The more HTTP requests your site has, the slower it’s going to load. So if you can reduce the number of HTTP requests and optimize how they load, you can improve your website’s performance.
In this post, we’ll take you through everything you need to know about how to make fewer HTTP requests on WordPress.
We’ll start with a basic introduction to HTTP requests, why they matter, and how to analyze your WordPress site’s requests.
Then, we’ll share some tips and strategies that you can implement to reduce your site’s requests. In addition to helping you with the “Make Fewer HTTP Requests” message in GTmetrix, these strategies will also help with the “Avoid chaining critical requests” message in Google PageSpeed Insights.
Slow site? ⏱ Too many HTTP requests could be the culprit. Check out this guide to making fewer requests right here 💥Click to Tweet
Prefer to watch the video version?
What Are HTTP Requests?
When you build a website, it has a lot of different parts. You have the different image files that you use on a page, the CSS stylesheets that control how content looks, the JavaScript files that add all that cool functionality, and so on.
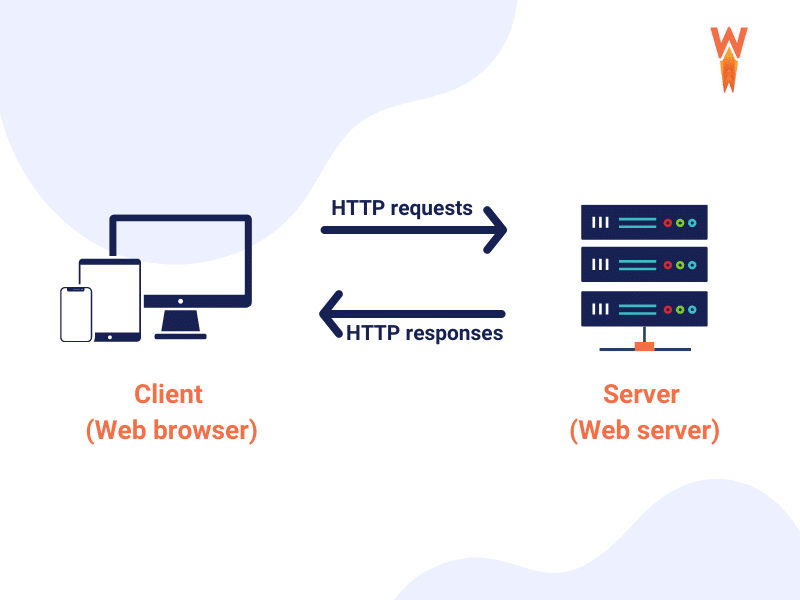
When someone visits your website, their browser needs a way to download all of the resources required for that page from your server. To do that, it makes HTTP requests to the server for each individual resource.
For example, it might say, “hey server, I need that coolimage.png file” and “hey server, I also need the CSS stylesheet for that contact form plugin“. The server then responds to those requests with the files in question.
Once the web browser gets those files, it can assemble the web page for your visitor. Of course, it’s a little more complicated than that, but that’s the basic idea.
HTTP, short for Hypertext Transfer Protocol, is how these computers (the visitor’s browser and your webserver) communicate.
One important thing to understand is that each separate element is a separate HTTP request. For example, if you have five image files on a webpage, the browser needs to make five separate HTTP requests, one for each image.
Similarly, if you use four WordPress plugins and each plugin adds its own CSS stylesheet, the visitor’s browser will need to make four separate HTTP requests, one for each plugin’s stylesheet.
Why Is It Important to Reduce HTTP Requests?
In general, the more HTTP requests your website has, the slower it’s going to load. So if you want to make your website load faster, you need to optimize and reduce the number of HTTP requests that your site requires.
While this is a bit of an oversimplification, the basic idea is that the web browser will only display the website to your visitor once it’s finished downloading all of the HTTP requests (though there are some tactics to tell the browser it’s ok to wait for certain files).
So if a website has to make 70 HTTP requests before it can display the page, that’s going to take longer than if it has to make 40 HTTP requests.
Additionally, some HTTP requests will “block” other HTTP requests, which means that the browser can’t start downloading certain HTTP requests until it finishes downloading the HTTP requests before it.
Bottom line is: when you make fewer HTTP requests, you make your website load faster.
How to See and Analyze Your Site’s HTTP Requests
Above, you learned that all things being equal, reducing the number of HTTP requests will speed up your site. However, all HTTP requests aren’t always “equal”. Some HTTP requests are bigger than others. Some are slower than others.
For example, the request for a huge 3 MB image file will take a lot longer than the request for a tiny 20 KB image.
If you want to make the biggest improvement to your site, focusing on the big, slow-loading HTTP requests first will have the biggest return on your investment.
To analyze your site’s HTTP requests, you can use something called Waterfall analysis.
Most speed test tools offer this, but the interfaces at GTMetrix and Pingdom are very convenient. You can also use your browser’s developer tools. However, we’ll use GTmetrix for our screenshots.
Once you plug in your URL, you’ll see a basic summary box at the top. This shows you how many HTTP requests your site has, but it doesn’t break down the individual requests:
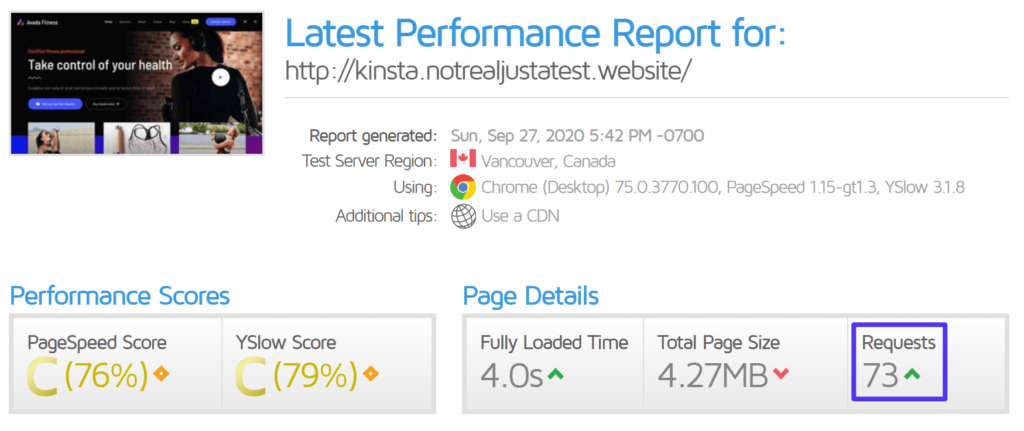
To analyze your individual requests, go to the Waterfall tab below.
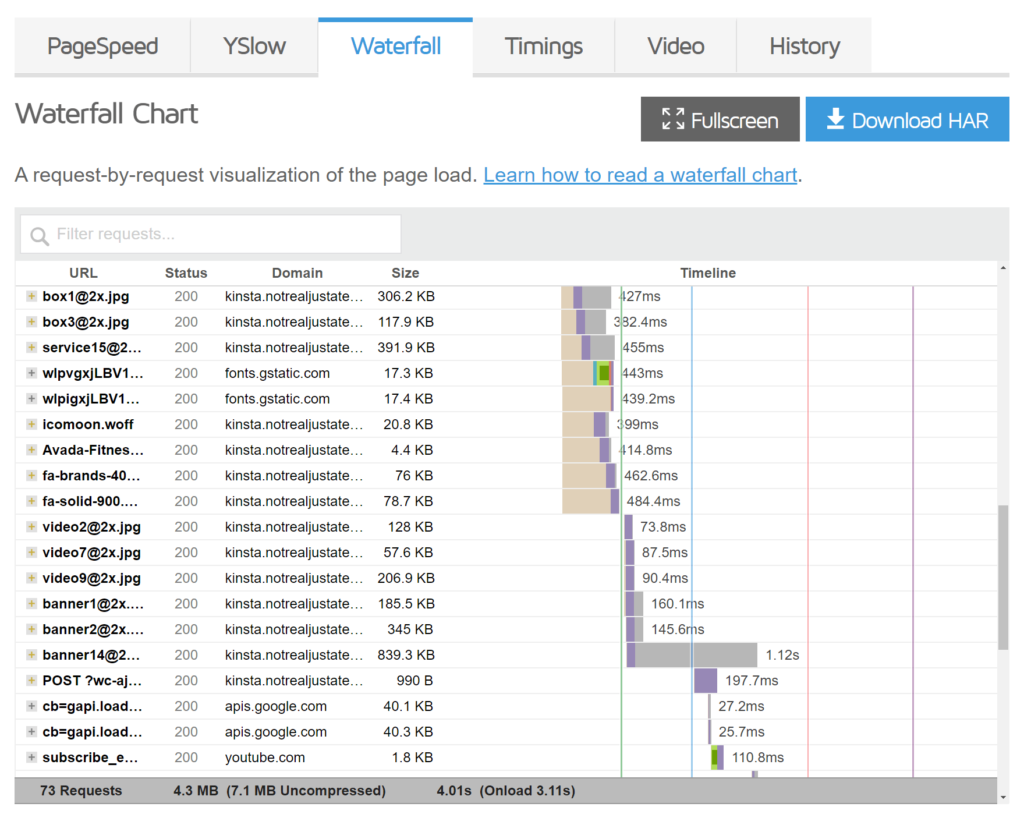
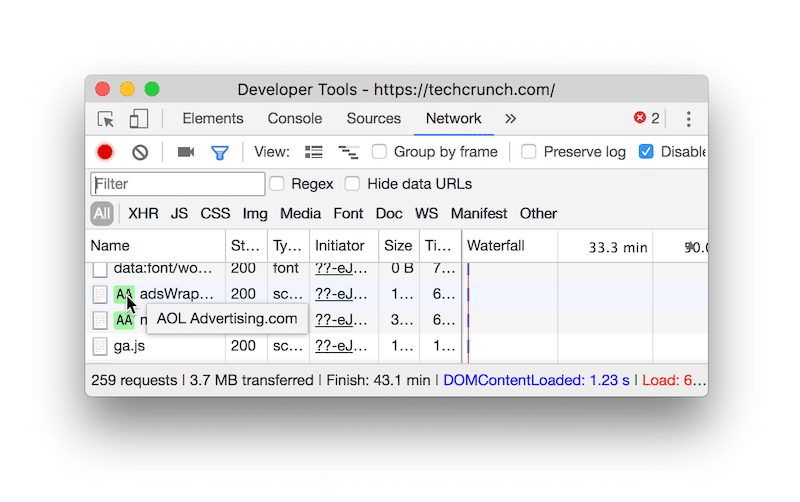
Here, you’ll see a list of each individual HTTP request on your site along with information on how long that HTTP request took to download:
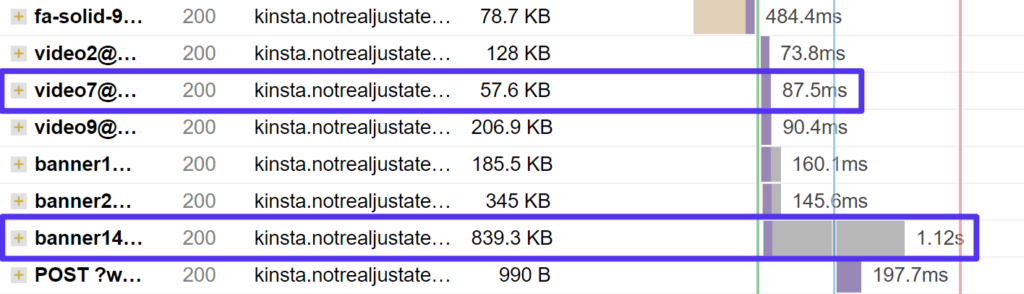
You can see how not all HTTP requests are equal. For example, the 839.3 KB image takes 1.12s while the 57.6 KB image took just 87.5 ms:
You can also find HTTP requests from the different WordPress plugins that you’re using by searching for the name of that plugin’s folder on your server. For example, you can see that WooCommerce adds seven of its own HTTP requests:
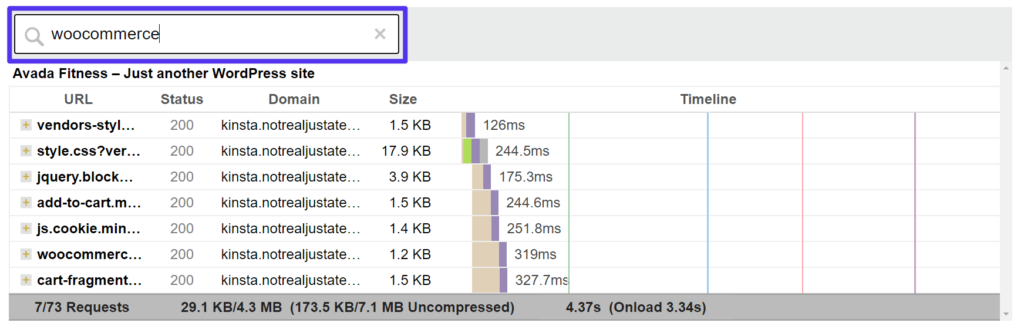
In this way, you can see if any plugins that you’re using are adding a lot of HTTP requests (especially slow-loading requests).
How to Optimize and Make Fewer HTTP Requests in WordPress
At a high level, there are two broad strategies to make fewer HTTP requests:
- Remove HTTP requests. If possible, you should completely remove every unnecessary HTTP request. For example, if you have a plugin that adds no value to your site and is loading its own CSS and JavaScript, just completely remove that plugin to get rid of all of its HTTP requests.
- Combine HTTP requests. If you have HTTP requests that you absolutely must load, you can combine them into a single file. For example, instead of six small CSS files, you can combine them into a single larger CSS file, which will still load faster because the browser needs to make fewer requests (this isn’t always true with HTTP/2, which we’ll discuss below).
We’ll start with the tactics that focus on removing HTTP requests and then we’ll get into how to combine the remaining HTTP requests. The basic idea is to remove what you can and then combine whatever is left.
1. Remove Unnecessary WordPress Plugins
To get started, you’ll want to use the waterfall analysis to pull up all the requests from your plugins. You can do this by searching for “plugins”, which will pull up every HTTP request originating from the wp-content/plugins folder.
If you hover over the name of the file, you can see which plugin it comes from. For example, here you can see a request from the slider plugin you might be using.
Some further digging would turn up that Slider Revolution adds three of its own HTTP requests, even though this test page doesn’t contain any sliders:
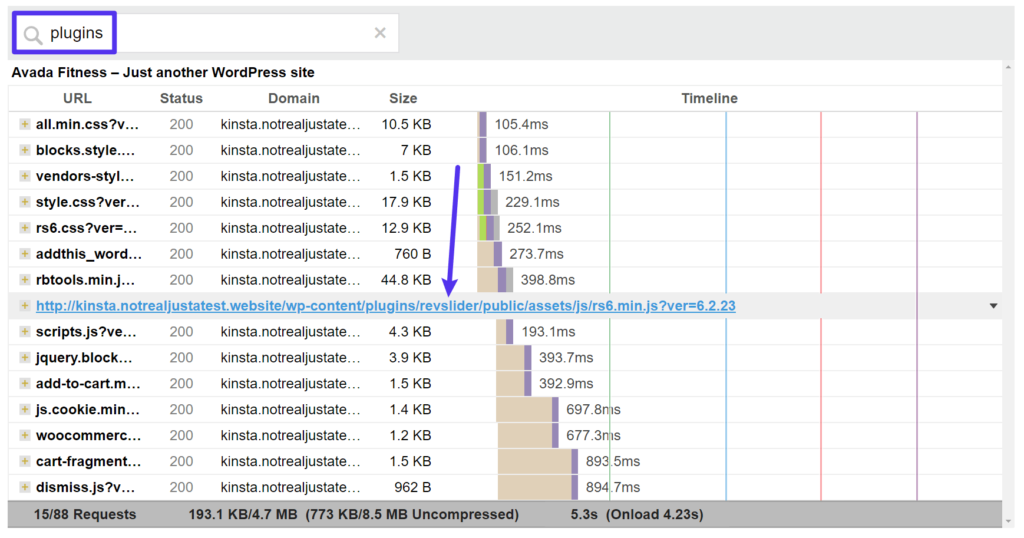
If you’re using Slider Revolution for a key slider, then maybe you need to keep it. But if you installed it to test it, then later removed the slider, and you’re now not really using it…then you should remove it to get rid of those HTTP requests.
Basically, you want to go through the entire list and ask yourself if each plugin is really adding value to your site. If a plugin isn’t (but is adding HTTP requests), then you’ll be better off removing it.
2. Replace Heavy Plugins With More Lightweight Ones
Once you’ve trimmed any unnecessary plugins, the next step is to see if you can replace any plugins you’re using with more lightweight alternatives.
For example, let’s say you want to add social share buttons to your site. That’s a good feature to have, but some social share plugins can add a lot of HTTP requests.
For example, the popular AddThis plugin adds six of its own HTTP requests (including some external requests – more on those in a second):
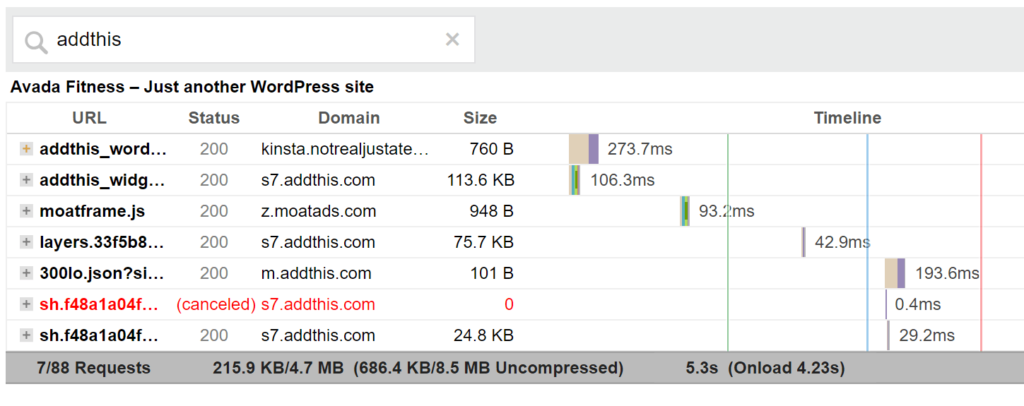
You could trim a lot of this fat by using a more optimized alternative such as NovaShare or Grow by MediaVine.
3. Conditionally Load Scripts That Aren’t Needed Sitewide
At this point, you should’ve removed all the plugins that aren’t needed anywhere on your site. However, there’s another class of plugins that might cause problems – plugins that are only needed on specific parts of your site but load their scripts everywhere.
For example, take the popular Contact Form 7 plugin. You probably only need this plugin on a couple of pages (e.g. your “Contact Us” page). However, Contact Form 7 loads its scripts on every single page on your site. So, for example, Contact Form 7 is still adding some HTTP requests to your blog posts even though your blog posts don’t have any contact forms.
Another example could be WooCommerce if you’re only using it as a payment processor. WooCommerce will still load its scripts everywhere, even though you really only need them on the cart and checkout pages for this use case.
An advanced tactic here is to conditionally load plugins only where they’re needed. For example, you could let Contact Form 7 load on your “Contact Us” page, but disable it everywhere else.
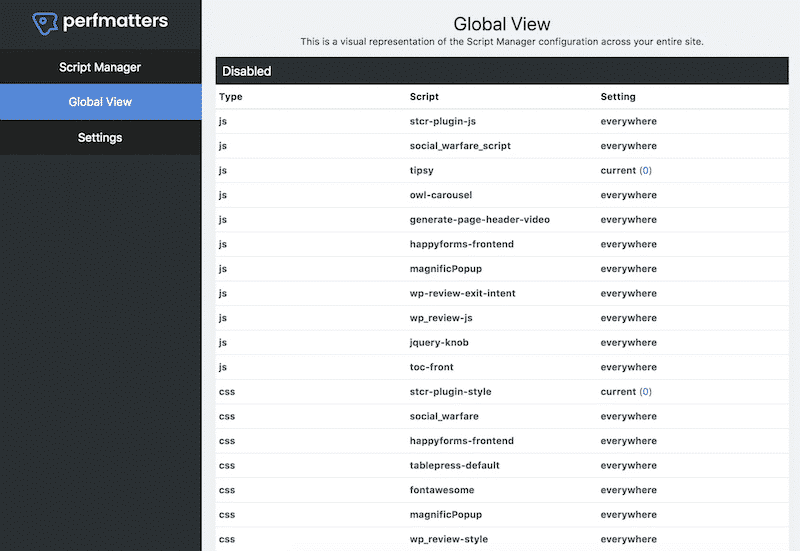
If you’re not a developer, you can use plugins like Asset CleanUp or Perfmatters to do this without code. With Perfmatters, you’ll first need to enable the script manager. Then, you can open the script manager to view all the scripts loading on a page and disable any that aren’t needed:
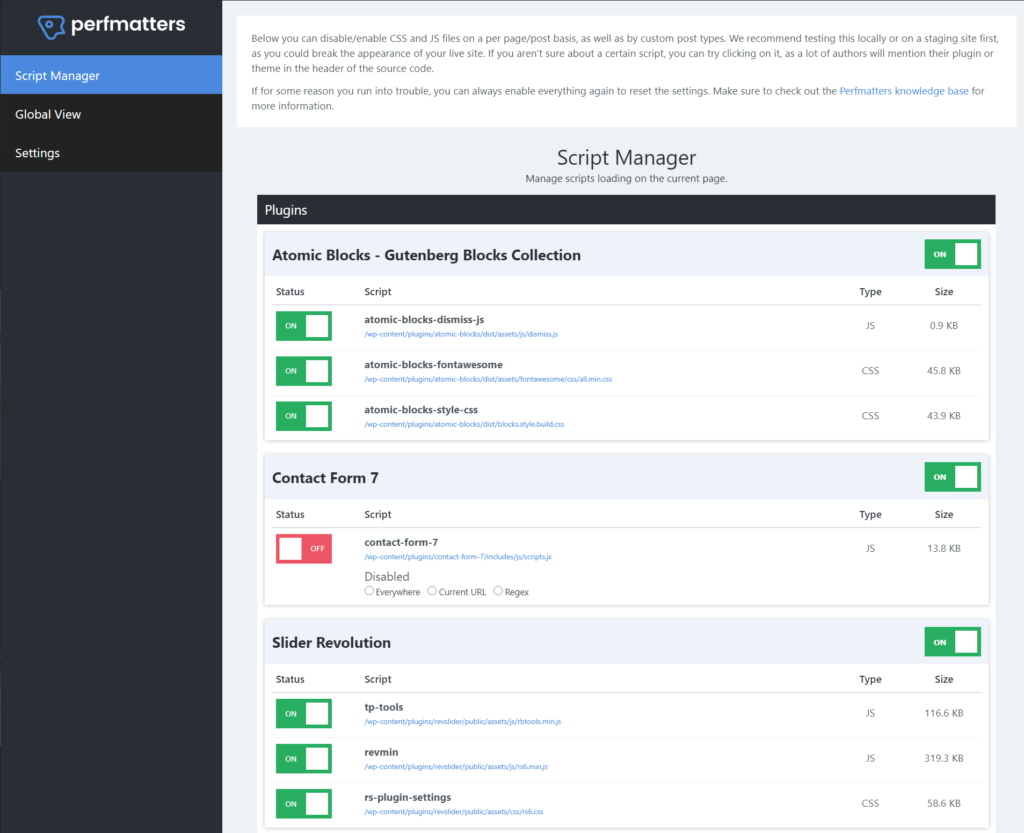
Be careful as you might cause issues if you accidentally disable a script that really is needed. While this is a useful tactic, it’s also an advanced tactic.
If you don’t feel confident, you might want to just skip this step or hire a developer to help you out.
4. Remove Unnecessary Images (And Optimize the Rest)
Used well, images make your website more user-friendly and engaging. They add value to your site.
However, each image on your site is a separate HTTP request. So if you have images that aren’t adding value, it’s best to remove them to eliminate those HTTP requests.
For example, is that funny GIF worth it? It might be… but it also might not – you need to think about the trade-offs whenever you’re adding more images to your content.
Finally, make sure to resize and compress the images that remain. While this won’t reduce the number of HTTP requests by itself, it will reduce the size of those HTTP requests, which will make them load faster.
5. Use Lazy Loading for Images and Videos
With lazy loading, your site will wait to load below-the-fold images, videos, and iframes until a user starts scrolling down.
Because these resources don’t load right away, there’s no need to make an HTTP request for the initial page load.
As of WordPress 5.5, WordPress now includes native lazy loading for images using the HTML loading attribute. For some other ways to implement lazy loading (including for video files), you can check out our complete guide to WordPress lazy loading.
6. Limit Custom Fonts Use and/or Use System Fonts (Same for Icon Fonts)
Custom fonts are great for improving the design and user experience on your site. However, you need to be careful with how you use them because each custom font type that you use adds another HTTP request.
If you’re going to use custom fonts, make sure to stick to a small number. Do you really need a different font for your post title and your post body? Or could you use the same font? Do you really need all five font weights? Or could you just choose two?
The same holds true for icon fonts such as Font Awesome and IcoMoon. Icon fonts can be useful, but you probably don’t need to load multiple icon font libraries. It’s better to pick just one icon font library and stick with that.
Finally, if you want to go one step further and completely eliminate HTTP requests related to your site’s fonts, you can consider using a system font stack. While this will give you less flexibility in terms of design, it also means that your visitors won’t have to load any font files just to render your site.
(Suggested reading: How to Change Fonts in WordPress).
7. Disable WordPress Emojis
By default, WordPress adds its own HTTP request for emojis. While it’s only a single 5.1 KB HTTP request, this file has long been a thorn in the side of WordPress performance fans. Here at Kinsta, we love WordPress performance, which is why we have an entire guide on how to disable WordPress emojis.
The simplest option is to just install and activate the free Disable Emojis (GDPR friendly) plugin. However, you can read our full guide for some other options.
After you do this, your HTTP request count will drop by one and you can still use emojis 😃
8. Reduce/Eliminate Third-Party HTTP Requests
So far, we’ve focused mainly on reducing the HTTP requests for files on your WordPress site’s server. However, your visitors’ browsers might also need to request files from third-party servers.
These requests can be even more troublesome because your site is at the mercy of the speed of those third-party servers.
Some examples:
- Google Analytics – the tracking script is hosted on Google’s servers, but visitors’ browsers still need to download that file.
- Embedded YouTube videos – you’ll see lots of HTTP requests to YouTube’s servers.
- Third-party ad services – you’ll see tons of third-party requests related to serving your ads.
- Google Fonts (on Google’s CDN) – you’ll see third-party requests to Google’s servers to load your font files.
You can apply many of the same tactics from above to these third-party HTTP requests.
For example, if a plugin adds its own third-party requests (like the AddThis plugin from above does), you can remove it and use something more optimized.
For YouTube videos, you can lazy load them and replace the initial page load with an image thumbnail. This will delay adding those HTTP requests until a visitor wants to play the video.
For third-party scripts that are necessary, like Google Analytics or Facebook Pixel, you can experiment with hosting those scripts locally.
WP Rocket has built-in add-ons to host Google Analytics and Facebook Pixel locally or you can use a plugin like CAOS (Complete Analytics Optimization Suite).
We also have some guides that might help:
- How to host fonts locally
- How to host Google Analytics locally
9. Combine Images with CSS Sprites
At this point, you should’ve hopefully been able to make fewer HTTP requests from your site. Now, it’s time to get into how to combine the HTTP requests that remain, starting with images.
Another way to optimize the images on your site is to combine separate images into a single image file. Then, you can use CSS to display just a portion of that image file where needed. This is a tactic called CSS sprites.
CSS sprites work best for decorative images like logo variations or icons. You should not use CSS sprites for informational images (like images in the body of a blog post) because there are two big drawbacks:
- SEO – because you’re combining images into a single image file, you can’t rank individual images in Google Search.
- Accessibility – because you can’t add alt-text to images, people with screen readers won’t be able to understand images loaded with CSS sprites (though there are some tactics to fix this).
If you’re still confused about this topic, here’s an example of Amazon’s CSS sprite file – you can see how it includes a bunch of logo variations, as well as some icons. Amazon uses CSS to make sure that only the relevant “portion” of that image file displays at each location:
![]()
Unfortunately, there’s no “set it and forget it” WordPress plugin for CSS sprites. However, you can find tools to help, like this CSS Sprite Tool:
- Upload the images that you want to combine to the tool.
- The tool will then give you a combined image file, along with some CSS code for each image that you uploaded.
- Upload the combined image file to your WordPress site.
- Use the CSS code to display the image in your content. The provided CSS will automatically select only the proper portion of the combined image file.
10. Combine CSS and JavaScript Files
Between your WordPress theme and your plugins, your site is probably going to be loading multiple CSS stylesheets and JavaScript files, which means multiple HTTP requests just for the browser to download the CSS and JavaScript it needs to render the page.
To reduce all of these separate requests, you can combine these separate files/stylesheets into a single file/stylesheet. This is called file combination or file concatenation, depending on the tool that you’re using.
Many WordPress caching plugins include features to combine CSS and JavaScript files. For example, WP Rocket, which you can use at Kinsta, lets you enable both with a few clicks.
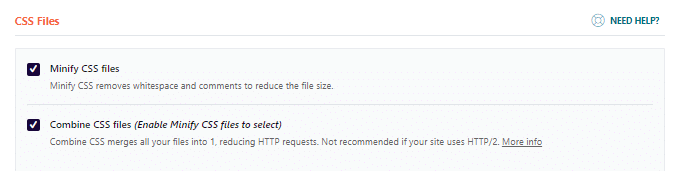
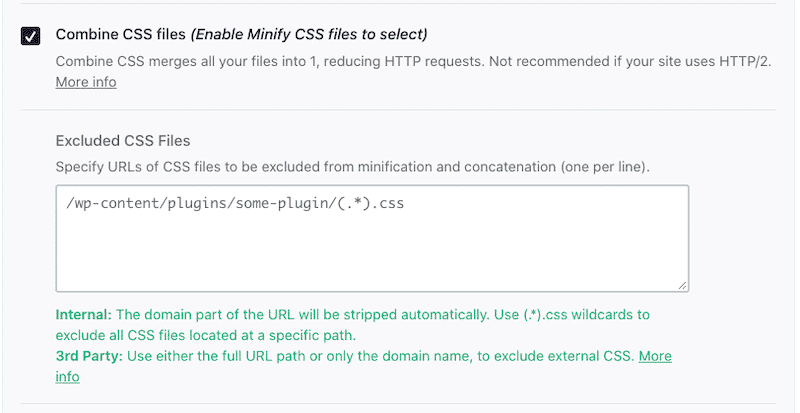
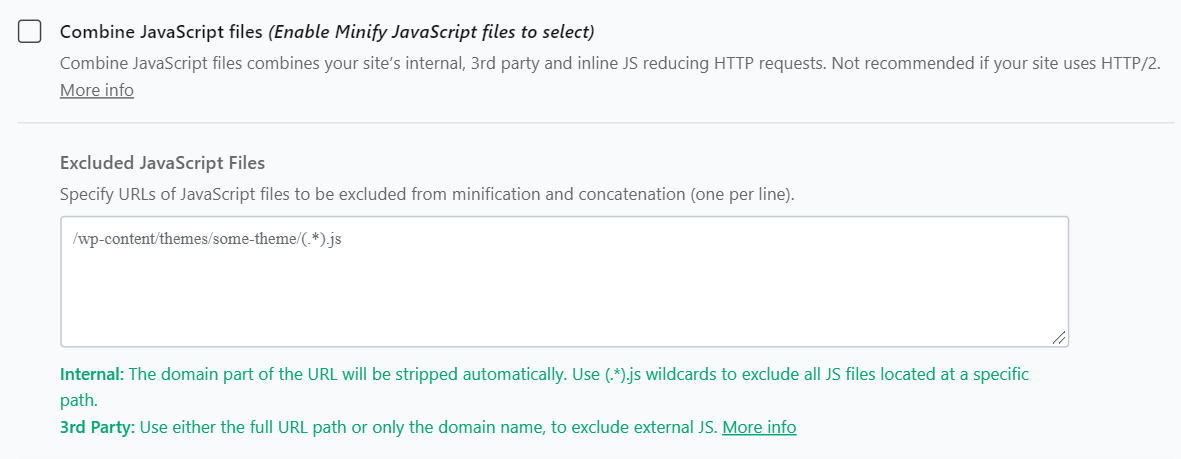
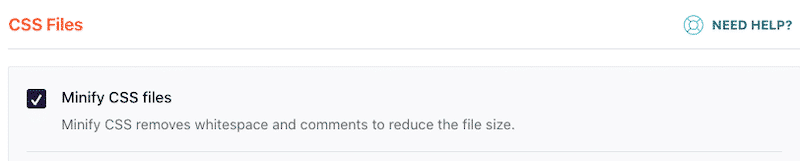
Go to the File Optimization tab in WP Rocket’s settings. Then, enable minification and then combine the files:

For a more detailed look, check out our full WP Rocket guide.
You can also use Autoptimize to combine CSS and JavaScript files. To combine files, go to Settings → Autoptimize and choose the options to:
- Aggregate JS-files
- Aggregate CSS-files
For a more detailed look, check out our full Autoptimize tutorial.
The benefits of file combination are less clear with HTTP/2, which is what your site uses if you host at Kinsta. HTTP/2 is designed to be more efficient at transferring multiple small files, which means there’s less of a difference between one large CSS/JS file and multiple small files.
Basically, if you’re hosting at Kinsta, you might not need to do this step to make improvements to your page load times. That’s because Kinsta customers can access the code minification feature directly in their MyKinsta dashboard. This will help boost overall optimization by allowing customers to enable automatic CSS and JavaScript minification with a simple click.
We recommend still testing it as it can still be beneficial to some sites, but you also might not notice any difference in real page load times.
However, many performance testing tools like GTmetrix still don’t recognize HTTP/2, so GTmetrix might still display the “Make Fewer HTTP Requests” message and reduce your score. Remember, though – scores don’t matter as much as real page load times do.
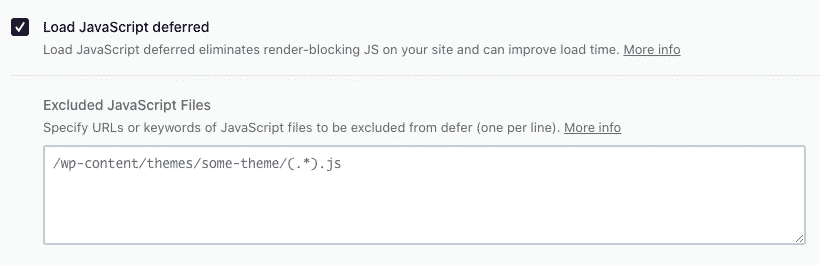
11. Defer Render-Blocking JavaScript
Deferring render-blocking JavaScript isn’t eliminating HTTP requests per se. However, it is optimizing how they load, which can have the same effect on your site’s perceived load times.
It can also help with the “avoid chaining critical requests” message in Google PageSpeed Insights/Lighthouse.
By deferring requests for certain files or loading them asynchronously, you can prevent certain unimportant resources from “blocking” resources that are needed to quickly load the visible portion of your site.
For more on why this happens, you can read our guide on understanding the critical rendering path of a web page.
Then, you can follow our detailed guide to eliminate render-blocking resources on WordPress.
Best WordPress Plugins to Make Fewer HTTP Requests
If you’re looking for some “all in one” WordPress plugins to make fewer HTTP requests, we recommend two of the plugins from the tutorial above:
- WP Rocket
- Perfmatters
While you’ll still need to manually evaluate your theme and plugins to see if they’re making too many HTTP requests, both these plugins can help you optimize everything that remains on your site once you’ve done your cleaning.
More HTTP requests = slower site loading time. ⏳ Break that cycle with this guide to reducing your requests 📉Click to Tweet
Summary
Every separate resource on your site adds an HTTP request. One image is one HTTP request, one CSS stylesheet is one HTTP request, one font file is one HTTP request, and so on.
If you’re using WordPress, your theme will certainly add its own HTTP requests and many plugins also add their own HTTP requests. You’ll also have HTTP requests from any images that you use and third-party scripts that you add (such as analytics tools).
More and/or larger HTTP requests will lead to a slower website. This is why you’ll commonly see messages like “make fewer HTTP requests” or “optimize HTTP requests” or “avoid chaining critical requests” when you use speed test tools like GTmetrix or PageSpeed Insights.
To reduce the number of HTTP requests on your site, you can follow the steps that we detailed above.
Do you still have any questions about how to make fewer HTTP requests in WordPress? Let us know in the comments!
Get all your applications, databases and WordPress sites online and under one roof. Our feature-packed, high-performance cloud platform includes:
- Easy setup and management in the MyKinsta dashboard
- 24/7 expert support
- The best Google Cloud Platform hardware and network, powered by Kubernetes for maximum scalability
- An enterprise-level Cloudflare integration for speed and security
- Global audience reach with up to 35 data centers and 275 PoPs worldwide
Test it yourself with $20 off your first month of Application Hosting or Database Hosting. Explore our plans or talk to sales to find your best fit.

Need to make fewer HTTP requests in GTmetrix YSlow?
To make fewer HTTP requests in WordPress, start by combining CSS, JavaScript, and font files. Lazy load images and videos, then reduce the amount of third party requests loading on your site. Avoid slow plugins that create unnecessary requests and finally, selectively disable plugins.
Making fewer HTTP requests means you need to reduce how many elements (requests) load on your WordPress site. Check your GTmetrix Waterfall report to see individual requests created by images, fonts, CSS, and JavaScript. Then optimize your website depending on those requests. Another method is to use Asset CleanUp or Perfmatters to view which requests load on certain content (plugins, scripts, and styles) and selectively disable these where they’re not being used.
1. Combine CSS + JavaScript Files
Combining CSS + JavaScript lets browsers make 1 single request for your CSS file instead of multiple requests, and same with JavaScript files. This can usually be done in your cache plugin.
Step 1: In your cache plugin settings, find the option to combine and minify CSS + JavaScript.

Step 2: Enable each setting one at a time, then test results in GTmetrix.
Step 3: Check for visible errors on your website. If you see errors, view the source code, find the problematic files, and exclude them from your CSS or JavaScript minification settings. For example, if your slider disappears when enabling a certain setting, check your slider files in the source code and exclude the problematic file. If you don’t see errors, there is no need for this.
Alternatively, you can manually combine your CSS files in WordPress under Appearance → Theme Editor. You would simply copy and paste the contents in all files into 1 single CSS file.

2. Combine Google Fonts
Google Fonts can be also combined to generate fewer requests.
Step 1: View your GTmetrix Waterfall report to see how many font files are being loaded.

Step 2: Enable Google Font optimization in your cache plugin. As said in WP Rocket, this “combines multiple font requests to reduce the number of HTTP requests.” If your cache plugin doesn’t have an option to combine fonts, try the OMGF of Self-Hosted Google Fonts plugin.

Step 3: Consolidate your fonts, weights, and font icons. In GTmetrix, you may notice each font, weight, and icon creates their own request. Try to use only 1 font and only a couple weights. Font icons can be created by plugins like Elementor, such as the arrows in my navigation menu.
Step 4: Preloading tells browsers to start downloading a resource as soon as possible and should reduce font load times in GTmetrix Waterfall. You can do this with plugins like WP Rocket, Perfmatters, or Pre* Party Resource Hints. Simply copy the font URLs from GTmetrix Waterfall, paste them in the preloading section, then retest your font’s load times in GTmetrix.

3. Lazy Load Images + Videos
Lazy loading significantly reduces HTTP requests and is recommended in PageSpeed Insights.
Lazy loading images eliminates all HTTP requests from images since they’re only loaded when you scroll down and see them. If you use many images, this significantly reduces HTTP requests.
Lazy loading videos eliminates most HTTP requests from embedded videos. But since thumbnails often create external requests, you may still see minor GTmetrix errors for leveraging browser caching and add expires headers (see Elementor section below to fix it on Elementor).
Lazy Load In WP Rocket – enable lazy loading and replace iframe with a preview image.

Lazy Load In SG Optimizer – enable all lazy load options in the Media Optimization settings.

Lazy Load In Elementor – I followed this video by WPCrafter and was able to get videos creating 0 errors in GTmetrix (not even browser caching or expires headers issues). You will need Elementor Ultimate Addons, then use the native Elementor video element to load the video. The key here is to upload a custom thumbnail directly to your website (through Elementor) so your website doesn’t have to go to YouTube to load the thumbnail. You can even customize the arrow buttons and branding on your embedded videos. It’s brilliant. My blog doesn’t use Elementor so you will still see errors for videos on my blog, but I promise it works!
If you’re not using either of these plugins, try WP YouTube Lyte for lazy loading videos.
4. Optimize Third Party HTTP Requests
Third party scripts are anything that pull requests from outside websites.
They can be Google Fonts and embedded YouTube videos (which I covered) but other requests can be created by Google AdSense, embedded Maps, Tag Manager, Facebook Pixel, Gravatars, even “like counts” on social sharing plugins. Some are easy to optimize, others are impossible.
- Google Fonts: covered in section 2.
- Google Analytics: using the Flying Scripts plugin to host locally.
- Google AdSense: load asynchronously and try Cloudflare Rocket Loader.
- Google Maps: only use on your contact and localized pages. Alternative, you can take a screenshot of the Google Map and include a link to driving directions when people click on the image (this looks almost just as good as the Map itself)!
- Google Tag Manager: usually does more harm than good when trying to combine multiple scripts. This should generally only be used for large, unoptimized sites.
- Embedded Videos: covered in section 3.
- Embedded Widgets + Posts: take screenshots instead of embedding them.
- Facebook Pixel: enable Facebook Pixel add-on in WP Rocket (only way I know).
- Gravatars/Comments: using the Flying Scripts plugin to create a timeout for Gravatar loading which should make these 100% in GTmetrix. This plugin can be used to create timeouts for other scripts too. For wpDiscuz, tweak the settings.
- Social Sharing Plugins: covered in section 5.
Prefetching External Requests – the final step is to view all your third party scripts from the “reduce DNS lookups” section in GTmetrix YSlow, copy their URLs, and prefetch them using a plugin like WP Rocket, Pre* Party Resource Hints, or Perfmatters. This helps load them faster.


Many social sharing plugins create HTTP requests from Facebook, Twitter, etc.
I recommend Grow by Mediavine (Social Pug) since it only created 1 single request when I tested it (though I ultimately disabled it because even 1 request was too much since I’m a speed nerd). But that plugin was also rated the #1 fast social sharing plugin by WP Rocket. Take a look at WP Rocket’s list and use a lightweight plugin that doesn’t create lots of requests in GTmetrix.
6. Selectively Disable Plugins
Many plugins run across your entire site, even on pages where they’re not needed.
Asset CleanUp and Perfmatters let you disable plugins, scripts, and styles on specific pages/posts. I like Perfmatters (by Kinsta) since it also lets you remove WordPress bloat. By disabling plugins on content where they don’t need to load, this results in fewer HTTP requests.
Examples:
- Disable slider plugin on pages that don’t use sliders
- Disable rich snippets plugin on pages that don’t use rich snippets
- Disable contact form plugin on pages that don’t have a contact form
- Disable affiliate link management plugin on pages that don’t use aff links
- Disable social sharing plugin on all pages (since it’s usually for blog posts)
Step 1: Install Asset CleanUp or Perfmatters (both let you selectively disable plugins).
Step 2: Edit a page or post, scroll down to the Asset CleanUp section, and review which CSS + JavaScript files are loading on the page. These can be from plugins, themes, or external scripts.

Step 3: Disable all plugins and requests you don’t need on that page. You can disable them on 1 single page, across your entire site, by post type, or use RegEx (regular expressions) to disable them on specific URL patterns. RegEx is only included with Perfmatters or Asset CleanUp Pro.
7. Avoid Slow Plugins That Generate Requests
High CPU plugins can generate a ton of HTTP requests.
These are usually social sharing, statistics (analytics), sliders, portfolios, page builders, calendars, chat, and contact form plugins. Basically, avoid any plugin that pulls external requests from outside websites, runs ongoing processes, or just takes a long time to load.
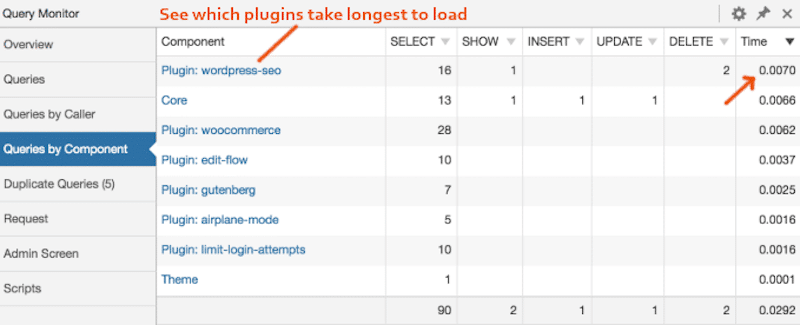
Step 1: Check for slow plugins in GTmetrix Waterfall or Query Monitor.

Step 2: Avoid known high CPU plugins.
- AddThis
- AdSense Click Fraud Monitoring
- All-In-One Event Calendar
- Backup Buddy
- Beaver Builder
- Better WordPress Google XML Sitemaps
- Broken Link Checker
- Constant Contact for WordPress
- Contact Form 7
- View All 73 Slow Plugins
Step 3: Replace slow plugins with faster, lightweight plugins. Research and testing is required.
8. Use WP Rocket To Make Fewer HTTP Requests
WP Rocket has many optimization features not included with other cache plugins, and I definitely recommend using it if you’re serious about making your WordPress site load faster.
Making sure you have properly configured settings can make a big difference. The file optimization and add-on settings are especially helpful in making fewer HTTP requests.
I have also guides on Autoptimize, W3TC, and WP Super Cache, but try to use WP Rocket.

9. Use A CDN
CDNs can help make fewer HTTP requests.
Instead of making your origin server respond to a request, a CDN’s data centers will offload bandwidth while lightening the load on the origin server. Cloudflare is free, so it’s a no-brainer.
I recommend either using Cloudflare or WP Rocket’s RocketCDN. Both have their pros and cons but I personally use RocketCDN which uses StackPath’s data centers. RocketCDN is set up automatically once you purchase it in WP Rocket, Cloudflare requires changing nameservers.
If using Cloudflare, be sure to check out my recommended page rules.

10. Minimize Redirects
Unnecessary redirects can cause extra HTTP requests.
You will need to look at your GTmetrix report to see what’s causing this error. Is it being generated by an external script or plugin on your site? Have you tried optimizing that script or looking for a more lightweight plugin? Is it because you changed your domain version to non-WWW or HTTPS but haven’t updated all links/images on your site to reflect the new version?

Common Causes
- Bad plugins
- External scripts
- Changed to WWW vs Non-WWW but haven’t updated links
- Changed to HTTPS vs non-HTTPS but haven’t updated links
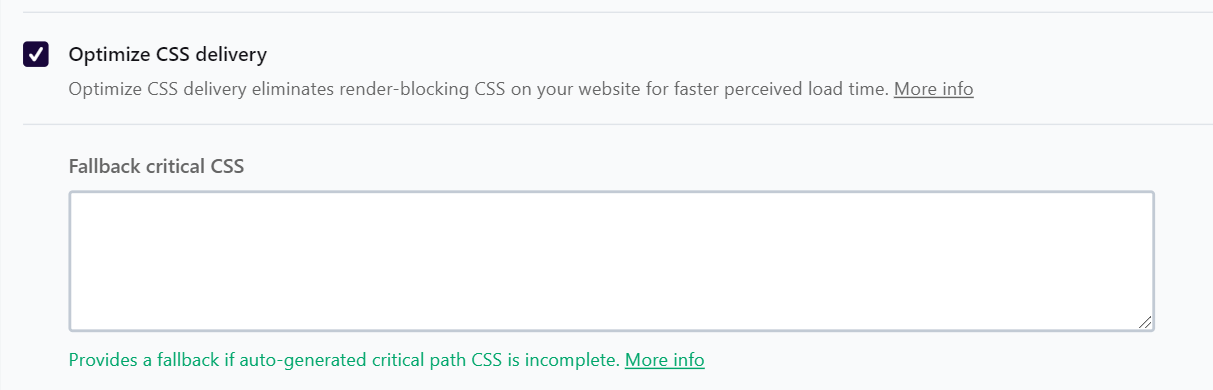
11. Optimize CSS Delivery
This should fix the render-blocking resources item in PageSpeed Insights.
WP Rocket, Autoptimize, and other similar plugins should have an option to optimize CSS delivery. Simply go into your settings and make sure you have this enabled, and it should fix it.

12. Minify HTML, CSS, JavaScript
Minifying files is usually done by your cache plugin (see step 1).
But sometimes, this can break your website. In this case, you would have to test each setting one by one, check for problematic files in the source code, then exclude those files from minification using your cache plugin. If you don’t see visible errors, you don’t need to do this.
13. Defer/Load JavaScript Files Asynchronously
Asynchronous JavaScript means the files load after the page is finished downloading.
This can be done using WP Rocket or Async JavaScript and should fix the remove render-blocking Javascript item. Async JavaScript gives you full control of which scripts to add an ‘async’ or ‘defer’ attribute to, while WP Rocket defers JavaScript automatically with 1 click.

14. Disable WooCommerce Scripts, Styles, Cart Fragments
WooCommerce sites naturally generate more HTTP requests.
Not only do they typically require more plugins, but they also load extra WooCommerce scripts, styles, and cart fragments. Just like you can selectively disable plugins from the previous step, you can also selectively disable WooCommerce requests from loading across your entire site.
Using Asset CleanUp or Perfmatters, disable these on pages where they don’t need to load:

Alternatively, Perfmatters lets you disable these in 1-click:

15. Optimize Images
There are 3 primary ways to optimize images in GTmetrix. These won’t reduce the number of HTTP requests, but they will reduce the size of the requests, therefore improving load times.
Serve Scaled Images: resize large images to be smaller. GTmetrix tells you which images are too large and the correct dimensions they should be cropped/resized to. Try creating an image dimension cheat sheet by measuring the dimensions of your sliders, full width blog images, widgets, and other areas of your website. Then make sure to resize images to those correct dimensions before uploading. If you do this, you should never have serve scaled image errors.

Optimize Images (Lossless Compression): use a plugin like TinyPNG (what I use), ShortPixel, Smush, or Imagify to compress images. Although these plugins say lossless, you may sometimes notice a small loss in quality. That’s why it’s best to backup your images and test a couple of them before bulk optimizing all images on your site, to make sure you’re happy with the quality.
Specify Image Dimensions: add a width + height to the image’s HTML or CSS. This is automatically done in the Visual Editor, but not custom HTML, some page builders, and possibly other areas of your WordPress site. GTmetrix will show you which images have these errors and provide you with their correct dimensions. To fix the error, you will need to locate the image in your WordPress dashboard, edit the HTML or CSS, then add the appropriate width + height.
<img src="example.jpg" width="680" height="680" />
16. Replace Plugins With Code
You can avoid many plugins by replacing them with code.
Examples:
- Google Fonts: host your fonts locally
- Google Analytics tracking code: insert manually
- Table of contents: design it manually in HTML + CSS
- Embedded Tweets or Google Maps: take a screenshot instead
- Embedded Facebook widget: replace with actual Facebook widget
Consolidating plugins also helps. One classic example is using WP Rocket which comes with hosting fonts, analytics, and Facebook Pixel locally, lazy loading images + videos, database cleanup, preloading, heartbeat control, and integration of both Cloudflare and multiple CDNs. With other cache plugins (since most of them don’t have these features), you would need to install 6-7 extra plugins to get those speed optimizations, when they’re built-in to WP Rocket.
Still Need To Make Fewer HTTP Requests?
If you still need help, leave me a comment. The WordPress Speed Up Facebook Group is also helpful, or you can hire us for WordPress speed services with before + after GTmetrix reports.

And for hosting, I recommend DigitalOcean on Cloudways for many reasons (see my review).

Frequently Asked Questions
How do you make fewer HTTP requests in WordPress?
Combine CSS, JavaScript, and font files. Lazy loading images and videos will also make fewer HTTP requests, as well as being minimal with font types, weights, and font icons. Optimizing or removing third party scripts like Google Analytics and Facebook Pixel helps.
How to combine CSS and JavaScript files?
Most cache plugins have an option to combine CSS and JavaScript files. To combine CSS files manually, combine CSS files in your theme editor into 1 file, to create 1 single request.
How do you optimize third party requests?
WP Rocket can optimize Google Fonts, Google Analytics, Facebook Pixel, and embedded YouTube videos while also giving you options to preload and prefetch them. The Flying Scripts plugin can create timeouts for third party requests (like Gravatars and comments) to bring them to 100% in GTmetrix. Google AdSense and Tag Manager are more difficult.
Does lazy loading reduce HTTP requests?
Yes, lazy loading images can completely eliminate all requests for most images. Lazy loading videos and replacing the YouTube iframe with a preview image (in WP Rocket or Elementor) prevents your site from having to make a third party request.
Thanks for reading 
Cheers,
Tom
Do you want your WordPress site to make fewer HTTP requests?
This essentially indicates that the number of loading things (requests) on your platform must be reduced. Every time you visit a website, a lot of technological things are going on behind the scenes. Your browser requests and gets files in the background as words and photographs are loaded into your computer.
Such HTTP requests slow down the loading of the effect page, which has an impact on the user interface, bounce rate, and SEO. The program will load faster if it sends fewer HTTP requests to the server.
Nowadays, having a fast-loading website, online store, or blog is a must. A speedy website not only provides a better experience for your visitors, but it also helps your website rank higher. Sending fewer HTTP requests to the server can help your website load faster.
Today I will demonstrate how to make fewer HTTP Requests in WordPress.
What exactly is HTTP?
HTTP (HyperText Transfer Protocol) is a client-server protocol for retrieving resources such as an HTML document. HTTP is the essential building block of data transfer on the Internet; without it, you won’t be able to read files or other documents on any website. HTTP Request and HTTP Response are used to communicate between the client and the server.
What are HTTP Requests?
Many different components make up a website. Image files are used on a website, CSS stylesheets control how content appears, JavaScript files provide all of that awesome functionality, and so on.
When someone visits a page on your blog, their browser sends a ping to your web server, asking for the files that include the page’s content. XML, CSS, and JavaScript files, as well as photos, icons, and other files, are examples of such files.
The protocol used to communicate between these two machines, the browser, and your server, is HTTP, which stands for Hypertext Transfer Protocol.
It’s important to remember that each element is its own HTTP request. For example, if a website has six image files, the browser must make six separate HTTP requests.

Article Continues Below
In the same way, if you install five WordPress plugins, each with its own stylesheet, the visitor’s browser will have to make five separate HTTP requests.
Why Should You Reduce HTTP Requests?
In order to display properly, a web page must download information such as images, stylesheets, and scripts. A browser sends an HTTP request to your site’s servers to get this information. The longer it takes for your page to load, the more HTTP requests it has. The longer it takes for a page to load, the more likely users will abandon it, and the less likely it will appear high in SERPs. That’s bad for business in general.
How to Check Your Site’s HTTP Request?
Knowing how many HTTP requests your web pages make can assist you in determining whether they should make fewer queries to improve page speed. In general, the more HTTP requests a web page generates, the slower it becomes. You should minimize the number of queries made by your web pages if they are making too many.
If you’re using Chrome, you can examine how many HTTP requests your site generates each time it loads using the browser’s Developer Tools.
To do so, right-click the page you want to inspect on your site and select “Inspect.” Then select “Network” from the drop-down menu.
The Network panel shows the network activities of your web page. Refresh the website with the panel open to watch what occurs when your load loads, and you’ll see your HTTP requests as they happen in real-time.
How Many HTTP Requests are too much?
It is determined by the domains from which the requests originate. When a page receives more than 20 HTTP requests from the same domain, it’s time to start thinking about reducing the number. It also depends on the page you’re working on. More information can be found here.
How to Make Make Fewer HTTPs Request Manually
Remove any photos that are no longer needed
As previously said, more files equal more requests.
As a result, the goal is to reduce the number of files and graphics that a web page must load. As a result, the number of HTTP requests is reduced, and the web page’s loading time may improve.
Article Continues Below

There are two things to keep in mind here:
- Remove any images that are no longer needed from your media collection. You’ll be astonished to discover how many photographs you don’t use anymore.
- If you want to reduce HTTP server requests, don’t sacrifice images. The goal is to get rid of any photographs that aren’t necessary, not to reduce the number of images you regularly utilize.
After you’ve dealt with images, go through your files and eliminate any that you don’t need. It could be an embedded video or a third-party social media feed plugin, for example.
Identify the various aspects that your website employs, and then eliminate the ones that aren’t necessary yet are consuming your resources.
Get rid of these and your site’s loading speed will increase.
Make images smaller
You may have erased a significant number of photos. There would, however, be plenty of images left. And there’s no way to get rid of them. You shouldn’t do it.
As a result, the following step is to lower the file size of the images you’ll be using on your website.
To reduce the size of the photos you use, you can use plugins like WP Smush and EWWW optimizer. It’s also a good idea to choose photographs that are optimized for the web. When feasible, for example, use.jpg images instead of.png.
One of the most basic strategies for increasing the loading speed of web pages is to reduce picture size.
It’s also a good idea to use picture caching to reduce server load and improve website performance.
Use Lazy Loading
Lazy loading postpones the loading of a picture that isn’t required right away on the page. When the website loads, an image that is not visible to the user is loaded later when the user scrolls and the image becomes visible. An image that is not visible to the user is never loaded if the user never scrolls.
Article Continues Below

- Native Lazy Loading
The ability to load pictures and iframes with native lazy loading is fantastic. Nothing could be easier to understand than the following markup:
<img src="myimage.jpg" loading="lazy" alt="..." />
<iframe src="content.html" loading="lazy"></iframe>
As you can see, there’s no JavaScript here, no dynamic src attribute value switching, just plain old HTML.
We can utilize the loading attribute to delay off-screen graphics and iframes until users scroll to their desired spot on the page. Any of the following three values can be used for loading:
eager: works well for sluggish loading. instructs the browser to immediately load the given content
auto: leaves it up to the browser to decide whether or not to lazily load.
This approach has no competitors because it has no overhead and is clean and easy.
Keep the number of external scripts to a minimum
It’s also a good idea to figure out which additional files are making requests. In the Google Chrome Network window, you can do so.
External scripts are notorious for increasing the number of HTTP requests. It could be a Twitter social feed plugin, Gravatar, or marketing scripts that are no longer in use, all of which add a few seconds to the load time.
You can make an informed decision about which assets to maintain and which to sacrifice by discovering the particular third-party integrations and external scripts that are slowing down your website.
Make use of a Content Delivery Network (CDN)
If you’re still having trouble keeping the number of HTTP requests under control, consider using a content delivery network (CDN).
A content delivery network (CDN) is a collection of servers spread throughout the globe. When a visitor visits your website, CDNs cache static material and serves it to them. The cached material comes from the server closest to the user’s physical location.
Several factors influence whether or not you should use a CDN. The most crucial consideration is whether your traffic is domestic or foreign. A content delivery network isn’t necessary if the majority of your website’s visitors are local.
If your website receives traffic from all around the world, a CDN can help you speed things up.
Combine Google Fonts
Google Fonts can also be merged to reduce the number of requests made.
- Check the number of font files loaded in your GTmetrix Waterfall report.
- In your cache plugin, enable Google Font optimization. This “combines numerous font queries to decrease the number of HTTP requests,” according to WP Rocket. Try the OMGF of Self-Hosted Google Fonts plugin if your cache plugin doesn’t offer a feature to merge fonts.
- Fonts, weights, and font icons should all be consolidated. You’ll see that each font, weight, and icon in GTmetrix generates its own request. Use only one typeface and a few different weights. Plugins like Elementor can make font icons, like the arrows on my navigation menu.
- In GTmetrix Waterfall, preloading instructs browsers to begin downloading a resource as soon as possible, which should reduce font load times. Plugins like WP Rocket, Perfmatters, and Pre* Party Resource Hints can help with this. Simply copy the font URLs from GTmetrix Waterfall, put them into the preloading area, and retest the load times of your font in GTmetrix.
Many social sharing plugins send HTTP queries to Facebook, Twitter, and other social media sites.
When I tested Grow by Mediavine (Social Pug), it only made one request (though I eventually removed it because even one request was too much for me as a speed nerd). WP Rocket, on the other hand, named that plugin the best quick social sharing plugin. Look over WP Rocket’s list and pick a lightweight plugin that doesn’t generate a lot of GTmetrix requests.
Replace Plugins with Code
Many plugins can be avoided by using code instead.
Examples:
- Using Google Fonts, you can store your fonts locally.
- Tracking code for Google Analytics: manually insert
- Design the table of contents in HTML + CSS by manually.
- Take a screenshot of embedded Tweets or Google Maps instead.
- Replace the embedded Facebook widget with a real Facebook widget.
How to Make Fewer HTTP Requests Using Plugins
Combine CSS and Javascript
Combining numerous CSS and Javascript files is one technique to decrease HTTP requests.
Don’t be alarmed if you don’t know how to use CSS or Javascript. There are simple ways to accomplish this that do not include manually altering your CSS file.
For starters, this capability is available in many WordPress caching plugins. To integrate CSS and Javascript files, you only need to install the plugin and enable the appropriate parameters.
WP Rocket

WP Rocket is a WordPress plugin that enables caching on websites in order to improve loading speeds. WP Rocket was created to make caching as simple as possible, so that anyone, regardless of technical ability, can start speeding up their WordPress website.
WP Rocket, on the other hand, seeks to appeal to power users by giving them enough tools and settings to enable caching on their website exactly the way they want it.
Pros
- If you decide to change some of the options, there are clear and simple explanations next to each one.
- Compatibility with many hosting providers, plugins, and themes, as well as WooCommerce.
Cons
- There is no live assistance available.
- There is no such thing as a lifetime license.
Steps to Combine CSS and Javascript
- In WP Rocket’s settings, go to the File Optimization tab. After that, activate minification and combine the files as follows:
![]()
- Autoptimize can also be used to merge CSS and JavaScript files. To merge files, go to Autoptimize Settings and select the following options:
- Aggregate JS-files
- Aggregate CSS-files
Price
- $49 per year
Get WP Rocket
Minifying CSS and JavaScript files
Minification is a popular approach for increasing a website’s loading speed.
You may reduce the total file size and the number of files that need to be loaded by minifying and concatenating assets like CSS and JavaScript. A decent rule of thumb is to combine files according to their functions; for example, if you have numerous files that handle picture editing, concatenating them could be a smart idea.
You can also lower the overall loading time by reducing the number of CSS files that load at first. Minification and concatenation can also aid in this instance.CSS files are cached by your browser after the initial load, so subsequent queries should take less time. You can see how having a single file with all of the required CSS, as well as caching, may improve the overall experience.
If you have highly specific CSS for a given page, you should load that file individually. As a result, you won’t have to transport CSS rules that aren’t used anywhere else in your HTML.
There are numerous online tools available to assist you with minification and concatenation during the development process. You can also use a plugin like WP Rocket to assist you in this.
WP Super Minify
WP Super Minify is a small and straightforward plugin that minifies, combines, and caches HTML, Javascript, and CSS code.
This is the only thing it does. There are two choices in the settings for excluding Javascript and CSS from being minified.
WP Super Minify is a good alternative if you want a simple and light plugin that is solely a minify plugin.
Pros
- Minifies JavaScript, CSS, and HTML with the option to turn off CSS/JavaScript compression.
- It’s quite straightforward and simple to use.
Cons
- There are more advanced plugins that improve page performance.
Minifying CSS and JavaScript files
- Select WP Super Minify from the Settings menu on the left-hand admin panel. This will take you to the main configuration page.
- On this plugin, there aren’t a lot of options. Simply select Compress JavaScript and Compress CSS from the drop-down menus.
- To complete the minification process, click the “Save Changes” button.

Price
- FREE
Get WP Super Minify
Wrapping Up!
During client-server communication, HTTP requests are a necessary part of data transport. If web pages take too long to load, visitors may abandon them rather than wait for the content to appear. Minimize download requests to reduce download delay.
As you can see, there are a variety of methods for reducing your website’s loading time. Reducing the number of HTTP requests you send to the server is by far the most significant improvement you can make. Additionally, minification can help speed things up by making the files smaller.
Hopefully, the solutions listed above will significantly minimize the number of HTTP requests made by your WordPress site. We’ve covered what HTTP is, how to check for HTTP requests on your WordPress site, and different techniques to reduce HTTP requests in this article.
Let us know if you need any help or have any questions. Shoot away!
Would you like to learn more about WordPress?
Sign up for our Weekly WordPress Newsletter.
Every Friday you’ll receive news, tutorials, reviews, and great deals from the WordPress space.
Invalid email address
Are you experiencing a slow WordPress site? Too many HTTP requests could be the source of the problem. Reducing your site’s page load time by making fewer HTTP requests improves how quickly users can access that content and impacts their overall web browsing experiences. Page loading speeds matter, and it directly affects how users feel about using an app or website.
But what are HTTP requests? How many should be made per page? How many requests are you currently dealing with? Stay with us: in this article, we’ll define HTTP requests, explain why they matter, how to measure them and how to keep them low.
What Are HTTP Requests?
HTTP is a communication protocol used to deliver content and data (HTML files, CSS, images, videos, etc.) on the Internet. The World Wide Web is an expansive place with a lot of information hosted on servers, right? If you want to access this content, your browser needs to send requests and receive responses. Without the requests, there is no effective communication between you and the server.
An HTTP request can also be seen as a layer of communication between the user and the server. The message sent by the client is called HTTP (Hypertext Transfer Protocol), which helps to structure request messages effectively in three parts: request line, header, and body.
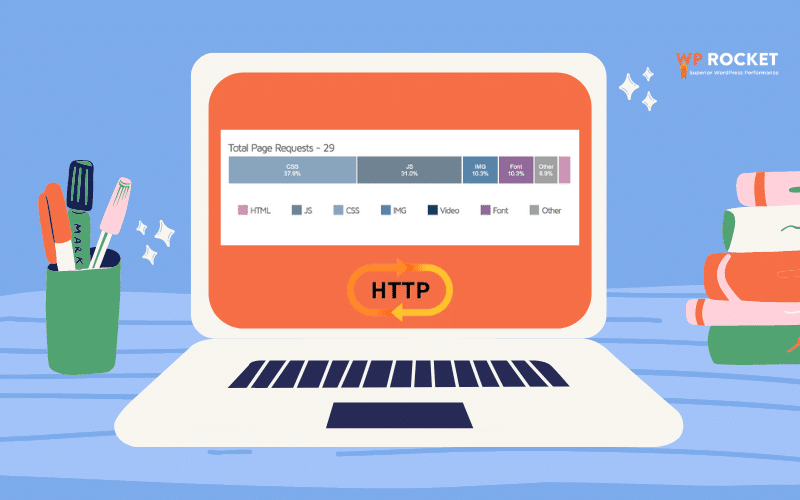
As you can see, every time you visit a site, some HTTP requests are made to display the content. Consequently, the more HTTP requests made on a page, the longer it will take to load.
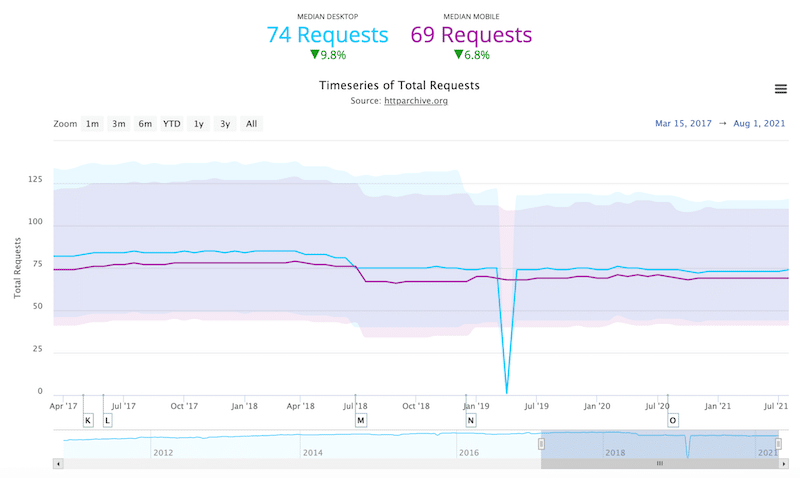
You may be wondering, how many HTTP requests are “too many” HTTP requests? Let’s go over some key figures so you know where to position your WordPress site:
- Outstanding performance: getting HTTP requests below 25 per page
- Healthy performance: keeping HTTP requests under 50 per page
- Average HTTP requests on the web: 70 HTTP requests
✅ HTTP requests are not all bad.
✅ Your WordPress site needs them to render the content and to look good.
✅ You don’t need as many HTTP requests as you have (keep them under 50 per page).
⚖️ It’s all about balance: have as few HTTP requests as possible without sacrificing the user experience.
It’s important to keep your site healthy because too many HTTP requests will slow down your site. We explain why in the next section.
Why You Should Reduce HTTP Requests
You should make fewer HTTP requests to maintain great speed and performance. Yahoo said that “80% of the end-user response time is spent on the front-end”. In other words, your performance is mainly affected by images, stylesheets, and scripts, which all are rendered thanks to HTTP requests.
They are a key component to displaying content, but chatting back and forth between the server and the user takes time to load. This roundtrip of data is called the round-trip response time (RTT):
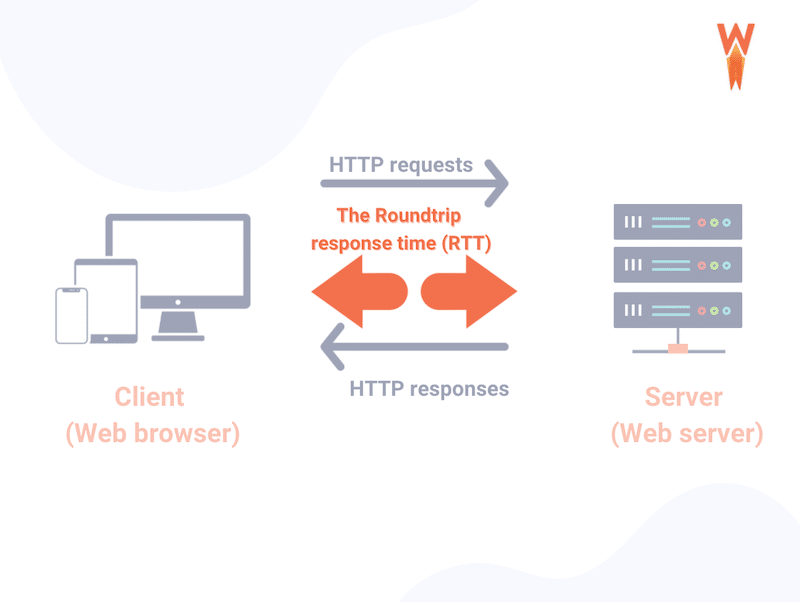
Another reason to make fewer HTTP requests is to keep your Core Web Vitals healthy, especially your Largest Content Paint (LCP) KPI.
LCP determines how fast the first meaningful piece of content loads. It’s all about speed-perception from the users.
Three factors affect the LCP score of your WordPress site: slow server response times, render-blocking JavaScript and CSS, and slow resource load time. Therefore, reducing your number of HTTP requests is the key to faster pages. The fewer HTTP requests your website makes, the quicker it can load the most important content (LCP) to the user.
To sum-up:
Big and heavy files? → You get longer HTTP Requests
Longer HTTP requests → Increase the actual loading time
Reduce your HTTP requests → Positive impact on your LCP
And remember, if users can access your content faster, you increase the chances of having them stay on the page and interact with your site. Interacting also means that they could be buying your products… And not only you avoid the frustration of visitors, but Google will also love your site.
That takes us to the next crucial question: how many HTTP requests is your WordPress site making?
How to Test and Measure the HTTP Requests of Your Site
There are some online tools simulating HTTP requests on your WordPress site, namely:
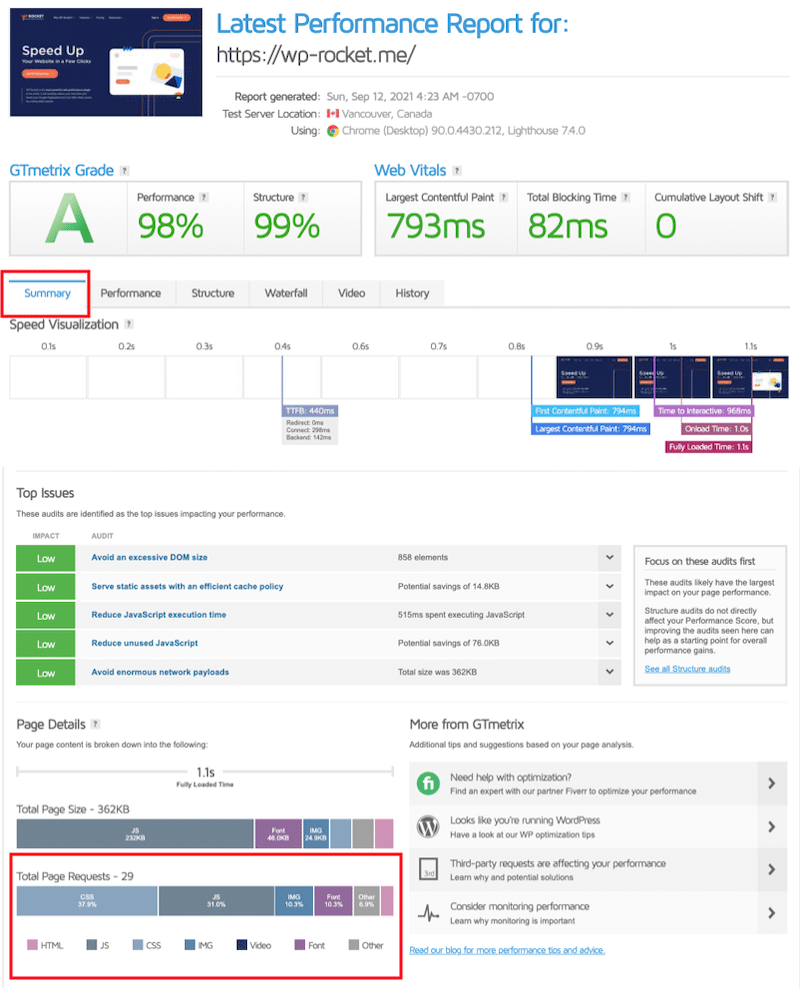
- GTmetrix (you need to have a free account to access your page details) — simply put the URL of your site, run the audit and open the “Summary” tab. Scroll down to the last section called “Page Details” to find out how many requests your page is making.
The waterfall tab is a great way to see how long individual HTTP requests take on your site:
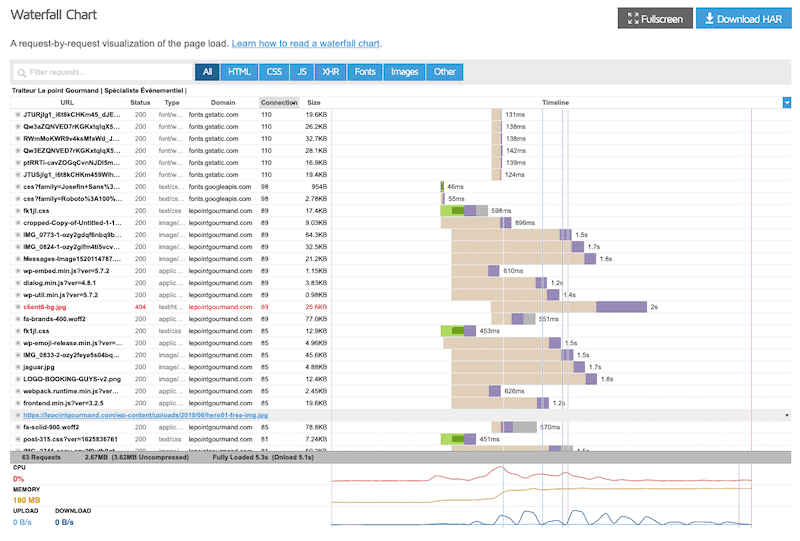
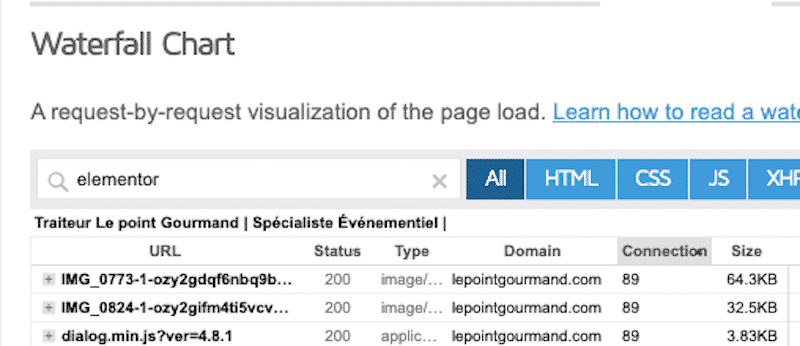
You can also look at the HTTP requests coming from a specific plugin, such as Elementor:
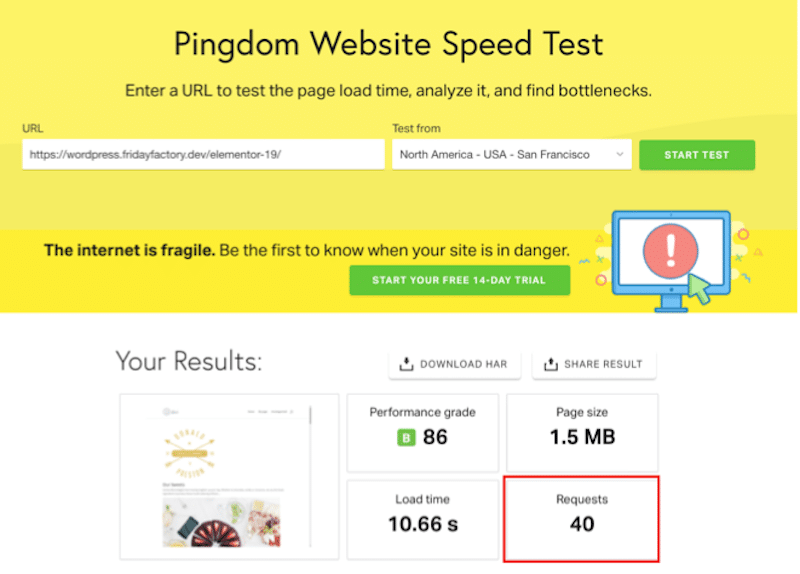
- Pingdom — simply put your URL into the box to find out how many HTTP Requests your page calls for:
- Query Monitor — a free debugging tool to identify plugins or scripts slowing down page loads. The HTTP API Calls panel shows you information about HTTP requests performed during the page load.

10 Ways to Make Fewer HTTP Requests to Your Website (Manually and With a Plugin)
Fewer HTTP requests mean fewer bytes to download, but it can be daunting to start this optimization. Don’t worry. Thanks to our list of techniques below, you’ll be able to reduce your HTTP requests. For each tactic, we will always give two solutions: using a WordPress plugin and a manual one.
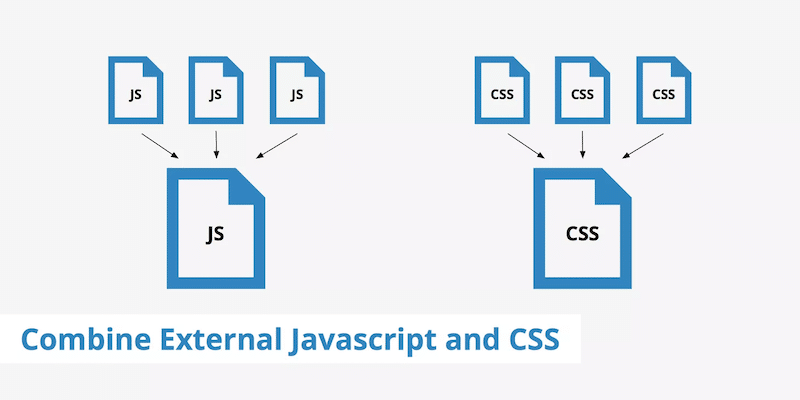
1. Combine CSS & JavaScript
Impact: High 🚀🚀🚀
An easy way to reduce HTTP requests is by combining multiple JS and CSS files.
With your WordPress theme and plugins, many CSS stylesheets and JS need to be loaded. This requires the browser to load all these resources to render web pages, meaning multiple HTTP requests.
Combining CSS and JS using online tools:
- Minify — Combines multiple CSS or JavaScript files.
- Combine– PHP script combined with URL rewriting to concatenate and compress CSS and JavaScript files.
- csscompressor.net (CSS only) — Online CSS compressor, quick and free to use.
- jscompress.com (JS only) — This JavaScript compression tool allows you to combine JavaScript files into one file.
- SmartOptimizer — A PHP library that enhances your website performance by optimizing the front end using concatenation techniques.
- CSS-JS-Booster — Concatenates, minifies, and gzips CSS and JavaScript files.
- CSS Crush — Concatenates and minifies CSS files.
- csscompressor.net (CSS only) — online CSS compressor, quick and free to use.
- jscompress.com (JS only) — This JavaScript compression tool allows you to combine JavaScript files into one file.
Uploading your new combined CSS & JS files to your WordPress site:
Our goal is to put all the separate requests together into a single file.
- Simply copy/paste all of your CSS code into one main file and re-upload the file to the server (do this only if you are comfortable with your WordPress files)
- If you are using C-panel:
- Log in to your cPanel
- Go to your ‘File Manager’
- Click on the folder that contains your WordPress site
- Create a folder in your root directory with the new combined file
Combining CSS & JS files using a plugin (the quickest and safest way):
- WP Rocket: combines minified files into one file per file type (CSS or JavaScript)
- Autoptimize: helps you with the concatenation of your scripts (CSS or JavaScript).
2. Combine Images with CSS Sprites
Impact: High 🚀🚀🚀
CSS sprites are a great way to reduce the number of HTTP requests made for image resources. All CSS files on your site are render-blocking, meaning that the more CSS files are loaded, the more likely this will slow down your site.
To avoid this, you should optimize the images on your site and combine them into a single file. Once this is done, time to lean towards the CSS sprites technique: use CSS to display just a part of that image file where it’s needed. This technique improves site performance where many small images, logos, or icons are used.
You can learn more in our dedicated article on combining images using CSS sprites in WordPress.

Combining images with CSS sprites using web-based tools:
- CSS Sprite Generator, Editor, and Code
- CSSspritestool
- Go to the CSSspritestool site to combine multiple images into one using the drag-and-drop builder.
- You get a combined image file, along with some CSS code for each image that you upload.
- Upload the combined image file to your WordPress site
- Add the CSS code to your WordPress site using the Customizer
- Display each image where you want using HTML
3. Optimize Images (and Delete the Non-Important Ones)
Impact: High 🚀🚀🚀
While there is no existing WordPress plugin allowing you to specifically combine images with CSS sprites, you can still use some incredible plugins to optimize your images. Images are a must-have for the user experience, but here’s the catch: each image on your site is a separate HTTP request! Consequently, choose them wisely and consider only having images bringing value to your content.
Optimizing images means reducing their weight without compromising quality. There is no point in having a light image blurred where the content can’t even be identified, right?
Here are some resizing tools you can use:
- Photoshop
- GIMP — Free, Windows & Mac
- IrfanView — Free for Windows
- Preview for Mac — Already installed!
To optimize your images automatically, we recommend you to use a WordPress plugin:
- Imagify — by WP Media, the same company behind WP Rocket. Optimize up to 20 MB of images for free per month.
- Optimole (Image optimization & Lazy Load by Optimole)
Read our dedicated article to discover more image optimization plugins.
Note: optimizing images won’t directly reduce the number of HTTP requests, but it will reduce their size and make them load faster.
4. Enable Lazy Load on Images
Impact: High 🚀🚀🚀
Implementing “lazy load” means postponing the loading of images outside the browser viewport. In simple words, if your visitor doesn’t scroll all the way down, images placed at the end of the page won’t even be loaded. Thanks to the lazy load script, you reduce the number of HTTP requests because you only load the images above the fold.
Implementing lazy loading script manually:
<img src=”image.jpg” alt=”…” loading=”lazy”><iframe src=”video-player.html” title=”…” loading=”lazy”></iframe>
Using a lazy load plugin to apply the script automatically:
- Lazy Load by WP Rocket (Free) — displays the content only when visible to the user.
- WP Rocket — comes with the lazy load features. It’s a premium plugin that comes with many other advantages such as caching, cleaning your code, etc.)
- If you are looking for more lazy load plugins, have a look at our article.
5. Minify HTML, CSS, and JavaScript
Impact: Medium 🚀🚀
Minifying your code means removing unnecessary whitespace, comments, and extra characters from a file to make it lighter. This technique can be applied to JavaScript, CSS, and HTML files. Of course, it’s all about cleaning up the code that is not crucial for final users.
| Example of non-minified JS | Example of a minified JS |
 |
 |
Minifying your code manually:
Before you edit the file, download a copy from your server to save it on your computer for safekeeping.
- Minifying HTML: open your code sheet and remove comments (<!– … –>), extra spaces, line-breaks, and similar content
- Minifying CSS: remove extra spaces and comments from CSS files (/* … */) Shorten ID, class, or variable names as much as possible
- Minifying JS: remove the JS comments (//) and extra spaces from the source code. Turn arrays into objects whenever possible, optimize your conditional statements, and find answers to basic constant expressions.
Minifying your code using an online tool:
- Use a code editor like Sublime text to edit the file
- Paste your code in one of those online tools: Closure Compiler, CSS nano, JS nano, UNCSS. (We have a full list of free minifying codes for you to check out).
- Replace your old code with the new minified code and upload it back to your site
Using a WordPress plugin to minify your code:
- WP Rocket — minify your CSS and JS automatically. All you need to do is to check two boxes. WP Rocket has a dedicated section for file optimization.

6. Replace Heavy Plugins with Lightweight Ones
Impact: Medium 🚀🚀
Your site’s slow loading speeds could result from one or two plugins that are overworking your WordPress site with too many HTTP requests. For classifying a plugin as lightweight, you should look at: code quality & professionalism, the features, how efficiently the code executes them, and the file size.
How to flag the slow plugins of your WordPress site?
Let’s say you are hesitating between two contact forms plugins (A and B). Use our 5 steps to run your diagnosis:
- Run a performance test using Pingdom to check your number of HTTP requests — write down your score
- Activate plugin A and run your test again- write down your score
- Deactivate plugin A and install plugin B to do the same audit
- Compare how many HTTP requests have been added for each plugin
- Choose the one with fewer HTTP requests and delete the slow one!
Using a plugin to identify which plugins are slowing down your site with too many HTTP requests:
- The Query Monitor plugin can be used to identify which plugins are harming your site and help you remove them
7. Load Scripts Only When Needed (and Only on Specific Pages)
Impact: Medium 🚀🚀
Another way to make fewer HTTP requests is to selectively disable scripts and plugins from specific pages/posts that don’t need to load.
Use a WordPress plugin to load script only when needed:
- Perfmatters — allows you to disable a script on a page or post.
- Asset Cleanup Pro — which is a bit less user-friendly but does the job too.
8. Reduce External Scripts / HTTP Requests
Impact: Medium 🚀🚀
Loading every third-party script is an extra HTTP request that the browser makes, slowing down page performance (here’s how you can reduce the impact of third-party scripts). Keeping track of all your third-party integrations is crucial to understanding which external assets slow down your site speed. We have been explaining how to reduce your HTTP requests. Let’s not be impacted by the external ones, right?
Too many HTTP requests will often force resources to be fetched from the network, and we don’t want this for our performance.
External scripts mainly come from Google Analytics tags, Facebook Pixels, YouTube videos, social sharing buttons, and A/B testing tags. Identifying all files that are adding requests is highly recommended.
Using tools to identify the heaviest external scripts:
- Performance tools like These Chrome DevTools, PageSpeed Insights, and WebPageTest can help you identify them.
Optimizing the third party requests manually:
Now that you have identified which external scripts affect performance, you can use the async or defer attribute on them:
<script async src=“script.js”> <script defer src=“script.js”>
If you want to learn more about using both attributes, we recommend reading Web.Dev, which lists all the steps to efficiently load third-party JS.
Using a plugin to reduce your external scripts impact on performance:
- WP Rocket help you reduce the impact of third-party code in many ways:
- Hosting Google Analytics files and tags locally.
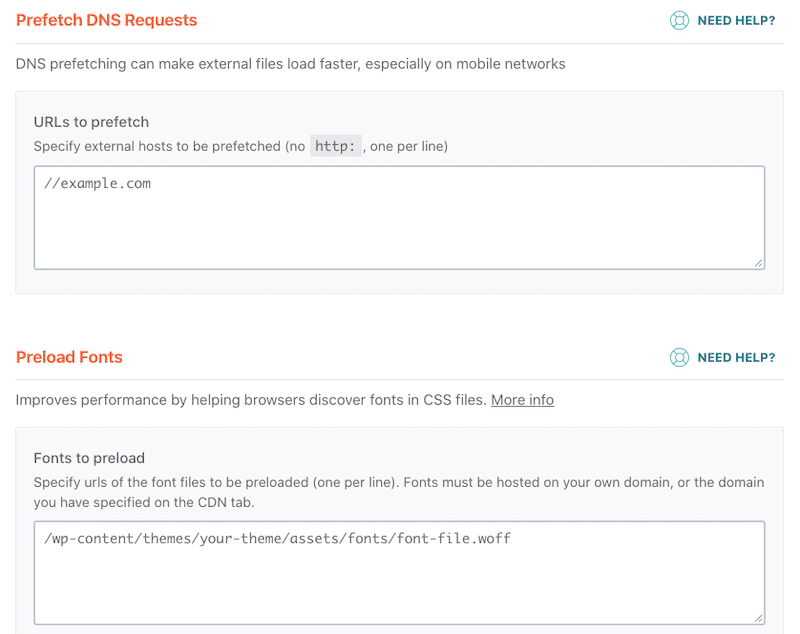
- Prefetching DNS requests, meaning that external files will load faster.
- Preloading fonts to help browsers discover Google fonts faster in your CSS files.
- Deferring your third-party JS such as ads and analytics, just tell your browser what he should load first.
For the story, Telegraph recently deferred all of their scripts and improved the ad charging time by an average of four seconds.
9. Use a CDN
Impact: Medium 🚀🚀
A Content Delivery Network (CDN) refers to geographically distributed servers that serve content from the closest location possible. No matter where a user is, they can access your site’s contents quickly and efficiently. Every HTTP request made by them will be served from the nearest location possible.
Best CDNs available on the market:
- RocketCDN
- Cloudflare CDN
We also wrote a guide to help you choose the right CDN for you.
10. Defer Render-Blocking JavaScript and CSS
Impact: Medium 🚀🚀
Is this resource very useful, or is it OK to load it later? The immediate need to use the resource will determine if the resource is render-blocking or not. To eliminate render-blocking JavaScript and CSS, you need to use the defer option or the async option.
Manually removing the render-blocking resources:
First, run an audit on Google PageSpeed Insights and check your opportunities section. If you have a section “Eliminate render-blocking resources”, then you probably need to do something just like in our example below:
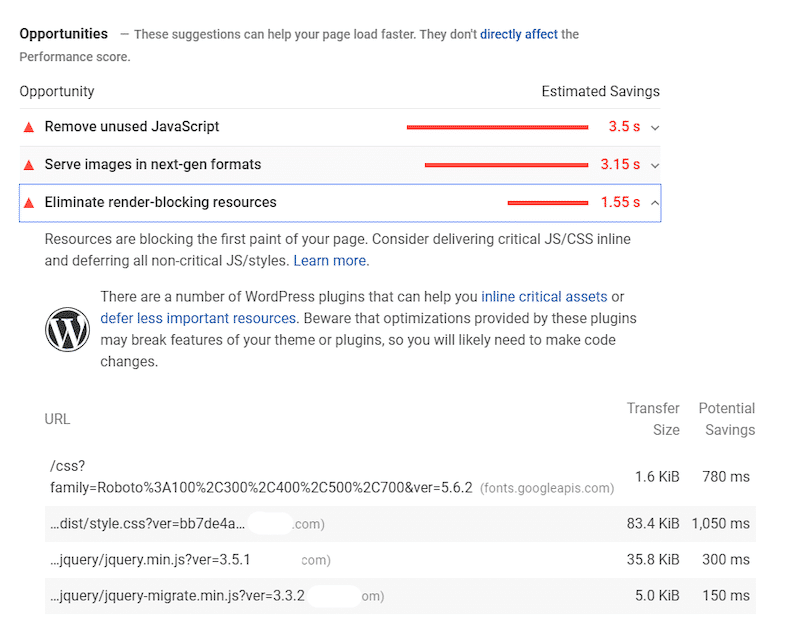
To eliminate this issue manually, you need to use the defer and async attributes.
Here’s an example of the defer attribute to defer JS:
<script defer src=”/example-js-script”></script>
Follow our in-depth tutorial explaining how to eliminate render-blocking resources using both scripts manually.
If you want something more straightforward, simply use a WordPress plugin.
Using a WordPress plugin to defer JS and CSS:
- WP Rocket — which helps you with deferring your JS files in the simplest way. The plugin also offers the “Optimize CSS delivery” feature that constitutes the render-blocking resources. You can also exclude any JS or CSS file from being deferred if you need it.
However, “reducing HTTP requests” is not the only performance optimization you should focus on. If you want your site at lightning speed, follow our complete guide about page speed optimization.
How to Reduce HTTP Requests with a Plugin
A plugin like WP Rocket helps to reduce HTTP requests and to speed up your site significantly. Let’s run a performance audit of a WordPress site with and without WP Rocket. You’ll see after the comparison that it’s one of the best caching plugins for WordPress.
We will use GTmetrix to measure the following KPIs:
- Overall performance grade (A to F)
- Core Web Vitals scores (LCP, CLS, and FID) + TTI and TBT (Note: if FID is not available, we will measure FCP)
- Number of HTTP requests (Total page requests)
In terms of content, my WordPress site contains some text, a few social media icons, 8 images, an embedded video from YouTube, a map with a pin (from Google Maps), and 3 testimonials from clients with their photos.

Scenario 1 — Measuring Performance and HTTP Requests – No WP Rocket
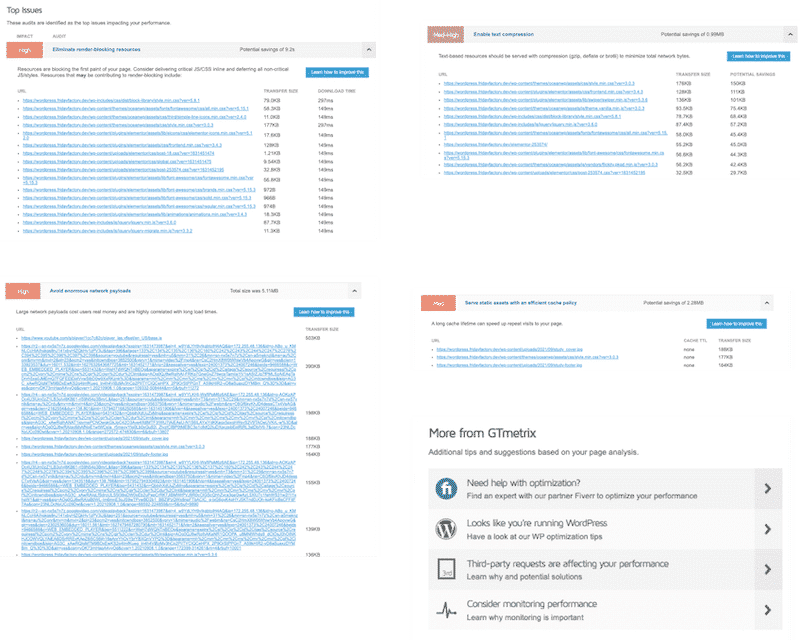
Let’s have a look at the performance results using GTmetrix. They are not very encouraging, and I got an “E” for my overall performance grade:
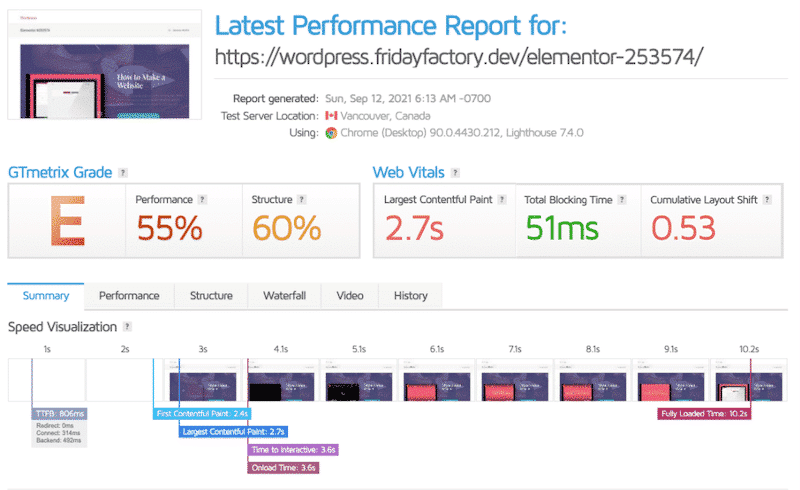
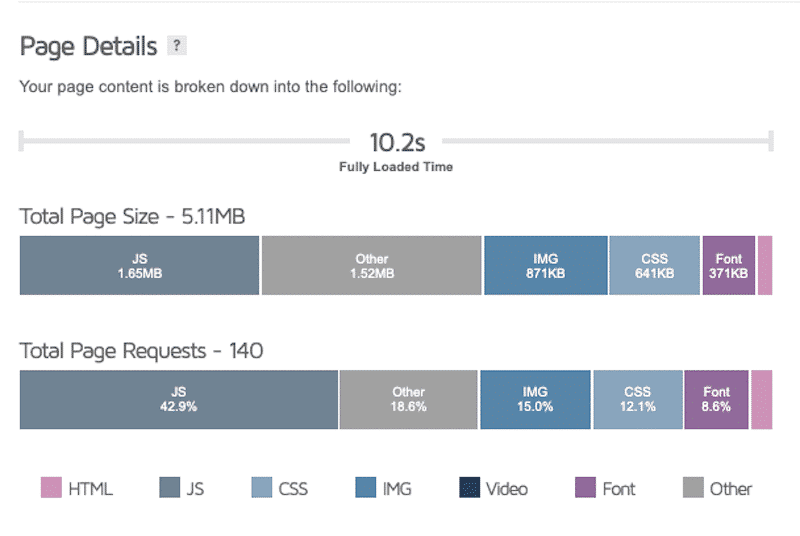
We notice that my page is making 140 HTTP requests and that 42.9% of them are due to JS. It takes 10.2s for my page to be fully loaded, and the size of the page is 5.11 MB.
| KPIs | Score (No WP Rocket) |
| GTmetrix Overall Grade | E |
| Performance | 55% |
| Largest Contentful Paint (LCP) | 2.7s |
| First Contentful Paint (FCP) | 2.4s |
| Cumulative Layout Shift (CLS) | 0.53 ms |
| Time to Interactive (TTI) | 3.6s |
| Total Blocking Time (TBT) | 51ms |
| Time To First Byte (TTFB) | 806 ms |
| Fully Loaded Time | 10.2s |
| Page Size | 5.11 MB |
| Total Page Requests | 140 (Best-in-class score: < 50) |
The main recommendations from GTmetrix are the following:
- Efficiently load third-party JS (defer JS, establish early connections to the required origins and apply lazy-load on embedded third-party resources)
- Eliminate render-blocking resources (Consider delivering critical CSS and JS inline and deferring all non-critical JS/styles. Learn more about what critical CSS is in our article)
- Optimize my code (combine and minify JS and CSS / optimize CSS delivery)
- Implement page caching
Guess what? This is exactly what WP Rocket can do for your WordPress site (amongst other things). In scenario 2, we will activate WP Rocket and check our website’s health again. Good things are coming.
Scenario 2 — Measuring Performance and HTTP Requests — 🚀 With WP Rocket
Now that WP Rocket is activated let’s run another performance audit using the same page.
This time, the results are very encouraging, and we went from “E” to “A” regarding my overall performance grade:
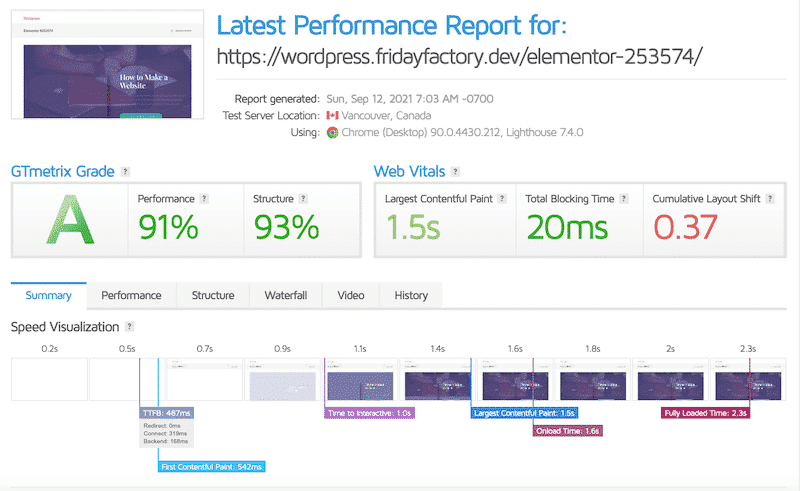
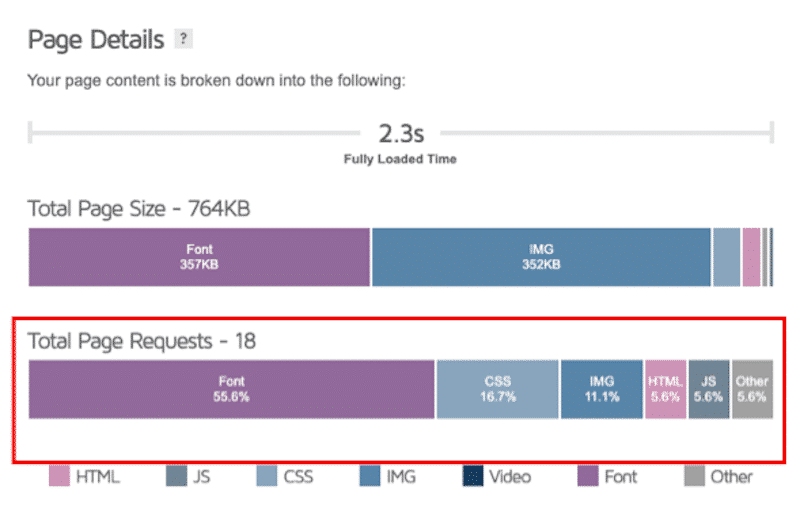
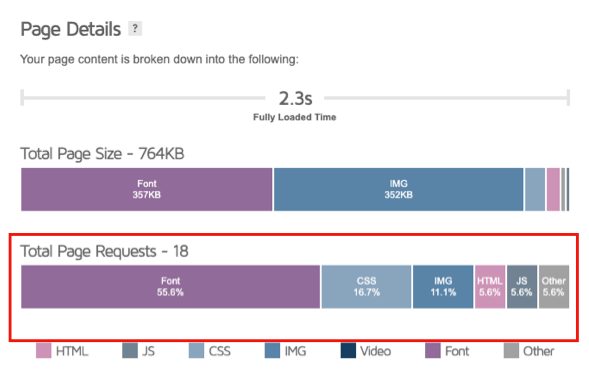
Another impressive progress is the number of my HTTP requests that dropped from 140 to 18 upon activation of WP Rocket (-87%).
Globally speaking, all my KPIs are better, and my website is much faster when using WP Rocket:
| KPIs | Score — No WP Rocket | Score 🚀 With WP Rocket |
| GTmetrix Overall Grade | E | A |
| Performance | 55% | 91% |
| Largest Contentful Paint (LCP) | 2.7s | 1.5s |
| First Contentful Paint (FCP) | 2.4s | 542 ms |
| Cumulative Layout Shift (CLS) | 0.53 ms | 0.37 ms |
| Time to Interactive (TTI) | 3.6s | 1 s |
| Total Blocking Time (TBT) | 51ms | 20 ms |
| Time To First Byte (TTFB) | 806 ms | 487 ms |
| Fully Loaded Time | 10.2s | 2.3s |
| Page Size | 5.11 MB | 604 KB |
| Total Page Requests | 140 (Best-in-class score: < 50) | 18 (Best-in-class score: < 50) |
Our performance has globally improved with the WP Rocket cache plugin activated.
WP Rocket automatically applied almost all the techniques listed in the section “How to Make Fewer HTTP Requests to Your Website“.
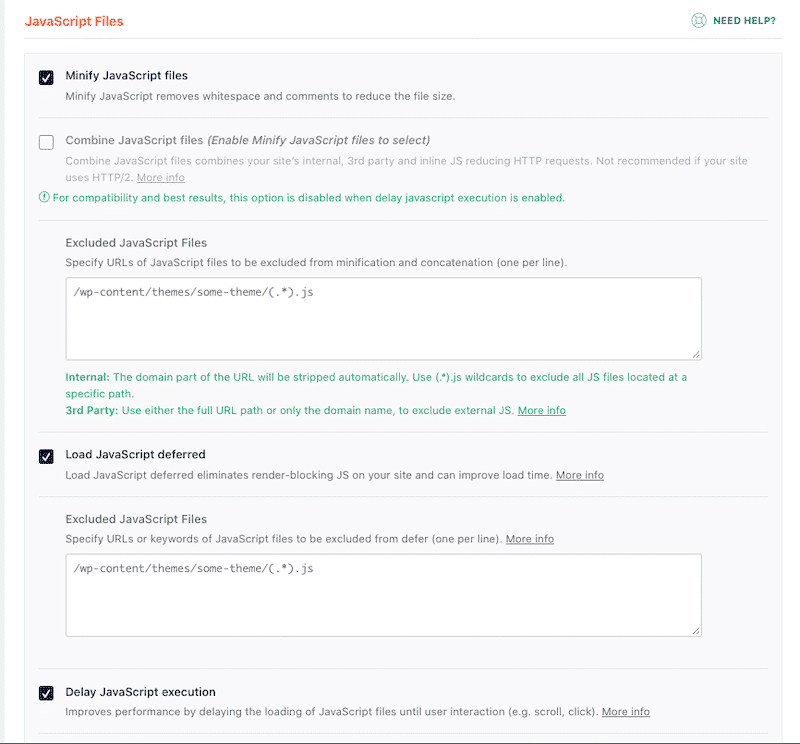
From the WP Rocket’s dashboard, you can see that my CSS code has been minified, combined, and optimized:

The same optimization has automatically been applied to my JS:
Wrapping Up
WP Rocket helped to reduce HTTP requests of my WordPress site by 87%. In our case study, we saw that our requests went from 140 to 18 simply upon activation of the plugin. You do save time and effort!
| Without WP Rocket | 🚀 With WP Rocket |
| 140 HTTP Requests | 18 HTTP Requests (-87%) |
 |
 |
To maintain a great performance of your site, it’s recommended to maintain the HTTP requests under 50. WP Rocket is a great automatic tool to never go over that number! It will boost performance by reducing and eliminating unnecessary HTTP requests — without any technical knowledge required on your part.
Work less and get better performance results thanks to WP Rocket today! We do have a 14-day money-back guarantee: if you are not satisfied, we refund you. Come on, give it a try and tell us how your HTTP requests are doing in the comments.
Ускорьте свой сайт! Используйте приведенные ниже методы оптимизации не только для улучшения своего рейтинга в ySlow, но и позиций в Google.
В этом уроке мы рассмотрим все аспекты использования W3 Total cache, Google page speed, CSS-спрайтов и правил htaccess для достижения высоких рейтингов в ySlow.
Перед тем как начать
Небольшое замечание: хотя это руководство и рассказывает обо всём в подробностях, мы будем (по возможности) использовать ссылки для экономии Вашего времени.
Шаг 1: Установка необходимых компонентов
Установка плагина для кэширования : Во-первых, какой бы плагин для кэширования Вы не использовали, выключите его прямо СЕЙЧАС!
Если конечно это не всемогущий W3 Total cache, с которым мы будем работать (Мы знакомы с немалым количеством плагинов для кэширования, но W3 – наш любимый. Если Вы по какой-то причине используете другой плагин – хорошо, но в этом руководстве мы будем работать с W3). Как поменять пароль вы все знаете, так что сразу переходим к разделу добавления новых плагинов в WordPress, найдите “W3 Total cache”, загрузите и установите его, но не включайте… по крайней мере пока…
Установка плагина для управления базой данных: Теперь нам нужно установить ещё один плагин под названием “WP-DBManager”. Опять же установите его и убедитесь в том, что Вы не используете каких-либо других плагинов для работы с базой данных.
Прежде чем пойти дальше и начать оптимизацию Вашего сайта, давайте посмотрим на то, с чем мы будем иметь дело. Откройте Google Chrome или установите его. Затем установите плагин ySlow. После этого Вы увидите новую иконку в правом верхнем углу браузера. Нажмите на неё (убедитесь в том, что Вы находитесь на главной странице своего сайта).
ySlow проверит Ваш сайт, сообщит, что хорошо, что плохо. Сначала сосредоточим своё внимание на пунктах, у которых оценка ниже B. Далее пройдемся по каждому из пунктов, необходимых для ускорения работы Вашего сайта.

Шаг 2: Включите W3 Total cache
Когда Вы включите W3 Total cache, то увидите новую вкладку в боковой панели – “Performance”. Нажмите на неё. Сейчас мы пробежимся по всем разделам этого плагина, но в целях экономии времени Вы можете импортировать файл с настройками W3, находящийся в “исходниках” этого руководства и перейти к шагу 2C.
Здесь находятся все настройки плагина. Взгляните на “General Settings” и поставьте галочки в следующих разделах:
Шаг 2B: настройка Minify
Нажмите вкладку/ссылку “Minify” вверху страницы/панели W3. Убедитесь в том, что первые три чек-бокса отмечены в секции “HTML и XML”. Затем нажмите на кнопку “Help” вверху.

Когда всплывающее окно загрузится, Вы увидите список javascript-файлов и каскадные таблицы стилей, на которые ссылается Ваш сайт. В общем-то, нам нужно выбрать всё, кроме:
- JQuery-файлы
- Рекламные блоки Google (или любые другие)
- Любые файлы stats.wordpress.js (если у Вас установлен jetpack)
Минимизация – один из важнейших моментов оптимизации. После того как Вы выбрали все свои файлы (и проделали это для всех своих тем, если у Вас их несколько) нажмите “Apply and close”, а потом “Save all settings” (если вдруг Ваш сайт всё ещё будет работать по-старому).
Шаг 2C: настройка Browser Cache
После того как Вы попадёте на вкладку/страницу “Browser Cache”, измените значение “Expires header lifetime” на 691200 секунд. Это сразу же повысит Ваши баллы в ySlow.
Теперь вернитесь в “General Settings” и нажмите “empty all caches”, затем зайдите на главную страницу своего сайта и запустите тест ySlow ещё раз. Вы должны увидеть положительные изменения.
Шаг 3: Давайте вернёмся к оптимизации базы данных
Под вкладкой “Performance ” в боковой панели WordPress должна быть вкладка с названием “Database” (если нет, то вернитесь назад и активируйте её).

Вам понадобятся три вещи из списка: резервное копирование, восстановление и оптимизация.
Для резервного копирования нажмите “Backup DB” и выполните эту операцию (о gzip-сжатии не беспокойтесь).
Далее перейдите к пункту меню “Repair DB” и нажмите кнопку “Repair” внизу.
И в конце оптимизируем базу данных. Нажмите на пункт “Optimize DB”, а далее, как Вы уже догадались, на кнопку “Optimize”.
Чтобы не повторять этот процесс каждый раз снова и снова, зайдите в “DB Options”. Внизу Вы увидите секцию “Automatic Scheduling”. Убедитесь в том, что резервное копирование выполняется КАЖДЫЙ ДЕНЬ (нельзя быть слишком осторожным), оптимизация – каждые несколько дней, а восстановление – раз в неделю. В конце сохраните изменения.
Шаг 4: CSS-спрайты
Теперь в ySlow Вы, вероятно, увидите в секции “Make fewer HTTP requests” строку текста примерно следующего содержания: “Это страница содержит 10 внешних фоновых изображений. Попробуйте объединить их в CSS-спрайты”.

Откройте главную страницу своего сайта в новой вкладке, а этот сайт в другой. Затем перетащите с помощью курсора мышки надпись “SpriteMe” на вкладку с Вашим сайтом. В правом верхнем углу появится окно. Когда приложение закончит своё “волшебство”, сохраните изображение у себя на компьютере и загрузите на Ваш сайт (предпочтительно в то место, где находится тема, которой Вы пользуетесь).

Теперь нажмите кнопку “export CSS” в появившемся окне “SpriteMe”. Скопируйте и вставьте CSS-код, который Вам предложили, прямо в конец файла “style.css” темы WordPress или в любое другое место, где он будет использоваться вместо стандартного кода (так как мы не хотим перезаписывать наш стандартный код). Вам нужно будет убедиться в том, что путь в “background-image: url” указывает на адрес, где хранится Ваш новый спрайт.
После того, как это будет сделано, пожалуйста, нажмите “empty all caches” во вкладке “Performance”.
Шаг 5: Оптимизация изображений (сжатие)
Обычно мы пользуемся ПО Photoshop для сжатия изображений перед загрузкой на сервер, но у многих из Вас нет этой программы. Поэтому предлагаем другой способ уменьшения размера изображений.
Вам нужно будет убедиться в том, что каждое изображение всех Ваших тем оптимизировано. Для этого воспользуйтесь небольшим приложением под названием “ImageOptim”.
После того как все изображения использующиеся темами WordPress будут сжаты до нужного размера, Вы можете взглянуть на плагин “Smush.it”, который будет автоматически оптимизировать изображения, использующиеся в ваших постах.
Шаг 6: GZIP-сжатие
Это один из самых важных моментов оптимизации. Чтобы включить PHP GZIP-сжатие, откройте файл php.ini любым текстовым редактором и найдите следующую директиву:
zlib.output_compression
Значение по умолчанию – Off. Измените его на On:
zlib.output_compression = On
Перезапустите Apache HTTPD-сервер после изменения. Теперь все страницы отправляемые сервером клиентам (браузерам) будут сжаты.
В настройках PHP также есть директива, отвечающая за уровень сжатия. Чтобы установить нужный уровень сжатия, отредактируйте значение соответствующей директивы в php.ini. Допустимые значения – от 1 до 9 (1 – минимум, 9 — максимум). Уровень сжатия по умолчанию – 6, это максимальная компрессия, которая не снижает производительность сервера.
zlib.output_compression_level = 6
Также можно активировать PHP-сжатие, добавив эту строку в начале разметки каждой веб-страницы: <?php ob_start("ob_gzhandler"); ?>. Мы не рекомендуем использовать Вам этот метод, т.к. придётся вносить изменения в каждую страницу. Изменения же в php.ini применяются ко всем страницам без исключения.
Если же Вы не имеете прав для редактирования файла php.ini или не имеете к нему доступа (такое может быть при использовании виртуального хостинга), то PHP GZIP-сжатие может быть настроено через файл .htaccess, который обычно расположен в корне сайта. Чтобы активировать сжатие, добавьте следующую строку в файл .htaccess:
php_flag zlib.output_compression on
Недостаток этого метода оптимизации в том, что только страницы, сгенерированные PHP-процессором, будут сжаты с помощью GZIP-кодирования. Всех подключаемых CSS и JS-файлов это не касается. Для сжатия файлов всех типов используют mod_deflate или mod_gzip на HTTPD-сервере.
Также посмотрите статью проверка на правильный запуск GZIP сжатия (eng).
Шаг 7: Ещё способы
По мере того, как мы подходим к заключительной части руководства, осталось еще несколько не известных вам вещей.
Теперь, когда Вы используете CSS-спрайты вместо изображений, нужно очистить кэш Вашего браузера и ещё раз “empty all caches” во вкладке “Performance”.
Теперь вернёмся назад, выйдите из настроек WordPress, зайдите на главную страницу Вашего сайта и запустите ySlow-тест. Опять же, показатели должны возрасти. В разделе CDN есть опция “Add as CDN”. Это должно повысить скорость загрузки сайта ещё больше.

Если Вы хотите корректно добавить CDN, то мы можем посоветовать вот это руководство (eng).
После этого можете ещё раз взглянуть на высокие результаты Вашего сайта в ySlow. Также можете сравнить результаты своего сайта и главной страницы Google.
Один пункт в оценке ySlow, о котором еще не рассказывали – это “Cookie free domain”. Объясняем: когда браузер делает запрос на статическое изображение и отправляет куки вместе с запросом, серверу нет никакого дела до них (то есть он их не использует). Таким образом, они создают лишний трафик без какой-либо пользы. Вы должны убедиться в том, что статические компоненты могут быть запрошены с сервера без использования куки. Создайте поддомен и разместите на нём все статические компоненты веб-сайта.
Если Ваш домен типа www.example.org, то Вы можете переместить всю статику на onstatic.example.org. Если Вы настроили куки для домена верхнего уровня example.org, а не для www.example.org, то все запросы к static.example.org будут включать эти куки. В этом случае Вы можете приобрести полностью новый домен и разместить все статические компоненты на нём, настроив его так, чтобы он не использовал куки. Yahoo использует yimg.com, YouTube – ytimg.com, Amazon – images-amazon.com и т.д.
Ещё одно преимущество использования cookie-free доменов в том, что некоторые proxy-серверы могут отказать в кэшировании компонентов, которые запрашиваются с куками. Так что если Вы сомневаетесь над тем, какой основной домен использовать для главной страницы своего сайта, то учтите влияние куки. В целях повышения производительности лучший вариант – использовать поддомен с www и записывать куки на него.
Мы не будем вдаваться во все подробности, главное, что Вы знаете об этом. Обсудим этот метод подробнее в другом уроке. Он улучшает производительность, но сделать всё правильно не так-то просто.
Заключение
Мы рассказали Вам о способах оптимизации скорости работы и уменьшения времени отклика веб-сайтов. Если Вам нужна более подробная информация или помощь в каком-то моменте – оставляйте свои комментарии ниже.
Each time you access a website there are a lot of processes happening behind the curtain. Though it seems like everything occurs in one fell swoop, your browser must request, receive, and process multiple files from a server before the website fully loads.
These requests can slow down your website, leading to poor user experience, a huge bounce rate, and bad SEO scores. To avoid these pitfalls and keep your visitors happy, you need to figure out how to make fewer HTTP requests.
This short article will teach you how to reduce the number of HTTP requests that your website sends. Here you’ll learn more about what HTTP server requests are, how they can be tracked, and how you can reduce them.
HTTP Server Requests —What Are They?
Starting with the very basics, HTTP server requests are those actions that take place whenever a person visits a page on a website. The user’s browser pings the web server and asks for the files that contain all the content listed on that website page they are trying to access.
These files can be of various types; they can be HTML, CSS, or JavaScript files, or they can be simple images or icons. Regardless of the type of file requested, this action of demanding files from the server is called an HTTP server request.
HTTP is short for Hypertext Transfer Protocol, which is the protocol used by both browsers and servers to facilitate the requesting and receiving of files. All websites make use of HTTP and WordPress sites are no exception.
The fewer elements your website includes, the fewer HTTP requests are sent for rendering a web page. As a result, your site will become faster and more responsive. In order to make fewer HTTP requests on your site, you need to follow the steps listed in this article.
Let’s take a look at how to see what requests are being made in the first place.
Tracking Your HTTP Server Requests
If you don’t know how many HTTP server requests your site sends, you can use one of the following tools that will tell you all you need to know:
Google Chrome Developer Tools
When are you done updating your website? Hopefully, never: using the latest version of all your themes and plugins is not just common sense, it is best practice in online safety. Similarly, you should always be looking into ways of making your website run smoother and faster, for reasons of both user experience and SEO, though this should take the back seat: safety is the priority. However, if you can spare your staff’s time and effort on it, you should really see if there is a way to make your website load and run faster. And the more HTTP requests the website makes, the slower it is. In this article, we will be talking about ways to make fewer HTTP requests from your website. But that is not all.
Apart from reducing the number of HTTP requests, we would also like to get into what these requests are, what they do, and when you really do need them. Apart from that, we will provide you with several methods of reducing HTTP requests both in number and in the volume of slow-downs they cause. We will not be providing you with a checklist of absolute musts, though: think of this instead as an optimization toolkit.
Here’s what we’d like to talk about, and also what you can do to reduce the number of HTTP requests:
What Are HTTP Requests

Whenever a visitor visits a website, their browser downloads all the files needed to display it for them. Each bit of the website needed to run it, commonly referred to as a resource or an asset, requires a request to your server. Resources can be anything from image files, to fonts, to CSS, to JavaScript files. These requests are served by the server (hence its name) using the hypertext transfer protocol, or HTTP. That is why they are called HTTP requests.
Why Make Fewer HTTP Requests
Each individual resource needs its own request – that is just an in-built characteristic of the internet. This means, for instance, that the speed of the website is determined not just by the size of the files required, but by their number as well. Each image you use, each JS effect, each plugin that uses its own CSS stylesheet means one more HTTP request.
The fewer the HTTP requests made, the faster the website, in other words. There is a flip side, though: reducing the number of HTTP requests can come at the expense of aesthetics.
Now, not all HTTP requests are created equal. Smaller ones are less of a strain on server resources. Still, the principle remains: if you can achieve the same effect without even a single HTTP request, you will have made your website that much faster.
How to Analyze HTTP Requests

There are several online tools you can use to detect and analyze the HTTP requests your website makes. We will be using GTmetrix for this demonstration.
To check for speed issues on your website, enter a website’s URL into the URL field and click the Test your site button.

You will be taken to a report screen outlining speed issues that may occur on your website. To see the individual HTTP requests, click on the Waterfall tab.

Once there, you will see a list of resources requested and the amount of time it takes for them to be rendered by the visitor’s browser. Here, you can easily isolate individual requests that take a long time to serve. Hovering over any single one you can assess it in detail. You can also filter them by choosing a filter from the menu above the table or using the search field.

Now that you have identified your problem or problems, though, what can you do about them? Possibly nothing, but, equally possibly, loads.
Use HTTP/2
HTTP/2 is an improved version of the old HTTP protocol. HTTP/2 allows for asynchronous loading of files, making HTTP requests easier to serve, if not fewer in number. This is done by loading multiple resources at the same time using a single connection. How can you do that, though? Unless you are your own hosting provider, you can’t switch to HTTP/2 – that is part of your service package.
You can use a tool such as Geekflare’s HTTP/2 Test to check whether your website uses HTTP/2. If not, consult your hosting provider and learn whether it is possible to remedy that. If it isn’t, take a look at our list of WordPress migration plugins – and consider changing your hosting provider. You should not settle for obsolete technology, if not for reasons of loading speed, then for reasons of security.
Trim the Dead Weight: Get Rid of Useless Plugins

As we’ve mentioned before, if you are using a lot of plugins, chances are they are slowing up your website. If you are using a speed testing tool, you can find all your plugin-related requests by filtering for the word plugin, as WordPress stores all your plugin resources in the folder wp-content/plugin.
You may have installed a plugin that you don’t use, or you may have used a plugin at some point, but are not using it anymore. If you haven’t deactivated and uninstalled such a plugin, it may still be loading, completely unnecessarily.
If there are multiple plugins that provide you with the functionality you need, and if you can afford all of them, try picking the ones which make fewer HTTP requests. You can typically find the details in the plugins’ documentation if you are an advanced user. If not, test the free ones: you can use the speed testing tools yourself.
Optimize Your Images

Now, there is a lot to be said about optimizing images – enough to merit its own article. This is exactly the reason why we have a whole article about how to optimize images for your WordPress website. We will go over the basics here, though.
For the purposes of making fewer HTTP requests, we will repeat what we have said for the plugins: remove anything you don’t really need. Some websites rely heavily on visuals, though, and that can’t be helped. There are ways to compress image files or change to a different file format, for instance, and you should make use of them. And, while you’re at it, do not neglect to optimize your images’ alt text as well.
Lazy Load Images And Video

Lazy loading is the practice of postponing loading an element until it’s needed. Say an important video is at the bottom of a page (below the fold), and therefore not immediately visible to a visitor who loads said page. Do you need to load it before the visitor starts interacting with your website? Of course not.
Implementing lazy loading in WordPress is easy: it doesn’t require you to do anything in particular. Simply update your WordPress to version 5.5 or newer, which you should have done anyway. Lazy loading is a core feature from version 5.5. If, for whatever reason, you are deferring updating to version 5.5 of WordPress, many image compression plugins offer a lazy loading feature, too.
Optimize Your Database
Your images and video files are likely the slowest to load, but they are not the only thing you should be looking at. For best results in terms of both speed and storage space, consult our in-depth guide on database optimization in WordPress.
Optimize Your Fonts

Fonts are graphics that are mostly used to render text, and are generally the easiest way to customize the appearance of your text. Certain fonts, called icon fonts, have a different purpose: they provide easily scalable icons for your website. Each font, though, means a new HTTP request. If you can make do with fewer, get rid of the excess. Even hosting Google fonts locally will improve your website’s loading speed.
Disable Emojis

There are plenty of reasons not to use emojis, their being in poor taste not the least important. However, there is no denying that, like cockroaches, they are widespread. For that very reason, WordPress uses scripts that support the rendering of emojis for older browsers. This change to WordPress’s core mechanics dates from 2015, and most browsers have no difficulty rendering emojis. WordPress’s scripts? They still load. Unless you are catering specifically to visitors who use older browsers, disable the emoji scripts.
Use a CDN

CDN stands for Content Delivery Network. It is a tool that ensures that a request is served from a server that is geographically the closest to the computer making the request. If you use a CDN, parts of your website are cached – stored – across different servers and requests are served more quickly. We even have a list of our favorite CDN services, but they come at a premium. Not only that: they are not efficient when dealing with CSS files.
Minify CSS and JavaScript Files
Best practices in coding dictate that it should be written in such a way as to be understood by humans. Not just any humans, though: primarily this refers to coders. However, this makes code slower to execute, as the computer generally doesn’t care whether the version of code it is using is easily legible to humans as well. This is what code minification is, in a nutshell: it makes code smaller and quicker to execute, at the expense of legibility to humans.
Combine CSS Files
Having a lot of CSS files means needing a lot of HTTP requests for the website to load. This, in turn, takes a lot of time to process. Fortunately, there are plenty of ways to combine CSS files in WordPress – in case you need to. You won’t need to if you are using the HTTP/2 protocol.
Eliminate or Defer Render-Blocking JavaScript and CSS

Render-blocking means that a CSS stylesheet or a JavaScript script is loaded, but isn’t needed to run the portion of the web page visible to the user. Plugins and themes add CSS stylesheets and JavaScript scripts to your website, and if they don’t work together very well, they may be loading when they are not needed. Fortunately, there are ways to resolve render-blocking using a specialized plugin.
In Conclusion
As you can see, there is a lot you can do to reduce the number of HTTP requests in WordPress. Some of these things are better suited for advanced users, while others involve little more than installing a plugin and letting it run. With fewer HTTP requests comes greater speed and a better user experience overall.
Your website could likely always be running a little better. If you can spare the time and effort, optimize it to the best of your abilities.