-
#1
Добрый день, была поставлена ранее точка UAP-AC-Lite .. понадобилось войти ( старого компьютера откуда входили нет) не смогли , программа была установлена заново unifi network application. и настройка проходила как новое устройство. как переключиться чтобы можно было управлять?
Network 6.5.54


-
#2
Сбросьте точку на заводские настройки. Раз новый контроллер — новые настройки, проще точку сбросить на по умолчанию.
-
Автор темы
-
#3
точка одна , настраивалась с компьютера, которого нет, если по ssh не входит , то механический сброс ? , главное пингуется и вайфай раздаёт , но на макинтошах подключается через раз (
-
#4
Да.
А ssh вероятно на прошлом контроллере был запрещен. В основном настройки точка сама помнит.
Установка контроллера и настройка Wi-Fi точки UniFi AP

Содержание:
- Описание беспроводных точек доступа Ubiquiti UniFi AP
- Подключение и монтаж точек доступа UniFi AP
- Установка контроллера и настройка Wi-Fi точки UniFi AP
- Настрйока vLan, HotSpot, ограничение скорости на UniFi AP
- Диагностика и индикаторы состояния работы точек UniFi AP
Установка UniFi контроллера
Контроллер для беспроводного оборудования UniFi представлен в виде мультиплатформенного ПО (Windows, Mac OS, Linux). Для его работы необходимы:
- Java Runtime Environment 1.6 или выше
- Adobe Flash Player
- имя ПК и пользователя, под которым выполняется установка, должны быть на латинице!
- последняя актуальная версия с сайта www.ubnt.com/download
Процесс установки стандартен, не имеет нюансов и не вызывает затруднений.
Подключение точек доступа UniFi к контроллеру в одной подсети
Подключите точку доступа UniFi в одну сеть с контроллером. Когда контроллер ее обнаружит, в верхнем меню появится надпись pending 1. В нижней части на вкладке Alerts появится сообщение, что точка доступа UniFi с таким-то MAC адресом ждет подключения к контроллеру. Чтобы подключить точку, нажмите напротив нее кнопку Adopt.
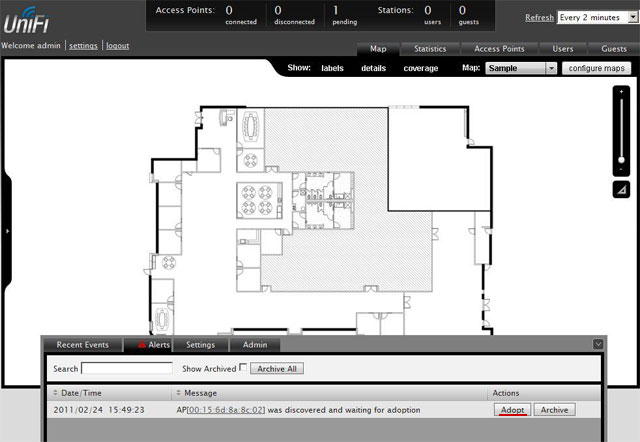
Если точка доступа определяется как manage by other, значит, она раньше подключалась к другому контроллеру. В этом случае нужно точку UniFi сбросить к заводским настройкам. Зажмите кнопку Reset (на 5 секунд) на корпусе UniFi, пока она не моргнет индикатором. После этого точка сбросится к заводским настройкам и ее можно подключать к контроллеру.
При первом подключении точка доступа будет два раза отключаться от контролера, чтобы установить в себя программное обеспечение и конфигурацию. Отслеживать состояние точек UniFi можно на вкладке Access Points.

Если в настройках контроллера стоит автоматическое обновление прошивки точек UniFi и он определит, что точке требуется обновление, то время подключения точки составит около 3 минут. Поэтому будьте терпеливы. В столбце Status в этом случае будет указано состояние Upgrading.
Когда UniFi подключится к контроллеру, в столбце Status будет указано состояние Connected.
В нижней части в настройках Settings — System есть пункт Connectivity Monitor. В нем указывается адрес шлюза Gateway или конкретный IP адрес Custom, который точки доступа проверяют на доступность. Если указанный IP адрес недоступен, то UniFi переходит в состояние isolated и отключает от себя клиентские устройства. Это позволяет в случае повреждения кабеля не держать на wifi точке клиентов без выхода в интернет, а переключить их на другие соседние wifi точки.
Размещение точек доступа на карте
Контроллер позволяет загружать изображения планов помещения и размещать на них точки доступа UniFi. Это очень удобно для отслеживания проблем в работе точек.
Откройте вкладку Map, нажмете кнопку configure maps, потом Add a Map и выберите картинку с планом помещения.
C помощью ползунка справа выполняется масштабирование картинки. Линейка под ползунком позволяет провести линию на картинке и сообщить системе, сколько в ней метров.
Чтобы расположить точки доступа UniFi на плане помещения, перетащите их с левой панели на карту. Точку можно зафиксировать от случайного изменения нажатием пиктограммы замка.
Если точка доступа отключится от контроллера или станет isolated, то она будет окрашена красным цветом на плане помещения, и на вкладке Alerts появится предупреждение. Таким образом, будет легко понять, у какой точки возникла неисправность.
Для уличных беспроводных сетей вместо графической карты можно подключить сервис Google Maps. Чтобы подключить Google Maps, понадобиться получить лицензию на подключение к серверу карт по этой ссылке http://code.google.com/apis/maps/signup.html.
Подключение точек доступа UniFi к контроллеру из другой подсети
Контроллер позволяет подключать не только точки UniFi, расположенные в одной подсети, но и управлять удаленными точками филиалов. При этом управление всеми беспроводными сетями выполняется централизованно из одного контроллера.
При такой конфигурации трафик Wi-Fi сетей филиалов выходит напрямую в интернет, а на контроллер в центральный офис перенаправляется лишь служебный трафик небольшого объема.
Для подключения удаленных точек к контроллеру, им нужно указать IP адрес контроллера. Это можно сделать тремя способами:
- Определение адреса контроллера через DNS;
- Определение адреса контроллера через DHCP option 43;
- Задание адреса контроллера через специальную утилиту.
Определение адреса через DNS
При наличии в удаленном офисе собственного DNS сервера, на нем указывается соответствие запроса UniFi и адреса удаленного контроллера в центральном офисе.
Определение адреса через DHCP option 43
Если DHCP сервер, установленный в удаленном офисе, поддерживает задание опций, можно передать адрес удаленного сервера в DHCP пакете.
Пример конфигурации для ISC DHCP server:
# …
Option space ubnt;
option ubnt.UniFi-address code 1 = IP-address;class «ubnt» {
match if substring (option vendor-class-identifier, 0, 4) = «ubnt»;
option vendor-class-identifier «ubnt»;
vendor-option-space ubnt;
}subnet 10.10.10.0 netmask 255.255.255.0 {
range 10.10.10.100 10.10.10.160;
option ubnt.UniFi-address 201.10.7.31; ### UniFi Controller IP ###
option routers 10.10.10.2;
option broadcast-address 10.10.10.255;
option domain-name-servers 168.95.1.1, 8.8.8.8;
# …
}
# …
Задание адреса контроллера через утилиту
Самым простым и быстрым способом подключения точек доступа филиалов является задание адреса контроллера вручную.
Подключите компьютер в одну подсеть с точками доступа UniFi и запустите утилиту Unifi-Discover, которая устанавливается вместе с контроллером. Контроллер на компьютере при этом не должен быть запущен. Выберите точку, нажмите manage и введите IP адрес контроллера. Контроллер увидит точку и сможет ее подключить.
После подключения точки UniFi к контроллеру и перезагрузки, нужно заново прописать адрес контроллера.
Настройка точки доступа UniFi репитером (повторителем)
Чтобы настроить точку доступа UniFi репитером (повторителем), откройте в ее параметрах вкладку Configuration — Wireless Uplinks, выберите мастер точку и нажмите Select.
После этого точку-ретранслятор можно отключить от компьютера или роутера, и она будет работать в режиме ретрансляции. На карте помещения рядом с такой точкой будет изображен значок радиоканала.
Если пункта меню Wireless Uplinks нет, то необходимо на выбранной точке нажать кнопку «locate«, после чего необходимый пункт меню появится в настройках.
Однако у такого подключения будут определенные недостатки:
- Упадет пропускная способность, и вырастут задержки, поскольку трафик ретранслируется через опорную точку;
- Ретрансляторы должны находиться в зоне покрытия мастер точки. Из-за этого половина зоны покрытия ретрансляторов будет использоваться не эффективно.
- Точка-ретранслятор подключается только к мастер точке, подключенной по кабелю. Нельзя подключить ретранслятор к такому же ретранслятору.
- На одну мастер точку доступа с кабельным подключением можно подключить не более 4-х точек-ретрансляторов.
Содержание:
- Описание беспроводных точек доступа Ubiquiti UniFi AP
- Подключение и монтаж точек доступа UniFi AP
- Установка контроллера и настройка Wi-Fi точки UniFi AP
- Настрйока vLan, HotSpot, ограничение скорости на UniFi AP
- Диагностика и индикаторы состояния работы точек UniFi AP
Ubiquiti UAP device adoption with UniFi network application and SSH terminal
Device adoption is the process of connecting a UniFi device to a UniFi application in order to be managed by UniFi Controller.
This article explains how device adoption works, how to adopt devices to the UniFi Network application, and how to troubleshoot any issues that may arise.
The UniFi Network application scans and displays all devices that are unmanaged or managed by UniFi Controller. A UniFi device that is not managed by any application will show a static white LED. This means that the device is available for discovery and adoption.
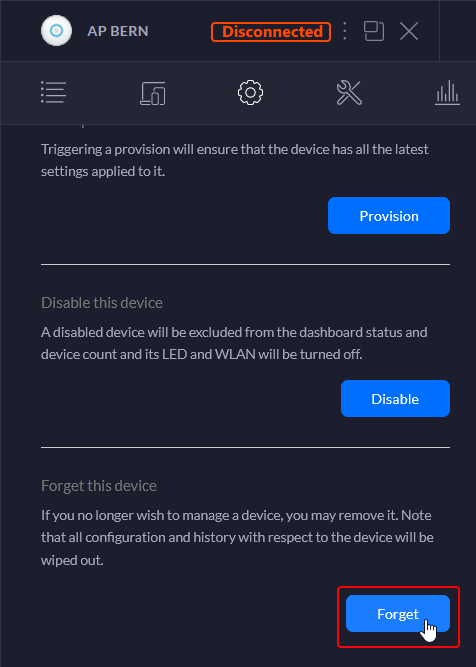
If the adoption process fails and the device is no longer possible to adopt because the UniFi Controller reject it, for example after a failed provisioning, the first step to do is to remove the device that is no longer connected from the UniFi Controller by clicking on the Forget button.
Manual set-inform via SSH
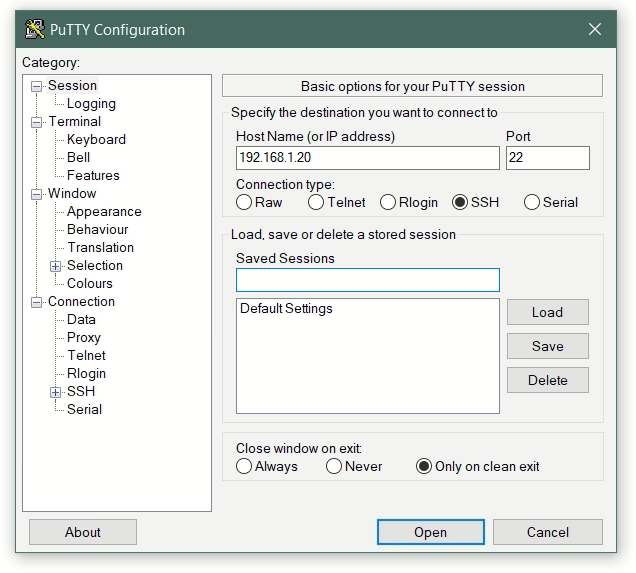
Now connect over SSH to the device, for example using PuTTY terminal or with Linux use SSH to the UAP Access Point.
BusyBox v1.25.1 () built-in shell (ash)


  ___ ___      .__________.__
 |   |   |____ |___  ____/__|
 |   |   /    |  ||  __) |  |   (c) 2010-2020
 |   |  |   |    ||     |  |   Ubiquiti Networks, Inc.
 |______|___|  /__||__/   |__|
            |_/                  https://www.ui.com/

      Welcome to UniFi UAP-AC-LR!

APBern-BZ.v4.3.28# info

Model:       UAP-AC-LR
Version:     4.3.28.11361
MAC Address: 18:e8:29:c0:b0:d6
IP Address:  192.168.1.20
Hostname:    APBern
Uptime:      104426 seconds

Status:      Server Reject (http://192.168.2.17:8080/inform)
APBern-BZ.v4.3.28#
If the UAP status Server Reject is displayed, then you can reset the UAP, using the following command-line from the SSH terminal.
sudo syswrapper.sh restore-defaulDuring the reset, the UAP will reboot, after about 2 minutes the device is reachable again, possibly now with a different IP address.
The device is now in the status – Pending Adoption (static white LED), the device can now adopt by the UniFi controller application.

Now open an SSH terminal again and execute the command-lines, the command set-inform must be executed several times. After reset the login is ubnt/ubnt or root/ubnt. The UniFi-Controller is running on Server 192.168.2.17, but it can also by an UniFi Cloud-Key.
set-inform http://192.168.2.17:8080/inform
set-inform
After about 2 minutes, the device is ready for adoption, in the UniFi Controller application click Adopt. After another 2 minutes, the device is adopted and has been provisioned. The device status LED now lights up blue permanently.
Advanced adoption troubleshooting
If the device doesn’t appear for adoption and the steps above didn’t help, try the following steps:
If the device status LED not lights up, check whether the device is powered. Check the PoE and Ethernet cables. If the device is powered and the LED lights up, it may be managed by another UniFi network application.
If the device status LED is permanently blue, it means that the device has either already been adopted from a UniFi network application and is no longer able to connect, or that the device is managed by another UniFi network application that prevents the device from being detected.
A reset can be triggered on the UniFi device next to the RJ-45 LAN port, use a pen or a curved paper clip to press and hold the reset button for at least 5 seconds, the device status LED starts flashing.
Add additional IP address on Windows
If the device has assigned the IP address 192.168.1.20 and not one from DHCP, it means that the device has been rejected by the UniFi Controller and the provisioning no longer works. In order to be able to reach the device via the SSH terminal, a second IP address must be assigned to the client computer. To do this, proceed as follows under Windows, by pressing the keys, Win+R for Run.

Enter ncpa.cpl and click OK
The Control Panel Network Connections is opened; right-click on Properties above the active network adapter.
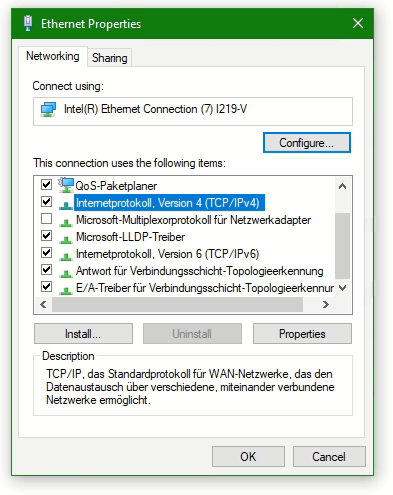
Mark the line Internetprotocol Version 4 (TCP/IPv4) and click on Properties.
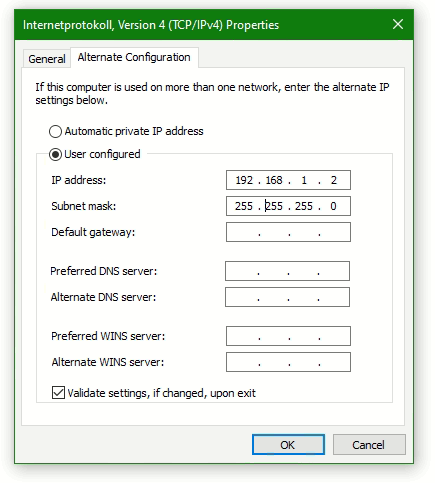
Enter an IP address in the Alternate Configuration tap, e.g. 192.168.1.2 and the subnet mask 255.255.255.0. Confirm the entry by clicking OK to activate the alternate IP address.
Add second IP address on Linux
Under Linux, a second IP address can be temporarily assigned to the network interface as root.
$ ifconfig eth0:0 192.168.1.2 netmask 255.255.255.0 upWith modern Linux distributions like Debian 10 (buster) or CentOS 7 and newer, it is this command line.
$ ip address add 192.168.1.2/24 dev eth0macOS use ifconfig to add second IP-Address to interface en0.
$ sudo ifconfig en0 inet 192.168.1.2 netmask 255.255.255.0The device can now be checked with ping and connected to 192.168.1.20 via SSH terminal.
$ ssh ubnt@192.168.1.20Linux has SSH built in and can be used directly from shell. After the SSH connection to the device has been established, the procedure described above is carried out.
If a UniFi AP is not accepted after several attempts using Adopt, assign an alternate IP address to the host on which the UniFi controller is running, for example. 192.168.1.100. The UAP that does not get an IP from the DHCP can be reached by the UniFi controller in order to be able to initiate provisioning, cause the UAP can be reached by the controller via the IP address 192.168.1.20, that after execute restore-default. After the successful provisioning, the UAP is back in the original subnet.
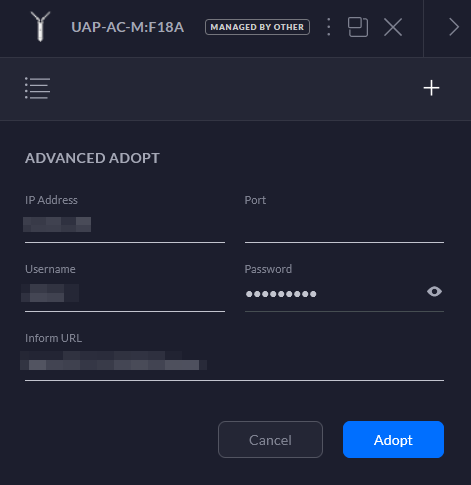
It is also possible to use the ADVANCED ADOPT option with click to the + on UAP they appers status MANAGED BY OTHER.
Adopting an Unifi Access Point in the controller should be really straightforward. But sometimes it just won’t work. You keep getting Adoption Failed, or maybe even not able to adopt your access point at all.
The first step is to make sure that the inform URL is set correctly in the access point. But if that is set correctly then we need to take a different approach to fix the Unifi Adoption Failed issue.
In this article, I will explain different solutions to will help you to fix the adoption issue.
Why is the Unifi Adoption Failing
First a little bit of background information about why the adoption could be failing. There are a couple of things required to successfully adopt an Unifi Access Point in your controller:
- The access point must not be managed by another controller
- Inform url should be set correctly – read more about it here
- Access Point firmware version should not be to old
- Controller should be up-to-date
The most common issue is a firmware mismatch. The access point is for example running the latest firmware version, but the controller is maybe 10 releases behind. This could cause problems with adopting the access point.
Method 1 – Factory Reset the Access Point
To make sure that the access point isn’t managed by another (old) controller, we are first going to factory reset the access point. Make sure that the access point is powered on and press the reset button for 10 seconds.
Another way to reset the access point is remotely with SSH.
- Connect to the access point over SSH (using PowerShell for example)
- Enter the following command to factory reset the AP:
set-default
You can reconnect to the access point after the Clearing CFG (configuration) is done.
With the Access Point reset you can now check if you can adopt the access point in the controller.
Method 2 – Check IP Address of the Access Point
After you have factory reset the access point, you should at least see the access point in the controller. If you don’t see it at all, then it’s possible that the IP range of the access point doesn’t match with the controller.
They both need to be in the same IP Range to be able to communicate with each other. You can use the Unifi Discovery Tool to scan your whole network for the access point. This way you can determine which IP Address the access point has got.
You might need to click the Unifi Family button in the top right corner to switch to the correct view.
If the access point is in a different IP range, then double-check your router and Unifi Controller to be sure that only one them has DHCP enabled. Another good option is to connect the access point to the same switch as the controller.
Method 3 – Update the Unifi Controller
Before we update the firmware of the access point, we are first going to make sure that Unifi Controller is up-to-date.
If you have a Cloudkey or UDM (Pro)
- Open your Unifi OS
- Go to Settings > Updates
- Check the Network application is up-to-date
If you are running the controller in a Docker container or on Windows then check the version that you are running in the settings screen:
- Open the network controller
- Click on Settings
- Note the version and check the latest available version here https://www.ui.com/download/unifi/
After you have updated the Unifi Controller, try again to adopt the Access Point.
Method 4 – Update the firmware on the Access Point
If the firmware on the access point is outdated, then you also won’t be able to adopt the access point in the Unifi Controller. Normally you update the firmware through the controller, but there is another option.
We can manually download the Unifi firmware on the access point directly. To do this we are going to connect to the access point over SSH. You will need to know the IP Address of the access point, if you don’t see the IP Address in the controller, then use Advanced IP Scanner to look it up.
- Press Windows Key + X (or right-click the startmenu) and choose Windows PowerShell
- Connect to your access point. Replace the IP Adres below with the address of your access point:
# Connect to the access point, with username ubnt
ssh [email protected]

# type yes on the following warning:
The authenticity of host '192.168.1.142 (192.168.1.142)' can't be established.
RSA key fingerprint is SHA256:dR0P62KnusGClIgPM1pfsx1QlH6HzrgTLxz0wDk2D4k.
Are you sure you want to continue connecting (yes/no/[fingerprint])? yes
- Enter the password ubnt
- We now need to find the correct firmware URL. Open the Unifi download page and find the firmware for your access point.
- Click Download and accept the terms.
- Click Copy URL
- In the PowerShell Windows, type upgrade and paste the URL that we just copied:
upgrade https://dl.ui.com/unifi/firmware/U7PG2/5.43.56.12784/BZ.qca956x_5.43.56+12784.211209.2338.bin
The access point will download the firmware and upgrade it. During the upgrade, you won’t be able to connect to the access point. It can take a couple of minutes to complete.
You should be able to adopt the Unifi Access point when the upgrade is completed and the status light is solid white.
Wrapping Up
I hope this article helped you to fix the Unifi adoption failed issue. A factory reset is most of the time needed and make sure that you check your firmware versions. If you are running the controller in a docker container, then make sure that the appropriate ports are forwarded.
In docker, it can help to add the --net=host flag to the docker run command.
If you have any questions, just drop a comment below.