MariaDB starting with 10.5.2
From MariaDB 10.5.2, mariadb-check is the name of the tool, with mysqlcheck a symlink .
Contents
- Using mysqlcheck
- Options
- Option Files
- Option Groups
- Notes
- Default Values
- mysqlcheck and auto-repair
- mysqlcheck and all-databases
- mysqlcheck and verbose
mysqlcheck is a maintenance tool that allows you to check, repair, analyze and optimize multiple tables from the command line.
It is essentially a commandline interface to the CHECK TABLE, REPAIR TABLE, ANALYZE TABLE and OPTIMIZE TABLE commands, and so, unlike myisamchk and aria_chk, requires the server to be running.
This tool does not work with partitioned tables.
Using mysqlcheck
./client/mysqlcheck [OPTIONS] database [tables]
OR
./client/mysqlcheck [OPTIONS] --databases DB1 [DB2 DB3...]
OR
./client/mysqlcheck [OPTIONS] --all-databases
mysqlcheck can be used to CHECK (-c, -m, -C), REPAIR (-r), ANALYZE (-a),
or OPTIMIZE (-o) tables. Some of the options (like -e or -q) can be
used at the same time. Not all options are supported by all storage engines.
The -c, -r, -a and -o options are exclusive to each other.
The option --check will be used by default, if no other options were specified.
You can change the default behavior by making a symbolic link to the binary, or
copying it somewhere with another name, the alternatives are:
Options
mysqlcheck supports the following options:
Option Files
In addition to reading options from the command-line, mysqlcheck can also read options from option files. If an unknown option is provided to mysqlcheck in an option file, then it is ignored.
The following options relate to how MariaDB command-line tools handles option files. They must be given as the first argument on the command-line:
In MariaDB 10.2 and later, mysqlcheck is linked with MariaDB Connector/C. However, MariaDB Connector/C does not yet handle the parsing of option files for this client. That is still performed by the server option file parsing code. See MDEV-19035 for more information.
Option Groups
mysqlcheck reads options from the following option groups from option files:
Notes
Default Values
To see the default values for the options and also to see the arguments you get
from configuration files you can do:
./client/mysqlcheck --print-defaults
./client/mysqlcheck --help
mysqlcheck and auto-repair
When running mysqlcheck with --auto-repair (as done by
mysql_upgrade), mysqlcheck will first
check all tables and then in a separate phase repair those that failed the
check.
mysqlcheck and all-databases
mysqlcheck --all-databases will ignore the internal log tables general_log and slow_log as these can’t be checked, repaired or optimized.
mysqlcheck and verbose
Using one --verbose option will give you more information about what mysqlcheck is doing.
Using two --verbose options will also give you connection information.
If you use three --verbose options you will also get, on stdout, all ALTER, RENAME, and CHECK commands that mysqlcheck executes.
mysqlcheck — это инструмент обслуживания, который позволяет проверять, восстанавливать, анализировать и оптимизировать несколько таблиц из командной строки.
Этот инструмент не работает с таблицами разделов.
mysqlcheck можно использовать для ПРОВЕРКИ (-c, -m, -C), REPAIR (-r), ANALYZE (-a) или OPTIMIZE (-o) таблиц. Некоторые параметры (например, -e или -q) можно использовать одновременно. Не все параметры поддерживаются всеми механизмами хранения.
Варианты -c,-r,-a и -o эксклюзивны друг для друга.
Параметр --check будет использоваться по умолчанию, если не указаны другие параметры. Вы можете изменить поведение по умолчанию, сделав символическую ссылку на двоичный файл или скопировав его куда-нибудь с другим именем, альтернативы:
| Option | Description |
|---|---|
-A, --all-databases
|
Проверить все базы данных. Это то же самое, что и --databases со всеми выбранными базами данных. |
-1, --all-in-1
|
Вместо того,чтобы делать по одному запросу к каждой таблице,используйте один запрос к БД,называя все таблицы в БД в списке,разделенном запятыми. |
-a, --analyze
|
Проанализируй данные таблицы. |
--auto-repair |
Если отмеченная таблица повреждена,автоматически исправьте ее.Восстановление будет произведено после того,как все таблицы будут проверены. |
--character-sets-dir=name |
Каталог, в котором установлены файлы наборов символов . |
-c, --check
|
Проверьте таблицу на наличие ошибок. |
-C, --check-only-changed
|
Проверяйте только те таблицы,которые изменились с момента последней проверки или не были закрыты должным образом. |
-g, --check-upgrade
|
Проверьте таблицы на наличие изменений, зависящих от версии. Может использоваться с --auto-repair для исправления таблиц, требующих обновлений в зависимости от версии. Автоматически включает параметры --fix-db-names и --fix-table-names . Используется при обновлении
|
--compress |
Сжимайте всю информацию,передаваемую между клиентом и сервером,если оба варианта поддерживают сжатие. |
-B, --databases
|
Проверить несколько баз данных. Обратите внимание, что обычно mysqlcheck обрабатывает первый аргумент как имя базы данных, а следующие аргументы — как имена таблиц. При использовании этой опции таблицы не указываются, и все аргументы имени рассматриваются как имена базы данных. |
-# , --debug[=name]
|
Выходной журнал отладки.Часто это ‘d:t:o,filename’. |
--debug-check |
Проверка использования памяти и открытия файла при выходе. |
--debug-info |
Распечатайте кое-какую отладочную информацию на выходе. |
--default-auth=plugin |
Используемый по умолчанию клиентский плагин для аутентификации. |
--default-character-set=name |
Установите набор символов по умолчанию . |
-e, --extended
|
Если вы используете эту опцию с --check , это гарантирует, что таблица будет согласована на 100 процентов, но это займет много времени. Если вы используете этот параметр с --repair , он заставит использовать старый медленный метод восстановления с помощью кеша ключей вместо более быстрого восстановления путем сортировки. |
-F, --fast
|
Проверяйте только те таблицы,которые не были закрыты должным образом. |
--fix-db-names |
Преобразование имен баз данных в формат, используемый начиная с MySQL 5.1. Затрагиваются только имена баз данных, содержащие специальные символы. Используется при обновлении со старой версии MySQL. |
--fix-table-names |
Преобразуйте имена таблиц (включая представления ) в формат, используемый начиная с MySQL 5.1. Затрагиваются только имена таблиц, содержащие специальные символы. Используется при обновлении со старой версии MySQL. |
--flush |
Промойте каждый стол после проверки.Это полезно,если вы не хотите,чтобы проверенные таблицы занимали место в кэше после проверки. |
-f, --force
|
Продолжайте,даже если мы получим ошибку SQL. |
-?, --help
|
Отобразите это справочное сообщение и выйдите. |
-h name, --host=name
|
Подключитесь к данному хосту. |
-m, --medium-check
|
Быстрее,чем при расширенной проверке,но находит только 99,99 процента всех ошибок.Должно быть достаточно хорошо для большинства случаев. |
-o, --optimize
|
Optimize tables. |
-p, --password[=name]
|
Пароль для использования при подключении к серверу. Если вы используете короткую форму параметра ( -p ), у вас не может быть пробела между параметром и паролем. Если вы не укажете значение пароля после параметра --password или -p в командной строке, mysqlcheck запросит его. Указание пароля в командной строке следует считать небезопасным. Вы можете использовать файл параметров, чтобы не вводить пароль в командной строке. |
-Z, --persistent
|
При использовании ANALYZE TABLE ( --analyze ), использует персистирующий вариант ALL, который заставляет двигатель-независимые статистики для этой таблицы будет обновлен. Добавлено в MariaDB 10.1.10
|
-W, --pipe
|
В Windows подключайтесь к серверу через именованный канал.Эта опция применяется только в том случае,если сервер поддерживает соединения по именованной трубе. |
--plugin-dir |
Справочник для клиентских плагинов. |
-P num, --port=num
|
Номер порта для подключения или 0 по умолчанию для,в порядке предпочтения,my.cnf,$MYSQL_TCP_PORT,/etc/services,встроенный по умолчанию (3306). |
--process-tables |
Выполните запрошенную операцию (проверка, исправление, анализ, оптимизация) над таблицами. Включено по умолчанию. Используйте --skip-process-tables для отключения. |
--process-views[=val] |
Выполните запрошенную операцию (только CHECK VIEW или REPAIR VIEW ). Возможные значения NO, YES (исправить контрольную сумму, при необходимости добавить поле mariadb-version), UPGRADE_FROM_MYSQL (то же самое, что YES и переключить алгоритм MERGE<->TEMPTABLE. |
--protocol=name |
Протокол соединения (tcp,сокет,труба,память),используемый для подключения к серверу.Полезен,когда другие параметры соединения приводят к использованию протокола,отличного от того,который вы хотите. |
-q, --quick
|
Если вы используете эту опцию с CHECK TABLE,она предотвращает проверку строк на наличие неправильных ссылок.Это самая быстрая проверка.Если вы используете эту опцию с REPAIR TABLE,она будет пытаться восстановить только дерево индексов.Это самый быстрый метод восстановления таблицы. |
-r, --repair
|
Может исправить почти все,кроме уникальных ключей,которые не являются уникальными. |
--shared-memory-base-name |
Имя общей памяти, которое будет использоваться для подключений Windows с использованием общей памяти к локальному серверу (запускается с параметром --shared-memory ). Чувствительный к регистру. |
-s, --silent
|
Печатайте только сообщения об ошибках. |
--skip-database |
Не обрабатывайте БД (регистрозависимую),указанную в качестве аргумента. |
-S name, --socket=name
|
Для подключений к localhost,используйте файл Unix сокета,или,в Windows,название именованной трубы для использования. |
--ssl |
Включает TLS . TLS также включен, даже если этот параметр не установлен, если заданы некоторые другие параметры TLS. Начиная с MariaDB 10.2 , опция --ssl по умолчанию не включает проверку сертификата сервера . Чтобы проверить сертификат сервера, пользователь должен указать параметр --ssl-verify-server-cert . |
--ssl-ca=name |
Определяет путь к файлу PEM, который должен содержать один или несколько сертификатов X509 для доверенных центров сертификации (CA), которые будут использоваться для TLS . Этот параметр требует, чтобы вы использовали абсолютный путь, а не относительный. См. Раздел Обзор защищенных подключений: центры сертификации (ЦС) для получения дополнительной информации. Этот параметр подразумевает параметр --ssl . |
--ssl-capath=name |
Определяет путь к каталогу, содержащему один или несколько файлов PEM, каждый из которых должен содержать один сертификат X509, который доверенный центр сертификации (CA) должен использовать для TLS . Этот параметр требует, чтобы вы использовали абсолютный путь, а не относительный. Каталог, указанный этой опцией, необходимо запустить с помощью команды openssl rehash . См. Раздел Обзор защищенных подключений: центры сертификации (ЦС) для получения дополнительной информации. Этот параметр поддерживается только в том случае, если клиент был создан с использованием OpenSSL или yaSSL. Если клиент был построен с использованием GnuTLS или Schannel, то этот параметр не поддерживается. См. TLS и библиотеки криптографии, используемые MariaDB для получения дополнительной информации о том, какие библиотеки используются на каких платформах. Этот вариант подразумевает --ssl вариант. |
--ssl-cert=name |
Определяет путь к файлу сертификата X509, который будет использоваться для TLS . Этот параметр требует, чтобы вы использовали абсолютный путь, а не относительный. Этот параметр подразумевает параметр --ssl . |
--ssl-cipher=name |
Список разрешенных шифров или комплектов шифров для использования для TLS . Этот параметр подразумевает параметр --ssl . |
--ssl-crl=name |
Определяет путь к файлу PEM, который должен содержать один или несколько отозванных сертификатов X509 для использования для TLS . Этот параметр требует, чтобы вы использовали абсолютный путь, а не относительный. См. Раздел Обзор защищенных подключений: списки отзыва сертификатов (CRL) для получения дополнительной информации. Этот параметр поддерживается только в том случае, если клиент был создан с использованием OpenSSL или Schannel. Если клиент был построен с использованием yaSSL или GnuTLS, то этот вариант не поддерживается. См. TLS и библиотеки криптографии, используемые MariaDB для получения дополнительной информации о том, какие библиотеки используются на каких платформах. |
--ssl-crlpath=name |
Определяет путь к каталогу, содержащему один или несколько файлов PEM, каждый из которых должен содержать один отозванный сертификат X509 для использования для TLS . Этот параметр требует, чтобы вы использовали абсолютный путь, а не относительный. Каталог, указанный этой опцией, необходимо запустить с помощью команды openssl rehash . См. Раздел Обзор защищенных подключений: списки отзыва сертификатов (CRL) для получения дополнительной информации. Эта опция поддерживается только в том случае, если клиент был построен с OpenSSL. Если клиент был построен с использованием yaSSL, GnuTLS или Schannel, то этот параметр не поддерживается. См. TLS и библиотеки криптографии, используемые MariaDB для получения дополнительной информации о том, какие библиотеки используются на каких платформах. |
--ssl-key=name |
Определяет путь к файлу закрытого ключа, который будет использоваться для TLS . Этот параметр требует, чтобы вы использовали абсолютный путь, а не относительный. Этот параметр подразумевает параметр --ssl . |
--ssl-verify-server-cert |
Включает проверку сертификата сервера . По умолчанию эта опция отключена. |
--tables |
Переопределяет параметр --databases или -B , так что все аргументы имени, следующие за параметром, рассматриваются как имена таблиц. |
--use-frm |
Для выполнения операций по восстановлению таблиц MyISAM,получите структуру таблицы из файла .frm,таким образом,таблица может быть восстановлена даже в случае повреждения заголовка .MYI. |
-u, --user=name
|
Пользователь для входа в систему,если он не является текущим пользователем. |
-v, --verbose
|
Распечатайте информацию о различных этапах. Вы можете использовать эту опцию несколько раз, чтобы получить еще больше информации. См. Mysqlcheck и подробное описание ниже. |
-V, --version
|
Вывод информации о версии и выход. |
--write-binlog |
Запишите команды ANALYZE, OPTIMIZE и REPAIR TABLE в двоичный журнал . Включено по умолчанию; используйте --skip-write-binlog , когда команды не должны отправляться ведомым устройствам репликации. |
В этой статье мы будем говорить о mysqlcheck, которая является инструментом обслуживания командной строки, что позволяет проверять, анализировать, ремонтировать, а также оптимизировать таблицы MySQL / MariaDB и базы данных.
Проверьте одну таблицу в базе данных
Следующая команда будет проверять сообщения таблицы в блоге базы данных:
$ mysqlcheck -c blog posts
blog.posts                         OK
Если база данных защищена паролем , добавьте -u root -p в конце команды:
$ mysqlcheck -c blog posts -u root -p
Enter password:
blog.posts                         OK
Анализ всех таблиц в базе данных
Следующая команда будет проверять сообщения таблицы в блоге базы данных:
$ mysqlcheck -a blog posts
blog.posts                         OK
Если сервер MySQL / MariaDB работает на удаленном хосте, добавьте -h в конце команды:
$ mysqlcheck -a blog posts -h remotehost.com
blog.posts                         OK
Оптимизировать все таблицы во всех баз данных
$ mysqlcheck -o --all-databases
blog.users
note     : Table does not support optimize, doing recreate + analyze instead
status   : OK
mysql.time_zone_transition_type                    Table is already up to date
Table does not support optimize, doing recreate + analyze instead - означает, что мы делаем OPTIMIZE в таблицах InnoDB, который не поддерживает эту опцию. При выполнении OPTIMIZE в таблицах, InnoDB создает пустую таблицу, копирует все строки из существующей таблицы в новую, удаляет старую и переименовывает новую таблицу, а затем запускает ANALYZE в таблицах.Table is already up to date - Означает, что таблица актуальна, и нет никакой необходимости проверять её.
Восстановление нескольких баз данных
Следующая команда восстановит все таблицы в обоих базах данных:
$ mysqlcheck -r --databases blog blog2
Если вы видите: note : The storage engine for the table doesn't support repair, то это означает, что вы делаете REPAIR на InnoDB.
Оптимизация и ремонт всех таблиц во всех базах данных
Следующая команда будет проверять все таблицы во всех базах данных, и если какая-то таблица повреждена он будет автоматически исправит это эту таблицу:
$ mysqlcheck --auto-repair -o --all-databases
-c, --check |
Проверить таблицу на наличие ошибок. |
-a, --analyze |
Анализировать данные таблицы. |
-o --optimize |
Оптимизация таблиц. |
-r, --repair |
Выполнение работ по ремонту, которые можно исправить почти все, за исключением уникальных ключей, которые не являются уникальными. |
--auto-repair |
Если проверенная таблица повреждена, автоматически восстановить ее. Ремонт будет сделан после того, как все таблицы были проверены. |
-A, --all-databases |
Проверьте все базы данных. Это то же самое, как -databases со всеми выбранными базами данных. |
-B, --databases |
Процесс все таблицы в названных баз данных. С помощью этой опции, все имена аргументов рассматриваются как имена баз данных, а не как имена таблиц. |
--tables |
Заменяет -databases или -B вариант таким образом, что все аргументы имени следующей опции рассматриваются как имена таблиц. |
-g, --check-upgrade |
Проверка таблицы для версии зависящих от изменений. Может использоваться с опцией -auto-repair для исправления таблиц, требующих версии зависящих от обновления. |
![]()
PS. Если вам понравился этот пост, пожалуйста, поделитесь им с друзьями в социальных сетях с помощью кнопок, расположенных ниже поста или просто оставьте комментарий. Благодарю.
Если вы нашли ошибку, пожалуйста, выделите фрагмент текста и нажмите Ctrl+Enter.
Программа mysqlcheck используется для проверки целостности (-c, -m, -C), восстановления (-r), анализа (-a) или оптимизации (-o) таблиц базы данных MySQL. Некоторые опции (например -e и -q) могут использоваться одновременно.
Не все опции поддерживаются различными движками MySQL. Опции -c, -r, -a и -o взаимоисключаемые, что означает, что будет применена последняя указанная опция.
Если не указано ничего, то будет применена опция -c. Альтернативами (синонимами) являются:
mysqlrepair: опция по умолчанию -r
mysqlanalyze: опция по умолчанию -a
mysqloptimize: опция по умолчанию -o
Использование:
mysqlcheck [OPTIONS] database [tables]
или:
mysqlcheck [OPTIONS] --databases DB1 [DB2 DB3...]
или
mysqlcheck -uлогин -pпароль [--auto-repair] [--check] [--optimize] [--all-databases] [имя_базы_данных]
Опции:
-A, --all-databases
Проверить все базы данных. Аналогична опции —databases, если указать все базы данных.
-1, --all-in-1
Вместо выполнения запросов для каждой таблицы в отдельности выполнить все запросы в одном отдельно для каждой таблицы. Имена таблиц будут представлены в виде списка имен, разделенных запятой.
-a, --analyze
Анализировать данные таблицы.
--auto-repair
Если проверенная таблица повреждена, автоматически восстановить ее. Исправления будут произведены после проверки всех таблиц, если были обнаружены повреждения.
-#, --debug=...
Выводит информацию журнала отладки. Часто используется следующий набор параметров: ‘d:t:o,filename’
--character-sets-dir=...
Директория, где находятся установки символов.
-c, --check
Проверить таблицу на наличие ошибок.
-C, --check-only-changed
Проверить только таблицы, измененные со времени последней проверки или некорректно закрытые.
--compress
Использовать сжатие данных в протоколе сервер/клиент.
-?, --help
Вывести данную вспомогательную информацию и выйти из программы.
-B, --databases
Проверить несколько баз данных. Обратите внимание на разницу в использовании: в этом случае таблицы не указываются. Все имена аргументов рассматриваются как имена баз данных.
--default-character-set=...
Установить набор символов по умолчанию.
-F, --fast
Проверить только базы данных, которые не были закрыты должным образом.
-f, --force
Продолжать даже при получении ошибки SQL.
-e, --extended
При использовании данного параметра совместно с CHECK TABLE можно быть уверенным в целостности таблицы. Если же использовать этот параметр с REPAIR TABLE, запустится расширенное восстановление таблицы.
-h, --host=...
Хост базы данных.
-m, --medium-check
Быстрее, чем —extended-check, но находит только 99,99 процентов всех ошибок.
-o, --optimize
Оптимизировать таблицу.
-p, --password[=...]
Используемый пароль при подключении к серверу. Если пароль не указан, у пользователя запрашивается пароль с терминала.
-P, --port=...
Номер порта, используемого для подключения по TCP/IP.
--protocol=(TCP | SOCKET | PIPE | MEMORY)
Для указания протокола соединения, который надлежит использовать.
-q, --quick
При использовании данной опции совместно с CHECK TABLE предотвращается сканирование строк для корректировки неправильных связей. Это наиболее быстрый метод проверки. Если же использовать этот параметр с REPAIR TABLE, программа попытается восстановить только систему индексов. Это наиболее быстрый метод восстановления таблицы.
-r, --repair
Может исправить почти все, за исключением уникальных ключей, имеющих дубликаты.
-s, --silent
Выводить только сообщения об ошибках.
-S, --socket=...
Файл сокета, используемый для подсоединения.
--tables
Перекрывает опцию —databases (-B).
-u, --user=#
Имя пользователя MySQL, если этот пользователь в данное время не является активным.
-v, --verbose
Вывести информацию о различных этапах.
-V, --version
Вывести информацию о версии и выйти из программы.
One of the clearest reasons for errors in the database can be an improper shutdown of the MySQL server. As it usually happens, there is a power failure of the server, or other reasons that led to a banal shutdown of the machine, or a reboot. Sometimes, and often, this kind of failure can lead to problems that can be solved only by restoring data from a backup, and this is the question of why you need to make backups . The presence of errors in the database may not appear immediately, but if they are, then sooner or later you will definitely notice them. Problems, as a rule, manifest themselves in the form of errors after queries to the database, or the database begins to go into thought for an inappropriate time.
Let’s see what you can do first to try to fix the situation. The mysqlcheck utility is usually installed by default with the MySQL server and can be used to check databases for errors. Let’s consider an example of its use.
Using the mysqlcheck utility
# mysqlcheck -u root -p --optimize --auto-repair --all-databases
Purpose of parameters:
|
1 2 3 |
|
If the database is large, and you urgently need to correct a specific table, then you can run a check of a specific table in the database.
Checking a single table in the database:
# mysqlcheck -r DB_name Table_name -u root -p
Correction of MyISAM tables
There is also the myisamchk utility , which differs from the previous utility in that before using it, you must stop the database server, while mysqlcheck can be used when the server is running. Let’s look at an example of using the myisamchk utility.
Stopping MySQL Server
Analyzing the database for errors
# myisamchk -s /var/db/mysql/our_database/*.MYI
Please note that the path to the databases may differ for you, you should also clarify this point. If there are errors, then a message similar to the following will appear:
myisamchk: warning: 2 client is using or hasn't closed the table properly
MyISAM-table '/var/db/mysql/our_database/ary_mem.MYI' is usable but should be fixed
Correcting errors with myisamchk
# myisamchk -r /var/db/mysql/our_database/ary_mem.MYI
We fix errors for all tables in the database (recursively)
# myisamchk -r /var/db/mysql/our_database/*.MYI
The error correction process will be accompanied by a similar message output in the console window:
|
1 2 3 |
|
After the bugs are fixed, you can start the MySQL server to make sure everything is in order.
Starting the MySQL Server
I would like to note one point that the commands for stopping and starting the MySQL server, as well as the paths for the location of the databases on your server, may differ, so you should also take these points into account.
Вас заинтересует / Intresting for you:
a table maintenance program
Synopsis
mysqlcheck [options] [db_name [tbl_name ...]]
Description
The mysqlcheck client performs table maintenance: It checks, repairs, optimizes, or analyzes tables.
Each table is locked and therefore unavailable to other sessions while it is being processed, although for check operations, the table is locked with a READ lock only (see Section 13.3.6, “LOCK TABLES and UNLOCK TABLES Statements”, for more information about READ and WRITE locks). Table maintenance operations can be time-consuming, particularly for large tables. If you use the —databases or —all-databases option to process all tables in one or more databases, an invocation of mysqlcheck might take a long time. (This is also true for the MySQL upgrade procedure if it determines that table checking is needed because it processes tables the same way.)
mysqlcheck must be used when the mysqld server is running, which means that you do not have to stop the server to perform table maintenance.
mysqlcheck uses the SQL statements CHECK TABLE, REPAIR TABLE, ANALYZE TABLE, and OPTIMIZE TABLE in a convenient way for the user. It determines which statements to use for the operation you want to perform, and then sends the statements to the server to be executed. For details about which storage engines each statement works with, see the descriptions for those statements in Section 13.7.3, “Table Maintenance Statements”.
All storage engines do not necessarily support all four maintenance operations. In such cases, an error message is displayed. For example, if test.t is an MEMORY table, an attempt to check it produces this result:
$> mysqlcheck test t
test.t
note     : The storage engine for the table doesn't support check
If mysqlcheck is unable to repair a table, see Section 2.11.13, “Rebuilding or Repairing Tables or Indexes” for manual table repair strategies. This is the case, for example, for InnoDB tables, which can be checked with CHECK TABLE, but not repaired with REPAIR TABLE.
Caution
It is best to make a backup of a table before performing a table repair operation; under some circumstances the operation might cause data loss. Possible causes include but are not limited to file system errors.
There are three general ways to invoke mysqlcheck:
mysqlcheck [options] db_name [tbl_name ...]
mysqlcheck [options] --databases db_name ...
mysqlcheck [options] --all-databases
If you do not name any tables following db_name or if you use the —databases or —all-databases option, entire databases are checked.
mysqlcheck has a special feature compared to other client programs. The default behavior of checking tables (—check) can be changed by renaming the binary. If you want to have a tool that repairs tables by default, you should just make a copy of mysqlcheck named mysqlrepair, or make a symbolic link to mysqlcheck named mysqlrepair. If you invoke mysqlrepair, it repairs tables.
The names shown in the following table can be used to change mysqlcheck default behavior.
| Command | Meaning |
|---|---|
| mysqlrepair | The default option is —repair |
| mysqlanalyze | The default option is —analyze |
| mysqloptimize | The default option is —optimize |
mysqlcheck supports the following options, which can be specified on the command line or in the [mysqlcheck] and [client] groups of an option file. For information about option files used by MySQL programs, see Section 4.2.2.2, “Using Option Files”.
- —help, -? Display a help message and exit.
- —all-databases, -A Check all tables in all databases. This is the same as using the —databases option and naming all the databases on the command line, except that the INFORMATION_SCHEMA and performance_schema databases are not checked. They can be checked by explicitly naming them with the —databases option.
- —all-in-1, -1 Instead of issuing a statement for each table, execute a single statement for each database that names all the tables from that database to be processed.
- —analyze, -a Analyze the tables.
- —auto-repair If a checked table is corrupted, automatically fix it. Any necessary repairs are done after all tables have been checked.
- —bind-address=ip_address On a computer having multiple network interfaces, use this option to select which interface to use for connecting to the MySQL server.
- —character-sets-dir=dir_name The directory where character sets are installed. See Section 10.15, “Character Set Configuration”.
- —check, -c Check the tables for errors. This is the default operation.
- —check-only-changed, -C Check only tables that have changed since the last check or that have not been closed properly.
- —check-upgrade, -g Invoke CHECK TABLE with the FOR UPGRADE option to check tables for incompatibilities with the current version of the server.
-
—compress Compress all information sent between the client and the server if possible. See Section 4.2.8, “Connection Compression Control”.
As of MySQL 8.0.18, this option is deprecated. Expect it to be removed in a future version of MySQL. See the section called “Configuring Legacy Connection Compression”.
-
—compression-algorithms=value The permitted compression algorithms for connections to the server. The available algorithms are the same as for the protocol_compression_algorithms system variable. The default value is uncompressed.
For more information, see Section 4.2.8, “Connection Compression Control”.
This option was added in MySQL 8.0.18.
- —databases, -B Process all tables in the named databases. Normally, mysqlcheck treats the first name argument on the command line as a database name and any following names as table names. With this option, it treats all name arguments as database names.
-
—debug[=debug_options], -# [debug_options] Write a debugging log. A typical debug_options string is d:t:o,file_name. The default is d:t:o.
This option is available only if MySQL was built using WITH_DEBUG. MySQL release binaries provided by Oracle are not built using this option.
-
—debug-check Print some debugging information when the program exits.
This option is available only if MySQL was built using WITH_DEBUG. MySQL release binaries provided by Oracle are not built using this option.
-
—debug-info Print debugging information and memory and CPU usage statistics when the program exits.
This option is available only if MySQL was built using WITH_DEBUG. MySQL release binaries provided by Oracle are not built using this option.
- —default-character-set=charset_name Use charset_name as the default character set. See Section 10.15, “Character Set Configuration”.
-
—defaults-extra-file=file_name Read this option file after the global option file but (on Unix) before the user option file. If the file does not exist or is otherwise inaccessible, an error occurs. If file_name is not an absolute path name, it is interpreted relative to the current directory.
For additional information about this and other option-file options, see Section 4.2.2.3, “Command-Line Options that Affect Option-File Handling”.
-
—defaults-file=file_name Use only the given option file. If the file does not exist or is otherwise inaccessible, an error occurs. If file_name is not an absolute path name, it is interpreted relative to the current directory.
Exception: Even with —defaults-file, client programs read .mylogin.cnf.
For additional information about this and other option-file options, see Section 4.2.2.3, “Command-Line Options that Affect Option-File Handling”.
-
—defaults-group-suffix=str Read not only the usual option groups, but also groups with the usual names and a suffix of str. For example, mysqlcheck normally reads the [client] and [mysqlcheck] groups. If this option is given as —defaults-group-suffix=_other, mysqlcheck also reads the [client_other] and [mysqlcheck_other] groups.
For additional information about this and other option-file options, see Section 4.2.2.3, “Command-Line Options that Affect Option-File Handling”.
-
—extended, -e If you are using this option to check tables, it ensures that they are 100% consistent but takes a long time.
If you are using this option to repair tables, it runs an extended repair that may not only take a long time to execute, but may produce a lot of garbage rows also!
- —default-auth=plugin A hint about which client-side authentication plugin to use. See Section 6.2.17, “Pluggable Authentication”.
- —enable-cleartext-plugin Enable the mysql_clear_password cleartext authentication plugin. (See Section 6.4.1.4, “Client-Side Cleartext Pluggable Authentication”.)
- —fast, -F Check only tables that have not been closed properly.
- —force, -f Continue even if an SQL error occurs.
-
—get-server-public-key Request from the server the public key required for RSA key pair-based password exchange. This option applies to clients that authenticate with the caching_sha2_password authentication plugin. For that plugin, the server does not send the public key unless requested. This option is ignored for accounts that do not authenticate with that plugin. It is also ignored if RSA-based password exchange is not used, as is the case when the client connects to the server using a secure connection.
If —server-public-key-path=file_name is given and specifies a valid public key file, it takes precedence over —get-server-public-key.
For information about the caching_sha2_password plugin, see Section 6.4.1.2, “Caching SHA-2 Pluggable Authentication”.
- —host=host_name, -h host_name Connect to the MySQL server on the given host.
-
—login-path=name Read options from the named login path in the .mylogin.cnf login path file. A “login path” is an option group containing options that specify which MySQL server to connect to and which account to authenticate as. To create or modify a login path file, use the mysql_config_editor utility. See mysql_config_editor(1).
For additional information about this and other option-file options, see Section 4.2.2.3, “Command-Line Options that Affect Option-File Handling”.
- —medium-check, -m Do a check that is faster than an —extended operation. This finds only 99.99% of all errors, which should be good enough in most cases.
-
—no-defaults Do not read any option files. If program startup fails due to reading unknown options from an option file, —no-defaults can be used to prevent them from being read.
The exception is that the .mylogin.cnf file is read in all cases, if it exists. This permits passwords to be specified in a safer way than on the command line even when —no-defaults is used. To create .mylogin.cnf, use the mysql_config_editor utility. See mysql_config_editor(1).
For additional information about this and other option-file options, see Section 4.2.2.3, “Command-Line Options that Affect Option-File Handling”.
- —optimize, -o Optimize the tables.
-
—password[=password], -p[password] The password of the MySQL account used for connecting to the server. The password value is optional. If not given, mysqlcheck prompts for one. If given, there must be no space between —password= or -p and the password following it. If no password option is specified, the default is to send no password.
Specifying a password on the command line should be considered insecure. To avoid giving the password on the command line, use an option file. See Section 6.1.2.1, “End-User Guidelines for Password Security”.
To explicitly specify that there is no password and that mysqlcheck should not prompt for one, use the —skip-password option.
-
—password1[=pass_val] The password for multifactor authentication factor 1 of the MySQL account used for connecting to the server. The password value is optional. If not given, mysqlcheck prompts for one. If given, there must be no space between —password1= and the password following it. If no password option is specified, the default is to send no password.
Specifying a password on the command line should be considered insecure. To avoid giving the password on the command line, use an option file. See Section 6.1.2.1, “End-User Guidelines for Password Security”.
To explicitly specify that there is no password and that mysqlcheck should not prompt for one, use the —skip-password1 option.
—password1 and —password are synonymous, as are —skip-password1 and —skip-password.
- —password2[=pass_val] The password for multifactor authentication factor 2 of the MySQL account used for connecting to the server. The semantics of this option are similar to the semantics for —password1; see the description of that option for details.
- —password3[=pass_val] The password for multifactor authentication factor 3 of the MySQL account used for connecting to the server. The semantics of this option are similar to the semantics for —password1; see the description of that option for details.
- —pipe, -W On Windows, connect to the server using a named pipe. This option applies only if the server was started with the named_pipe system variable enabled to support named-pipe connections. In addition, the user making the connection must be a member of the Windows group specified by the named_pipe_full_access_group system variable.
- —plugin-dir=dir_name The directory in which to look for plugins. Specify this option if the —default-auth option is used to specify an authentication plugin but mysqlcheck does not find it. See Section 6.2.17, “Pluggable Authentication”.
- —port=port_num, -P port_num For TCP/IP connections, the port number to use.
-
—print-defaults Print the program name and all options that it gets from option files.
For additional information about this and other option-file options, see Section 4.2.2.3, “Command-Line Options that Affect Option-File Handling”.
- —protocol={TCP|SOCKET|PIPE|MEMORY} The transport protocol to use for connecting to the server. It is useful when the other connection parameters normally result in use of a protocol other than the one you want. For details on the permissible values, see Section 4.2.7, “Connection Transport Protocols”.
-
—quick, -q If you are using this option to check tables, it prevents the check from scanning the rows to check for incorrect links. This is the fastest check method.
If you are using this option to repair tables, it tries to repair only the index tree. This is the fastest repair method.
- —repair, -r Perform a repair that can fix almost anything except unique keys that are not unique.
-
—server-public-key-path=file_name The path name to a file in PEM format containing a client-side copy of the public key required by the server for RSA key pair-based password exchange. This option applies to clients that authenticate with the sha256_password or caching_sha2_password authentication plugin. This option is ignored for accounts that do not authenticate with one of those plugins. It is also ignored if RSA-based password exchange is not used, as is the case when the client connects to the server using a secure connection.
If —server-public-key-path=file_name is given and specifies a valid public key file, it takes precedence over —get-server-public-key.
For sha256_password, this option applies only if MySQL was built using OpenSSL.
For information about the sha256_password and caching_sha2_password plugins, see Section 6.4.1.3, “SHA-256 Pluggable Authentication”, and Section 6.4.1.2, “Caching SHA-2 Pluggable Authentication”.
-
—shared-memory-base-name=name On Windows, the shared-memory name to use for connections made using shared memory to a local server. The default value is MYSQL. The shared-memory name is case-sensitive.
This option applies only if the server was started with the shared_memory system variable enabled to support shared-memory connections.
- —silent, -s Silent mode. Print only error messages.
- —skip-database=db_name Do not include the named database (case-sensitive) in the operations performed by mysqlcheck.
-
—socket=path, -S path For connections to localhost, the Unix socket file to use, or, on Windows, the name of the named pipe to use.
On Windows, this option applies only if the server was started with the named_pipe system variable enabled to support named-pipe connections. In addition, the user making the connection must be a member of the Windows group specified by the named_pipe_full_access_group system variable.
- —ssl* Options that begin with —ssl specify whether to connect to the server using encryption and indicate where to find SSL keys and certificates. See the section called “Command Options for Encrypted Connections”.
-
—ssl-fips-mode={OFF|ON|STRICT} Controls whether to enable FIPS mode on the client side. The —ssl-fips-mode option differs from other —ssl-xxx options in that it is not used to establish encrypted connections, but rather to affect which cryptographic operations to permit. See Section 6.8, “FIPS Support”.
These —ssl-fips-mode values are permitted:
- OFF: Disable FIPS mode.
- ON: Enable FIPS mode.
- STRICT: Enable “strict” FIPS mode.
Note
If the OpenSSL FIPS Object Module is not available, the only permitted value for —ssl-fips-mode is OFF. In this case, setting —ssl-fips-mode to ON or STRICT causes the client to produce a warning at startup and to operate in non-FIPS mode. - —tables Override the —databases or -B option. All name arguments following the option are regarded as table names.
-
—tls-ciphersuites=ciphersuite_list The permissible ciphersuites for encrypted connections that use TLSv1.3. The value is a list of one or more colon-separated ciphersuite names. The ciphersuites that can be named for this option depend on the SSL library used to compile MySQL. For details, see Section 6.3.2, “Encrypted Connection TLS Protocols and Ciphers”.
This option was added in MySQL 8.0.16.
- —tls-version=protocol_list The permissible TLS protocols for encrypted connections. The value is a list of one or more comma-separated protocol names. The protocols that can be named for this option depend on the SSL library used to compile MySQL. For details, see Section 6.3.2, “Encrypted Connection TLS Protocols and Ciphers”.
- —use-frm For repair operations on MyISAM tables, get the table structure from the data dictionary so that the table can be repaired even if the .MYI header is corrupted.
- —user=user_name, -u user_name The user name of the MySQL account to use for connecting to the server.
- —verbose, -v Verbose mode. Print information about the various stages of program operation.
- —version, -V Display version information and exit.
- —write-binlog This option is enabled by default, so that ANALYZE TABLE, OPTIMIZE TABLE, and REPAIR TABLE statements generated by mysqlcheck are written to the binary log. Use —skip-write-binlog to cause NO_WRITE_TO_BINLOG to be added to the statements so that they are not logged. Use the —skip-write-binlog when these statements should not be sent to replicas or run when using the binary logs for recovery from backup.
-
—zstd-compression-level=level The compression level to use for connections to the server that use the zstd compression algorithm. The permitted levels are from 1 to 22, with larger values indicating increasing levels of compression. The default zstd compression level is 3. The compression level setting has no effect on connections that do not use zstd compression.
For more information, see Section 4.2.8, “Connection Compression Control”.
This option was added in MySQL 8.0.18.
Copyright
Copyright © 1997, 2022, Oracle and/or its affiliates.
This documentation is free software; you can redistribute it and/or modify it only under the terms of the GNU General Public License as published by the Free Software Foundation; version 2 of the License.
This documentation is distributed in the hope that it will be useful, but WITHOUT ANY WARRANTY; without even the implied warranty of MERCHANTABILITY or FITNESS FOR A PARTICULAR PURPOSE. See the GNU General Public License for more details.
You should have received a copy of the GNU General Public License along with the program; if not, write to the Free Software Foundation, Inc., 51 Franklin Street, Fifth Floor, Boston, MA 02110-1301 USA or see http://www.gnu.org/licenses/.
See Also
For more information, please refer to the MySQL Reference Manual, which may already be installed locally and which is also available online at http://dev.mysql.com/doc/.
Referenced By
The man page mariadb-check(1) is an alias of mysqlcheck(1).
11/26/2022 MySQL 8.0 MySQL Database System
Posted By: Mar. 12, 2020
How to check and repair MySQL Databases
You will need know how to check and repair MySQL databases or tables when you troubleshoot your website as they may have become corrupt. The mysqlcheck command is a maintenance tool that can be used to check, repair, analyze and optimize multiple tables from the command line. One of the best features of using mysqlcheck is that you don’t need to stop the MySQL service to perform the database maintenance.
In this tutorial, we will show you how to check/repair MySQL databases and tables.
Note : It is recommended to take a backup of your databases before performing a database repair operation.
Basic Syntax of mysqlcheck
A basic syntax of mysqlcheck is shown below:
mysqlcheck [OPTION] DATABASENAME TABLENAME -u root -p
A brief explanation of each option that you can use with mysqlcheck as shown below:
-c : Used to check a table for errors
-C : Used to check a tables that are changed after last week.
-a : Used to analyze tables.
-A : Used to check all databases.
-g : Used to check tables for version-dependent changes.
-B, –databases : Used to specify multiple databases.
-F : Used to check tables that are not closed properly.
–fix-db-names : Used to fix the database name.
–fix-table-names : Used to fix the table name.
–e : Used to perform an extended check.
-r : Used to repair corrupt table.
Check a Specific Table in a MySQL Database
In some cases, you need to check a specific table in a specific database. In that case, you can use the following syntax:
mysqlcheck -c databasename tablename -u root -p
For example, checks authors table in books database by running the following command:
mysqlcheck -c books authors -u root -p
You should get the following output:
books.authors OK

Check All Tables in a MySQL Database
If you want to check all the tables in a specific database use the following syntax:
mysqlcheck -c databasename -u root -p
For example, check all tables in books database by running the following command:
mysqlcheck -c books -u root -p
You should get the following output:
 Enter password:
 books.accountant                                   OK
 books.authors                                      OK
 books.writer                                       OK

Check and Optimize All Tables and All MySQL Databases
You can check all tables and all databases using the following command:
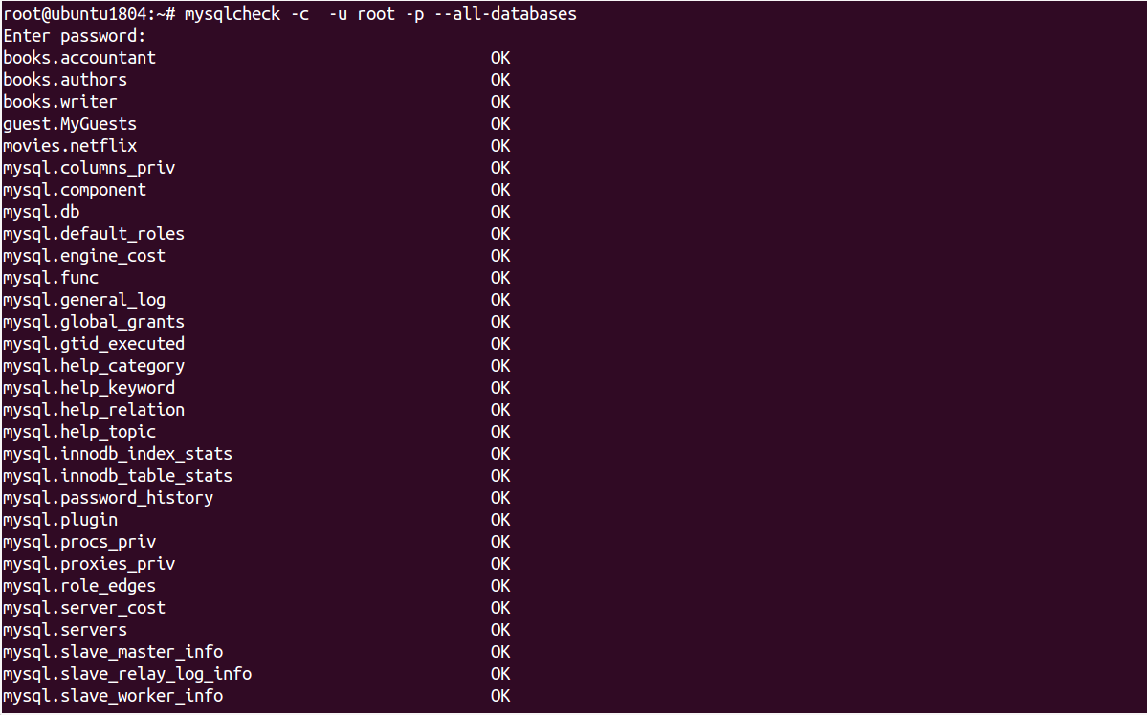
mysqlcheck -c -u root -p --all-databases
Output:
 Enter password:
 books.accountant                                   OK
 books.authors                                      OK
 books.writer                                       OK
 guest.MyGuests                                     OK
 movies.netflix                                     OK
 mysql.columns_priv                                 OK
 mysql.component                                    OK
 mysql.db                                           OK
 mysql.default_roles                                OK
 mysql.engine_cost                                  OK
 mysql.func                                         OK
 mysql.general_log                                  OK
 mysql.global_grants                                OK
 mysql.gtid_executed                                OK
 mysql.help_category                                OK
 mysql.help_keyword                                 OK
 mysql.help_relation                                OK
 mysql.help_topic                                   OK
 mysql.innodb_index_stats                           OK
 mysql.innodb_table_stats                           OK
 mysql.password_history                             OK
 mysql.plugin                                       OK
 mysql.procs_priv                                   OK
 mysql.proxies_priv                                 OK
 mysql.role_edges                                   OK
 mysql.server_cost                                  OK
 mysql.servers                                      OK
 mysql.slave_master_info                            OK
 mysql.slave_relay_log_info                         OK
 mysql.slave_worker_info                            OK
You can optimize all tables and all databases using the following command:
mysqlcheck -o root -p --all-databases
Output:
 Enter password:
 books.accountant
 note     : Table does not support optimize, doing recreate + analyze instead
 status   : OK
 books.authors
 note     : Table does not support optimize, doing recreate + analyze instead
 status   : OK
 books.writer
 note     : Table does not support optimize, doing recreate + analyze instead
 status   : OK
 guest.MyGuests
 note     : Table does not support optimize, doing recreate + analyze instead
 status   : OK
 movies.netflix
 note     : Table does not support optimize, doing recreate + analyze instead
 status   : OK
 mysql.columns_priv
 note     : Table does not support optimize, doing recreate + analyze instead
 status   : OK
 mysql.component
 note     : Table does not support optimize, doing recreate + analyze instead
 status   : OK
 mysql.db
 note     : Table does not support optimize, doing recreate + analyze instead
 status   : OK
 mysql.default_roles
 note     : Table does not support optimize, doing recreate + analyze instead
 status   : OK
 mysql.engine_cost
 note     : Table does not support optimize, doing recreate + analyze instead
 status   : OK
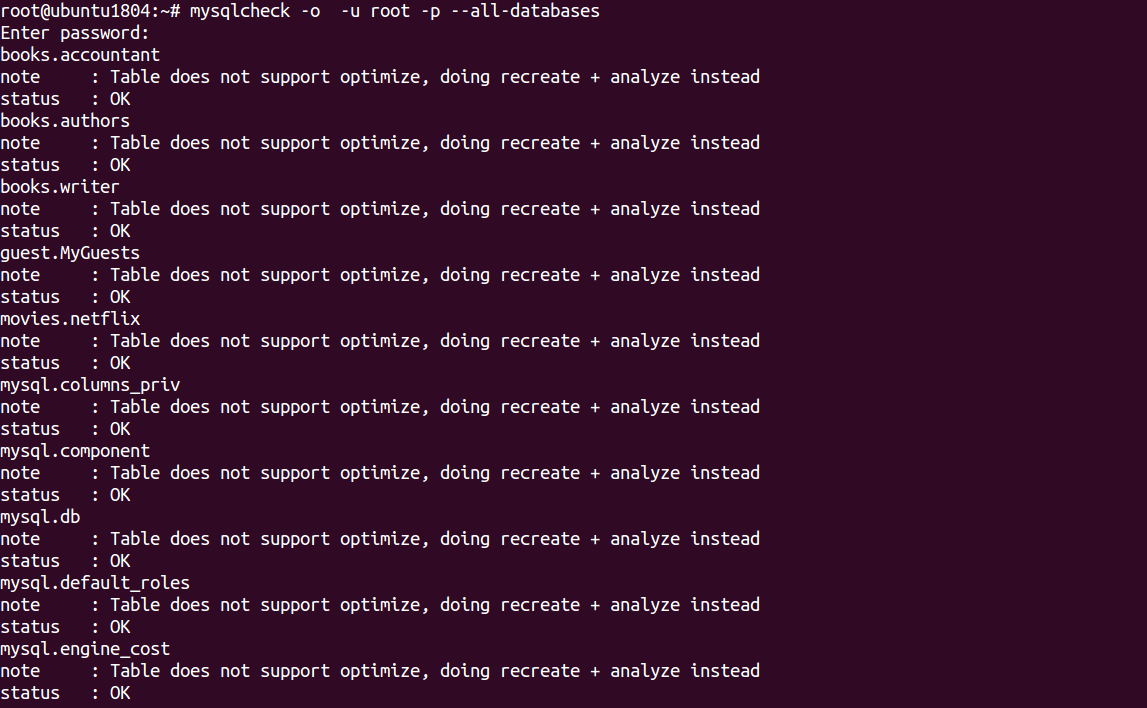
In the above output, you should see “Table does not support optimize” which means the InnoDB table that doesn’t support this option.
Repair MySQL Databases
To repair accountant tables in books database run the following command:
mysqlcheck -r books accountant -u root -p
Output:
 mysqlcheck -r books accountant -u root -p
 Enter password:
 books.accountant                                   OK

To repair all tables in both books and movies database run the following command:
mysqlcheck -r --databases books movies -u root -p
Output:
 Enter password:
 books.accountant                                   OK
 books.authors                                      OK
 books.writer                                       OK
 movies.netflix                                     OK

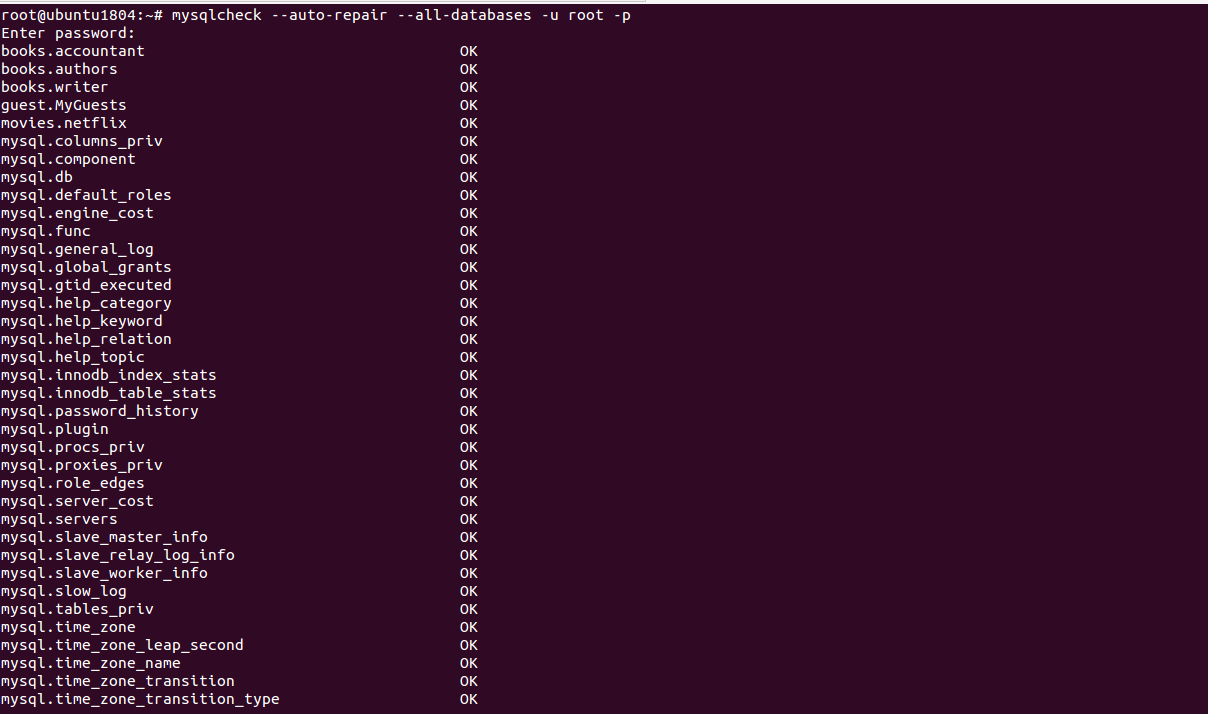
To check and repair all tables in all databases run the following command:
mysqlcheck --auto-repair --all-databases -u root -p
Output:
 Enter password:
 books.accountant                                   OK
 books.authors                                      OK
 books.writer                                       OK
 guest.MyGuests                                     OK
 movies.netflix                                     OK
 mysql.columns_priv                                 OK
 mysql.component                                    OK
 mysql.db                                           OK
 mysql.default_roles                                OK
 mysql.engine_cost                                  OK
 mysql.func                                         OK
 mysql.general_log                                  OK
 mysql.global_grants                                OK
 mysql.gtid_executed                                OK
 mysql.help_category                                OK
 mysql.help_keyword                                 OK
 mysql.help_relation                                OK
 mysql.help_topic                                   OK
 mysql.innodb_index_stats                           OK
 mysql.innodb_table_stats                           OK
 mysql.password_history                             OK
 mysql.plugin                                       OK
 mysql.procs_priv                                   OK
 mysql.proxies_priv                                 OK
 mysql.role_edges                                   OK
 mysql.server_cost                                  OK
 mysql.servers                                      OK
 mysql.slave_master_info                            OK
 mysql.slave_relay_log_info                         OK
 mysql.slave_worker_info                            OK
 mysql.slow_log                                     OK
 mysql.tables_priv                                  OK
 mysql.time_zone                                    OK
 mysql.time_zone_leap_second                        OK
 mysql.time_zone_name                               OK
 mysql.time_zone_transition                         OK
 mysql.time_zone_transition_type                    OK
Important note: InnoDB storage engine does not support repair. So you will need to change MySQL storage engine from InnoDB to MyISAM.
Check, Repair and Optimize MySQL Database with PHPMyAdmin
You can also check, repair and optimize tables and databases using the PHPMyAdmin web interface.
You can follow the below steps to check, repair and optimize tables and databases:
1- Open the phpMyAdmin tool through a web browser as shown below:
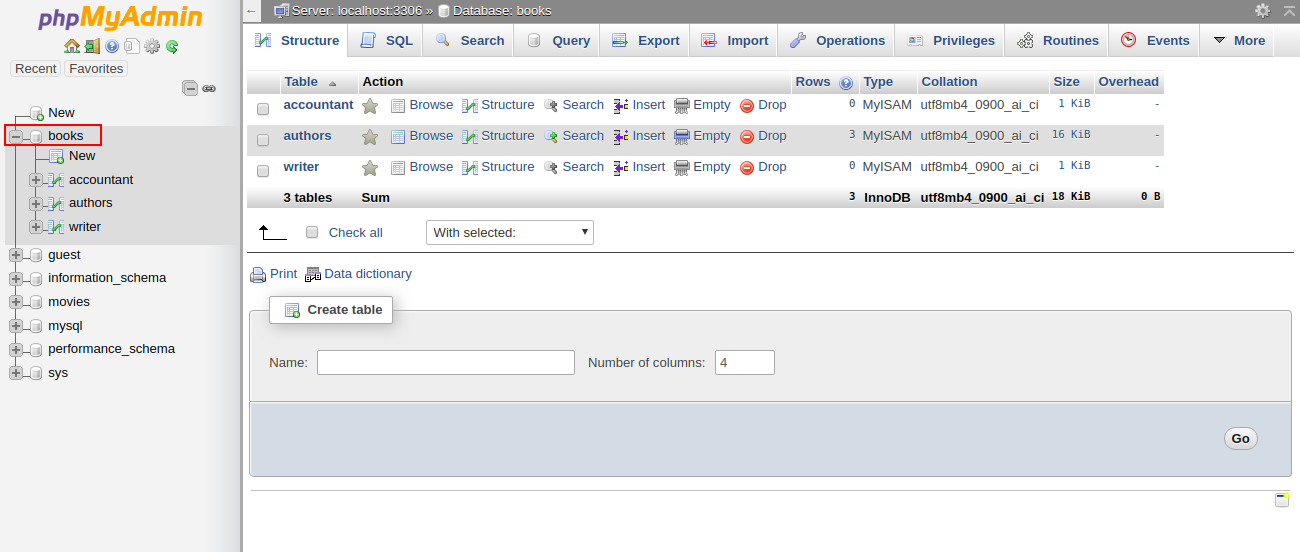
2- Select the affected database in the left pane. You should see all the tables in the right pane in the following screen:
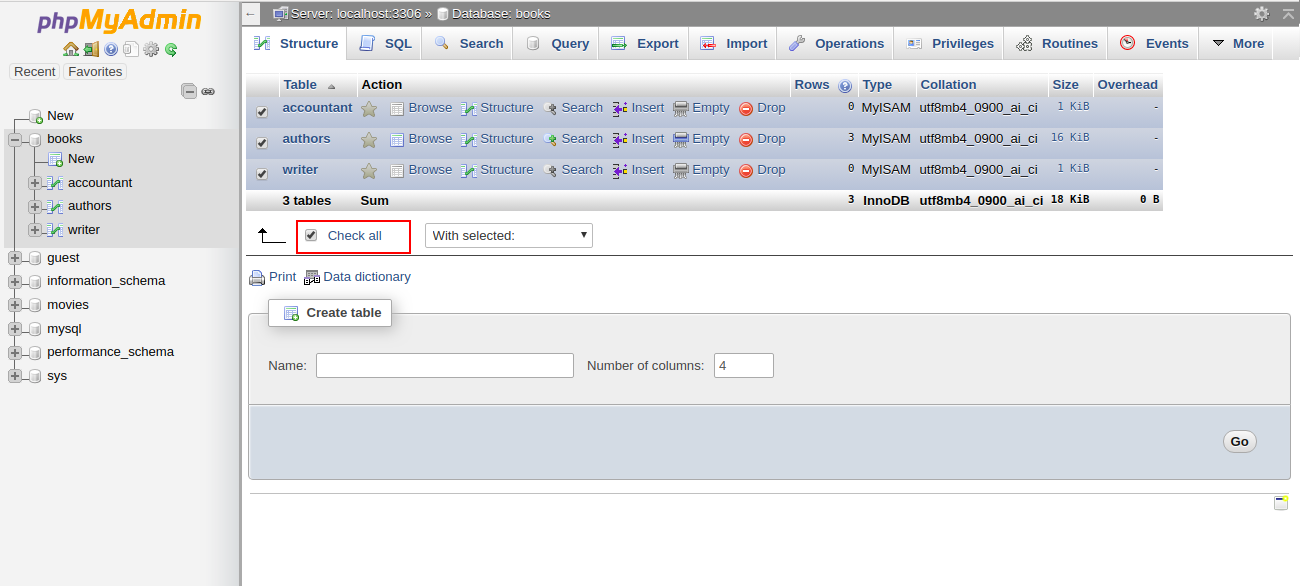
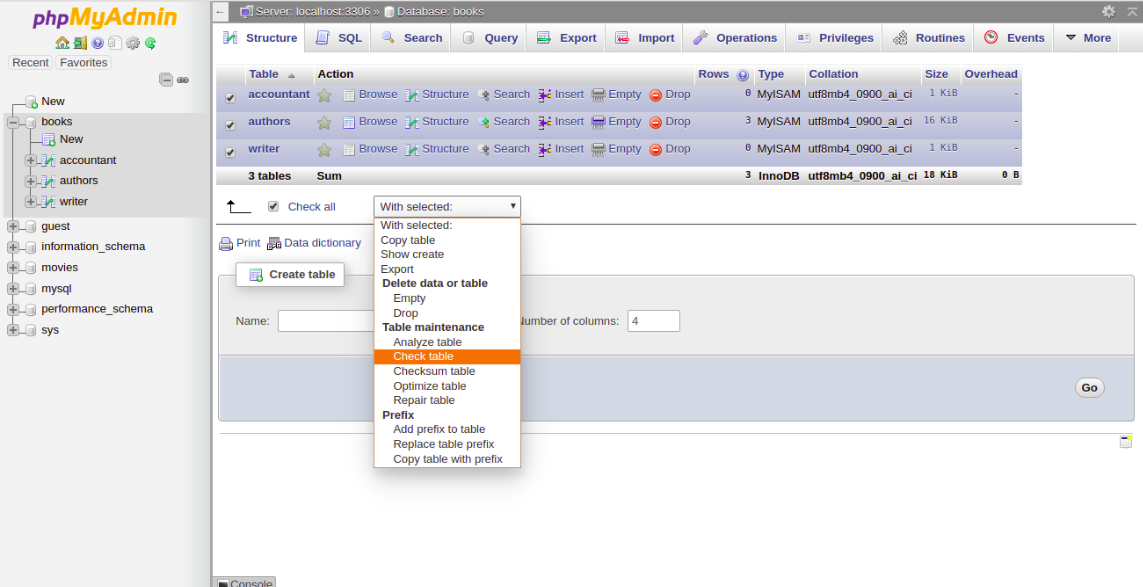
3- Click Check All to select all the tables. At the bottom of the window, choose Check Table from the menu. You should see a summary of the tables in the following screen:
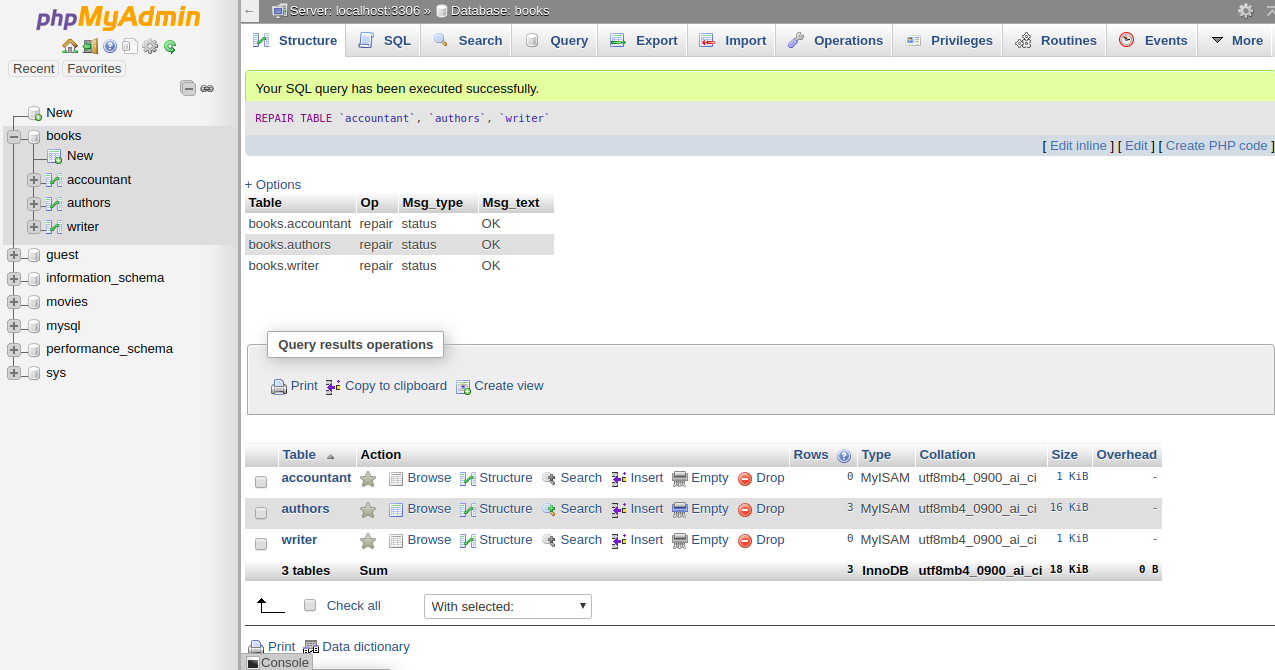
4- To repair the table, Check All to select all the tables and choose Repair Table from the menu. You should see the following page:
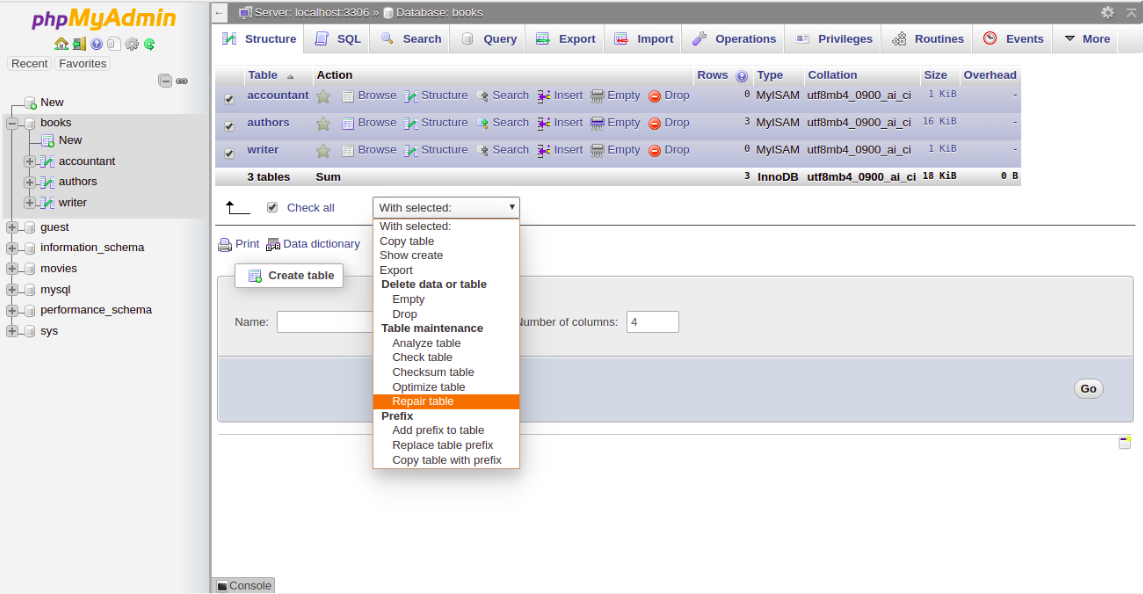
Then you should get a confirmation that the command been executed successfully:
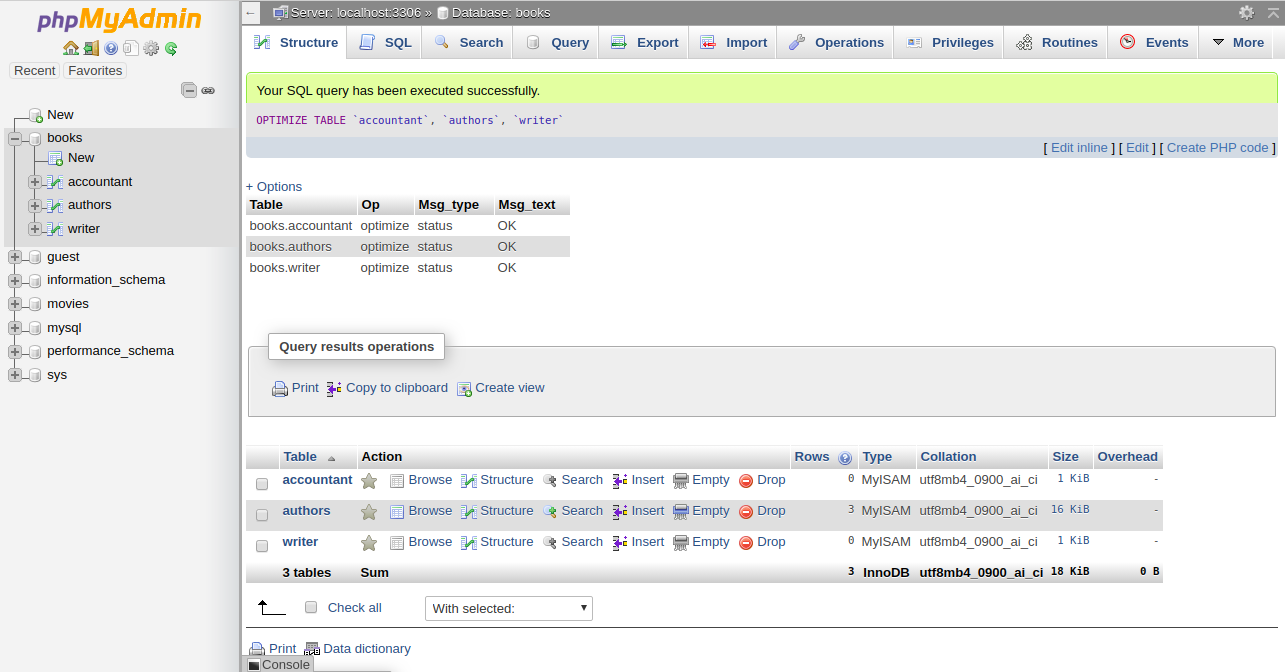
5- To optimize the table, Check All to select all the tables and choose Optimize Table from the menu. You should see the following page:

Then you should get a confirmation that the command been executed successfully:
Conclusion
In the above tutorial, we learned how to check and repair MySQL table using mysqlcheck command-line tool. We also learned how to check, repair and optimize database tables using the PHPMyAdmin web interface. I hope you can now easily fix your corrupted tables using this tool.