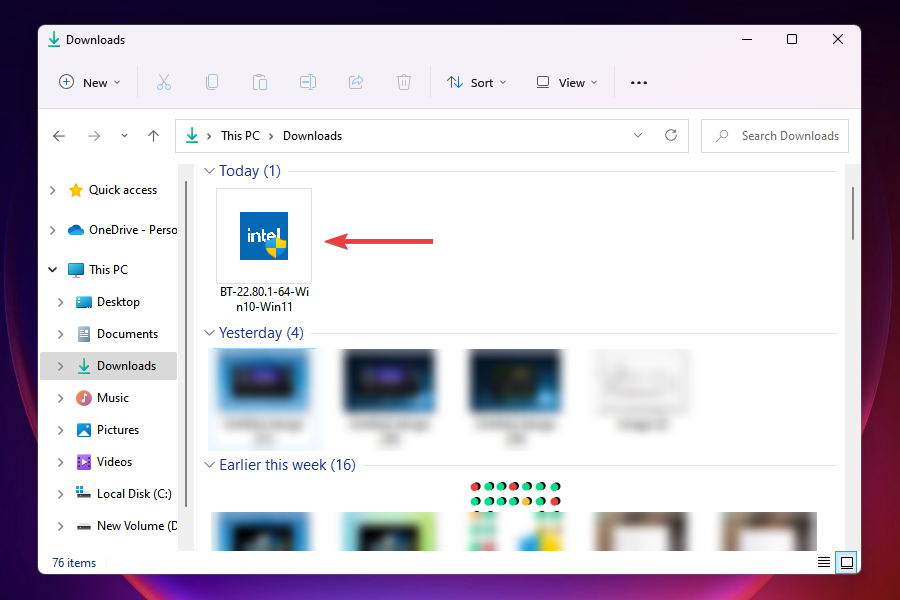
В особенности на старых компьютерах и ноутбуках пользователи сталкиваются с ошибкой эмулятора Nox: «Драйвер вашей видеокарты устарел». Также текст может отображаться на английском языке (Your graphic card driver is outdated). Соответственно, для решения данной проблемы необходимо обновить этот самый драйвер. Но вот незадача – нигде не указано, как это делается. Так что мы подготовили подробное руководство.
Содержание
- Подробное руководство
- Дополнение
Подробное руководство
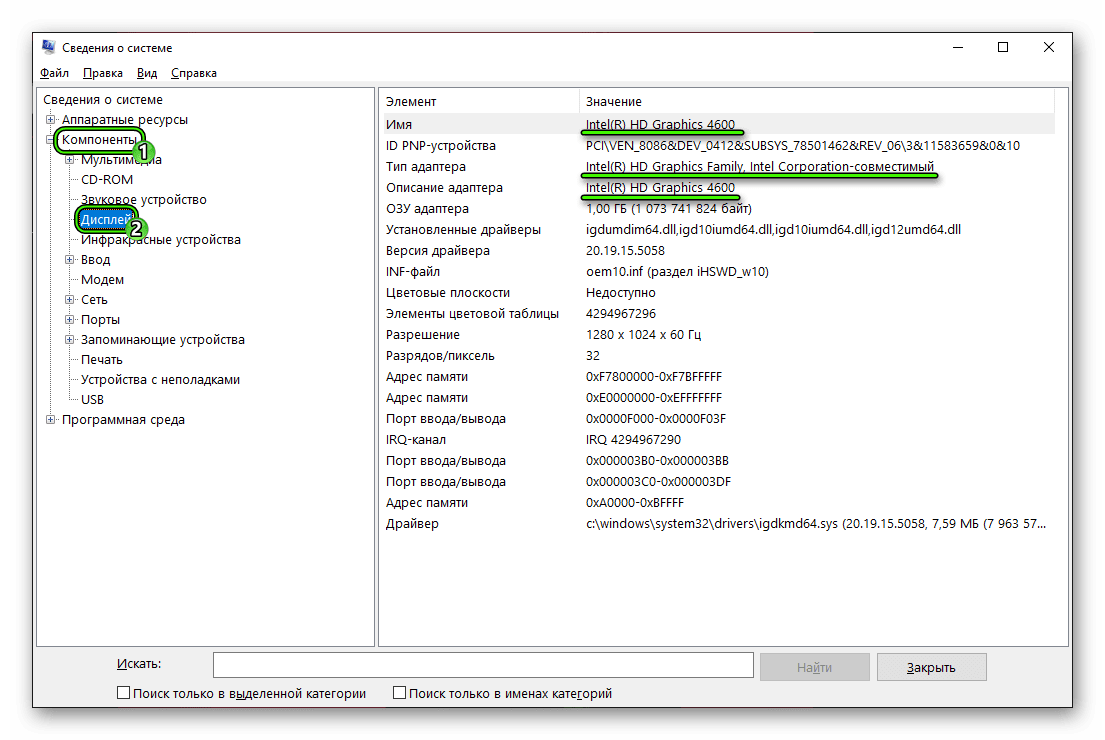
Перед загрузкой и установкой необходимого ПО, пользователю нужно выяснить, какой графический адаптер используется на ПК, в частности, его модель. Мы предлагаем универсальный способ, подходящий даже для старых версий Windows.
Инструкция:
- Запустите инструмент «Выполнить» любым удобным способом. Например, это очень просто сделать, если одновременно нажать Win + R на клавиатуре.
- С его помощью выполните команду msinfo32.

- В появившемся окошке раскройте вкладку «Компоненты».
- Теперь перейдите в раздел «Дисплей».
- В правом информационном блоке вы и увидите модель графического адаптера. Она записана в одной из трех отмеченных граф.


Теперь вы знаете, какая именно видеокарта используется. Остается только загрузить для нее последнюю версию ПО. Делать это нужно исключительно с официального сайта производителя. В противном случае велик риск получить вместе (или даже вместо) с драйвером и какой-нибудь вирус.
Поэтому оставляем актуальные ссылки для трех производителей:
- NVIDIA
- AMD
- Intel
 Найдите на сайте производителя подходящую версию ПО под ваш графический адаптер и операционную систему, скачайте его и выполните инсталляцию. В конце нужно перезагрузить компьютер. Тогда в Android-эмуляторе Nox App Player не должно появляться соответствующей ошибки. А если он все же отображается – ознакомьтесь с финальным разделом нашей статьи.
Дополнение
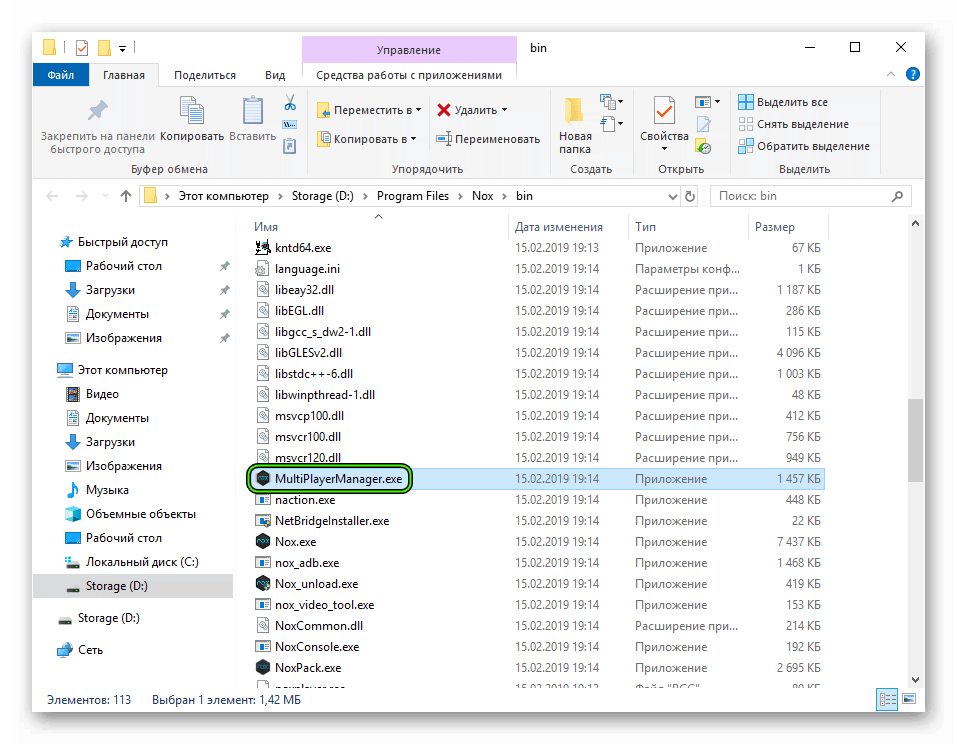
В определенных случаях данный сбой связан вовсе не с ПО для графического адаптера, а с некорректными настройками в программе. В частности, с режимом рендеринга OpenGL, который изредка работает некорректно. Это же касается и ошибки 1005 в Nox App Player. Чтобы все исправить, выполните следующие шаги:
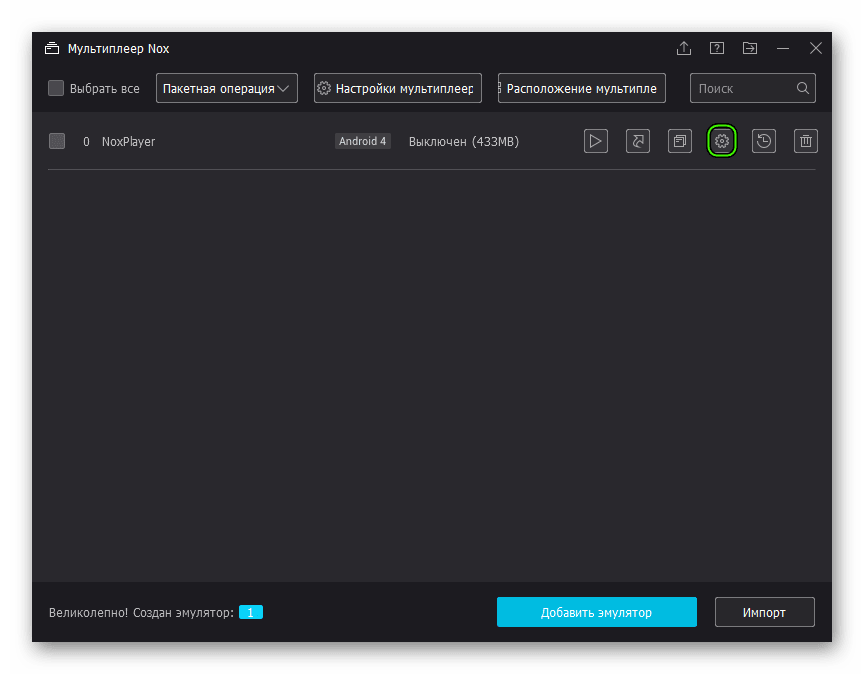
- Запустите инструмент Multi—Drive, предназначенный для настройки эмулятора. Сделать это проще всего с иконки на рабочем столе или из каталога C:Program FilesNoxbin, где следует открыть соответствующий файл.

- Кликните по иконке «Настройки системы» (она похожа на шестеренку) напротив нужной копии эмулятора.

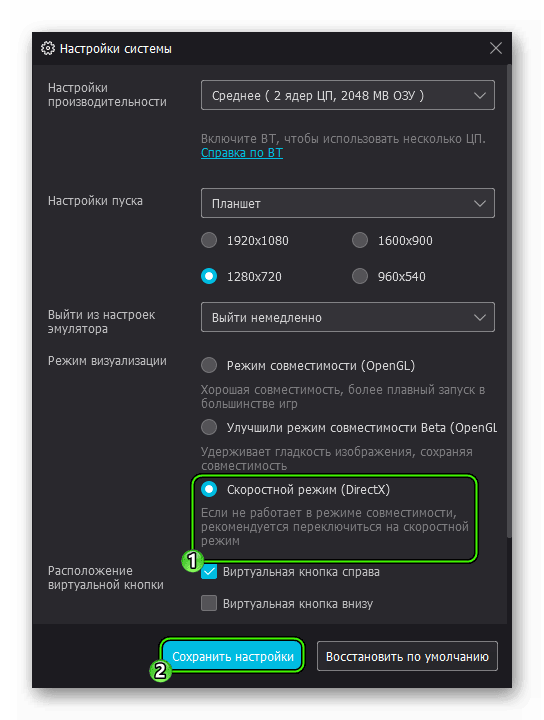
- Найдите раздел параметров с названием «Режим визуализации».
- Здесь активируйте опцию «Скоростной режим».
- Нажмите на «Сохранить настройки».

- Закройте все окна инструмента Multi—Drive, а затем запустите сам Нокс.
Больше сообщения об ошибке появляться не должно.
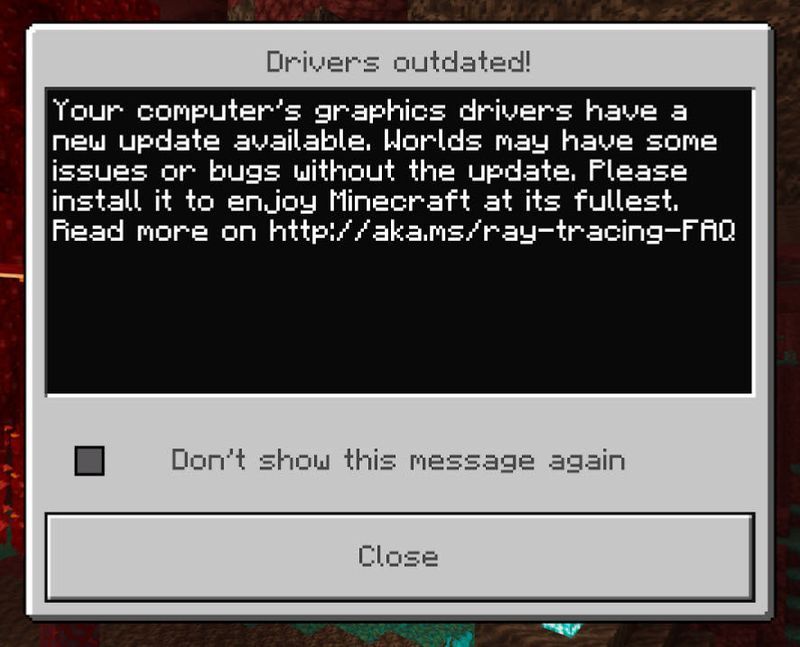
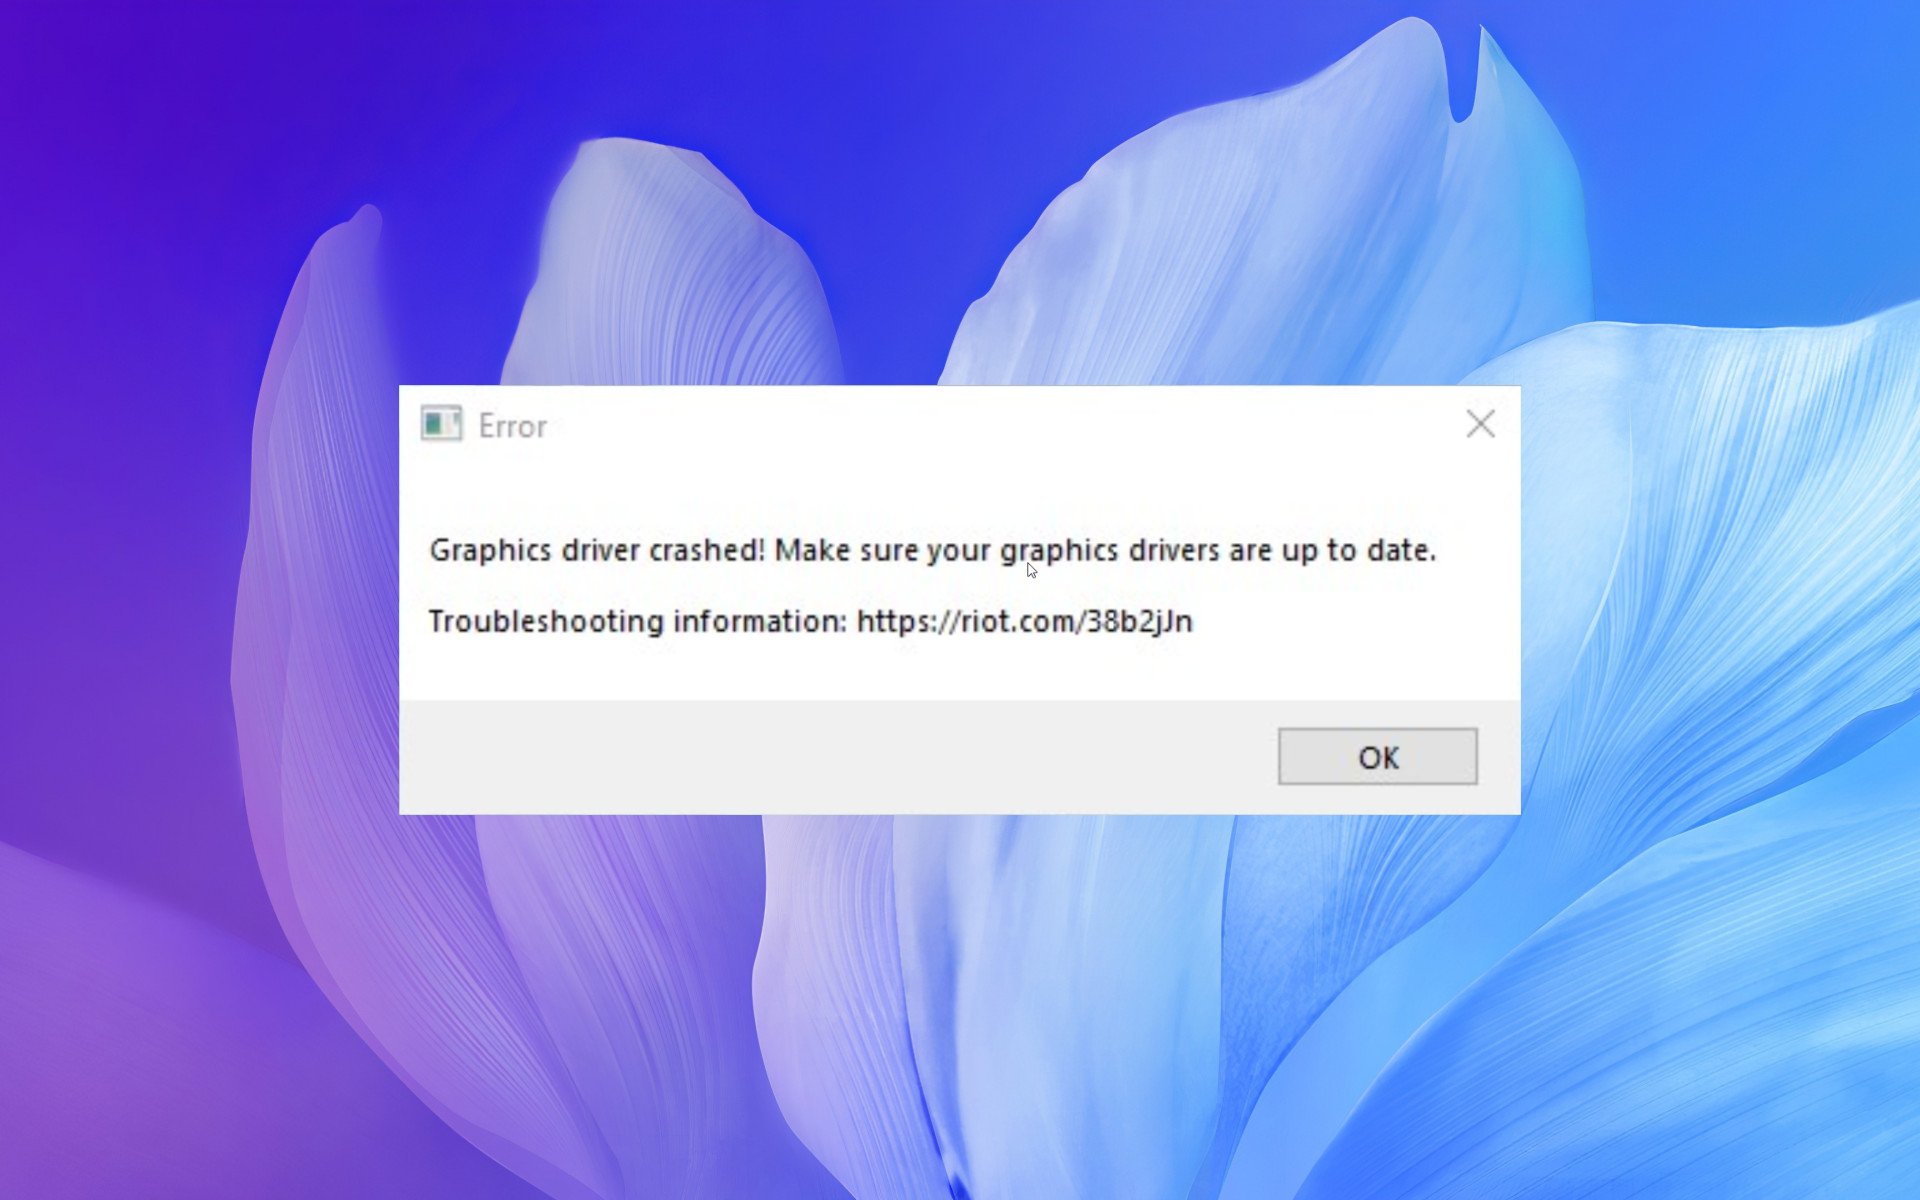
Minecraft is a popular single and multiplayer video game for Windows and other platforms. However, like any other gaming platform, it also has some errors and bugs that cause difficulty for players to play their game. One such error is the “Drivers Outdated” message on Minecraft. This message accompanies a long message that says:
Your computer’s graphics drivers have a new update available. Worlds may have some issues or bugs without the update. Please install it to enjoy Minecraft at its fullest.

Although this error message indicates a problem with your graphics driver, this may not always be the case with all users. There can be some other reasons for this message as well. You might encounter it if your Windows is not updated or you are not using the latest version of Minecraft. It may also occur if your GPU settings for Minecraft are not set to High performance.
Now, if you are one of those who are experiencing this error message on Minecraft and getting annoyed with it, no worries. This guide is for you. Here, we are going to discuss several fixes for this Minecraft error message. Let us check out!
Here are the main methods to fix the “Drivers Outdated” error message on Minecraft on Windows 11/10 PC:
- Update your Graphics Drivers.
- Verify the Minecraft version.
- Update Windows.
- Change GPU Settings.
1] Update your Display Drivers
The first thing you should try is to make sure that you are using up-to-date graphics drivers. As the error message is showing a Driver outdated problem, you must check and update your graphics drivers to the latest version. Old and out-of-date drivers cause a lot of issues between software and devices and this might be the case with Minecraft too. So, see if you are able to fix the issue by updating your drivers.
You can download and install driver updates directly from the official websites. Just go to the website of your driver manufacturers like Intel, NVIDIA, or AMD, and then download and install the latest updates for the driver model you are using.
You can also manually update graphics drivers by going to the Settings app and then go to Update & Security > Windows Update. Then, click on the View optional updates and then enable the driver update checkboxes that you are facing a problem with under the Driver Updates option. Finally, click on the Download and install button to install the updates.
If you want to automatically update all your drivers on your PC, you can use free third-party driver update software. These are some nice software that can detect outdated drivers on your system and then update them automatically. You just have to download and install the software on your PC. Then, you can launch the software and update your graphics and other drivers in a few clicks. Some free tools that you can use include Double Driver, Snappy Driver Installer, and IObit Driver Booster Free. You can also use the DriverFix program for updating graphics drivers.
See if this fixes up the issue for you or not. If not, you might need to try some other method to resolve the issue, so move on to the next fix.
Read: Fix Minecraft unable to connect to the world.
2] Verify the Minecraft version
This error message can be encountered by the users that have an older version of Minecraft installed on their system. So, first and foremost, check the Minecraft version that you are currently using and make sure it is up-to-date. Using the latest version ensures that you have all the new game patches and updates and it ensures a smoother and optimal gaming experience.
To check for updates for Minecraft, you can follow the below steps:
For Bedrock edition:
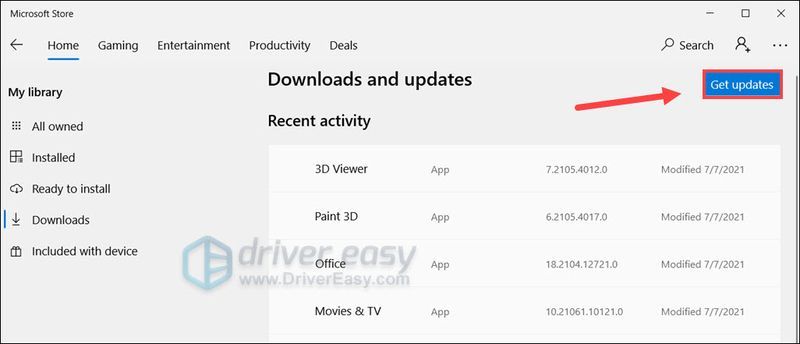
- Firstly, open the Microsoft Store by going to the search box.
- Now, click on the three-dot menu button present on the top-right corner, and click on the Downloads and updates option.
- Next, tap on the Get updates button to check for updates available. If there are new updates available for Minecraft, simply click on the app and install the updates.
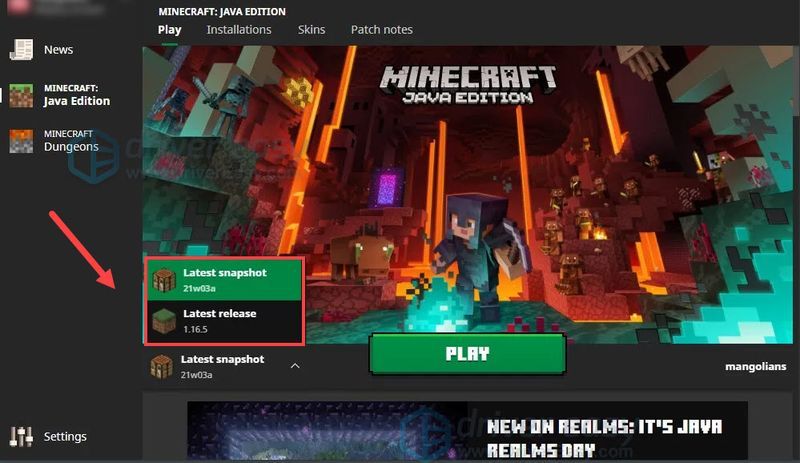
For Java edition:
- First, launch Minecraft and click on the arrow button present at the left of the PLAY button.
- Now, click on the Latest release option to use the latest version of Minecraft.
If the issue still persists even after updating the Minecraft launcher, go ahead with the next fix to resolve the issue.
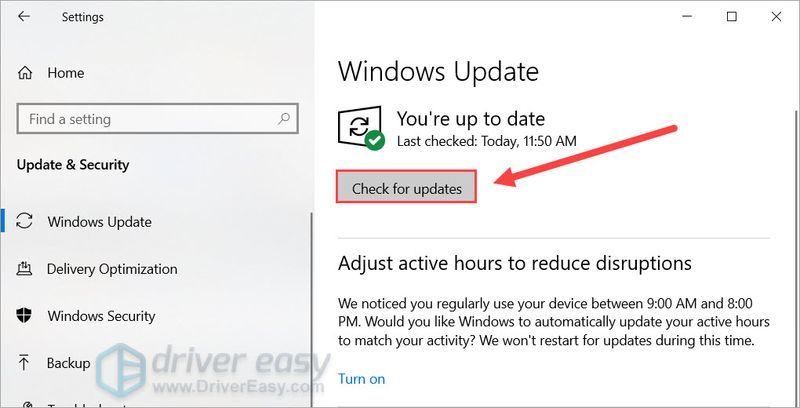
3] Update Windows
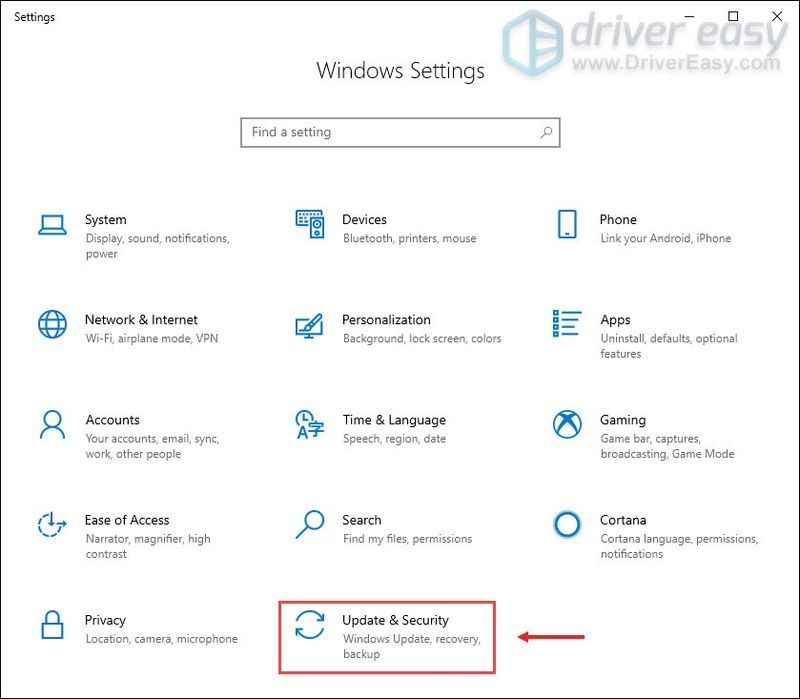
If you are still getting the same Drivers Outdated error message on Minecraft, consider updating your system to download and install the latest patches. This might help you get rid of the error and play Minecraft games smoothly.
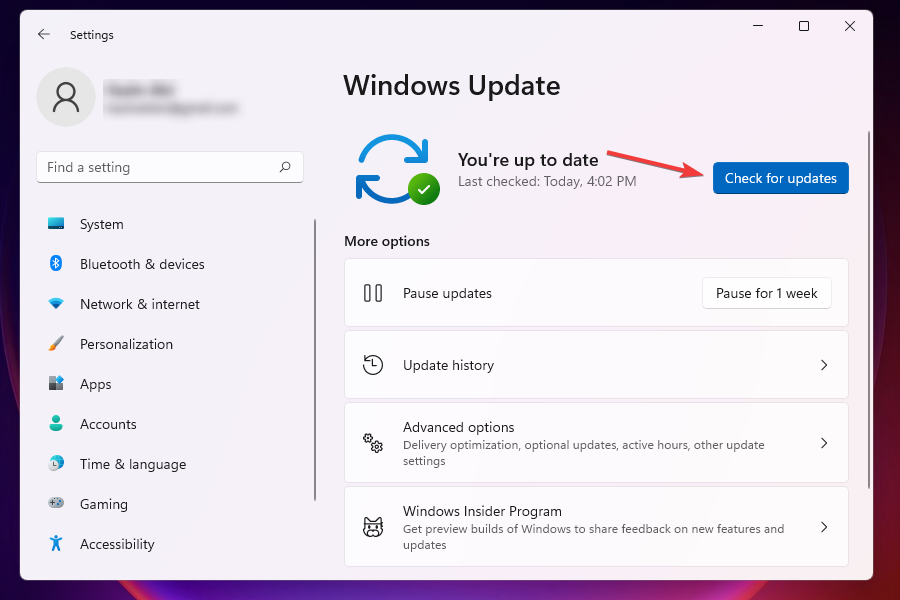
To update Windows, you can simply open up the Settings app by clicking Windows + I hotkey. Then, you can click on the Updates & security category and move to the Windows Update tab. From here, click on the Check for Updates button and let it scan download the available updates. Once the download is complete, reboot your PC to let it install the system updates.
Now, check if the “Driver Outdated” issue is fixed on Minecraft or not.
See: Port forwarding not working in Minecraft in Windows
4] Change GPU Settings
If the issue is still not fixed, you can try changing your GPU settings to resolve the error. This is also effective if there are dual graphics cards on your system. You need to check whether or not you are running Minecraft on the desired GPU card. If not, modify GPU settings and then check if the issue is fixed.
To modify GPU settings, follow the below steps:
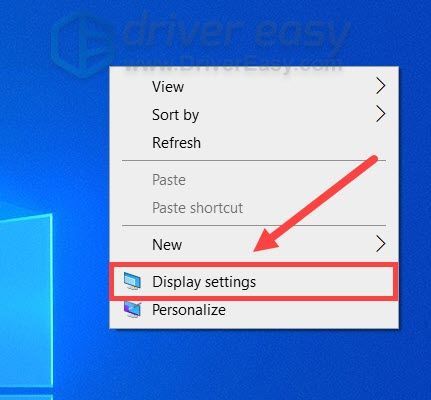
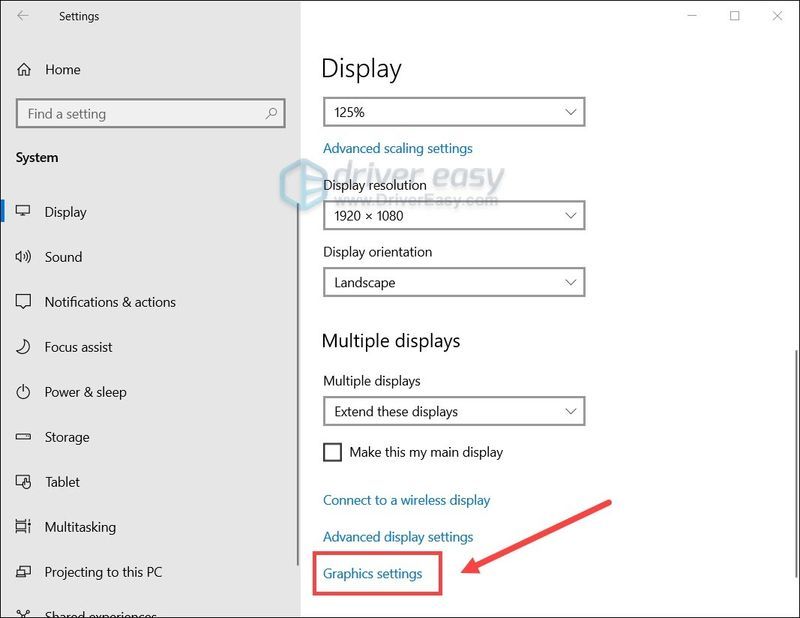
- Firstly, go to the desktop and right-click on the empty part.
- From the context menu, select the Display settings option.
- Now, inside the Display tab, scroll down to the Multiple displays section and tap on the Graphics settings button.
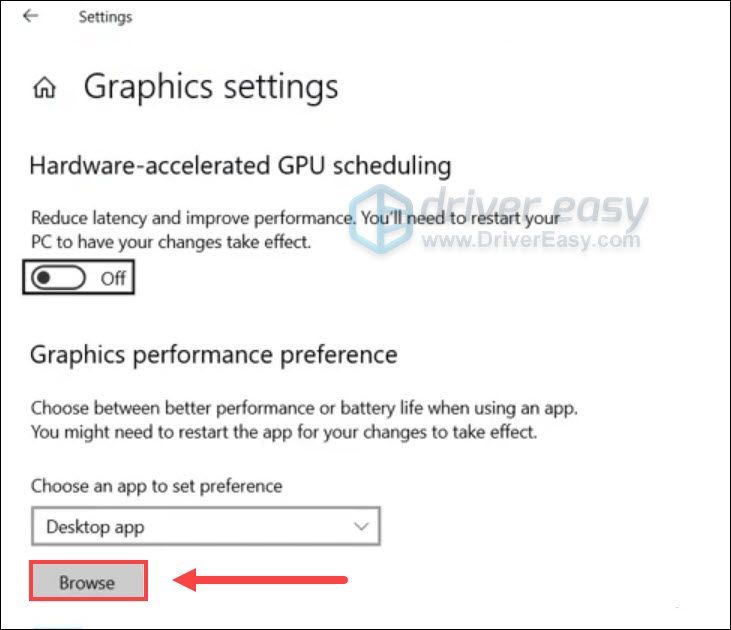
- Next, depending on the Minecraft edition you are using, you need to select either the Microsoft Store app (for Bedrock) or the Desktop app (for Java edition).
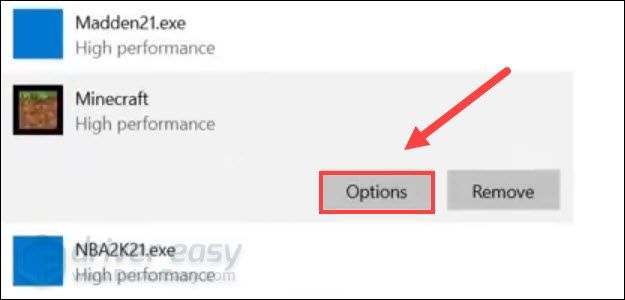
- Then, select or browse the Minecraft Launcher and tap on Options.
- Finally, select High performance and then click the Save button to apply changes.
Relaunch Minecraft and see if the message still appears or not.
How do I give Minecraft more RAM?
You can allocate more RAM to Minecraft in its Java edition. For doing that, simply open the Minecraft Launcher and go to the Installations tab at the top. Scroll to the Minecraft version and then click on the three-dot menu button and select the Edit option. Now, tap on the More Options and you will be able to see a “JVM Arguments” field. It will have a similar text like “2G” that basically indicates the current RAM used by Minecraft (in this case 2GB). Simply change this number to allocate more RAM to Minecraft and leave the rest text as it is. Finally, tap on the Save button to apply changes.
Why is Minecraft so laggy?
The main reason why Minecraft is so laggy in multiplayer mode is because of high latency. This basically means that your internet connection is not gaming optimized. If you get lagging issues even in single-player mode, your system has no adequate resources to handle the game’s load.
That’s it!
Now read:
- Fix Minecraft Can’t keep up, Is the server overloaded error
- Fix Error Placing Order for Minecraft via the official Mojang Store.

тоже так пишет в лаунчере, но играть не мешает
- пожаловаться
- скопировать ссылку

а у меня не запускается я уже всё перепробовал а толку нет хоть комп не слабый кор ай 5 2 66 12 гигов оперативки и родеон 285 х 3 гб но не как не запускается всё обновин все программы и стим отключил антивирус и даже Винда свежая хоть 7 хоть 8 ставил не как не помогло в чём дело может быть кто знает ?
- пожаловаться
- скопировать ссылку

У меня все работает на 7 -даже моды пашут ))) скорее всего у вас глюченная таблетка ! Попробуйте скачать таблетку в которой идет перечисление различных процесоров компов .
- пожаловаться
- скопировать ссылку
Спасибо большое за совет помогло.
- пожаловаться
- скопировать ссылку

Ребята зайдите на сайт изготовителя железа
у меня АМД и на сайте у них есть автобот который можно запустить для проверки вашего железа и софта к нему , если будет доступны новые драйвера то он их автоматом для вашей видюхи скачает
на сайте интела такая штука тоже должна быть , просто посмотрите внимательно
у меня тоже такое было
прогрузил новые дрова и всё запахало без проблем и сообщений о старье
- пожаловаться
- скопировать ссылку
После обновления Minecraft многие игроки начинают сообщать о Сообщение об устаревших драйверах сообщая, что им нужно обновить графический драйвер. Если вы находитесь в одной лодке, вы находитесь в правильном месте. В этом уроке мы покажем вам, как избавиться от этого сообщения.
Попробуйте эти исправления:
Возможно, вам не нужно пробовать их все. Просто работайте вниз, пока не найдете тот, который принесет вам удачу.
- Проверьте версии Minecraft и вашей системы
- Убедитесь, что вы используете последние версии драйверов
Проверьте свой графический процессор по умолчанию
Исправление 1: проверьте версии Minecraft и вашей системы
Хотя в сообщении вам предлагается обновить графический драйвер, для вас также является приоритетом убедитесь, что ваш клиент Minecraft и система обновлены . Некоторые игроки предполагают, что сообщение также может говорить о том, что вы используете устаревший клиент или систему.
Подтвердите свою версию Minecraft
Вы можете использовать следующие шаги, чтобы проверить наличие обновлений Minecraft.
Базовое издание
- На клавиатуре нажмите Выиграть (клавиша с логотипом Windows). Затем нажмите Магазин Майкрософт .

- В верхнем левом углу нажмите Получайте обновления и дождитесь завершения процесса.

Java-версия
- Откройте или перезапустите программу запуска Minecraft.
- Если вы не видите запрос на обновление, справа от кнопки «Воспроизвести» щелкните стрелку и выберите «Последний выпуск».
Убедитесь, что вы используете последнюю версию Windows
- На клавиатуре нажмите Выиграть+Я (клавиша с логотипом Windows и клавиша i), чтобы открыть приложение «Параметры Windows». Нажмите Обновление и безопасность .
- Нажмите Проверить наличие обновлений . Затем Windows загрузит и установит доступные исправления. Это может занять некоторое время (до 30 минут).
Чтобы подтвердить, что вы установили все обновления системы, повторите эти шаги пока не появится сообщение Вы в курсе, когда вы нажмете Проверить наличие обновлений .
После установки всех системных обновлений перезагрузите компьютер и проверьте, сохраняется ли проблема.
Если вы все еще видите сообщение, перейдите к следующему исправлению.
Исправление 2. Убедитесь, что вы используете последние версии драйверов
Сообщение говорит само за себя: вам нужно проверить, используете ли вы последнюю версию графического диска р. Последний видеодрайвер увеличивает производительность графического процессора. В отличие от системных обновлений, в большинстве случаев вам нужно самостоятельно позаботиться об обновлениях драйверов.
Вы можете обновить свои драйверы вручную, посетив веб-сайт производителя вашего графического процессора ( NVIDIA / AMD / Интел ), затем выполните поиск вашей модели и найдите последнюю правильную программу установки. Это потребует от вас некоторого времени и навыков работы с компьютером. Но если вам неудобно играть с компьютерными драйверами, вы можете обновить вручную с помощью Драйвер Легкий .
- Скачатьи установите драйвер Easy.
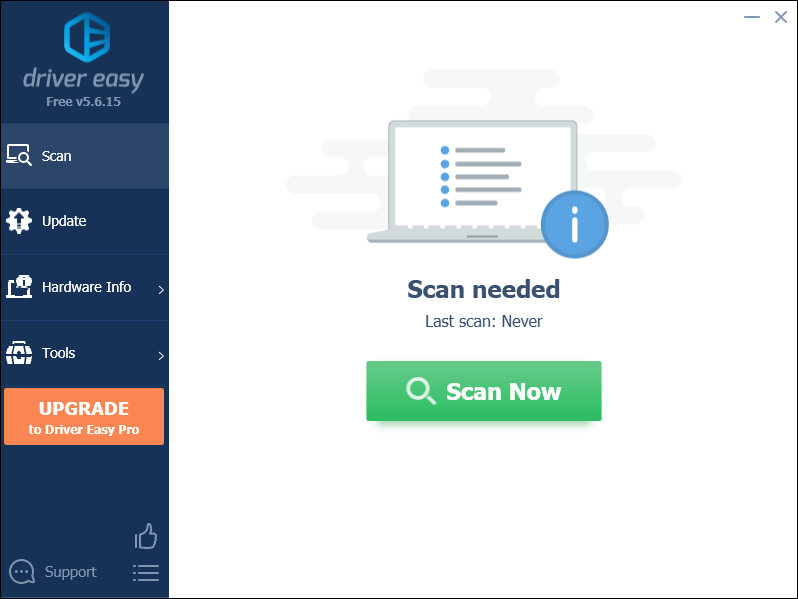
- Запустите Driver Easy и нажмите кнопку Сканировать сейчас кнопка. Затем Driver Easy просканирует ваш компьютер и обнаружит проблемные драйверы.
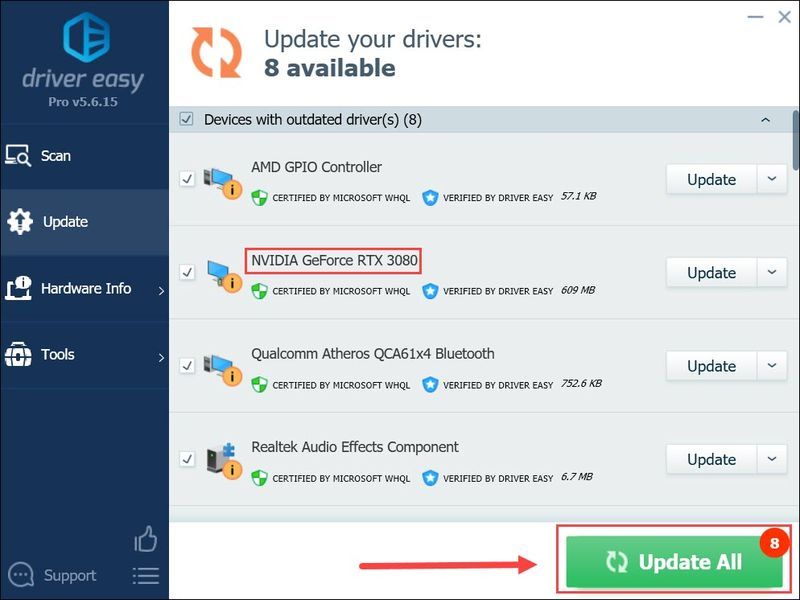
- Нажмите Обновить все для автоматической загрузки и установки правильной версии все драйверы, которые отсутствуют или устарели в вашей системе.
(Для этого требуется Про версия — вам будет предложено обновиться, когда вы нажмете «Обновить все». Если вы не хотите платить за Pro-версию, вы все равно можете загрузить и установить все необходимые драйверы в бесплатной версии; вам просто нужно загрузить их по одному и установить вручную, как обычно в Windows.)
После обновления графического драйвера перезагрузите компьютер и проверьте, нормально ли работает Minecraft.
Если сообщение об обновлении появляется снова, попробуйте следующий метод.
Исправление 3: проверьте свой графический процессор по умолчанию
Если ваш компьютер оснащен двумя графическими картами, например, интегрированной графической картой Intel и выделенной графической картой NVIDIA/AMD, вы можете проверить, запуск Minecraft на нужном графическом процессоре . Сообщение об обновлении может появиться, если вы используете Minecraft не на том графическом процессоре.
Вот как вы можете проверить предпочтительный графический процессор Minecraft:
Если вы используете Windows 7 или 8, вы можете изменить предпочтительный графический процессор Minecraft в Панель управления NVIDIA или Настройки AMD Radeon™ .
- В пустой области рабочего стола щелкните правой кнопкой мыши и выберите Настройки отображения .
- Под Несколько дисплеев раздел, нажмите Настройки графики .
- Под Настройка производительности графики , укажите тип вашего приложения (для Java Edition выберите Настольное приложение . Для Bedrock выберите Приложение Microsoft Store ). Затем нажмите Просматривать и выберите программу запуска Minecraft.
- Нажмите Опции .
- Нажмите Высокая производительность а потом Сохранять .
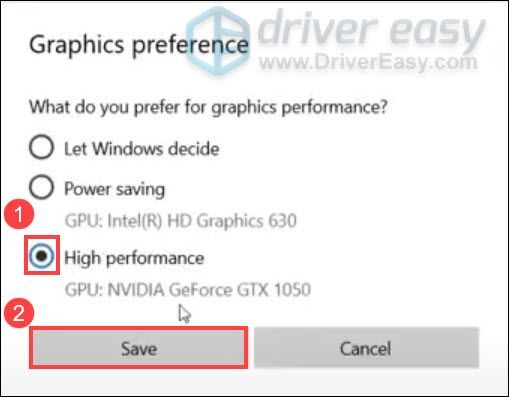
Теперь вы можете перезапустить Minecraft и проверить, сохраняется ли сообщение.
Надеюсь, это руководство поможет вам избавиться от сообщения об обновлении драйвера в Minecraft. Если у вас есть какие-либо вопросы или идеи, не стесняйтесь сообщить нам в комментариях ниже.
- Шахтерское ремесло
Keeping your drivers up-to-date is a priority you should to set
by Kazim Ali Alvi
Kazim has always been fond of technology, be it scrolling through the settings on his iPhone, Android device, or Windows. And at times, unscrewing the device to take… read more
Updated on February 2, 2023
Reviewed by
Vlad Turiceanu

Passionate about technology, Windows, and everything that has a power button, he spent most of his time developing new skills and learning more about the tech world. Coming… read more
- Many users have reported encountering outdated driver errors on Windows 11 while playing games such as Minecraft and Battlefield or performing other tasks.
- You will likely encounter the problem when an older version of the graphics driver is installed.
- One can update the drivers using Device Manager, Windows Update, from the manufacturer’s website or a dedicated third-party tool.
XINSTALL BY CLICKING THE DOWNLOAD FILE
- Download Restoro PC Repair Tool that comes with Patented Technologies (patent available here).
- Click Start Scan to find Windows 11 issues that could be causing PC problems.
- Click Repair All to fix issues affecting your computer’s security and performance
- Restoro has been downloaded by 0 readers this month.
A driver is a critical piece of software that facilitates the relay of commands between the OS and the device. Every hardware connected to the PC has a separate drive installed. But what happens when you encounter an outdated driver’s error in Windows 11?
And there may be a few other questions you have always wanted to answer. For instance, when you encounter an outdated driver’s error, why should you update them, what the benefits of it are, and which are the ones to be updated frequently?
In the following sections, we will try and answer as many queries users generally have and list the best fixes for the error.
When do I encounter the outdated driver’s error in Windows 11?
Errors with an outdated driver can be encountered while running an application/tool or performing a task. For example, users generally encounter this issue with the graphics driver when playing games on Windows. For instance, Battlefield 2042 recently displayed this error.
Some have reported trouble while using their webcam, another problem attributed to an outdated or corrupt driver.
Apart from these, you may also encounter issues while performing everyday tasks and notice poor computer performance when on an outdated driver.
Moreover, there are multiple devices that you can encounter such errors on. Some of them are the following:
- AMD outdated drivers in Windows 11 – The solutions below are easy to follow on AMD laptops/computers.
- Asus outdated drivers in Windows 11 – Asus users are no exception from driver issues. Drivers need to updated regardless of what computer brand you are using.
- Lenovo outdated drivers in Windows 11 – Outdated drivers can cause a multiplicity of errors that can be avoided.
- HP outdated drivers in Windows 11 – By updating your drivers regularly, you won’t have to bother with troubleshooting driver errors in the future.
Where can I find the devices listed on the computer?
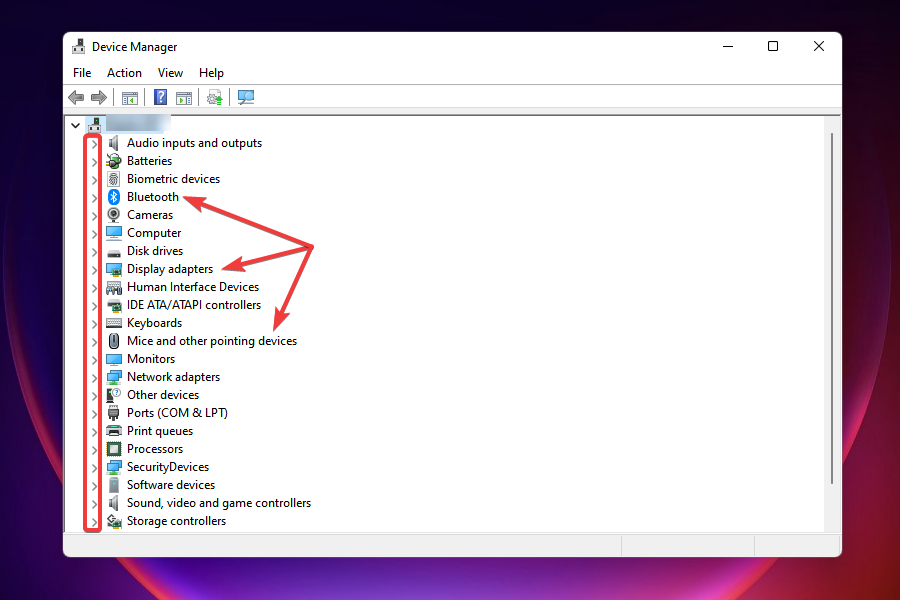
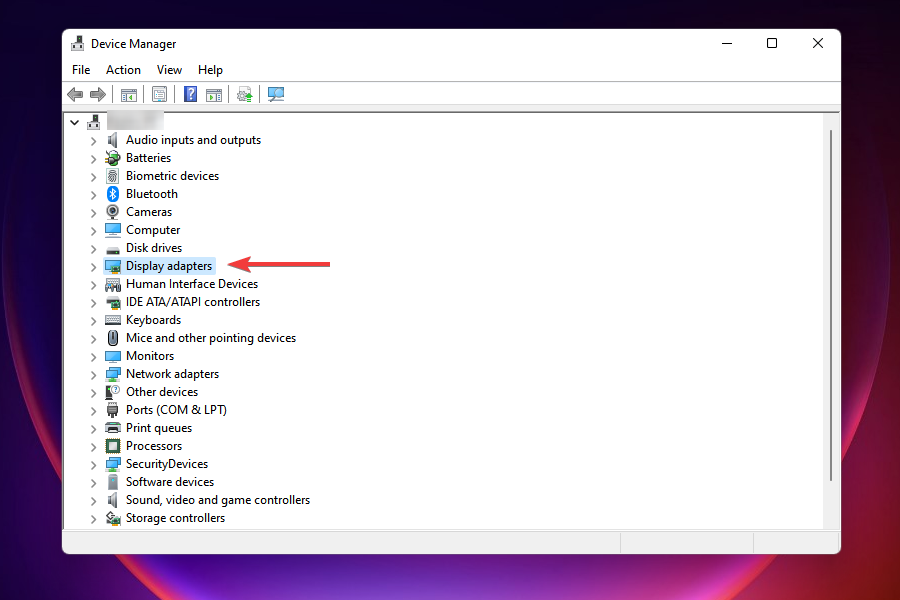
All the devices connected to the computer, external and internal, can be listed in Device Manager. They are sorted based on the category they fall under. Here’s how you can view the various devices.
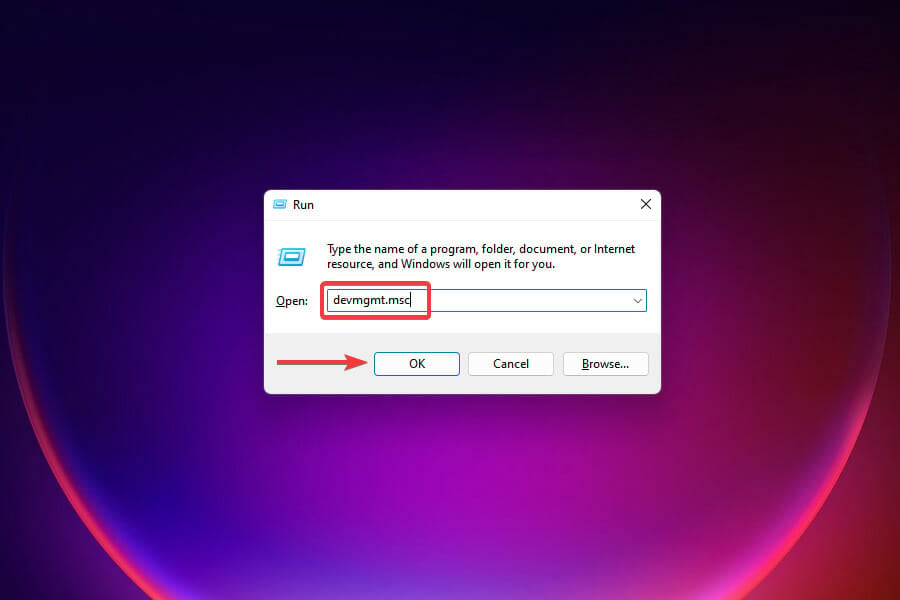
- Press Windows + R to launch the Run command. Type devmgmt.msc in the text field and either click on OK or hit Enter to launch the Device Manager.

- You will now find various categories listed here, just double-click on an individual entry or click on the caret icon to expand and view the devices under it.

How can I find the currently installed driver’s version?
When updating drivers, it’s imperative that you first identify the currently installed version to determine if an update is available. The process is simple, straightforward, and wouldn’t take more than a minute.

NOTE
We will take up the Graphics driver for all examples in this article since it’s one of the most critical. However, after understanding the process conceptually, you should be able to update any driver on the computer.
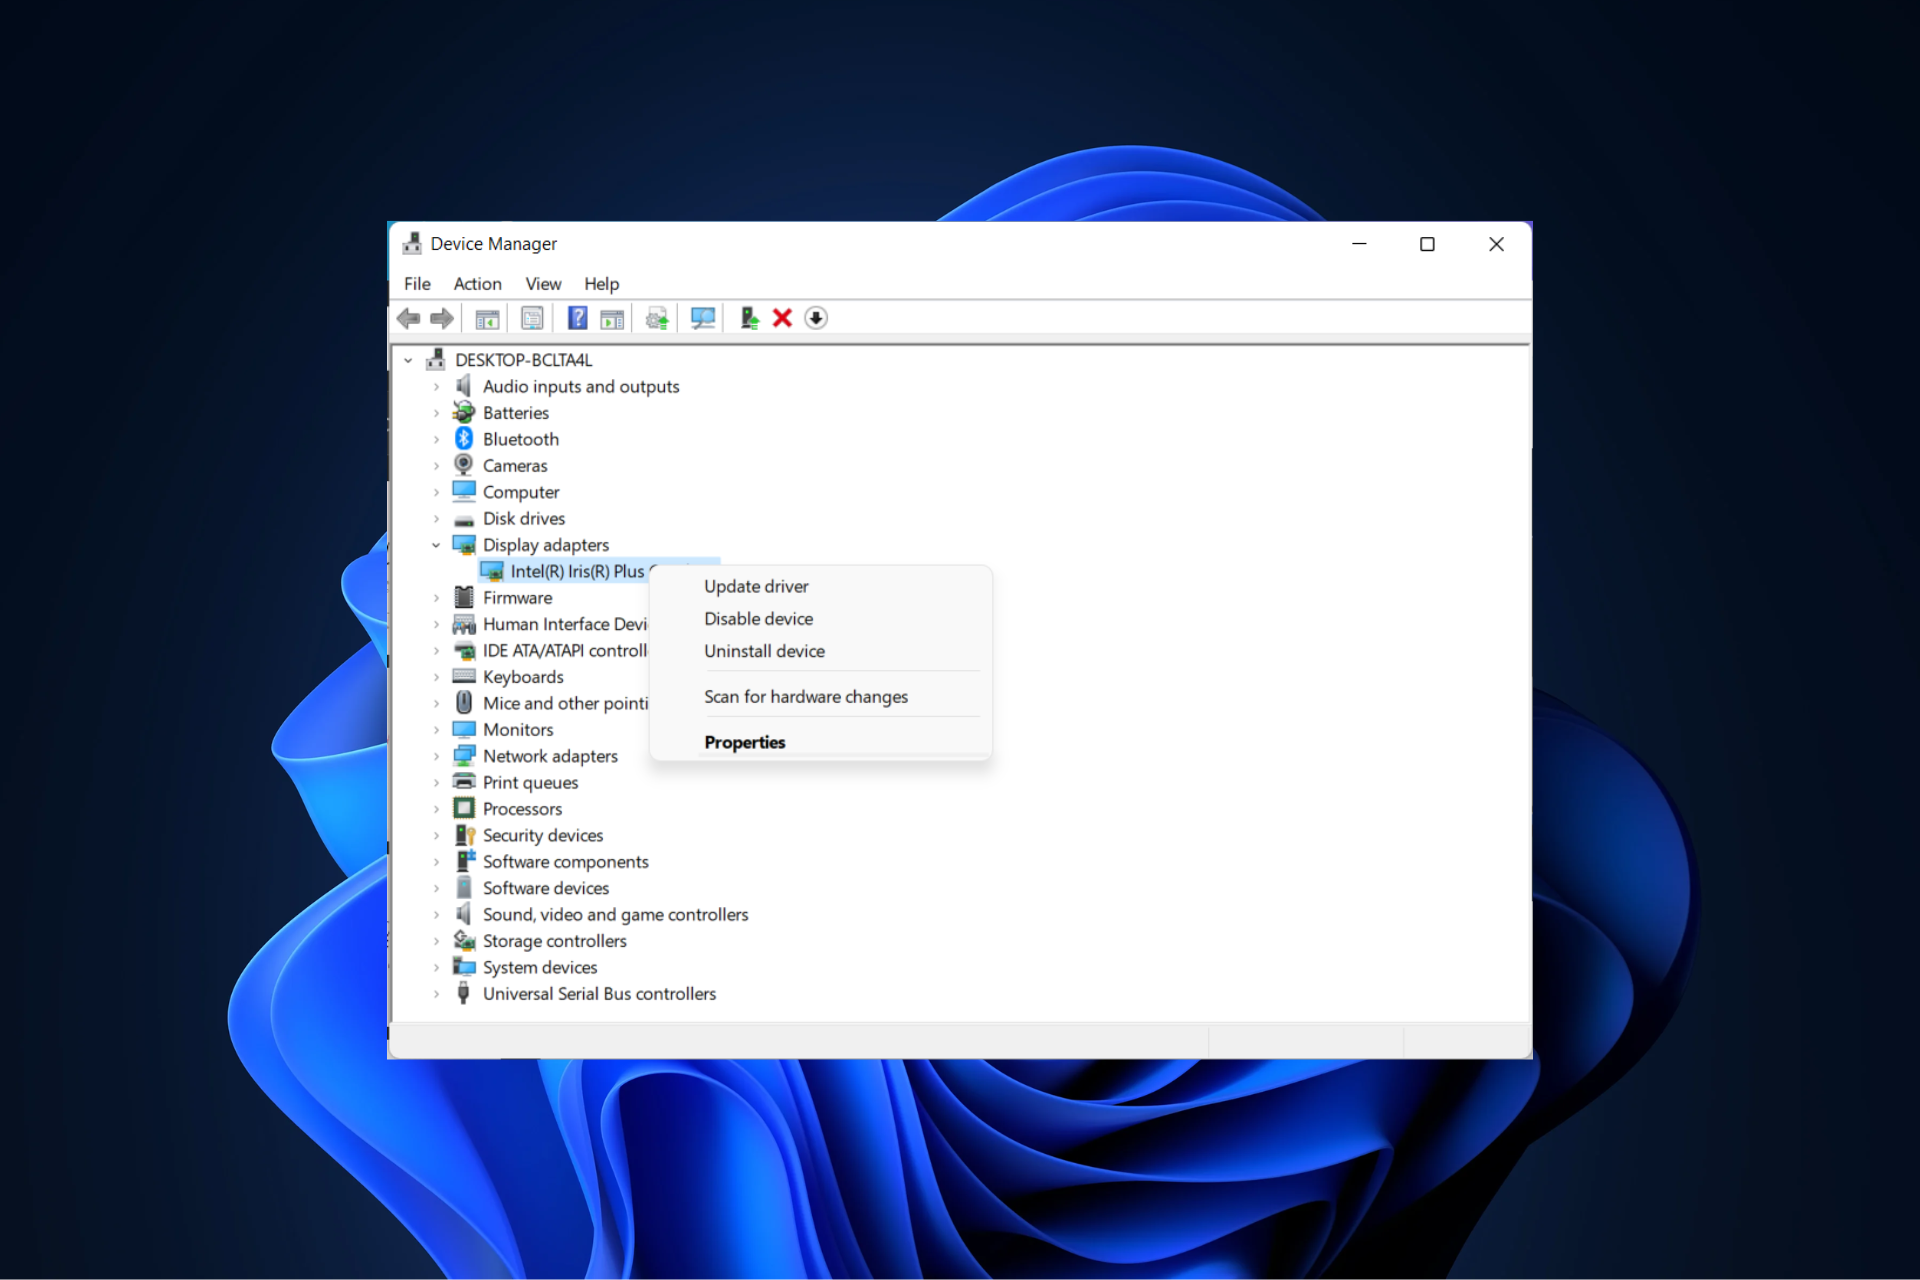
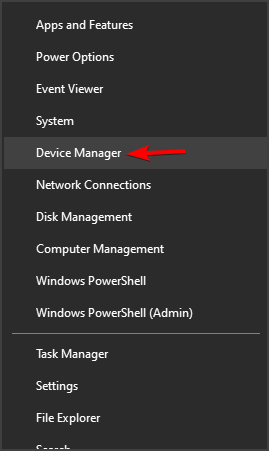
- Launch Device Manager by right-clicking the Start icon from your Taskbar and selecting it from the options.
- Double-click on the entry under which the device is listed to expand and view it.
- Right-click on the device and select Properties from the context menu.
- Navigate to the Driver tab and jot down the Driver Version.
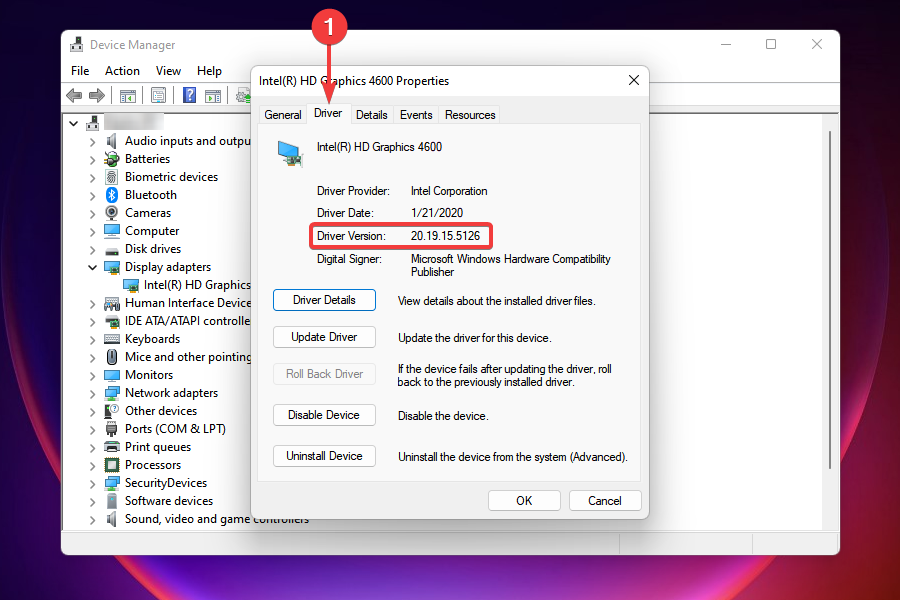
Once you have the version of the currently installed driver, it would be easy to identify if the version you are about to install is newer.
Do I need to update drivers for Windows 11?
It should come as no surprise that maintaining an up-to-date set of system drivers is essential to achieving peak performance from your personal computer and a distraction-free work environment.
Even though more recent versions of Windows, such as Windows 10 and 11, automatically update drivers via OS updates, many drivers may remain out of date.
Without further ado, let’s see what you can do specifically to solve driver issues in Windows 11. Follow along!
How can I fix the outdated drivers error in Windows 11?
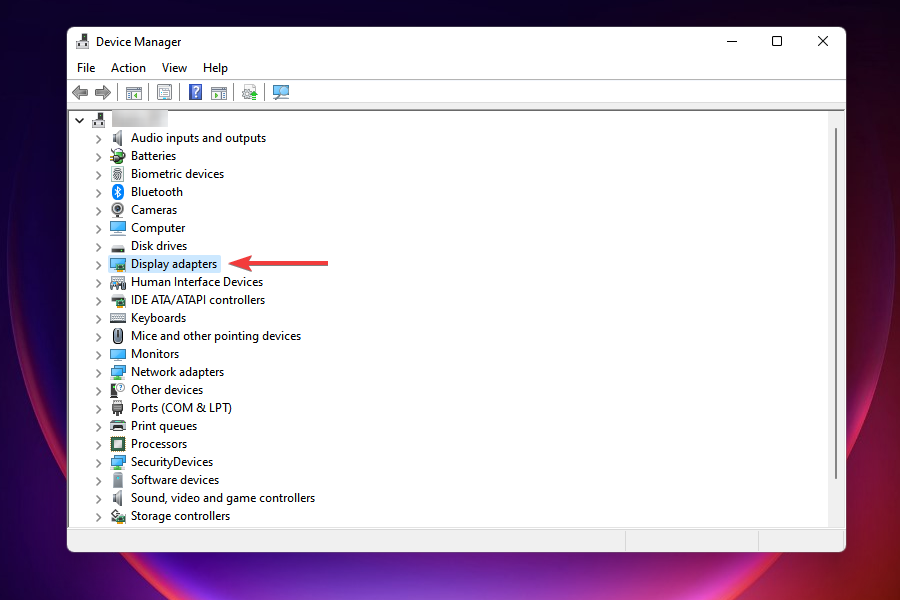
1. Enable the graphics card
- Press Windows + R to launch the Run command.
- Type or paste devmgmt.msc in the text field, and click on OK or hit Enter to launch Device Manager.
- Locate and double-click on the Display adapters option.
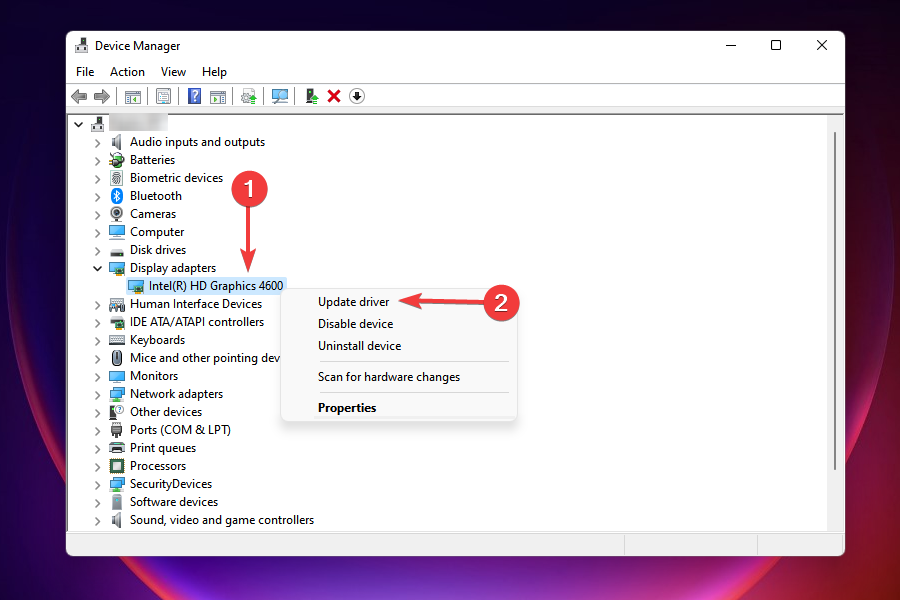
- Right-click on the graphics adapter and select Enable device from the context menu.
- Close Device Manager and check if you can perform the action that was restricted earlier.

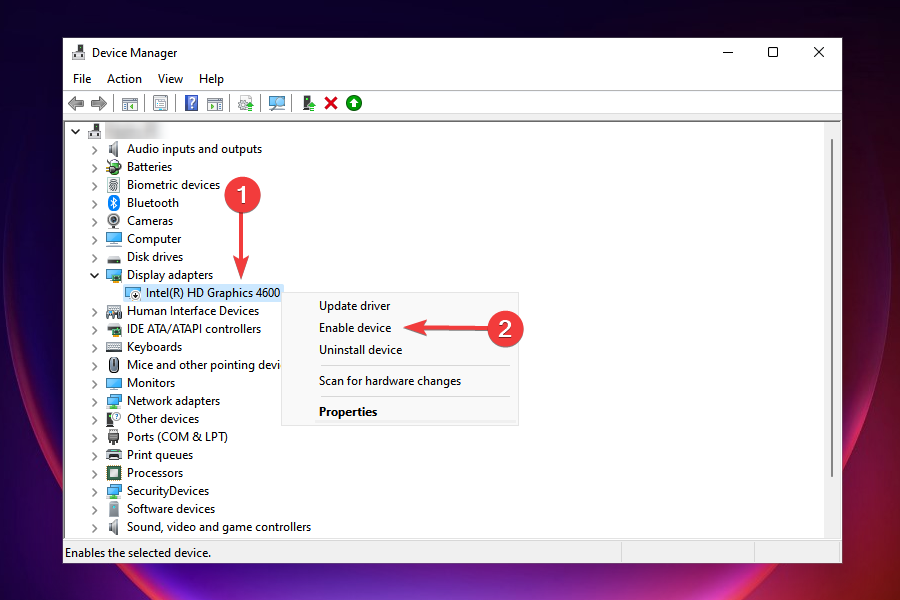
Many users reported the outdated driver error on Minecraft and efficiently fixed it by enabling the graphics card. However, if the display adapter is disabled, your computer will switch to the generic version, which may lead to issues when high-end graphics are required.
2. Update the driver
2.1 Via Device Manager
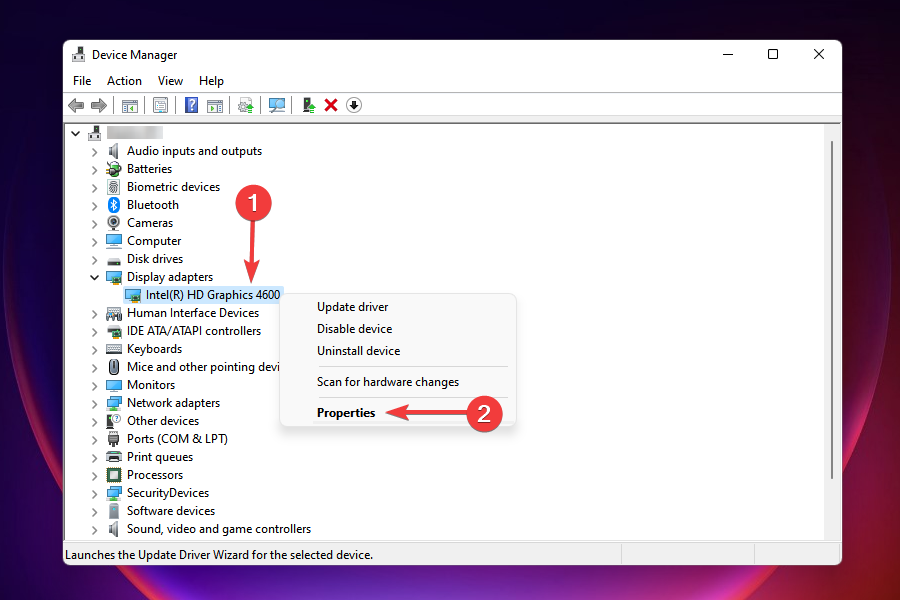
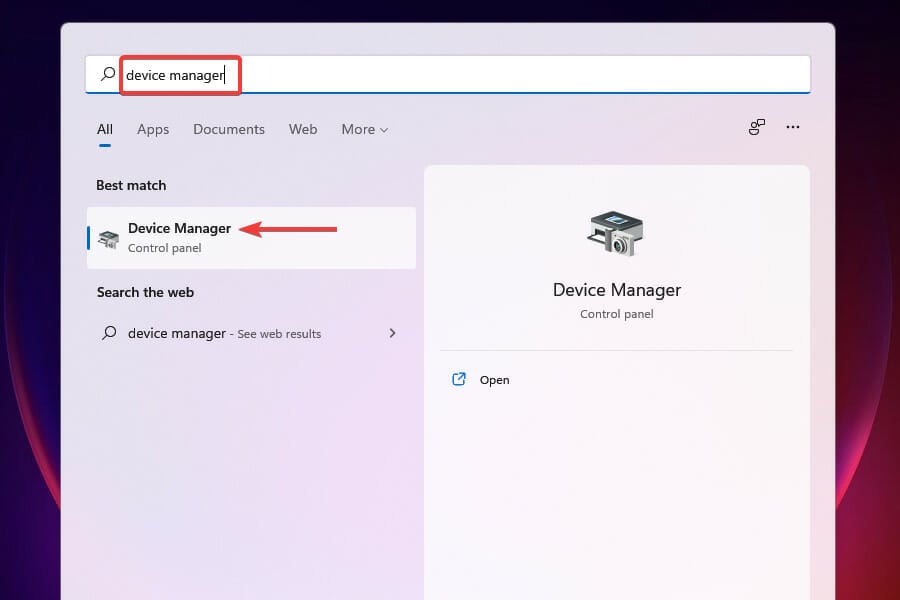
- Press Windows + S to launch the Search menu.
- Enter Device Manager in the text field at the top and click on the relevant search result that appears.
- Double-click on the entry under which the device is placed.
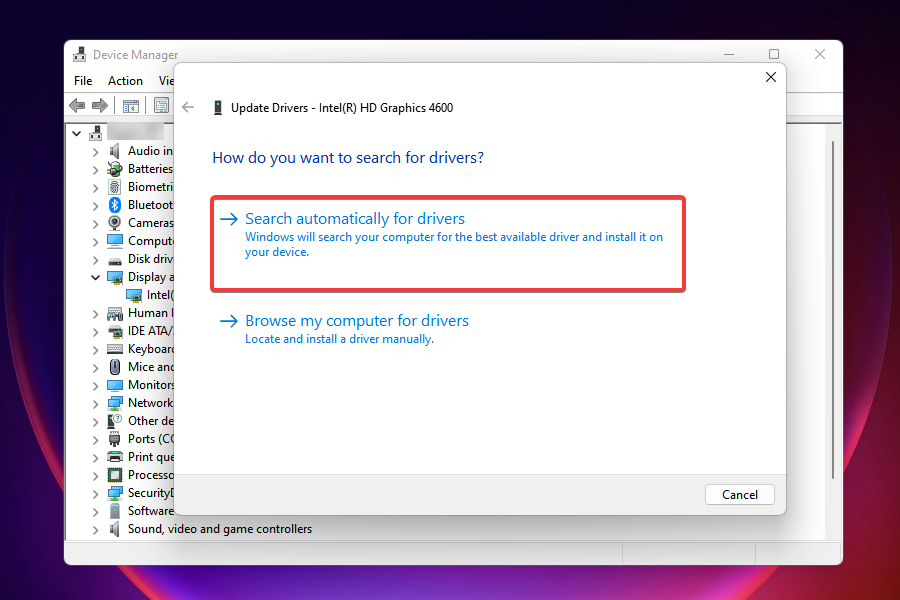
- Right-click on the device and select Update driver from the context menu.
- Select Search automatically for drivers from the two options in the Update Drivers window. This is how to update outdated drivers in Windows 11.
You would have noticed earlier that Windows only scans your system for any available updates in this method. So, in simple terms, only the updates that have already been downloaded to the computer can be installed this way.
If Windows was able to find a newer version and install it, go ahead and check if the error is fixed.
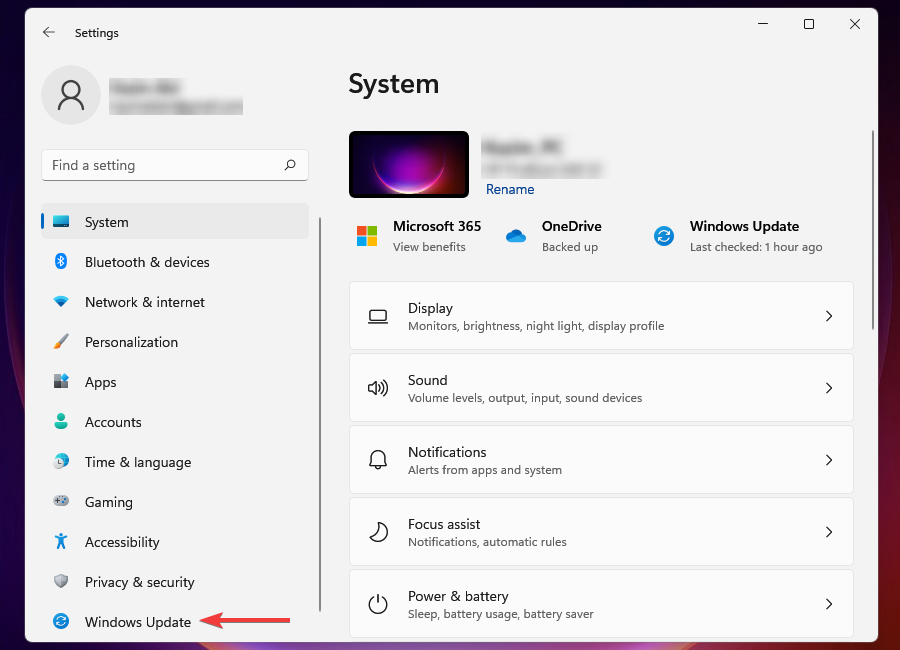
2.2 Via Windows Update
- Press Windows + I to launch the Settings app.
- Select Windows Update from the tabs listed in the navigation pane on the left.

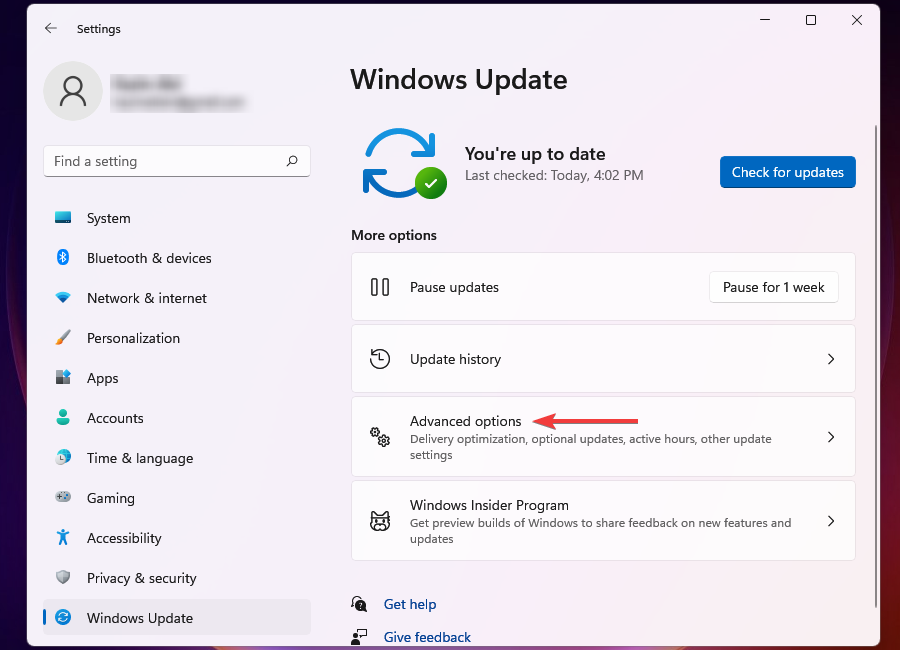
- Click on Advanced Options on the right.
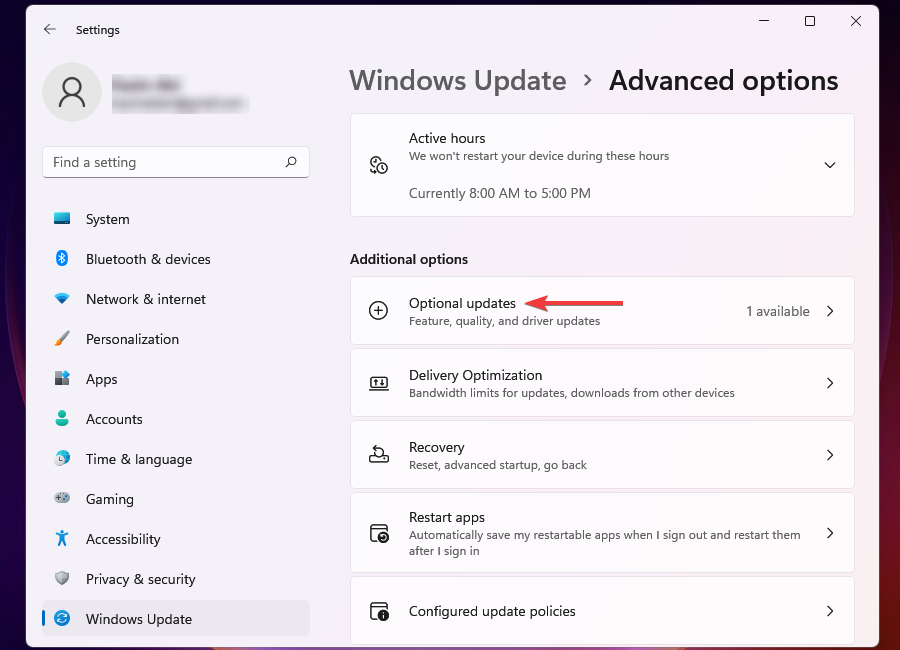
- Select Optional Updates under Additional Options.
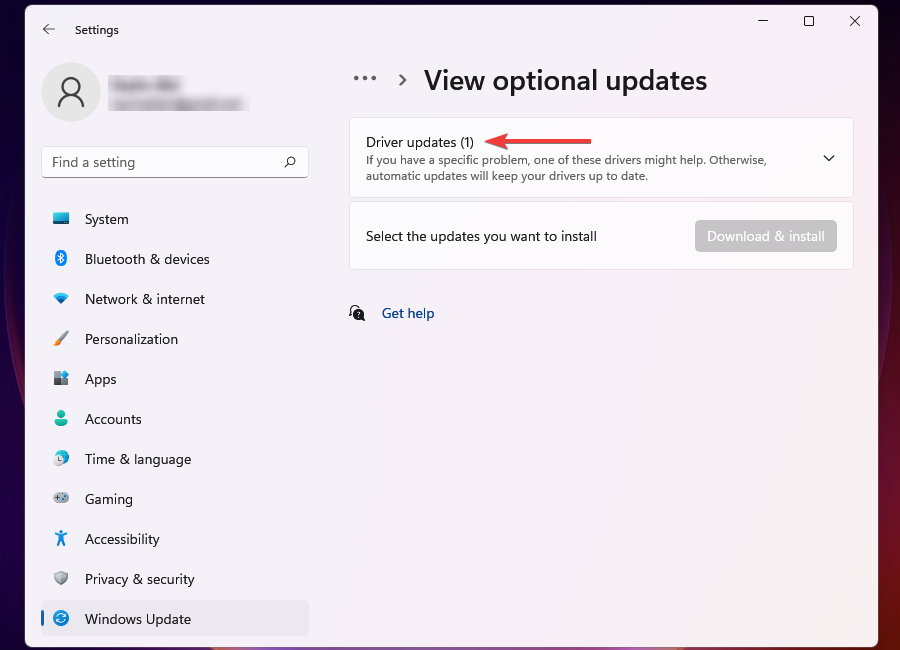
- Click on Driver updates if there are any available. The figure in the bracket next to it depicts the number of updates available for download.
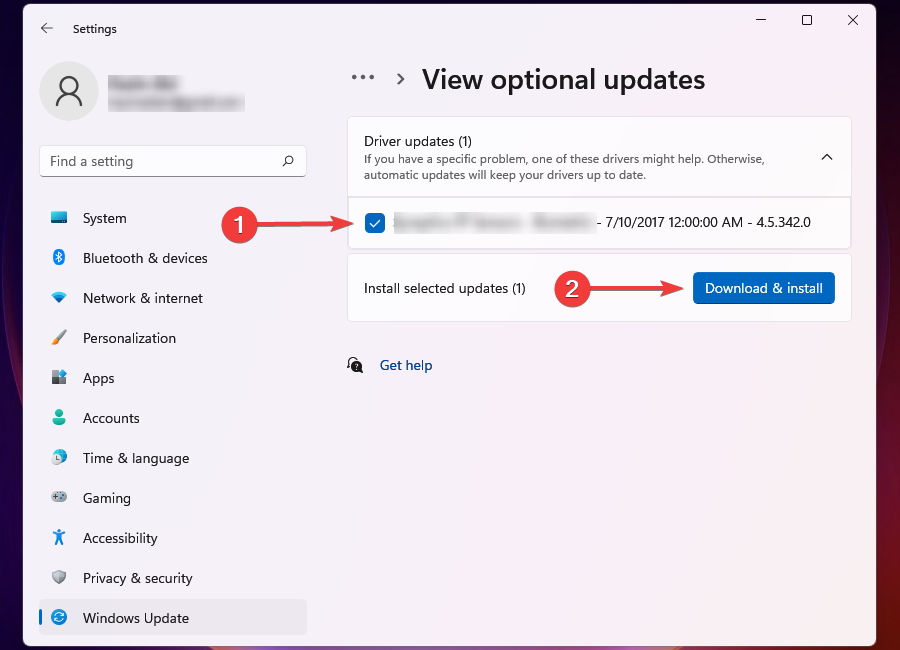
- Tick the checkbox for the driver and click on Download & install to begin the process.
- Wait for the installation process to complete, and then restart the computer for the changes to effect. The Windows 11 driver error will be fixed afterward.
You should download driver updates through Windows Update since these are all checked and tested by Microsoft. Also, the installation is automatic, so you haven’t much to do after downloading the driver.
Some PC issues are hard to tackle, especially when it comes to corrupted repositories or missing Windows files. If you are having troubles fixing an error, your system may be partially broken.
We recommend installing Restoro, a tool that will scan your machine and identify what the fault is.
Click here to download and start repairing.
After the update is done, check if the outdated drivers error on Windows 11 is fixed.
If you couldn’t find a newer version offline (Device Manager) and in the Windows Update section, look for it on the manufacturer’s website. Here’s how you can do that.
2.3 Via manufacturer’s website
- Open the desired web browser and go to any search engine of your preference.
- Search for the update using the Driver Name and OS (Windows 11) as the keywords.
- Locate and open the manufacturer’s website from the search results.
- Since you already have the version of the currently installed driver, it would be easy to identify if there’s a newer version available. If you find one, download it.
- If the downloaded file is in .exe format, double-click on it to launch the installer and follow the on-screen instructions to complete the process.
- After installing the latest driver version, restart the computer for the changes to effect.
You can easily find all the recent updates on the manufacturer’s website and install them.
You had to go through so much trouble because many manufacturers, instead of submitting the driver update to Microsoft, upload it on their official website. These drivers may later be accessible through Windows Update, but going the extra mile will get you the latest driver sooner than others.
Below, we have listed the links to the driver support pages of some of the manufacturers:
- HP
- Dell
- Acer
- Intel
- Nvidia
- AMD
On many of these websites, you will find a tool that automatically detects drivers installed on your computer and lists available updates.
NOTE
If you can’t find the concerned driver on the manufacturer’s website, other third-party sources are available. However, it’s recommended that you do thorough research before downloading from one of these since there’s a high possibility of it being malware disguised as a driver update.
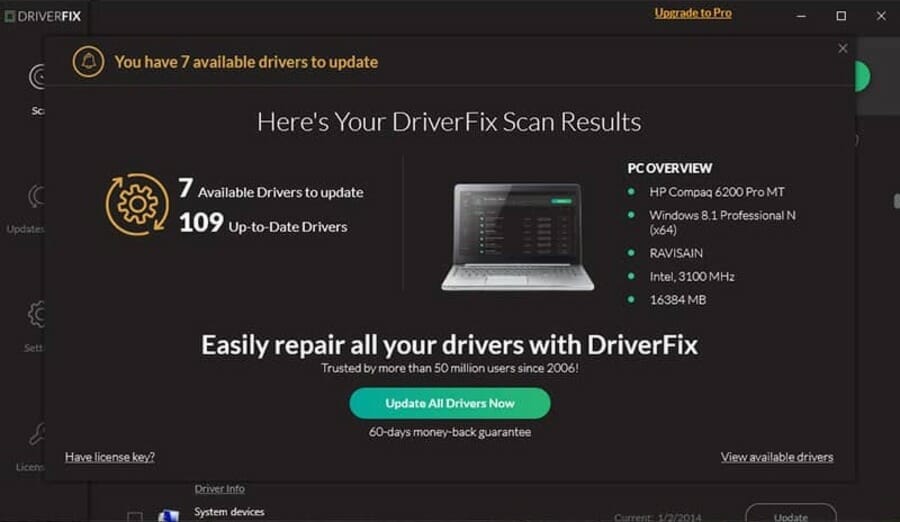
The above three methods, although practical, consume a lot of time and can be tricky for some users. To them, we recommend downloading DriverFix, a reliable tool that will keep the installed drivers up-to-date.
It will scan for available updates and download them to your computer. You will find other similar third-party tools available, but we recommend being extra cautious when using those.

DriverFix
Automatically find and install all updates and keep all your drivers up to date.
3. Set driver updates to automatic
- Press Windows + S to launch the Search menu.
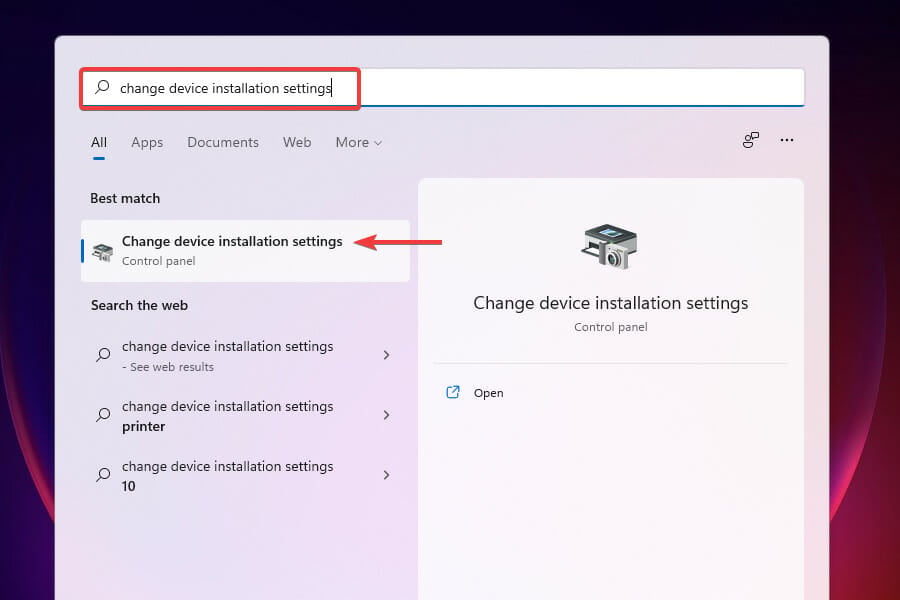
- Enter change device installation settings in the text field and click on the relevant search result to launch Device installation settings.
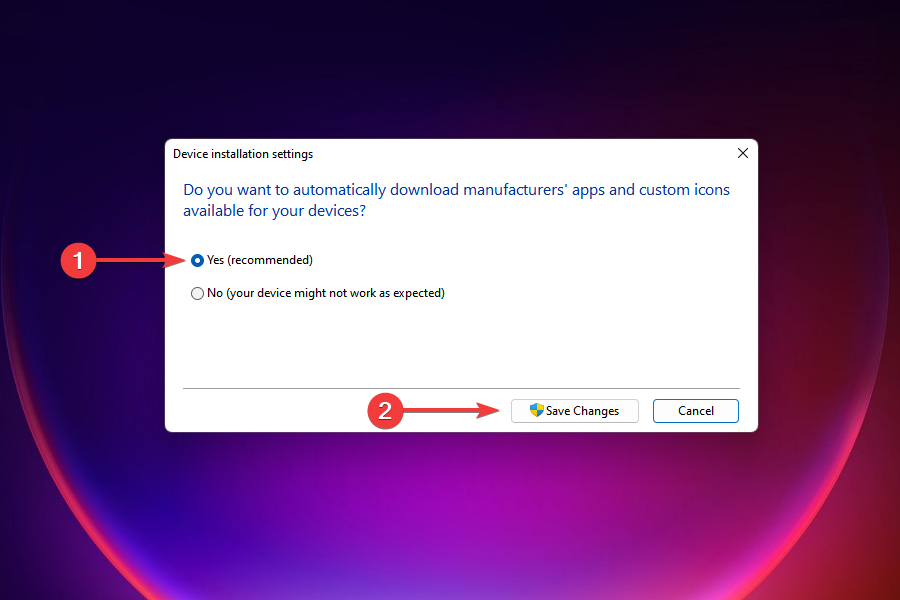
- Select Yes (recommended) and click on Save Changes.
You can also set driver updates to automatic and let Windows take care of all future downloads. Once the setting is enabled, your system will install any available new versions and keep your drivers up-to-date.
- Fix: Device requires further installation in Windows 10/11
- How to Update Drivers on Windows 11? Try 5 Easy Methods
- How to manually install drivers on Windows 11
- 3 Easy Ways to Update Network Drivers in Windows 11
4. Update Windows 11
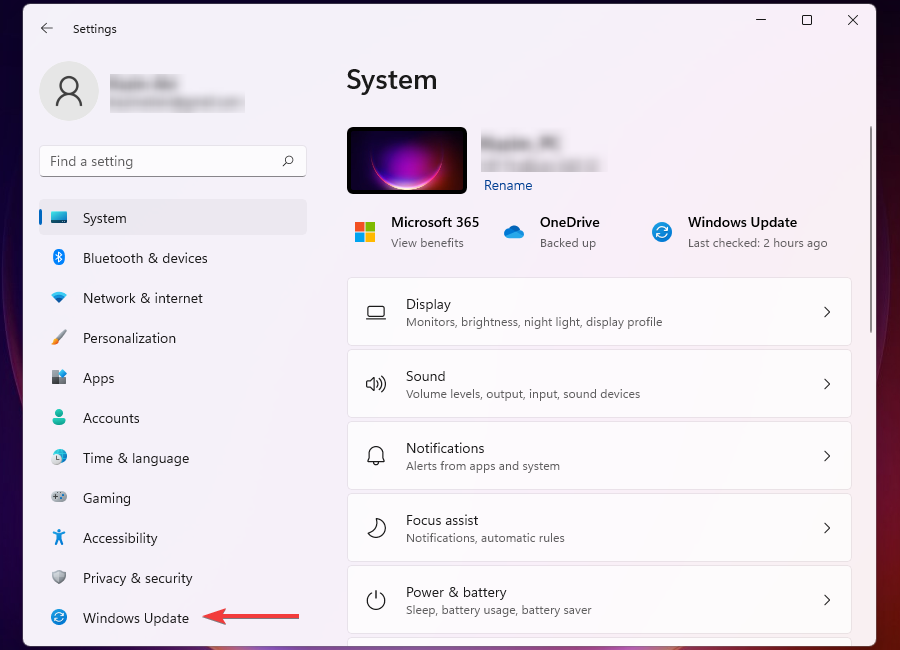
- Press Windows + I to launch Settings.
- Select Windows Update from the tabs listed in the navigation pane on the left.
- Click on Check for updates to scan and download, if any are available.
- After updating, check if the outdated drivers error is fixed.
When you update Windows, patches, driver updates, and new features or changes are added to the computer. This ensures that your system remains up-to-date, including the installed drivers, thus offering both high performance and higher levels of security and privacy.
Should I update all drivers installed on the PC?
It may come as a surprise to a lot of users, but the answer is No. If the currently installed drivers are working fine, there’s no need for you to meddle.
However, if you start encountering errors frequently or notice poor system performance, it could be due to an outdated driver. In such cases, you must update them.
Which driver should I update on the PC?
Regarding updating, it’s recommended that you keep the critical ones up-to-date: the graphics driver, those for the network adapter, and disks.
While drivers for peripherals, namely the keyboard, mice, and speakers, are just fine and don’t need to be updated very often. Even if there’s an update available, you won’t notice any considerable change in performance after upgrading to the latest version.
So the bottom line here is not to update a driver until it starts throwing errors or affects the system performance.
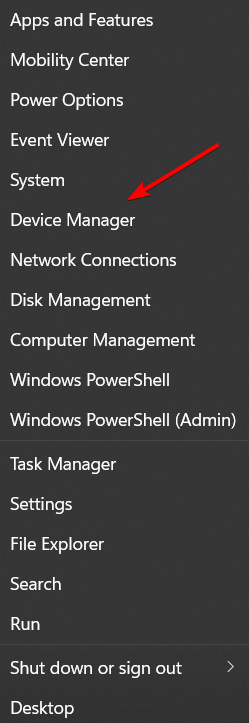
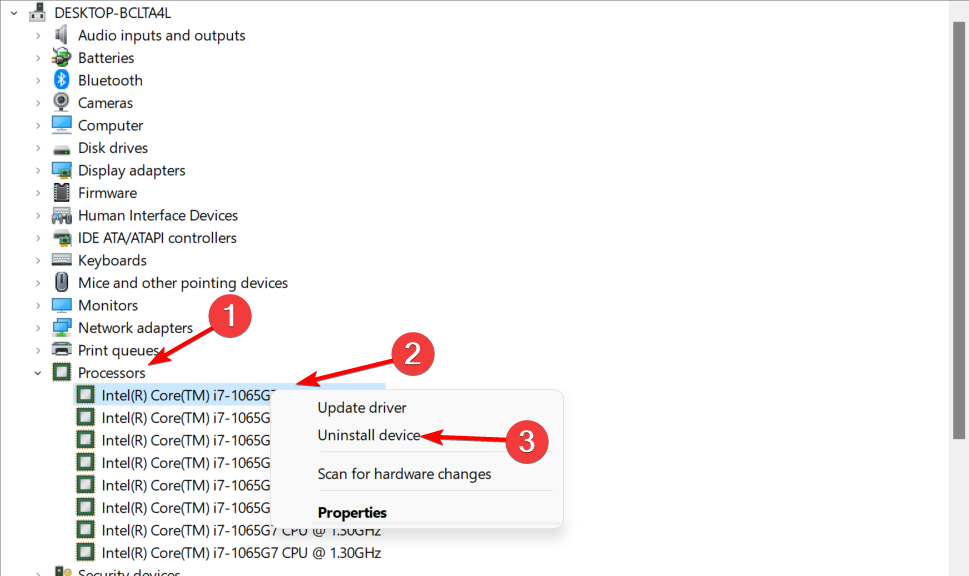
How do I reinstall drivers on Windows 11?
- Right-click the Start icon from your Taskbar, then select Device Manager.

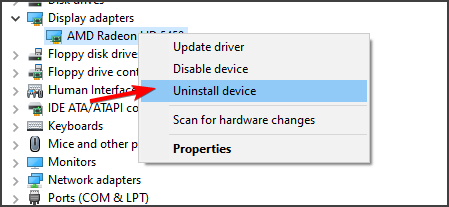
- Expand the section with the driver you want to uninstall, then right-click and select Uninstall device.

- Reboot your computer to reinstall that driver automatically. That’s it!
The above fixes will likely resolve the outdated drivers error on Windows 11. All you have to do is identify the one responsible for the problem and then update it.
You also now know when to update a driver and which ones. Get done with the troubleshooting and have your system up and running like new.
Let us know which fix worked for you in the comments section below.
![]()
Newsletter
Keeping your drivers up-to-date is a priority you should to set
by Kazim Ali Alvi
Kazim has always been fond of technology, be it scrolling through the settings on his iPhone, Android device, or Windows. And at times, unscrewing the device to take… read more
Updated on February 2, 2023
Reviewed by
Vlad Turiceanu
Passionate about technology, Windows, and everything that has a power button, he spent most of his time developing new skills and learning more about the tech world. Coming… read more
- Many users have reported encountering outdated driver errors on Windows 11 while playing games such as Minecraft and Battlefield or performing other tasks.
- You will likely encounter the problem when an older version of the graphics driver is installed.
- One can update the drivers using Device Manager, Windows Update, from the manufacturer’s website or a dedicated third-party tool.
XINSTALL BY CLICKING THE DOWNLOAD FILE
- Download Restoro PC Repair Tool that comes with Patented Technologies (patent available here).
- Click Start Scan to find Windows 11 issues that could be causing PC problems.
- Click Repair All to fix issues affecting your computer’s security and performance
- Restoro has been downloaded by 0 readers this month.
A driver is a critical piece of software that facilitates the relay of commands between the OS and the device. Every hardware connected to the PC has a separate drive installed. But what happens when you encounter an outdated driver’s error in Windows 11?
And there may be a few other questions you have always wanted to answer. For instance, when you encounter an outdated driver’s error, why should you update them, what the benefits of it are, and which are the ones to be updated frequently?
In the following sections, we will try and answer as many queries users generally have and list the best fixes for the error.
When do I encounter the outdated driver’s error in Windows 11?
Errors with an outdated driver can be encountered while running an application/tool or performing a task. For example, users generally encounter this issue with the graphics driver when playing games on Windows. For instance, Battlefield 2042 recently displayed this error.
Some have reported trouble while using their webcam, another problem attributed to an outdated or corrupt driver.
Apart from these, you may also encounter issues while performing everyday tasks and notice poor computer performance when on an outdated driver.
Moreover, there are multiple devices that you can encounter such errors on. Some of them are the following:
- AMD outdated drivers in Windows 11 – The solutions below are easy to follow on AMD laptops/computers.
- Asus outdated drivers in Windows 11 – Asus users are no exception from driver issues. Drivers need to updated regardless of what computer brand you are using.
- Lenovo outdated drivers in Windows 11 – Outdated drivers can cause a multiplicity of errors that can be avoided.
- HP outdated drivers in Windows 11 – By updating your drivers regularly, you won’t have to bother with troubleshooting driver errors in the future.
Where can I find the devices listed on the computer?
All the devices connected to the computer, external and internal, can be listed in Device Manager. They are sorted based on the category they fall under. Here’s how you can view the various devices.
- Press Windows + R to launch the Run command. Type devmgmt.msc in the text field and either click on OK or hit Enter to launch the Device Manager.
- You will now find various categories listed here, just double-click on an individual entry or click on the caret icon to expand and view the devices under it.
How can I find the currently installed driver’s version?
When updating drivers, it’s imperative that you first identify the currently installed version to determine if an update is available. The process is simple, straightforward, and wouldn’t take more than a minute.
NOTE
We will take up the Graphics driver for all examples in this article since it’s one of the most critical. However, after understanding the process conceptually, you should be able to update any driver on the computer.
- Launch Device Manager by right-clicking the Start icon from your Taskbar and selecting it from the options.
- Double-click on the entry under which the device is listed to expand and view it.
- Right-click on the device and select Properties from the context menu.
- Navigate to the Driver tab and jot down the Driver Version.
Once you have the version of the currently installed driver, it would be easy to identify if the version you are about to install is newer.
Do I need to update drivers for Windows 11?
It should come as no surprise that maintaining an up-to-date set of system drivers is essential to achieving peak performance from your personal computer and a distraction-free work environment.
Even though more recent versions of Windows, such as Windows 10 and 11, automatically update drivers via OS updates, many drivers may remain out of date.
Without further ado, let’s see what you can do specifically to solve driver issues in Windows 11. Follow along!
How can I fix the outdated drivers error in Windows 11?
1. Enable the graphics card
- Press Windows + R to launch the Run command.
- Type or paste devmgmt.msc in the text field, and click on OK or hit Enter to launch Device Manager.
- Locate and double-click on the Display adapters option.
- Right-click on the graphics adapter and select Enable device from the context menu.
- Close Device Manager and check if you can perform the action that was restricted earlier.
Many users reported the outdated driver error on Minecraft and efficiently fixed it by enabling the graphics card. However, if the display adapter is disabled, your computer will switch to the generic version, which may lead to issues when high-end graphics are required.
2. Update the driver
2.1 Via Device Manager
- Press Windows + S to launch the Search menu.
- Enter Device Manager in the text field at the top and click on the relevant search result that appears.
- Double-click on the entry under which the device is placed.
- Right-click on the device and select Update driver from the context menu.
- Select Search automatically for drivers from the two options in the Update Drivers window. This is how to update outdated drivers in Windows 11.
You would have noticed earlier that Windows only scans your system for any available updates in this method. So, in simple terms, only the updates that have already been downloaded to the computer can be installed this way.
If Windows was able to find a newer version and install it, go ahead and check if the error is fixed.
2.2 Via Windows Update
- Press Windows + I to launch the Settings app.
- Select Windows Update from the tabs listed in the navigation pane on the left.
- Click on Advanced Options on the right.
- Select Optional Updates under Additional Options.
- Click on Driver updates if there are any available. The figure in the bracket next to it depicts the number of updates available for download.
- Tick the checkbox for the driver and click on Download & install to begin the process.
- Wait for the installation process to complete, and then restart the computer for the changes to effect. The Windows 11 driver error will be fixed afterward.
You should download driver updates through Windows Update since these are all checked and tested by Microsoft. Also, the installation is automatic, so you haven’t much to do after downloading the driver.
Some PC issues are hard to tackle, especially when it comes to corrupted repositories or missing Windows files. If you are having troubles fixing an error, your system may be partially broken.
We recommend installing Restoro, a tool that will scan your machine and identify what the fault is.
Click here to download and start repairing.
After the update is done, check if the outdated drivers error on Windows 11 is fixed.
If you couldn’t find a newer version offline (Device Manager) and in the Windows Update section, look for it on the manufacturer’s website. Here’s how you can do that.
2.3 Via manufacturer’s website
- Open the desired web browser and go to any search engine of your preference.
- Search for the update using the Driver Name and OS (Windows 11) as the keywords.
- Locate and open the manufacturer’s website from the search results.
- Since you already have the version of the currently installed driver, it would be easy to identify if there’s a newer version available. If you find one, download it.
- If the downloaded file is in .exe format, double-click on it to launch the installer and follow the on-screen instructions to complete the process.
- After installing the latest driver version, restart the computer for the changes to effect.
You can easily find all the recent updates on the manufacturer’s website and install them.
You had to go through so much trouble because many manufacturers, instead of submitting the driver update to Microsoft, upload it on their official website. These drivers may later be accessible through Windows Update, but going the extra mile will get you the latest driver sooner than others.
Below, we have listed the links to the driver support pages of some of the manufacturers:
- HP
- Dell
- Acer
- Intel
- Nvidia
- AMD
On many of these websites, you will find a tool that automatically detects drivers installed on your computer and lists available updates.
NOTE
If you can’t find the concerned driver on the manufacturer’s website, other third-party sources are available. However, it’s recommended that you do thorough research before downloading from one of these since there’s a high possibility of it being malware disguised as a driver update.
The above three methods, although practical, consume a lot of time and can be tricky for some users. To them, we recommend downloading DriverFix, a reliable tool that will keep the installed drivers up-to-date.
It will scan for available updates and download them to your computer. You will find other similar third-party tools available, but we recommend being extra cautious when using those.
DriverFix
Automatically find and install all updates and keep all your drivers up to date.
3. Set driver updates to automatic
- Press Windows + S to launch the Search menu.
- Enter change device installation settings in the text field and click on the relevant search result to launch Device installation settings.
- Select Yes (recommended) and click on Save Changes.
You can also set driver updates to automatic and let Windows take care of all future downloads. Once the setting is enabled, your system will install any available new versions and keep your drivers up-to-date.
- Fix: Device requires further installation in Windows 10/11
- How to Update Drivers on Windows 11? Try 5 Easy Methods
- How to manually install drivers on Windows 11
- 3 Easy Ways to Update Network Drivers in Windows 11
4. Update Windows 11
- Press Windows + I to launch Settings.
- Select Windows Update from the tabs listed in the navigation pane on the left.
- Click on Check for updates to scan and download, if any are available.
- After updating, check if the outdated drivers error is fixed.
When you update Windows, patches, driver updates, and new features or changes are added to the computer. This ensures that your system remains up-to-date, including the installed drivers, thus offering both high performance and higher levels of security and privacy.
Should I update all drivers installed on the PC?
It may come as a surprise to a lot of users, but the answer is No. If the currently installed drivers are working fine, there’s no need for you to meddle.
However, if you start encountering errors frequently or notice poor system performance, it could be due to an outdated driver. In such cases, you must update them.
Which driver should I update on the PC?
Regarding updating, it’s recommended that you keep the critical ones up-to-date: the graphics driver, those for the network adapter, and disks.
While drivers for peripherals, namely the keyboard, mice, and speakers, are just fine and don’t need to be updated very often. Even if there’s an update available, you won’t notice any considerable change in performance after upgrading to the latest version.
So the bottom line here is not to update a driver until it starts throwing errors or affects the system performance.
How do I reinstall drivers on Windows 11?
- Right-click the Start icon from your Taskbar, then select Device Manager.
- Expand the section with the driver you want to uninstall, then right-click and select Uninstall device.
- Reboot your computer to reinstall that driver automatically. That’s it!
The above fixes will likely resolve the outdated drivers error on Windows 11. All you have to do is identify the one responsible for the problem and then update it.
You also now know when to update a driver and which ones. Get done with the troubleshooting and have your system up and running like new.
Let us know which fix worked for you in the comments section below.
![]()
Newsletter
Check if these solutions help fix the problem or get yourself a new GPU
by Milan Stanojevic
Milan has been enthusiastic about technology ever since his childhood days, and this led him to take interest in all PC-related technologies. He’s a PC enthusiast and he… read more
Updated on September 26, 2022
Reviewed by
Vlad Turiceanu
Passionate about technology, Windows, and everything that has a power button, he spent most of his time developing new skills and learning more about the tech world. Coming… read more
- If games crash after installing a new GPU, the problem is most likely related to your drivers or the power supply.
- One way to fix this issue is to use reliable driver updater software to update all your drivers.
- In some instances, slightly underclocking your GPU can help you make the game more stable.
- If your video card crashes when playing games, it’s possible that your power supply doesn’t have enough power to support it.
XINSTALL BY CLICKING THE DOWNLOAD FILE
This software will repair common computer errors, protect you from file loss, malware, hardware failure and optimize your PC for maximum performance. Fix PC issues and remove viruses now in 3 easy steps:
- Download Restoro PC Repair Tool that comes with Patented Technologies (patent available here).
- Click Start Scan to find Windows issues that could be causing PC problems.
- Click Repair All to fix issues affecting your computer’s security and performance
- Restoro has been downloaded by 0 readers this month.
Getting a new graphics card is always exciting since you’ll now be able to experience smoother gameplay and play more recent games.
However, some users reported that games crash after installing a new GPU. This can be a big problem, and in this guide, we’ll show you the best ways to fix this issue.
Why is my GPU crashing games?
Well, all games depend on your GPU for the best performance you can experience. Here are some of the most common reasons your GPU might be crashing games on your PC.
- It could be because of the increased GPU temperature.
- You have overclocked your GPU.
- The GPU drivers aren’t updated.
- A faulty power supply could also result in the crashing of games.
- Some critical system files are missing from your PC.
- DirectX isn’t updated.
- Your GPU itself is problematic.
How do I test my new GPU?
There are a few things that you can do to test if your new GPU is working fine or not.
- Check if the cooling fans are moving freely or not.
- Clean the dust off the GPU.
- Download benchmark tools on your PC and run tests to see all the working features.
- Use the DirectX Diagnostic Tool to check if all the graphics features your card supports are working or not.
- You can also use the Windows Display settings to check if your graphics card is supported by your PC or not.
- Play some games and check whether you are getting the optimal performance.
How can I fix games crashing after installing a new GPU?
1. Make sure that your drivers are updated
If you’re experiencing crashes with a new GPU, your drivers may be outdated. There are several ways to update them, but the fastest would be using specialized driver updater software.
To make sure that everything goes smoothly and avoid any kind of GPU driver errors, be sure to use a complete driver update assistant that will solve your problems with just a couple of clicks, and we strongly recommend DriverFix. Follow these easy steps to safely update your drivers:
- Download and install DriverFix.
- Launch the software.
- Wait for DriverFix to detect all your faulty drivers.
- The application will now show you all the drivers that have issues, and you just need to select the ones you’d liked fixed.
- Wait for the app to download and install the newest drivers.
- Restart your PC for the changes to take effect.

DriverFix
Keep you GPU on the peaks of their performance without worrying about its drivers.
Disclaimer: this program needs to be upgraded from the free version in order to perform some specific actions.
2. Reinstall the drivers
- Press Win + X and choose Device Manager from the list.

- Locate your graphics card driver, right-click it and choose Uninstall device.

- Check Remove driver software for this device if available and click on Uninstall.

- After doing that, install the latest drivers for your new graphics card.

A few users reported that switching to an older driver version fixed the problem for them, so you might want to try that as well.
3. Underclock your graphics card/RAM
If the games crash after installing a new GPU, your PC may not handle the current graphics card. One way to fix this problem is by underclocking your graphics card.
To do that, you need to use overclocking software that is compatible with your graphics card and reduces overclock values.
Some users suggest lowering the frequency by 100MHz since that might be able to fix the issue, so be sure to try that.
Some PC issues are hard to tackle, especially when it comes to corrupted repositories or missing Windows files. If you are having troubles fixing an error, your system may be partially broken.
We recommend installing Restoro, a tool that will scan your machine and identify what the fault is.
Click here to download and start repairing.
Others also suggested that you might be able to fix this problem by underclocking your RAM. To do that, follow these steps:
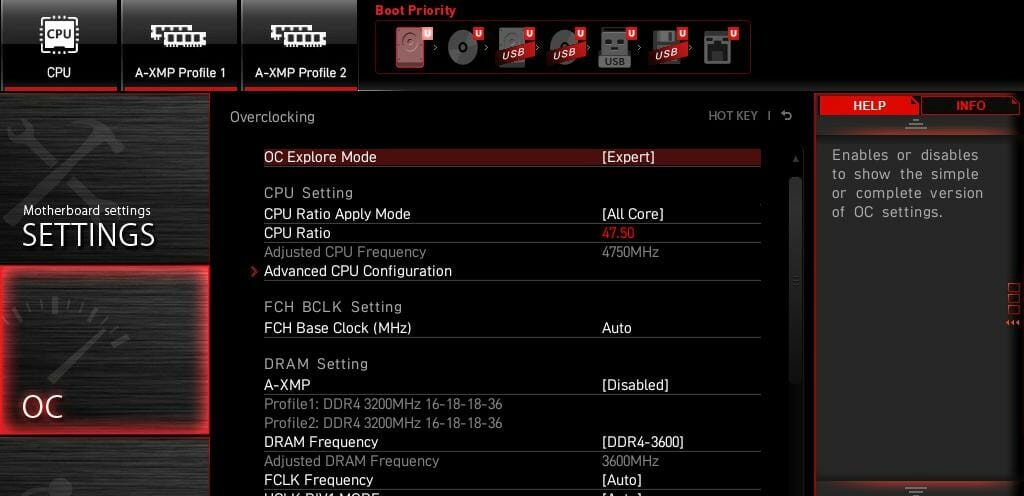
- Enter BIOS. To see how to do that, check our guide on accessing BIOS.
- Next, go to the Overclock section.

- Lower the RAM frequency. Some suggest using the default frequency for RAM.
- Save changes.
Remember that underclocking will slightly reduce your performance, but it might help fix the game crashes.
- Second GPU not Detected: 3 Methods to get it Working
- Play Age of Mythology on Windows 10 With These Simple Steps
4. Turn off G-Sync
- Open the Nvidia Control Panel.
- Now go Setup G-SYNC in the left pane.
- In the right pane, uncheck Enable G-Sync and save changes.

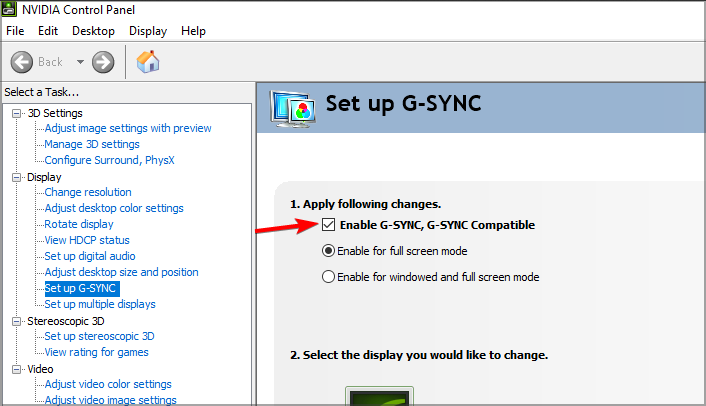
Once you disable G-Sync, check if the problem is still there. If Nvidia Control Panel is not opening, our quick solutions will help you.
5. Check the power supply
You might have to check your power supply if the games crash after installing a new GPU. But, first, make sure that everything is connected correctly.
Next, you might want to test your power supply. Again, you can do that easily with specialized power supply testing software.
Lastly, be sure to check the power output. Your new graphics card might need more power; if that’s the case, you might have to upgrade your power supply.
Problems with a graphics card can be hard to fix, but we hope you managed to fix this issue with our solutions. Moreover, we encourage you to check out these great graphics cards for gaming.
How do I know if my GPU is failing?
Here are some quick checks you can go through that will help you determine if your GPU is failing or if it is time for you to get a new one.
- You are coming across graphics glitches quite often.
- Strange fan noise comes from the GPU.
- Your PC is crashing multiple times.
- You are experiencing significant frame drops while playing games.
- Blue Screen of Death (BSoD) is another indication of your GPU dying.
Did you find a different solution to this problem? Feel free to share it with us in the comments section below.
Still having issues? Fix them with this tool:
SPONSORED
If the advices above haven’t solved your issue, your PC may experience deeper Windows problems. We recommend downloading this PC Repair tool (rated Great on TrustPilot.com) to easily address them. After installation, simply click the Start Scan button and then press on Repair All.
![]()
Newsletter
Do you know if your drivers need updating? Are you suffering unexplained computer problems? And do you know how to update drivers in Windows 10?
A driver is a software that communicates with your hardware to make it work with your operating system. If you’re having system trouble, like a printer not working or games crashing, then it might be indicative that your drivers need updating.
Drivers are available for your video card, audio, motherboard, and much more. However, you don’t always need to update your drivers for the sake of it. If everything is working well on your system, then you might be better off leaving them well alone. If they do need updating, though, we’ve rounded up a number of different methods to help you.
Be sure to head to the comments section afterward to let us know what methods you use to update your outdated drivers.
Check Your Drivers
While you’ll have drivers installed on your system, you may not know precisely what they are or what version you’re using.
If you’re running anything from Windows XP to Windows 8, you can use the Command Prompt to find this information. Press Windows key + X and click Command Prompt. Type driverquery and hit Enter to get a list of every driver installed on your system and when that driver was published.
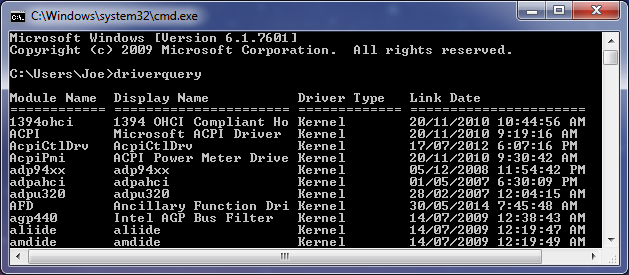
You can also type driverquery > driver.txt to export all that information into a handy text file. The file will save into wherever your command prompt path is set to. So in my example above, that’d be C:UsersJoe.
It’s very important to bear in mind that the date given is not when you last updated the driver, it’s the date the driver you’re using was published. As such, although a driver might have a Link Date of some years back, it isn’t necessarily true that it needs updating.
However, this method doesn’t work properly on Windows 10. The information provided is either missing or inaccurate. As such, use the free utility DriverView instead.
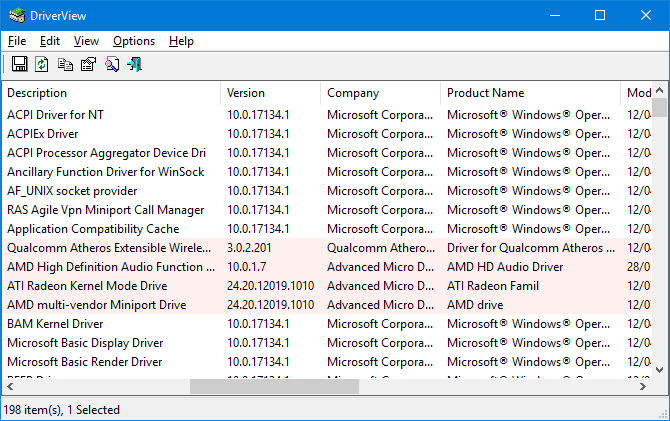
This will give you all sorts of information about your drivers, like the version number, manufacturer, installation date, and more. You can double-click a driver on the list to see the information in a single view.
1. Update Drivers Directly From Microsoft
Windows will automatically update your drivers via Windows Update. This is usually safe and reliable because the drivers have been verified and should only be delivered to your system if they’re known to be compatible. Windows Update runs in the background and you’ll only notice it when it requires you to restart your system.
Windows 10 is far more pushy with updates than previous versions of the operating system. However, that’s generally a good thing, since you can set it and forget about it, and it’s usually intelligent enough to know when not to provide a driver update since you don’t always need the most recent version.

To perform a Windows Update, press Windows key + I to open Settings and go to Update & Security > Windows Update > Check for updates.
You can disable automatic driver updates if you want, though it isn’t recommended by Microsoft. To do so, perform a system search for device installation settings and select the relevant result.
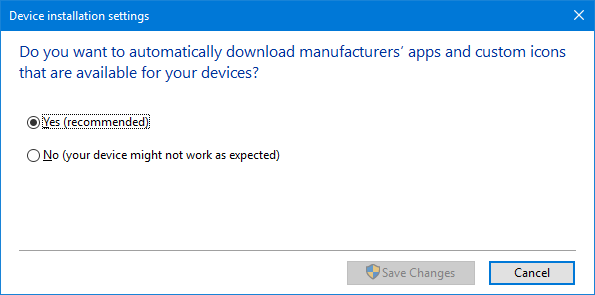
If you don’t want automatic updates provided through Windows Update, select No (your device might not work as expected) and click Save Changes.
You can always reverse the change by returning to this window and selecting Yes (recommended) instead.
Check out our guide on taking back control over driver updates in Windows 10 for more advice.
2. Update Drivers Via Device Manager
You can also check all your devices and view their drivers using the Device Manager. To open it, press Windows key + X and click Device Manager.
The Device Manager will show all your system components, like your disk drives, display adapters, processors, and more. Double click a category to expand it and see the devices within.
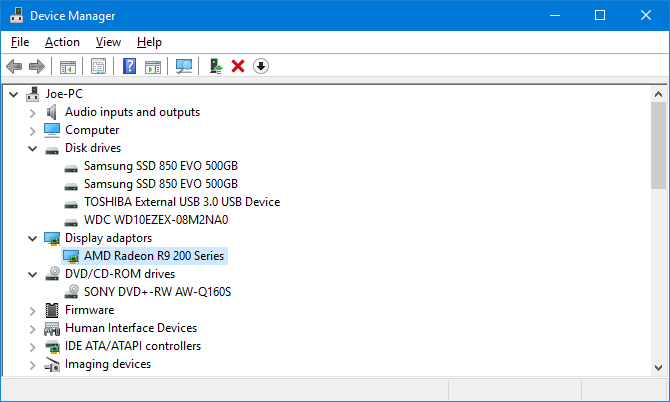
To see driver information, right click a device, click Properties, and switch to the Driver tab. This displays the date the driver was published, its version number, and other information.
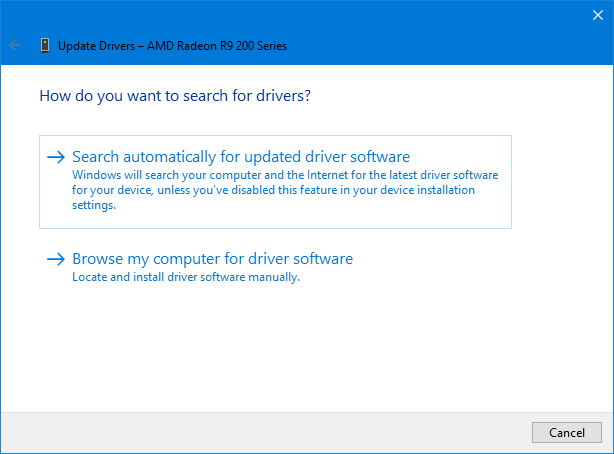
To check for a driver update, click Update Driver. Select Search automatically for updated driver software and Windows will search your computer and the web for the latest software. This is what it does through Windows Update anyway, but this is a good method to double check for a specific component. If an update is found, follow the wizard to install it.
You can also Browse my computer for driver software, which we’ll cover in the manual update section below.
3. Update Drivers Manually From The Manufacturer
You can also go to the manufacturer of your device and update your drivers through them. If you want to download drivers manually then it’s highly advisable to go straight to the source. This way you’ll ensure the download is up-to-date and safe.
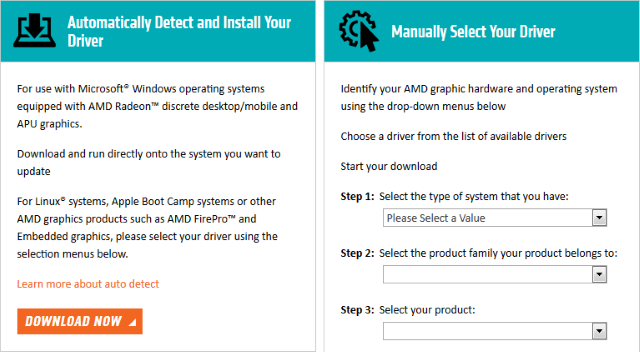
You can use the information provided through the «driverquery» command, DriverView utility or Device Manager to find out what drivers you have and who manufactures them. Head to their website and look for their driver section (it might be under a Support heading). Some providers, like AMD and NVIDIA, will have tools that can scan your system and detect what driver you need if you’re unsure.
Once downloaded, most of the drivers will have executables that can be opened and they’ll update what’s necessary. If not, head back to the Device Manager, right-click the device, select Update driver, and click Browse my computer for driver software. Point the wizard to the location of your downloaded file.
If you bought the physical computer component itself then you may find that it came with a CD that includes drivers. Be slightly wary of these because unless they connect to the internet then there’s a possibility they’ll be outdated. The same applies to CDs that come with pre-built machines.
Avoid Third-Party Software
There’s a lot of third-party software out there that will claim to scan your system and update all the drivers in one go. Do not use them. The methods listed above are safe. I’ve yet to find any third-party utilities that I’d consider truly reputable and that won’t bundle adware alongside, install outdated drivers, or get them from dubious sources.

Besides, your drivers shouldn’t need updating that often anyway. The small amount of time it takes to perform the above methods are much more preferable than risking a third-party tool that could potentially muck your system up.
Keep Your Computer Healthy
You may find that all your drivers are already up-to-date if you’ve never fiddled with your system settings, thanks to Windows Update. And if everything is working well then you might be better off not updating them at all. It’s usually things like graphics cards, which receive constant patches to support recent games, that need updating the most.
Remember, always download your drivers from reputable sources (direct from the manufacturer if possible). Do not install any which weren’t made specifically for your devices.
For more guidance, check out our advice on how to easily remove old drivers from Windows.