Not able to close modal dialog using dialogRef.close() #7550
Comments
VishalChorghe commented Oct 5, 2017
I am opening Modal popup in Angular 4 using Material. whereas it is opening properly but I am not able to close it using dialogRef.close(). I am opening AdminComponent as a popup by clicking on button which is present on Home.Component.html.
Admin.Component.ts-
`import from ‘@angular/material’;
import from ‘@angular/material’;
Admin.Component.html-
Cancel
The text was updated successfully, but these errors were encountered:
julianobrasil commented Oct 5, 2017 •
This should work out of the box. There must be some configuration problem with your code. You can also use the matDialogClose to set the button to close the dialog (I’m using the currently recommended — in beta.11 — mat instead of md prefix ):
Deltids commented Oct 5, 2017
Having the opposite problem here. I can close with dialogRef.close(), but not with the directive md-dialog-close. Pressing «Yes» closes the dialog, but pressing «No» doesnt.
willshowell commented Oct 5, 2017
@Deltids try mdDialogClose or matDialogClose
VishalChorghe commented Oct 6, 2017 •
@julianobrasil tried using matDialogClose, still not working.
I replaced all md prefix with mat.
Following is my Home.Component from where I am opening AdminComponent as a popup.

Home.Component.ts —
`export class HomeComponent implements OnInit <
dialogRef: MdDialogRef;
constructor(private emergencycontacts: EMTServiceService, private router: Router, public dialog: MdDialog)
openDialog() <
this.dialogRef = this.dialog.open(AdminComponent);
this.dialogRef.afterClosed().subscribe((result) => <
console.log(result);
ghost commented Nov 3, 2017 •
@VishalChorghe Did you import MatDialogModule or MdDialogModule in relevant xxx.Module.ts?
jelbourn commented Nov 4, 2017
@VishalChorghe are you able to provide a reproduction?
mackelito commented Nov 14, 2017 •
Can confirm that we have the same issue
Also tried ‘this.dialog.closeAll()’ before opening the second dialog but ‘this.dialog.openDialogs’ confirms that first one is still open
krisparis commented Nov 17, 2017 •
I have the same issue.
Could you tell me if I missed something and if any workaround exist?
I inserted below parts of my code to describe my problems.
In my AppModule, I imported MatDialogModule, declared my dialog components
and added my dialog content component to the array of entryComponents.
Calling dialogRef.close() or clicking outside the dialog does not close it.
The only I found to close it was to open the Chrome console and then move the console top edge using my mouse.
However MatDialog.closeAll() does work for me.
But trying to reference the MatDialof
I put below the code of the following classes:
dialog container component
dialog content component
I put my dialog container component template inside my app component lie written below
Below is the dialog content template. I tried to use
Dialog Container class
`
Dialog Content class
willshowell commented Nov 17, 2017
@krisparis can you try this in ErrorDialogContainerComponent ?
krisparis commented Nov 17, 2017 •
@willshowell
Thanks a lot! It now works well!
The dialog now disappears when I click on my close button or when I click outside the dialog.
So, just to know,
was I doing something wrong ?
Or was it maybe because I was trying to open a dialog from inside a subscribe() method ?
willshowell commented Nov 17, 2017
@krisparis It is related to your ErrorEventService . I’m assuming you’re implementing ErrorHandler there or elsewhere, and handleError is called by angular outsize the zone. There have been similar issues with dialogs and snackbars. AFAIK you’re not doing anything wrong, but you should be aware that any UI effects from handleError need to re-enter the zone.
@VishalChorghe @mackelito could your issues be related to this as well?
krisparis commented Nov 17, 2017 •
Yes, I did almost that.
Actually I have a class AppErrorHandler that extends ErrorHandler .
I inserted the code at the bottom of this post.
And in my AppModule , I added the line below into my providers array ,
krisparis commented Nov 17, 2017
For the sake of trying, I temporarly removed my ErrorHandler subclass from my app and the use of the ngZone instance from my dialog container class (so back to my original code).
I now handle the error at its origin like shown at the bottom of this post.
In that case also, the dialog disappears after a click on the close button or outside the dialog.
you should be aware that any UI effects from handleError need to re-enter the zone.
- So do you think it’s better for now to handle my errors locally without a custom ErrorHandler?
- until it gets fixed in a future release
- Or is it better to keep using the ErrorHandler and the Ngzone as you shown in the previous post?
- even if my app might have to use other dialog components for different use cases
willshowell commented Nov 17, 2017
@krisparis I think everything on Angular and Angular Material’s end is working as intended, so I wouldn’t await a fix (maybe a docs improvement here at best).
Every use case is different — I think the expected use of the ErrorHandler is to facilitate logging or extra ajax calls or similar, which don’t need to operate within the angular zone. You’ve chosen to bring the error callback into your components (material dialog), so you should do so inside the zone. If you are using errorEventService.changeEmitted$ exclusively for UI updates, I would suggest this:
But also I have only a moderate understanding of how zones work and should be utilized so take it with a grain of salt 😄
jelbourn commented Nov 17, 2017
Closing this since it’s not directly related to Angular Material.
fredmaggiowski commented Nov 30, 2017 •
I’m having a similar problem but the NgZone solution doesn’t work.
I’ve a simple dialog that shows a message and a QRCode and has an «OK» button to close it just for user experience.
The problem is that there’s no way to close the dialog, nothing works: clicks outside, pressing ESC key or pressing the OK button are useless.
TokenComponent
where openDialog is fired on a simple FAB click.
Then I have this modal:
Lorem ipsum dolor sit amet
The modal gets opened but I can’t find a way to close it.
I’ve tried creating a simple StackBlitz and I realised that it actually works: https://stackblitz.com/edit/test-dialog-closing
I’m honestly confused but I think it could be related to this issue since the symptoms are similar.
Note: the close button in the example is using [mat-dialog-close] , I’ve also tried matDialogClose and a custom function that calls this.dialogRef.close() which is the one used in the stackblitz.
A difference between the stackblitz and my local project is that the dialog component and the «container» component are in two separate files but I guess everything is properly included since I can see the dialog properly rendered.
PS: I’m a super newbie with Angular 5 and Material 2, I started my first project two days ago after a few years working with Angular 1 and no background of material design.
PPS: Do not scan the QRCode, I copy-pasted the first result from google search of «qrcode», I do not know that’s inside 😞
fredmaggiowski commented Dec 1, 2017
I’ve found out that this problem was related to an error occurring on another component..
In particular I have a TypeError during the rendering of a MatTable in the same page. This error causes the Dialog not to work properly once opened.
If you want to investigate this weird behaviour of Dialog when an error occurs I can provide further information.
Источник
[GetX] Dialog
Let’s see how to show Dialog with GetX in Flutter.
Contents
Outline
In this blog post, I will introduce how to use GetX to show Dialog in Flutter. You can see full source code of this blog post on the link below.
Blog series
This blog post is made in the series about how to use GetX in Flutter. If you want to see the other features of the GetX, please check out the following blog posts.
GetX installation
To check how to use GetX in Flutter, execute the command below to create a new Flutter project.
And then, execute the command below to install the GetX package.
Next, let’s see how to use GetX to show Dialog .
Open Dialog
You can use the Get.dialog function to show Dialog with GetX like the below.
To check this, open the lib/main.dart file and modify it like the below.
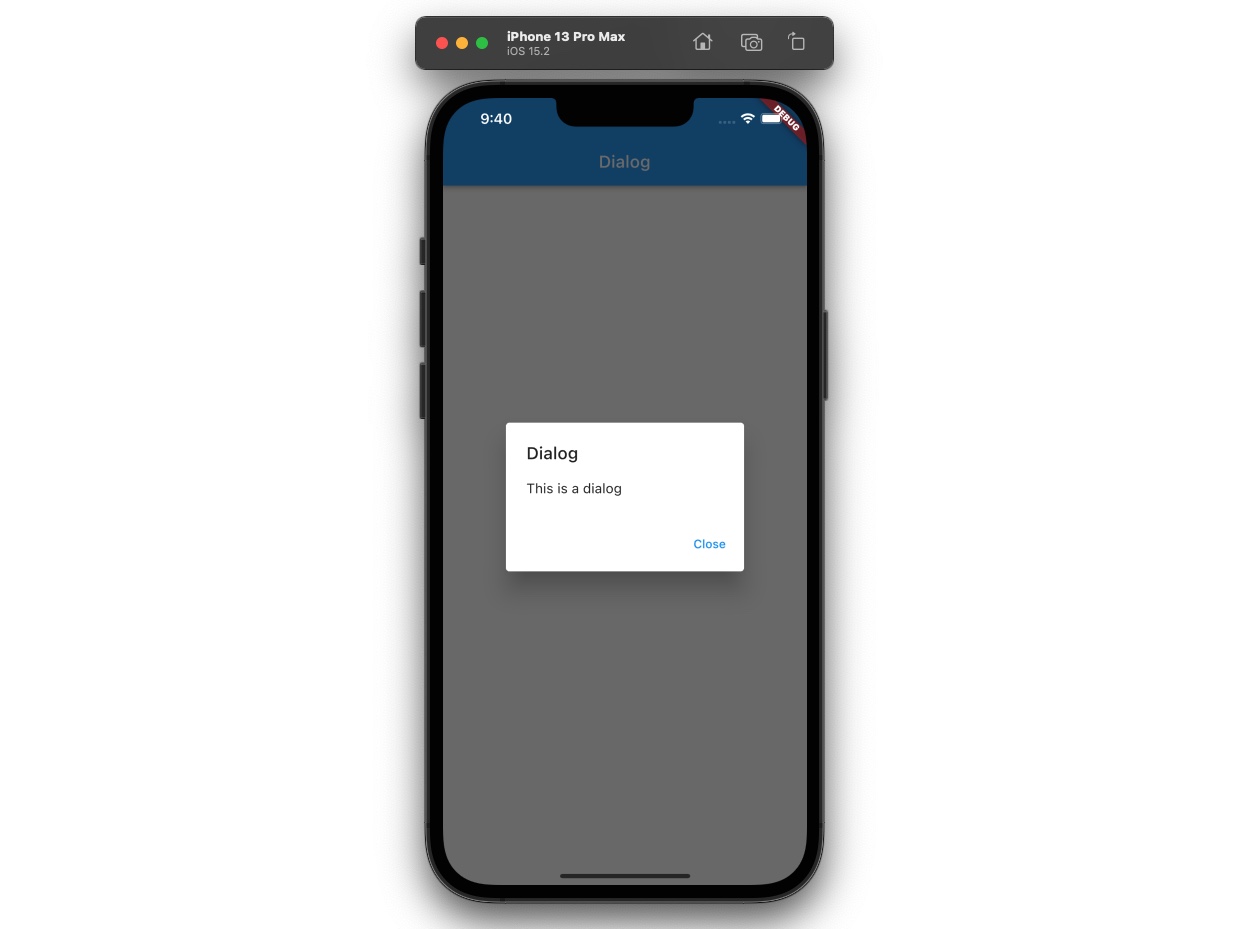
When you execute the above code, you will see the following screen.
And then, when you press the Open button, Get.dialog is called like the below.
After that, you can see the dialog like the below.
Close Dialog
To close the opened Dialog , you can use the Get.back function.
In the example, the Get.back() function is called when the close button is pressed like the below.
Check Dialog
In GetX, you can use the below code to check the Dialog is opened or not.
To check this, modify the openDialog() function like the below.
When you execute the above code, you can see the true is printed after 1 second.
Completed
Done! we’ve seen how to use GetX to show the Dialog in Flutter. Also, we’ve seen how to close the dialog and how to check the dialog is opened or not.
Was my blog helpful? Please leave a comment at the bottom. it will be a great help to me!
App promotion
You can use the applications that are created by this blog writer Deku .
Deku created the applications with Flutter.
If you have interested, please try to download them for free.
Источник
Angular 13 Material Dialog Example – Positions, Fullscreen, Events Tutorial
In this Angular material tutorial, you will learn how to implement Dialog modal with an extensively used scenario tutorial with easy to go tutorial.
This Angular post is compatible with Angular 4 upto latest versions, Angular 7, Angular 8, Angular 9, Angular 10, Angular 11, Angular 12 and Angular 13
You will get to know how to position a Dialog or display a fullscreen modal popup. Explore various events and popup hooks including after opened or closed callbacks. Passing data dynamically to the modal and getting back the data to the parent component.
You will start with a new Angular 13 project, afterwords we will add the Material library to use its Dialog API module. Consequently, we will explore various use0cased with elaborated examples and demos to put you more to work instead of looking anywhere else.
Why Dialog or Modal UI Component?
We know Dialog AKA Modal got its popularity from the Bootstrap component, which floats over your content to catch all user attention at once. it can be used for any purpose from filling out important details using an intensive form to show a simple confirm Yes, No dialogue box.
With Material, you can have customized Modal with Header, Body, Footer panes or simply a paneless diolog. It can have an in-view template based or fully component-based Dialog modal. You can easily customize styles and control how data with go through it.
Let’s get our hands dirty!
How to Add Material Dialog in Angular App?
This is how you can open the Angular Material dialog.
Following are quick steps, including various types of Dialog and details about event hook handling to control data follow by passing in/ out of Dialog or Modal popup container:
Step 1 – Create Angular App
Step 2 – Install Material Library
Step 3 – Import Dialog Module
Step 4 – Dialog using Template
Step 5 – Dialog using Component
Step 7 – AfterOpened and AfterClosed Dialog Events
Step 8 – Full Screen Dialog Modal
Step 9 – Confirm Dialog with YES, NO Buttons
Step 10 – Dialog with Header, Body and Footer Panel
Step 1 – Create Angular App
To enable the ng command in the terminal window, make sure to instal the angular cli tool. If you already have, you can update it as well.
Afterwards, you can hit the following command to create a new angular project with the name provided:
Move inside the application folder
Step 2 – Install Material Library
Thereafter creating and moving the terminal to the application folder, we will install the Material library by executing the ng add command. This makes the installation of the material library very easy, you can choose options while installation as shown below:
This will update the «styles» property array inside the angular.json file, which you can change anytime.
Step 3 – Import Dialog Module
The Material library provides huge set of usable API’s for its various modules and components. So we need to import only those modules, that we’re going to use in our application. This keeps out app more optimized and size-efficient.
Open the app.module.ts file to import the MatDialogModule under the imports array:
Step 4 – Dialog using Template, Pass and Get Data
Now we are all set to start using the simplest implementation of our Dialog popup using a template. We’ll also pass dynamic data into the Template of dialog to create a list out of it.
In the app.component.html add folloiwng template HTML
The ng-template with ref variable #dialogRef will contain the template HTMl to show inside the Dialog we’re going to generate. The let-mydata (or any name you like) directive will contain the data we will pass into the open method.
Next, open the app.component.ts file and add the following content in it:
The @ViewChild with TemplateRef helps to get template context that we are passing into the open method. On top, we are passing the data property with any data set you wan to pass into the modal dynamically. This is how to send data to a TemplateRef MatDialog.
Step 5 – Dialog using Component
Templates can be used for quick implementation of less complex modals, but for keeping things cool, we need to have a separate components which will take care of our Dialog content and its data communication. let’s check how to pass data to and forth between parent and component popup modal.
Creating a new component named MyDialogComponent by executing below command:
It will create a new component, update the my-dialog.component.ts file:
The fromPage and fromDialog variables are handling data to pass inside the Modal and sending back to parent using close() method.
Update the my-dialog.component.html file to show the list of item passed dynamically:
Finally update the App Component HTML to have a button and its method in the class:
We’re passing the component it self to open in the dialog, instead of template ref.
Step 7 – AfterOpened and AfterClosed Dialog Events
The Dialog provides three useful Hooks that can be used to manage dialog data render.
- afterOpened(): Triggered After Dialog is Opened.
- beforeClosed(): Triggered Before Dialog is Opened.
- afterClosed(): Triggered After Dialog is Closed.
These can be subscribed to the dialog open instance as shown below
Step 8 – Full Screen Dialog Modal
By default, the dialogs are displayed at the centre of the screen with max-width of 80%. But here you will learn how to make them full screen by adding few configuration settings with modified width, height and custom CSS class.
The .fullscreen-dialog class you can add in the styles.css/scss file at project root or remove view encapsulation and directly add in the my-dialog.component.css/scss file.
Step 9 – Confirm Dialog with YES, NO Buttons
Here’s a quick look at how to modify a dialogue to show Yes, No or any custom button with their respective callback methods to trigger any required action. You can do it using a template or dedicated component.
HTML Template in my-dialog.component.html for dialogue modal will have the following”
Add the following methods in my-dialog.component.ts file:
The AppModule class will have the following open method:
Step 10 – Dialog with Header, Body and Footer Panel
The MatDialogModule provides other mat tag directives to create Header, Body and Footer components for the Dialog modal.
Step 11 – Positioning Material Dialog on Page
The position property can be used to place the dialog at top, bottom, left or right location of the page.
Conclusion
We have completed the Material Dialog tutorial, with various useful use-cases and examples. We discussed how to use a template or component and pass dynamic data in the dialog modal popup. Also, we looked into various callback hooks to control various custom actions.
Using the custom CSS style and class we modified the dialog width to display in the fullscreen mode. Hope you like the tutorial and it was helpful and handy for quick development suggestions.
Источник
На основании Вашего запроса эти примеры могут содержать грубую лексику.
На основании Вашего запроса эти примеры могут содержать разговорную лексику.
While in the About dialog box, select the last tab, titled System Info.
В диалоговом окне О программе выберите последнюю вкладку, под названием Системная информация.
Regarding the About dialog, you should know that you can customize it as well, with the option to adjust your images or text dialogs width and height.
Что касается диалога «О программе», вы должны знать, что можете настроить его также, с возможностью настройки ширины и высоты вашего изображения или текста.
So if you do everything right, you shouldn’t see that reminder, and your registration information appears in the About dialog of Remote Computer Access software.
Поэтому, если вы все сделаете правильно, вы не увидите это напоминание, и ваша регистрационная информация появится в диалоговом окне «О программе».
In addition to that, this version brings improvement to the layout of labels on the splash screen and on the Splash tab of the About dialog box.
В дополнение к этому, улучшена разметка сведений на заставке Радиопроводника и на вкладке Заставка диалогового окна О программе.
Другие результаты
In the About Remote Desktop Connection dialog box, look for the phrase Network Level Authentication supported.
В диалоговом окне О программе найдите фразу Поддерживается проверка подлинности на уровне сети.
Created by Intel Corporation (Sean Hefty, David Levine and Fab Tillier are listed by the Iometer About dialog as the developers), the tool was officially announced at the Intel Developer Forum (IDF) on 17 February 1998.
Программа создана Intel Corporation, разработчики Sean Hefty, David Levine и Fab Tillier, о создании программы было официально объявлено на Intel Developer Forum (IDF) 17 февраля 1998 года.
This is the name that is shown in the new game dialog and in the About Course dialog.
Double-click winver in the list of results to open the About Windows dialog box, where you’ll see the version of Windows that your PC is running.
Дважды щелкните winver в списке результатов поиска, чтобы открыть диалоговое окно О Windows, в котором вы увидите версию Windows, установленную на вашем ПК.
This latest version corrected some issues that were there in the previous version of LoadUI, issue: «File».bat, .sh and.command» line ending issue» and the About LoadUI dialog box does not display always.
Эта последняя версия исправила некоторые проблемы, которые были в предыдущей версии (v2.6) LoadUI, проблема: «Конец строки файла«.bat, .sh и.command»» и диалоговое окно About LoadUI не всегда отображается.
The RDP version that RDC supports is listed in the About Remote Desktop Connection dialog box.
Поддерживаемая версия протокола RDP отображается в диалоговом окне О программе.
I’m surprised you didn’t mention anything about the dialog.
Intended use and local factors determine which exact capabilities will be useful in the dialog about risk.
ПРЕДНАЗНАЧЕННОЕ ИСПОЛЬЗОВАНИЕ и местные факторы определяют, какие именно возможности будут использоваться в диалоге о РИСКЕ.
On the eve of continuing the dialog about Kosmet, Belgrade and Pristina firmly hold their stances.
Накануне продолжения диалога о Косово и Метохии, и Белград и Приштина твердо придерживаются своих позиций.
I didn’t say anything about the preferences dialog.
Complete the dialog about that one event.
The list of reasons why the complainants of the complaint about the Open Dialog portal was open and formed as we studied their contents.
Перечень причин, по которым заявители жалобы на портал «Открытый диалог», был открытым и формировался по мере изучения их содержания.
So the decision about the Troika Dialog brand depends on the products, clients, and the unified brand.
Поэтому то, каким будет бренд «Тройки Диалог», зависит от продуктов, клиентов и единого бренда.
Product version (see the «About» dialog)
Use this command to retrieve the information about a Signal Dialog object.
Используйте эту команду для получения информации об Объекте Диалога Сигналов.
Start the dialog about tobacco use at age 5 or 6 and continue through the high school years.
Начинайте разговоры о курении в 5-6-летнем возрасте и продолжайте в течение обучения в школе и в институте.
Результатов: 667. Точных совпадений: 4. Затраченное время: 1919 мс
Documents
Корпоративные решения
Спряжение
Синонимы
Корректор
Справка и о нас
Индекс слова: 1-300, 301-600, 601-900
Индекс выражения: 1-400, 401-800, 801-1200
Индекс фразы: 1-400, 401-800, 801-1200
today I met the similar problem after I upgraded the react-native from 0.33 to 0.37. I want to show an Alert dialog after close the Modal, but Modal doesn’t disappear, even after I close the Alert dialog and use cmd + R to reload the app. only in iOS, and it works fine by react-native 0.33.
the code likes following:
  renderModal() {
    return (
      <Modal
        animationType = 'fade'
        transparent={true}
        visible={this.state.isProcessing}
        onRequestClose={()=>{}}>
        <View style={styles.modalContainer}>
          <LoadingSpiner size='large' color='white' styleAttr='Normal'/>
        </View>
      </Modal>
    )
  }

  _pressNext() {
    // display a Modal with a spinner
    this.setState({isProcessing: true}}

    // network request
    // ...
  }

  componentWillReceiveProps(nextProps) {
      // ...

      // to hide the Modal with a spinner
      this.setState({isProcessing: false})
      Alert.alert('title', 'Something has done!', [
        { text: 'Got it', onPress: () => {} }
      ])
    }
  }
then I try to use setTimeout to work around it, the code likes following:
  componentWillReceiveProps(nextProps) {
      // ...

      // to hide the Modal with a spinner
      this.setState({isProcessing: false})
      setTimeout( () => {
        // this log will output
        console.log("show alert")
        // but Alert doesn't display
        // sometimes it will display occasionally
        Alert.alert("title", "msg")
      }, 200)
  }
then the Modal will disappear, but, the Alert dialog can’t display!!!
I also tried run setTimeout in setState callback, like this:
  this.setState({isProcessing: false}, () => {
    setTimeout( () => {
      Alert.alert("title", "msg")
    }, 200)
  }
but the same result, Alert dialog doesn’t pop up yet.
finally, I decide to hide Modal after I close the Alert dialog, and that works! code likes following:
Alert.alert("title", "msg", [
  { text: "OK", onPress: () => { this.setState({ isProcessing: false } }
])
Showing a success message after closing a modal dialog
APEX 5 comes with Modal Dialogs out of the box. Very neat. Especially for adding and changing data. And to minimise the number of time a user has to click, it could be useful to add a «Close Dialog» process after the actual data processing. When the data processing fails, the Dialog stays on top showing the error. When data processing runs fine, the Dialog is closed … without any confirmation. And this might be scary for a shaky user.
 So how can we provide the user some feedback? On Page 4 of the Sample Dialog Application you can see one solution: up on a Dialog Closed Event on the parent page it does a redirect to refresh the parent page appending the success message of the «Close Dialog» process. This has two drawbacks. First, it probably refreshes more than necessary. And second, if you’re using multiple layers of dialogs (dialogs that open other dialogs) the message appears in the «parent dialog».
As an alternative you could follow these steps:
1. Create an Alert Region on the Inline Dialogs position on your Global Page (0). Assign a static ID «successMessage» to this region and define this styling for the region — either in the region header, a separate CSS file or your Theme style :
#successMessage{
position: fixed;
top: 12px;
right: 12px;
max-width: 480px;
z-index: 2000;
opacity: 0.9;
border-radius: 2px;
display : none;
}
2. On that same Global Page, create a Dynamic Action on the «Dialog Closed» event. Set the Selection Type to «jQuery Selector» and use «body» as the jQuery Selector. Execute this JavaScript code when the result of the selector is true:
var lMessage = this.data.successMessage.text;
if (lMessage ){
$(‘#successMessage_heading’, top.document).html(lMessage);
$(‘#successMessage’, top.document).fadeIn(300);
}
$(«#successMessage»).delay(3000).fadeOut(300);
3. In the Modal Dialog itself : set the “Success Message” of the Close Dialog Process to something like «Changes saved» or anything else that makes sense to your user.
Now your user gets a nice feedback in the upper left corner of the (main) page that automatically fades away after 3 seconds. The only thing you have to do is adding a success message to the Close Dialog process.
While the above works, there’s nowadays (APEX 19.x, but probably also in 18.x) an easier and more elegant solution. Just forget about the Alert Region and simplify the JavaScript in the Dynamic Action to :
var lMessage = this.data.successMessage.text;
if (lMessage ){
apex.message.showPageSuccess( lMessage );
}
That’s it. Done.
Popular posts from this blog
If you run your APEX application — like a Form based on the EMP table — and test if you can change the value of Department to something else then the standard values of 10, 20, 30 or 40, you’ll get a nice error message like this: But it isn’t really nice, is it? So what do a lot of developers do? They create a validation (just) in order to show a nicer, better worded, error message like «This is not a valid department». And what you then just did is writing code twice : Once in the database as a (foreign key) check constraint and once as a sql statement in your validation. And we all know : writing code twice is usually not a good idea — and executing the same query twice is not enhancing your performance! So how can we transform that ugly error message into something nice? By combining two APEX features: the Error Handling Function and the Text Messages! Start with copying the example of an Error Handling Function from the APEX documentation. Create this function
Remember Oracle Forms? One of the nice features of Forms was the use of GLOBAL items. More or less comparable to Application Items in APEX. These GLOBALS where often used to pre-query data. For example you queried Employee 200 in Form A, then opened Form B and on opening that Form the Employee field is filled with that (GLOBAL) value of 200 and the query was executed. So without additional keys strokes or entering data, when switching to another Form a user would immediately see the data in the same context. And they loved that. In APEX you can create a similar experience using Application Items (or an Item on the Global Page) for Classic Reports (by setting a Default Value to a Search Item) and Interactive Reports (using the APEX_IR.ADD_FILTER procedure). But what about the Interactive Grid? There is no APEX_IG package … so the first thing we have to figure out is how can we set a filter programmatically? Start with creating an Interactive Grid based upon the good old Employ
If you created your own «updatable reports» or your custom version of tabular forms in Oracle Application Express, you’ll end up with a query that looks similar to this one: then you disable the » Escape special characters » property and the result is an updatable multirecord form. That was easy, right? But now we need to process the changes in the Ename column when the form is submitted, but only if the checkbox is checked. All the columns are submitted as separated arrays, named apex_application.g_f0x — where the «x» is the value of the «p_idx» parameter you specified in the apex_item calls. So we have apex_application.g_f01, g_f02 and g_f03. But then you discover APEX has the oddity that the «checkbox» array only contains values for the checked rows. Thus if you just check «Jones», the length of g_f02 is 1 and it contains only the empno of Jones — while the other two arrays will contain all (14) rows. So for
Websites nowadays are frequently implementing the usage of pop-ups, alerts, or modal dialog boxes for various use cases like accepting cookies, asking for permissions, entering data, warning alerts, etc. Although there are a few valid use cases for these, unnecessary popups might look annoying and need to be handled.
You must have encountered these in your day-to-day web interactions on different websites like Amazon or Walmart on the first visit prompting for SignUp, on various food websites like McD, Swiggy to provide the location, or a payment gateway modal to complete payment.
With this increased usage, it is now expected of an automation tester that they are aware of their handling via automation. The main reason is that most of these popups, which at times are multiple, appear on the homepage for the website under test and need to be handled/closed till the parent page is accessible to interact with and the actual test flow can begin.
So if you have not got a chance to work on these or automate them so far, this blog is the right one for you. In this blog, we will learn how to handle modal dialog box in Selenium WebDriver Java with practical examples.
This blog would cover handling Bootstrap dialog boxes, pop-up windows/tabs, and alerts. I will be starting with the basics of pop-ups, post which I will demonstrate how to handle modal dialog box in Selenium WebDriver Java. So let’s get started.
TABLE OF CONTENTS
- How to handle Modal Dialog Box in Selenium WebDriver Java?
- What is a Modal Dialog Box?
- Demonstration: Handling Modal Dialog Box in Selenium Java
- Modal Dialog Box Automation Example
- How to handle Alerts using Selenium Java?
- What are Alerts?
- Demonstration: Handling Alerts Windows using Selenium Java
- How to handle Popups using Selenium Java?
- What are Popups?
- Demonstration: Handling Popups using Selenium Java
- Frequently Asked Questions (FAQs)
How to handle Modal Dialog Box in Selenium WebDriver Java?
In this Selenium Java tutorial, we will learn what is a modal dialog box and demonstrate the handling of a modal dialog box in Selenium Java.
What is a Modal Dialog Box?
A Modal Dialog Box (also referred to as Bootstrap Modal Window) is built in Bootstrap Framework, due to which it gets displayed on top of your current page. Due to this, modal boxes need to be interacted with first before moving to the current webpage.
For starters, The Bootstrap Framework is a very popular, free, and open-source CSS framework that is highly used in web page development, especially for responsive and mobile-first web pages. It contains HTML, CSS, and JavaScript. To learn more about the Bootstrap framework, you can deep dive into CSS Grid vs. Bootstrap comparison.
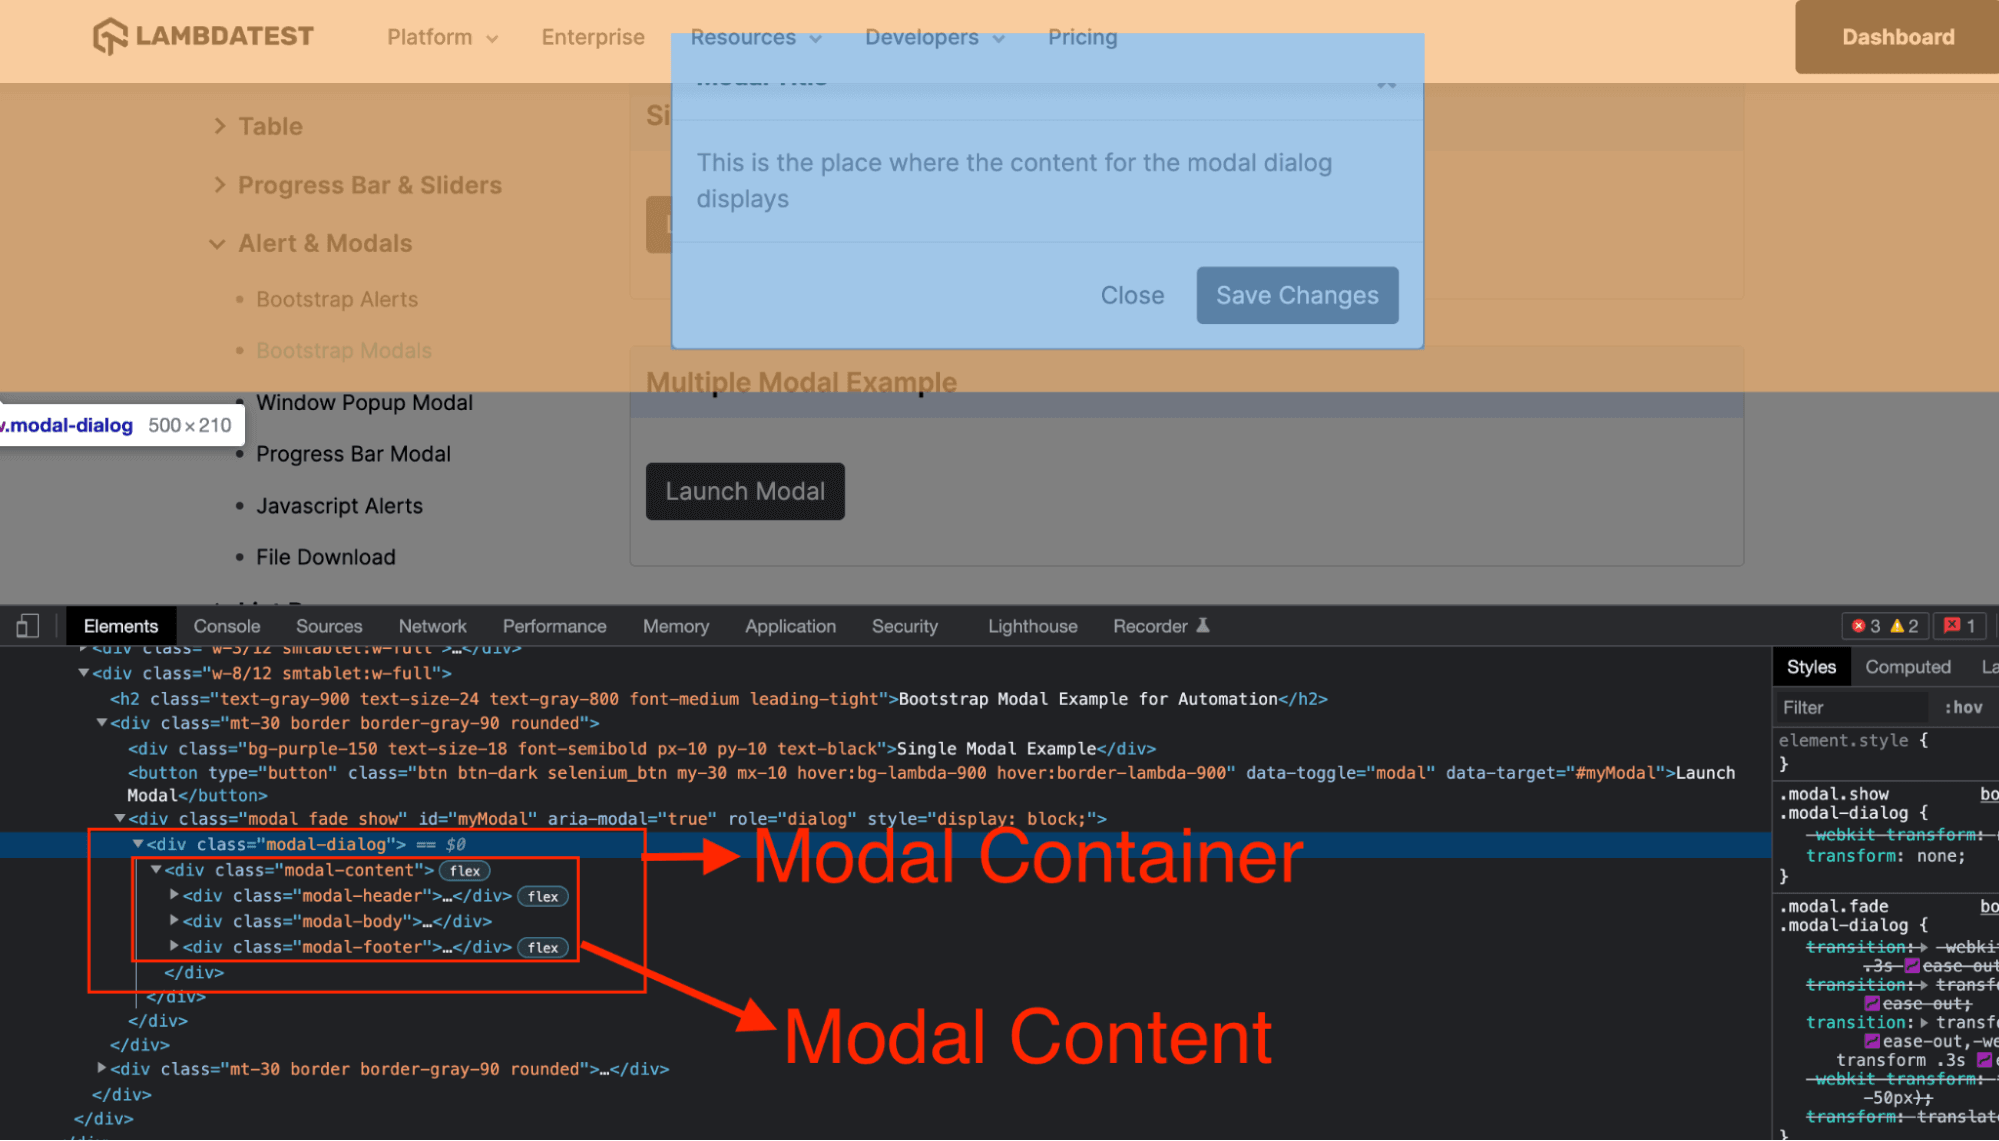
A modal dialog box written with Bootstrap is formed with three key components, namely,
- Trigger element, which triggers the modal window to be shown on the webpage. It can be any link on the webpage or any button, etc.
- Modal, which is like a holding area for the actual modal window code that will come up when the trigger element is interacted with.
- Modal content, is the actual code and the content with which the window is formed and displayed as per the implementation.
So while automating any modal window, we first fetch the modal using our web driver and then identify the modal content inside it to perform actions.

Demonstration: Handling Modal Dialog Box in Selenium WebDriver Java
Having developed a basic understanding of the modal dialog box, it’s time to implement it and see how it works in real-time.
Before that you can also refer to our video to learn how to handle a modal dialog box in Selenium WebDriver Java.
Please note that for all the examples in this blog, we will be using this same project setup for all the examples in this blog and keep adding more test class files as we proceed. So do the setup carefully on your machine for implementation purposes.
Step 1. Choose the IDE on which you want to do the setup. In this blog, Eclipse IDE is being used. You can follow the same steps if any other IDE has opted. In case you are using IntelliJ, you can go through the article on building and executing Selenium Projects.
Step 2. Create a Maven Project in Eclipse and name it as Dialog_Boxes_With_Selenium_Java.
Step 3. Update the pom.xml file to have Selenium (as it will be a web automation project using Selenium WebDriver) and TestNG (to create test flow and execute test cases using Annotations) dependencies.
Filename : pom.xml
|
1 2 3 4 5 6 7 8 9 10 11 12 13 14 15 16 17 18 19 20 21 22 23 24 25 26 27 28 29 30 31 |
<project xmlns=«http://maven.apache.org/POM/4.0.0» xmlns:xsi=«http://www.w3.org/2001/XMLSchema-instance» xsi:schemaLocation=«http://maven.apache.org/POM/4.0.0 https://maven.apache.org/xsd/maven-4.0.0.xsd»> <modelVersion>4.0.0</modelVersion> <groupId>Dialog_Boxes_With_Selenium_Java</groupId> <artifactId>Dialog_Boxes_With_Selenium_Java</artifactId> <version>0.0.1—SNAPSHOT</version> <build> <sourceDirectory>src</sourceDirectory> <plugins> <plugin> <artifactId>maven—compiler—plugin</artifactId> <version>3.8.1</version> <configuration> <release>16</release> </configuration> </plugin> </plugins> </build> <dependencies> <dependency> <groupId>org.seleniumhq.selenium</groupId> <artifactId>selenium—java</artifactId> <version>3.141.59</version> </dependency> <dependency> <groupId>org.testng</groupId> <artifactId>testng</artifactId> <version>7.5</version> <scope>test</scope> </dependency> </dependencies> </project> |
Step 4. Now inside the src package, add a package and name it as test. This will contain all the test classes which will be created in this blog.
Step 5. Inside the test package add a Java class file and name it as BaseClass.java. This file will have the basic driver functions like, initialize driver, quit driver, etc.
In this blog on how to handle modal dialog box in Selenium WebDriver Java, we will be using the TestNG testing framework for test execution. Reason being, it is widely supported with Selenium Java testing and provides an easy way to write and manage test automation scripts with the usage of annotations.
Filename : BaseClass.java
|
1 2 3 4 5 6 7 8 9 10 11 12 13 14 15 16 17 18 19 20 21 22 23 24 25 26 27 28 29 30 31 32 33 34 35 36 37 38 39 40 41 |
package test; import java.net.MalformedURLException; import java.net.URL; import org.openqa.selenium.remote.DesiredCapabilities; import org.openqa.selenium.remote.RemoteWebDriver; import org.testng.annotations.AfterMethod; import org.testng.annotations.BeforeMethod; public class BaseClass { public RemoteWebDriver driver = null; String username = «<lambdatest_username>»; String accessKey = «<lambdatest_accesskey>»; @BeforeMethod public void setUp() { DesiredCapabilities capabilities = new DesiredCapabilities(); capabilities.setCapability(«browserName», «Chrome»); capabilities.setCapability(«version», «92.0»); capabilities.setCapability(«platform», «Windows 10»); capabilities.setCapability(«resolution», «1024×768»); capabilities.setCapability(«build», «DialogBoxes And Pop-ups Selenium JAVA»); capabilities.setCapability(«name», «DialogBoxes And Pop-ups Selenium JAVA»); try { driver = new RemoteWebDriver( new URL(«https://» + username + «:» + accessKey + «@hub.lambdatest.com/wd/hub»), capabilities); } catch (MalformedURLException e) { System.out.println(«Invalid grid URL»); } } @AfterMethod public void closeDriver() { driver.quit(); } } } |
Code Walkthrough
We have created BaseClass.java as the first file, which will have the code to initiate the browser session for Selenium automation and handle the code for browser setup and closing it after test completion. This will be inherited to our test classes, thus preventing redundancy for such code and providing an abstraction of driver code from every other class user.
Step 1. Inside the BaseClass, we will be adding two functions, one to initialize the driver and create an instance of it and another to close it once the test cases are executed.
We will be executing the code on a Selenium Cloud Grid using an instance of Selenium RemoteWebDriver.
The reason is, along with the advantages of Selenium Grid, like executing multiple cases across various browsers and OS, a Cloud Grid also offers speed and scalability, which makes executions faster and more reliable.
An example of one such Selenium Cloud Grid is LambdaTest, which facilitates cross browser testing across an online browser farm of 3000+ real browsers and operating systems on the cloud. Automation testing tools like LambdaTest provide an interactive reporting dashboard for results analysis along with all the benefits of cloud testing.
Here’s a glimpse of LambdaTest cloud Selenium Grid:
You can also Subscribe to the LambdaTest YouTube Channel and stay updated with the latest tutorials around automated browser testing, Cypress testing, CI/CD, and more.
|
public RemoteWebDriver driver = null; |
Step 2. Next would be to add the LambdaTest username and access key for your account to be used to run the script. You can find these details in the LambdaTest Profile Section.
|
String username = «<lambdatest_username>»; String accessKey = «<lambdatest_accesskey>»; |
Step 3. After that, add the first method in this file as setUp(), which would be used to set initial capabilities for the browser and launch the grid with the given credentials.
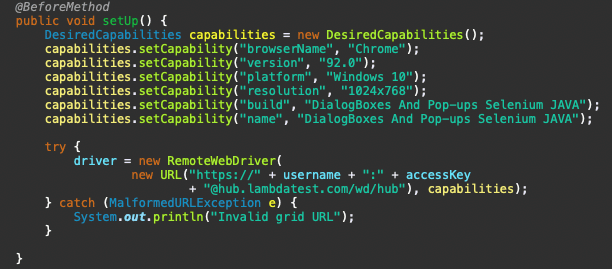
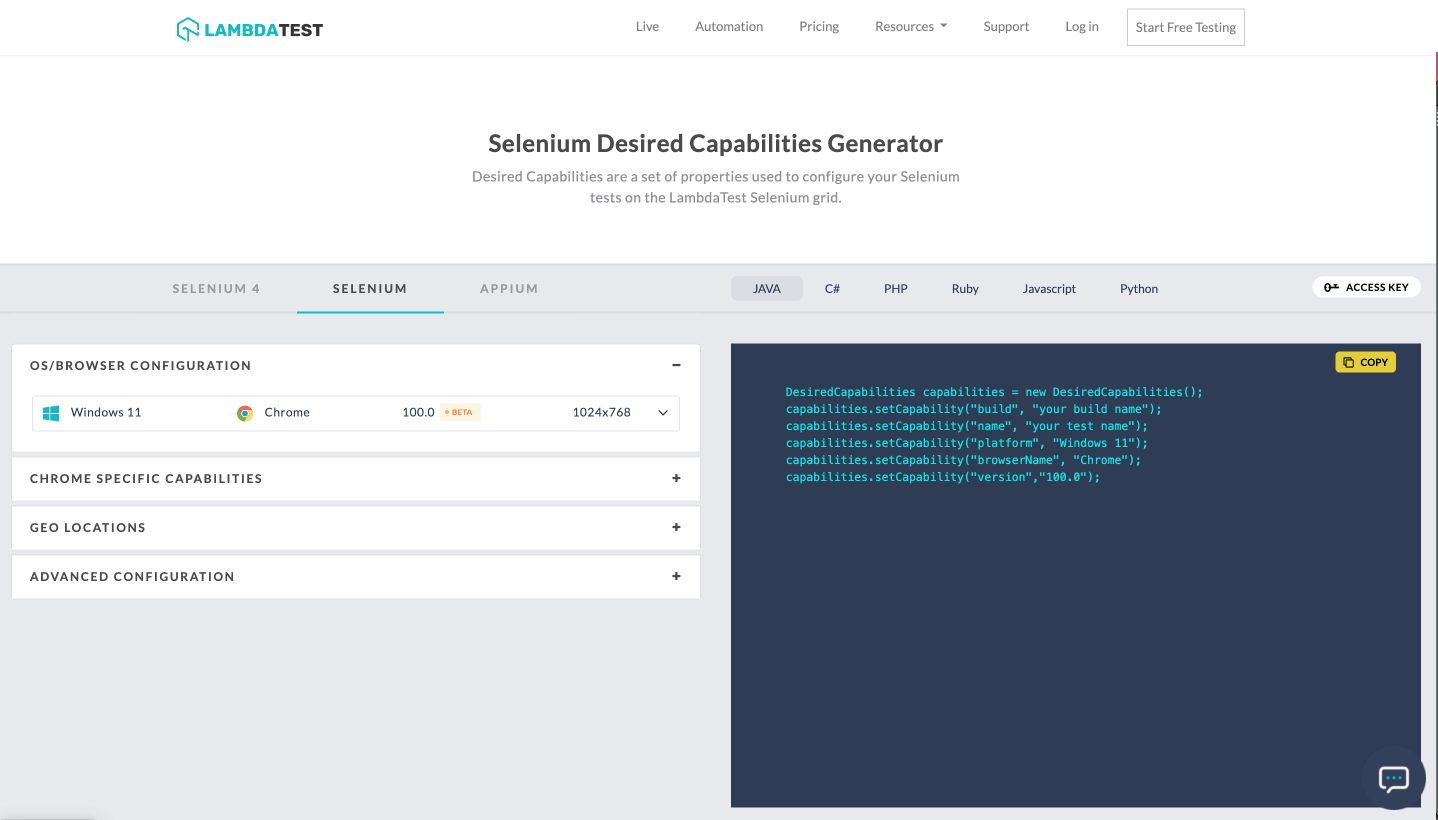
You can see we have set some capabilities for the Chrome browser to be used for our test case. As we are using the LambdaTest platform here for remote execution, we can take advantage of its Selenium Desired Capabilities Generator to generate such values for a number of browser and operating systems combinations by selecting them as required.
Step 4. Just like the setUp() method would create the driver instance to be used for executing the script, it is a good practice to quit the current browser instance as soon as the case is completed. To facilitate the same, add the next method as closeDriver() to quit the driver instance. This would have @AfterMethod annotation in TestNG as the method with this annotation will be called after every test method has completed execution.
|
@AfterMethod public void closeDriver() { driver.quit(); } |
This completes the setup for our base implementation. Let’s move to the next section to implement and see how modal dialog box automation works.
Modal Dialog Box Automation Example
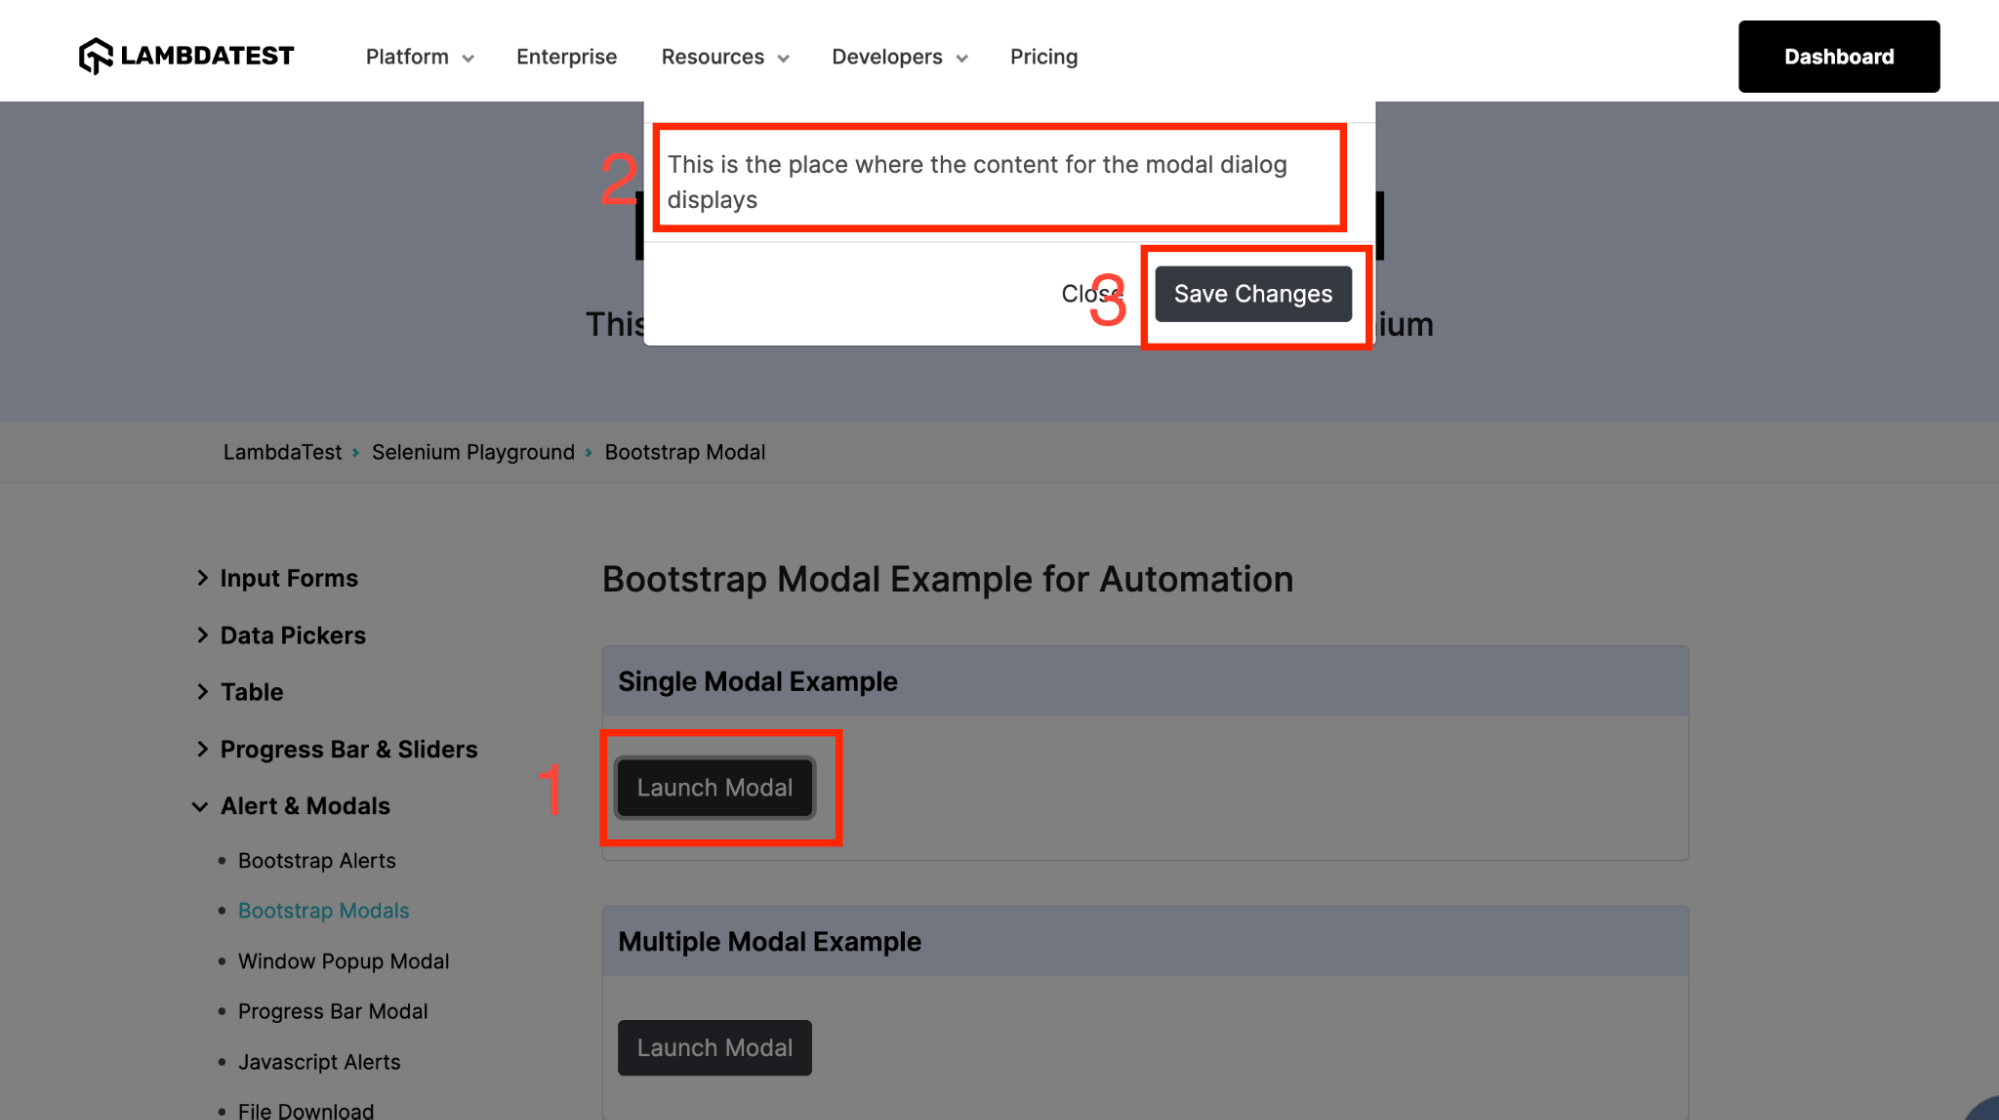
For this blog purpose, we will be automating the following flow:
- Navigate to https://www.lambdatest.com/selenium-playground/bootstrap-modal-demo.
- Click on Launch Model under Single Modal Example.
- Fetch the modal container web element.
- Fetch the modal content web elements using the container element.
- Verify and interact with the modal dialog window.
Filename : TestModalDialogBox.java
|
1 2 3 4 5 6 7 8 9 10 11 12 13 14 15 16 17 18 19 20 21 22 23 24 25 26 27 28 29 30 31 32 33 34 35 36 37 38 39 40 41 42 43 44 45 |
package test; import org.openqa.selenium.By; import org.openqa.selenium.WebElement; import org.testng.Assert; import org.testng.annotations.Test; import org.openqa.selenium.support.ui.ExpectedConditions; import org.openqa.selenium.support.ui.WebDriverWait; public class TestModalDialogBox extends BaseClass { @Test(description = «test to verify modal dialog box») public void verifyModalDialogBox() throws InterruptedException { // to navigate to the website System.out.println(«Navigating to the website»); driver.get(«https://www.lambdatest.com/selenium-playground/bootstrap-modal-demo»); // to click Launch model button — Trigger element System.out.println(«Clicking launch modal button»); driver.findElement(By.xpath(«//button[@data-target=’#myModal’]»)).click(); // wait to let the modal box be visible WebDriverWait wait = new WebDriverWait(driver, 30); wait.until(ExpectedConditions.visibilityOfElementLocated( By.className(«modal-dialog»))); // to fetch the web element of the modal container System.out.println(«Fetching the web element for modal container»); WebElement modalContainer = driver.findElement( By.className(«modal-dialog»)); // to fetch the web elements of the modal content and interact with them // code to fetch content of modal body and verify it System.out.println(«Fetching modal body content and asserting it»); WebElement modalContentBody = modalContainer.findElement(By.xpath(«.//div[@class=’modal-body’]»)); Assert.assertEquals(modalContentBody.getText(), «This is the place where the content for the modal dialog displays», «Verify modal body message»); // code to click on accept modal button System.out.println(«Clicking modal accept button»); WebElement modalAcceptButton = modalContainer .findElement(By.xpath(«.//button[contains(text(),’Save Changes’)]»)); modalAcceptButton.click(); } } |
GitHub
Code Walkthrough
Step 1. First lines of code in the testcase are to navigate to the URL on which we will have our modal dialog box to automate.
|
driver.get(«https://www.lambdatest.com/selenium-playground/bootstrap-modal-demo»); |
Step 2. After the page has loaded, we click on the button to launch the dialog box. As we learnt, this is the trigger element which makes the dialog box appear.
For this we use the XPath element locator to fetch the element using its tag and attribute key-value.
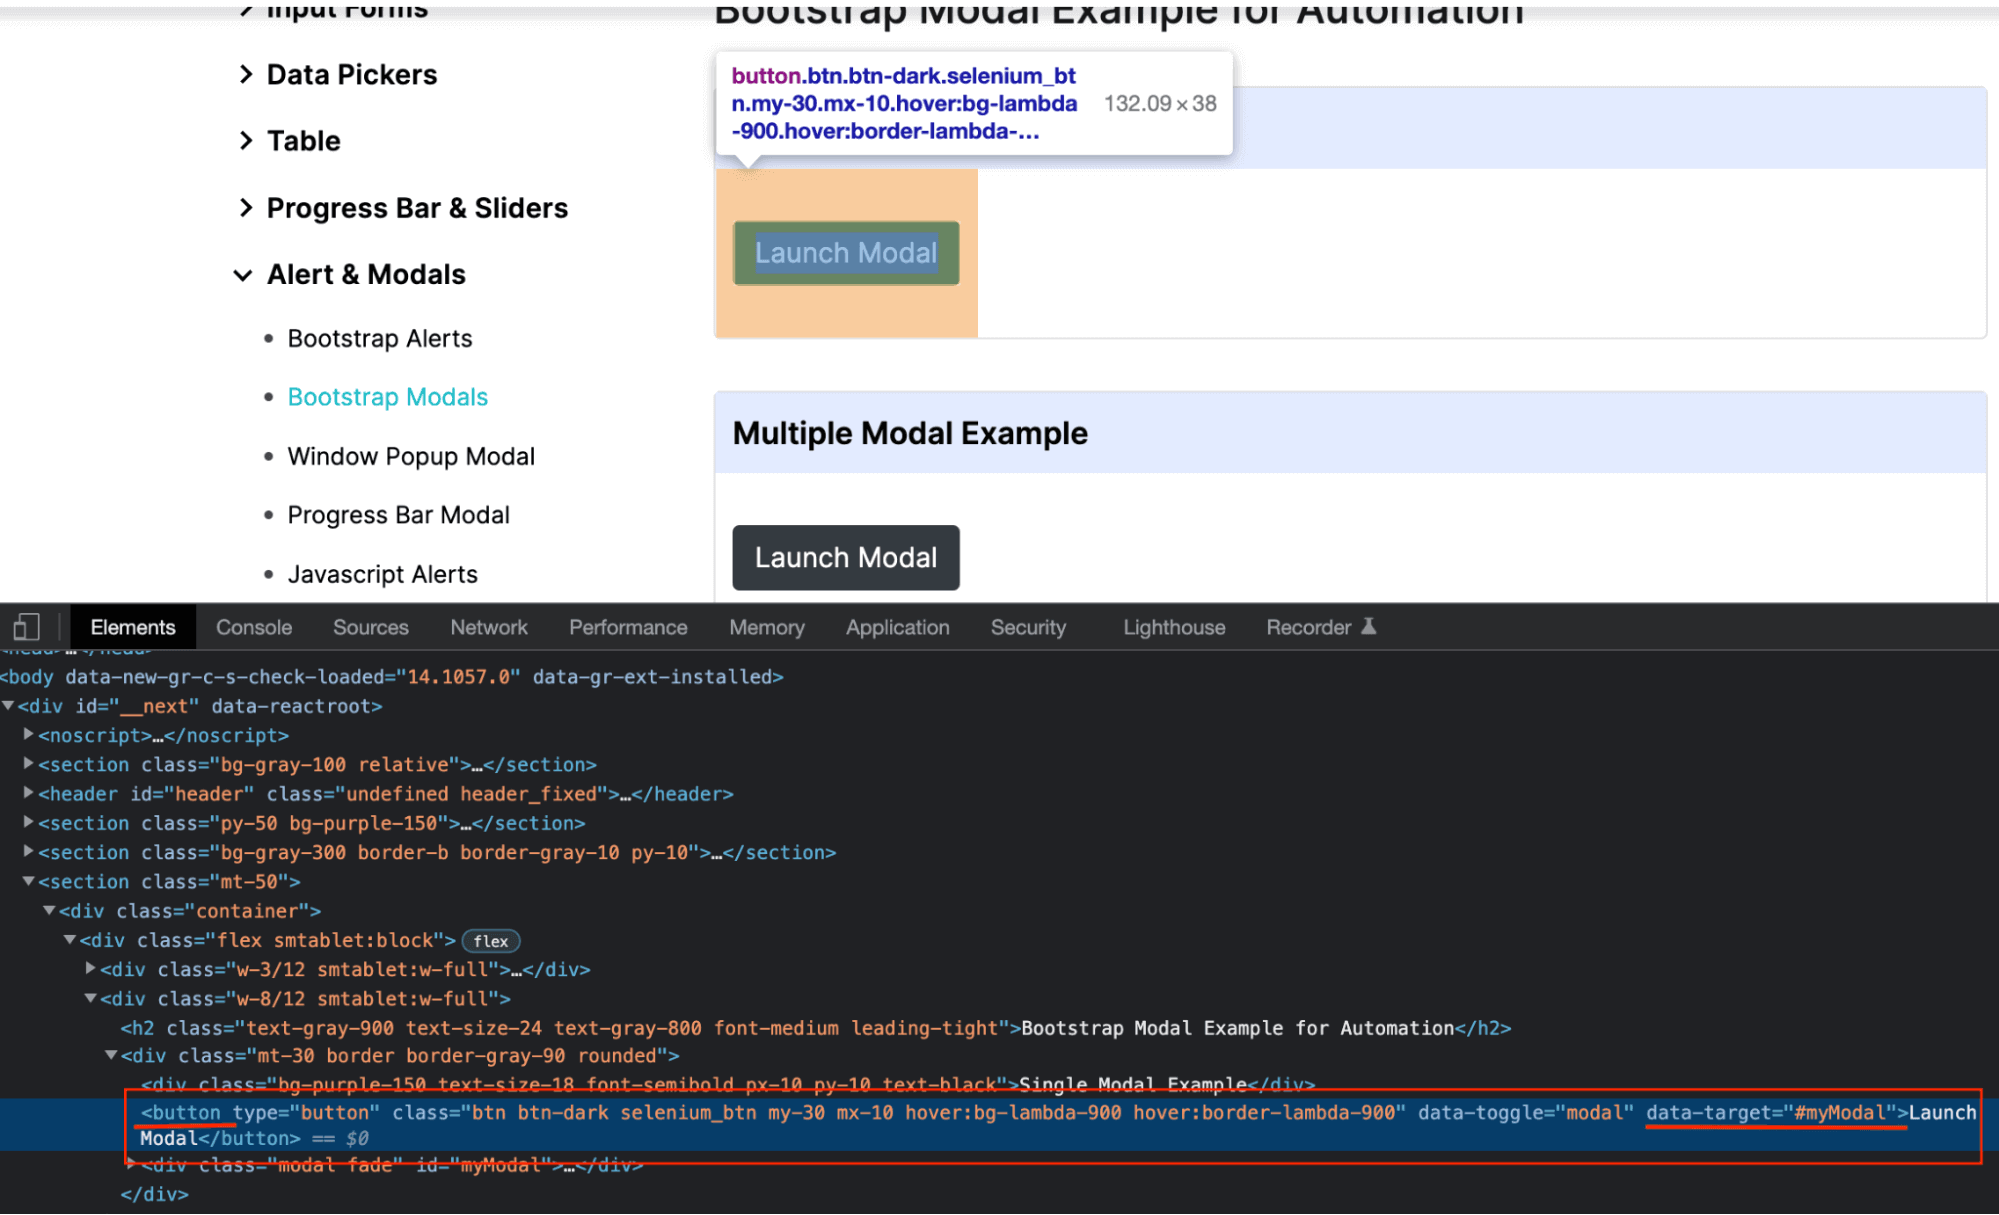
|
driver.findElement(By.xpath(«//button[@data-target=’#myModal’]»)).click(); |
Step 3. After clicking the button, we wait for the modal box to be visible. For this, we have used explicit waits, as per which the WebDriver waits for a certain condition to occur before proceeding to execute the further code. To know more about explicit waits, you can go through this article on types of Waits in Selenium.
To use these waits in your test automation script, the following imports are done:
|
import org.openqa.selenium.support.ui.ExpectedConditions; import org.openqa.selenium.support.ui.WebDriverWait; |
Step 4. After this, an object of WebDriverWait class is instantiated using the WebDriver reference and maximum time to wait for before raising an exception. The time is in seconds.
|
WebDriverWait wait = new WebDriverWait(driver, 30); |
Using this wait object, we implement some “ExpectedConditions” function to be fulfilled. There are certain predefined conditions for it in Selenium, of which we have used visibilityOfElementLocated(), which means to wait until the given WebElement is visible.
|
wait.until(ExpectedConditions.visibilityOfElementLocated(By.className(«modal-dialog»))); |
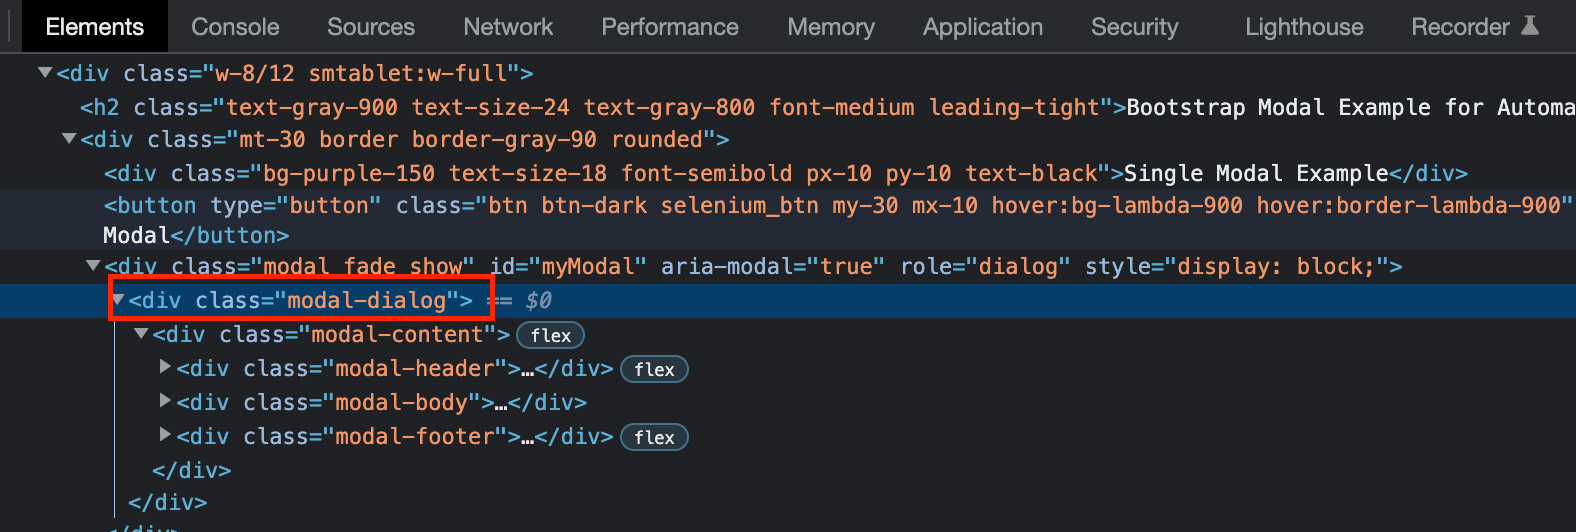
Step 5. Once the modal dialog box opens up, we fetch the WebElement of the modal container as we will be interacting with the elements inside the modal dialog box container.
|
WebElement modalContainer = driver.findElement(By.className(«modal-dialog»)); |
Step 6. Next, we fetch the modal dialog box WebElements to perform actions on their content. One important thing to note here is the way how the WebElement for the model content is fetched.
For this, in place of the driver, the WebElement identifier for the modal container is used, and the identifying XPath for the element starts with “.//,” which signifies that the corresponding element to be found is inside this element, i.e., inside the modal dialog box.
The following code showcases this implementation of how elements would be identified and how we can assert on it or click the button. To learn more about assertions you can go through our earlier blog on How To Use Assertions In TestNG With Selenium or watch this video to learn what are TestNG assertions, the different types of TestNG assertions, and how you can use them while performing Selenium automation testing with TestNG.
|
WebElement modalContentBody = modalContainer.findElement(By.xpath(«.//div[@class=’modal-body’]»)); Assert.assertEquals(modalContentBody.getText(), «This is the place where the content for the modal dialog displays», «Verify modal body message»); // code to click on accept modal button WebElement modalAcceptButton = modalContainer .findElement (By.xpath («.//button[contains(text(),’Save Changes’)]»)); modalAcceptButton.click(); |
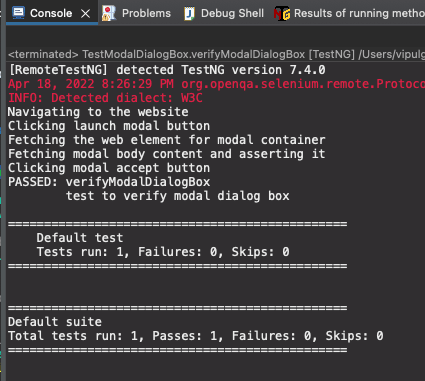
Test Execution
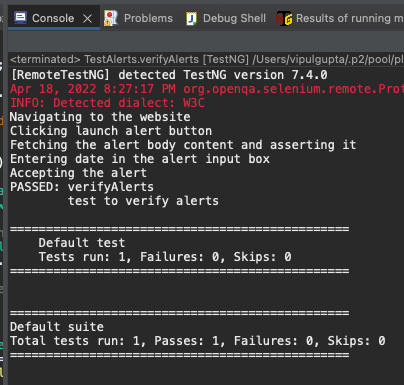
Having understood the code implementation, lets execute the code using TestNG. Once successfully executed, you can see the following output on the IDE.
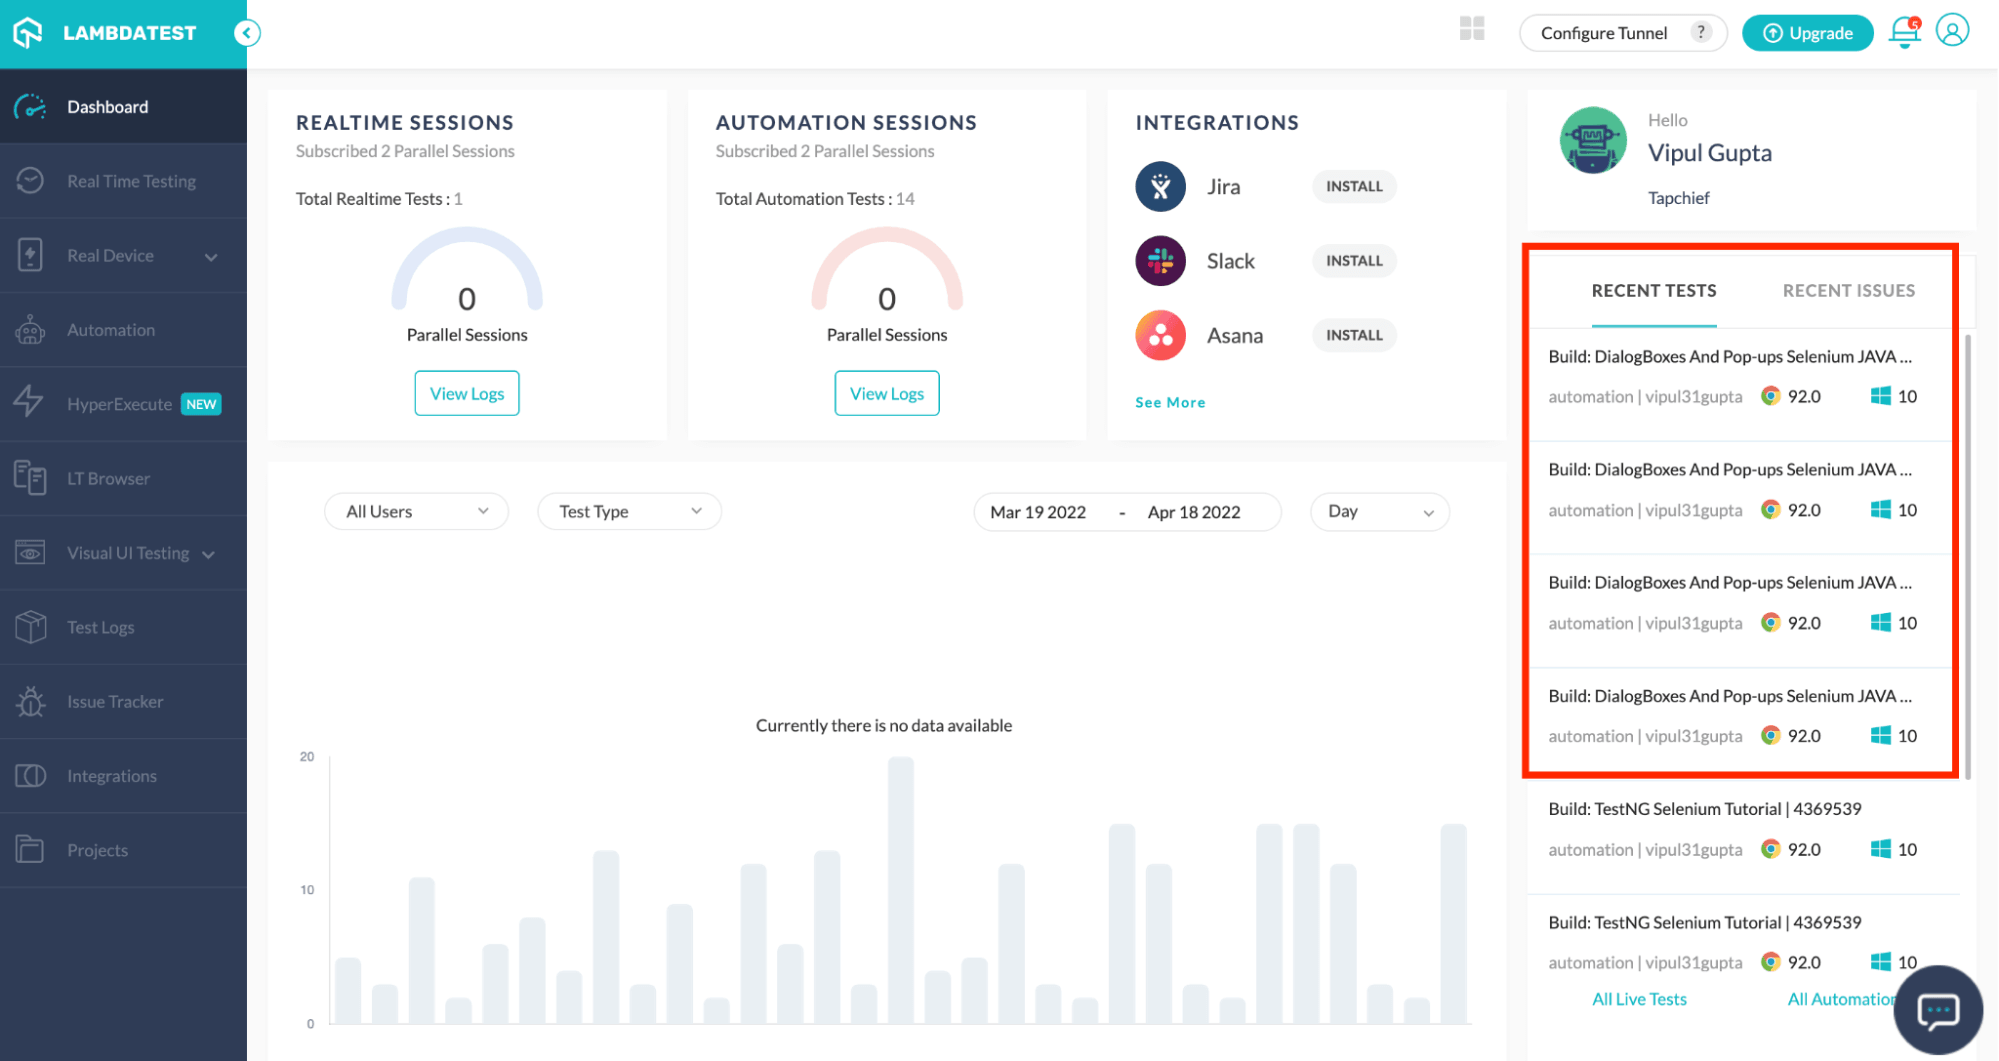
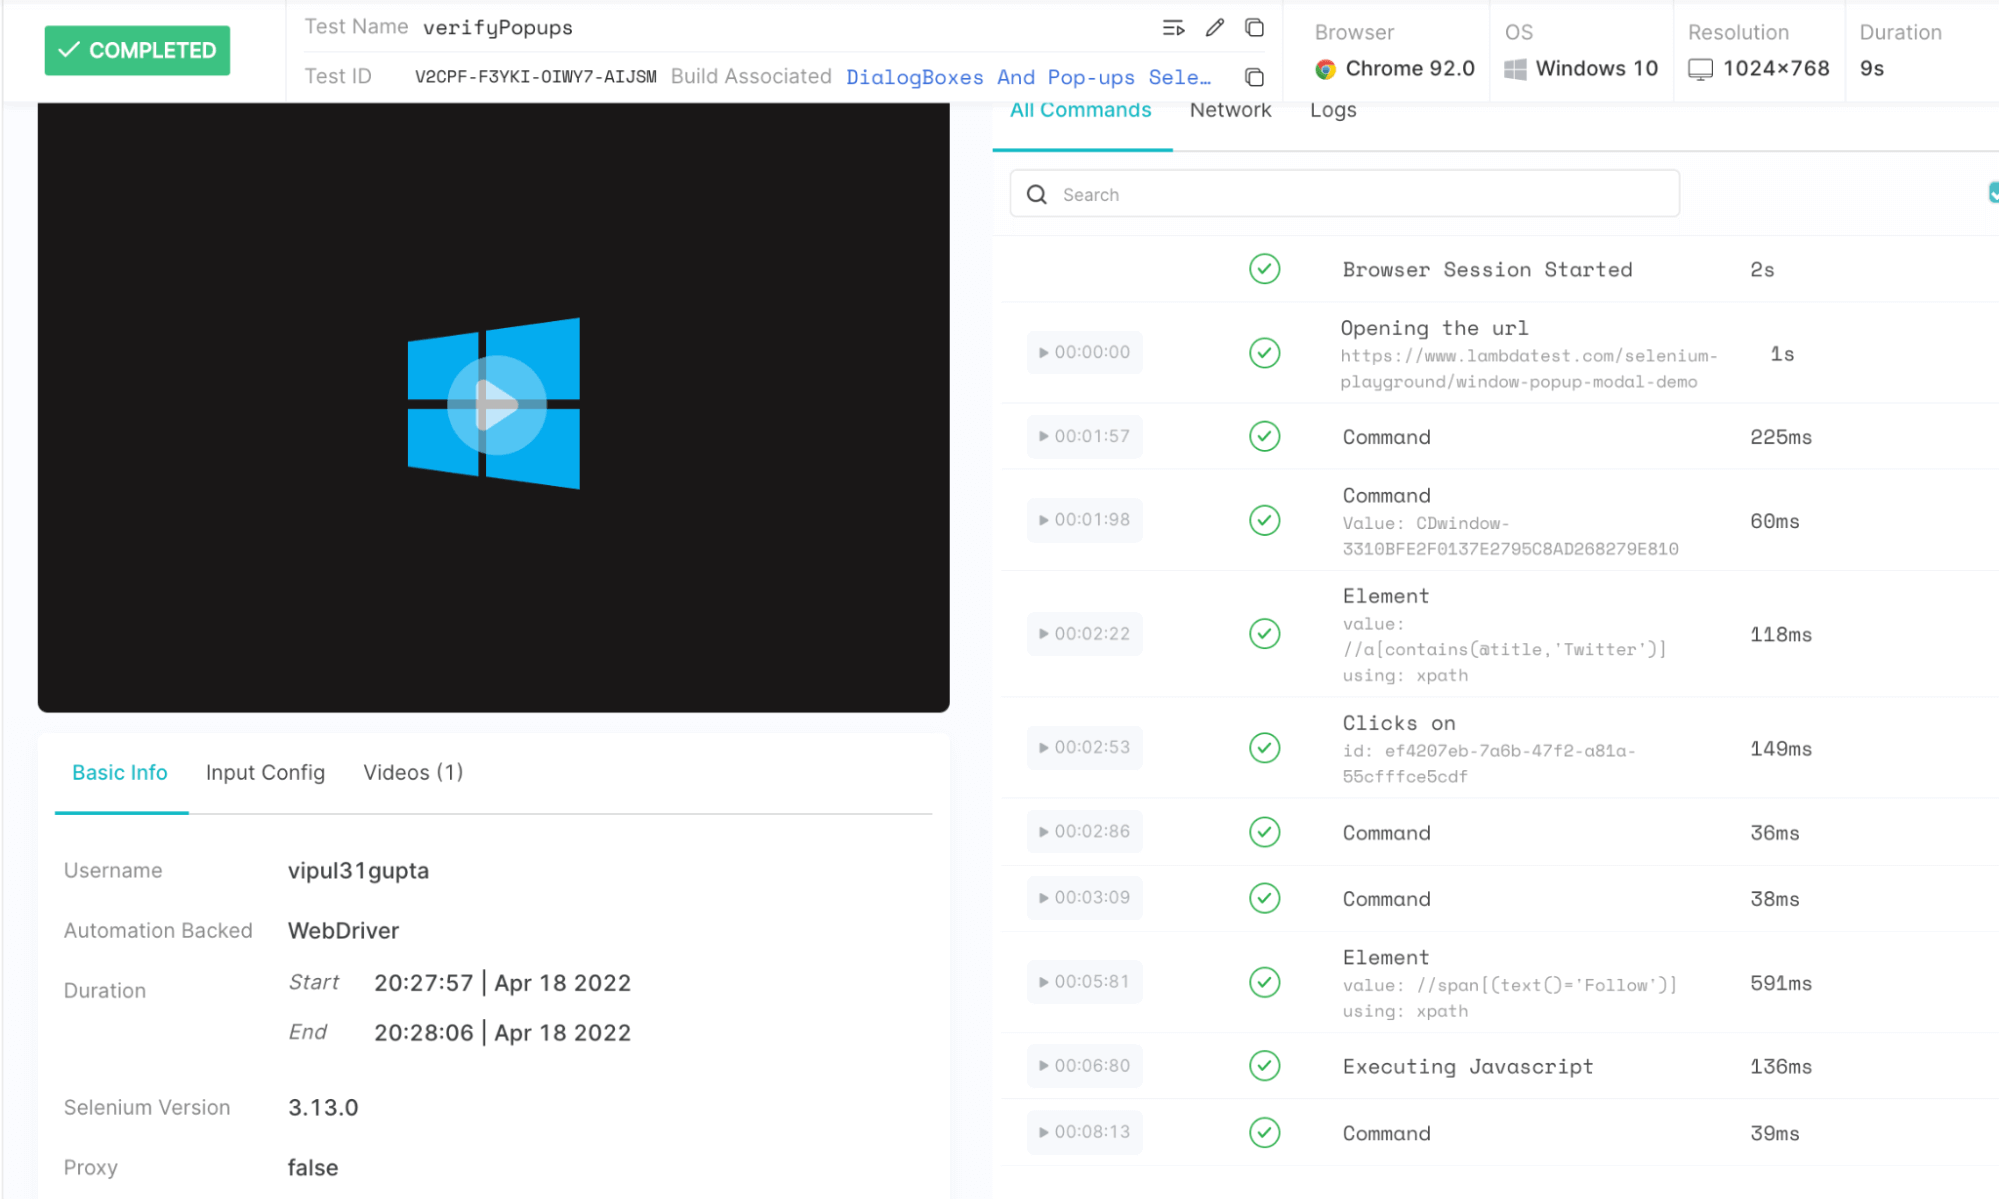
Since we executed the code on a remote grid using LambdaTest, execution logs are also available on the LambdaTest Dashboard, including video, steps of the automation script, and network and console logs.
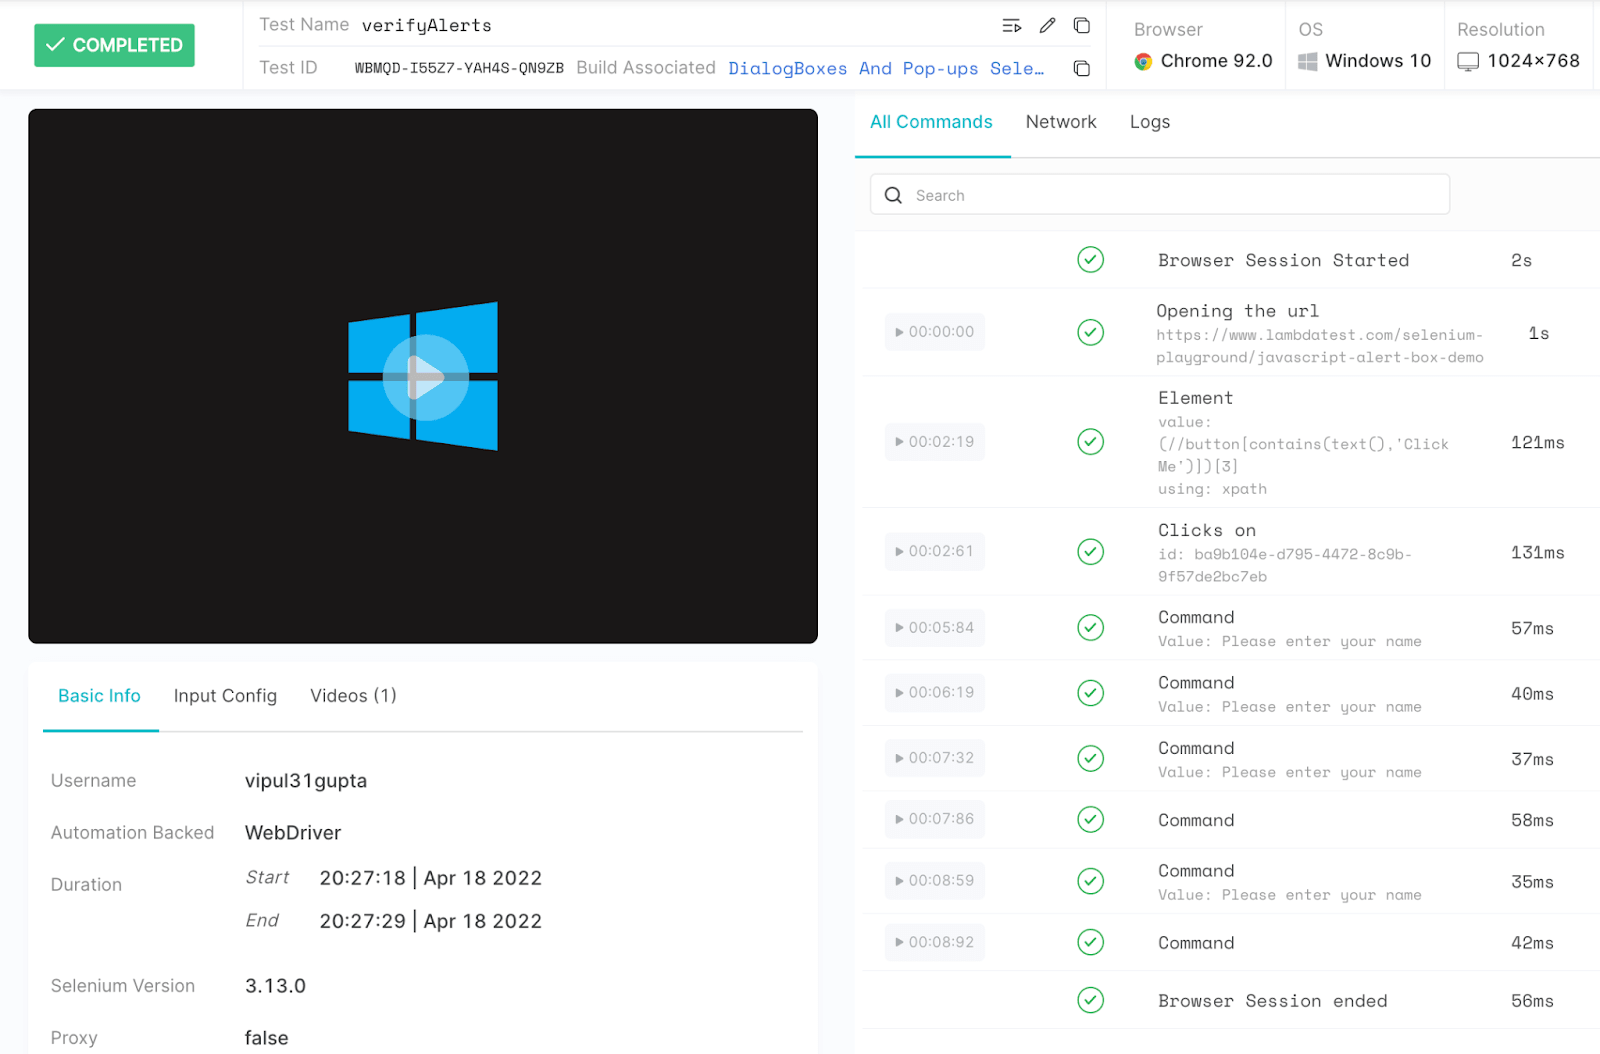
You can see your executed test cases under Recent Tests on the Dashboard.
To see the detailed execution for your case, click on the test case, and you can see the details like the following:
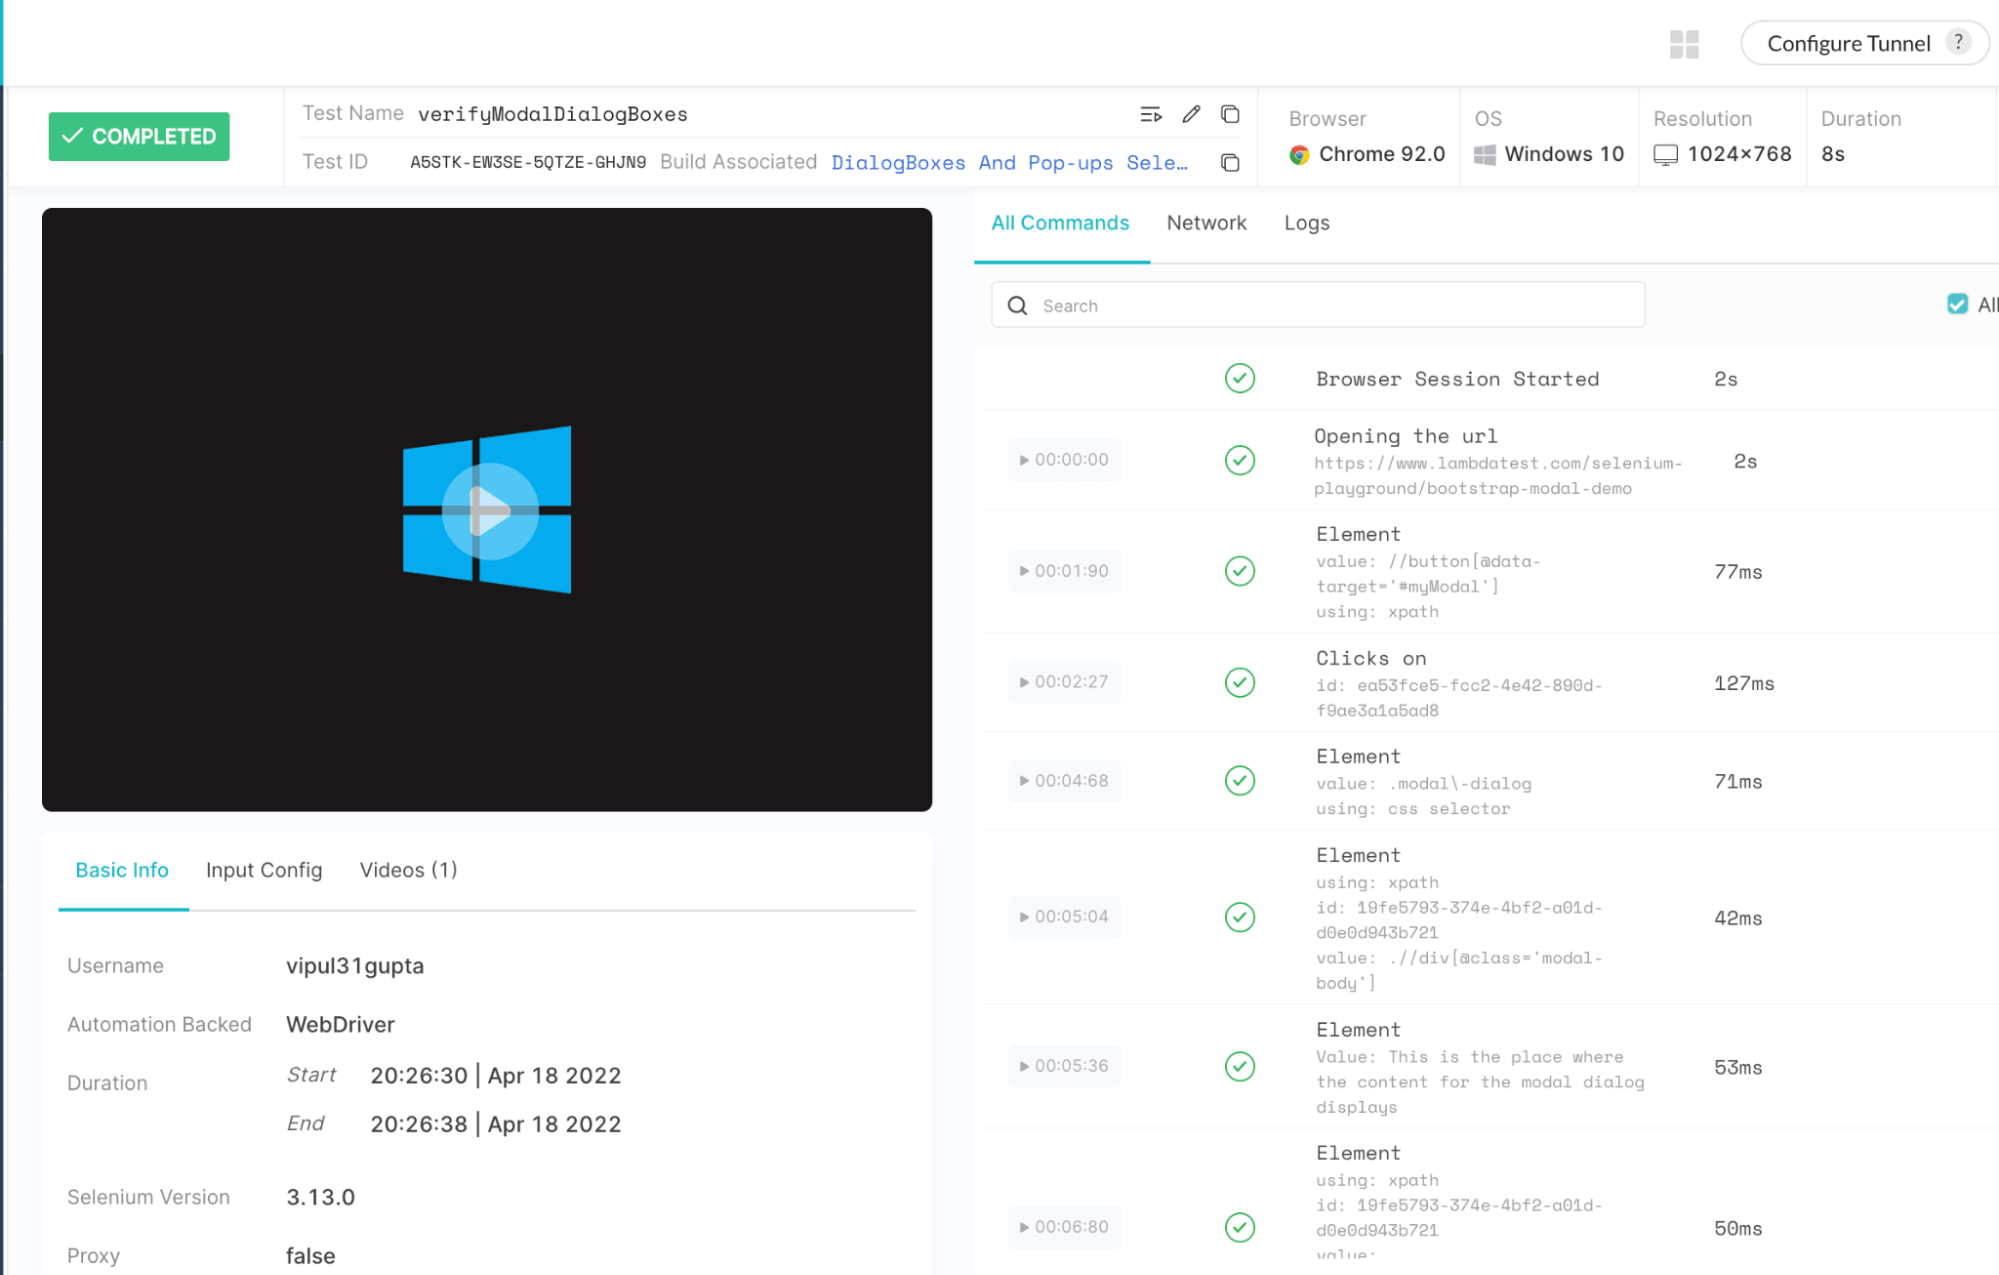
You can also navigate to the LambdaTest Analytics Dashboard to see test performance metrics. From the Test Summary section, you will see the total number of tests passed or failed, including completed and pending tests. You can also see the snapshot of consistent tests from the Test Overview section.
Intrigued to know more about LambdaTest? Try LambdaTest Now!
How to handle Alerts using Selenium Java?
In this section of the blog on how to handle modal box in Selenium WebDriver Java, we will learn what are alerts and how to handle alerts in Windows using Selenium Java
What are Alerts?
Alerts in web development usually refer to a message or notification that lets the user know about information, namely:
- Asking for access permissions.
- Highlighting mandatory fields on a form.
- Display warning messages or help information.
Unlike modal dialog boxes, Selenium offers some special functions to deal with alerts. This is because it is a very tricky and time-consuming task for testers to automate alerts using regular methods. A few of these predefined methods are
- Click Accept Button of the alert Dismiss/Cancel an Alert Box
- Click Accept on Alert Box
- Fetch static data from Alert Box
- Send data to input fields on Alert Box
|
driver.switchTo().alert().dismiss(); |
|
driver.switchTo().alert().accept(); |
|
driver.switchTo().alert().getText(); |
|
driver.switchTo().alert().sendKeys(«Text»); |
sendKeys() function is used to enter data to the input fields on any web page in Selenium automation. SendKeys in Selenium performs the same action here by entering data to any input field on the alert.
Demonstration: Handling Alerts Window using Selenium Java
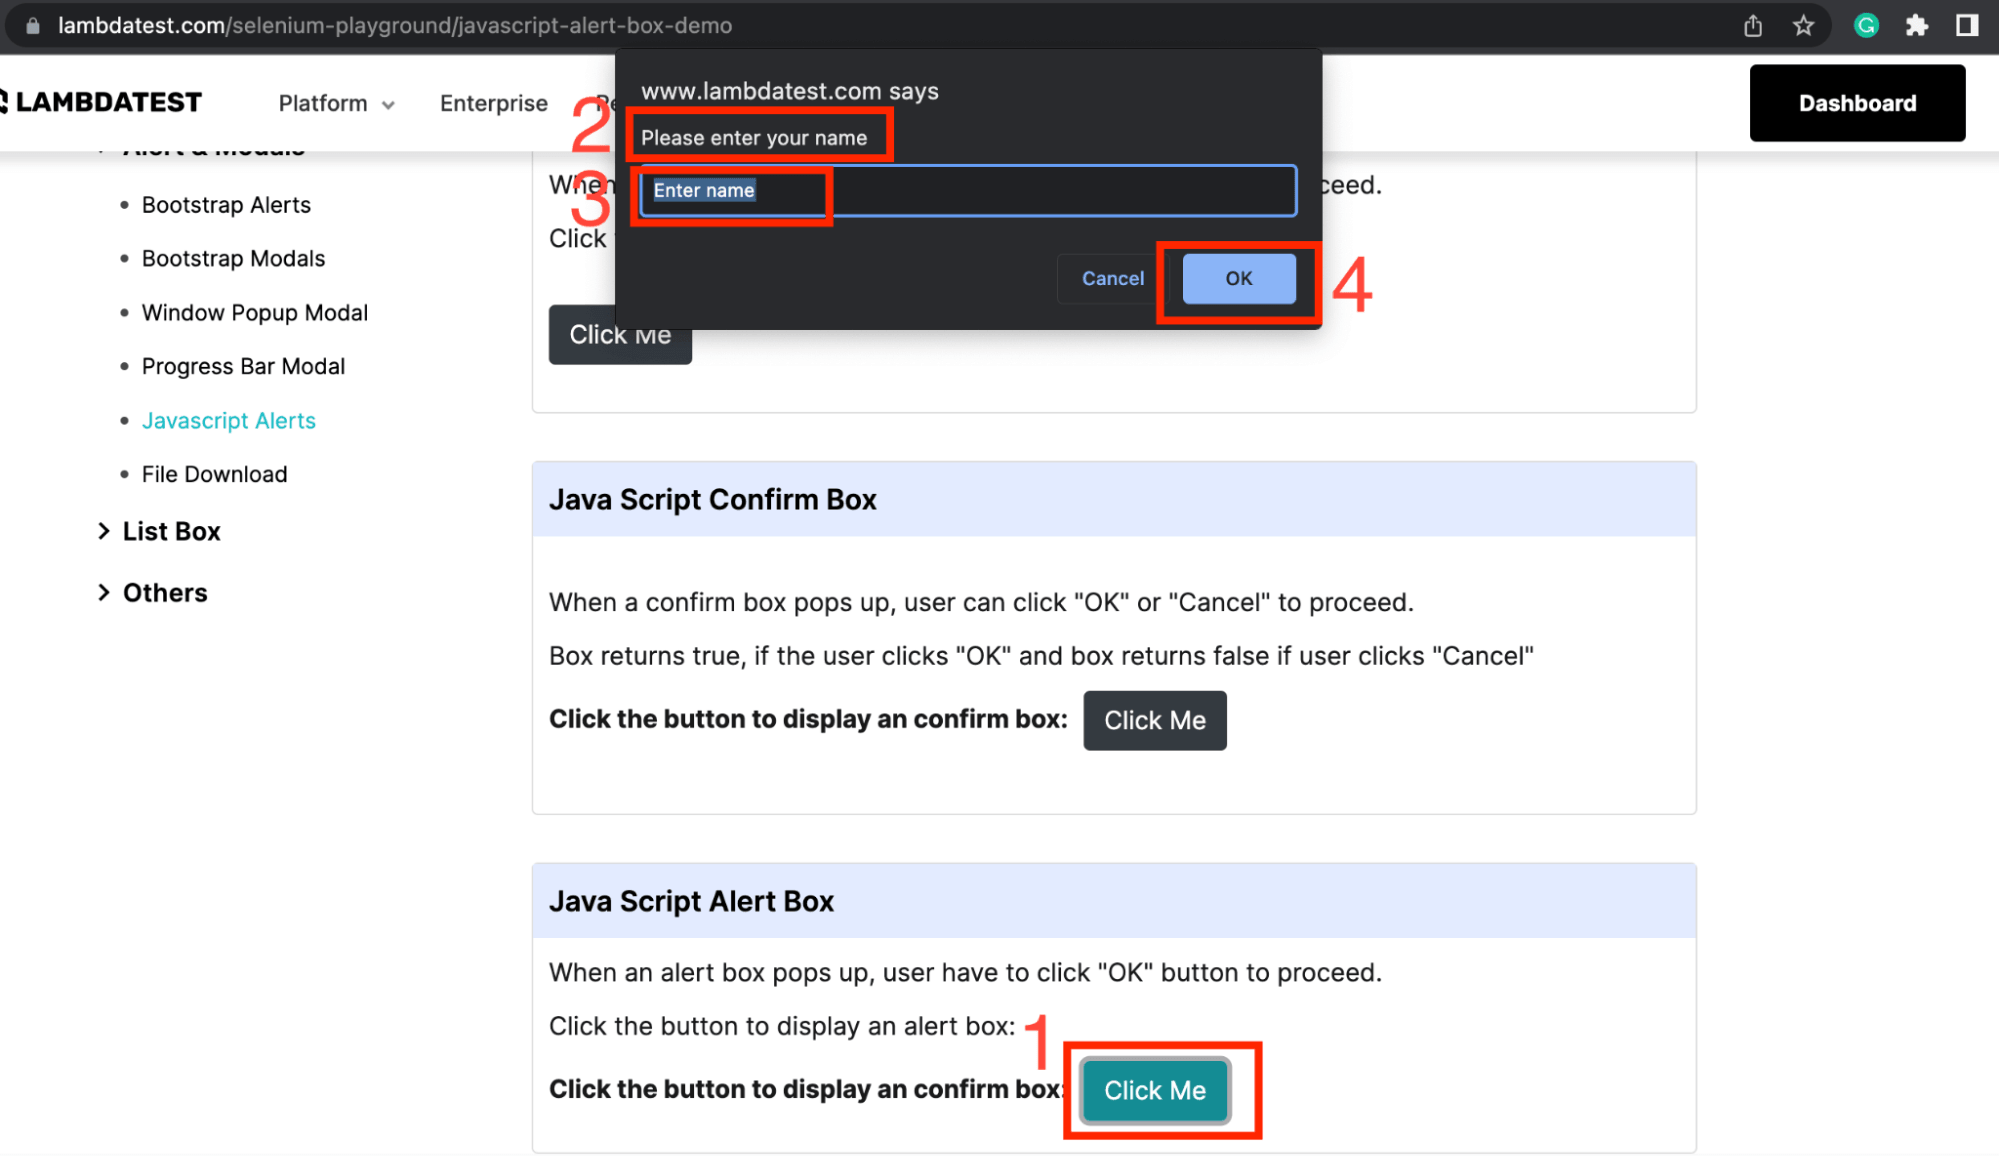
For this blog on how to handle modal dialog box in Selenium Java, we will be automating the following flow:
- Navigate to https://www.lambdatest.com/selenium-playground/javascript-alert-box-demo.
- Click on Click Me button under Java Script Alert Box.
- Verify the alert body content as Please Enter Your Name.
- Enter some data in the alert input box.
- Click OK to accept the alert.
Filename : TestAlerts.java
|
1 2 3 4 5 6 7 8 9 10 11 12 13 14 15 16 17 18 19 20 21 22 23 24 25 26 27 28 29 30 31 32 33 34 35 36 37 38 |
package test; import org.openqa.selenium.By; import org.testng.Assert; import org.testng.annotations.Test; import org.openqa.selenium.support.ui.ExpectedConditions; import org.openqa.selenium.support.ui.WebDriverWait; public class TestAlerts extends BaseClass { @Test(description = «test to verify alerts») public void verifyAlerts() throws InterruptedException { // to navigate to the website System.out.println(«Navigating to the website»); driver.get(«https://www.lambdatest.com/selenium-playground/javascript-alert-box-demo»); // to click the button to get demo alert System.out.println(«Clicking launch alert button»); driver.findElement(By.xpath(«(//button[contains(text(),’Click Me’)])[3]»)).click(); // to let the alert be visible WebDriverWait wait = new WebDriverWait(driver, 30); wait.until(ExpectedConditions.alertIsPresent()); // to fetch the alert body content and verify it System.out.println(«Fetching the alert body content and asserting it»); String alertBodyText = driver.switchTo().alert().getText(); Assert.assertEquals(alertBodyText, «Please enter your name», «Verify alert body content»); // to enter data as required by the alert System.out.println(«Entering date in the alert input box»); driver.switchTo().alert().sendKeys(«LambdaTest»); // to accept the alert System.out.println(«Accepting the alert»); driver.switchTo().alert().accept(); } } |
GitHub
Code Walkthrough
Step 1. This code also starts with the first step as navigating to the target page where the actual automation script would be executed.
|
driver.get(«https://www.lambdatest.com/selenium-playground/javascript-alert-box-demo»); |
Step 2. Once the page is loaded, we click the button to get the alert on which alert functions can be implemented and verified.
|
driver.findElement(By.xpath(«(//button[contains(text(),’Click Me’)])[3]»)).click(); |
Step 3. Just like for the modal dialog box, for alert as well, explicit wait is being implemented. Imports and object creation remain same for this case as well with only difference being on ExpectedConditions. For supporting alerts, just like there are predefined functions in Selenium, alertIsPresent() is used in this case.
|
wait.until(ExpectedConditions.alertIsPresent()); |
Step 4. After the alert is visible, we start with implementing alert().getText() to fetch the content on the alert and asserting it.
But before we can do so, we need to make sure that the driver instance focus has been switched to the alert from the main window. For this purpose, the switchTo() function is used in Selenium automation testing. This function is used whenever we are working with multiple windows like new tab, alerts, pop ups, etc. in web automation.
Since in this test script, we need to switch to alert in this test script to interact with it, switchTo().alert() is used. We will learn more about how to switch between parent/child windows in the popups section.
|
String alertBodyText = driver.switchTo().alert().getText(); |
Step 5. Here we are using the Assert class of TestNG to compare the content using the assertEquals() function. In this function, we will pass the expected content, which is the string and the actual content, which is the body content of the alert that is fetched on the previous step. If both matches, assert is passed; else, it fails with an error that is expected and actual data do not equal.
|
Assert.assertEquals(alertBodyText, «Please enter your name»,«Verify alert body content»); |
Step 6. Next, we verify the alert().sendKeys() function by entering some data in the input field.
|
driver.switchTo().alert().sendKeys(«LambdaTest»); |
Step 7. The last step of this test scenario is to accept the alert for which the predefined method that Selenium provides is being used.
|
driver.switchTo().alert().accept(); |
Depending upon the use case, you can also implement the function to dismiss/cancel the alert. For this following method Selenium method can be used
|
driver.switchTo().alert().dismiss(); |
Test Execution
As mentioned for the modal dialog box in the previous section, we can similarly execute the alerts test case from IDE and see the output like below on successful execution on the IDE and the LambdaTest dashboard for the automation cases.
Wondering how to handle alerts on cloud Selenium Grid? Try LambdaTest Now!
How to handle Popups using Selenium Java?
In this section of the blog on how to handle modal box in Selenium WebDriver Java, we will learn what are popups and how to handle popups using Selenium Java.
What are Popups?
Pop-up refers to a new window or tab that pops up or gets opened as a result of some interaction on the webpage. It can come up in a number of conditions and as per implementation.
In Selenium automation, the driver always focuses on the currently active window and interacts with it. So whenever we are working with pop-ups in Selenium, some additional methods are used to shift the driver’s focus to the newly opened window and then back to the main window.
- Get handles of all the windows that are open at that instance.
- Get the current window handle on which the driver is focused.
- Switch to the main parent window.
- Switch to any specific window using its handle.
|
driver.getWindowHandles(); |
|
driver.getWindowHandle(); |
|
driver.switchTo().defaultContent(); |
|
driver.switchTo().window(handleId); |
handleId here refers to the ids of the window which we can fetch using the getWindowHandle() or getWindowHandles() function of the WebDriver.
Demonstration: Handling Popups using Selenium Java
For this blog purpose, we will be automating the following flow:
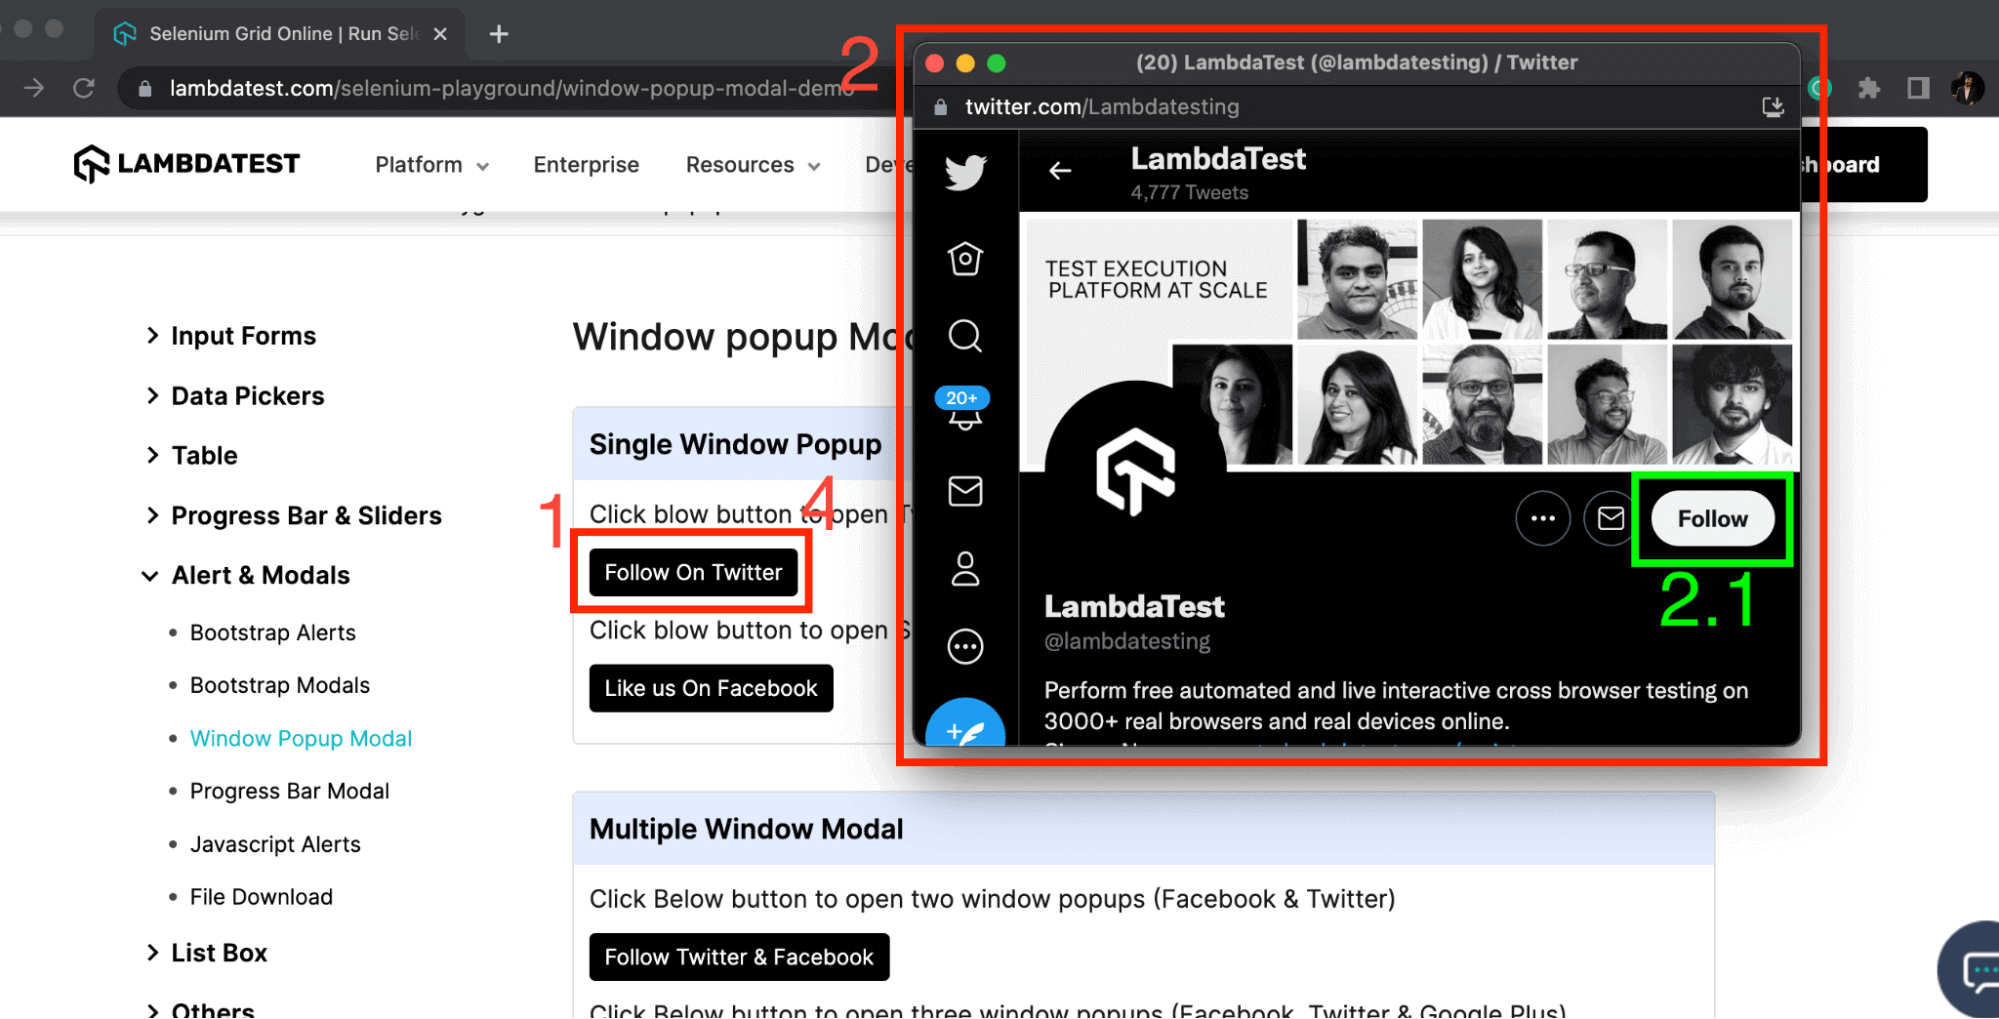
- Navigate to https://www.lambdatest.com/selenium-playground/window-popup-modal-demo.
- Click on Follow On Twitter under Single Window Popup.
- Switch to a new popup window.
- Assert Follow button on it is present.
- Switch back to the main window.
- Assert Follow On Twitter is displayed.
Filename: TestPopups.java
|
1 2 3 4 5 6 7 8 9 10 11 12 13 14 15 16 17 18 19 20 21 22 23 24 25 26 27 28 29 30 31 32 33 34 35 36 37 38 39 40 41 42 43 44 45 46 47 48 49 50 51 52 53 54 55 56 57 58 59 60 61 62 63 |
package test; import java.util.Iterator; import java.util.Set; import org.openqa.selenium.By; import org.openqa.selenium.WebElement; import org.testng.Assert; import org.testng.annotations.Test; import org.openqa.selenium.support.ui.ExpectedConditions; import org.openqa.selenium.support.ui.WebDriverWait; public class TestPopups extends BaseClass { @Test(description = «test to verify pop ups») public void verifyPopups() throws InterruptedException { // to navigate to the website System.out.println(«Navigating to the website»); driver.get(«https://www.lambdatest.com/selenium-playground/window-popup-modal-demo»); driver.manage().window().maximize(); // to fetch and save the handle of current window System.out.println(«storing the main window handle»); String mainWindowHandle = driver.getWindowHandle(); // to click the button to get a popup (new tab in this case) System.out.println(«Clicking launch popup button»); WebElement followButtonOnMainWindow = driver.findElement(By.xpath(«//a[contains(@title,’Twitter’)]»)); followButtonOnMainWindow.click(); // to get the list of all window handles after the new tab // should have length 2 since 1 new tab opens up System.out.println(«Fetching the list of all window handles and asserting them»); Set<String> windowHandles = driver.getWindowHandles(); Assert.assertEquals(windowHandles.size(), 2, «Verify the total number of handles»); // switch to new opened tab System.out.println(«Switching to the new window handle»); Iterator<String> itr = windowHandles.iterator(); while (itr.hasNext()) { String childWindowHandle = itr.next(); // to skip the handle of our main window and switch to new one if (!mainWindowHandle.equalsIgnoreCase(childWindowHandle)) driver.switchTo().window(childWindowHandle); } WebDriverWait wait = new WebDriverWait(driver, 30); wait.until(ExpectedConditions.visibilityOfElementLocated( By.xpath(«//span[(text()=’Follow’)]»))); // to verify that driver focus is shifted to popup window System.out.println(«Asserting some element on the new popup window to confirm switch»); WebElement twitterFollowButton = driver.findElement(By.xpath(«//span[(text()=’Follow’)]»)); Assert.assertTrue(twitterFollowButton.isDisplayed(), «Verify twitter follow button is displayed»); // shift driver back to main window and verify System.out.println(«Switching back to main window and asserting same»); driver.switchTo().window(mainWindowHandle); wait.until(ExpectedConditions.visibilityOfElementLocated( By.xpath(«//a[contains(@title,’Twitter’)]»))); Assert.assertTrue(followButtonOnMainWindow.isDisplayed(), «Verify focus is shifted to main window»); } } |
GitHub
Code Walkthrough
You can find two special imports in this test class, namely
|
import java.util.Iterator; import java.util.Set; |
These are done to support the usage of Set type Data Structure and Iterator, the function to traverse through the Set. More details about these are with the corresponding code where these are used.
Step 1. For writing the automation test case for handling pop-ups, after navigating to the required webpage, first, we get and save the handle of the main window. This is done as once there is a new popup window, we need to have some way to differentiate between the handle of the current window and the newly opened window.
|
String mainWindowHandle = driver.getWindowHandle(); |
Step 2. After storing this, the next step would be to click on the link text or button, in this case, on the current/main window, to get the new popup window.
|
WebElement followButtonOnMainWindow = driver.findElement(By.xpath («//a[contains(@title,’Twitter’)]»)); followButtonOnMainWindow.click(); |
Step 3. Now, as per the test scenario expectation, we should have two windows on the screen. To verify the same, use the getWindowHandles() method to get identifiers (or window handles) of the respective Windows.
This method returns the list of handles of all the Windows, which to understand are the ids of different Windows that can be used to identify them. This entire list is stored in a Set type of data structure for easy accessibility.
As the number of window handles is stored in the Set type variable, we can use the size() method to fetch the total number of handles in that and assert as per expectation which is 2 here.
|
Set<String> windowHandles = driver.getWindowHandles(); Assert.assertEquals(windowHandles.size(), 2, «Verify the total number of handles»); |
Step 4. Next step would be to switch to the new pop up window. For this, we traverse through the list of window handles and compare it with the main window handle value, which we stored in the first step.
For traversal through the Set containing all window handles, we are using Iterator. As the name suggests, it means to visit repeatedly until some point. So here, we keep on iterating the set for the next values till we reach the last value.
|
Iterator<String> itr = windowHandles.iterator(); while (itr.hasNext()) { String childWindowHandle = itr.next(); // to skip the handle of our main window and switch to new one if (!mainWindowHandle.equalsIgnoreCase(childWindowHandle)) driver.switchTo().window(childWindowHandle); } |
Step 5. Once we get a non-matching value, we switch to the new popped-up window and use the Explicit Wait like discussed before to wait for the new popped-up window using the visibilityOfElementLocated() function and raise an Assert to verify the switch is successful.
|
// to verify that driver focus is shifted to popup window WebDriverWait wait = new WebDriverWait(driver, 30); wait.until(ExpectedConditions.visibilityOfElementLocated(By.xpath(«//span[(text()=’Follow’)]»))); WebElement twitterFollowButton = driver.findElement(By.xpath («//span[(text()=’Follow’)]»)); Assert.assertTrue(twitterFollowButton.isDisplayed(), «Verify twitter follow button is displayed»); |
Step 6. The last step is to switch back to the main window using its already stored handle and assert some element on it to verify that the driver focus has been shifted again to the main window.
|
driver.switchTo().window(mainWindowHandle); Assert.assertTrue(followButtonOnMainWindow.isDisplayed(), «Verify focus is shifted to main window»); |
Test Execution
In a similar way as discussed above, after execution, we will get the result on IDE as follows:
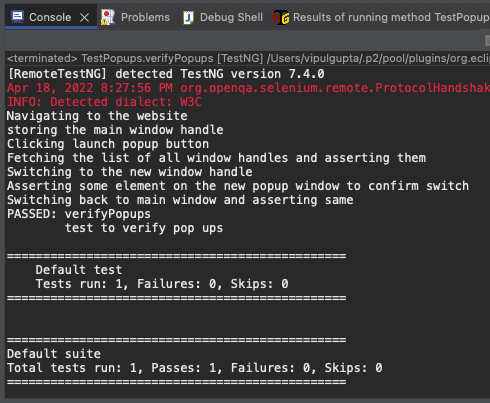
And we can see the detailed execution logs on LamdaTest Dashboard by navigating to the test details and can see the data like:
If you’re a Java developer looking to improve your skills, the following certification from LambdaTest can help:

This Selenium Java 101 certification is for beginning to intermediate level Java developers who want to refresh their knowledge of the programming language and learn more about the Selenium automation testing.
Here’s a short glimpse of the Selenium Java 101 certification from LambdaTest:
By now you must have got a fair understanding about popups and alerts and how you can handle modal dialog box in Selenium WebDriver Java over a cloud grid like LambdaTest. However, if you want to leverage the best features of the cloud setup with faster execution (as good as the speed of a local setup), you can try HyperExecute – a blazing fast next gen testing cloud, which is upto 70% faster than any traditional Selenium cloud setup.
Now execute your test at Hyper Speed? Try HyperExecute Now!
Conclusion
With this blog on how to handle modal dialog box in Selenium WebDriver Java, we have learned the implementation and working for all of these in detail covering all the aspects and functions that you might encounter and would need while working with these. I hope, by now, you would be confident enough to automate any kind of modal dialog box, alerts, or popups that come up in your automation scripts. So go ahead and get started with Selenium Java automation testing to handle these with ease.
Happy Automating !!
Frequently Asked Questions (FAQs)
Is a dialog box a modal?
Modal Dialogs are one of the most useful features for user interface design. They allow you to overlay a dialog box onto your application, allowing the user to interact with it or dismiss it, without interfering with the main content.
How do you use dialog boxes?
A modal dialog box is a small pane that consists of one or more windows with various controls. Modal dialog boxes block input to all but the active control. To create a modal dialog box, you can use Visual Basic code or create the template and populate it with controls in the development environment.
To create a dialog box, use the “DialogBox” function. This function uses a template and the name of the procedure that gets activated when the user makes a choice.
How do I stop popups in Selenium?
In order to close the popup window with Selenium, we can use the getWindowHandles and getWindowHandle methods for opening the popup window. The getWindowHandles method is used for storing all the window handles in Selenium in a Set data structure. The getWindowHandle method is used to store the window handle of the pop up in focus.

Vipul Gupta
Vipul Gupta is a passionate Quality Engineer with 6+ years of experience and keen interest in automation testing of Web and API based applications. He is having experience in designing and maintaining various automation frameworks. Currently working as Sr. SDET, he enjoys reading and learning about new test practices and frameworks.
In this Angular material tutorial, you will learn how to implement Dialog modal with an extensively used scenario tutorial with easy to go tutorial.
You will get to know how to position a Dialog or display a fullscreen modal popup. Explore various events and popup hooks including after opened or closed callbacks. Passing data dynamically to the modal and getting back the data to the parent component.
You will start with a new Angular 13 project, afterwords we will add the Material library to use its Dialog API module. Consequently, we will explore various use0cased with elaborated examples and demos to put you more to work instead of looking anywhere else.
Why Dialog or Modal UI Component?
We know Dialog AKA Modal got its popularity from the Bootstrap component, which floats over your content to catch all user attention at once. it can be used for any purpose from filling out important details using an intensive form to show a simple confirm Yes, No dialogue box.
With Material, you can have customized Modal with Header, Body, Footer panes or simply a paneless diolog. It can have an in-view template based or fully component-based Dialog modal. You can easily customize styles and control how data with go through it.
Let’s get our hands dirty!
How to Add Material Dialog in Angular App?
This is how you can open the Angular Material dialog.
Following are quick steps, including various types of Dialog and details about event hook handling to control data follow by passing in/ out of Dialog or Modal popup container:
Step 1 – Create Angular App
Step 2 – Install Material Library
Step 3 – Import Dialog Module
Step 4 – Dialog using Template
Step 5 – Dialog using Component
Step 7 – AfterOpened and AfterClosed Dialog Events
Step 8 – Full Screen Dialog Modal
Step 9 – Confirm Dialog with YES, NO Buttons
Step 10 – Dialog with Header, Body and Footer Panel
Step 1 – Create Angular App
To enable the ng command in the terminal window, make sure to instal the angular cli tool. If you already have, you can update it as well.
# Install NG CLI
npm install -g @angular/cli

#Update NG CLI
ng update
Afterwards, you can hit the following command to create a new angular project with the name provided:
ng new angular-material-dialog-appMove inside the application folder
cd angular-material-dialog-appStep 2 – Install Material Library
Thereafter creating and moving the terminal to the application folder, we will install the Material library by executing the ng add command. This makes the installation of the material library very easy, you can choose options while installation as shown below:
ng add @angular/material

# ? Choose a prebuilt theme name, or "custom" for a custom theme: Indigo/Pink
# ? Set up global Angular Material typography styles? No
# ? Set up browser animations for Angular Material? Yes
This will update the "styles" property array inside the angular.json file, which you can change anytime.
Step 3 – Import Dialog Module
The Material library provides huge set of usable API’s for its various modules and components. So we need to import only those modules, that we’re going to use in our application. This keeps out app more optimized and size-efficient.
Open the app.module.ts file to import the MatDialogModule under the imports array:
import { NgModule } from '@angular/core';
import { BrowserModule } from '@angular/platform-browser';

import { AppRoutingModule } from './app-routing.module';
import { AppComponent } from './app.component';
import { BrowserAnimationsModule } from '@angular/platform-browser/animations';

import { MatDialogModule } from '@angular/material/dialog';


@NgModule({
  declarations: [
    AppComponent
  ],
  imports: [
    BrowserModule,
    AppRoutingModule,
    BrowserAnimationsModule,
    MatDialogModule // < - Add here
  ],
  providers: [],
  bootstrap: [AppComponent]
})
export class AppModule { }
Step 4 – Dialog using Template, Pass and Get Data
Now we are all set to start using the simplest implementation of our Dialog popup using a template. We’ll also pass dynamic data into the Template of dialog to create a list out of it.
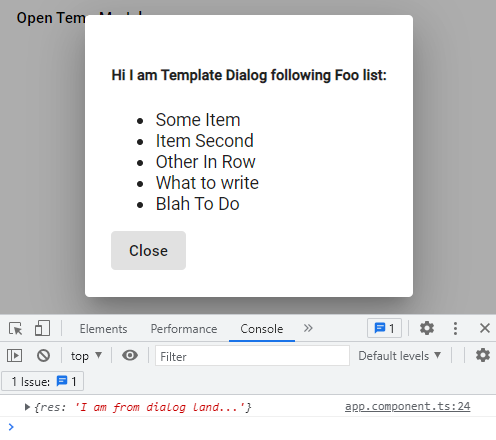
In the app.component.html add folloiwng template HTML
<button mat-button (click)="openTempDialog()">Open Temp Modal</button>

<ng-template #dialogRef let-mydata>
  <h5>Hi I am Template Dialog following Foo list:</h5>
  <ul *ngIf="mydata">
    <li *ngFor="let item of mydata">{{item}}</li>
  </ul>
  <button mat-button mat-dialog-close="I am from dialog land...">Close</button>
</ng-template>
The ng-template with ref variable #dialogRef will contain the template HTMl to show inside the Dialog we’re going to generate. The let-mydata (or any name you like) directive will contain the data we will pass into the open method.
Next, open the app.component.ts file and add the following content in it:
import { Component, TemplateRef, ViewChild } from '@angular/core';
import { MatDialog } from '@angular/material/dialog';

@Component({
  selector: 'app-root',
  templateUrl: './app.component.html',
  styleUrls: ['./app.component.css']
})
export class AppComponent {
  title = 'angular-material-dialog-app';

  @ViewChild('dialogRef')
  dialogRef!: TemplateRef<any>;

  myFooList = ['Some Item', 'Item Second', 'Other In Row', 'What to write', 'Blah To Do']

  constructor(public dialog: MatDialog) { }

  openTempDialog() {
    const myTempDialog = this.dialog.open(this.dialogRef, { data: this.myFooList });
    myTempDialog.afterClosed().subscribe((res) => {

      // Data back from dialog
      console.log({ res });
    });
  }
}
The @ViewChild with TemplateRef helps to get template context that we are passing into the open method. On top, we are passing the data property with any data set you wan to pass into the modal dynamically. This is how to send data to a TemplateRef MatDialog.
Step 5 – Dialog using Component
Templates can be used for quick implementation of less complex modals, but for keeping things cool, we need to have a separate components which will take care of our Dialog content and its data communication. let’s check how to pass data to and forth between parent and component popup modal.
Creating a new component named MyDialogComponent by executing below command:
ng generate component comps/my-dialogIt will create a new component, update the my-dialog.component.ts file:
import { Component, Inject, OnInit, Optional } from '@angular/core';
import { MatDialogRef, MAT_DIALOG_DATA } from '@angular/material/dialog';

@Component({
  selector: 'app-my-dialog',
  templateUrl: './my-dialog.component.html',
  styleUrls: ['./my-dialog.component.css']
})
export class MyDialogComponent implements OnInit {

  fromPage!: string;
  fromDialog!: string;

  constructor(
    public dialogRef: MatDialogRef<MyDialogComponent>,
    @Optional() @Inject(MAT_DIALOG_DATA) public mydata: any
  ) { }

  ngOnInit(): void {
    this.fromDialog = "I am from dialog land...";
  }

  closeDialog() { this.dialogRef.close({ event: 'close', data: this.fromDialog }); }
}
The fromPage and fromDialog variables are handling data to pass inside the Modal and sending back to parent using close() method.
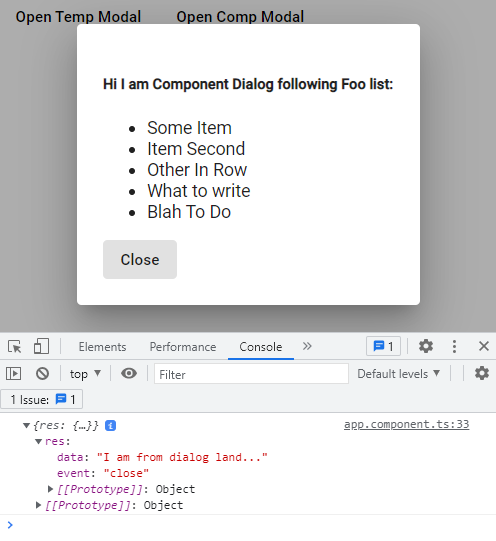
Update the my-dialog.component.html file to show the list of item passed dynamically:
<h5>Hi I am Component Dialog following Foo list:</h5>
<ul *ngIf="mydata">
  <li *ngFor="let item of mydata">{{item}}</li>
</ul>
<button mat-button (click)="closeDialog()">Close</button>
Finally update the App Component HTML to have a button and its method in the class:
<button mat-button (click)=”openCompDialog()”>Open Comp Modal</button>
Now, update the class component with following method:
openCompDialog() {
    const myCompDialog = this.dialog.open(MyDialogComponent, { data: this.myFooList });
    myCompDialog.afterClosed().subscribe((res) => {
      // Data back from dialog
      console.log({ res });
    });
  }
We’re passing the component it self to open in the dialog, instead of template ref.
Step 7 – AfterOpened and AfterClosed Dialog Events
The Dialog provides three useful Hooks that can be used to manage dialog data render.
- afterOpened(): Triggered After Dialog is Opened.
- beforeClosed(): Triggered Before Dialog is Opened.
- afterClosed(): Triggered After Dialog is Closed.
These can be subscribed to the dialog open instance as shown below
openCompDialog() {
    const myCompDialog = this.dialog.open(MyDialogComponent, { data: this.myFooList });
    myCompDialog.afterOpened().subscribe((res) => {
      // Trigger After Dialog Opened
      console.log('After Opened', { res });
    });
    myCompDialog.beforeClosed().subscribe((res) => {
      // Trigger Before Dialog Closed
      console.log('Before Closed', { res });
    });
    myCompDialog.afterClosed().subscribe((res) => {
      // Trigger After Dialog Closed
      console.log('After Closed', { res });
    });
  }
Step 8 – Full Screen Dialog Modal
By default, the dialogs are displayed at the centre of the screen with max-width of 80%. But here you will learn how to make them full screen by adding few configuration settings with modified width, height and custom CSS class.
this.dialog.open(MyDialogComponent,
      {
        data: this.myFooList,
        panelClass: 'fullscreen-dialog',
        height: '100vh',
        width: '100%'
      }
    );
The .fullscreen-dialog class you can add in the styles.css/scss file at project root or remove view encapsulation and directly add in the my-dialog.component.css/scss file.
.fullscreen-dialog {
  max-width: 100% !important;
}
Step 9 – Confirm Dialog with YES, NO Buttons
Here’s a quick look at how to modify a dialogue to show Yes, No or any custom button with their respective callback methods to trigger any required action. You can do it using a template or dedicated component.
HTML Template in my-dialog.component.html for dialogue modal will have the following”
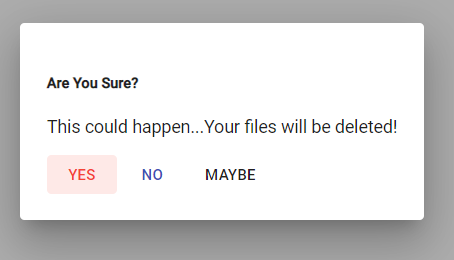
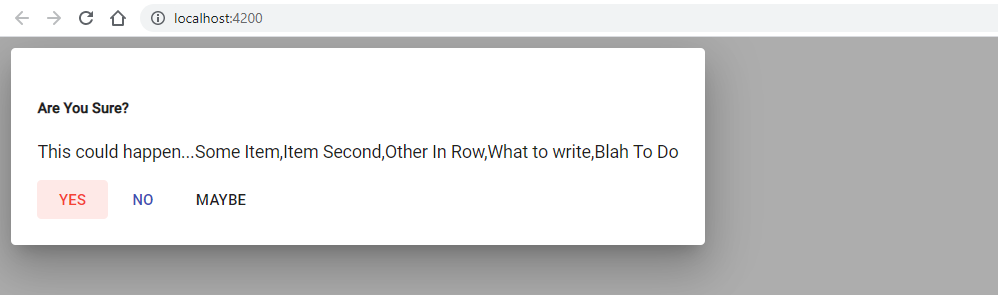
<h5>Are You Sure?</h5>
<p>This could happen...{{fromPage}}</p>
<button mat-button color="warn" (click)="yesDialog()">YES</button>
<button mat-button color="primary" (click)="noDialog()">NO</button>
<button mat-button (click)="maybeDialog()">MAYBE</button>
Add the following methods in my-dialog.component.ts file:
export class MyDialogComponent implements OnInit {

  fromPage!: string;
  fromDialog!: string;

  constructor(
    public dialogRef: MatDialogRef<MyDialogComponent>,
    @Optional() @Inject(MAT_DIALOG_DATA) public mydata: any
  ) { }

  ngOnInit(): void {
    this.fromPage = this.mydata;
    this.fromDialog = "I am from dialog land...";
  }

  yesDialog() {
    this.dialogRef.close({ event: 'yes-option', data: this.fromDialog });
  }
  noDialog() {
    this.dialogRef.close({ event: 'no-option', data: this.fromDialog });
  }
  maybeDialog() {
    this.dialogRef.close({ event: 'maybe-option', data: this.fromDialog });
  }
}
The AppModule class will have the following open method:
openConfirmDialog() {
    const myCompDialog = this.dialog.open(MyDialogComponent,
      {
        data: 'Your files will be deleted!'
      }
    );
    myCompDialog.afterClosed().subscribe((res) => {
      // Trigger After Dialog Closed

      switch (res.event) {
        case "yes-option":
          console.log('Yes Clicked');
          break;
        case "no-option":
          console.log('No Clicked');
          break;
        case "maybe-option":
          console.log('May Be Clicked');
          break;

        default:
          break;
      }
    });
  }
Step 10 – Dialog with Header, Body and Footer Panel
The MatDialogModule provides other mat tag directives to create Header, Body and Footer components for the Dialog modal.
<h2 mat-dialog-title>Install Angular</h2>
<mat-dialog-content class="mat-typography">
  <h3>Develop across all platforms</h3>
  <p>Learn one way to build applications with Angular and reuse your code and abilities to build
    apps for any deployment target. For web, mobile web, native mobile and native desktop.</p>
</mat-dialog-content>
<mat-dialog-actions align="end">
  <button mat-button mat-dialog-close>Cancel</button>
  <button mat-button [mat-dialog-close]="true" cdkFocusInitial>Install</button>
</mat-dialog-actions>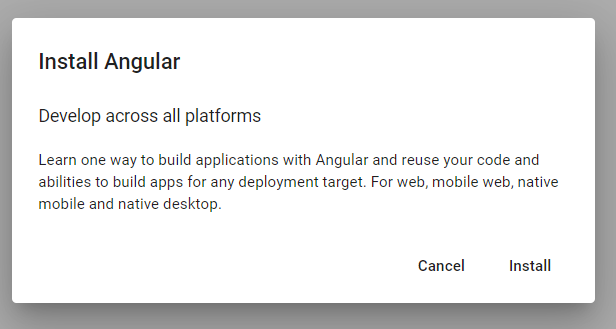
Step 11 – Positioning Material Dialog on Page
The position property can be used to place the dialog at top, bottom, left or right location of the page.
const myCompDialog = this.dialog.open(MyDialogComponent,
      {
        data: this.myFooList,
        position: {
          left: '10px',
          top: '10px',
        }
      }
    );
Conclusion
We have completed the Material Dialog tutorial, with various useful use-cases and examples. We discussed how to use a template or component and pass dynamic data in the dialog modal popup. Also, we looked into various callback hooks to control various custom actions.
Using the custom CSS style and class we modified the dialog width to display in the fullscreen mode. Hope you like the tutorial and it was helpful and handy for quick development suggestions.