As described in another post, I was installing Linux Mint 17.3 KDE on a Lenovo ThinkPad Edge E430 laptop, in a secondary partition to dual-boot with Windows 7. I had installed Linux Mint 17.3 Cinnamon successfully in that same partition twice before. But for some reason the KDE installation ended with an error message referring to an MEBx Error State. This post describes the steps I took to resolve that situation.
Becoming Familiar with the Problem
The first time I got that message, it said “MEBx Error State : : 0106.” A search yielded the statement that there were no results for this exact phrase, but of course Google kindly ran the search again without the quotes — and pulled up a confirmation that, in the words of one writer, “Our support did not recognize (and never seen before).” That and another source suggested starting with a reboot and, if that failed, trying additional steps.
Instead of a simple reboot, I powered the laptop off (but did not remove its power cable or battery) for at least a half-minute. This time, the error was different: “MEBx Error State : : 0303.” A search for that phrase (and also a variation) yielded one result in Czech and one in Chinese. We did not progress on to any other numbers; subsequent reboots returned to that 0303 error.
Looking at the screen where the error message appeared, I saw the words, “Intel(R) Management Engine BIOS Extension.” MEBx appeared to be short for that. I was puzzled to observe that that screen also said the firmware version was 0.0.0.0. It sounded like Intel was just starting out when they designed my machine.
There were suggestions to short pins 1 and 2, in order “to reset the Intel ME configuration to the factory defaults,” as described on p. 67 of the Intel NUC Board NUC5i5MYBE Technical Product Specification document. I didn’t think I had that particular board, but was not inclined to disassemble my laptop to make sure. I saw that this procedure failed to help at least one person who went to the trouble.
Each time, at startup, I noticed that the words “FW Status Recovery Error” appeared briefly onscreen. That search was a bit more fruitful. As with the previous searches, there were recurrent references to BIOS upgrades: some people said that such upgrades helped them get past this problem. To clarify, in light of the preceding paragraph, it appeared that what I might need to upgrade would be the MEBx — that is, the Intel BIOS Extension — which was surely not the same as the Phoenix BIOS whose information screen appeared as soon as I started the machine. (I had set my BIOS to display the diagnostic screen rather than the splashscreen, so that was why I was seeing this sort of detail.)
I guessed that maybe I was getting this error because KDE wanted to take advantage of BIOS features newer than those currently available on the ThinkPad. I had told the KDE installer to reformat the partition where Cinnamon was installed, so I thought I was starting from a blank slate in that partition.
The GRUB Issue
I saw some indications that hitting Ctrl-P at bootup would put me into the MEBx. Repeatedly doing so put me back at the same MEBx error, but this time (and henceforth) it did not remain stuck there; after a few seconds it moved on to the “grub rescue” prompt. It seemed that hitting Ctrl-P had made a change in the machine’s response to the MEBx error.
This time, I noticed these words before the GRUB prompt: “error: no such device,” followed by a long string of numbers and letters. I guessed that the long string was a Universally Unique Identifier (UUID) for some device that GRUB thought it should be finding on my computer. Most likely it was the Cinnamon installation. Apparently the KDE installer had not changed that to refer to the UUID corresponding to the new KDE installation.
Another suggestion was to change the hard drive boot sequence in my BIOS. I took a look, and rearranged things slightly, but I did not expect that to be the answer, and in fact it wasn’t. I had been booting from the same drive for the past year or two, and expected to continue to do so. In my case, it seemed the change was not in the physical drives, or even in the order of bootable partitions; it was just that I had replaced one bootable partition with another, having a different UUID.
A search for the “error: no such device” message led to various suggestions, including using Boot-Repair-Disk. I had that on my YUMI drive, but for a minute I thought this MEBx error was preventing me from booting it. But when I took the error message’s advice to “Press any key to continue,” it put me through to the USB drive (having hit F12 during the initial bootup, and then selected the USB drive). In the spirit of exploration, I chose Advanced Options and made two changes to the default values: (1) In the Main Options tab, I checked Restore MBR. (2) In the MBR Options tab, I chose sdb, which in my case was the drive containing the Windows and Linux dual-boot partitions. Then I clicked Apply. Unfortunately, the problem persisted.
I re-ran Boot-Repair-Disk and this time used Recommended Repair. At first, it looked like that didn’t work: on reboot, I had the same error messages. But after I pressed a key to continue, it put me through to the desired GNU GRUB multiboot menu, giving me the choice of booting Linux Mint KDE (with or without advanced options), Memtest86+ (in two configurations), or Windows 7.
I tried the Windows 7 option. That worked. I rebooted out of Windows. The “FW Status Recovery Error” message was still there, and so was the “MEBx Error State : : 0303.” I responded to the suggestion, “Press any key to continue,” and the GNU GRUB menu was back. I didn’t respond to it, and in a few seconds it defaulted to the first item on the list, which was to boot into Linux Mint KDE. That worked too.
So it seemed we were making progress. My guess, at this point, was that I had started with two problems. One was a GRUB problem caused by the KDE installation. I doubted that the problem was in the KDE installer per se, or in the choice of partitions, or in the way I had partitioned. I suspected that GRUB got screwed up because of the other problem, which had to do with the Intel MEBx. Apparently there was a way to update that BIOS Extension; and if I did that, maybe the error message would go away; maybe it wouldn’t be there after a reinstallation; maybe it would never have appeared, if I had done that BIOS update first.
If I was wrong in that understanding of the situation, I might have to refer back to some of the other sources that I had found, regarding the task of fixing GRUB. For future reference, those included Ubuntu Community documents on installing and troubleshooting Grub2 and on recovering Ubuntu after installing Windows; there was also an oft-cited StackExchange answer on repairing GRUB, and another on the “no such partition” error, as well as an Ubuntu forums thread on that last topic.
The MEBx Issue
If the GRUB problem was fixed, then my attention needed to turn, now, to that BIOS update issue. The first question was, what exactly was I supposed to be updating? I rebooted and took another look at the MBEx screen, where the error message appeared. The top line said I had MBEx v8.0.0.0065. I wondered if maybe Lenovo had a relevant update for this machine. The most recent BIOS update on their webpage dated from 2012. I was sure I had already installed that. Well, how about Intel? Along with that previous advice about shorting pins 1 and 2 (above), a search led to an unanswered question about resetting MBEx by briefly removing the CMOS battery (not an option, to my knowledge, on a laptop); an Intel AMT Implementation and Reference Guide page on Restoring Intel AMT to Factory Mode; and the following exchange in an Intel forum:
Lance Atencio (Intel): The MEBx is an extension to the BIOS and controlled by the OEM/BIOS provider. Each one has different ways of providing access to the MEBx settings. Ctrl-P is the typical means to access, but some vendors do it differently.
You might try looking for other settings in the BIOS that would display the CTRL-p during boot or try other boot hotkeys that are available.plmanikandan: In BIOS setting ->Advance chipset feature ->Intel AMT is enabled. I downloaded the AMT tools from Acer website and triedMEInfoWin.exe. I’m getting error as “Error 8199: Communication error between application and Intel ME (Get RCS Connectivity v2)”
Lance Atencio (Intel): It appears that this system does have AMT, but since you cannot get access to the MEBx I’m afraid I’ll have to refer you back to Acer to get help with getting your system working. The OEMs control the firmware which is where the issue seems to be.
plmanikandan: If I do a local firmware update using tool provided by Intel(downloaded from Acer website), will it recover MEBx configuration?
Paul Carbin (Intel): Updating the firmware may recover the MEBx configuration, but you are really in the domain of the OEM. Intel AMT is only a small portion of the system firmware, and Intel does not control how the OEMs implement their firmware. Updating the firmware may cause other issues, andI recommend that you work with the OEM before upgrading firmware.
Also, did you try resetting BIOS to factory defaults?
That exchange led me to think the solution might be in my BIOS. I rebooted the machine and hit F1 (on other machines it might be F2, DEL, or some other key) to get into the BIOS settings. Unlike plmanikandan in the foregoing exchange, however, I did not see an Advanced Chipset Feature option. A search led to a Lenovo forum statement that “In general, BIOS menus are limited in Notebooks,” to which the user responded that s/he did somehow hit an unknown hotkey to get into advanced mode. A revised search led to another user who likewise believed there was some such option — because s/he had discovered it, by accident, hitting some random combination of keys, but was not sure which keys s/he had hit. Another search led to a Lenovo page listing ways to access the BIOS. There was an option of hitting Ctrl-Alt-F11 from a system booted in DOS on some models, but again there was no mention of advanced options.
I tried the BIOS option of loading setup defaults. On reboot, that did it: the error messages were gone. It wasn’t just that the default (i.e., relatively pretty) ThinkPad splash screen was hiding them: the system moved immediately from that introductory splash screen to the GRUB menu. I rebooted again and hit F1, F2, and DEL (I wasn’t sure which one would cut through the splash screen) to get back into BIOS. I reconfigured everything as it was before, as far as I could remember. This took away the splash screen and replaced it with the detailed diagnostic bootup screen, among other things. And now the error messages were back.
It appeared, then, that one of my changes to the BIOS settings was triggering the error messages. Back in the BIOS settings, I reverted once more to the factory defaults, but this time I altered those in just one way: I allowed the diagnostic screens instead of the splash screen. On reboot, the error messages were back. So I was probably wrong: the errors were still there, but somehow the splash screen was just bypassing them, on its way to the GRUB menu. Apparently it wasn’t that my BIOS changes were triggering the errors; apparently they were there in any case, but the splash screen would bypass them.
One source suggested another possible solution: re-flash the BIOS. The concept here was that the BIOS was firmware — that is, software built into chips on the computer’s motherboard — and it could be updated through certain procedures. I had saved the ISO that I downloaded when I last flashed the ThinkPad’s BIOS, so now I added that to the YUMI USB drive and rebooted the ThinkPad from that BIOS update ISO. For some reason, though, what appeared on the screen was mostly illegible.
I tried again with a fresh download from the Lenovo webpage. That worked. Possibly the old version had become corrupted. The flashing involved several steps and took a few minutes. When it was done, the error messages were gone. I booted into Windows and then immediately went back out and customized the BIOS settings. Then I rebooted again. Still no error messages. They were gone. I was able to boot into Linux Mint as well. This problem appeared to be solved.
101-Option ROM Checksum Error
System ROM or expansion board option ROM checksum.
-
Verify the correct ROM.
-
Flash the ROM if needed.
-
If an expansion board was recently added, remove it to see if the problem remains.
-
Clear CMOS. (See Appendix B, Password Security and Resetting CMOS.)
-
If the message disappears, there may be a problem with the expansion card.
-
Replace the system board.
103-System Board Failure
DMA or timers.
-
Clear CMOS. (See Appendix B, Password Security and Resetting CMOS.)
-
Remove expansion boards.
-
Replace the system board.
110-Out of Memory Space for Option ROMs
Recently added PCI expansion card contains an option ROM too large to download during POST.
-
If a PCI expansion card was recently added, remove it to see if the problem remains.
-
In Computer Setup, set Advanced > Device Options > NIC PXE Option ROM Download to DISABLE to prevent PXE option ROM for the internal NIC from being downloaded during POST to free more memory for an expansion card’s option ROM. Internal PXE option ROM is used for booting from the NIC to a PXE server.
162-System Options Not Set
Configuration incorrect.
RTC (real-time clock) battery may need to be replaced.
Run Computer Setup and check the configuration in Advanced > Onboard Devices.
Reset the date and time under Control Panel. If the problem persists, replace the RTC battery. See the Hardware Reference Guide for instructions on installing a new battery, or contact an authorized dealer or reseller for RTC battery replacement.
163-Time & Date Not Set
Invalid time or date in configuration memory.
RTC (real-time clock) battery may need to be replaced.
Reset the date and time under Control Panel (Computer Setup can also be used). If the problem persists, replace the RTC battery. See the Hardware Reference Guide for instructions on installing a new battery, or contact an authorized dealer or reseller for RTC battery replacement.
163-Time & Date Not Set
CMOS jumper may not be properly installed.
Check for proper placement of the CMOS jumper if applicable.
164-MemorySize Error
Memory amount has changed since the last boot (memory added or removed).
Press the F1 key to save the memory changes.
164-MemorySize Error
Memory configuration incorrect.
-
Run Computer Setup or Windows utilities.
-
Make sure the memory module(s) are installed properly.
-
If third-party memory has been added, test using HP-only memory.
-
Verify proper memory module type.
201-Memory Error
RAM failure.
-
Ensure memory modules are correctly installed.
-
Verify proper memory module type.
-
Remove and replace the identified faulty memory module(s).
-
If the error persists after replacing memory modules, replace the system board.
213-Incompatible Memory Module in Memory Socket(s) X, X, …
A memory module in memory socket identified in the error message is missing critical SPD information, or is incompatible with the chipset.
-
Verify proper memory module type.
-
Try another memory socket.
-
Replace DIMM with a module conforming to the SPD standard.
214-DIMM Configuration Warning
Populated DIMM Configuration is not optimized.
Rearrange the DIMMs so that each channel has the same amount of memory.
219-ECC Memory Module Detected ECC Modules not supported on this Platform
Recently added memory module(s) support ECC memory error correction.
-
If additional memory was recently added, remove it to see if the problem remains.
-
Check product documentation for memory support information.
301-Keyboard Error
Keyboard failure.
-
Reconnect keyboard with computer turned off.
-
Check connector for bent or missing pins.
-
Ensure that none of the keys are depressed.
-
Replace keyboard.
303-Keyboard Controller Error
I/O board keyboard controller.
-
Reconnect keyboard with computer turned off.
-
Replace the system board.
304-Keyboard or System Unit Error
Keyboard failure.
-
Reconnect the keyboard with computer turned off.
-
Ensure that none of the keys are depressed.
-
Replace the keyboard.
-
Replace the system board.
501-Display Adapter Failure
Graphics display controller.
-
Reseat the graphics card (if applicable).
-
Clear CMOS. (See Appendix B, Password Security and Resetting CMOS.)
-
Verify monitor is attached and turned on.
-
Replace the graphics card (if possible).
510-Flash Screen Image Corrupted
Flash Screen image has errors.
Reflash the system ROM with the latest BIOS image.
511-CPU, CPUA, or CPUB Fan not Detected
CPU fan is not connected or may have malfunctioned.
-
Reseat CPU fan.
-
Reseat fan cable.
-
Replace CPU fan.
512-Chassis, Rear Chassis, or Front Chassis Fan not Detected
Chassis, rear chassis, or front chassis fan is not connected or may have malfunctioned.
-
Reseat chassis, rear chassis, or front chassis fan.
-
Reseat fan cable.
-
Replace chassis, rear chassis, or front chassis fan.
513-Front Chassis fan not detected
Front chassis fan is not connected or may have malfunctioned.
-
Reseat front chassis fan.
-
Reseat fan cable.
-
Replace front chassis fan.
515-Power Supply fan not detected
Power supply fan is not connected or may have malfunctioned.
-
Reseat power supply fan.
-
Reseat fan cable.
-
Replace power supply fan.
601-Diskette Controller Error
Diskette controller circuitry or floppy drive circuitry incorrect.
-
Check and/or replace cables.
-
Clear CMOS. (See Appendix B, Password Security and Resetting CMOS.)
-
Replace diskette drive.
-
Replace the system board.
605-Diskette Drive Type Error
Mismatch in drive type.
-
Disconnect any other diskette controller devices (tape drives).
-
Clear CMOS. (See Appendix B, Password Security and Resetting CMOS.)
660-Display cache is detected unreliable
Integrated graphics controller display cache is not working properly and will be disabled.
Replace system board if minimal graphics degrading is an issue.
912-Computer Cover Has Been Removed Since Last System Startup
Computer cover was removed since last system startup.
No action required.
917-Front Audio Not Connected
Front audio harness has been detached or unseated from motherboard.
Reconnect or replace front audio harness.
918-Front USB Not Connected
Front USB harness has been detached or unseated from motherboard.
Reconnect or replace front USB harness.
921-Device in PCI Express slot failed to initialize
There is an incompatibility/problem with this device and the system or PCI Express Link could not be retrained to an x1.
Try rebooting the system. If the error reoccurs, the device may not work with this system
1151-Serial Port A Address Conflict Detected
Both external and internal serial ports are assigned to COM1.
-
Remove any serial port expansion cards.
-
Clear CMOS. (See Appendix B, Password Security and Resetting CMOS.)
-
Reconfigure card resources and/or run Computer Setup or Windows utilities.
1152-Serial Port B Address Conflict Detected
Both external and internal serial ports are assigned to COM2.
-
Remove any serial port expansion cards.
-
Clear CMOS. (See Appendix B, Password Security and Resetting CMOS.)
-
Reconfigure card resources and/or run Computer Setup or Windows utilities.
1155-Serial Port Address Conflict Detected
Both external and internal serial ports are assigned to same IRQ.
-
Remove any serial port expansion cards.
-
Clear CMOS. (See Appendix B, Password Security and Resetting CMOS.)
-
Reconfigure card resources and/or run Computer Setup or Windows utilities.
1720-SMART Hard Drive Detects Imminent Failure
Hard drive is about to fail. (Some hard drives have a hard drive firmware patch that will fix an erroneous error message.)
-
Determine if hard drive is giving correct error message. Enter Computer Setup and run the Drive Protection System test under Storage > DPS Self-test.
-
Back up contents and replace hard drive.
1796-SATA Cabling Error
One or more SATA devices are improperly attached. For optimal performance, the SATA 0 and SATA 1 connectors must be used before SATA 2 and SATA 3.
Ensure SATA connectors are used in ascending order. For one device, use SATA 0. For two devices, use SATA 0 and SATA 1. For three devices, use SATA 0, SATA 1, and SATA 2.
1801-Microcode Patch Error
Processor is not supported by ROM BIOS.
-
Upgrade BIOS to proper version.
-
Change the processor.
2200-PMM Allocation Error during MEBx Download
Memory error during POST execution of the Management Engine (ME) BIOS Extensions option ROM.
-
Reboot the computer.
-
Unplug the power cord, re-seat the memory modules, and reboot the computer.
-
If the memory configuration was recently changed, unplug the computer, restore the original memory configuration, and reboot the computer.
-
If the error persists, replace the system board.
2201-MEBx Module did not checksum correctly
Memory error during POST execution of the Management Engine (ME) BIOS Extensions option ROM.
-
Reboot the computer.
-
Unplug the power cord, re-seat the memory modules, and reboot the computer.
-
If the memory configuration was recently changed, unplug the power cord, restore the original memory configuration, and reboot the computer.
-
If the error persists, replace the system board.
2202-PMM Deallocation Error during MEBx cleanup
Memory error during POST execution of the Management Engine (ME) BIOS Extensions option ROM.
-
Reboot the computer.
-
Unplug the power cord, re-seat the memory modules, and reboot the computer.
-
If the memory configuration was recently changed, unplug the power cord, restore the original memory configuration, and reboot the computer.
-
If the error persists, replace the system board.
2212-USB Key Provisioning failure writing to device
USB device used for USB key provisioning will not allow BIOS to update provision file properly.
-
Try a different USB key device for provisioning.
-
If the error persists, update to the latest BIOS version and ME firmware version.
-
If the error still persists, replace the system board.
2217-ME Firmware Version request failure
ME firmware is not properly responding to BIOS query for version information.
-
Reboot the computer.
-
If the error persists, update to the latest BIOS version and ME firmware version.
-
If the error still persists, replace the system board.
2218-ME Firmware Version should be updated
ME firmware must be updated to match current functionality contained in the system BIOS.
-
Update to the latest ME firmware version.
-
If the error persists and system BIOS has been recently updated, restore previous system BIOS version.
-
If the error still persists, replace the system board.
2219-USB Key Provisioning file has invalid header identifier
Provisioning file contained on the USB key has been corrupted or is not a valid version for the current ME firmware.
-
Recreate the provisioning file using third party management console software.
-
If the error persists and system BIOS has been recently updated, restore previous system BIOS version. Otherwise, update the ME firmware version.
-
If the error still persists, replace the system board.
2220-USB Key Provisioning file has mismatch version
Provisioning file contained on the USB key is not a valid version for the current ME firmware.
-
Reboot the computer.
-
If the error persists and system BIOS has been recently updated, restore previous system BIOS version. Otherwise, update the ME firmware version.
-
If the error still persists, replace the system board.
2230-General error during MEBx execution
Error occurred during MEBx execution which fails into the “General” grouping. Status information displayed along with the error provides further clarity into the failure. MEBx handles transference of information between the system BIOS and ME firmware.
-
Reboot the computer.
-
If the error persists, update to the latest BIOS version and ME firmware version.
-
If the error still persists, replace the system board.
2231-ME error during MEBx execution
Error occurred during MEBx execution which fails into “ME” grouping.
-
Reboot the computer.
-
If the error persists, update to the latest BIOS version and ME firmware version.
-
If the error still persists, replace the system board.
2232-AMT error during MEBx execution
Error occurred during MEBx execution which fails into “AMT” grouping.
-
Reboot the computer.
-
If the error persists, update to the latest BIOS version and ME firmware version.
-
If the error still persists, replace the system board.
2233-HECI error during MEBx execution
Error occurred during MEBx execution which fails into “MEI or HECI” grouping.
-
Reboot the computer.
-
If the error persists, update to the latest BIOS version and ME firmware version.
-
If the error still persists, replace the system board.
2239-ME image lock failure
Special system configurations with reduced ME firmware image require BIOS control of ME firmware upgrading. A failure has occurred after the ME firmware update process in which the BIOS could not relock the ME firmware region.
-
Reboot the computer.
-
If the error persists, update to the latest BIOS version and ME firmware version.
-
If the error still persists, replace the system board.
2240-ME image unlock failure
Special system configurations with reduced ME firmware image require BIOS control of ME firmware upgrading. A failure has occurred prior to the ME firmware update process in which the BIOS could not unlock the ME firmware region.
-
Reboot the computer.
-
If the error persists, update to the latest BIOS version and ME firmware version.
-
If the error still persists, replace the system board.
Invalid Electronic Serial Number
Electronic serial number is missing.
Enter the correct serial number in Computer Setup.
Network Server Mode Active and No Keyboard Attached
Keyboard failure while Network Server Mode enabled.
-
Reconnect keyboard with computer turned off.
-
Check connector for bent or missing pins.
-
Ensure that none of the keys are depressed.
-
Replace keyboard.
Parity Check 2
Parity RAM failure.
Run Computer Setup and Diagnostic utilities.
Не представляю сколько ещё таких древних компов в эксплуатации, но вдруг кому поможет.
Восстановленные блоки питания продаются за какие-то космические деньги, можно как минимум купить 2 аналогичных компа… кондер стоил 0,3 Евро
В один прекрасный день стала вылезать ошибка MEBx Init Error.
Если нажать на любую клавишу, то винда грузилась как обычно.
А после выключения компа — вентиляторы продолжали крутиться. Приходилось довырубать комп удерживая рукой кнопку Power.
Не напрягало, так бы и пользовался дальше…
Если бы со временем глюков не добавилось:
1) При включении начинал до бесконечности отбивать морзянку дисководом, моргать жеским диском…
а) перезапускал удерживая кнопку Power — со второго-пятого раза он всё же запускался.
б) запускался нормально с вынутым шнуром интернета
2) Комп стал сам «включаться» через некоторое время после выключения удерживанием кнопки. … ну как включаться, экран не горел а просто вентиляторы начинали работать.
3)Комп стал загружаться и перезагружаться с отключением на пару секунд — запускается 2 сек/вырубается 2 сек/запускается окончательно.
Все эти то запускается, то не запускается как-бы намекали на сдохший электролит, а так как в итоге комп стал самопроизвольно запускаться, то решил залезть в блок питания (поначалу думал в матери что-то полетело, поэтому просто нажимал клаву при закрузке и после выключения компа, «глушил» кнопкой вентиляторы).
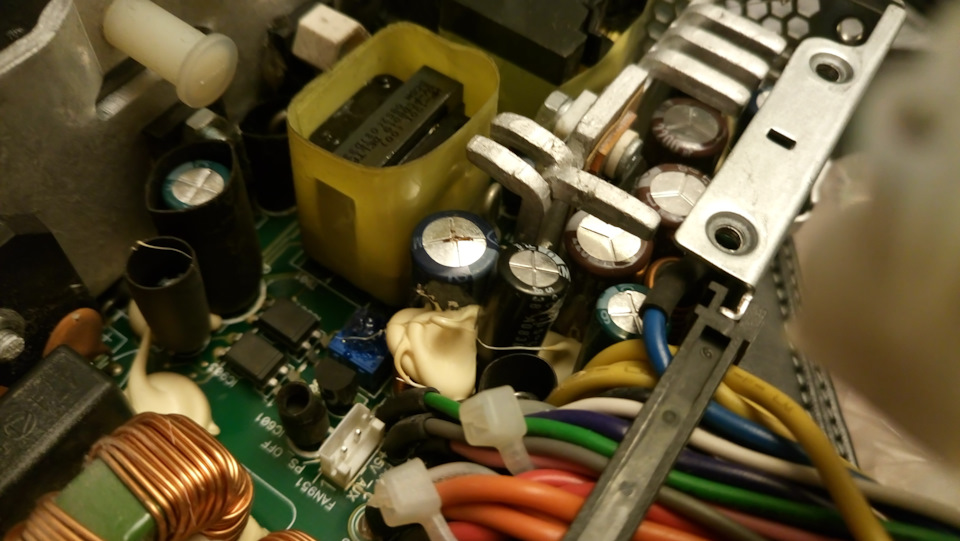
Полный размер
Сдохший электролит не заставил себя искать, повезло!
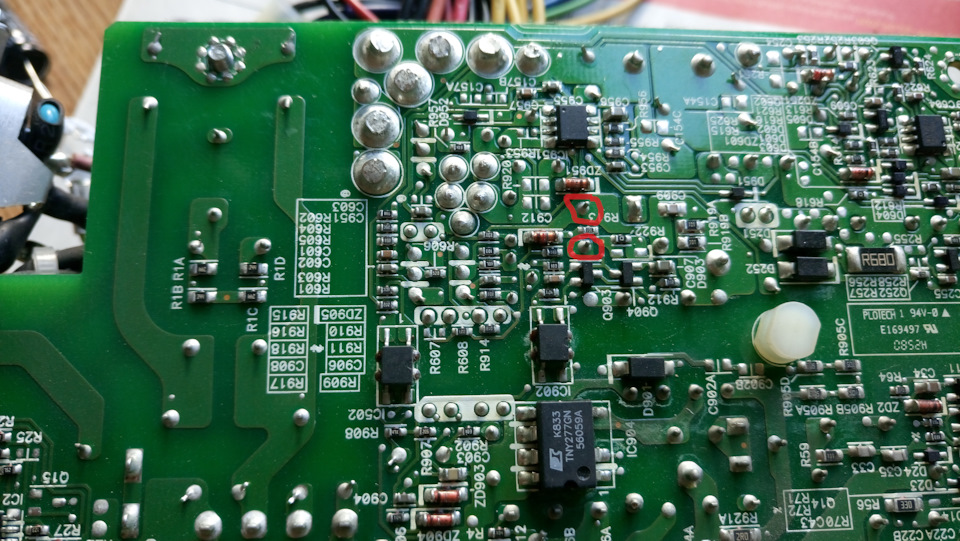
Полный размер
Ноги выпаивал предварительно раскачав и вырвав старый кондер
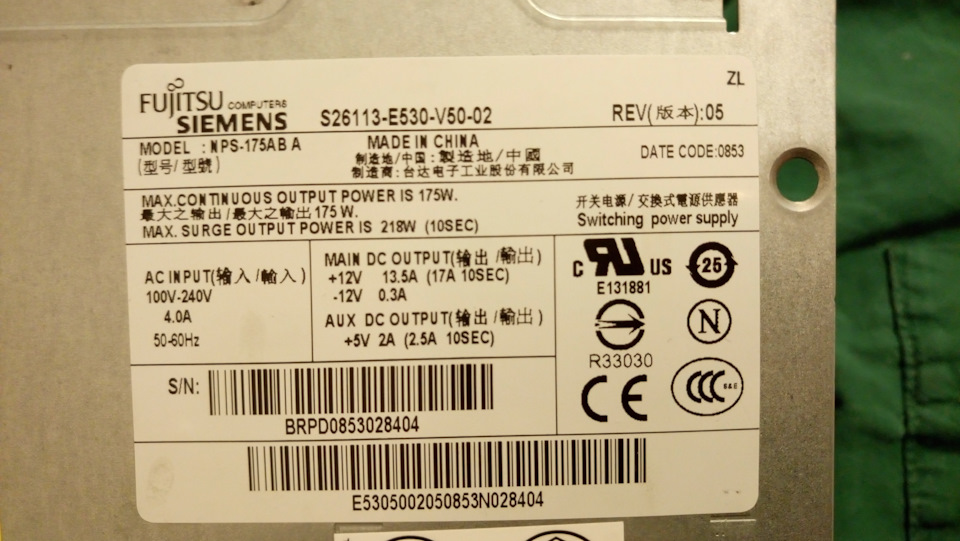
Полный размер
Маркировка блока питания

Полный размер
Припой отсасывал медным чулком, шприца для удаления припоя у меня нет, как и опыта его использования
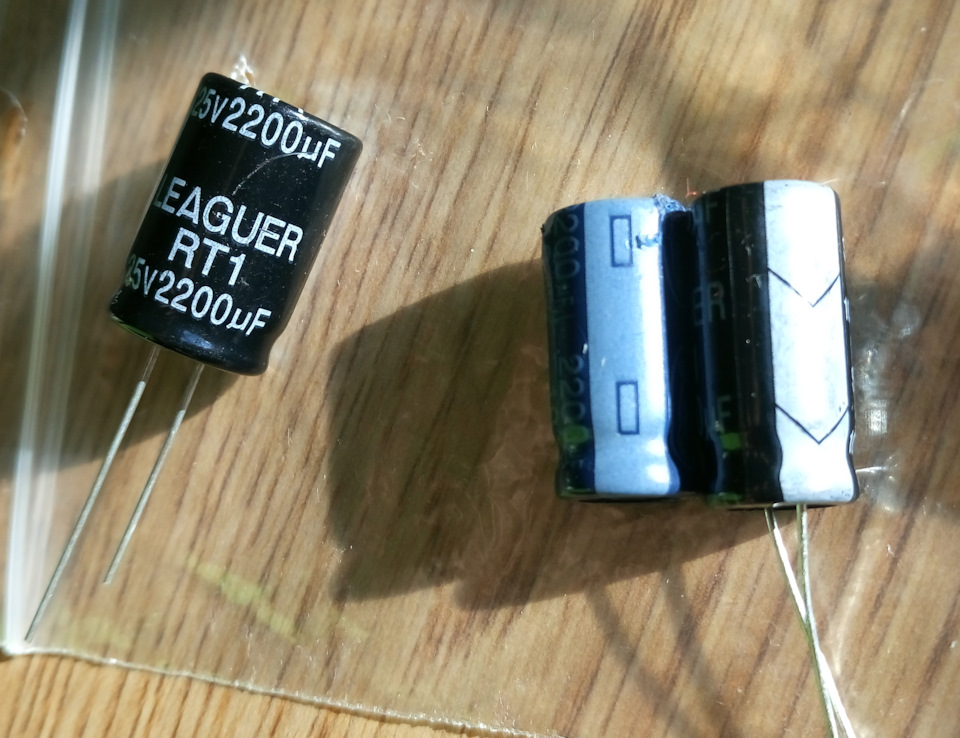
Полный размер
Так как в принципе работы и в схеме я не разбирался, то просто подбирал кондер наибольшего вольтажа и той же ёмкости, который влезет заместо вздувшегося. 25-ти вольтовый примерил и не стал пихать, 16-ти вольтовый по размеру идентичен 10-ти вольтовому — его и поставил. Стрелки вниз это то же что и минус — альтернативное обозначение минусовой ноги у кондера.
для ГУГЛА:
ESPRIMO C5730 MEBx Init Error
FUJITSU Esprimo C5731 175W Power Supply S26113-E530-V50-02 NPS-175AB A capasitor replacement
-
CKnoell
- Posts: 9
- Joined: Tue Jul 14, 2015 10:44 pm
FW Status Recovery Error
I’m trying to setup my uSVR for headless operation using Intel AMT. I have the most recent BIOS (12-15-13) installed.
However, I’ve been unable to get AMT working. When I select ‘Enter MEBx setup’ in the BIOS, I receive the ‘FW Status Recovery Error’ message upon reboot. The system then boots the installed OS. I have also tried using the Intel AMT Configuration Utility to make a bootable USB key and get the same error.
I’ve even reflashed the BIOS with the same (12-15-13) version. I did notice that it does reboot a few times after the BIOS update was complete and finally displayed the above error before successfully booting the installed OS.
Any help would be greatly appreciated.
Chris Knoell
-
mbirger
Re: FW Status Recovery Error
Post
by mbirger » Wed Jul 15, 2015 12:14 pm
After selecting this Un-Configure ME, you should save and exit. The system reboots and ask if you want to continue with unconfiguration. You type Y (yes).
Then you can continue with the AMT fresh setup.
Did you go through all these steps?
-
CKnoell
- Posts: 9
- Joined: Tue Jul 14, 2015 10:44 pm
Re: FW Status Recovery Error
Post
by CKnoell » Wed Jul 15, 2015 12:35 pm
I selected Un-Configure ME, save and exit. Upon reboot the error is displayed. There are no other messages.
I have tried disabling AMT, re-enabling, and then Un-Configuring, but the result is the same.
-
CKnoell
- Posts: 9
- Joined: Tue Jul 14, 2015 10:44 pm
Re: FW Status Recovery Error
Post
by CKnoell » Thu Jul 16, 2015 11:20 am
When I select the MEBx debug output option in the AMT settings, I get the following info (immediately after the error message):
MEBx V8.0.0.0070
ME Firmware version 0.0.0.0
….Other data….. (my description since I don’t what data is significant)
MEBx continue state 0001
MEBx error state 0303
-
CKnoell
- Posts: 9
- Joined: Tue Jul 14, 2015 10:44 pm
Re: FW Status Recovery Error
Post
by CKnoell » Thu Jul 16, 2015 2:15 pm
I just looked at ‘ME Config’ in BIOS settings. It lists ME FW version 8.1.20.1336.
Is there a way to reset the BIOS to the original factory settings in the BIOS setup?
-
CKnoell
- Posts: 9
- Joined: Tue Jul 14, 2015 10:44 pm
Re: FW Status Recovery Error
Post
by CKnoell » Fri Jul 17, 2015 10:04 am
I’ve tried resetting the BIOS using the method described for the IPC. This hasn’t made a difference.
When I have reflashed the BIOS, it seems as though it isn’t actually writing anything since it is at the same version. Is it possible to force an overwrite of the same version?
Flashing the BIOS with a previous working version, overwriting the current version or installing an updated version seems to be a common method to resolve this problem.
-
mbirger
Re: FW Status Recovery Error
Post
by mbirger » Mon Jul 20, 2015 10:17 am
Definitely there is an option to reset the BIOS from the BIOS menu:
Exit -> Load Setup Defaults
As you have mentioned another method that may work is overriding system variables (that might led to this undefined state or error) by programming the same BIOS version.
Please let me know if you have managed to activate the AMT.
-
CKnoell
- Posts: 9
- Joined: Tue Jul 14, 2015 10:44 pm
Re: FW Status Recovery Error
Post
by CKnoell » Mon Jul 20, 2015 11:59 am
I have also tried ‘Load Setup Defaults’. This does not rollback the BIOS version to the factory default. It does change the settings to the defaults.
In any case, it doesn’t resolve the problem with the FW Status Recovery Error.
Is there a way to restore the BIOS exactly as it was when the uSVR was built? Specifically , the Intel ME BIOS needs to be what CompuLab loaded.
Is there a way to force a complete rewrite of the current BIOS update? The ‘patch’ option is preventing the BIOS from being rewritten since it is the same version.
|
|
|
|
To Fix (2233-HECI error during MEBx execution) error you need to |
|
|
Шаг 1: |
|
|---|---|
| Download (2233-HECI error during MEBx execution) Repair Tool |
|
|
Шаг 2: |
|
| Нажмите «Scan» кнопка | |
|
Шаг 3: |
|
| Нажмите ‘Исправь все‘ и вы сделали! | |
|
Совместимость:
Limitations: |
Ошибка 2233-HECI при выполнении MEBx обычно вызвано неверно настроенными системными настройками или нерегулярными записями в реестре Windows. Эта ошибка может быть исправлена специальным программным обеспечением, которое восстанавливает реестр и настраивает системные настройки для восстановления стабильности
If you have 2233-HECI error during MEBx execution then we strongly recommend that you
Download (2233-HECI error during MEBx execution) Repair Tool.
This article contains information that shows you how to fix
2233-HECI error during MEBx execution
both
(manually) and (automatically) , In addition, this article will help you troubleshoot some common error messages related to 2233-HECI error during MEBx execution that you may receive.
Примечание:
Эта статья была обновлено на 2023-02-06 и ранее опубликованный под WIKI_Q210794
Содержание
- 1. Meaning of 2233-HECI error during MEBx execution?
- 2. Causes of 2233-HECI error during MEBx execution?
- 3. More info on 2233-HECI error during MEBx execution
Meaning of 2233-HECI error during MEBx execution?
Ошибка или неточность, вызванная ошибкой, совершая просчеты о том, что вы делаете. Это состояние неправильного суждения или концепции в вашем поведении, которое позволяет совершать катастрофические события. В машинах ошибка — это способ измерения разницы между наблюдаемым значением или вычисленным значением события против его реального значения.
Это отклонение от правильности и точности. Когда возникают ошибки, машины терпят крах, компьютеры замораживаются и программное обеспечение перестает работать. Ошибки — это в основном непреднамеренные события. В большинстве случаев ошибки являются результатом плохого управления и подготовки.
Ошибки EXE происходят по ряду причин, но в основном из-за проблем с исполняемыми файлами или EXE-файлами. EXE — это расширение приложения в Windows. Подобно другим типам файлов, встроенных в вашу компьютерную систему, EXE-файлы могут время от времени входить в ошибки. Некоторые ошибки являются общими, но некоторые из них трудно устранить и устранить.
Программное обеспечение, которое вы используете, и приложения, необходимые для работы операционной системой, используют EXE-файлы для выполнения своих задач. В этой записке ПК содержит много EXE-файлов, возможно, тысячи, что позволяет с большой вероятностью иметь место ошибка. Иногда ошибки EXE могут повлиять на вашу компьютерную систему. Программы могут перестать работать, или ваш компьютер может замедлить работу. Хуже того, EXE-ошибка может помешать вам получить доступ к вашему компьютеру и войти в него.
Некоторые проблемы, которые могут вызвать ошибки EXE:
- Вирусы, вредоносные программы и программы-шпионы
- Неверные, поврежденные, поврежденные или устаревшие файлы или драйверы
- Конфликт записей в системном реестре Windows
- Конфликты приложений
Causes of 2233-HECI error during MEBx execution?
Обычно, если тип Ошибка EXE происходит часто, вам нужно выполнить только одно, прежде чем делать что-либо еще — очистить системный реестр. Скорее всего, ваш реестр Windows имеет некоторые поврежденные файлы, которые требуют очистки или ремонта. Одна вещь, чтобы избежать таких типов ошибок EXE, — это использовать антивирусные или подобные инструменты. Это ваше лучшее оружие для борьбы с ошибками EXE, вызванными вредоносными заражениями.
Итак, как вы исправляете ошибку EXE и избегаете будущих сбоев?
- Всегда защищайте свой компьютер с помощью антивирусной программы.
- Регулярно запускайте средство очистки реестра, чтобы удалить и восстановить поврежденные записи реестра Windows.
- Обновите драйверы вашего ПК.
- Обязательно используйте хорошее интернет-соединение для загрузки программ из Интернета, чтобы убедиться, что они загружены без изменений и не повреждены.
- Избегайте доступа к подозрительным веб-сайтам и открытия электронных писем из неизвестных источников.
More info on
2233-HECI error during MEBx execution
РЕКОМЕНДУЕМЫЕ: Нажмите здесь, чтобы исправить ошибки Windows и оптимизировать производительность системы.
Go an error then I get this error «Error 8193: Intel Me Interface: Cannot locate ME device driver». I have tried installing different driver is a part of chipset drivers. So what could I try or do to get ME firmware updated and get rid of the the original problem? Then I found out that this ME ME update on HP page.
Hi,
I have a HP Compaq 8200 Elite MT and at startup I get this «2233-HECI error during MEBx execution». I found a instructions for advance.
I also tried to update them from the HP page then it completes but doesn’t actually change anything. Thanks in ME firmware packages but no luck.
I was able to update BIOS, but when I try to update ME Firmware is out of date BIOS and ME firmware. Windows says that they are up to date and when I download chipset but still no luck. I found that the reason for this «System isn’t supported».
Ошибка 2233 HECI, статус MEBX 0303, ME fastversion: 5.0.1.1111
Как обновить прошивку ME?
2233-ME Error during MEBx execution
After i power on my pc i see this message on screen 2233- Me fine into windows. It goes I do this but same messages appear again. i can login window only if i Error during MEBx execution and 2206- End of post HECI failure then it asks to power cycle. I updated the bios too but am unable to update ME Firmware.
Пожалуйста помоги
press F-10 and go to bios setup and then immediately exit without saving any changes.
Ошибка инициализации heci
Ошибка HECI в окнах 7 32bit
также обновленные драйверы и окна также обновлены с последними обновлениями от Microsoft. Спасибо, надеюсь услышать, что у меня есть бит win7 32, установленный на моем компьютере, через некоторое время, и вскоре эксперты.
Я только изменил свой блок питания, который взорвался, и я попал в новый блок питания XORNW.
Ошибка 2234-HECI во время инициализации.
Решение. Посмотреть
Получение службы LMS не может подключиться к ошибке драйвера HECI
Здравствуйте,
Я получаю ошибку. Служба LMS Service не может подключиться к драйверу HECI в журнале приложений Windows при загрузке. Кроме того, я получаю попытку отладки с Visual Studio Explorer.exe
Мне любопытно, как решить проблему.
Я заметил, что какое-то программное обеспечение не запускается e, g, Offiice Messenger, в основном большинство системных лотков (для автозапуска больше не запускается).
Ошибка журнала событий — служба LMS не может подключиться к драйверу HECI
Pavilion G7-2233 Windows Activation
You can’t use HDD/SSD from one machine on other machine. Please call other one worked fine.
Okay, I have two Hp pavilion g7s and one of them had some issues (i.e. Hi, No, HP won’t be able to help Microsoft in your country and only Microsoft can answer you. Regards.
So and the Is there anything I can do to rectefy this without paying for the HP out of warrenty service. I called microsoft and they said they can do nothing and it is the OEM’s job. TLDR; Windows won’t activate on my laptop after a hardware change.
pixels, overheats). Dead and HP does NOT sell Windows license.
Ошибка выполнения сервера WMP, ошибка WinAMP DirectSound, другие.
But other problems started showing up, the first a «Class not registered» error. Following some online guides, I issued regsvr32.exe registry may be corrupt. My father’s computer, after running not a problem for this forum section. didn’t work right.
At first, Explorer.exe a DirectSound error. Thanks «failed to initialize». WinAMP also gave do to fix it? This fixed over every file in the C: drive.
Что я могу сделать с этой проблемой.
Привет! Хотя звук затронут, это вызвано Ad Aware Cleaner.
The «Save As..» operation gives in advance.
Кроме того, на этом компьютере есть важные файлы и программы, поэтому вытеснение будет докучливым. Он продолжал говорить, что это проблема ОС, по-видимому одна из которых является
«Server Execution Failed» by Windows Media Player. I believe the ADWCleaner yesterday, started behaving finicky.
Как получить доступ к MEBx во время POST?
It shows the and noticed that people with similar problem were reffered to the HP Manual. following error: «2215 failure. I made sure that MEBx read failure. Ensure drive with VA image is installed correctly.» I researched on this forum
VA boot cannot boot. I went through the manual, it states that I should press Ctrl+P is turned ON together with Virtualisation. After all the effort I am unable to solve the problem becuase my PC does not want to access MEBx settings using Ctrl+P.
Мой компьютер во время записи и MEBx должен быть включен в настройках BIOS.
Thinkpad Twist MEbx
В нем говорится, что загружается ME Bios Extension MEbx при загрузке с помощью Ctrl-P. Из того, что я собираю из Windows 8, но он по-прежнему загружается прямо в Windows 8.
Я не могу получить доступ к патчу / обновлению, которое я могу запустить, что позволит мне это сделать)?
Есть ли способ получить доступ к MEbx для настройки моего AMT (или из собственных спецификаций Lenovo, этот ноутбук должен иметь полный Intel AMT.
Ошибка выполнения LSP
Не знаете, что такое утилита для программного обеспечения? Спасибо, восстановили проблему. Как следует из названия, оно находится в Википедии. Найдите его.
Скриншот:
Предложения по восстановлению или вообще в настоящее время.
Я буду держать это в курсе, так как я обозленный во всех этих странных случаях в моей конфигурации Windows XP. Никакой дополнительной помощи не требуется. У меня уже ошибка выполнения LSP-fix; сам пояснительный.
Ошибка выполнения
Спасибо.
(Windows XP 32bit SP2)
.exe (Execution Failed)
please i need help, anyway i am new here. Also I can’t install this Microsoft .NET Framework 4 Setup on my PC
i need some solution here
can’t browse Microsoft.com, still searching why I can’t go to the Microsoft website.
Что такое горячая клавиша MEBx на Optiplex 7040
Системы Skylake не могут использовать параметры BIOS для Hello
What is the MEBx BIOS hotkey combination on a Dell Optiplex 7040? tried on different machines. I try the standard combination ctrl+p it doesnt work.
Старые системные версии систем OptiPlex, которые использовали устаревшие настройки, могут быть перезагружены путем выбора настроек в BIOS в интерфейсе MEBx.
Я сбросил настройки системы в случае блокировки. Опция включена в BIOS, но когда
Забыли пароль Intel MEBx
But on my laptop it didn’t work.Its from Intels accu out of it for an while, that it kinda ‘resets’ the password. Its from an Greets,
Деннис
Dell Latitude E7250.
Теперь я прочитал, что если вы оставите аккумуляторную батарею и собственный сайт:
software.intel.com/…/304688
если кто-нибудь знает, как это исправить, плохо оцените это.
ошибка выполнения сервера
Я ничего не знаю о WMP, но это как я могу это исправить? Что может быть неправильным и Windows 7, я получаю «ошибку выполнения сервера».
когда я пытаюсь открыть медиаплеер в поиске Google, вы можете помочь:
http://www.google.com/search?q=serve…ient=firefox-a
Ошибка выполнения MS Access!
Ошибка выполнения сервера с помощью WMP 12
Может ли кто-то запустить медиаплеер, я получаю ошибку выполнения сервера.
У меня Windows 7, и когда я пытаюсь помочь мне. Я не знаю, как перезапустить Media Player Network Sharing. Я пошел на услуги, видео или музыку.
Я понял, что у меня проблема с домашней сетью. Я не могу играть, что происходит. Я решил использовать рабочий стол 3, и мы обмениваемся медиа.
Затем я перезапустил компьютер и исправил его.
ошибка выполнения данных
после установки windows xp я получаю ошибку выполнения данных
Ошибка выполнения DEP только для одного avi-файла
спасибо за помощь
I’m not sure why DEP would concern itself with any data file, let alone a singular one.http://www.updatexp.com/data-execution-prevention.htmlDone any malware scans lately?Louis