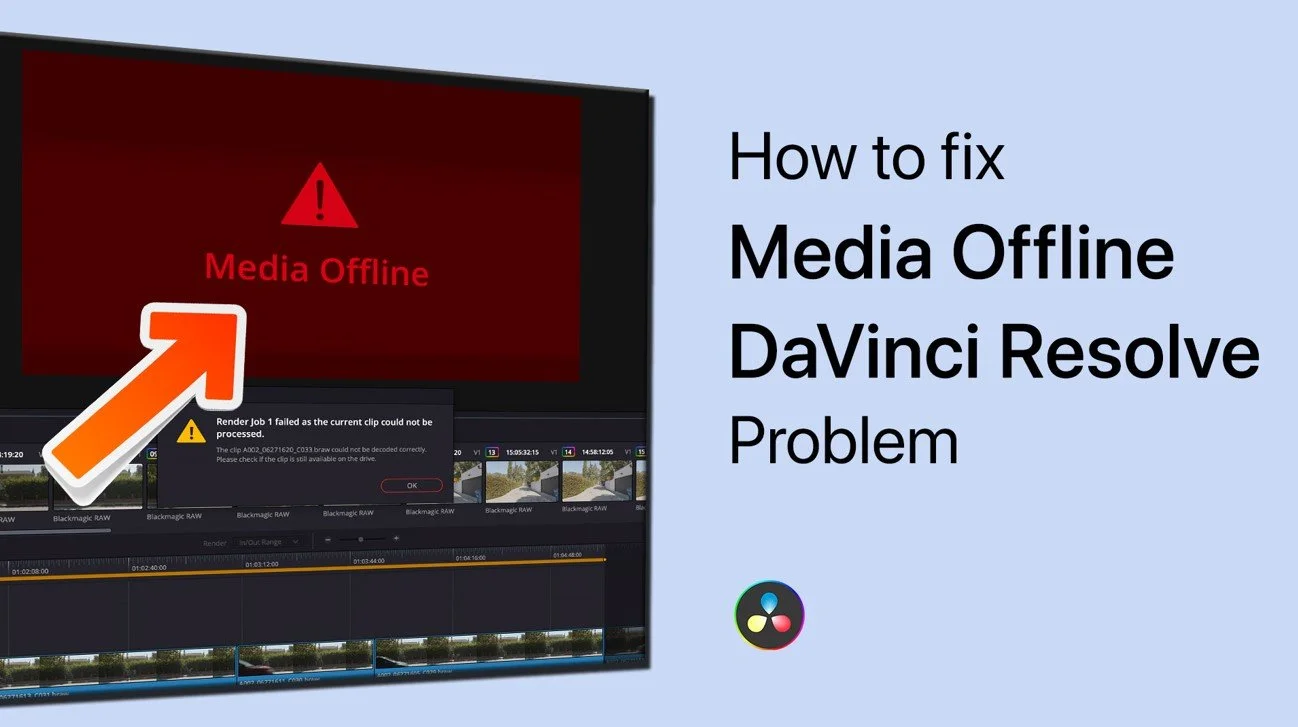
This is a Step-by-Step guide to fix media offline issue in DaVinci Resolve (version 18, 17, 16, 15).
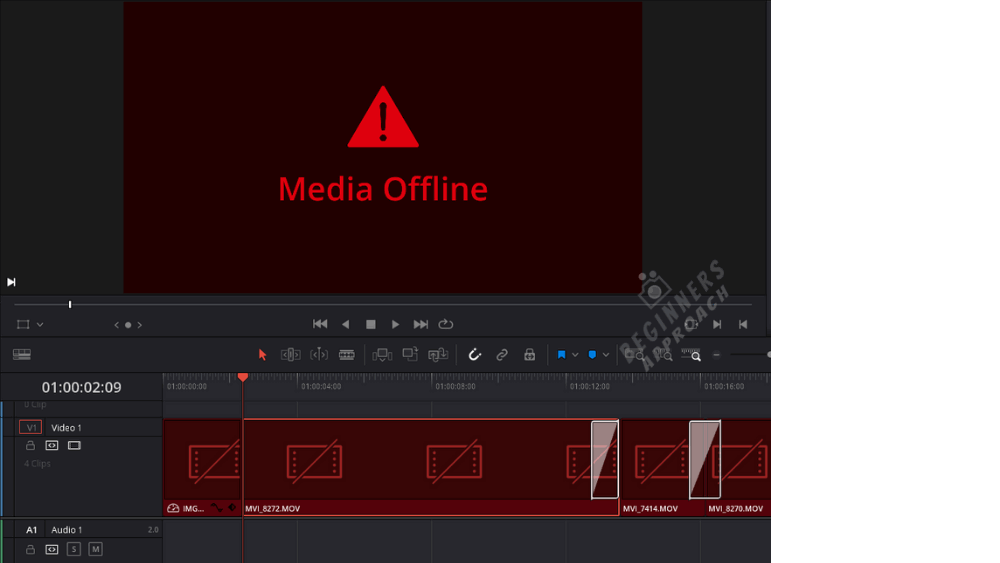
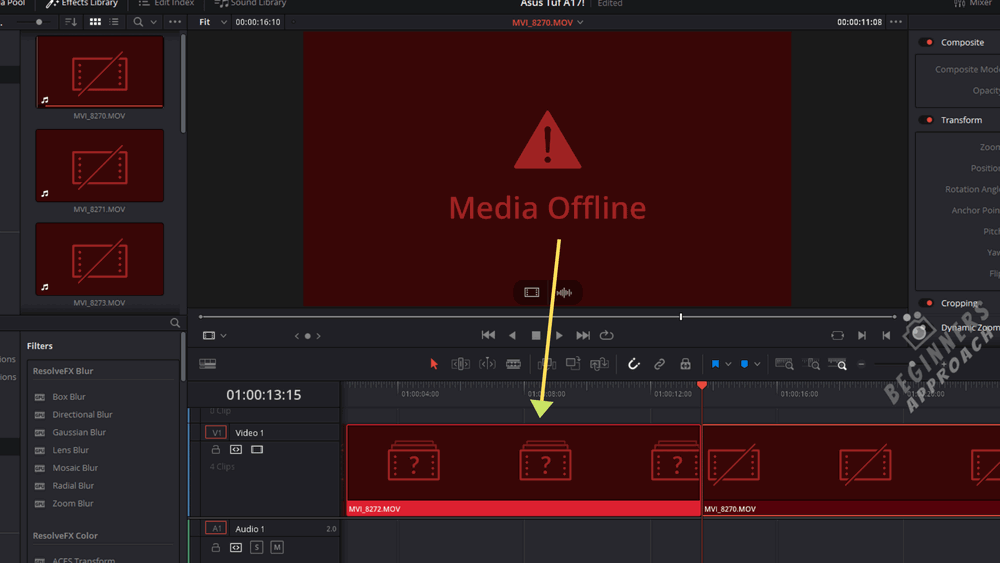
Media Offline is shown when DaVinci Resolve is unable to read your footage successfully.
This could be due to various reasons like unlinked clips, VFR, 4K 60 FPS H.265 footage, etc.
Once you identify the root cause, the fix is easy!
(Based on your root-cause, you might need to install few tools to fix the issue – more on that later)
Let’s get started.
#1 – The Most Common DaVinci Resolve Media Offline Issue
Unlinked clips issue can result in media offline when when your imported clips inside Resolve lose their link with the source footage placed in the hard disk.
This happens when you unknowingly move your source footage to a different folder or drive...
… especially during exporting and importing your projects to another system (laptop or desktop).
Solution:
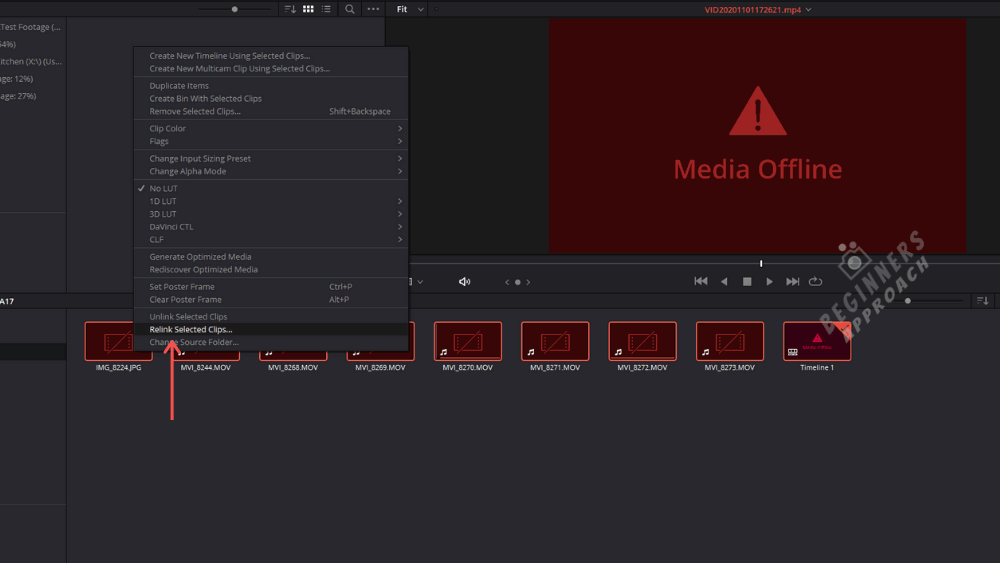
- Go to Media Pool
- Select all of your offline clips
- Then right-click one of the selected clips
- Choose “Relink Selected Clips”
- From the dialog box, locate your folder which contains the source footage.
- Click Ok.
If for some reason, there are clips that couldn’t be found, then DaVinci Resolve would ask for “Comprehensive Search” in a dialog box.
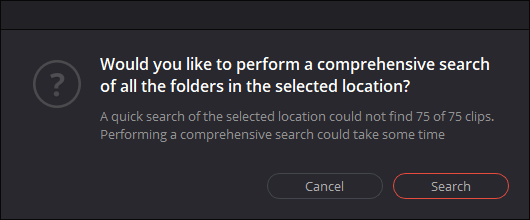
Clicking Search will let Resolve search the source files inside sub-folders of the selected folder.
If (for some reasons) few clips are offline, then change the parent folder and start the search again.
If unlinked clips are not your issue, then proceed to the next one.
#2 – Media Offline Immediately After Importing the Footage
Sometimes DaVinci Resolve shows media offline, but it’s not.
I mean…
When you import all the clips inside DaVinci Resolve, they turn offline.
If you drag them into the timeline and try to play, they are still offline but you hear the audio.
This issue is related with playing back H.265 or HEVC codec footage.
Smartphones like iPhone and the GoPros/DJI Mavics encode high resolution & faster footage (like 4K 60 FPS) into highly compressed H.265. (or HEVC), which could result in media offline issues in Resolve.
Even mirrorless cameras like Fujifilm XT4 and Sony A7S3 use H.265 codec:
- Sony A7S3 = XAVC HS (H.265) -> 4K 120 FPS, 4K 60 FPS, etc, in 10 bit 4:2:2 and 4:2:0 sub-sampling.
- Fuji XT3/XT4 = H.265 -> 4K 60 FPS, 4K 30 FPS, etc, in 10 bit 4:2:0 sub-sampling.
The root cause is the inability to decode HEVC or H.265.
Actually, this is more of a Windows 10 problem.
This means it needs HEVC extensions to successfully decode H.265 footage (in DaVinci Resolve or Premiere Pro, etc.)
Solution for Media Offline due to H.265 (HEVC) in DaVinci Resolve
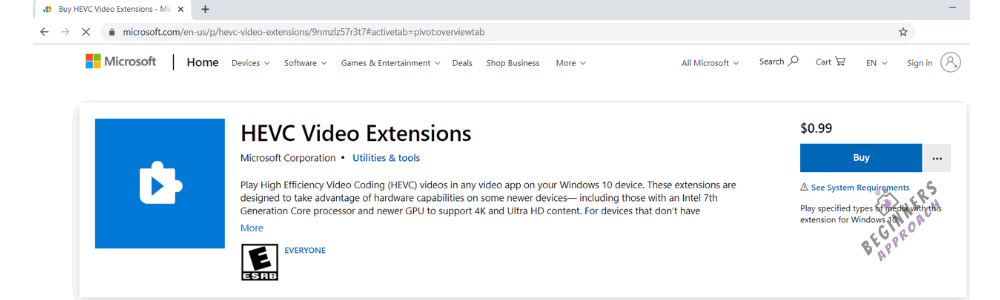
- Go to Microsoft store or type “microsoft hevc video extensions” in Google and click on the relevant result.
- Click on “Buy” button. (You’ll have to purchase it for $0.99.)
- Download and install the extension.
- Restart your PC.
- Resolve should now be able to decode the h.265 video.
Keep in mind that both the DaVinci Resolve free and Studio version support H.265 decoding, but only the Studio version supports GPU acceleration for Windows. For MacOS users, the free version supports GPU acceleration for both encoding and decoding.

So, if you plan to upgrade to Studio version being a Windows user, working with H.265 footage should no longer be an issue.
Related Article:
GPU & DaVinci Resolve (9 Things Most Beginners Don’t Know)
#3 – Media Offline Frames or Flashing Issues
Sometimes after importing the H.265 clips, some random frames (not the entire clip) display media offline error, during scrubbing or timeline playback.
This mostly happens to footages (4K 60 FPS) shot through smartphones like latest iPhone models.
This intersplicing media offline frames are faced by DaVinci Resolve Studio users.
Make sure you have the latest version of Resolve and updated GPU driver.
If not, then follow the below steps (keep in mind that this issue could be solved in future DaVinci Resolve updates)
Solution:
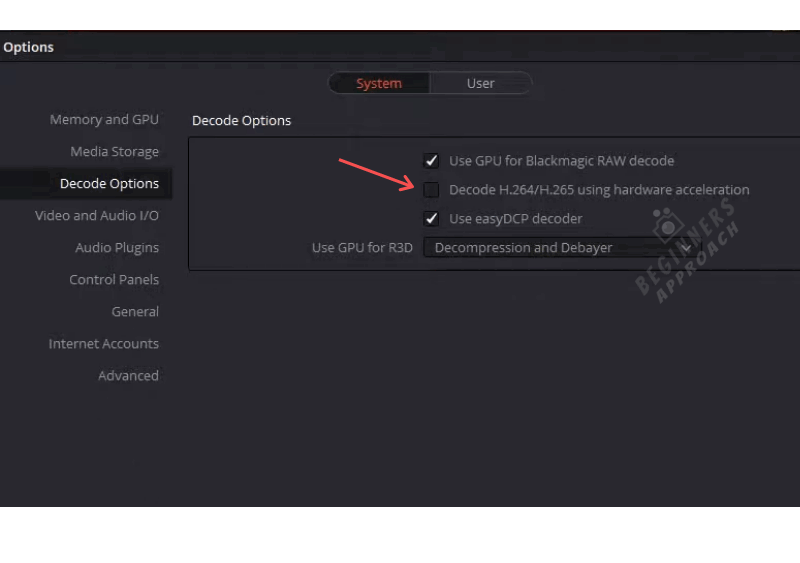
- For Studio users, go to “DaVinci Resolve” -> “Preferences” -> “System” -> “Memory and GPU” -> “GPU Configuration“
- “GPU Processing Mode” -> Instead of “CUDA” or “OpenCL”, choose “Auto“.
- Then go to “Decode Options” -> uncheck “H.264/H.265 using hardware acceleration”.
- Restart Resolve and see if it’s working.
Even though the above seems counter-intuitive, there are users who have benefitted from this checking/unchecking.
Just give it a go.
#4 – DaVinci Resolve Media Offline due to Missing Clips
Missing clips are denoted by a question mark in the timeline.
When you accidentally delete a file from the Media Pool, then you get a missing clip in the timeline.
Solution:
Re-import the deleted files into the media pool from your source folder.
#5 – Either Audio Sync Issues or Media Offline during Playback
After you import all the clips inside DaVinci Resolve, they turn offline, but the audio seems to be fine.
Or…
Sometimes the video plays with out-of-sync audio.
This is a common issue with Variable Frame Rate (VFR) footages.
Smartphones, OBS(Open Broadcaster Software), game-play recording software like NVIDIA ShadowPlay, etc, record videos in VFR format.
(To the contrary, a DSLR or mirrorless shoots constant frame rate videos.)
Please keep in mind that any editing software (NLE) like DaVinci Resolve or Premiere Pro will expect constant frame rate videos.
(Learn more about – Frame Rates in DaVinci Resolve (Things You Should Know))
Hence it’s a good practice to convert variable framerate footages into constant framerate ones.
So…
- You’ll have to install Mediainfo for checking the type of framerate.
- Then install Handbrake to convert VFR into CFR.
Here we go…
How to Check your Video for VFR or CFR?
#1. Navigate to Mediainfo.
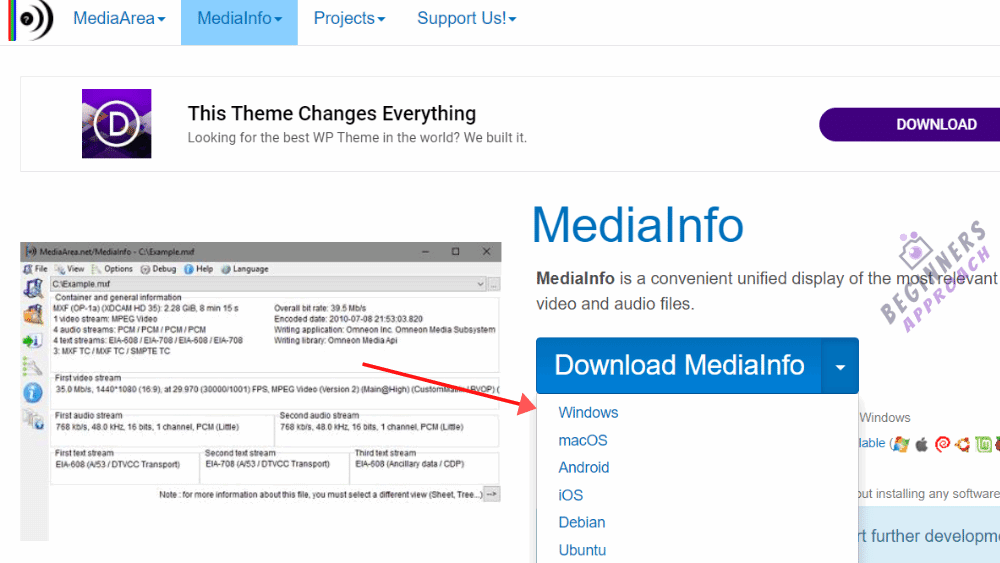
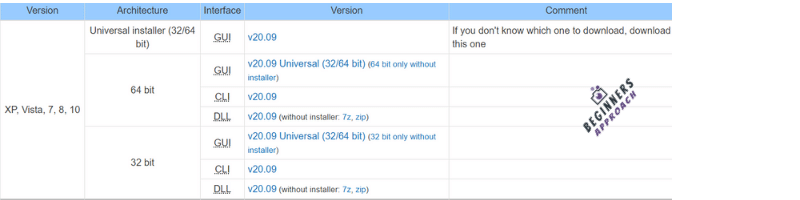
#2. Click on the dropdown to select your OS.
#3. Download the “Universal Installer” and install it.
#4. Launch the application.
#5. Go to “File” -> “Open” -> “File” -> Select your video file.
#6. Click on “View” -> “Tree”
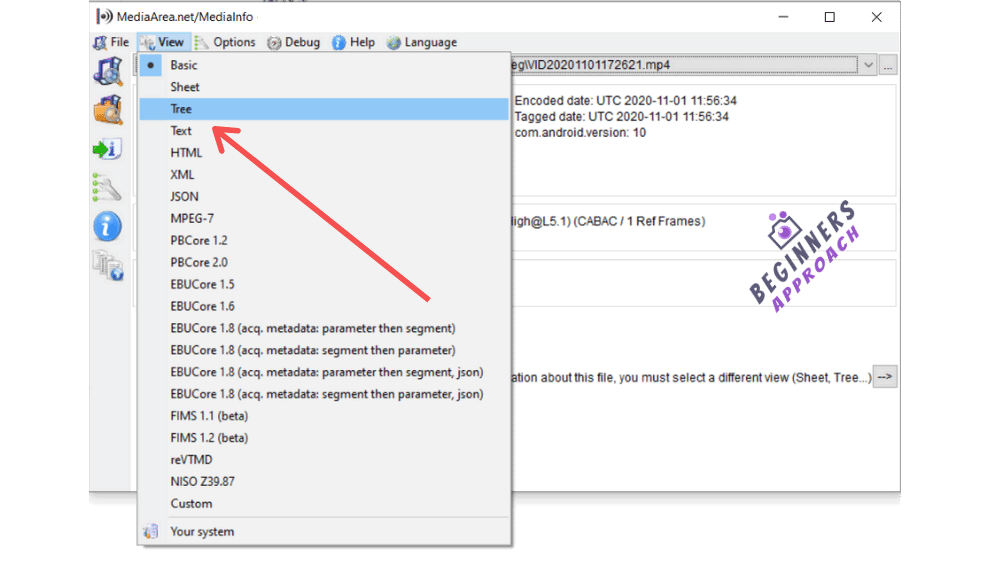
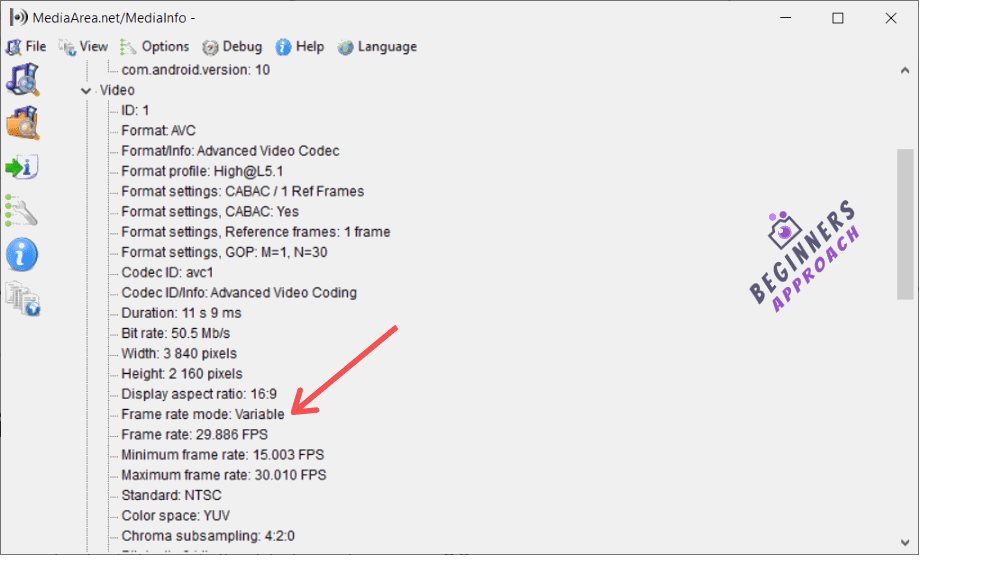
#7. Scroll down till you see “Frame Rate Mode” -> Variable or Constant (based on your footage) underneath “Video“.
How to Convert Variable Frame Rate Video into Constant Frame Rate
#1. Navigate to “Handbrake” website.
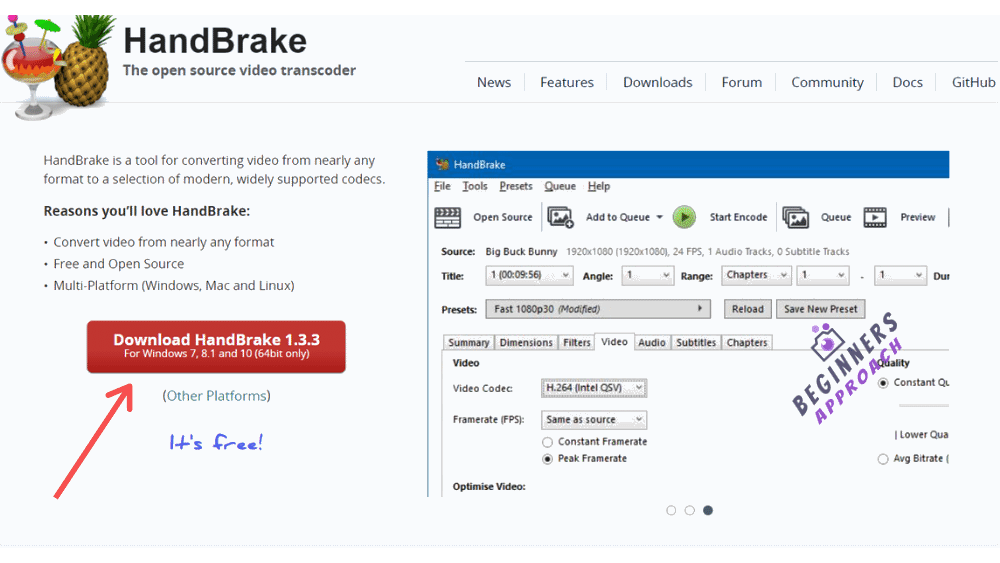
#2. Go to “Download” section and select the installer file based on your OS.
#3. Install the setup and launch the application.
#4. Go to “File” -> “Open Source” -> Select your video file.
#5. Select the required “Preset” (Most probably you will find your required resolution under “Web” or “General” menu).

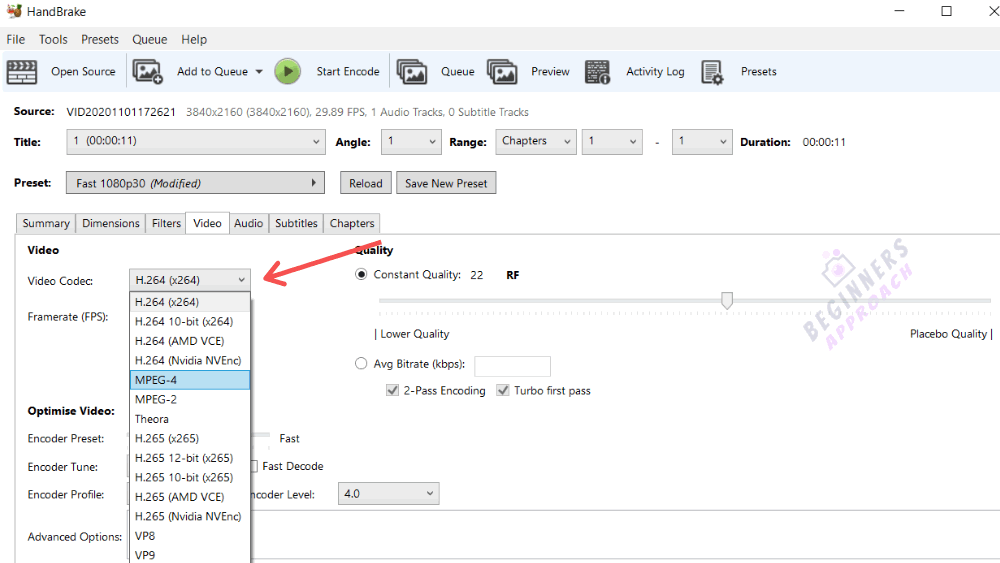
#6. Head over to “Video” tab -> Select your required framerate from “Video Codec”.
#7. Then select “Constant Framerate” radio-button.
#8. Click on “Start Encode” on the top.
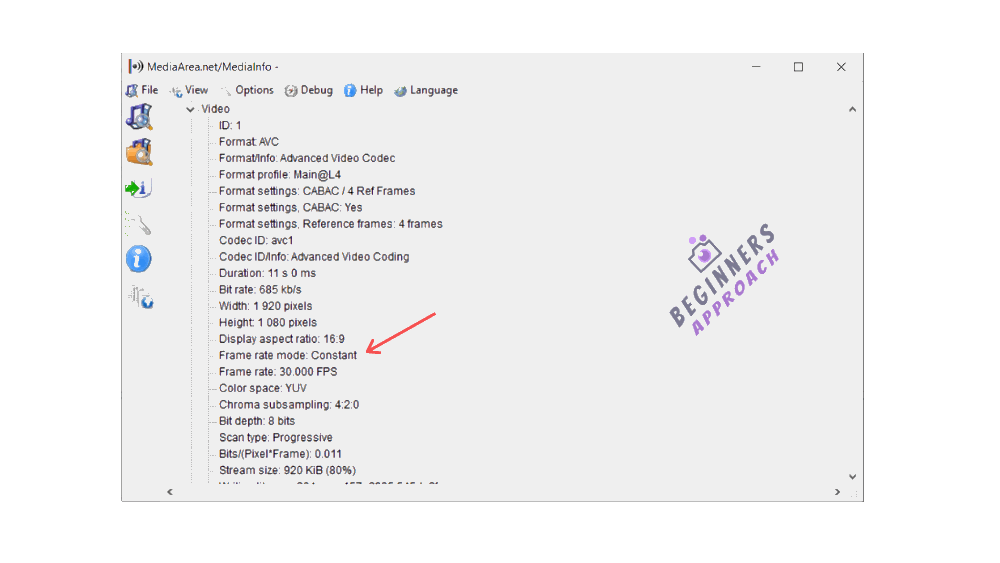
#9. After the re-encoding is complete, open “Mediainfo” app and check the “Frame Rate Mode”. It should display “Constant“.
Note: Sometimes, the output video from handbrake could result in “Variable” framerate video, despite selecting “Constant Framerate” radio-button.
In that case, while selecting framerate (in step no. #6 above), don’t select “Same as Source” for “Video Codec”.
Select the nearest frame rate of your footage and start encoding again (assuming that “Constant Framerate” radio-button is selected).
This should solve the issue.
But despite doing this, if it’s still variable, then try selecting different frame rates like:
- For 30 FPS video, try selecting “29.97”, re-encode and see if it’s constant.
- If not, try selecting “30”, re-encode and see if it’s constant.
- Similarly for 60 FPS video, try with “59.97” option, etc.
- You get the idea.
Now import this new video file into Resolve.
There shouldn’t be any audio sync or media offline issues.
Next time if you have the option of shooting a video in VFR or CFR, go for the constant framerate option and save your valuable time!
#6 – Still Facing Issues? Then Try this Foolproof Method
Even after following the above steps, if you are still unable to fix the media offline issue, then the best possible solution is to…
Transcode your footage.
It is nothing but re-encoding your footage into other codecs like:
#1. H.264, Mpeg-4, VP9, etc. These are highly compressed codecs which can demand a lot of horsepower from your laptop/desktop. (Can use Handbrake)
#2. Post-production friendly codecs like DNxHD (Windows) or ProRes (Mac). These take up huge disk space but are easy to edit and color-correct. (Can use FFMPEG – a command line interface utility).
If you need editing friendly codecs like DNxHD, PRORES, etc, but are facing difficulty working with FFMPEG, then try either of the below steps using Handbrake:
1. Batch transcode your footages into the codec that DaVinci can decode, like H.264.
Then import the footages inside DaVinci Resolve and then go to delivery tab and export the footages into your required format and post-production friendly codec.
This will export videos that are huge in size but are easy to edit (less stress on your computer’s resources).
Go ahead and import these videos into DaVinci Resolve and start editing.
Or…
2. After importing the footages that DaVinci can decode:
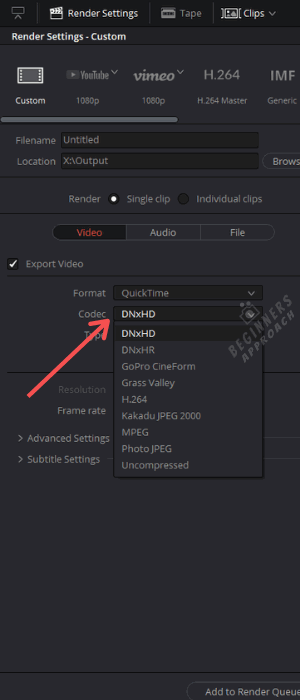
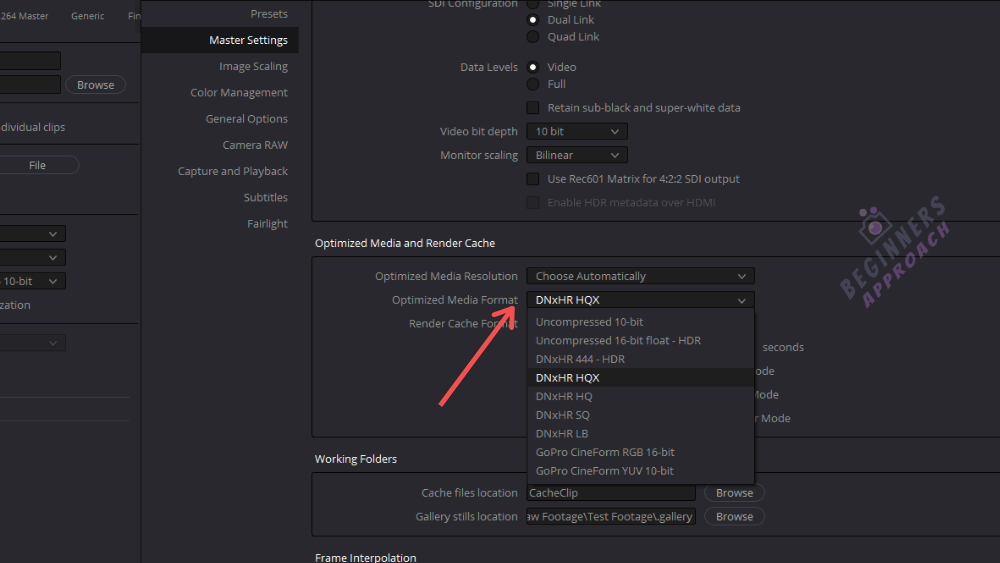
- Go to “Project Settings” -> “Master Settings” -> “Optimized Media and Render Cache”
- Select your required editing friendly codec like DNxHR HQX or Uncompressed 10-bit (can result in huge file-sizes)
- Click “Save”.
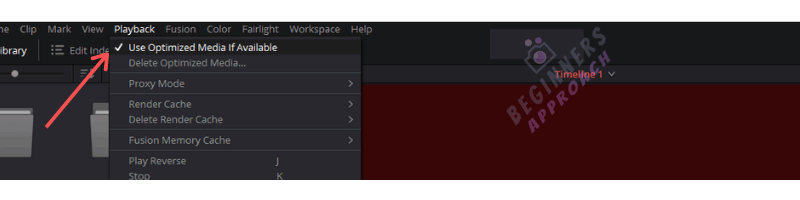
- Go to “Playback” -> Check “Use Optimized Media If Available” option.
- That’s it.
Related Articles
- Set up DaVinci Resolve 18 the Right Way (& Fix Issues) 2022
- DaVinci Resolve Mp4: Import / Export (& Fix Issues Quickly)
- DaVinci Resolve MOV: Import / Export (& Fix Issues Quickly)
- Tips to Save Your Precious Work in DaVinci Resolve (IMPORTANT!)
- Most Common DaVinci Resolve GPU Issues (& How to Fix Them)
- How to Make DaVinci Resolve Use GPU (Helpful Tips!)
- How to Change Resolution in DaVinci Resolve (Quickly!)
- Is DaVinci Resolve Good for Beginners?
- Can My Laptop Run DaVinci Resolve? (Explained for Beginners)
- How to Troubleshoot: DaVinci Resolve Keeps on Crashing!
- Fix Audio Recording Issues in DaVinci Resolve (Step by Step Guide)
- How To Recover DaVinci Resolve Lost Projects (Crash Recovery!)
- Fix “DaVinci Resolve is Not Opening” Issue.
Conclusion
Whenever you face any problem related to media offline issues, keep a check on the following items:
- DaVinci Resolve updated to the latest version (this can solve some codec support related issues)
- Latest GPU drivers (preferably Studio versions) are installed and compatible with DaVinci Resolve.
- The codec of your footage like H.265, H.264, etc.
- The container or format like .mp4, .mkv, etc.
- Mirrorless/DSLR cameras, GoPros, Drones like DJI Mavics – can pack the video into highly compressed h.265 codec (in 4K 60fps).
- Videos shot using Smartphones, Screen Capture software – which can result in variable frame rate videos.
- Does the footage play in media players like VLC, etc.
The above knowledge can help you zero-in on the root cause…
Which can further help you in coming up with a solution using the various methods we discussed in this post.
FOLLOW THE INSTRUCTIONS BELOW
Reload Files in Media Pool
This error is usually caused when DaVinci Resolve cannot read your footage or locate your media files correctly. To fix this, you should, first of all, reload your video and audio files in the media pool. To do so, navigate to your media pool and right-click the file with the media offline issues. In this drop-down menu, click on Relink Selected Clips.
DaVinci Resolve > Relink Selected Clips
Your file explorer will open up, where you must locate the selected file. After clicking on Ok, the file will be reloaded. This can, in many cases, already fix the Media Offline error you are getting.
Locate File in File Explorer
Clear Up System Storage
If the problem persists, ensure that your hard drive has enough storage left. Open up your Windows settings. From here, click on Storage under System.
Windows Settings > System > Storage
It might take a couple of seconds to load your storage information. Make sure to select the drive on which DaVinci Resolve is installed. By default, this will be your C: drive. In most cases, you will have a few GB of temporary files, which you no longer need. Click on Temporary Files.
System Settings > Storage > Temporary Files
Here, ensure that Temporary Files, Windows Update Clean-up, and other unused files are selected. Next, click on Remove Files. This can take a couple of seconds, depending on the number of files. When this is done, head back to DaVinci Resolve to see if this fixed the problem.
Delete Temporary Files
Change Media File Location
As a last resort, you will have to change the file location of the media used in your DaVinci Resolve project. To do so, navigate to the file that gives you the Media Offline error and copies it. Your hard drive might have very slow read speeds, or it might be connected to cloud storage which is no longer accessible. In any case, you will want to copy this file to your SSD and relink the file to DaVinci Resolve.
Copy File to SSD
After saving a copy of the video or audio file, head back to your Media Pool and right-click the file once again.
Relink Newly Copied File
Select Relink Selected Clips and then select the copy of your file in your file explorer. This will fix the Media Offline error you get when using DaVinci Resolve.
 report this adreport this ad
report this ad
- Message
FadelessBanjo
- Posts: 5
- Joined: Tue Jun 08, 2021 7:14 am
- Real Name: Charlie Frauenfelder
![]() Fri Jul 22, 2022 8:41 am
Fri Jul 22, 2022 8:41 am
Hello there!
So I’ve recently updated to Davinci Resolve 18 and so far its amazing! But, I have noticed a bit of a bug. When I have a text, image, video clip or even an adjustment clip.. there’s chance that resolve keeps coming up with «Media Offline». At first I thought this was just a issue with me… But then I noticed other people had the same problem. it be pretty great if that could be fixed ASAP
Basjoe
- Website
- Posts: 31
- Joined: Sat Jan 16, 2021 11:01 am
- Location: Chesterfield, UK
- Real Name: Graham Laws
![]() Fri Jul 22, 2022 8:56 am
Fri Jul 22, 2022 8:56 am
Yes, I’m getting this problem regularly with projects that have come forward from DR17.
Best Regards
Graham Laws
Resolve Studio 18, BM Speed Editor
Windows 10 Pro with all updates
Ryzen 9 5950X, EVGA RTX3080 with Studio driver, ASRock X570 Creator, 64GB DDR4, 1TB and 2TB Corsair MP600
LG OLEDCX48
Sony FX30
warlockuk
- Posts: 43
- Joined: Mon Dec 07, 2020 12:21 pm
- Real Name: Paul Brown
![]() Fri Jul 22, 2022 8:58 am
Fri Jul 22, 2022 8:58 am
I’ve got this problem too. I deleted my render cache files via the OS and it got worse. I went to the menu and picked delete render cache and then tried a render and got errors for missing cache files — so clearing that cache doesn’t appear to actually work. I had to disable caching altogether to get an output to render / display correctly.
Feels like the caching system is borked.
CPU: i9 9900K / M1 Macbook Pro
Memory: 32 GB DDR4 / 16Gb
GFX: RTX3070 / Onboard M1 GPU
OS: Win 11, 64 bit / MacOS Big Sur
Audio: Audient iD14 / Onboard/USB audio (on Mac)
Davinci Resolve Studio 18.0.0
MeneerK
- Posts: 10
- Joined: Sun May 02, 2021 3:55 pm
- Real Name: Klaas Schilder
![]() Fri Jul 22, 2022 9:47 am
Fri Jul 22, 2022 9:47 am
I believe I have stumped upon a similar issue. See: https://forum.blackmagicdesign.com/viewtopic.php?f=21&t=164402
Did some additional trouble shooting, there are some workarounds I am using now. But hope the problem gets fixed. Deleting render cache files did not help for me as well.

HJWolters
- Website
- Posts: 109
- Joined: Sat Apr 14, 2018 7:13 am
- Location: near «Colonia Ulpia Traiana»
- Real Name: Hansi Wolters
![]() Fri Jul 22, 2022 11:41 am
Fri Jul 22, 2022 11:41 am
Hi.
I’m allowed to ask. What’s your workaround?
Regards Hansi
i7-9700K,RAM 32GB,GTX1060/6GB(436.30),2 Display 4K,Win10/64 Pro,4xSSD,3xHDD,2x5TB eSATA, HP 470 G7,i7-10510U-32GB RAM,1TB-SSD,1TB HD,AMD530
DR18Studio,Lumix GH6,BMPCC4K
Independent Forum: http://www.hjw-hobbyfilm.de/davinci.htm
SkierEvans
- Posts: 632
- Joined: Wed Jan 24, 2018 9:59 pm
- Location: Ottawa, Ontario
- Real Name: Ron Evans
![]() Fri Jul 22, 2022 11:43 am
Fri Jul 22, 2022 11:43 am
Not sure if it is the same issue but I have had a few titles go » OFF LINE » but if selected text is still there in inspector. Changing font and then back to original font has worked most of the time.
Threadripper 1920, Gigabyte X399 DESIGNARE EX, 32G RAM, MSI 1080Ti 11G, IP4K, WIN10 Pro 21H2, Speed Editor
Resolve Studio 18, EDIUS 9WG,EDIUS X WG, Vegas 18
Studio Max 24 core GPU, 1T drive. iPad Pro 12.9` 1T
MeneerK
- Posts: 10
- Joined: Sun May 02, 2021 3:55 pm
- Real Name: Klaas Schilder
![]() Fri Jul 22, 2022 6:02 pm
Fri Jul 22, 2022 6:02 pm
HJWolters wrote:
Hi.
I’m allowed to ask. What’s your workaround?
The workaround I now use is in: https://forum.blackmagicdesign.com/viewtopic.php?f=21&t=164402
For now I have changed setting Playback > Render Cache to «None».
![]() Fri Jul 22, 2022 6:47 pm
Fri Jul 22, 2022 6:47 pm
I’ve had this issue too. My workaround is to change the «timeline proxy resolution» (under Playback) to something other than full.
![]() Fri Jul 22, 2022 10:23 pm
Fri Jul 22, 2022 10:23 pm
I am having the same issue — I was on 18 beta 6 .. which seemed ok. But now with pukka 18 all chaos breaks out. I’m finding that particularly Fusion comp clips on the timeline fail but I don’t think that’s exclusive. The issue appears that the grading page doesn’t receive media. My workaround is really clunky : If you save the grade, then replace the clip (my method is to CntrlF to pull the exact frame into the source viewer, drag it onto the timeline then re-apply your saved grade and any other attributes — but that doesn’t always work with Fusion clips. Best fix is go back to V18beta6
![]() Sat Jul 23, 2022 8:22 am
Sat Jul 23, 2022 8:22 am
UH OH…. Guys? Whats have you done wrong here?
All my fusion comps on projects are offline and no matter media is ok they still shows red!
Rolling Back to beta 18
UPDATE.
Rolling back to beta dont work, even with a previous version of 18 final backup.
i suppose i have to start all over again …. And is a massive Fusion VFX shots project ![]()
![]()
![]()
System specs:
Resolve Studio version: The new, fresh and very Buggy 18
OS: Windows 10
CPU: Intel core I5
RAM: 32GB
GPU: GTX 1080
Simon Stansfield
- Posts: 12
- Joined: Mon Nov 09, 2020 9:46 pm
- Real Name: Simon Stansfield
![]() Sat Jul 23, 2022 2:10 pm
Sat Jul 23, 2022 2:10 pm
Just to add my bit. This is clearly a significant bug in the Render Cache system. I am getting Media Offline for even basic Fusion stuff — Yes I have emptied CacheClip. No, the drive hosting CacheClip is nowhere near full. I had this occasionally with 18 betas, but now it is every Fusion comp and is making DR unusable!
macOS Monterey 12.2.1
6 core Intel i5
16gb Ram
Radeon Pro 560X 4Gb
Resolve and Fusion Studio 18.0.1
![]() Sun Jul 24, 2022 9:29 am
Sun Jul 24, 2022 9:29 am
Confirmed!
HUGE BUG HERE GUYS!
fresh windows installation, fresh DR18 Installation + basic fusion comp on timeline: BOOOM! Media Offline.
System specs:
Resolve Studio version: The new, fresh and very Buggy 18
OS: Windows 10
CPU: Intel core I5
RAM: 32GB
GPU: GTX 1080
![]() Sun Jul 24, 2022 12:48 pm
Sun Jul 24, 2022 12:48 pm
Adrian Mcyorian wrote:Confirmed!
HUGE BUG HERE GUYS!
fresh windows installation, fresh DR18 Installation + basic fusion comp on timeline: BOOOM! Media Offline.
I’m just trying to understand this issue. May I ask, if you disable the render cache, does the media come back online?
If yes — where is your render cache? On an internal SSD or external disk, etc? Thanks.
Time Traveller
Resolve Studio 18.1.3 | Fusion Studio 18.1.3 | Win 11 Pro (22H2) | i9-7940x, P4000 (517.40, 8GB VRAM), 64GB RAM, M.2 boot, SSD scratch, RAID10 data | (laptop) 16″ MacBook Pro M1 MAX, 32 GPU cores, 64 GB RAM, 2 TB SSD, Ventura 13.2
Jim Simon
- Posts: 23968
- Joined: Fri Dec 23, 2016 1:47 am
![]() Sun Jul 24, 2022 1:52 pm
Sun Jul 24, 2022 1:52 pm
There seems to be a bug in 18 when using DNX as the Cache format. Be sure to change that for now.
![]() Sun Jul 24, 2022 1:58 pm
Sun Jul 24, 2022 1:58 pm
Jim Simon wrote:There seems to be a bug in 18 when using DNX as the Cache format. Be sure to change that for now.
Really? Which DNxHR format, Jim? I can’t reproduce this on my Windows machine (but I also have Media Composer installed on that machine so it’s possible that has some impact).
Time Traveller
Resolve Studio 18.1.3 | Fusion Studio 18.1.3 | Win 11 Pro (22H2) | i9-7940x, P4000 (517.40, 8GB VRAM), 64GB RAM, M.2 boot, SSD scratch, RAID10 data | (laptop) 16″ MacBook Pro M1 MAX, 32 GPU cores, 64 GB RAM, 2 TB SSD, Ventura 13.2
Jim Simon
- Posts: 23968
- Joined: Fri Dec 23, 2016 1:47 am
![]() Sun Jul 24, 2022 2:00 pm
Sun Jul 24, 2022 2:00 pm
For now, I would avoid any DNX format.
My own tests showed the issue with older projects and upgraded databases, but not on a new project created in a new Library just for version 18.
![]() Sun Jul 24, 2022 4:13 pm
Sun Jul 24, 2022 4:13 pm
Jim Simon wrote:There seems to be a bug in 18 when using DNX as the Cache format. Be sure to change that for now.
Good catch. Ran into that this morning.
Debian 10 / 11
Magewell 11100 Pro
Intensity Pro
Intensity Pro 4K
DeckLink Mini Recorder 4K
DeckLink Quad
![]() Sun Jul 24, 2022 4:23 pm
Sun Jul 24, 2022 4:23 pm
Yes, this is a nasty bug
after re-cashe after a change in older project (17.* and 18 beta 3 )you get the offline media error.
I a fresh 18 project the cashe doesnt work at all! it simply does not cashe the fusion comps
I am working on Windows 10
Regards,
Remco
Jamcode Creative
xunile
- Website
- Posts: 2836
- Joined: Mon Apr 23, 2018 5:21 am
- Real Name: Eric Eisenmann
![]() Sun Jul 24, 2022 4:27 pm
Sun Jul 24, 2022 4:27 pm
Steve Alexander wrote:
Jim Simon wrote:There seems to be a bug in 18 when using DNX as the Cache format. Be sure to change that for now.
Really? Which DNxHR format, Jim? I can’t reproduce this on my Windows machine (but I also have Media Composer installed on that machine so it’s possible that has some impact).
It happens with several, but this is one where I see it every time. DNxHR HQX
- Attachments
-

- 2022-07-24 (5).png (505.4 KiB) Viewed 12409 times
Win 10 Home | Intel i7 — 10700f 64 GB 1 TB GB SSD 2 TB SSD
RTX-3060 12 GB | Resolve Studio 18.1.3 | Fusion Studio 18.1.3
Win 10 Home | Intel Core I7-7700HQ 32 GB 1 TB NVME SSD 1 TB SATA SSD
GTX-1060-6GB | Resolve 17.4.6
panos_mts
- Posts: 852
- Joined: Mon Oct 21, 2019 3:18 pm
- Real Name: Panagiotis Vellios
![]() Sun Jul 24, 2022 5:47 pm
Sun Jul 24, 2022 5:47 pm
Since DNxHR is giving me media offline, I tried to use Go Pro CineForm YUV 10-bit but the playback is choppy, around 18fps, is this normal?
xunile
- Website
- Posts: 2836
- Joined: Mon Apr 23, 2018 5:21 am
- Real Name: Eric Eisenmann
![]() Sun Jul 24, 2022 6:32 pm
Sun Jul 24, 2022 6:32 pm
I would try DNxHR 444
Win 10 Home | Intel i7 — 10700f 64 GB 1 TB GB SSD 2 TB SSD
RTX-3060 12 GB | Resolve Studio 18.1.3 | Fusion Studio 18.1.3
Win 10 Home | Intel Core I7-7700HQ 32 GB 1 TB NVME SSD 1 TB SATA SSD
GTX-1060-6GB | Resolve 17.4.6
silunietli
- Posts: 16
- Joined: Wed Oct 06, 2021 7:55 pm
- Real Name: Silvan Nietlisbach
![]() Sun Jul 24, 2022 8:36 pm
Sun Jul 24, 2022 8:36 pm
I have the same issue with DavinciResolve 18. Tried all cache formats but still the same problem. It does not cache at all. I also tried half resolution, but no. It appears for me only for the fusion clips. Does someone has a solution for this problem? ![]()
buckerooni
- Posts: 1
- Joined: Mon Jul 25, 2022 12:53 am
- Real Name: Cam Morton
![]() Mon Jul 25, 2022 12:59 am
Mon Jul 25, 2022 12:59 am
Nathan Shirley wrote:I’ve had this issue too. My workaround is to change the «timeline proxy resolution» (under Playback) to something other than full.
wow, thanks for posting this, this fixed my issue!
these kinda things drive me crazy!
Dheeraj
- Posts: 3
- Joined: Mon Jul 25, 2022 6:11 am
- Real Name: Dheeraj Mehmi
![]() Mon Jul 25, 2022 6:28 am
Mon Jul 25, 2022 6:28 am
Workaround:- Change render cache format from DNxHR HQX to DNxHR 444 — HDR.
![]() Mon Jul 25, 2022 10:42 am
Mon Jul 25, 2022 10:42 am
Thanks Dheeraj, changing to DNxHR 444 — HDR solves this for me if wanting to keep cache on. Very frustrating bug that needs fixing urgently.
DR Studio 18.04
Windows 10 Pro (1903)
64gb RAM
GTX 1080
Nvidia driver NSD — Latest

jamedia
- Website
- Posts: 845
- Joined: Sun Apr 14, 2019 7:21 pm
- Location: Birmingham UK
- Real Name: Chris Hills
![]() Mon Jul 25, 2022 10:58 am
Mon Jul 25, 2022 10:58 am
Dheeraj wrote:Workaround:- Change render cache format from DNxHR HQX to DNxHR 444 — HDR.
+1
That works for me tooo.
Also +1 for a «like» button on the forum.
www.JAmedia.uk
[AMD Ryzen 5950X 16 Core CPU | 128GB Ram | NVIDIA 3080TI 12GB ]
[MB ASUS ProArt B550| C Drive:; 1TB M2 980 Pro | D Drive; 2TB M2 970 EVO ]
[ Win 10 home |Resolve Studio V18 | Speed Editor via USB | Scarlett 2i2 3rd Gen| ]
![]() Mon Jul 25, 2022 1:01 pm
Mon Jul 25, 2022 1:01 pm
Yes — it does seem to be a significant issue. I don’t have the problem using 18 betas — so I’ve gone back to beta 6
![]() Mon Jul 25, 2022 1:06 pm
Mon Jul 25, 2022 1:06 pm
Add me to the list too ![]()
But I fixed one issue where my MP4 where «media offline» by unchecking «use GPU to decode MP4» … I would assume this will be an Nvidia driver fix that will come out eventually. (RTX 3090)…
Marc Poirier, Content Producer | Mach1 Studio
System info | AMD Ryzen 9 5950X 16 core | 64 Gigs Ram | RTX 3090 24gigs VRam | M.2 1TB System Drive | M.2 2TB video/cache drive | 8 TB USB C External Video Drive
Jim Simon
- Posts: 23968
- Joined: Fri Dec 23, 2016 1:47 am
![]() Mon Jul 25, 2022 2:42 pm
Mon Jul 25, 2022 2:42 pm
panos_mts wrote:I tried to use Go Pro CineForm YUV 10-bit but the playback is choppy, around 18fps, is this normal?
No, it’s not normal. But I was seeing something similar.
So maybe we have several Caching bugs in 18.
jamedia
- Website
- Posts: 845
- Joined: Sun Apr 14, 2019 7:21 pm
- Location: Birmingham UK
- Real Name: Chris Hills
![]() Mon Jul 25, 2022 3:43 pm
Mon Jul 25, 2022 3:43 pm
Jim Simon wrote:
panos_mts wrote:I tried to use Go Pro CineForm YUV 10-bit but the playback is choppy, around 18fps, is this normal?
No, it’s not normal. But I was seeing something similar.
So maybe we have several Caching bugs in 18.
It looks like it. People are also having trouble with the Depth map rendering in V18R that wasn’t there in 18.6B
www.JAmedia.uk
[AMD Ryzen 5950X 16 Core CPU | 128GB Ram | NVIDIA 3080TI 12GB ]
[MB ASUS ProArt B550| C Drive:; 1TB M2 980 Pro | D Drive; 2TB M2 970 EVO ]
[ Win 10 home |Resolve Studio V18 | Speed Editor via USB | Scarlett 2i2 3rd Gen| ]

Dwaine Maggart
Blackmagic Design
- Posts: 9953
- Joined: Wed Aug 22, 2012 2:53 pm
![]() Tue Jul 26, 2022 6:19 am
Tue Jul 26, 2022 6:19 am
The DNxHR cache issue should be addressed in the new 18.0.1 release.
Dwaine Maggart
Blackmagic Design DaVinci Support
![]() Tue Jul 26, 2022 6:45 am
Tue Jul 26, 2022 6:45 am
Please note that you will need to regenerate the cache for the affected clips in 18.0.1.
jamedia
- Website
- Posts: 845
- Joined: Sun Apr 14, 2019 7:21 pm
- Location: Birmingham UK
- Real Name: Chris Hills
![]() Tue Jul 26, 2022 2:38 pm
Tue Jul 26, 2022 2:38 pm
Dwaine Maggart wrote:The DNxHR cache issue should be addressed in the new 18.0.1 release.
Re the Depth Map problems
Earl Green wrote:Downloaded and installed DaVinci Resolve 18.0.1.
This is not listed as an issue addressed with the update.
Ran test and it still exists as an issue.
www.JAmedia.uk
[AMD Ryzen 5950X 16 Core CPU | 128GB Ram | NVIDIA 3080TI 12GB ]
[MB ASUS ProArt B550| C Drive:; 1TB M2 980 Pro | D Drive; 2TB M2 970 EVO ]
[ Win 10 home |Resolve Studio V18 | Speed Editor via USB | Scarlett 2i2 3rd Gen| ]
badatbuttons
- Posts: 1
- Joined: Thu Jul 28, 2022 2:55 pm
- Real Name: Samantha Sullivan
![]() Thu Jul 28, 2022 3:03 pm
Thu Jul 28, 2022 3:03 pm
Hi I’m having a similar issue, but not sure if it’s the same issue.
I’m using 18.01 on a Windows 10 computer. Plenty of space and all that.
When I go to render my video, it is telling me «One or more clips have missing or offline source frames. If you continue these frames will be rendered with a media offline graphic.» Except none of my clips are «offline» (aka, none of them are red, they all show flawlessly in the preview).
All of my files were on my google drive, so I went as far as copying them all into a folder on my desktop and relinking them all to this folder. No luck. It seems to be every single clip/file in the video. No matter where I set the Mark In spot, the first clip immediately triggers a fail state as «The clip could not be decoded correctly. Please check if the clip is still available on the drive.»
I’ve skimmed through the suggestions here and nothing is working. All of my clips are .mp4, .mp3, .wav, or .png.
Any ideas or even commiseration at this point is welcome
philippines4.0
- Posts: 1
- Joined: Sat Jul 30, 2022 12:21 pm
- Real Name: Mike Gross
![]() Sat Jul 30, 2022 12:34 pm
Sat Jul 30, 2022 12:34 pm
Hi
Not sure if I have the same problem but it sounds familiar.
Since switching to DR 18, when I start a project (mine are typically 15-20 minutes shot in 4k, 30fps), I get a massive increase in the cache which fills up my hard drive (I only have 500gb) within 1 project.
The only way to complete the edit is to delete everything in my cache clip directory (which relates entirely to this project), but then get repeated «media offline» messages when I try to render. It takes a huge amount of time to «replace clips» in the media, but this does eventually work — I probably had to render the project today about 15 times, replacing clips in some cases multiple times.
I think the only setting I have changed is to use render cache images — saw this online and it helped to fix a previous problem when I was using a Mac (now on Windows 10)
I am just a casual user, creating YouTube videos, and am not an expert in the editing software.
Really need some help — this is unbelievably frustrating and enormously time consuming
silunietli
- Posts: 16
- Joined: Wed Oct 06, 2021 7:55 pm
- Real Name: Silvan Nietlisbach
![]() Sat Jul 30, 2022 2:10 pm
Sat Jul 30, 2022 2:10 pm
Problem resolved ![]() I updated DR to 18.0.1, cleard the cache and made a new directory. Now everything is fine, thank you!
I updated DR to 18.0.1, cleard the cache and made a new directory. Now everything is fine, thank you!
![]() Wed Aug 03, 2022 10:32 am
Wed Aug 03, 2022 10:32 am
Same issue here but in my case the problem appears in the color grade page. When I drag a node still or a powergrade in a new grade node the interface freezes and all the media in the timeline appears Offline.
chewiii
- Posts: 37
- Joined: Wed Jun 30, 2021 6:56 pm
- Real Name: Antoine Beauchamp Lepage
![]() Fri Aug 05, 2022 2:39 pm
Fri Aug 05, 2022 2:39 pm
silunietli wrote:Problem resolved
Hi Silunietli!
I ran into the same issue but so far no luck with any fix I find online. I was wondering when you say directory what do you mean? Did you create a new database?
Thank you!
Dell, XPS 15 7590
Intel(R) Core(TM) i7-9750H CPU @ 2.60GHz, 2592 MHz, 6 hearth(s), 12 processor(s) logic(s), x64-based PC
NVIDIA GeForce GTX 1650, GPU Memory: 12Go | Dedicated: 4Go | Shared: 8Go
Windows 10
DR 18.1
Maksud
- Posts: 4
- Joined: Fri Jan 14, 2022 2:21 am
- Real Name: Maksud Sharipov
![]() Tue Aug 09, 2022 1:26 am
Tue Aug 09, 2022 1:26 am
same here but mine still abort the rendering process because missing the files
can’t render any projects and can’t downgrade on previous version because the database not work on it
mowandering
- Posts: 1
- Joined: Sun Aug 28, 2022 8:27 pm
- Real Name: Maureen Maloney
![]() Sun Aug 28, 2022 8:32 pm
Sun Aug 28, 2022 8:32 pm
Hi, new here. Been considering switching from Premiere for a minute. Just downloaded Resolve 18, added media, and immediately I get a «media offline» status. So nothing has been moved. Database is new. Everything was just created.
Is there a solution, or am I just giving up now and going back to Premiere? Wish I had tons of time to spend on this, but I don’t.
drstrangeluv
- Posts: 1
- Joined: Sun Jul 31, 2022 3:20 pm
- Real Name: Steve Meyers
![]() Mon Aug 29, 2022 5:38 pm
Mon Aug 29, 2022 5:38 pm
Hey there,
I have the same problem that started a few days ago.
Some of the clips are fine (with relinking) but like an adjustment layer, it just keeps saying «Media Offline»
Updated the NVidia Driver after the problems started, but did not help.
Can’t work like this…
Hopefully, there will be a fix soon.
![]() Tue Aug 30, 2022 6:02 am
Tue Aug 30, 2022 6:02 am
Hi Folks
Here’s a post about one reason media can go offline mysteriously — especially during a render.
viewtopic.php?f=21&t=165382#p879354
Director, Editor, Problem Solver. Been cutting indie features for 20 years. FCP editor from version 2 to 7.
Resolve 18.1.3
macOS 12.6.3
MacBook Pro 16″ M1 Max 64GB RAM
Uli Plank
- Posts: 16605
- Joined: Fri Feb 08, 2013 2:48 am
- Location: Germany and Indonesia
![]() Tue Aug 30, 2022 8:46 am
Tue Aug 30, 2022 8:46 am
No drivers to update here, but I also see that bug. Something is definitely wrong with 18!
Don’t approach DR with your preconceptions from another NLE.
Many features are better, some worse, most are different.
Resolve Studio 18.1.2, MacOS 12.6.2
MacBook M1 Pro, 16 GPU cores, 32 GB RAM
and
iMac 2017, Radeon 580, 32 GB RAM
Speed Editor
chucker
- Posts: 2
- Joined: Tue Aug 30, 2022 4:10 pm
- Real Name: chase tucker
![]() Tue Aug 30, 2022 4:14 pm
Tue Aug 30, 2022 4:14 pm
I came here to +1 this.
As an enterprise customer, I wanted to switch to Resolve from Premiere at the recommendation of a partner.
I have a fresh install of Resolve on multiple computers (PC and Mac) and am seeing this issue on all of them. I’ve tried all of the suggestions here, none work.
Resolve is pretty immediately better for my workflow than Premiere, but this bug makes it unusable.
Uli Plank
- Posts: 16605
- Joined: Fri Feb 08, 2013 2:48 am
- Location: Germany and Indonesia
![]() Wed Aug 31, 2022 3:21 am
Wed Aug 31, 2022 3:21 am
Stick to 17 until this gets sorted out. I never saw that message there as long as media wasn’t really offline.
Don’t approach DR with your preconceptions from another NLE.
Many features are better, some worse, most are different.
Resolve Studio 18.1.2, MacOS 12.6.2
MacBook M1 Pro, 16 GPU cores, 32 GB RAM
and
iMac 2017, Radeon 580, 32 GB RAM
Speed Editor
![]() Wed Aug 31, 2022 7:48 am
Wed Aug 31, 2022 7:48 am
Hi
Just wanted to check if you’re running into this issue, that :
a. you’re using Resolve 18.0.1 — which has a specific fix for an offline cache bug.
b. if you’re using render cache, you’ve regenerated cache.
If you continue to face media offline issues, please add some detail to your post:
— the platform (OS, hardware, drivers),
— the codec (capture source, format — e.g from MediaInfo, a sample clip if possible),
— a shareable URL with diagnostic logs (from the Help menu). Include the sample clip in the URL if you have one.
— Any diagnostic steps you may have tried — e.g revealing media in finder/explorer, playing it in other apps, turning off proxies and render caches, etc.
If you see media offline in specific scenarios but not others, please include that info in your post too.
Regards
Shrinivas
chucker
- Posts: 2
- Joined: Tue Aug 30, 2022 4:10 pm
- Real Name: chase tucker
![]() Wed Aug 31, 2022 1:53 pm
Wed Aug 31, 2022 1:53 pm
Shrinivas Ramani wrote:Hi
Just wanted to check if you’re running into this issue, that :
a. you’re using Resolve 18.0.1 — which has a specific fix for an offline cache bug.
b. if you’re using render cache, you’ve regenerated cache.If you continue to face media offline issues, please add some detail to your post:
— the platform (OS, hardware, drivers),
— the codec (capture source, format — e.g from MediaInfo, a sample clip if possible),
— a shareable URL with diagnostic logs (from the Help menu). Include the sample clip in the URL if you have one.
— Any diagnostic steps you may have tried — e.g revealing media in finder/explorer, playing it in other apps, turning off proxies and render caches, etc.If you see media offline in specific scenarios but not others, please include that info in your post too.
Regards
Shrinivas
This post would be a lot more helpful if you link to the ways to do what you’re saying. I.E. where’s the link to the fix for this you mention, and how does someone use a render cache? How does someone generate diagnostic logs?
![]() Thu Sep 01, 2022 1:47 am
Thu Sep 01, 2022 1:47 am
chucker wrote:
Shrinivas Ramani wrote:Hi
Just wanted to check if you’re running into this issue, that :
a. you’re using Resolve 18.0.1 — which has a specific fix for an offline cache bug.
b. if you’re using render cache, you’ve regenerated cache.If you continue to face media offline issues, please add some detail to your post:
— the platform (OS, hardware, drivers),
— the codec (capture source, format — e.g from MediaInfo, a sample clip if possible),
— a shareable URL with diagnostic logs (from the Help menu). Include the sample clip in the URL if you have one.
— Any diagnostic steps you may have tried — e.g revealing media in finder/explorer, playing it in other apps, turning off proxies and render caches, etc.If you see media offline in specific scenarios but not others, please include that info in your post too.
Regards
ShrinivasThis post would be a lot more helpful if you link to the ways to do what you’re saying. I.E. where’s the link to the fix for this you mention, and how does someone use a render cache? How does someone generate diagnostic logs?
See the FAQ section of the forum for instructions regarding posting diagnostic logs (and lots more). You can download the latest Resolve software on the BMD website under the support area / Resolve.
Time Traveller
Resolve Studio 18.1.3 | Fusion Studio 18.1.3 | Win 11 Pro (22H2) | i9-7940x, P4000 (517.40, 8GB VRAM), 64GB RAM, M.2 boot, SSD scratch, RAID10 data | (laptop) 16″ MacBook Pro M1 MAX, 32 GPU cores, 64 GB RAM, 2 TB SSD, Ventura 13.2
![]() Thu Sep 01, 2022 1:49 am
Thu Sep 01, 2022 1:49 am

Возможно, при работе с DaVinci Resolve, вы сталкивались с проблемой, когда импортированный с вашей новой камеры или телефона, с алгоритмом сжатия h.265, видео-файл — вместо видеосигнала отображает плашку Media Offline.

Точно такая же плашка может появится, когда вы утратили исходный видеофайл, например, импортировав видео с флешки, которую в последствии извлекли, и в тому подобных случаях.
Однако, в отличие от случаев с действительно отсутствующим файлом, при данной проблеме вы точно имеете доступ к файлу, и более того, если начать воспроизводить его через ДаВинчи, аудио-дорожка будет прекрасно работать.
Все что нужно сделать, для того чтобы избавиться от таблички «Media Offline», и научить Resolve работать с файлами HEVC, это установить соответствующий кодек в систему.
Для пользователей Windows 10 и 11
Самое простое решение — это установить из магазина приложений Windows HEVC Video Extensions, и сразу же, даже без перезапуска ДаВинчи, ваши медиафайлы начнут правильно работать.
Увы, по ссылке выше, кодек платный. Однако существует и бесплатная версия данного приложения, которая автоматически привязывалась к вашему аккаунту, если вы покупали новый ноутбук или видеокарту. Вернее, стоимость данного кодека уже была включена в стоимость вашего устройства. Раньше его спокойно можно было установить прямиком из Microsoft Store, однако уже к концу 2020 года, для его установки требовалось ввести некий код, если это приложение не было привязано к вашему аккаунту. А с зимы 2022 года и вовсе — было скрыто из магазина приложений, автоматически устанавливаясь владельцам соответствующих устройств.
Поэтому вам придется получить приложение из другого источника — я разместила установочный пакет на своем сервере.
Обязательно проверьте SHA256 хэш перед установкой! Для размещенной мною версии 2.0.53348.0_x64 он будет:
3ea5551a0cfc342fe5b0904ca2b4c21027c78ef304244b6901ee58d7a4e003e2Пользователям других операционных систем
Стоит обратить внимание на x265, либо на OpenHEVC, однако эти решения не столь тривиальны и потребуют от вас понимания того как работает операционная система, и хотя-бы умения собирать исполняемые файлы из исходного кода.
Постскриптум
HEVC видео абсолютно непригодно для видеомонтажа. Настоятельно рекомендую, прежде чем приступать к монтажу, транскодировать медиафайлы в монтажный кодек, что значительно увеличит производительность программы.
Last updated on 26 October 2022
Opening DaVinci Resolve and continuing your current project to find that your timeline is filled with “Media Offline” everywhere instead of your clips that should be there instead. Learn how to fix media offline in DaVinci Resolve below.
Don’t worry! The clips are still there, DaVinci Resolve just can’t locate the files. We’ll show you how you can help DaVinci Resolve locate the files so you can continue your work.
Quick guide
On DaVinci Resolve:
- Navigate to the “Media Pool” panel in the “Edit” or “Media” tab – this is where all your imported media is located.
- Right-click on the background of the Media Pool and select “Relink Clips for Bins“
- Now all you have to do from here is locate where your files are and hit “Select folder“
Pro tip: If you aren’t sure where your files are located, you can broaden your search with DaVinci by doing a wider search on your computer such as searching through “Videos“, rather than a specific folder located in the videos folder. DaVinci will search for the files fairly quickly, a window should pop up that looks something like the image below.

800+ DaVinci Resolve Animated Elements
Over 800 unique drag & drop animations that work directly in DaVinci Resolve. Improve your video editing with professional video editing tools. No need to hire animators at a high cost & look more professional.
Provided in Apple ProRes 4444 + Alpha channel, MP4 H264 & PNG Photos.

Get 30% off – $84 $49
How to fix Media Offline – step by step
Here’s our step-by-step process which will go into more detail regarding the steps you need to follow to fix media offline in DaVinci Resolve.
Step 1 – In the “Edit” tab, locate the “Media Pool” panel
So you’ve opened up your project to find something that looks like the image below. The first task you need to complete is to find the “Master” panel. This is the panel where your imported media is located.
- Go to the “Edit” tab

- Go to “Media Pool” in the top-left. This is where you will find all of your media.

You can also find all of your media by going to the “Media” panel at the bottom of the screen. But either way will work the same.

Step 2 – Relink clips for bin
Right-click on the background of the master panel and select “Relink Clips for Bin“. This is so you can help DaVinci Resolve find the lost footage and fix media offline from showing up.

Step 3 – Locate your footage
A window will pop up looking similar to the below image. All you need to do now is locate your offline media.
If you’re struggling to find your offline media, then you can broaden your search in the OS by performing a wider search. (Searching through “Videos” instead of a specific folder located in Videos).
DaVinci Resolve will filter through thousands of files in a short amount of time to find your footage.

Go back to DaVinci Resolve. Your project should now look something like the below image. Your timeline should now be displayed as normal, and you should be able to continue working on your project.

Extra advice
If you only located a part of your offline media
If only a part of your footage was re-located, then it’s likely that the rest of the remaining footage is in another location. You can repeat the above steps and perform an even wider search than you performed before or you can search in a completely different location for the remaining footage.
If the above steps haven’t helped you fix offline media
It’s likely that your project is located on a hard drive or media server that your PC isn’t currently connected to. It’s worth double-checking that you’re connected to any servers that you need to be connected to and ensuring that you have any hard drives that could potentially contain the footage connected to your PC.
Video tutorial to fix “Media Offline”
Summary
You should now know how to quickly fix media offline within the DaVinci Resolve software. The process is similar to most video editing software, so it’s fairly easy to take the skills you’ve learnt today to other video editing platforms too.
Related
- Why Is DaVinci Resolve Free? + Free vs. Studio Differences
- How to Update DaVinci Resolve & Safely Backup Data
- Changing the Timeline Frame Rate in DaVinci Resolve
- How To Create Subtitles In DaVinci Resolve
- How to Add LUTs in DaVinci Resolve + Free Downloads
In the realm of sophisticated 8K editing, color grading, visual effects, and sound post-production, DaVinci Resolve 17 is the sole answer. With a single tap, you may switch between editing, color, filters, and audio. Whether you’re a solo artist or part of a huge team, it’s clear why DaVinci Resolve is the industry standard for high-end digital effects and finishes on more Hollywood motion pictures, television programs, and ads than any other program.
If you get an error warning in DaVinci Resolve claiming that your video is offline and you can’t assess your clips, don’t panic.
Get your adobe 60% student discount from here:
The most common explanation is that your records have been relocated or stored in a new place. Video files do not truly reside inside a DaVinci Resolve project file, and hence an error occurs as a result. Their position on your hard disc and the program uses them as a point of reference.
You’ll discover How to fix Davinci resolve media offline issue in this guide. Let’s get this party started, shall we?
DaVinci Resolve’s media offline problem may be fixed by following this step-by-step procedure. After a failed attempt to read your video, DaVinci Resolve will show you that it’s “Media Offline.”
Various factors, such as unlinked clips, VFR, and 4K 60 FPS H.265 video, might cause this. Fixing the problem is a piece of cake after you’ve located its source. Installing a few tools to remedy the problem may be necessary, depending on the underlying reason.
Let’s get this party started, shall we?
Common Media Offline Problems with DaVinci Resolver
When your imported videos within Resolve lose their connection with the primary footage stored on the hard drive, you may experience media offline as a consequence of unlinked clips.
In the course of exporting and importing your projects to a new machine, you may accidentally relocate your input footage to a separate folder or disc (laptop or desktop).
Problem-solving Steps:
- Visit the Media Pool
- Select all of your saved videos from your computer’s hard drive.
- After that, right-click on one of the chosen videos.
- Select “Relink Selected Clips” as the action to perform.
- The dialogue box will ask you to choose a location for the original footage.
- Click the Ok button to confirm your action.
Occasionally, DaVinci Resolve may ask for a “Comprehensive Search” in a dialogue box if certain clips aren’t discovered during a search.
When you click Search, Resolve will look for source files within the specified folder’s sub-folders. It may be necessary to restart the search if just a few clips are available due to a technical issue.
If you’re not bothered by broken links, go on to the next step.
Offline Media As Soon As It Is Imported
DaVinci Resolve may seem to indicate media as being offline when it isn’t. All of the imported clips in DaVinci Resolve go offline after you’re done. However, the audio is audible if you drag it into the timeline and attempt to play it. This is a problem with H.265 or HEVC codec video being played back.
HD video from GoPros and DJI Mavics (such 4K 60 FPS) is reduced to a smaller file size by using the H.265 encoding standard. Fujifilm’s XT4 and Sony’s A7S3 employ the H.265 codec, as do DSLRs.
Canon EOS 7D Mark III = XAVC HS (H.265) -> 10 bit 4:2:2 and 4:2:0 subsampling -> Ultra HD 120 FPS, Ultra HD 60 FPS, and other frame rates. In 10 bit 4:2:0 sub-sampling, Fuji XT3/XT4 = H.265 -> 4K 60 FPS, and so forth. The fundamental reason is a lack of HEVC or H.265 decoding capability.
It’s most likely a bug in Windows 10. To correctly decode H.265 video, it thus requires HEVC extensions
Solution:
- Then, either visit Microsoft Office or Google “Microsoft hevc video extensions” to get what you’re looking for.
- Select “Purchase” by clicking the “Buy” button. (You’ll be required to pay $0.99 for it.)
- Install the extension when it has been downloaded.
- Restart your computer to have changes take effect.
- That video should now be decoded in Resolve thanks to this fix.
Remember that H.265 decoding is supported by both the free and studio versions of DaVinci Resolve, but GPU acceleration is only available in the studio version.
Some random frames (not the full clip) exhibit media offline error during dragging or timeline playing after uploading the H.265 clips. Videos (4K 60 FPS) filmed using smartphones like the current iPhone models are more likely to have this issue. There are issues with inter-splicing media in offline frames that DaVinci Resolve Studio users must deal with.
Check to see whether your Resolve and GPU drivers are up-to-date. Then complete these steps if you don’t have them already:
Solution:
- If you’re a Studio user, you may adjust your GPU settings in DaVinci Resolve by going to the “Preferences” menu, then “System,” then “Memory and GPU.”
- “GPU Processing Mode” -> Select “Auto” rather than “CUDA” or “OpenCL.”
- Click “Decode Options” and then “H.265 utilising hardware acceleration” until they are both unchecked.
- Restart Decide on a solution and test it out.
Contrary to popular belief, consumers have reaped the benefits of this checking and unchecking. Don’t be afraid to give up on that idea.
A question mark appears in the timeline when a clip is missing. If you remove a video from the Media Library by mistake, a clip from the timeline will be missing.
Solution:
- Re-import the deleted files from your original drive into the storage pool.
- Audio synchronization problems or media not available for playback
DaVinci Resolve turns all imported clips offline, although the audio still sounds OK. There are occasions when the video and audio are out of sync. This is a typical problem with film shots at a variable frame rate (VFR).
Games like NVIDIA ShadowPlay and Open Broadcaster Software (OBS) record their gameplay in VFR format. (Instead, a DSLR or mirrorless camera records movies at a consistent frame rate.) Any NLE, such as DaVinci Resolve or Premiere Pro, expects movies to have a consistent frame rate.
As a result, making the switch from a variable to uniform framete footage is an excellent idea. To determine the framerate, you’ll need to download and run Mediainfo. Afterward, add a Handbrake to transform VFR into CFR mode.
Are you still having difficulties? Use This Guaranteed Method Instead
However, if you’re still unable to repair the media offline problem after completing the preceding methods, your best bet is to…
Transcode the video you’ve shot.
It’s nothing more than converting your video to a different format, such as:
H.264, Mpeg-4, VP9, etc. are examples of compression formats. These are very resource-intensive codecs that will tax the processing capacity of your laptop or desktop computer. (Handbrake is an option.)
Codecs that are easy to work with in post-production, such as DNxHD (for Windows) or ProRes (Mac). However, although they use a lot of disc space, they’re quite simple to modify and colour-correct. The command-line interface tool FFMPEG (which may be used) is available.
Use Handbrake to convert FFMPEG files to editing-friendly codecs like DNxHD, PRORES, etc.
- Convert all of your videos in a bulk into a format that DaVinci can understand, such as H.264.
In DaVinci Resolve, import the video files. Then choose the delivery tab, export the video files, and import them into your desired format and post-production-friendly codec.
Using this method, you may create films that are both large in file size and simple to edit.
- Start trimming in DaVinci Resolve after importing the videos. Alternatively, After you’ve imported the DaVinci Resolve-capable video files, you’ll need to:
- Activate the “Optimized Media and Render Cache” option under “Project Settings” -> “Master Settings.”
- Choose a codec that’s easy to modify, such as DNxHR HQX or Uncompressed 10-bit.
- Save your work by clicking the “Save” button.
- Select “Playback” -> “Use Optimized Media If Available” from the drop-down list.
- That’s all there is to it.
Additional Methods to fix the media offline problem
Method 1: Check the Media Location
The first step to resolve the media offline issue in Davinci Resolve is to check the location of your media files. The software needs to access the media files to be able to import and use them in your projects. If the location of the media files has changed, Davinci Resolve will not be able to find them and will display the media offline error message.
To check the location of the media files, go to the media pool, right-click on the media offline clip, and select “Locate”. A window will appear that allows you to browse your computer and find the new location of the media file.
Method 2: Check the File Format
Another reason why Davinci Resolve may show the media offline error message is due to an unsupported file format. The software only supports a limited number of file formats, and if your media file is in a format that is not supported, it will not be able to import it.
To check the file format, right-click on the media offline clip and select “Properties”. The properties window will display the file format of the media file. If the format is not supported, you will need to convert it to a supported format using a video conversion tool.
Method 3: Check the Disk Space
Davinci Resolve also requires a certain amount of disk space to function properly. If your disk space is running low, it can cause the software to display the media offline error message. To check your disk space, go to the “About” section in the software, and it will display the amount of disk space available on your computer. If you need more disk space, you can free up some space by deleting unneeded files or moving them to an external hard drive.
Method 4: Check for Corrupted Files
In some cases, the media offline error message may appear due to corrupted files. Corrupted files can be caused by a variety of reasons, such as a power outage, software crash, or a virus. To check for corrupted files, you can use a file recovery tool that will scan your hard drive and repair any corrupted files.
Method 5: Reinstall Davinci Resolve
If the above steps do not resolve the media offline issue in Davinci Resolve, you may need to reinstall the software. Uninstalling and reinstalling the software can often fix any underlying issues that are causing the error message to appear.
To reinstall Davinci Resolve, go to the “Programs and Features” section in your computer’s control panel, find the software in the list, and select “Uninstall”. Once the software has been uninstalled, restart your computer and then reinstall the software from the official website.
Method 6: Update Davinci Resolve
An outdated version of Davinci Resolve can also cause the media offline error message to appear. It is important to regularly update the software to ensure that it is functioning properly. To update Davinci Resolve, go to the “Help” section and select “Check for Updates”. If an update is available, follow the on-screen instructions to install it.
Method 7: Check the Media Drive
If the media offline error message appears for all your media files, it is possible that the media drive is not functioning properly.
To check the media drive, you can run a disk check on it to ensure that it is not corrupted.To run a disk check, right-click on the drive, select “Properties”, and go to the “Tools” tab. From there, you can select “Check” to run the disk check.
Method 8: Reset Davinci Resolve Preferences
Resetting the preferences in Davinci Resolve can also help resolve the media offline error message. To reset the preferences, go to the “Preferences” section and select “Reset All”. This will reset the preferences to the default settings and can help resolve any underlying issues causing the media offline error message to appear.
Method 9: Relink Media
If the media offline error message appears for specific files, you can try relinking the media to the project. To relink media in Davinci Resolve, right-click on the clip in the timeline and select “Relink Media”. From there, you can select the file that you want to link and click on “Relink”. This will reconnect the media to the project and should resolve the media offline error message.
Method 10: Check File Permissions
In some cases, the media offline error message may appear due to incorrect file permissions. To check the file permissions, right-click on the file and select “Properties”. From there, go to the “Security” tab and make sure that you have the correct permissions to access the file. If you do not have the correct permissions, you can change them by clicking on “Edit” and selecting the appropriate permissions.
Method 11: Re-Import Media
If none of the steps above resolve the media offline error message, you can try re-importing the media into the project. To re-import media, go to the “Media” section and select “Import”. From there, select the media that you want to import and follow the on-screen instructions. This will create a new link between the media and the project and should resolve the media offline error message.
Conclusion
The problem with this issue is that the software may not be properly synchronising the audio and video for the incoming media.
It occurs when you import a video file that was shot in real time with a camera that doesn’t have an electronic shutter, or when you have a footage edited with a codec such as ProRes.
This is one of the most debilitating problems in the field of digital video editing. It can result in errors that manifest while processing audio and video. If you get an error claiming that your video is offline and you can’t assess your clips, don’t panic.
Don’t freak out. This has happened to most of us. We sit down after filming our project, stretch our fingers, and begin importing all of our footage. While we wait, we do a few extra things to our footage, grab a sandwich, start doing a light edit, and then realize we didn’t want a clip after all and delete it. Before you know it, you are met with a red screen of terror to tell you that your beloved footage is not currently present. But don’t worry. I’m here to tell you how to fix the DaVinci Resolve media offline issue.
Why Does DaVinci Resolve say Media offline?
There are multiple reasons why this is happening. The most common is that a file you imported into your media pool is no longer linked to its source file outside. i.e.: you moved your files to a different drive or folder. I had also had this happen when I simply renamed files.
A few other reasons are as follows:
- Missing clips. This happens when you delete a file from your media pool, but the clip still exists in your timeline.
- H.265 or HEVC camera codecs.
- A very rare instance with using Sony cameras and XAVC camera codecs and renaming files on your drive as opposed to within DaVinci.
Unlinked Clips
Let’s first address unlinked clips. If you have moved your files to a new drive, new computer, or a new folder, then you will automatically need to relink it.
Next Step: Relink Clips
To relink your clips:
- Go into your media pool and select your missing clips.
- Right-click on one of the missing clips and click “relink selected clips.”
- Navigate to the folder that has your footage in it.

If different clips are in other folders, let’s say, scene 1 or scene 2, etc., then DaVinci will ask you to perform a comprehensive search which allows it to look in subfolders of bigger folders. This is helpful when you have a bunch of files missing, and the source files are in multiple folders. However, if you only have a few, I would recommend linking them one at a time and navigating to the exact folder it’s in so DaVinci can find them quickly. This shouldn’t be an issue if all of your files are in one folder.

Missing Clips From Media Pool
If your problem is a missing clip from your media pool, then you can reimport your media into the media pool from your source folder.
Next Step: Reimport Media Into Media Pool
To reimport your media into the Media Pool, go to File -> Import -> Media. Or simply drag and drop your clips into the Media Pool.

H.265 and HEVC Camera Codec
As our tech advances, we will need to do a little bit extra to be able to decode particular codecs so that DaVinci can work with them. Cameras like GoPros and certain drones use this codec because it allows them to film large file formats like 4k60fps at half the file size.
Next Step: Windows HEVC Extension
If you are on Windows, you can get a free extension by going to Free-codecs.com, clicking Download at the bottom of the screen, and then downloading whichever one pertains to your operating system. Microsoft also has an extension for $0.99 if the free codecs don’t work. Once you have downloaded and installed the extension, restart your PC.

While it is excellent that both DaVinci Resolve Free and Studio both support H.265 decoding, understanding all that goes into CPU and GPU decoding can be kind of a headache. Therefore, if you want to work with these files, the easiest way to get them compatible is to use the Optimize Media feature within DaVinci. This will give you smoother playback with less stress on your CPU or GPU.
Next Step: Optimize Media
To optimize your media, you must first decide what kind of media you want. You can do this by heading over to your project settings (shift 9 for both Mac and PC). Once you have chosen your preferred media type, which will change depending on your needs, change the storage location so your optimized media won’t be in the same folder as your source files.

You can then right-click on your files and click Generate Optimized Media. Depending on the original file size and the codec you are changing, this may take a few minutes. So now is the time to grab that sandwich. Once DaVinci has created the media, you can then go to “Playback” and check on “Use Optimized Media if Available.” This feature is nice because when you need to watch performance playback in real-time, the optimized media will be a better choice for smoothness. But then, if you are color grading, you might want to use the raw footage.

Sony Cameras and XAVC Codec
Let me preface this by saying it is a rare issue but is an issue nonetheless, and I would like you all to keep your hair because I certainly lost a lot of my own. If you are like me and have a specific way of labeling your footage, then listen up. Over the years, I have heard filmmakers talk about importing their footage into their editing software and then doing all of the sorting and labeling.
In my experience of working on a lot of 48 hour to 72 hour film festivals or just working in short turnarounds, that is an insane waste of time. Before I even open the editing program, I label my files, separate them into folders, mark the ones I plan to use, and then import those into the editing software.
Speaking of 72 hour film festivals, here is 5ive, a short we did for the Adrenaline Film Project.
Now back to our topic!
If this is also your process, your files are missing, and you are using Sony or the XAVC codec, this could be the reason why.

I say this with all of the enthusiasm in the world. Don’t touch, rename, move, or even look at those source folders. The minute one of those folders is renamed, or you have renamed a clip, there is no going back because that codec is labeled and placed in those folders the way it is for a reason.
Your media will forever be offline, and you will have to do another media dump of all of your cards. All while praying to the film gods that you haven’t reformatted the card with your files on it. Right now, your only step is to offload all of your footage again, reimport it into DaVinci, and then do all your renaming and sorting.
The best way to attack this issue is to be ahead of it in the first place. Think of my unfortunate experience as a cautionary tale.
After almost a year of not finding anything online about this issue, I was able to attend NAB, where I spoke to a Black Magic rep, bless this human, and they said this was something specific to that codec and Sony cameras. Now don’t worry. This isn’t all completely hopeless because I also spoke to a Sony rep at Cinegear this year, and they have said that is something they plan to address to make sorting their footage a little bit easier. We will all soon rejoice.
Finally, Verify The Files
You always want to make sure that you have relinked the correct clips. If for some reason, you have linked the wrong one, you can always right-click the clip in your Media Pool and relink it again.
Conclusion
Whether it’s a misplaced clip, moved file, or different camera codec, I hope you found this article helpful on how to fix DaVinci Resolve media offline. Always make sure you are keeping track of your clip locations to help prevent media from disappearing from your timeline.
I would love to hear your thoughts or tips and tricks regarding DaVinci Resolve Media Offline. Leave us a comment below, and happy filmmaking!
Last Updated on August 9, 2021
Media going offline simply means that DaVinci Resolve has lost track as to where the source file is. It’s easily remedied and nothing to be worried about, but sometimes Resolve will display a Media Offline error if it cannot ingest the file for one reason or another.
For instance, if you’re using the Free version of Resolve and import 10-bit footage from a Panasonic GH5, it’ll bring up the Offline error to indicate that you’re not able to use it.
While it appears to be a catch-all for Blackmagic to use to just indicate something has gone wrong, it rarely ever indicates what has gone wrong. Usually, though, this is just a simple fix of relocating the source files.
Fix Any Loose Connections
We can do this in a few ways and the simplest solution is to just first check that the USB device you’ve got connected to the computer hasn’t come loose. Plug it in again and in Resolve right click the media that’s gone offline and press “Relink”, this will scan the PC for the original file if it can’t find it immediately. Once that’s done, it’ll be able to be used again.
Media Offline: Relink Files
Sometimes you might have accidentally moved the source footage from one place to the other, resulting in Resolve ‘losing it’. The one thing to do now is to simply relink it with the same method above.
Right-click on “Relink Media”.
If there are multiple clips missing, you can highlight them all in the Media Pool by either clicking in and pressing CTRL+A or clicking and dragging over the required clips.
If the file could not be found, Resolve will once again do a comprehensive search for each file that’s missing.
Recover Deleted Clips
Okay, you’ve made a mistake and deleted the original clip and it’s no longer in your recycle bin or storage device. Resolve has flagged it – rightfully – offline and you’ll need to begin tracking it down.
If it’s an image or video you downloaded from the internet, as long as you can find the original file and have it match the name that you imported it into Resolve with, it should realign and bring it back into the fold.
However, if it was an originally created clip – filmed or screen captured – you might be out of luck in this case. There’s methods of file retrieval as detailed by Microsoft, but you’ll absolutely need to have two drives, external or internal.
Windows Recover Media
To do this, you’ll need to do the following with a Command Prompt and running it as Administrator.
Type chkdsk X: /f, replacing X with the drive you want to search.
Once completed, proceed to the next prompt and type ATTRIB -H -R -S /S /D X:. (replacing X with the letter of the hard drive.
To copy paste this into Command Prompt, copy and paste as usual here and then just right click into the black box.

- By Funmi Looi Somoye
- Feb 9, 2023

- By Umer Abdullah
- Feb 9, 2023

- By Camilo Delgado
- Feb 9, 2023

- By Funmi Looi Somoye
- Feb 9, 2023