Be sure a memory count error did not occur
3.
displaying memory count during POST.
Server fails to recognize new memory
Action:
Be sure the memory is the correct type for the server and is installed according to the server
1.
requirements. See the server documentation or HP website (http://www.hp.com).
Be sure you have not exceeded the memory limits of the server or operating system. See the server
2.
documentation.
Be sure no Event List error messages are displayed in the IML
3.
77).
Be sure the memory is seated properly
4.
Be sure no conflicts are occurring with existing memory. Run the server setup utility.
5.
Test the memory by installing the memory into a known working server. Be sure the memory meets the
6.
requirements of the new server on which you are testing the memory.
Replace the memory. See the server documentation.
7.
Server fails to boot, all DIMM LEDs illuminate amber, ….
…the health LED is blinking red, the system emits continuous beeps, and an entry is logged to the Integrated
Management Log (IML)
Possible cause: The server is an HP ProLiant G6 server with 5500-series Xeon processors installed. The
DIMMs are not installed according to the server requirements.
Action: Be sure the memory is the correct type for the server and is installed according to the server
requirements.
•
Do not mix Unbuffered and Registered PC3 DIMMs.
•
Populate DIMM slots for a processor only if the processor is installed.
•
If Unbuffered DIMMs are installed, each channel supports a maximum of two DIMMs.
•
If quad-rank DIMMs are installed for a processor, a maximum of two DIMMs can be installed on each
channel for that processor.
•
If a channel contains quad-rank DIMMs, the quad-rank DIMM must be installed first on that channel.
For more information, see the server documentation on the HP website (http://www.hp.com/support).
If the system is configured with HP iLO 2 Firmware version 1.75, the IML message reports the following
message:
Uncorrectable Memory Error (Module Unknown)
This does NOT indicate a failed DIMM; this only indicates a DIMM configuration error.
If the system is configured with HP iLO 2 Firmware version 1.77 or later, the IML message reports the
following message:
Memory Configuration Error: System boot halted
For more information, see the server documentation on the HP website (http://www.hp.com/support).
(«Memory count error
(«Integrated Management
(«DIMM handling
guidelines» on page 19).
exists» on page 49). See the message
Log» on page
Hardware problems 50
#1
![]()
Отправлено 14 Октябрь 2014 — 07:33
Купили память HP 8Gb 2Rx4 PC3-10600R-9 kit(500662-B21) для сервера HP DL320 G6. Установили на слоты 3A и 6B, как описано в конфигураторе на сайте hp.com . Пишет «207-Invalid Memory Configuration — System Halted!»
Что делать? Поставили Proliant System BIOS — W07(07/02/2013). Толку нету. В биосе установили максимальную частоту 1333Mhz для памяти.
#2
![]()
megagleb
Отправлено 17 Октябрь 2014 — 06:53
Добрый день.
Установите только HP 8Gb 2Rx4 PC3-10600R-9 kit, согласно инструкции на крышке сервера.
Ремонт и сервисное обслуживание ленточных библиотек, систем резервного копирования, автозагрузчиков, серверов, сетевого оборудования.
Организация электронного архива, экспертиза, проектирование, резервное копирование информации. Подробнее — http://nstor.ru/ru/service/
Сервисный отдел компании NStor: service@nstor.ru , +7(495) 374-74-35, Москва, Колодезный пер. 3 стр. 4
#3
![]()
Sergey14
Отправлено 17 Октябрь 2014 — 07:51
Спасибо. сам уже разобрался. Крышка никакой роли не играет. подбирал по конфигуратору сервера на сайте HP. Конфигуратор HP не учитывает модель процессора сервера.
Процессоры Intel XEON W35XX не поддерживают память REGISTERED. Поддерживают память UNBUFFERED. В чем была моя ошибка и косяк в конфигураторе на сайте HP.
Добрый день.
Установите только HP 8Gb 2Rx4 PC3-10600R-9 kit, согласно инструкции на крышке сервера.
Содержание
- TruDDR4 memory POST/UEFI event: [W.58007] — unsupported DIMM population — Lenovo x86 Servers
- Troubleshooting
- Problem
- Resolving The Problem
- Source
- Symptom
- Affected configurations
- Solution
- Workaround
- Additional information
- Ошибки и проблемы серверов большой тройки: часть третья. IBM
- Оперативная память
- Накопители
- Обновление прошивок и ПО
- Другие проблемы
- Преимущества серверов IBM
TruDDR4 memory POST/UEFI event: [W.58007] — unsupported DIMM population — Lenovo x86 Servers
Troubleshooting
Problem
[This abstract has been truncated due to length constraints] Light path diagnostic panel Light Emitting Diodes (LEDs) ‘MIS’ and ‘MEM’ are illuminated on Flex System x240 M5 Node. Light path diagnostic panel LEDs ‘Check log LED’ and ‘System errorLED’ are illuminated for NeXtScale and System x servers. If memory population rules are not followed, the server will log erroneous DIMM failed memory test error along with memory configuration errors: POST/UEFI Event [W.58007] — Unsupported DI MM population POST/UEFI Event [S.58008] — DIMM failed memory test POST/UEFI Event [W.50001] — DIMM disabled IMM Event [W.58007] — Invalid memory configuration (unsupported DIMM Population) detected. Please verify memory configuration is valid. IMM Event [S.58008] — A DIMM has failed the POST memory test. [*] where DIMM stands for Dual In-line Memory Module. [*] where MIS stands for mismatch occurred between the processor
Resolving The Problem
Source
RETAIN tip: H213780
Symptom
Light path diagnostic panel Light Emitting Diodes (LEDs) ‘MIS’ and ‘MEM’ are illuminated on Flex System x240 M5 Node.
Light path diagnostic panel LEDs ‘Check log LED’ and ‘System error LED’ are illuminated for NeXtScale and System x servers.
If memory population rules are not followed, the server will log erroneous DIMM failed memory test error along with memory configuration errors:
POST/UEFI Event [S.58008] — DIMM failed memory test
POST/UEFI Event [W.50001] — DIMM disabled
IMM Event [W.58007] — Invalid memory configuration (unsupported DIMM Population) detected. Please verify memory configuration is valid.
IMM Event [S.58008] — A DIMM has failed the POST memory test.
[*] where DIMM stands for Dual In-line Memory Module.
[*] where MIS stands for mismatch occurred between the processors, DIMMs, or Hard Disk Drives (HDDs) within the configuration as reported by Power On Self-Test (POST).
[*] where MEM stands for a memory fault. The corresponding DIMM error LEDs on the system board will also be illuminated.
Affected configurations
The system may be any of the following Lenovo servers:
- Lenovo Flex System x240 M5 Compute Node, type 9532, any model, any AC1
- Lenovo NeXtScale nx360 M5, type 5465, any model
- Lenovo NeXtScale nx360 M5, type 5467, any model
- Lenovo System x3500 M5, type 5464, any model
- Lenovo System x3550 M5, type 5463, any model
- Lenovo System x3650 M5, type 5462, any model
This tip is not software specific.
This tip is not option specific.
Solution
This behavior is corrected in 2Q2015 Unified Extensible Firmware Interface (UEFI) Flash Update as follows:
- NeXtScale nx360 M5, type 5465 Version 1.20 — Build D: THE108J
- Flex System x240 M5, type 9532 Version 1.10 — Build ID: C4E106J
- System x3500 M5, type 5464 Version 1.11 — Build ID: TAE106J
- System x3550 M5, type 5463 Version 1.10 — Build ID: TBE106K
- System x3650 M5, type 5462 Version 1.10 — Build ID: TCE106K
The erroneous DIMM failed memory test error tied to the event [S.58008] will no longer be logged when DIMM population rules are not followed.
The file will be available by selecting the appropriate Product Group, type of System, Product name, Product machine type, and Operating system on IBM Support’s Fix Central web page, at the following URL:Â Â Â Â
Workaround
The DIMM memory scrub error can be safely ignored.
To resolve DIMM memory configuration error, follow memory population rules as documented in the individual server installation guidelines. Do not order new DIMMs for this error.
The supported DIMM population rules for each channel are as follows, where DIMM0 is the DIMM in the channel furthest away from the CPU:
SR — Single Rank DIMM (Registered Dual In-Line Memory Module) DR — Dual Rank DIMM (Registered Dual In-Line Memory Module) LR — LRDIMM (Load Reduced Dual-inline Memory Module)
IMPORTANT: Mixing of RDIMM with LRDIMM in a system is not supported.
(where LRDIMM = Load Reduced Dual In-Line Memory Module)
Additional information
With the introduction of the Intel Xeon E5-2600 v3 processor architecture, Intel memory reference code (MRC) is enforcing DIMM population rules.
If a memory channel has an unsupported memory configuration, the DIMMs will be disabled in that channel and the system will continue to boot if additional memory is found in the other memory channels. The system will indicate a memory configuration error for the disabled channel, and the memory error LED will indicate the slot with the unsupported memory configuration.
DIMMs disabled due to memory configuration error should not be considered as bad and bereplaced with new parts. Instead, they should be reinserted into a supported memory configuration.
If no system memory can be found as a result of an unsupported memory configuration, the system will halt with a memory configuration error.
Источник
Ошибки и проблемы серверов большой тройки: часть третья. IBM

Привет, Хабр! В прошлых статьях мы касались ошибок и проблем с серверами Dell и HP, и наш рассказ об ошибках refurbished-серверов был бы неполон без упоминания продукции третьего вендора «большой тройки» — IBM. Хотя эта славная корпорация уже отошла от производства серверов, её продукция ещё активно используется. Поэтому спешим поделиться с вами накопленным опытом «укрощения» серверов IBM. Это не исчерпывающий список проблем, но всё же он может оказаться кому-то полезен.
Оперативная память
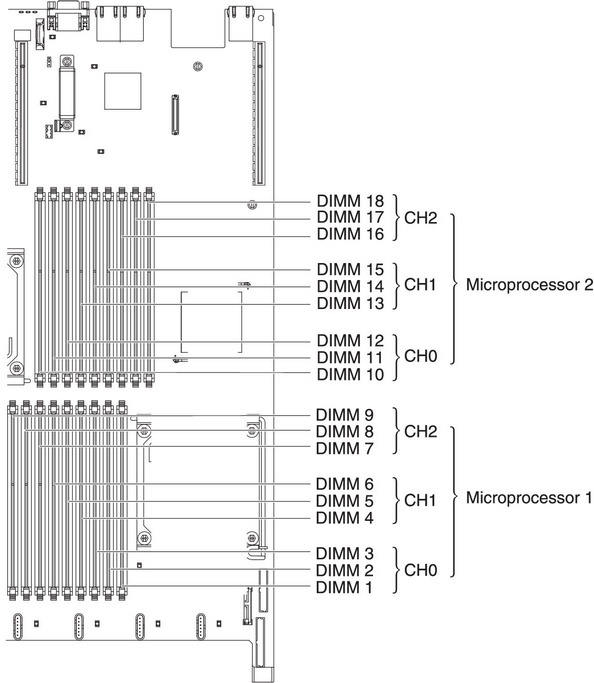
Серверы IBM чувствительны по отношению к конфигурации модулей памяти. Зачастую после самостоятельного апгрейда — добавления памяти или её замены — сервер не загружается, либо видит меньше памяти, чем установлено на самом деле. К счастью, в подобных ситуациях не приходится долго гадать о причинах сбоя: на диагностической панели (если таковая имеется) загораются два индикатора Config и Memory.
Поэтому, прежде чем апгрейдить память обязательно изучите спецификацию, память какого типа и объёма поддерживается вашим сервером. Также большое значение имеет количество процессоров в сервере — от этого зависит порядок размещения модулей в слотах. Это тоже необходимо уточнить в спецификации.
Вообще, с памятью ровно такая же ситуация, как описано в статье про HP, например. Вкратце:
- Соблюдайте канальность памяти.
- Ставьте ECC REG 1(2)Rx4 память в двухпроцессорные системы и UDIMM — в однопроцессорные.
- Ставьте одинаковый объём памяти на каждый процессор.
А что делать, если вы вставили память в соответствии с инструкциями, а сервер всё равно не работает и предательски горит индикатор Memory? В этом случае придётся проверять разные варианты:
- Этот тип памяти не поддерживается сервером. Внимательно сверьтесь со спецификациями.
- Память оказалась «битой». Замените линейку на точно такую же и проверьте, заведётся ли сервер.
- Засорился пылью слот на материнской плате. Это довольно популярная причина, если сервер трудится уже несколько лет, а тем более если вы его не первый владелец. Продуйте слоты сжатым воздухом.
- Загнутый контакт в сокете. Такое бывает очень редко, но всё же бывает: память отказывается работать из-за загнутого контакта в сокете процессора. Если предыдущие варианты не помогли найти причину сбоя, снимите процессор и внимательно осмотрите сокет. Если вы оказались в числе немногочисленных «счастливчиков», то можете попробовать осторожно выпрямить погнутый контакт, но это исключительно на ваш страх и риск.
Многие сисадмины сталкиваются с тем, что при проверке оперативной памяти с помощью MemTest86 получают сообщения об ошибках даже в заведомо рабочих модулях, либо на одних и тех же дорожках. Особенно часто это встречается у серверов поколения M4. Это вовсе не вина машин или памяти: MemTest86 не рекомендуется использовать для проверки серверной памяти. Если же память начнёт сбоить, то сервер сообщит об этом через диагностическую панель. Проверять память на серверах IBM лучше стандартными средствами самодиагностики.
Накопители
Мы уже неоднократно упоминали о том, что совсем не обязательно устанавливать в серверах «родные» накопители. Ни IBM, ни другие вендоры их не производят, они лишь приобретают их у всем известных производителей, перепрошивают и клеят свои логотипы. Поэтому вы можете без труда сэкономить на апгрейде или восстановлении дисковых массивов, выбрав аналоги вместо «родных» накопителей. Двух-трёхкратная разница в цене это оправдывает, особенно если речь идёт о refurbished-серверах. В сети можно легко найти таблицы соответствия моделей, например:
| Модель IBM | Оригинал |
|---|---|
| IBM 49Y2003 | Seagate ST9600204SS |
| IBM 90Y8872 | Seagate ST9600205SS |
| IBM 90Y8908 | Seagate ST9600105SS |
| IBM 81Y9650 | Seagate ST900MM0006 |
Тем не менее, ещё возможны ситуации несовместимости «неродных» накопителей с сервером. В этом случае сервер не грузится штатно, либо не видит накопитель. Обычно это решается с помощью установки свежей прошивки RAID-контроллера. К слову, рекомендуется обновить прошивку и бэкплейна/экспандера, в этом вам поможет приложение IBM Bootable Media Creator (BoMC).
При включении сервера и прохождении POST-проверки возможно появление ошибки:
A discovery error has occurred, please powercycle the system and all the enclosures attached to this system.
Это сигнализирует о проблеме с одним из накопителей. Вычислить его просто: индикаторы на его салазках постоянно мигают, даже когда все остальные носители прошли проверку и перестали мигать.
С дисковой подсистемой бывают и более экзотические проблемы. Например, при использовании RAID-1 в фирменном приложении MegaRAID Storage Manager могут появиться ошибки вида:
ID = 63
SEQUENCE NUMBER = 48442
TIME = 24-01-2016 17:03:59
LOCALIZED MESSAGE = Controller ID: 0 Consistency Check found inconsistent parity on VD strip: ( VD = 0, strip = 637679)
Чаще всего это говорит не об умирании диска, а об ошибке контроля чётности — несовпадении данных на основном и вторичном дисках. Возможные причины:
- Нередко такие ошибки появляются сразу после конфигурирования нового массива или после замены одного из дисков.
- Во время сеанса диагностики поверхности блинов происходит инициализация диска и выполнение операций ввода/вывода. На RAID-1 это может привести к временному несоответствию томов, которое автоматически исправляется при следующей проверке на соответствие. Такое возникает не при любом сеансе диагностики, а когда сходятся звёзды:
- o Используется RAID-контроллер без кэширования, либо активирован режим Write Through.
- o Нехватка оперативной памяти, при которой с диска осуществляется активная подкачка страниц.
- o Просто очень интенсивное использование дисков.
Для решения этой проблемы рекомендуется снизить активность подкачки с диска: используйте RAID-контроллер с кэшированием и увеличьте объём оперативной памяти.
Обновление прошивок и ПО
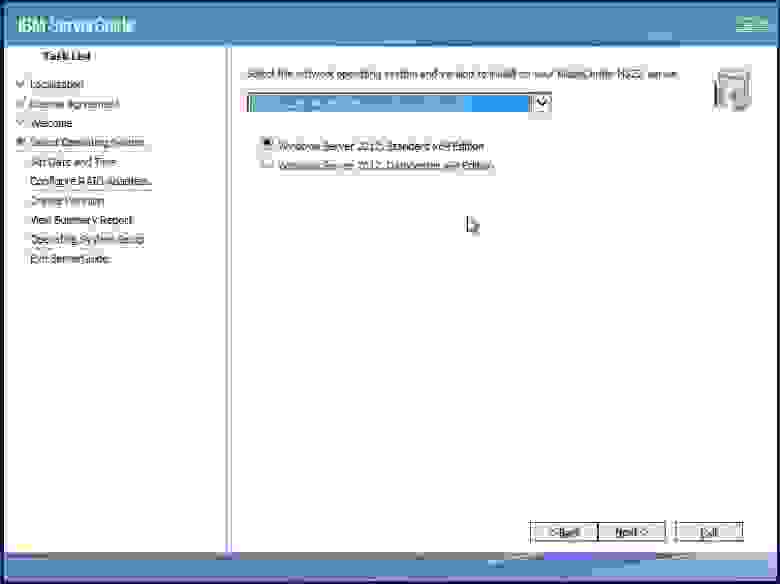
Любопытная проблема может подстерегать при установке с нуля Windows 2012 или Windows 2012 R2 — свежеустановленная операционка не видит ни одного накопителя. Причём такое бывает не только с серверами IBM. Дело в том, что все накопители в сервере подключены через RAID, а упомянутые версии ОС не имеют вшитых драйверов для работы с RAID. И поэтому они их просто игнорируют. Как быть? Самый надёжный способ: использовать утилиту IBM ServerGuide. При установке ОС она принудительно подсовывает все необходимые драйвера для данной модели и версии операционной системы. Обратите внимание, что образ ОС должен устанавливаться с диска, а не с флэшки: ServerGuide не будет работать с образом на том же USB-носителе, с которого запущен сам.
При покупке серверов бывают ситуации, когда нужно сначала обновить все прошивки, а потом уже накатывать систему. Сделать это можно с помощью вышеупомянутой IBM Bootable Media Creator:
- Загрузитесь с загрузочной флешки или диска.
- Запустите BoMC от имени Администратора.
- Выберите, что вы хотите сделать: обновить и/или провести диагностику.
- Программа спросит, где ей взять драйверы: скачать самой или вытащить из указанного вами архива.
- Выберите носитель для записи загрузочного образа: флэшку или диск. Запись может идти несколько часов, не волнуйтесь, программа не зависла.
- По окончании записи загрузитесь с этого носителя, и далее по инструкции.
Эта процедура помогает и в ряде проблемных ситуаций. Например, если вы не дождались завершения обновления Integrated Management Module и нажали кнопку «отмена», то при следующих загрузках сервер может не суметь загрузить IMM и использует настройки по умолчанию. Можно сначала попытаться восстановить с помощью джампера “UEFI & IMM recovery jumper” на материнской плате, благодаря которому загружается прошитый образ IMM.
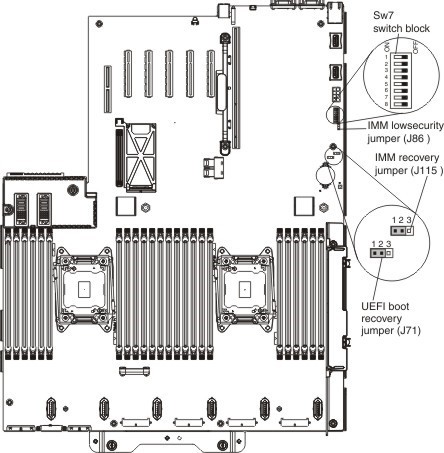
Но если не поможет, то воспользуйтесь процедурой обновления через BoMC.
Бывают и более неприятные ситуации, когда по закону подлости в ходе установки более свежей версии BIOS’а происходит сбой питания.

После этого сервер уже не может загрузить основную прошивку, и использует резервную. Если штатная процедура восстановления BIOS’а не помогает, то сделайте… даунгрейд: установите более старую прошивку, чем та, что была до сбоя питания. Обычно это помогает. После этого уже можно попытаться снова поставить свежую версию BIOS’а. Как говорится, шаг назад — два вперёд.
Другие проблемы
Иногда при попытке удалённого управления сервером возникает ошибка “Login failed with an access denied error.”, причём в любых браузерах. Если перезагрузка сервера и клиента не помогает, то рекомендуется сбросить IMM до заводских настроек.
В статье про ошибки серверов HP мы упоминали о проблемах с системой охлаждения: сразу после запуска сервера вентиляторы выходили на высокие обороты и уже не снижали их. Случается такой недуг и в серверах IBM. Сервер воет, как реактивный лайнер на взлёте. Нам не удалось выяснить причину таких сбоев, но посоветовать можно следующее:
- Проверьте плотность подключения разъёмов питания.
- Отключите все вентиляторы и снимите корзину.
- Проверьте каждый вентилятор на других серверах.
- Соберите корзину снова, поменяв вентиляторы местами. Либо совсем их замените.
Встречался в нашей практике и такой интересный сбой: при загрузке сервера штатно инициализируется IMM, затем начинается инициализация UEFI, и… всё. Дальше сервер не грузится без объяснения причин. Не помогали никакие манипуляции: отключение от сети, полное обесточивание, отключение разных компонентов. Загрузка бэкапа UEFI с помощью джампера на материнской плате тоже не помогла. Опытным путём выяснилось, что если подождать около 20 минут, то всё же можно дождаться загрузки сервера. Так он и работает с тех пор — каждый раз грузится по 20 минут. Выяснить причину сбоя не удалось.
Преимущества серверов IBM
Серверы IBM заслуженно пользуются большой популярностью:
- Это простые и очень надёжные машины.
- Отличная расширяемость даже на начальных моделях и богатый комплект поставки.
- Серверы IBM обычно дешевле конкурентов и не уступают в производительности. Например, поколения M3 и M4 дешевле, чем аналоги у HP (Gen7 и Gen8) и Dell (11G и 12G).
- Самые недорогие расходники. Легко найти в России.
- Удобная диагностическая панель на многих моделях.
Главное, в чём серверы IBM уступают конкурентам — у них очень долгий «холодный» старт.
Источник
101—Option ROM Checksum Error
System ROM checksum.
Verify the you have the latest ROM:
-
Flash the ROM, if needed.
-
If an expansion card was recently added, remove it to find out if the problem remains.
-
Clear CMOS. If the message disappears, there might be a problem with the expansion card.
-
Replace the system board.
102—System Board Failure
DMA, timers, and so forth, might be set improperly or might be defective.
-
Clear the CMOS.
-
Remove the expansion boards.
-
Replace the system board.
110—Out of memory space for option ROMs
Option ROM for a device could not run because of memory constraints.
Run the Computer Setup (F10) Utility to disable unneeded option ROMs, and to enable ACP0/USB Buffers at Top of Memory.
162—Systems Options Error
163—Time and Date Not Set
-
Invalid time or date in configuration memory.
-
RTC battery might need replacement.
-
CMOS jumper might not be properly installed.
-
Set the date and time from the Control Panel or in the Computer Setup (F10) Utility (depending on the operating system).
-
If the problem persists, replace the RTC battery.
164—Memory Size Error
Memory configuration is incorrect.
-
Run the Computer Setup (F10) Utility or the Windows utilities.
-
Verify that the memory modules are installed properly.
-
If third-party memory has been added, test the memory configuration using HP memory.
-
Verify the memory module type.
201—Memory Error
RAM failure.
-
Run the Computer Setup (F10) utility or the Windows utilities.
-
Be sure that memory modules are installed correctly.
-
Verify the memory module type.
-
Remove and replace memory modules one at a time to isolate faulty modules.
-
Replace faulty memory modules.
-
If the error persists after replacing memory modules, replace the system board.
202—Memory Type Mismatch
Memory modules do not match.
Replace the memory modules with matched sets.
203—Memory module failed self-test and failing rank was disabled
Defective memory module.
Replace the memory module.
204—Memory module failed and user rank was disabled
Improper module load.
Reseat the memory module correctly.
205—Memory high temperature detected
Insufficient memory module cooling.
Verify that a memory module cooling fan is installed and operating.
206—Memory setup invalid
Memory configured incorrectly.
Reconfigure the memory modules in the proper slots.
207—Incompatible DIMMs detected
DIMMs are installed that do not fulfill system requirements.
-
Verify that the memory module type matches workstation requirements.
-
Insert the DIMM in the proper memory socket.
-
Replace the DIMM if the problem persists.
208—Mismatched DIMMs detected
Installed DIMMs are improperly matched.
Verify that matching DIMMs are installed.
209—Memory warning condition detected
Incorrect memory module type in use.
Verify that the memory modules are compatible with workstation requirements.
212—Failed Processor 0
Processor has failed to initialize.
-
Reseat the processor in its socket.
-
If the processor does not respond, replace it.
-
Replace the system board.
213—Incompatible Memory Modules
A memory module in the memory socket identified in the error message is missing critical SPD information, or is incompatible with the chipset.
-
Verify the memory module type.
-
Insert the DIMM in another memory socket.
-
Replace the module with a DIMM conforming to the SPD standard.
214—DIMM Configuration Warning
DIMMs are not installed correctly (not paired correctly).
See the service label on the workstation access panel for the correct memory configurations, and reseat the DIMMs accordingly.
215—DIMM Configuration Error
216—Memory Size Exceeds Maximum Supported
The amount of memory installed exceeds that supported by the hardware.
-
Verify how much memory the workstation supports.
-
Remove the excess memory.
301—Keyboard Error
Keyboard failure.
-
Reconnect the keyboard with the workstation powered off.
-
Check the connector for bent or missing pins.
-
Be sure that none of the keys are pressed.
-
Replace the keyboard.
303—Keyboard Controller Error
I/O board keyboard controller is defective or is not set properly.
-
Reconnect the keyboard with the workstation powered off.
-
Connect a keyboard directly to the workstation (instead of through a switch box).
-
Replace the system board.
304—Keyboard or System Unit Error
Keyboard failure.
-
Reconnect the keyboard with the workstation powered off.
-
Connect a keyboard directly to the workstation (instead of through a switch box).
-
Be sure that none of the keys are pressed.
-
Replace keyboard.
-
Replace system board.
510—Splash Screen image corrupted
Splash Screen image has errors.
Update system BIOS.
511—CPU Fan not detected
Fan is not connected or is defective.
-
Reseat the fan cable.
-
Reseat the fan.
-
Replace the fan.
512—Rear Chassis fan not detected
Rear fan missing, disconnected, or defective.
-
Reseat the fan cable.
-
Reseat the fan.
-
Replace the fan.
513—Front Chassis fan not detected
Front fan missing, disconnected, or defective.
-
Reseat the fan cable.
-
Reseat the fan.
-
Replace the fan.
514—Memory fan not detected
Memory fan missing, disconnected, or defective.
-
Verify that the memory fan is installed and connected properly.
-
Replace the fan.
515—CPU Overtemp occurred
Insufficient processor cooling or processor defect.
-
If necessary, add a heatsink to the processor and ensure proper operation.
-
Replace the processor.
516—Chipset fan not detected
Chipset fan missing, disconnected, or defective.
-
Ensure that the fan is installed and connected properly.
-
Replace the fan.
517—Low power CPU heatsink(s) detected for high power CPUs
Inadequate heatsink is installed.
Replace the low power heatsink with a high power heatsink.
518—Power supply wattage insufficient for hardware configuration
Workstation configuration requires more power than the power supply can provide.
-
Reduce the workstation power consumption.
-
Replace the power supply with a high output power supply.
601—Diskette Controller Error
Diskette controller circuitry or diskette drive circuitry incorrect.
-
Run the Computer Setup (F10) utility.
-
Verify cabling and replace defective cables if necessary.
-
Clear CMOS.
-
Replace the diskette drive.
-
Replace the system board.
605—Diskette Drive Type Error
Mismatch in drive type.
-
Run the Computer Setup (F10) Utility.
-
Disconnect any other diskette controller devices (tape drives).
-
Clear the CMOS.
610—External Storage Device Failure
External storage device is not detected, is improperly connected, or is defective.
-
Verify that the external device is present and connected properly.
-
Replace the external device.
611—Primary Floppy Port Address Assignment Conflict
The flexible disk drive is configured at a previously assigned address.
Select a new address for the flexible disk drive.
912—Computer Cover Has Been Removed Since Last System Start Up
N/A
No action required.
914— Hood Lock Coil is not Connected
Mechanism is missing or is not connected.
-
Reconnect or replace the missing mechanism.
-
Reseat or replace the missing mechanism cable.
916—Power Button Not Connected
Power button cable is disconnected from the system board.
Reconnect the cable and restart.
917—Front Audio Not Connected
Front Audio mechanism is missing or is not connected.
-
Replace or reconnect the missing front audio mechanism to the system board.
-
Reseat or replace the missing mechanism cable.
918—Front USB Not Connected
Front USB mechanism is missing or is not connected.
-
Replace or reconnect the missing Front USB mechanism to the system board..
-
Reseat or replace the missing mechanism cable.
919—Multi-Bay Riser Not Connected
Multi-Bay riser mechanism is missing or is not connected.
-
Replace or reconnect the missing Multi-Bay mechanism to the system board.
-
Reseat or replace the missing mechanism cable.
920—Fatal error on QPI link X
Fatal error detected on QPI link x, where x is 0 or 1. This type of error is identified on the line following the error message.
System board problem; contact HP Support.
921—Fatal error on QPI Protocol link X
Fatal error detected in QPI link x protocol, where x is 0 or 1. This type of error is identified on the line following the error message.
Potential system board problem; contact HP Support.
922—Fatal error on PCIe slot X
Fatal error occurred in the designated slot.
Move the card to a different slot. If the problem persists, replace the card.
923—Fatal error on ESI port 0
A fatal error occurred on ESI port 0. slot.
Verify that the ESI port device is connected and working properly.
924—Fatal error on IOH core X
Fatal error detected on IOH core x, where x is 0 or 1. This type of error is identified on the line following.
Potential system board problem; contact HP Support.
925—Fatal error on IOH miscellaneous
Fatal miscellaneous error detected on IOH core x, where x is 0 or 1.
Potential system board problem; contact HP Support.
926—Fatal error on IOH Vtd
Fatal error detected in the Intel Virtualization Technology.
Potential system board problem; contact HP Support.
927—Fatal error on DIMM in slot CPU X DIMM Y
Fatal multibit ECC error detected on the DIMM in the slot labeled CPU x DIMM y (where x is 0 or 1 and y is 1 — 6), as labeled on the system board.
Replace the DIMM in the identified slot.
928—Fatal machine check detected on CPU X
Contact HP support.
1720—SMART Hard Drive Detects Imminent Failure
Hard drive is about to fail. (Some hard disk drives have a firmware patch that fixes erroneous error messages.)
-
Determine if the hard disk drive is giving a correct error message.
-
Run the Drive Protection System test (if applicable).
-
Back up contents and replace the hard disk drive.
1783—Fixed Disk 0/1 locked
Hard disk drive failure.
Diagnose the hard disk drive, and replace it if necessary.
1796—SATA Cabling Error
Missing or improperly attached cable.
Verify that a cable is attached. Reattach the cable.
1797—SATA Drivelock is not supported in RAID mode
SATA Drivelock is not supported in RAID mode.
Disable RAID mode, or disable SATA drivelock..
1801—Microcode Update Error
Unsupported processor (C0 Stepping or greater only).
The microcode update failed. Check the processor stepping to ensure it is a supported stepping. If it is contact, HP Support.
1802—Processor Not Supported
The system board does not support the processor.
Replace the processor with a compatible one.
1803—Processor feature set is insufficient for current system settings
Processor feature set is insufficient for current system settings. The BIOS settings do not match the support provided by the processor
Change the BIOS settings or upgrade the processors.
1804—A processor feature and the memory configuration are incompatible
A processor feature is incompatible with the memory configuration.
Restore the previous memory configuration.
ERROR: Invalid 1394 GUID (Invalid electronic serial number)
No electronic serial number is stored with the system.
To assign a serial number , select Security >System IDs in the Computer Setup (F10) Utility.
ERROR: Invalid electronic serial number (no number)
No electronic serial number is stored with the system
To assign a serial number , select Security >System IDs in the Computer Setup (F10) Utility.
ERROR: An unsupported processor is installed. System halted
Unsupported processor detected.
Replace the processor.
ERROR: A processor requiring too much power is installed. System halted
Unsupported processor detected.
Replace the processor.
Invalid electronic serial number
Incorrect serial number registered in the system.
Use the Computer Setup (F10) Utility to reset the serial number.
Network Server Mode Active and No Keyboard Attached
Keyboard not detected.
Verify that a functioning keyboard is attached to the workstation.
Processor initialization fails!!!
Processor defective.
Replace the processor.