-

Junior Member
- Join Date: Aug 2016
- Posts: 5
Hello Community,
the computer of a friend crashed last week with an error code indicating there might be a memory error (I changed the memory bars last summer), so I ran memtest overnight. It reported quite a number of errors (see attached picture), all within a small address range. So I guess the cure by exchange might probably be the right one.
In any case, memtest states an error confidence level of 13, so what does mean? I haven’t found any explanation for that line.
All hints and tips are welcome.
Thanks plenty in advance,
Anja

1 Photo
-
Employee
- Join Date: Oct 2010
- Posts: 622
From the MemTest86 User Guide (can be found in the MemTest86 boot media)
Error Confidence Value:
A value that indicates the validity of the errors being reported with larger values indicating greater
validity. There is a high probability that all errors reported are valid regardless of this value. However,
when this value exceeds 100 it is nearly impossible that the reported errors will be invalid.For some reason, the screenshot in your post is extremely tiny which makes it impossible to see the errors you are getting.
Comment
-
Junior Member
- Join Date: Aug 2016
- Posts: 5
Thank you for the explanation! (I haven’t found the user guide, only the technical info on the site).
I try again with the picture upload:
(larger this time but far away from the original size 1280×960), hopefully it can be read..Thanks again,
Anja
1 Photo
Comment
-
Administrator
- Join Date: Jan 2003
- Posts: 9610
Could be a BIOS bug or actual RAM fault. Try switching the RAM first and see if that fixes the problem.
Comment

-
- Aug 30, 2017
-
- 39
-
- 0
-
- 4,540
- 1
-
#1


That is my motherboard.
https://www.gigabyte.com/Motherboard/GA-H61M-D2H-rev-10#sp
The value starts from 127 and keep growing. Im doing the test with both Ram’s at same time.
Update.


-
- May 18, 2007
-
- 22,834
-
- 4,107
-
- 88,040
- 2,971
-
#2
If the same bits at the same subset of addresses keep generating errors, then you know with reasonable certainty that those bits are indeed bad. If errors jump around in bits and addresses, then there may be some other issue such as with timing margins or signal noise on the motherboard, try knocking the memory clock one notch and see if that fixes those.
The only acceptable result on memtest is 0 errors. I wouldn’t trust memory until it can achieve that over a 10+ passes break-in.
-
- Aug 30, 2017
-
- 39
-
- 0
-
- 4,540
-
- 1
-
#3
-
- May 18, 2007
-
- 22,834
-
- 4,107
-
- 88,040
- 2,971
-
#4
-
- Aug 30, 2017
-
- 39
-
- 0
-
- 4,540
- 1
-
#5
-
- May 18, 2007
-
- 22,834
-
- 4,107
-
- 88,040
- 2,971
-
#6
http://lmgtfy.com/?q=memtest86
… first result…
It got a whole lot fancier since the last time I’ve downloaded it.
-
- Aug 30, 2017
-
- 39
-
- 0
-
- 4,540
- 1
-
#7
MemTest86 V7.4 Free Edition Download
Says thats is x32 version. Can I use it with x64 system?
System Requirements
x86 based hardware, 32bit or 64bit
UEFI or BIOS platform firmware (UEFI required to boot V7)
Windows, Linux, or Mac OS
CD or USB Flash Drive (>= 256MB capacity)
What this suppose to mean??
-
- May 18, 2007
-
- 22,834
-
- 4,107
-
- 88,040
-
- 2,971
-
#8
Guest
Guest
-
#9
-
- Aug 30, 2017
-
- 39
-
- 0
-
- 4,540
- 1
-
#10
-
- May 18, 2007
-
- 22,834
-
- 4,107
-
- 88,040
- 2,971
-
#11
| Thread starter | Similar threads | Forum | Replies | Date |
|---|---|---|---|---|
|
S
|
Question My games keep crashing and I suspect its due to my RAM settings | Memory | 7 | Jan 9, 2023 |
|
C
|
Question For the love of god.. i cannot get memtest 86 to boot | Memory | 1 | Jan 6, 2023 |
|
|
[SOLVED] Corsair DDR5 ram throwing lots of memtest errors … | Memory | 4 | Dec 1, 2022 |
|
W
|
Question Memtest reporting errors on two new RAM kits ? | Memory | 27 | Oct 15, 2022 |
|
|
Question What could have damaged my RAM | Memory | 1 | Oct 10, 2022 |
|
H
|
[SOLVED] PC restarting itself — error during memtest | Memory | 2 | May 23, 2022 |
|
F
|
Question My brand new DRAM causing crashes errors and freezings in games | Memory | 6 | May 23, 2022 |
|
N
|
Question Memtest 86 error Confidence value 213 | Memory | 10 | Apr 14, 2022 |
|
T
|
[SOLVED] Memtest86 errors, possible culprits (Cpu, MoBo, RAM)? | Memory | 9 | Mar 6, 2022 |
|
L
|
Question Ryzen 5600x crashes after PBO with WHEA-Logger Event ID 46,Memory tested with memtest and passed ,kinda confused but please have a look | Memory | 13 | Mar 2, 2022 |


- Advertising
- Cookies Policies
- Privacy
- Term & Conditions
- Topics
Доброго времени суток, дорогие читатели, читатели, посетители, проходители и все остальные! Думаю, многие из Вас слышали о необходимости проверки оперативной памяти и о такой замечательной утилите как Memtest, которая позволяет проверить оперативную память компьютера.
Особенно данное решение актуально при возникновении так называемых Синих Экранов Смерти (Blue Screen of Death — BSoD) и проблем вроде вылетов или ошибок вида «Инструкция по адресу обратилась к памяти по адресу. Память не может быть read«.

Memtest записывает в каждый блок памяти информацию, а затем считывает её и проверяет на ошибки. В процессе тестирования утилита совершает несколько проходов, что позволяет выявить и составить список плохих блоков памяти в формате BadRAM. Оное чудо программистской мысли запускается с помощью собственного загрузчика, поэтому наличие операционной системы для её работы не обязательно.
Как Вы уже поняли, в этой статье речь и пойдет как раз о том как пользоваться этой самой программкой. Поехали.
-
Этап 1: загрузка программы для проверки оперативной памяти
-
Этап II: установка Memtest для проверки оперативной памяти
-
Этап III: загрузка программы с внешнего носителя и BIOS
-
Этап IV: диагностика оперативной памяти с использованием Memtest
-
Этап V: описание тестов
-
Послесловие
Этап 1: загрузка программы для проверки оперативной памяти
Первая сложность будет в том, что именно качать (в интернете довольно много всяких разных сборок и дистрибутивов этого самого Memtest) и в каком виде.
Так как память мы будем проверять вне операционной системы, то нам потребуется дистрибутив программы, который мы запишем на внешний носитель, а, соответственно, в зависимости от того, что у нас есть под рукой, выбираем следующий пункт:
- Если Вы хотите записать программу на CD-диск, то Вам надо скачать «Pre-Compiled Bootable ISO (.zip)»;
- Если Вы хотите установить программу на USB-флешку, то Вам скачать «Auto-installer for USB Key (Win 9x/2k/xp/7)».
Вот и вся сложность, оказалось, что и искать ничего, благодаря нам, и не надо 
Итак, Вы её скачали, а теперь перейдем ко второму этапу — установке, а точнее говоря записи на внешний носитель и загрузке с него.
к содержанию ↑
Этап II: установка Memtest для проверки оперативной памяти
На самом деле установка (точнее создание загрузочного носителя) программы проста и требует совсем немного времени (порядка 5 минут).
Давайте разберем оба вышеупомянутых варианта, а именно — запись на CD-болванку и установка на USB-флешку:
- CD/DVD носитель — выбрав этот путь, Вы скачали по ссылке выше zip архив, распаковали его чем-нибудь вроде 7-zip и теперь у Вас лежит непонятный файлик mt410.iso. Что с ним делать?Ответ прост — Вы его записываете на диск при помощи любой программы записи, например SCDWriter:Вставив диск и запустив вышеупомянутую программу, жмем «Диск — Записать ISO-образ на диск» и указываем путь к файлику .iso, который получили после распаковки.Далее остается дождаться окончания процесса записи и диск готов.
- USB-flash носитель, — если Вы пошли по этому пути, то скачали по ссылке выше архивчик, содержащий внутри установочный файл Memtest86+ 4.10 USB Installer.exe. Архив, опять же, не забудьте распаковать.Тут всё так же просто: втыкаете флешку в компьютер и запускаете установку, т.е файл .exe. На втором шаге необходимо будет указать путь к флешке (появляется при учете, что она вставлена), а так же поставить галочку «We will format as Fat32«:
ВНИМАНИЕ!
При установке, т.е нажатии кнопки «Greate» все файлы на флешке будут удалены с носителя, поэтому хорошо бы их заранее куда-нибудь перенестиПосле чего остается дождаться окончания процесса и флешка с Memtest‘ом у нас в руках.
 Вставив диск и запустив вышеупомянутую программу, жмем «
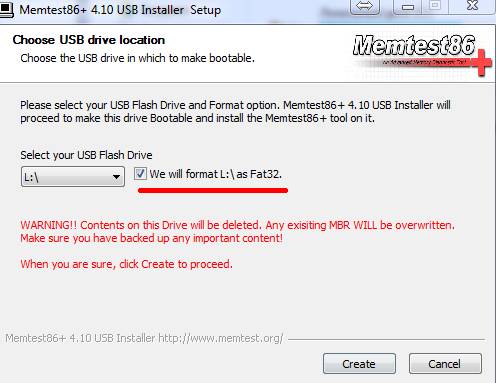
Создав тот (или иной) внешний носитель, собственно, переходим к стадии загрузки.
к содержанию ↑
Этап III: загрузка программы с внешнего носителя и BIOS
Вставляете Ваш диск или флешку в компьютер, перезагружаетесь, заходите в BIOS (кнопочка DEL на самой ранней стадии загрузки компьютера) и там выставляете загрузку с диска/флешки. Примеры того как это делается показаны на скриншотах ниже.
Вариант 1. Если Ваш BIOS имеет следующий вид, то заходите сначала в Advanced Features:
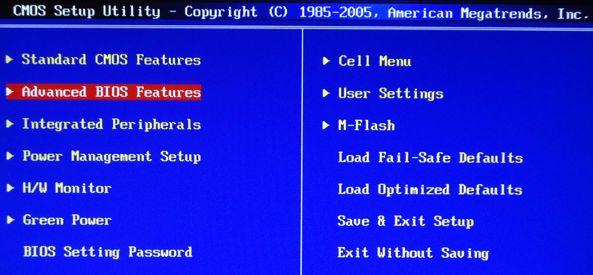
Далее в Boot sequence:
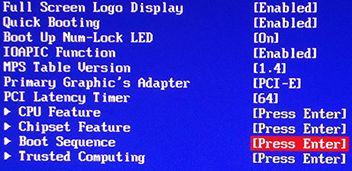
Где выставляйте на первое место загрузку с CD/DVD привода примерно так:

После чего выходите из BIOS через «Save and exit setup» и, если Вы все правильно сделали, то ждите, пока вместо операционной системы загрузится оная программа.
Вариант 2. Если же у вас BIOS имеет следующий вид:
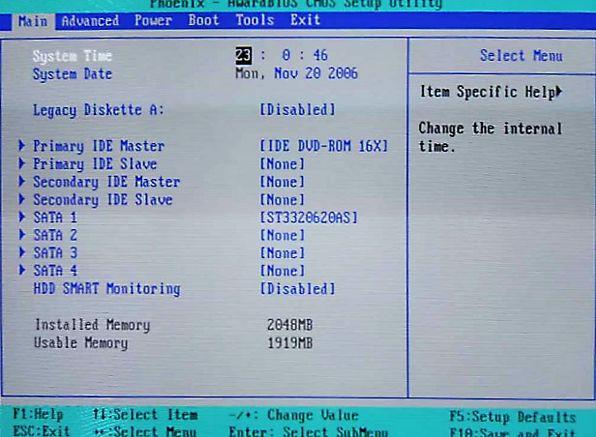
То Вы просто переходите на вкладку Boot, а дальше выставляете все так же, как и на картинках выше (тобишь, в качестве первой, выбираете загрузку с диска).
Если у Вас поддерживается загрузка с USB и Вы делали не диск, а флешку, то в BIOS необходимо будет выбрать примерно следующий вариант:
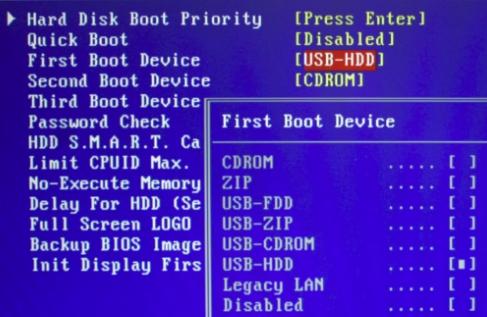
Или, скажем, вот такой:
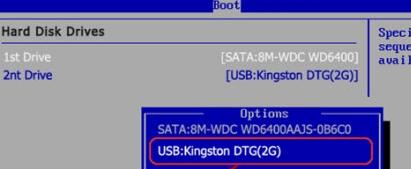
Т.е может быть указано название самой флешки и её объём или что-то в этом духе. В общем-то разобраться не сложно. После чего выходите из BIOS (с сохранением параметров) и, если Вы все правильно сделали, то ждете, пока вместо операционной системы загрузится сам Memtest.
В крайнем случае, если что-то не получается, то вместо выбора порядка загрузки Вы можете попробовать нажимать F8 на самой ранней стадии загрузки (там где вызывали BIOS) компьютера, чем вызовите «одноразовое» Boot-меню:
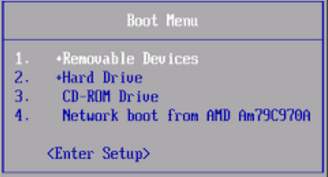
Где можете выбрать нужный носитель клавишей Enter (как правило Removable Devices отвечает за USB-носители) и должна начаться загрузка. Сразу хотим отметить, что такое меню есть далеко не на всех мат.платах и выглядит подобным образом, поэтому более надежным будет способ описанный выше, т.е выбор порядка загрузки, а не загрузочного меню.
Теперь приступаем непосредственно к диагностике и проверке.
к содержанию ↑
Этап IV: диагностика оперативной памяти с использованием Memtest
Обычно тест оперативной памяти будет сразу же запущен, Вам лишь остается идти заниматься своими делами (тест должен длиться довольно долго, — обычно порядка восьми часов для каждой планки оперативной памяти).
То, что процесс идет, символизирует изменение процентов и решеточек в правом верхнем углу (на скриншоте выделено красным):
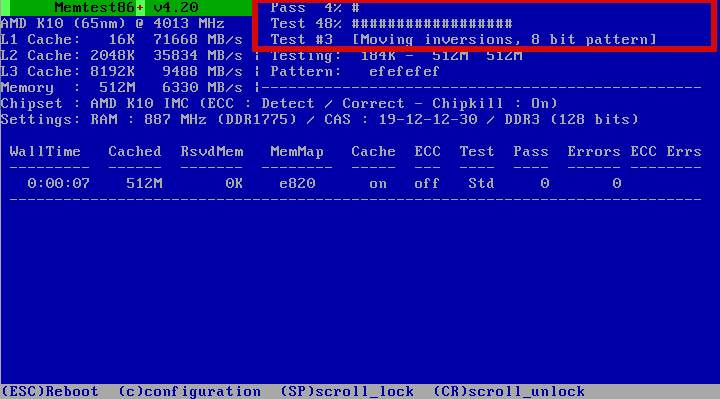
Какой конкретно тест сейчас идет показано в третьей строке (Test #3 на скриншоте выше), ход текущего теста показан во второй строке (Test 48% на скриншоте выше) и, наконец, прогресс полного цикл отражен в первой строке (Pass 4%) (правда не всегда точно).
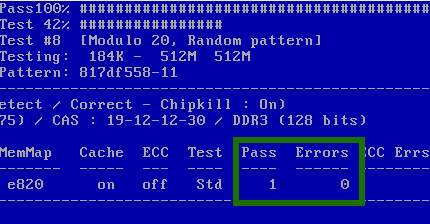
Еще раз уточним: программа тестирует оперативную память циклически, т.е. у нее есть несколько тестов (всего их девять), которые она гоняет про кругу, полный проход по всем 9-ти тестам = 1 одному циклу. Количество уже совершенных проходов и найденных ошибок указан напротив каждой из планок памяти (выделено зеленым на скриншоте выше).
к содержанию ↑
Этап V: описание тестов
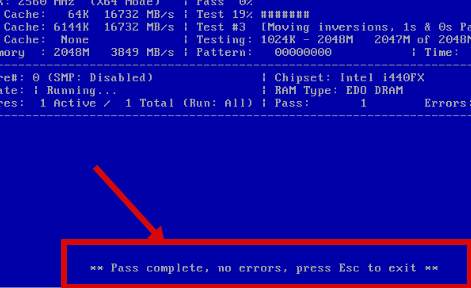
А вообще, как только один круг будет пройден, то внизу экрана появится сообщение «*****Pass complete, (no / 1 / 2 / 10…) errors, press Esc to exit*****». На сим тест будет завершен и Вы можете перезагрузить компьютер нажатием кнопочки Esc. В случае, если программа найдет ошибки хоть на одной из стадий, скорее всего, Вам придется сменить планку оперативной памяти.
Ниже, для любопытствующих, я написал небольшое описание всех тестов:
- Test 0 [Address test, walking ones, no cache], — тест для определения проблем с адресацией памяти;
- Test 1 [Address test, own address], — более углубленный тест для определения проблем с пропиской адресацией памяти;
- Test 2 [Moving inversions, ones&zeros], — быстрая проверка на аппаратные или трудноуловимые ошибки;
- Test 3 [Moving inversions, 8 bit pat], — тоже самое, только используется 8 битный алгоритм прохода нулей и единиц (не волнуйтесь, автор понял не больше вашего). Использует 20 схем для теста;
- Test 4 [Moving inversions, random pattern], — этот тест особенно эффективен для выявления проблем с data sensitive. Использует 60 схем для теста;
- Test 5 [Block move, 64 moves], — тест для поиска проблем в схемах памяти;
- Test 6 [Moving inversions, 32 bit pat], — эффективен для определения data sensitive errors. Очень долгий тест;
- Test 7 [Random number sequence], — тест, проверяющий ошибки записи памяти;
- Test 8 [Modulo 20, ones&zeros], — тест для определения скрытых ошибок при помощи кеша и буферизации, которые не выявили предыдущие тесты;
- Test 9 [Bit fade test, 90 min, 2 patterns], — особый тест, который можно запустить вручную. Запоминает адреса в памяти, после чего засыпает на полтора часа. После этого проверяет не изменились ли биты в адресах. Требует 3 часа для прохождения и ручного запуска через меню конфигурации (клавиша с).
Если по окончании теста выдается сообщение (как на изображении ниже), то память не содержит неисправных блоков.
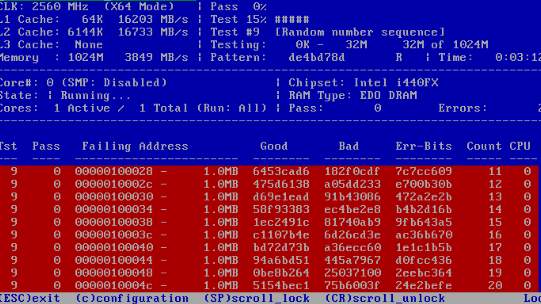
К слову, если в процессе или по окончании теста появляются ошибки (как на изображении ниже), то память скорее всего битая (неисправная), иногда может быть виной плохой контакт или битый слот мат.платы.
Стоит еще отметить, что пробегов памяти может быть несколько, в зависимости от выбранного режима. Обычно для действительно проверки хватает двух-трёх циклов как минимум и, если в ходе них не было выявлено проблем, то, скорее всего, память в порядке.
Что еще можно сделать, если ошибки, проблемы, зависания в ходе теста и прочее:
- Изредка решить проблемы может помочь процесс извлечения-вставки планок памяти с удалением пыли на контактах и в слоте;
- Если память не парная (т.е разной частоты, производителя, таймингов и прочего), то может сбоить только одна из планок и стоит использовать компьютер только с одной из них (перед этим стоит сделать проверку, каждой в отдельности).
Что еще можно сказать? Пожалуй, что этого хватит, а посему, на сим всё.
Переходим к послесловию.
к содержанию ↑
Послесловие
Этот замечательный инструмент стоит иметь ввиду, держать под рукой и пользоваться при необходимости, ибо зачастую именно он может выявить ту проблему с памятью, над проявлениями которой Вы ломаете голову уже не первый день.
Как вариант, еще можно проверить оперативную память средствами Windows, о чем мы писали в этой статье: «Проверка оперативной памяти штатными средствами Windows [mdsched]», но это способ менее точен с точки зрения диагностики, хотя и более прост с точки зрения запуска.
Как и всегда, если есть какие-то вопросы, то, спрашивайте, – буду рад ответить на них в комментариях.
PS: За существование оной статьи отдельное спасибо другу проекта и члену нашей команды под ником “barn4k“.
Содержание
- Memtest error results
- festerovic
- Error confidence value 172
- Memtest frozen and RAM replacement
- minzeycat
- festerovic
- BSODs and Errors found in Memtest86
- madman300
- Memtest error results
- festerovic
Memtest error results
Honorable


Hi !
so it all started with my computer having a hard time booting. it used to make a strange beep sound (just a single long beep, as far as i remmeber, it also didnt repeat) before it boots, but it would get fixed by restarting before i could understand what the beep actually means
so after the boot problem was fixed, i had problems with my windows, random lockups and restarts for no reason, especially when i was watching a movie or surfing the web. i thought this is a virus problem, so i scanned my computer, and eventually decided ti format my hard disks. it didn’t help, i still got the lockups and the random restarts
so i finally decided to run a Memtest..
i have 2 Kingston KVR667D2N5/1G, and here is a screen shot of my memtest.
although today i learned that i should test the RAMs one by one, but here is a picture of memtest with both of them there:
http://up.liz.ir/files/2012-08-26%2019_47_16.jpg
sorry for bad english

festerovic
Distinguished


well, one or more sticks is bad. You should test the sticks 1 by 1 like you said to figure out which one is bad. Since they are only 1 gb sticks, you could do yourself a favor and take advantage of cheap ram prices.
One thing to check : use the program CPU-z ID to determine what speed the RAM is running when you are in windows. The program is free, just google it. Report the RAM speed back when you know.
Источник
Error confidence value 172
PsiRat, ибо за их платами наблюдались крайне странные глюки без видимых причин
Это да, есть такое))) Я помню как порты usb с корпуса подключал))) Там две группы контактов — каждая на 2 порта. То бишь, можно 4 порта подключить. Но! если сажать два порта на одну группу — то вылезает красненькое окошко про то, что я дескать оверклокер и это как бы на мой страх и риск))) Так что оба порта с корпуса у меня каждый на своей группе сидит)))
Orange Lynx, Разъем ATX и питания процессора нормально подключен?
Разъём на мать — прочно сидит, хрен пошевелишь. На проц отдельного нет — см. фото материнки выше.
Биос пробовали сбросить?
Первое, что сделал))) Через некоторое время снова случилось. Причина так и не известна.
Попробуйте загрузиться с любого LiveCD и попробовать поработать там. Вырубится или нет? Есть подозрение, что винда вылетает, но не дает компу команду на выключение.
Ну это можно попробовать. Проблема в том, что причина не ясна. И под лайвсидишкой я могу хоть до нового года просидеть.))) Просто даже фиг потестишь его, т.к. непонятно что к «выбросу» приводит.
Ещё попробуйте вызвать глюк и, не перезагружаясь, открыть корпус компа и надавить на проц или мосты — и держа их нажать на Reset (если рук хватит )
Как вызвать — вот что непонятно. Рук хватит, попробую, если случится ещё.
UPS стоит? Есть встроенное видео?
Упса нет, видяхи встроенной нет, только дискретка — 9500 GT
Источник
Memtest frozen and RAM replacement
minzeycat
Honorable
Today I decided to find out what is wrong with my Acer Aspire 5100 running Win XP. I know this is a really old laptop, but it’s been sitting around and I want to fix it.
Anyway, it has been freezing. No BSOD, just freezing with the screen going white. The screen would freeze and all the pixels would turn white within couple of minutes. This usually happens after turning it on 2/3 hours, and I would take out the battery/power cord and turn it back on again. When I do that, it freezes faster; I recall it freezing after 5-10 minutes of re-booting.
So I did some research and ran memtest v4 on it. It found 334 errors right away (within 3 minutes or so) and memtest froze on test 9. I tried clicking Esc and it didn’t respond.
I’ve never taken any computer apart and I’m not sure what specs you guys need. I am fairly certain this has 1 stick of 1GB RAM inside. Should I just replace the RAM and see what happens? I don’t want to spend too much money on it.
Thanks 
festerovic
Distinguished
according to acer:
1 GB / 4 GB using DDR2 533/667 soDIMM modules
Replace the stick and see what happens. I would buy two sticks for each empty slot in that laptop.
Источник
BSODs and Errors found in Memtest86
madman300
Senior member
About 6-8 months back I completed a build of a fully new PC. The rough specs are:
— Intel Quad Core 2.8 GHZ
— 2x2GB GSKILL Ram PC2-6400 CL5-5-5-15
— 2x 640GB HDDs
— Gigabyte EP45 motherboard.
Since I first installed Windows XP, I have received random blue screens (BSODs). They normally occurred once every two weeks and I have never been able to recreate the issue that causes them.
Recently the frequency has picked up and I was getting some BAD_Pool_Header errors along with IRQL_Not_Less_Or_Equal. I decided to reformat (full format plus fix mbr) the drive and reinstall with Windows 7 RC. Due to numerous errors during the Win 7 install I formatted and went back to Windows XP.
Since the format, BSODs are happening more frequently (1 ever 3-4 days). Last night I booted the PC and ran memtest86 on each Dimm. The first dimm yielded 9 errors after several hours. The second dimm gave the following:
Bits in Error Total: 2
Max contiguous Errors: 1
Errors Per ememory Slot: 47,000,000 (and counting quickly)
This happened on Test #6 Moving Inversions 32 bit Pattern fffffbff
Since I have no experience using memtest86 I have to ask a stupid question, does this mean I have a serious problem with my memory? Should I trash my ram and replace it with new stuff? Could these errors be caused by some other type of memory (L1 L2 cache)? What else should I do to trouble shoot?
(One last note, I have also been noticing that every few days I run into issues with files being corrupted. Thought this might be a virus, but numerous scans show nothing.)
Any advice on the RAM test or my issue would be greatly appreciated.
Источник
Memtest error results
Honorable
Hi !
so it all started with my computer having a hard time booting. it used to make a strange beep sound (just a single long beep, as far as i remmeber, it also didnt repeat) before it boots, but it would get fixed by restarting before i could understand what the beep actually means
so after the boot problem was fixed, i had problems with my windows, random lockups and restarts for no reason, especially when i was watching a movie or surfing the web. i thought this is a virus problem, so i scanned my computer, and eventually decided ti format my hard disks. it didn’t help, i still got the lockups and the random restarts
so i finally decided to run a Memtest..
i have 2 Kingston KVR667D2N5/1G, and here is a screen shot of my memtest.
although today i learned that i should test the RAMs one by one, but here is a picture of memtest with both of them there:
http://up.liz.ir/files/2012-08-26%2019_47_16.jpg
sorry for bad english
festerovic
Distinguished
well, one or more sticks is bad. You should test the sticks 1 by 1 like you said to figure out which one is bad. Since they are only 1 gb sticks, you could do yourself a favor and take advantage of cheap ram prices.
One thing to check : use the program CPU-z ID to determine what speed the RAM is running when you are in windows. The program is free, just google it. Report the RAM speed back when you know.
Источник
| Автор | Сообщение |
|---|---|
|
Заголовок сообщения: Ошибки Memtest память распаяна на матери.
|
|
|
|
Здравствуйте. Error Confidence Value: 113 Микросхем памяти 8 штук. При добавлении дополнительного модуля памяти на 1 Гб картина сохраняется. Смущает что винда с n-й попытки запускается. |
| Вернуться к началу |
|
|
san-vai |
Заголовок сообщения: Re: Ошибки Memtest память распаяна на матери.
|
|
|
Был ударник тоже с памятью ,при загрузке пищал два пика после нажатия f1 работал прекрасно ,плата велась на прижим памяти ,после прогрева пришлось снимать все чипы , восстанавливать пятаки . |
| Вернуться к началу |
|
|
Валентин Макушкин (Panasonic) |
Заголовок сообщения: Re: Ошибки Memtest память распаяна на матери.
|
|
|
err_serhio писал(а): Мост или все-таки битые микросхемы памяти. Греть их или менять? Смущает что винда с n-й попытки запускается. Если был мост, то проблема с линиями адреса или данных не давали такую картину, все было бы печальней. |
| Вернуться к началу |
|
|
Maxim Skridonenko |
Заголовок сообщения: Re: Ошибки Memtest память распаяна на матери.
|
|
|
поснимать память и оставить только в слоте _________________ |
| Вернуться к началу |
|
|
err_serhio |
Заголовок сообщения: Re: Ошибки Memtest память распаяна на матери.
|
|
|
Maxim Skridonenko писал(а): поснимать память и оставить только в слоте Я попробую феном попрогревать чипы памяти, на каком сработает переставлю от донора. Если не поможет последую вашему совету. Если что в Одессе куплю рабочую мать… |
| Вернуться к началу |
|
|
Maxim Skridonenko |
Заголовок сообщения: Re: Ошибки Memtest память распаяна на матери.
|
|
|
феном добить можно, правильнее будет — снять и поставить на место, если нет новой памяти _________________ |
| Вернуться к началу |
|
|
err_serhio |
Заголовок сообщения: Re: Ошибки Memtest память распаяна на матери.
|
|
|
Maxim Skridonenko писал(а): феном добить можно, правильнее будет — снять и поставить на место, если нет новой памяти А если полностью отпаять все чипы набортной памяти нужно будет модифицировать BIOS или искать микросхему которая присутствует на обычном модуле памяти и хранит тайминги и остальные параметры микросхем памяти? |
| Вернуться к началу |
|
|
Maxim Skridonenko |
Заголовок сообщения: Re: Ошибки Memtest память распаяна на матери.
|
|
|
не нужно, но не уверен _________________ |
| Вернуться к началу |
|

|
err_serhio |
Заголовок сообщения: Re: Ошибки Memtest память распаяна на матери.
|
|
|
Maxim Skridonenko писал(а): не нужно, но не уверен SONY MBX-138 |
| Вернуться к началу |
|
|
smetankin (Сметанкин Владимир) |
Заголовок сообщения: Re: Ошибки Memtest память распаяна на матери.
|
|
|
err_serhio писал(а): Maxim Skridonenko писал(а): феном добить можно, правильнее будет — снять и поставить на место, если нет новой памяти А если полностью отпаять все чипы набортной памяти нужно будет модифицировать BIOS или искать микросхему которая присутствует на обычном модуле памяти и хранит тайминги и остальные параметры микросхем памяти? думаю в основной пзу содержится тайминго-частотная формула чипов памяти… |
| Вернуться к началу |
|

|
radeon6 |
Заголовок сообщения: Re: Ошибки Memtest память распаяна на матери.
|
|
|
Если схема есть то найдите сигнал DQ62 на какой чип идет тот и меняйте. Если не поможет то еще по линии DQ28 чип ищите и меняйте должно помочь. |
| Вернуться к началу |
|
|
Валентин Макушкин (Panasonic) |
Заголовок сообщения: Re: Ошибки Memtest память распаяна на матери.
|
|
|
radeon6 писал(а): Если схема есть то найдите сигнал DQ62 на какой чип идет тот и меняйте. Если не поможет то еще по линии DQ28 чип ищите и меняйте должно помочь. Расскажите подробно почему? Правда интересно ? И почему только одна ячейка при этом битая ? |
| Вернуться к началу |
|
|
radeon6 |
Заголовок сообщения: Re: Ошибки Memtest память распаяна на матери.
|
|
|
Валентин Макушкин (Panasonic) писал(а): Расскажите подробно почему? Правда интересно ? И почему только одна ячейка при этом битая ? 1.Почему? — незнаю. |
| Вернуться к началу |
|
|
Maxim Skridonenko |
Заголовок сообщения: Re: Ошибки Memtest память распаяна на матери.
|
|
|
да снимите чипы и проверьте _________________ |
| Вернуться к началу |
|
|
err_serhio |
Заголовок сообщения: Re: Ошибки Memtest память распаяна на матери.
|
|
|
Maxim Skridonenko писал(а): да снимите чипы и проверьте Не заработало. Но возможно действовал неаккуратно что-то пробил и т.д. Ниче главное чтоб мне удалось ее купить как договаривался. |
| Вернуться к началу |
|
Кто сейчас на конференции |
|
Зарегистрированные пользователи: akabasi, andriy_m, Bing [Bot], capstan, Google [Bot], IgorR76, sergun_bald, Sidney, svg21, Vlad555, Yandex [Bot], фыы |
| Вы не можете начинать темы Вы не можете отвечать на сообщения Вы не можете редактировать свои сообщения Вы не можете удалять свои сообщения Вы не можете добавлять вложения |
Memtest86+ is a free, open-source, stand-alone memory tester for x86 and
x86-64 architecture computers. It provides a much more thorough memory
check than that provided by BIOS memory tests.
It is also able to access almost all the computer’s memory, not being
restricted by the memory used by the operating system and not depending
on any underlying software like UEFI libraries.
Memtest86+ can be loaded and run either directly by a PC BIOS (legacy or UEFI)
or via an intermediate bootloader that supports the Linux 16-bit, 32-bit,
64-bit, or EFI handover boot protocol. It should work on any Pentium class or
later 32-bit or 64-bit CPU.
Binary releases (both stable and nightly dev builds) are available on
memtest.org.
Table of Contents
- Origins
- Licensing
- Build and Installation
- Boot Options
- Keyboard Selection
- Operation
- Error Display
- Trouble-shooting Memory Errors
- Execution Time
- Memtest86+ Test Algorithms
- Individual Test Descriptions
- Known Limitations and Bugs
- Code Contributions
- Acknowledgments
Origins
Memtest86+ v6.00 was based on PCMemTest, which was a fork and rewrite of the
earlier Memtest86+ v5, which in turn was a fork of MemTest-86. The purpose
of the PCMemTest rewrite was to:
- make the code more readable and easier to maintain
- make the code 64-bit clean and support UEFI boot
- fix failures seen when building with newer versions of GCC
In the process of creating PCMemTest, a number of features of Memtest86+ v5
that were not strictly required for testing the system memory were dropped. In
particular, no attempt was made to measure the cache and main memory speed, or
to identify and report the DRAM type. These features were added back and expanded
in Memtest86+ v6.0 to create a unified, fully-featured release.
Licensing
Memtest86+ is released under the terms of the GNU General Public License
version 2 (GPLv2). Other than the provisions of the GPL there are no
restrictions for use, private or commercial. See the LICENSE file for details.
Build and Installation
Build is only tested on a Linux system, but should be possible on any system
using the GNU toolchain and the ELF file format. The tools required are:
- GCC
- binutils
- make
- dosfstools and mtools (optional)
- xorrisofs (optional)
To build a 32-bit image, change directory into the build32 directory and
type make. The result is a memtest.bin binary image file which can be
booted directly by a legacy BIOS (in floppy mode) or by an intermediate
bootloader using the Linux 16-bit boot protocol and a memtest.efi binary
image file which can be booted directly by a 32-bit UEFI BIOS. Either image
can be booted by an intermediate bootloader using the Linux 32-bit or 32-bit
EFI handover boot protocols.
To build a 64-bit image, change directory into the build64 directory and
type make. The result is a memtest.bin binary image file which can be
booted directly by a legacy BIOS (in floppy mode) or by an intermediate
bootloader using the Linux 16-bit boot protocol and a memtest.efi binary
image file which can be booted directly by a 64-bit UEFI BIOS. Either image
can be booted by an intermediate bootloader using the Linux 32-bit, 64-bit,
or 64-bit EFI handover boot protocols.
In either case, to build an ISO image that can be used to create a bootable
CD, DVD, or USB Flash drive, type make iso, The result is a memtest.iso
ISO image file. This can then be written directly to a blank CD or DVD, or
to a USB Flash drive, which can then be booted directly by a legacy or UEFI
PC BIOS.
Note that when writing to a USB Flash drive, the ISO image must be written
directly (‘dumped’) to the raw device, either by using the dd command or
by using a utility that provides the same functionality.
When using an intermediate bootloader, either the memtest.bin file or the
memtest.efi file should be stored in a disk partition the bootloader can
access, and the bootloader configuration should be updated to boot from
that file as if it were a Linux kernel with no initial RAM disk. Several
boot command line options are recognised, as described below. If using the
16-bit boot protocol, Memtest86+ will use the display in text mode (640×400).
If using the 32-bit or 64-bit boot protocols, Memtest86+ will use the display
in either text mode or graphics mode, as specified in the boot_params struct
passed to it by the bootloader. If in graphics mode, the supplied framebuffer
must be at least 640×400 pixels; if larger, the display will be centred. If
the system was booted in UEFI mode, graphics mode must be used.
For test purposes, there is also an option to build an ISO image that uses
GRUB as an intermediate bootloader. See the Makefile in the build32 or
build64 directory for details. The ISO image is both legacy and UEFI
bootable, so you need GRUB modules for both legacy and EFI boot installed
on your build system (e.g. on Debian, the required GRUB modules are located
in packages grub-pc-bin, grub-efi-ia32-bin and grub-efi-amd64-bin).
You may need to adjust some path and file names in the Makefile to match
the naming on your system.
The GRUB configuration files contained in the grub directory are there for
use on the test ISO, but also serve as an example of how to boot Memtest86+
from GRUB.
Boot Options
An intermediate bootloader may pass a boot command line to Memtest86+. The
command line may contain one or more options, separated by spaces. Each
option consists of an option name, optionally followed by an = sign and
one or more parameters, separated by commas. The following options are
recognised:
- nosmp
- disables ACPI table parsing and the use of multiple CPU cores
- nobench
- disables the integrated memory benchmark
- nobigstatus
- disables the big PASS/FAIL pop-up status display
- nosm
- disables SMBUS/SPD parsing, DMI decoding and memory benchmark
- nopause
- skips the pause for configuration at startup
- keyboard=type
- where type is one of
- legacy
- usb
- both
- where type is one of
- usbdebug
- pauses after probing for USB keyboards
- usbinit=mode
- where mode is one of
- 1 = use the two-step init sequence for high speed devices
- 2 = add a second USB reset in the init sequence
- 3 = the combination of modes 1 and 2
- where mode is one of
- console=ttySx,y
- activate serial/tty console output, where x is one of the following IO port
- 0 = 0x3F8
- 1 = 0x2F8
- 2 = 0x3E8
- 3 = 0x2E8
- and y is an optional baud rate to choose from the following list
- 9600
- 19200
- 38400
- 54600
- 115200 (default if not specified or invalid)
- 230400
- activate serial/tty console output, where x is one of the following IO port
Keyboard Selection
Memtest86+ supports both the legacy keyboard interface (using I/O ports 0x60
and 0x64) and USB keyboards (using its own USB device drivers). One or the
other or both can be selected via the boot command line, If not specified on
the command line, the default is to use both if the system was booted in UEFI
mode, otherwise to only use the legacy interface.
Older BIOSs usually support USB legacy keyboard emulation, which makes USB
keyboards act like legacy keyboards connected to ports 0x60 and 0x64. This
can often be enabled or disabled in the BIOS setup menus. If Memtest86+’s
USB device drivers are enabled, they will override this and access any USB
keyboards directly. The downside of that is that the USB controllers and
device drivers require some memory to be reserved for their private use,
which means that memory can’t then be covered by the memory tests. So to
maximise test coverage, if it is supported, enable USB legacy keyboard
emulation and, if booting in UEFI mode, add keyboard=legacy on the boot
command line.
NOTE: Some UEFI BIOSs only support USB legacy keyboard emulation when
you enable the Compatibility System Module (CSM) in the BIOS setup. Others
only support it when actually booting in legacy mode.
Many USB devices don’t fully conform to the USB specification. If the USB
keyboard probe hangs or fails to detect your keyboard, try the various
workarounds provided by the «usbinit» boot option.
NOTE: Hot-plugging is not currently supported by the Memtest86+ USB
drivers. When using these, your USB keyboard should be plugged in before
running Memtest86+ and should remain plugged in throughout the test.
Operation
Once booted, Memtest86+ will initialise its display, then pause for a few
seconds to allow the user to configure its operation. If no key is pressed,
it will automatically start running all tests using a single CPU core,
continuing indefinitely until the user reboots or halts the machine.
At startup, and when running tests, Memtest86+ responds to the following keys:
- F1
- enters the configuration menu
- F2
- toggles use of multiple CPU cores (SMP)
- Space
- toggles scroll lock (stops/starts error message scrolling)
- Enter
- single message scroll (only when scroll lock enabled)
- Escape
- exits the test and reboots the machine
Note that testing is stalled when scroll lock is enabled and the scroll region
is full.
The configuration menu allows the user to:
- select which tests are run (default: all tests)
- limit the address range over which tests are performed (default: all memory)
- select the CPU sequencing mode (default: parallel)
- parallel
- each CPU core works in parallel on a subset of the memory region being
tested
- each CPU core works in parallel on a subset of the memory region being
- sequential
- each CPU core works in turn on the full memory region being tested
- round robin
- a single CPU core works on the full memory region being tested, with a
new CPU core being selected (in round-robin fashion) for each test
- a single CPU core works on the full memory region being tested, with a
- parallel
- select the error reporting mode (default: individual errors)
- error counts only
- error summary
- individual errors
- BadRAM patterns
- select which of the available CPU cores are used (at startup only)
- a maximum of 256 CPU cores can be selected, due to memory and
display limits - the bootstrap processor (BSP) cannot be deselected
- a maximum of 256 CPU cores can be selected, due to memory and
- enable or disable the temperature display (at startup only)
- enable or disable boot tracing for debug (at startup only)
- skip to the next test (when running tests)
In all cases, the number keys may be used as alternatives to the function keys
(1 = F1, 2 = F2, … 0 = F10).
Error Reporting
The error reporting mode may be changed at any time without disrupting the
current test sequence. Error statistics are collected regardless of the
current error reporting mode (so switching to error summary mode will show
the accumulated statistics since the current test sequence started). BadRAM
patterns are only accumulated when in BadRAM mode.
Any change to the selected tests, address range, or CPU sequencing mode will
start a new test sequence and reset the error statistics.
Error Counts Only
The error counts only mode just displays the total number of errors found since
the current test sequence started.
Error Summary
The error summary mode displays the following information:
- Lowest Error Address
- the lowest address that where an error has been reported
- Highest Error Address
- the highest address that where an error has been reported
- Bits in Error Mask
- a hexadecimal mask of all bits that have been in error
- Bits in Error
- total bits in error for all error instances and the min, max and average
number of bits in error across each error instance
- total bits in error for all error instances and the min, max and average
- Max Contiguous Errors
- the maximum of contiguous addresses with errors
- Test Errors
- the total number of errors for each individual test
Individual Errors
The individual error mode displays the following information for each error
instance:
- pCPU
- the physical CPU core number that detected the error
- Pass
- the test pass number where the error occurred (a test pass is a single
run over all the currently selected tests)
- the test pass number where the error occurred (a test pass is a single
- Test
- the individual test number where the error occurred
- Failing Address
- the memory address where the error occurred
- Expected
- the hexadecimal data pattern expected to be found
- Found
- the hexadecimal data pattern read from the failing address
- Err Bits (only in 32-bit builds)
- a hexadecimal mask showing the bits in error
BadRAM Patterns
The BadRAM patterns mode accumulates and displays error patterns for use with
the Linux BadRAM feature. Lines are
printed in the form badram=F1,M1,F2,M2... In each F,M pair, the F
represents a fault address and the M is a bitmask for that address. These
patterns state that faults have occurred in addresses that equal F on all 1
bits in M. Such a pattern may capture more errors that actually exist, but
at least all the errors are captured. These patterns have been designed to
capture regular patterns of errors caused by the hardware structure in a terse
syntax.
The BadRAM patterns are grown incrementally rather than calculated from an
overview of all errors. The number of pairs is constrained to ten for a
number of practical reasons. As a result, handcrafting patterns from the
output in address printing mode may, in exceptional cases, yield better
results.
Trouble-shooting Memory Errors
Please be aware that not all errors reported by Memtest86+ are due to bad
memory. The test implicitly tests the CPU, caches, and motherboard. It is
impossible for the test to determine what causes the failure to occur. Most
failures will be due to a problem with memory. When it is not, the only option
is to replace parts until the failure is corrected.
Once a memory error has been detected, determining the failing module is not a
clear cut procedure. With the large number of motherboard vendors and possible
combinations of memory slots it would be difficult if not impossible to assemble
complete information about how a particular error would map to a failing memory
module. However, there are steps that may be taken to determine the failing
module. Here are some techniques that you may wish to use:
-
Removing modules
- This is the simplest method for isolating a failing modules, but may only
be employed when one or more modules can be removed from the system. By
selectively removing modules from the system and then running the test
you will be able to find the bad module(s). Be sure to note exactly which
modules are in the system when the test passes and when the test fails.
- This is the simplest method for isolating a failing modules, but may only
-
Rotating modules
- When none of the modules can be removed then you may wish to rotate modules
to find the failing one. This technique can only be used if there are three
or more modules in the system. Change the location of two modules at a time.
For example put the module from slot 1 into slot 2 and put the module from
slot 2 in slot 1. Run the test and if either the failing bit or address
changes then you know that the failing module is one of the ones just moved.
By using several combinations of module movement you should be able to
determine which module is failing.
- When none of the modules can be removed then you may wish to rotate modules
-
Replacing modules
- If you are unable to use either of the previous techniques then you are
left to selective replacement of modules to find the failure.
- If you are unable to use either of the previous techniques then you are
Sometimes memory errors show up due to component incompatibility. A memory
module may work fine in one system and not in another. This is not uncommon
and is a source of confusion. The components are not necessarily bad but
certain combinations may need to be avoided.
In the vast majority of cases errors reported by Memtest86+ are valid. There
are some systems that cause Memtest86+ to be confused about the size of memory
and it will try to test non-existent memory. This will cause a large number of
consecutive addresses to be reported as bad and generally there will be many
bits in error. If you have a relatively small number of failing addresses and
only one or two bits in error you can be certain that the errors are valid.
Also intermittent errors are always valid.
All valid memory errors should be corrected. It is possible that a particular
error will never show up in normal operation. However, operating with marginal
memory is risky and can result in data loss and even disk corruption.
Memtest86+ can not diagnose many types of PC failures. For example a faulty CPU
that causes your OS to crash will most likely just cause Memtest86+ to crash in
the same way.
Execution Time
The time required for a complete pass of Memtest86+ will vary greatly depending
on CPU speed, memory speed, and memory size. Memtest86+ executes indefinitely.
The pass counter increments each time that all of the selected tests have been
run. Generally a single pass is sufficient to catch all but the most obscure
errors. However, for complete confidence when intermittent errors are suspected
testing for a longer period is advised.
Memory Testing Philosophy
There are many good approaches for testing memory. However, many tests simply
throw some patterns at memory without much thought or knowledge of memory
architecture or how errors can best be detected. This works fine for hard
memory failures but does little to find intermittent errors. BIOS based memory
tests are useless for finding intermittent memory errors.
Memory chips consist of a large array of tightly packed memory cells, one for
each bit of data. The vast majority of the intermittent failures are a result
of interaction between these memory cells. Often writing a memory cell can
cause one of the adjacent cells to be written with the same data. An effective
memory test attempts to test for this condition. Therefore, an ideal strategy
for testing memory would be the following:
- write a cell with a zero
- write all of the adjacent cells with a one, one or more times
- check that the first cell still has a zero
It should be obvious that this strategy requires an exact knowledge of how the
memory cells are laid out on the chip. In addition there is a never ending
number of possible chip layouts for different chip types and manufacturers
making this strategy impractical. However, there are testing algorithms that
can approximate this ideal strategy.
Memtest86+ Test Algorithms
Memtest86+ uses two algorithms that provide a reasonable approximation of the
ideal test strategy above. The first of these strategies is called moving
inversions. The moving inversion tests work as follows:
- Fill memory with a pattern
- Starting at the lowest address
- check that the pattern has not changed
- write the pattern’s complement
- increment the address
- repeat 2.i to 2.iii
- Starting at the highest address
- check that the pattern has not changed
- write the pattern’s complement
- decrement the address
- repeat 3.i — 3.iii
This algorithm is a good approximation of an ideal memory test but there are
some limitations. Most high density chips today store data 4 to 16 bits wide.
With chips that are more than one bit wide it is impossible to selectively
read or write just one bit. This means that we cannot guarantee that all
adjacent cells have been tested for interaction. In this case the best we can
do is to use some patterns to ensure that all adjacent cells have at least
been written with all possible one and zero combinations.
It can also be seen that caching, buffering, and out of order execution will
interfere with the moving inversions algorithm and make it less effective.
It is possible to turn off caching but the memory buffering in new high
performance chips cannot be disabled. To address this limitation a new
algorithm called Modulo-20 was created. This algorithm is not affected by
caching or buffering. The algorithm works as follows:
- For starting offsets of 0 — 19 do
- write every 20th location with a pattern
- write all other locations with the pattern’s complement
- repeat 1.ii one or more times
- check every 20th location for the pattern
This algorithm accomplishes nearly the same level of adjacency testing as
moving inversions but is not affected by caching or buffering. Since separate
write passes (1.i, 1.ii) and the read pass (1.iv) are done for all of memory we
can be assured that all of the buffers and cache have been flushed between
passes. The selection of 20 as the stride size was somewhat arbitrary. Larger
strides may be more effective but would take longer to execute. The choice of
20 seemed to be a reasonable compromise between speed and thoroughness.
Individual Test Descriptions
Memtest86+ executes a series of numbered tests to check for errors. These tests
consist of a combination of test algorithm, data pattern and caching. The
execution order for these tests were arranged so that errors will be detected
as rapidly as possible. A description of each test follows.
To allow testing of more than 4GB of memory on 32-bit CPUs, the physical
address range is split into 1GB windows which are be mapped one at a time
into a virtual memory window. Each 1GB window may contain one or more
contiguous memory regions. For most tests, the test is performed on each
memory region in turn. Caching is enabled for all but the first test.
Test 0 : Address test, walking ones, no cache
In each memory region in turn, tests all address bits by using a walking
ones address pattern. Errors from this test are not used to calculate BadRAM
patterns.
Test 1 : Address test, own address in window
In each memory region in turn, each address is written with its own address
and then each address is checked for consistency. This test is performed
sequentially with each available CPU, regardless of the CPU sequencing mode
selected by the user.
Test 2 : Address test, own address + window
Across all memory regions, each address is written with its own virtual
address plus the window number (for 32-bit images) or own physical address
(for 64-bit images) and then each address is checked for consistency. This
catches any errors in the high order address bits that would be missed when
testing each window in turn. This test is performed sequentially with each
available CPU, regardless of the CPU sequencing mode selected by the user.
Test 3 : Moving inversions, ones & zeros
In each memory region in turn, and for each pattern in turn, uses the moving
inversions algorithm with patterns of all ones and all zeros.
Test 4 : Moving inversions, 8 bit pattern
In each memory region in turn, and for each pattern in turn, uses the moving
inversions algorithm with patterns of 8-bit wide walking ones and walking zeros.
Test 5 : Moving inversions, random pattern
In each memory region in turn, and for each pattern in turn, uses the moving
inversions algorithm with patterns of a random number and its complement. The
random number is different on each test pass so multiple passes increase
effectiveness.
Test 6 : Moving inversions, 32/64 bit pattern
In each memory region in turn, and for each pattern in turn, uses the moving
inversions algorithm with patterns of 32-bit wide (on 32-bit builds) or 64-bit
wide (on 64-bit builds) walking ones and walking zeros. Unlike previous tests,
the pattern is rotated 1 bit on each successive address.
Test 7 : Block move, 64 moves
This test stresses memory by using block move (movs) instructions and is based
on Robert Redelmeier’s burnBX test.
In each memory region in turn, memory is initialized with shifting patterns
that are inverted every 8 bytes. Then blocks of memory are moved around using
the movs instruction. After the moves are completed the data patterns are
checked. Because the data is checked only after the memory moves are completed
it is not possible to know where the error occurred. The addresses reported
are only for where the bad pattern was found. In consequence, errors from this
test are not used to calculate BadRAM patterns.
Test 8 : Random number sequence
In each memory region in turn, each address is written with a random number,
then each address is checked for consistency and written with the complement
of the original data, then each address is again checked for consistency.
Test 9 : Modulo 20, random pattern
In each memory region in turn, and for each pattern in turn, uses the
Modulo-20 algorithm with patterns of a random number and its complement.
The random number is different on each test pass so multiple passes increase
effectiveness.
Test 10 : Bit fade test, 2 patterns
Across all memory regions, and for each pattern in turn, initialises each
memory location with a pattern, sleeps for a period of time, then checks
each memory location for consistency. The test is performed with patterns
of all zeros and all ones.
Known Limitations and Bugs
Please see the list of open issues
and enhancement requests
on GitHub.
Feel free to submit bug reports!
Code Contributions
Code contributions are welcomed, either to fix bugs or to make enhancements.
See the README_DEVEL.md in the doc directory for some basic guidelines.
Acknowledgments
Memtest86+ v6.0 was based on PCMemTest, developed by Martin Whitaker, which
was based on Memtest86+ v5.01, developed by Samuel Demeulemeester, which in
turn was based on Memtest86, developed by Chris Brady with the resources and
assistance listed below:
-
The initial versions of the source files bootsect.S, setup.S, head.S and
build.c are from the Linux 1.2.1 kernel and have been heavily modified. -
Doug Sisk provided code to support a console connected via a serial port.
(not currently used) -
Code to create BadRAM patterns was provided by Rick van Rein.
-
The block move test is based on Robert Redelmeier’s burnBX test.
-
Screen buffer code was provided by Jani Averbach.
(not used by Memtest86+ v6.0) -
Eric Biederman provided all of the feature content for version 3.0
plus many bugfixes and significant code cleanup. -
Major enhancements to hardware detection and reporting in version 3.2, 3.3
and 3.4 provided by Samuel Demeulemeester (from Memtest86+ v1.11, v1.60
and v1.70).
In addition, several bug fixes for Memtest86+ were imported from
anphsw/memtest86.