Test results / reports
- Test result summary
- HTML report file
- Binary results file
Test result summary
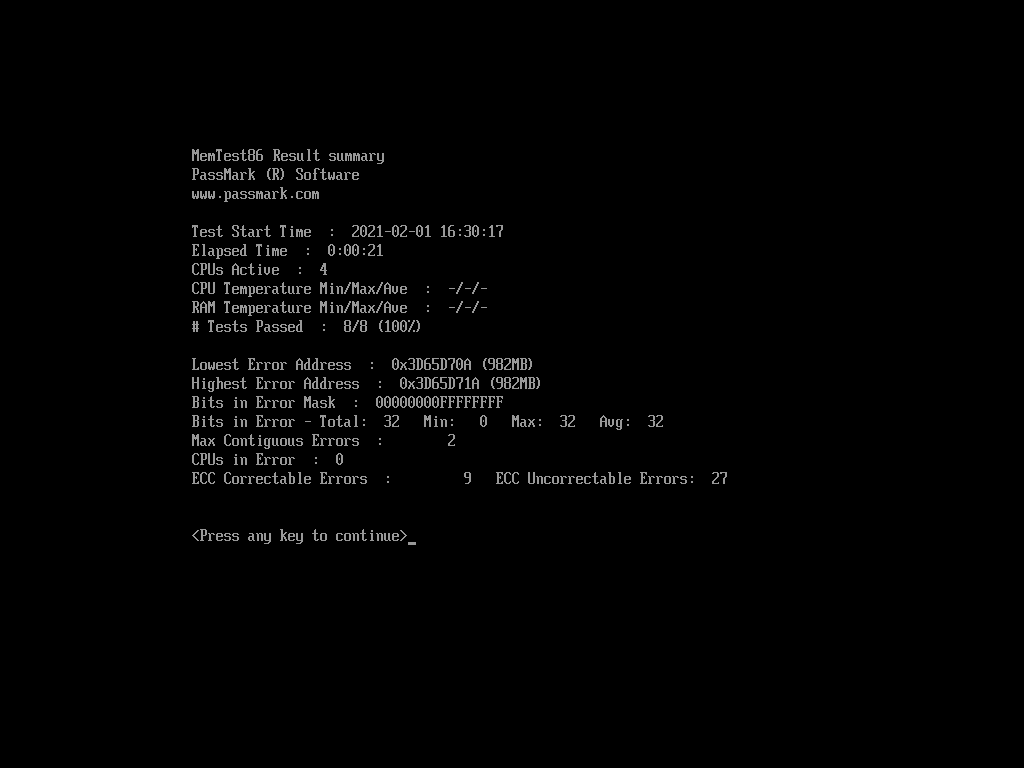
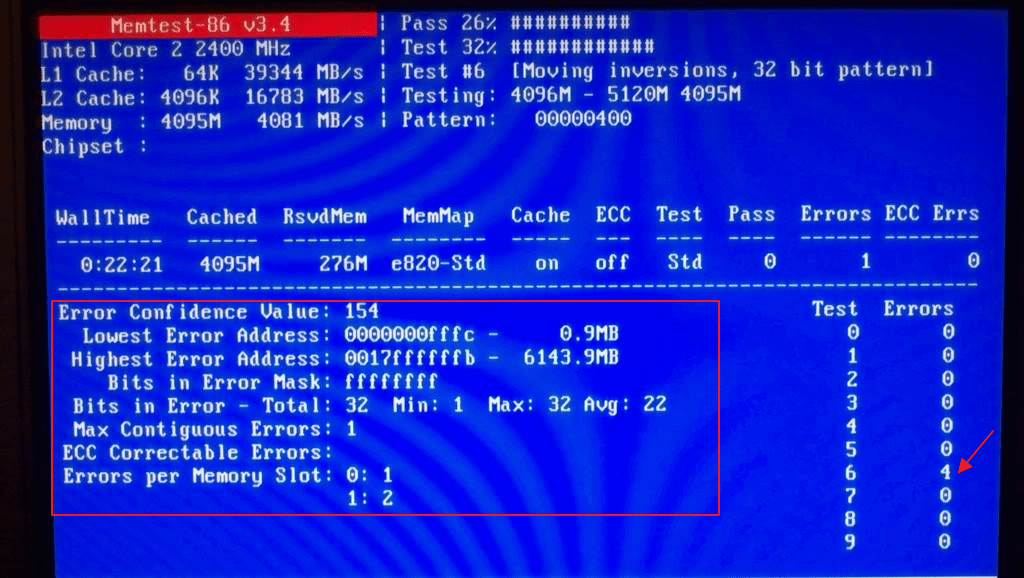
At the end of the test, a summary of the test results is displayed, as shown in the following screenshot:
    Lowest Error Address:
        The lowest address that where an error has been reported.
    Highest Error Address:
        The highest address that where an error has been reported.
    Bits in Error Mask:
        A mask of all bits that have been in error (hexadecimal).
    Bits in Error:
        Total bit in error for all error instances and the min, max and average bit in error of each individual occurrence.
    Max Contiguous Errors:
        The maximum of contiguous addresses with errors.
    CPUs in Error:
        List of CPU cores that detected memory errors.
    ECC Correctable/Uncorrectable Errors:
        The number of errors that have been corrected/uncorrected by ECC hardware.
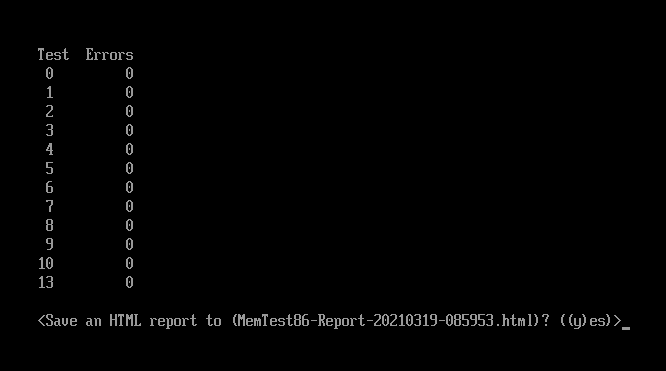
    Test Errors:
        On the right hand side of the screen the number of errors for each test are displayed.
HTML report file
The user may also save the results as an HTML test report to a file.
The test report appearance is fully customizable in the pro and site license version. Here is an example of an HTML test report
To save your the results as a HTML report, press ‘y’ to save when prompted. Note the file name the report will appear as, this will be saved to the USB you have booted from.
As seen in the following screenshot:
For Pro and Site editions, HTML report files can be automatically saved by specifying the AUTOMODE and AUTOREPORTFMT configuration file parameters.
See Configuring MemTest86 for more details about configuration file parameters.
When network booting from PXE (Site edition only), HTML reports are uploaded to the PXE server. This can be useful for automated workflows such as production line environments.
Binary results file
(Site and Pro editions only) For environments with limited storage space and processing capacity, the user may choose to save the results as a binary file.
The format of the binary file is as follows.
typedef struct _TESTRESULT {

    CHAR8 Signature[4];// "MT86" signature

    UINT16 Revision;   // Current revision: 1.1 (Upper byte: major version; Lower byte: minor version)

    UINT32 StartTime;  //Start test time in Unix time, accurate to 1 sec

    UINT32 ElapsedTime;//Test elapsed time in seconds

    UINT64 RangeMin;   //Min address tested

    UINT64 RangeMax;   //Max address tested

    UINT16 CPUSelMode; //0-Single CPU, 1-Parallel, 2-Round Robin, 3-Sequential

    INT16 CPUTempMin;  //Min CPU temp for duration of test (-1 if N/A)

    INT16 CPUTempMax;  //Max CPU temp for duration of test (-1 if N/A)

    INT16 CPUTempAve;  //Ave CPU temp for duration of test (-1 if N/A)

    INT16 RAMTempMin;  //Min RAM temp for duration of test (-1 if N/A)

    INT16 RAMTempMax;  //Max RAM temp for duration of test (-1 if N/A)

    INT16 RAMTempAve;  //Ave RAM temp for duration of test (-1 if N/A)

    BOOLEAN ECCSupport;//0 if ECC not supported, != 0 if ECC supported

    INT8 TestResult;   //0 if NumErrors>0, 1 if NumErrors==0, -1 if no tests were completed

    UINT32 ErrorCode;  // Error code

    UINT32 NumErrors;  //Number of errors from all tests. Must be 0 if Passed == True

    UINT64 MinErrorAddr;//Lowest address that had an error

    UINT64 MaxErrorAddr;//Highest address that had an error

    UINT64 ErrorBits;  //Bit coded field showing the bits in error

    UINT32 NumCorrECCErrors;//Number of detected and corrected ECC errors from all tests.

    UINT32 NumUncorrECCErrors;//Number of detected but uncorrected ECC errors from all tests.

    UINT8 Reserved[14]; // For future use

    UINT16 NumTestsEnabled;// Number of individual tests enabled

    struct {

        UINT8  TestNo;    // Test ID number

        UINT16 NumTestsPassed;// Number tests passed for this test number

        UINT16 NumTestsCompleted;// Number tests completed for this test number

        UINT32 NumErrors; // Number of errors detected for this test number

    } AllTests[1];  // Variable-sized array of size=NumTestsEnabled

    struct SLOTCHIP_ERRINFO {

        UINT16 SlotChipErrsArrCount; // Size of variable-sized array SlotChipErrs below

        struct {

            INT8  Slot;          // Slot number (-1 for unknown)

            INT8  Chip;          // Chip number (-1 for unknown)

            UINT32 NumErrors;    // Number of errors detected for this slot/chip combination

        } SlotChipErrs[1];

    } SlotChipErrInfo;

} TESTRESULT;
Binary result files cannot be saved manually and can only be saved by specifying the AUTOMODE and AUTOREPORTFMT configuration file parameters. See Configuring MemTest86 for more details about configuration file parameters.
As with HTML report files, binary results can be automatically saved to disk or uploaded to the PXE server, supporting automated workflows such as production line environments.
Содержание
- Создание загрузочного диска с MemTest86+ в среде Windows
- Начало тестирования
- Настройка MemTest86+
- Главное Меню MemTest86+
- Описание Отдельных Тестов
- Терминология программы MemTest86+
- Результаты Теста
- Время Выполнения
- Восстановить дисковое пространство на флешке
- Видео-урок:
- Вопросы и ответы
Программа MemTest86+ создана для тестирования оперативной памяти. Проверка происходит в автоматическом или ручном режиме. Для работы с программой необходимо создать загрузочный диск или флешку. Что мы сейчас и сделаем.
Скачать последнюю версию MemTest86+
Создание загрузочного диска с MemTest86+ в среде Windows
Заходим на официальный сайт производителя (Там же есть инструкция по MemTest86+, правда на английском языке) и скачиваем установочный файл программы. Затем, нам необходимо вставить CD-диск в привод либо флешку в USB-разъем.
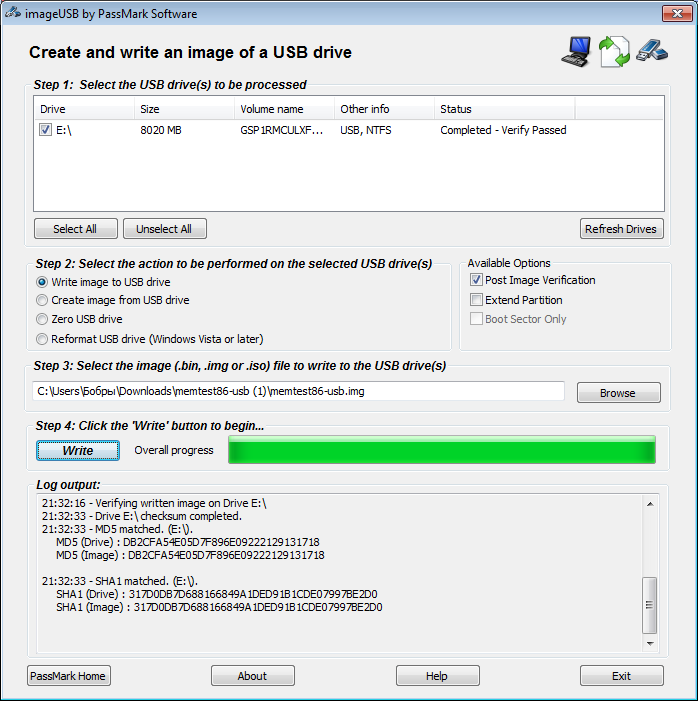
Запускаем. На экране вы увидите окно программы для создания загрузчика. Выбираем куда закидывать информацию и «Write». Все данные на флешке будут утеряны. Помимо этого, в ней произойдут некоторые изменения, в результате чего ее объем может уменьшиться. Как это исправить я опишу ниже.
Начало тестирования
Программа поддерживает загрузку из UEFI и BIOS-системы. Чтобы начать тестирование оперативной памяти в MemTest86+, при перезагрузке компьютера выставляем в BIOS, загрузку с флешки (Она должна быть первой в списке).
Сделать это можно с помощью клавиш «F12, F11, F9», все зависит от конфигурации вашей системы. Также можно в процессе включения нажимать клавишу «ESC», откроется небольшой список, в котором можно задать приоритет загрузки.
Если, вы приобрели полную версию MemTest86+, то после ее запуска появится заставка, в виде 10-секундного таймера обратного отсчета. По истечении данного времени, MemTest86+ автоматически запускает тесты памяти с настройками по умолчанию. Нажатие клавиш или движения мышкой должны остановить таймер. Главное меню позволяет пользователю настраивать параметры, например, тесты на выполнение, диапазон адресов для проверки и какой процессор будет использоваться.
В пробном варианте, после загрузки программы, необходимо будет нажать «1». После этого начнется тестирование памяти.
Главное Меню MemTest86+
Главное меню имеет следующую структуру:
Для того, чтобы начать проверку в ручном режиме, вам необходимо выбрать тесты, с помощью которых будет сканирована система. Сделать это можно в графическом режиме в поле «Test Selection». Или же в окне проверки, нажав клавишу «С», для выбора дополнительных параметров.
Если ничего не настраивалось, тестирование пройдет по заданному алгоритму. Память будет проверена всеми тестами, причем, при возникновении ошибок, сканирование будет продолжаться пока пользователь не остановит процесс. При отсутствии ошибок, на экране появиться соответствующая запись и проверка остановиться.
Описание Отдельных Тестов
MemTest86+ выполняет ряд нумерованных тестов для проверки ошибок.
Тест 0 — проверяются биты адреса во всех планках памяти.
Тест 1 — более углубленный вариант «Тест 0». Он может поймать любые ошибки, которые ранее не были обнаружены. Выполняется последовательно с каждого процессора.
Тест 2 — проверяет в быстром режиме аппаратную часть памяти. Тестирование происходит параллельно с использованием всех процессоров.
Тест 3 — тестирует в быстром режиме аппаратную часть памяти. Использует 8-ми битный алгоритм.
Тест 4 — также использует 8-ми битный алгоритм, только сканирует более углубленно и выявляет малейшие ошибки.
Тест 5 — сканирует схемы памяти. Этот тест особенно эффективен в поиске трудноуловимых ошибок.
Тест 6 — выявляет ошибки «data sensitive errors».
Тест 7 — находит ошибки памяти в процессе записи.
Тест 8 — сканирует ошибки кеш.
Тест 9 — детальный тест, который проверяет кеш-память.
Тест 10 — 3-х часовой тест. Сначала сканирует и запоминает адреса памяти, а через 1-1.5 часа проверяет не было ли изменений.
Тест 11 — Сканирует ошибки кеш используя собственные 64-разрядные инструкции.
Тест 12 — Сканирует ошибки кеш используя собственные 128-битные инструкции.
Тест 13 — Детально сканирует систему для выявления глобальных проблем с памятью.
Терминология программы MemTest86+
«TSTLIST» — список тестов для выполнения последовательности испытаний. Отображаются они вряд и разделяются запятой.
«NUMPASS» — количество повторов тестовой последовательности выполнения. Это должно быть число больше 0.
«ADDRLIMLO»— нижний предел диапазона адресов для проверки.
«ADDRLIMHI»— верхний предел диапазона адресов для проверки.
«CPUSEL»— выбор процессора.
«ECCPOLL и ECCINJECT» — указывает на наличие ошибок ECC.
«MEMCACHE» — используется для кэширования памяти.
«PASS1FULL» — указывает на то, что в первом проходе будет использован сокращенный тест, для быстрого обнаружения очевидных ошибок.
«ADDR2CHBITS, ADDR2SLBITS, ADDR2CSBITS» — список битовых позиций адреса памяти.
«LANG» — указывает на язык.
«REPORTNUMERRS» — номер последней ошибки для вывода в файл отчета. Это число должно быть не более 5000.
«REPORTNUMWARN» — количество последних предупреждений для отображения в файле отчета.
«MINSPDS» — минимальное количество оперативной памяти.
«HAMMERPAT» — определяет 32-битовый шаблон данных для теста «Молоток (Тест 13)». Если этот параметр не задан, используются модели случайных данных.
«HAMMERMODE» — указывает на выбор молотка в Тест 13.
«DISABLEMP» — указывает, следует ли отключить многопроцессорную поддержку. Это можно использовать как временное решение для некоторых из UEFI прошивок, которые имеют проблемы с запуском MemTest86+.
Результаты Теста
После окончания тестирования будет отображен результат проверки.
Lowest Error Address:
Highest Error Address:
Bits in Error Mask:
Bits in Error:
Max Contiguous Errors:
ECC Correctable Errors:
Test Errors:
Пользователь может сохранить результаты в виде отчетов в HTML-файл.
Время Выполнения
Время, необходимое для полного прохода MemTest86+ сильно зависит от скорости процессора, скорости и объема памяти. Обычно, одного прохода достаточно, чтобы определить все, кроме самых непонятных ошибок. Для полной уверенности, рекомендуется сделать несколько прогонов.
Восстановить дисковое пространство на флешке
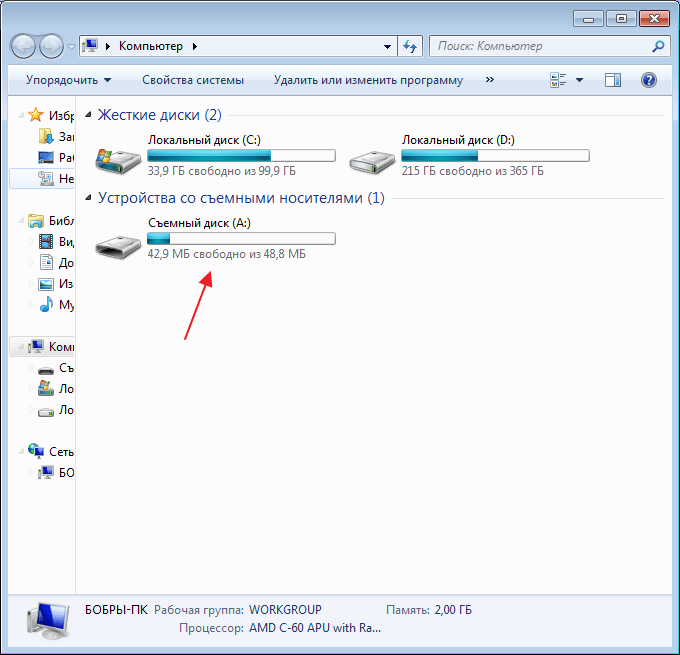
После использования программы на флешке, пользователи отмечают что накопитель уменьшился в объеме. Это действительно так. Ёмкость моей 8 Гб. флешки уменьшилась до 45 Мб.
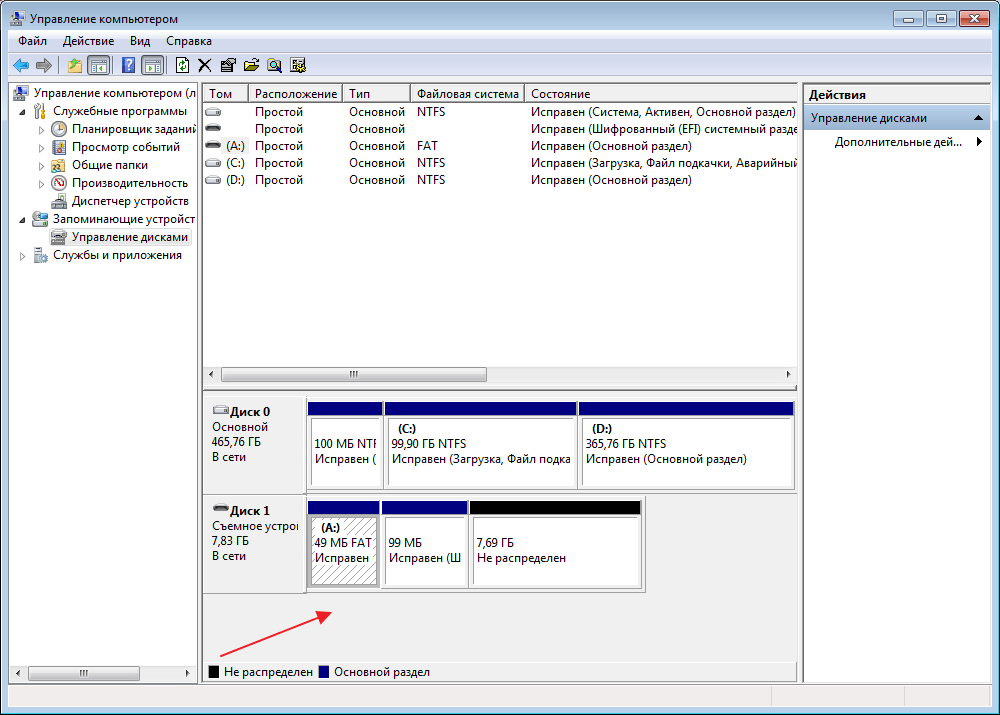
Чтобы исправить данную проблему необходимо зайти в «Панель управления-Администрирование-Управление компьютером-Управление дисками». Смотрим что у нас с флешкой.
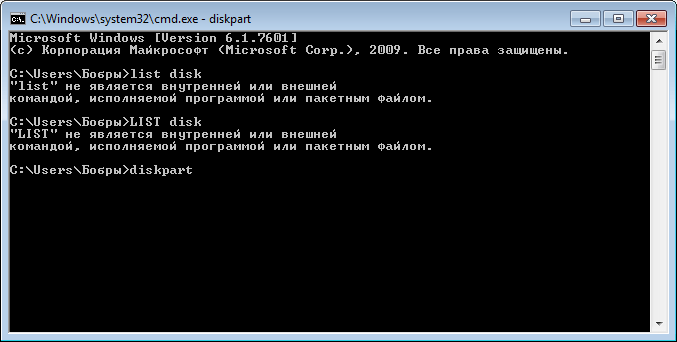
Затем переходим в командную строку. Для этого в поле поиска вводим команду «cmd». В командной строке пишем «diskpart».
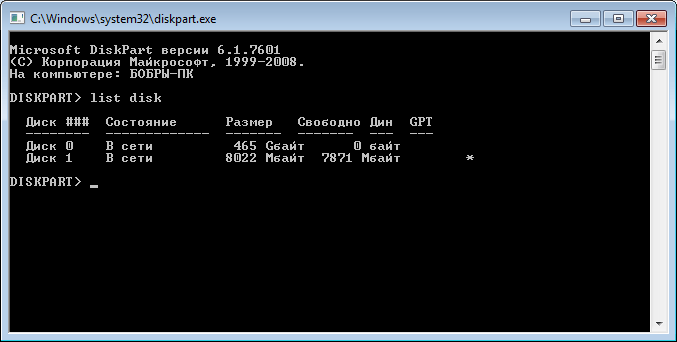
Теперь мы переходим к поиску нужного диска. Для этого вводим команду «List disk». По объему определяем нужный и вводим в диалоговое окно «select disk=1» (в моем случае).
Далее вводим «clean». Тут главное не ошибиться с выбором.
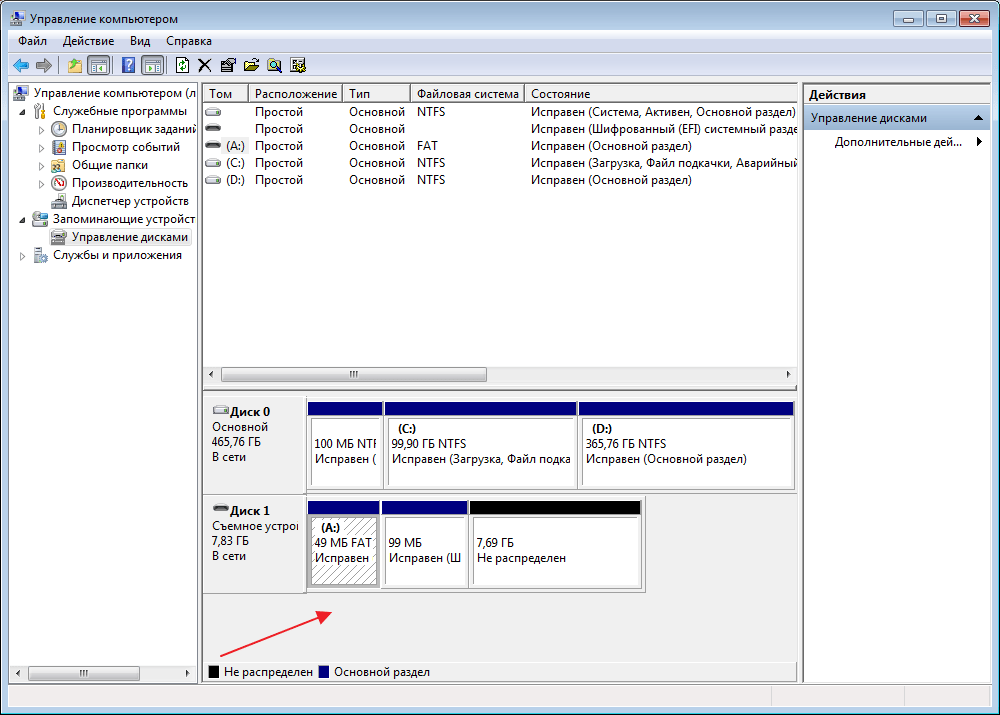
Снова идем в «Управление дисками» и видим, что вся область флешки стала не размеченной.
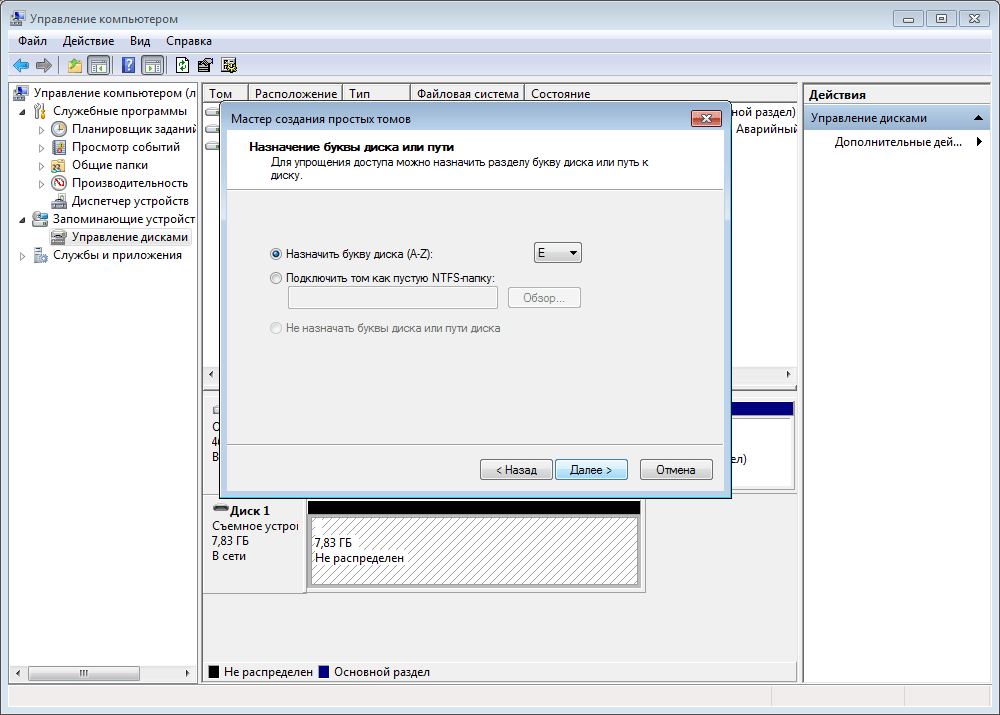
Создаем новый том. Для этого правой клавишей нажимаем на области флешки и выбираем «Создать новый том». Откроется специальный мастер. Здесь нам необходимо нажимать везде «Далее».
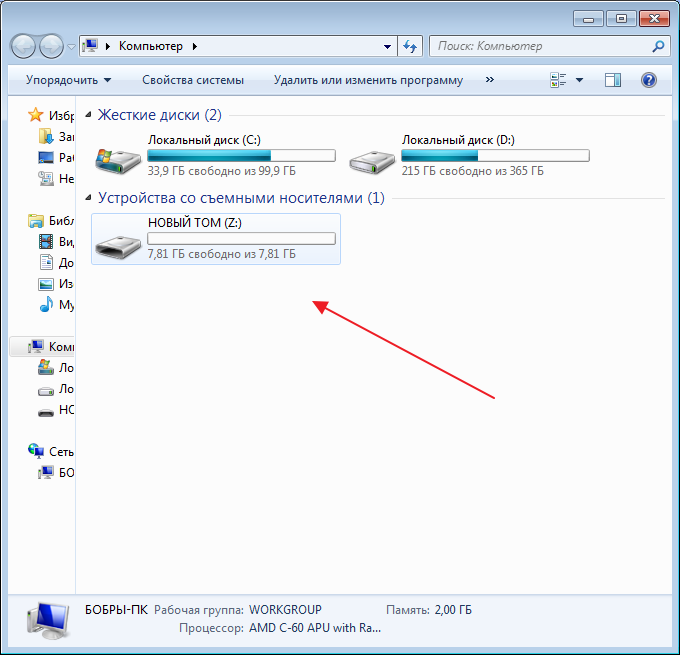
На конечном этапе флешка форматируется. Можно проверять.
Видео-урок:
Протестировав программу MemTest86+, я остался доволен. Это действительно мощный инструмент, который позволяет протестировать оперативную память различными способами. Однако, при отсутствии полной версии доступна только функция автоматической проверки, но в большинстве случаев ее достаточно для выявления большинства проблем с оперативной памятью.
Memtest86+ is a free, open-source, stand-alone memory tester for x86 and
x86-64 architecture computers. It provides a much more thorough memory
check than that provided by BIOS memory tests.
It is also able to access almost all the computer’s memory, not being
restricted by the memory used by the operating system and not depending
on any underlying software like UEFI libraries.
Memtest86+ can be loaded and run either directly by a PC BIOS (legacy or UEFI)
or via an intermediate bootloader that supports the Linux 16-bit, 32-bit,
64-bit, or EFI handover boot protocol. It should work on any Pentium class or
later 32-bit or 64-bit CPU.
Binary releases (both stable and nightly dev builds) are available on
memtest.org.
Table of Contents
- Origins
- Licensing
- Build and Installation
- Boot Options
- Keyboard Selection
- Operation
- Error Display
- Trouble-shooting Memory Errors
- Execution Time
- Memtest86+ Test Algorithms
- Individual Test Descriptions
- Known Limitations and Bugs
- Code Contributions
- Acknowledgments
Origins
Memtest86+ v6.00 was based on PCMemTest, which was a fork and rewrite of the
earlier Memtest86+ v5, which in turn was a fork of MemTest-86. The purpose
of the PCMemTest rewrite was to:
- make the code more readable and easier to maintain
- make the code 64-bit clean and support UEFI boot
- fix failures seen when building with newer versions of GCC
In the process of creating PCMemTest, a number of features of Memtest86+ v5
that were not strictly required for testing the system memory were dropped. In
particular, no attempt was made to measure the cache and main memory speed, or
to identify and report the DRAM type. These features were added back and expanded
in Memtest86+ v6.0 to create a unified, fully-featured release.
Licensing
Memtest86+ is released under the terms of the GNU General Public License
version 2 (GPLv2). Other than the provisions of the GPL there are no
restrictions for use, private or commercial. See the LICENSE file for details.
Build and Installation
Build is only tested on a Linux system, but should be possible on any system
using the GNU toolchain and the ELF file format. The tools required are:
- GCC
- binutils
- make
- dosfstools and mtools (optional)
- xorrisofs (optional)
To build a 32-bit image, change directory into the build32 directory and
type make. The result is a memtest.bin binary image file which can be
booted directly by a legacy BIOS (in floppy mode) or by an intermediate
bootloader using the Linux 16-bit boot protocol and a memtest.efi binary
image file which can be booted directly by a 32-bit UEFI BIOS. Either image
can be booted by an intermediate bootloader using the Linux 32-bit or 32-bit
EFI handover boot protocols.
To build a 64-bit image, change directory into the build64 directory and
type make. The result is a memtest.bin binary image file which can be
booted directly by a legacy BIOS (in floppy mode) or by an intermediate
bootloader using the Linux 16-bit boot protocol and a memtest.efi binary
image file which can be booted directly by a 64-bit UEFI BIOS. Either image
can be booted by an intermediate bootloader using the Linux 32-bit, 64-bit,
or 64-bit EFI handover boot protocols.
In either case, to build an ISO image that can be used to create a bootable
CD, DVD, or USB Flash drive, type make iso, The result is a memtest.iso
ISO image file. This can then be written directly to a blank CD or DVD, or
to a USB Flash drive, which can then be booted directly by a legacy or UEFI
PC BIOS.
Note that when writing to a USB Flash drive, the ISO image must be written
directly (‘dumped’) to the raw device, either by using the dd command or
by using a utility that provides the same functionality.
When using an intermediate bootloader, either the memtest.bin file or the
memtest.efi file should be stored in a disk partition the bootloader can
access, and the bootloader configuration should be updated to boot from
that file as if it were a Linux kernel with no initial RAM disk. Several
boot command line options are recognised, as described below. If using the
16-bit boot protocol, Memtest86+ will use the display in text mode (640×400).
If using the 32-bit or 64-bit boot protocols, Memtest86+ will use the display
in either text mode or graphics mode, as specified in the boot_params struct
passed to it by the bootloader. If in graphics mode, the supplied framebuffer
must be at least 640×400 pixels; if larger, the display will be centred. If
the system was booted in UEFI mode, graphics mode must be used.
For test purposes, there is also an option to build an ISO image that uses
GRUB as an intermediate bootloader. See the Makefile in the build32 or
build64 directory for details. The ISO image is both legacy and UEFI
bootable, so you need GRUB modules for both legacy and EFI boot installed
on your build system (e.g. on Debian, the required GRUB modules are located
in packages grub-pc-bin, grub-efi-ia32-bin and grub-efi-amd64-bin).
You may need to adjust some path and file names in the Makefile to match
the naming on your system.
The GRUB configuration files contained in the grub directory are there for
use on the test ISO, but also serve as an example of how to boot Memtest86+
from GRUB.
Boot Options
An intermediate bootloader may pass a boot command line to Memtest86+. The
command line may contain one or more options, separated by spaces. Each
option consists of an option name, optionally followed by an = sign and
one or more parameters, separated by commas. The following options are
recognised:
- nosmp
- disables ACPI table parsing and the use of multiple CPU cores
- nobench
- disables the integrated memory benchmark
- nobigstatus
- disables the big PASS/FAIL pop-up status display
- nosm
- disables SMBUS/SPD parsing, DMI decoding and memory benchmark
- nopause
- skips the pause for configuration at startup
- keyboard=type
- where type is one of
- legacy
- usb
- both
- where type is one of
- usbdebug
- pauses after probing for USB keyboards
- usbinit=mode
- where mode is one of
- 1 = use the two-step init sequence for high speed devices
- 2 = add a second USB reset in the init sequence
- 3 = the combination of modes 1 and 2
- where mode is one of
- console=ttySx,y
- activate serial/tty console output, where x is one of the following IO port
- 0 = 0x3F8
- 1 = 0x2F8
- 2 = 0x3E8
- 3 = 0x2E8
- and y is an optional baud rate to choose from the following list
- 9600
- 19200
- 38400
- 54600
- 115200 (default if not specified or invalid)
- 230400
- activate serial/tty console output, where x is one of the following IO port
Keyboard Selection
Memtest86+ supports both the legacy keyboard interface (using I/O ports 0x60
and 0x64) and USB keyboards (using its own USB device drivers). One or the
other or both can be selected via the boot command line, If not specified on
the command line, the default is to use both if the system was booted in UEFI
mode, otherwise to only use the legacy interface.
Older BIOSs usually support USB legacy keyboard emulation, which makes USB
keyboards act like legacy keyboards connected to ports 0x60 and 0x64. This
can often be enabled or disabled in the BIOS setup menus. If Memtest86+’s
USB device drivers are enabled, they will override this and access any USB
keyboards directly. The downside of that is that the USB controllers and
device drivers require some memory to be reserved for their private use,
which means that memory can’t then be covered by the memory tests. So to
maximise test coverage, if it is supported, enable USB legacy keyboard
emulation and, if booting in UEFI mode, add keyboard=legacy on the boot
command line.
NOTE: Some UEFI BIOSs only support USB legacy keyboard emulation when
you enable the Compatibility System Module (CSM) in the BIOS setup. Others
only support it when actually booting in legacy mode.
Many USB devices don’t fully conform to the USB specification. If the USB
keyboard probe hangs or fails to detect your keyboard, try the various
workarounds provided by the «usbinit» boot option.
NOTE: Hot-plugging is not currently supported by the Memtest86+ USB
drivers. When using these, your USB keyboard should be plugged in before
running Memtest86+ and should remain plugged in throughout the test.
Operation
Once booted, Memtest86+ will initialise its display, then pause for a few
seconds to allow the user to configure its operation. If no key is pressed,
it will automatically start running all tests using a single CPU core,
continuing indefinitely until the user reboots or halts the machine.
At startup, and when running tests, Memtest86+ responds to the following keys:
- F1
- enters the configuration menu
- F2
- toggles use of multiple CPU cores (SMP)
- Space
- toggles scroll lock (stops/starts error message scrolling)
- Enter
- single message scroll (only when scroll lock enabled)
- Escape
- exits the test and reboots the machine
Note that testing is stalled when scroll lock is enabled and the scroll region
is full.
The configuration menu allows the user to:
- select which tests are run (default: all tests)
- limit the address range over which tests are performed (default: all memory)
- select the CPU sequencing mode (default: parallel)
- parallel
- each CPU core works in parallel on a subset of the memory region being
tested
- each CPU core works in parallel on a subset of the memory region being
- sequential
- each CPU core works in turn on the full memory region being tested
- round robin
- a single CPU core works on the full memory region being tested, with a
new CPU core being selected (in round-robin fashion) for each test
- a single CPU core works on the full memory region being tested, with a
- parallel
- select the error reporting mode (default: individual errors)
- error counts only
- error summary
- individual errors
- BadRAM patterns
- select which of the available CPU cores are used (at startup only)
- a maximum of 256 CPU cores can be selected, due to memory and
display limits - the bootstrap processor (BSP) cannot be deselected
- a maximum of 256 CPU cores can be selected, due to memory and
- enable or disable the temperature display (at startup only)
- enable or disable boot tracing for debug (at startup only)
- skip to the next test (when running tests)
In all cases, the number keys may be used as alternatives to the function keys
(1 = F1, 2 = F2, … 0 = F10).
Error Reporting
The error reporting mode may be changed at any time without disrupting the
current test sequence. Error statistics are collected regardless of the
current error reporting mode (so switching to error summary mode will show
the accumulated statistics since the current test sequence started). BadRAM
patterns are only accumulated when in BadRAM mode.
Any change to the selected tests, address range, or CPU sequencing mode will
start a new test sequence and reset the error statistics.
Error Counts Only
The error counts only mode just displays the total number of errors found since
the current test sequence started.
Error Summary
The error summary mode displays the following information:
- Lowest Error Address
- the lowest address that where an error has been reported
- Highest Error Address
- the highest address that where an error has been reported
- Bits in Error Mask
- a hexadecimal mask of all bits that have been in error
- Bits in Error
- total bits in error for all error instances and the min, max and average
number of bits in error across each error instance
- total bits in error for all error instances and the min, max and average
- Max Contiguous Errors
- the maximum of contiguous addresses with errors
- Test Errors
- the total number of errors for each individual test
Individual Errors
The individual error mode displays the following information for each error
instance:
- pCPU
- the physical CPU core number that detected the error
- Pass
- the test pass number where the error occurred (a test pass is a single
run over all the currently selected tests)
- the test pass number where the error occurred (a test pass is a single
- Test
- the individual test number where the error occurred
- Failing Address
- the memory address where the error occurred
- Expected
- the hexadecimal data pattern expected to be found
- Found
- the hexadecimal data pattern read from the failing address
- Err Bits (only in 32-bit builds)
- a hexadecimal mask showing the bits in error
BadRAM Patterns
The BadRAM patterns mode accumulates and displays error patterns for use with
the Linux BadRAM feature. Lines are
printed in the form badram=F1,M1,F2,M2... In each F,M pair, the F
represents a fault address and the M is a bitmask for that address. These
patterns state that faults have occurred in addresses that equal F on all 1
bits in M. Such a pattern may capture more errors that actually exist, but
at least all the errors are captured. These patterns have been designed to
capture regular patterns of errors caused by the hardware structure in a terse
syntax.
The BadRAM patterns are grown incrementally rather than calculated from an
overview of all errors. The number of pairs is constrained to ten for a
number of practical reasons. As a result, handcrafting patterns from the
output in address printing mode may, in exceptional cases, yield better
results.
Trouble-shooting Memory Errors
Please be aware that not all errors reported by Memtest86+ are due to bad
memory. The test implicitly tests the CPU, caches, and motherboard. It is
impossible for the test to determine what causes the failure to occur. Most
failures will be due to a problem with memory. When it is not, the only option
is to replace parts until the failure is corrected.
Once a memory error has been detected, determining the failing module is not a
clear cut procedure. With the large number of motherboard vendors and possible
combinations of memory slots it would be difficult if not impossible to assemble
complete information about how a particular error would map to a failing memory
module. However, there are steps that may be taken to determine the failing
module. Here are some techniques that you may wish to use:
-
Removing modules
- This is the simplest method for isolating a failing modules, but may only
be employed when one or more modules can be removed from the system. By
selectively removing modules from the system and then running the test
you will be able to find the bad module(s). Be sure to note exactly which
modules are in the system when the test passes and when the test fails.
- This is the simplest method for isolating a failing modules, but may only
-
Rotating modules
- When none of the modules can be removed then you may wish to rotate modules
to find the failing one. This technique can only be used if there are three
or more modules in the system. Change the location of two modules at a time.
For example put the module from slot 1 into slot 2 and put the module from
slot 2 in slot 1. Run the test and if either the failing bit or address
changes then you know that the failing module is one of the ones just moved.
By using several combinations of module movement you should be able to
determine which module is failing.
- When none of the modules can be removed then you may wish to rotate modules
-
Replacing modules
- If you are unable to use either of the previous techniques then you are
left to selective replacement of modules to find the failure.
- If you are unable to use either of the previous techniques then you are
Sometimes memory errors show up due to component incompatibility. A memory
module may work fine in one system and not in another. This is not uncommon
and is a source of confusion. The components are not necessarily bad but
certain combinations may need to be avoided.
In the vast majority of cases errors reported by Memtest86+ are valid. There
are some systems that cause Memtest86+ to be confused about the size of memory
and it will try to test non-existent memory. This will cause a large number of
consecutive addresses to be reported as bad and generally there will be many
bits in error. If you have a relatively small number of failing addresses and
only one or two bits in error you can be certain that the errors are valid.
Also intermittent errors are always valid.
All valid memory errors should be corrected. It is possible that a particular
error will never show up in normal operation. However, operating with marginal
memory is risky and can result in data loss and even disk corruption.
Memtest86+ can not diagnose many types of PC failures. For example a faulty CPU
that causes your OS to crash will most likely just cause Memtest86+ to crash in
the same way.
Execution Time
The time required for a complete pass of Memtest86+ will vary greatly depending
on CPU speed, memory speed, and memory size. Memtest86+ executes indefinitely.
The pass counter increments each time that all of the selected tests have been
run. Generally a single pass is sufficient to catch all but the most obscure
errors. However, for complete confidence when intermittent errors are suspected
testing for a longer period is advised.
Memory Testing Philosophy
There are many good approaches for testing memory. However, many tests simply
throw some patterns at memory without much thought or knowledge of memory
architecture or how errors can best be detected. This works fine for hard
memory failures but does little to find intermittent errors. BIOS based memory
tests are useless for finding intermittent memory errors.
Memory chips consist of a large array of tightly packed memory cells, one for
each bit of data. The vast majority of the intermittent failures are a result
of interaction between these memory cells. Often writing a memory cell can
cause one of the adjacent cells to be written with the same data. An effective
memory test attempts to test for this condition. Therefore, an ideal strategy
for testing memory would be the following:
- write a cell with a zero
- write all of the adjacent cells with a one, one or more times
- check that the first cell still has a zero
It should be obvious that this strategy requires an exact knowledge of how the
memory cells are laid out on the chip. In addition there is a never ending
number of possible chip layouts for different chip types and manufacturers
making this strategy impractical. However, there are testing algorithms that
can approximate this ideal strategy.
Memtest86+ Test Algorithms
Memtest86+ uses two algorithms that provide a reasonable approximation of the
ideal test strategy above. The first of these strategies is called moving
inversions. The moving inversion tests work as follows:
- Fill memory with a pattern
- Starting at the lowest address
- check that the pattern has not changed
- write the pattern’s complement
- increment the address
- repeat 2.i to 2.iii
- Starting at the highest address
- check that the pattern has not changed
- write the pattern’s complement
- decrement the address
- repeat 3.i — 3.iii
This algorithm is a good approximation of an ideal memory test but there are
some limitations. Most high density chips today store data 4 to 16 bits wide.
With chips that are more than one bit wide it is impossible to selectively
read or write just one bit. This means that we cannot guarantee that all
adjacent cells have been tested for interaction. In this case the best we can
do is to use some patterns to ensure that all adjacent cells have at least
been written with all possible one and zero combinations.
It can also be seen that caching, buffering, and out of order execution will
interfere with the moving inversions algorithm and make it less effective.
It is possible to turn off caching but the memory buffering in new high
performance chips cannot be disabled. To address this limitation a new
algorithm called Modulo-20 was created. This algorithm is not affected by
caching or buffering. The algorithm works as follows:
- For starting offsets of 0 — 19 do
- write every 20th location with a pattern
- write all other locations with the pattern’s complement
- repeat 1.ii one or more times
- check every 20th location for the pattern
This algorithm accomplishes nearly the same level of adjacency testing as
moving inversions but is not affected by caching or buffering. Since separate
write passes (1.i, 1.ii) and the read pass (1.iv) are done for all of memory we
can be assured that all of the buffers and cache have been flushed between
passes. The selection of 20 as the stride size was somewhat arbitrary. Larger
strides may be more effective but would take longer to execute. The choice of
20 seemed to be a reasonable compromise between speed and thoroughness.
Individual Test Descriptions
Memtest86+ executes a series of numbered tests to check for errors. These tests
consist of a combination of test algorithm, data pattern and caching. The
execution order for these tests were arranged so that errors will be detected
as rapidly as possible. A description of each test follows.
To allow testing of more than 4GB of memory on 32-bit CPUs, the physical
address range is split into 1GB windows which are be mapped one at a time
into a virtual memory window. Each 1GB window may contain one or more
contiguous memory regions. For most tests, the test is performed on each
memory region in turn. Caching is enabled for all but the first test.
Test 0 : Address test, walking ones, no cache
In each memory region in turn, tests all address bits by using a walking
ones address pattern. Errors from this test are not used to calculate BadRAM
patterns.
Test 1 : Address test, own address in window
In each memory region in turn, each address is written with its own address
and then each address is checked for consistency. This test is performed
sequentially with each available CPU, regardless of the CPU sequencing mode
selected by the user.
Test 2 : Address test, own address + window
Across all memory regions, each address is written with its own virtual
address plus the window number (for 32-bit images) or own physical address
(for 64-bit images) and then each address is checked for consistency. This
catches any errors in the high order address bits that would be missed when
testing each window in turn. This test is performed sequentially with each
available CPU, regardless of the CPU sequencing mode selected by the user.
Test 3 : Moving inversions, ones & zeros
In each memory region in turn, and for each pattern in turn, uses the moving
inversions algorithm with patterns of all ones and all zeros.
Test 4 : Moving inversions, 8 bit pattern
In each memory region in turn, and for each pattern in turn, uses the moving
inversions algorithm with patterns of 8-bit wide walking ones and walking zeros.
Test 5 : Moving inversions, random pattern
In each memory region in turn, and for each pattern in turn, uses the moving
inversions algorithm with patterns of a random number and its complement. The
random number is different on each test pass so multiple passes increase
effectiveness.
Test 6 : Moving inversions, 32/64 bit pattern
In each memory region in turn, and for each pattern in turn, uses the moving
inversions algorithm with patterns of 32-bit wide (on 32-bit builds) or 64-bit
wide (on 64-bit builds) walking ones and walking zeros. Unlike previous tests,
the pattern is rotated 1 bit on each successive address.
Test 7 : Block move, 64 moves
This test stresses memory by using block move (movs) instructions and is based
on Robert Redelmeier’s burnBX test.
In each memory region in turn, memory is initialized with shifting patterns
that are inverted every 8 bytes. Then blocks of memory are moved around using
the movs instruction. After the moves are completed the data patterns are
checked. Because the data is checked only after the memory moves are completed
it is not possible to know where the error occurred. The addresses reported
are only for where the bad pattern was found. In consequence, errors from this
test are not used to calculate BadRAM patterns.
Test 8 : Random number sequence
In each memory region in turn, each address is written with a random number,
then each address is checked for consistency and written with the complement
of the original data, then each address is again checked for consistency.
Test 9 : Modulo 20, random pattern
In each memory region in turn, and for each pattern in turn, uses the
Modulo-20 algorithm with patterns of a random number and its complement.
The random number is different on each test pass so multiple passes increase
effectiveness.
Test 10 : Bit fade test, 2 patterns
Across all memory regions, and for each pattern in turn, initialises each
memory location with a pattern, sleeps for a period of time, then checks
each memory location for consistency. The test is performed with patterns
of all zeros and all ones.
Known Limitations and Bugs
Please see the list of open issues
and enhancement requests
on GitHub.
Feel free to submit bug reports!
Code Contributions
Code contributions are welcomed, either to fix bugs or to make enhancements.
See the README_DEVEL.md in the doc directory for some basic guidelines.
Acknowledgments
Memtest86+ v6.0 was based on PCMemTest, developed by Martin Whitaker, which
was based on Memtest86+ v5.01, developed by Samuel Demeulemeester, which in
turn was based on Memtest86, developed by Chris Brady with the resources and
assistance listed below:
-
The initial versions of the source files bootsect.S, setup.S, head.S and
build.c are from the Linux 1.2.1 kernel and have been heavily modified. -
Doug Sisk provided code to support a console connected via a serial port.
(not currently used) -
Code to create BadRAM patterns was provided by Rick van Rein.
-
The block move test is based on Robert Redelmeier’s burnBX test.
-
Screen buffer code was provided by Jani Averbach.
(not used by Memtest86+ v6.0) -
Eric Biederman provided all of the feature content for version 3.0
plus many bugfixes and significant code cleanup. -
Major enhancements to hardware detection and reporting in version 3.2, 3.3
and 3.4 provided by Samuel Demeulemeester (from Memtest86+ v1.11, v1.60
and v1.70).
In addition, several bug fixes for Memtest86+ were imported from
anphsw/memtest86.
Hi, I’ve recently been getting BSODs on my workstation which was rock solid for the last 3 years until about 2 months ago. During normal usage (email, web surfing and application development) I’ve had no issues, but I’ve seen a big uptick in BSODs and application crashes to desktop playing games and using 3d graphics software (although not when developing image processing applications). Since it seems to only happen when running graphics intensive applications, I first ran video memory diagnostics, but those all returned zero errors so my next stop was memtest86 v7.0. I ran booting off of USB with the default settings and got zero errors on pass 1 but failed on passes 2-4 in the row hammer test. There are only 3 bits flagged as bad by the report so I’m wondering:
1) Are these real errors?
2) Why did I pass on Pass1 but not 2 — 4?
3) Is there any way to tell which DIMM the issue is in from the reported memory addresses or do i just have to test 1 DIMM at a time until i find the bad one(s)?
Here is the report:
| Test Start Time | 2018-04-27 12:34:25 |
| Elapsed Time | 7:47:57 |
| Memory Range Tested | 0x0 — 81F000000 (33264MB) |
| CPU Selection Mode | Parallel (All CPUs) |
| ECC Polling | Enabled |
| # Tests Passed | 46/48 (95%) |
| Lowest Error Address | 0xA42C62E0 (2626MB) |
| Highest Error Address | 0x3A32C4E30 (14898MB) |
| Bits in Error Mask | 0000000042000100 |
| Bits in Error | 3 |
| Max Contiguous Errors | 1 |
| Test | # Tests Passed | Errors |
| Test 0 [Address test, walking ones, 1 CPU] | 4/4 (100%) | 0 |
| Test 1 [Address test, own address, 1 CPU] | 4/4 (100%) | 0 |
| Test 2 [Address test, own address] | 4/4 (100%) | 0 |
| Test 3 [Moving inversions, ones & zeroes] | 4/4 (100%) | 0 |
| Test 4 [Moving inversions, 8-bit pattern] | 4/4 (100%) | 0 |
| Test 5 [Moving inversions, random pattern] | 4/4 (100%) | 0 |
| Test 6 [Block move, 64-byte blocks] | 4/4 (100%) | 0 |
| Test 7 [Moving inversions, 32-bit pattern] | 4/4 (100%) | 0 |
| Test 8 [Random number sequence] | 4/4 (100%) | 0 |
| Test 9 [Modulo 20, ones & zeros] | 4/4 (100%) | 0 |
| Test 10 [Bit fade test, 2 patterns, 1 CPU] | 4/4 (100%) | 0 |
| Test 13 [Hammer test] | 2/4 (50%) | 3 |
| Last 10 Errors |
| [Data Error] Test: 13, CPU: 0, Address: 3A32C4E30, Expected: D1308F30, Actual: 91308F30 |
| [Data Error] Test: 13, CPU: 0, Address: 1032C4138, Expected: 4414C326, Actual: 4614C326 |
| [Data Error] Test: 13, CPU: 0, Address: A42C62E0, Expected: D85C4FDE, Actual: D85C4EDE |
and here is my system info:
| EFI Specifications | 2.31 |
| System | |
| Manufacturer | MSI |
| Product Name | MS-7752 |
| Version | 1.0 |
| Serial Number | To be filled by O.E.M. |
| BIOS | |
| Vendor | American Megatrends Inc. |
| Version | V2.11 |
| Release Date | 07/10/2013 |
| Baseboard | |
| Manufacturer | MSI |
| Product Name | Z77A-G45 (MS-7752) |
| Version | 1.0 |
| Serial Number | To be filled by O.E.M. |
| CPU Type | Intel Core i5-3570K @ 3.40GHz |
| CPU Clock | 3400 MHz [Turbo: 4200.0 MHz] |
| # Logical Processors | 4 |
| L1 Cache | 4 x 64K (117576 MB/s) |
| L2 Cache | 4 x 256K (63912 MB/s) |
| L3 Cache | 6144K (34498 MB/s) |
| Memory | 32740M (19496 MB/s) |
| DIMM Slot #0 | 8GB DDR3 XMP PC3-12800 |
| G Skill Intl / F3-1600C9-8GSR | |
| 9-9-9-24 / 1600 MHz / 1.500V | |
| DIMM Slot #1 | 8GB DDR3 XMP PC3-12800 |
| G Skill Intl / F3-1600C9-8GSR | |
| 9-9-9-24 / 1600 MHz / 1.500V | |
| DIMM Slot #2 | 8GB DDR3 XMP PC3-12800 |
| G Skill Intl / F3-1600C9-8GSR | |
| 9-9-9-24 / 1600 MHz / 1.500V | |
| DIMM Slot #3 | 8GB DDR3 XMP PC3-12800 |
| G Skill Intl / F3-1600C9-8GSR | |
| 9-9-9-24 / 1600 MHz / 1.500V |
I guess despite it only being 3 potentially bad bits, since I’m seeing recent BSOD and crash-to-desktop behavior, i should isolate the DIMM(s) and replace them, but before I do that, I’m just wondering if there are any chances of «false positives» and how i can tell them apart from «real» errors.
thanks in advance for any infoanswers!!
Если все работает — забей на тесты.
- Ссылка
Что посоветуете?
Попробуй разные версии Memtest. Я на похожие грабли вставал, оказалось, что проблема в самом Memtest. До сих пор с этой машиной всё в порядке.
ls-h ★★★★★
(07.04.21 16:35:56 MSK)
- Ссылка
Дело в новомодном контролёре и организации памяти. У тебя два варианта:
-
Не глючит если, то забей.
-
Если глючит, то посмотри что у тебя с таймингами в BIOS и проверь более новой, желательно этого года, Memtest 86+. Со многими дистрибутивами есть в комплекте и можно выбрать в grub, а можно скачать отдельно посвежее. Ну и когда 4 планки, то в зависимости от организации памяти с XMS в BIOS могут быть некоторые проблемы, иногда помогает его обновление, но тут уже смотри сам. Ибо разгоны с 4 плашками — это тот ещё гемор, а иногда они и не возможны.
anonymous
(07.04.21 16:44:52 MSK)
- Показать ответ
- Ссылка
memtest устарел
чекай частоты/тайминги. 4 палки едут существенно хуже почастотам. testmem5 + extreme профили от anta777 в помощь
anonymous
(07.04.21 16:59:49 MSK)
- Показать ответ
- Ссылка
Ответ на:
комментарий
от anonymous 07.04.21 16:44:52 MSK
Спасибо други за быструю помощь
- Memtest брал свежайший
- Память не разгонял. Вообще никогда оверклок не делал.
- Показать ответы
- Ссылка
Ответ на:
комментарий
от ITdreamer 07.04.21 17:00:28 MSK
Память не разгонял. Вообще никогда оверклок не делал.
А она у тебя не разогнанная из коробки, случайно?
aquadon ★★★★★
(07.04.21 17:03:31 MSK)
- Показать ответ
- Ссылка
Ответ на:
комментарий
от aquadon 07.04.21 17:03:31 MSK
Да, я и не знаю. Покупали в студию 5 таких материнок и 5 комплектов памяти, на каждый комп.
В 3х все норм, тесты проходят. В 1ом, о том что щас пишу сыплются ошибки. В другом тоже есть небольшие ошибки, но как минимум они не сыпятся подряд.
На той машине о которой пишу
Там
Основные ошибки на
Тест 8: Random number sequence
И ещё парочка на
Тест 6: Block move
- Показать ответы
- Ссылка
Ответ на:
комментарий
от ITdreamer 07.04.21 18:18:41 MSK
Если есть ошибки, значит нужно менять оборудование, оно бракованное. Что тут обсуждать. Если у тебя есть несколько планок и плат, то задача выяснить, кто глючит, вообще крайне простая.
- Ссылка
Попробуйте обратить внимание на адреса, на которые тест выдает ошибки. Возможно, это что-то прояснит.
anonymous
(07.04.21 18:41:25 MSK)
- Показать ответ
- Ссылка
Ответ на:
комментарий
от anonymous 07.04.21 18:41:25 MSK
Ну адреса есть, только мне они ни о чем не говорят, к сожалению
- Ссылка
Ответ на:
комментарий
от ITdreamer 07.04.21 17:00:28 MSK
Насчёт разгона памяти. Если включал в BIOS XMS профиль с частотой хашитой в память, а там бывает приличные зашиты, то это уже разгон, но штатный. Можно попробовать его убрать, если включён конечно, а потом потестить. И такое бывало, просто выставлял штатную, тестил и отдавал клиенту, обычно и брал за это очень дёшево 
anonymous
(08.04.21 06:57:56 MSK)
- Ссылка
Re: memtest устарел
testmem5 + extreme профили от anta777
Под запущенной виндой, ога. Причём охреневший афтар позиционирует это как преимущество(!). Но вендохацкеры-оверклокеры хавают…
anonymous
(08.04.21 07:29:44 MSK)
- Показать ответ
- Ссылка
Как вариант, бракованный процессор, а не память. Сталкивался с таким. Проверь комплектующие отдельно.
Khnazile ★★★★★
(08.04.21 07:34:32 MSK)
- Показать ответы
- Ссылка
Ответ на:
комментарий
от Khnazile 08.04.21 07:34:32 MSK
Сейчас уже и процессоры бракованные пошли что ли? Блин, 32 года с компьютерным железом и ни разу не попадались. Неужели и они пошли говённые такие? У меня новый Ryzen 5 PRO 4650G так нормально всё, но в отзывах видел такое предположение, но его вроде как опровергли.
anonymous
(08.04.21 07:52:05 MSK)
- Показать ответы
- Ссылка
Ответ на:
комментарий
от anonymous 08.04.21 07:52:05 MSK
какая короткая память, не так давно райзены первого поколения сыпали сегфолтами и бесплатно обменивались амд на исправные
anonymous
(08.04.21 09:02:26 MSK)
- Показать ответ
- Ссылка
Ответ на:
комментарий
от anonymous 08.04.21 09:02:26 MSK
Видимо мне везло и таких не попадалось. Хотя у меня большинство компьютеров было на Intel. Хотя я про это читал, но практически не сталкивался ни разу. А прошло их через меня не мало. Но я не продаван, может и меняли, продаванов нет знакомых чтоб спросить.
anonymous
(08.04.21 09:46:47 MSK)
- Ссылка
Ответ на:
комментарий
от anonymous 08.04.21 07:52:05 MSK
Ответ на:
комментарий
от anonymous 08.04.21 10:00:29 MSK
Ага. Значит было. Ну спасибо. Но мне не попадались. Хотя помню как 1600 ризены 2016-го года — вдруг резко сменили 1600AF 2017 года. Вон оно оказывается что. А я думал что китайцы прошарились с маркировкой и 1600AF = 2600, хотя по технологии это так, только у 1600AF частоту немного даунклокнули. Впрочем сейчас 1600 все AF с 2017-го и найти их уже не так просто в магазинах. Хотя и в некоторых городах в BOX исполнении и есть ещё. Навёл справки. Был не прав. Но мне не попадались.
anonymous
(08.04.21 10:34:34 MSK)
- Ссылка
Посоветую не забивать, а проверить всё более основательно и заменить, пока есть гарантия. Оно может с виду работать идеально, но через полтора года ты затрахаешься с плавающими багами, когда какую-то неудачливую софтину надо будет запустить. У меня есть i5 с алишки, не проходящий мемтест, на нём дискорд каждые 10 минут сегфолтится, а других проявлений нет.
★★★
(08.04.21 13:08:33 MSK)
Последнее исправление: izzholtik 08.04.21 13:09:14 MSK
(всего
исправлений: 1)
- Ссылка
Ответ на:
комментарий
от Khnazile 08.04.21 07:34:32 MSK
нет, просто погнанная в хлам память самим производителем (кингсшлак такое любит например, да и многие другие).
сталкивался с тем, что кингсшлак по 2 планки на канал сыпал ошибки в мемтесте и портил myisam БД (+ сегфолтил компилятор), по одной — работал нормально, при этом тасование плашек памяти меняло картину (2 из 4 работали нормально в паре, одна — сбоила в паре, одна — сбоила и сама собой). замена на память с ЕСС сотворила чудо — ни одной скорректированной ошибки. пушо ЕСС память в хлам уже не погонишь — то в игорях почти не заметны редкие глюки памяти, ну вылетит раз в сутки если очень не повезло, если повезло — текстуры попортятся или полигон хз куда улетит; а при ЕСС — каждая ошибка четности будет падать в логи.
NiTr0 ★★★★★
(08.04.21 13:21:38 MSK)
- Показать ответы
- Ссылка
Ответ на:
комментарий
от NiTr0 08.04.21 13:21:38 MSK
У меня был именно неисправный процессор. Причём с магазина новый в коробке. Корректно работал только с одной планкой памяти. Притом, мемтест на нем запускался и работал, а вот ОС записала на загрузке. Поменял по гарантии.
ИЧСХ, это был единственный раз когда я брал боксовый процессор для себя 
Khnazile ★★★★★
(08.04.21 13:26:27 MSK)
Последнее исправление: Khnazile 08.04.21 13:28:22 MSK
(всего
исправлений: 1)
- Показать ответы
- Ссылка
Ответ на:
комментарий
от NiTr0 08.04.21 13:21:38 MSK
ECC хороши, сам радовался им. Но надо чтоб их остальное оборудование умело. У меня умело, работало долго и 24/7. Потом всё было разом апнуто и взята хорошая не ECC из Crucial Balistics. Работает в разгоне до 3600Мгц., гнал и до 4000Мгц., но мне нужна стабильность. Хотя и на 4000Мгц. нормально было, но я не оверклокер. Просто для AMD немного погнать, хотя бы по профилю XMP и то нормально. С Intel никогда не заморачивался с разгоном памяти. Хотя и умельцы приносили глючные компьютеры с погнанной но на Z чипсете, он разрешает процессору её гнать, в отличие от H и B.
anonymous
(08.04.21 13:32:30 MSK)
- Показать ответ
- Ссылка
Ответ на:
комментарий
от Khnazile 08.04.21 13:26:27 MSK
Нда. Это же надо чтоб вот так «подфортило». Нет слов…
anonymous
(08.04.21 13:35:27 MSK)
- Ссылка
Ответ на:
комментарий
от anonymous 08.04.21 10:00:29 MSK
Начитался вдоволь. Странно всё, сколько ремонтом занимаюсь компьютеров с i8086 начиная и по сей день, ни одного случая чтоб процессор был неисправный. А тут вон что. Полез тестить и смотреть логи и у своего Ryzen 5 PRO 4650G. Долго изучал и аж от сердца отлегло. Не то что ни одной ошибки, так ни одного варнинга нету с ядром 5.8.0-48 HWE Ubuntu 20.04.2.0. Тогда в тройне не понятно, почему видео встроенное в него, а у меня иного нету, с ядром 5.11.х конфликтует в разных дистрибутивах и не стартует вообще. Может ему модуля внешнего под именно его не хватает всё таки, очень на то похоже. Надеюсь что когда придёт в ubuntu 5.11.0-xx HWE, то они, и модули, и mesa, и linux-imsge HWE, и amdgpu поправят и будет всё хорошо. Дай то Бог. Иначе мне с моим новым железом будет прискорбно, я его так тщательно подбирал к началу декабря и покупал, а тут может быть опа… Стресстесты спецом прогнал и тоже всё отлично и холодное. Жаль что ТС так вот не повезло с процессором, может быть.
anonymous
(08.04.21 14:06:06 MSK)
- Показать ответ
- Ссылка
4 планки могут не запускаться на высокой частоте. Оставляй 2 или занижай частоты/подкручивай тайминги.
vazgen05 ★★★
(08.04.21 14:09:44 MSK)
- Ссылка
Ответ на:
комментарий
от anonymous 08.04.21 13:32:30 MSK
ну это да. хотя опять же тайминги у ЕСС модулей более вменяемые — просто потому, что любой флапающий бит на ЕСС памяти будет заметен сразу же, а на не-ЕСС — это все «венда глючит»/«игра кривая»/«софт анусманусы писали»…
NiTr0 ★★★★★
(08.04.21 14:37:36 MSK)
- Ссылка
если есть гарантия то возвращай в магазин.
★★★★★
(08.04.21 14:44:56 MSK)
- Ссылка
Ответ на:
комментарий
от Khnazile 08.04.21 13:26:27 MSK
возможно дело не в процессоре даже было, а в пережатом креплении куллера которое давит на текстолит материнской платы. у меня была такая материнка лет 10 назад на sandy bridge. если перетянуть венты то память либо не определяется либо работает на заниженных частотах, раслабил винты — все ок и мемтест проходит. тот пк до сих пор работает кстати.
а если у ТСа гарантия то ему вообще внутрь лезть нельзя тем более процессор снимать.
★★★★★
(08.04.21 14:47:32 MSK)
Последнее исправление: bhfq 08.04.21 14:48:25 MSK
(всего
исправлений: 1)
- Показать ответ
- Ссылка
Ответ на:
комментарий
от anonymous 08.04.21 14:06:06 MSK
Странно всё, сколько ремонтом занимаюсь компьютеров с i8086 начиная и по сей день, ни одного случая чтоб процессор был неисправный
Это действительно очень странно, ведь в одно время с 8086 существовали советские микропроцессоры, как клоны, так и оригинальные разработки, и вот у них как минимум с заводским браком было все в порядке.
Khnazile ★★★★★
(08.04.21 14:49:10 MSK)
- Показать ответ
- Ссылка
Ответ на:
комментарий
от bhfq 08.04.21 14:47:32 MSK
Но в итоге по гарантии процессор же поменяли. Не думаю, что его бы поменяли без проверки.
Khnazile ★★★★★
(08.04.21 14:57:10 MSK)
- Ссылка
Ответ на:
комментарий
от ITdreamer 07.04.21 18:18:41 MSK
Покупали в студию 5 таких материнок и 5 комплектов памяти, на каждый комп.
Можно попробовать поменять память на другие машины.
ls-h ★★★★★
(08.04.21 15:12:20 MSK)
- Показать ответ
- Ссылка
Ответ на:
комментарий
от ls-h 08.04.21 15:12:20 MSK
Вот да, хочу попробовать
- Ссылка
Ответ на:
комментарий
от Khnazile 08.04.21 14:49:10 MSK
Ну я отечественные к1810вм86 машинки тоже ремонтировал, но там у процессоров то брак в процессе сборки отсеивали обычно, готовой мне ни разу не попадалось. НО у нас в городе было 6 заводов по этому профилю и покойная жена на одном из них работала на сборке. Браку было не просто много, а очень много. Про остальные клоны Z80 и.т.д. я молчу, был даже в городе магазин некондиции «Сделай сам» и там уж всякого этого добра было столько, что москвичи, со своими «чёрными» рынками радиодеталей, завидовали. Там тоже продавали обычно хоть и из изолятора брака, но или с разбросом параметров от нормы отклоняющимся, а у оборонки приёмка, в те 60-70 годы, была очень серьёзная, или со смазанной маркировкой и.т.д. Но в те годы конечно же были максимум к580ик(вм)80, аналог i8080. Но нам, тогда и это было сильно. А были и оригинальные разработки и шедевры на их базе. Но те я не ремонтировал, а только если дисковод добавлял и HDD MFM Seagate 10-20Мб. Так что — брак был, но на этапе производства отсеивался, тем удивительнее что у intel проблемы с микрокодом были и у AMD, и прочие гадости, даже у Ryzen Zen и Zen+ версии, у Zen2 редко очень и у них в основном больше то разброс параметров, впрочем как и у Intel. У меня есть дома 5 компьютеров, 2шт. AMD, 3шт. Intel. Разных поколений. А сколько прошло через мои руки, пока я до прошлого года ещё мог и ремонтом практиковал… Но… Вот бывает. Извиняюсь что длинно получилось.
anonymous
(08.04.21 16:59:54 MSK)
- Показать ответ
- Ссылка
Ответ на:
комментарий
от anonymous 08.04.21 16:59:54 MSK
Так в моём случае тоже мог быть брак сборки. Кристалл на текстолит припаян на шарах, если один оторвется из-за брака пайки, возможны проблемы.
Khnazile ★★★★★
(08.04.21 17:09:14 MSK)
- Показать ответ
- Ссылка
Мемтест очень кривой и материнки очень кривые и новые процессоры очень кривые и память тоже очень кривая
смотри чтоб в мемтесте была поддержка твоей материнки, процессора, и памяти иначе буду ошибки на 100% исправной памяти/процессоре/материнке
- Показать ответы
- Ссылка
Ответ на:
комментарий
от svv20624 08.04.21 17:24:05 MSK
самый нормальный не багающий мемтест в Win10, его запускай
- Ссылка
Ответ на:
комментарий
от svv20624 08.04.21 17:24:05 MSK
П.С. если купил железо 2020-21 года то очевидно его поддержки в мемтесте нет
выше уже многие отписали что у них тоже мемтест показывал ошибки
у меня в 2020 когда я купил Райзен 2019 года были ошибки в мемтесте из за отсутствия поддержки нового железа (я купил несколько ПК и на всех были ошибки, погуглил понял что мемтест кривой и не работает с DDR4 памятью и новыми райзенами)
- Показать ответ
- Ссылка
Ответ на:
комментарий
от Khnazile 08.04.21 17:09:14 MSK
Это очень упрощённо, это раньше паяли мосты на материнки на шары. В процессорах всё сложнее, тем более технологии сейчас уже достигли минимального уровня нм., для х86 архитектуры. Дальше только переход на RISC. Попытки уже есть, поживём посмотрим. Даст Бог.
anonymous
(08.04.21 17:40:36 MSK)
- Показать ответ
- Ссылка
Ответ на:
комментарий
от svv20624 08.04.21 17:28:54 MSK
В конференции аппаратчиков это вот недавно обсуждали, сейчас memtest 86+ постоянно и часто обновляют. И уже даже есть его аналоги под DDR4 и даже DDR5, и процессоры поддерживающие, которых ещё нет особо то на прилавках. Я свой то Ryzen 5 4650G купил в ноябре случайно, а то бы так и сидел на Intel i5 9600, который дороже, кстати 
anonymous
(08.04.21 17:47:24 MSK)
- Ссылка
Ответ на:
комментарий
от anonymous 08.04.21 17:52:15 MSK
Плюсую! В конференции аппаратчиков его тоже рекомендуют и ты меня немного со ссылкой опередил 

anonymous
(08.04.21 18:02:55 MSK)
- Ссылка
Ок, протестировал каждую планку поотдельности (каждую в своем слоте), думал найду битую. Хрена с два! Все планки проходят тесты по отдельности
меняй материнку, память достаточно много потребляет, так что 4 не работают скорей всего из-за хренового питания
anonymous
(09.04.21 08:17:58 MSK)
- Показать ответ
- Ссылка
Ответ на:
комментарий
от anonymous 09.04.21 08:17:58 MSK
максимум упорин. память мало потребляет, во всех матерях vrm памяти избыточный
anonymous
(09.04.21 08:21:16 MSK)
- Показать ответ
- Ссылка
Ответ на:
комментарий
от anonymous 08.04.21 17:40:36 MSK
Шизик, нанометры никак не связаны с архитектурой команд.
anonymous
(09.04.21 08:23:05 MSK)
- Ссылка
Мемтест говно и не находит ошибок там, где предлженная им программа находит, иксперд.
anonymous
(09.04.21 08:25:24 MSK)
- Ссылка
Ответ на:
комментарий
от anonymous 09.04.21 08:21:16 MSK
Ответ на:
комментарий
от anonymous 09.04.21 09:11:50 MSK
не увидел, каким образом они эти цифры получили. с потолка? процессор у них там 200вт+ выжрет, для сравнения. пара транзисторов аналогичных тем, что в нём, (потому что производитель ставит всюду одинаковые закупаемые оптом компоненты) будет избыточна для памяти. кроме того, современные планки делают по более тонким техпроцессам уже и они жрать будут меньше
anonymous
(09.04.21 09:31:01 MSK)
- Показать ответ
- Ссылка
Ответ на:
комментарий
от anonymous 09.04.21 09:31:01 MSK
аналогичных тем, что стоят в vrm процессора
anonymous
(09.04.21 09:31:57 MSK)
- Ссылка
Ответ на:
комментарий
от anonymous 09.04.21 09:11:50 MSK
Это нехилый такой ток — у некоторых на вводных автоматах в квартиру такой.
Вот только напряжение у них не 1.2 V, а все 220
tiinn ★★★★★
(09.04.21 09:32:36 MSK)
- Показать ответ
- Ссылка
| Автор | Сообщение | ||
|---|---|---|---|
|
|||
|
Решил сегодня прогнать свою ОЗУ в Memtest86 6 free (UEFI), из-за своих подозрений. ОЗУ crucial ct51264ba160bj две штуки Помогите, пожалуйста. В таком я ничего не понимаю и не знаю. «Результаты» _________________ |
||
| Вернуться к началу |
Профиль Ответить с цитатой |
||
|
Reaper |
|||
|
Цитата:
Извини, добрый человек, но ты это к чему сейчас сказал !? _________________ |
||
| Вернуться к началу | |||
|
Reaper |
|||
|
Цитата:
Вот в том-то и дело, что не очень хорошо (мягко выражаясь) его понимаю. _________________ |
||
| Вернуться к началу | |||
|
Reaper |
|||
|
ssegga Тему не стану закрывать. Хочу услышать и другие мнения. _________________ |
||
| Вернуться к началу | |||
|
R2D2 |
|||
|
От души, братюня сегазавр |
||
| Вернуться к началу | |||
|
UPGRADE |
|||
Откуда: Екатеринбург |
Так это _________________ |
||
| Вернуться к началу | |||
|
Reaper |
|||
|
Сделал всё как и предлагали. Если у кого есть соображения на этот счёт, то делитесь. Заранее всем спасибо.!!!!!! _________________ |
||
| Вернуться к началу | |||
|
UPGRADE |
|||
Откуда: Екатеринбург |
Так что даже одна полоска в любом из слотов ошибается? _________________ |
||
| Вернуться к началу | |||
|
Reaper |
|||
|
Цитата: Так что даже одна полоска в любом из слотов ошибается?
Не все слоты проверил, но в 3-ёх из 4 проверял. _________________ |
||
| Вернуться к началу | |||
|
UPGRADE |
|||
Откуда: Екатеринбург |
Так что даже одна полоска в любом из слотов ошибается? _________________ |
||
| Вернуться к началу | |||
|
Reaper |
|||
|
Цитата: Так что даже одна полоска в любом из слотов ошибается? Так и есть…. _________________ |
||
| Вернуться к началу | |||
|
xxxgoes |
|
|
|
Что-то как-то очень подозрительно. Выход из строя двух палок одновременно маловероятен. Может мамка (или проц, контроллер памяти ведь в нем) шалит? |
| Вернуться к началу | |
|
Reaper |
|||
|
Как писал выше, что эта ошибка, как понял из прочитанного, не столь серьёзная и она не столь критична для обычного пользователя и ПК, как может показаться на первый взгляд. Всё работает нормально, ничего не трещит и не издаёт непонятных звуков. BSOD’ов случается больше, чем на моём предыдущем ПК (фен ii x4 920 + Asus M3A78Pro), но как после такого ни смотрю на сайтах коды этих ошибок, то постоянно вижу одно и тоже — софт или драйвер заглючил. Удалив программу, на которую падает подозрение, комп опять работает без проблем. _________________ Последний раз редактировалось Reaper 16 май 2015 22:01, всего редактировалось 1 раз. |
||
| Вернуться к началу | |||
|
Reaper |
|||
|
Кто-нибудь проводил «Test 13. Hammer Test» в memtest86 !? _________________ |
||
| Вернуться к началу | |||
|
Reaper |
|||
|
Цитата: Цитата: memtest86 !? Что это? http://www.memtest86.com/index.html А ты вообще «сведущие люди»!? _________________ |
||
| Вернуться к началу | |||
|
means |
|||
|
Предлагаю топикстартеру, курсануть валерианки иль глицинчику Цитата: Как писал выше, что эта ошибка, как понял из прочитанного, не столь серьёзная и она не столь критична для обычного пользователя и ПК, как может показаться на первый взгляд. Всё работает нормально, ничего не трещит и не издаёт непонятных звуков. BSOD’ов случается больше, чем на моём предыдущем ПК (фен ii x4 920 + Asus M3A78Pro), но как после такого ни смотрю на сайтах коды этих ошибок, то постоянно вижу одно и тоже — софт или драйвер заглючил. Удалив программу, на которую падает подозрение, комп опять работает без проблем.
_________________ |
||
| Вернуться к началу | |||
|
Reaper |
|||
|
Цитата: Предлагаю топикстартеру, курсануть валерианки иль глицинчику Цитата: Как писал выше, что эта ошибка, как понял из прочитанного, не столь серьёзная и она не столь критична для обычного пользователя и ПК, как может показаться на первый взгляд. Всё работает нормально, ничего не трещит и не издаёт непонятных звуков. BSOD’ов случается больше, чем на моём предыдущем ПК (фен ii x4 920 + Asus M3A78Pro), но как после такого ни смотрю на сайтах коды этих ошибок, то постоянно вижу одно и тоже — софт или драйвер заглючил. Удалив программу, на которую падает подозрение, комп опять работает без проблем.
Дело верное говоришь. Я уже так и сделал — «курсанул валерьянки иль глицинчику». _________________ |
||
| Вернуться к началу | |||
|
xxxgoes |
|
|
|
Я бы отнес память на проверку — если все ОК, я бы поменял мать по гарантии, если гарантия все, то и хрен с ним |
| Вернуться к началу | |
|
UPGRADE |
|||
Откуда: Екатеринбург |
Линксом гоняли? _________________ |
||
| Вернуться к началу | |||
|
Reaper |
|||
|
Цитата: Линксом гоняли? Нет. А можно ссылочку на сайт, а то поиск выдаёт всякую херь !? Заранее благодарю. _________________ |
||
| Вернуться к началу | |||
|
Reaper |
|||
|
Цитата: Цитата: Линксом гоняли? Нет. А можно ссылочку на сайт, а то поиск выдаёт всякую херь !? Заранее благодарю.
Сам нашёл… Не то в поиске вводил…. _________________ |
||
| Вернуться к началу | |||
|
UPGRADE |
|||
Откуда: Екатеринбург |
_________________ |
||
| Вернуться к началу | |||
|
Reaper |
|||
|
Цитата:
А 50 кругов хватит !? 500 — это через уж будет. _________________ |
||
| Вернуться к началу | |||
|
UPGRADE |
|||
Откуда: Екатеринбург |
Поставить под Линксом на ночь _________________ |
||
| Вернуться к началу | |||
|
UPGRADE |
|||
Откуда: Екатеринбург |
Хотя конечно чаще все наоборот — в мемтесте все ок _________________ |
||
| Вернуться к началу | |||
|
Reaper |
|||
|
«А вот в ликнсе начинаются проблемы» — как вы это увидели !? Мне бы самому с этим хочется разобраться и понять. Цитата: Только memtest86+, только хардкор.
Я вас тогда не понял, что вы имели ввиду, но Пушистый всё объяснил. _________________ |
||
| Вернуться к началу | |||
|
Reaper |
|||
|
Всем спасибо!!! Тему бы надо закрыть, но вдруг ещё какие подозрения будут)))) _________________ |
||
| Вернуться к началу | |||
-
#1
I have a new Supermicro Xeon D motherboard, with two new Samsung 32GB DDR4 sticks of RAM. I’ve been running Memtest86+ for the last 13 hours and have found 80 errors.
I’m wondering if the errors could be caused by something other than the RAM. The RAM and motherboard both came new from eBay, and appear to be new.
My testing setup is less than ideal, with the motherboard outside of a case resting on top of the box it came in, powered by a very old power supply, with a fan blowing across it.
Temperatures as reported by IPMI are good.
If I put the motherboard in a case with a new power supply and run the test again without errors, should I feel safe knowing that my RAM is probably good? Or at this point should I just replace the RAM?
-
#2
Best way to tell is to.mave things about and see if the problem moves.
Retest with only one stick in slot a1. Then test with the other stick by itself. Did you get errors both times? If you have other ddr4 ram test the board with that — and if you have another board test the memory there. The actually bad component (board or ram) should readily become apparent.
Sent from my SM-G925V using Tapatalk
-
#3
If you are seeing Memtest errors and the addresses are all under 1MB then there’s a good chance that this is actually just an issue with BIOS reserved memory or some other BIOS-related bug.
It looks like this is probably happening in your case, based on the screenshot. You are not seeing single bit flips, something is trashing those areas of memory. It also looks like this was a burst of errors during a single pass, i.e. not happening over and over again.
I’ve seen this issue multiple times on different systems and it never turned out to be bad memory. The problem either disappeared after some config change, or simply rebooting and restarting memtest again went on to pass for days at a time.
You can try using a newer or different version of Memtest (either from memtest86.com or memtest.org). Make sure you have the latest BIOS. You can try running with some or all of the multiple CPU cores disabled. You might also want to try some alternate tests like running prime95.
-
#4
@PigLover, unfortunately I don’t have any other DDR4 motherboards or RAM. I will try testing one stick at a time tomorrow.
@sullivan, My board is a Supermicro X10SDV-TLN4F and I am using Samsung ECC REG M393A4K40BB0-CPB RAM from the Supermicro compatibility chart. I will check my BIOS revision. What config change might fix this? Shouldn’t Registered ECC RAM not report errors? Does memtest disable ECC?
-
#5
First, I would make sure you have the latest BIOS. Just for good measure, clear the CMOS and reset the BIOS defaults.
Next, try running the Passmark version of Free Edition MemTest86 from memtest86.com. You will need to follow the instructions on their web page for booting via UEFI:
MemTest86 — Download now!
PassMark MemTest86 — Memory Diagnostic Tool — Technical Information
I am a long-time fan of the free version of memtest86+ (from memtest.org) but the reality is that it hasn’t been updated in about 4 years. This is why it shows «Chipset: Unknown, Memory Type: Unknown» on newer motherboards like yours. Passmark is trying hard to sell their product but they are not too obnoxious about it and the Free Edition seems to work fine and supports new hardware well.
I had a similar issue with memtest86+ low memory errors on a Supermicro X10SRL / E5-1650v3 system a few months ago. I retested with the Passmark version and it ran fine for days. I reran memtest86+ with a single core and it ran fine for days. One more try with memtest86+ and multiple cores and it spit out low memory errors in the first couple of passes then no more errors for days.
I recall having similar issues with some other X9 series motherboards in the past. I suspect some sort of bug in memtest86+ related to large core counts and/or buggy BIOS code. If you go digging through the memtest86+ source code, there is a description of how they test low memory that involves relocating the executable code on the fly:
memtest86-plus/README.background at master · wkatsak/memtest86-plus · GitHub
The address ranges they use are in low memory between 0x2000 and 0x20000. I suspect that sometimes perhaps one core is still running trashing memory while the main program is doing its relocation tricks. So this looks like an error in that memory range. I suspect the BIOS because there may also be some interaction with interrupt handling, starting and stopping threads, and getting threads in and out of protected mode, but I’ve never investigated further.

