Последнее обновление: 31.10.2015
Как правило, для вывода сообщений применяется элемент MessageBox. Однако кроме сообственно вывода строки сообщения данный элемент может устанавливать
ряд настроек, которые определяют его поведение.
Для вывода сообщения в классе MessageBox предусмотрен метод Show, который имеет различные версии и может принимать ряд параметров.
Рассмотрим одну из наиболее используемых версий:
public static DialogResult Show(
	string text,
	string caption,
	MessageBoxButtons buttons,
	MessageBoxIcon icon,
	MessageBoxDefaultButton defaultButton,
	MessageBoxOptions options
)
Здесь применяются следующие параметры:
text: текст сообщения
caption: текст заголовка окна сообщения
buttons: кнопки, используемые в окне сообщения.
Принимает одно из значений перечисления MessageBoxButtons:
-
AbortRetryIgnore: три кнопки Abort (Отмена), Retry (Повтор), Ignore (Пропустить) -
OK: одна кнопка OK -
OKCancel: две кнопки OK и Cancel (Отмена) -
RetryCancel: две кнопки Retry (Повтор) и Cancel (Отмена) -
YesNo: две кнопки Yes и No -
YesNoCancel: три кнопки Yes, No и Cancel (Отмена)
Таким образом, в зависимости от выбора окно сообщения может иметь от одной до трех кнопок.
icon: значок окна сообщения. Может принимать одно из следующих значений перечисления MessageBoxIcon:
-
Asterisk, Information: значок, состоящий из буквы i в нижнем регистре, помещенной в кружок -
Error, Hand, Stop: значок, состоящий из белого знака «X» на круге красного цвета. -
Exclamation, Warning: значок, состоящий из восклицательного знака в желтом треугольнике -
Question: значок, состоящий из вопросительного знака на периметре круга -
None: значок у сообщения отсутствует
defaultButton: кнопка, на которую по умолчанию устанавливается фокус. Принимает одно из значений перечисления MessageBoxDefaultButton:
-
Button1: первая кнопка из тех, которые задаются перечислением MessageBoxButtons -
Button2: вторая кнопка -
Button3: третья кнопка
options: параметры окна сообщения. Принимает одно из значений перечисления MessageBoxOptions:
-
DefaultDesktopOnly: окно сообщения отображается на активном рабочем столе. -
RightAlign: текст окна сообщения выравнивается по правому краю -
RtlReading: все элементы окна располагаются в обратном порядке справа налево -
ServiceNotification: окно сообщения отображается на активном рабочем столе, даже если в системе не зарегистрирован ни один пользователь
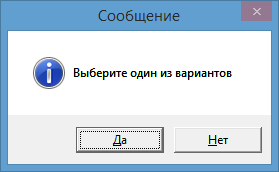
Нередко используется один параметр — текст сообщения. Но посмотрим, как использовать остальные параметры. Пусть у нас есть кнопка, в обработчике
нажатия которой открывается следующее окно сообщения:
private void button1_Click(object sender, EventArgs e)
{
    MessageBox.Show(
        "Выберите один из вариантов",
        "Сообщение",
        MessageBoxButtons.YesNo,
        MessageBoxIcon.Information,
        MessageBoxDefaultButton.Button1,
        MessageBoxOptions.DefaultDesktopOnly);
}
Однако нам не просто дается возможность установки кнопок в окне сообщения. Метод MessageBox.Show возвращает объект
DialogResult, с помощью которого мы можем узнать, какую кнопку в окне сообщения нажал пользователь. DialogResult представляет
перечисление, в котором определены следующие значения:
-
Abort: нажата кнопка Abort -
Retry: нажата кнопка Retry -
Ignore: нажата кнопка Ignore -
OK: нажата кнопка OK -
Cancel: нажата кнопка Cancel -
None: отсутствие результата -
Yes: нажата кнопка Yes и No -
No: нажата кнопка No
Используем обработку выбора пользователя, изменив обработчик нажатия кнопки следующим образом:
private void button1_Click(object sender, EventArgs e)
{
    DialogResult result = MessageBox.Show(
        "Окрасить кнопку в красный цвет?",
        "Сообщение",
        MessageBoxButtons.YesNo,
        MessageBoxIcon.Information,
        MessageBoxDefaultButton.Button1,
        MessageBoxOptions.DefaultDesktopOnly);

	if (result == DialogResult.Yes)
        button1.BackColor=Color.Red;

	this.TopMost = true;
}
И теперь, если в окне сообщения мы выберем выриант Yes, то кнопка окрасится в красный цвет.
Приветствую всех, сегодня я покажу как вывести диалоговое окно с сообщением пользователю, я частенько использую в своих программах. Да и порой под забываю какое именно мне нужно, и подсматриваю здесь.
Для начало создадим обычное приложение WinForm и разместим на нем кнопку при нажатии на которое будем выводить сообщения.
|
1 2 3 4 5 6 7 8 9 10 11 12 13 14 15 16 17 18 |
using System; using System.Windows.Forms; namespace Сообщения { public partial class Form1 : Form { public Form1() { InitializeComponent(); } private void button1_Click(object sender, EventArgs e) { } } } |
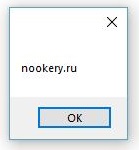
Для того что бы вывести обычно сообщения достаточно вписать в метод нажатия кнопки строку:
|
private void button1_Click(object sender, EventArgs e) { MessageBox.Show(«nookery.ru»); } |
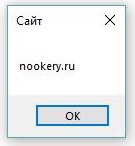
MessageBox.Show имеет перегруженные варианты метода, следующий пример нам покажет как отобразить окно сообщения с заданным текстом и заголовком.
|
private void button1_Click(object sender, EventArgs e) { MessageBox.Show(«nookery.ru», «Сайт»); } |
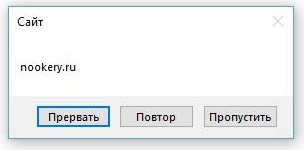
В следующем примере нам придется использовать MessageBoxButtons в качестве передаваемого аргумента. Однако он имеет несколько параметров:
- MessageBoxButtons.AbortRetryIgnore – Прервать | Повтор | Пропустить
- MessageBoxButtons.OK — ОК
- MessageBoxButtons.OKCancel — ОК | Отмена
- MessageBoxButtons.RetryCancel — Повтор | Отмена
- MessageBoxButtons.YesNo — Да | Нет
- MessageBoxButtons.YesNoCancel — Да | Нет | Отмена
Это нам позволит разместить в диалоговом окне сообщение кнопку или кнопки, в зависимости от параметров.
Рассмотрим все примеры с использованием кнопок:
Вариант AbortRetryIgnore
|
private void button1_Click(object sender, EventArgs e) { MessageBox.Show(«nookery.ru», «Сайт», MessageBoxButtons.AbortRetryIgnore); } |
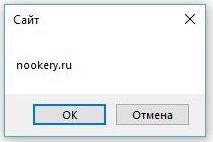
Вариант OK
В этом варианте у нас ничего не измениться так как он используется по умолчанию, выводит кнопку Ok.
Вариант OKCancel
|
private void button1_Click(object sender, EventArgs e) { MessageBox.Show(«nookery.ru», «Сайт», MessageBoxButtons.OKCancel); } |
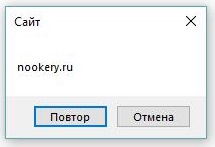
Вариант RetryCancel Диалоговое окно подходит для вывода сообщения пользователю с возможностью повторения какого либо действия, имея в функционале диалогового окна две кнопки Повтор, Отмена.
|
private void button1_Click(object sender, EventArgs e) { MessageBox.Show(«nookery.ru», «Сайт», MessageBoxButtons.RetryCancel); } |
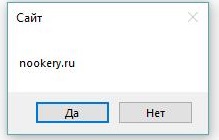
Вариант YesNo Диалоговое окно подходит для вывода сообщения пользователю с возможностью выбора, подтвердить или отказаться имя в функционале диалогового окна две кнопки Да, Нет.
|
private void button1_Click(object sender, EventArgs e) { MessageBox.Show(«nookery.ru», «Сайт», MessageBoxButtons.YesNo); } |
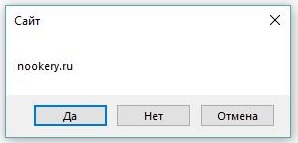
Вариант YesNoCancel Диалоговое окно подходит для вывода сообщения пользователю с возможностью выбора, подтвердить или отказаться имя в функционале диалогового окна три кнопки Да, Нет, Отмена.
|
private void button1_Click(object sender, EventArgs e) { MessageBox.Show(«nookery.ru», «Сайт», MessageBoxButtons.YesNoCancel); } |
Метод Show может принимать в качестве параметра изображения MessageBoxIcon которые позволяют устанавливать тип сообщения, и могут принимать следующие значения:
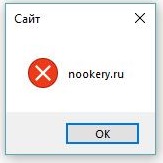
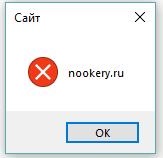
MessageBoxIcon.Error Диалоговое окно подходит для вывода сообщения пользователю об ошибке.
|
private void button1_Click(object sender, EventArgs e) { MessageBox.Show(«nookery.ru», «Сайт», MessageBoxButtons.OK, MessageBoxIcon.Error); } |
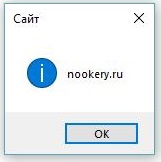
MessageBoxIcon.Information Диалоговое окно подходит для вывода сообщения пользователю о какой то информации.
|
private void button1_Click(object sender, EventArgs e) { MessageBox.Show(«nookery.ru», «Сайт», MessageBoxButtons.OK, MessageBoxIcon.Information); } |
MessageBoxIcon.None
Данные вариант стоит по умолчанию и не выводит никого изображения.
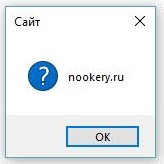
MessageBoxIcon.Question Диалоговое окно подходит для вывода сообщения пользователю о помощи.
|
private void button1_Click(object sender, EventArgs e) { MessageBox.Show(«nookery.ru», «Сайт», MessageBoxButtons.OK, MessageBoxIcon.Question); } |
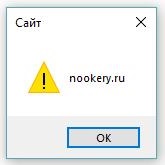
MessageBoxIcon.Warning Диалоговое окно подходит для вывода сообщения пользователю об ошибке или опасности.
|
private void button1_Click(object sender, EventArgs e) { MessageBox.Show(«nookery.ru», «Сайт», MessageBoxButtons.OK, MessageBoxIcon.Warning); } |
MessageBoxIcon.Exclamation
|
private void button1_Click(object sender, EventArgs e) { MessageBox.Show(«nookery.ru», «Сайт», MessageBoxButtons.OK, MessageBoxIcon.Exclamation); } |
MessageBoxIcon.Stop
|
private void button1_Click(object sender, EventArgs e) { MessageBox.Show(«nookery.ru», «Сайт», MessageBoxButtons.OK, MessageBoxIcon.Stop); } |
MessageBoxIcon.Asterisk
|
private void button1_Click(object sender, EventArgs e) { MessageBox.Show(«nookery.ru», «Сайт», MessageBoxButtons.OK, MessageBoxIcon.Asterisk); } |
MessageBoxIcon.Hand
|
private void button1_Click(object sender, EventArgs e) { MessageBox.Show(«nookery.ru», «Сайт», MessageBoxButtons.OK, MessageBoxIcon.Hand); } |
Для того что бы сохранить полученный результат после нажатия кнопки, нам достаточно создать переменную класса DialogResult
DialogResult может принимать следующие значения:
- DialogResult.Abort — Прервать
- DialogResult.Cancel — Отмена
- DialogResult.Ignore — Пропустить
- DialogResult.No — Нет
- DialogResult.Yes — Да
- DialogResult.OK — ОК
- DialogResult.Retry — Повтор
|
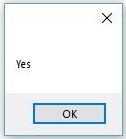
DialogResult resualt= MessageBox.Show(«nookery.ru», «Сайт», MessageBoxButtons.YesNo); |
А что бы посмотреть что хранить переменная resualt мы можем вывести ее в сообщении :
|
MessageBox.Show(resualt.ToString()); |
В моем примере я нажал на кнопку Да и вывелось сообщения
В этих примерах мы рассмотрели возможность вывода сообщений пользователю, на основе диалоговых окно в WinForm.
Introduction to C# MessageBox
In today’s applications, it is always required that a message is displayed to the user as a token of information or confirmation so that the user is aware of the status of the operation he performed. The message can be anything ranging from “The payment is successful” or a warning type like “Do you want to continue” etc. This is achieved in C# with the help of Message Box. A message box can be considered as an interface between the user and the application. It is nothing but a window that has text, images, or symbols to guide or convey something to the user. Until appropriate action is performed, and the message box is closed, it will not allow other actions to be performed.
Syntax:
Message Box is a class in the “Systems.Windows.Forms” Namespace and the assembly it is available is “System.Windows.Forms.dll”.The show method available in the class is used to display the message along with action buttons. The action buttons can be anything ranging from Yes to No, Ok to Cancel.
Example:
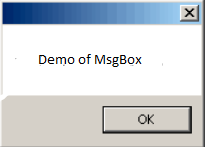
The following code will create a simple Message Box only with the OK button.
string msg = "Test";
MessageBox.Show(msg);
Types of Show Methods
Following are the types of show method:
| Syntax | Use |
| MessageBox.Show(String) | It will display only the message box with the string that is passed. An ok button is also present to close the dialog. Example: |
| MessageBox.Show( String, String) | It will display only the message box with the string that is passed as first parameter. The second parameter is the title of the Message Box. An ok button is also present to close the dialog. Example: |
| MessageBox.Show( String,String, MessageBoxButtons) | It will display the message box with the supplied text, title and the corresponding buttons to be displayed on the Message Box. For eg the below will display Yes and No buttons. |
| Show(String, String, MessageBoxButtons, MessageBoxIcon) | It will display the message box with the supplied text, title and the corresponding buttons to be displayed on the Message Box. It will also display the icon that is specified before the text. For eg the below will display Yes and No buttons with a question mark in front of message. |
| Show(String, String, MessageBoxButtons, MessageBoxIcon, MessageBoxDefaulButton) | It will display the message box with the supplied text, title and the corresponding buttons to be displayed on the Message Box. It will also display the icon that is specified before the text. The last parameter denotes which button must be selected by default on load. For eg the below will display Yes and No buttons with a question mark in front of message. |
| Show(String, String, MessageBoxButtons, MessageBoxIcon, MessageBoxDefaulButton, MessageBoxOptions) | It will display the message box with the supplied text, title, and the corresponding buttons to be displayed on the Message Box. It will also display the icon that is specified before the text. The last parameter denotes which button must be selected by default on load and the contents of the messagebox will be right-aligned. For eg the below will display Yes and No buttons with a question mark in front of message. |
Types of MessageBox Buttons
The following are the types of Buttons that are available in the MessageBox.Show() method. They are
- OK: It is defined as MessageBoxButtons.OK
- OK and Cancel: It is defined as MessageBoxButtons.OkCancel.
- Abort Retry and Ignore: It is defined as MessageBoxButtons.AbortRetryIgnore.
- Yes No and Cancel: It is defined as MessageBoxButtons.YesNoCancel.
- Yes and No: It is defined as MessageBoxButtons.YesNo.
- Retry and Cancel: It is defined as MessageBoxButtons.RetryCancel.
Types of MessageBox Icons
The following are the types of MessageBox icons method are:
- None: No icons are displayed in the Message box.
- Hand: A hand icon is displayed. It is defined as MessageBoxIcon.Hand.
- Question: A question mark is displayed. It is defined as MessageBoxIcon.Question.
- Exclamation: An exclamation mark is displayed. It is defined as MessageBoxIcon.Exclamation.
- Asterisk: An asterisk symbol is displayed. It is defined as MessageBoxIcon.Asterisk.
- Stop: A stop icon is displayed. It is defined as MessageBoxIcon.Stop.
- Error: An error icon is displayed. It is defined as MessageBoxIcon.Error.
- Warning: A warning icon is displayed. It is defined as MessageBoxIcon.Warning.
- Information: An info symbol is displayed. It is defined as MessageBoxIcon.Information.
Types of MessageBox Options
The following are the various Message Box options that are available.
- ServiceNotification: It is defined as MessageBoxOptions.ServiceNotification. This is used to display the message box on the current desktop which is active. The message box is displayed even when no user is logged on to the desktop.
- DefaultDesktopOnly: It is defined as MessageBoxOptions.DefaultDesktopOnly. This also displays on the currently active desktop. The difference between this and service notification is that here the message is displayed on the interactive window.
- RightAlign: It is defined as MessageBoxOptions.RightAlign. This is used to format the message in right alignment.
- RtlReading: It is defined as MessageBoxOptions.RtlReading. This denotes that message is displayed from right to left order.
Example of C# MessageBox
Following are the examples of c# message box are:
Input:
using System;
using System.Collections.Generic;
using System.ComponentModel;
using System.Data;
using System.Drawing;
using System.Linq;
using System.Text;
using System.Windows.Forms;
namespace test
{
public partial class testform : Form
{
public testform()
{
InitializeComponent();
}
private void testform_Load(object sender, EventArgs e)
{
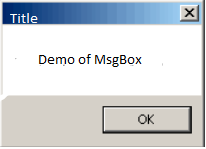
MessageBox.Show("Demo of MsgBox");
MessageBox.Show("Demo of MsgBox", "Title");
MessageBox.Show("Demo of Msgbox","Title",MessageBoxButtons.YesNo);
MessageBox.Show("Demo of Msgbox","Title",MessageBoxButtons.YesNoCancel);
MessageBox.Show("Demo of Msgbox","Title",MessageBoxButtons.OkCancel);
MessageBox.Show("Demo of Msgbox","Title",MessageBoxButtons.RetryCancel);
MessageBox.Show("Demo of Msgbox","Title",MessageBoxButtons.OK);
MessageBox.Show("Demo of Msgbox","Title",MessageBoxButtons.AbortRetryIgnore);
MessageBox.Show("Demo of Msgbox","Title",MessageBoxButtons.YesNoCancel,MessageBoxIcon.Question);
MessageBox.Show("Demo of Msgbox","Title",MessageBoxButtons.YesNoCancel,MessageBoxIcon.Hand);
MessageBox.Show("Demo of Msgbox","Title",MessageBoxButtons.YesNoCancel,MessageBoxIcon.Exclamation);
MessageBox.Show("Demo of Msgbox","Title",MessageBoxButtons.YesNoCancel,MessageBoxIcon.Asterisk);
MessageBox.Show("Demo of Msgbox","Title",MessageBoxButtons.YesNoCancel,MessageBoxIcon.Stop);
MessageBox.Show("Demo of Msgbox","Title",MessageBoxButtons.YesNoCancel,MessageBoxIcon.Error);
MessageBox.Show("Demo of Msgbox","Title",MessageBoxButtons.YesNoCancel,MessageBoxIcon.Warning);MessageBox.Show("Demo of Msgbox","Title",MessageBoxButtons.YesNoCancel,MessageBoxIcon.Information);MessageBox.Show("Demo of Msgbox","Title",MessageBoxButtons.YesNoCancel,MessageBoxIcon.Question,MessageBoxDefaultButton.Button2);
MessageBox.Show("Demo of Msgbox","Title",MessageBoxButtons.OK,MessageBoxIcon.Exclamation,MessageBoxDefaultButton.Button1);
}
}
}Output:
Conclusion – C# MessageBox
Thus, the article covered in detail about the Message box class in c# in detail. It explained about various message box show methods that are available, the various parameters of each method, and demonstrated that with an example. The article also covered in detail about various message box options, message box buttons, and message box icons in detail along with their use. To learn more in detail it is advisable to write sample programs and practice them.
Recommended Articles
This is a guide to C# MessageBox. Here we also discuss the introduction and types of show method along with an example and its code implementation. You may also have a look at the following articles to learn more –
- Assert in C#
- C# List vs Array
- ASP.NET CheckBox
- C# BinaryReader
Содержание
- Message Box Icon Перечисление
- Определение
- Примеры
- Комментарии
- Message Box Icon Enum
- Definition
- Fields
- Examples
- Remarks
- Диалоговое окно сообщений для пользователя c#
- Использование стандартного окна MessageBox для вывода сообщений
- C# MessageBox
- C# Certification Training
- ASP.NET Course
- .NET Course
- Introduction to C# MessageBox
- Types of Show Methods
- Types of MessageBox Buttons
- Types of MessageBox Icons
- Types of MessageBox Options
- Example of C# MessageBox
- Conclusion – C# MessageBox
- Recommended Articles
Message Box Icon Перечисление
Определение
Некоторые сведения относятся к предварительной версии продукта, в которую до выпуска могут быть внесены существенные изменения. Майкрософт не предоставляет никаких гарантий, явных или подразумеваемых, относительно приведенных здесь сведений.
Задает константы, определяющие отображаемые сведения.
Окно сообщения содержит символ, состоящий из строчной буквы в кружке.
Окно сообщения содержит символ, состоящий из белого X в кружке с красным фоном.
Окно сообщения содержит символ, состоящий из восклицательного знака в треугольнике с желтым фоном.
Окно сообщения содержит символ, состоящий из белого X в кружке с красным фоном.
Окно сообщения содержит символ, состоящий из строчной буквы в кружке.
Окно сообщения не содержит символы.
Окно сообщения содержит символ, состоящий из вопросительного знака в кружке. Больше не рекомендуется использовать значок вопросительного знака для сообщений, так как он не может четко отразить определенный тип сообщения, а оформление сообщения в виде вопроса может применяться для любого типа сообщений. Кроме того, пользователи могут путать вопросительный знак с символом справочной информации. Таким образом, не следует использовать символ вопросительного знака в окнах сообщений. Система продолжает поддерживать его включение только для обратной совместимости.
Окно сообщения содержит символ, состоящий из белого X в кружке с красным фоном.
Окно сообщения содержит символ, состоящий из восклицательного знака в треугольнике с желтым фоном.
Примеры
В следующем примере кода показано, как использовать объект MessageBox для информирования пользователя о отсутствующих записях в объекте TextBox. В этом примере требуется, чтобы метод был вызван из существующей формы с элементом a Button и a TextBox в нем.
Комментарии
Это перечисление используется классом MessageBox. Описание каждого элемента этого перечисления содержит типичное представление символа. Фактически отображаемый рисунок является функцией констант операционной системы. В текущих реализациях существует четыре уникальных символа с несколькими значениями, назначенными им.
В следующей таблице показаны различные значки окна сообщения.
Источник
Message Box Icon Enum
Definition
Some information relates to prerelease product that may be substantially modified before it’s released. Microsoft makes no warranties, express or implied, with respect to the information provided here.
Specifies constants defining which information to display.
Fields
The message box contains a symbol consisting of a lowercase letter i in a circle.
The message box contains a symbol consisting of white X in a circle with a red background.
The message box contains a symbol consisting of an exclamation point in a triangle with a yellow background.
The message box contains a symbol consisting of a white X in a circle with a red background.
The message box contains a symbol consisting of a lowercase letter i in a circle.
The message box contains no symbols.
The message box contains a symbol consisting of a question mark in a circle. The question mark message icon is no longer recommended because it does not clearly represent a specific type of message and because the phrasing of a message as a question could apply to any message type. In addition, users can confuse the question mark symbol with a help information symbol. Therefore, do not use this question mark symbol in your message boxes. The system continues to support its inclusion only for backward compatibility.
The message box contains a symbol consisting of white X in a circle with a red background.
The message box contains a symbol consisting of an exclamation point in a triangle with a yellow background.
Examples
The following code example shows how to use a MessageBox to inform the user of a missing entry in a TextBox. This example requires that the method is called from an existing form with a Button and a TextBox on it.
This enumeration is used by the MessageBox class. The description of each member of this enumeration contains a typical representation of the symbol. The actual graphic displayed is a function of the operating system constants. In current implementations there are four unique symbols with multiple values assigned to them.
The following table shows the different message box icons.
Источник
Диалоговое окно сообщений для пользователя c#
Приветствую всех, сегодня я покажу как вывести диалоговое окно с сообщением пользователю, я частенько использую в своих программах. Да и порой под забываю какое именно мне нужно, и подсматриваю здесь.
Для начало создадим обычное приложение WinForm и разместим на нем кнопку при нажатии на которое будем выводить сообщения.
Для того что бы вывести обычно сообщения достаточно вписать в метод нажатия кнопки строку:
MessageBox.Show имеет перегруженные варианты метода, следующий пример нам покажет как отобразить окно сообщения с заданным текстом и заголовком.
В следующем примере нам придется использовать MessageBoxButtons в качестве передаваемого аргумента. Однако он имеет несколько параметров:
- MessageBoxButtons.AbortRetryIgnore – Прервать | Повтор | Пропустить
- MessageBoxButtons.OK— ОК
- MessageBoxButtons.OKCancel — ОК | Отмена
- MessageBoxButtons.RetryCancel — Повтор | Отмена
- MessageBoxButtons.YesNo — Да | Нет
- MessageBoxButtons.YesNoCancel — Да | Нет | Отмена
Это нам позволит разместить в диалоговом окне сообщение кнопку или кнопки, в зависимости от параметров.
Рассмотрим все примеры с использованием кнопок:
Вариант AbortRetryIgnore
Источник
Использование стандартного окна MessageBox для вывода сообщений
Синтаксис использования метода имеет следующий вид:
ReturnValue = MessageBox::Show([owner], text, , [buttons],
[icon], [defaultButton], [options],
[helpFilePath, navigator, param]);


Рис.4.3. Варианты окна сообщения MessageBox
– owner – указывает окно, которому будет принадлежать данное модальное диалоговое окно;
– text – текст, отображаемый в окне сообщения;
– caption – текст, отображаемый в заголовке окна сообщения;
– buttons – определяет набор кнопок в окне сообщения. Один из типовых наборов кнопок выбирается соответствующей константой из перечисления System::Windows::Forms::MessageBoxButtons (таблица 4.9);
– icon – определяет вид пиктограммы в окне сообщения. Вид пиктограммы определяется соответствующей константой из перечисления System::Windows::Forms::MessageBoxIcon (таблица 4.9);
– defaultButton – определяет кнопку по умолчанию в окне сообщения. Для этого используется соответствующая константа из перечисления System::Windows::Forms::MessageBoxDefaultButton (таблица 4.9);
– options – определяет вариант отображения окна сообщения и способ отображения текста в нем. Для этого используются соответствующие константы из перечисления System::Windows::Forms::MessageBoxOptions (таблица 4.9). Задание нуля означает использование настроек по умолчанию;
– helpFilePath – строка, содержащая путь и имя файла справки, который отображается при нажатии кнопки «Help» («Справка»);
– navigator – определяет способ доступа к элементам файла справки. Для этого используется соответствующая константа из перечисления System::Windows::Forms::HelpNavigator (таблица 4.10);
– param – числовой идентификатор раздела cправки, который отображается при нажатии кнопки «Help» («Справка»);
– ReturnValue – возвращаемое значение, позволяющее определить нажатую пользователем кнопку в окне сообщения. Для этого используется соответствующая константа из перечисления System::Windows::Forms::DialogResult (таблица 4.11).
Таблица 4.9. Константы, используемые в методе Show из класса MessageBox
| Константа | Значение | Назначение |
| Перечисление MessageBoxButtons | ||
| MessageBoxButtons.OK | Отображается только кнопка ОК | |
| MessageBoxButtons.OKCancel | Отображаются кнопки ОК и Cancel (Отмена) | |
| MessageBoxButtons.AbortRetryIgnore | Отображаются кнопки Abort (Прервать), Retry (Повторить) и Ignore (Пропустить) | |
| MessageBoxButtons.YesNoCancel | Отображаются кнопки Yes (Да), No (Нет) и Cancel (Отмена) | |
| MessageBoxButtons.YesNo | Отображаются кнопки Yes (Да), No (Нет) | |
| MessageBoxButtons.RetryCancel | Отображаются кнопки Retry (Повторить) и Cancel (Отмена) | |
| Перечисление MessageBoxIcon | ||
| MessageBoxIcon.None | Окно сообщения не содержит ни каких пиктограмм | |
| MessageBoxIcon.Error MessageBoxIcon.Hand MessageBoxIcon.Stop | Отображается пиктограмма «Ошибка» –  (белый крестик на фоне красного кружка) (белый крестик на фоне красного кружка) |
|
| MessageBoxIcon.Question | Отображается пиктограмма «Запрос» –  (синий вопросительный знак на фоне белого кружка). Не рекомендуется использовать, т.к. он не четко отражает тип сообщения. (синий вопросительный знак на фоне белого кружка). Не рекомендуется использовать, т.к. он не четко отражает тип сообщения. |
|
| MessageBoxIcon.Exclamation MessageBoxIcon.Warning | Отображается пиктограмма «Предупреждение» –  (восклицатель-ный знак на фоне желтого треугольника) (восклицатель-ный знак на фоне желтого треугольника) |
|
| MessageBoxIcon.Information MessageBoxIcon.Asterisk | Отображается пиктограмма «Информация» –  (синяя буква «i» на фоне белого кружка) (синяя буква «i» на фоне белого кружка) |
|
| Перечисление MessageBoxDefaultButton | ||
| MessageBoxDefaultButton.Button1 | Первая кнопка в окне задается кнопкой по умолчанию | |
| MessageBoxDefaultButton.Button2 | Вторая кнопка в окне задается кнопкой по умолчанию | |
| MessageBoxDefaultButton.Button3 | Третья кнопка в окне задается кнопкой по умолчанию | |
| Перечисление MessageBoxOptions | ||
| MessageBoxOptions.DefaultDesktopOnly | Окно сообщения (с параметрами по умолчанию) отображается на активном рабочем столе, =2 17 | |
| MessageBoxOptions.RightAlign | Текст в окне сообщения выравнивается по правому краю, =2 19 | |
| MessageBoxOptions.RtlReading | Текст в окне сообщения отображается с порядком чтения справа налево (еврейский, арабский), =2 20 | |
| MessageBoxOptions.ServiceNotification | Окно сообщения отображается на текущем активном рабочем столе даже в том случае, если ни один пользователь не зарегистрирован в системе, = 2 21 |
Таблица 4.10. Константы (из перечисленияSystem::Windows::Forms::HelpNavigator),
для доступа к элементам файла Справки
| Имя члена | Описание |
| Topic | Открытие файла Справки в указанной теме, если эта тема существует |
| TableOfContents | Открытие файла Справки по оглавлению |
| Index | Открытие файла Справки для индексации |
| Find | Открытие файла Справки на странице поиска |
| AssociateIndex | Открытие файла Справки на элементе указателя на первый символ указанного раздела |
| KeywordIndex | Открытие файла Справки в разделе с записью указанного индекса, если он существует; в противном случае отображается элемент указателя, ближайший к указанному ключевому слову |
| TopicId | Открытие файла Справки в разделе, заданном числовым идентификатором раздела |
Таблица 4.11. Константы (из перечисленияSystem::Windows::Forms::DialogResult),
соответствующие возвращаемым методом Show значениям
| Константа | Значение | Нажатая кнопка |
| OK | OK | |
| Cancel | Cancel (Отмена) (этому же значению соответствует и нажатие кнопки Ï – Закрыть в строе заголовка окна сообщения) | |
| Abort | Abort (Стоп) | |
| Retry | Retry (Повторить) | |
| Ignore | Ignore (Пропустить) | |
| Yes | Yes (Да) | |
| No | No (Нет) | |
| None | Значение Nothing возвращается из диалогового окна. Это означает, что модальное диалоговое окно продолжает свою работу |
Пример 4.7. Использование метода Show класса MessageBox для отображения окна сообщения с запросом сохранения файла. В зависимости от того, какая кнопка была нажата в ответ на запрос, будут выполнены те или иные действия.
using namespace System;
using namespace System::Windows::Forms;
System::Windows::Forms::DialogResult result =
MessageBox::Show(this,
«Сохранить изменения в файле test.txt?», // Текст сообщения
«MyApplication», // Заголовок
Источник
C# MessageBox
By  Priya Pedamkar
C sharp Tutorial
C# Certification Training
ASP.NET Course
.NET Course
Introduction to C# MessageBox
In today’s applications, it is always required that a message is displayed to the user as a token of information or confirmation so that the user is aware of the status of the operation he performed. The message can be anything ranging from “The payment is successful” or a warning type like “Do you want to continue” etc. This is achieved in C# with the help of Message Box. A message box can be considered as an interface between the user and the application. It is nothing but a window that has text, images, or symbols to guide or convey something to the user. Until appropriate action is performed, and the message box is closed, it will not allow other actions to be performed.


Syntax:
Web development, programming languages, Software testing & others
Message Box is a class in the “Systems.Windows.Forms” Namespace and the assembly it is available is “System.Windows.Forms.dll”.The show method available in the class is used to display the message along with action buttons. The action buttons can be anything ranging from Yes to No, Ok to Cancel.
Example:
The following code will create a simple Message Box only with the OK button.
Types of Show Methods
Following are the types of show method:
| Syntax | Use |
| MessageBox.Show(String) | It will display only the message box with the string that is passed. An ok button is also present to close the dialog. Example: |
| MessageBox.Show( String, String) | It will display only the message box with the string that is passed as first parameter. The second parameter is the title of the Message Box. An ok button is also present to close the dialog. Example: |
| MessageBox.Show( String,String, MessageBoxButtons) | It will display the message box with the supplied text, title and the corresponding buttons to be displayed on the Message Box. For eg the below will display Yes and No buttons. |
| Show(String, String, MessageBoxButtons, MessageBoxIcon) | It will display the message box with the supplied text, title and the corresponding buttons to be displayed on the Message Box. It will also display the icon that is specified before the text. For eg the below will display Yes and No buttons with a question mark in front of message. |
| Show(String, String, MessageBoxButtons, MessageBoxIcon, MessageBoxDefaulButton) | It will display the message box with the supplied text, title and the corresponding buttons to be displayed on the Message Box. It will also display the icon that is specified before the text. The last parameter denotes which button must be selected by default on load. For eg the below will display Yes and No buttons with a question mark in front of message. |
| Show(String, String, MessageBoxButtons, MessageBoxIcon, MessageBoxDefaulButton, MessageBoxOptions) | It will display the message box with the supplied text, title, and the corresponding buttons to be displayed on the Message Box. It will also display the icon that is specified before the text. The last parameter denotes which button must be selected by default on load and the contents of the messagebox will be right-aligned. For eg the below will display Yes and No buttons with a question mark in front of message. Types of MessageBox ButtonsThe following are the types of Buttons that are available in the MessageBox.Show() method. They are
Types of MessageBox IconsThe following are the types of MessageBox icons method are:
Types of MessageBox OptionsThe following are the various Message Box options that are available.
Example of C# MessageBoxFollowing are the examples of c# message box are: Input: Output:
Conclusion – C# MessageBoxThus, the article covered in detail about the Message box class in c# in detail. It explained about various message box show methods that are available, the various parameters of each method, and demonstrated that with an example. The article also covered in detail about various message box options, message box buttons, and message box icons in detail along with their use. To learn more in detail it is advisable to write sample programs and practice them. Recommended ArticlesThis is a guide to C# MessageBox. Here we also discuss the introduction and types of show method along with an example and its code implementation. You may also have a look at the following articles to learn more – Источник Adblock |
A message box or dialog box is used to interact with the users of your application. The purpose of using a message box may include notifying about a particular action e.g. success message after entering a record. Similarly, an error message if an operation was unsuccessful. In both cases, you may display the “OK” button in the message box with the message.
In other cases, you may display a message box for the user confirmation before performing a critical action e.g. deleting a record permanently. In that case, a Yes/No button in the dialog box makes sense.
In this tutorials, I will show you how to create various types of C# message box with code.
How to make message box work in Visual Studio?
If you are working in Visual Studio then you have to include the System.Windows.Forms by following this:
- In your project name under “Solution Explorer” right click and select “Add Reference”.
- There you can see a few tabs. Select “.Net” tab.
- Now locate the System.Windows.Forms and press OK
The example of creating a simple message box
After taking the above steps, you need including the System.Windows.Forms namespace as used in the code below.
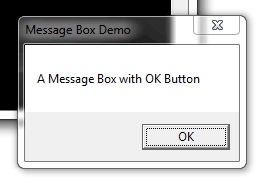
You may provide a message to be displayed and the title of the dialog box by using the MessageBox class’s show method. The following example simply displays a box with the OK button:
|
1 2 3 4 5 6 7 8 9 10 11 12 13 14 15 16 17 18 19 20 21 22 23 24 25 26 27 |
using System; using System.Windows.Forms; class msgbox_example { static void Main() { string box_msg = «A Message Box with OK Button»; string box_title = «Message Box Demo»; MessageBox.Show(box_msg, box_title); } } |
The result:
An example of Yes/No message box
The Yes/No dialog box can be useful for asking users to choose an option between the two. For example, “Are you sure you want to delete this record?” Similarly, “Do you want to really quit?” and so on.
The example below shows a Yes/No message box:
|
1 2 3 4 5 6 7 8 9 10 11 12 13 14 15 16 17 18 19 20 21 22 23 24 25 26 27 |
using System; using System.Windows.Forms; class msgbox_example { static void Main() { string box_msg = «Message Box with Yes / No Options»; string box_title = «Yes No Dialog»; MessageBox.Show(box_msg, box_title, MessageBoxButtons.YesNo); } } |
The result:

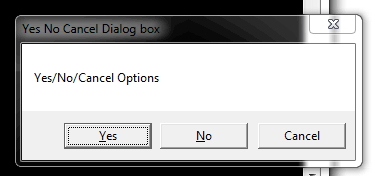
Adding Cancel button in above dialog
You may use the YesNoCancel Enum value for creating a dialog with the third button i.e. Cancel in addition to the above two buttons. The code below shows how with the output:
|
1 2 3 4 5 6 7 8 9 10 11 12 13 14 15 16 17 18 19 20 21 22 23 24 25 26 27 |
using System; using System.Windows.Forms; class msgbox_example { static void Main() { string box_msg_y_n_c = «Yes/No/Cancel Options»; string box_title_y_n_c = «Yes No Cancel Dialog box»; MessageBox.Show(box_msg_y_n_c, box_title_y_n_c, MessageBoxButtons.YesNoCancel); } } |
Adding an icon example
By using the MessageBoxIcon Enum, you may specify an icon to be displayed with the message in the dialog box. A number of values for various types of icons can be used. For example:
- Exclamation
- Information
- Question
- Warning
- Asterisk
- Error
- Hand
- Stop
- None
The following example shows a few message boxes with different icons:
|
1 2 3 4 5 6 7 8 9 10 11 12 13 14 15 16 17 18 19 20 21 22 23 24 25 26 27 28 29 |
using System; using System.Windows.Forms; class msgbox_example { static void Main() { MessageBox.Show(«Exclamation Icon message box», «Dialog with Icon», MessageBoxButtons.YesNo, MessageBoxIcon.Exclamation); MessageBox.Show(«Warning Icon message box», «Dialog with Icon», MessageBoxButtons.OKCancel, MessageBoxIcon.Warning); MessageBox.Show(«There was an error processing your request!», «Dialog with Icon», MessageBoxButtons.OK, MessageBoxIcon.Error); MessageBox.Show(«Operation cannot be successful, Do you want to retry?», «Dialog with Icon», MessageBoxButtons.RetryCancel, MessageBoxIcon.Stop); } } |
As you execute this code, four dialog boxes should display with respective icons and messages.
Performing actions on different buttons
The message box with OK button only may be used for information purpose to the user, without performing any action. However, in the case of boxes with OK, Cancel, Yes and No, Retry buttons, you may require performing some action based on the user’s selection.
So, how to catch which button is pressed by the user?
For that, you may use a variable that catches the returned value. Then it can be used in an if statement and you may perform the desired action.
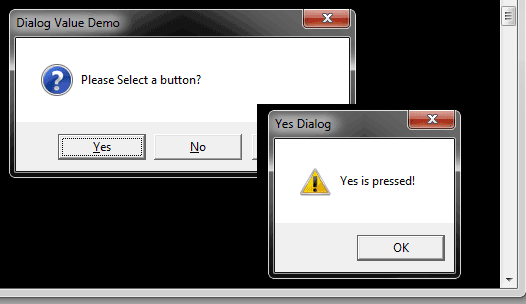
To demonstrate that, the following program displays a message box with Yes/No/Cancel buttons. As you click any button, another message box with “OK” button is displayed with its own message for each button:
|
1 2 3 4 5 6 7 8 9 10 11 12 13 14 15 16 17 18 19 20 21 22 23 24 25 26 27 28 29 30 31 32 33 34 35 36 37 38 39 40 41 42 43 44 45 46 47 48 49 |
using System; using System.Windows.Forms; class msgbox_example_value { static void Main() { var selectedOption = MessageBox.Show(«Please Select a button?», «Dialog Value Demo», MessageBoxButtons.YesNoCancel, MessageBoxIcon.Question); // If the no button was pressed … if (selectedOption == DialogResult.Yes) { MessageBox.Show(«Yes is pressed!», «Yes Dialog», MessageBoxButtons.OK, MessageBoxIcon.Warning); } else if (selectedOption == DialogResult.No) { MessageBox.Show(«No is pressed!», «No Dialog», MessageBoxButtons.OK, MessageBoxIcon.Exclamation); } else { MessageBox.Show(«Cancel is pressed», «Cancel Dialog», MessageBoxButtons.OK, MessageBoxIcon.Error); } } } |
This div height required for enabling the sticky sidebar