In this chapter, we will be covering the fundamentals of Windows. To create a program, also called an application, you derive a class from the MFC’s CWinApp. CWinApp stands for Class for a Windows Application.
Let us look into a simple example by creating a new Win32 project.
Step 1 − Open the Visual studio and click on the File → New → Project menu option.
Step 2 − You can now see the New Project dialog box.
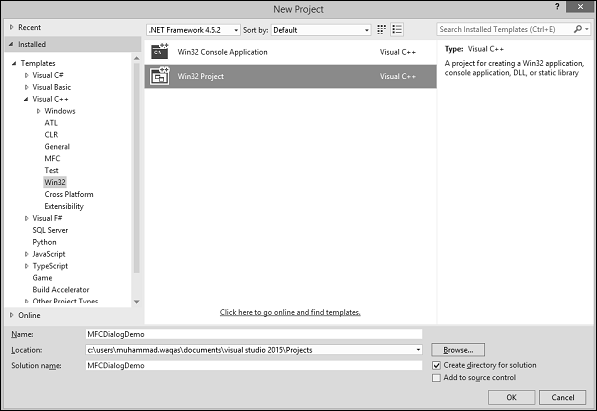
Step 3 − From the left pane, select Templates → Visual C++ → Win32.
Step 4 − In the middle pane, select Win32 Project.
Step 5 − Enter the project name ‘MFCWindowDemo’ in the Name field and click OK to continue. You will see the following dialog box.
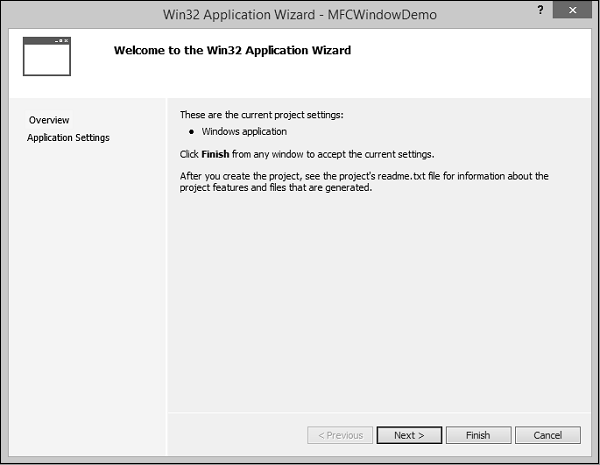
Step 6 − Click Next.
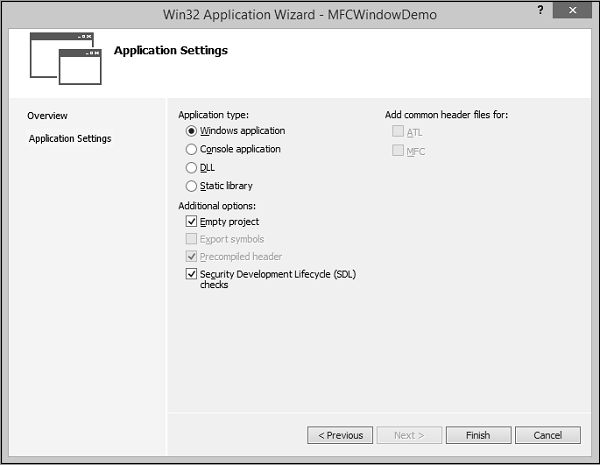
Step 7 − Select the options as shown in the dialog box given above and click Finish.
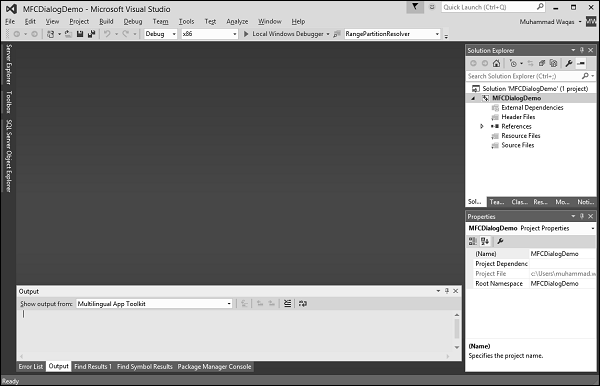
Step 8 − An empty project is created.
Step 9 − To make it an MFC project, right-click on the project and select Properties.
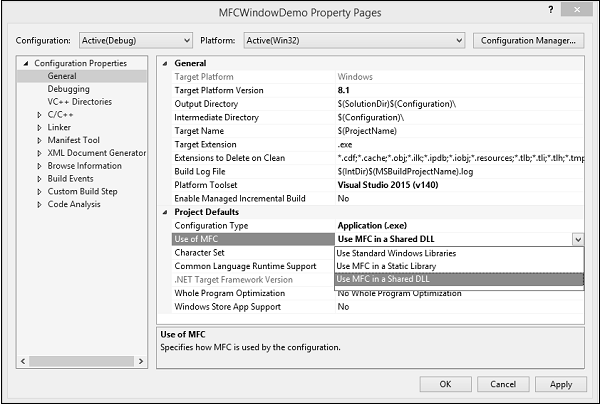
Step 10 − In the left section, click Configuration Properties → General.
Step 11 − Select the Use MFC in Shared DLL option in Project Defaults section and click OK.
Step 12 − Add a new source file.
Step 13 − Right-click on your Project and select Add → New Item…
Step 14 − In the Templates section, click C++ File (.cpp).
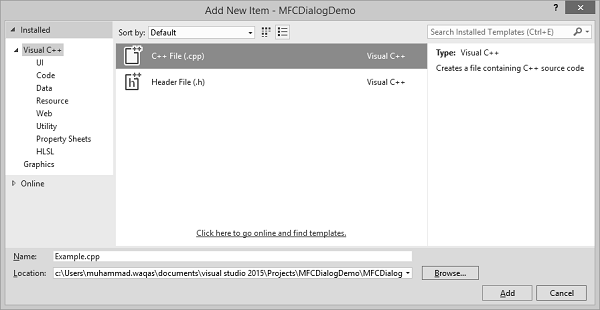
Step 15 − Set the Name as Example and click Add.
Window Creation
Any application has two main sections −
- Class
- Frame or Window
Let us create a window using the following steps −
Step 1 − To create an application, we need to derive a class from the MFC’s CWinApp.
#include
class CExample : public CWinApp {
   BOOL InitInstance() {
      return TRUE;
   }
};
Step 2 − We also need a frame/window to show the content of our application.
Step 3 − For this, we need to add another class and derive it from the MFC’s CFrameWnd class and implement its constructor and a call the Create() method, which will create a frame/window as shown in the following code.
class CMyFrame : public CFrameWnd {
   public:
      CMyFrame() {
         Create(NULL, _T("MFC Application Tutorial"));
      }
};
Step 4 − As you can see that Create() method needs two parameters, the name of the class, which should be passed as NULL, and the name of the window, which is the string that will be shown on the title bar.
Main Window
After creating a window, to let the application use it, you can use a pointer to show the class used to create the window. In this case, the pointer would be CFrameWnd. To use the frame window, assign its pointer to the CWinThread::m_pMainWnd member variable. This is done in the InitInstance() implementation of your application.
Step 1 − Here is the implementation of InitInstance() in CExample class.
class CExample : public CWinApp {
   BOOL InitInstance() {
      CMyFrame *Frame = new CMyFrame();  m_pMainWnd = Frame;

      Frame->ShowWindow(SW_NORMAL);
      Frame->UpdateWindow();

      return TRUE;
   }
};
Step 2 − Following is the complete implementation of Example.cpp file.
#include <afxwin.h>

class CMyFrame : public CFrameWnd {
   public:
      CMyFrame() {
         Create(NULL, _T("MFC Application Tutorial"));
      }
};

class CExample : public CWinApp {
   BOOL InitInstance() {
      CMyFrame *Frame = new CMyFrame();
      m_pMainWnd = Frame;

      Frame->ShowWindow(SW_NORMAL);
      Frame->UpdateWindow();

      return TRUE;
   }
};

CExample theApp;
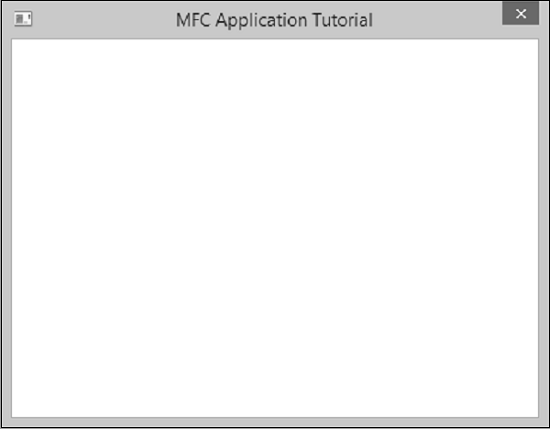
Step 3 − When we run the above application, the following window is created.
Windows Styles
Windows styles are characteristics that control features such as window appearance, borders, minimized or maximized state, or other resizing states, etc.
| Sr.No. | Style & Description |
|---|---|
| 1 |
WS_BORDER Creates a window that has a border. |
| 2 |
WS_CAPTION Creates a window that has a title bar (implies the WS_BORDER style). Cannot be used with the WS_DLGFRAME style. |
| 3 |
WS_CHILD Creates a child window. Cannot be used with the WS_POPUP style. |
| 4 |
WS_CHILDWINDOW Same as the WS_CHILD style. |
| 5 |
WS_CLIPCHILDREN Excludes the area occupied by child windows when you draw within the parent window. Used when you create the parent window. |
| 6 |
WS_CLIPSIBLINGS Clips child windows relative to each other; that is, when a particular child window receives a paint message, the WS_CLIPSIBLINGS style clips all other overlapped child windows out of the region of the child window to be updated. (If WS_CLIPSIBLINGS is not given and child windows overlap, when you draw within the client area of a child window, it is possible to draw within the client area of a neighboring child window.) For use with the WS_CHILD style only. |
| 7 |
WS_DISABLED Creates a window that is initially disabled. |
| 8 |
WS_DLGFRAME Creates a window with a double border but no title. |
| 9 |
WS_GROUP Specifies the first control of a group of controls in which the user can move from one control to the next with the arrow keys. All controls defined with the WS_GROUP style FALSE after the first control belong to the same group. The next control with the WS_GROUP style starts the next group (that is, one group ends where the next begins). |
| 10 |
WS_HSCROLL Creates a window that has a horizontal scroll bar. |
| 11 |
WS_ICONIC Creates a window that is initially minimized. Same as the WS_MINIMIZE style. |
| 12 |
WS_MAXIMIZE Creates a window of maximum size. |
| 13 |
WS_MAXIMIZEBOX Creates a window that has a Maximize button. |
| 14 |
WS_MINIMIZE Creates a window that is initially minimized. For use with the WS_OVERLAPPED style only. |
| 15 |
WS_MINIMIZEBOX Creates a window that has a Minimize button. |
| 16 |
WS_OVERLAPPED Creates an overlapped window. An overlapped window usually has a caption and a border. |
| 17 |
WS_OVERLAPPED WINDOW Creates an overlapped window with the WS_OVERLAPPED, WS_CAPTION, WS_SYSMENU, WS_THICKFRAME, WS_MINIMIZEBOX, and WS_MAXIMIZEBOX styles. |
| 18 |
WS_POPUP Creates a pop-up window. Cannot be used with the WS_CHILD style. |
| 19 |
WS_POPUPWINDOW Creates a pop-up window with the WS_BORDER, WS_POPUP, and WS_SYSMENU styles. The WS_CAPTION style must be combined with the WS_POPUPWINDOW style to make the Control menu visible. |
| 20 |
WS_SIZEBOX Creates a window that has a sizing border. Same as the WS_THICKFRAME style. |
| 21 |
WS_SYSMENU Creates a window that has a Control-menu box in its title bar. Used only for windows with title bars. |
| 22 |
WS_TABSTOP Specifies one of any number of controls through which the user can move by using the TAB key. The TAB key moves the user to the next control specified by the WS_TABSTOP style. |
| 23 |
WS_THICKFRAME Creates a window with a thick frame that can be used to size the window. |
| 24 |
WS_TILED Creates an overlapped window. An overlapped window has a title bar and a border. Same as the WS_OVERLAPPED style. |
| 25 |
WS_TILEDWINDOW Creates an overlapped window with the WS_OVERLAPPED, WS_CAPTION, WS_SYSMENU, WS_THICKFRAME, WS_MINIMIZEBOX, and WS_MAXIMIZEBOX styles. Same as the WS_OVERLAPPEDWINDOW style. |
| 26 |
WS_VISIBLE Creates a window that is initially visible. |
| 27 |
WS_VSCROLL Creates a window that has a vertical scroll bar. |
Step 1 − Let us look into a simple example in which we will add some styling. After creating a window, to display it to the user, we can apply the WS_VISIBLE style to it and additionally, we will also add WS_OVERLAPPED style. Here is an implementation −
class CMyFrame : public CFrameWnd {
   public:
      CMyFrame() {
         Create(NULL, _T("MFC Application Tutorial"), WS_VISIBLE | WS_OVERLAPPED);
      }
};
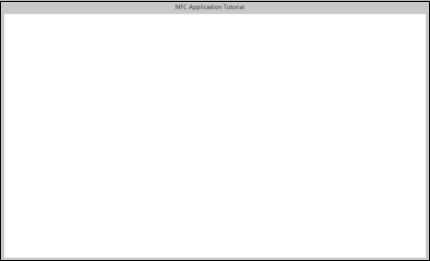
Step 2 − When you run this application, the following window is created.
You can now see that the minimize, maximize, and close options do not appear anymore.
Windows Location
To locate things displayed on the monitor, the computer uses a coordinate system similar to the Cartesian’s, but the origin is located on the top left corner of the screen. Using this coordinate system, any point can be located by its distance from the top left corner of the screen of the horizontal and the vertical axes.
The Win32 library provides a structure called POINT defined as follows −
typedef struct tagPOINT {
   LONG x;
   LONG y;
} POINT;
-
The ‘x’ member variable is the distance from the left border of the screen to the point.
-
The ‘y’ variable represents the distance from the top border of the screen to the point.
-
Besides the Win32’s POINT structure, the Microsoft Foundation Class (MFC) library provides the CPoint class.
-
This provides the same functionality as the POINT structure. As a C++ class, it adds more functionality needed to locate a point. It provides two constructors.
CPoint();
CPoint(int X, int Y);
Windows Size
While a point is used to locate an object on the screen, each window has a size. The size provides two measures related to an object.
- The width of an object.
- The height of an object.
The Win32 library uses the SIZE structure defined as follows −
typedef struct tagSIZE {
   int cx;
   int cy;
} SIZE;
Besides the Win32’s SIZE structure, the MFC provides the CSize class. This class has the same functionality as SIZE but adds features of a C++ class. It provides five constructors that allow you to create a size variable in any way of your choice.
CSize();
CSize(int initCX, int initCY);
CSize(SIZE initSize);
CSize(POINT initPt);
CSize(DWORD dwSize);
Windows Dimensions
When a Window displays, it can be identified on the screen by its location with regards to the borders of the monitor. A Window can also be identified by its width and height. These characteristics are specified or controlled by the rect argument of the Create() method. This argument is a rectangle that can be created through the Win32 RECT structure.
typedef struct _RECT {
   LONG left;
   LONG top;
   LONG right;
   LONG bottom;
} RECT, *PRECT;
Besides the Win32’s RECT structure, the MFC provides the CRect class which has the following constructors −
CRect();
CRect(int l, int t, int r, int b);
CRect(const RECT& srcRect);
CRect(LPCRECT lpSrcRect);
CRect(POINT point, SIZE size);
CRect(POINT topLeft, POINT bottomRight);
Let us look into a simple example in which we will specify the location and the size of the window
class CMyFrame : public CFrameWnd {
   public:
      CMyFrame() {
         Create(NULL, _T("MFC Application Tutorial"), WS_SYSMENU, CRect(90, 120,
            550, 480));
      }
};
When you run this application, the following window is created on the top left corner of your screen as specified in CRect constructor in the first two parameters. The last two parameters are the size of the Window.
Windows Parents
In the real world, many applications are made of different Windows. When an application uses various Windows, most of the objects depend on a particular one. It could be the first Window that was created or another window that you designated. Such a Window is referred to as the Parent Window. All the other windows depend on it directly or indirectly.
-
If the Window you are creating is dependent of another, you can specify that it has a parent.
-
This is done with the pParentWnd argument of the CFrameWnd::Create() method.
-
If the Window does not have a parent, pass the argument with a NULL value.
Let us look into an example which has only one Window, and there is no parent Window available, so we will pass the argument with NULL value as shown in the following code −
class CMyFrame : public CFrameWnd {
   public:
      CMyFrame() {
         Create(NULL, _T("MFC Application Tutorial"), WS_SYSMENU,
            CRect(90, 120, 550, 480), NULL);
      }
};
When you run the above application, you see the same output.
In this chapter, we will be covering the fundamentals of Windows. To create a program, also called an application, you derive a class from the MFC’s CWinApp. CWinApp stands for Class for a Windows Application.
Let us look into a simple example by creating a new Win32 project.
Step 1 − Open the Visual studio and click on the File → New → Project menu option.
Step 2 − You can now see the New Project dialog box.
Step 3 − From the left pane, select Templates → Visual C++ → Win32.
Step 4 − In the middle pane, select Win32 Project.
Step 5 − Enter the project name ‘MFCWindowDemo’ in the Name field and click OK to continue. You will see the following dialog box.
Step 6 − Click Next.
Step 7 − Select the options as shown in the dialog box given above and click Finish.
Step 8 − An empty project is created.
Step 9 − To make it an MFC project, right-click on the project and select Properties.
Step 10 − In the left section, click Configuration Properties → General.
Step 11 − Select the Use MFC in Shared DLL option in Project Defaults section and click OK.
Step 12 − Add a new source file.
Step 13 − Right-click on your Project and select Add → New Item…
Step 14 − In the Templates section, click C++ File (.cpp).
Step 15 − Set the Name as Example and click Add.
Window Creation
Any application has two main sections −
- Class
- Frame or Window
Let us create a window using the following steps −
Step 1 − To create an application, we need to derive a class from the MFC’s CWinApp.
#include
class CExample : public CWinApp {
   BOOL InitInstance() {
      return TRUE;
   }
};
Step 2 − We also need a frame/window to show the content of our application.
Step 3 − For this, we need to add another class and derive it from the MFC’s CFrameWnd class and implement its constructor and a call the Create() method, which will create a frame/window as shown in the following code.
class CMyFrame : public CFrameWnd {
   public:
      CMyFrame() {
         Create(NULL, _T("MFC Application Tutorial"));
      }
};
Step 4 − As you can see that Create() method needs two parameters, the name of the class, which should be passed as NULL, and the name of the window, which is the string that will be shown on the title bar.
Main Window
After creating a window, to let the application use it, you can use a pointer to show the class used to create the window. In this case, the pointer would be CFrameWnd. To use the frame window, assign its pointer to the CWinThread::m_pMainWnd member variable. This is done in the InitInstance() implementation of your application.
Step 1 − Here is the implementation of InitInstance() in CExample class.
class CExample : public CWinApp {
   BOOL InitInstance() {
      CMyFrame *Frame = new CMyFrame();  m_pMainWnd = Frame;

      Frame->ShowWindow(SW_NORMAL);
      Frame->UpdateWindow();

      return TRUE;
   }
};
Step 2 − Following is the complete implementation of Example.cpp file.
#include <afxwin.h>

class CMyFrame : public CFrameWnd {
   public:
      CMyFrame() {
         Create(NULL, _T("MFC Application Tutorial"));
      }
};

class CExample : public CWinApp {
   BOOL InitInstance() {
      CMyFrame *Frame = new CMyFrame();
      m_pMainWnd = Frame;

      Frame->ShowWindow(SW_NORMAL);
      Frame->UpdateWindow();

      return TRUE;
   }
};

CExample theApp;
Step 3 − When we run the above application, the following window is created.
Windows Styles
Windows styles are characteristics that control features such as window appearance, borders, minimized or maximized state, or other resizing states, etc.
| Sr.No. | Style & Description |
|---|---|
| 1 |
WS_BORDER Creates a window that has a border. |
| 2 |
WS_CAPTION Creates a window that has a title bar (implies the WS_BORDER style). Cannot be used with the WS_DLGFRAME style. |
| 3 |
WS_CHILD Creates a child window. Cannot be used with the WS_POPUP style. |
| 4 |
WS_CHILDWINDOW Same as the WS_CHILD style. |
| 5 |
WS_CLIPCHILDREN Excludes the area occupied by child windows when you draw within the parent window. Used when you create the parent window. |
| 6 |
WS_CLIPSIBLINGS Clips child windows relative to each other; that is, when a particular child window receives a paint message, the WS_CLIPSIBLINGS style clips all other overlapped child windows out of the region of the child window to be updated. (If WS_CLIPSIBLINGS is not given and child windows overlap, when you draw within the client area of a child window, it is possible to draw within the client area of a neighboring child window.) For use with the WS_CHILD style only. |
| 7 |
WS_DISABLED Creates a window that is initially disabled. |
| 8 |
WS_DLGFRAME Creates a window with a double border but no title. |
| 9 |
WS_GROUP Specifies the first control of a group of controls in which the user can move from one control to the next with the arrow keys. All controls defined with the WS_GROUP style FALSE after the first control belong to the same group. The next control with the WS_GROUP style starts the next group (that is, one group ends where the next begins). |
| 10 |
WS_HSCROLL Creates a window that has a horizontal scroll bar. |
| 11 |
WS_ICONIC Creates a window that is initially minimized. Same as the WS_MINIMIZE style. |
| 12 |
WS_MAXIMIZE Creates a window of maximum size. |
| 13 |
WS_MAXIMIZEBOX Creates a window that has a Maximize button. |
| 14 |
WS_MINIMIZE Creates a window that is initially minimized. For use with the WS_OVERLAPPED style only. |
| 15 |
WS_MINIMIZEBOX Creates a window that has a Minimize button. |
| 16 |
WS_OVERLAPPED Creates an overlapped window. An overlapped window usually has a caption and a border. |
| 17 |
WS_OVERLAPPED WINDOW Creates an overlapped window with the WS_OVERLAPPED, WS_CAPTION, WS_SYSMENU, WS_THICKFRAME, WS_MINIMIZEBOX, and WS_MAXIMIZEBOX styles. |
| 18 |
WS_POPUP Creates a pop-up window. Cannot be used with the WS_CHILD style. |
| 19 |
WS_POPUPWINDOW Creates a pop-up window with the WS_BORDER, WS_POPUP, and WS_SYSMENU styles. The WS_CAPTION style must be combined with the WS_POPUPWINDOW style to make the Control menu visible. |
| 20 |
WS_SIZEBOX Creates a window that has a sizing border. Same as the WS_THICKFRAME style. |
| 21 |
WS_SYSMENU Creates a window that has a Control-menu box in its title bar. Used only for windows with title bars. |
| 22 |
WS_TABSTOP Specifies one of any number of controls through which the user can move by using the TAB key. The TAB key moves the user to the next control specified by the WS_TABSTOP style. |
| 23 |
WS_THICKFRAME Creates a window with a thick frame that can be used to size the window. |
| 24 |
WS_TILED Creates an overlapped window. An overlapped window has a title bar and a border. Same as the WS_OVERLAPPED style. |
| 25 |
WS_TILEDWINDOW Creates an overlapped window with the WS_OVERLAPPED, WS_CAPTION, WS_SYSMENU, WS_THICKFRAME, WS_MINIMIZEBOX, and WS_MAXIMIZEBOX styles. Same as the WS_OVERLAPPEDWINDOW style. |
| 26 |
WS_VISIBLE Creates a window that is initially visible. |
| 27 |
WS_VSCROLL Creates a window that has a vertical scroll bar. |
Step 1 − Let us look into a simple example in which we will add some styling. After creating a window, to display it to the user, we can apply the WS_VISIBLE style to it and additionally, we will also add WS_OVERLAPPED style. Here is an implementation −
class CMyFrame : public CFrameWnd {
   public:
      CMyFrame() {
         Create(NULL, _T("MFC Application Tutorial"), WS_VISIBLE | WS_OVERLAPPED);
      }
};
Step 2 − When you run this application, the following window is created.
You can now see that the minimize, maximize, and close options do not appear anymore.
Windows Location
To locate things displayed on the monitor, the computer uses a coordinate system similar to the Cartesian’s, but the origin is located on the top left corner of the screen. Using this coordinate system, any point can be located by its distance from the top left corner of the screen of the horizontal and the vertical axes.
The Win32 library provides a structure called POINT defined as follows −
typedef struct tagPOINT {
   LONG x;
   LONG y;
} POINT;
-
The ‘x’ member variable is the distance from the left border of the screen to the point.
-
The ‘y’ variable represents the distance from the top border of the screen to the point.
-
Besides the Win32’s POINT structure, the Microsoft Foundation Class (MFC) library provides the CPoint class.
-
This provides the same functionality as the POINT structure. As a C++ class, it adds more functionality needed to locate a point. It provides two constructors.
CPoint();
CPoint(int X, int Y);
Windows Size
While a point is used to locate an object on the screen, each window has a size. The size provides two measures related to an object.
- The width of an object.
- The height of an object.
The Win32 library uses the SIZE structure defined as follows −
typedef struct tagSIZE {
   int cx;
   int cy;
} SIZE;
Besides the Win32’s SIZE structure, the MFC provides the CSize class. This class has the same functionality as SIZE but adds features of a C++ class. It provides five constructors that allow you to create a size variable in any way of your choice.
CSize();
CSize(int initCX, int initCY);
CSize(SIZE initSize);
CSize(POINT initPt);
CSize(DWORD dwSize);
Windows Dimensions
When a Window displays, it can be identified on the screen by its location with regards to the borders of the monitor. A Window can also be identified by its width and height. These characteristics are specified or controlled by the rect argument of the Create() method. This argument is a rectangle that can be created through the Win32 RECT structure.
typedef struct _RECT {
   LONG left;
   LONG top;
   LONG right;
   LONG bottom;
} RECT, *PRECT;
Besides the Win32’s RECT structure, the MFC provides the CRect class which has the following constructors −
CRect();
CRect(int l, int t, int r, int b);
CRect(const RECT& srcRect);
CRect(LPCRECT lpSrcRect);
CRect(POINT point, SIZE size);
CRect(POINT topLeft, POINT bottomRight);
Let us look into a simple example in which we will specify the location and the size of the window
class CMyFrame : public CFrameWnd {
   public:
      CMyFrame() {
         Create(NULL, _T("MFC Application Tutorial"), WS_SYSMENU, CRect(90, 120,
            550, 480));
      }
};
When you run this application, the following window is created on the top left corner of your screen as specified in CRect constructor in the first two parameters. The last two parameters are the size of the Window.
Windows Parents
In the real world, many applications are made of different Windows. When an application uses various Windows, most of the objects depend on a particular one. It could be the first Window that was created or another window that you designated. Such a Window is referred to as the Parent Window. All the other windows depend on it directly or indirectly.
-
If the Window you are creating is dependent of another, you can specify that it has a parent.
-
This is done with the pParentWnd argument of the CFrameWnd::Create() method.
-
If the Window does not have a parent, pass the argument with a NULL value.
Let us look into an example which has only one Window, and there is no parent Window available, so we will pass the argument with NULL value as shown in the following code −
class CMyFrame : public CFrameWnd {
   public:
      CMyFrame() {
         Create(NULL, _T("MFC Application Tutorial"), WS_SYSMENU,
            CRect(90, 120, 550, 480), NULL);
      }
};
When you run the above application, you see the same output.
|
|
|
|


Правила раздела Visual C++ / MFC / WTL (далее Раздела)

Как программно изменить размер окна?
- Подписаться на тему
- Сообщить другу
- Скачать/распечатать тему
|
|
|
|
Full Member
Рейтинг (т): 8 |
Доброе время суток! Не подскажете, как изменить программно размер окна в SDI приложении написанного на MFC? |


|
byte |
|
|
SetWindowPos |
|
Russel |
|
|
Full Member
Рейтинг (т): 8 |
Спасибо, но ведь там Хендл окна надо указывать, а как его получить? Сообщение отредактировано: Russel — 22.02.05, 20:14 |
|
Kezya |
|
|
Если пытаешь изменить положение окна не из класса окна, то можно вот так:
CMainFrame *pMainFrm = NULL; pMainFrm = (CMainFrame *)m_pMainWnd; if(pMainFrm != NULL); ::SetWindowPos(pMainFrm->m_hWnd,…. |


|
IEZ |
|
|
MoveWindow можно использовать. |
|
byte |
|
|
Цитата IEZ @ 22.02.05, 20:51 MoveWindow можно использовать. Это приведет к бОльшему геморрою. |
|
IEZ |
|
|
Цитата byte @ 22.02.05, 21:31 Это приведет к бОльшему геморрою. А именно? |
|
byte |
|
|
Цитата IEZ @ 22.02.05, 22:05 А именно?
У функции SetWindowPos есть последним аргументом флаги, которые как раз и характеризуют действие. То есть чтобы просто установить новый размер окна, надо поставить флаги: А MoveWindow сразу изменяет положение окна. То есть чтобы окно осталось на том же месте, надо узнать положение окна и передать его параметрами. Лишние движения.. |
|
IEZ |
|
|
byte, Но Russel, не упомянул для какого окно ему нужно изменить размер (родительское, дочернее). |
 MoveWindow.rar (94.17 Кбайт, скачиваний: 246)
|
byte |
|
|
Цитата IEZ @ 22.02.05, 22:24 Но Russel, не упомянул для какого окно ему нужно изменить размер (родительское, дочернее). и как это влияет? Чтобы окно не изменило свое положение, надо перед вызовом MoveWindow его знать, а перед вызовом SetWindowPos — нет. |
|
IEZ |
|
|
Цитата byte @ 22.02.05, 22:27 Чтобы окно не изменило свое положение, надо перед вызовом MoveWindow его знать
Ну и что. Это только одна строка кода добавляется. И в конце концов выбор вариантов за Russel. |
|
Russel |
|
|
Я уточнил в каком окне — это SDI приложение то бишь — одно окно |

|
Russel |
|
|
Всем большое спасибо за помощь и советы — искренне благодарен |
|
Russel |
|
|
Full Member
Рейтинг (т): 8 |
Цитата Kezya @ 22.02.05, 20:38 Если пытаешь изменить положение окна не из класса окна, то можно вот так:
CMainFrame *pMainFrm = NULL; pMainFrm = (CMainFrame *)m_pMainWnd; if(pMainFrm != NULL); ::SetWindowPos(pMainFrm->m_hWnd,…. Компилятор ругается на m_pMainWnd — не знает что такое… Я все делаю в классе документ |
PIL |
|
|
CMyApp* pApp = (CMyApp*)AfxGetApp(); pMainFrm = (CMainFrame*)pApp->m_pMainWnd; |
0 пользователей читают эту тему (0 гостей и 0 скрытых пользователей)
0 пользователей:
- Предыдущая тема
- Visual C++ / MFC / WTL
- Следующая тема
![]()
![]()
[ Script execution time: 0,0483 ] [ 16 queries used ] [ Generated: 9.02.23, 21:32 GMT ]
#c #mfc
Вопрос:
У меня есть приложение MFC, над которым я работаю уже несколько недель, я хочу вручную задать размеры основного фрейма при его загрузке, может ли кто-нибудь помочь мне с этим, в частности, куда также поместить код?
Спасибо!
Ответ №1:
Вы также можете задать размер (с SetWindowPos() ) изнутри CMainFrame::OnCreate() или в CWinApp производном классе» InitInstance . Найдите строку с надписью pMainFrame->ShowWindow() и позвоните pMainFrame->SetWindowPos() до этой строки. Вот где я всегда это делаю.
Ответ №2:
Найдите свой размер экрана с помощью ..
 CRect rect;
SystemParametersInfo(SPI_GETWORKAREA,0,amp;rect,0);
screen_x_size=rect.Width();
screen_y_size=rect.Height();
затем используйте эти значения для вычисления размера X и Y вашего окна ..
::SetWindowPos(m_hWnd,HWND_TOPMOST,0,0,main_x_size,main_y_size,SWP_NOZORDER);
Где main_x_size и main_y_size каковы ваши размеры.
Комментарии:
1. SPI_GETWORKAREA получает только размер основного mnonitor. Для всего виртуального рабочего стола используйте следующее: int desktopW = GetSystemMetrics(SM_CXVIRTUALSCREEN); int desktopH = GetSystemMetrics(SM_CYVIRTUALSCREEN);
Ответ №3:
Я думаю, что вы ищете предварительное окно и что ваше приложение не основано на диалоге.
Это виртуальная функция-член класса CWnd, и она вызывается платформой непосредственно перед созданием окна. Так что это подходящее место для размещения ваших изменений.
Вы должны написать что-то вроде этого:
 BOOL CMyWindow::PreCreateWindow(CREATESTRUCTamp; cs)
{
   cs.cy = 640; // width
   cs.cx = 480; // height
   cs.y = 0; // top position
   cs.x = 0; // left position
   // don't forget to call base class version, suppose you derived you window from CWnd
   return CWnd::PreCreateWindow(cs);
}
Комментарии:
1. Это работает, но вы должны редактировать
PreCreateWindowвMainFrm.cpp, а не в своем классе просмотра.
Ответ №4:
вы можете использовать это:
 CRect rect;
SystemParametersInfo(SPI_GETWORKAREA, 0, amp;rect, 0);
left = -3, right = 3;
rect.top = 100;
rect.bottom = 500;
rect.left = 100;
rect.right = 800;
//or use
CRect cr;
cr.SetRect(POINT{ 100,100 }, POINT{ 500,800 });
MoveWindow(rect);
Комментарии:
1. Вы не ответили на полный вопрос и не объяснили, как работает ваш код. Пожалуйста, помогите спрашивающему, предоставив небольшой контекст вокруг вашего ответа.
|
Qazan 215 / 63 / 25 Регистрация: 30.04.2013 Сообщений: 866 Записей в блоге: 10 |
||||||||
|
1 |
||||||||
|
22.12.2015, 18:03. Показов 2546. Ответов 4 Метки нет (Все метки)
В общем сделал класс Доска (class Board) , который знает о своих размерах и размещение ячеек (class Cell ) на ней(Не шахматное). То есть хочу сделать такие функций , а после вызывать их уже во View. (Мне эти паттерны прям покоя не дают Еще хочу сделать черное белую карту, чисто для нужд программы — чтобы отлавливать куда нажимает пользователь. 2. Как узнав размеры доски — доска определена как поле класса Document , установить в соответствий с этим размеры окна ? работает так
но мне нужно это сделать в классе документа, такие же изменения не работают там
не помогает
0 |

 ).
).|
vkiper 17 / 17 / 6 Регистрация: 11.11.2015 Сообщений: 119 |
||||||||
|
22.12.2015, 19:03 |
2 |
|||||||
|
Если вы из класса документа делаете такой вызов:
, то это работать не будет в принципе, ибо Документ не есть Окно. Главное Окно вытаскиваете (из любого места в проге) функцией AfxGetMainWnd(), а с ним уже пляшете дальше, например SetWindowPos(). Если вышеупомянутая функция не работает как я описал(не помню есть ли в CWnd метод SetWindowPos), то извлекаете из главного Окна его дескриптор —
А с ним проходят все функции из WinAPI.
1 |
|
215 / 63 / 25 Регистрация: 30.04.2013 Сообщений: 866 Записей в блоге: 10 |
|
|
22.12.2015, 20:05 [ТС] |
3 |
|
vkiper, Спасибо ) хотелось из View установить размеры, не из документа
0 |
|
vkiper 17 / 17 / 6 Регистрация: 11.11.2015 Сообщений: 119 |
||||
|
22.12.2015, 20:26 |
4 |
|||
|
Объект класса View явлается вложенным в объект класса Frame. В плане окон иерархия такая же. Исходя из этого, вы не можете, задав позицию дочернему окну, ожидать, что родительское окно поменяет эту позицию. Так не работает. Добавлено через 15 минут
в следующие функции — CMyView::PreCreateWindow(), CMyView::OnCreate(). Ни хрена не работает. Очевидно, сначала должен завершиться процесс формирования главного окна. Забыл.
1 |
|
183 / 181 / 66 Регистрация: 15.02.2015 Сообщений: 515 |
|
|
23.12.2015, 11:40 |
5 |
|
1. Должны ли эти классы уметь рисовать себя ? Да по сути как вам будет угодно и удобно. Можете давать классу «Cell» CDC, чтобы он нарисовал себя сам, а можете из класса «Board» рисовать ячейки, спрашивая у них данные (позиция, размер, содержимое).
1 |
