Hello!
I am getting a really infuriating problem that is preventing me from installing applications, such as Livestream Podcaster. Here is the error as displayed by Event Viewer:
Product: Microsoft Visual C++ 2005 Redistributable — Error 1935.An error occurred during the installation of assembly ‘policy.8.0.Microsoft.VC80.ATL,type=»win32-policy»,version=»8.0.50727.762″,publicKeyToken=»1fc8b3b9a1e18e3b»,processor Architecture=»x86″‘.
Please refer to Help and Support for more information. HRESULT: 0x80073712. assembly interface: IAssemblyCacheItem, function: Commit, component: {66332652-9C28-58B1-A01F-C8B3B9A1E18E}
Here’s some things I’ve tried:
— Cleaning registry
— Restarting computer
— Disabling Anti-virus
— Microsoft .NET Framework disabling and repairing
— Repairing Windows update issues
— Turning TrustedInstaller.exe to Manual
— Installing C++ 2008 Redistributable all versions as well as 2005.
I’m really stumped on this one. Can someone help me out??
Thanks!
Here’s some specs as well:
——————
System Information
——————
Time of this report: 10/11/2011, 00:31:55
Machine name: JAKE-PC
Operating System: Windows 7 Home Premium 64-bit (6.1, Build 7601) Service Pack 1 (7601.win7sp1_gdr.110622-1506)
Language: English (Regional Setting: English)
System Manufacturer: CLEVO CO.
System Model: W150HRM
BIOS: BIOS Date: 05/03/11 16:56:05 Ver: 04.06.04
Processor: Intel(R) Core(TM) i7-2630QM CPU @ 2.00GHz (8 CPUs), ~2.0GHz
Memory: 8192MB RAM
Available OS Memory: 8098MB RAM
Page File: 2229MB used, 13966MB available
Windows Dir: C:Windows
DirectX Version: DirectX 11
DX Setup Parameters: Not found
User DPI Setting: Using System DPI
System DPI Setting: 120 DPI (125 percent)
DWM DPI Scaling: UnKnown
DxDiag Version: 6.01.7601.17514 32bit Unicode
————
DxDiag Notes
————
Display Tab 1: No problems found.
Sound Tab 1: No problems found.
Sound Tab 2: No problems found.
Input Tab: No problems found.
———————
DirectX Debug Levels
———————
Direct3D: 0/4 (retail)
DirectDraw: 0/4 (retail)
DirectInput: 0/5 (retail)
DirectMusic: 0/5 (retail)
DirectPlay: 0/9 (retail)
DirectSound: 0/5 (retail)
DirectShow: 0/6 (retail)
—————
Display Devices
—————
Card name: Intel(R) HD Graphics Family
Manufacturer: Intel Corporation
Chip type: Intel(R) HD Graphics Family
DAC type: Internal
Device Key: EnumPCIVEN_8086&DEV_0116&SUBSYS_15001558&REV_09
Display Memory: 4062 MB
Dedicated Memory: 2014 MB
Shared Memory: 2047 MB
Current Mode: 1920 x 1080 (32 bit) (60Hz)
Monitor Name: Generic PnP Monitor
Monitor Model: unknown
Monitor Id: LGD01E9
Native Mode: 1920 x 1080(p) (59.934Hz)
Output Type: Internal
Driver Name: igdumd64.dll,igd10umd64.dll,igd10umd64.dll,igdumdx32,igd10umd32,igd10umd32
Driver File Version: 8.15.0010.2291 (English)
Driver Version: 8.15.10.2291
DDI Version: 11
Driver Model: WDDM 1.1
Driver Attributes: Final Retail
Driver Date/Size: 1/26/2011 19:57:14, 7470080 bytes
WHQL Logo’d: Yes
WHQL Date Stamp:
Device Identifier: {D7B78E66-4256-11CF-186F-0C35B7C2C535}
Vendor ID: 0x10DE
Device ID: 0x0DCE
SubSys ID: 0x15001558
Revision ID: 0x00A1
Driver Strong Name: oem22.inf:Intel.Mfg.NTamd64:iSNBM0:8.15.10.2291
Rank Of Driver: 00E62001
Video Accel: ModeMPEG2_A ModeMPEG2_C ModeWMV9_C ModeVC1_C
Deinterlace Caps: {BF752EF6-8CC4-457A-BE1B-08BD1CAEEE9F}: Format(In/Out)=(YUY2,YUY2) Frames(Prev/Fwd/Back)=(0,0,1) Caps=VideoProcess_YUV2RGB VideoProcess_StretchX VideoProcess_StretchY VideoProcess_AlphaBlend DeinterlaceTech_EdgeFiltering
{335AA36E-7884-43A4-9C91-7F87FAF3E37E}: Format(In/Out)=(YUY2,YUY2) Frames(Prev/Fwd/Back)=(0,0,0) Caps=VideoProcess_YUV2RGB VideoProcess_StretchX VideoProcess_StretchY VideoProcess_AlphaBlend DeinterlaceTech_BOBVerticalStretch
{5A54A0C9-C7EC-4BD9-8EDE-F3C75DC4393B}: Format(In/Out)=(YUY2,YUY2) Frames(Prev/Fwd/Back)=(0,0,0) Caps=VideoProcess_YUV2RGB VideoProcess_StretchX VideoProcess_StretchY VideoProcess_AlphaBlend
{BF752EF6-8CC4-457A-BE1B-08BD1CAEEE9F}: Format(In/Out)=(UYVY,YUY2) Frames(Prev/Fwd/Back)=(0,0,1) Caps=VideoProcess_YUV2RGB VideoProcess_StretchX VideoProcess_StretchY VideoProcess_AlphaBlend DeinterlaceTech_EdgeFiltering
{335AA36E-7884-43A4-9C91-7F87FAF3E37E}: Format(In/Out)=(UYVY,YUY2) Frames(Prev/Fwd/Back)=(0,0,0) Caps=VideoProcess_YUV2RGB VideoProcess_StretchX VideoProcess_StretchY VideoProcess_AlphaBlend DeinterlaceTech_BOBVerticalStretch
{5A54A0C9-C7EC-4BD9-8EDE-F3C75DC4393B}: Format(In/Out)=(UYVY,YUY2) Frames(Prev/Fwd/Back)=(0,0,0) Caps=VideoProcess_YUV2RGB VideoProcess_StretchX VideoProcess_StretchY VideoProcess_AlphaBlend
{BF752EF6-8CC4-457A-BE1B-08BD1CAEEE9F}: Format(In/Out)=(YV12,YUY2) Frames(Prev/Fwd/Back)=(0,0,1) Caps=VideoProcess_YUV2RGB VideoProcess_StretchX VideoProcess_StretchY VideoProcess_AlphaBlend DeinterlaceTech_EdgeFiltering
{335AA36E-7884-43A4-9C91-7F87FAF3E37E}: Format(In/Out)=(YV12,YUY2) Frames(Prev/Fwd/Back)=(0,0,0) Caps=VideoProcess_YUV2RGB VideoProcess_StretchX VideoProcess_StretchY VideoProcess_AlphaBlend DeinterlaceTech_BOBVerticalStretch
{5A54A0C9-C7EC-4BD9-8EDE-F3C75DC4393B}: Format(In/Out)=(YV12,YUY2) Frames(Prev/Fwd/Back)=(0,0,0) Caps=VideoProcess_YUV2RGB VideoProcess_StretchX VideoProcess_StretchY VideoProcess_AlphaBlend
{BF752EF6-8CC4-457A-BE1B-08BD1CAEEE9F}: Format(In/Out)=(NV12,YUY2) Frames(Prev/Fwd/Back)=(0,0,1) Caps=VideoProcess_YUV2RGB VideoProcess_StretchX VideoProcess_StretchY VideoProcess_AlphaBlend DeinterlaceTech_EdgeFiltering
{335AA36E-7884-43A4-9C91-7F87FAF3E37E}: Format(In/Out)=(NV12,YUY2) Frames(Prev/Fwd/Back)=(0,0,0) Caps=VideoProcess_YUV2RGB VideoProcess_StretchX VideoProcess_StretchY VideoProcess_AlphaBlend DeinterlaceTech_BOBVerticalStretch
{5A54A0C9-C7EC-4BD9-8EDE-F3C75DC4393B}: Format(In/Out)=(NV12,YUY2) Frames(Prev/Fwd/Back)=(0,0,0) Caps=VideoProcess_YUV2RGB VideoProcess_StretchX VideoProcess_StretchY VideoProcess_AlphaBlend
{BF752EF6-8CC4-457A-BE1B-08BD1CAEEE9F}: Format(In/Out)=(IMC1,YUY2) Frames(Prev/Fwd/Back)=(0,0,1) Caps=VideoProcess_YUV2RGB VideoProcess_StretchX VideoProcess_StretchY VideoProcess_AlphaBlend DeinterlaceTech_EdgeFiltering
{335AA36E-7884-43A4-9C91-7F87FAF3E37E}: Format(In/Out)=(IMC1,YUY2) Frames(Prev/Fwd/Back)=(0,0,0) Caps=VideoProcess_YUV2RGB VideoProcess_StretchX VideoProcess_StretchY VideoProcess_AlphaBlend DeinterlaceTech_BOBVerticalStretch
{5A54A0C9-C7EC-4BD9-8EDE-F3C75DC4393B}: Format(In/Out)=(IMC1,YUY2) Frames(Prev/Fwd/Back)=(0,0,0) Caps=VideoProcess_YUV2RGB VideoProcess_StretchX VideoProcess_StretchY VideoProcess_AlphaBlend
{BF752EF6-8CC4-457A-BE1B-08BD1CAEEE9F}: Format(In/Out)=(IMC2,YUY2) Frames(Prev/Fwd/Back)=(0,0,1) Caps=VideoProcess_YUV2RGB VideoProcess_StretchX VideoProcess_StretchY VideoProcess_AlphaBlend DeinterlaceTech_EdgeFiltering
{335AA36E-7884-43A4-9C91-7F87FAF3E37E}: Format(In/Out)=(IMC2,YUY2) Frames(Prev/Fwd/Back)=(0,0,0) Caps=VideoProcess_YUV2RGB VideoProcess_StretchX VideoProcess_StretchY VideoProcess_AlphaBlend DeinterlaceTech_BOBVerticalStretch
{5A54A0C9-C7EC-4BD9-8EDE-F3C75DC4393B}: Format(In/Out)=(IMC2,YUY2) Frames(Prev/Fwd/Back)=(0,0,0) Caps=VideoProcess_YUV2RGB VideoProcess_StretchX VideoProcess_StretchY VideoProcess_AlphaBlend
{BF752EF6-8CC4-457A-BE1B-08BD1CAEEE9F}: Format(In/Out)=(IMC3,YUY2) Frames(Prev/Fwd/Back)=(0,0,1) Caps=VideoProcess_YUV2RGB VideoProcess_StretchX VideoProcess_StretchY VideoProcess_AlphaBlend DeinterlaceTech_EdgeFiltering
{335AA36E-7884-43A4-9C91-7F87FAF3E37E}: Format(In/Out)=(IMC3,YUY2) Frames(Prev/Fwd/Back)=(0,0,0) Caps=VideoProcess_YUV2RGB VideoProcess_StretchX VideoProcess_StretchY VideoProcess_AlphaBlend DeinterlaceTech_BOBVerticalStretch
{5A54A0C9-C7EC-4BD9-8EDE-F3C75DC4393B}: Format(In/Out)=(IMC3,YUY2) Frames(Prev/Fwd/Back)=(0,0,0) Caps=VideoProcess_YUV2RGB VideoProcess_StretchX VideoProcess_StretchY VideoProcess_AlphaBlend
{BF752EF6-8CC4-457A-BE1B-08BD1CAEEE9F}: Format(In/Out)=(IMC4,YUY2) Frames(Prev/Fwd/Back)=(0,0,1) Caps=VideoProcess_YUV2RGB VideoProcess_StretchX VideoProcess_StretchY VideoProcess_AlphaBlend DeinterlaceTech_EdgeFiltering
{335AA36E-7884-43A4-9C91-7F87FAF3E37E}: Format(In/Out)=(IMC4,YUY2) Frames(Prev/Fwd/Back)=(0,0,0) Caps=VideoProcess_YUV2RGB VideoProcess_StretchX VideoProcess_StretchY VideoProcess_AlphaBlend DeinterlaceTech_BOBVerticalStretch
{5A54A0C9-C7EC-4BD9-8EDE-F3C75DC4393B}: Format(In/Out)=(IMC4,YUY2) Frames(Prev/Fwd/Back)=(0,0,0) Caps=VideoProcess_YUV2RGB VideoProcess_StretchX VideoProcess_StretchY VideoProcess_AlphaBlend
D3D9 Overlay: Supported
DXVA-HD: Supported
DDraw Status: Enabled
D3D Status: Enabled
AGP Status: Enabled
————-
Sound Devices
————-
Description: Speakers (High Definition Audio Device)
Default Sound Playback: Yes
Default Voice Playback: Yes
Hardware ID: HDAUDIOFUNC_01&VEN_10EC&DEV_0269&SUBSYS_15581500&REV_1001
Manufacturer ID: 1
Product ID: 65535
Type: WDM
Driver Name: HdAudio.sys
Driver Version: 6.01.7601.17514 (English)
Driver Attributes: Final Retail
WHQL Logo’d: Yes
Date and Size: 11/20/2010 05:44:23, 350208 bytes
Other Files:
Driver Provider: Microsoft
HW Accel Level: Basic
Cap Flags: 0xF1F
Min/Max Sample Rate: 100, 200000
Static/Strm HW Mix Bufs: 1, 0
Static/Strm HW 3D Bufs: 0, 0
HW Memory: 0
Voice Management: No
EAX(tm) 2.0 Listen/Src: No, No
I3DL2(tm) Listen/Src: No, No
Sensaura(tm) ZoomFX(tm): No
Description: Digital Audio (S/PDIF) (High Definition Audio Device)
Default Sound Playback: No
Default Voice Playback: No
Hardware ID: HDAUDIOFUNC_01&VEN_10EC&DEV_0269&SUBSYS_15581500&REV_1001
Manufacturer ID: 1
Product ID: 65535
Type: WDM
Driver Name: HdAudio.sys
Driver Version: 6.01.7601.17514 (English)
Driver Attributes: Final Retail
WHQL Logo’d: Yes
Date and Size: 11/20/2010 05:44:23, 350208 bytes
Other Files:
Driver Provider: Microsoft
HW Accel Level: Basic
Cap Flags: 0xF1F
Min/Max Sample Rate: 100, 200000
Static/Strm HW Mix Bufs: 1, 0
Static/Strm HW 3D Bufs: 0, 0
HW Memory: 0
Voice Management: No
EAX(tm) 2.0 Listen/Src: No, No
I3DL2(tm) Listen/Src: No, No
Sensaura(tm) ZoomFX(tm): No
———————
Sound Capture Devices
———————
Description: Microphone (High Definition Audio Device)
Default Sound Capture: Yes
Default Voice Capture: Yes
Driver Name: HdAudio.sys
Driver Version: 6.01.7601.17514 (English)
Driver Attributes: Final Retail
Date and Size: 11/20/2010 05:44:23, 350208 bytes
Cap Flags: 0x1
Format Flags: 0xFFFFF
Description: Microphone (High Definition Audio Device)
Default Sound Capture: No
Default Voice Capture: No
Driver Name: HdAudio.sys
Driver Version: 6.01.7601.17514 (English)
Driver Attributes: Final Retail
Date and Size: 11/20/2010 05:44:23, 350208 bytes
Cap Flags: 0x1
Format Flags: 0xFFFFF
- Remove From My Forums
-
Question
-
So I upgraded to Windows 10 yesterday. Did an upgrade and then a reset so I had a clean system. Everything’s been pretty smooth except this.
Trying to install Autodesk Maya 2014 and 2016 but both fail due to another piece of software failing to install. The software in question is this: Microsoft Visual C++ 2005 Service Pack 1 Redistributable Package ATL Security Update
So I tried to install it manually from here:
https://www.microsoft.com/en-gb/download/details.aspx?id=14431
But of course it fails. The error I get reads:
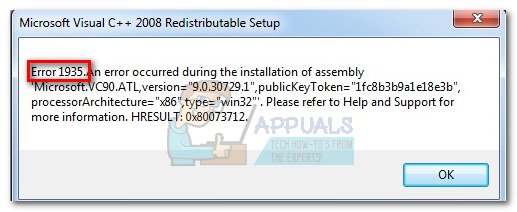
Error 1935. An error occurred during the installation of assembly ‘Microsoft.VC80.CRT.type=»win32″.version=»8.0.50727.4053″.publicKeyToken=»1fc8b3b9a1e18e3b».processorArchitecture=»amd64″.
Please note my system is a 64 bit Intel machine (Core i7 2700k), so Im not sure why its saying the processor architecture is amd64.
Answers
-
Hi,
“The 64 bit extensions to the x86 architecture were invented and first implemented by AMD. Intel were laggards to the 64 bit party because they were hoping to transition away from x86 architecture and move us towards IA64. IA64 already existed in the form
of the Itanium and Intel was hoping to transition towards that. Despite being a far better and more efficient architecture, lacking the inherent design flaws of x86, it suffered through lack of compatibility and it never took off except in the commercial space.
AMD effectively forced Intel’s hand by introducing the Sledgehammer, which was effectively a 64bit chip based on the x86 architecture. Hence the name AMD64.”Here is a similar symptom, please try the solution as mentioned to have a check:
Microsoft Visual C++ 2005 Redistributable error 1935
http://answers.microsoft.com/en-us/windows/forum/windows_7-windows_programs/microsoft-visual-c-2005-redistributable-error-1935/9b245369-5053-e011-8dfc-68b599b31bf5
You may receive an «Error 1935» error message when you try to install Visual Studio .NET or Visual Studio 2005
https://support.microsoft.com/en-us/kb/872904
Regards,
D. Wu
Please remember to mark the replies as answers if they help, and unmark the answers if they provide no help. If you have feedback for TechNet Support, contact tnmff@microsoft.com.
-
Proposed as answer by
Tuesday, September 22, 2015 6:23 AM
-
Marked as answer by
Michael_LS
Tuesday, September 22, 2015 7:56 AM
-
Proposed as answer by
На чтение 8 мин. Просмотров 256 Опубликовано 18.04.2021
« Ошибка 1935 Visual C ++ » может возникнуть, если платформа Microsoft .NET или Распространяемый компонент Visual C ++ пакет поврежден или отсутствует, служба Trustedinstaller отказывается запускаться при вызове установщиком или если служба Windows Module Installer отключена. Другой редкий, но допустимый виновник, который вызывает эту проблему, – системный журнал транзакций (после неудачной установки) – он будет отображать эту ошибку до тех пор, пока журнал не будет очищен.
Эта конкретная ошибка обычно возникает при установке Распространяемый пакет Microsoft Visual C ++ или версия SQL Server.

Если вы в настоящее время боретесь с этой конкретной проблемой, есть хорошие новости. Нам удалось идентифицировать довольно много успешных исправлений, которые помогли пользователям, находившимся в такой же ситуации, как и вы. Ниже представлена коллекция методов, которые были подтверждены как минимум одним пользователем. Следуйте каждому потенциальному исправлению по порядку, пока вам не удастся устранить ошибку « error 1935 Visual C ++ ».
Содержание
- Метод 1: Использование системы Инструмент готовности к обновлению (только для Windows 7)
- Метод 2: восстановление Microsoft. Установка .NET Framework
- Метод 3. Включение установщика модулей Windows из служб
- Метод 4: очистка журнала транзакций
- Метод 5: принудительный запуск службы TrustedInstaller
Метод 1: Использование системы Инструмент готовности к обновлению (только для Windows 7)
Как оказалось, ошибка также может возникать из-за несоответствия с обслуживанием Магазина Windows . Неисправный магазин обслуживания Windows может помешать вам устанавливать обновления Windows, пакеты обновления и утилитарное программное обеспечение с расширенными разрешениями, например пакеты Распространяемый компонент Visual C ++ .
Некоторым пользователям удалось легко устранить ошибку « error 1935 Visual C ++ », используя Инструмент готовности к обновлению системы для автоматического устранения несоответствий с обслуживание Магазина Windows .
Примечание. Этот первый метод применим только к пользователям, которые сталкиваются с ошибкой « 1935 Visual C + ”В Windows 7. Если вы не используете Windows 7, сразу переходите к методу 2.
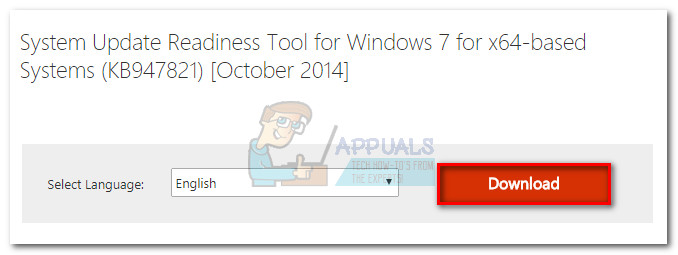
Если вы используете Windows 7, загрузите Инструмент готовности к обновлению системы для Windows 7 по официальной ссылке Microsoft (здесь). Имейте в виду, что инструмент довольно большой, поэтому загрузка может занять некоторое время.

После загрузки инструмента запустите установщик и дайте ему просканировать вашу систему, чтобы исправить несоответствия при обслуживании магазина . Если в конце не будет предложено перезагрузить компьютер, сделайте это самостоятельно. При следующем запуске системы проверьте, решена ли проблема. Если это не так, продолжите устранение неполадок с помощью метода 2.
Метод 2: восстановление Microsoft. Установка .NET Framework
« ошибка 1935 Visual C ++ » может также возникнуть, если установка Microsoft .NET на этом компьютере поврежден или поврежден. Некоторым пользователям удалось решить проблему, переустановив Microsoft .Net Framework , а затем переустановив программное обеспечение, которое выдавало ошибку « error 1935 Visual C ++ ».
Выполните следующие действия, чтобы повторно запустить установку Microsoft .NET Framework и восстановить ее:
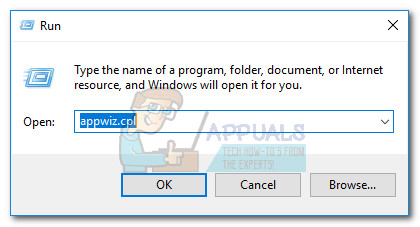
- Нажмите клавишу Windows + R , чтобы открыть окно “Выполнить”. Введите « appwiz.cpl » и нажмите Enter , чтобы открыть Программы и компоненты .
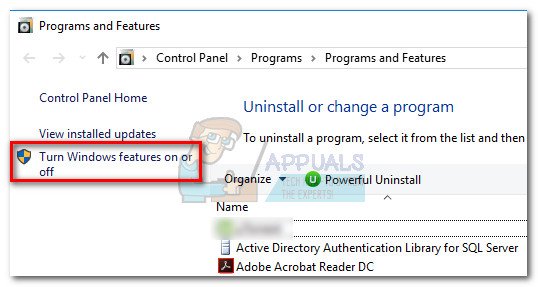
- В Программы и компоненты нажмите Повернуть Windows включены или выключены на самой левой панели.
Примечание. Если будет предложено подтвердить пароль администратора, введите его и нажмите Enter , чтобы продолжить.
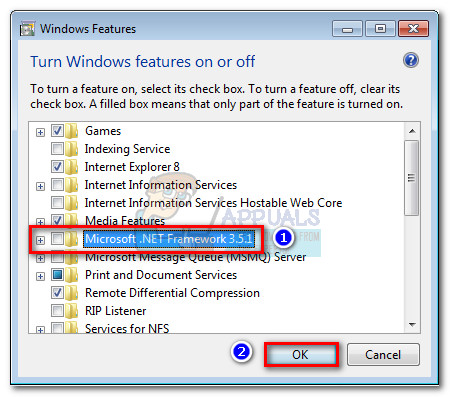
- Снимите флажок рядом с Microsoft .NET Framework 3.5 .1 и нажмите Далее , чтобы отключить его.
Примечание. Если вы используете Windows 8 или Windows 10, отключите .NET Framework 3.5 .
- Перезагрузите компьютер и по порядку чтобы применить изменения, затем вернитесь к экрану Компоненты Windows через шаг 1 и шаг 2.
- Повторно включите Microsoft .NET Framew ork 3.5.1 (или NET Framework 3.5) , установив флажок рядом с ним и нажав OK.
- Перезагрузите компьютер еще раз и посмотрите, была ли решена проблема путем повторной установки программного обеспечения, в котором возникала ошибка.
Если вы все еще видите « ошибку 1935 Visual C ++ », перейдите к методу 3.
Метод 3. Включение установщика модулей Windows из служб
Некоторым пользователям удалось решить проблему после обнаружения установщика модулей Windows был отключен. Если это является причиной проблемы « error 1935 Visual C ++ », вы сможете решить проблему, изменив Тип запуска для Установщик модулей Windows на Вручную или
Примечание: Установщик модулей Windows позволяет устанавливать, изменять и удалять обновления Windows и несколько других дополнительных компонентов (включая пакеты Распространяемый компонент Visual C ++ ). Вам может быть показана « ошибка 1935 Visual C ++ », потому что эта служба отключена.. Хотя состояние Установщика модулей Windows по умолчанию – Вручную , существуют некоторые служебные программы сторонних производителей, которые отключают эту службу для повышения производительности системы.
Выполните следующие действия, чтобы проверить, отключен ли Установщик модулей Windows , и включите его при необходимости:
- Нажмите клавишу Windows + R , чтобы открыть команду «Выполнить». Затем введите « services.msc » и нажмите Enter , чтобы открыть окно Services .
- Просмотрите список служб и найдите Установщик модулей Windows . Найдя его, щелкните его правой кнопкой мыши и выберите Свойства.
- На вкладке Общие окна Свойства установщика модулей Windows посмотрите, какой тип запуска в настоящее время активен. Если для Тип запуска установлено значение Отключено , измените его на Вручную и нажмите Применить , чтобы подтвердить изменения.
Примечание. Вы также можете установить Тип запуска на Автоматически , но это будет запускать службу при каждом запуске, даже если в этом нет необходимости.
- Перезагрузите компьютер и посмотрите, сможете ли вы установить программное обеспечение без « ошибки 1935 Visual C ++ ». Если вы все еще видите это, перейдите к методу 4.
Метод 4: очистка журнала транзакций
Эта проблема может также возникнуть, если журнал транзакций файловой системы Windows был поврежден после установки определенного программного обеспечения. Этот журнал транзакций используется для восстановления файлов при возникновении файловой ошибки. Некоторым пользователям удалось решить проблему « error 1935 Visual C ++» , очистив журнал транзакций и повторно открыв исполняемый файл установки.
Следуйте приведенным ниже инструкциям, чтобы очистить журнал транзакций и решить проблему « 1935 Visual C ++» ошибка:
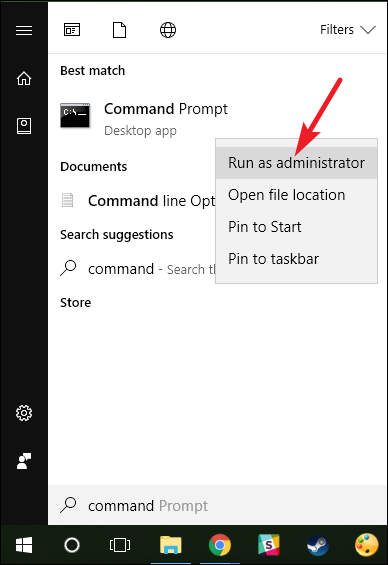
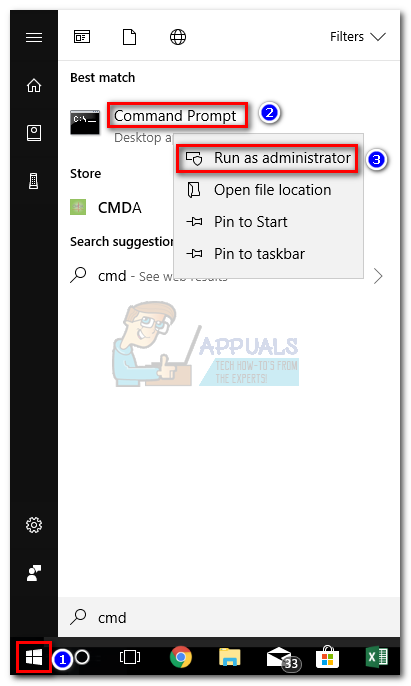
- Откройте командную строку с повышенными привилегиями. Для этого откройте панель Пуск , найдите « cmd », затем щелкните правой кнопкой мыши Командную строку и выберите Запуск от имени администратора.
- В в командной строке с повышенными привилегиями выполните следующую команду и нажмите Enter :
fsutil resource setautoreset true C:
Примечание. Помните, что в приведенной выше команде предполагается, что диск C: является томом вашей ОС.. Если вы установили Windows в другой раздел, измените букву соответствующим образом.
- Перезагрузите компьютер и откройте программу установки программного обеспечения, запускающую « 1935 Visual C ++ ».
Если вы все еще видите ошибку « 1935 Visual C ++ », переходите к последнему методу.
Метод 5: принудительный запуск службы TrustedInstaller
Также известно, что появляется « ошибка 1935 Visual C ++ ». когда служба TrustedInstaller отказывается открываться при вызове некоторыми установщиками. Некоторым пользователям удалось обойти сообщение об ошибке, принудительно запустив службу TrustedInstaller прямо перед открытием исполняемого файла установки.
Для этого откройте команду «Выполнить». в окне ( клавиша Windows + R ) и введите/вставьте « C: Windows servicing TrustedInstaller.exe ». Нажмите Enter , чтобы открыть TrustedInstaller.exe . Это может показаться ненужным, поскольку ничего не видно, но заставит процесс TrustedInstaller открыться.
Сразу после выполнения описанного выше шага откройте установщик приложения, в котором отображается ошибка, и посмотрите, сможете ли вы завершить процесс установки. В противном случае выполните следующие действия.
Возможно, TrustedInstaller не может быть вызван для завершения установки, поскольку он не отображается в службе. список. Мы можем исправить эту ошибку, изменив значение регистра на активный с помощью редактора реестра . Вот полное руководство по выполнению этого:
- Нажмите клавишу Windows + R , чтобы открыть команду «Выполнить». Затем введите « regedit » и нажмите Enter , чтобы открыть окно редактора реестра .
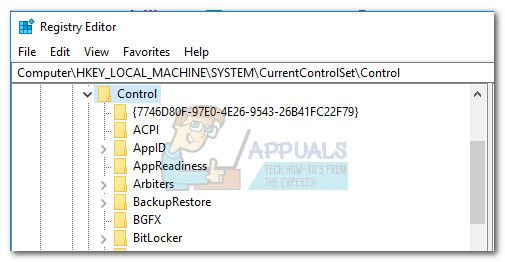
- В редакторе реестра перейдите к HKEY_LOCAL_MACHINE> СИСТЕМА> CurrentControlSet> Control.
- На правой панели, дважды щелкните раздел RegistrySizeLimit , чтобы открыть диалоговое окно «Изменить значение DWORD .
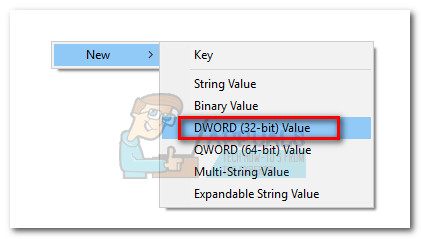
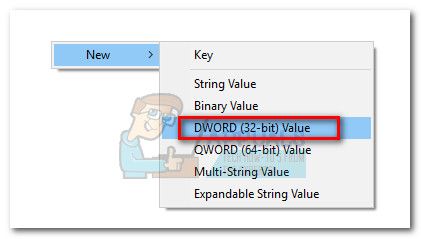
Если вы не можете определить ключ для RegistrySizeLimit , вам необходимо его создать. сам. Сделайте это, щелкнув правой кнопкой мыши в любом месте правой панели и выбрав New> Dword (32-bit) . Назовите вновь созданное значение DWORD « RegistrySizeLimit », затем откройте его двойным щелчком.
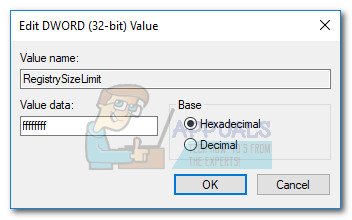
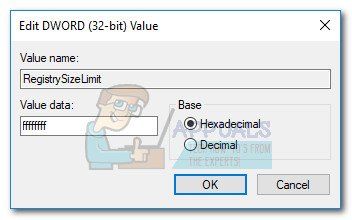
- На экране Изменить значение Dword (32-разрядного) установите для Base значение Шестнадцатеричный и введите « ffffffff » в поле Value Data . Затем измените Base на Decimal и убедитесь, что значение Value data равно « 4294967295 ». Если оно содержит другое значение, измените его вручную на значение, указанное выше, и нажмите OK.
- После успешного создания ключа RegistrySizeLimit с необходимыми значениями закройте редактор реестра и перезагрузите компьютер.
- После того, как вы система загрузится, откройте командную строку с повышенными привилегиями. Для этого откройте панель Пуск , найдите « cmd », затем щелкните правой кнопкой мыши Командная строка и выберите Запуск от имени администратора.
- В командной строке с повышенными привилегиями введите « SFC/SCANNOW ”И нажмите Enter , чтобы начать сканирование всей системы для поиска и восстановления системных файлов.
- После завершения сканирования SFC переустановите программу, которая вызвала проблемы, и посмотрите, устранена ли ошибка« 1935 Visual C ++ ». .
The “error 1935 Visual C++” might occur if the Microsoft .NET framework or the Visual C++ Redistributable package is damaged or missing, Trustedinstaller service refuses to start when called by the installer, or if the Windows Module Installer service is disabled. Another rare but valid culprit that will trigger this issue is the system transaction log (after a failed installation) – it will display this error until the log is cleared.
This particular error usually occurs when installing a Microsoft Visual C++ Redistributable package or a version of SQL Server.
If you’re currently struggling with this particular issue, there is some good news. We managed to identify quite a few of successful fixes that have managed to help users that were in a similar situation as you. Below you have a collection of methods that were confirmed to work by at least one user. Please follow each potential fix in order until you manage to resolve the “error 1935 Visual C++” error.
Method 1: Using the System Update Readiness Tool (Windows 7 only)
As it turns out, the error might also occur because of an inconsistency with the Windows Store servicing. A glitched Windows servicing store might prevent you from installing Windows updates, service packs and utilitarian software with enhanced permissions like Visual C++ Redistributable packages.
Some users have managed to easily resolve the “error 1935 Visual C++” error, by using the System Update Readiness Tool to automatically resolve inconsistencies with the Windows Store servicing.
Note: This first method is only applicable to users who are encountering the “error 1935 Visual C+” issue on Windows 7. If you’re not on Windows 7, jump straight to Method 2.
If you’re on Windows 7, download the System Update Readiness Tool for Windows 7 from this Microsoft official link (here). Keep in mind that the tool is quite large, so it might take a while for the download to complete.
Once the tool is downloaded, run the installer and let it scan your system in order to repair the store servicing inconsistencies. If not prompted to restart at the end, do it on your own. At the next system startup, see if the issue is resolved. If it isn’t, continue troubleshooting with Method 2.
Method 2: Repairing the Microsoft .NET Framework installation
The “error 1935 Visual C++” might also occur if the Microsoft .NET installation on this computer is damaged or corrupted. Some users have managed to resolve the issue by reinstalling Microsoft .Net Framework and then reinstalling the software that was showing the “error 1935 Visual C++” error.
Follow the steps down below to reinitiate the Microsoft .NET Framework installation in order to repair it:
- Press Windows key + R to open a Run window. Type “appwiz.cpl” and hit Enter to open Programs and Features.
- In Programs and Features, click on Turn Windows features on or off from the leftmost pane.
Note: If prompted to confirm via the administrator password, type it and hit Enter to continue.
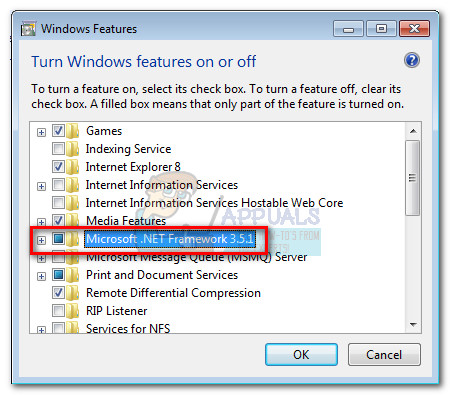
- Uncheck the box next to Microsoft .NET Framework 3.5.1 and hit Next to disable it.
Note: If you’re on Windows 8 or Windows 10, disable .NET Framework 3.5.
- Restart your computer and in order to apply the changes, then return to the Windows Features screen via step 1 and step 2.
- Re-enable Microsoft .NET Framework 3.5.1 (or NET Framework 3.5) by enabling the checkbox next to it and hitting OK.
- Restart your computer again and see if the issue has been resolved by re-installing the software that was showing the error.
If you’re still seeing the “error 1935 Visual C++“, move down to Method 3.
Method 3: Enable Windows Modules Installer from Services
Some users have managed to resolve the issue after discovering the Windows Module Installer was disabled. If this is the cause of the “error 1935 Visual C++” issue, you will be able to resolve the problem by changing the Startup type of Windows Module Installer to Manual or Automatic.
Note: The Windows Module Installer enables the installation, modification, and removal of Windows updates and a few other optional components (including Visual C++ Redistributable packages). You might be shown the “error 1935 Visual C++” because this service is disabled. Although the default state of the Windows Modules Installer is Manual, there are some utility 3rd party programs that will disable this service in order to boost the system’s performance.
Follow the steps below to check if Windows Modules Installer is disabled and enable it if needed:
- Press Windows key + R to open a Run command. Then, type “services.msc” and hit Enter to open the Services window.
- Navigate through the list of services and find Windows Modules Installer. When you find it, right-click on it and choose Properties.
- In the General tab of Windows Modules Installer Properties, see which Startup type is currently active. If the Startup Type is set to Disabled, change it to Manual and hit Apply to confirm your changes.
Note: You can also set the Startup Type to Automatic but this will run the service at every startup, even when it’s not needed.
- Reboot your computer and see if you’re able to install the software without the “error 1935 Visual C++“. If you’re still seeing it, move over to Method 4.
Method 4: Clearing the transaction log
This issue might also occur when the Windows file system transaction log has become corrupt after installing a particular piece of software. This transaction log is used to recover files whenever a file error occurs. Some users have been able to resolve the “error 1935 Visual C++” issue by clearing the transaction log and re-opening the installation executable.
Follow the guide down below to clear the transaction log and resolve the “1935 Visual C++” error:
- Open an elevated Command Prompt. To do this, access the Start bar, search for “cmd“, then right-click on Command Prompt and choose Run as Administrator.
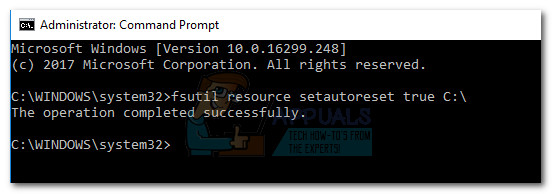
- In the elevated Command prompt, run the following command and press Enter:
fsutil resource setautoreset true C:
Note: Keep in mind the command above assumes that the C: drive is your OS volume. If you installed Windows on a different partition, change the letter accordingly.
- Reboot your computer and open the software installation that is triggering the “1935 Visual C++“.
If you’re still seeing the “1935 Visual C++” error, move over to the final method.
Method 5: Force-starting the TrustedInstaller service
The “error 1935 Visual C++” is also known to appear when the TrustedInstaller service refuses to open when called by certain installers. Some users have been able to bypass the error message by forcing the TrustedInstaller service to start right-before opening the installation executable.
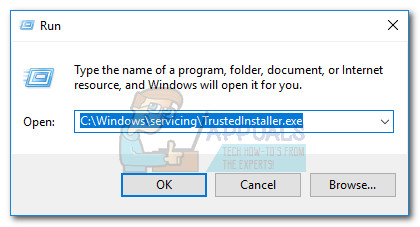
To do this, open a Run window (Windows key + R) and type/paste “C:WindowsservicingTrustedInstaller.exe“. Hit Enter to open the TrustedInstaller.exe. This might appear unnecessary as it doesn’t do anything visible, but it will force the TrustedInstaller process to open.
Immediately after performing the step above, open the installer of the application that is showing the error and see if you’re able to complete the installation process. If you’re not, continue with the steps below.
It is possible that TrustedInstaller cannot be called to complete the installation because it does not appear in the service list. We can right this wrong by changing its register value to active using Registry Editor. Here’s the complete guide to doing this:
- Press Windows key + R to open a Run command. Then, type “regedit” and hit Enter to open the Registry Editor window.
- In Registry Editor, navigate to HKEY_LOCAL_MACHINE > SYSTEM > CurrentControlSet > Control.
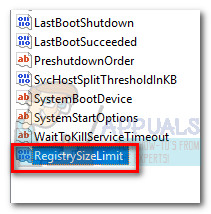
- From the right pane, double-click on the RegistrySizeLimit key to open the Edit DWORD Value dialog box.
Note: If you aren’t able to identify the key for RegistrySizeLimit, you’ll need to create one yourself. Do this by right-clicking anywhere in the right-pane and selecting New > Dword (32-bit). Name the newly created DWORD value to “RegistrySizeLimit“, then open it by double-clicking.
- In the Edit Dword (32-bit) Value screen set the Base to Hexadecimal and enter “ffffffff” in the Value Data box. Then, change the Base to Decimal and verify that the Value data is “4294967295“. If it holds a different value, change it manually to the value specified above and hit OK.
- Once the RegistrySizeLimit key is successfully created with the required values, close Registry Editor and reboot your computer.
- Once your system boots back up, open an elevated Command Prompt. To do this, access the Start bar, search for “cmd“, then right-click on Command Prompt and choose Run as Administrator.
- In the elevated Command Prompt, type “SFC /SCANNOW” and hit Enter to initiate a system-wide scan to find and repair system files.
- Once the SFC scan is complete, re-install the program that was giving you issues and see if the “1935 Visual C++” error is resolved.
Kevin Arrows
Kevin is a dynamic and self-motivated information technology professional, with a Thorough knowledge of all facets pertaining to network infrastructure design, implementation and administration. Superior record of delivering simultaneous large-scale mission critical projects on time and under budget.
SYMPTOMS
After installing Genie Timeline (GTL) or Genie Backup Manager (GBM), you receive the following error in the Event Viewer:
“Error 1935. An error occurred during the installation of assembly ‘Microsoft.VC80.ATL, type=”win32″, version=”8.0.50727.4053″, publicKeyToken=”1fc8b3b9a1e18e3b”, processorArchitecture=”x86″‘. Please refer to Help and Support for more information”
Definition
A 1935 error is one of the most common problems that can prevent a user from being able to install any application that uses the Microsoft Windows Installer MSIAssembly and MSIAssemblyName tables to install assemblies. In general, this error means that Microsoft Windows Installer encountered an error while trying to install assemblies to the Global Assembly Cache (GAC) or the Win32 GAC (WinSxS). This error is considered fatal and causes setup to fail and initiate rollback.
The error can be caused by a variety of reasons:
- Another application deletes the file while our application tries to open this file.
- Some driver in the file system stack intercepts a CreateFile/ReadFile etc and translates the error code to “file not found” etc.
Solution
Solution 1: Clear the transaction log
If you receive a 1935 error, the Windows file system transaction log has become corrupted. The transaction log is used by the Windows file system to recover when a file error occurs. To correct this install error, you need to clear the log as follows:
- From the Start menu, type cmd and you will see Command Prompt listed as the main result. Right-click that result and choose Run as administrator.
- In the command prompt, type the following command and hit Enter:
fsutil resource setautoreset true C:
This assumes that C: is the drive in which Windows is installed. If it is installed on another drive like D:, please change the drive letter appropriately.
- Restart your computer.
- Install GTL or GBM again.
Solution 2: Disable antispyware and antivirus software or remove adware or spyware from your computer and then install GTL or GBM
- Disable the following applications or types of applications, following any instructions provided by such software:
- Disable Lavasoft Ad-Watch, Ad-Aware, or similar detection software before installation.
- Disable WebRoot Spy Sweeper.
- Install GBM or GTL again.
Solution 3: Remove adware and then install GBM or GTL
Error 1935 can be caused by a certain type of adware running on the system.
- Start the Task Manager. (Alt + Ctrl + Delete)
- Look for a process named wtoolsa.exe. If this process is running, then you will need to remove this adware.
- Install GBM or GTL again.
Solution 4: Perform an installation repair of Windows
Your system might have some corruption that has gone undetected.
- Re-install or repair your Windows.
- Install GTL or GBM again.
Applies to: All GBM and GTL versions.


 Примечание. Если будет предложено подтвердить пароль администратора, введите его и нажмите Enter , чтобы продолжить.
  Примечание. Если вы используете Windows 8 или Windows 10, отключите .NET Framework 3.5 .


 Примечание. Вы также можете установить Тип запуска на Автоматически , но это будет запускать службу при каждом запуске, даже если в этом нет необходимости.
 Примечание. Помните, что в приведенной выше команде предполагается, что диск C: является томом вашей ОС.. Если вы установили Windows в другой раздел, измените букву соответствующим образом.

 Если вы не можете определить ключ для RegistrySizeLimit , вам необходимо его создать. сам. Сделайте это, щелкнув правой кнопкой мыши в любом месте правой панели и выбрав New> Dword (32-bit) . Назовите вновь созданное значение DWORD « RegistrySizeLimit », затем откройте его двойным щелчком.

 Note: If prompted to confirm via the administrator password, type it and hit Enter to continue.
 Note: If you’re on Windows 8 or Windows 10, disable .NET Framework 3.5.


 Note: You can also set the Startup Type to Automatic but this will run the service at every startup, even when it’s not needed.
 Note: Keep in mind the command above assumes that the C: drive is your OS volume. If you installed Windows on a different partition, change the letter accordingly.


 Note: If you aren’t able to identify the key for RegistrySizeLimit, you’ll need to create one yourself. Do this by right-clicking anywhere in the right-pane and selecting New > Dword (32-bit). Name the newly created DWORD value to “RegistrySizeLimit“, then open it by double-clicking.