-
#1
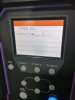
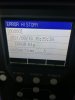
I have a problem with my ucjv300_107 mimaki printer supply ink CL 6 and overflow CL 5 I tried all the solutions that I have in my manual operation anyone have a solution for this error u can see the errors in the pics
-

WhatsApp Image 2022-01-13 at 9.28.11 AM (1).jpeg
174.7 KB · Views: 746
-
WhatsApp Image 2022-01-13 at 9.28.11 AM.jpeg
176.3 KB · Views: 377
-
#2
Check the ink supply pump.
-
#3
Check your positive and negative pressure values and adjust if needed. Then I’d run an air purge on the clear channels. The ink supply error means the machine is not detecting ink in the sub tank after trying to fill it which could be a pressure issue or even a clogged tube. The overflow error means the ink is too high in the sub tank. That could also be a pressure issue but if you run an air purge it should lower the ink level and get you back into normal spec.
-
#4
Check your positive and negative pressure values and adjust if needed. Then I’d run an air purge on the clear channels. The ink supply error means the machine is not detecting ink in the sub tank after trying to fill it which could be a pressure issue or even a clogged tube. The overflow error means the ink is too high in the sub tank. That could also be a pressure issue but if you run an air purge it should lower the ink level and get you back into normal spec.
very thankful , already checked positive and negative pressure . will try air purge .
-
#5
Check the ink supply pump.
thank you friend , i will check it again
-
Diman55
Error 61b Ink route
Вчера mimaki jfx 1631 — Error 61b Ink route выдал ошибку на Cyan.
Подскажите что делать.
Уже поставил новый картридж, сделал subtank mainteance,- все равно та же ошибка, проверил негативное давление оказалось скачет от 2,3 до 2,7 разобрал продул воздушный фильтр, давление сейчас норм 2,5-2,4. Повторил subtank mainteance не помогло выдает ту же ошибку. Что делать дальше — настроить в инженерном меню ???
-
just
Сообщение just » 04 ноя 2011 02:45
Diman55
Ink route он и есть Ink route — чернильный тракт. Принтер генерирует такую ошибку когда получает нелогичные данные из датчиков субтанка. Раз с давлением воздушным(к стати, а позитивное в норме?) все ок, то проблема с закачкой чернил в субтанк либо с работой датчиков в субтанке(например: поплавок залип). Ну а в этом руте участвуют и помпа чернильная и фильтры чернильные итд
-
Diman55
Сообщение Diman55 » 04 ноя 2011 07:50
Проблема оказалась в завоздушении одного из каналов судя по всему в картридже с чернилами был воздух в следствии чего субтанки и не наполнялся до нужного уровня, пришлось раза три делать прокачку чернил пока воздух из системы не был убран.
just спасибо за помошь !
Вернуться в «Принтеры MIMAKI»
Кто сейчас на конференции
Сейчас этот форум просматривают: нет зарегистрированных пользователей и 1 гость
-
Catalog
-
Sign In
-
Contacts
-
Forum
-
Eng
- Error Codes
- Mimaki
- JFX200-2513
- All codes
Error Codes List page 15
- Code: 51C
- Display: ERROR 51C X ORIGIN
- Description: X-origin error (Origin of X-axis can not be detected)
- Remedy: 1. Execute and confirm [#TEST SENSOR TEST]-> [X-ORG]. (ON/OFF is switchable by moving the Y-bar back and forth.) 2. Check the connector connection of X-origin sensor. 3. Replace the X-origin sensor with a new one. 4. Check the assembly and connector connection of Xaxis motor. 5. Replace the X-axis motor with a new one. 6. Replace the FWC PCB with a new one. 7. Replace the main PCB with a new one.
- Code: 51d
- Display: ERROR 51d DETECTION ERROR
- Description: Cap pin unit is in malfunction. Or, Media is too thick.
- Remedy:
- Code: 617
- Display: ERROR 617 SUBTANK SENSOR:12345678
- Description: An error of the liquid level detection sensor of the sub-tank has been detected.
- Remedy: 1. Check the connection of the liquid level detection sensor. 2. From [#TEST SENSOR] -> [SUBTANK], check the detection status of the liquid level detection sensor. 3. Replace the liquid level detection sensor. *An error may occur if you bring magnetized items such as the tip of the driver close to the float sensor.
- Code: 618
- Display: ERROR 618 TANKlevelH:12345678
- Description: Even though a certain amount of ink has been consumed, there is no change in the liquid level detection sensor “High”.
- Remedy: 1. Check the nozzle status. (If nozzle clogging is terrible, consumption difference may be generated.) 2. From [#TEST SENSOR] -> [SUBTANK], check the detection status of the liquid level detection sensor. (Also, visually check the float position in the subtank.) If there is an error, replace the liquid level detection sensor. 3. Perform [MAINTENANCE SUB TANK]. 4. Replace the sub-tank.
- Code: 619
- Display: ERROR 619 TANKlevelL:12345678
- Description: Even though a certain amount of ink has been consumed, there is no change in the liquid level detection sensor “Low”.
- Remedy: 1. Check the nozzle status. (If nozzle clogging is terrible, consumption difference may be generated.) 2. From [#TEST SENSOR] -> [SUBTANK], check the detection status of the liquid level detection sensor. (Also, visually check the float position in the subtank.) If there is an error, replace the liquid level detection sensor. 3. Perform [MAINTENANCE SUB TANK]. 4. Replace the sub-tank.
- Code: 61a
- Display: ERROR 61a INK OVER FLOW:12345678
- Description: Overflow from the sub-tank has been detected.
- Remedy: 1. Check that ink did not flow into the air pressure path. If ink flowed into, filter replacement and path cleaning are required. 2. Perform [MAINTENANCE SUB TANK]. Check that it has been discharged to the middle status. 3.With [#TEST SENSOR], check the detection status of the target sensor. 4. Replace the liquid level detection sensor. 5. Replace the sub-tank. 6. Check that the bottle valve is not open. (Because ink flows into the sub-tank due to head difference.)
- Dealing with Problems
- Problems Indicated by Messages
- Error Messages
 Problems Indicated by Messages
Check the error details in the following table corresponding to the error numbers displayed:
If the problem persists even after carrying out the corrective action corresponding to the error number, contact your local distributor, our sales office, or service center. .
|
Error number/Message |
Cause |
Corrective action |
|---|---|---|
|
401 MOTOR X |
|
Check the following points:
|
|
402 MOTOR Y |
|
|
|
403 X Current |
|
|
|
404 Y Current |
|
|
|
41b ** NO MEDIA ** |
|
|
|
50a Y ORIGIN |
|
|
|
50b FRONT EDGE |
|
|
|
50c WIDTH |
|
|
|
520 REAR EDGE |
|
|
|
901 OPERATION |
|
|
|
902 DAT REMAIN |
|
|
|
C02 MAIN RAM |
|
|
|
C04 EEPROM |
|
|
|
C06 BUFFER |
|
|
|
C08 POWER |
|
|
|
C10 Commands |
|
Check the following points:
|
|
C11 PARAMETER |
|
|
|
C12 DEVICE |
|
|
|
C13 PM OVER |
|
|
|
C15 AUTO FEED |
|
|
|
|
|
|
C16 AUTO I/F |
|
|
|
C20 I/O |
|
|
|
C27 BUFFERover |
|
|
|
C31 NO DATA |
|
|
|
C32 DATAtooBIG |
|
|
|
C33 SHEET SIZE |
|
|
|
C36 MARK DETECT |
|
Check the following points:
|
|
C37 MARK ORG |
|
|
|
C38 MARK SCALE |
|
|
|
|
|
|
|
|
|
|
|
|
|
|
|
|
|
|
C39 MARK ID |
|
Check the following points:
|
|
C51 PINCH POS* |
|
|
|
C60 PenEncoder |
|
|
|
C61 Pen Stroke |
|
Check the following points:
|
Проблемы, при которых на дисплее появляются сообщения об ошибке
Если в работе устройства возникают проблемы, то раздается звуковой сигнал, и на дисплее появляется соответствующее сообщение об ошибке.
Выполните необходимые корректирующие действия в соответствии с сообщением на дисплее.
Ошибки, сопровождающиеся предупредительными сигналами
Эти ошибки обычно имеют отношение к элементам устройства, которые связаны с чернилами.


Сообщения об ошибках
В сообщениях об ошибках указан номер ошибки. Если на дисплее появилось какое-либо сообщение об ошибке, отключите питание устройства и затем через некоторое время включите его снова. Если на дисплее вновь появится такое же сообщение, свяжитесь с местным дистрибьютором MIMAKI или обратитесь за помощью непосредственно в сервисную службу компании MIMAKI.
Сообщение об ошибке
Отключите на некоторое время питание устройство, затем включите его снова. При появлении на дисплее того же сообщения, обратитесь к местному дистрибьютору за сервисной помощью.


Приложение
В приложении описаны спецификации и детали устройства, а также структура меню функций.
Содержание
Приложение
ОСНОВНЫЕ спецификации
СПЕЦИФИКАЦИИ ЧЕРНИЛ
РАЗМЕЩЕНИЕ предупредительных НАДПИСЕЙ
Структура меню функций……………………………………………………..
ОСНОВНЫЕ спецификации |
| Наименование | JV3-160SP | |
| Печатающая головка | Метод | Пьезоэлектрическая печатающая головка «c каплей по запросу» |
| Спецификация | 4 линейные головки | |
| Дозатор | 360 дозаторов для каждого цвета | |
| Разрешение | 360, 540, 720, 1440 точек на дюйм (т/д) | |
| Режим печати | Набор из 4-х цветов | 360 x 360 т/д: 1 / 2 / 4 проходов, в одном/ двух направлениях |
| 360 x 720 т/д: 2 / 4 / 8 проходов, в одном/ двух направлениях | ||
| 720 x 720 т/д: 2 / 4 / 8 проходов, в одном/ двух направлениях | ||
| 720 x 1440 т/д: 4 / 8 / 16 проходов, в одном/ двух направлениях | ||
| 1440 x 1440 т/д: 8 / 16 проходов, в одном/ двух направлениях | ||
| Набор из 6-х цветов | 360 x 360 т/д: 2 / 4 / 8 проходов, в одном/ двух направлениях | |
| 360 x 540 т/д: 3 / 6 / 12 проходов, в одном/ двух направлениях | ||
| 360 x 720 т/д: 4 / 8 / 16 проходов, в одном/ двух направлениях | ||
| 720 x 720 т/д: 4 / 8 / 16 проходов, в одном/ двух направлениях | ||
| 720 x 1440 т/д: 8 / 16 / 32 проходов, в одном/ двух направлениях | ||
| 1440 x 1440 т/д: 16 / 32 проходов, в одном/ двух направлениях | ||
| Используемые чернила | Набор из 4-х цветов | 4 цвета (черный, циан, маджента, желтый) по два цвета на 1 картридж для каждого цвета |
| Набор из 6-х цветов | 6 цветов сольвентных чернил (черный, циан, маджента, желтый, светлый циан, светлая маджента), по одному каждого цвета, и 2 картриджа очистительной жидкости для 1 картриджа каждого цвета | |
| Емкость чернильного картриджа | 4-цветный набор: каждый цвет (220 cc 5 cc для каждого картриджа) x 2
6-цветный набор: каждый цвет (220 cc 5 cc для каждого картриджа) x 1 Около 200 cc для каждого картриджа, изменяемая |
|
| Тип материала для печати | Баннер, FF, ПВХ | |
| Макс. ширина печати | 1440 x 1440 т/д: 1610 мм (для 4 цветов), 1000 мм (для 6 цветов) | |
| При нормальном сканировании | 1610 мм | |
| Высокоскоростное сканирование | 1570 мм | |
| Размеры рулонного материала | (макс.) | 1620 мм |
| (мин.) | 210 мм | |
| толщина | 1.0 мм или менее (< 1, 0 мм) | |
| внешний диаметр рулона | 180 мм или менее (< 180 мм) | |
| вес рулона | 25 Кг или менее (<25 кг) | |
| внутренний диаметр рулона | 2 дюйма, 3 дюйма | |
| поверхность печати | Лицом наружу | |
| крепление конца рулона | используется легкая клеящаяся лента для облегчения снятия бумаги с сердечника | |
| Размеры листового материала | (макс.) | 1620 мм |
| (мин.) | 210 мм | |
| Поля | листовой материал | правый и левый край: 15 мм |
| спереди: 65 мм | ||
| сзади: 110 мм | ||
| Поля | рулонный материал | правый и левый край: 15 мм |
| спереди: 25 мм | ||
| сзади: 0 мм | ||
| Точность размера | абсолютная точка | Любая наибольшая из 0.3 мм или 0.3 % от назначенной |
| воспроизводимость | Любая наибольшая из of 0.2 мм или 0.1 % от назначенной | |
| Перпендикулярный | 0.5 мм / 1000 мм | |
| Отклонение материала | 5 мм или меньше / 10 м изменяемая (< 5 мм / 10 м) | |
| Регулировка высоты головки | 2.0 мм / 3 мм изменяемая, от поверхности рабочего печатного стола | |
| Обрезка материала | Обрезка по оси Y при помощи резака на блоке головок,
точность отрезания (шаги): 0.5 мм или менее. |
|
| Подача материала | Стандартное подающее устройство (закрутка внутрь / наружу, на выбор) | |
| Емкость для отхода чернил | Бутылочный тип (2,000 cc [1pcs.])
Необходимость замены определяется визуально. |
|
| Интерфейс | Совместим с IEEE1394 и с IEEE1284. | |
| Команда | MRL-II (база ESC/PV.2, MIMAKI) | |
| Рабочий шум | в режиме ожидания: менее 58 dB (FAST-A, измерено на расстоянии 1 м со всех сторон)
при непрерывной печати: менее 65 dB при прерывании печати: менее 70 dB |
|
| Стандарт безопасности | UL, VCCI-classA, FCC-classA, CEmarking, CBreport | |
| Питание | AC 100 — 120 V± 10%, AC 220 — 240 V± 10%, 50/60 Hz ± 1 Hz | |
| Поглощение энергии | 1.5 KVA
или менее |
|
| рекомендованные условия окружающей среды | допустимая температура | От 20º С до 35º C |
| влажность | 35 to 65 % относительной влажности (без конденсации) | |
| гарантированная температура | От 20º С до 25º C | |
| колебания температуры | ± 10 º C / в час или менее | |
| пыль | Условия обычного офисного уровня | |
| Вес | основной блок | 185 кг (без переднего вытяжного блока: 175 кг или менее) |
| габариты | ширина | 2660 мм |
| глубина | Менее 750 мм | |
| высота | Менее 1240 мм |
СПЕЦИФИКАЦИИ ЧЕРНИЛ |
| Наименование | Спецификация |
| Цвет | Картридж с чернилами черного цвета |
| Картридж с чернилами цвета циан | |
| Картридж с чернилами цвета маджента | |
| Картридж с чернилами желтого цвета | |
| Картридж с чернилами цвета светлый циан | |
| Картридж с чернилами цвета светлая маджента | |
| емкость картриджа с чернилами | 220 cc для каждого картриджа |
| срок хранения | Один год с даты производства (при комнатной температуре) |
| В течение 3 месяцев после открытия упаковки | |
| t хранения | -30 to 40º C
(Хранение при t = 40ºC не более месяца) -30 to 60ºC (Хранение при t = 60ºC не более 120 часов, а при t = 40ºC — не более одного месяца) |

РАЗМЕЩЕНИЕ предупредительныХ НАДПИСЕЙ |
На устройстве приклеены этикетки с предупредительными надписями. Убедитесь в том, что Вы правильно понимаете все, что на них написано. Если хотя бы одна из надписей загрязнится до такой степени, что понять написанное будет невозможно, или если надпись отклеится, приобретите новую у своего местного дистрибьютора или в офисе MIMAKI.
Лицевая сторона
З
адняя сторона
Структура меню функций |


© MIMAKI ENGINEERING Co., Ltd. 2004