Содержание
- Как исправить ошибку «java.io.ioexception» в Minecraft?
- Простые решения
- Варианты запуска
- Отключение межсетевого экрана
- Установка разрешений в брандмауэре Windows
- Уменьшение глубины прорисовки
- Как исправить внутреннее исключение Minecraft: java.net.SocketException: ошибка сброса подключения
- Что такое внутреннее исключение: java.net.SocketException: ошибка сброса соединения в Minecraft?
- Как исправить внутреннее исключение Minecraft: java.net.SocketException: ошибка сброса подключения?
- Исправление 1. Настройте параметры графики
- Исправление 2. Смените DNS-сервер
- Исправление 3. Обновите учетные данные IP/DNS
- Решение 4. Попробуйте использовать VPN
- Решение 5: проверьте подключение к Интернету
- Исправление 6: переустановите Minecraft
- Как исправить внутреннее исключение Java.IO.IOException в Minecraft?
- Решение 1. Обновите программу запуска Minecraft до последней сборки.
- Решение 2. Очистите кеш DNS вашей системы
- Решение 3. Отключите пакет ресурсов сервера
- Решение 4. Удалите конфликтующие приложения.
- Решение 5.Уменьшите расстояние отрисовки в настройках Minecraft
- Решение 6. Измените настройки Java.
- Обновите Java до последней сборки
- Включить собственную песочницу
- Отредактируйте путь к Java в настройках программы запуска
- Решение 7. Ремонт / переустановка Minecraft
- Решение 8. Измените параметры, связанные с сетью
- Попробуйте другую сеть или VPN
- Отключите ускорение NAT в настройках роутера.
- Решение 9. Отредактируйте настройки брандмауэра
- Установите Java (TM) Platform SE на Private в настройках брандмауэра
- Разрешить Minecraft через брандмауэр
Как исправить ошибку «java.io.ioexception» в Minecraft?
При запуске игр мы часто сталкиваемся с различными ошибками и сбоями, которые заставляют переключить нашу вовлеченность с игрового мира в процесс поиска способов их решения. Более того, некоторые из них не просто решить. В частности, к таким ошибкам при запуске Minecraft относится и « internal exception java.io.ioexception», которая препятствует подключению ПК к внешнему серверу игры.
Простые решения
В общем она может появиться по ряду причин и некоторые из них можно исправить простыми способами. Поэтому прежде чем перейти к более продвинутым решениям выполните следующие шаги.
Во-первых, попробуйте исправить ошибку Java.Io.Ioexception обычным перезапуском Minecraft. В противном случае перезапустите компьютер и роутер. Также нужно проверить состояние внешнего сервера Minecraft. Если эти методы не сработали, перейдите к следующим шагам.
Варианты запуска
Ошибка внутреннего исключения «internal exception java.io.ioexception удаленный хост принудительно разорвал существующее подключение» в основном происходит из-за проблем с Java. Даже если игра работает, сбой может произойти из-за проблем этой среды выполнения. Иногда программа запуска использует старую версию java, хотя в системе установлен последний ее выпуск.
В этом случае нужно заставить загрузчик Minecraft использовать последнюю версию программной среды. Для этого нужно перейти в параметры запуска и в профиле переключить путь с устаревшей версии на новую.
Отключение межсетевого экрана
Межсетевые экраны, включая брандмауэр Windows, могут сбросить подключение с внешним сервером Minecraft на этапе запуска игры. Чтобы узнать, не причастен ли он к этому событию, попробуйте отключить эту функцию безопасности.
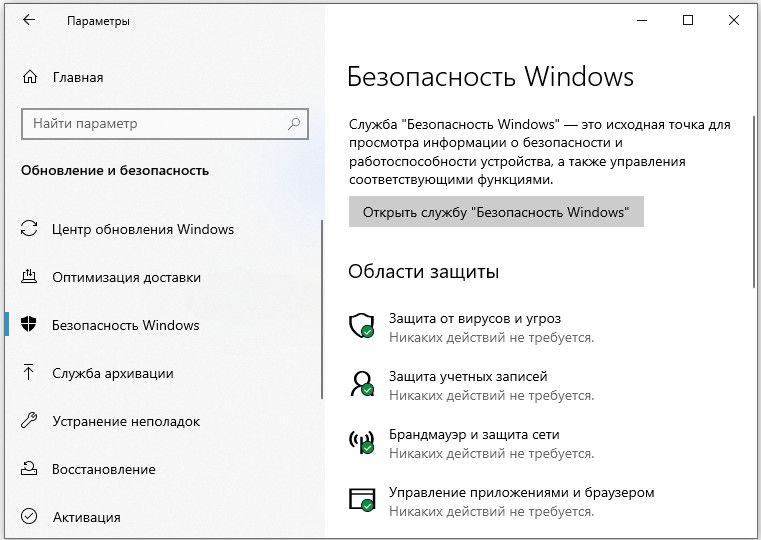
Откройте параметры Windows нажатием на Win + I и перейдите в раздел Обновление и безопасность. На вкладке Безопасность Windows выберите раздел Брандмауэр и защита сети.
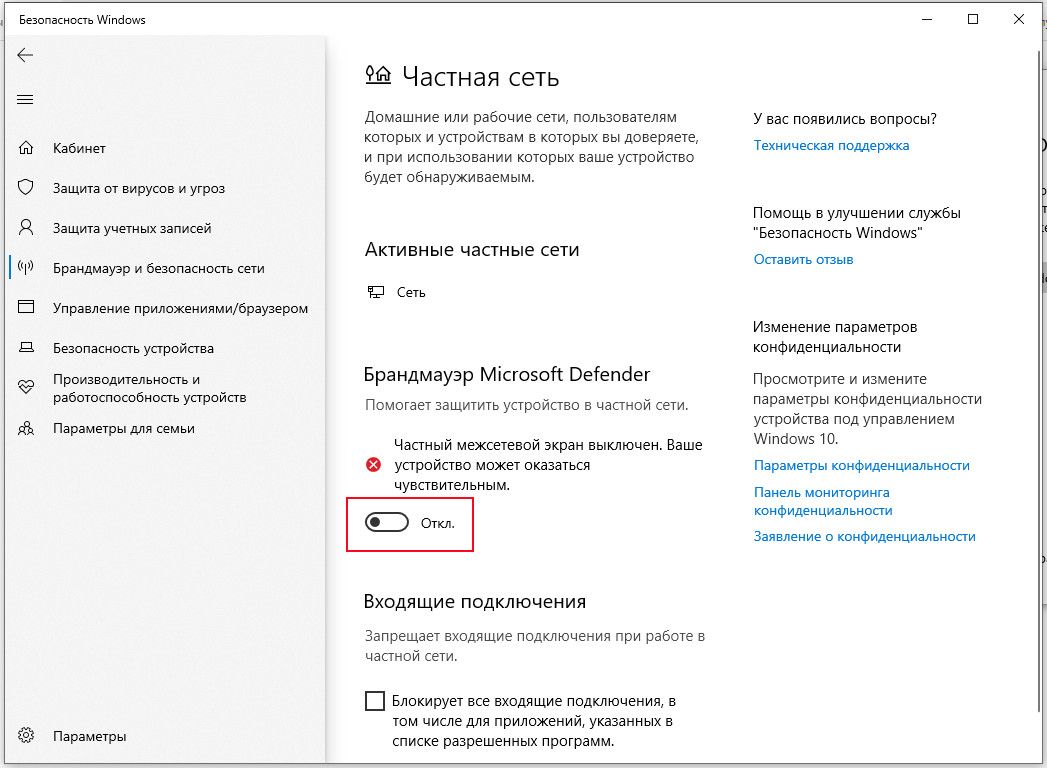
Для активной частной сети переместите переключатель в положение «Отключено». После этого попробуйте запустить игру.
Установка разрешений в брандмауэре Windows
Если продолжаете сталкиваться с ошибкой внутреннего исключения java.io.ioexception, попробуйте добавить среду в список разрешений брандмауэра.
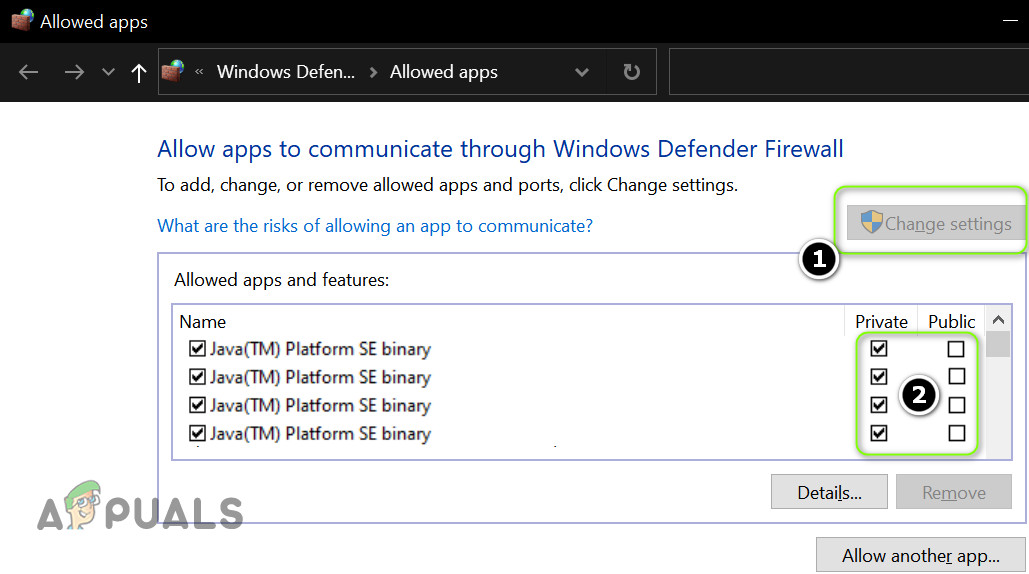
С помощью поискового запроса перейдите в брандмауэр. На панели слева перейдите на вкладку «Разрешение взаимодействия с приложением или компонентом в брандмауэре Windows». Затем щелкните на кнопку изменения параметров.

Найдите в списке файлы Java Platform SE и разрешите им доступ по частной сети.

После перезагрузки компьютера проблема должна быть решена.
Уменьшение глубины прорисовки
С ошибкой внутреннего исключения можно столкнуться, когда Minecraft не сможет отобразить всю картинку в целом из-за низкой скорости Интернета. В этом случае уменьшите глубину прорисовки в настройках до минимально допустимого.
В настройках Майнкрафт в разделе «Настройки графики» переместите ползунок прорисовки до минимального, например, до 2-х позиций.
Если ошибка исчезла, увеличьте этот показатель на единицу, пока не достигните оптимального значения.
Источник
Как исправить внутреннее исключение Minecraft: java.net.SocketException: ошибка сброса подключения
Minecraft — самая любимая игра-песочница в мире. Однако надоедливая ошибка Internal Exception: java.net.SocketException: Connection Reset портит игровой процесс за считанные секунды. Тем не менее, есть несколько способов исправить эту ошибку в Minecraft. Продолжайте читать это руководство, и вы в конечном итоге поймете, почему появляется эта ошибка и как ее можно исправить.
Что такое внутреннее исключение: java.net.SocketException: ошибка сброса соединения в Minecraft?
Как следует из названия ошибки, ошибка связана с обработкой Java и выполнением сервера. Это означает, что Java не удалось выполнить задачу, которая привела к сбою игры или вытеснению вас из игры.
Эта ошибка появляется только в Java-версии Minecraft и особенно в версии 1.7 или старше. Далее при появлении ошибки игрок блокируется от игры. Это внутреннее исключение: java.net.SocketException: ошибка сброса подключения также влияет на Minecraft Realms и многопользовательские серверы. Что ж, с учетом сказанного, давайте посмотрим, как вы можете решить эту надоедливую проблему.
Как исправить внутреннее исключение Minecraft: java.net.SocketException: ошибка сброса подключения?
Здесь мы обсудили множество способов исправить внутреннюю ошибку исключения Minecraft. Мы рекомендуем следить за каждым исправлением, так как одно или другое поможет. Пожалуйста, не пропускайте никакие исправления, потому что одно может быть связано с другим. Кроме того, поскольку вы читаете это руководство на , его будет довольно легко понять.
Исправление 1. Настройте параметры графики
Первое, что вам нужно попробовать при устранении ошибки сброса подключения, — это настроить параметры графики в Minecraft. Хотя может показаться, что ошибка вызвана сервером, но основной проблемой может быть проблема с рендерингом. Если вы не знаете, выполните следующие простые шаги.
- Запустите Minecraft и присоединитесь к карте для одиночной игры.
- Когда игра начнется, приостановите игру. нажав Esc и выбрав Параметры.
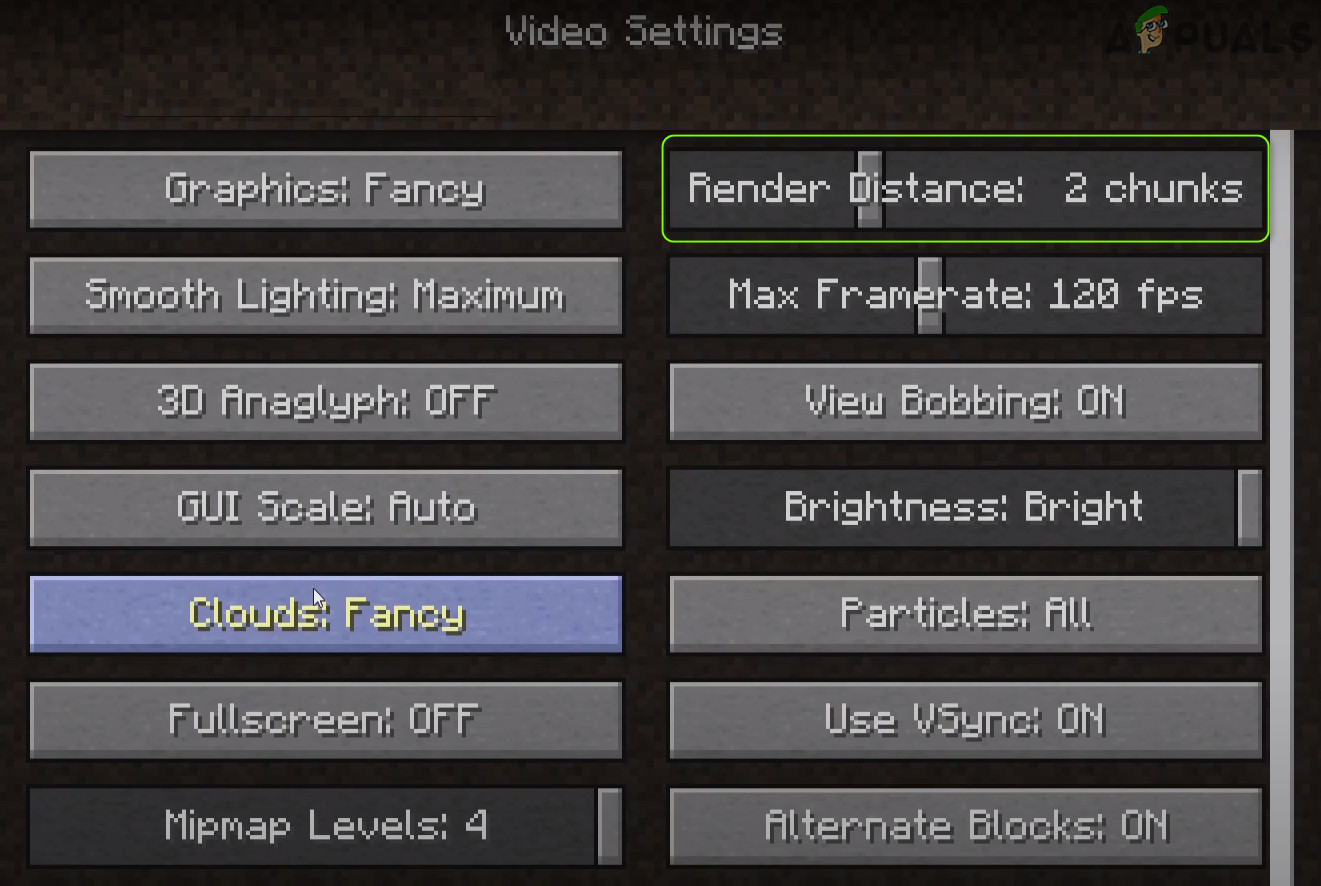
- Затем перейдите в раздел ВидеоНастройки и включите параметр РендерингРасстояние. Обязательно уменьшите его значение ниже 8.
- После этого установите для параметра Графика значение Быстро.
- Затем уменьшите или выключите параметр Плавное освещение Уровень.
- Когда вы закончите все делать, нажмите ГОТОВО
Теперь начните играть и посмотрите, закрывается ли игра с тем же кодом ошибки. Если да, выполните следующее исправление.
Исправление 2. Смените DNS-сервер
Поскольку мы уже упоминали, DNS-сервер виноват во внутреннем исключении: java.net.SocketException: Ошибка сброса соединения, всегда можно немного подправить ее. Выполните следующие простые действия, чтобы изменить DNS-сервер:
- Нажмите Windows + R и введите ncpa.cpl в диалоговом окне «Выполнить». и нажмите Enter.
- Теперь щелкните правой кнопкой мыши на Текущая сеть и перейдите в раздел Свойства.
- Далее дважды щелкните Протокол Интернета версии 4 (TCP/IPv4).
- В следующем нажмите «Использовать следующий адрес DNS-сервера» и введите 1.1.1.1 в качестве предпочтительного DNS-сервера и 1.0.0.1 в качестве альтернативного DNS-сервера.

Когда ваш компьютер загрузится, запустите Minecraft и проверьте, появляется ли ошибка. Если да, выполните следующее исправление.
Исправление 3. Обновите учетные данные IP/DNS
Ну, надоедливое внутреннее исключение: java.net.SocketException: ошибка сброса подключения, похоже, возникает после обновления IP-адреса. /DNS-учетные данные. Сброс IP-адреса — отличный способ, если вы уже выполнили указанное выше исправление. Выполните следующие простые действия, чтобы обновить и очистить DNS.
- Нажмите Windows + R и введите cmd в диалоговом окне Выполнить.
- Теперь нажмите Ctrl + Shift + Enter вместе. Это откроет командную строку в режиме администратора.
- Теперь в окне командной строки введите следующие команды одну за другой и продолжайте нажимать клавишу ввода после каждой команды.
- После выполнения всех команд выключите компьютер, подождите 1-2 минуты и перезагрузите компьютер.
Теперь начните играть в Minecraft и проверьте, не появляется ли ошибка Internal Exception: java.net.SocketException: Connection Reset error. . Если да, выполните следующее исправление. Если нет, все готово.
Решение 4. Попробуйте использовать VPN
Используя одну из лучших доступных VPN, вы можете исправить ошибку сброса соединения в Minecraft. VPN подключит вас к другому серверу, и все готово. Но убедитесь, что бесплатные VPN могут вызвать много лагов и множество новых кодов ошибок в Minecraft. Поэтому обязательно используйте платный VPN или выберите из нашего списка.
Решение 5: проверьте подключение к Интернету
Возможно, основная проблема связана с вашим интернет-соединением, и вы пытаетесь решить проблему, даже не замечая этого. Не волнуйтесь, вы не одиноки. Обычно мы упускаем из виду скорость интернет-соединения и начинаем устранять неполадки со всеми остальными вариантами. Обязательно проверьте способы увеличения скорости интернета, если вы чувствуете, что ваш интернет медленный. Наконец, если вы убедились, что с вашим Интернетом все в порядке, выполните следующее исправление.
Исправление 6: переустановите Minecraft
Если ни одно из вышеперечисленных исправлений не помогло устранить внутреннее исключение: java.net .SocketException: ошибка сброса подключения, последний вариант — удалить Minecraft, а затем переустановить его. Однако удаление традиционным способом — это не то, что вам нужно делать. Но используйте другой подход.
Прежде всего, загрузитесь в безопасном режиме, а затем удалите игру. После этого продолжите переустановку, следуя инструкциям на экране. Как только вы закончите установку, начните играть в Minecraft, и вы увидите, что надоедливая ошибка сброса соединения исчезла.
Источник
Как исправить внутреннее исключение Java.IO.IOException в Minecraft?
Средство запуска Minecraft может отображать проблему «Internal Exception Java.IO.IOException», если установка Minecraft повреждена или устарела. Более того, поврежденный кеш DNS системы или неправильная конфигурация Java также могут вызвать проблему.
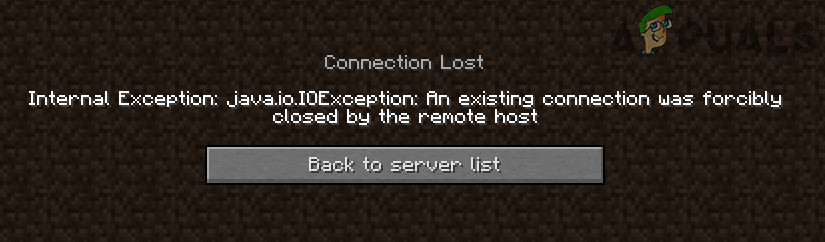
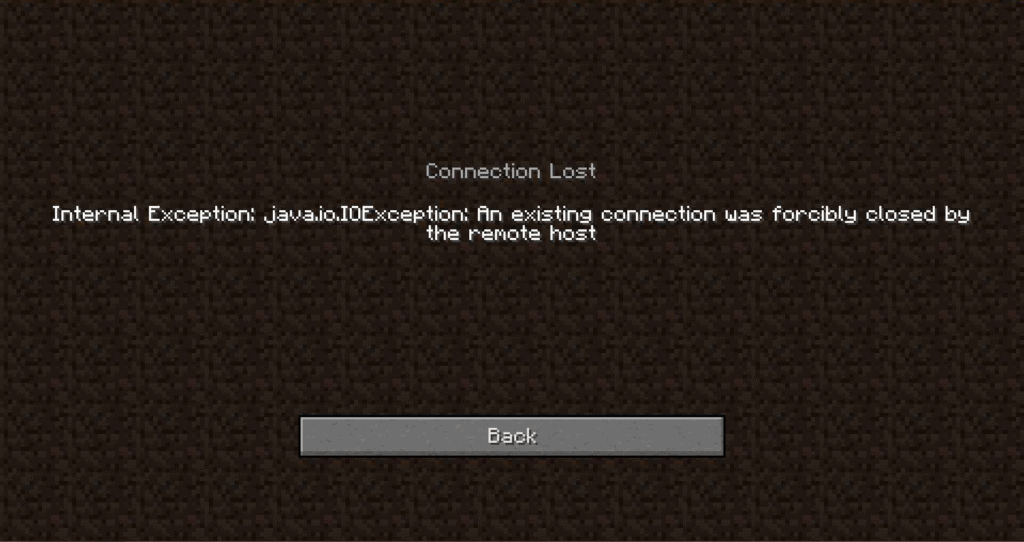
Проблема возникает, когда пользователь пытается присоединиться к серверу или подключиться к нему, но встречает следующее сообщение:
«Внутреннее исключение при потере соединения: java.io.IOException: существующее соединение было принудительно закрыто удаленным узлом»
Программы для Windows, мобильные приложения, игры — ВСЁ БЕСПЛАТНО, в нашем закрытом телеграмм канале — Подписывайтесь:)
Прежде чем приступить к решениям по остановке внутренних исключений в Java IO IOException, проверьте, решает ли проблему попытка использования другого сетевого кабеля (при использовании соединения Ethernet).
Если у вас длинное имя пользователя (7+ символов), проверьте, решает ли проблему сокращение его до (7 или меньше символов). Также проверьте, соответствует ли скорость вашего интернета требованиям Minecraft к минимальной скорости.
Кроме того, убедитесь, что выйти из / отключить в Minechat (если используется) , а затем закройте его. Кроме того, проверьте, решает ли проблему запуск программы запуска Minecraft (или сервера) от имени администратора.
Решение 1. Обновите программу запуска Minecraft до последней сборки.
Вы можете столкнуться с проблемой внутреннего исключения, если программа запуска Minecraft в вашей системе устарела, поскольку это может создать несовместимость между программой запуска и сервером.
В этом контексте обновление средства запуска Minecraft до последней версии может решить проблему. Но прежде чем двигаться дальше, проверьте, настроено ли у вас более одной учетной записи с пусковой установкой Minecraft, если да, то удалите все остальные учетные записи, кроме одной.
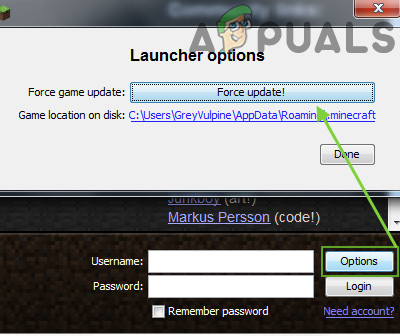
- Откройте панель запуска Minecraft и рядом с именем пользователя нажмите Параметры.
- Затем нажмите кнопку «Принудительное обновление» и примените обновление средства запуска.

- После обновления перезапустите средство запуска Minecraft и проверьте, не возникла ли в нем ошибка IOexception.
- Если нет, проверьте, решает ли проблему использование другого средства запуска.
Решение 2. Очистите кеш DNS вашей системы
Ошибка Java.io может возникнуть, если кеш DNS вашей системы поврежден, поскольку это может привести к тому, что система не сможет разрешить доменное имя. В этом контексте очистка кеша DNS (что заставит систему повторно выбирать комбинации) может решить проблему.
- Кликните Windows, введите: Командная строка и кликните правой кнопкой мыши результат командной строки. Затем выберите «Запуск от имени администратора».
- Теперь выполните следующее одно за другим:
- Затем выйдите из командной строки и проверьте, решена ли проблема исключения Java.


Если проблема не исчезнет, проверьте, решает ли изменение DNS-сервера (например, Google DNS ) проблему внутреннего исключения.
Решение 3. Отключите пакет ресурсов сервера
Пакеты ресурсов позволяют игрокам выполнять множество настроек (например, текстуры, музыку, модели, тесты на всплески и т. д.), Но эта настройка может препятствовать обмену данными между клиентом и сервером и, таким образом, вызвать проблему исключения ввода-вывода. В этом сценарии отключение пакета ресурсов сервера может решить проблему.
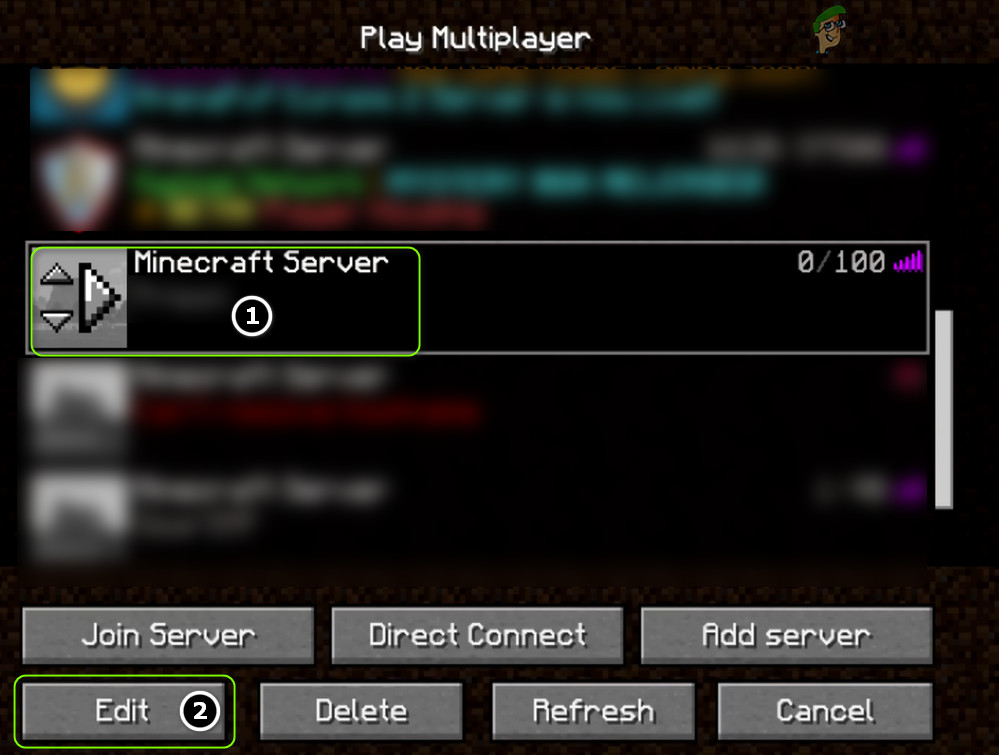
- Откройте программу запуска Minecraft и выберите «Многопользовательская игра».
- Затем выберите проблемный сервер и нажмите «Изменить».
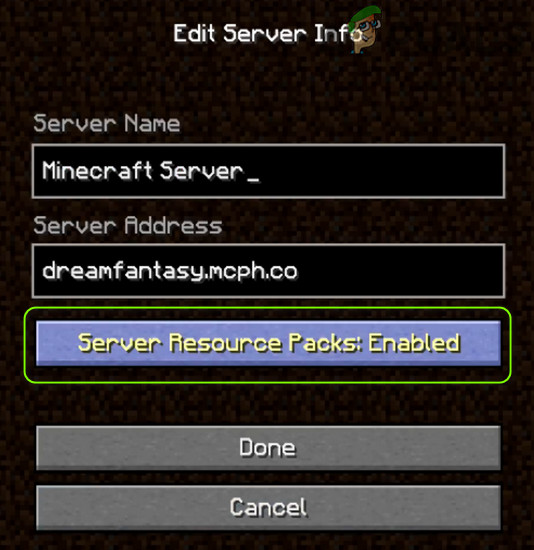
- Теперь нажмите Server Resource Packs, чтобы установить его в Disabled (если он включен), и нажмите Done.
- Затем проверьте, очищена ли программа запуска от проблемы Java.io.
Решение 4. Удалите конфликтующие приложения.
Вы можете столкнуться с проблемой Java.io, если приложение в вашей системе препятствует работе Minecraft. В этом случае удаление конфликтующего приложения может решить проблему.
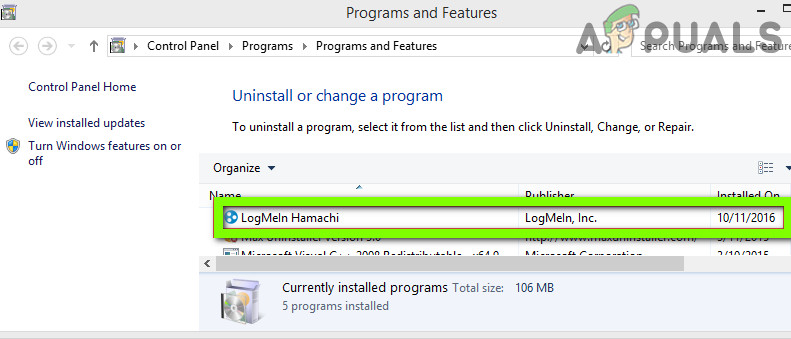
Вы можете выполнить чистую загрузку своего ПК, чтобы определить проблемное приложение. Для иллюстрации мы обсудим процесс для Hamachi VPN (по сообщениям пользователей, вызывающий проблему).
- Кликните правой кнопкой мыши Windows и откройте «Приложения и компоненты».
- Теперь нажмите LogMeIn Hamachi, чтобы развернуть его, а затем нажмите Удалить.
- Затем следуйте инструкциям по удалению Hamachi и перезагрузите компьютер.
- После перезагрузки проверьте, решена ли проблема IOexception.
Решение 5.Уменьшите расстояние отрисовки в настройках Minecraft
Проблема с внутренним исключением может возникнуть, если Minecraft не может отобразить все видеоблоки сразу (из-за низкой скорости интернета). В этом контексте уменьшение расстояния рендеринга в настройках Minecraft до минимально возможного может решить проблему.
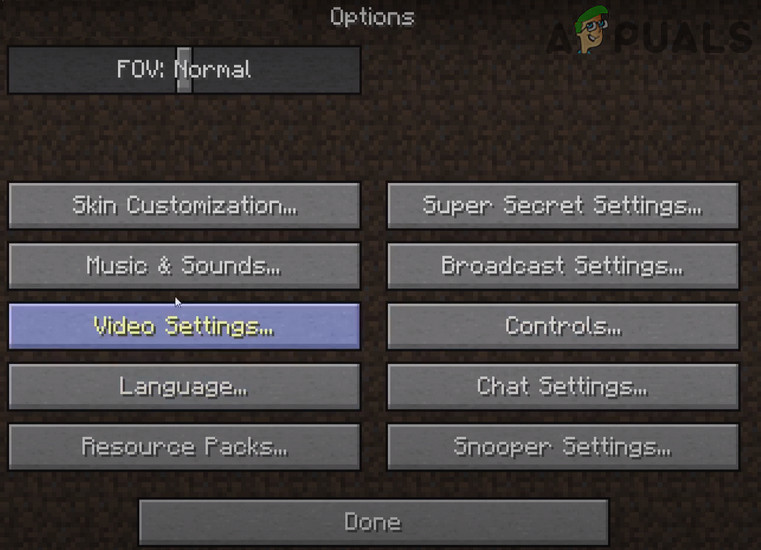
- Откройте Minecraft Launcher и откройте его Параметры (также будет хорошей идеей уменьшить Расстояние рендеринга в настройках сервера, если это возможно).
- Теперь выберите «Настройки видео» и сдвиньте расстояние рендеринга до минимально возможного (например, до 2).
- Затем проверьте, решена ли проблема с Java.io. Если да, то вы можете увеличить расстояние рендеринга на единицу, пока не достигнете желаемого расстояния рендеринга.

Решение 6. Измените настройки Java.
Ошибка Java.io может возникнуть, если установка Java в вашей системе настроена неправильно. В этом контексте изменение настроек Java (например, включение собственной песочницы) может решить проблему. Но прежде чем продолжить, убедитесь, что у вас только одна установка Java.
Обновите Java до последней сборки
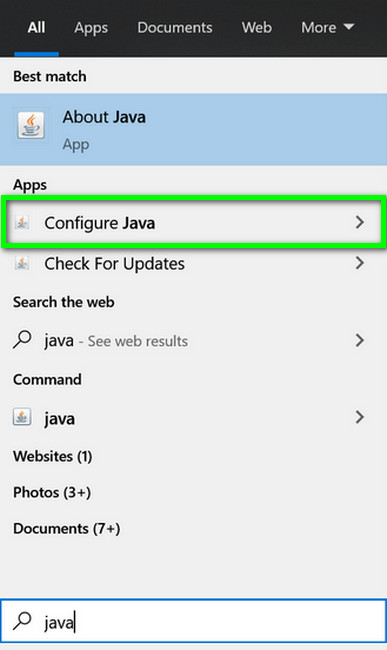
- Кликните Windows, введите: Configure Java и затем откройте его.
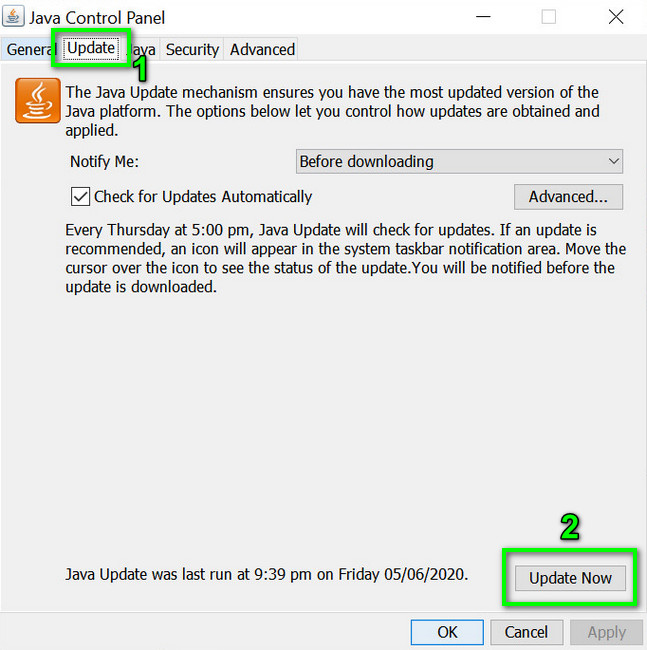
- Теперь перейдите на вкладку «Обновить» и нажмите кнопку «Обновить сейчас».
- Если доступно обновление, примените обновление Java и проверьте, решена ли проблема с внутренним исключением.
Включить собственную песочницу
- Кликните Windows, введите: Configure Java & open it.
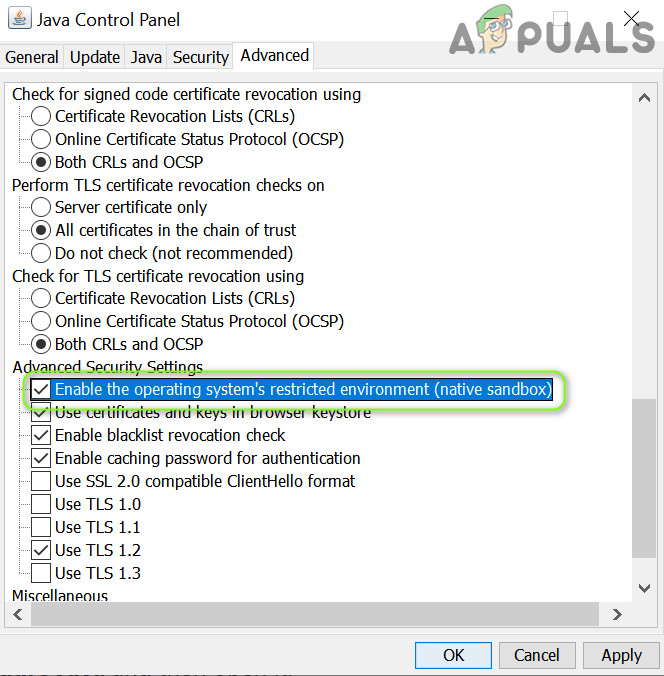
- Теперь перейдите на вкладку «Дополнительно» и установите флажок «Включить ограниченную среду операционной системы (собственная песочница)».
- Затем примените изменения и перезагрузите компьютер.
- После перезагрузки проверьте, решена ли проблема Minecraft IOexception.
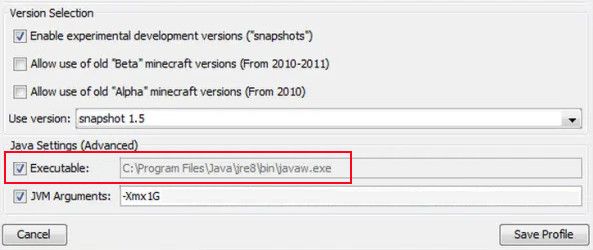
Отредактируйте путь к Java в настройках программы запуска
- Кликните правой кнопкой мыши Windows и откройте «Выполнить».
- Теперь перейдите по следующему пути:
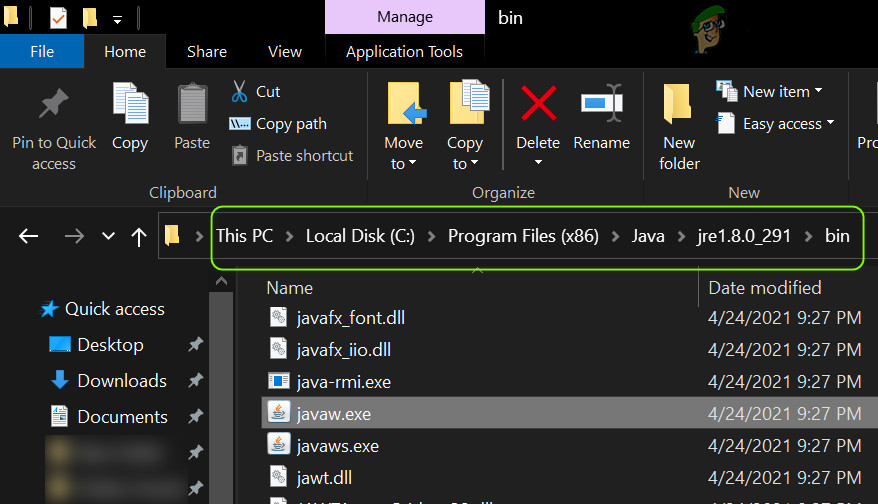
- Затем откройте папку Java и перейдите к последней версии установки Java (например, папке jre1.8.0_291).
- Теперь откройте папку Bin и скопируйте адрес из адресной строки.
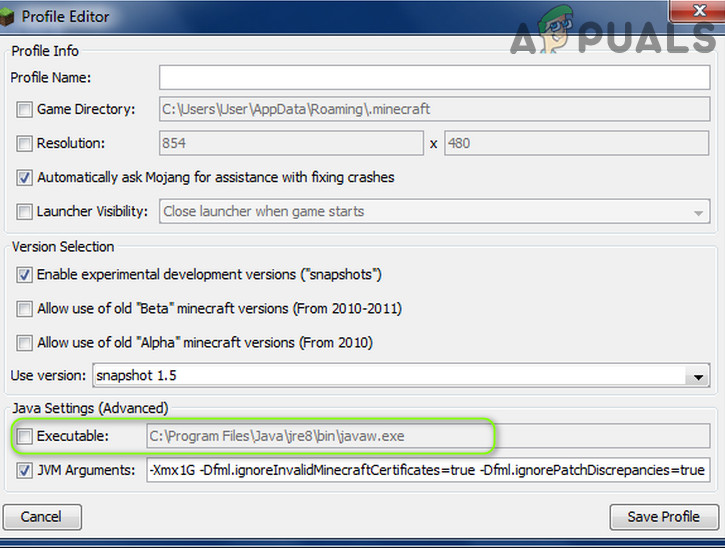
- Затем откройте программу запуска Minecraft и выберите «Редактировать профиль».
- Теперь в разделе «Настройки Java» («Дополнительно») установите флажок «Исполняемый файл».
- Затем вставьте адрес (скопированный на шаге 4) в Bin, так что путь должен быть примерно таким:
- Теперь примените свои изменения и проверьте, решена ли проблема с внутренним исключением.

Если проблема не исчезнет, проверьте , решает ли переустановка Java проблему исключения ввода-вывода.
Решение 7. Ремонт / переустановка Minecraft
Проблема с Java.io может возникнуть, если установка Minecraft повреждена. В этом контексте его ремонт или переустановка могут решить проблему.
- Кликните Windows, введите: Панель управления и запустите.
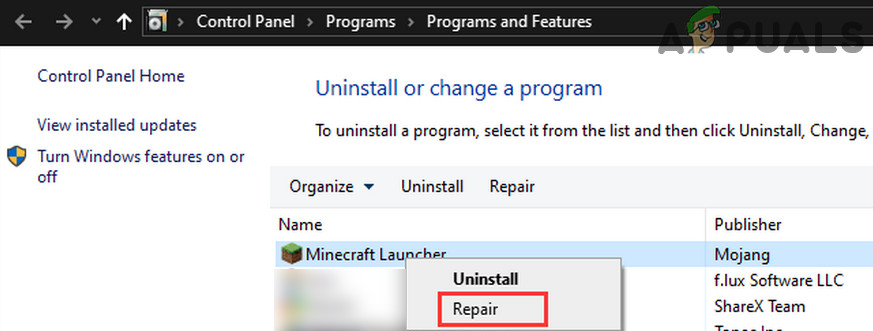
- Теперь откройте Удаление программы и выберите Minecraft.
- Затем нажмите «Восстановить» и следуйте инструкциям по ремонту Minecraft.
- Теперь перезагрузите компьютер и проверьте, решена ли проблема IOexception.
- Если нет, удалите Minecraft и Java (обязательно сделайте резервную копию самого необходимого).
- Теперь перезагрузите компьютер и после перезагрузки кликните правой кнопкой мыши Windows и выберите «Выполнить».
- Затем перейдите по следующему пути (скопируйте и вставьте адрес):
- Теперь откройте каждый каталог (Local, LocalLow и Roaming) один за другим и удалите в них папки Minecraft.
- Затем загрузите последние версии Java и Minecraft.
- Затем установите Java от имени администратора и перезагрузите компьютер.
- После перезагрузки установите Minecraft от имени администратора и проверьте, решена ли проблема с внутренним исключением.
Решение 8. Измените параметры, связанные с сетью
Minecraft может отображать проблему внутреннего исключения, если сетевые настройки вашей системы не настроены должным образом (или ваш интернет-провайдер блокирует доступ к ресурсу, необходимому для работы Minecraft). В этом случае изменение настроек сети (или попытка использования другой сети / VPN) может решить проблему.
Попробуйте другую сеть или VPN
- Отключите вашу систему от текущей сети и подключитесь к другой сети, например, к точке доступа вашего телефона, чтобы проверить, решена ли проблема IOexception. Вы также можете проверить с помощью VPN. Кроме того, это будет идея хорошо переключатьсямежду с Wi-Fi и локальных сетей связи.
- Если проблема не исчезнет, подключите систему к Интернету напрямую без маршрутизатора, чтобы исключить, не вызывает ли проблема его конфигурация.
Отключите ускорение NAT в настройках роутера.
- Запустите браузер и перейдите на страницу управления маршрутизатором.
- Теперь выберите LAN (на левой панели) и отключите аппаратное ускорение на вкладке Switch Control. Если аппаратное ускорение (функция фирменного маршрутизатора Asus) не отображается, ищите его с другими названиями, такими как CTF (сквозная пересылка) и FA (ускоритель потока).
- Затем примените свои изменения и проверьте, решена ли проблема с внутренним исключением.
Решение 9. Отредактируйте настройки брандмауэра
Вы можете столкнуться с проблемой внутреннего исключения, если брандмауэр вашей системы блокирует доступ к ресурсу, необходимому для работы Minecraft. В этом контексте изменение настроек брандмауэра (например, разрешение Java ™ Platform SE Binary в настройках брандмауэра) может решить проблему.
Прежде чем продолжить, рекомендуется проверить, решает ли проблему временное отключение брандмауэра вашей системы. Для иллюстрации мы рассмотрим процесс для брандмауэра Защитника Windows.
Предупреждение : продвигайтесь вперед на свой страх и риск, поскольку редактирование настроек брандмауэра — это умелая задача, и в случае неправильного выполнения вы можете подвергнуть свою систему / данные угрозам.
Установите Java (TM) Platform SE на Private в настройках брандмауэра
- Кликните Windows, введите: Разрешить приложению через брандмауэр Windows и откройте его.
- Теперь нажмите «Изменить настройки» и в списке приложений найдите Java (TM) Platform SE Binary. Если нет, то нажмите на Разрешить другой App & бычка в директорию установки Явы (обычно, каталог Java в Program Files и Program Files (X86) папки) и двойным щелчком по javaw.exe.
- Затем снимите отметку с опции Public и отметьте опцию Private для всех двоичных процессов Java (TM) Platform SE.
- Теперь выберите Java (TM) Platform SE Binary и нажмите Details.
- Затем откройте «Тип сети» и установите флажок «Частная».
- Теперь примените ваши изменения и перезагрузите компьютер.
- После перезагрузки проверьте, решена ли проблема IOexception.
Разрешить Minecraft через брандмауэр
- Кликните Windows, введите: Брандмауэр и откройте брандмауэр Защитника Windows.
- Теперь убедитесь, что правила для входящего и исходящего трафика, связанные с Minecraft, не установлены для блокировки подключения.
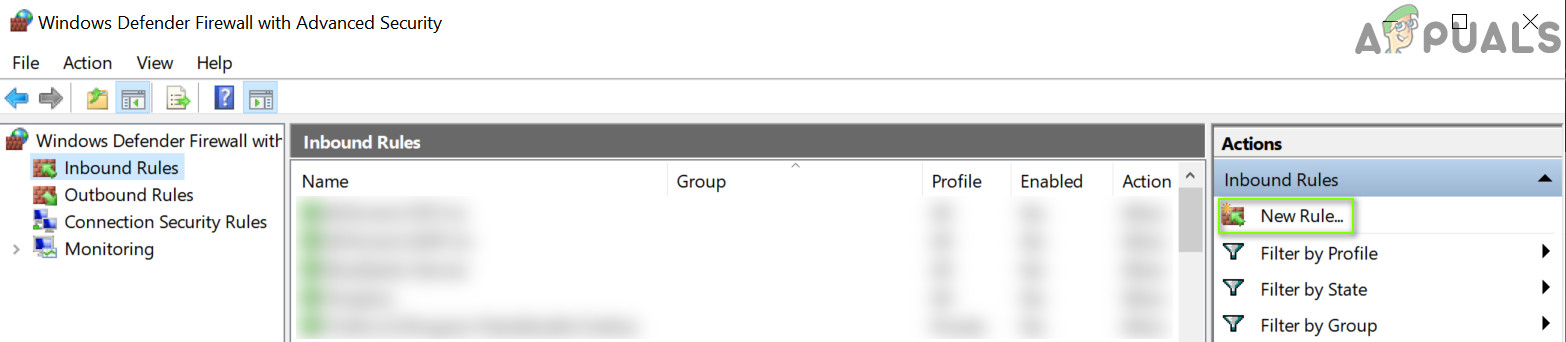
- Затем выберите «Правила для входящих подключений» и нажмите «Новое правило».
- Теперь выберите «Программа» и нажмите «Далее». Выберите программу в окне нового правила
- Затем нажмите «Обзор» и перейдите в каталог установки Minecraft.
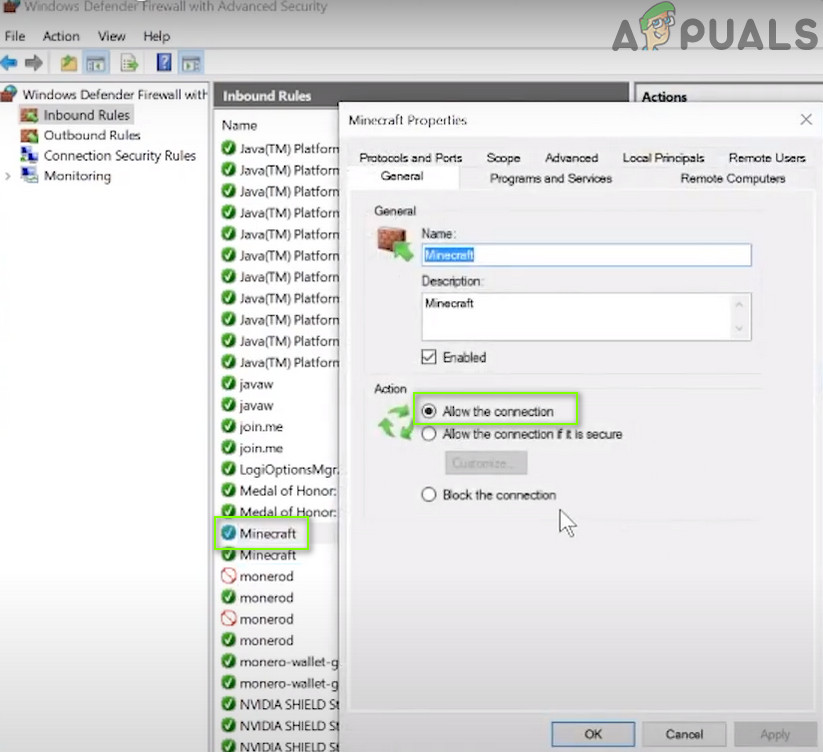
- Теперь дважды кликните на Minecraft.exe и выберите Разрешить подключение.
- Затем нажмите «Далее» и выберите все три профиля (т. Е. «Общедоступный», «Частный» и «Доменный»).
- Теперь назовите правило и нажмите Готово.
- Затем повторите то же самое для правила исходящего трафика и перезагрузите компьютер.
- После перезагрузки проверьте, решена ли проблема Java.io.

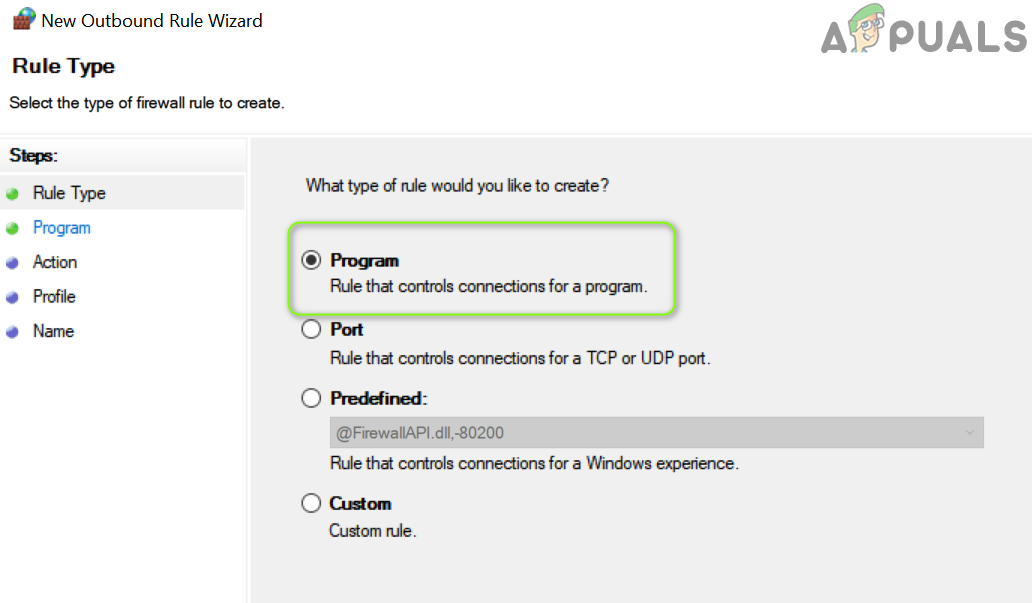 Выберите программу в окне нового правила
Если проблема не устранена , проверьте, разрешает ли подключение Minecraft через брандмауэр маршрутизатора (если есть) проблему (особенно, если он использует некоторую функцию автоблокировки).
Если это не помогло, проверьте , не ограничивает ли родительский контроль доступ Minecraft. Кроме того, будет хорошей идеей убедиться, что порты правильно перенаправлены в брандмауэре системы / маршрутизатора в соответствии с требованиями Minecraft.
Если проблема не исчезнет, проверьте, решает ли проблему выделение для Minecraft дополнительной оперативной памяти . Если это не помогло, вы можете связаться с администраторами сервера, чтобы удалить данные вашего игрока или проверить наличие проблем на стороне сервера.
Если проблема до сих пор не решена, возможно, вам придется выполнить сброс настроек вашего компьютера до заводских настроек, и если это не помогло, проверьте свою систему (особенно жесткий диск и сетевую / Wi-Fi карту) на наличие аппаратной ошибки.
Источник
While Minecraft isn’t one of the most graphically intensive games, it can still cause problems for players; especially those trying to play Minecraft multiplayer on Minecraft servers.
For those facing the error with Internal Exception while trying to connect to a Minecraft server, it can be challenging to fix it. This can be due to several different reasons.
This guide will dive into the best ways players can hopefully fix the Internal Exception error when trying to play the game.
How do you fix the Minecraft Internal Exception (io.netty.handler) (Java.IO.IOException) errors?
Simply put, a connection problem causes this error. This could be due to several things. Players can try each of the standard solutions listed below to see if one happens to rectify the issue.
First, check if the server you are trying to join has an error
Players should first check whether the connection issue causing the Internal Exception error message is coming from the server or their side.
If the error is from the server-side, players can rest assured that nothing is wrong with their copy of Minecraft or their PC settings. It is simply a problem with the server itself.
The best way to check if the server has an error is by connecting to this testing server with IP: test.prisonfun.com
If the connection to this server is successful, there is no problem with the game client or PC settings. This particular server supports all versions of Minecraft and is always up to date, so it is the best place to test any potential connection problems.
If the connection to this server is unsuccessful, then there is an issue on the player’s side, not the server. Players can try the proposed solutions below to try and fix them.
Update Java
Minecraft is a Java application and needs Java to run. Players should ensure they have the latest official Java version:
- Go to the official Java Download found here
- Download the latest version of Java available
- Complete the installation
- Retry on Minecraft to join server IP: test.prisonfun.com
Turn off Firewall + Antivirus + VPN
Minecraft multiplayer is sensitive to specific Firewall rules, Antivirus settings and VPNs.
Players can try and disable all three of these and retry the connection:
Turn off firewall
- Press Windows Key + R (or type «run» in the start menu)
- Type «control» in the Run menu and hit enter
- Press «System and Security»
- Press «Windows Firewall»
- On the left-hand side, press «Turn windows defender firewall on or off»
- Turn off the firewall for both public and private network
- Retry on MC to join server IP: test.prisonfun.com
Turning off the antivirus and VPN is less straightforward than turning off the firewall. It will depend on the specific antivirus and VPN being used.
Turn off AntiVirus
If players are using a specific type of antiviruses such as Norton, McAffee, or Avast, they must be fully disabled in their control panels. After doing this, players can retry to connect to the server IP: test.prisonfun.com
Turn off VPN
If players are connected to any VPN, it should be turned off and disconnected. After doing this, players can retry their connection to the server IP: test.prisonfun.com
Change DNS Server Address
The DNS server can have an impact on failed connections. It is important to make sure it is up to date and accurate.
- Press Windows Key + R (or type «run» in the start menu)
- Type «control» in the Run menu and hit enter
- Navigate to the «Network and internet» tab
- Press «Network and sharing center»
- Select the connection (usually either «Ethernet» or «wifi»)
- Press «Properties»
- Click «Internet Protocol Version 4» (IPv4)
- Select «Use the following DNS server addresses»
- For the primary DNS server, use 8.8.8.8
- For an alternate DNS server, use 8.8.4.4
- Press «OK»
- Retry on Minecraft to join server IP: test.prisonfun.com
Users may want to watch this video below on how to change the DNS server (it works for Windows 10 and 11).
Re-download a fresh Installation of Minecraft
There may be something wrong with the Minecraft installation. Players should try to re-download a fresh copy with no modifications enabled.
- Open the official Minecraft launcher (download it here if you don’t have it)
- On the main launcher menu, click the «Installations» button (it should be at the top of the screen on the navbar)
- Press «New installation»
- Select the version of Minecraft you want to use (Latest release is recommended)
- Press the green «Create» button on the bottom right of the installation menu
- Make sure the newly created version is selected on the main launcher menu
- Hit the big green «Play» button on the main launcher menu
- Retry on Minecraft to join server IP: test.prisonfun.com
Install Minecraft to a new directory
If re-downloading a fresh installation of Minecraft is unsuccessful, players can try and install a new Minecraft directory altogether.
- Open the official Minecraft launcher (download it here if you don’t have it)
- On the main launcher menu, click the «Installations» button (it should be at the top of the screen on the navbar)
- Press «New installation»
- Select the version of the game you want to use (Latest release is recommended)
- For the «Game Directory» option, press «Browse» and select any place where you want to install the game on your PC if you don’t know where just press «Desktop» at the top.
- Hit OK
- Press the green «Create» button on the bottom right to create the new installation profile
- Make sure the newly created installation profile is selected on the main launcher menu before launching the game
- Hit the big green «Play» button on the main launcher menu
- Retry on MC to join server IP: test.prisonfun.com

Try VPN or a different wifi network
If nothing has worked so far, there might be an issue with the local network. Players can confirm if this is the case by connecting to a different wifi network or simply via a free VPN downloaded online.
Players are free to use their VPN, or they can try out the one in the video tutorial below.

After a VPN is connected to it, players can once again try and connect to the test server IP: test.prisonfun.com
Enable Java Native Sandbox
Enabling the Java Native Sandbox option has helped some users clear up their issues related to io.netty.handler and Java.IO.IOException.
- Press the Windows key (or click the start menu icon)
- Type Configure Java and press enter
- Navigate to the «Advanced» tab and scroll down to the «Advanced security settings» and enable the option «enable the operating system’s restricted environment (native sandbox).»
- Press Apply, then press OK
- Reboot the PC. This is very important.
- Retry on Minecraft to join server IP: test.prisonfun.com
Restart Router
Sometimes, the connection problem can originate from the local router needing a reboot. This is for various technical reasons, but restarting a router can assign a new IP and much more, which can help fix the underlying problem.
- Unplug the network router
- Wait a few minutes (restart your computer during this time)
- Plugin the network router
- Retry on MC to join server IP: test.prisonfun.com
Ensure there are no parental or admin restrictions on the PC/Network
Another major cause of the io.netty.handler and Java.IO.IOException problems is due to restrictions that are applied by parental control software (e.g., NetNanny, Norton Family, Qustodio, etc…) and network administrators.
Unfortunately, the only way to fix this is to turn them off entirely, which varies in each case due to different software being used.
Should players be aware that parental or admin restrictions are applied to the machine or network, these could most certainly be the underlying cause of the problems.
Once these restrictions are fully turned off, players can once again try and connect to the server with IP: test.prisonfun.com
For detailed guides, walkthroughs, tips & more, check out SK Minecraft Wiki
Edited by Srijan Sen
Thank You!
GIF
❯

Minecraft — самая любимая игра-песочница в мире. Однако надоедливая ошибка Internal Exception: java.net.SocketException: Connection Reset портит игровой процесс за считанные секунды. Тем не менее, есть несколько способов исправить эту ошибку в Minecraft. Продолжайте читать это руководство, и вы в конечном итоге поймете, почему появляется эта ошибка и как ее можно исправить.

Как следует из названия ошибки, ошибка связана с обработкой Java и выполнением сервера. Это означает, что Java не удалось выполнить задачу, которая привела к сбою игры или вытеснению вас из игры.
Эта ошибка появляется только в Java-версии Minecraft и особенно в версии 1.7 или старше. Далее при появлении ошибки игрок блокируется от игры. Это внутреннее исключение: java.net.SocketException: ошибка сброса подключения также влияет на Minecraft Realms и многопользовательские серверы. Что ж, с учетом сказанного, давайте посмотрим, как вы можете решить эту надоедливую проблему.
Как исправить внутреннее исключение Minecraft: java.net.SocketException: ошибка сброса подключения?
Здесь мы обсудили множество способов исправить внутреннюю ошибку исключения Minecraft. Мы рекомендуем следить за каждым исправлением, так как одно или другое поможет. Пожалуйста, не пропускайте никакие исправления, потому что одно может быть связано с другим. Кроме того, поскольку вы читаете это руководство на , его будет довольно легко понять.
Исправление 1. Настройте параметры графики
Первое, что вам нужно попробовать при устранении ошибки сброса подключения, — это настроить параметры графики в Minecraft. Хотя может показаться, что ошибка вызвана сервером, но основной проблемой может быть проблема с рендерингом. Если вы не знаете, выполните следующие простые шаги.
- Запустите Minecraft и присоединитесь к карте для одиночной игры.
- Когда игра начнется, приостановите игру. нажав Esc и выбрав Параметры.
- Затем перейдите в раздел Видео Настройки и включите параметр Рендеринг Расстояние. Обязательно уменьшите его значение ниже 8.
- После этого установите для параметра Графика значение Быстро.
- Затем уменьшите или выключите параметр Плавное освещение Уровень.
- Когда вы закончите все делать, нажмите ГОТОВО
Теперь начните играть и посмотрите, закрывается ли игра с тем же кодом ошибки. Если да, выполните следующее исправление.
Исправление 2. Смените DNS-сервер
Поскольку мы уже упоминали, DNS-сервер виноват во внутреннем исключении: java.net.SocketException: Ошибка сброса соединения, всегда можно немного подправить ее. Выполните следующие простые действия, чтобы изменить DNS-сервер:
- Нажмите Windows + R и введите ncpa.cpl в диалоговом окне «Выполнить». и нажмите Enter.
- Теперь щелкните правой кнопкой мыши на Текущая сеть и перейдите в раздел Свойства.
- Далее дважды щелкните Протокол Интернета версии 4 (TCP/IPv4).
- В следующем нажмите «Использовать следующий адрес DNS-сервера» и введите 1.1.1.1 в качестве предпочтительного DNS-сервера и 1.0.0.1 в качестве альтернативного DNS-сервера.
- Нажмите ОК и перезагрузите компьютер.
Когда ваш компьютер загрузится, запустите Minecraft и проверьте, появляется ли ошибка. Если да, выполните следующее исправление.
Исправление 3. Обновите учетные данные IP/DNS
Ну, надоедливое внутреннее исключение: java.net.SocketException: ошибка сброса подключения, похоже, возникает после обновления IP-адреса. /DNS-учетные данные. Сброс IP-адреса — отличный способ, если вы уже выполнили указанное выше исправление. Выполните следующие простые действия, чтобы обновить и очистить DNS.
- Нажмите Windows + R и введите cmd в диалоговом окне Выполнить.
- Теперь нажмите Ctrl + Shift + Enter вместе. Это откроет командную строку в режиме администратора.
- Теперь в окне командной строки введите следующие команды одну за другой и продолжайте нажимать клавишу ввода после каждой команды.
ipconfig /flushdns ↵ ipconfig /registerdns ↵ ipconfig /release ↵ ipconfig /renew ↵ netsh winsock reset ↵
- После выполнения всех команд выключите компьютер, подождите 1-2 минуты и перезагрузите компьютер.
Теперь начните играть в Minecraft и проверьте, не появляется ли ошибка Internal Exception: java.net.SocketException: Connection Reset error. . Если да, выполните следующее исправление. Если нет, все готово.
Решение 4. Попробуйте использовать VPN
Используя одну из лучших доступных VPN, вы можете исправить ошибку сброса соединения в Minecraft. VPN подключит вас к другому серверу, и все готово. Но убедитесь, что бесплатные VPN могут вызвать много лагов и множество новых кодов ошибок в Minecraft. Поэтому обязательно используйте платный VPN или выберите из нашего списка.
Решение 5: проверьте подключение к Интернету
Возможно, основная проблема связана с вашим интернет-соединением, и вы пытаетесь решить проблему, даже не замечая этого. Не волнуйтесь, вы не одиноки. Обычно мы упускаем из виду скорость интернет-соединения и начинаем устранять неполадки со всеми остальными вариантами. Обязательно проверьте способы увеличения скорости интернета, если вы чувствуете, что ваш интернет медленный. Наконец, если вы убедились, что с вашим Интернетом все в порядке, выполните следующее исправление.
Исправление 6: переустановите Minecraft
Если ни одно из вышеперечисленных исправлений не помогло устранить внутреннее исключение: java.net .SocketException: ошибка сброса подключения, последний вариант — удалить Minecraft, а затем переустановить его. Однако удаление традиционным способом — это не то, что вам нужно делать. Но используйте другой подход.
Прежде всего, загрузитесь в безопасном режиме, а затем удалите игру. После этого продолжите переустановку, следуя инструкциям на экране. Как только вы закончите установку, начните играть в Minecraft, и вы увидите, что надоедливая ошибка сброса соединения исчезла.
Ну, это все, что у нас есть о том, как вы можете исправить внутреннее исключение: java.net.SocketException: Connection Ошибка сброса в Майнкрафте. Мы надеемся, что это руководство помогло вам. Если вам это понравилось, обязательно ознакомьтесь с лучшими семенами Minecraft.
Few things are as frustrating as running into error codes, especially when you have no idea what the problem might be.
What kind of error is: Internal Exception: java.io.ioexception
Simply put it is an internet connection error. Your computer is trying to establish a connection to the Minecraft server you have chosen and that connection gets interrupted while traveling between the server and your computer.
What is the solution to this error?
Let’s start solving this problem with some basic solutions that work for almost any error. Do not skip these unless you have already tried them, because these are the simplest solutions that take the least amount of time!
- Power cycle your Router, by unplugging it for a minute and then plugging it back in to start again.
- Restart your computer.
- Restart Minecraft.
Those are basic steps that will let us figure out if your problem is temporary, or comes from a larger issue that will need more troubleshooting. If these didn’t help it is time to try some of the more advanced steps.
Advanced Troubleshooting
If the basic steps above didn’t work for you, it’s probably time to look at more advanced solutions.
Uninstall and reinstall a fresh version of Minecraft
One of the biggest culprits with Minecraft issue is … Minecraft itself. Before you do anything too advanced to try and solve this problem, try to uninstall the game and reinstall it fresh. Do not reinstall any texture packs, mods, or Optifine yet. Try connecting to the server with the base game and see if it solves your problem.
Enabling the Java Native Sandbox
The Java Native Sandbox lets you start Java applications such as Minecraft in a restricted environment that might bypass whatever is causing the issue with your connection to the server. You can enable it with the following steps:
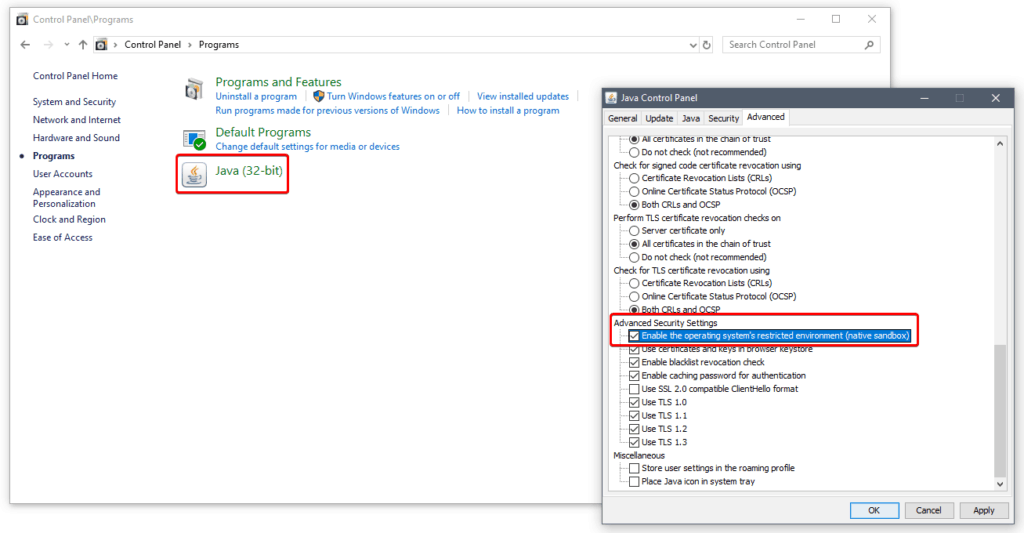
- Go to the search bar on the Windows Task Bar, usually at the bottom of your screen, and type in “Control Panel” and click on the entry that pops up.
- Find a section with a header “Programs” and click on that header.
- On the following screen you should see an icon for “Java”. Click on the header. We have marked the Java header and icon in red in the below graphic.
- You should now have a small pop up labeled “Java Control Panel”. In it switch to the “Advanced” tab and start scrolling down until you see a section labeled “Advanced Securrity Settings”. We have marked this section in red in the graphic above.
- Here you will find an option for “Enable the operating system’s restricted environment (native sandbox)”. Make sure it is checkmarked, then click “Apply” and then click “OK”.
- It is very important that you now restart your computer, so that the changes can take effect.
After restarting your computer, start up Minecraft again and see if the connection to the server now holds. If it doesn’t, feel free to disable the native sandbox again for the sake of not adding more parameters to the problem you’re trying to track down.
Changing the DNS on your router to the Google DNS servers
Your internet service provider might have temporary issues with its DNS server, preventing your computer from finding the server you are connecting to. You can find your DNS settings in your router/modem administration panel and it will usually be set automatically.
Almost all routers will allow you to switch DNS servers to the ones you specify manually, usually two of them. You should enter the following values:
- Primary DNS Server: 8.8.8.8
- Secondary DNS Server: 8.8.4.4
The new DNS server settings will connect to Google’s own servers whenever it is trying to connect to something from your computer, and this tends to be a lot more reliable over time than whatever your local internet service provider will give you. Even if this solution doesn’t work, it is probably a good thing for you to keep the new settings.
Conclusion
Hopefully this solution helped you fix the Internal Exception: java.io.ioexception error and let you get back to playing Minecraft. If not then you might want to take to the Minecraft Forum to find some more information.

Minecraft is a beloved sandbox video game by Mojang Studios. Children and adults alike enjoy building their own worlds in this 3D game.
However, many players have recently received a stressful error message: Internal Exception: java.io.ioexception. When you get the notification “an existing connection was forcibly closed by the remote host Minecraft,” you won’t be able to continue playing.
So what exactly does the java.io.ioexception error mean? The main reason you received this error is an internet connection error. There are several possible causes of connection failure, such as firewall blocking, router and issues, or outdated Minecraft or Java.
While fixing the internal exception error in Minecraft might seem too technical, the problem can easily be resolved with the help of our step-by-step guide. If a standard power cycle or re-installing Minecraft or Java doesn’t work, set up your DNS, IP address, and server settings.
In this article, we’ll begin by giving you an introduction to this common error. From there, go through our list of tried-and-tested troubleshooting solutions.
Table of Contents
- 1 What is Minecraft Internal Exception Java io ioexception?
- 1.1 What causes the error?
- 2 How to fix Minecraft internal exception java.io.ioexception
- 2.1 Check your Internet Connection
- 2.2 Powercycle your system
- 2.3 Update Minecraft
- 2.4 Uninstall and Reinstall Minecraft
- 2.5 Update/Fix Java
- 2.6 Reset the Server
- 2.7 Flush DNS and Renew IP address
- 2.8 Change Router DNS to Google DNS servers
- 2.9 Disable Server’s Resource Pack
- 2.10 Turn off Firewall Permissions
- 2.11 Enable Java Native Sandbox
- 3 Conclusion
When you receive “Minecraft Internal Exception: java.io.ioexception an existing connection was forcibly closed,” this means that there was a problem with your internet connection. This network issue likely prevented your device from connecting with the Minecraft server.
Getting this error can be very frustrating because you won’t be able to continue playing.
On top of that, it’s difficult to find the main cause of the problem. Any disruption in your network can cause a Minecraft server error.
This means that you’ll have to try multiple solutions to try and fix the error.
What causes the error?
As mentioned, there are many possible reasons why you received the connection error. It’s hard to pinpoint the exact point where the connection failed, but these are some of the most common causes:
- Firewall permissions blocked access to the Minecraft server
- Incorrect DNS, IP address, or router settings
- Incompatible or outdated Minecraft and Java softwares
How to fix Minecraft internal exception java.io.ioexception
As mentioned, the Minecraft internal exception error is a bit complicated because there are many possible causes of the glitch.
To help you out, we provided 11 solutions on how to fix the java.io.ioexception issue.
Before proceeding, make sure that you have a stable internet connection. Try not to use mobile data or a mobile hotspot as these are much more unstable compared to a WiFi network.
Make sure to try which solution works for you, and don’t skip any steps.
However, if none of these work, you may need to contact your internet service provider (ISP).
Check your Internet Connection
Before trying anything complicated, make sure that your internet connection is stable.
Unreliable internet connection using mobile data or mobile hotspot can prevent your PC from connecting to the Minecraft server. Standard multiplayer mode will use 40MB of data per hour.
Open an internet speed checker, and check if your bandwidth is up to par. The host computer should have at least 1.5 Mbps bandwidth.
The appropriate bandwidth speed will depend on how many other gamers you’re playing with in Multiplayer mode. Ideally, though, bandwidth should be at least 100Mb an hour per user.
Powercycle your system
The first thing you should try is restarting your PC, internet connection, and Minecraft.
For many users, simply doing a full power cycle fixes the issue. This is because it restarts the services and closes all failed processes.
- Close Minecraft and shutdown your PC. Remove your PC from the power source.
- Unplug the router from the power source while it is still running, then switch it off. Disconnect the ethernet cable from the power source.
- Leave your router and PC unplugged for five minutes.
- Reconnect the ethernet cable and switch on your router and PC. Connect your PC to the internet network.
- Launch Minecraft and see if the issue persists.
If this doesn’t work, try connecting to the internet using a different device, such as your smartphone. If you can’t connect to the network, the problem might be with your ISP.
Call your ISP so they can find the issue with your network setup.
Update Minecraft
This is another effective solution that fixes the Minecraft internal exception error for most users. Updating Minecraft will do two things: it will remove the glitch in the installed program, and it will match your client application to the Minecraft server you’re connecting to.
If your current Minecraft version doesn’t match your server, you will likely encounter some sort of connection error.
- Open the Minecraft launcher and double-click the Minecraft app. Log in with your email address and password if necessary.
- Look for the Download button beside Play in the main menu. The Download option will appear if a new Minecraft version update is available.
- Click Play. The update will start to download –– wait for the green progress bar to finish downloading. You can now start playing.
Here’s another way to update Minecraft:
- Open the Minecraft launcher and double-click the Minecraft app.
- On the Login page, click on Options.
- From the list, click Manage game & add-ons > Updates.
- Click the update you want to download. You can now start playing.
If there’s a problem with updating Minecraft, you need to uninstall the game, then reinstall it again.
Uninstall and Reinstall Minecraft
You need to re-download Minecraft if the available update in your area fails. Here’s how to uninstall and reinstall the latest version of Minecraft:
Reinstall Minecraft on Windows:
- Press Win+R on your keyboard and type %appdata%. Press enter and select the Roaming folder.
- Open the .minecraft folder and locate saves. Copy and paste the saves folder to a secure location. You will need this folder to restore your Minecraft progress.
- Return to the Roaming folder and delete the .minecraft folder. This will uninstall the game.
- Visit the Minecraft website and log in with your Mojang account if necessary. Download the latest Minecraft Windows version available in your region.
- Launch the Minecraft installer and follow the on-screen instructions. After installing and loading, close Minecraft.
- Open the .minecraft folder and drag the saves folder to this location. This will restore your Minecraft gameplay.
Reinstall Minecraft on macOS:
- Open the Finder Window and click Go on the Toolbar. Click Go to Folder and type ~/Library/Application Support/minecraft. Press Enter.
- Copy and paste the saves folder to a secure location. You will need this folder to restore your Minecraft progress.
- Select all the other folders in the Minecraft folder and drag them to the Trash. Empty the Trash folder.
- Visit the Minecraft website and log in with your Mojang account if necessary. Download the latest Minecraft macOS version available in your region.
- Launch the Minecraft installer and follow the on-screen instructions. After installing and loading, close Minecraft.
- Open the .minecraft folder and drag the saves folder to this location. Click Replace to overwrite to restore your Minecraft gameplay.
Reinstalling Minecraft is also a recommended fix for jna-4.4.0.jar Error (the File Contents Differ From What Was Expected).
Update/Fix Java
For Minecraft to work, your Java software should be up to date.
- Press Win + S on your keyboard, then type Configure Java. Click OK.
- Navigate tot he Update tab, then click Update Now.
There are some cases when updating Java doesn’t work. You’ll need to reinstall Java:
- Type Control Panel on the Windows Search Bar then launch the program.
- Click on Uninstall a Program, then look for Java.
- Download the latest version of Java, and install it onto your PC.
- Restart your computer, then launch Minecraft. Check if the problem persists.
Reset the Server
If you receive a connection error and restarting your PC or internet connection doesn’t work, you may need to reset the Minecraft Server.
If you’re using someone else’s server, the only way to configure the server is to request the owner to reset it. If you own the server, you can use programs like Shockbyte, CraftyControl, or Multicraft.
- Log into your server’s Control Panel, and select the server you want to reset. Make sure to stop the server from running to prevent creating or modifying files.
- Navigate to the Server Type dropdown menu and select the action you want to take after the restart.
- Navigate to the Setup tab of your control panel choose Reset or Delete All server files. Enter your password when prompted.
- Click Apply or Done to confirm the changes.
- Start the Server, then launch Minecraft. Check if the error still persists.
Flush DNS and Renew IP address
If your DNS or IP address is corrupted, you can flush DNS and renew your IP address.
- Launch Command Prompt from the Start menu.
- Type these commands:
ipconfig /flushdns

ipconfig /release

ipconfig /renew
- Restart your computer, than launch Minecraft. Check to see if the error persists.
Change Router DNS to Google DNS servers
In cases where it’s difficult to get a stable internet connection, your ISP may have temporary issues that prevent your computer from connecting with the server. To fix this issue, you need to adjust your DNS settings in your router control panel.
- Access your router settings –– enter your login and password when prompted.
- Navigate to the DNS tab then type the following under Primary DNS server and Secondary DNS server. These settings will automatically connect to Google’s more reliable DNS servers.
Primary DNS Server: 8.8.8.8
Secondary DNS Server: 8.8.4.4
- Apply the changes, then restart your internet connection. Launch Minecraft and see if the problem persists.
While this strategy may not work all the time, connecting to Google DNS servers usually works better than the settings given by your ISP.
Disable Server’s Resource Pack
Resource Packs allow users to add more personality into their gameplay. You can customize textures, music, and other skins onto Minecraft.
However, if you have Resource Pack enabled, there are times when you will be blocked from the server. In this case, you need to adjust Resource Pack permissions:
- Launch Minecraft then navigate to Multiplayer.
- Click Problematic Server, then Edit.
- Locate Server Resource Packs, then click Disable.
- Save the changes and check if the error persists.
Turn off Firewall Permissions
Another common reason why Minecraft players get the connection error is because their PC fails to connect to the server because of Windows Firewall permissions:
- Click the Windows search bar and look for Windows Security.
- Open Firewall & Network protection, then click on the network and Firewall protection option on the menu.
- Select the network that you’re connected to, and toggle off Windows firewall protection on your device.
- Apply the changes, then restart your computer. Launch Minecraft and check if the problem persists.
Enable Java Native Sandbox
Java Native Sandbox allows users to access Java applications in a restricted environment. This means that you can play Minecraft while bypassing connection issues to the server.
- Type Control Panel on the Windows Search Bar then launch the program.
- Look for the header labeled ‘Programs.’
- In the next section, look for the Java icon. A small pop-up notification labeled ‘Java Control Panel’ will appear. In the same window, navigate to Advanced > Advanced Security Settings.
- Select the option Enable the operating system’s restricted environment (native sandbox), then apply and click OK.
- Restart your computer then launch Minecraft. Check if the problem persists. If it does, try disabling Native Sandbox then enabling it again.
Conclusion
The Minecraft Internal Exception Java.io.ioexception is caused by failed connections between your PC and the Minecraft server. This error is more complicated compared to other Minecraft connection errors because there are a lot of possible causes of the issue.
Before troubleshooting your PC, the first thing that you should do is check that you have stable internet connection. After confirming a strong connection, you can try powercycling your router and PC, updating or reinstalling Minecraft.
If these don’t work, try to fix your internet connection by changing your DNS, router settings, or IP address. You can also try turning off Firewall permissions and disabling server resource pack.
Other gamers solved the issue by enabling Java Native Sandbox.
If these solutions don’t work for you, try contacting your ISP.
The Minecraft launcher may show the ‘Internal Exception Java.IO.IOException’ issue if the Minecraft installation is corrupt or outdated. Moreover, the corrupt DNS cache of the system or improper configuration of Java may also cause the issue at hand.
The issue arises when the user tries to join or connect a server but encounters the following message:
“Connection Lost Internal Exception: java.io.IOException: An existing connection was forcibly closed by the remote host”
Before proceeding with the solutions to stop internal exceptions in Java IO IOException, check if trying another network cable (if using an ethernet connection) resolves the issue. If you have a long username (7+ characters), then check if reducing it to (7 or fewer characters) solves the issue. Also, check if your internet speed meets the minimum speed requirements of Minecraft. Moreover, make sure to log out/disconnect the Minechat (if using) and then close it. Additionally, check if launching the Minecraft launcher (or server) as an administrator resolves the issue.
Solution 1: Update the Minecraft Launcher to the Latest Build
You may encounter the internal exception issue if the Minecraft launcher of your system is outdated as it can create incompatibility between the launcher & server. In this context, updating the Minecraft launcher to the latest release may solve the problem. But before moving on, check if you have more than one account configured with the Minecraft launcher, if so, then remove all the other accounts but one.
- Open the Minecraft launcher & near the username, click on the Options.
- Then click on the Force Update button & apply the launcher update.

Force Update the Minecraft Launcher - Once updated, relaunch the Minecraft launcher and check if it is clear of the IOexception error.
- If not, check if using another launcher resolves the issue.
Solution 2: Clear the DNS Cache of Your System
The Java.io error may emerge if the DNS cache of your system is corrupt as it may lead to the system’s ability to resolve the domain name. In this context, flushing the DNS cache (which will force the system to re-fetch the combinations) may solve the problem.
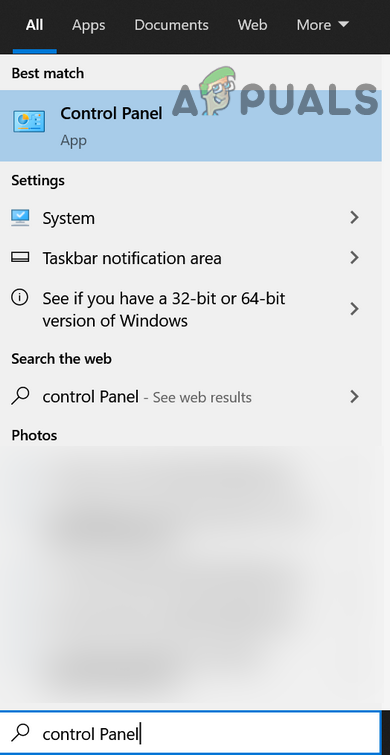
- Click Windows, type: Command Prompt, and right-click on the result of Command Prompt. Then choose Run as Administrator.

Open Command Prompt as Administrator - Now execute the following one by one:
ipconfig /flushdns ipconfig /release ipconfig /renew

Flush the DNS Cache - Then exit the Command Prompt and check if the Java exception issue is resolved.
If the issue persists, then check if changing DNS server (e.g., Google DNS) resolves the internal exception issue.
Solution 3: Disable Server’s Resource Pack
Resource packs allow the players to do a lot of customization (like textures, music, models, splash tests, etc.) but this customization may hinder the client/server communication and thus cause the IOexception issue. In this scenario, disabling the server’s resource pack may solve the problem.
- Open the Minecraft launcher and select Multiplayer.
- Then select the problematic server and click on Edit.

Edit the Minecraft Server Properties - Now click on Server Resource Packs to set it to Disabled (if enabled) and click on Done.

Disable Server Resource Packs in Minecraft - Then check if the launcher is clear of the Java.io issue.
Solution 4: Uninstall the Conflicting Applications
You may encounter the Java.io issue if an application on your system is hindering the operation of Minecraft. In this scenario, removing the conflicting application may solve the problem. You can clean boot your PC to find out the problematic application. For illustration, we will discuss the process for the Hamachi VPN (reported by the users to cause the issue).
- Right-click Windows & open Apps and Features.
- Now click on LogMeIn Hamachi to expand it & then click on Uninstall.

Uninstall Hamachi - Then follow the prompts to remove Hamachi & reboot your PC.
- Upon reboot, check if the IOexception issue is resolved.
Solution 5: Decrease the Render Distance in the Minecraft Settings
The internal exception issue may arise if Minecraft could not render all the video blocks at once (due to the poor internet speed). In this context, decreasing the Render Distance in the Minecraft settings to the lowest possible may solve the problem.
- Open the Minecraft Launcher & open its Options (it will be also a good idea to lower the Render Distance in the server settings, if possible).

Open the Minecraft Options - Now select Video Settings & slide the Render Distance to the lowest possible (e.g., to 2).

Open Video Settings of Minecraft - Then check if the Java.io issue is resolved. If so, then you may increase the Render Distance by one till you reach your desired Render Distance.

Set Render Distance to 2 Chunks in Minecraft
Solution 6: Edit the Java Settings
The Java.io error may arise if the Java installation of your system is not properly configured. In this context, editing the Java settings (like enabling the Native Sandbox) may solve the problem. But before proceeding, make sure you have only one Java installation.
Update Java to the Latest Build
- Click Windows, type: Configure Java & then open it.

Open Configure Java - Now steer to the Update tab & click on the Update Now button.

Click Update Java in the Update Tab - If an update is available, apply the Java update & check if the internal exception issue is resolved.
Enable Native Sandbox
- Click Windows, type: Configure Java & open it.
- Now steer to the Advanced tab & checkmark Enable the Operating System’s Restricted Environment (Native Sandbox).

Enable the Operating System’s Restricted Environment (Native Sandbox) - Then apply your changes & reboot your PC.
- Upon reboot, check if the Minecraft IOexception issue is resolved.
Edit the Java Path in the Launcher Settings
- Right-click Windows & open Run.
- Now navigate to the following path:
Program Files (x86)

Open Program Files (x86) From Run - Then open the Java folder & steer to the latest version of the Java installation (e.g., the jre1.8.0_291 folder).
- Now open the Bin folder & copy the address from the address bar.

Copy the Java Path - Then open the Minecraft Launcher & select Edit Profile.
- Now, under Java Settings (Advanced), checkmark the option of Executable.
- Then paste the address (copied at step 4) up to Bin, so the path should be something like below:
C:Program Files (x86)Javajre1.8.0_291binjavaw.exe

Edit the Java Path in the Minecraft Profile Editor - Now apply your changes & check if the internal exception issue is resolved.
If the issue persists, then check if reinstalling Java sorts out the IOexception issue.
Solution 7: Repair / Reinstall the Minecraft
The Java.io issue may arise if the Minecraft installation is corrupt. In this context, repairing or reinstalling it may solve the problem.
- Click Windows, type: Control Panel, & launch it.

Open Control Panel - Now open Uninstall a Program & select Minecraft.

Repair the Minecraft Launcher - Then click on Repair & follow the prompts to repair Minecraft.
- Now reboot your PC & check if the IOexception issue is resolved.
- If not, uninstall Minecraft & Java (make sure to back up the essentials).
- Now reboot your PC & upon reboot, right-click Windows & select Run.
- Then navigate to the following path (copy-paste the address):
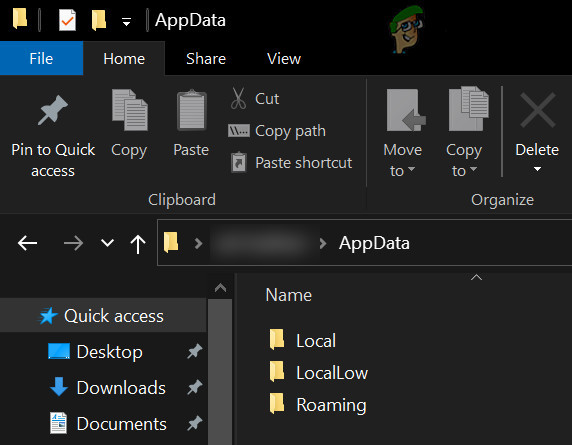
AppData

Open AppData Through the Run Box - Now open each directory (Local, LocalLow, & Roaming) one by one & delete the Minecraft folders in them.

Delete the Minecraft Directories in the AppData Folders - Then download the latest versions of Java & Minecraft.
- Then install Java as administrator & reboot your PC.
- Upon reboot, install Minecraft as administrator & check if the internal exception issue is resolved.
Solution 8: Edit the Network-Related Settings
Minecraft may show the internal exception issue if the network settings of your system are not properly configured (or your ISP is blocking access to a resource essential for the operation of Minecraft). In this case, editing the network settings (or trying another network/VPN) may solve the problem.
Try Another Network or a VPN
- Disconnect your system from the current network & connect to another network e.g., the hotspot of your phone to check if the IOexception issue is resolved. You can also check by using a VPN. Also, it will be a good idea to switch between the Wi-Fi and ethernet connection.
- If the issue persists, directly connect the system to the internet without the router to rule out if its configuration causing the issue.
Disable NAT Acceleration in the Router’s Settings
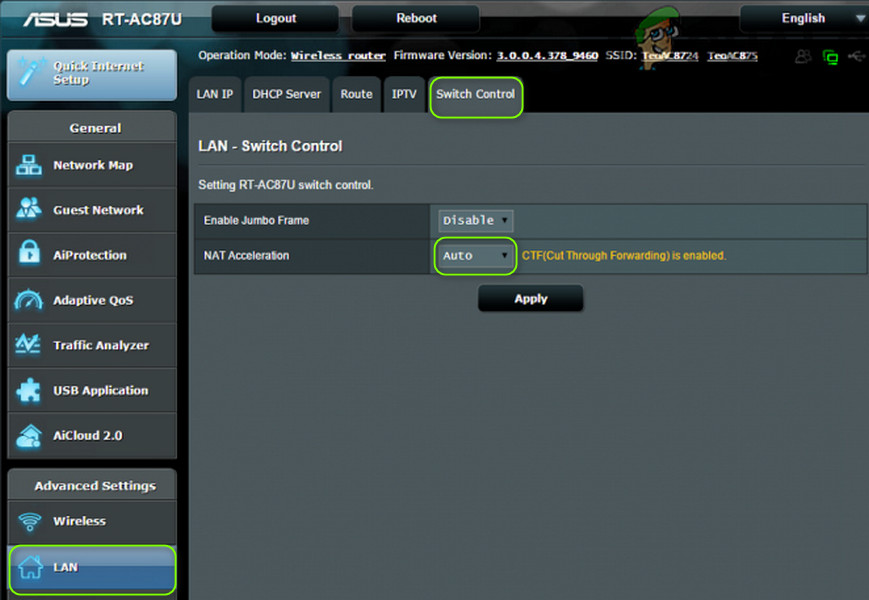
- Launch a web browser & navigate to the Router’s control page.
- Now select LAN (in the left pane) & disable Hardware Acceleration in the Switch Control tab. If the Hardware Acceleration (the Asus branded router feature) is not shown, look for it with different names like CTF (Cut-Through Forwarding) & FA (Flow Accelerator).

Disable NAT Acceleration - Then apply your changes & check if the internal exception issue is resolved.
Solution 9: Edit the Firewall Settings
You may encounter the internal exception issue if the Firewall of your system is blocking access to a resource essential for the operation of Minecraft. In this context, editing the Firewall settings (like allowing Java (TM) Platform SE Binary in the Firewall settings) may solve the problem. Before proceeding, it will be a good idea to check if temporarily disabling the firewall of your system resolves the issue. For illustration, we will go through the process for the Windows Defender Firewall.
Warning: Advance at your own risk as editing the firewall’s settings is a skillful task & if done wrong, you may expose your system/data to threats.
Set Java (TM) Platform SE to Private in the Firewall Settings
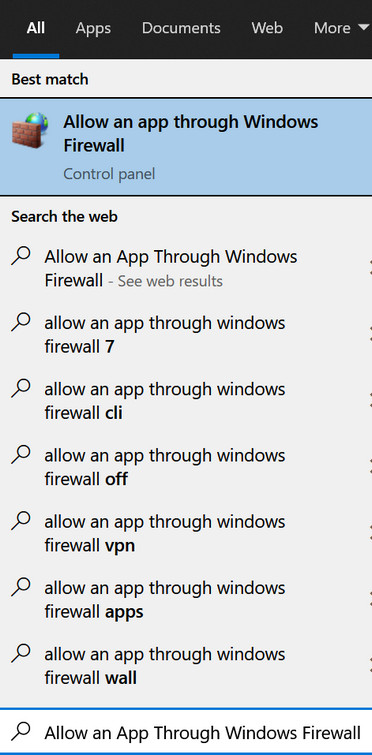
- Click Windows, type: Allow an App Through Windows Firewall, & open it.

Open Allow an App Through Windows Firewall - Now click on Change Settings & in the list of Apps, find Java (TM) Platform SE Binary. If it is not present, click on Allow Another App & steer to the installation directory of Java (usually, the Java directory of Program Files and Program Files (X86) folders) and double-click on Javaw.exe.

Set Java (TM) Platform SE Binary to Private - Then uncheck the option of Public and checkmark the option of Private for all the Java (TM) Platform SE Binary processes.
- Now select Java (TM) Platform SE Binary & click on Details.
- Then open Network Type and checkmark Private.
- Now apply your changes & reboot your PC.
- Upon reboot, check if the IOexception issue is resolved.
Allow the Minecraft Through the Firewall
- Click Windows, type: Firewall, & open Windows Defender Firewall.

Open Windows Defender Firewall - Now make sure no Inbound and Outbound rules related to Minecraft are set to Block the Connection.

Allow the Minecraft Connection Through the Windows Defender Firewall - Then select Inbound Rules & click on New Rule.

Create a New Inbound Rule - Now select Program & click on Next.

Select Program in New Rule Window - Then click on Browse & steer to the installation directory of Minecraft.

Open Browse and Steer to The Installation Directory of Minecraft - Now double-click on Minecraft.exe & select Allow the Connection.
- Then click on Next & select all the three profiles (i.e., Public, Private, & Domain).
- Now name the rule & click on Finish.
- Then repeat the same for the Outbound Rule & reboot your PC.
- Upon reboot, check if the Java.io issue is resolved.

If the issue persists, check if allowing the Minecraft connections through the router’s Firewall (if any) resolves the issue (especially, if it is using some autoblocking feature). If that did not do the trick, check if the parental controls are not restricting the Minecraft access. Also, it will be a good idea to ensure that the ports are properly forwarded in the system/router firewall as required by Minecraft.
If the issue persists, check if allocating more RAM to Minecraft solves the problem. If that did not do the trick, you may contact the server’s admins to delete your player data or check for a server-side problem. If the issue did not resolve so far, you may have to perform a factory reset of your PC & if that did not do the trick, get your system (especially, hard disk and network/Wi-Fi card) checked for a hardware error.
Ошибка «внутреннее исключение» или Internal Exception с io netty handler либо Java IO IOException в Minecraft случаются по причине того, что игра теряет подключение к серверу.
А вот сбоить подключение, как известно, может по самым разным причинам. Следовательно, в каждом отдельном случае устраняется проблема тоже разными способами, притом вполне себе стандартными.
О них и расскажем. Итак,..
что делать, когда в Minecraft отваливается подключение с ошибкой io netty handler или Java IO IOException
Значит, первым делом просто проверяем подключение (перезагружаем роутер, переподключаем комп к Wi-Fi заново, переподключаем его напрямую через кабель, перезагружаем, запускаем Minecraft от имени администратора, проверяем и отключаем родительский контроль и т.д.) далее действуем следующим порядком:
#1 — проверяем состояние сервера
… для того, чтобы определить где именно случился сбой подключения — на стороне сервера, или локально. А для того, чтобы оперативно проверить и текущее состояние сервера игры, и текущее состояние подключения со своей стороны, просто подключаемся к тестовому серверу с IP: test.prisonfun.com.
Не пропустите: ОШИБКА С КОДОМ 0X803F8001 В MINECRAFT: ЧТО ЗНАЧИТ И КАК УСТРАНЯТЬ
Если подключится получается без проблем, то с клиентом игры и с настройками компа все в порядке. Данный сервер поддерживает все версии Minecraft и обновляется регулярно, потому оптимально подходит для оперативного выявления любых потенциально возможных проблем с подключением.
В противном же случае, то есть, когда подключиться именно к этому серверу не получилось, то, вероятнее всего, сбой подключения случился на стороне пользователя. И надо его устранять. Потому идем дальше.
#2 — отключаем брандмауэр, антивирус и VPN
Мера это временная, но крайне необходимая в случае, когда нужно быстро определить и устранить причину ошибок io netty handler или Java IO IOException в Minecraft. Поэтому:
- отключаем брандмауэр Windows:
- жмем Win+R с клавиатуры, в строке «Выполнить» пишем control и жмем Enter;
- в окне Панели управления кликаем «Система и безопасность» и далее — «Брандмауэр Windows«;
- в следующем окне слева жмем «Включение и отключение брандмауэра Windows«;
- отключаем брандмауэр для обоих типов сети — для домашней и рабочей и для общественной;
- кликаем ОК.
После этого снова пробуем подключиться к IP: test.prisonfun.com. Если снова не получилось то:
- отключаем антивирус — через панель управления программы;
- отключаем VPN
И снова подключаемся тестовому IP: test.prisonfun.com.
Не пропустите: MINECRAFT RTX С ТРАССИРОВКОЙ ЛУЧЕЙ: ЕСЛИ НЕ ВКЛЮЧАЕТСЯ И ПРОЧИЕ ПРОБЛЕМЫ
Опять безрезультатно? Тогда..
#3 — обновляем Java
Minecraft без Java не работает (и не должен). Более того, во избежание проблем с игрой Java на компе желательно иметь в самой последней версии. Обновляется эта самая версия стандартно:
- идем на официальную страницу загрузки Java — [ССЫЛКА];
- качаем и устанавливаем самую свежую версию Java.
Попутно в случае с проблемкой «внутреннего исключения» (ошибка io.netty.handler и Java.IO.IOException) не лишним также будет включить функцию Java Native Sandbox, а для этого:
- жмем «Пуск«, в строке поиска системы пишем java и в результатах выше кликаем «Configure Java«;
- в открывшемся окне переходим во вкладку «Advanced«;
- список параметров прокручиваем до раздела «Advanced security settings» и активируем опцию «Enable the operating system’s restricted environment (native sandbox)«;
- жмем «Применить» и «ОК«.
После перерезагружаем комп (это важно!), запускаем Minecraft и подключаемся к IP: test.prisonfun.com. Снова никак?
Не пропустите: MINECRAFT CLASSIC В БРАУЗЕРЕ: ПОЧЕМУ ТОРМОЗИТ И КАК ПОДНЯТЬ FPS
перенастраиваем DNS
Процедура тоже стандартная:
- жмем Win+R с клавиатуры, в строке «Выполнить» пишем control и жмем Enter;
- в окне Панели управления кликаем «Сеть и Интернет» и далее — «Центр управления сетями и общим доступом«;
- находим с списке сетей свое текущее подключение («Ethernet» или «WiFi») и кликаем ссылку «сетевое соединение«;
- в следующем окне жмем кнопку «Свойства» и далее в окне свойств подключения:
-
- двойным кликом кликаем по строке «Протокол интернета версии 4 (IPv4)» в компонентах;
- в открывшемся окошке активируем опцию «Использовать следующие адреса DNS-серверов» и ниже
- для «Предпочитаемый DNS-сервер» прописываем 8.8.8.8
- для «Альтернативный DNS-сервер» прописываем 8.8.4.4
- и жмем ОК.
Перезагружаем комп, запускаем Minecraft и пробуем подключиться к IP: test.prisonfun.com.
Не пропустите: КАК СОЗДАТЬ НАСТОЯЩИЙ КОМПЬЮТЕР В MINECRAFT: О ВОЗМОЖНОСТЯХ КРАСНОГО КАМНЯ
Если после перенастройки DNS (и всех предыдущих мер) устранить проблему не удалось, то, очень вероятно, что причина сбоя — в самой игре, а точнее в имеющейся сборке и/или в установленных модах. Поэтому
#4 — выполняем чистую переустановку Minecraft
То есть, качаем последнюю версию Minecraft с официального сайта и устанавливаем её безо всяких модов. Сделать нужно следующее:
- открываем официальный лаунчер Minecraft (либо сначала качаем его и устанавливаем — [ССЫЛКА] — и затем открываем);
- в главном меню открываем вкладку «Установки» (вверху) и жмем «Новая установка«;
- выбираем версию Minecraft (разработчик рекомендует ставить самую последнюю) и жмем «Загрузить«;
- далее проверяем, чтобы в меню лаунчера выбрана была именно нужная версия и жмем «Играть«;
- после запуска Minecraft проверяем подключение через IP: test.prisonfun.com.
Не пропустите: УСТАРЕВШИЙ КЛИЕНТ MINECRAFT: ПОЧЕМУ, И ЧТО С ЭТИМ ДЕЛАТЬ?
Ну а если игра снова выдает «внутреннее исключение» с io netty handler либо Java IO IOException (а такое тоже может быть), значит придется переустановить её в другое место. Для этого:
- открываем официальный лаунчер Minecraft (ссылку см. выше);
- в главном меню открываем вкладку «Установки» (вверху) и жмем «Новая установка«;
- выбираем самую новую (рекомендуется);
- жмем кнопку «Обзор» и указываем другое место установки игры (либо просто кликаем «Рабочий стол«) и жмем ОК;
- теперь кликаем «Загрузить«;
- далее проверяем, чтобы в меню лаунчера выбрана была именно нужная версия и жмем «Играть«.
После запуска Minecraft проверяем подключение через IP: test.prisonfun.com. Если опять никак, то тогда еще раз, еще внимательнее проверяем подключение, а также «родительский контроль«. Вероятно, дело как раз в последнем…
Technology has contributed to the creation of new modern games and the updates of existing games. Gaming used to be primarily for entertainment, but technological improvements have extended consumers’ views on the subject.
Minecraft is currently one of the most popular and engaging games. Minecraft is an objective video game that encourages players to use their imaginations to achieve a particular objective. Many children have become engrossed in the game due to its numerous exciting features.
Automatically Repair Windows Errors
Recommended: To easily install drivers automatically, use the tool below.
However, as fascinating as Minecraft is, it may not be easy to access. This is true for any built applications or websites, not only Minecraft. Internal Exception java.io.ioexception does not suggest a serious problem with the game.
However, explicit knowledge of its genuine meaning is essential to judge the severity of the issue. On the other hand, this page addresses java.io.ioexception concerns in Minecraft games.
Mojang used Java to create the Minecraft video game. When playing Minecraft, there will be some instances when you might experience specific errors, much like using other applications. On the other hand, this is not unusual, as various factors can trigger it.
Causes of the Minecraft Error Internal exception: java.io.ioexception
The following reasons can cause this Minecraft Error:
- Weak/intermittent internet connection.
- Low storage on the hard drive.
- The anti-virus application is blocking Minecraft and other files associated with the game.
- Minecraft does not have permission to access/make changes to its files.
- Minecraft files are missing/corrupted.
Troubleshooting Methods to Fix the Minecraft Error Internal exception: java.io.ioexception
Before you make changes in the settings of Minecraft or your system, you have to ensure that error is not from any external causes. Here are some basic troubleshooting steps that you can perform that might save you time and effort.
Reboot Your Internet Router
Rebooting your router will clear your connection settings, stop malicious network attacks, and remove any unauthorized connections from your network. Restarting your connection will also fix various speed and connectivity issues, such as the Minecraft internal exception error.
Reboot Your Computer/Device
When you restart a computer, all device drivers are unloaded, all programs are closed, and the operating system is restarted. In the course of regular usage or as a troubleshooting procedure to remedy a problem, you may need to reboot your computer, and both Windows and Mac OS provide options for you to do so fast.
Reinstall a Fresh Copy of Minecraft
If the above steps do not work for you, try this next. Uninstalling the current version of Minecraft from your computer and installing a fresh copy of the game may solve the error.
- Hold down the “Windows + R” keys on your keyboard, type in “appwiz.cpl” on the run command line, and press “enter.”

- In the list of applications, look for Minecraft and click uninstall.

- While waiting for the process to complete, go to Minecraft’s official website to download a fresh installer by clicking here. Select the appropriate installer version for your computer.

- Once Minecraft has been removed, go to the installer file of Minecraft and install the application as usual. Install a fresh copy of Minecraft, launch the game, and see if the error message has been fixed.
Temporarily Disable Windows Defender
In some cases, Windows Defender will quarantine files that aren’t harmful. These files are referred to as “false positives.” If a Minecraft file is recognized as a false positive, the program may fail to function correctly, resulting in a crash. To see if Windows Defender is the issue, turn it off momentarily.
- Open Windows Defender by clicking on the Windows button, type “Windows Security,” and press “enter.”
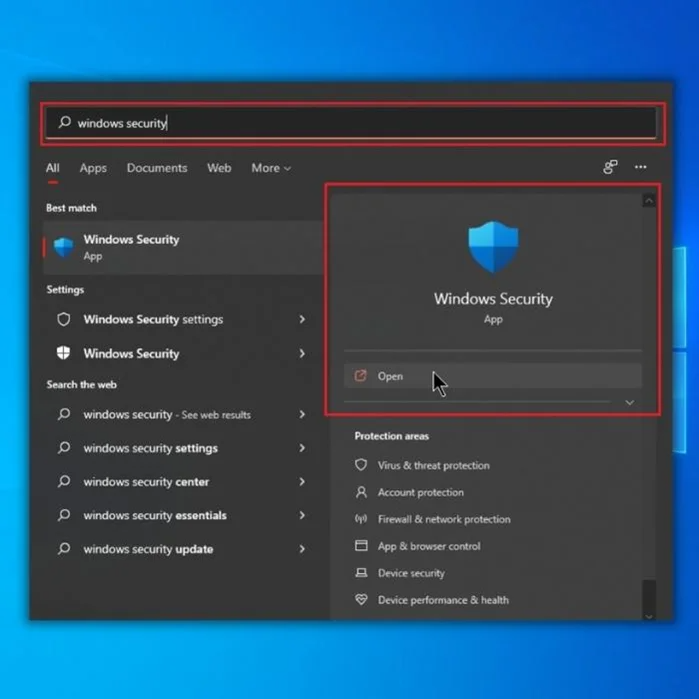
- Click on “Virus & Threat Protection” on the Windows Security homepage.
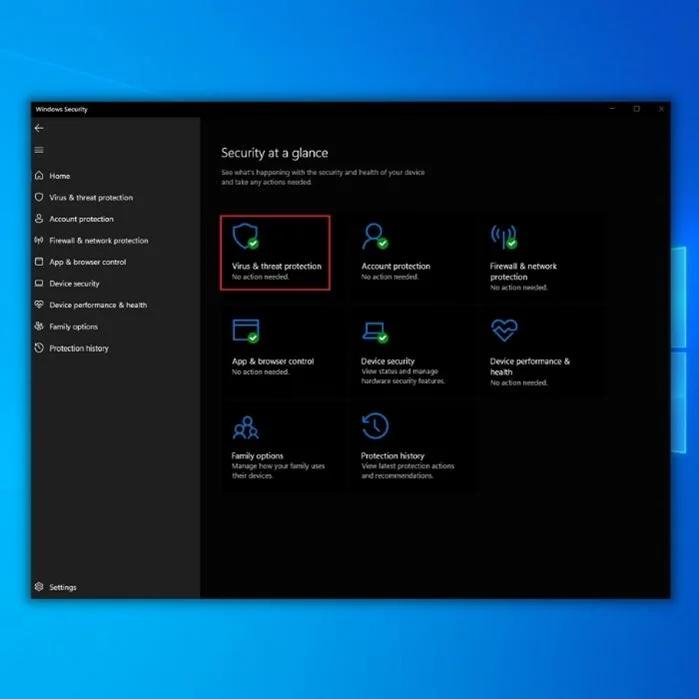
- Under Virus & Threat Protection Settings, click “Manage Settings” and disable the following options:
- Real-time Protection
- Cloud-delivered Protection
- Automatic Sample Submission
- Tamper Protection
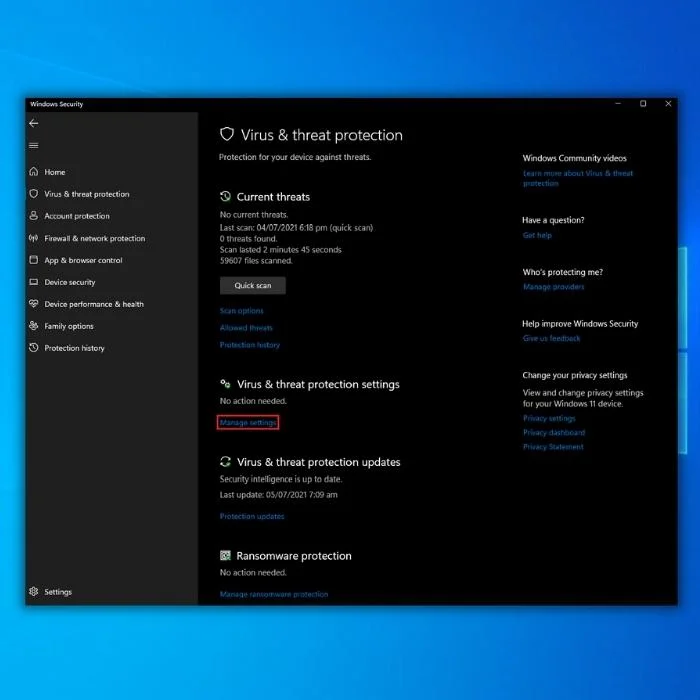
Recommended: Restoro System Repair Tool – Fix Errors & Speed Up Windows Automatically
Add Minecraft to the Windows Defender Whitelist
If Minecraft appears to work after disabling Windows Defender, that suggests Windows Defender is preventing or quarantining Minecraft files. You must now add the Minecraft folder to Windows Defender’s whitelist or exception folder.
This implies that Windows Defender will not block or put any files in quarantine in the Minecraft folder, whether old or new.
- Open Windows Defender by clicking on the Windows button, type “Windows Security,” and press “enter.”
- Under the “Virus & Threat Protection Settings,” click on “Manage Settings.”
- Click on “Add or Remove Exclusions” under Exclusions.

- Click on “Add an exclusion” and select “Folder.” Choose the “Minecraft Launcher” folder and click “select folder.”

- You can now enable Windows Defender and open Minecraft to check if the Minecraft internal exception error message has been fixed.
Allow Minecraft Through the Firewall
If your Firewall blocks Minecraft, it may lead to the Minecraft Error Internal exception: java.io.ioexception. Here’s how to get Minecraft to work around your Firewall.
- Hold down the “Windows + R” keys on your keyboard and type in “control firewall.cpl” in the run command line.

- In the Firewall window, click on “Allow an app or feature through Windows Defender Firewall.”

- Click on “Change Settings” and put a check on both “Private” and “Public” for all apps with the name “javaw.exe,” “Minecraft,” and “Java Platform SE Binary.”

- If you cannot see the “Minecraft” application on the list, click on “Allow another app.”

- Click on “Browse,” go to the folder of Minecraft and select “Minecraft Launcher,” and click “Add.” Once it has been added, you will be brought back to the main window of Windows Firewall; click “OK” to complete the steps.

- Once you have completed all the steps, launch Minecraft and see if the Minecraft Internal exception: java.io.ioexception error.
Wrap Up
There might be multiple reasons why Minecraft players would encounter the Minecraft Error Internal exception: java.io.ioexception, but most of these causes can easily be fixed by performing their corresponding troubleshooting methods.
Windows Automatic Repair Tool

System Information
-
Your machine is currently running Windows 10 -
Restoro is compatible with your operating system.
Recommended: To repair Windows Errors, use this software package; Restoro System Repair. This repair tool has been proven to identify and fix these errors and other Windows problems with very high efficiency.

-
100% safe as confirmed by Norton. -
Only your system and hardware are evaluated.
Frequently Asked Questions
Why does my Minecraft server say connection timed out?
When you attempt to connect to a Minecraft server, your computer sends a “connection request” to the server. The server responds with an acknowledgment that it has received the request and then sends a response back to your computer. If the response takes too long to arrive (known as a “timed out” connection), either the server is not responding or is too busy to respond to the request promptly. This could be due to various reasons, such as a slow internet connection, a congested network, or an overloaded server.
java enable the operating system’s restricted environment what is it?
Java enables the operating system’s restricted environment, a type of security measure designed to protect the system from malicious software and unauthorized access to the system. The operating system typically implements a restricted environment and restricts the type of programs and data that can be accessed and executed. This helps to protect the system from malware, viruses, and other malicious software. Java enables the operating system to control the environment by limiting the resources that can be accessed and used and the types of programs that can be run. This helps to ensure that only trusted programs and data can be accessed and executed and that malicious software and unauthorized access are blocked.
Minecraft not working when I play it says: internal exception: java .lang.nullpointerexception?
This error is caused when a program attempts to access a data structure or variable that has not been initialized or set to null. Minecraft could be caused by a corrupted game file, a bug in the game code, or a conflict with another program running on your computer. You should try updating the game, reinstalling it, or running it in a different compatibility mode to fix this issue. You should contact the game’s support team if the issue persists.
Which primary DNS server is best to play Minecraft?
The best primary DNS server to play Minecraft depends on your specific needs. Generally, it is recommended to use a secondary DNS server in addition to your primary DNS server to ensure optimal performance. Google’s Public DNS is a popular choice for a secondary DNS server due to its reliability and security. Google’s Public DNS is also known to be faster than many other DNS servers, which may be beneficial when playing Minecraft.
How to disable a disable server’s resource pack Minecraft?
Disabling a server’s resource pack in Minecraft is easy to do. First, you need to open the server settings menu. This can be accessed by clicking the “Settings” button in the server list. Once you are in the server settings, you should see a section labeled “Resource Packs.” In this section, you can disable or enable resource packs. You can also choose which resource packs to use. To disable a resource pack, simply uncheck the box next to it. Once you have done this, the resource pack will no longer be used on the server.
How do I use the Java Native Sandbox to run Minecraft?
First, open the Java Control Panel and select the Java tab. In the Java Control Panel, click on the Security tab and check the box labeled “Enable Java content in the browser.” Then, go to the Java folder in the Windows Control Panel and select the Java settings. Check the box labeled “Use the Java Native Sandbox” and click OK. Finally, launch Minecraft, and you should be able to play the game with the Java Native Sandbox enabled.
How do I fix an existing internet connection error on my Minecraft server?
Check your router and modem for any loose connections or power issues. Ensure your internet connection is stable, and check your network settings to ensure that your Minecraft server uses the correct ports. If all else fails, try restarting your router and modem.
How do I set up new DNS server settings for Minecraft?
You’ll need to log into your problematic server and find the DNS settings. Once you’ve located the DNS settings, you’ll need to enter the IP addresses for the Google DNS servers (8.8.8.8 and 8.8.4.4). After entering the IP addresses, save the changes and restart your server. Your new Minecraft server DNS settings should now be active.
What can I do if I am getting a Minecraft internet connection error?
If you are getting an internet connection error in Minecraft, try the following solutions: 1. Check your existing connection and ensure it is stable and working properly. 2. Ensure you are connected to the correct Wi-Fi network or Ethernet cable. 3. Check if your firewall or antivirus is blocking the connection. 4. Make sure you have the latest version of Java installed. 5. Try restarting your router or modem. 6. Try uninstalling and reinstalling the game. 7. If you still have issues, contact your internet service provider.
What is the purpose of configuring Java Native Sandbox in Minecraft?
Configure Java Native Sandbox in Minecraft allows players to adjust the amount of memory and RAM that Minecraft can use. This helps ensure the game runs smoothly and prevents system crashes or slowdowns due to insufficient resources.
Minecraft is the most loved sandbox game in the world. However, the pesky Internal Exception: java.net.SocketException: Connection Reset error destroys the gameplay experience in a matter of seconds. Nevertheless, there are a few ways to fix this error in Minecraft. Keep reading this guide and you will ultimately understand why this error is appearing and how you can fix it.

As the error name suggests, the error is related to Java handling and server execution. That means, the Java was unable to execute a task that resulted in crashing the game or pushing you out of the game.
This error appears only in the Java version of Minecraft and especially in version 1.7 or older. Further, when the error appears, the player is locked out of the game. This Internal Exception: java.net.SocketException: Connection Reset error also affects Minecraft Realms and multiplayer servers. Well, with that being said, let’s see how you can fix this pesky issue.
How to Fix Minecraft Internal Exception: java.net.SocketException: Connection Reset Error?
Here we have discussed a slew of methods to fix the Minecraft internal exception error. We recommend following each fix as one or the other will help. Please don’t skip on any fix because one may be linked to the next. Further, since you are reading this guide on Make Tech Quick, it will be fairly easy to understand.
Fix 1: Adjust Graphics Settings
The first thing you need to try when fixing the connection reset error is to adjust the graphics settings in Minecraft. While it may seem that the error is caused by the server, but the main issue can be a rendering problem. If you don’t know, follow these simple steps.
- Launch Minecraft and join the Single-Player map.
- When the game starts, pause the game by clicking Esc and select Options.
- Next, go to Video Settings and toggle the Render Distance option. Make sure to reduce it below 8.
- After that, toggle the Graphics settings to Fast.
- Next, reduce or stop the Smooth Lighting Level.
- When you have finished doing everything, click on DONE
Now start playing and see whether the game closes with the same error code. If yes, follow up with the next fix.
Fix 2: Change DNS Server
Since we have already mentioned, the DNS server is to blame when experiencing the internal Exception: java.net.SocketException: Connection Reset error, it is always a viable option to tweak it a little bit. Follow these simple steps to change the DNS server:
- Press Windows + R and type ncpa.cpl in the Run dialog box and press Enter.
- Now, right-click on your Current network and go to Properties.
- Next, double-click on Internet Protocol Version 4 (TCP/IPv4).
- In the next window, click on Use the following DNS server address and enter 1.1.1.1 for the Preferred DNS server and 1.0.0.1 for the Alternative DNS server.

- Click on OK and restart your PC.

When your PC has started, launch Minecraft and check whether the error appears. If yes, follow up with the next fix.
Fix 3: Refresh IP/DNS Credentials
Well, the pesky Internal Exception: java.net.SocketException: Connection Reset error seems to go after refreshing IP/DNS credentials. Flushing the IP is a great way if you have already performed the above fix. Follow these simple steps to refresh and flush DNS.:
- Press Windows + R and type cmd in the Run dialog box.
- Now, press Ctrl + Shift + Enter together. This will open Command Prompt in Administrator mode.
- Now in the Command Prompt window, type the following commands one by one and keep pressing enter after each command.
ipconfig /flushdns ↵
ipconfig /registerdns ↵
ipconfig /release ↵
ipconfig /renew ↵
netsh winsock reset ↵
- Once all the commands are done, Shut Down your PC, wait for 1-2 minutes and restart.
Now start playing Minecraft and check whether the Internal Exception: java.net.SocketException: Connection Reset error appears not. If yes, follow up with the next fix. If not, you are good to go.
Fix 4: Try Using a VPN
Using one of the best VPNs available, you can fix the connection reset error in Minecraft. The VPN will connect you to some other server and you are good to go. But make sure, free VPNs can cause a lot of lags and a slew of new error codes in Minecraft. Therefore, make sure to use a paid VPN or you can choose from our list.
Fix 5: Check Your Internet Connection
It is possible that the main problem is with your internet connection and you are trying the fix the issue without even noticing it. Don’t worry, you are not alone. We usually overlook the internet connection speed and start troubleshooting every other option. Make sure to check ways to increase internet speed if you feel that your internet is slow. Finally, if you have checked that your internet is fine, follow up with the next fix.
Fix 6: Reinstall Minecraft
If none of the above fixes have managed to resolve Internal Exception: java.net.SocketException: Connection Reset error, the final option is to uninstall Minecraft and then reinstall it. However, uninstalling in the traditional way is not what you need to do. But follow up with a different approach.
First of all, boot up to safe mode and then uninstall the game. After that, proceed with the reinstallation by following the on-screen instruction. Once you are done with the installation, start playing Minecraft and you will see that the pesky connection reset error has disappeared.
Well, that’s all we have here about how you can fix the Internal Exception: java.net.SocketException: Connection Reset error in Minecraft. We hope this guide helped you. If you liked this, make sure to check out the best Minecraft seeds.
При запуске игр мы часто сталкиваемся с различными ошибками и сбоями, которые заставляют переключить нашу вовлеченность с игрового мира в процесс поиска способов их решения. Более того, некоторые из них не просто решить. В частности, к таким ошибкам при запуске Minecraft относится и «internal exception java.io.ioexception», которая препятствует подключению ПК к внешнему серверу игры.
Содержание
- 1 Простые решения
- 2 Варианты запуска
- 3 Отключение межсетевого экрана
- 4 Установка разрешений в брандмауэре Windows
- 5 Уменьшение глубины прорисовки
Простые решения
В общем она может появиться по ряду причин и некоторые из них можно исправить простыми способами. Поэтому прежде чем перейти к более продвинутым решениям выполните следующие шаги.
Во-первых, попробуйте исправить ошибку Java.Io.Ioexception обычным перезапуском Minecraft. В противном случае перезапустите компьютер и роутер. Также нужно проверить состояние внешнего сервера Minecraft. Если эти методы не сработали, перейдите к следующим шагам.
Варианты запуска
Ошибка внутреннего исключения «internal exception java.io.ioexception удаленный хост принудительно разорвал существующее подключение» в основном происходит из-за проблем с Java. Даже если игра работает, сбой может произойти из-за проблем этой среды выполнения. Иногда программа запуска использует старую версию java, хотя в системе установлен последний ее выпуск.
В этом случае нужно заставить загрузчик Minecraft использовать последнюю версию программной среды. Для этого нужно перейти в параметры запуска и в профиле переключить путь с устаревшей версии на новую.
Отключение межсетевого экрана
Межсетевые экраны, включая брандмауэр Windows, могут сбросить подключение с внешним сервером Minecraft на этапе запуска игры. Чтобы узнать, не причастен ли он к этому событию, попробуйте отключить эту функцию безопасности.
Откройте параметры Windows нажатием на Win + I и перейдите в раздел Обновление и безопасность. На вкладке Безопасность Windows выберите раздел Брандмауэр и защита сети.
Для активной частной сети переместите переключатель в положение «Отключено». После этого попробуйте запустить игру.
Установка разрешений в брандмауэре Windows
Если продолжаете сталкиваться с ошибкой внутреннего исключения java.io.ioexception, попробуйте добавить среду в список разрешений брандмауэра.
С помощью поискового запроса перейдите в брандмауэр. На панели слева перейдите на вкладку «Разрешение взаимодействия с приложением или компонентом в брандмауэре Windows». Затем щелкните на кнопку изменения параметров.
Найдите в списке файлы Java Platform SE и разрешите им доступ по частной сети.
После перезагрузки компьютера проблема должна быть решена.
Уменьшение глубины прорисовки
С ошибкой внутреннего исключения можно столкнуться, когда Minecraft не сможет отобразить всю картинку в целом из-за низкой скорости Интернета. В этом случае уменьшите глубину прорисовки в настройках до минимально допустимого.
В настройках Майнкрафт в разделе «Настройки графики» переместите ползунок прорисовки до минимального, например, до 2-х позиций.
Если ошибка исчезла, увеличьте этот показатель на единицу, пока не достигните оптимального значения.