What Happened?
Running minikube 1.24.0
$ minikube addons enable ingress
▪ Using image k8s.gcr.io/ingress-nginx/controller:v1.0.4
▪ Using image k8s.gcr.io/ingress-nginx/kube-webhook-certgen:v1.1.1
▪ Using image k8s.gcr.io/ingress-nginx/kube-webhook-certgen:v1.1.1
Verifying ingress addon…
❌ Exiting due to MK_ADDON_ENABLE: run callbacks: running callbacks: [sudo KUBECONFIG=/var/lib/minikube/kubeconfig /var/lib/minikube/binaries/v1.22.3/kubectl apply -f /etc/kubernetes/addons/ingress-deploy.yaml: Process exited with status 1
stdout:
namespace/ingress-nginx unchanged
serviceaccount/ingress-nginx unchanged
configmap/ingress-nginx-controller unchanged
configmap/tcp-services unchanged
configmap/udp-services unchanged
clusterrole.rbac.authorization.k8s.io/ingress-nginx unchanged
clusterrolebinding.rbac.authorization.k8s.io/ingress-nginx unchanged
role.rbac.authorization.k8s.io/ingress-nginx unchanged
rolebinding.rbac.authorization.k8s.io/ingress-nginx unchanged
service/ingress-nginx-controller-admission unchanged
service/ingress-nginx-controller unchanged
deployment.apps/ingress-nginx-controller configured
ingressclass.networking.k8s.io/nginx unchanged
validatingwebhookconfiguration.admissionregistration.k8s.io/ingress-nginx-admission configured
serviceaccount/ingress-nginx-admission unchanged
clusterrole.rbac.authorization.k8s.io/ingress-nginx-admission unchanged
clusterrolebinding.rbac.authorization.k8s.io/ingress-nginx-admission unchanged
role.rbac.authorization.k8s.io/ingress-nginx-admission unchanged
rolebinding.rbac.authorization.k8s.io/ingress-nginx-admission unchanged
stderr:
Error from server (Invalid): error when applying patch:
{«metadata»:{«annotations»:{«helm.sh/hook»:null,»helm.sh/hook-delete-policy»:null,»kubectl.kubernetes.io/last-applied-configuration»:»{«apiVersion»:»batch/v1″,»kind»:»Job»,»metadata»:{«annotations»:{},»labels»:{«app.kubernetes.io/component»:»admission-webhook»,»app.kubernetes.io/instance»:»ingress-nginx»,»app.kubernetes.io/name»:»ingress-nginx»},»name»:»ingress-nginx-admission-create»,»namespace»:»ingress-nginx»},»spec»:{«template»:{«metadata»:{«labels»:{«app.kubernetes.io/component»:»admission-webhook»,»app.kubernetes.io/instance»:»ingress-nginx»,»app.kubernetes.io/name»:»ingress-nginx»},»name»:»ingress-nginx-admission-create»},»spec»:{«containers»:[{«args»:[«create»,»—host=ingress-nginx-controller-admission,ingress-nginx-controller-admission.$(POD_NAMESPACE).svc»,»—namespace=$(POD_NAMESPACE)»,»—secret-name=ingress-nginx-admission»],»env»:[{«name»:»POD_NAMESPACE»,»valueFrom»:{«fieldRef»:{«fieldPath»:»metadata.namespace»}}}],»image»:»k8s.gcr.io/ingress-nginx/kube-webhook-certgen:v1.1.1@sha256:64d8c73dca984af206adf9d6d7e46aa550362b1d7a01f3a0a91b20cc67868660″,»imagePullPolicy»:»IfNotPresent»,»name»:»create»}],»restartPolicy»:»OnFailure»,»securityContext»:{«runAsNonRoot»:true,»runAsUser»:2000},»serviceAccountName»:»ingress-nginx-admission»}}}}n»},»labels»:{«app.kubernetes.io/managed-by»:null,»app.kubernetes.io/version»:null,»helm.sh/chart»:null}},»spec»:{«template»:{«metadata»:{«labels»:{«app.kubernetes.io/managed-by»:null,»app.kubernetes.io/version»:null,»helm.sh/chart»:null}},»spec»:{«$setElementOrder/containers»:[{«name»:»create»}],»containers»:[{«name»:»create»,»securityContext»:null}],»nodeSelector»:null}}}}
to:
Resource: «batch/v1, Resource=jobs», GroupVersionKind: «batch/v1, Kind=Job»
Name: «ingress-nginx-admission-create», Namespace: «ingress-nginx»
for: «/etc/kubernetes/addons/ingress-deploy.yaml»: Job.batch «ingress-nginx-admission-create» is invalid: spec.template: Invalid value: core.PodTemplateSpec{ObjectMeta:v1.ObjectMeta{Name:»ingress-nginx-admission-create», GenerateName:»», Namespace:»», SelfLink:»», UID:»», ResourceVersion:»», Generation:0, CreationTimestamp:v1.Time{Time:time.Time{wall:0x0, ext:0, loc:(*time.Location)(nil)}}, DeletionTimestamp:(*v1.Time)(nil), DeletionGracePeriodSeconds:(*int64)(nil), Labels:map[string]string{«app.kubernetes.io/component»:»admission-webhook», «app.kubernetes.io/instance»:»ingress-nginx», «app.kubernetes.io/name»:»ingress-nginx», «controller-uid»:»9ab2e7ab-1a6c-4b96-a0df-33cbddf973a4″, «job-name»:»ingress-nginx-admission-create»}, Annotations:map[string]string(nil), OwnerReferences:[]v1.OwnerReference(nil), Finalizers:[]string(nil), ClusterName:»», ManagedFields:[]v1.ManagedFieldsEntry(nil)}, Spec:core.PodSpec{Volumes:[]core.Volume(nil), InitContainers:[]core.Container(nil), Containers:[]core.Container{core.Container{Name:»create», Image:»k8s.gcr.io/ingress-nginx/kube-webhook-certgen:v1.1.1@sha256:64d8c73dca984af206adf9d6d7e46aa550362b1d7a01f3a0a91b20cc67868660″, Command:[]string(nil), Args:[]string{«create», «—host=ingress-nginx-controller-admission,ingress-nginx-controller-admission.$(POD_NAMESPACE).svc», «—namespace=$(POD_NAMESPACE)», «—secret-name=ingress-nginx-admission»}, WorkingDir:»», Ports:[]core.ContainerPort(nil), EnvFrom:[]core.EnvFromSource(nil), Env:[]core.EnvVar{core.EnvVar{Name:»POD_NAMESPACE», Value:»», ValueFrom:(*core.EnvVarSource)(0xc00bbc4100)}}, Resources:core.ResourceRequirements{Limits:core.ResourceList(nil), Requests:core.ResourceList(nil)}, VolumeMounts:[]core.VolumeMount(nil), VolumeDevices:[]core.VolumeDevice(nil), LivenessProbe:(*core.Probe)(nil), ReadinessProbe:(*core.Probe)(nil), StartupProbe:(*core.Probe)(nil), Lifecycle:(*core.Lifecycle)(nil), TerminationMessagePath:»/dev/termination-log», TerminationMessagePolicy:»File», ImagePullPolicy:»IfNotPresent», SecurityContext:(*core.SecurityContext)(nil), Stdin:false, StdinOnce:false, TTY:false}}, EphemeralContainers:[]core.EphemeralContainer(nil), RestartPolicy:»OnFailure», TerminationGracePeriodSeconds:(*int64)(0xc00df04c88), ActiveDeadlineSeconds:(*int64)(nil), DNSPolicy:»ClusterFirst», NodeSelector:map[string]string(nil), ServiceAccountName:»ingress-nginx-admission», AutomountServiceAccountToken:(*bool)(nil), NodeName:»», SecurityContext:(*core.PodSecurityContext)(0xc00ac3a400), ImagePullSecrets:[]core.LocalObjectReference(nil), Hostname:»», Subdomain:»», SetHostnameAsFQDN:(*bool)(nil), Affinity:(*core.Affinity)(nil), SchedulerName:»default-scheduler», Tolerations:[]core.Toleration(nil), HostAliases:[]core.HostAlias(nil), PriorityClassName:»», Priority:(*int32)(nil), PreemptionPolicy:(*core.PreemptionPolicy)(nil), DNSConfig:(*core.PodDNSConfig)(nil), ReadinessGates:[]core.PodReadinessGate(nil), RuntimeClassName:(*string)(nil), Overhead:core.ResourceList(nil), EnableServiceLinks:(*bool)(nil), TopologySpreadConstraints:[]core.TopologySpreadConstraint(nil)}}: field is immutable
Error from server (Invalid): error when applying patch:
{«metadata»:{«annotations»:{«helm.sh/hook»:null,»helm.sh/hook-delete-policy»:null,»kubectl.kubernetes.io/last-applied-configuration»:»{«apiVersion»:»batch/v1″,»kind»:»Job»,»metadata»:{«annotations»:{},»labels»:{«app.kubernetes.io/component»:»admission-webhook»,»app.kubernetes.io/instance»:»ingress-nginx»,»app.kubernetes.io/name»:»ingress-nginx»},»name»:»ingress-nginx-admission-patch»,»namespace»:»ingress-nginx»},»spec»:{«template»:{«metadata»:{«labels»:{«app.kubernetes.io/component»:»admission-webhook»,»app.kubernetes.io/instance»:»ingress-nginx»,»app.kubernetes.io/name»:»ingress-nginx»},»name»:»ingress-nginx-admission-patch»},»spec»:{«containers»:[{«args»:[«patch»,»—webhook-name=ingress-nginx-admission»,»—namespace=$(POD_NAMESPACE)»,»—patch-mutating=false»,»—secret-name=ingress-nginx-admission»,»—patch-failure-policy=Fail»],»env»:[{«name»:»POD_NAMESPACE»,»valueFrom»:{«fieldRef»:{«fieldPath»:»metadata.namespace»}}}],»image»:»k8s.gcr.io/ingress-nginx/kube-webhook-certgen:v1.1.1@sha256:64d8c73dca984af206adf9d6d7e46aa550362b1d7a01f3a0a91b20cc67868660″,»imagePullPolicy»:»IfNotPresent»,»name»:»patch»}],»restartPolicy»:»OnFailure»,»securityContext»:{«runAsNonRoot»:true,»runAsUser»:2000},»serviceAccountName»:»ingress-nginx-admission»}}}}n»},»labels»:{«app.kubernetes.io/managed-by»:null,»app.kubernetes.io/version»:null,»helm.sh/chart»:null}},»spec»:{«template»:{«metadata»:{«labels»:{«app.kubernetes.io/managed-by»:null,»app.kubernetes.io/version»:null,»helm.sh/chart»:null}},»spec»:{«$setElementOrder/containers»:[{«name»:»patch»}],»containers»:[{«name»:»patch»,»securityContext»:null}],»nodeSelector»:null}}}}
to:
Resource: «batch/v1, Resource=jobs», GroupVersionKind: «batch/v1, Kind=Job»
Name: «ingress-nginx-admission-patch», Namespace: «ingress-nginx»
for: «/etc/kubernetes/addons/ingress-deploy.yaml»: Job.batch «ingress-nginx-admission-patch» is invalid: spec.template: Invalid value: core.PodTemplateSpec{ObjectMeta:v1.ObjectMeta{Name:»ingress-nginx-admission-patch», GenerateName:»», Namespace:»», SelfLink:»», UID:»», ResourceVersion:»», Generation:0, CreationTimestamp:v1.Time{Time:time.Time{wall:0x0, ext:0, loc:(*time.Location)(nil)}}, DeletionTimestamp:(*v1.Time)(nil), DeletionGracePeriodSeconds:(*int64)(nil), Labels:map[string]string{«app.kubernetes.io/component»:»admission-webhook», «app.kubernetes.io/instance»:»ingress-nginx», «app.kubernetes.io/name»:»ingress-nginx», «controller-uid»:»d1eff703-f384-4b1f-848e-7413d21f8ef0″, «job-name»:»ingress-nginx-admission-patch»}, Annotations:map[string]string(nil), OwnerReferences:[]v1.OwnerReference(nil), Finalizers:[]string(nil), ClusterName:»», ManagedFields:[]v1.ManagedFieldsEntry(nil)}, Spec:core.PodSpec{Volumes:[]core.Volume(nil), InitContainers:[]core.Container(nil), Containers:[]core.Container{core.Container{Name:»patch», Image:»k8s.gcr.io/ingress-nginx/kube-webhook-certgen:v1.1.1@sha256:64d8c73dca984af206adf9d6d7e46aa550362b1d7a01f3a0a91b20cc67868660″, Command:[]string(nil), Args:[]string{«patch», «—webhook-name=ingress-nginx-admission», «—namespace=$(POD_NAMESPACE)», «—patch-mutating=false», «—secret-name=ingress-nginx-admission», «—patch-failure-policy=Fail»}, WorkingDir:»», Ports:[]core.ContainerPort(nil), EnvFrom:[]core.EnvFromSource(nil), Env:[]core.EnvVar{core.EnvVar{Name:»POD_NAMESPACE», Value:»», ValueFrom:(*core.EnvVarSource)(0xc00bbc5ec0)}}, Resources:core.ResourceRequirements{Limits:core.ResourceList(nil), Requests:core.ResourceList(nil)}, VolumeMounts:[]core.VolumeMount(nil), VolumeDevices:[]core.VolumeDevice(nil), LivenessProbe:(*core.Probe)(nil), ReadinessProbe:(*core.Probe)(nil), StartupProbe:(*core.Probe)(nil), Lifecycle:(*core.Lifecycle)(nil), TerminationMessagePath:»/dev/termination-log», TerminationMessagePolicy:»File», ImagePullPolicy:»IfNotPresent», SecurityContext:(*core.SecurityContext)(nil), Stdin:false, StdinOnce:false, TTY:false}}, EphemeralContainers:[]core.EphemeralContainer(nil), RestartPolicy:»OnFailure», TerminationGracePeriodSeconds:(*int64)(0xc00df42cc8), ActiveDeadlineSeconds:(*int64)(nil), DNSPolicy:»ClusterFirst», NodeSelector:map[string]string(nil), ServiceAccountName:»ingress-nginx-admission», AutomountServiceAccountToken:(*bool)(nil), NodeName:»», SecurityContext:(*core.PodSecurityContext)(0xc00ac3bf00), ImagePullSecrets:[]core.LocalObjectReference(nil), Hostname:»», Subdomain:»», SetHostnameAsFQDN:(*bool)(nil), Affinity:(*core.Affinity)(nil), SchedulerName:»default-scheduler», Tolerations:[]core.Toleration(nil), HostAliases:[]core.HostAlias(nil), PriorityClassName:»», Priority:(*int32)(nil), PreemptionPolicy:(*core.PreemptionPolicy)(nil), DNSConfig:(*core.PodDNSConfig)(nil), ReadinessGates:[]core.PodReadinessGate(nil), RuntimeClassName:(*string)(nil), Overhead:core.ResourceList(nil), EnableServiceLinks:(*bool)(nil), TopologySpreadConstraints:[]core.TopologySpreadConstraint(nil)}}: field is immutable
]
╭─────────────────────────────────────────────────────────────────────────────────────────────────────────────────────────╮
│ │
│ 😿 If the above advice does not help, please let us know: │
│ 👉 https://github.com/kubernetes/minikube/issues/new/choose │
│ │
│ Please run minikube logs --file=logs.txt and attach logs.txt to the GitHub issue. │
│ Please also attach the following file to the GitHub issue: │
│ — /var/folders/tq/yfx_f_bs51341hf44jrrsm1r0000gn/T/minikube_addons_a007ce4e3c0b38b164d12b3a723e3d1f0a0d0321_1.log │
│ │
╰─────────────────────────────────────────────────────────────────────────────────────────────────────────────────────────╯
Although I am seeing the following:
$ get pods —namespace=ingress-nginx
NAME READY STATUS RESTARTS AGE
ingress-nginx-admission-create—1-tvlpm 0/1 Completed 0 37m
ingress-nginx-admission-patch—1-gl6t6 0/1 Completed 1 37m
ingress-nginx-controller-5f66978484-4lkxm 1/1 Running 0 36m
Attach the log file
log.txt
Operating System
macOS (Default)
Driver
HyperKit
In this comprehensive ingress guide, you will learn how to setup Nginx ingress controller on Kubernetes and configure ingress using DNS.
If you want to understand how Kubernetes ingress work, read my Kubernetes Ingress Tutorial. for beginners. I have explained all the core ingress concepts including how an ingress object works with an ingress controller.
Table of Contents
- Ingress & Nginx Ingress controller Architecture
- Prerequisites
- Nginx Ingress Controller Kubernetes Manifests
- Deploy Nginx Ingress Controller With Manifests
- Need for Admission Controller & Validating Webhook
- Create a Namespace
- Create Admission Controller Roles & Service Account
- Create Validating Webhook Configuration
- Deploy Jobs To Update Webhook Certificates
- Create Ingress Controller Roles & Service Account
- Create Configmap
- Create Ingress Controller & Admission Controller Services
- Create Ingress Controller Deployment
- Nginx Ingress Controller Helm Deployment
- Map a Domain Name To Ingress Loadbalancer IP
- Single DNS Mapping
- Wildcard DNS Mapping
- Deploy a Demo Application
- Create Ingress Object for Application
- TLS With Nginx Ingress
- Conclusion
There are two Nginx ingress controllers.
- Nginx ingress controller by kubernetes community
- Nginx ingress controller by Nginx Inc
We will be using the kubernetes community Nginx controller.
Note: Today, you can get 35% discount on Kubernetes CKA, CKAD, CKS, KCNA certifications using code FEST35 at kube.promo/latest
Ingress & Nginx Ingress controller Architecture
Here is a high-level architecture of Kubernetes ingress using the Nginx ingress controller. In this guide, we will learn by building the setup in the architecture.
(Note: Click the image to view in high resolution)
Prerequisites
- A Kubernetes cluster
- kubectl utility installed and authenticated to kubernetes cluster.
- Admin access to kubernetes cluster.
- A valid domain to point to ingress controller Load Balancer IP. (Optional)
If you are on google cloud, assign admin permissions to your account to enable cluster roles.
ACCOUNT=$(gcloud info --format='value(config.account)')
kubectl create clusterrolebinding owner-cluster-admin-binding
    --clusterrole cluster-admin
    --user $ACCOUNT
All the kubernetes manifests used in this tutorial are hosted on the Github repository. Clone it and use it for deployment. These manifests are taken from the official Nginx community repo.
git clone https://github.com/scriptcamp/nginx-ingress-controller.gitFirst, we will understand all the associated Kubernetes objects by deploying Nginx controllers using YAML manifests. Once we have the understanding, we will deploy it using the Helm chart.
Also, here is the one-liner to deploy all the objects.
kubectl apply -f https://raw.githubusercontent.com/kubernetes/ingress-nginx/controller-v1.1.1/deploy/static/provider/cloud/deploy.yamlNote: If you want to understand all the Nginx ingress controllers objects and how they relate to each other, I suggest you create objects individually from the repo. Once you know how it works, you can use a single manifest or a helm chart to deploy it.
Deploy Nginx Ingress Controller With Manifests
We need to deploy the following objects to have a working Nginx controller.
ingress-nginxnamespace- Service account/Roles/ClusterRoles for Nginx admission controller
- Validating webhook Configuration
- Jobs to create/update Webhook CA bundles
- Service account/Roles/ClusterRoles of Nginx controller deployment
- Nginx controller configmap
- Services for nginx controller & admission controller
- Ingress controller deployment
Note: You can create all the manifests yourself or use the Github repo. However, I highly suggest you go through every manifest and understand what you are deploying.
Need for Admission Controller & Validating Webhook
Kubernetes Admission Controller is a small piece of code to validate or update Kubernetes objects before creating them. In this case, it’s an admission controller to validate the ingress objects. In this case, the Admission Controller code is part of the Nginx controller which listens on port 8443.
We can deploy ingress objects with the wrong configuration without an admission controller. However, it breaks all the ingress rules associated with the ingress controller.
With the admission controller in place, we can ensure that the ingress object we create has configurations and doesn’t break routing rules.
Here is how admission controllers work for Nginx.
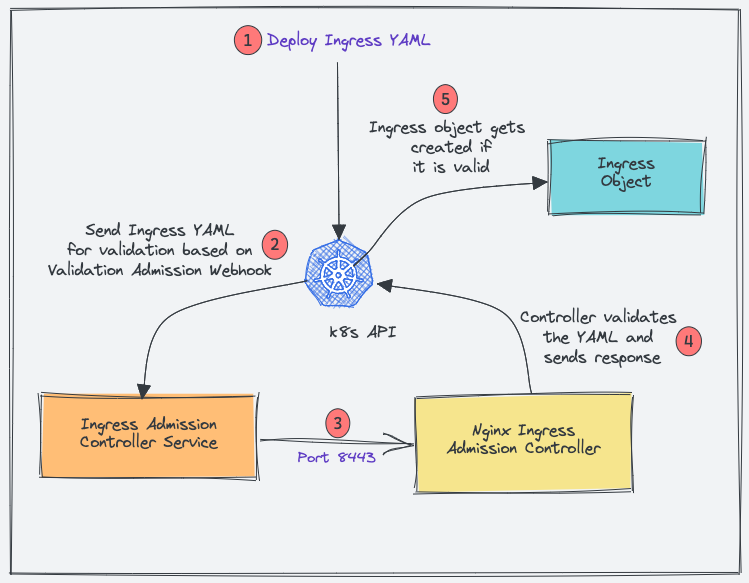
- When you deploy an ingress YAML, the Validation admission intercepts the request.
- Kubernetes API then sends the ingress object to the validation admission controller service endpoint based on admission webhook endpoints.
- Service sends the request to the Nginx deployment on port 8443 for validating the ingress object.
- The admission controller then sends a response to the k8s API.
- If it is a valid response, the API will create the ingress object.
Now let’s get started by creating Kubernetes objects for the ingress controller.
Create a Namespace
We will deploy all the Nginx controller objects in the ingress-nginx namespace.
Let’s create the namespace.
kubectl create ns ingress-nginxCreate Admission Controller Roles & Service Account
We need a Role and ClusterRole with required permissions and bind to ingress-nginx-admission service account.
Create a file named admission-service-account.yaml and copy the following contents.
---
apiVersion: v1
kind: ServiceAccount
metadata:
  labels:
    app.kubernetes.io/component: admission-webhook
    app.kubernetes.io/instance: ingress-nginx
    app.kubernetes.io/name: ingress-nginx
  name: ingress-nginx-admission
  namespace: ingress-nginx

---
apiVersion: rbac.authorization.k8s.io/v1
kind: Role
metadata:
  annotations:
    app.kubernetes.io/component: admission-webhook
    app.kubernetes.io/instance: ingress-nginx
    app.kubernetes.io/name: ingress-nginx
  name: ingress-nginx-admission
  namespace: ingress-nginx
rules:
- apiGroups:
  - ""
  resources:
  - secrets
  verbs:
  - get
  - create

---
apiVersion: rbac.authorization.k8s.io/v1
kind: RoleBinding
metadata:
  labels:
    app.kubernetes.io/component: admission-webhook
    app.kubernetes.io/instance: ingress-nginx
    app.kubernetes.io/name: ingress-nginx
  name: ingress-nginx-admission
  namespace: ingress-nginx
roleRef:
  apiGroup: rbac.authorization.k8s.io
  kind: Role
  name: ingress-nginx-admission
subjects:
- kind: ServiceAccount
  name: ingress-nginx-admission
  namespace: ingress-nginx


---
apiVersion: rbac.authorization.k8s.io/v1
kind: ClusterRole
metadata:
  labels:
    app.kubernetes.io/component: admission-webhook
    app.kubernetes.io/instance: ingress-nginx
    app.kubernetes.io/name: ingress-nginx
  name: ingress-nginx-admission
rules:
- apiGroups:
  - admissionregistration.k8s.io
  resources:
  - validatingwebhookconfigurations
  verbs:
  - get
  - update

---
apiVersion: rbac.authorization.k8s.io/v1
kind: ClusterRoleBinding
metadata:
  labels:
    app.kubernetes.io/component: admission-webhook
    app.kubernetes.io/instance: ingress-nginx
    app.kubernetes.io/name: ingress-nginx
  name: ingress-nginx-admission
roleRef:
  apiGroup: rbac.authorization.k8s.io
  kind: ClusterRole
  name: ingress-nginx-admission
subjects:
- kind: ServiceAccount
  name: ingress-nginx-admission
  namespace: ingress-nginx
Deploy the manifest.
kubectl apply -f admission-service-account.yaml Create Validating Webhook Configuration
Create a file named validating-webhook.yaml and copy the following contents.
---
apiVersion: admissionregistration.k8s.io/v1
kind: ValidatingWebhookConfiguration
metadata:
  labels:
    app.kubernetes.io/component: admission-webhook
    app.kubernetes.io/instance: ingress-nginx
    app.kubernetes.io/name: ingress-nginx
  name: ingress-nginx-admission
webhooks:
- admissionReviewVersions:
  - v1
  clientConfig:
    service:
      name: ingress-nginx-controller-admission
      namespace: ingress-nginx
      path: /networking/v1/ingresses
  failurePolicy: Fail
  matchPolicy: Equivalent
  name: validate.nginx.ingress.kubernetes.io
  rules:
  - apiGroups:
    - networking.k8s.io
    apiVersions:
    - v1
    operations:
    - CREATE
    - UPDATE
    resources:
    - ingresses
  sideEffects: None
Create the ValidatingWebhookConfiguration
kubectl apply -f validating-webhook.yamlDeploy Jobs To Update Webhook Certificates
The ValidatingWebhookConfiguration works only over HTTPS. So it needs a CA bundle.
We use kube-webhook-certgen to generate a CA cert bundle with the first job. The generated CA certs are stored in a secret named ingress-nginx-admission
The second job patches the ValidatingWebhookConfiguration object with the CA bundle.
Create a file named jobs.yaml and copy the following contents.
---
apiVersion: batch/v1
kind: Job
metadata:
  labels:
    app.kubernetes.io/component: controller
    app.kubernetes.io/instance: ingress-nginx
    app.kubernetes.io/name: ingress-nginx
  name: ingress-nginx-admission-create
  namespace: ingress-nginx
spec:
  template:
    metadata:
      labels:
        app.kubernetes.io/component: controller
        app.kubernetes.io/instance: ingress-nginx
        app.kubernetes.io/name: ingress-nginx
      name: ingress-nginx-admission-create
    spec:
      containers:
      - args:
        - create
        - --host=ingress-nginx-controller-admission,ingress-nginx-controller-admission.$(POD_NAMESPACE).svc
        - --namespace=$(POD_NAMESPACE)
        - --secret-name=ingress-nginx-admission
        env:
        - name: POD_NAMESPACE
          valueFrom:
            fieldRef:
              fieldPath: metadata.namespace
        image: k8s.gcr.io/ingress-nginx/kube-webhook-certgen:v1.1.1
        imagePullPolicy: IfNotPresent
        name: create
        securityContext:
          allowPrivilegeEscalation: false
      nodeSelector:
        kubernetes.io/os: linux
      restartPolicy: OnFailure
      securityContext:
        runAsNonRoot: true
        runAsUser: 2000
      serviceAccountName: ingress-nginx-admission
---
apiVersion: batch/v1
kind: Job
metadata:
  labels:
    app.kubernetes.io/component: admission-webhook
    app.kubernetes.io/instance: ingress-nginx
    app.kubernetes.io/name: ingress-nginx
  name: ingress-nginx-admission-patch
  namespace: ingress-nginx
spec:
  template:
    metadata:
      labels:
        app.kubernetes.io/component: admission-webhook
        app.kubernetes.io/instance: ingress-nginx
        app.kubernetes.io/name: ingress-nginx
      name: ingress-nginx-admission-patch
    spec:
      containers:
      - args:
        - patch
        - --webhook-name=ingress-nginx-admission
        - --namespace=$(POD_NAMESPACE)
        - --patch-mutating=false
        - --secret-name=ingress-nginx-admission
        - --patch-failure-policy=Fail
        env:
        - name: POD_NAMESPACE
          valueFrom:
            fieldRef:
              fieldPath: metadata.namespace
        image: k8s.gcr.io/ingress-nginx/kube-webhook-certgen:v1.1.1
        imagePullPolicy: IfNotPresent
        name: patch
        securityContext:
          allowPrivilegeEscalation: false
      nodeSelector:
        kubernetes.io/os: linux
      restartPolicy: OnFailure
      securityContext:
        runAsNonRoot: true
        runAsUser: 2000
      serviceAccountName: ingress-nginx-admission
Once the jobs are executed, you can describe the ValidatingWebhookConfigurationand, you will see the patched bundle.
kubectl describe ValidatingWebhookConfiguration ingress-nginx-admissionCreate Ingress Controller Roles & Service Account
Create a file named ingress-service-account.yaml and copy the following contents.
---
apiVersion: v1
kind: ServiceAccount
metadata:
  labels:
    app.kubernetes.io/component: admission-webhook
    app.kubernetes.io/instance: ingress-nginx
    app.kubernetes.io/name: ingress-nginx
  name: ingress-nginx
  namespace: ingress-nginx

---
apiVersion: rbac.authorization.k8s.io/v1
kind: Role
metadata:
  labels:
    app.kubernetes.io/component: controller
    app.kubernetes.io/instance: ingress-nginx
    app.kubernetes.io/name: ingress-nginx
  name: ingress-nginx
  namespace: ingress-nginx
rules:
- apiGroups:
  - ""
  resources:
  - namespaces
  verbs:
  - get
- apiGroups:
  - ""
  resources:
  - configmaps
  - pods
  - secrets
  - endpoints
  verbs:
  - get
  - list
  - watch
- apiGroups:
  - ""
  resources:
  - services
  verbs:
  - get
  - list
  - watch
- apiGroups:
  - networking.k8s.io
  resources:
  - ingresses
  verbs:
  - get
  - list
  - watch
- apiGroups:
  - networking.k8s.io
  resources:
  - ingresses/status
  verbs:
  - update
- apiGroups:
  - networking.k8s.io
  resources:
  - ingressclasses
  verbs:
  - get
  - list
  - watch
- apiGroups:
  - ""
  resourceNames:
  - ingress-controller-leader
  resources:
  - configmaps
  verbs:
  - get
  - update
- apiGroups:
  - ""
  resources:
  - configmaps
  verbs:
  - create
- apiGroups:
  - ""
  resources:
  - events
  verbs:
  - create
  - patch

---
apiVersion: rbac.authorization.k8s.io/v1
kind: RoleBinding
metadata:
  labels:
    app.kubernetes.io/component: controller
    app.kubernetes.io/instance: ingress-nginx
    app.kubernetes.io/name: ingress-nginx
  name: ingress-nginx
  namespace: ingress-nginx
roleRef:
  apiGroup: rbac.authorization.k8s.io
  kind: Role
  name: ingress-nginx
subjects:
- kind: ServiceAccount
  name: ingress-nginx
  namespace: ingress-nginx

---
apiVersion: rbac.authorization.k8s.io/v1
kind: ClusterRole
metadata:
  labels:
    app.kubernetes.io/component: controller
    app.kubernetes.io/instance: ingress-nginx
    app.kubernetes.io/name: ingress-nginx
  name: ingress-nginx
rules:
- apiGroups:
  - ""
  resources:
  - configmaps
  - endpoints
  - nodes
  - pods
  - secrets
  - namespaces
  verbs:
  - list
  - watch
- apiGroups:
  - ""
  resources:
  - nodes
  verbs:
  - get
- apiGroups:
  - ""
  resources:
  - services
  verbs:
  - get
  - list
  - watch
- apiGroups:
  - networking.k8s.io
  resources:
  - ingresses
  verbs:
  - get
  - list
  - watch
- apiGroups:
  - ""
  resources:
  - events
  verbs:
  - create
  - patch
- apiGroups:
  - networking.k8s.io
  resources:
  - ingresses/status
  verbs:
  - update
- apiGroups:
  - networking.k8s.io
  resources:
  - ingressclasses
  verbs:
  - get
  - list
  - watch

---
apiVersion: rbac.authorization.k8s.io/v1
kind: ClusterRoleBinding
metadata:
  labels:
    app.kubernetes.io/component: controller
    app.kubernetes.io/instance: ingress-nginx
    app.kubernetes.io/name: ingress-nginx
  name: ingress-nginx
roleRef:
  apiGroup: rbac.authorization.k8s.io
  kind: ClusterRole
  name: ingress-nginx
subjects:
- kind: ServiceAccount
  name: ingress-nginx
  namespace: ingress-nginx
Deploy the manifest.
kubectl apply -f ingress-service-account.yamlCreate Configmap
With this configmap, you can customize the Nginx settings. For example, you can set custom headers and most of the Nginx settings. Please refer to the official community documentation for all the supported configurations.
Create a file named configmap.yaml and copy the following contents.
---
apiVersion: v1
data:
  allow-snippet-annotations: "true"
kind: ConfigMap
metadata:
  labels:
    app.kubernetes.io/component: controller
    app.kubernetes.io/instance: ingress-nginx
    app.kubernetes.io/name: ingress-nginx
  name: ingress-nginx-controller
  namespace: ingress-nginx
Create the configmap.
kubectl apply -f configmap.yamlCreate Ingress Controller & Admission Controller Services
Create a file named services.yaml and copy the following contents.
---
apiVersion: v1
kind: Service
metadata:
  labels:
    app.kubernetes.io/component: controller
    app.kubernetes.io/instance: ingress-nginx
    app.kubernetes.io/name: ingress-nginx
  name: ingress-nginx-controller
  namespace: ingress-nginx
spec:
  externalTrafficPolicy: Local
  ipFamilies:
  - IPv4
  ipFamilyPolicy: SingleStack
  ports:
  - appProtocol: http
    name: http
    port: 80
    protocol: TCP
    targetPort: http
  - appProtocol: https
    name: https
    port: 443
    protocol: TCP
    targetPort: https
  selector:
    app.kubernetes.io/component: controller
    app.kubernetes.io/instance: ingress-nginx
    app.kubernetes.io/name: ingress-nginx
  type: LoadBalancer
---
apiVersion: v1
kind: Service
metadata:
  labels:
    app.kubernetes.io/component: controller
    app.kubernetes.io/instance: ingress-nginx
    app.kubernetes.io/name: ingress-nginx
  name: ingress-nginx-controller-admission
  namespace: ingress-nginx
spec:
  ports:
  - appProtocol: https
    name: https-webhook
    port: 443
    targetPort: webhook
  selector:
    app.kubernetes.io/component: controller
    app.kubernetes.io/instance: ingress-nginx
    app.kubernetes.io/name: ingress-nginx
  type: ClusterIP
Create the services.
kubectl apply -f services.yamlingress-nginx-controller creates a Loadbalancer in the respective cloud platform you are deploying.
You can get the load balancer IP/DNS using the following command.
kubectl --namespace ingress-nginx get services -o wide -w ingress-nginx-controllerNote: For each cloud provider there are specific annotations you can use to map static IP address and other configs to the Loadbalancer. Check out GCP annotations here and AWS annoatations here.
Create Ingress Controller Deployment
Create a file named deployment.yaml and copy the following contents.
---
apiVersion: apps/v1
kind: Deployment
metadata:
  labels:
    app.kubernetes.io/component: controller
    app.kubernetes.io/instance: ingress-nginx
    app.kubernetes.io/name: ingress-nginx
  name: ingress-nginx-controller
  namespace: ingress-nginx
spec:
  minReadySeconds: 0
  revisionHistoryLimit: 10
  selector:
    matchLabels:
      app.kubernetes.io/component: controller
      app.kubernetes.io/instance: ingress-nginx
      app.kubernetes.io/name: ingress-nginx
  template:
    metadata:
      labels:
        app.kubernetes.io/component: controller
        app.kubernetes.io/instance: ingress-nginx
        app.kubernetes.io/name: ingress-nginx
    spec:
      containers:
      - args:
        - /nginx-ingress-controller
        - --publish-service=$(POD_NAMESPACE)/ingress-nginx-controller
        - --election-id=ingress-controller-leader
        - --controller-class=k8s.io/ingress-nginx
        - --configmap=$(POD_NAMESPACE)/ingress-nginx-controller
        - --validating-webhook=:8443
        - --validating-webhook-certificate=/usr/local/certificates/cert
        - --validating-webhook-key=/usr/local/certificates/key
        env:
        - name: POD_NAME
          valueFrom:
            fieldRef:
              fieldPath: metadata.name
        - name: POD_NAMESPACE
          valueFrom:
            fieldRef:
              fieldPath: metadata.namespace
        - name: LD_PRELOAD
          value: /usr/local/lib/libmimalloc.so
        image: k8s.gcr.io/ingress-nginx/controller:v1.1.1
        imagePullPolicy: IfNotPresent
        lifecycle:
          preStop:
            exec:
              command:
              - /wait-shutdown
        livenessProbe:
          failureThreshold: 5
          httpGet:
            path: /healthz
            port: 10254
            scheme: HTTP
          initialDelaySeconds: 10
          periodSeconds: 10
          successThreshold: 1
          timeoutSeconds: 1
        name: controller
        ports:
        - containerPort: 80
          name: http
          protocol: TCP
        - containerPort: 443
          name: https
          protocol: TCP
        - containerPort: 8443
          name: webhook
          protocol: TCP
        readinessProbe:
          failureThreshold: 3
          httpGet:
            path: /healthz
            port: 10254
            scheme: HTTP
          initialDelaySeconds: 10
          periodSeconds: 10
          successThreshold: 1
          timeoutSeconds: 1
        resources:
          requests:
            cpu: 100m
            memory: 90Mi
        securityContext:
          allowPrivilegeEscalation: true
          capabilities:
            add:
            - NET_BIND_SERVICE
            drop:
            - ALL
          runAsUser: 101
        volumeMounts:
        - mountPath: /usr/local/certificates/
          name: webhook-cert
          readOnly: true
      dnsPolicy: ClusterFirst
      nodeSelector:
        kubernetes.io/os: linux
      serviceAccountName: ingress-nginx
      terminationGracePeriodSeconds: 300
      volumes:
      - name: webhook-cert
        secret:
          secretName: ingress-nginx-admission
Create the deployment.
kubectl apply -f deployment.yamlTo ensure that deployment is working, check the pod status.
kubectl get pods -n ingress-nginxNginx Ingress Controller Helm Deployment
If you are a Helm user, you can deploy the ingress controller using the community helm chart. ValidatingWebhookConfiguration is disabled by default in values.yaml.
Deploy the helm chart. It will create the namespace ingress-nginx if not present.
helm upgrade --install ingress-nginx ingress-nginx
  --repo https://kubernetes.github.io/ingress-nginx
  --namespace ingress-nginx --create-namespace
Verify the helm release.
helm list -n ingress-nginxTo clean up the resources, uninstall the release.
helm uninstall ingress-nginx -n ingress-nginxMap a Domain Name To Ingress Loadbalancer IP
The primary goal of Ingress is to receive external traffic to services running on Kubernetes. Ideally in projects, a DNS would be mapped to the ingress controller Loadbalancer IP.
This can be done via the respective DNS provider with the domain name you own.
Info: For internet-facing apps, it will be public DNS pointing to the public IP of the load balancer. If it’s an internal app, it will be an organization’s private DNS mapped to a private load balancer IP.
Single DNS Mapping
You can map a single domain directly as an A record to the load balancer IP. Using this you can have only one domain for the ingress controller and multiple path-based traffic routing.
For example,
www.example.com --> Loadbalancer IPYou can also have path-based routing using this model.
Few examples,
http://www.example.com/app1
http://www.example.com/app2
http://www.example.com/app1/api
http://www.example.com/app2/api
Wildcard DNS Mapping
If you map a wildcard DNS to the load balancer, you can have dynamic DNS endpoints through ingress.
Once you add the wildcard entry in the DNS records, you need to mention the required DNS in the ingress object and the Nginx ingress controller will take care of routing it to the required service endpoint.
For example, check the following two mappings.
*.example.com --> Loadbalancer IP
*.apps.example.com --> Loadbalancer IP
This way you can have multiple dynamic subdomains through a single ingress controller and each DNS can have its own path-based routing.
Few examples,
#URL one

http://demo1.example.com/api
http://demo1.example.com/api/v1
http://demo1.example.com/api/v2

#app specific urls

http://grafana.apps.example.com
http://prometheus.apps.example.com

#URL two

http://demo2.apps.example.com/api
http://demo2.apps.example.com/api/v1
http://demo2.apps.example.com/api/v2
For demo purposes, I have mapped a wildcard DNS to the LoadBalancer IP. Based on your DNS provider, you can add the DNS record.
The following image shows the DNS records I used for this blog demo. I used EKS so instead of Loadnbalacer IP, I have a DNS of network load balancer endpoint which will be a CNAME. In the case of GKE, you will get an IP and in that case, you need to create an A record.
Deploy a Demo Application
For testing ingress, we will deploy a demo application and add a ClusterIp service to it. This application will be accessible only within the cluster without ingress.
Step 1: Create a namespace named dev
kubectl create namespace devStep 2: Create a file named hello-app.yaml
Step 3: Copy the following contents and save the file.
apiVersion: apps/v1
kind: Deployment
metadata:
  name: hello-app
  namespace: dev
spec:
  selector:
    matchLabels:
      app: hello
  replicas: 3
  template:
    metadata:
      labels:
        app: hello
    spec:
      containers:
      - name: hello
        image: "gcr.io/google-samples/hello-app:2.0"
Step 4: Create the deployment using kubectl
kubectl create -f hello-app.yamlCheck the deployment status.
kubectl get deployments -n devStep 5: Create a file named hello-app-service.yaml
Step 6: Copy the following contents and save the file.
apiVersion: v1
kind: Service
metadata:
  name: hello-service
  namespace: dev
  labels:
    app: hello
spec:
  type: ClusterIP
  selector:
    app: hello
  ports:
  - port: 80
    targetPort: 8080
    protocol: TCP
Step 7: Create the service using kubectl.
kubectl create -f hello-app-service.yamlCreate Ingress Object for Application
Now let’s create an ingress object to access our hello app using a DNS. An ingress object is nothing but a setup of routing rules.
If you are wondering how the ingress object is connected to the Nginx controller, the ingress controller pod connects to the Ingress API to check for rules and it updates its nginx.conf accordingly.
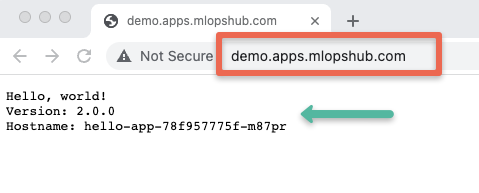
Since I have wildcard DNS mapped (*.apps.mlopshub.com) with the DNS provider, I will use demo.apps.mlopshub.com to point to the hello app service.
Step 1: Create a file named ingress.yaml
Step 2: Copy the following contents and save the file.
Replace demo.apps.mlopshub.com with your domain name. Also, we are creating this ingress object in the dev namespace as the hello app is running in the dev namespace.
apiVersion: networking.k8s.io/v1
kind: Ingress
metadata:
  name: test-ingress
  namespace: dev
spec:
  ingressClassName: nginx
  rules:
  - host: "demo.apps.mlopshub.com"
    http:
      paths:
        - pathType: Prefix
          path: "/"
          backend:
            service:
              name: hello-service
              port:
                number: 80
Step 3: Describe created ingress object created to check the configurations.
kubectl describe ingress -n devNow if I try to access demo.apps.mlopshub.com domain, I will be able to access the hello app as shown below. (You should replace it with your domain name)
TLS With Nginx Ingress
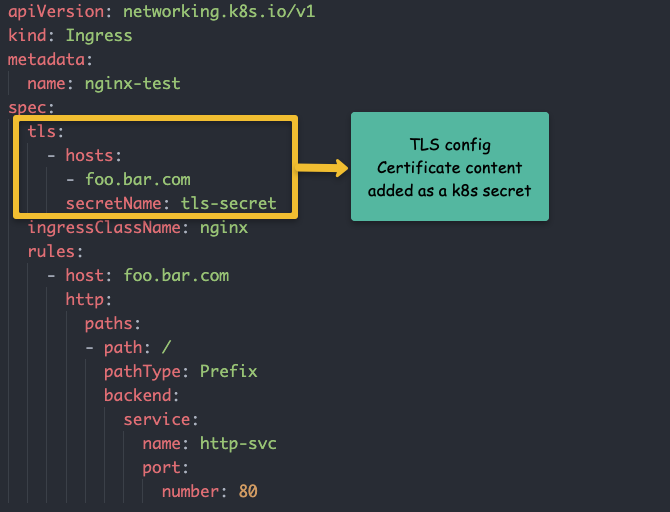
You can configure TLS certificates with each ingress object. The TLS gets terminated at the ingress controller level.
The following image shows the ingress TLS config. The TLS certificate needs to be added as a secret object.
I have written a detailed article on Ingress TLS configuration.
👉 Take a look at the guide to configure ingress TLS on Kubernetes.
Conclusion
In this article, we have learned how to set up the Nginx ingress controller.
It is very easy to get started. However, for project implementation ensure that you got through all Nginx configurations and tune them according to the requirements.
With the Nginx controller configmap, you can configure all the Nginx settings without redeploying the controller.
I hope you enjoyed this guide on Nginx ingress controller.
Let me know your thoughts and queries in the comment section.
Also, if you are learning Kubernetes, check out my 30+ comprehensive Kubernetes tutorials.
An Ingress is an API object that defines rules which allow external access
to services in a cluster. An Ingress controller fulfills the rules set in the Ingress.
This page shows you how to set up a simple Ingress which routes requests to Service web or web2 depending on the HTTP URI.
Before you begin
You need to have a Kubernetes cluster, and the kubectl command-line tool must
be configured to communicate with your cluster. It is recommended to run this tutorial on a cluster with at least two nodes that are not acting as control plane hosts. If you do not already have a
cluster, you can create one by using
minikube
or you can use one of these Kubernetes playgrounds:
- Killercoda
- Play with Kubernetes
Your Kubernetes server must be at or later than version 1.19.
To check the version, enter kubectl version.
If you are using an older Kubernetes version, switch to the documentation
for that version.
Create a Minikube cluster
- Using Katacoda
- Locally
- If you already installed Minikube
locally, runminikube startto create a cluster.
Enable the Ingress controller
-
To enable the NGINX Ingress controller, run the following command:
minikube addons enable ingress -
Verify that the NGINX Ingress controller is running
- minikube v1.19 or later
- minikube v1.18.1 or earlier
kubectl get pods -n ingress-nginxThe output is similar to:
NAME                                        READY   STATUS      RESTARTS    AGE
ingress-nginx-admission-create-g9g49        0/1     Completed   0          11m
ingress-nginx-admission-patch-rqp78         0/1     Completed   1          11m
ingress-nginx-controller-59b45fb494-26npt   1/1     Running     0          11m
kubectl get pods -n kube-systemThe output is similar to:
NAME                                        READY     STATUS    RESTARTS   AGE
default-http-backend-59868b7dd6-xb8tq       1/1       Running   0          1m
kube-addon-manager-minikube                 1/1       Running   0          3m
kube-dns-6dcb57bcc8-n4xd4                   3/3       Running   0          2m
kubernetes-dashboard-5498ccf677-b8p5h       1/1       Running   0          2m
nginx-ingress-controller-5984b97644-rnkrg   1/1       Running   0          1m
storage-provisioner                         1/1       Running   0          2m
Make sure that you see a Pod with a name that starts with
nginx-ingress-controller-.
Deploy a hello, world app
-
Create a Deployment using the following command:
kubectl create deployment web --image=gcr.io/google-samples/hello-app:1.0The output should be:
deployment.apps/web created -
Expose the Deployment:
kubectl expose deployment web --type=NodePort --port=8080The output should be:
service/web exposed -
Verify the Service is created and is available on a node port:
The output is similar to:
NAME TYPE CLUSTER-IP EXTERNAL-IP PORT(S) AGE web NodePort 10.104.133.249 <none> 8080:31637/TCP 12m -
Visit the Service via NodePort:
minikube service web --urlThe output is similar to:
http://172.17.0.15:31637The output is similar to:
Hello, world!
Version: 1.0.0
Hostname: web-55b8c6998d-8k564
You can now access the sample app via the Minikube IP address and NodePort. The next step lets you access
the app using the Ingress resource.
Create an Ingress
The following manifest defines an Ingress that sends traffic to your Service via hello-world.info.
-
Create
example-ingress.yamlfrom the following file:apiVersion: networking.k8s.io/v1 kind: Ingress metadata: name: example-ingress annotations: nginx.ingress.kubernetes.io/rewrite-target: /$1 spec: rules: - host: hello-world.info http: paths: - path: / pathType: Prefix backend: service: name: web port: number: 8080 -
Create the Ingress object by running the following command:
kubectl apply -f https://k8s.io/examples/service/networking/example-ingress.yamlThe output should be:
ingress.networking.k8s.io/example-ingress created -
Verify the IP address is set:
You should see an IPv4 address in the ADDRESS column; for example:
NAME CLASS HOSTS ADDRESS PORTS AGE example-ingress <none> hello-world.info 172.17.0.15 80 38s -
Add the following line to the bottom of the
/etc/hostsfile on
your computer (you will need administrator access):172.17.0.15 hello-world.infoAfter you make this change, your web browser sends requests for
hello-world.info URLs to Minikube. -
Verify that the Ingress controller is directing traffic:
You should see:
Hello, world!
Version: 1.0.0
Hostname: web-55b8c6998d-8k564
Create a second Deployment
-
Create another Deployment using the following command:
kubectl create deployment web2 --image=gcr.io/google-samples/hello-app:2.0The output should be:
deployment.apps/web2 created -
Expose the second Deployment:
kubectl expose deployment web2 --port=8080 --type=NodePortThe output should be:
service/web2 exposed
Edit the existing Ingress
-
Edit the existing
example-ingress.yamlmanifest, and add the
following lines at the end:- path: /v2 pathType: Prefix backend: service: name: web2 port: number: 8080 -
Apply the changes:
kubectl apply -f example-ingress.yamlYou should see:
ingress.networking/example-ingress configured
Test your Ingress
-
Access the 1st version of the Hello World app.
The output is similar to:
Hello, world! Version: 1.0.0 Hostname: web-55b8c6998d-8k564 -
Access the 2nd version of the Hello World app.
The output is similar to:
Hello, world!
Version: 2.0.0
Hostname: web2-75cd47646f-t8cjk
What’s next
- Read more about Ingress
- Read more about Ingress Controllers
- Read more about Services
#kubernetes #minikube
#kubernetes #minikube
Вопрос:
Мне было интересно, можно ли привязать мою сеть minikube к моей host сети.
Я пытался:
minikube start --memory=10000 --cpus=4 --vm-driver=docker --kubernetes-version=v1.19.6 --mount --mount-string="/usr/local/citizennet/db:/usr/local/citizennet/db" --network="host"
Но я получаю следующую ошибку:
 ❗  Unable to create dedicated network, this might result in cluster IP change after restart: un-retryable: create network host 192.168.49.0/24: docker network create --driver=bridge --subnet=192.168.49.0/24 --gateway=192.168.49.1 -o --ip-masq -o --icc -o com.docker.network.driver.mtu=1500 --label=created_by.minikube.sigs.k8s.io=true host: exit status 1
stdout:

stderr:
Error response from daemon: operation is not permitted on predefined host network
Я смог сделать это с помощью haproxy , но я хотел бы знать, есть ли более чистый способ сделать это.
Мой мини-куб размещен на экземпляре EC2, и я хотел бы переслать все на мой мини-куб напрямую. Или, по крайней мере, запросы HTTP / HTTPS.
Спасибо!
Комментарии:
1. Здравствуйте, вы пробовали использовать
$ minikube start --driver=none? Он использует Docker для создания всех ресурсов Kubernetes непосредственно на вашемVMкомпьютере. Вы можете прочитать больше об этом, следуя этой документации: minikube.sigs.k8s.io/docs/drivers/none2. Привет @DawidKruk, проблема в том, что я хочу использовать
ingressаддон, и этот аддон больше не совместим с--driver=none
Ответ №1:
Я не нашел способа предоставить minikube экземпляр с --driver=docker помощью сети хоста (кроме $ kubectl port-forward svc/svc-name --address=0.0.0.0 local_port:pod_port запуска на хосте).
Он выдает ту же ошибку, что и у исходного плаката:
Error response from daemon: operation is not permitted on predefined host network
Подтверждение следующего комментария:
проблема в том, что я хочу использовать
ingressаддон, и этот аддон больше не совместим--driver=none.
Вместо использования --driver=docker which разместит все ресурсы в контейнере Docker, вы можете выбрать a --driver=none , который предоставит все ваши ресурсы непосредственно в VM . Вы сможете напрямую запрашивать ресурсы с других сетевых устройств.
На данный момент minikube версия v1.17.1 не позволяет использовать ingress аддон с --driver=none , но я нашел способ, которым его можно было бы подготовить. Я включил этот пример в конец этого ответа. Пожалуйста, рассматривайте это как обходной путь.
Эта проблема (невозможность использования ingress дополнения --driver=none ) уже решена на github:
- Github.com : Kubernetes: Minikube: Проблемы: аддон Ingress перестал работать с драйвером виртуальной машины ‘none’, начиная с версии v1.12.x
Говоря с точки зрения раскрытия minikube :
Поскольку он предназначен для доступа из внешних источников, я рекомендую попробовать другие решения, которые, субъективно говоря, облегчат передачу ваших рабочих нагрузок внешним источникам.Существует множество доступных инструментов, которые создают кластеры Kubernetes, и вы можете выбрать тот, который больше всего соответствует вашим потребностям. Некоторые из них:
- Kubeadm
- Kubespray
- MicroK8S
Развертывание nginx-ingress с minikube --driver=none
Как указывалось ранее, пожалуйста, рассматривайте это как обходной путь.
Дополнительное замечание!
Посмотрите, как настроен ваш
NGINX Ingressконтроллерminikube addons enable ingress, поскольку он будет в значительной степени имитирован в этом примере.
Шаги:
Downloadманифестnginx-ingressYAML:- Измените
Deploymentв манифесте - Удалите
Serviceиз манифеста
- Измените
- Примените и проверьте
Download манифест nginx-ingress YAML
Вы можете использовать следующий манифест:
- Kubernetes.github.io : Ingress Nginx: Развертывание (например
GKE, можно загрузить манифест)
Измените Deployment в манифесте
Как я уже говорил ранее, то, что происходит при запуске minikube addons enable ingress , может оказаться полезным. Развернутые ресурсы дают некоторые подсказки о том, как вам нужно его изменить.
- Добавьте
hostPortforHTTPиHTTPSсвязь:
           ports:
            - name: http
              hostPort: 80 # <-- IMPORTANT, ADD THIS
              containerPort: 80
              protocol: TCP
            - name: https
              hostPort: 443 # <-- IMPORTANT, ADD THIS
              containerPort: 443
              protocol: TCP
            - name: webhook
              containerPort: 8443
              protocol: TCP
- Удалите
--publish-service=$(POD_NAMESPACE)/ingress-nginx-controller:
           args:
            - /nginx-ingress-controller
            - --publish-service=$(POD_NAMESPACE)/ingress-nginx-controller # <-- DELETE THIS
            - --election-id=ingress-controller-leader
            - --ingress-class=nginx
            - --configmap=$(POD_NAMESPACE)/ingress-nginx-controller
            - --validating-webhook=:8443
            - --validating-webhook-certificate=/usr/local/certificates/cert
            - --validating-webhook-key=/usr/local/certificates/key
Удалите Service из манифеста
Вам нужно будет полностью удалить Service тип LoadBalancer с именем: ingress-nginx из манифеста, который вы уже будете использовать hostPort .
После этих шагов вы сможете использовать Ingress ресурсы и взаимодействовать с ними по VM_IP : 80 / 443 .
Дополнительные ресурсы:
- Kubernetes.io : Документы: Концепции: Сетевые сервисы: Вход
- Minikube.sigs.k8s.io : Документы: Драйверы: Отсутствуют
Комментарии:
1. Большое вам спасибо!