Issue:
Running the Revit Interoperability 2022.0.1 Hotfix for Inventor 2022 gives this error:
The Revit Interoperability 2022.0.1 Hotfix fixes this error that occurs importing or exporting to a Revit .RVT file:
Causes:
The Revit Interoperability 2022 installation may be corrupt.
Solution:
Try uninstalling and reinstalling Revit Interoperability 2022.
- Uninstall Autodesk Revit Unit Schemas 2022 from Windows Control Panel > Programs and Features.
- And Autodesk Revit Interoperability 2022 if it’s listed under Programs and Features > View installed updates.
- If Autodesk Revit Interoperability 2022 is not listed in Control Panel uninstall it from this location: C:ProgramDataAutodeskUninstallersAutodesk Revit Interoperability 2022.0.1AdskUninstallHelper.exe
After both are uninstalled run the Inventor installer to reinstall Revit Interoperability 2022.
If the install files were downloaded to the local hard drive run the installer from this folder:
- C:AutodeskInventor_Pro_2022_English_Win_64bit_DlmSetup.exe
- Select Revit Interoperability 2022 and Install.
Run the Revit Interoperability 2022.0.1 Hotfix installer again.
- Find the update in your Autodesk Account under Product Updates by searching for ‘Revit interoperability 2022’:
After installing the Revit Interoperability 2022.0.1 Hotfix for Inventor 2022, Revit Unit Schemas and Revit Interoperability will be updated to version 22.0.10.28.
Check in Windows Control Panel under Programs and Features:
Autodesk Revit Unit Schemas 2022 version 22.0.10.28
Under View Installed Updates search for ‘Revit Interoperability 2022’:
Autodesk Revit Interoperability 2022.0.1 version 22.0.10.28
If you still get an error installing or importing/exporting Revit .rvt files:
- Try running the Inventor Cleaner Tool to roll Inventor 2022 back to out of the box-RTM:
- https://knowledge.autodesk.com/support/inventor/troubleshooting/caas/sfdcarticles/sfdcarticles/When-creating-an-IAM-assembly-Inventor-2022-will-crash-after-installing-the-Inventor-2022-1-and-or-2022-1-1-update.html
- Or perform a clean uninstall of Inventor:
- https://knowledge.autodesk.com/support/inventor/troubleshooting/caas/sfdcarticles/sfdcarticles/Perform-a-clean-uninstall-of-Inventor.html
Download the latest Inventor 2022 update from the Autodesk Desktop App or Autodesk Account:
All Inventor 2022 Updates
About the Author
Manufacturing Technical Support Specialist<br><br>Joanna has over eight years of experience working with Autodesk products. She started supporting core AutoCAD and network installations of all Autodesk products. She now has five years of experience with Inventor. <br>
She graduated from Mechanical Engineering and has been providing solutions to clients and dedicating her knowledge to the Solution Center since then.More Content by Joanna Gryszka

Issue:
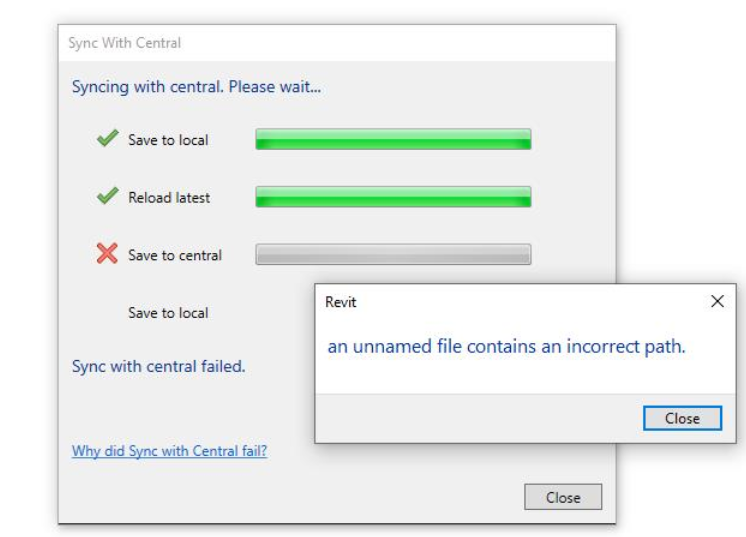
Cannot synchronize a Revit cloud workshared model to central in BIM 360 Document Management or Autodesk Docs, as the following message appears:
Revit
An unnamed file contains an incorrect path.
Causes:
The folder path length for the model exceeds the Windows limitation of 255 characters.
Solution:
To resolve the issue try one of the following:
Shorten the file path length, using one of the following methods:
- Shorten the folder and sub-folder structure.
- Shorten the affected user’s Revit username.
- Shorten the (linked) model name.
If a DWG was linked from drive location and reloaded from BIM 360 before experiencing this issue:
- Remove the DWG link, this would be BIM 360 location.
- Add the DWG from its original location.
- Sync to Central.
- Remove the DWG link.
- Sync to Central.
- Add DWG from BIM 360 Desktop Connector.
- Sync to Central.
Update Revit:
- Make sure that Revit is up-to-date.-
Note: Everyone should be on the same build.
Clearing the collaboration cache:
- All users in the project team should synchronize all changes (the affected user should synchronize changes from the loaner workstation).
- Close all Revit sessions on the affected workstation.
- On the affected workstation, clear collaboration cache as outlined in the following article: How to clear a corrupt/damaged cloud workshared model or outdated link from the system in Revit
- Start a new Revit session.
- Have the affected users sign out and sign in again with their Autodesk User Account credentials in Revit.
- Have the affected users open the cloud workshared model from the Open Dialog > BIM 360 > Affected Project folder (this will create a new local copy of the model in the collaboration cache folder).
Remove linked files
-
Open the model with Audit and Specify worksets as shown below:
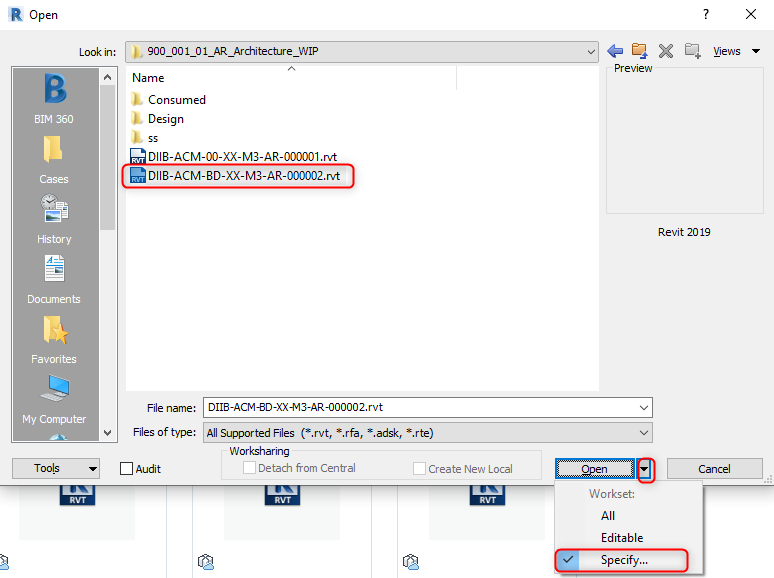
- Select all worksets > Close > OK.

- Go to Manage Links > Unload all linked files > OK.
- Perform Synchronize-to-Central procedure.
- Close Revit session.
Products:
Revit Product Family; Revit Cloud Worksharing; BIM 360;
Issue:
Cannot synchronize a Revit cloud workshared model to central in BIM 360 Document Management or Autodesk Docs, as the following message appears:
Revit
An unnamed file contains an incorrect path.
Causes:
The folder path length for the model exceeds the Windows limitation of 255 characters.
Solution:
To resolve the issue try one of the following:
Shorten the file path length, using one of the following methods:
- Shorten the folder and sub-folder structure.
- Shorten the affected user’s Revit username.
- Shorten the (linked) model name.
If a DWG was linked from drive location and reloaded from BIM 360 before experiencing this issue:
- Remove the DWG link, this would be BIM 360 location.
- Add the DWG from its original location.
- Sync to Central.
- Remove the DWG link.
- Sync to Central.
- Add DWG from BIM 360 Desktop Connector.
- Sync to Central.
Update Revit:
- Make sure that Revit is up-to-date.-
Note: Everyone should be on the same build.
Clearing the collaboration cache:
- All users in the project team should synchronize all changes (the affected user should synchronize changes from the loaner workstation).
- Close all Revit sessions on the affected workstation.
- On the affected workstation, clear collaboration cache as outlined in the following article: How to clear a corrupt/damaged cloud workshared model or outdated link from the system in Revit
- Start a new Revit session.
- Have the affected users sign out and sign in again with their Autodesk User Account credentials in Revit.
- Have the affected users open the cloud workshared model from the Open Dialog > BIM 360 > Affected Project folder (this will create a new local copy of the model in the collaboration cache folder).
Remove linked files
-
Open the model with Audit and Specify worksets as shown below:
- Select all worksets > Close > OK.
- Go to Manage Links > Unload all linked files > OK.
- Perform Synchronize-to-Central procedure.
- Close Revit session.
Products:
Revit Product Family; Revit Cloud Worksharing; BIM 360;
02
нояб
2021
- Информация о материале
-
Автор: Долматов Вячеслав
- Просмотров: 31325

В данной статье будет рассмотрен процесс установки Autodesk Revit 2022 Multilingual Win x64. После установки программы, подробно рассмотрим процесс её лицензирования. В конечном итоге, получим лицензию для коммерческого использования с неограниченным сроком действия.
В начале будет приведён текстовый вариант инструкции, но если предпочитаете видео формат, в конце статьи найдёте видео инструкцию по установке.
Скачать файлы архива программы, установка которой здесь рассмотрена можно по ссылкам, приведённым ниже:
Revit_2022_x64.part01.rar
Revit_2022_x64.part02.rar
Revit_2022_x64.part03.rar
Revit_2022_x64.part04.rar
Revit_2022_x64.part05.rar
Revit_2022_x64.part06.rar
Revit_2022_x64.part07.rar
Revit_2022_x64.part08.rar
Revit_2022_x64.part09.rar
Поскольку файлы программы занимают значительный объём, они ‘порезаны’ на девять частей. Скачивать следует все части архива и разместить их в одной папке. Для того, что бы распаковать архив, на распаковку следует запустить его первую часть ‘Revit_2022_x64.part01.rar’. При условии, что все файлы размещены в одной папке, остальные части архива будут обнаружены архиватором и подключены к распаковке, автоматически. Распаковать архив можно с помощью WinRAR (версии не ниже 5.80), или 7-Zip архиваторов. Пароля у архива нет.
Внимание!
После того, как скачаете файлы архива, перед тем как его распаковывать, отключите антивирус, потому как патчер (программа Autodesk License Patcher Ultimate Installer.exe для Revit 2022), входящий в состав архива и предназначенный для лицензирования программы, воспринимается антивирусом как вредоносный и может быть им удалён в процессе распаковки архива.
Перед тем, как перейти к установке программы, убедитесь, что Вы подключены к Интернет. Без подключения к сети Интернет, установка программы – НЕ ВОЗМОЖНА!
Установка Autodesk Revit 2022 Multilingual Win x64.
После распаковки архива, у Вас появиться папка ‘Autodesk Revit 2022 Multilanguage Win x64’. Откройте её и там Вы увидите следующий набор файлов программы:

От имени администратора запустите файл Setup.exe:

Появится панель, информирующая о подготовке к установке программы:

В панели лицензионного соглашения поставьте галочку возле ‘Я принимаю Условия соглашения’, затем нажмите на кнопку ‘Далее’:

В панели выбора путей установки программы и её компонентов можно изменить директорию установки. По умолчанию путь установки программы C:Program FilesAutodesk, путь установки компонентов C:ProgramDataAutodeskRVT 2022. Без понимания того, что Вы делаете, не меняйте пути установки, предложенные по умолчанию, и нажмите на кнопку ‘Установка’:

Начнётся установка программы:

Процесс установки займёт некоторое время. Дождитесь окончания установки.
После того, как установка программы будет завершена, появиться панель, информирующая о завершении установки. В этой панели будет предложено запустить программу. Пока не запускайте её и, нажав на крестик в правом верхнем углу панели, просто закройте эту панель:

На этом установка программы завершена. Переходим к её лицензированию.
Лицензирование Autodesk Revit 2022 Multilingual Win x64.
Вернитесь к набору файлов программы, найдите там папку Crack и откройте её:

Там Вы увидите папку ‘Patcher for Revit 2022’, её так же откройте:

Теперь от имени администратора (обязательно от имени администратора!!!) запустите файл ‘Autodesk License Patcher Ultimate Installer.exe’:

Появиться панель ‘Autodesk License Patcher’ информирующая о ходе лицензирования программы:

Сейчас ни во что не вмешивайтесь и не нажимайте ни каких кнопок на клавиатуре. Просто сидите и наблюдайте за процессом. На панели ‘Autodesk License Patcher’ будет меняться текст, информирующий о ходе лицензировании программы. Дождитесь окончания лицензирования. Когда панель исчезнет с экрана монитора, это будет сигналом о том, что лицензирование программы завершено.
Теперь запустите программу с помощью ярлыка на рабочем столе. В открывшейся панели лицензирования, нажмите на кнопку ‘Выбрать’, расположенную ниже текста ‘Использовать сетевую лицензию’:

Откроется панель, в которой следует указать сервер лицензий. В раскрывающемся списке серверов выберите ‘Один сервер лицензий’, как это показано на рисунке, а в поле ‘Имя сервера’ введите ‘127.0.0.1’, затем нажмите кнопку готово:

Если всё сделали правильно и ни чего не перепутали — программа запуститься.
На этом лицензирование Autodesk Revit 2022 Multilingual Win x64 – завершено.
Осталось только убедиться, что Вы являетесь счастливым обладателем бессрочной лицензии для коммерческого использования.
В интерфейсе программы, щелкните на разворачивающийся список, находящийся правее знака вопроса (находиться в правом верхнем углу программы) и выберите пункт ‘О программе Autodesk Revit 2022’:

Откроется информационная панель ‘О программе Autodesk Revit 2022’. Здесь нажмите на кнопку ‘Управление лицензиями’:

В панели ‘License Manager’, в позиции ‘Сетевая лицензия:’, у Вас должно присутствовать сообщение ‘для коммерческого использования’:

Если нажать на кнопку (на рисунке выше кнопка обведена красным прямоугольником) и развернуть подробности, то увидите что ‘Вид лицензии — Постоянная’, и ‘срок действия лицензии’ не ограничен ни какими временными рамками:

Это как раз именно то, что мы и хотели получить в итоге.
Если в процессе изучения материалов статьи у Вас остались не выясненные моменты, посмотрите подробную видео инструкцию по установке и лицензированию программы. Там все детали, изложенные в статье, показаны более наглядно.
Видео инструкция по установке Autodesk Revit 2022 Multilingual Win x64:
К сожалению, мой канал на видеохостинге Яндекс.Дзен, заблокирован. А поскольку, несколько ранее, подобная история произошла и на видеохостинге YouTube, то я уже понял, что это будет продолжаться бесконечно, с перманентной цикличностью. Так что, на данный момент, единственным способом получить видео инструкцию по установке программы (если, конечно, она Вам нужна), это только скачать её с файлообменника. Скачать видео инструкцию в формате RAR архива можно здесь: Install Revit 2022.
Если тем файлом, что расположен в архиве, лицензировать программу у Вас не получилось, попробуйте лицензировать этим файлом: Autodesk License Patcher NEW, он более новый и поможет Вам с лицензией на программу. Но имейте ввиду, что при применении нового файла для лицензирования программы, Вам потребуется поместить две папки в исключение антивирусом. Что это за папки, где они расположены и как всё это осуществить, подробно прописано в статье Autodesk 3ds Max 2023.2.2 Win x64. 3ds Max 2023.2.2 Update. Инструкция по установке и лицензированию 3ds Max 2023.2.2 Win x64. Пусть Вас не смущает, что в статье речь идёт про 3ds Max. Там Вас интересует только раздел: Добавление папок в “исключение антивирусом”. Этот раздел абсолютно одинаков, для любой программы компании Autodesk, будь то Revit, 3ds Max, AutoCAD и т.д.
Вот и всё!