Как устранить ошибку смешанного контента в WordPress?
Всё про mixed content, или ошибку смешанного контента и как её устранить в WordPress

Автор: Nikita L.
Обновлено более недели назад
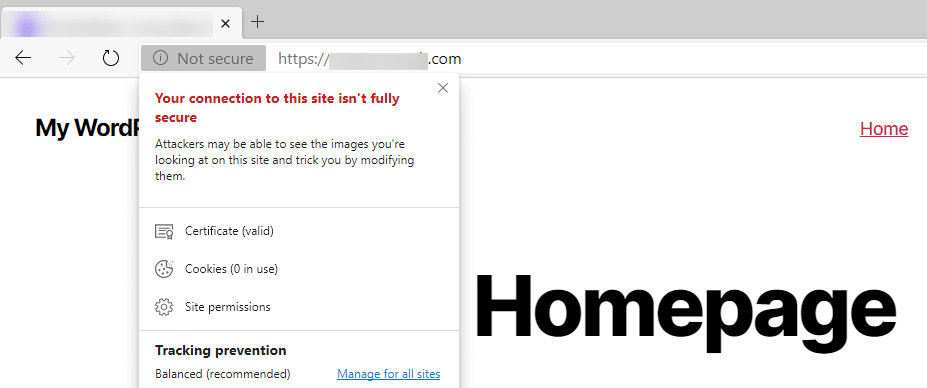
После установки SSL-сертификата и принудительного применения протокола HTTPS на сайте может появиться ошибка смешанного контента. При этом рядом с доменом в адресной строке появится предупреждение по типу «Защищено не полностью»:

Смешанный контент означает, что Вы пытаетесь загрузить изображения или другой контент с HTTP в их ссылках. Чтобы исправить это, Вам просто нужно отредактировать все ссылки на своей странице, и заменить префикс HTTP на HTTPS.
Если Вы используете Elementor, перейдите в Elementor → Инструменты:

Выберите Сменить URL и вставьте адрес своего домена с HTTP и HTTPS:

После этого проблема смешанного контента должна полностью исчезнуть. Если у Вас нет Elementor, ознакомьтесь с вариантами ниже:
Метод 1 — Установите плагин Really Simple SSL
Войдите админ-панель WordPress и нажмите Плагины → Добавить новый.

Установите и активируйте плагин Really Simple SSL. Затем перейдите в Настройки → Общие:

И измените адрес своего сайта с http:// на https://:

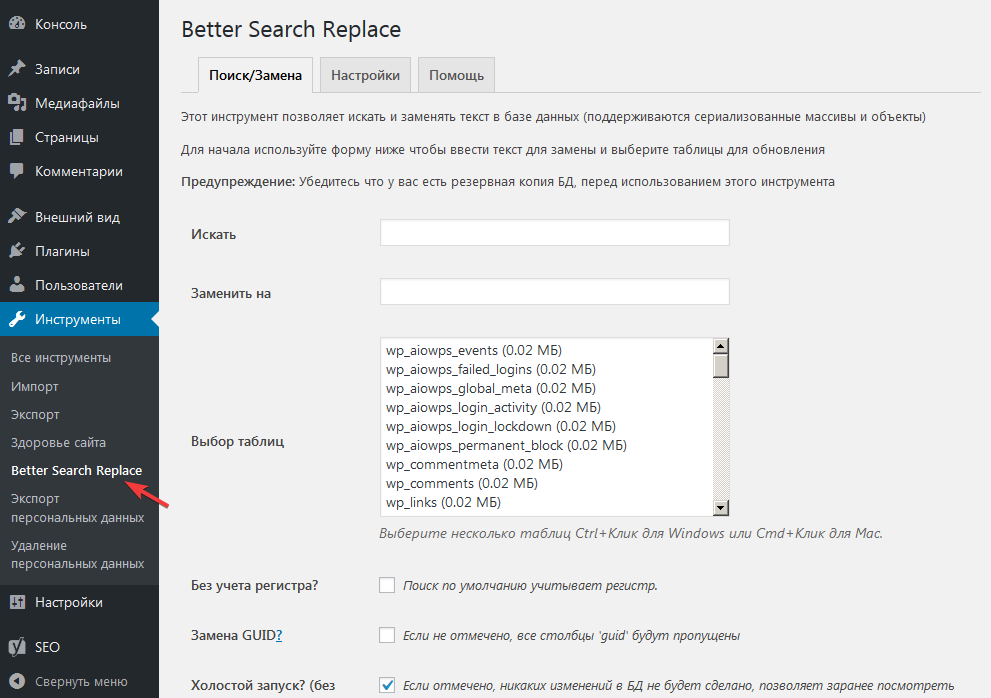
Метод 2 — Установите плагин Better Search & Replace
Установите плагин Better Search & Replace, затем откройте Инструменты → Better Search Replace.
-
В поле поиска введите имя домена с HTTP, например, http://example.com
-
В поле Заменить на введите имя домена с использованием HTTPS, например https://example.com.
-
Выберите все таблицы, затем снимите флажок возле холостого запуска и нажмите кнопку Запустить Поиск/Замену


Метод 3 — Вставьте код в файл .htaccess
Если первые два метода Вам не помогли, откройте public_html/файл .htaccess (или создайте его, если он ещё не был создан) и вставьте следующий код:
Header always set Content-Security-Policy: upgrade-insecure-requests
Сохраните изменения и перезагрузите сайт — он уже должен работать правильно 💪
ПРИМЕЧАНИЯ:
-
Не рекомендуется использовать этот вариант, если на Вашем сайте используются символические ссылки.
-
Если ни один из этих вариантов не помог устранить ошибку смешанного контента, напишите нашей команде успеха клиентов!
Популярные браузеры, такие как Chrome и Firefox, поощряют веб-сайты использовать безопасный протокол HTTPS. Однако посетители и владельцы веб-сайтов, использующих этот протокол, могут увидеть ошибку «На этом сайте небезопасный контент» или смешанное содержимое.
Ошибка смешанного содержимого в WordPress возникает при конфликте между SSL и HTTP. Часто его существование никак не влияет на сайт, но может негативно повлиять на рейтинг и SEO.
Раньше использование HTTPS для веб-сайтов WordPress было необязательным, но в настоящее время необходимо использовать HTTPS. Запуск WordPress на HTTPS – важный фактор в SEO и рейтинге. Кроме того, это делает сайт более безопасным. Потому что ваши данные зашифрованы и больше не в текстовом формате.
В этой статье мы хотели бы обсудить смешанный контент WordPress и то, как исправить смешанный контент WordPress.
Что такое ошибка смешанного содержимого?
Ошибка смешанного содержимого возникает, когда ваш веб-сайт одновременно использует HTTP и HTTPS. В этом случае весь контент на вашем веб-сайте, включая тексты, изображения, код и ссылки, вызывается как по HTTP, так и по HTTPS. Эти протоколы совершенно разные, и их использование создает нарушение безопасности.
HTTP – наиболее распространенное соединение. Однако HTTP совсем небезопасен, и любой может получить доступ к вашим данным.
Следовательно, использование HTTPS просто необходимо. HTTPS создает безопасное соединение между вами и веб-сервером.
Это соединение проверено и зашифровано. Таким образом, никто не может получить доступ к вашим данным и практически гарантирует безопасность соединения. Этот протокол необходим для генерации паролей и способов онлайн-платежей.
С 2018 года Google Chrome определяет веб-сайты, которые по-прежнему используют HTTP, как небезопасные, и настоятельно рекомендует пользователям посещать веб-сайты, использующие HTTPS / SSL. SSL добавляет еще один уровень безопасности к вашим данным.
В настоящее время крупные хостинговые компании предлагают бесплатный SSL в своих пакетах. Если провайдер хостинга не предлагает бесплатный SSL, а вы не хотите его покупать, letsencrypt.org предоставляет бесплатный SSL.
Если вы правильно установили SSL на своем веб-сайте, рядом с URL-адресом вашего веб-сайта появится зеленый замок. Это означает, что ваш сайт безопасен.
Проверить ошибку смешанного содержимого в WordPress
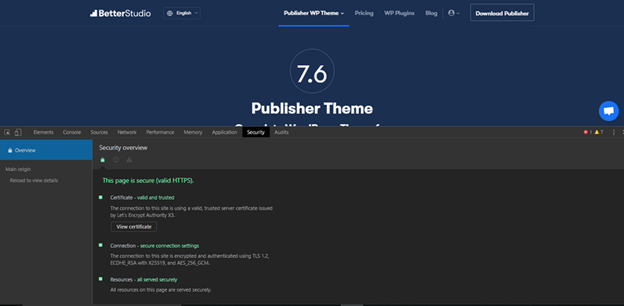
Чтобы определить ошибку смешанного содержимого в WordPress, есть две страницы, которые вы можете проверить на предмет передаваемых данных по обычному протоколу HTTP. Сначала от Tools перейдите к Devtools.

Первая страница, которую вы можете проверить, это Консоль, а затем Безопасность. На этих страницах вы можете увидеть небезопасное содержимое и ошибку смешанного содержимого.
Вы также можете использовать другие инструменты, чтобы лучше обнаружить ошибку смешанного контента в WordPress и помочь вам исправить ее.
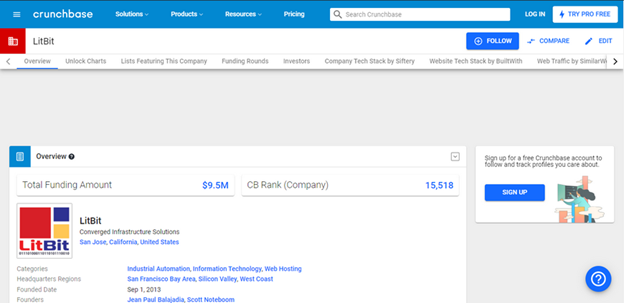
Jitbit представил бесплатную проверку SSL, которую вы можете использовать для проверки своего веб-сайта WordPress и поиска любых небезопасных изображений и скриптов. Однако этот инструмент ограничен проверкой только 200 страниц.

Ahrefs – еще один инструмент, который вы можете использовать для обнаружения ошибки смешанного контента в WordPress. Этот инструмент очень удобен и может помочь вам исправить ошибку смешанного содержимого WordPress.
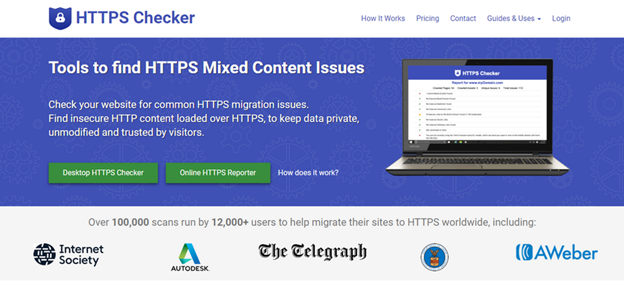
HTTPS Checker – это компьютерный инструмент, который вы можете установить в своей системе и использовать для сканирования WordPress. Это программное обеспечение помогает обнаруживать небезопасный контент и ошибки после каждого изменения, которое вы вносите на свой веб-сайт. Это программное обеспечение опубликовано только для Mac и позволяет проверять 100 веб-страниц.
Как исправить ошибку смешанного содержимого WordPress в WordPress?
Первый шаг, который нужно сделать для исправления ошибки смешанного содержимого WordPress, – это установить полезный плагин в WordPress.
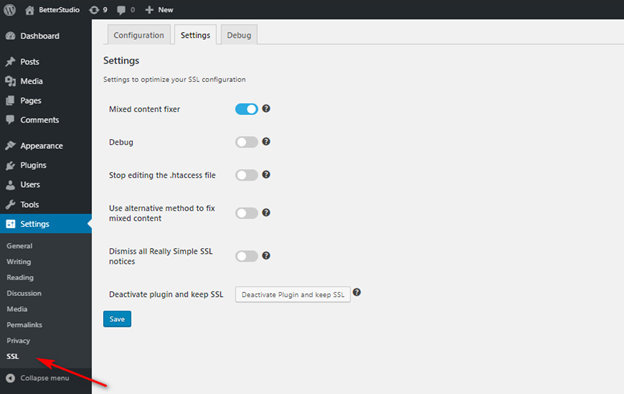
Really Simple SSL – один из лучших плагинов в WordPress. После установки и активации он автоматически сканирует ваш сайт. SSL Insecure Content Fixer – еще один отличный плагин, который вы можете использовать для исправления ошибки смешанного содержимого WordPress.
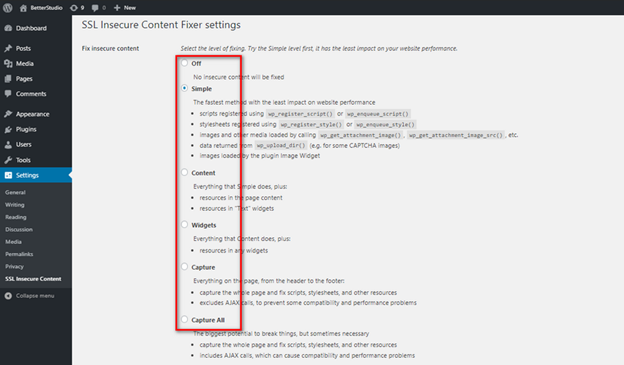
Ниже мы обсудим различные режимы, которые SSL Insecure Content Fixer использует для исправления ошибки смешанного содержимого WordPress.
просто
Этот метод является одним из самых быстрых и часто используемых для новичков и автоматически исправляет ошибку смешанного содержимого в WordPress.
Содержание
Если простой метод не смог исправить ошибку смешанного содержания на вашем веб-сайте, попробуйте этот метод. Помимо регулярных проверок, он также проверяет все текстовые виджеты.
Виджет
Этот метод специально разработан для проверки доступных виджетов в WordPress.
Захватить
Этот метод захватывает все веб-страницы от верхнего до нижнего колонтитула и заменяет все URL-адреса на HTTPS. Этот режим медленнее по сравнению с другими методами, упомянутыми выше, и может повлиять на ваш сайт.
Захватить все
Если ни один из вышеперечисленных методов не помог исправить смешанное содержимое WordPress, вы можете использовать этот режим. В этом режиме он проверяет все возможные варианты, которые могут вызвать эту ошибку, и автоматически начинает их исправлять. Однако этот режим наиболее негативно влияет на ваш сайт.
Теперь снова посетите свой веб-сайт и проверьте, исчезла ли ошибка смешанного содержимого WordPress. Помните, что перед посещением веб-сайта удалите кеш браузера.
Как только плагин исправит ошибку смешанного содержимого, вы можете использовать инструмент Why No Padlock для защиты своего сайта.
Источник записи: https://betterstudio.com
В браузере видите ошибку смешанного содержимого на сайте WordPress?
Она возникает из-за неправильных настроек HTTP/SSL. Вообще это не влияет на функциональность веб-ресурса, но может отрицательно сказаться на SEO. Рассмотрим, как исправить ошибку смешанного содержимого в ВордПресс.
Что такое ошибка смешанного контента?
SSL добавляет дополнительный уровень безопасности для передачи данных в веб-браузере. Google также рекомендует использовать защищенный протокол.
Если вы правильно установили SSL, то в браузере увидите значок замка в адресной строке.
![]()
Если HTTP/SSL настроен неправильно, возле замка появится знак восклицания.
![]()
Это указывает на то, что, хотя сайт использует сертификат SSL, некоторое содержимое по-прежнему доступно по незащищенному протоколу HTTP. Это можно узнать в Консоли веб-браузера в виде предупреждения с подробностями для каждого такого элемента.

Если найден всего один элемент, то его можно исправить вручную, отредактировав пост, страницу или тему.
Но обычно смешанный контент сохраняется в базе данных. В этом случае сложно обнаружить и исправить самому.
Рассмотрим 2 способа.
Способ 1. Плагин SSL Insecure Content Fixer
Установите бесплатное дополнение.
После активации перейдите Настройки > Небезопасный контент SSL.

Выберите уровень исправления ошибки смешанного содержимого.
1. Простой
Это самый быстрый и рекомендуемый метод для начинающих. Автоматически исправляет ошибку для скриптов, таблиц стилей и изображений из Медиабиблиотеки.
2. Содержимое
Если первый способ не работает, попробуйте этот. Он использует все функции первого, также проверяет контент и все текстовые виджеты.
3. Виджеты
Включает все исправления на уровне контента, а также вносит правки в ресурсы, загруженные во все виджеты.
4. Режим захвата
Вносит изменения на всей странице и заменяет все URL-адреса, которые начинаются с HTTP. Может снизить производительность сайта.
5. Захватить все
Способ пытается исправить все, что может привести к смешанному содержимому. Еще больше повышает нагрузку на сервер. Стоит использовать в крайнем случае, если все остальные способы не дают результат.
После выбора уровня прокрутите вниз и найдите опцию Определение HTTPS.

По умолчанию используется функция WordPress, которая будет работать для большинства сайтов.
Другие опции нужны, если используете Cloudflare CDN или веб-сервер Nginx.
Не забудьте нажать кнопку Сохранить изменения, чтобы сохранить настройки.
Способ 2. Плагин Better Search and Replace
Это еще одно удобное решение для правильной работы HTTPS-протокола.
После установки и активации в админке откройте Инструменты > Better Search Replace.
В поле Искать введите адрес своего сайта через http, а в Заменить на – с https.
Выберите все таблицы БД, в которых нужно сделать замену.

Нажмите кнопку Запустить Поиск/Замену, чтобы запустить процесс замены.
Плагин работает с базой данных WordPress, поэтому он не сможет изменить ссылки в коде тем и плагинов.
Нажмите, пожалуйста, на одну из кнопок, чтобы узнать понравилась статья или нет.

Building a website consists of a varied number of steps, depending on the owner, creator, manager, type of site, and audience.
Everyone cares about security and wants a positive user experience. No one likes to see “site down” error messages or web browser warnings.
Below, you can learn about serving secure web pages and secure assets (like images, scripts, and forms) and how to find and resolve browser security errors.
The Basics of HTTPS
Forms that receive sensitive user information – like credit cards, login information, or confidential user feedback – need to be submitted securely, via HTTPS. An SSL certificate is purchased and installed on your web server to enable HTTPS browsing.
SSL certificates range from $10 to $1,000+ per year, providing different levels of verification and browser integration (e.g. it costs more to turn the browser bar green). All price ranges enable HTTPS browsing, which permits secure browsing, assuming the SSL certificate is valid and that the website is trusted by the visitor.
Pages can be served via HTTP while still including HTTPS forms. This practice allows for form submissions to be submitted securely while still enabling caching (for site speed), or for other reasons. However, the downside to this method is that the visitor has been trained to look for a padlock icon or a green bar displayed within the browser, which only happens when pages are served via HTTPS (i.e. when HTTPS is in the browser’s address bar).
But the browser gives warnings for webpages served via HTTPS that include HTTP assets, like scripts, forms, and images. To avoid these browser warning messages, you need to make sure that you don’t serve any HTTP assets on an HTTPS page. Browser warning messages may put some of your site visitors on high alert, causing them to not complete that shopping cart order or that contact form.
WordPress HTTPS
After installing a valid SSL certificate onto your server (your host can help with that), there are 3 ways to implement HTTPS into your WordPress site.
Option 1: Forcing All Pages to HTTPS
Although this is the easiest option, it’s not always the right option because caching isn’t enabled for HTTPS pages. If you’re sure you want to serve every page of your WordPress site via HTTPS, just go to your WordPress General Settings and change the WordPress Address (URL) and the Site Address (URL) from HTTP to HTTPS.

Option 2: Forcing Certain Pages to HTTPS (most common)
More often than not, there are only a few pages you want to force load via HTTPS, and the rest should be loaded via HTTP by default. While there are server-side ways to enable this, there are also a few plugins that provide the ease of a check box. You check the box if you want the page loaded via HTTPS, or you leave it unchecked. Here are a couple of plugins to choose from:
- WordPress HTTPS (SSL)
- Better WP Security
Option 3: Force HTTPS logins or Force HTTPS logins and HTTPS administration
If you’re looking for a simple way to secure WordPress logins (the wp-login.php script) or the entire wp-admin area, you could set one of these two wp-config.php constants, respectively:
-
define('FORCE_SSL_LOGIN', true); -
define('FORCE_SSL_ADMIN', true);
You do not need to set both of these options, just one or the other because FORCE_SSL_ADMIN includes FORCE_SSL_LOGIN.
How to Identify HTTP Assets Loaded on an HTTPS Page
Here’s the nitty gritty section you’ve been waiting for.
- You already have your SSL certificate installed correctly, and you can browse your site via HTTPS by manually typing it into the address bar.
- You have your HTTPS plugin(s) and/or wp-config.php constant(s) setup and working.
- But the browser throws intimidating warning messages about “mixed content” or “insecure content” loaded on an HTTPS page.
Following are several ways to identify the insecure (HTTP) assets loaded on secure (HTTPS) pages. You may need to use several of these methods to resolve all your browser security warnings about mixed content.
Note: Option 4 is my favorite!
Option 1: View Source
This method is pretty simple. Load the page via HTTPS; right-click anywhere on the page; and click “View Page Source”, “View Source”, or “Source”, depending on your browser.
Then use the “Find” command (Edit -> Find or Ctrl+F or Cmd+F) and search for:
-
src="http:
(with double-quote)
-
src='http:
(with single-quote)
Long story short, you’re manually looking for images, scripts, iframes, and all other assets served via HTTP instead of HTTPS. If you don’t find any with either double- or single-quote HTTP:, then you’re all done with that page. Keep browsing to other HTTPS pages and keep searching through View Source.
Option 2: Use a Plugin
A couple plugins exist that essentially do the View Source for you:
- WordPress HTTPS (SSL) (mentioned above too)
- WordPress HTTPS Test
- SSL Insecure Content Fixer
Basically, you browse your site via HTTPS with one of these plugins active, and the plugin displays notifications of the HTTP assets. Some plugins show the warnings for all visitors and some only display to Administrators so beware of leaving these sort of plugins active while you’re not testing.
Option 3: Paste the URL into a Website that Tests for Insecure Assets
If you don’t want to View Source and don’t want to enable a plugin (maybe because it displays to all visitors, not just administrators), then you could paste your page’s URL into a website that tests it for you.
WhyNoPadlock is a free testing site that provides you with a report of all the insecurely-loaded items. It provides an easy-to-understand list of green check marks or red x’s. Pay attention to the red x’s; fix them in your plugins or theme; and click the “Test URL Again” button to try and rid yourself of red x’s. Once done with that page, paste in a different URL to see if it’s also free from red x’s. Wash, Rinse, Repeat.

Option 4: Use Google Chrome Inspector Console (My Favorite Way)
Google Chrome’s Inspector has a Console tab. If the HTTPS page you’re displays yellow or red in the address bar (see 3rd and 4th icons below), open the Console to see the one or multiple insecure assets.
![]()
This is my favorite method because it’s quick, easy, and can be used on any page I can access, not just on the front-end like WhyNoPadlock. It’s basically like Option 1: View Source but with Chrome finding the issues for me.

How to Fix Insecurely-Loaded Assets
Make note of each item sourced via HTTP and you’ll get an idea where to find the problem. Here are some examples:
- A plugin loading a JavaScript file via HTTP: http://example.com/wp-content/plugins/example-plugin/awesome.js
- The active theme loading an insecure image file: http://example.com/wp-content/themes/example-theme/assets/images/circle.png
- The active theme (most likely in functions.php, but it could be loaded via a plugin instead of the theme) loading Google fonts insecurely: http://fonts.googleapis.com/css?family=Lato:100,400,700
- Notice even insecure assets from outside your WordPress installation throw browser errors.

What You Now Know
You now know that the plugin or theme you’re using isn’t coded properly. It may be a quick fix or need significant modification. Before working on fixing it, you have to ask yourself, “Do I really need this?” because if this is wrong, I bet other things are wrong. Sometimes an uninstall can be healthy.
If you decide the plugin or theme is worth keeping, start working to fix these errors.
You have a few options per asset:
- Report the error to the plugin developer and leave deactivated for now.
- Edit the plugin files yourself, sharing the fix with the plugin developer.
- Change to a different theme
- Edit the current theme’s files (hint: start looking in functions.php)
Personally, if a plugin throws WP_DEBUG errors, sets off security errors, or loads assets on pages where it doesn’t belong, I usually get rid of it altogether. If I have the time and the plugin is valuable enough, sometimes I report the error or even provide the fix, especially if the plugin author has enough credibility that I know this is an infrequent occurrence.

How to Change Assets from HTTP to HTTPS
After discovering the offending assets, you need to change them to either respect the protocol (i.e. serve HTTP when the page is HTTP and serve HTTPS when the page is HTTPS) or change them to always be served via HTTPS, even for pages loaded with the HTTP protocol. These 2 steps should cover all scenarios. You might only need Step 1 or Step 2 to resolve the insecure warning issues.
Step 1: Use Relative URLs
This is the simplest fix. If an asset (image, script, etc.) is hard-coded into a plugin or theme, change it from ‘http://site.com/assets/logo.png’ to ‘//site.com/assets/logo.png’.
Typically, this is most useful when including assets from other servers, like Google scripts, API scripts, or iframes.
Before doing this, however, you need to make sure the HTTPS version is available. If loading an asset from a site that doesn’t have HTTPS enabled, it’s probably best to remove the reference entirely (i.e. comment out or delete) or to save the asset to your own server and change the source to load via your site instead.
Step 2: Use Proper WordPress Coding Standards
This issue is a bit more complicated. I’ve seen all kinds of things, like:
- Code that forces HTTP (why?!)
- Using deprecated WordPress functions that don’t respect SSL settings
- Code that tries (and fails) to implement its own “if is HTTPS” logic instead of using the WordPress functions
Each of these types of errors could take some time to resolve. Here are some helpful WordPress functions that may need to be used instead of the current code:
- home_url() and related functions
- is_ssl()
- WordPress Function Reference (stay away from the ones in red; they are deprecated)
- WP_DEBUG might help too
Conclusion
Here are the bullet points:
- If you’re going to have an SSL certificate and serve one or more pages via HTTPS, work hard to resolve all “mixed content” warnings to provide your visitors with a pleasant browsing experience (especially Internet Explorer users because IE’s warnings are the most in-your-face).
- If a WordPress extension (plugin / theme) isn’t coded properly for SSL, do you really want to use it?
- If it was free, report the problem and try to help provide the solution.
- If it was not free, report the problem and consider if it was really worth your money. Maybe you should ask for a refund and find another alternative.
- Once you resolve a single page’s mixed content warnings, keep browsing the site and testing each page individually, whether by using View Source, a plugin, or a testing website.
If this is too much work for you and you’re comfortable with visitors receiving mixed content warnings and you do nothing else other than install an SSL certificate, make sure to at least force secure logins. I think everyone should do this. ManageWP does.
Please share your questions and comments below.
Creative Commons images courtesy of Brenda Clarke and Jakob Montrasio
Вы видите ошибку смешанного содержания в WordPress? Как исправить ошибку смешанного контента в WordPress?
Ошибка смешанного контента в WordPress вызвана неправильными настройками HTTP / SSL. Часто это не влияет на функциональность вашего веб-сайта, но может сказаться на SEO и удобстве использования.
В этом уроке мы покажем вам, как исправить ошибку смешанного контента в WordPress.
Но раньше, если вы никогда не устанавливали WordPress, откройте для себя Как установить WordPress блог шаги 7 et Как найти, установить и активировать WordPress тему на своем блоге
Тогда вернемся к тому, почему мы здесь.

Что такое ошибка смешанного контента в WordPress?
Настоятельно рекомендуется добавить SSL в WordPress, потому что с июля 2018 года Google Chrome сообщит, что не все http-версии веб-сайтов являются безопасными.
SSL добавляет дополнительный уровень безопасности вокруг данных, передаваемых с вашего сайта в браузеры пользователей. поисковые системы Также рекомендуем использовать SSL-сертификат на вашем сайте.
Все лучшие хостинговые компании WordPress предлагают SSL бесплатно в различных тарифных планах. Если ваш веб-хостинг не предлагает этого, вы можете получить бесплатный SSL через Let’s Encrypt для вашего сайта WordPress.
Если вы успешно внедрили SSL на своем веб-сайте, рядом с URL-адресом вашего веб-сайта в адресной строке браузера появится зеленый значок замка.

С другой стороны, если ваши настройки HTTP / SSL настроены неправильно, вы увидите информационный знак или значок со сломанным замком в адресной строке.

Это означает, что даже несмотря на то, что ваш веб-сайт использует сертификат SSL, часть содержимого на вашем веб-сайте по-прежнему обслуживается с URL-адресов, отличных от HTTPS.
Вы можете узнать, какой контент доставляется по незащищенному протоколу, используя инструмент инспектировать предлагаемые браузерами. Ошибка смешанного содержимого будет отображаться в консоли в виде предупреждения с подробностями для каждого элемента смешанного содержимого.

Если это только один элемент, который вы можете исправить вручную, вы можете исправить его, отредактировав пост или страницу WordPress тема где он появляется.
Однако в большинстве случаев эти элементы динамически добавляются WordPress или хранятся в вашей базе данных. В этом случае их все будет сложно обнаружить и исправить вручную.
При этом давайте посмотрим, как легко исправить ошибку смешанного контента в WordPress.
Исправлена ошибка смешанного контента в WordPress
Первое, что нужно сделать, это установить и активировать плагин. Безопасный контентный фильтр SSL. Для получения дополнительных сведений см. Наше пошаговое руководство по как установить WordPress плагин.
После активации плагина нужно зайти на страницу Настройки »Незащищенный контент SSL настроить его параметры.

Этот плагин предоставляет различные уровни исправления ошибок смешанного содержимого. Мы объясним каждому из них, что они делают и какой из них лучше всего подходит для вас.
Откройте для себя эти несколько советов по защите вашего блога на WordPress
1. Простой
Это самый быстрый способ, рекомендуемый для всех новичков. Он автоматически исправляет ошибку смешанного содержимого в скриптах, таблицах стилей и изображениях в медиатеке.
2. содержание
Если простой метод не устраняет ошибку смешанного содержимого на вашем веб-сайте, вам следует попробовать этот метод. Он будет использовать все функции «простого» метода в дополнение к проверке исправлений в содержимом WordPress и текстовых виджетах.
Откройте для себя Как получить бесплатный сертификат SSL (и почему Google заставляет вас)
3. Виджеты
Это включает в себя все исправления, примененные на уровне контента, а также дополнительное исправление для ресурсов, загруженных во все виджеты WordPress на вашем веб-сайте.
4. Захватить
Этот метод захватывает все на каждой странице вашего веб-сайта от верхнего колонтитула до нижнего колонтитула и заменяет любые URL-адреса, использующие протокол HTTP. Это медленнее и повлияет на производительность вашего сайта.
Ваши изображения не отображаются с помощью SSL? Вот решение
5. Захватить все
Когда все вышеперечисленные уровни не пройдут, вы можете попробовать этот метод. Он пытается исправить все, что может вызвать неожиданное поведение на вашем сайте. Это также окажет самое негативное влияние на производительность.
Откройте для себя это Сравнение поставщиков сертификатов SSL 5
После выбора уровня исправления содержимого вам необходимо прокрутить вниз до раздела обнаружения HTTPS.
Здесь вы можете выбрать способ обнаружения HTTP-содержимого на своем веб-сайте.

По умолчанию используется функция WordPress, которая работает для большинства веб-сайтов.
Другие варианты выше, которые особенно полезны, если вы используете Cloudflare CDN, то веб-сервер nginx и многое другое Идите вперед и выберите метод, который вы планируете применить к вашему сайту, в зависимости от вашей конкретной конфигурации.
Откройте для себя тоже Как заменить ссылки на изображения после установки SSL на WordPress
Не забудьте нажать на кнопку Сохранить изменения сохранить ваши настройки.
Теперь вы можете посетить свой веб-сайт, чтобы узнать, помогло ли это решить проблемы с незащищенным контентом на вашем сайте. Обязательно очистите кеш WordPress перед посещением вашего сайта.
Если ошибка смешанного содержимого в WordPress не устранена, еще раз посетите страницу настроек плагина и измените уровни настроек.
Идите дальше, узнав, если Вы должны использовать SSL для своего интернет-магазина WooCommerce
Откройте для себя также несколько премиальных плагинов WordPress
Вы можете использовать другие WordPress плагины чтобы придать современный вид и оптимизировать обработку вашего блога или веб-сайта.
Мы предлагаем вам несколько премиальных плагинов WordPress, которые помогут вам сделать это.
1. ARPrice
ARPrice — это Плагин WordPress самый гибкий и самый полный в создании ценовых сеток. Он поставляется с более чем 300 шаблонами ценовых сеток и предоставляет все инструменты, необходимые для создания уникальных и гибких ценовых сеток и сравнительных таблиц.

Это Плагин WordPress красивая, интуитивно понятная и единственная в своем роде, с впечатляющим визуальным редактором, обеспечивающим предварительный просмотр настроек в реальном времени. Выберите шаблон, а затем с помощью простых щелчков перетащите инструменты, чтобы настроить сетку цен вплоть до мельчайших деталей.
Вы сможете добавлять неограниченное количество столбцов, изменять цвета, шрифты, значки и добавлять свои собственные изображения и ленты (например, для объявления скидки).
скачать | Демонстрация | веб-хостинг
Slaido — это плагин премиум-класса для WordPress, который позволяет вам выбирать из почти 320 адаптивных шаблонов слайдеров и импортировать один из них на свой сайт всего за несколько кликов. 
Это полный пакет шаблонов, идеально подходящий для Слайдер революция. Итак, вам сначала нужно установить последний, чтобы полностью использовать этот плагин WordPress.
Его основными особенностями являются: адаптивная компоновка слайдеров, простота импорта или экспорта слайдеров, регулярные обновления, круглосуточная поддержка клиентов, плавная и очень крутая анимация, доступность видеоуроков для быстрого старта, поддержка Google Fonts и многое другое.
скачать | Демонстрация | веб-хостинг
3. портфель X
Portfolio X — это уникальный плагин для WordPress, который поможет вам интегрировать портфолио или красивую галерею на вашем сайте.

Он предлагает изначально виджеты, посвященные портфелям и витринам. Его нумерация страниц и страница, посвященная деталям ваших проектов, принесут большую удобство для пользователя и улучшение вашего SEO.
Его основными особенностями являются: 16 уникальных моделей, несколько Портфолио виджетов доступно, ппосвященный деталям проектов,опции навигации и фильтрации доступны через портфели,строитель шорткодов, эотличная поддержка клиентов,бесплатные и регулярные обновления, едц …
скачать | Демонстрация | веб-хостинг
Рекомендуемые ресурсы
Узнайте о других рекомендуемых ресурсах, которые помогут вам создать и управлять своим сайтом.
- Как настроить тему Twenty Seventeen
- Как создать частный магазин с WooCommerce
- Как создавать столбцы в WordPress без плагинов
- Как исправить ошибку подключения в WordPress
Заключение
Вот ! Это все для этого урока. Мы надеемся, что вы сочтете полезным исправить проблему смешанного контента в WordPress. Не стесняйся поделиться с друзьями в ваших любимых социальных сетях.
Однако вы также сможете ознакомиться с нашими Ressources, если вам нужно больше элементов для реализации ваших проектов создания интернет-сайтов, обратитесь к нашему руководству по Создание блога на WordPress.
Если у вас есть предложения или замечания, оставьте их в нашем разделе Комментарии.
…
Are you trying to switch from HTTP to HTTPS, but your WordPress still has mixed content error even after trying everything on the internet?
I can understand your frustration.
At One Smart Sheep, we get clients like you who face WordPress issues and waste hundreds of dollars. We give them an extremely affordable solution.
Did you know that mixed content warning can affect your site’s SEO performance negatively?
Google announced in 2014 that HTTPS would be a ranking factor, and the mixed content warning is the biggest culprit that doesn’t let you take full advantage of HTTPS security.

Not only does it harm your website on Google, but users see your site as suspicious—not visiting your site ever again.
To address the issue, Google has made HTTPS a ranking factor so that webmasters focus on fixing the issue, and hackers cannot steal users’ confidential information from their websites.
In this article, you’ll learn:
- What Is Mixed Content Error in WordPress?
- Examples of Mixed Content Error
- What Triggers Mixed Content Error?
- How to Check Checking HTTPS Warnings in Bulk?
- How to Fix Mixed Content Error Without a Plugin?
- How to Fix Mixed Content Error with a Plugin?
- Why Not to Use Really Simple SSL Plugin?
- Is Cloudflare Effective to Fix Mixed Content?
- Is ‘Better Search and Replace’ Safe?
- Chrome No Mixed Content Warnings Examples
What Is Mixed Content Error in WordPress?
As the name suggests, the mixed content error is when scripts load over HTTP and HTTPS simultaneously, and a warning appears in the address bar of the user’s browser. Images, JS, and CSS are script files that load when visiting a website. Even a single file that loads over HTTP can cause a mixed content error in WordPress.
Examples of Mixed Content Error in Different Browsers
Here are the examples you can see how the mixed content errors look like in different browsers:
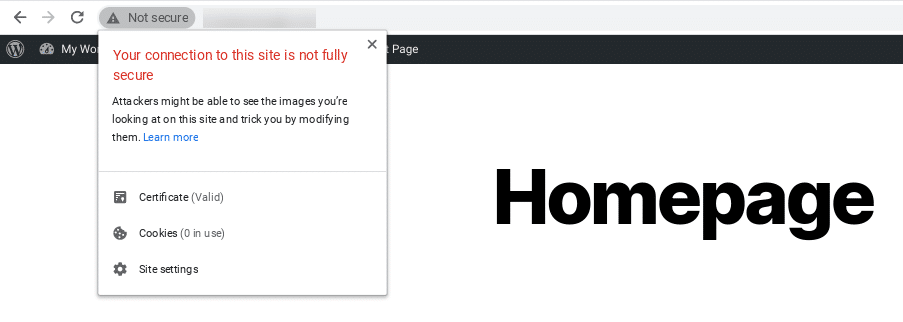
1. Google Chrome Mixed Content Error Example
According to Statcounter, Google Chrome has a whopping 66% market share.

Google Chrome started to show Not Secure in all the latest Google Chrome versions across all operating systems. See the below screenshot here is how Chrome shows mixed content error. Google Chrome warns, “Your connection to this site is not secure”

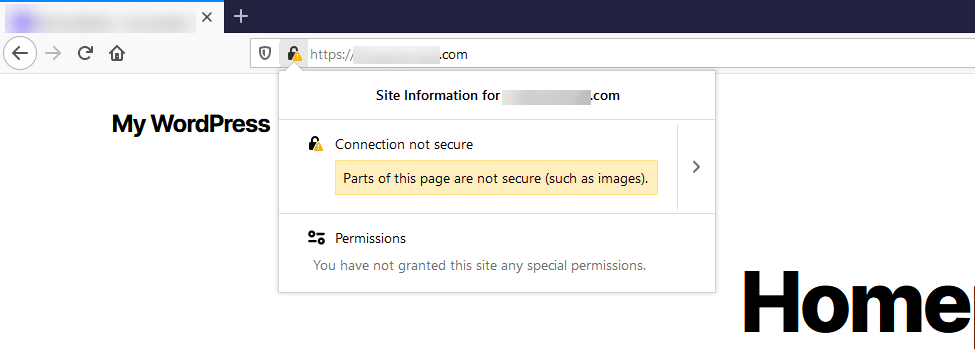
2. Firefox Chrome Mixed Content Error Example
Firebox has a market share of only 4%. Most people love to use it since its memory consumption is a lot lower than on Chrome. Firefox is more descriptive when it comes to showing mixed content warnings.

3. Opera Chrome Mixed Content Error Example
Opera dominates only 2% of the browser market. Opera isn’t as dangerous as Chrome since Chrome shows users the site is not secure without clicking the padlock.

4. Edge Mixed Content Error Example
Microsoft is putting real efforts to make Edge better and adopting technologies that have made Google Chrome a hit. Now Edge runs on the Chromium engine, but Microsoft engineers have customized it to look different. Edge shows exactly like Chrome but with different styles, fonts, and icons.

What Triggers Mixed Content Error?
Several reasons cause mixed content errors, but I’ve listed five common reasons:
1. Incorrect WordPress URL Addresses
Most users forget to put HTTPS in WordPress Address (URL) and Site Address (URL) from the General section that falls under Settings, especially when they install a new WordPress instance.

Most of the time, merely putting HTTPS in the URLs fixes the problem without any plugins and external support from your hosting.
2. Installing WordPress from cPanel as HTTP
Most users install WordPress as HTTP since cPanel shows a warning that the respective domain doesn’t have an SSL certificate.

I strongly recommend to install your blog as HTTPS and install SSL certificates immediately after creating your blog.
But if your hosting provider offers a free Let’s Encrypt certificate, you don’t need to worry about installing the SSL certificate,.
3. Using Outdated or Nulled Theme
Users download nulled themes from the internet, and many scripts are served over HTTP connections so that hackers can steal the content. Most nulled themes have malware that mostly servers over HTTP connections.

Most outdated themes were not built with SSL security in mind, so they frequently cause mixed content errors.
It’s better to audit the WordPress theme before you hit the purchase button.
4. Importing Demo Content
Importing demo content is one of the most common reasons before the mixed content warning.
Demo content, usually written in XML, is the file that helps your WordPress blog exactly like the demo.

It has links served over HTTP, and WordPress catches the insecure HTTP links embedded in the demo XML file.
Keep reading; we’ve provided a quick solution to this problem.
5. Hosting Limitations
Users fall victim to cheap hosting providers who don’t mention SSL availability until they buy the package.
They take full advantage of the people’s ignorance since people don’t have any idea about SSL unless they see the insecure padlock icon.
Later on, hosting companies force to use a premium package to use the SSL certificate.

Godaddy provides a free SSL certificate to people who opt for the Ultimate package that costs $13 a month.
How to Check Checking HTTPS Warnings in Bulk
Do you think you have fixed the mixed content warnings from your homepage and you’ve successfully passed the mission?
Nope.
Your website may have other scripts that might be loading over the HTTP protocol.
I suggest checking your whole site for HTTP insecure content.
You might be thinking about how to check?
Method 1: Ahrefs Free Webmaster for SEO
Ahefs just made their premium SEO audit tool for free to all webmasters.

It crawls your whole website and finds out all the technical SEO issues on your website.
To find all the URLs being served over HTTP, go to Page Explorer and click Filter and choose HTTP protocol.

Method 2: Screaming Frog
Screaming Frog has been the industry leader in detecting SEO technical issues, including mixed content issues.
The free software is limited to 500 pages only, but it’s enough to find out the culprit.
How to get started?
Download Screaming Frog from the official website.
Put your website and click scan.

Once completed, you’ll find out all the HTTP requests under the Security section.
It’s simple, isn’t it?
Method 3: Google Advanced Command
The fastest way to find HTTP web pages from your website is to use Google advanced command.
The command runs:
site:yourwebsite.com -inurl:https

We’ve optimized our website well so that’s why you’ll not find mixed content issues on our website.
I recently found out using Google advanced operator that Amazon has several URLs that are still served over HTTP
site:amazon.com -inurl:https

Even the biggest company in the world can make mistakes 😀

Check SSL Certificate Before You Try to Fix Mixed Content Issue
When you install a new WordPress instance, it’s highly likely that you see the red padlock.
If your hosting company provides free Let’s Encrypt certificates, it’ll take a few minutes until it’s fully activated.
You can use different tools that can show either SSL is properly installed on your website or not.
Visit whynopadlock.com and check your SSL certificate status.

It’s crucial otherwise fixing mixed content and insecure connections wouldn’t fix the issue.
You can install Cloudflare or Let’s Encrypt that provides free SSL.
If an SSL certificate is not installed, you’ll get an error message.
Dlg_flags_sec_cert_cn_invalid

How to Fix Mixed Content Error with a Plugin
I strongly recommend fixing the mixed content warning without a plugin.
But if you’re a newbie to WordPress, you can use the Really Simple SSL plugin that is the best for fixing the mixed content problems.
Install the plugin and activate it.

When you hit the activity button, you’ll be redirected to this page.

Let me explain the three points:
- The CSS and JS files are to be changed from HTTP:// to //. If you’re a complete beginner, ignore it.
- Some images and other scripts may be serving from HTTP servers where the SSL certificate is not installed. It’s recommended to remove these files or install SSL from other servers. It happens with a demo theme that imports files from the servers with no SSL certificates.
- Making a backup is essential.
Click Go Ahead and activate SSL.
You’re done.
Your mixed content warning will disappear. If it doesn’t, try the manual method.
How to Make a Backup of My WordPress Blog?
Go to cPanel, and find WordPress that falls under the Scripts section.

Scroll down to the Current Installations section, and click the Backup Icon.

Select Backup Directory, Backup Database, and select the Default Backup option.

And click Backup Installation.

How to recover? Easy. Click the Backup & Restore icon. You can recover any backup instantly or download to your machine.

How to Fix Mixed Content Error without a Plugin
Sometimes even if you install and activate a Really Simple SSL plugin, your site may not be fully secure. Here are a few ways you can fix:
Way 1 – String Locator and cPanel Editor
You can fix the issues with the String Locator plugin that you can delete later on once you’ve fixed the issue, unlike Really Simple SSL that reset the settings.
Check out the below site even with Really Simple SSL installed; still, it has mixed content issues.

The reason? The URL doesn’t have an SSL certificate installed since it’s hosted on every hosting. It doesn’t work with https.
How can you fix it?
First, I need to find the location of the URL in my WordPress directory so that I can replace it.
You can use String Locator to find out the URL.

Go to Tools and select String Locator. Paste the URL that has a mixed content issue by going to inspect elements.

Click Edit.
It will redirect you to this complex page. You can make changes here, but sometimes you may not edit properly.

It prefers to edit with a cPanel editor since you can’t edit it here if it’s a complicated file.
We first need to find the file location.

Go to File Manager.

Go to the desired folder and edit the file.

Press Ctrl+F (Control+F in Mac) and paste the URL that is loading in HTTP.

Either you can remove it or replace it with the HTTPS version. Upload a file on your blog via Media Library and paste the URL here.

Copy the URL shown on the right side.

Replace the URL and paste into the url(“YOUR COPIED URL HERE”) and save changes.
As you can see, there are no mixed content issues.

Way 2 – .htaccess Method
.htaccess is a highly recommended method that should be used since it works on the server-side that makes the site load faster.
You need to go to File Manager in cPanel.

.htaccess doesn’t show up as it’s hidden as default. Click Settings and enable SHOW HIDDEN FILES.

Refresh the page, and right-click .htaccess and Edit.

You don’t need to do anything, just click Edit.

And paste the below code into the file and hit Save Changes.

RewriteEngine On
RewriteCond %{SERVER_PORT} 80
RewriteRule ^(.*)$ https://www.website.com/$1 [R,L]
Don’t forget to change your website name.
Here is how we’ve done for our website:
RewriteEngine On
RewriteCond %{SERVER_PORT} 80
RewriteRule ^(.*)$ https://onesmartsheep.com/$1 [R,L]
Why Not Use the Really Simple SSL Plugin?
Most people recommend using the Really Simple SSL plugin to solve all SSL and HTTPS problems.
But it’s not the right way, according to many experts.
Many hosting providers have banned the plugin since it consumes a lot of CPU time and causes the site to shut down.

It’s the reason when you deactivate Really Simple SSL; your HTTPS version doesn’t work.
The main purpose of a plugin is to make money. Really Simple SSL provides premium packages.

You should fix mixed content issues without any plugin for maximum performance instead of relying on plugins that have high consumption, and you end up buying an expensive plugin.
At One Smart Sheep, we fix the mixed content issue without any plugin, making the site faster as requests are made from the server level.
Is Cloudflare Effective to Fix Mixed Content?
Cloudflare has several features that may fix the mixed content problem, but it doesn’t. When you turn on Always Use HTTPS and Always HTTPS Rewriters, the issue will not be resolved, most probably.

People have been complaining about it on many social media platforms, including the Cloudflare community.

You should fix it from on server rather than Cloudflare.
If Cloudflare has fixed your issue, let us know in the comment section.
Is ‘Better Search and Replace Plugin’ Safe For Fixing Mixed Content Issue?
Better Search and Replace’ plugin is a helpful plugin that can fix HTTPS issue, but not in all cases.
I installed a demo theme on a dummy WordPress to show you how it works.
I’ll try to fix the mixed content issues with the help of the plugin.

I activated it.

I added a rule.

When I added the rule, the site was destroyed. It didn’t work as expected.

But the good news is that you can remove the rule that you added that fixes the issue that you have encountered.

Why Is Elementor Not Working with HTTPS?
If you’re using Elementor, there is a greater chance of having mixed content issues on your website.
You can quickly fix it by going to Tools>Replace URL and type your old URL without HTTP and replace it with HTTPS.

And don’t forget to regenerate files otherwise, the changes will no longer work.

Does the issue persist still?
Try the manual method without a plugin. Keep reading…
Examples of No Mixed Content Error in Different Browsers
Here are real examples of different browsers and how they look when mixed content issue is resolved:
1. Chrome No Mixed Content Warnings Example
If you’ve fixed the mixed content issue, Chrome will award you with a green padlock 🙂

2. Firefox No Mixed Content Warnings Example
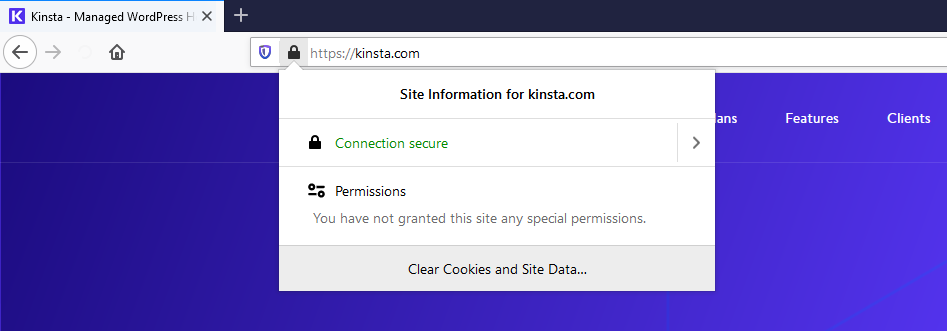
Firefox indicates the connection is secure after you’ve fixed the mixed content warning. When you click the > icon, you can see which authority has issued the certificate.

3. Edge No Mixed Content Warnings Example
Edge runs on chromium shows the same as Google Chrome.

4. Opera No Mixed Content Warnings Example
Opera also runs on chromium, but it doesn’t show the green padlock 😀

Final Thoughts
Fixing mixed content is not easy to solve in most cases, but having technical knowledge can really help you.
It doesn’t only impact your user experience, but also negatively affects your SEO performance.
If you can’t afford to fix your WordPress issue every second day and don’t want to waste hundreds of dollars, you should hire One Smart Sheep that fixes, builds, maintains, hosts websites on ultra high-speed servers and many other great features for a flat rate so that you don’t need to worry about any issue that may arise in future.
The most effective method is the one that is done manually with the .htaccess file since it doesn’t put any strain on the CPU otherwise using Really Simple SSL and other plugins cost you money in the long term due to higher consumption of your resources.
Running your site over HTTPS is no longer optional. Not only is it more secure (everything is encrypted, with nothing passed in plain text), but it also builds trust, is a search engine ranking factor, and provides more accurate referral data. Unfortunately, when migrating from HTTP to HTTPS, website owners can encounter several issues. One of which is ‘mixed content warnings’.
Performance issues tied to encryption have been fixed for the most part thanks to HTTP/2, and Let’s Encrypt has changed the entire industry by providing you with an easy way to get free SSL certificates.
Most importantly for online businesses, web browsers such as Google Chrome and Mozilla Firefox are cracking down on sites not running over HTTPS, and are showing stricter warnings to potential visitors. For example, if you’re using legacy TLS versions, you may encounter ERR_SSL_OBSOLETE_VERSION notifications in Chrome. Warnings are the last thing you want your visitors to see.
To help you avoid those problems, we have an in-depth guide on how to migrate from HTTP to HTTPS. However, after following that process, you might still see mixed content warnings.
Today we’ll show you a few different ways you can fix this issue on your site.
Prefer to watch the video version?
What Is a Mixed Content Warning?
A mixed content warning appears in a user’s browser when the site they’re trying to visit is loading HTTPS and HTTP scripts or content at the same time. This can cause problems since HTTP and HTTPS are completely separate protocols.
When you migrate to HTTPS, everything needs to be running over that protocol, including your images, JavaScript files, and so on. Below are some examples of what can happen if some of your content is still loading over HTTP instead.
Mixed Content Warning Examples
Chrome is currently the top browser, used by over 77% of the web. So the following warning is what most of your visitors would see:
Of course, not everyone is using Chrome.
Here is an example of what happens in Firefox when a mixed content warning displays on a site:
Next is an example of what this warning looks like in Microsoft Edge:
And here’s how it appears in Internet Explorer:
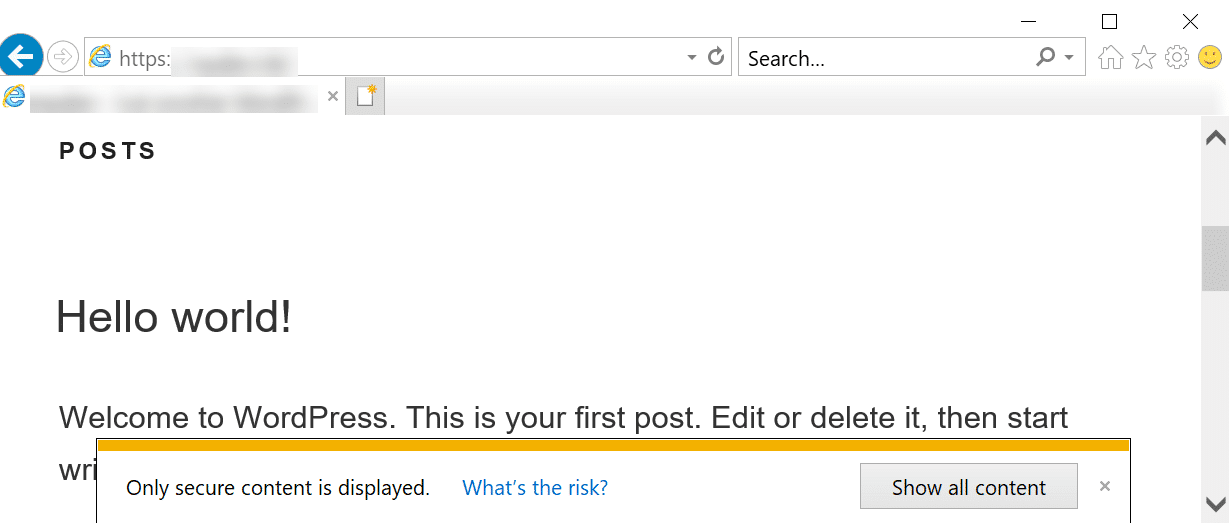
As you can see, Internet Explorer is probably one of the worst places for this warning to appear, because it actually breaks the rendering of the page until the popup is clicked on.
This isn’t an error you want visitors on any browser to see. It can be fixed, but first, you’ll need to understand why it occurs.
Running your site over HTTPS is no longer optional. ✅ But moving from HTTP ➡️ HTTPS can come with mixed content warnings. Learn how to solve them quickly with this guide 💥Click to Tweet
What Causes Mixed Content Warnings?
We’ve found that most common mixed content warnings appear right after someone migrates their site from HTTP to HTTPS. Some HTTP links simply get carried over, and this causes mixed content warnings to start firing.
Here are some additional causes of this warning:
- You just added a new service or plugin to your site. In particular, developers sometimes use absolute paths (http://yourdomain.com/style.css) in their plugins or themes to link to CSS and JavaScript, instead of using relative paths (/style.css).
- Your images have hardcoded URLs (such as http://yourdomain.com/image.png) that run over HTTP. These could be within posts, pages, or even widgets.
- You’re linking to HTTP versions of external scripts (hosted jQuery, Font Awesome, etc.).
- You have embedded video scripts that use HTTP instead of HTTPS.
Unfortunately, you may not uncover the real source of the issue until you start troubleshooting.
With that in mind, let’s take a look at some methods you can use to fix mixed content warnings.
How to Fix Mixed Content Warnings (4 Steps)
You can follow the four simple steps below to fix your mixed content warnings. This process assumes that you have already done the following:
- Installed an SSL certificate
- Redirected HTTP to HTTPS (site-wide)
We’ll be using an example development site in the following examples.
1. Find Out Which Resources Are Loading Over HTTP
The first thing you’ll need to do is find out which resources are still loading over HTTP.
Remember that these warnings might only be happening in certain areas of your site, not globally. Browse to the page that’s prompting the warning and launch Chrome DevTools by hitting:
- Windows: F12 or CTRL + Shift + I
- macOS : Cmd + Opt + I
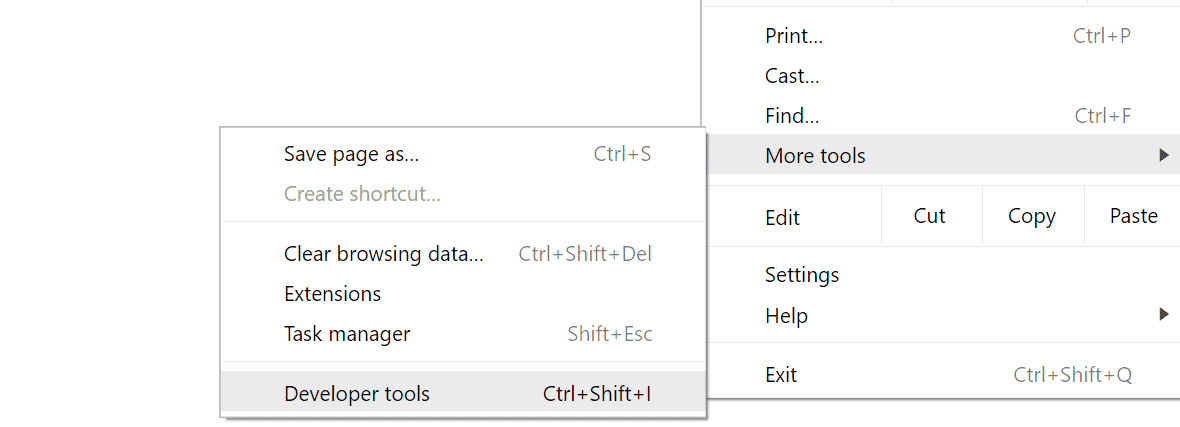
You can also open Chrome DevTools from the tools menu in your browser:
There are a couple of places you can check to find out which resources aren’t loading over HTTPS.
The first is the Console tab. Note that you might need to refresh the page after you have Chrome DevTools open for it to properly load everything.
If mixed content errors are present, they’ll be highlighted in either red or yellow. Typically, they’re accompanied by information explaining that “This request has been blocked; the content must be served over HTTPS.” This means that the browser settings are configured to automatically block any HTTP content.
In an effort to ensure pages only load over HTTPS, Chrome started to begin blocking mixed content by default with Chrome 79. Most recently, they unrolled features to start auto-upgrading mixed images and media.
Therefore, when using Chrome DevTools, you may see mixed content messages indicating some requested elements were automatically upgraded:
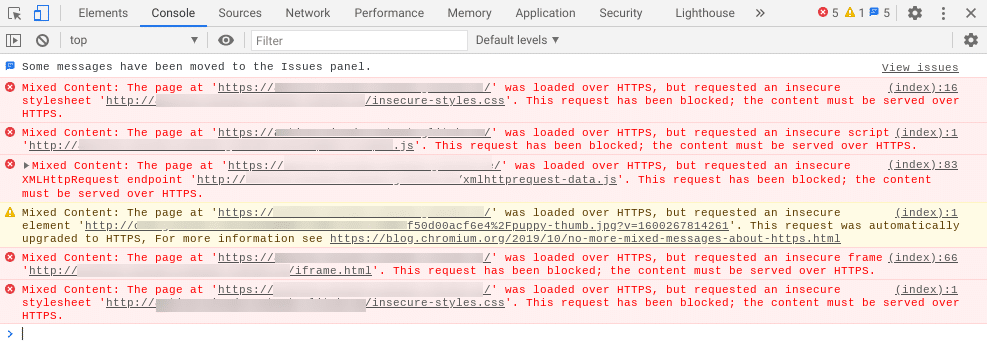
Here, we can clearly see that there are a variety of insecure elements causing the mixed content warnings, including a stylesheet and script.
You’ll also notice that a request was made for an insecure .jpg image, which was automatically upgraded to HTTPS. (Note: If this were in another browser other than Chrome, it wouldn’t be automatically upgraded).
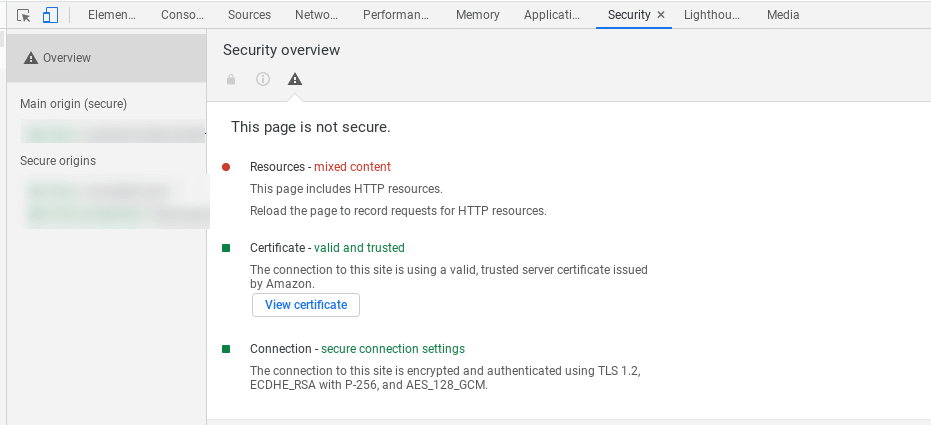
You can also look in the Security tab of Chrome DevTools. This will show you any non-secure origins:
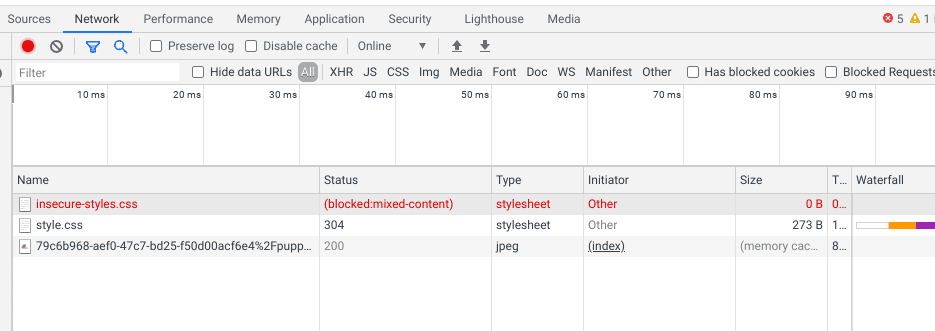
Under the Network tab, you can also find a list of blocked requests:
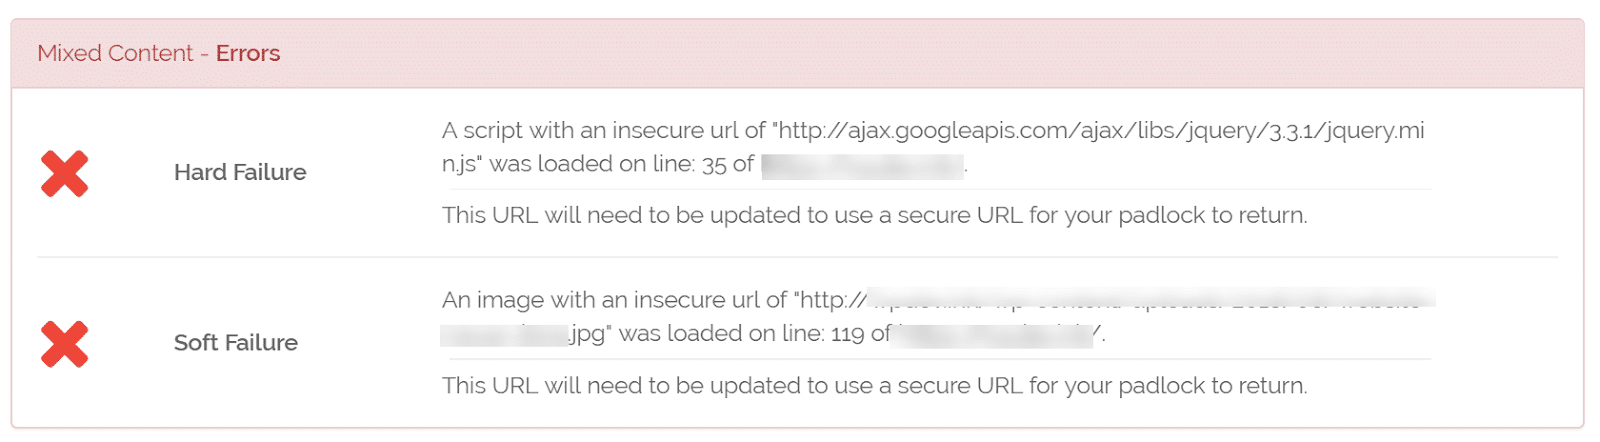
If you aren’t using Chrome, or you just want a quick summary of the errors, you can also use a free tool like Why No Padlock.
It scans an individual page and shows you all of the insecure resources:
This tool is easy to use. You can simply enter your URL and click on Test Page, and it will show you any errors that are present. Plus, it’s free!
Checking HTTPS Warnings in Bulk
If you’re worried about the rest of your site, you might want to check it in bulk. Here are some recommended options for doing that:
- There’s a free little tool called SSL Check from JitBit, which you can use to crawl your HTTPS site and search for insecure images and scripts that will trigger a warning message in browsers. The number of pages crawled is limited to 400 per website.
- The Ahrefs Site Audit tool has the ability to detect HTTPS/HTTP mixed content. If you already have access to this solution, or someone on your marketing team does, it can be a great way to be thorough.
- HTTPS Checker is a desktop software you can install to scan your site. It can help you check for “not secure” warnings and content after big changes. It is available on Windows, Mac, and Ubuntu. The free plan enables you to check up to 500 pages per scan.
- SSL Insecure Content Fixer is a WordPress plugin you can install on your site to uncover errors that lead to mixed content warnings. It’s free to use, and will even automatically perform fixes to resolve the errors.
Using any of the above tools can help save you time over having to manually check each page on your site for mixed content warnings and errors. For a thorough assessment of the potential errors on your site, you might consider using a combination of these solutions.
2. Verify Whether HTTP Resources Are Accessible Over HTTPS
The next step is confirming that the resources loading over HTTP are accessible over HTTPS. They most likely are, you just need to update the links.
As an example, let’s say our mixed content errors pointed to the following insecure jQuery script and .jpg image:
- http://ajax.googleapis.com/ajax/libs/jquery/3.31/jquery.min.js
- http://example-site.com/wp-content/50d00acf6e4%2Fpuppy-thumb.jpg?v=1600261043278
If we take both of those URLs, input them into our browser’s address bar, and replace “http” with “https” at the beginning, we can see that they load just fine. Therefore, we simply need to do a search and replace on our site.
3. Perform a Search and Replace
There are a lot of ways to perform a search and replace. In this section, we will walk you through two different recommended options.
If you’re curious, we don’t recommend using a tool such as Really Simple SSL. While it’s a great plugin, it’s best not to rely on a solution like this over the long term. You won’t be migrating back to HTTP later, so it’s best to do it the right way and update your HTTP URLs in your database (as we’ll show you below).
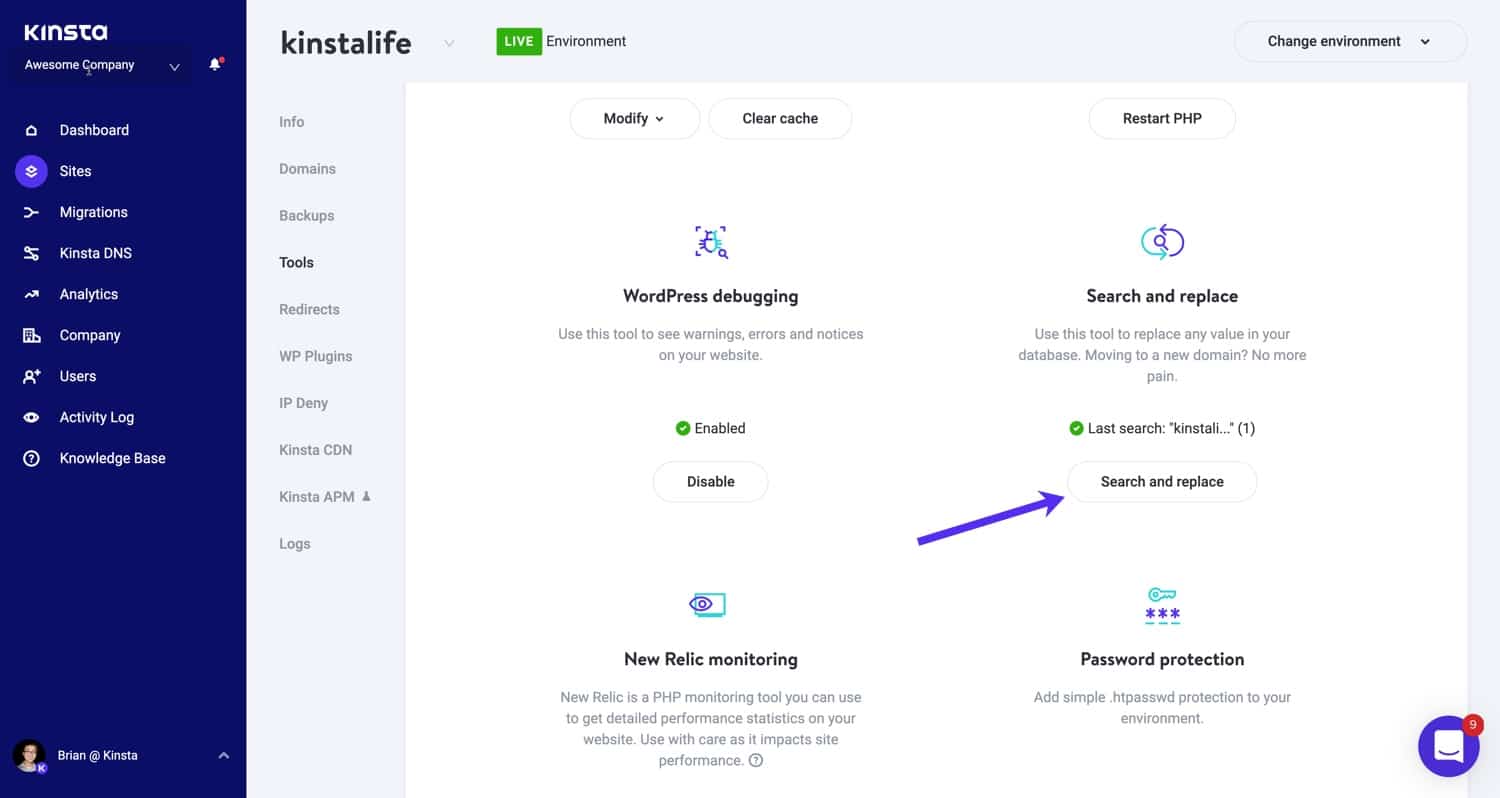
If you’re a Kinsta customer, you can use our search and replace tool, which is available right within the MyKinsta dashboard.
Go to your site’s Tools page and click on Search and Replace:
Next, in the search field, enter the value you want to look for in the database.
In this case, we will use our HTTP domain: http://kinstalife.com. Then click on the Search button. The search and replace tool will show the number of occurrences for the given string.
Check the Replace box to continue with the replacement process. In the Replace with field, enter whatever should replace the value you are searching for. In this case, we will use our HTTPS domain: https://kinstalife.com.
We also recommend leaving the Clear cache when ready box checked, to automatically purge the Kinsta cache after the search and replace process is complete. Finally, click on the Replace button:
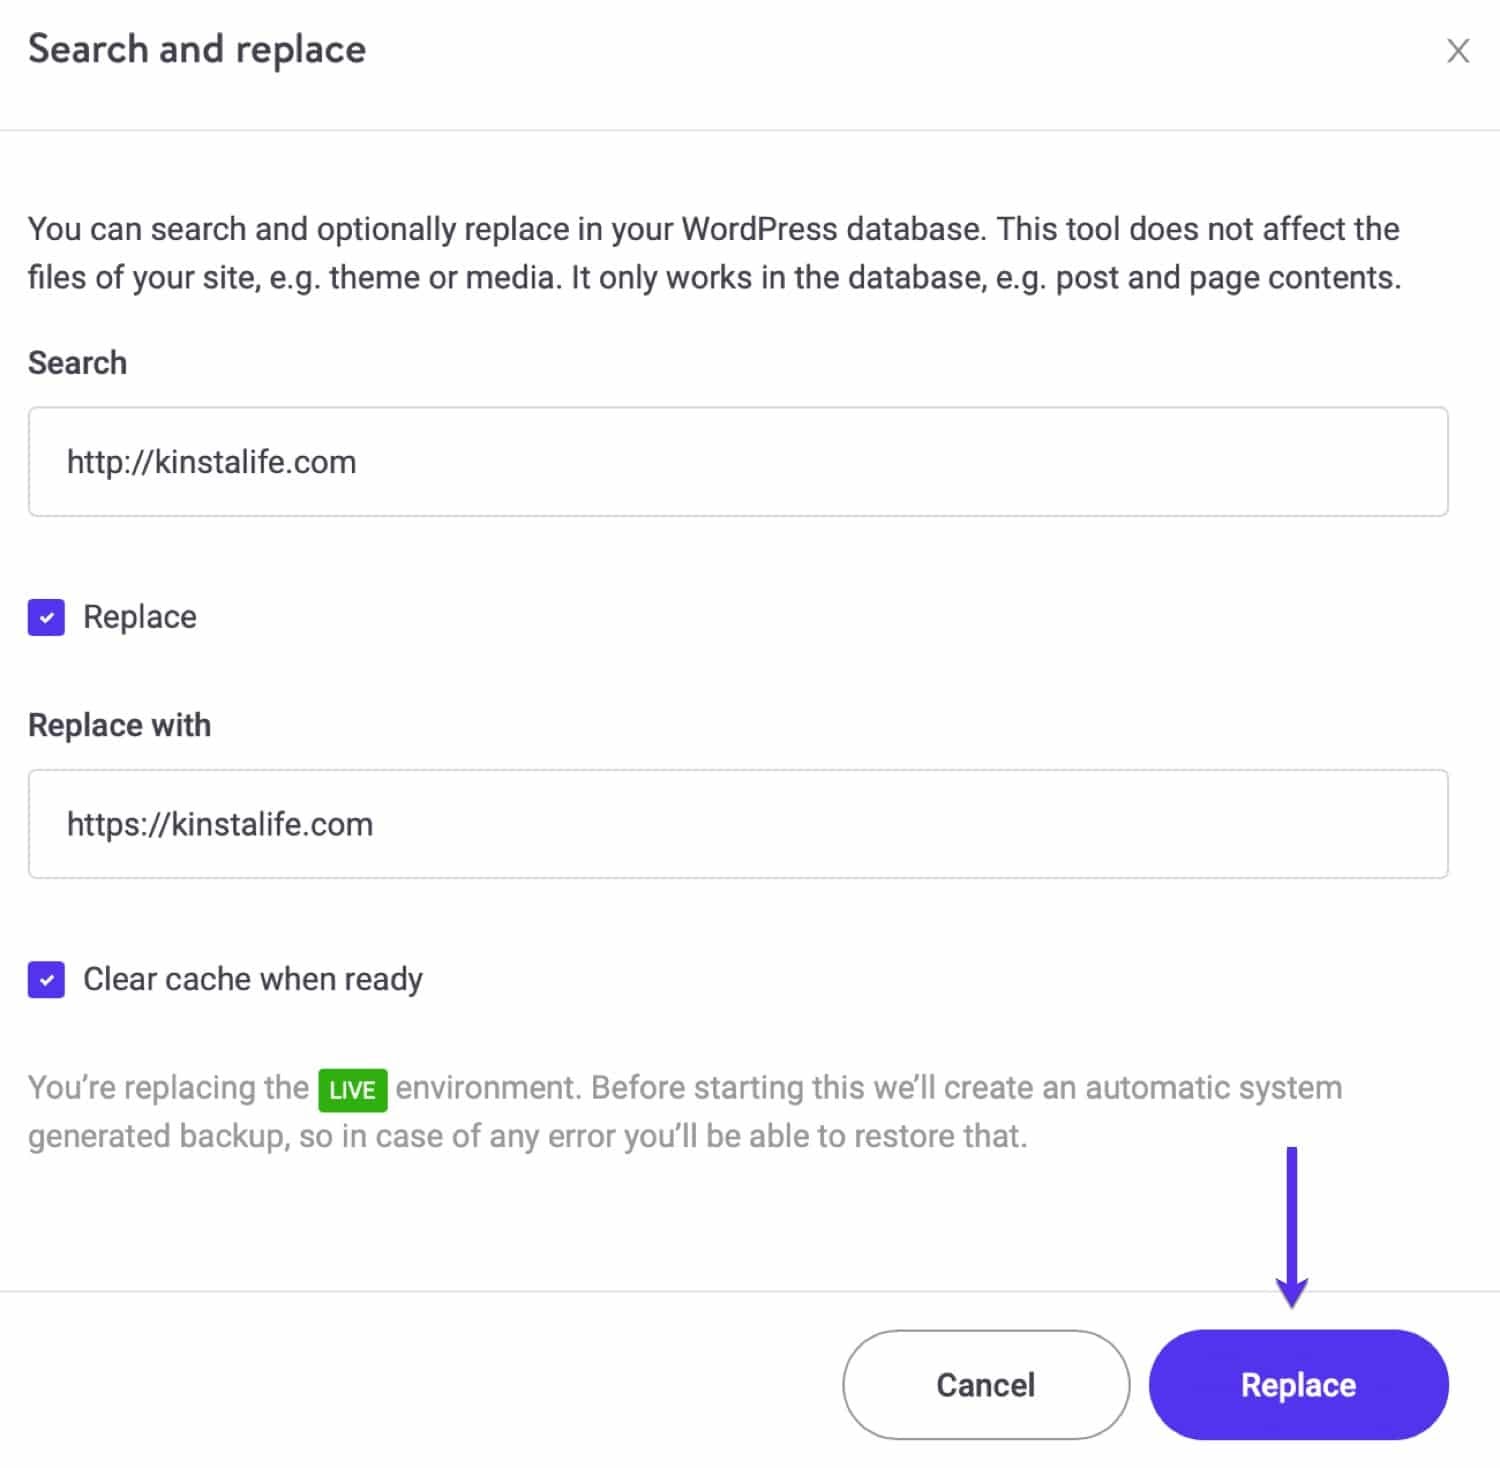
Important: Make sure you don’t include any leading/trailing white space in either of these fields, as this might produce undesirable results.
Search and Replace Alternatives
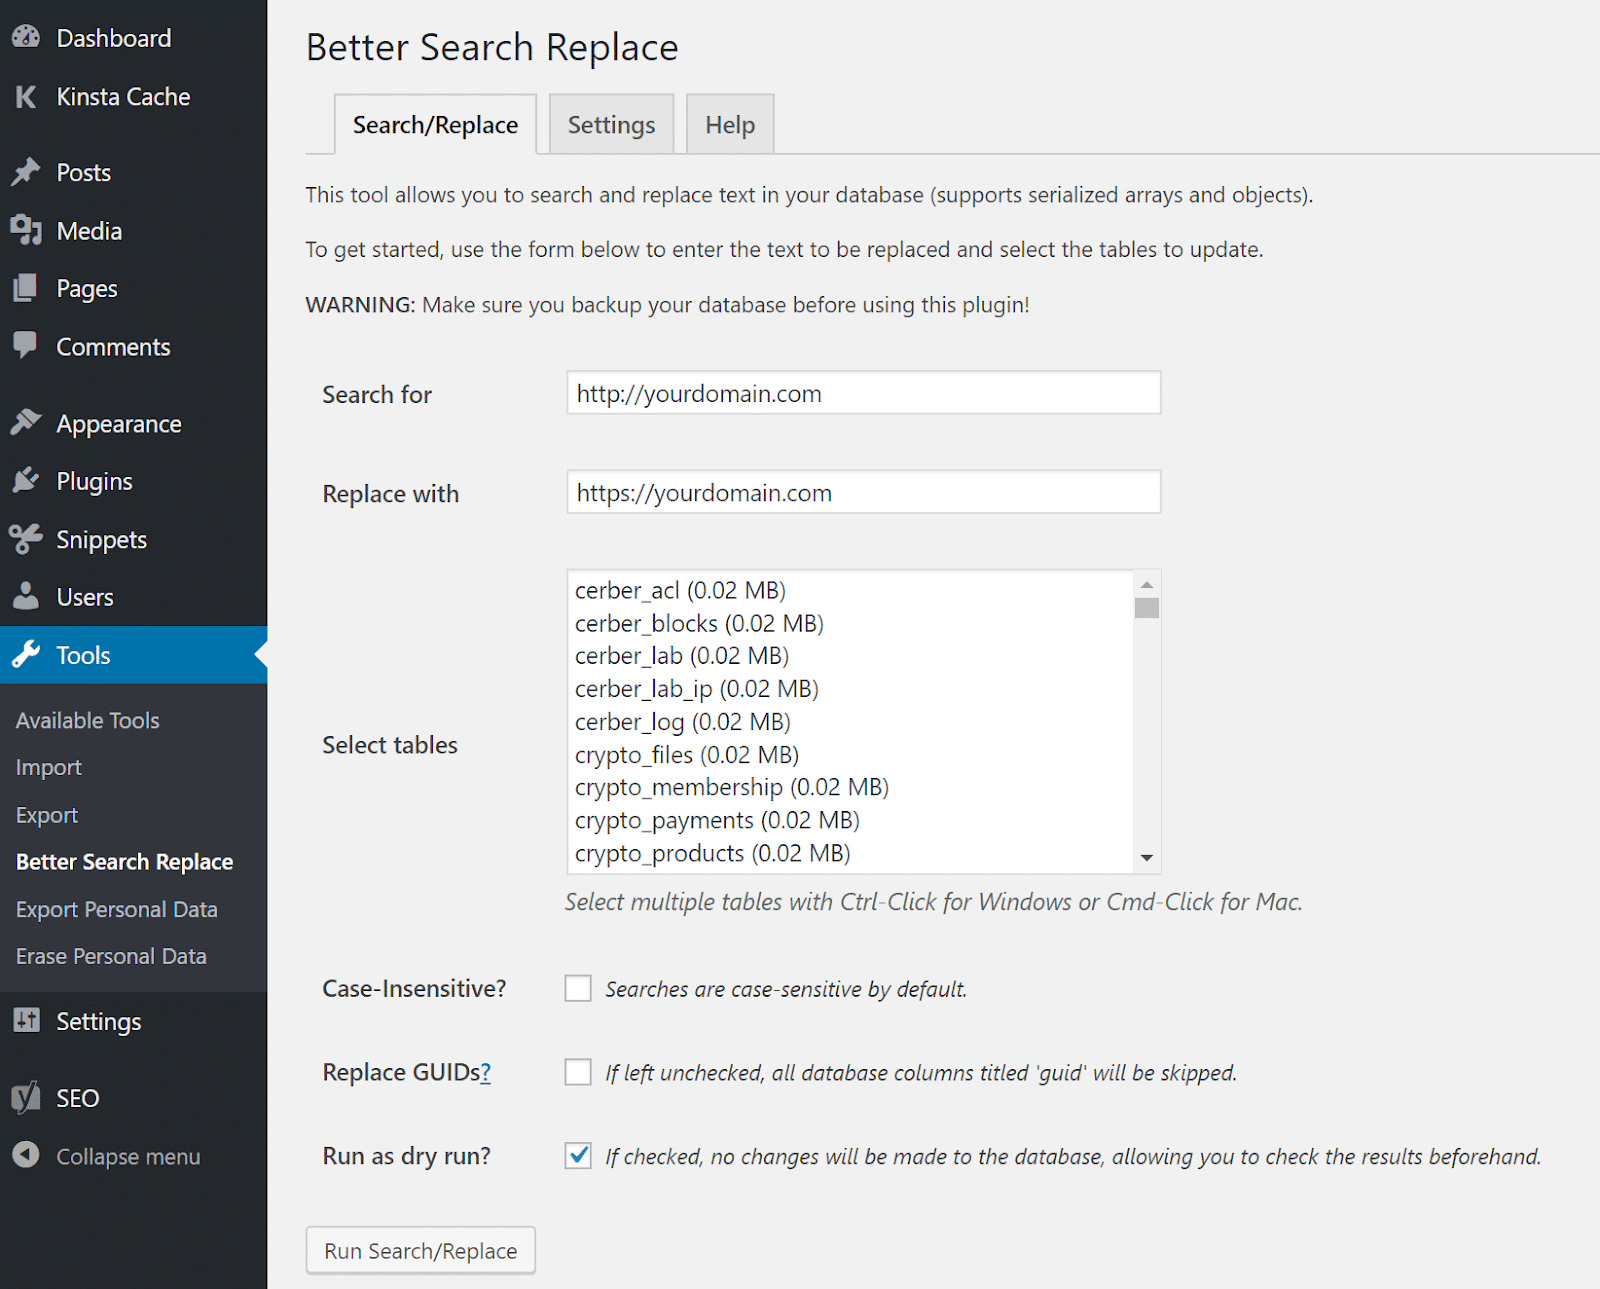
If you aren’t using Kinsta, you can accomplish this same task with the free Better Search Replace plugin, and then simply delete it after you’re done:

You can download this tool from the WordPress Plugin Directory, or by searching for it within your WordPress dashboard.
After activating it, just search for your HTTP domain (http://yourdomain.com) and replace that with your HTTPS domain (https://yourdomain.com):
As an alternative, you could also do a search and replace with the interconnect/it Search Replace DB PHP Script or WP-CLI.
Check out our video to learn more about using search and replace in WordPress:
4. Confirm That the Mixed Content Warnings Are Gone
After you finish doing the search and replace, you’ll want to double-check your site to confirm that the mixed content warnings are gone. We recommend visiting your site on the frontend and clicking around on a few pages while looking at the browser status indicator up in the address bar.
On our site, we can see that the .jpg image is now fixed, but an insecure script warning remains.
That’s because we ran a search and replace on resources loading from our own domain. The jQuery warning is caused by an external script that has to be manually updated:
In this case, the script needed to be manually added to our header (header.php). It should be using a relative URL, so we updated it to //ajax.googleapis.com/ajax/libs/jquery/3.3.1/jquery.min.js:
The search and replace will most likely fix all of your issues.
In general, you’ll only run into additional problems if you have something hardcoded on your site.
If you think there’s an external script hardcoded in one of your plugins or themes, and you’re having trouble tracking it down, feel free to reach out to the relevant developer for assistance.
No Mixed Content Warnings Examples
So you now know what to look for to fix these mixed content errors.
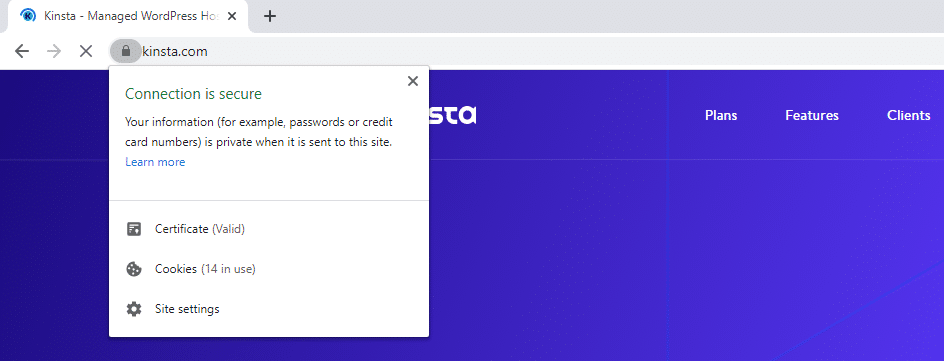
Here is an example of what happens in Chrome when everything is loading correctly over HTTPS, with no mixed content warnings:
Firefox will offer a similar message:
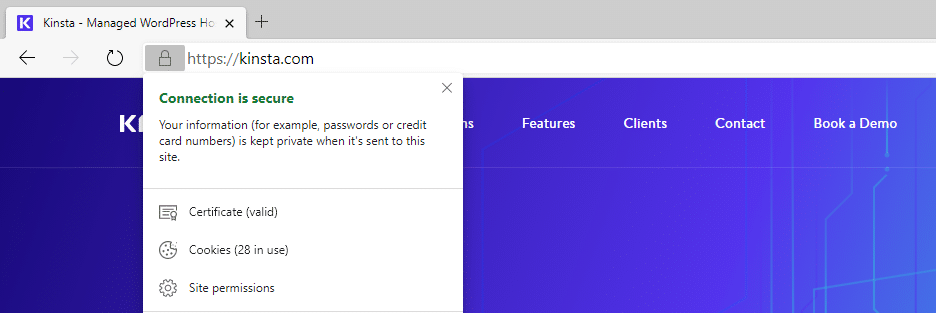
And here’s what you’ll see in Microsoft Edge:
Although the wording of the message may vary slightly depending on which browser you’re using, you should see a notification indicating a secure connection. If you do, you’ll know that you are no longer dealing with mixed content errors on your site.
What About HSTS?
Some of you might be wondering why you can’t simply use HSTS (HTTP Strict Transport Security) to fix this problem. HSTS was created as a way to force the browser to use secure connections when a site is running over HTTPS.
It’s a security header you can add to your web server and is reflected in the response header as ‘Strict-Transport-Security’.
However, HSTS isn’t a quick fix for all mixed content warnings. HSTS merely handles redirects, whereas the mixed content warning is a feature of the browser itself. You also don’t have control over whether third-party sites enable HSTS.
Therefore, you’ll always need to update your http:// URLs. Esa Jokinen dives deeper into the reasons why in this Server Fault discussion.
Additional Recommendations (Special Cases)
If you’re using the Elementor page builder, you must also go into the Elementor settings and update your site’s URL there, so the CSS files will regenerate with the new URL.
Once you have done that, clearing the cache should resolve any insecure warnings due to Elementor. In addition, if you’re using the Kinsta CDN, it’s recommended to purge the CDN zone as well.
Ready to make the switch to HTTPS, but frustrated by mixed content warnings? 🥴 Learn how to resolve this issue with help from this guide!Click to Tweet
Summary
Mixed content warnings can be frustrating to deal with, especially when there are a handful of causes they can be attributed to. Luckily, there are some simple steps you can take to fix these issues.
In most cases, a simple search and replace should quickly resolve your mixed content warnings and have your site back to normal in just a few minutes. If that doesn’t fix everything, it’s likely there are one or two hardcoded scripts left behind. You’ll need to find them and manually update them in order to clear this error or hire a developer who can do that for you.
If you have any feedback or run into any issues, let us know below in the comments section!
Get all your applications, databases and WordPress sites online and under one roof. Our feature-packed, high-performance cloud platform includes:
- Easy setup and management in the MyKinsta dashboard
- 24/7 expert support
- The best Google Cloud Platform hardware and network, powered by Kubernetes for maximum scalability
- An enterprise-level Cloudflare integration for speed and security
- Global audience reach with up to 35 data centers and 275 PoPs worldwide
Test it yourself with $20 off your first month of Application Hosting or Database Hosting. Explore our plans or talk to sales to find your best fit.
Running your site over HTTPS is no longer optional. Not only is it more secure (everything is encrypted, with nothing passed in plain text), but it also builds trust, is a search engine ranking factor, and provides more accurate referral data. Unfortunately, when migrating from HTTP to HTTPS, website owners can encounter several issues. One of which is ‘mixed content warnings’.
Performance issues tied to encryption have been fixed for the most part thanks to HTTP/2, and Let’s Encrypt has changed the entire industry by providing you with an easy way to get free SSL certificates.
Most importantly for online businesses, web browsers such as Google Chrome and Mozilla Firefox are cracking down on sites not running over HTTPS, and are showing stricter warnings to potential visitors. For example, if you’re using legacy TLS versions, you may encounter ERR_SSL_OBSOLETE_VERSION notifications in Chrome. Warnings are the last thing you want your visitors to see.
To help you avoid those problems, we have an in-depth guide on how to migrate from HTTP to HTTPS. However, after following that process, you might still see mixed content warnings.
Today we’ll show you a few different ways you can fix this issue on your site.
Prefer to watch the video version?
What Is a Mixed Content Warning?
A mixed content warning appears in a user’s browser when the site they’re trying to visit is loading HTTPS and HTTP scripts or content at the same time. This can cause problems since HTTP and HTTPS are completely separate protocols.
When you migrate to HTTPS, everything needs to be running over that protocol, including your images, JavaScript files, and so on. Below are some examples of what can happen if some of your content is still loading over HTTP instead.
Mixed Content Warning Examples
Chrome is currently the top browser, used by over 77% of the web. So the following warning is what most of your visitors would see:
Of course, not everyone is using Chrome.
Here is an example of what happens in Firefox when a mixed content warning displays on a site:
Next is an example of what this warning looks like in Microsoft Edge:
And here’s how it appears in Internet Explorer:
As you can see, Internet Explorer is probably one of the worst places for this warning to appear, because it actually breaks the rendering of the page until the popup is clicked on.
This isn’t an error you want visitors on any browser to see. It can be fixed, but first, you’ll need to understand why it occurs.
Running your site over HTTPS is no longer optional. ✅ But moving from HTTP ➡️ HTTPS can come with mixed content warnings. Learn how to solve them quickly with this guide 💥Click to Tweet
What Causes Mixed Content Warnings?
We’ve found that most common mixed content warnings appear right after someone migrates their site from HTTP to HTTPS. Some HTTP links simply get carried over, and this causes mixed content warnings to start firing.
Here are some additional causes of this warning:
- You just added a new service or plugin to your site. In particular, developers sometimes use absolute paths (http://yourdomain.com/style.css) in their plugins or themes to link to CSS and JavaScript, instead of using relative paths (/style.css).
- Your images have hardcoded URLs (such as http://yourdomain.com/image.png) that run over HTTP. These could be within posts, pages, or even widgets.
- You’re linking to HTTP versions of external scripts (hosted jQuery, Font Awesome, etc.).
- You have embedded video scripts that use HTTP instead of HTTPS.
Unfortunately, you may not uncover the real source of the issue until you start troubleshooting.
With that in mind, let’s take a look at some methods you can use to fix mixed content warnings.
How to Fix Mixed Content Warnings (4 Steps)
You can follow the four simple steps below to fix your mixed content warnings. This process assumes that you have already done the following:
- Installed an SSL certificate
- Redirected HTTP to HTTPS (site-wide)
We’ll be using an example development site in the following examples.
1. Find Out Which Resources Are Loading Over HTTP
The first thing you’ll need to do is find out which resources are still loading over HTTP.
Remember that these warnings might only be happening in certain areas of your site, not globally. Browse to the page that’s prompting the warning and launch Chrome DevTools by hitting:
- Windows: F12 or CTRL + Shift + I
- macOS : Cmd + Opt + I
You can also open Chrome DevTools from the tools menu in your browser:
There are a couple of places you can check to find out which resources aren’t loading over HTTPS.
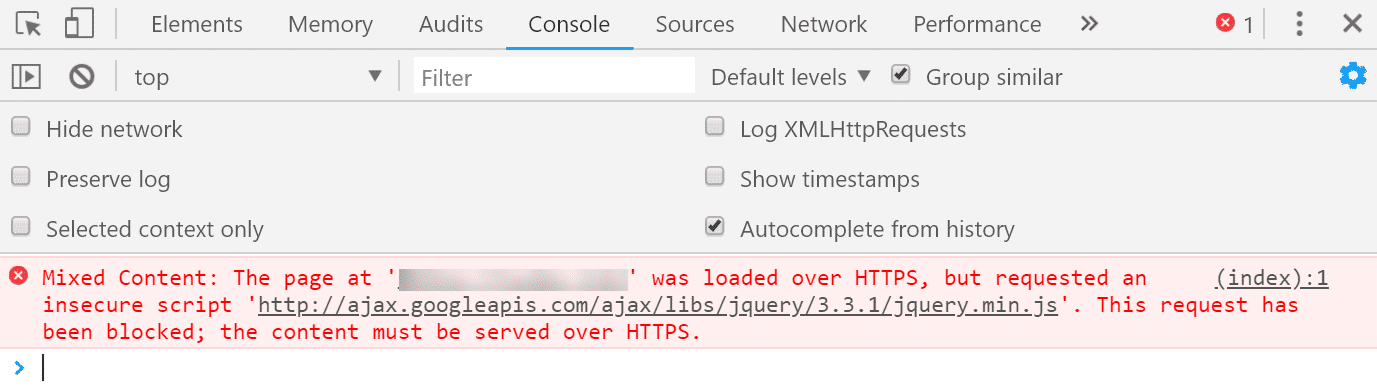
The first is the Console tab. Note that you might need to refresh the page after you have Chrome DevTools open for it to properly load everything.
If mixed content errors are present, they’ll be highlighted in either red or yellow. Typically, they’re accompanied by information explaining that “This request has been blocked; the content must be served over HTTPS.” This means that the browser settings are configured to automatically block any HTTP content.
In an effort to ensure pages only load over HTTPS, Chrome started to begin blocking mixed content by default with Chrome 79. Most recently, they unrolled features to start auto-upgrading mixed images and media.
Therefore, when using Chrome DevTools, you may see mixed content messages indicating some requested elements were automatically upgraded:
Here, we can clearly see that there are a variety of insecure elements causing the mixed content warnings, including a stylesheet and script.
You’ll also notice that a request was made for an insecure .jpg image, which was automatically upgraded to HTTPS. (Note: If this were in another browser other than Chrome, it wouldn’t be automatically upgraded).
You can also look in the Security tab of Chrome DevTools. This will show you any non-secure origins:
Under the Network tab, you can also find a list of blocked requests:
If you aren’t using Chrome, or you just want a quick summary of the errors, you can also use a free tool like Why No Padlock.
It scans an individual page and shows you all of the insecure resources:
This tool is easy to use. You can simply enter your URL and click on Test Page, and it will show you any errors that are present. Plus, it’s free!
Checking HTTPS Warnings in Bulk
If you’re worried about the rest of your site, you might want to check it in bulk. Here are some recommended options for doing that:
- There’s a free little tool called SSL Check from JitBit, which you can use to crawl your HTTPS site and search for insecure images and scripts that will trigger a warning message in browsers. The number of pages crawled is limited to 400 per website.
- The Ahrefs Site Audit tool has the ability to detect HTTPS/HTTP mixed content. If you already have access to this solution, or someone on your marketing team does, it can be a great way to be thorough.
- HTTPS Checker is a desktop software you can install to scan your site. It can help you check for “not secure” warnings and content after big changes. It is available on Windows, Mac, and Ubuntu. The free plan enables you to check up to 500 pages per scan.
- SSL Insecure Content Fixer is a WordPress plugin you can install on your site to uncover errors that lead to mixed content warnings. It’s free to use, and will even automatically perform fixes to resolve the errors.
Using any of the above tools can help save you time over having to manually check each page on your site for mixed content warnings and errors. For a thorough assessment of the potential errors on your site, you might consider using a combination of these solutions.
2. Verify Whether HTTP Resources Are Accessible Over HTTPS
The next step is confirming that the resources loading over HTTP are accessible over HTTPS. They most likely are, you just need to update the links.
As an example, let’s say our mixed content errors pointed to the following insecure jQuery script and .jpg image:
- http://ajax.googleapis.com/ajax/libs/jquery/3.31/jquery.min.js
- http://example-site.com/wp-content/50d00acf6e4%2Fpuppy-thumb.jpg?v=1600261043278
If we take both of those URLs, input them into our browser’s address bar, and replace “http” with “https” at the beginning, we can see that they load just fine. Therefore, we simply need to do a search and replace on our site.
3. Perform a Search and Replace
There are a lot of ways to perform a search and replace. In this section, we will walk you through two different recommended options.
If you’re curious, we don’t recommend using a tool such as Really Simple SSL. While it’s a great plugin, it’s best not to rely on a solution like this over the long term. You won’t be migrating back to HTTP later, so it’s best to do it the right way and update your HTTP URLs in your database (as we’ll show you below).
If you’re a Kinsta customer, you can use our search and replace tool, which is available right within the MyKinsta dashboard.
Go to your site’s Tools page and click on Search and Replace:
Next, in the search field, enter the value you want to look for in the database.
In this case, we will use our HTTP domain: http://kinstalife.com. Then click on the Search button. The search and replace tool will show the number of occurrences for the given string.
Check the Replace box to continue with the replacement process. In the Replace with field, enter whatever should replace the value you are searching for. In this case, we will use our HTTPS domain: https://kinstalife.com.
We also recommend leaving the Clear cache when ready box checked, to automatically purge the Kinsta cache after the search and replace process is complete. Finally, click on the Replace button:
Important: Make sure you don’t include any leading/trailing white space in either of these fields, as this might produce undesirable results.
Search and Replace Alternatives
If you aren’t using Kinsta, you can accomplish this same task with the free Better Search Replace plugin, and then simply delete it after you’re done:
You can download this tool from the WordPress Plugin Directory, or by searching for it within your WordPress dashboard.
After activating it, just search for your HTTP domain (http://yourdomain.com) and replace that with your HTTPS domain (https://yourdomain.com):
As an alternative, you could also do a search and replace with the interconnect/it Search Replace DB PHP Script or WP-CLI.
Check out our video to learn more about using search and replace in WordPress:
4. Confirm That the Mixed Content Warnings Are Gone
After you finish doing the search and replace, you’ll want to double-check your site to confirm that the mixed content warnings are gone. We recommend visiting your site on the frontend and clicking around on a few pages while looking at the browser status indicator up in the address bar.
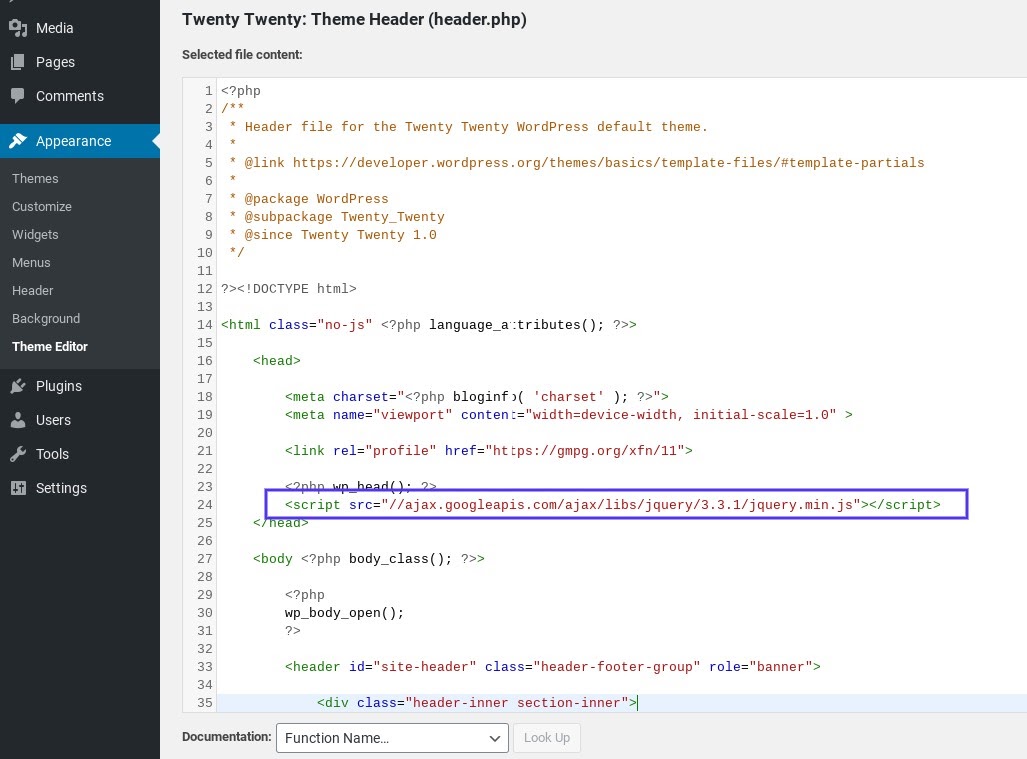
On our site, we can see that the .jpg image is now fixed, but an insecure script warning remains.
That’s because we ran a search and replace on resources loading from our own domain. The jQuery warning is caused by an external script that has to be manually updated:
In this case, the script needed to be manually added to our header (header.php). It should be using a relative URL, so we updated it to //ajax.googleapis.com/ajax/libs/jquery/3.3.1/jquery.min.js:
The search and replace will most likely fix all of your issues.
In general, you’ll only run into additional problems if you have something hardcoded on your site.
If you think there’s an external script hardcoded in one of your plugins or themes, and you’re having trouble tracking it down, feel free to reach out to the relevant developer for assistance.
No Mixed Content Warnings Examples
So you now know what to look for to fix these mixed content errors.
Here is an example of what happens in Chrome when everything is loading correctly over HTTPS, with no mixed content warnings:
Firefox will offer a similar message:
And here’s what you’ll see in Microsoft Edge:
Although the wording of the message may vary slightly depending on which browser you’re using, you should see a notification indicating a secure connection. If you do, you’ll know that you are no longer dealing with mixed content errors on your site.
What About HSTS?
Some of you might be wondering why you can’t simply use HSTS (HTTP Strict Transport Security) to fix this problem. HSTS was created as a way to force the browser to use secure connections when a site is running over HTTPS.
It’s a security header you can add to your web server and is reflected in the response header as ‘Strict-Transport-Security’.
However, HSTS isn’t a quick fix for all mixed content warnings. HSTS merely handles redirects, whereas the mixed content warning is a feature of the browser itself. You also don’t have control over whether third-party sites enable HSTS.
Therefore, you’ll always need to update your http:// URLs. Esa Jokinen dives deeper into the reasons why in this Server Fault discussion.
Additional Recommendations (Special Cases)
If you’re using the Elementor page builder, you must also go into the Elementor settings and update your site’s URL there, so the CSS files will regenerate with the new URL.
Once you have done that, clearing the cache should resolve any insecure warnings due to Elementor. In addition, if you’re using the Kinsta CDN, it’s recommended to purge the CDN zone as well.
Ready to make the switch to HTTPS, but frustrated by mixed content warnings? 🥴 Learn how to resolve this issue with help from this guide!Click to Tweet
Summary
Mixed content warnings can be frustrating to deal with, especially when there are a handful of causes they can be attributed to. Luckily, there are some simple steps you can take to fix these issues.
In most cases, a simple search and replace should quickly resolve your mixed content warnings and have your site back to normal in just a few minutes. If that doesn’t fix everything, it’s likely there are one or two hardcoded scripts left behind. You’ll need to find them and manually update them in order to clear this error or hire a developer who can do that for you.
If you have any feedback or run into any issues, let us know below in the comments section!
Get all your applications, databases and WordPress sites online and under one roof. Our feature-packed, high-performance cloud platform includes:
- Easy setup and management in the MyKinsta dashboard
- 24/7 expert support
- The best Google Cloud Platform hardware and network, powered by Kubernetes for maximum scalability
- An enterprise-level Cloudflare integration for speed and security
- Global audience reach with up to 35 data centers and 275 PoPs worldwide
Test it yourself with $20 off your first month of Application Hosting or Database Hosting. Explore our plans or talk to sales to find your best fit.
Seeing mixed content errors in WordPress? Been alerted to visitors experiencing mixed content warnings? This post can help!
Mixed content errors in WordPress are caused by a mismatch in HTTP and HTTPS connections. If you have implemented SSL to bring your website up to current security standards, you may see this error.
You’ll see a mixed content error when a page loads using HTTPS but features an image or script still using an old HTTP URL. It’s an easy thing to miss but can potentially flag your website as unsafe in browsers.
That’s why we need to fix it.
HTTPS has become part of running a website the same as using a fast WordPress theme and an SEO plugin. It’s now an essential ingredient in the mix that every website should be using.
Switching to HTTPS has brought challenges for some websites though. One of those challenges is mixed content errors.
What are mixed content warnings? Why do they happen? Why does WordPress warn you about them and what can you do to stop them?
This article will answer all those questions and more!
Table Of Contents
- What Is a WordPress Mixed Content Error?
- What Causes WordPress Mixed Content Warnings?
- How to Identify Mixed Content Warnings
- How to Fix Mixed Content Warnings in WordPress
- Testing to Make Sure Errors Have Been Addressed
- SSL and WordPress Security
- How to Implement SSL and HTTPS in WordPress
- FAQs for SSL/HTTPS
- WordPress Mixed Content
What Is a WordPress Mixed Content Error?
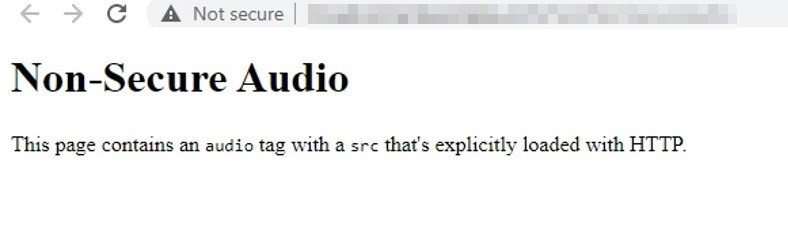
A mixed content error is admittedly not the clearest error you’ll ever see in WordPress so it’s no wonder it can cause confusion.
A mixed content warning appears in the visitor’s browser when a website tries to load HTTP and HTTPS assets in the same session.
For example, your website runs entirely on HTTPS and visitor loads an archived page with an image that hasn’t been migrated over to HTTPS. The page itself will be correctly loaded as HTTPS but the image won’t as it is linked via HTTP.
The visitor’s browser is designed to alert them when a mismatch like this occurs as it could theoretically be a vulnerability.
It isn’t a vulnerability most of the time but browsers now subscribe to the ‘better safe than sorry’ approach and will alert the user to anything that doesn’t look right.
Types of Mixed Content
There are two primary types of mixed content, active and passive.
- Active mixed content is where a page loads using HTTPS but has scripts loading using HTTP. Those scripts could be CSS files, JS files or other script you host on your site.
- Passive mixed content is where pages are loaded via HTTPS and include images, audio or video loaded using HTTP sources.
Both can be common on older websites that have transitioned from HTTP over to HTTPS using SSL.
We’ll discuss the importance of SSL and WordPress later in this article.

Hello! My name is Sujay and I’m CEO of Astra.
We’re on a mission to help small businesses grow online with affordable software products and the education you need to succeed.
Leave a comment below if you want to join the conversation, or click here if you would like personal help or to engage with our team privately.
What Causes WordPress Mixed Content Warnings?
The primary cause of mixed content warnings is a website that has installed SSL and transitioned to HTTPS without migrating all content over to the more secure version.
This is common in larger or well-established sites with dozens of media folders, hundreds of posts and pages and a lot of content to move to HTTPS. It’s easy for something to be overlooked and for quick testing to miss.
It’s also easy to check for and remedy, which we’ll cover next.
How to Identify Mixed Content Warnings
You can proactively check for mixed content in a number of ways. We recommend doing this as soon as you switch to HTTPS or install a new SSL certificate.
These methods are free and take just a few minutes so there is no reason not to use them!
WordPress 5.7 and Mixed Content Checks
Users of WordPress 5.7 will have automatic detection of mixed content. The new update includes some core enhancements that will check whether the current environment supports HTTPS.
It will also be able to verify content using the new ‘https_detection_errors’ option.
Read this blog post for more information on WordPress 5.7 and content checking.
If you’re using this WordPress version or newer, you may already have content checking built in.
Whatever version you’re using, any of the following methods will work.
Checking for Mixed Content Using External Websites
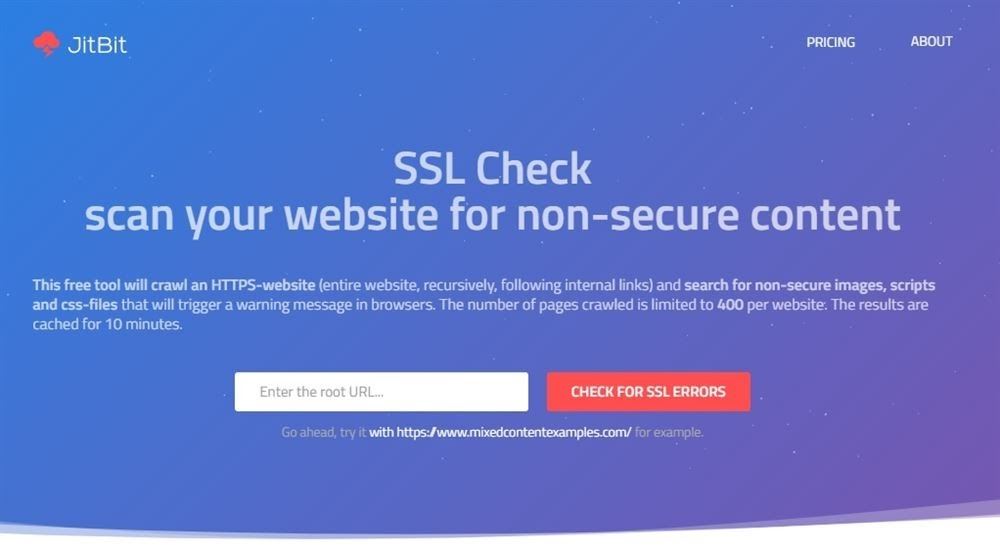
One of the easiest ways to check your website for mixed content is to let someone else do it for you. One method is to use a specific web app that can inspect your website, including all its assets for mixed URLs.
One such website is SSL Check from JitBit. Other websites are available.
- Visit SSL Check and enter your root URL into the search box in the center. Your root URL is your domain name with nothing else attached to the end. For example, https://wpastra.com/ and not https://wpastra.com/pro/.
- Select the red Check for SSL Errors button beside the URL box and give the tool time to work its magic.
- As the app works, you’ll see a list of URLs being tested. Depending on the size of your site, this could take a while!
You should ideally see a ‘Done – No issues found’ message at the end.
If you don’t see that message, you should see a list of pages with mixed content. We’ll show you how to fix them in a minute.
Checking for Mixed Content Using Inspect Element
All modern browsers have inspection tools designed to let developers test websites and apps. You can use these same tools to identify any mixed content.
You can access it using shortcut keys on your computer while you have a browser open.
- Windows users can press F12 or Ctrl + Shift + I
- Mac users can press Cmd + Opt + I
You can also use the right click dialog on most browsers too. Right click on a page and select Inspect (Chrome) or Inspect Element (Firefox). Other browsers may differ but you get the idea.
The downside with checking using a browser is that you need to be on the page with mixed content to detect it. Checking using an external website can check your entire website at once.
That’s a much more efficient way of doing it!
How to Fix Mixed Content Warnings in WordPress
There are a few methods you can use to fix mixed content errors. You can use a plugin, use SQL or modify your .htaccess file to place a permanent redirect.
We’ll show you how to use all three.
First’ we’ll cover the very basics and check you have changed the Site Address URL in WordPress.
- Log into WordPress and select Settings and General from the left menu
- Check the WordPress Address (URL) and Site Address (URL) and make sure both use HTTPS as the prefix
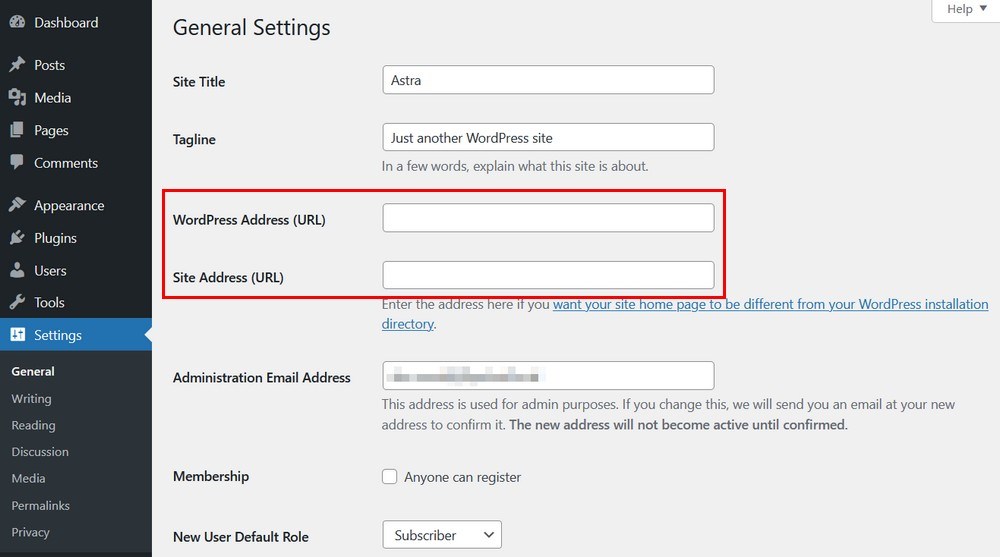
If both entries say HTTPS, your basic setup is already correct. Let’s move on to the fixes.
Fix Mixed Content Errors Using a Plugin
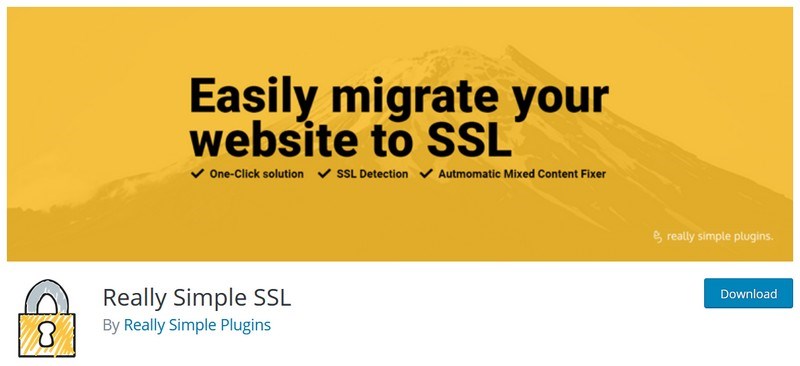
As with most things WordPress, you have a multitude of plugins you can use to fix mixed content warnings. As using a plugin is the fastest and easiest way to fix mixed content errors, we’ll cover that first.
- Really Simple SSL
- Better Search Replace
- SSL Insecure Content Fixer
As we have Really Simple SSL installed on our test site, we’ll use that to describe the process.
- Download and install Really Simple SSL
- Activate the plugin when the option appears
That’s it!
The plugin will handle all SSL issues, including mixed content errors. There’s no configuration, no setup and nothing you need to do. It’s all done for you.
If you want to take a closer look at how Really Simple SSL works, do this:
- Select Settings and SSL from the left menu in your WordPress dashboard
- Check the center pane where you see the toggles to ensure the mixed content fixer is enabled.
The plugin method is about as easy as it gets and requires no work from you aside from installation. If you don’t want to mess with phpMyAdmin or modify your .htaccess file, this is definitely the way to go!
Fix Mixed Content Errors Using SQL
Not everyone is comfortable making database changes but for those of you that are, it’s a very effective way to address mixed content warnings in WordPress.
You will need access to phpmyAdmin on your web host for this to work.
- Select your WordPress database from the list on the left
- Select the Query tab at the top and paste in the code below:
UPDATE wp_posts SET post_content = REPLACE (post_content, 'src="http://yourdomainname.com', 'src="https://yourdomainname.com');Where you see ‘yourdomainname.com, change for your own domain.
Select Submit Query at the bottom right and let the database do its work
This query updates all database entries to read HTTPS instead of HTTP. It’s a very effective way to ensure all pages, posts and assets use the correct protocol and should be enough to fix the mixed content error.
Fix Mixed Content Errors by Modifying .htaccess
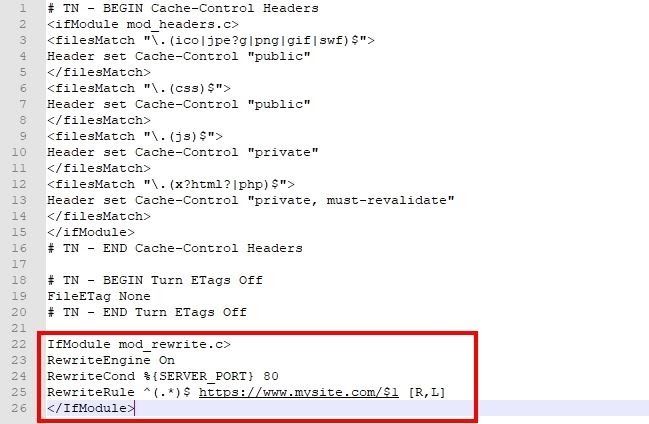
The .htaccess file controls how your web server handles requests, including redirects. Adding a redirect from HTTP to HTTPS here will also stop mixed content errors in WordPress.
Modifying the .htaccess file is simple but can have far-reaching consequences for your website if you get the syntax wrong. We recommend you double check the text you enter before you save the file.
For Apache servers:
1. Log into your web host’s cPanel or equivalent
2. Select File Manager and navigate to the root directory of your website
3. Locate .htaccess in the directory, right click and select edit
4. Paste the following at the bottom of the .htaccess file outside the section that begins with # BEGIN WordPress and ends with # END WordPress. Don’t add code between those tags
IfModule mod_rewrite.c>
RewriteEngine On
RewriteCond %{SERVER_PORT} 80
RewriteRule ^(.*)$ https://yourdomainname.com/$1 [R,L]
</IfModule>
6. Change where you see ‘yourdomainname.com’ to your own domain.
7. Save the file
If you use NGINX instead of Apache, you’ll need to paste the following instead:
server {
listen 80;
server_name yoursite.com www.yourdomainname.com;
return 301 https://yourdomainname.com$request_uri;
}
Change where you see ‘yourdomainname.com’ to your own domain.
If your web host uses a different port than port 80, change that too.
Force WordPress to use HTTPS by Modifying .htaccess
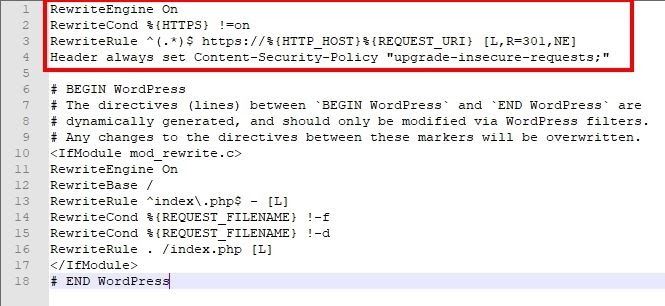
Even if you have implemented SSL and use HTTPS across your website, visitors can use legacy HTTP URLs to access pages if you have any. You can fix that by forcing WordPress to use HTTPS with a simple change to your .htaccess file.
This isn’t usually necessary as most web hosts will automatically redirect visitors to HTTPS versions of pages when you set up SSL. However, if you want to be really sure, you can add the following code to your .htaccess file.
Follow the steps above to edit .htaccess and paste in the following code:
RewriteEngine On
RewriteCond %{HTTPS} !=on
RewriteRule ^(.*)$ https://%{HTTP_HOST}%{REQUEST_URI} [L,R=301,NE]
Header always set Content-Security-Policy "upgrade-insecure-requests;"
The same rules apply. Don’t add this code between # BEGIN WordPress and # END WordPress and save your change at the end.
This should now force a redirect to any visitor who uses an old URL to access your website.
Testing to Make Sure Errors Have Been Addressed
Whenever you make a change on a live website, you should always test to make sure everything is working again. WordPress is full of interconnected systems and a change in one area can sometimes impact other, seemingly unrelated areas.
Run your website URL through SSL Check again to make sure there are no more mixed content errors.
SSL and WordPress Security
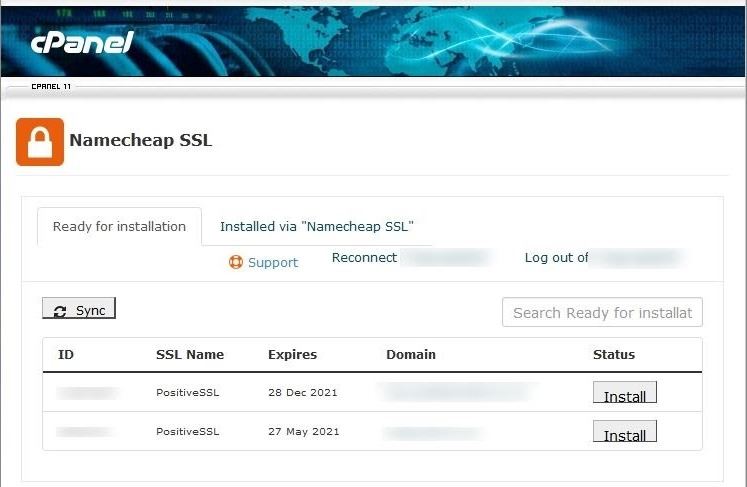
It may seem like SSL has added a whole new layer of complexity to WordPress security but it’s an essential tool that protects your website and your visitors.
When the internet was first invented, traffic was sent in the clear, meaning anyone with the right skills and equipment could see traffic going back and forth. As the internet expanded, this became untenable and something had to be done to improve security.
SSL is one of the answers.
SSL stands for Secure Sockets Layer and is a protocol that enables encrypted connections between a web browser and a website. Using SSL means every visitor who lands on your website will be able to use an encrypted connection rather than an open one.
Security is now so important that Google now penalizes websites that don’t use SSL encryption. Browsers will also warn users of a website isn’t secure.
Two good reasons to use SSL and HTTPS!
Here are some other benefits of using HTTPS:
It’s what users expect – The most important reason to use HTTPS is because users now expect it. They demand you keep them and their data safe. Websites that don’t take safety seriously won’t be around for long!
Enables advanced browser features such as microphone, video, geolocation and Bluetooth – If your website uses rich media or has advanced functions that require the browser interface with the user’s device, you will only be able to make requests if you’re using HTTPS.
Uses HTTP/2 which is faster than HTTP and only available to HTTPS websites – When speed is everything, you need to use every trick in the book to deliver fast websites. HTTP/2 is significantly faster than HTTP so is definitely worth using.
It’s required by many credit card companies and payment gateways – If you run an eCommerce store or deal with payments of any kind, most payment processors will require you use HTTPS.
How to Implement SSL and HTTPS in WordPress
If you haven’t switched from HTTP to HTTPS yet, you really should. For all those reasons above, it’s the right thing to do.
Most web hosts now include SSL in their web hosting plans so everything will be set up for you. If you have been with your host a while, you may need to set it up manually.
It’s so important that we wrote an entire guide on securing WordPress by moving from HTTP to HTTPS. If you haven’t read it yet or haven’t switched, we strongly encourage you to do so!
FAQs for SSL/HTTPS
What does mixed content mean?
Mixed content in WordPress means that some links within your HTTPS website are still using insecure HTTP connections. Browsers are designed to warn users to potential vulnerabilities and mixed content is one such vulnerability. It isn’t dangerous but is potentially insecure and should be addressed as soon as possible.
How do I fix the mixed content error in WordPress?
You can fix the mixed content error in WordPress by using a plugin, modifying your SQL database or adding a redirect to your .htaccess file. This post explains exactly how to identify mixed content and how to fix it.
What is mixed content and why is Chrome blocking it?
Mixed content is where pages that use HTTPS also include links or assets still using HTTP. The browser detects the mismatch and alerts the user to potential vulnerability. Chrome blocks mixed content because it is potentially unsafe and it is designed to be very cautious in protecting users.
Can I change http to https WordPress?
You can change HTTP to HTTPS in WordPress. You’ll need an SSL certificate installed on your web host and will need to make the changes within WordPress. This guide walks you through the entire process of securing WordPress using HTTPS.
How do I fix Nginx mixed content issue?
You can fix NGINX mixed content issues by inserting a couple of lines of code into the .htaccess file in the root directory. All you need to do is open the .htaccess file, paste some code, change the default URL to your own URL and save the file. This post includes full instructions on how to do it.
Is mixed content bad?
Mixed content isn’t bad in itself as it’s mainly a theoretical risk. However, it is regarded as bad by browsers, by Google (for SEO) and by users so it’s best to avoid it wherever possible. Having your entire website running on HTTPS is good practice and increases trust so we highly recommend doing it.
WordPress Mixed Content
So there you have it. Everything you need to know about mixed content errors in WordPress. What they are, what they mean and how to fix them.
When trust is everything online, even the tiniest doubt about your website’s security can cause visitors to avoid you. Even if there is no real risk, perceived risk is often enough to make visitors go elsewhere.
That’s just one reason why you should never ignore mixed content errors. Now you have this guide, you have no excuse to ignore them!
Have you had issues installing SSL or switching to HTTPS? How did you overcome them? Have any advice for those having trouble with mixed content? Share your thoughts below!
Is your WordPress website displaying the ‘mixed content’ warning? Don’t panic. This warning can strike on any site even if you have installed a Secure Socket Layer (SSL) certificate.
The mixed content warning does not stop your site from showing content on a page, but it can have a negative effect on your site’s SEO ranking. That’s why you should resolve it as soon as possible.
Luckily, that’s pretty easy. And in this post, we’ll show you four techniques you can use to fix mixed content problems on your WordPress website.
Mixed Content Warning Explained
The mixed content warning appears when certain links or resources on your site run on HTTP and HTTPS connections. You will see a padlock icon beside the URL in your browser’s address bar if your WordPress website has an SSL certificate. You will see a ‘connection is secure’ message on your web browser after you press that padlock.
The SSL padlock signifies that connections to your website will be safe, so attackers are unable to access any data that users enter on your site (e.g. credit card details or passwords). But if any of your website URLs have been loaded with an insecure HTTP link, this means your page will have mixed contents. That will cause the padlock icon to disappear or appear broken, while a notification will warn you that connections to the site will not be completely secured.
As Google requires that all websites implement HTTPS to transport content, this can be a problem. Your site’s SEO could be negatively affected if Google discovers that some of your site’s content uses HTTP connections only. Furthermore, if you’re running an online store and you see a mixed content warning, your customers will struggle to enter their payment information on your site.
Typical Reasons for Mixed Content on WordPress Sites
A mixed content issue in WordPress occurs when you move your website from HTTP to HTTPS. Some of your site’s resources may keep their HTTP links even if you install SSL on your site correctly. SSL mixed content warnings can seem complex, even daunting, at first, but they’re fairly easy to handle.
Additionally, your mixed content warning could be the result of static files such as javascript or media files. If you use an absolute URL to link to your site’s files, you could also run into mixed content warnings.
The absolute path could be due to a plugin installed on your site, or if you hardcode the URLs to pictures on your widgets or pages via HTTP connections in the URL. For example, http://thisisyourwebsite.com/photo.png.
How Can You Find Mixed Content Warnings?
We have already established that if you see no padlock, or a padlock icon that appears broken, next to your website’s URL, that leads to mixed content error notifications. But actually finding the resources or links responsible may be difficult.
Still, you can use various techniques to locate links or files with mixed content on your browser, and we’ll look at two below.
First, use your browser’s developer menu. If you’re on Chrome, you can use developer tools to identify the mixed content errors in your website. Here’s how.
Just right-click on the page with the broken padlock icon, then choose ‘Inspect’ to access the developer tools. Next, tap the console tab to find all the warnings and errors affecting the site when you load the page. Find the errors with mixed content title, and look for the link to the resources via a HTTP connection.
How can You Fix WordPress Mixed Content Warnings Simply?
The crucial step in troubleshooting the mixed content error warning is understanding which files or links are to blame. You should also have a valid SSL certificate installed on your site.
Please note: Does your WordPress hosting include a free SSL certificate? If so, you can take advantage of the ‘Really Simple SSL’ plugin to force WordPress to utilize SSL on your site.
But if your hosting does NOT include an SSL certificate, you can pick a free one up at Let’s Encrypt. Cloudflare and other CDNs offer their users free SSL, too.
Next, we’ll explore the essential steps for fixing the mixed content warning error.
Use the SSL Insecure Content Fixer
Let’s talk SSL, mixed content warnings, and solutions.
A simple way to address mixed content warnings is to use the SSL Insecure Content Fixed Plugin, which helps to resolve insecure files or links on WordPress websites. This includes multiple levels of action that you can choose from, with Simple set as the default level. The Simple level causes the plugin to browse your site in search of mixed content errors in your scripts, css files and images.
The plugin will resolve mixed content issues it finds, though it may be unable to do so at the Simple level if you have hardcoded the URL to images on your pages or posts. Instead, you would have to try a solution at a higher level available in the SSL Insecure Content Fixer. You can choose from:
- Content: At this level, you will get all the features included in the simple level, and it will search your posts and pages to locate insecure content. It will also browse the resources available within your text widgets.
- Widgets: The Widgets level incorporates all the functionalities in the Simple and Content levels covered above. Furthermore, it will scour all of your WordPress site’s widgets: if the plugin finds insecure contents on any of them, it will resolve them.
- Capture: When you use the plugin at this level, it will go through all of the content on your page, from the header to the footer. This undertakes a comprehensive check and resolves any insecure content entries on your WordPress site.
- Capture All: This level incorporates all the functionalities contained in the previous three levels, and it will search through Asynchronous JavaScript and XML (AJAX) calls on your site. But this can have an impact on the performance of your site.
How Can You Use Your SSL Insecure Content Fixer?
Install the plugin on your WordPress admin dashboard, then activate it, to begin. Next, navigate to Settings > SSL Insecure Content, then choose the level you want to apply on your WordPress site. After that, scroll down to find the ‘save changes’ button, then click on it.
Please note: When you choose a fix of a higher level, the effect on your site will also grow. So, when you pick the Capture All level, the speed of your site could be affected too.
With that in mind, it’s recommended that you start at the Simple level before graduating to the more advanced levels if you find that your lower levels fail to fully fix the mixed content error warning on your site.
How Can You Handle HTTP File Testing and Replacement?
If a hard coded image or script is responsible for the mixed content warning on your WordPress website, one simple solution is to switch your URLs from HTTP to secure HTTPS versions instead.
You can either replace those files manually by directly editing your theme files. But certain plugins, such as ‘Better Search Replace’ or ‘Elementor Page Builder’, may make the process much easier. Make sure that you backup your database and site before you continue.
How Does Better Search Replace Work?
The Better Search Replace plugin allows you to update database tables via the search and replace function. That means you can run a direct search for every entry with the non-secure HTTP protocol, then swap them with the HTTPS protocol (which is secure) instead.
To get started, install the Better Search Replace plugin on your WordPress website, then activate it. Once you have done this, navigate to Tools, then click on Better Search Replace. Next, click on the Search/Replace tab.
After you complete these steps, type the address of your site into the ‘search for’ box, using HTTP format (for instance, http://thisismysuperwebsite.com). Then, type your site address into the box with the HTTPS format (https://thisismysuperwebsite.com).
The next step is to pick the database table(s) you intend to run the search/replace feature on — these would be wp_options, wp_posts, wp_terms, wp_term_relationships, and wp_term_taxonomy table.
If you want to pick several tables, just click on the relevant table name while holding the ‘ctrl’ key. You can activate the ‘dry run’ option which will present information on how your adjustments will affect the database, so you can be sure you’re happy to proceed before you commit. Next, press the Run Search/Replace button to finish.
How Do You Use the Elementor Page Builder?
With the Elementor plugin, you can create a WordPress website with simple drag-and-drop functionality. But Elementor also incorporates a feature which enables you to search for and replace insecure links.
It’s best to choose this option if you have already installed the plugin. Otherwise, use the Search and Replace one discussed above.
Open your dashboard and click on Elementor > Tools, followed by the Replace URL tab. Next, type your website address in the HTTP format into the old URL box, then put your site’s secure HTTPS address into the new box. Finally, tap the ‘Replace URL’ button.
If you fix the mixed content warnings on your site with any of these plugins, that’s fantastic. But if you still receive the warnings, it’s likely that a hardcoded script or image is to blame. That means you would have to replace links within your theme files manually.
How to Replace HTTP Files Manually
When loading a script via an external link, you may sometimes find that using the search-and-replace feature won’t switch the script URL. But you can replace insecure links in your theme files manually instead in these cases.
How? Navigate to Appearance > Theme Editor then click on the header template. Then, open the search box with ‘CTRL F’, and paste the link triggering the mixed content warnings. When you find the code, replace it with the link’s secure version (so, changing http:// to https://).
Furthermore, if you link to a stylesheet or image on your site via an absolute path, you can change the link to use a relative path instead. For instance, when you have an image with a path like ‘http://thisismywebsite/images/logo.png’, you could switch it for ‘/images/logo/png.’. When you’ve done this, press Update File to finish.
How to Adjust .htaccess File
Insecure URLs may still be contained in files and links after you transfer your website to a different server or installing an SSL certificate on your current server. But you can fix this in a fairly straightforward way: just redirect every request from the insecure port to a secure HTTPS port. You can configure this in your server’s htaccess file.
Connect to your website to FileZilla FTP to begin, then click on whichever directory holds your site’s files. Once in the directory, double click on the .htaccess file to start downloading a backup of it. Next, right-click on the file and press the ‘view/edit’ button. Use a text editor to open the file then take all of the content from the file.
This is when you will rewrite the whole file with a new rule designed to redirect traffic NOT from a secure port (port 443, in this instance). Just paste the following code into the file:
# BEGIN WordPress
<IfModule mod_rewrite.c>
RewriteEngine On
RewriteCond %{SERVER_PORT} !^443$
RewriteRule (.*) https://%{HTTP_HOST}%{REQUEST_URI} [R=301,L]
RewriteBase /
RewriteRule ^indexphp$ - [L]
RewriteCond %{REQUEST_FILENAME} !-f
RewriteCond %{REQUEST_FILENAME} !-d
RewriteRule . /index.php [L]
</IfModule>
# END WordPress
Then, save the file before re-uploading it to your chosen server. This code will redirect every request from an insecure URL on your webserver to force SSL on your site.
How Do You Use CDN to Resolve Issues with Mixed Content?
A Content Delivery Network (CDN) like Cloudflare is a valuable tool for enhancing your website speed and defending it from SQL injections. Also, the majority of CDNs provide users with a free SSL certificate. On Cloudflare, you can set this up by clicking on the SSL/TLS tab in your dashboard.
Another useful Cloudflare setting enables you to rewrite mixed content on your site automatically, so if an image or file uses insecure HTTP connections, it will be changed to HTTPS connections before the user sees the page.
Press the “Edge Certificates” tab below the SSL/TLS section to turn on this feature in your account. Then, scroll down the page to find the ‘Automatic HTTPS Rewrites’ area. Once there, tap the switch to active this feature. After you’ve done this, your WordPress mixed content warnings should be resolved!
Conclusion
Using HTTPS on your WordPress website protects both it and your users’ data, but you could still run into mixed content warnings at times. These are, by and large, negative for your site, as users are likely to stop trusting websites that have not been secured fully. Fortunately, after reading this guide, you know how easy it can be to resolve WordPress mixed content warnings!