Содержание
- Disconnected by vac you cannot play on secure servers error
- Disconnected by vac you cannot play on secure servers error
- How to Fix the ‘Disconnected by VAC: You Cannot Play on Secure Servers’ Error on Windows?
- What Causes the “Disconnected by VAC: You Cannot Play on Secure Servers” Error on Windows?
- Solution 1: Verify the Integrity of Game Files
- Solution 2: Add the Steam Folder to Your Antivirus Exceptions List
- Solution 3: Update or Rollback Your Network Adapter Driver
- Alternative: Rollback the Driver
- Solution 4: End the Powershell Process While Playing
- Solution 5: Add an Exception for Steam Executables in Windows Firewall
- Solution 6: Activate Data Execution Prevention (DEP) on Your Computer.
Disconnected by vac you cannot play on secure servers error
I haven’t been able to play 2 consecutive competitive CS:GO games without getting the error in the title. I follow the guidelines precisely and I still can’t join the game after.
Here’s some details of what I do:
- Don’t have any configuration files or anything loading with the game. I use the default of everything.
- Don’t have «Launch Options» set up.
- Close all conflicting programs like CCleaner, MSI Afterburner etc. etc. I even close chrome, mail clients, printer software
- Repaired steam, game files, and the system and restarted the machine
- Do everything again with the given order but I keep getting the same error.
Btw, when I get in my steam account > settings > VAC Status: No VAC Bans on Account
Because I get these errors in a competitive game, now my account is suspended to join a competitive game for 1 week. Before this, I got 1 day suspension and I thought it’s ok to wait for 1 day. Now it’s getting frustrating after getting disconnected too many times.
I’ve written an email to VacReview@valvesoftware.com 5 days ago and I haven’t gotten a response yet. If it’s going to help I’ll post my PC hardware and software info just to overcome typical support questions.
I want to play the game and want to solve this peacefully even though I haven’t done anything suspicious.
Источник
Disconnected by vac you cannot play on secure servers error
I was playing for a few hours in casual and when I played in competitive, about 20th round, this message shows up «Disconnected by VAC: You cannot play on secure servers». WTH. I wasn’t able to reconnect to my competitive match, thus counting as a leave and have a 30 minute cooldown. Am i gonna be compensated for this? This VAC thing is sht. BTW, im playing on a new ssd. So theres no way I could have a program that would interfere with the CSGO files. Fix this up
EDIT: Don’t bother accusing me of cheats, I don’t use one and watch all my games if you believe me otherwise. F u and your cheats

Modifying game files and/or in-game textures may cause this error.
Please remove any custom textures, skin changers, or software that modifies game files and restart your computer. We also recommend verifying your game files after making these changes.
What typically causes this error?
There are a number of common software conflicts that can cause this error. If you are running any of the following software, please disable it while playing:
CCleaner
Powershell
Sandboxie
Cheat Engine
IObit Start Menu 8
Process Hacker
DLL Injectors
Hypervisors
Steam Idlers
other ways to fix this are in the link i put
I have tried all of these. restarted, reinstalled, verified countless times. whats next?
Restart your computer
If the error persists on all servers it may be resolved by exiting Steam and restarting your computer.
Repair the Steam Service
The error may also indicate a Steam service failure. Please try repairing the Steam service:
Exit Steam.
Click Start > Run (Windows Key + R).
Type the following command:
«C:Program Files (x86)SteambinSteamService.exe» /repair
Launch Steam and test the issue again.
Note: This command requires administrator privileges and may take a few minutes. If you have installed Steam to another path, please replace C:Program Files (x86)Steam with the correct path.
Restore boot settings to default
Kernel integrity checks, kernel debugging, and Data Execution Prevention (DEP) must be set to default to play on VAC secured servers.
If you receive the following error when entering these commands they are already set to default:
The value is protected by Secure Boot policy and cannot be modified or deleted.
To change boot settings to default please follow the steps below:
Note: If you are running Windows 8 you will need to press Windows Key + X and select Command Prompt (Admin).
Exit Steam.
Click the Start button, then All Programs, and Accessories.
Right-click on Command Prompt and click Run as administrator.
In the command prompt, type the following commands and press Enter after each command:
bcdedit /deletevalue nointegritychecks
bcdedit /deletevalue loadoptions
bcdedit /debug off
bcdedit /deletevalue nx
Restart your computer.
Launch Steam and test the issue again.
Repair system files
There may be corrupt system files that are causing this issue. The following instructions will run a critical system file check on your Windows installation, replacing any missing or damaged files:
Note: If you are running Windows 8 you will need to press Windows Key + X and select Command Prompt (Admin).
Exit Steam.
Click the Start button, All Programs, and Accessories.
Right-click on Command Prompt and click Run as administrator.
In the command prompt, type the following command and press Enter:
sfc /scannow
Once the operation has completed please restart your computer, then launch Steam and test the issue again.
Источник
How to Fix the ‘Disconnected by VAC: You Cannot Play on Secure Servers’ Error on Windows?
The “Disconnected by VAC” error can appear while playing any game which uses the Valve Anti-Cheat (VAC) engine which includes DOTA 2, Counter-Strike: Global Offensive, Team Fortress 2, etc. This error appears after you have been kicked from the server under an accusation of using a cheat.
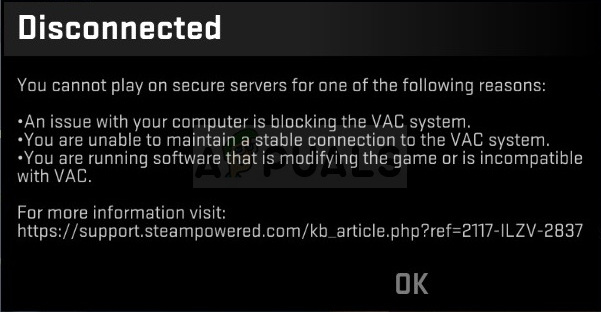 Disconnected by VAC: You Cannot Play on Secure Servers
If haven’t been cheating and the error appears, you should consider checking out this article as it should help you get rid of the problem. The article contains methods other people found successful and we hope they will help you as well!
What Causes the “Disconnected by VAC: You Cannot Play on Secure Servers” Error on Windows?
This error message should appear only if you are using cheats while playing a game protected by VAC. However, this problem also affects users who are not cheating due to various causes. We have decided to list out these causes in a single article for you to check out!
- Some game files are missing or corrupt – If something went wrong with your game files, the problem is bound to appear but you can always verify their integrity using Steam’s useful feature.
- Your antivirus or firewall may be blocking Steam or the game – Antivirus and firewall tools are notorious for blocking harmless apps from running properly and you might have to add an exception for Steam inside your antivirus and Windows Firewall.
- Old or faulty network adapter driver – Users have reported seeing this problem disappear after installing the latest network driver. On the other hand, other users only started to see this error after installing the latest driver.
- PowerShell running – Even Steam support claimed that PowerShell running alongside the game can cause VAC to go crazy and you can only try ending the PowerShell process while in-game.
- Data Execution Prevention – If your motherboard supports DEP, you should have it enabled on your computer to prevent being disconnected by VAC.
Solution 1: Verify the Integrity of Game Files
If you have purchased and installed the game via Steam, you have access to a great option which enabled you to check the game’s installation for missing or corrupt files and the utility will enable you to re-download and replace these files which can indeed solve many problems regarding the game, including this “Disconnected by VAC” problem. Make sure you try this out!
- Start Steam by double-clicking its icon on the Desktop or by searching for it in the Start menu. Head over to the Library tab in the Steam window by locating the Library tab at the top of the window, and locate the problematic game in the list of games you own in your library.
- Right-click on its entry and choose Properties. Navigate to the Local Files tab and click the Verify Integrity of Game Files.
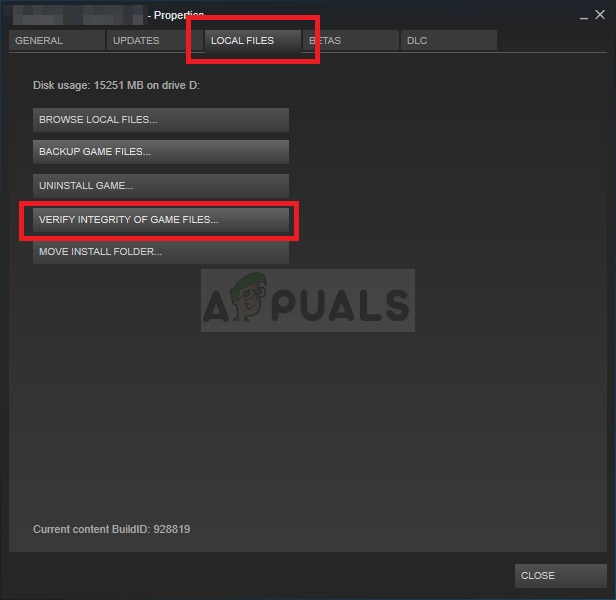 Steam – Verify integrity of game files
- Wait for the tool to finish doing its thing and you should probably see that a couple of files may have been downloaded. Afterward, relaunch the game and check to see if you still encounter the “Disconnected by VAC: You cannot play on secure servers” error while playing!
Solution 2: Add the Steam Folder to Your Antivirus Exceptions List
Antivirus tools should not disturb the operations of normal, trustworthy programs such as Steam but they sometimes do that and that is a fact that has been going on for years now. This often occurs with free antivirus tools such as Avast or AVG but the problem can be resolved simply by adding Steam to the exceptions list, without needing to uninstall or change the antivirus you are using.
- Open the antivirus user interface by double-clicking on its icon at the system tray (right part of the taskbar at the bottom of the window) or by searching for it in the Start menu.
- The Exceptions or Exclusions setting is located in different spots for different antivirus tools. It can often be found simply without much hassle but here are some quick guides on how to find it in the most popular antivirus tools:
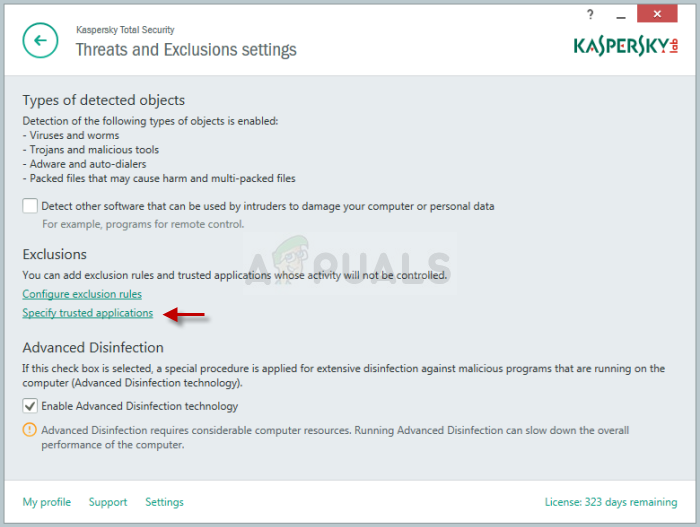 Adding exclusions in Kaspersky
  AVG – Adding exceptions
- You will need to add Steam’s main folder in the box which will appear prompting you to navigate to the folder. It should be in the same directory where you installed it (C >> Program Files >> Steam is the usual location). If you have a shortcut on the desktop, right-click on it and choose Open file location.
- Check to see if you are now able to play the game without being disconnected by VAC. If it still won’t work, try restarting your computer and try again.
Solution 3: Update or Rollback Your Network Adapter Driver
The problem can often be caused by a driver issue, the network driver to be more specific. There are several scenarios which can occur regarding the network adapter driver. Some users have old, outdated drivers and the error appears with new games which require the latest drivers to be installed. In other scenarios, installing the latest driver causes the problem to appear. Either way, follow the instructions below for both methods!
- Open Start menu, type in “Device Manager” after it opens, and select it from the list of available results. You can also use the Windows Key + R key combo to bring up the Run Type in “devmgmt.msc” in the dialog box and click OK to run it.
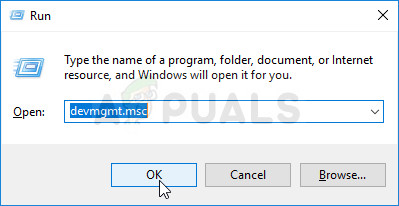 Running Device Manager
- Since it’s the network adapter driver you want to update on your computer, expand the Network adapters section, right-click on the one you use to connect to the Internet and choose the Uninstall Device.
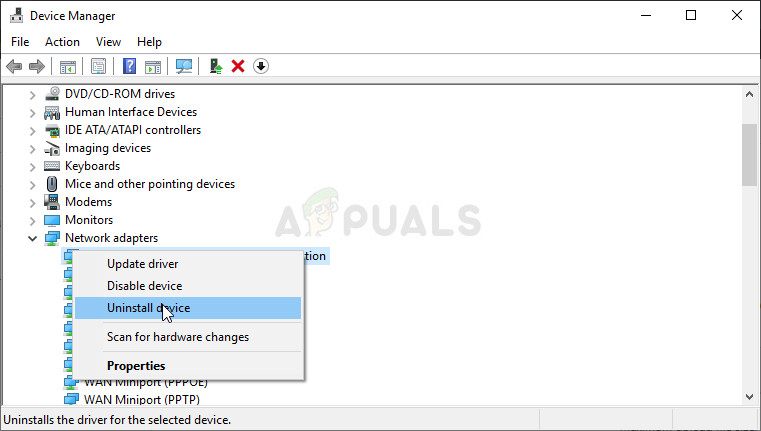 Uninstalling the network adapter
- Confirm any prompts which may ask you to confirm the uninstallation of the current network device driver and wait for the process to complete.
- Look for your network adapter driver on the manufacturer’s site. Input the required information about the device and your operating system and click on Search.
- A list of all available drivers should appear. Make sure you download the most recent one, click on its name and the Download button afterward. Save it to your computer, open it, and follow the instructions on-screen.
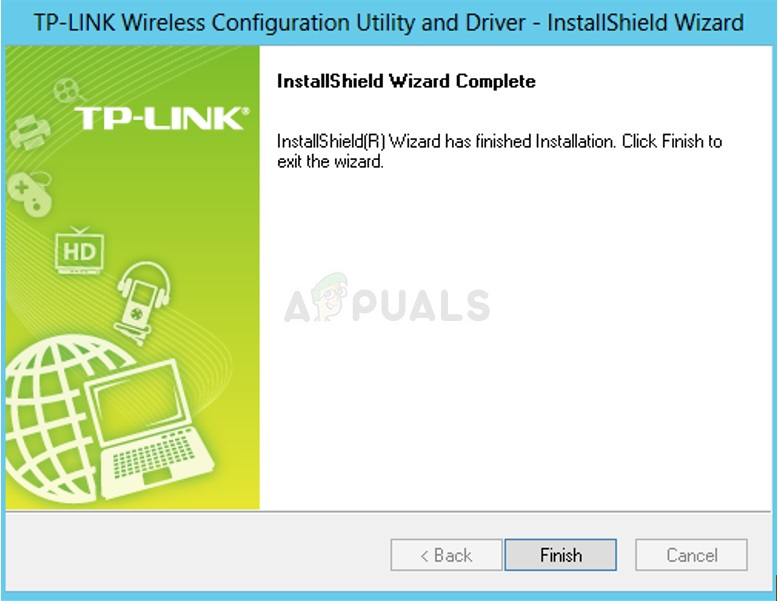 Installing the network driver
- Check to see if the problem has been resolved and if you are still being disconnected by VAC!
Alternative: Rollback the Driver
For the users for which the problem started to appear after they have installed the latest drivers for their network adapter, there is a different method they can use. It involves rolling back the driver.
This process will look for backup files of the driver which was installed before the most recent updates and that driver will be installed instead.
- First of all, you will need to uninstall the driver you currently have installed on your machine.
- Open Start menu, type in “Device Manager” after it opens, and select it from the list of available results. You can also use the Windows Key + R key combo to bring up the Run Type in “devmgmt.msc” in the dialog box and click OK to run it.
Running Device Manager
- Expand the “Network Adapters” section. This will display all network adapters that the machine has installed at the moment.
- Right-click the network adapter you want to rollback and select Properties. After the Properties window opens, navigate to the Driver tab and locate the Roll Back Driver
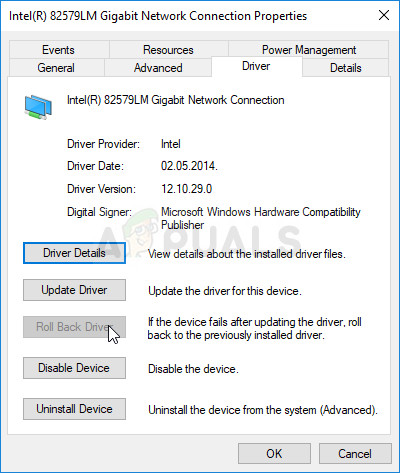 Rolling back the networking driver
- If the button is grayed out, it means that the device wasn’t updated recently or it has no backup files remembering the old driver.
- If the option is available to click on, do so and follow the instructions on-screen to proceed with the process.
Solution 4: End the Powershell Process While Playing
Official Steam Support posted a message saying that certain occurrences of the “Disconnected by VAC: You cannot play on secure servers” error are caused by Powershell running alongside the game. Disabling Powershell for good is not recommended because of its functionality but you can end its process while playing the game by following the steps below!
- Use the Ctrl + Shift + Esc key combination by pressing the keys at the same time to open the Task Manager utility.
- Alternatively, you can use the Ctrl + Alt + Del key combination and select Task Manager from the popup blue screen which will appear with several options. You can also search for it in the Start menu.
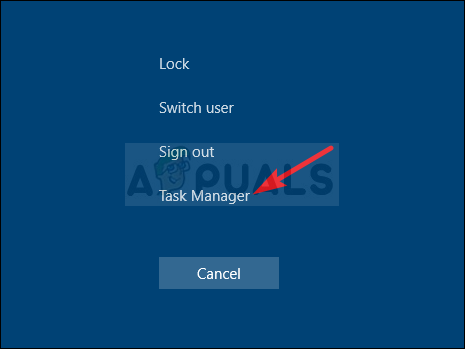 Opening Task Manager
- Click on More details at the bottom left part of the window to expand Task Manager and search for the Windows PowerShell It should be located right under Apps. Select it and choose the End task option from the lower right part of the window.
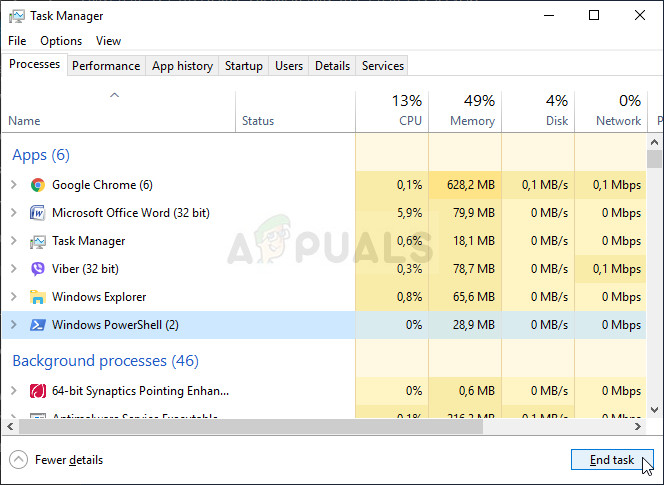 Ending the PowerShell task
- Check to see if the problem has been resolved and if you are still being disconnected by VAC!
Solution 5: Add an Exception for Steam Executables in Windows Firewall
The latest Steam update was reported to cause issues with Windows Defender Firewall. If you have Windows Defender running on your computer, you might want to add an exception for the Steam executable to make it run properly.
- Open up Control Panel by searching for the utility in the Start button or by clicking the Search button or the Cortana button at the left part of your taskbar (bottom left part of your screen).
- After Control Panel opens, change the view to Large or Small icons and navigate to the bottom to open the Windows Defender Firewall.
 Windows Defender Firewall in Control Panel
- Click on Windows Defender Firewall and click on the Allow an app or feature through Windows Firewall option from the left side list of options. A list of installed apps should open. Check the bottom of the window for the Allow another app button. Under the Path section, select Browse. Navigate to where you installed Steam (C:Program Files (x86)Steam by default), open the bin folder, and choose the SteamService.exe file.
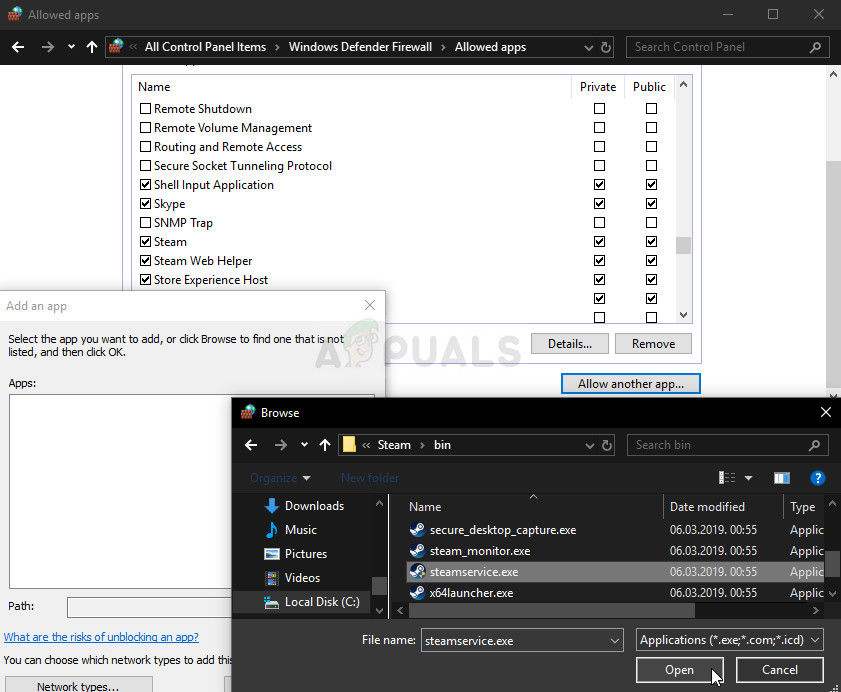 Allowing the SteamService.exe in Windows Defender Firewall
- Click OK and restart your computer before checking whether the “Disconnected by VAC” problem persists!
Solution 6: Activate Data Execution Prevention (DEP) on Your Computer.
If your motherboard is capable of using DEP, you should try enabling it as many users claim that this was able to resolve the problem almost instantly on their computer. DEP is a set of technologies that perform additional memory checks to prevent malicious software from running on your computer. Enabling it definitely won’t do any harm so make sure you follow the steps below!
- Right-click on the This PC entry which can usually be found on your Desktop or in your File Explorer. Choose Properties.
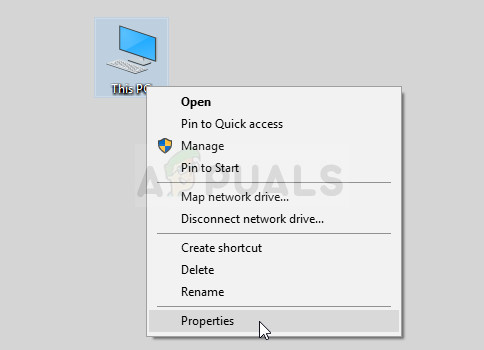 This PC >> Properties
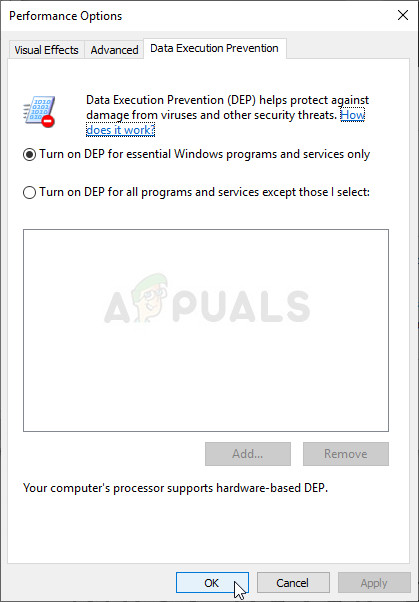
- Click on the “Advanced system settings” button at the right of the window and navigate to the Advanced Under the Performance section, click on Settings and navigate to the Data Execution Prevention tab of this window.
 Enabling DEP
- Make sure the radio button is set to Turn on DEP for essential Windows programs and services only. Apply the changes afterward, restart your computer, and check to see if the “Disconnected by VAC: You cannot play on secure servers” error appears while playing!
Источник
![]()
I got Detected, but it was a warning to remove any software modifying my skins or textures, something along those lines, after I removed the software, repaired, cs go I was able to play again
![]()
i got this too
Disconnected by VAC: You cannot play on secure servers
Modifying game files and/or in-game textures may cause this error.
Please remove any custom textures, skin changers, or software that modifies game files and restart your computer. We also recommend verifying your game files after making these changes.
![]()
@agshaidun u prob use the onetap.crack so u got these. U changed the depot
![]()
@agshaidun u prob use the onetap.crack so u got these. U changed the depot
omg you were right
![]()
@agshaidun u prob use the onetap.crack so u got these. U changed the depot
how do i change the depot back ??
![]()
Just verify ur game’s integrity
![]()
![]()
dont use antiaim or rage aimbot over 40fov and u wont get vac kick, if u do get vac kick just change account / sign out and back in and wait for like 10-20 mins
![]()
This is because of nSkinz. Been using nSkinz (by namazso) and after atleast 5 rounds I get VAC kicked
![]()
Cheat ain’t detected, if you are newcomer and don’t know how to protect cheat from vac don’t paste.
Only maximally for us what have some knowledge, is possible vac error.
Close this issue, and dont have more dumb questions.
![]()
VAC.NET, not VAC
the reason you are betting VAC Auths is because you are playing blatantly. if you understand vac banning patterns (if your ban takes a certain time to escalate to a vac ban then you can determine if it was VAC.NET or VAC) you will see that your ban is because of VAC.NET, not VAC. the cheat is not detected (my accounts have lasted for weeks while using the cheat unmodified).
be mature and stop raging. then your accounts wont get vac authed instantly.
about skins, valve will vac auth you for skin changers however i don’t think nSkins is authed. i play with the skin changer for every skin and i dont get vac authed until i start raging
use max angle delta if you really are too immature to aimbot so often.
- VAC Authentication Error Troubleshooting
- Preamble
-
- Modifying game files and/or in-game textures may cause this error.
- What does this error mean? Am I VAC banned?
- What typically causes this error?
- Re-start your computer
- Troubleshooting
-
- The VAC Authentication Error Fixer
- OS re-install
- Disable your anti-virus/firewall
- Scan your computer
- Programs Which May Interfere with Steam
- Clean your computer from unused programs, files, etc.
- Steam-specific fixes
-
- Clear caches
- Re-install Steam
- Opt into the Steam Beta Client
- Re-install the game
- Verify integrity of game files
- Repair the Steam Service
- Network fixes
-
- Renew your IP and flush your DNS
- Reset your Network Adapter
- Power cycle your network devices
- Disable safe-web
- Hardware issues
-
- Crystal Disk Info
- Crystal Disk Mark
- Check your drive health
- Check RAM for issues
- Update your drivers
-
- Motherboard drivers and BIOS
- Graphics card drivers
- SSD firmware
- NVMe driver
-
- Additional note on NVMe drives
- Other drivers and software to check
-
- Restore boot settings to default
- Repair system files
VAC Authentication Error Troubleshooting
This wiki page will compile all known possible fixes to the VAC Authentication Error.
All of the solutions and fixes here have reportedly worked for a large number of people, while at the same time some have not worked for others.
The solutions and fixes will be listed in no particular manner.
Preamble
Modifying game files and/or in-game textures may cause this error.
Please remove any custom textures, skin changers, or software that modifies game files and restart your computer. Verify your game files after making these changes.
What does this error mean? Am I VAC banned?
No, the VAC Authentication Error is not a VAC ban and you have nothing to worry about when it comes to VAC bans.
A VAC ban looks like this, this, this or this.
This error is caused by a program, file or software interfering with your game or Steam, and on rare occasions it is caused by faulty hardware. To resolve the issue, you’ll need to disable, remove, or otherwise fix the problem program, file or software, or identify and potentially replace the faulty hardware.
What typically causes this error?
This error is typically caused by a software conflict on your system, but faulty hardware, typically bad RAM or a bad drive, can also cause this issue.
Amongst many things it can be caused by Cheat Engine, a Steam Idler, Anti-Virus programs, Anti-Spyware programs, Firewalls or similar security programs, CCleaner or CCleaner-like programs, DLL Injectors etc.
This is the complete list of programs that may interfere with Steam, and this is a partial list of programs Valve recommend you disable regarding this specific error.
Re-start your computer
Seriously though, please re-start your computer.
It’s a simple thing that you should do whenever you experience issues with something, and it works a lot of the time.
Troubleshooting
The VAC Authentication Error Fixer
This program made by /u/RunarM does the following things to try to resolve the VAC error, most of which are listed in the official Steam Support article:
-
Repairs the Steam Service.
-
Enables Kernel Integrity.
-
Turns off Kernel Debugging.
-
Enables DEP.
-
Turns off your Firewall.
-
Deletes .PAK files.
-
Checks for conflicting software.
Remember to exit both CS:GO and Steam before you use this program and restart your computer after you’ve completed the process.
Once your computer has booted up, open Steam and verify the integrity of the games cache.
You can download VACAF here.
This Reddit thread has more information about the program, including virus scans of the program to prove it’s legitimacy, screenshots of what it looks like and includes a link to the source code.
OS re-install
Many people think re-installing OS is a last resort, but that is absolutely untrue.
Re-installing your OS removes all software-related fixes that you can perform from the equation and only leaves hardware issues. Depending on the issue and recommended troubleshooting steps, re-installing your OS can be faster and less frustrating.
This video by Richard Tech covers how to re-install Windows with a USB drive, which is the preferred method.
I do not recommend the «Reset this PC» option that is built into Windows 8 and 10 because it doesn’t completely re-install. To completely re-install, which is what we want to do, you must re-install Windows using the method shown in the video above.
This Apple Support article guides you through reinstalling Mac OSX.
Disable your anti-virus/firewall
Your anti-virus software or firewall may be blocking Steam/VAC from operating properly.
Please disable your anti-virus or firewall and try to launch Steam.
If this solves the problem, re-enable your anti-virus or firewall and whitelist Steam and it’s processes, like the bootstrapper, in the anti-virus software or firewall.
If you do not know how to disable your anti-virus software or firewall, or how to whitelist programs and processes in it you must Google how to do that for your particular anti-virus or firewall.
Scan your computer
NB: Make sure to re-start your computer after each and every scan, including the first scan you perform with your default anti-virus.
This issue can be caused by a virus or similar unwanted program tampering with your computer.
First off, scan your computer with the anti-virus you currently have, or the default anti-virus/firewall that comes with your operating system if you do not have a 3rd party anti-virus.
After you have done that please do the following even if the scan(s) you’ve already done found and removed a virus.
- Download and run Malwarebytes and remove anything the program finds.
Tom’s guide has a great article on how to use this program. Please read through it if you are curious or do not understand how to use the program.
- Download and run AdwCleaner and remove anything the program finds.
The same page you download AdwCleaner from has a section further below named «ADWCLEANER USAGE INSTRUCTIONS», please read through it.
The section you just read tells you to go through the list of viruses AdwCleaner finds and uncheck any viruses you do not want to remove. I recommend against this. There is a reason why any one of the entries show up. If a program you use or think you use shows up there and you do not want to remove it I recommend you Google the program and look up information about the program, and do not only read up on it on the programs own website, look for 3rd party opinions and reports on the program. You might be surprised by what you find out about the program; there is a reason why AdwCleaner detects it and wants to remove it.
- Finally, download and run Junkware Removal Tool.
This is a ‘run and go’ program: once you run it, the program does what it is programmed to do, it creates a restore point and proceeds to scan your computer and removes anything it deems a virus or malicious program. It does not give you any options of what you want or don’t want to remove.
If you are for whatever reason scared to run it because of that, please don’t be. What is the worst that can happen? If a program you use gets removed, first read up on the program and do proper research on it and make sure it is indeed a clean program that is safe to use, then secondly just re-install it. Either way, the chances of it removing a non-malicious program is very minimal. And keep in mind, Junkware Removal Tool creates a restore point that you can fall back to.
Once you’re done with all the scans and have removed anything each program may have found, please uninstall each program and delete their .exe’s in your downloads folder then re-test the issue with Steam.
Programs Which May Interfere with Steam
Please read through this Steam Support article and disable any type of program that is listed there and re-test your issue.
The VAC Authentication Error can be, and most often is caused by an application interfering with VAC.
Please exit each program running in the background 1 by 1 and re-test the issue after you close each program so you can more easily identify which program is causing the issue. Closing all background programs at the same time will not help you identify which program is causing issues.
Clean your computer from unused programs, files, etc.
Not only can a large abundance of programs, files and processes cause this error but it is also highly recommended for obvious reasons to keep your computer clean of files and software that you do not use.
Uninstall programs you do not use. Delete folders you do not need and you can, to further clean your computer up, scavenge through your AppData folders to check for .config files and folders left behind from uninstalled programs, games, etc.
Please keep in mind that you should not delete any folders that you do not know what are, it is recommended to make a System Restore Point if you are inexperienced, and make copies of things you delete.
You can also, to make your computer start up faster, turn off unused start-up programs.
This HowToGeek article covers how to disable start-up programs on Windows XP, Vista, 7, 8, 8.1 and 10.
This SmallBusiness article covers how to disable start-up programs on Mac OSX.
For Ubuntu/Linux you’ll have to Google how to do it as it differs from each version of Ubuntu/Linux you are running.
Steam-specific fixes
Clear caches
How to clear your appcache — Exit Steam before you do this.
How to clear your download cache.
How to clear your Steam browser cache.
Re-install Steam
The following method will NOT delete your games, and it will not completely reinstall, but rather perform a soft reinstall of Steam, which is all you need in 99.99% of cases.
-
Exit Steam.
-
Head to the Steam Program Files folder.
-
Delete everything within the folder except for Steam.exe and the steamapps folder.
-
To keep any locally saved screenshots you must also keep the userdata folder.
-
Run Steam.exe and wait for it to download the required files and re-install.
Opt into the Steam Beta Client
Valve will very often push bug fixes to the Steam Beta Client before they get pushed to the next full Steam Client update.
To ensure you’re not missing out on a potential fix to your problem you should opt into the Steam Beta Client.
To opt into the Steam Beta Client open Steam and click on Steam in the upper left corner, then click on Settings, then click on the Account tab, then click on Change… under the Beta participation section.
.gif format
Re-install the game
Properly uninstall the game from Steam by right-clicking it in your Steam library and selecting «Uninstall…», delete any left-over folders in your steamapps and AppData/Users folder(s) and then re-install the game.
This CSGONoob article covers how to save your CS:GO .config files.
Verify integrity of game files
This error may be caused by missing or broken game files.
How to verify the integrity of the game files.
Repair the Steam Service
This error may occur due to a Steam service failure. Please try repairing the Steam service.
-
Exit Steam.
-
Click Start > Run (Windows Key + R).
-
Type the following command: «C:Program Files (x86)SteambinSteamService.exe» /repair
-
Launch Steam and test the issue again.
Note: This command requires administrator privileges and may take a few minutes. If you have installed Steam to another path, please replace C:Program Files (x86)Steam with the correct path.
Network fixes
Renew your IP and flush your DNS
Renewing your IP and flushing your DNS information is used to address networking issues.
This Blizzard support article goes over how you can renew your IP and flush your DNS for Mac, Windows XP, Vista, 7, 8, 8.1 and 10.
Reset your Network Adapter
The following fix is known as Winsock Reset, it resets your network adapter which can solve some internet/connection related issues, which can be related to the VAC error.
This article covers how to reset your network adapter on Mac and Windows XP, Vista, 7, 8, 8.1 and 10.
Power cycle your network devices
Power cycling your modem and router allows them to completely reset and re-establish a connection to your ISP. Doing this may resolve the VAC Authenticator Error.
This wiki page goes over how to power cycle your network devices.
Disable safe-web
Your router may have a filtering setting called safe-web. This setting filters all incoming data it deems as not safe, and as you might expect it is very common for filters like these to disrupt programs that are safe.
If your router has this setting and it is enabled, please disable it and re-test your issue.
Please consult your router manual or Google how to do this on your particular router.
Hardware issues
This issue, amongst many other issues with your computer in general can be caused by hardware issues, so I recommend you check your drives and RAM for issues.
Crystal Disk Info
Crystal Disk Info can help to identify any obvious issues with your drive and I strongly recommend you download the program to quickly test your drive.
Crystal Disk Mark
Crystal Disk Mark is essentially a performance tester, and I recommend you test your drives with it. A guideline to go by is to look up the drive you are using and find the advertised speeds for that drive. If Crystal Disk Mark reports speeds that are not close to the advertised speeds then you likely have a drive issue — it is normal for SATA-based drives to be 10-50 megabytes under advertised speeds, and for M.2 NVMe drives to be over a hundred megabytes under advertised speeds.
M.2 drives: If you are using an M.2 drive you need to make sure that it is plugged into an M.2 compatible NVMe slot. Some motherboards have NVMe slots that do not support M.2 NVMe and will only run at SATA speeds, not M.2 speeds.
Please consult your motherboard manual to find out if the NVMe slot you are using is compatible with M.2 NVMe drives.
Check your drive health
This error may stem from a broken, or some sort of failure on your drive.
Running a disk check will help to identify any issues on your drive, and can potentially fix them.
How to run a disk check on Windows Vista
How to run a disk check on Windows 7
How to run a disk check on Windows 8/8.1
How to run a disk check on Windows 10
How to run a disk check on Mac OS
How to run a disk check on Linux
Check RAM for issues
**NB: Do not handle computer parts when standing on carpeting. Do not directly touch circuitry, handle parts by their edges where there are no circuitry. When handling RAM do not touch the golden teeth, handle it by the edges, if your RAM has a heat spreader it is safe to touch the heat spreader. When handling parts correctly there is no need for an anti-static wrist strap, and there is no need to worry about static shock.
RAM error-checking is extremely time consuming and can take anywhere from an hour to a few days to complete because how long testing takes; it essentially puts all other troubleshooting on hold and you will not be able to use your computer while the testing is being done.
If you happen to have another set of RAM nearby I recommend you skip all of this and simply replace your RAM and test the issue again. If the error goes away: your RAM was the issue; if it doesn’t go away: it is extremely unlikely that RAM is the issue, but the motherboard sockets might still be bad.
Quick things to do:
-
Check the System Information tab on your computer and make sure that the correct amount of RAM shows up. If you know for a fact that you have 16GB of RAM but only 12GB of RAM shows up in the System Information tab then there is obviously something wrong with one of the RAM sticks, or one of the RAM sockets in the motherboard.
-
Open your computer up and make sure that your RAM is properly seated into their sockets. To do this, simply push inwards on each end, and in the middle of every stick. If any of them go further inwards into the socket when you do this it was likely not seated properly and I recommend you watch this video clip, once you’ve finished viewing the part linked to about RAM, take out all of your RAM and re-seat it properly how the video showed.
-
Open your computer up and make sure that each RAM stick is seated into the correct socket. If every RAM socket on your motherboard is used then you can ignore this, but if you have 2 RAM sticks and 4 sockets you need to make sure you’re using the correct sockets. Check your motherboard manual to find out the assigned letter and number to each socket and which sockets the manual advises you to use. It doesn’t matter if it seems obvious which sockets to use, and I can assure you that if your RAM sticks are right next to each other, then you’ve installed them incorrectly, on 99% of boards a pair is supposed to be installed 1 socket apart from each other, so if your sockets are numbered, in order of placement: 1 — 2 — 3 — 4, then you’re supposed to use either 1 and 3, or 2 and 4.
For RAM error-checking we are going to use the industry standard: MemTest86.
This video quickly goes over how to use MemTest86. For additional help on how to use MemTest86, refer to their technical information page.
It is recommended to let MemTest perform 8 passes(meaning the full test 8 times in a row).
For the first test you will test your RAM with all of the RAM installed in your PC. If no errors show up after 8 passes then it is extremely unlikely that there are any issues with your RAM, however if errors do show up you have to identify either which stick of RAM is bad, or which motherboard socket is bad.
The way we do this is by taking all of the RAM out of the computer except for 1 stick, and then you perform the test again. If the test finds errors you must take the stick out and put a different one into the same socket and repeat the test to identify whether the socket is bad, or the RAM is bad. If the 2nd time there are no errors, then the first stick you tested is bad, if the 2nd test also shows errors then it is likely that your motherboard is defective.
If you didn’t get any errors with the first stick of RAM, do the test over again with each stick of RAM until you find one that gives errors. If non of the RAM gave you errors when testing them 1 by 1 then it is very likely that your RAM is okay, and there are either no RAM errors, or there is a problem with one of the sockets in your motherboard. To test this do the test over again for each socket you have. Do not place all the RAM in, do it 1 socket at a time, so take 1 RAM stick, place it in socket A, test it, when finished move it over to socket B, test it, when finished move it over to socket C, test it, etc, etc.
On very rare occasions you can do all of this, get 0 errors, but still have an issue with your RAM or motherboard sockets. Keep in mind that this is very rare, but does still happen, and has happened to me before when troubleshooting computers. When signs of RAM issues continue to show up even though all sticks have been tested, your best bet is to replace all the RAM and test the issue again.
Update your drivers
Make sure all drivers are updated and that there are no pending updates in your Windows Update.
I do NOT recommend you use programs like Driver Easy, many of these programs install packages of spyware and junkware on your computer, some of them are inaccurate, like telling that all your drivers need updating when this is obviously not true, many of them require you to purchase a pro version to actually install the drivers, and many of these programs can cause bluescreens and other problems.
And keep in mind that Windows 10 automatically updates most of your drivers.
The things you should check are:
Motherboard drivers and BIOS
Carey Holzman has a great video on how to update your BIOS: https://youtu.be/-TRWfYCiO6M
Updating your BIOS is virtually identical across all boards, the only difference between boards is that you download different BIOS’s for different boards, and the UEFI/BIOS interface may graphically look different, but you’re essentially doing the same thing no matter what board you have, and the video by Carey Holzman is a great guide.
Updating the drivers on your board can be a little bit different across boards. Some motherboard manufacturers make it very easy by offering a utility that checks for updates, while others do not offer this and requires more interactivity and attention from you.
Britec09 has a great video that covers both how to update your motherboard drivers via an updater utility, and how to do it manually: https://youtu.be/TDYOkCZOa30
Graphics card drivers
If you have a name brand card like Nvidia or AMD then you should download Nvidia GeForce Experience or AMD software and check for updates in the software.
SSD firmware
If you have a name-brand SSD then the company who makes it will have an SSD utility software that will check for firmware updates for you.
List of name-brand SSD software: Intel® Solid State Drive Toolbox, Kingston SSD Manager, Samsung Magician, Western Digital SSD Dashboard, Crucial Storage Executive, Toshiba SSD Utility, ADATA SSD ToolBox.
NVMe driver
A driver is different from firmware.
Is it difficult to list of which brands offer this, but when you first physically installed your NVMe drive in your computer and first turned it on, Windows downloaded a ‘standard’/’default’ Microsoft NVMe driver for it. Running the Microsoft driver is less efficient and cause some compatibility issues. I strongly recommend that you find the proper NVMe driver for your NVMe drive.
Here I will use a Samsung NVMe and the Samsung Magician software as an example.
Image of the software with the default Microsoft NVMe driver.
Image of the software with the Samsung NVMe driver.
Replacing the driver is very easy and quick to do.
-
Go to the main Tools & Software page.
-
Scroll down to the Samsung NVMe Driver section and download it.
-
Run the .exe that you just downloaded, follow its instructions and promptly re-boot your computer once it has finished.
-
Once your computer has finished re-booting, open the Samsung Magician software and verify that it now says «Samsung» and not «Microsoft» in the NVMe Driver box.
Additional note on NVMe drives
This only applies to NVMe drives.
One quick thing to make yourself sure of is that your NVMe drive is connected to the correct interface on your motherboard.
Again, Samsung Magician is being used as the example: In your Samsung Magician software, make sure that it says you are connected to the following interace: PCIe Gen. 3 x 4. Image of the software outlining where this is.
If you are not connected to this interface, your NVMe drive will run at the speed of a regular M.2 or SSD drive, and not NVMe speeds.
If you are connected to the wrong interface, refer to your motherboard manual and first make sure that your motherboard has an NVMe interface, then verify where the correct interface is, then verify that you are indeed connected to the wrong one physically on your motherboard, then switch it to the correct interface.
If according to your motherboard manual you are connected to the correct NVMe interface you likely either do not have an NVMe drive(M.2 and NVMe are 2 different things), or you have a faulty motherboard.
Other drivers and software to check
Make sure you also keep things like sound cards, WiFi adapters, and other things updated.
If you have a keyboard, mouse, headset, etc. that uses their own software like Razer Synapse, ASTRO Command Center, Corsair Utility Center, SteelSeries Engine, etc. you should check for updates in those programs.
Restore boot settings to default
Kernel integrity checks, kernel debugging, and Data Execution Prevention (DEP) must be set to their default settings to play on VAC secured servers.
If you receive the following error when entering these commands they are already set to default:
The value is protected by Secure Boot policy and cannot be modified or deleted. To change boot settings to default please follow the steps below:
Note: If you are running Windows 8 you will need to press Windows Key + X and select Command Prompt (Admin).
-
Exit Steam.
-
Click the Start button, then All Programs, and Accessories.
-
Right-click on Command Prompt and click Run as administrator….
-
In the command prompt, type the following commands and press Enter after each command:
-
bcdedit /deletevalue nointegritychecks
-
bcdedit /deletevalue loadoptions
-
bcdedit /debug off
-
bcdedit /deletevalue nx
-
Restart your computer.
-
Launch Steam and test the issue again.
Repair system files
There may be corrupt system files that are causing this issue. The following instructions will run a critical system file check on your Windows installation, replacing any missing or damaged files:
Note: If you are running Windows 8 you will need to press Windows Key + X and select Command Prompt (Admin).
-
Exit Steam.
-
Click the Start button, All Programs, and Accessories.
-
Right-click on Command Prompt and click Run as administrator….
-
In the command prompt, type the following command and press Enter: sfc /scannow
-
Once the operation has completed please restart your computer, then launch Steam and test the issue again.
For Mac OSX click here.
For Ubuntu/Linux click here.