Fillip38 opened this issue 5 months ago · comments
motionEyeOS Version
motionEye Version | 0.42
Motion Version | 4.2.2
OS Version | Ubuntu 18.10
Board Model
Debian (Docker)
Hello,
i have running motionEyeOS on a Debain System and Docker. I wanted to add action buttons for PAN / Tilt to a camera, that worked, but I get the error «An error occurred. Refreshing is recommended.» when I activate it in the browser. The individual files (up_4, down_4, …) can be executed in the terminal without errors…
And where can i find the logs in a Docker System of motionEye…? I don´t have an «log» folder under /var
Which docker install instructions for motionEye did you use?
Which Docker? docker-ce or docker.io?
Where are you putting the up_4 file?
What command are you running to start motionEye?
What directories are you attaching from the host to the container?
I use the install instruction from https://github.com/motioneye-project/motioneye/wiki/Install-In-Docker at docker.io
the files (up_4,..) are in the same folder like the camera-4.conf and motioneye.conf files, i can see the buttons in the Cam image on motioneye…
I’ve been using motioneye for a long time, but now I have a camera with PAN / Tilt and would like to integrate it into motioneye
The directories are volumes…
And i have found the log file (motion.log) but it contains no errors as far as that is concerned
I am trying to reproduce the error.
What command are you running to start motionEye?
What directories are you attaching from the host to the container? (will/should be in your docker run command)
I´m using Portainer to start motioneye, I don’t know exactly which command motioneye starts with.


Oh okey…
As I said, motionEye runs without any problems for me, until now this…
What do you mean by «direct start command». ?
The command is found in the Docker Install instructions here:
docker run —name=»motioneye»
-p 8765:8765
—hostname=»motioneye»
-v /etc/localtime:/etc/localtime:ro
-v /etc/motioneye:/etc/motioneye
-v /var/lib/motioneye:/var/lib/motioneye
—restart=»always»
—detach=true
ccrisan/motioneye:master-amd64
(If running on an SBC/arm processor you would change amd64 for armhf)
The issue you are running into may be related to something that portainer is involved with.
Yesterday evening I created and started a second Motioneye docker via the console, but I get the same error when I press the action button in the web front end…
I also wonder why there is no error in the log
If you create 2 containers using the same ports, you will have all kinds of conflicts if they are both running at the same time.
No, I changed the port (8764:8765), double ports don’t work either
I created a docker (docker.io, standard install) on Debian host, and my action buttons work, no issues. Can you post one of your scripts, please, that works if called from console, but doesn’t work as button, and post the ownership and permissions on the file (root:root rwxr-xr-x)?
The owner an permissions are
-rwxrwxrwx 1 root root 89 Sep 2 20:03 down_4 (I did a chmod 777 before "desperation")
The content of the file is a simple curl command to get a URL…
curl -u admin:password http://192.168.199.120/cgi-bin/hi3510/ytdown.cgi > /dev/null
This works in the terminal correctly
I had that at the beginning, but then I get the following error when trying to run this in the console
bash: ./down_4: /bin/bash^M: bad interpreter: No such file or directory
Ahhhh its work now!!!
Yesterday I created the files with notepad++ and loaded them onto the Docker container, the file must have been created incorrectly somehow. Now I created the file using the terminal and it works! Thank you for your hard work and help
I saw in the error message an extraneous ^M but I see you found it and fixed it. Glad to help.
30.10.2016
motionEye это веб интерфейс для motion. Собственно инструкций по его установки в интернете хватает, но я столкнулся с одной проблемой, и решил задокументировать ее решение.
Оригинал инструкции по установке motionEye на Raspbian можно посмотреть по ссылке
Краткое изложение:
Установка:
wget https://github.com/ccrisan/motioneye/wiki/precompiled/ffmpeg_3.1.1-1_armhf.deb
dpkg -i ffmpeg_3.1.1-1_armhf.deb
apt-get remove libavcodec-extra-56 libavformat56 libavresample2 libavutil54
apt-get install v4l-utils python-pip python-dev curl libssl-dev libcurl4-openssl-dev libjpeg-dev libx264-142
wget https://github.com/ccrisan/motioneye/wiki/precompiled/motion-mrdave-raspbian -O /usr/local/bin/motion
chmod +x /usr/local/bin/motion
pip install motioneye
mkdir -p /etc/motioneye
cp /usr/local/share/motioneye/extra/motioneye.conf.sample /etc/motioneye/motioneye.conf
mkdir -p /var/lib/motioneye
cp /usr/local/share/motioneye/extra/motioneye.systemd-unit-local /etc/systemd/system/motioneye.service
systemctl daemon-reload
systemctl enable motioneye
systemctl start motioneye
Не уверен, что нужно, но видел, что еще в файл /etc/modules добавляли строку:
Обновление:
pip install motioneye --upgrade
systemctl restart motioneye
Результат:
Результат будет доступен по ссылке http://192.168.XX.YY:8765/, где http://192.168.XX.YY — IP малины
Проблема:
MotionEye, в браузере, попросило авторизоваться, потом добавить камеру (камера в списке появилась), но дальше появляться не информативная ошибка о том, что что-то пошло не так и страницу нужно обновить
Немного поискав причину, нашел в логе motion (/var/log/motion.log) сообщение об ошибке:
error while loading shared libraries: libavdevice.so.55: cannot open shared object file: No such file or directory
А вот дальше я встрял, на поиске вариантов решения проблемы.
Конечное решение:
Уже после того, как все установлено, я повторил установку
wget https://github.com/ccrisan/motioneye/wiki/precompiled/ffmpeg_3.1.1-1_armhf.deb
dpkg -i ffmpeg_3.1.1-1_armhf.deb
There have been several disjointed tutorials on making a raspberrypi or orangepi into a surveillance camera. So I threw this together to maybe help someone out there with any issues.
I used the orangepipc+ but any orangepi board should work as long as it has the basics, internet connectivity, storage, and a camera. (I highly suggest heatsinks as well)
any feedback or enhancements to this tutorial are greatly appreciated.
——————————————————————
ORANGEPI IPCAMERA
——————————————————————
su root

apt-get update
apt-get upgrade
apt-get install

wget https://github.com/ccrisan/motioneye/wiki/precompiled/ffmpeg_3.1.1-1_armhf.deb
dpkg -i ffmpeg_3.1.1-1_armhf.deb

apt-get remove libavcodec-extra-56 libavformat56 libavresample2 libavutil54

apt-get install python-pip python-dev curl libssl-dev libcurl4-openssl-dev libjpeg-dev libx264-142 libavcodec56 libavformat56 libmysqlclient18 libswscale3 libpq5

wget https://github.com/Motion-Project/motion/releases/download/release-4.0.1/pi_jessie_motion_4.0.1-1_armhf.deb
dpkg -i pi_jessie_motion_4.0.1-1_armhf.deb

pip install motioneye

mkdir -p /etc/motioneye
cp /usr/local/share/motioneye/extra/motioneye.conf.sample /etc/motioneye/motioneye.conf

mkdir -p /var/lib/motioneye

cp /usr/local/share/motioneye/extra/motioneye.systemd-unit-local /etc/systemd/system/motioneye.service
systemctl daemon-reload
systemctl enable motioneye
systemctl start motioneye

sudo modprobe gc2035
sudo modprobe vfe_v4l2

systemctl restart motioneye
Accessing The Frontend
After having successfully followed the installation instructions, the motionEye server should be running on your system and listening on port 8765. Fire up your favorite web browser and visit the following URL (replacing [your_ip] with… well, your system’s IP address):
http://[your_ip]:8765/
Use admin with empty password when prompted for credentials. For further details on how to configure motionEye, see Configuration.
——————————————————————
FOR UPDATES;
——————————————————————
pip install motioneye —upgrade
systemctl restart motioneye
sudo nano /etc/motioneye/motioneye.conf
ctrl+x then y (nano)
Modifiy the motion.config file to turnoff localhost;
stream_localhost off
change the port to 80 from 8765 if desired by;
systemctl enable motion
systemctl start motion
Tutorial sources;
https://github.com/ccrisan/motioneye/wiki/Install-On-Raspbian
http://www.orangepi.org/orangepibbsen/forum.php?mod=viewthread&tid=941
http://www.orangepi.org/orangepibbsen/forum.php?mod=viewthread&tid=1988 (some resources for motion)
http://www.cnx-software.com/2015/09/26/how-to-use-orange-pi-camera-in-linux-with-motion/(VERY OLD)
WIP tutorial, I want to add a version with facial recognition using openface and a version using ALPR (automatic license plate recognition, as the orangepi systems can have 2GB of ram)
Update 1 09/30/16;
seems there is a issue with motioneye and being unable to find the csi camera. I’m trying to find a work around, any help is appreciated.
Update 2 11/05/2016
Updated motioneye installation
added information on motion and basic setup (incomplete)
the editor seems to be breaking my wget addresses ![]()
I forgot to add the login information and frontend… *DOH*
Прочитано:
2 067
Просматривая почтовый ящик support@ekzorchik.ru мне заинтересовало одно письмо от читателя моего блога который не поленился, а поблагодарил за блог который я веду и выкладываю действительно реальные заметки. У него возникла проблема с переустановкой утилиты MotionEye на новый релиз Raspbian Stretch миникомпьютера Raspberry Pi Model B. Меня это заинтересовало, а действительно ли это так и есть сложности в этом процессе. Ведь если хоть раз разберешь желательно Сам то и трудностей в дальнейшем быть не должно. Итого ниже я выкладываю в публичный доступ заметку, как установить MotionEyE на Raspbian Stretch.
Основные моменты опираются на ранее опубликованную где я рассматривал дистрибутив Raspbian Jessie.
Первым делом после записи дистрибутива на карту памяти (MicroSD) оптимизирую систему по своей заметке.
Начинаю…
pi@raspberrypi:~ $ sudo apt-get install v4l-utils libmariadbclient18 libpq5 python-pip
python-dev libssl-dev libcurl4-openssl-dev libjpeg-dev libz-dev
-y
pi@raspberrypi:~ $ wget https://github.com/Motion-Project/motion/releases/download/release-4.1.1/pi_stretch_motion_4.1.1-1_armhf.deb
pi@raspberrypi:~ $ sudo dpkg -i pi_stretch_motion_4.1.1-1_armhf.deb
pi@raspberrypi:~ $ sudo apt-get install -f -y
pi@raspberrypi:~ $ sudo pip install motioneye
pi@raspberrypi:~ $ sudo mkdir -p /etc/motioneye
pi@raspberrypi:~ $ sudo cp /usr/local/share/motioneye/extra/motioneye.conf.sample /etc/motioneye/motioneye.conf
pi@raspberrypi:~ $ sudo mkdir -p /var/lib/motioneye
pi@raspberrypi:~ $ sudo cp /usr/local/share/motioneye/extra/motioneye.systemd-unit-local /etc/systemd/system/motioneye.service
pi@raspberrypi:~ $ sudo systemctl daemon-reload
pi@raspberrypi:~ $ sudo systemctl enable motioneye
Created symlink /etc/systemd/system/multi-user.target.wants/motioneye.service → /etc/systemd/system/motioneye.service.
pi@raspberrypi:~ $ sudo systemctl start motioneye
pi@raspberrypi:~ $ sudo pip install motioneye --upgrade
pi@raspberrypi:~ $ sudo systemctl restart motioneye
pi@raspberrypi:~ $ sudo netstat -tulpn | grep :8765
tcp 0 0 0.0.0.0:8765 0.0.0.0:* LISTEN 4430/python
http://IP&DNS:8765
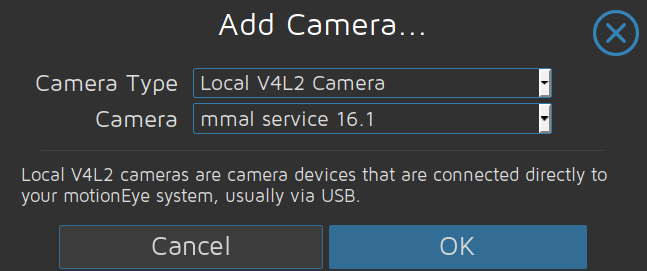
 Далее исходя из своей заметки пробую воспроизвести пошаговые действия по запуску камеры (Geekworm 5M 1080P Night Vision Camera for Raspberry Pi — White + Black) через CSI интерфейс в новую версию пакета Motioneye на Raspbian Stretch
после подключения камеры к миникомпьютеру Raspberry Pi 3 Model B ее следует активировать в системе:
pi@raspberrypi:~ $ sudo raspi-config
перехожу в меню «5 Interfacing Options» → «P1 Camera» → на вопрос желаю ли я включить интерфейс работы с камерой: «Would you like the camera interface to be enabled?» отвечаю «Yes» последует уведомление «The camera interface is enabled», затем выхожу из режима настройки нажатием на выбор «Finish» и подтверждаю что для активации изменений систему следует перезагрузить «Would you like to reboot now?» — «Yes»
Проверяю через утилиту raspivid что могу делать снимки и делать видеоряд:
pi@raspberrypi:~ $ whereis raspivid
raspivid: /usr/bin/raspivid /opt/vc/bin/raspivid
pi@raspberrypi:~ $ raspistill -o image.png -t 1000
pi@raspberrypi:~ $ file image.png
image.png: JPEG image data, Exif standard: [TIFF image data, big-endian, direntries=10, height=0, manufacturer=RaspberryPi, model=RP_ov5647, xresolution=156, yresolution=164, resolutionunit=2, datetime=2018:08:21 23:14:30, width=0], baseline, precision 8, 2592x1944, frames 3
Затем активирую V4L2 Driver вместо того который работает с утилитой raspivid и raspistill:
pi@raspberrypi:~ $ sudo modprobe bcm2835-v4l2
pi@raspberrypi:~ $ sudo nano /etc/modules
bcm2835-v4l2
pi@raspberrypi:~ $ sudo reboot
После проверяю, что может данная CSI камера:
pi@raspberrypi:~ $ dmesg | grep video0
[4.706761] bcm2835-v4l2: V4L2 device registered as video0 - stills
mode > 1280x720
pi@raspberrypi:~ $ ls -l /dev/video0
crw-rw----+ 1 root video 81, 0 Aug 21 23:16 /dev/video0
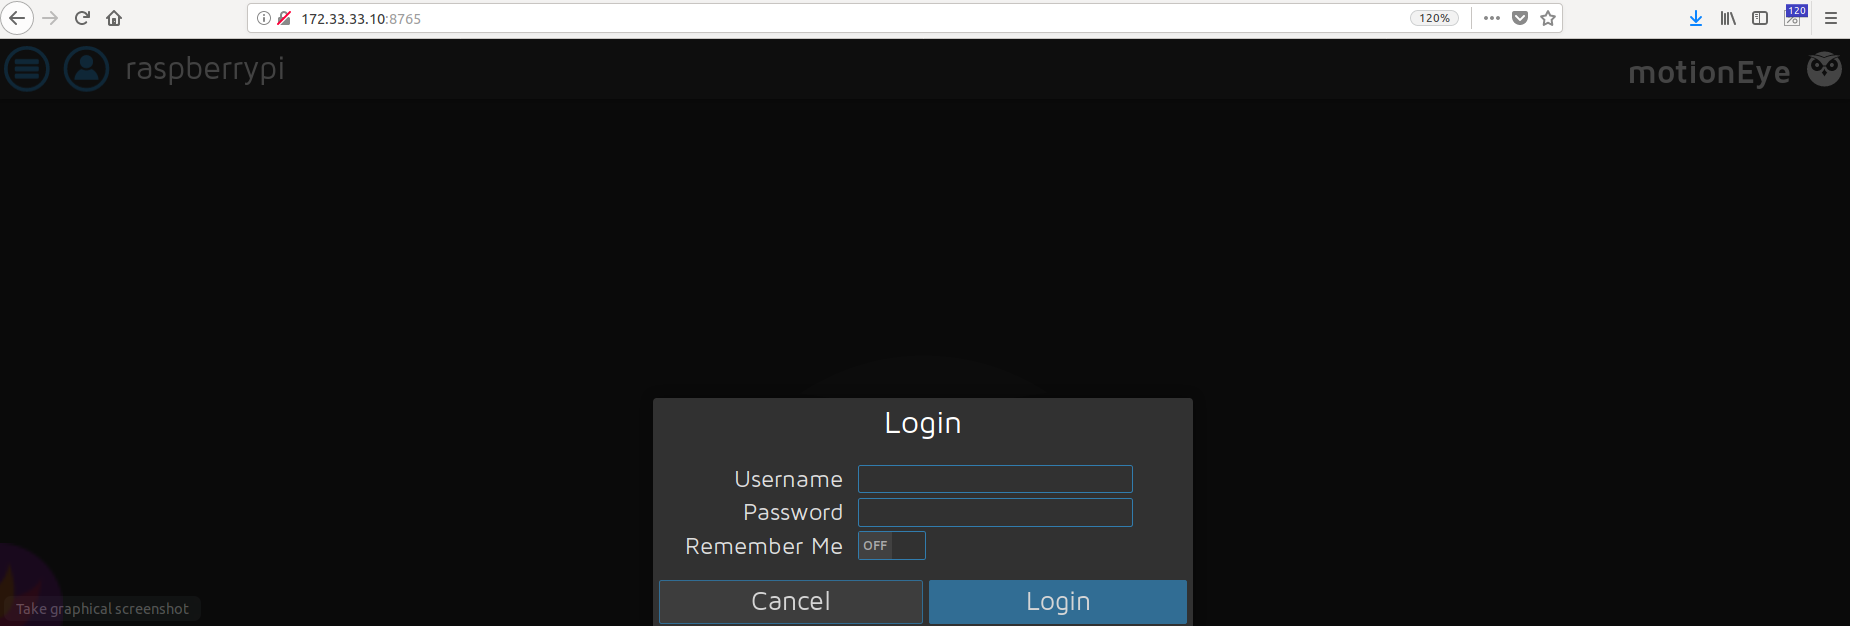
Чтобы авторизоваться используем дефолтные данные, где
Username:adminPassword:нет пароля
и нажимаем Login
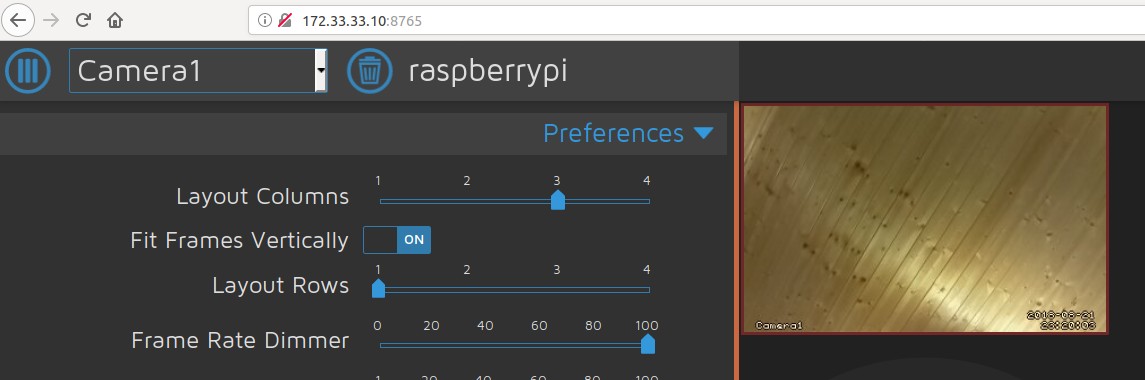
 и камера также успешно завелась и показывает происходящее доступное ее взору
Из всех проделанных действий видно, что ничего не изменилось как я думал если сменить релиз дистрибутива с Raspbian Jessiy на Raspbian Stretch. Как хорошо, когда есть собственные заметки и они выручают в задумках.
[stextbox id=’alert’]На заметку: Главное не забыть поставить на миникомпьютер вентилятор чтобы системе не перегревалась от создаваемой нагрузки.[/stextbox]
Заметка работоспособна. На этом у меня все, с уважением автор блога Олло Александр aka ekzorchik.