Содержание
- CentOS
- mount error(13): Permission denied mounting CIFS
- mount error(13): Permission denied mounting CIFS
- Re: mount error(13): Permission denied mounting CIFS
- Re: mount error(13): Permission denied mounting CIFS
- Re: mount error(13): Permission denied mounting CIFS
- Re: mount error(13): Permission denied mounting CIFS
- Re: mount error(13): Permission denied mounting CIFS
- mount error 13 = Permission denied
- 5 Answers 5
- Permissions on credentials file
- Verbose mount
- Check the logs
- Type of security
- Unable to mount CIFS share on Linux: mount error(13): Permission denied (cifs_mount failed w/return code = -13)
- Add a comment
- Comments (newest first)
- Blog Tags:
- Mount CIFS Permission Denied on Linux – Fixed!
- Table of Contents
- Mount CIFS Permission Denied Error
- Step 1 – Installing CIFS Utils
- Step 2 – Creating a Mount Point
- Step 3 – Editing the fstab file
- Step 4 – Creating the .smbcredentials file
- Step 5 – Mounting the Share
- Wrapping up
- mount.cifs error 13 after update (CentOS/RedHat Linux 7.6)
- Configuration that triggered the problem
- Troubleshooting & solution
CentOS
The Community ENTerprise Operating System
mount error(13): Permission denied mounting CIFS
mount error(13): Permission denied mounting CIFS
Post by dadep » 2016/07/20 13:08:48
Hello,
I’m new of this forum and have a problem mounting cifs share (shared by win2003 server) to my test CentOS 7 box.
I have already tried all tips/trick/workaround founded by google but any of these as worked.
My fstab line is the following
//veeamserver/val /winshare cifs sec=ntlm,user,rw,suid,credentials=/root/secret.txt 0 0
credential.txt is
username=MYUSER
password=MYPASSWD
Also mount.cifs //veeamserver/val /winshare not works
smbclient -L veeamserver
and smbclient //veeamserver/val /winshare
are working
I’m working as root.
«mount -a» writes following in /var/log/messages
Jul 20 15:29:44 localhost kernel: Status code returned 0xc000006d NT_STATUS_LOGON_FAILURE
Jul 20 15:29:44 localhost kernel: CIFS VFS: Send error in SessSetup = -13
Jul 20 15:29:44 localhost kernel: CIFS VFS: cifs_mount failed w/return code = -13
Does anyone can help me ?
thanks in advance
Davide
Re: mount error(13): Permission denied mounting CIFS
Post by dadep » 2016/07/20 13:51:55
Have found this https://goo.gl/4HBF1R post
and using sudo (even though I’m working as root) I’m able to manually mount my CIFS share.
sudo mount.cifs //veeamserver/val /winshare -o username=centos,sec=ntlm
Now the questionm is how to make fstab working.
Re: mount error(13): Permission denied mounting CIFS
Post by poky » 2016/07/20 18:22:19
//192.168.x.y/val /winshare cifs auto,_netdev,x-systemd.automount,sec=ntlm,user,rw,suid,credentials=/root/secret.txt 0 0
username=MYUSER
password=MYPASSWD
workgroup=MYWORKGROUPNAME
domain=MYWORKGROUPNAME
This article is a good read:
https://wiki.centos.org/TipsAndTricks/WindowsShares
Re: mount error(13): Permission denied mounting CIFS
Post by dadep » 2016/07/22 07:43:32
Poky,
is not working.
dmesg reports:
Status code returned 0xc000006d NT_STATUS_LOGON_FAILURE
[155434.173507] CIFS VFS: Send error in SessSetup = -13
[155434.173597] CIFS VFS: cifs_mount failed w/return code = -13
Re: mount error(13): Permission denied mounting CIFS
Post by poky » 2016/07/22 20:34:42
Re: mount error(13): Permission denied mounting CIFS
Post by marthyr » 2016/07/30 02:37:00
Источник
mount error 13 = Permission denied
One of my servers is set up to automatically mount a Windows directory using fstab. However, after my last reboot it stopped working. The line in fstab is:
The .Smbcredentials file is:
I do a mount -a and I receive mount error 13 = Permission denied . If I do this enough it will lock out my Windows account, so I know it’s trying. I’ve checked that my password is correct.
What am i doing wrong?
5 Answers 5
A couple of things to check out. I do something similar and you can test mount it directly using the mount command to make sure you have things setup right.
Permissions on credentials file
Make sure that this file is permissioned right.
Verbose mount
You can coax more info out of mount using the -v switch which will often times show you where things are getting tripped up.
Resulting in this output if it works:
Check the logs
After running the above mount command take a look inside your dmesg and /var/log/messages or /var/log/syslog files for any error messages that may have been generated when you attempted the mount .
Type of security
You can pass a lot of extra options via the -o .. switch to mount. These options are technology specific, so in your case they’re applicable to mount.cifs specifically. Take a look at the mount.cifs man page for more on all the options you can pass.
I would suspect you’re missing an option to sec=. . Specifically one of these options:
You may need to adjust the sec=. option so that it’s either sec=ntlm or sec=ntlmssp .
Источник
Published on January 4th 2022 — Listed in Linux Windows Samba
There are a couple of ways how to mount a CIFS/Samba share on a Linux client. However some tutorials are outdated and meanwhile completely wrong. I just ran into a (stupid) case of a wrong mount.cifs syntax:
# mount -t cifs //server/Share /mnt -o rw,user=domainmyuser,password=secret
mount error(13): Permission denied
Refer to the mount.cifs(8) manual page (e.g. man mount.cifs) and kernel log messages (dmesg)
Unfortunately, the additional output in dmesg is not helpful to figure out the problem:
# dmesg
[. ]
[16444886.307684] CIFS: Attempting to mount //server/Share
[16444886.307717] No dialect specified on mount. Default has changed to a more secure dialect, SMB2.1 or later (e.g. SMB3), from CIFS (SMB1). To use the less secure SMB1 dialect to access old servers which do not support SMB3 (or SMB2.1) specify vers=1.0 on mount.
[16444886.539770] Status code returned 0xc000006d STATUS_LOGON_FAILURE
[16444886.539795] CIFS VFS: \server Send error in SessSetup = -13
[16444886.539901] CIFS VFS: cifs_mount failed w/return code = -13
After additional try and errors (and looking up a recent share mount from the history), the problem turned out to be the user=domainmyuser syntax. This way of combining the domain/workgroup and the username is not working (anymore).
Note: Both user= and username= are accepted in the options.
# mount -t cifs «//server/Share» /mnt -o «user=myuser,password=secret,workgroup=DOMAIN»
root@focal:
# ll /mnt/
total 0
drwxr-xr-x 2 root root 0 Sep 1 2020 _Archiv
drwxr-xr-x 2 root root 0 Aug 9 12:10 Client
[..]
This way it worked.
Of course the password should not be used on the command line, so for the final (and automatic) mount of the share use the following entry in /etc/fstab:
# cat /etc/fstab
[. ]
# Mount CIFS share from server
//server/Share /mnt cifs rw,relatime,vers=3.1.1,credentials=/etc/samba/servershare.conf,uid=0 0 0
Where /etc/samba/servershare.conf contains the credentials:
# cat /etc/samba/servershare.conf
user=myuser
password=secret
domain=DOMAIN
ck from Switzerland wrote on Nov 29th, 2022:
Keith, make sure you have the cifs-utils and smbclient packages installed on your Ubuntu. Still an error? Try to connect to the share using the smbclient command. It could also be a SMB protocol mismatch. Check out this article, describing Samba protocol configuration on the client.
Keith from United States wrote on Nov 29th, 2022:
I’ve tried for the past 3 hours, 5AM in the morning now, and I’ve tried everything from every other website and this one and still get the exact same errors. Tried it with just sudo, then root. Same thing. Host OS is ubuntu server trying to mount a network share from my Synology NAS.
AJav from wrote on Sep 19th, 2022:
very good, Thanks !
simonpunk2016 from wrote on Aug 1st, 2022:
Thank you sir, never know the mount option has changed, because I just successfully mounted the cifs last month, thought my Manjaro has come to an end.
simonpunk2016 from wrote on Jul 29th, 2022:
Thank you sir, never know the mount option has changed, because I just successfully mounted the cifs last month, thought my Manjaro has come to an end.
Jesko from wrote on Feb 10th, 2022:
I had exact the same error, but different reason. On a freshly installed (old) Ubuntu 16.04 LTS (last 32Bit version). My reason was: There was no cifs-utils installed! so «sudo apt install cifs-utils» was the solution. I just write here because I crawled through hundreds of comments.

Blog Tags:
© 2008 — 2023 by Claudio Kuenzler. Powered by  .
.
Источник
Mount CIFS Permission Denied on Linux – Fixed!
In this tutorial, I show you how to fix the Mount CIFS Permission Denied error on Linux.
Table of Contents
Please enable JavaScript
Mount CIFS Permission Denied Error
The error occurs mostly because you don’t provide sufficient credential information, specifically which Domain you are in. Most Tutorials out there only mention username and password when editing the .smbcredentials file. But let me take you through the process from the beginning.
Step 1 – Installing CIFS Utils
To mount a CIFS share on Linux, we first need to install cifs-utils. Let’s get started with that.
It should probably be pre-installed in most distros anyway.
Step 2 – Creating a Mount Point
Next, we need to create the directory where we want to Mount our Share in. You can later find the Share in this Directory. For this example, we will mount the imaginary “Photos” share.
Step 3 – Editing the fstab file
That we don’t have to mount our Share again after each reboot, we have to edit the fstab file to make the Share mount automatically after each reboot. But first, we make a backup of this file in case something goes wrong.
That done, we edit our fstab file.
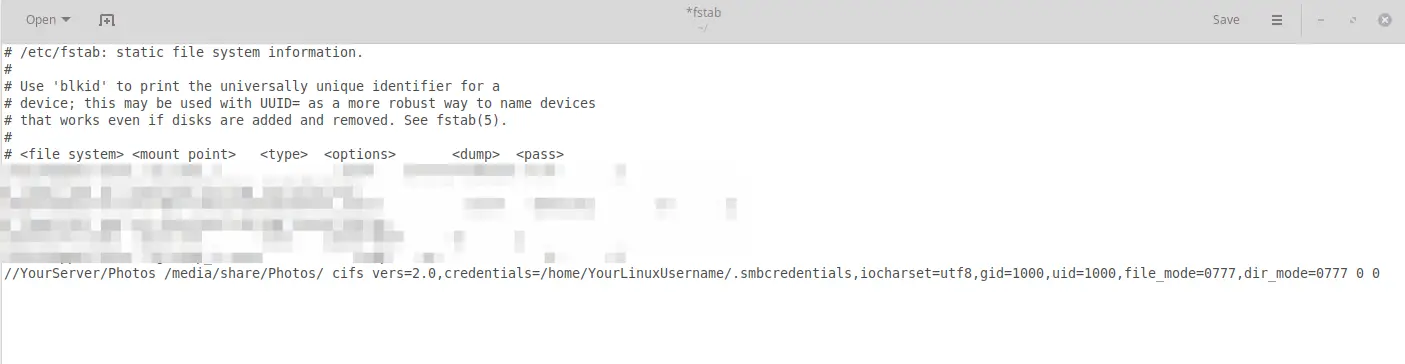
And paste this line at the end of the file (all in one line)
Of course, adjust accordingly to your own Server and YourLinuxUsername! We will create the .smbcredentials file next.
By default, you will have the gid=1000 and uid=1000. That’s your Group & User ID, but to make sure that those values are the same in your system, double-check it by typing:
If all is correct, hit CTRL+S to Save the fstab file and close it.
Step 4 – Creating the .smbcredentials file
We could enter our username directly into our fstab file, but that would not be safe as someone could clearly read our Username and Password in this unencrypted file. Therefore, we are going to create a separate file containing this information.
And here is the key point to fixing the Mount CIFS Permission Denied error. Most guides simply state to enter Username and Password into this file, but you also have to enter your Domain!
So paste this into your .smbcredentials file:
Save & Close the file.
Now we just make the .smbcredentials file so that only the root user can read its contents.
Now when everything is done, try to mount the share by typing
And your share should now be successfully mounted! If there are still some errors, try rebooting your system and see again if the Share was mounted. The share should be located in your media/share/Photos folder.
Wrapping up
It took me a while to figure out this error. I use a Synology NAS and had to set vers=2.0 in the fstab file. If you still encounter problems, try changing vers to 1.0 or 3.0. Let me know in the comments below if this solution worked for you!
Источник
mount.cifs error 13 after update (CentOS/RedHat Linux 7.6)
If you recently updated your RedHat or CentOS 7.6 system, you may suddenly start getting “Permission Denied” errors when attempting to mount SMB shares via CIFS. Typical error messages in syslog look like this:
Configuration that triggered the problem
- Synology NAS with latest operating system shares a volume via SMB
- CentOS 7 Linux server mounts SMB share using a local username and password (NOT domain credentials)
- cifs-utils version 6.2 installed in May of 2019 (this by itself worked fine)
- libsmbclient just updated to 4.9.1-6
- libmount just updated to 2.23.2-61
- CIFS mount options: vers=3.0,credentials=/root/credentials.txt,sec=ntlmsspi
- File /root/credentials.txt contained a username and password that are LOCAL to the SMB server
Troubleshooting & solution
I was able to isolate the problem to mount.cifs with the following procedure:
- Mount the SMB share from a Windows host, using the same credentials as the Linux host. This proved that the credentials were valid and there were no problems on the SMB server side.
- Access the SMB share from the Linux host using smbclient. This step ruled out any network issues between the Linux and SMB server, and verified that the version of Samba installed on the Linux host was compatible with the SMB server.
I found the solution in a post from a couple of years ago in the askubuntu forum on StackExchange. It seems that one of the recent CentOS/RedHat updates changed some default behavior in the way that mount.cifs authenticates to SMB shares. When authenticating as a local user, you now have to specify the host as the domain. I did this by adding one line to the credentials file that is referenced from /etc/fstab as shown below:
Here are the contents of file /root/credentials.txt :
I am not sure why this problem showed up now; it seems like it should have occurred months ago when we updated to latest version of cifs-utils. I’m also unsure if this problem will occur if you’re attempting to authenticate as a domain user. Let me know in the comments!
Источник
A couple of things to check out. I do something similar and you can test mount it directly using the mount command to make sure you have things setup right.
Permissions on credentials file
Make sure that this file is permissioned right.
$ sudo ls -l /etc/smb_credentials.txt
-rw-------. 1 root root 54 Mar 24 13:19 /etc/smb_credentials.txt
Verbose mount
You can coax more info out of mount using the -v switch which will often times show you where things are getting tripped up.
$ sudo mount -v -t cifs //server/share /mnt
    -o credentials=/etc/smb_credentials.txt
Resulting in this output if it works:
mount.cifs kernel mount options: ip=192.168.1.14,unc=\servershare,credentials=/etc/smb_credentials.txt,ver=1,user=someuser,domain=somedom,pass=********
Check the logs
After running the above mount command take a look inside your dmesg and /var/log/messages or /var/log/syslog files for any error messages that may have been generated when you attempted the mount.
Type of security
You can pass a lot of extra options via the -o .. switch to mount. These options are technology specific, so in your case they’re applicable to mount.cifs specifically. Take a look at the mount.cifs man page for more on all the options you can pass.
I would suspect you’re missing an option to sec=.... Specifically one of these options:
   sec=
       Security mode. Allowed values are:
       ·   none - attempt to connection as a null user (no name)
       ·   krb5 - Use Kerberos version 5 authentication
       ·   krb5i - Use Kerberos authentication and forcibly enable packet
           signing
       ·   ntlm - Use NTLM password hashing
       ·   ntlmi - Use NTLM password hashing and force packet signing
       ·   ntlmv2 - Use NTLMv2 password hashing
       ·   ntlmv2i - Use NTLMv2 password hashing and force packet signing
       ·   ntlmssp - Use NTLMv2 password hashing encapsulated in Raw NTLMSSP
           message
       ·   ntlmsspi - Use NTLMv2 password hashing encapsulated in Raw
           NTLMSSP message, and force packet signing

       The default in mainline kernel versions prior to v3.8 was sec=ntlm.
       In v3.8, the default was changed to sec=ntlmssp.
You may need to adjust the sec=... option so that it’s either sec=ntlm or sec=ntlmssp.
References
- Thread: mount -t cifs results gives mount error(13): Permission denied

If you recently updated your RedHat or CentOS 7.6 system, you may suddenly start getting “Permission Denied” errors when attempting to mount SMB shares via CIFS. Typical error messages in syslog look like this:
kernel: Status code returned 0xc000006d STATUS_LOGON_FAILURE
kernel: CIFS VFS: Send error in SessSetup = -13
kernel: CIFS VFS: cifs_mount failed w/return code = -13
Configuration that triggered the problem
- Synology NAS with latest operating system shares a volume via SMB
- CentOS 7 Linux server mounts SMB share using a local username and password (NOT domain credentials)
- cifs-utils version 6.2 installed in May of 2019 (this by itself worked fine)
- libsmbclient just updated to 4.9.1-6
- libmount just updated to 2.23.2-61
- CIFS mount options: vers=3.0,credentials=/root/credentials.txt,sec=ntlmsspi
- File /root/credentials.txt contained a username and password that are LOCAL to the SMB server
Troubleshooting & solution
I was able to isolate the problem to mount.cifs with the following procedure:
- Mount the SMB share from a Windows host, using the same credentials as the Linux host. This proved that the credentials were valid and there were no problems on the SMB server side.
- Access the SMB share from the Linux host using smbclient. This step ruled out any network issues between the Linux and SMB server, and verified that the version of Samba installed on the Linux host was compatible with the SMB server.
I found the solution in a post from a couple of years ago in the askubuntu forum on StackExchange. It seems that one of the recent CentOS/RedHat updates changed some default behavior in the way that mount.cifs authenticates to SMB shares. When authenticating as a local user, you now have to specify the host as the domain. I did this by adding one line to the credentials file that is referenced from /etc/fstab as shown below:
//172.1.1.1/share_name /mnt/mountpoint cifs vers=3.0,credentials=/root/credentials.txt,sec=ntlmsspi
Here are the contents of file /root/credentials.txt:
username=my_username
password=my_password
domain=172.1.1.1
I am not sure why this problem showed up now; it seems like it should have occurred months ago when we updated to latest version of cifs-utils. I’m also unsure if this problem will occur if you’re attempting to authenticate as a domain user. Let me know in the comments!
In this tutorial, I show you how to fix the Mount CIFS Permission Denied error on Linux.
Table of Contents
- Mount CIFS Permission Denied Error
- Step 1 – Installing CIFS Utils
- Step 2 – Creating a Mount Point
- Step 3 – Editing the fstab file
- Step 4 – Creating the .smbcredentials file
- Step 5 – Mounting the Share
- Wrapping up
⚠️Related Articles
Part 1 – How to install WSL 2 with Windows Terminal – Complete Guide
Part 2 – Windows Terminal Customization for WSL 2
Part 3 – In-Depth Windows Terminal Customization for WSL2
The error occurs mostly because you don’t provide sufficient credential information, specifically which Domain you are in. Most Tutorials out there only mention username and password when editing the .smbcredentials file. But let me take you through the process from the beginning.
Step 1 – Installing CIFS Utils
To mount a CIFS share on Linux, we first need to install cifs-utils. Let’s get started with that.
sudo apt-get install cifs-utils -yCode language: JavaScript (javascript)
It should probably be pre-installed in most distros anyway.
Step 2 – Creating a Mount Point
Next, we need to create the directory where we want to Mount our Share in. You can later find the Share in this Directory. For this example, we will mount the imaginary “Photos” share.
sudo mkdir /media/share/Photos
Step 3 – Editing the fstab file
That we don’t have to mount our Share again after each reboot, we have to edit the fstab file to make the Share mount automatically after each reboot. But first, we make a backup of this file in case something goes wrong.
sudo cp /etc/fstab /etc/fstab.old
That done, we edit our fstab file.
sudo gedit /etc/fstab
And paste this line at the end of the file (all in one line)
Code language: JSON / JSON with Comments (json)
//YourServer/Photos /media/share/Photos/ cifs vers=2.0,credentials=/home/YourLinuxUsername/.smbcredentials,iocharset=utf8,gid=1000,uid=1000,file_mode=0777,dir_mode=0777 0 0
Of course, adjust accordingly to your own Server and YourLinuxUsername! We will create the .smbcredentials file next.
By default, you will have the gid=1000 and uid=1000. That’s your Group & User ID, but to make sure that those values are the same in your system, double-check it by typing:
id

If all is correct, hit CTRL+S to Save the fstab file and close it.
Step 4 – Creating the .smbcredentials file
We could enter our username directly into our fstab file, but that would not be safe as someone could clearly read our Username and Password in this unencrypted file. Therefore, we are going to create a separate file containing this information.
Code language: CSS (css)
sudo gedit .smbcredentials
And here is the key point to fixing the Mount CIFS Permission Denied error. Most guides simply state to enter Username and Password into this file, but you also have to enter your Domain!
So paste this into your .smbcredentials file:
username=yourusername
password=yourpassword
domain=yourdomain
Save & Close the file.
Now we just make the .smbcredentials file so that only the root user can read its contents.
sudo chmod 600 ~/.smbcredentials
Now when everything is done, try to mount the share by typing
sudo mount -a
And your share should now be successfully mounted! If there are still some errors, try rebooting your system and see again if the Share was mounted. The share should be located in your media/share/Photos folder.
Wrapping up
It took me a while to figure out this error. I use a Synology NAS and had to set vers=2.0 in the fstab file. If you still encounter problems, try changing vers to 1.0 or 3.0. Let me know in the comments below if this solution worked for you!
linux
October 25, 2019March 16, 2021
1 Minute
After upgrading a test machine from CentOS Linux release 7.6.1810 to 7.7.1908, we encountered a mount error(13): Permission denied when mounting a CIFS share.
The systemd journal shows additional details:
kernel: Status code returned 0xc000006d STATUS_LOGON_FAILURE
kernel: CIFS VFS: Send error in SessSetup = -13
kernel: CIFS VFS: cifs_mount failed w/return code = -13
Running the mount command in verbose mode provides a hint of the issue when reviewing the user option:
# mount -v /path_of_mountpoint
mount.cifs kernel mount options: ip=10.x.x.x,unc=\fileserver.domain.comsharename$,sec=ntlmssp,dir_mode=0777,file_mode=0666,user=username@domain.com,pass=********
mount error(13): Permission denied
Refer to the mount.cifs(8) manual page (e.g. man mount.cifs)
In our /etc/fstab file we use the credentials=/root/.smbcredentials_sharename option to keep the credentials in a separate file, only readable by the root user.
It turns out, however, that we were using a deprecated format, which still worked fine in previous CentOS versions:
username=username@domain.com
password=thepassword
Changing it to the correct format fixed the issue:
username=username
password=thepassword
domain=domain.com
This is confirmed by the MOUNT.CIFS(8) manpage:
Earlier versions of mount.cifs also allowed one to specify the username in a “user%password” or “workgroup/user” or “workgroup/user%password” to allow the password and workgroup to be specified as part of the username. Support for those alternate username formats is now deprecated and should no longer be used. Users should use the discrete “password=” and “domain=” to specify those values.
After ensuring that the correct format works with older releases of CentOS, we fixed the credential file in our central Ansible repository and deployed it to the other hosts via the copy module:
- name: copy CIFS credentials file
  copy:
    src: smbcredentials_sharename
    dest: /root/.smbcredentials_sharename
    mode: '400'
References
- mount.cifs(8) – Linux man page
- Ansible copy module

Published by Marco Baldelli
I am an IT professional based in Bergamo, Italy.
I have been working with databases since 2006, specializing in Business Intelligence and Data Warehouse systems.
My interests include: database technologies; software development; system administration, automation and devops.
View all posts by Marco Baldelli
Published
October 25, 2019March 16, 2021