A couple of things to check out. I do something similar and you can test mount it directly using the mount command to make sure you have things setup right.
Permissions on credentials file
Make sure that this file is permissioned right.
$ sudo ls -l /etc/smb_credentials.txt
-rw-------. 1 root root 54 Mar 24 13:19 /etc/smb_credentials.txt
Verbose mount
You can coax more info out of mount using the -v switch which will often times show you where things are getting tripped up.
$ sudo mount -v -t cifs //server/share /mnt
    -o credentials=/etc/smb_credentials.txt
Resulting in this output if it works:
mount.cifs kernel mount options: ip=192.168.1.14,unc=\servershare,credentials=/etc/smb_credentials.txt,ver=1,user=someuser,domain=somedom,pass=********
Check the logs
After running the above mount command take a look inside your dmesg and /var/log/messages or /var/log/syslog files for any error messages that may have been generated when you attempted the mount.
Type of security
You can pass a lot of extra options via the -o .. switch to mount. These options are technology specific, so in your case they’re applicable to mount.cifs specifically. Take a look at the mount.cifs man page for more on all the options you can pass.
I would suspect you’re missing an option to sec=.... Specifically one of these options:
   sec=
       Security mode. Allowed values are:
       ·   none - attempt to connection as a null user (no name)
       ·   krb5 - Use Kerberos version 5 authentication
       ·   krb5i - Use Kerberos authentication and forcibly enable packet
           signing
       ·   ntlm - Use NTLM password hashing
       ·   ntlmi - Use NTLM password hashing and force packet signing
       ·   ntlmv2 - Use NTLMv2 password hashing
       ·   ntlmv2i - Use NTLMv2 password hashing and force packet signing
       ·   ntlmssp - Use NTLMv2 password hashing encapsulated in Raw NTLMSSP
           message
       ·   ntlmsspi - Use NTLMv2 password hashing encapsulated in Raw
           NTLMSSP message, and force packet signing

       The default in mainline kernel versions prior to v3.8 was sec=ntlm.
       In v3.8, the default was changed to sec=ntlmssp.
You may need to adjust the sec=... option so that it’s either sec=ntlm or sec=ntlmssp.
References
- Thread: mount -t cifs results gives mount error(13): Permission denied
In this tutorial, I show you how to fix the Mount CIFS Permission Denied error on Linux.
Table of Contents
- Mount CIFS Permission Denied Error
- Step 1 – Installing CIFS Utils
- Step 2 – Creating a Mount Point
- Step 3 – Editing the fstab file
- Step 4 – Creating the .smbcredentials file
- Step 5 – Mounting the Share
- Wrapping up
⚠️Related Articles
Part 1 – How to install WSL 2 with Windows Terminal – Complete Guide
Part 2 – Windows Terminal Customization for WSL 2
Part 3 – In-Depth Windows Terminal Customization for WSL2
The error occurs mostly because you don’t provide sufficient credential information, specifically which Domain you are in. Most Tutorials out there only mention username and password when editing the .smbcredentials file. But let me take you through the process from the beginning.
Step 1 – Installing CIFS Utils
To mount a CIFS share on Linux, we first need to install cifs-utils. Let’s get started with that.
Code language: JavaScript (javascript)
sudo apt-get install cifs-utils -y
It should probably be pre-installed in most distros anyway.
Step 2 – Creating a Mount Point
Next, we need to create the directory where we want to Mount our Share in. You can later find the Share in this Directory. For this example, we will mount the imaginary “Photos” share.
sudo mkdir /media/share/Photos
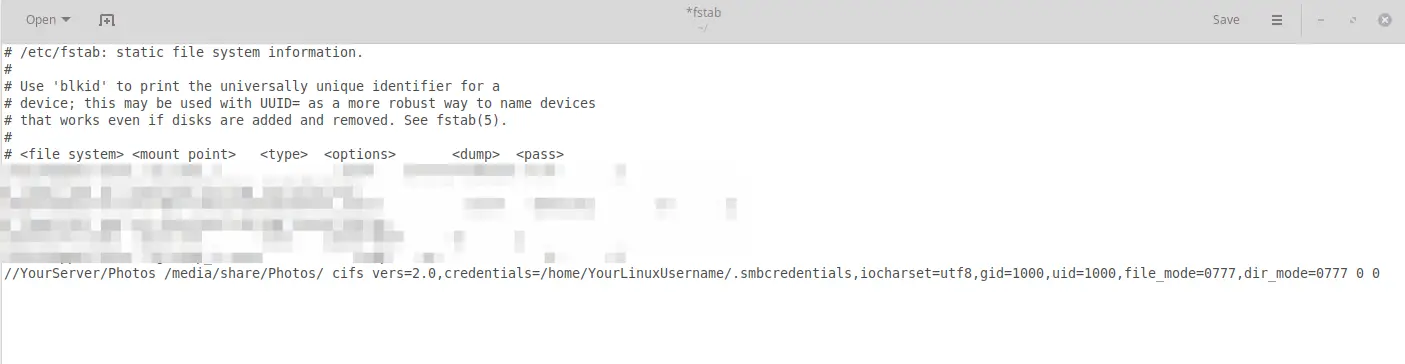
Step 3 – Editing the fstab file
That we don’t have to mount our Share again after each reboot, we have to edit the fstab file to make the Share mount automatically after each reboot. But first, we make a backup of this file in case something goes wrong.
sudo cp /etc/fstab /etc/fstab.old
That done, we edit our fstab file.
sudo gedit /etc/fstab
And paste this line at the end of the file (all in one line)
Code language: JSON / JSON with Comments (json)
//YourServer/Photos /media/share/Photos/ cifs vers=2.0,credentials=/home/YourLinuxUsername/.smbcredentials,iocharset=utf8,gid=1000,uid=1000,file_mode=0777,dir_mode=0777 0 0
Of course, adjust accordingly to your own Server and YourLinuxUsername! We will create the .smbcredentials file next.
By default, you will have the gid=1000 and uid=1000. That’s your Group & User ID, but to make sure that those values are the same in your system, double-check it by typing:
id

If all is correct, hit CTRL+S to Save the fstab file and close it.
Step 4 – Creating the .smbcredentials file
We could enter our username directly into our fstab file, but that would not be safe as someone could clearly read our Username and Password in this unencrypted file. Therefore, we are going to create a separate file containing this information.
Code language: CSS (css)
sudo gedit .smbcredentials
And here is the key point to fixing the Mount CIFS Permission Denied error. Most guides simply state to enter Username and Password into this file, but you also have to enter your Domain!
So paste this into your .smbcredentials file:
username=yourusername
password=yourpassword
domain=yourdomain
Save & Close the file.
Now we just make the .smbcredentials file so that only the root user can read its contents.
sudo chmod 600 ~/.smbcredentials
Now when everything is done, try to mount the share by typing
sudo mount -a
And your share should now be successfully mounted! If there are still some errors, try rebooting your system and see again if the Share was mounted. The share should be located in your media/share/Photos folder.
Wrapping up
It took me a while to figure out this error. I use a Synology NAS and had to set vers=2.0 in the fstab file. If you still encounter problems, try changing vers to 1.0 or 3.0. Let me know in the comments below if this solution worked for you!

This error was appeared in one of the Linux Ubuntu Server when I was trying to mount a Windows File Share to save some files.
The fix to the issue was quite an easy task, but can be a time consuming work when you are running with a busy schedule. I thought to share this with my followers and I hope this will help you to save some valuable time for your work.
I was trying to mount the File Share with the below command.
techc_admin@TCVM-01:~$ sudo mount -t cifs //techcrumblerg01diag.file.core.windows.net/tcfileshare-01 /mnt/TCFileShare/ -o vers=3.0,username=<username>,password=<password>,dir_mode=0777,file_mode=0777,serverino                            mount error(13): Permission denied
Refer to the mount.cifs(8) manual page (e.g. man mount.cifs)
I forgot to add “sec=ntlmssp” parameter to the command, so the complete command would be something similar to this.
sudo mount -t cifs //techcrumblerg01diag.file.core.windows.net/tcfileshare-01 /mnt/TCFileShare/ -o vers=3.0,username=<username>,password=<password>,dir_mode=0777,file_mode=0777,serverino,sec=ntlmssp
Sample Command which I executed when I connect Azure File Share to an Ubuntu Server.

What Is “sec=ntlmssp”
“sec” is the security mode and it define how the passwords are encrypted between Client and the Server.
“ntlmssp” stands for “NT LAN Manager Security Support Provider” is the binary messaging protocol for a Microsoft Security Support Provider Interface (MSSPI). It is the stream which provide the NTLM challenge-response authentication for the communication.
NTLMSSP is used when there is a SSPI authentication for SMB (Server Message Block) or CIFS (Common Internet File System) access in place.
Click to rate this post!
[Total: 22 Average: 4.9]

Aruna Lakmal
Associate Technical Specialist, Sri Lanka. Technology junky, enthusiast, a VMware vExpert and a blogger with more than 8 years of Experience in Virtualization and Cloud Native technologies.
Get Updates Directly To Your Inbox!
There are a couple of ways how to mount a CIFS/Samba share on a Linux client. However some tutorials are outdated and meanwhile completely wrong. I just ran into a (stupid) case of a wrong mount.cifs syntax:
root@focal:~# mount -t cifs //server/Share /mnt -o rw,user=domainmyuser,password=secret
mount error(13): Permission denied
Refer to the mount.cifs(8) manual page (e.g. man mount.cifs) and kernel log messages (dmesg)
Unfortunately, the additional output in dmesg is not helpful to figure out the problem:
root@focal:~# dmesg
[…]
[16444886.307684] CIFS: Attempting to mount //server/Share
[16444886.307717] No dialect specified on mount. Default has changed to a more secure dialect, SMB2.1 or later (e.g. SMB3), from CIFS (SMB1). To use the less secure SMB1 dialect to access old servers which do not support SMB3 (or SMB2.1) specify vers=1.0 on mount.
[16444886.539770] Status code returned 0xc000006d STATUS_LOGON_FAILURE
[16444886.539795] CIFS VFS: \server Send error in SessSetup = -13
[16444886.539901] CIFS VFS: cifs_mount failed w/return code = -13
After additional try and errors (and looking up a recent share mount from the history), the problem turned out to be the user=domainmyuser syntax. This way of combining the domain/workgroup and the username is not working (anymore).
Note: Both user= and username= are accepted in the options.
Instead use:
root@focal:~# mount -t cifs «//server/Share» /mnt -o «user=myuser,password=secret,workgroup=DOMAIN»
root@focal:~# ll /mnt/
total 0
drwxr-xr-x 2 root root 0 Sep 1 2020 _Archiv
drwxr-xr-x 2 root root 0 Aug 9 12:10 Client
[..]
This way it worked.
Of course the password should not be used on the command line, so for the final (and automatic) mount of the share use the following entry in /etc/fstab:
root@focal:~# cat /etc/fstab
[…]
# Mount CIFS share from server
//server/Share /mnt cifs rw,relatime,vers=3.1.1,credentials=/etc/samba/servershare.conf,uid=0 0 0
Where /etc/samba/servershare.conf contains the credentials:
root@focal:~# cat /etc/samba/servershare.conf
user=myuser
password=secret
domain=DOMAIN
Add a comment
Show form to leave a comment
Comments (newest first)
Edgardo Pannunzio (KERNEL Consultores) from Uruguay wrote on Feb 9th, 2023:
Thanks very much !!
Your post was really helpful.
Ed from wrote on Jan 27th, 2023:
In my case (mounting win 2019 share in RHEL9) when using double apostrophe: «user=myuser…» was outputing:
«bash: !,workgroup=$MY_DOMAIN: event not found»
Switching to single apostrophe ‘user=mysers…’ did the trick
ck from Switzerland wrote on Nov 29th, 2022:
Keith, make sure you have the cifs-utils and smbclient packages installed on your Ubuntu. Still an error? Try to connect to the share using the smbclient command. It could also be a SMB protocol mismatch. Check out this article, describing Samba protocol configuration on the client.
Keith from United States wrote on Nov 29th, 2022:
I’ve tried for the past 3 hours, 5AM in the morning now, and I’ve tried everything from every other website and this one and still get the exact same errors. Tried it with just sudo, then root. Same thing. Host OS is ubuntu server trying to mount a network share from my Synology NAS.
AJav from wrote on Sep 19th, 2022:
very good, Thanks !
simonpunk2016 from wrote on Aug 1st, 2022:
Thank you sir, never know the mount option has changed, because I just successfully mounted the cifs last month, thought my Manjaro has come to an end.
simonpunk2016 from wrote on Jul 29th, 2022:
Thank you sir, never know the mount option has changed, because I just successfully mounted the cifs last month, thought my Manjaro has come to an end.
Jesko from wrote on Feb 10th, 2022:
I had exact the same error, but different reason. On a freshly installed (old) Ubuntu 16.04 LTS (last 32Bit version). My reason was: There was no cifs-utils installed! so «sudo apt install cifs-utils» was the solution. I just write here because I crawled through hundreds of comments.
We have a windows XP share entry in our FSTAB that works as follows:
//MAIN/StorageD /mnt/storaged cifs username=admin,password='',uid=1001,gid=1000,iocharset=utf8,file_mode=0777,dir_mode=0777,noperm 0 0
But the entry for a Windows 7 box does not:
//MAIN-WIN7/Win7VM /mnt/Win7VM cifs username=main,password='',uid=1001,gid=1000,iocharset=utf8,file_mode=0777,dir_mode=0777,noperm 0 0
The directory /mnt/Win7VM is set to 777 permissons and owned by user 1001
So we try to debug a bit and mount manually…
Just as a check, the following works:
mount -t cifs '//MAIN/backupx' /mnt/backupx -o username=Admin,password=''
But for the windows 7 machine, this does not work.
mount -t cifs '//MAIN-WIN7/Win7VM' /mnt/Win7VM -o username=Main,password=''
As I get the error (which is famous I guess):
root@debian:/home/user# mount -t cifs //MAIN-WIN7/Win7VM /mnt/Win7VM -o     username=Main,password='',sec=ntlm
mount error(13): Permission denied
Refer to the mount.cifs(8) manual page (e.g. man mount.cifs)
So, I spend hours searching, checking, and trying to do the following:
Checked settings:
- Workgroup is «WORKGROUP»
- Domain is «MAIN-WIN7»
- User is «Main»
- Password is not set
- Share is Win7VM
- Share is available through network shares in windows
SMBTREE lists:
root@debian:/home/user# smbtree
Enter root's password:
WORKGROUP
\MAIN-WIN7
    \MAIN-WIN7Win7VM
- Changed Windows security policy settings of «Microsoft Network Client: Send un-encrypted passwords to third party» to «Enabled»
- Changed Windows security policy of «Network Security: LAN manager authentication level in to send LM & NTLM — use NTLMv2 session security if negotiated»
- Turned off all anti virus and firewalls
- Adding «sec=ntlm» switch as in «/mnt/Win7VM -o username=Main,password=»,sec=ntlm»
- Adding domain to user as in «MAIN-WIN7/Main»
- Using «mount.cifs» instead of «mount -t cifs»
- CHMOD mount directory to 777 CHOWN mount directory to user «1001» and Group to «user» (will need this for fstab entry if I can get it to mount manually)
Share is on Windows 7 Ultimate and Client with permission errors is Debian Wheezy.
Now I am out of searching terms and ideas. I thought this would be simple; now I have wasted hours. Anyone got any ideas? Its probably something simple right?
Edit:
Forgot the dummy check of trying to access the share from a windows computer. It did not work leading me to investigate more windows settings which led me to the solution posted below.