A couple of things to check out. I do something similar and you can test mount it directly using the mount command to make sure you have things setup right.
Permissions on credentials file
Make sure that this file is permissioned right.
$ sudo ls -l /etc/smb_credentials.txt
-rw-------. 1 root root 54 Mar 24 13:19 /etc/smb_credentials.txt
Verbose mount
You can coax more info out of mount using the -v switch which will often times show you where things are getting tripped up.
$ sudo mount -v -t cifs //server/share /mnt
    -o credentials=/etc/smb_credentials.txt
Resulting in this output if it works:
mount.cifs kernel mount options: ip=192.168.1.14,unc=\servershare,credentials=/etc/smb_credentials.txt,ver=1,user=someuser,domain=somedom,pass=********
Check the logs
After running the above mount command take a look inside your dmesg and /var/log/messages or /var/log/syslog files for any error messages that may have been generated when you attempted the mount.
Type of security
You can pass a lot of extra options via the -o .. switch to mount. These options are technology specific, so in your case they’re applicable to mount.cifs specifically. Take a look at the mount.cifs man page for more on all the options you can pass.
I would suspect you’re missing an option to sec=.... Specifically one of these options:
   sec=
       Security mode. Allowed values are:
       ·   none - attempt to connection as a null user (no name)
       ·   krb5 - Use Kerberos version 5 authentication
       ·   krb5i - Use Kerberos authentication and forcibly enable packet
           signing
       ·   ntlm - Use NTLM password hashing
       ·   ntlmi - Use NTLM password hashing and force packet signing
       ·   ntlmv2 - Use NTLMv2 password hashing
       ·   ntlmv2i - Use NTLMv2 password hashing and force packet signing
       ·   ntlmssp - Use NTLMv2 password hashing encapsulated in Raw NTLMSSP
           message
       ·   ntlmsspi - Use NTLMv2 password hashing encapsulated in Raw
           NTLMSSP message, and force packet signing

       The default in mainline kernel versions prior to v3.8 was sec=ntlm.
       In v3.8, the default was changed to sec=ntlmssp.
You may need to adjust the sec=... option so that it’s either sec=ntlm or sec=ntlmssp.
References
- Thread: mount -t cifs results gives mount error(13): Permission denied
In this tutorial, I show you how to fix the Mount CIFS Permission Denied error on Linux.
Table of Contents
- Mount CIFS Permission Denied Error
- Step 1 – Installing CIFS Utils
- Step 2 – Creating a Mount Point
- Step 3 – Editing the fstab file
- Step 4 – Creating the .smbcredentials file
- Step 5 – Mounting the Share
- Wrapping up
⚠️Related Articles
Part 1 – How to install WSL 2 with Windows Terminal – Complete Guide
Part 2 – Windows Terminal Customization for WSL 2
Part 3 – In-Depth Windows Terminal Customization for WSL2
The error occurs mostly because you don’t provide sufficient credential information, specifically which Domain you are in. Most Tutorials out there only mention username and password when editing the .smbcredentials file. But let me take you through the process from the beginning.
Step 1 – Installing CIFS Utils
To mount a CIFS share on Linux, we first need to install cifs-utils. Let’s get started with that.
Code language: JavaScript (javascript)
sudo apt-get install cifs-utils -y
It should probably be pre-installed in most distros anyway.
Step 2 – Creating a Mount Point
Next, we need to create the directory where we want to Mount our Share in. You can later find the Share in this Directory. For this example, we will mount the imaginary “Photos” share.
sudo mkdir /media/share/Photos
Step 3 – Editing the fstab file
That we don’t have to mount our Share again after each reboot, we have to edit the fstab file to make the Share mount automatically after each reboot. But first, we make a backup of this file in case something goes wrong.
sudo cp /etc/fstab /etc/fstab.old
That done, we edit our fstab file.
sudo gedit /etc/fstab
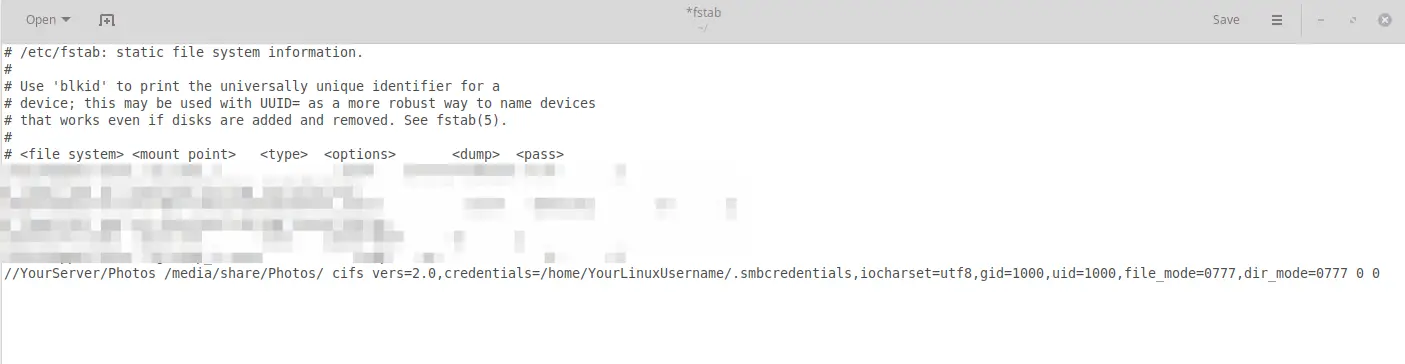
And paste this line at the end of the file (all in one line)
Code language: JSON / JSON with Comments (json)
//YourServer/Photos /media/share/Photos/ cifs vers=2.0,credentials=/home/YourLinuxUsername/.smbcredentials,iocharset=utf8,gid=1000,uid=1000,file_mode=0777,dir_mode=0777 0 0
Of course, adjust accordingly to your own Server and YourLinuxUsername! We will create the .smbcredentials file next.
By default, you will have the gid=1000 and uid=1000. That’s your Group & User ID, but to make sure that those values are the same in your system, double-check it by typing:
id

If all is correct, hit CTRL+S to Save the fstab file and close it.
Step 4 – Creating the .smbcredentials file
We could enter our username directly into our fstab file, but that would not be safe as someone could clearly read our Username and Password in this unencrypted file. Therefore, we are going to create a separate file containing this information.
Code language: CSS (css)
sudo gedit .smbcredentials
And here is the key point to fixing the Mount CIFS Permission Denied error. Most guides simply state to enter Username and Password into this file, but you also have to enter your Domain!
So paste this into your .smbcredentials file:
username=yourusername
password=yourpassword
domain=yourdomain
Save & Close the file.
Now we just make the .smbcredentials file so that only the root user can read its contents.
sudo chmod 600 ~/.smbcredentials
Now when everything is done, try to mount the share by typing
sudo mount -a
And your share should now be successfully mounted! If there are still some errors, try rebooting your system and see again if the Share was mounted. The share should be located in your media/share/Photos folder.
Wrapping up
It took me a while to figure out this error. I use a Synology NAS and had to set vers=2.0 in the fstab file. If you still encounter problems, try changing vers to 1.0 or 3.0. Let me know in the comments below if this solution worked for you!
There are a couple of ways how to mount a CIFS/Samba share on a Linux client. However some tutorials are outdated and meanwhile completely wrong. I just ran into a (stupid) case of a wrong mount.cifs syntax:
root@focal:~# mount -t cifs //server/Share /mnt -o rw,user=domainmyuser,password=secret
mount error(13): Permission denied
Refer to the mount.cifs(8) manual page (e.g. man mount.cifs) and kernel log messages (dmesg)
Unfortunately, the additional output in dmesg is not helpful to figure out the problem:
root@focal:~# dmesg
[…]
[16444886.307684] CIFS: Attempting to mount //server/Share
[16444886.307717] No dialect specified on mount. Default has changed to a more secure dialect, SMB2.1 or later (e.g. SMB3), from CIFS (SMB1). To use the less secure SMB1 dialect to access old servers which do not support SMB3 (or SMB2.1) specify vers=1.0 on mount.
[16444886.539770] Status code returned 0xc000006d STATUS_LOGON_FAILURE
[16444886.539795] CIFS VFS: \server Send error in SessSetup = -13
[16444886.539901] CIFS VFS: cifs_mount failed w/return code = -13
After additional try and errors (and looking up a recent share mount from the history), the problem turned out to be the user=domainmyuser syntax. This way of combining the domain/workgroup and the username is not working (anymore).
Note: Both user= and username= are accepted in the options.
Instead use:
root@focal:~# mount -t cifs «//server/Share» /mnt -o «user=myuser,password=secret,workgroup=DOMAIN»
root@focal:~# ll /mnt/
total 0
drwxr-xr-x 2 root root 0 Sep 1 2020 _Archiv
drwxr-xr-x 2 root root 0 Aug 9 12:10 Client
[..]
This way it worked.
Of course the password should not be used on the command line, so for the final (and automatic) mount of the share use the following entry in /etc/fstab:
root@focal:~# cat /etc/fstab
[…]
# Mount CIFS share from server
//server/Share /mnt cifs rw,relatime,vers=3.1.1,credentials=/etc/samba/servershare.conf,uid=0 0 0
Where /etc/samba/servershare.conf contains the credentials:
root@focal:~# cat /etc/samba/servershare.conf
user=myuser
password=secret
domain=DOMAIN
Add a comment
Show form to leave a comment
Comments (newest first)
Edgardo Pannunzio (KERNEL Consultores) from Uruguay wrote on Feb 9th, 2023:
Thanks very much !!
Your post was really helpful.
Ed from wrote on Jan 27th, 2023:
In my case (mounting win 2019 share in RHEL9) when using double apostrophe: «user=myuser…» was outputing:
«bash: !,workgroup=$MY_DOMAIN: event not found»
Switching to single apostrophe ‘user=mysers…’ did the trick
ck from Switzerland wrote on Nov 29th, 2022:
Keith, make sure you have the cifs-utils and smbclient packages installed on your Ubuntu. Still an error? Try to connect to the share using the smbclient command. It could also be a SMB protocol mismatch. Check out this article, describing Samba protocol configuration on the client.
Keith from United States wrote on Nov 29th, 2022:
I’ve tried for the past 3 hours, 5AM in the morning now, and I’ve tried everything from every other website and this one and still get the exact same errors. Tried it with just sudo, then root. Same thing. Host OS is ubuntu server trying to mount a network share from my Synology NAS.
AJav from wrote on Sep 19th, 2022:
very good, Thanks !
simonpunk2016 from wrote on Aug 1st, 2022:
Thank you sir, never know the mount option has changed, because I just successfully mounted the cifs last month, thought my Manjaro has come to an end.
simonpunk2016 from wrote on Jul 29th, 2022:
Thank you sir, never know the mount option has changed, because I just successfully mounted the cifs last month, thought my Manjaro has come to an end.
Jesko from wrote on Feb 10th, 2022:
I had exact the same error, but different reason. On a freshly installed (old) Ubuntu 16.04 LTS (last 32Bit version). My reason was: There was no cifs-utils installed! so «sudo apt install cifs-utils» was the solution. I just write here because I crawled through hundreds of comments.

This error was appeared in one of the Linux Ubuntu Server when I was trying to mount a Windows File Share to save some files.
The fix to the issue was quite an easy task, but can be a time consuming work when you are running with a busy schedule. I thought to share this with my followers and I hope this will help you to save some valuable time for your work.
I was trying to mount the File Share with the below command.
techc_admin@TCVM-01:~$ sudo mount -t cifs //techcrumblerg01diag.file.core.windows.net/tcfileshare-01 /mnt/TCFileShare/ -o vers=3.0,username=<username>,password=<password>,dir_mode=0777,file_mode=0777,serverino                            mount error(13): Permission denied
Refer to the mount.cifs(8) manual page (e.g. man mount.cifs)
I forgot to add “sec=ntlmssp” parameter to the command, so the complete command would be something similar to this.
sudo mount -t cifs //techcrumblerg01diag.file.core.windows.net/tcfileshare-01 /mnt/TCFileShare/ -o vers=3.0,username=<username>,password=<password>,dir_mode=0777,file_mode=0777,serverino,sec=ntlmssp
Sample Command which I executed when I connect Azure File Share to an Ubuntu Server.

What Is “sec=ntlmssp”
“sec” is the security mode and it define how the passwords are encrypted between Client and the Server.
“ntlmssp” stands for “NT LAN Manager Security Support Provider” is the binary messaging protocol for a Microsoft Security Support Provider Interface (MSSPI). It is the stream which provide the NTLM challenge-response authentication for the communication.
NTLMSSP is used when there is a SSPI authentication for SMB (Server Message Block) or CIFS (Common Internet File System) access in place.
Click to rate this post!
[Total: 22 Average: 4.9]

Aruna Lakmal
Associate Technical Specialist, Sri Lanka. Technology junky, enthusiast, a VMware vExpert and a blogger with more than 8 years of Experience in Virtualization and Cloud Native technologies.
Get Updates Directly To Your Inbox!
- Печать
Страницы: [1] 2 Все Вниз

Тема: Уважаемые знатоки, помогите замонтить ресурс Windows Server 2003 на Ubuntu 13,04 (Прочитано 10320 раз)
0 Пользователей и 1 Гость просматривают эту тему.

Antiseptik

Есть сервер Windows Server 2003. На нём есть расшаренный сетевой ресурс. Мне нужно смонтировать этот сетевой ресурс на ПК с linux Ubutu 13.04, что, собственно говоря, у меня и не получается.
Допустим: IP сервака-192.168.0.1, расшаренный сетевой ресурс на нём (сетевая папка)-1Cbase
Путь, куда монтирую на Ubutu — /home/buhg/Base1C
Монтирую так (пока только через терминал — для проверки):
sudo mount -t cifs //192.168.0.1/1Cbase /home/buhg/Base1C -o username=buhg/WORKGROUP%123456,iocharset=utf8,rw,file_mode=0777,dir_mode=0777
и так:
sudo mount -t cifs //192.168.0.1/1Cbase /home/buhg/Base1C -o username=buhg,password=123456,iocharset=utf8,rw,file_mode=0777,dir_mode=0777
и даже через mount.gifs пробовал и другие разные комбинации. Никакие танцы с бубнами не помогают=(.
Если просто набрать, чтобы потом попросил паролики:
sudo mount -t cifs //192.168.0.1/1Cbase /home/buhg/Base1C -o username=buhg
Потом попросит паролик. Ввожу. И вижу тоже самое, что и с предыдущими способами:
mount error(13): Permission denied
Refer to the mount.cifs( 8)manual page (e.g. man mount.cifs)
Что самое интересное, если монтировать сетевой ресурс с win XP подобными командами, то всё замечательно монтируется.
Уже вертел права пользователя, службы, политики безопасности и вкривь, и вкось на серваке-ничего не получается. Никаких доменов на серваке не установлено. Простая сетка и всё. Перепробовал уйму способов, что нашёл и инете — результат отрицательный, поэтому и обращаюсь к Вам за помощью.
« Последнее редактирование: 07 Ноября 2013, 11:20:58 от Antiseptik »
oermolaev
Antiseptik
Да я уже там был, вообщем перепробовал всё, что описано относительно терминала, но ничего так и не помогло. Если у меня в терминале получится, то и через fstab я по-идее смонтирую, наверное. Или я ошибаюсь? Хотя, мне бы хотя-бы так для начала.
Я что-то не так делаю, а что — понять не могу. Неделю бьюсь с этим вопросом.
Давайте поподробней.
На сервере под управлением Windows Server 2003. Его IP: 192.168.0.1. Рабочая группа: WORKGROUP. На серваке есть встроенная учётная запись: «администратор». Добавил туда дополнительную учётку Buhg в «локальные пользователи и группыПользователи«. Включил данную учётку на всякий случай в группу «администраторы«.
Расшарил папку на серваке 1Cbase. На неё дал следующие права доступа: Доступ на измнение т.е. чтение и запись дал ВСЕМ и пользователю buhg отдельно на тоже самое.
Есть ПК под управлением linux Ubuntu 13.04, на который будем монтировать. Пользователь: buhg. Рабочая группа: WORKGROUP
Дальше (в первом случае) запускаю терминал и ввожу следующее:
sudo mount -t cifs //192.168.0.1/1Cbase /home/buhg/Base1C -o username=buhg,password=123456,iocharset=utf8,rw,file_mode=0777,dir_mode=0777
где:
//192.168.0.1/1Cbase — шара на сервере
/home/buhg/Base1C — куда монтирую
cifs — Common Internet File System
rw — чтение запись
user=buhg,password=123456 — пользователь, пароль.
iocharset=utf8 — кодировка
file_mode=0777,dir_mode=0777 — права доступа
————
Вся трабла в том, что если брать в качестве сервака Windows XP, то всё монтируется. А вот под Windows Server 2003 — нет.
Может мне что-то дописать надо?
« Последнее редактирование: 07 Ноября 2013, 15:03:22 от Antiseptik »
oermolaev
Может мне что-то дописать надо?
Может наоборот, убрать всё лишнее и добиться результата, а потом уже добавлять разные примочки?
Сейчас у себя монтирую раздел на win2003:
# mount -t cifs //192.168.0.21/D$ /mnt/test -o username=admin
Всё ОК!
А ошибка
mount error(13): Permission denied
Refer to the mount.cifs( 8)manual page (e.g. man mount.cifs)
возникает когда ввожу заведомо не правильный пароль.
Antiseptik
Спасибо большое, что Вы мне помогаете.
Да, действительно, ошибка возникает на пароле, но вот почему, пока не ясно.
По Вашему примеру учётка «admin» — это учётка, созданная в «локальные пользователипользователи» на сервере и она не является встроенной учётной записью? Я правильно понял? Ей соответствует определённый пароль допустим.
Если да, то у меня тоже на сервре создана учётка buhg и ей соответствует допустим пароль 123456, который я задал.
Набираю в терминале:
sudo mount -t cifs //192.168.0.1/1Cbase /home/buh1/Base1C -o username=buhg
он запрашивает 1 раз
password:
набираю: 123456
и снова та же ошибка.
Пользователь решил продолжить мысль 07 Ноября 2013, 16:17:11:
может у меня трабла в расшаренном сетевом ресурсе?
« Последнее редактирование: 07 Ноября 2013, 16:18:19 от Antiseptik »
oermolaev
Antiseptik,
может… Ну попробуйте смонтировать через административный ресурс. что то типа: //192.168.0.1/c$/1Cbase
хотя у меня и шара монтируется от обычного пользователя:
mount -t cifs //192.168.0.21/Bases /mnt/test -o username=oermolaev
так что у вас скорее всего проблема со стороны windows, типа «Общий доступ и безопасность» надо посмотреть.
« Последнее редактирование: 07 Ноября 2013, 16:45:18 от oermolaev »
Antiseptik
создал на серваке папку 1с. Дал доступ. Права и разрешения не раздавал. Ощий ресурс определён как 1с$.
Набираю в терминале:
sudo mount -t cifs //192.168.0.1/1c$ /home/buhg/Base1C -o username=buhg
Так?
попросил пароль 2 раза. в обоих случаях ввёл 123456
та же ошибка. Что-то не соображаю уже
Пользователь решил продолжить мысль 07 Ноября 2013, 17:19:39:
1й раз спросил собственно пароль на машине с Ubuntu
2й раз спросил пароль на учётке buhh на серваке
попробовал через самбу зайти, через графический интерфейс. выдало окно ауинтификации. логин: Buhg, Раб. группа: WORKGROUP, пароль набрал: 123456. зашёл нормально.
« Последнее редактирование: 07 Ноября 2013, 17:19:39 от Antiseptik »
oermolaev
Antiseptik,
может пароль у вас там какой хитрый — попробуйте через файл credentials= авторизовываться
Пользователь решил продолжить мысль 07 Ноября 2013, 17:23:56:
1й раз спросил собственно пароль на машине с Ubuntu
2й раз спросил пароль на учётке buhh на серваке
а вот в этом я уже не уверен. Что то у меня тоже спросили два раза пароль, однако, оба раза это был вопрос от сервера..
про повторном монтировании уже спрашивает один раз… 
« Последнее редактирование: 07 Ноября 2013, 17:26:51 от oermolaev »
Antiseptik
Мне право, очень не удобно Вас просить, но не могли бы Вы сверить мои пиолитики безопасности со ссвоими, если у вас тоже winserver 2003.
вот мои.
Ну или скиньте мне свою пожалуйста на мыло Antiseptik@mail.ru
Пользователь решил продолжить мысль 08 Ноября 2013, 12:17:14:
Попробую перебить систему с «нуля», без добавления ролей сервера. Может быть поможет=))
« Последнее редактирование: 08 Ноября 2013, 12:17:14 от Antiseptik »
oermolaev
Antiseptik,
«перебить» — новое для меня слово 
Вы хотите сервер 2003 заново поднять? Может в VirtualBox попробовать сперва?
Antiseptik
Здравствуйте, спасибо за инфу о политиках безопасности.
О виртульной машине как-то не додумался. Систему установил заново, но параметры «локальной политики безопасности» не такие, как у Вас. У меня очень мало параметров установлено как «не определно», остальные «вкл/откл». Привести их к такому виду, как у Вас не получается. Или «вкл», или «откл».
В «локальных пользователях» создал пользователя buhg с паролем buhg. Дал доступ на папку 1с. В разрешениях на папку дал доступ ВСЕМ на чтение и запись.
Набираю команду в терминале:
sudo mount -t cifs //192.168.0.1/1c /home/buhg/Base1C -o username=buhg
спрашивает пароль 1й раз.
набираю пароль 1 й раз с ПК на Ubuntu: buhg
спрашивает пароль 2й раз.
набираю пароль 2й раз локального польщователя на сервере: buhg
курсор игает продолжительное время.
после выдаётся ошибка, но уже другая: mount error(115): Operation now in progress
Сейчас ищу на просторах интернет, что это за ошибка и что сней делать
Пользователь решил продолжить мысль 08 Ноября 2013, 14:24:30:
отключил брандмауэр на сервере.
sudo mount -t cifs //192.168.0.1/1c /home/buhg/Base1C -o username=buhg
спрашивает пароль 1й раз.
набираю пароль 1 й раз с ПК на Ubuntu: buhg
спрашивает пароль 2й раз.
набираю пароль 2й раз локального польщователя на сервере: buhg
после выдал страую ошибку: mount error(13): Permission denied
« Последнее редактирование: 08 Ноября 2013, 14:25:41 от Antiseptik »
oermolaev
Antiseptik,
ну вот, сделал это за вас: установил в VirtualBox Microsoft Windows Server 2003 R2 Standard Edition Service Pack 2 ни вводя регистрационного кода, ни вводя в домен, ни заводя никаких юзеров. Всё по умолчанию. Только пароль администратора задал. Сетевой адрес виртуальная машина получила по dhcp через сетевой мост.
так вот, по команде из хостовой машины:
$ sudo mount -t cifs //192.168.0.218/c$ /mnt/test -o username=Администраторвесь диск гостя успешно смонтировался:
$ ls /mnt/test/
AUTOEXEC.BAT  Documents and Settings  ntldr                      WINDOWS
bootfont.bin  IO.SYS                  pagefile.sys               wmpub
boot.ini      MSDOS.SYS               Program Files
CONFIG.SYS    NTDETECT.COM            System Volume Information
Chibiko
Пропишите в /etc/fstab
//192.168.0.1/1c /home/buhg/Base1C cifs username=buhg,password=123456,iocharset=utf8,file_mode=0777,dir_mode=0777 0 0Подключайте
mount -aДолжно сработать.
AnrDaemon
Хотите получить помощь? Потрудитесь представить запрошенную информацию в полном объёме.
Прежде чем [Отправить], нажми [Просмотр] и прочти собственное сообщение. Сам-то понял, что написал?…
Antiseptik
Поставил чистый пакет Ubuntu 13.10. Теперь при монтировании выдаётся ссобщение: «mount: невозможно примонтировать блочное устройство //192.168.0.12/1c только для чтения». Буду чесать репу дальше
Пользователь решил продолжить мысль 11 Ноября 2013, 12:52:14:
поменял уже ай-пишники и имена ПК и юзеров.
buh1@Buh1:~$ sudo mount -t cifs //192.168.50.2/1c /home/buh1/Base1C -o username=buh1
[sudo] password for buh1:
Password for buh1@//192.168.50.2/1c:
mount error(13): Permission denied
Refer to the mount.cifs( 8 ) manual page (e.g. man mount.cifs)
Пользователь решил продолжить мысль 11 Ноября 2013, 14:05:58:
Таки проблема с Windows Server 2003 R2. Пока не знаю где, разбираюсь. Потому как если монтит с WinXP — всё прекрастно моунтится
Пользователь решил продолжить мысль 11 Ноября 2013, 18:54:25:
1. Вообщем нашёл такую штуку, как отключение проверки SMB-пакетов на сервере: http://support.microsoft.com/kb/887429/ru
2. В локальных политиках безопасности «Сетевой доступ: модель совместного доступа и безопасности для локальных учетных записей» включил гостевой режим.
И как бы всё заработало, даже без проверки пароля на серваке (но скорее всего из-за второго пункта). Это, конечно, не решение моей проблемы, но даст мне время и возможность ещё подумать над этим…
Завтра буду пробовать автоматом маунтить черех фстаб=))
« Последнее редактирование: 11 Ноября 2013, 18:54:25 от Antiseptik »
- Печать
Страницы: [1] 2 Все Вверх
Contents
- Prerequisites
- CIFS installation
- Mounting unprotected (guest) network folders
-
Mount password protected network folders
- Special permissions
- Mount password protected shares using libpam_mount (Ubuntu 9.04)
-
Troubleshooting
- Login errors
- Unprotected network folder won’t automount
- Mount during login instead of boot
- Slow shutdown due to a CIFS/Network Manager bug
- CIFS Options Deprecated
- Use of tilde in pathnames such as «credentials=~/.smbcredentials»
This document describes how to mount CIFS shares permanently. The shares might be hosted on a Windows computer/server, or on a Linux/UNIX server running Samba. This document also applies to SMBFS shares, which are similar to CIFS but are deprecated and should be avoided if possible (link).
(This document does not describe how to host the shares yourself, only how to access shares that are hosted somewhere else. For hosting shares, use Samba.)
Prerequisites
We’re assuming that:
- Network connections have been configured properly.
-
Your local (Ubuntu) username is ubuntuusername.
-
Share username on Windows computer is msusername.
-
Share password on Windows computer is mspassword.
-
The Windows computer’s name is servername (this can be either an IP address or an assigned name).
-
The name of the share is sharename.
-
You want to mount the share in /media/windowsshare.
CIFS installation
sudo apt-get install cifs-utils
On older systems:
sudo apt-get install smbfs
Mounting unprotected (guest) network folders
First, let’s create the mount directory. You will need a separate directory for each mount.
sudo mkdir /media/windowsshare
Then edit your /etc/fstab file (with root privileges) to add this line:
//servername/sharename /media/windowsshare cifs guest,uid=1000,iocharset=utf8 0 0
Where
-
guest indicates you don’t need a password to access the share,
-
uid=1000 makes the Linux user specified by the id the owner of the mounted share, allowing them to rename files,
-
iocharset=utf8 allows access to files with names in non-English languages. This doesn’t work with shares of devices like the Buffalo Tera Station, or Windows machines that export their shares using ISO8895-15.
-
If there is any space in the server path, you need to replace it by 40, for example //servername/My40Documents
After you add the entry to /etc/fstab type:
sudo mount -a
This will (re)mount all entries listed in /etc/fstab.
Mount password protected network folders
The quickest way to auto-mounting a password-protected share is to edit /etc/fstab (with root privileges), to add this line:
//servername/sharename /media/windowsshare cifs username=msusername,password=mspassword,iocharset=utf8 0 0
This is not a good idea however: /etc/fstab is readable by everyone and so is your Windows password in it. The way around this is to use a credentials file. This is a file that contains just the username and password.
Using a text editor, create a file for your remote servers logon credential:
gedit ~/.smbcredentials
Enter your Windows username and password in the file:
username=msusername
password=mspassword
Save the file, exit the editor.
Change the permissions of the file to prevent unwanted access to your credentials:
chmod 600 ~/.smbcredentials
Then edit your /etc/fstab file (with root privileges) to add this line (replacing the insecure line in the example above, if you added it):
//servername/sharename /media/windowsshare cifs credentials=/home/ubuntuusername/.smbcredentials,iocharset=utf8 0 0
Save the file, exit the editor.
Finally, test the fstab entry by issuing:
sudo mount -a
If there are no errors, you should test how it works after a reboot. Your remote share should mount automatically.
Special permissions
If you need special permission (like chmod etc.), you’ll need to add a uid (short for ‘user id’) or gid (for ‘group id’) parameter to the share’s mount options.
//servername/sharename /media/windowsshare cifs uid=ubuntuuser,credentials=/home/ubuntuuser/.smbcredentials,iocharset=utf8 0 0
In addition to the initial assumptions, we’re assuming that
-
Your username and password are the same on the Ubuntu machine and on the network drive.
Install libpam-mount:
sudo apt-get install libpam-mount
Edit /etc/security/pam_mount.conf.xml using your preferred text editor.
gksudo gedit /etc/security/pam_mount.conf.xml
First, we’re moving the user specific config bits to a file which users can actually edit themselves: remove the commenting tags (<!— and —>) surrounding the section called <luserconf name=».pam_mount.conf.xml» />. Save the file when done. With this in place, users can create their own ~/.pam_mount.conf.xml.
gedit ~/.pam_mount.conf.xml
Add the following:
<?xml version="1.0" encoding="utf-8" ?>

<pam_mount>

<volume options="uid=%(USER),gid=100,dmask=0700" user="*" mountpoint="/media/windowsshare" path="sharename" server="servername" fstype="cifs" />

</pam_mount>
Troubleshooting
Login errors
If you get the error «mount error(13) permission denied», then the server denied your access. Here are the first things to check:
- Are you using a valid username and password? Does that account really have access to this folder?
-
Do you have whitespace in your credentials file? It should be password=mspassword, not password = mspassword.
-
Do you need a domain? For example, if you are told that your username is SALESsally, then actually your username is sally and your domain is SALES. The fstab entry should read: …username=sally,password=pass,domain=SALES,… Or: …credentials=/path/to/file,domain=SALES,…
-
The security and version settings are interrelated. SMB1 is insecure and no longer supported by default. At first, try to not specify either security or version: do not specify sec= or vers=. If you still have authentication errors then you may need to specify either sec= or vers= or both. You can try the options listed at the mount.cifs man page. The man page list leaves out the option sec=lanman for some reason, but you should try that one as well (see discussion).
Unprotected network folder won’t automount
I’ve had a situation where an unprotected network folder wouldn’t automount during bootup, but after manually entering «sudo mount -a» was mounted correctly. I solved this by replacing the «guest» option by «username=guest,password=». If anyone has an explanation for this, please leave a comment.
//servername/sharename /media/windowsshare smbfs username=guest,password=,uid=1000,iocharset=utf8,codepage=unicode,unicode 0 0
Mount during login instead of boot
If for some reason/etc/rc0.d/S31umountnfs.sh (networking problems for example) the automatic mounting during boot doesn’t work, you can add the «noauto» parameter to your smbfs fstab entry and then have the share mounted at login.
In /etc/fstab:
//servername/sharename /media/windowsshare cifs noauto,credentials=/home/ubuntuusername/.smbpasswd 0 0
In /etc/rc.local:
mount /media/windowsshare
exit 0
Slow shutdown due to a CIFS/Network Manager bug
If you use Network Manager, and are getting really slow shutdowns, it’s probably because NM shuts down before unmounting the network shares. That will cause CIFS to hang and wait for 60 seconds or so. Here’s how to fix it:/etc/rc0.d/S31umountnfs.sh
sudo ln -s /etc/init.d/umountnfs.sh /etc/rc0.d/K14umountnfs.sh
sudo ln -s /etc/init.d/umountnfs.sh /etc/rc6.d/K14umountnfs.sh
Ubuntu 12.04 already runs umountnfs.sh at reboot and shutdown by default (/etc/rc0.d/S31umountnfs.sh and /etc/rc6.d/S31umountnfs.sh) so this is no longer necessary.
CIFS Options Deprecated
20 Feb 2008 TW
Using dmask or fmask in the fstab file produces the following warnings: WARNING: CIFS mount option ‘dmask’ is deprecated. Use ‘dir_mode’ instead. WARNING: CIFS mount option ‘fmask’ is deprecated. Use ‘file_mode’ instead.
Instead use this format: file_mode=0777,dir_mode=0777 . Or in some cases you might need to use file_mode=0777,dir_mode=0777,nounix (see discussion)
Use of tilde in pathnames such as «credentials=~/.smbcredentials»
20 Feb 2008 TW
Curiously, using credentials=~/.smbcredentials in fstab didn’t work. I had to use the full path, i.e. /home/username/.smbcredentials
(This is likely because the tilde «~» is only a shell short-hand alias for «$HOME»; it isn’t something recognized system-wide by all programs, especially not in a system file table where the concept of «HOME» doesn’t really exist. -Ian!)
CategoryDocumentation