![]()
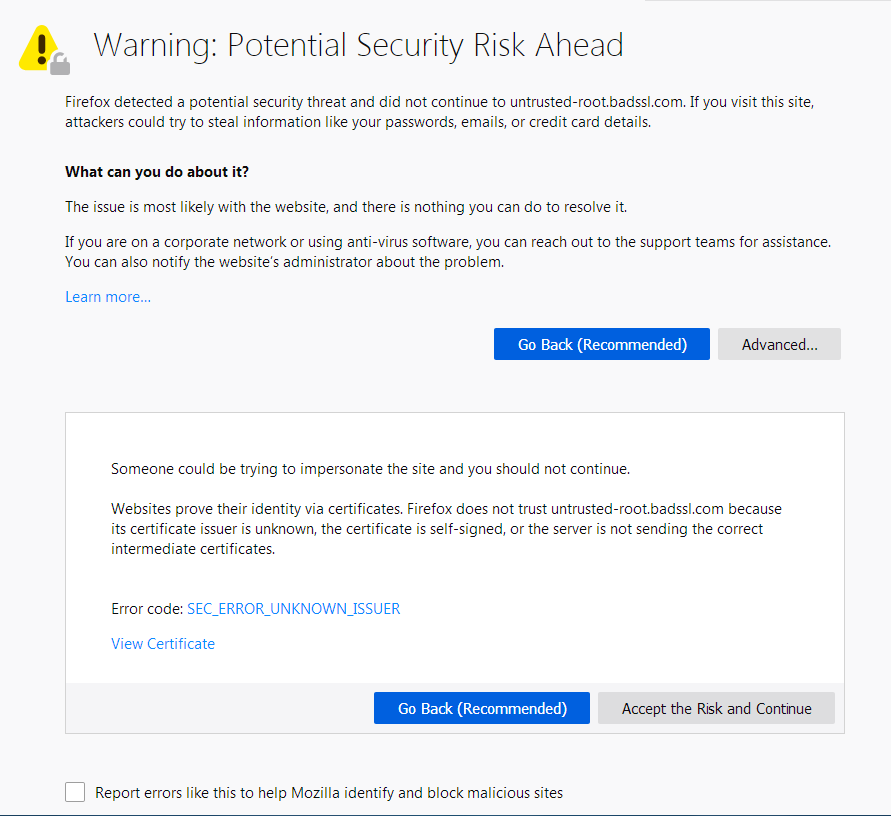
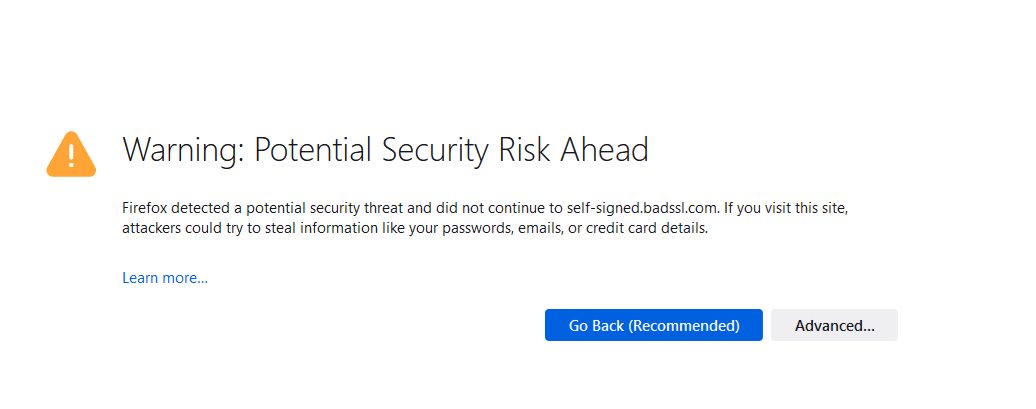
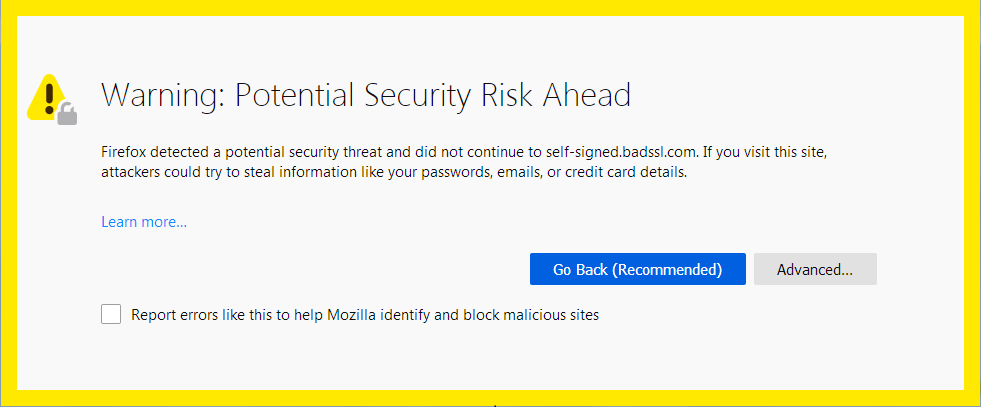
На веб-сайтах, соединение с которыми должно быть защищено (адрес начинается с «https://»), Firefox должен удостовериться, что сертификат, предоставленный веб-сайтом, является действительным. Если сертификат проверить невозможно, Firefox прекратит подключение к веб-сайту и отобразит вместо этого страницу с ошибкой «Предупреждение: потенциальная угроза безопасности». Щёлкнув по кнопке Подробнее, вы можете увидеть конкретную ошибку, обнаруженную Firefox.
В этой статье объясняется, почему вы можете видеть коды ошибок «SEC_ERROR_UNKNOWN_ISSUER», «MOZILLA_PKIX_ERROR_MITM_DETECTED» или «ERROR_SELF_SIGNED_CERT» на веб-сайтах и как её устранить.
Оглавление
- 1 Что означает этот код ошибки?
- 2 Ошибка появляется на множестве защищённых сайтов
- 2.1 Антивирусные продукты
- 2.1.1 Avast/AVG
- 2.1.2 Bitdefender
- 2.1.3 Bullguard
- 2.1.4 ESET
- 2.1.5 Kaspersky
- 2.2 Настройки Family Safety в учётных записях Windows
- 2.3 Наблюдение/фильтрация в корпоративных сетях
- 2.4 Вредоносные программы
- 2.1 Антивирусные продукты
- 3 Ошибка появляется только на конкретном сайте
- 3.1 Сертификат выпущен центром, принадлежащим Symantec
- 3.2 Отсутствует промежуточный сертификат
- 3.3 Самоподписанный сертификат
- 3.4 Обход предупреждения
Что означает этот код ошибки?
Во время защищённого соединения веб-сайту необходимо представить сертификат, выпущенный доверенным центром сертификации, для того, чтобы Firefox убедился, что пользователь подключен к необходимому сайту и соединение является зашифрованным. Если вы щёлкните по кнопке Дополнительно на странице с ошибкой «Предупреждение: потенциальная угроза безопасности» и видите код ошибки «SEC_ERROR_UNKNOWN_ISSUER» или «MOZILLA_PKIX_ERROR_MITM_DETECTED», это означает, что представленный сертификат был издан центром сертификации, который не известен Firefox, и поэтому ему нельзя доверять по умолчанию.
Ошибка появляется на множестве защищённых сайтов
Если вы сталкиваетесь с этой проблемой на множестве не связанных друг с другом HTTPS-сайтов, это указывает на то, что что-то в вашей системе или сети перехватывает ваше соединение и внедряет сертификаты способом, которому не доверяет Firefox. В большинстве случаев зашифрованные соединения сканирует антивирусное программное обеспечение или слушает вредоносная программа и подменяет легитимные сертификаты веб-сайтов на свои собственные. В частности, код ошибки «MOZILLA_PKIX_ERROR_MITM_DETECTED» показывает, что Firefox обнаружил перехват соединения.
Антивирусные продукты
Стороннее антивирусное программное обеспечение может вмешиваться в защищённые соединения Firefox. Вы можете попробовать переустановить его, что может привести к тому, что программное обеспечение снова поместит свои сертификаты в доверенное хранилище Firefox.
Мы рекомендуем удалить ваше стороннее программное обеспечение и использовать вместо этого защитное программное обеспечение, предлагаемое Microsoft для Windows:
- Windows 8 и Windows 10 — Защитник Windows (встроен)
Если вы не хотите удалять своё стороннее программное обеспечение, вы можете попробовать его переустановить, что может заставить программное обеспечение расположить свои сертификаты в доверенное хранилище Firefox снова.
Ниже описаны некоторые альтернативные решения, которые вы можете попробовать:
Avast/AVG
В антивирусных продуктах Avast или AVG вы можете отключить перехват защищённых соединений:
- Откройте настройки вашего приложения Avast или AVG.
- Перейдите в и щёлкните > > .
- Прокрутите вниз до раздела настроек и щёлкните по .
- Снимите флажок рядом с и подтвердите это, нажав OK.
-
В более старых версиях продукта вы найдёте соответствующий параметр перейдя через > > и щёлкнув Настроить рядом с
-
Для получения дополнительной информации прочитайте статью Управление HTTPS-сканированием в Web Shield в антивирусе Avast на сайте поддержки Avast. Дополнительная информация об этой функции доступна на этой странице Блога Avast.
Bitdefender
В антивирусных продуктах Bitdefender вы можете отключить перехват защищённых соединений:
- Откройте настройки вашего приложения Bitdefender.
- Перейдите к меню и в разделе щёлкните по .
- Отключите параметр Сканирование защищённого соединения.
-
В более старых версиях продукта вы найдёте соответствующий параметр как Сканирование SSL после перехода через >
-
В Bitdefender Antivirus Free этот параметр невозможно изменить. Вместо этого вы можете попробовать восстановить или удалить программу, если у вас возникли проблемы с доступом к защищённым веб-сайтам.
Для корпоративных продуктов Bitdefender, пожалуйста, обратитесь к этой странице Центра поддержки Bitdefender.
Bullguard
В продуктах безопасности Bullguard можно отключить перехват защищённых соединений на конкретных крупных сайтах, таких как Google, Yahoo и Facebook:
- Откройте панель вашего приложения Bullguard.
- Щёлкните по и включите Расширенный просмотр в правой верхней части панели.
- Перейдите к > .
- Снимите флажок с параметра для тех сайтов, на которых отображается сообщение об ошибке.
ESET
В антивирусных продуктах ESET вы можете попробовать отключить и повторно включить фильтрацию SSL/TLS-протокола или полностью отключить перехват защищённых подключений, как описано в статье справки ESET.
Kaspersky
Пострадавшие пользователи Kaspersky, должны обновиться до последней версии их продукта безопасности, например до Kaspersky 2019 и выше, которая уменьшает риски этой проблемы. Страница обновления продукта Kaspersky содержит ссылки «обновить», которые бесплатно установят последнюю версию для пользователей с текущей подпиской.
В противном случае, вы можете также отключить перехват защищённых соединений:
- Откройте настройки вашего приложения Kaspersky.
- Нажмите на снизу слева.
- Щёлкните и затем .
- В разделе отметьте флажок Не сканировать зашифрованные соединения и подтвердите это изменение.
- Перезапустите вашу систему, чтобы изменения вступили в силу.
Настройки Family Safety в учётных записях Windows
В учётных записях Microsoft Windows, защищённых настройками Family Safety, защищённые соединения на таких популярных веб-сайтах, как Google, Facebook и Youtube могут перехватываться, а их сертификаты подменяются сертификатами, изданными Microsoft для фильтрации и записи поисковых запросов.
Ознакомьтесь с этой страницей Microsoft ЧаВо, чтобы узнать, как отключить эти компоненты семьи для учётных записей. В случае, если вы хотите вручную установить отсутствующие сертификаты для проблемных учётных записей, вы можете обратиться к этой справочной статье Microsoft.
Наблюдение/фильтрация в корпоративных сетях
Некоторые продукты для наблюдения/фильтрации трафика, использующиеся в корпоративных окружениях, могут перехватывать зашифрованные соединения, подменяя сертификат веб-сайта своим собственным, что может при этом вызывать ошибки на защищённых HTTPS-сайтах.
Если вы подозреваете, что это ваш случай, свяжитесь, пожалуйста, с вашим ИТ-отделом, чтобы узнать, как корректно настроить Firefox для того, чтобы он правильно работал в таком окружении, поскольку необходимый сертификат, возможно, должен быть сначала помещён в хранилище доверенных сертификатов Firefox. Дополнительную информацию для ИТ-отделов о том, что необходимо для этого сделать, можно найти на странице Mozilla Wiki CA:AddRootToFirefox.
Вредоносные программы
Некоторые виды вредоносных программ, перехватывающих зашифрованный веб-трафик, могут вызывать подобное сообщение об ошибке — обратитесь к статье Устранение проблем Firefox, вызванных вредоносными программами, чтобы узнать о том, как решить проблемы с вредоносными программами.
Ошибка появляется только на конкретном сайте
В том случае, если вы сталкиваетесь с этой проблемой только на конкретном сайте, этот тип ошибки обычно указывает на то, что веб-сервер сконфигурирован неправильно. Тем не менее, если вы видите эту ошибку на подлинных крупных сайтах, таких как Google или Фейсбук, или сайтах, на которых проводятся финансовые операции, вы должны выполнить действия, описанные выше.
Сертификат выпущен центром, принадлежащим Symantec
После множества выявленных сбоев с сертификатами, выпущенными корневыми центрами сертификации Symantec, производители браузеров, включая Mozilla, постепенно убирают доверие к этим сертификатам из своих продуктов. Firefox больше не доверяет серверам сертификатов, выпущенных Symantec, включая сертификаты, выпущенные под брендами GeoTrust, RapidSSL, Thawte и Verisign. Для получения дополнительной информации прочитайте это сообщение в блоге Mozilla.
Основной ошибкой будет MOZILLA_PKIX_ERROR_ADDITIONAL_POLICY_CONSTRAINT_FAILED, но на некоторых серверах вы можете увидеть вместо этого код ошибки SEC_ERROR_UNKNOWN_ISSUER.Когда вы попадаете через такой сайт, вы должны связаться с владельцами сайта для того, чтобы информировать их об этой проблеме.
Mozilla настоятельно рекомендует операторам затронутых сайтов провести незамедлительное действие по замене этих сертификатов. DigiCert предоставляет бесплатную замену сертификатов.
Отсутствует промежуточный сертификат
На сайте с отсутствующим промежуточным сертификатом вы увидите следующее описание ошибки после того, как щёлкните по Дополнительно на странице ошибки:
К сертификату нет доверия, так как сертификат его издателя неизвестен.
Сервер мог не отправить соответствующие промежуточные сертификаты.
Может понадобиться импортировать дополнительный корневой сертификат.
Сертификат веб-сайта мог не быть выдан доверенным центром сертификации, или не была предоставлена полная цепочка сертификатов до доверенного центра сертификации (отсутствует так называемый «промежуточный сертификат»).
Вы можете проверить, что сайт настроен правильно, введя адрес веб-сайта в инструмент стороннего производителя, например на тестовой странице SSL Labs. Если он возвращает результат «Chain issues: Incomplete», значит надлежащий промежуточный сертификат отсутствует.
Вам следует связаться с владельцами веб-сайта, на котором вы испытываете проблемы с доступом, чтобы сообщить им об этой проблеме.
Самоподписанный сертификат
На сайте с самоподписанным сертификатом вы увидите код ошибки ERROR_SELF_SIGNED_CERT и последующим описанием ошибки после того, как вы щёлкнете по Дополнительно на странице ошибки:
К сертификату нет доверия, так как он является самоподписанным.
К самоподписанному сертификату, который был выдан непризнанным центром сертификации, по умолчанию нет доверия. Самоподписанные сертификаты могут обеспечить защиту ваших данных от прослушивания, но они ничего не говорят о том, кто является получателем данных. Это характерно для интранет-сайтов, которые не доступны для широкой публики, и вы можете обойти предупреждение для таких сайтов.
Обход предупреждения
Предупреждение: Вам никогда не следует добавлять исключение сертификата для широко известных веб-сайтов или сайтов, где речь идёт о финансовых транзакциях — в этом случае недействительный сертификат может быть индикатором того, что ваше подключение скомпрометировано третьей стороной.
Если веб-сайт это допускает, вы можете обойти предупреждение для того, чтобы посетить сайт, несмотря на то, что сертификат не является доверенным по умолчанию:
- На странице с предупреждением щёлкните по кнопке Дополнительно.
- Щёлкните Подтвердить риск и продолжить.
Эти прекрасные люди помогли написать эту статью:

Станьте волонтёром
Растите и делитесь опытом с другими. Отвечайте на вопросы и улучшайте нашу базу знаний.
Подробнее
![]()
Что значит «Ваше соединение не защищено»?
Когда Firefox соединяется с защищённым веб-сайтом (URL начинается с «https://»), он должен убедиться, что серитификат, предоставленный этим веб-сайтом, действителен, и что уровень шифрования достаточен для обеспечения вашей приватности. Если он не в состоянии проверить это, Firefox прекратит соединение с веб-сайтом и покажет вам страницу ошибки с сообщением Предупреждение: Вероятная угроза безопасности.
Щёлкните по кнопке Дополнительно…, чтобы просмотреть код ошибки и другую информацию об ошибке. Распространённые ошибки описаны в этой статье.
Оглавление
- 1 Что делать, если вы видите эти ошибки?
- 2 MOZILLA_PKIX_ERROR _ADDITIONAL_POLICY_CONSTRAINT_FAILED
- 3 SEC_ERROR_EXPIRED_ISSUER_CERTIFICATE
- 4 SEC_ERROR_EXPIRED_CERTIFICATE
- 5 SEC_ERROR_UNKNOWN_ISSUER
- 6 MOZILLA_PKIX_ERROR_MITM_DETECTED
- 7 ERROR_SELF_SIGNED_CERT
- 8 SSL_ERROR_BAD_CERT_DOMAIN
- 9 SEC_ERROR_OCSP_INVALID_SIGNING_CERT
- 9.1 Повреждённое хранилище сертификатов
- 10 Игнорирование предупреждений
Что делать, если вы видите эти ошибки?
Если вы видите сообщение Предупреждение: Вероятная угроза безопасности, вы можете:
- Связаться с владельцем сайта и попросить их исправить сертификаты сайта.
- Щёлкнуть Вернуться назад (Рекомендовано) или посетить другой веб-сайт.
- Если вы находитесь в корпоративной сети или используете антивирусное программное обеспечение, свяжитесь с группой поддержки для помощи.
После просмотра кода ошибки и другой информации об ошибке нажмите кнопку «Принять риск и продолжить», чтобы загрузить сайт на свой страх и риск. Это добавит исключение безопасности для сертификата этого веб-сайта.
Внимание! Не заходите на веб-сайт, пока не поймёте причины предупреждения безопасности. Легальные публичные сайты не требуют добавления исключений безопасности для их сертификатов. Недействительный сертификат может быть индикатором того, что веб-страница вас обманет или украдёт ваши идентификационные данные.
MOZILLA_PKIX_ERROR _ADDITIONAL_POLICY_CONSTRAINT_FAILED
Эта ошибка указывает на то, что сертификат сайта не соответствовал политикам безопасности Программы сертификации Mozilla CA. Большинство браузеров, а не только Firefox, не доверяют сертификатам выпущенным GeoTrust, RapidSSL, Symantec, Thawte и VeriSign, потому что эти центры сертификации не следовали нормам безопасности в прошлом.
Владельцы сайта должны работать с их центром сертификации, чтобы исправить эту проблему политики. Программа сертификации Mozilla CA публикует список предстоящих политических действий, влияющих на центры сертификации, который содержит сведения, которые могут быть полезны для владельцев веб-сайтов.
Для получения дополнительной информации, посмотрите сообщение в Блоге Безопасности Mozilla Недоверие TLS сертификатам Symantec.
SEC_ERROR_EXPIRED_ISSUER_CERTIFICATE
Сертификат не будет действителен до даты (…)
В тексте ошибки также отображается текущая дата и время вашей системы. В случае, если они некорректные, установите системные часы на текущую дату и время (дважды щёлкните по значку часов на панели задач Windows), чтобы решить эту проблему. Подробнее об этом можно прочитать в статье поддержки Как устранить ошибки, связанные со временем, на защищённых сайтах.
SEC_ERROR_EXPIRED_CERTIFICATE
Сертификат закончился дата (…)
Эта ошибка возникает, когда срок сертификата идентификации веб-сайта закончился.
В тексте ошибки также отображается текущая дата и время вашей системы. В случае, если они некорректные, установите системные часы на текущую дату и время (дважды щёлкните по значку часов на панели задач Windows), чтобы решить эту проблему. Подробнее об этом можно прочитать в статье поддержки Как устранить ошибки, связанные со временем, на защищённых сайтах.
SEC_ERROR_UNKNOWN_ISSUER
Сертификат не является доверенным, так как сертификат эмитента неизвестен.
Сервер не может отправлять соответствующие промежуточные сертификаты.
Возможно, придётся импортировать дополнительный корневой сертификат.
Дополнительную информацию об этой ошибке прочитайте в статье поддержки Как устранить ошибку с кодом «SEC_ERROR_UNKNOWN_ISSUER» на защищённых веб-сайтах.
MOZILLA_PKIX_ERROR_MITM_DETECTED
Сертификат не является доверенным, так как сертификат эмитента неизвестен.
Сервер не может отправлять соответствующие промежуточные сертификаты.
Возможно, придётся импортировать дополнительный корневой сертификат.
MOZILLA_PKIX_ERROR_MITM_DETECTED является частным случаем кода ошибки SEC_ERROR_UNKNOWN_ISSUER, когда обнаружена атака человек-в-середине.
Возможно у вас включено сканирование SSL в программном обеспечении безопасности, таком как Avast, BitDefender, Eset или Kaspersky. Попробуйте отключить этот параметр. Более подробную информацию можно найти в статье поддержки Как устранить ошибку с кодом «SEC_ERROR_UNKNOWN_ISSUER» на защищённых веб-сайтах.
Вы также можете увидеть это сообщение об ошибке на крупных сайтах, таких как Google, Facebook, YouTube и других учётных записях пользователей Windows, защищённых семейными настройками Microsoft. Информацию о том, как включить такие настройки для конкретного пользователя, можно найти в статье поддержки Майкрософт Удаление участников из семейной группы?.
ERROR_SELF_SIGNED_CERT
Этот сертификат не является доверенным, потому что он самоподписан.
Самоподписанные сертификаты сохранят ваши данные в безопасности от перехвата, но ничего не скажут о том, кто получатель данных. Это характерно для интранет-сайтов, которые не являются общедоступными, и вы можете обойти предупреждение для таких сайтов. Более подробную информацию можно найти в статье поддержки Как устранить ошибку с кодом «SEC_ERROR_UNKNOWN_ISSUER» на защищённых веб-сайтах.
SSL_ERROR_BAD_CERT_DOMAIN
Firefox не доверяет этому сайту, поскольку он использует сертификат, который не является допустимым для данного конкретного сайта. Информация, передаваемая через этот сайт может оказаться под угрозой, поэтому лучше всего для вас связаться с владельцами веб-сайта, чтобы исправить эту проблему.
SEC_ERROR_OCSP_INVALID_SIGNING_CERT
Сайт не правильно настроен и провалил проверку безопасности. Если вы посещаете этот сайт, злоумышленники могут попытаться украсть вашу личную информацию, такую как пароли, электронные письма или данные кредитной карты.
Эта проблема на стороне веб-сайта и вы ничего не можете сделать, чтобы решить её. Вы можете сообщить администратору сайта об этой проблеме.
Повреждённое хранилище сертификатов
Вы также можете увидеть сообщения об ошибке сертификата, когда файл cert9.db в папке профиля, который хранит ваши сертификаты, может быть повреждён. Попробуйте удалить этот файл при закрытом Firefox, чтобы восстановить его:
Примечание: Вы должны выполнять эти шаги только в крайнем случае, после того, как все другие шаги по устранению неполадок не дали результатов.
-
Откройте папку вашего профиля:
- Нажмите кнопку меню
 , выберите , а затем — .В меню выберите . Откроется вкладка «Информация для решения проблем».
- В разделе «Сведения о приложении» рядом с надписью «ПапкаКаталог профиля» нажмите кнопку Открыть папкуПоказать в FinderОткрыть каталог. Откроется окно с вашей папкой профиля.Откроется ваша папка профиля.
- Нажмите кнопку меню
- Нажмите кнопку меню Firefox и выберите .Нажмите кнопку меню Firefox в верхней части экрана и выберите .Нажмите кнопку меню Firefox и выберите .
- Щёлкните по файлу с именем cert9.db.
- Нажмите command+Delete.
- Перезагрузите Firefox.
 , выберите , а затем — .
 и выберите .
-
Примечание: cert9.db будет снова создан, когда вы перезапустите Firefox. Это нормально.
Игнорирование предупреждений
Примечание: Некоторые предупреждения о безопасности обойти нельзя.
Вам следует игнорировать предупреждение только если вы уверены как в идентификации веб-сайта, так и надёжности вашего соединения – даже если вы доверяете сайту, кто-то может подслушивать ваше соединение. Данные, вводимые вами на сайт по слабо зашифрованному соединению, также могут быть уязвимы для перехвата.
Чтобы проигнорировать страницу предупреждения, щёлкните Дополнительно:
- На сайтах со слабым шифрованием вам будет предоставлена возможность загрузки сайта с помощью устаревшей системы безопасности.
- На сайтах, где сертификат не может быть подтверждён, вам может быть предоставлена возможность добавить исключение.
Подлинные публичные сайты не будут просить вас добавить исключение для их сертификата – в этом случае недействительный сертификат может быть указанием на веб-страницу, которая обманет вас или украдёт ваши идентификационные данные.
Эти прекрасные люди помогли написать эту статью:
Станьте волонтёром
Растите и делитесь опытом с другими. Отвечайте на вопросы и улучшайте нашу базу знаний.
Подробнее
![]()
For websites that are securely encrypted (the URL begins with «https://»), Firefox must verify that the certificate presented by the website is valid. If the certificate cannot be validated, Firefox will stop the connection to the website and show a «Warning: Potential Security Risk Ahead» error page instead. Clicking the Advanced button, you can view the specific error Firefox encountered.
This article explains why you might see the error codes SEC_ERROR_UNKNOWN_ISSUER, MOZILLA_PKIX_ERROR_MITM_DETECTED or ERROR_SELF_SIGNED_CERT on an error page and how to troubleshoot it.
Table of Contents
- 1 What does this error code mean?
- 2 The error occurs on multiple secure sites
- 2.1 Antivirus products
- 2.1.1 Avast/AVG
- 2.1.2 Bitdefender
- 2.1.3 Bullguard
- 2.1.4 ESET
- 2.1.5 Kaspersky
- 2.2 Family Safety settings in Windows accounts
- 2.3 Monitoring/filtering in corporate networks
- 2.4 Malware
- 2.1 Antivirus products
- 3 The error occurs on one particular site only
- 3.1 Certificate issued by an authority belonging to Symantec
- 3.2 Missing intermediate certificate
- 3.3 Self-signed certificate
- 3.4 Bypassing the warning
What does this error code mean?
During a secure connection, a website must provide a certificate issued by a trusted certificate authority to ensure that the user is connected to the intended target and the connection is encrypted. If you click the Advanced button on a «Warning: Potential Security Risk Ahead» error page and you see the error code SEC_ERROR_UNKNOWN_ISSUER or MOZILLA_PKIX_ERROR_MITM_DETECTED, it means that the provided certificate was issued by a certificate authority that is not known by Firefox and, therefore, cannot be trusted by default.
The error occurs on multiple secure sites
If you get this problem on multiple unrelated HTTPS-sites, it indicates that something on your system or network is intercepting your connection and injecting certificates in a way that is not trusted by Firefox. The most common causes are security software scanning encrypted connections, or malware listening in and replacing legitimate website certificates with their own. In particular, the error code MOZILLA_PKIX_ERROR_MITM_DETECTED indicates that Firefox detected connection interception.
Antivirus products
Third-party antivirus software can interfere with Firefox’s secure connections. You could try reinstalling it, which might trigger the software into placing its certificates into the Firefox trust store again.
We recommend uninstalling your third-party software and using the security software offered for Windows by Microsoft:
- Windows 8 and Windows 10 — Windows Defender (built-in)
If you do not want to uninstall your third-party software, you could try reinstalling it, which might trigger the software into placing its certificates into the Firefox trust store again.
Here are some alternative solutions you can try:
Avast/AVG
In Avast or AVG security products you can disable the interception of secure connections:
- Open the dashboard of your Avast or AVG application.
- Go to and click on > > .
- Scroll down to the Configure shield settings section and click on .
- Uncheck the box next to and confirm this by clicking OK.
-
In older versions of the product you’ll find the corresponding option when you go to > > and click Customize next to
-
See the Avast support article Managing HTTPS scanning in Web Shield in Avast Antivirus for details. More Information about this feature is available on this Avast Blog.
Bitdefender
In Bitdefender security products you can disable the interception of secure connections:
- Open the dashboard of your Bitdefender application.
- Go to and in the section click on .
- Toggle off the Encrypted Web Scan setting.
-
In older versions of the product you can find the corresponding option labelled Scan SSL when you go to >
-
In Bitdefender Antivirus Free it’s not possible to control this setting. You can try to repair or remove the program instead when you’re having problems accessing secure websites.
For corporate Bitdefender products, please refer to this Bitdefender Support Center page.
Bullguard
In Bullguard security products you can disable the interception of secure connections on particular major websites like Google, Yahoo and Facebook:
- Open the dashboard of your Bullguard application.
- Click on and enable the Advanced view on the top right of the panel.
- Go to > .
- Uncheck the option for those websites which are showing an error message.
ESET
In ESET security products you can try to disable and re-enable SSL/TLS protocol filtering or generally disable the interception of secure connections as described in ESET’s support article.
Kaspersky
Affected users of Kaspersky should upgrade to the most recent version of their security product, as Kaspersky 2019 and above contain mitigations for this problem. The Kaspersky Downloads page includes «update» links that will install the latest version free of charge for users with a current subscription.
Otherwise, you can also disable the interception of secure connections:
- Open the dashboard of your Kaspersky application.
- Click on on the bottom-left.
- Click and then .
- In the section check the Do not scan encrypted connections option and confirm this change.
- Finally, reboot your system for the changes to take effect.
Family Safety settings in Windows accounts
In Microsoft Windows accounts protected by Family Safety settings, secure connections on popular websites like Google, Facebook and YouTube might be intercepted and their certificates replaced by a certificate issued by Microsoft in order to filter and record search activity.
Read this Microsoft FAQ page on how to turn off these family features for accounts. In case you want to manually install the missing certificates for affected accounts, you can refer to this Microsoft support article.
Monitoring/filtering in corporate networks
Some traffic monitoring/filtering products used in corporate environments might intercept encrypted connections by replacing a website’s certificate with their own, at the same time possibly triggering errors on secure HTTPS-sites.
If you suspect this might be the case, please contact your IT department to ensure the correct configuration of Firefox to enable it to work properly in such an environment, as the necessary certificate might have to be placed in the Firefox trust store first. More information for IT departments on how to go about this can be found in the Mozilla Wiki page CA:AddRootToFirefox.
Malware
Some forms of malware intercepting encrypted web traffic can cause this error message — refer to the article Troubleshoot Firefox issues caused by malware on how to deal with malware problems.
The error occurs on one particular site only
In case you get this problem on one particular site only, this type of error generally indicates that the web server is not configured properly. However, if you see this error on a legitimate major website like Google or Facebook or sites where financial transactions take place, you should continue with the steps outlined above.
After a number of irregularities with certificates issued by Symantec root authorities came to light, browser vendors, including Mozilla, are gradually removing trust from these certificates in their products. Firefox will no longer trust server certificates issued by Symantec, including those issued under the GeoTrust, RapidSSL, Thawte and Verisign brands. For more information, see this Mozilla blog post.
MOZILLA_PKIX_ERROR_ADDITIONAL_POLICY_CONSTRAINT_FAILED will be the primary error, but with some servers, you may see the error code SEC_ERROR_UNKNOWN_ISSUER instead. If you come across such a site you should contact the owner of the website to inform them of the problem.
Mozilla strongly encourages operators of affected sites to take immediate action to replace these certificates. DigiCert is providing certificate replacements for free.
On a site with a missing intermediate certificate you will see the following error description after you click on Advanced on the error page:
The certificate is not trusted because the issuer certificate is unknown.
The server might not be sending the appropriate intermediate certificates.
An additional root certificate may need to be imported.
The website’s certificate might not have been issued by a trusted certificate authority itself and no complete certificate chain to a trusted authority was provided either (a so-called «intermediate certificate» is missing).
You can test if a site is properly configured by entering a website’s address into a third-party tool like SSL Labs’ test page. If it is returning the result «Chain issues: Incomplete», a proper intermediate certificate is missing.
You should contact the owner of the website you’re having troubles accessing to inform them of that problem.
Self-signed certificate
On a site with a self-signed certificate you will see the error code ERROR_SELF_SIGNED_CERT and the following error description, after you click on Advanced on the error page:
The certificate is not trusted because it is self-signed.
A self-signed certificate that wasn’t issued by a recognized certificate authority is not trusted by default. Self-signed certificates can make your data safe from eavesdroppers, but say nothing about who the recipient of the data is. This is common for intranet websites that aren’t available publicly and you may bypass the warning for such sites.
Bypassing the warning
Warning: You should never add a certificate exception for a legitimate major website or sites where financial transactions take place – in this case an invalid certificate can be an indication that your connection is compromised by a third party.
If the website allows it, you can bypass the warning in order to visit the site, even thought its certificate is not being trusted by default:
- On the warning page, click Advanced.
- Click Accept the Risk and Continue.
These fine people helped write this article:
AliceWyman, Chris Ilias, philipp, Tonnes, Michele Rodaro, Roland Tanglao, YFdyh000, Mozinet, pollti, Joni, Artist, Scribe, Dinesh, Marcelo Ghelman, «Barely Harry», franziskus, PGGWriter, k_alex, JeremyKoozar
Volunteer
Grow and share your expertise with others. Answer questions and improve our knowledge base.
Learn More
Mozilla Firefox продолжает оставаться одним из самых популярных веб-браузеров во всем мире. Даже на этапе бета-тестирования его хвалили за безопасность, скорость и эффективные надстройки. Однако, как и другие браузеры, он также подвержен проблемам. Например, у многих пользователей Firefox возникают проблемы с доступом к различным веб-сайтам, особенно с префиксом HTTPS. Большинство из них получают следующие сообщения об ошибках:
- MOZILLA_PKIX_ERROR_MITM_DETECTED
- SEC_ERROR_UNKNOWN_ISSUER
- ERROR_SELF_SIGNED_CERT
Стоит отметить, что эти сообщения об ошибках указывают на то, что ваш веб-браузер не доверяет целостности сертификатов, выданных веб-сайтам, которые вы посещаете. Хорошая новость в том, что есть еще способы получить доступ к сайтам. В этом посте мы научим вас, как исправить проблему MOZILLA_PKIX_ERROR_MITM_DETECTED.
Что такое ошибка «MOZILLA_PKIX_ERROR_MITM_DETECTED»?
Если вы видели это сообщение об ошибке, вероятно, что-то в вашей сети или системе нарушает ваше соединение и сертификаты. Следовательно, Firefox не доверяет сертификатам. Обычно это происходит, когда вредоносная программа пытается использовать свой сертификат для замены легитимного сертификата. Таким образом, крайне важно, чтобы на вашем компьютере было надежное программное обеспечение безопасности, чтобы предотвратить эту проблему.
Существует множество антивирусных программ, но Auslogics Anti-Malware — это продукт, который может предоставить вам комплексную защиту. Помимо проверки вашей системной памяти на наличие вредоносных программ, он также сканирует расширения вашего браузера. Он предотвращает утечку данных и обнаруживает подозрительные элементы, которые могут угрожать безопасности вашего компьютера.
Как исправить ошибку «MOZILLA_PKIX_ERROR_MITM_DETECTED»
Большинство пользователей, затронутых проблемой, отметили, что проблема возникла в Nightly версии Firefox. В этом случае вы можете попробовать использовать стабильную сборку для доступа к защищенным веб-сайтам. Однако, если это не сработает, вы всегда можете узнать, как устранить коды ошибок безопасности на защищенных веб-сайтах с помощью Firefox. Вот методы:
Способ 1. Отключение функции сканирования HTTPS
Вы можете настроить параметры безопасности любой антивирусной программы. Итак, если ваше программное обеспечение безопасности поддерживает функцию сканирования HTTPS, мы рекомендуем вам отключить ее. Стоит отметить, что вы можете найти эту функцию под разными именами, включая следующие:
- Сканировать SSL
- Не проверять зашифрованные соединения
- Показать безопасные результаты
Метод 2: отключение функции сканирования HTTPS в Firefox
Не рекомендуется отключать функцию сканирования HTTPS в Firefox. Однако это может быть последнее средство для исправления ошибки MOZILLA_PKIX_ERROR_MITM_DETECTED.
- Запустите Mozilla Firefox.
- В поле URL введите «about: config» (без кавычек) и нажмите Enter.
- Если появится информационное сообщение, нажмите «Я принимаю риск!» кнопка.
- Найдите запись security.enterprise_roots.enabled.
- Найдя его, дважды щелкните по нему.
- Измените значение на «истина».
- Перезагрузите Firefox.
После выполнения описанных выше действий Firefox импортирует все настраиваемые сертификаты из других программ безопасности на вашем компьютере. Следовательно, процесс гарантирует, что с этого момента источникам можно доверять, и вы перестанете видеть сообщение об ошибке «MOZILLA_PKIX_ERROR_MITM_DETECTED».
Можете ли вы порекомендовать другие методы устранения ошибки MOZILLA_PKIX_ERROR_MITM_DETECTED?
Присоединяйтесь к обсуждению ниже и поделитесь своими советами с нашими читателями!
Ошибка MOZILLA_PKIX_ERROR_MITM_DETECTED возникает, когда затронутые пользователи пытаются получить доступ к одному или нескольким серверам имен. Об этом обычно сообщают duckduckgo.com, reddit.com и несколько других веб-сайтов HTTPS. Для большинства пользователей эта проблема возникает только в Mozilla Firefox — веб-сайт доступен из других браузеров.
MOZILLA_PKIX_ERROR_MITM_DETECTED
Примечание. Вот что нужно сделать, если вы не хотите сохранять историю просмотров.
Чаще всего эта проблема вызвана помехами AV сторонних производителей, вызванными сканированием или фильтрацией HTTPS. Это можно исправить, отключив функцию безопасности или полностью удалив пакет безопасности.
Хотя это и не рекомендуется, вы также можете избежать этой ошибки, отключив проверку сертификата HTTPS в браузере Mozilla Firefox. Это опасно, главным образом потому, что эта ошибка также может возникать из-за вредоносного приложения (Legendas), которое известно для майнинга криптовалют и извлечения поведенческих данных.
В редких случаях VPN-сеть или прокси-сервер также могут вызвать эту ошибку в браузере Firefox.
1. Включение сканирования / фильтрации HTTPS
Как выясняется, одной из наиболее распространенных причин, способных вызвать эту проблему, является параметр безопасности, который обычно применяется сторонним AV-пакетом. Avast, Kaspersky, ESET и некоторые другие комплекты безопасности используют функции сканирования / фильтрации HTTPS.
В большинстве случаев эта проблема возникает из-за ложного срабатывания, которое убеждает ваш браузер в том, что на вашем компьютере выполняется MITM (человек посередине). В большинстве случаев это происходит из-за того, что сторонний AV отправляет информацию о ваших подключениях (IIRC).
Конечно, в зависимости от третьего комплекта, который вы используете, вы можете найти его под разными именами в меню настроек:
Сканирование SSL
Включить фильтрацию SSL / TLS
Включить сканирование HTTPS
Показать только безопасные результаты
Если этот сценарий применим и вы используете сторонний пакет, который, как вы подозреваете, может использовать HTTPS-сканирование или фильтрацию, вам потребуется получить доступ к настройкам AV и отключить параметр, который может вызывать проблему.
Если вы не знаете, как сделать это самостоятельно, найдите в Интернете конкретные шаги.
Примечание. Ниже описано, как исправить SSL_ERROR_BAD_CERT_DOMAIN в Mozilla.
Например, в ESET Smart Security это можно сделать, перейдя в раздел «Интернет и электронная почта»> «SSL / TLS» и отключив переключатель, связанный с «Включить фильтрацию протокола SSL / TLS». После этого нажмите «ОК», чтобы сохранить изменения, затем нажмите «Да» в UAC (контроль учетных записей), чтобы предоставить административные привилегии.
Отключение переключателя, связанного с включением фильтрации протокола SSL / TLS
После этого перезагрузите компьютер и посмотрите, решена ли проблема при следующем запуске системы. Если вы все еще сталкиваетесь с той же ошибкой MOZILLA_PKIX_ERROR_MITM_DETECTED даже после того, как вы отключили фильтрацию HTTPS, перейдите к следующему потенциальному исправлению ниже.
2. Отключение проверки сертификата HTTPS (не рекомендуется)
Если вы хотите ускорить ошибку MOZILLA_PKIX_ERROR_MITM_DETECTED без особых хлопот, отключение проверок сертификатов HTTPS — это ваш самый быстрый вариант. Но я бы не советовал идти по этому пути, если вы действительно не знаете, что делаете.
Это, безусловно, предотвратит возникновение ошибки, но также сделает вашу систему уязвимой для угроз безопасности, возникающих в результате вашего веб-серфинга.
Однако, если вы все еще решили отключить проверку сертификата HTTPS, вот как это сделать из скрытого меню «about: config» дополнительных настроек конфигурации Mozilla Firefox:
- Откройте Mozilla Firefox, вставьте ‘about: config‘ в панель навигации и нажмите Enter, чтобы открыть меню расширенных настроек этого браузера.
о: конфиг в Firefox
- Когда вы увидите приглашение «Приступить с осторожностью», нажмите кнопку «Принять риск и продолжить», чтобы отобразить меню расширенных настроек.
Mozilla Firefox о: config
- После того, как вам удастся войти в меню «Дополнительные настройки», используйте панель поиска, чтобы найти следующие параметры: security.enterprise_roots.enabled
- Как только вам удастся найти правильные настройки, измените его значение с ложного на истинное, нажав на значок переключателя.
Изменение значения security.enterprise_roots.enabled
- После того, как изменение вступило в силу, перезагрузите компьютер и посмотрите, будет ли проблема решена при следующем запуске.
Если та же проблема MOZILLA_PKIX_ERROR_MITM_DETECTED все еще возникает, перейдите к следующему потенциальному исправлению ниже.
3. Удалите Legendas и отключите службу Com + Leg (если применимо).
Как выясняется, эта конкретная проблема также может возникать из-за процесса, принадлежащего программе субтитров Legendas. По-видимому, это приложение, скорее всего, использует свои права для майнинга криптовалют, используя предоставленную им оперативную память. Более того, существуют проблемы безопасности, связанные с тем, что приложение также отслеживает личную информацию пользователя и его поведение.
Firefox и несколько других браузеров обнаружат, что он отправляет данные в соответствии с правилами, поэтому он в результате вызовет MOZILLA_PKIX_ERROR_MITM_DETECTED.
Если на вашем компьютере установлено это приложение Legendas (особенно Windows 3.7), вам нужно удалить его как можно скорее. Более того, известно, что процесс, продолжающий добычу данных, остается позади, поэтому вам также необходимо удалить его.
И как дополнительная мера безопасности, вы должны также включить проверку безопасности, просто чтобы убедиться, что вы полностью сохранены.
Вот быстрое избавление от Legendas и связанного с ним процесса:
- Нажмите клавишу Windows + R, чтобы открыть диалоговое окно «Выполнить». Затем введите «appwiz.cpl» и нажмите Enter, чтобы открыть меню «Программы и компоненты».
Введите appwiz.cpl и нажмите Enter, чтобы открыть список установленных программ.
- Как только вы окажетесь в меню «Программы и компоненты», прокрутите список установленных приложений и найдите запись, связанную с Legendas.
- Когда вы увидите его, щелкните его правой кнопкой мыши и выберите «Удалить» из появившегося контекстного меню.
Удаление Легенд
- В подсказке удаления, следуйте инструкциям, чтобы избавиться от него навсегда. После завершения удаления перезагрузите компьютер и дождитесь завершения следующего запуска.
- Нажмите клавишу Windows + R, чтобы снова открыть диалоговое окно «Выполнить». Затем введите «services.msc» и нажмите Enter, чтобы открыть экран служб.
Введите «services.msc» в диалоговом окне «Выполнить» и нажмите Enter
Примечание. Если вы видите запрос UAC (Контроль учетных записей), нажмите Да, чтобы предоставить доступ администратора.
- На экране «Службы» перейдите в правую часть экрана и выберите службу, называемую COM + Leg Service. Когда вы увидите его, дважды щелкните по нему, затем выберите вкладку Общие, измените тип запуска на Отключено и нажмите Применить, чтобы сохранить изменения.
Отключение службы COM + Leg через экран служб
- После перезапуска службы перезагрузите компьютер и после завершения следующего запуска начать сканирование с помощью Malwarebytes для того, чтобы убедиться, что заражение вредоносным ПО имеет дело с.
Если этот сценарий неприменим или вы все еще сталкиваетесь с этой проблемой даже после удаления вредоносного ПО, перейдите к следующему потенциальному исправлению ниже.
4. Отключить VPN или прокси-сервер
Если мы проанализируем код ошибки, это, по сути, говорит о том, что какая-то третья сторона перехватывает HTTPS-соединение с веб-сайтом, который пытается загрузить ваш браузер.
Ну, еще один возможный виновник, который может вызвать эту проблему, это VPN или прокси-сервер, который фильтрует соединение. Несколько затронутых пользователей подтвердили, что им удалось решить проблему после удаления VPN-клиента или отключения прокси-сервера (в зависимости от используемой ими службы).
Чтобы учесть оба возможных сценария, мы создали два разных руководства, которые помогут вам решить MOZILLA_PKIX_ERROR_MITM_DETECTED:
Отключить прокси-сервер
- Откройте диалоговое окно «Выполнить», нажав клавишу Windows + R. Затем в текстовом поле введите «ms-settings: network-proxy» и нажмите Enter, чтобы открыть вкладку «Прокси» в собственном приложении «Настройки».
Диалог запуска: ms-settings: network-proxy
- Как только вам удастся попасть на вкладку «Прокси», прокрутите до конца раздел «Настройка прокси вручную», затем отключите переключатель, связанный с «Использовать прокси-сервер».
Отключение использования прокси-сервера
- После применения этой модификации перезагрузите компьютер и проверьте, устранена ли проблема при следующем запуске системы.
Отключить VPN-соединение
- Откройте диалоговое окно «Выполнить», нажав клавишу Windows + R. Затем, как только вы окажетесь внутри текстового поля, введите «appwiz.cpl» и нажмите Enter, чтобы открыть меню «Программы и компоненты».
Введите appwiz.cpl и нажмите Enter, чтобы открыть список установленных программ.
- На экране «Программы и компоненты» прокрутите список установленных приложений и найдите сторонний VPN, который, как вы подозреваете, может вызывать проблему. Когда вы увидите его, щелкните его правой кнопкой мыши и выберите «Удалить» из появившегося контекстного меню.
Удаление инструмента VPN
- На экране удаления следуйте инструкциям, чтобы избавиться от приложения. После завершения процесса перезагрузите компьютер и проверьте, решена ли проблема при следующем запуске.
Если этот сценарий неприменим, перейдите к последнему методу исправления ниже.
5. Удалите сторонний брандмауэр
Мы уже установили, что эта проблема может быть легко вызвана реальным вредоносным ПО, которое происходит после взлома данных и шифрования. Однако оказывается, что эта проблема также может возникать из-за антивируса, который по совпадению действует как вредоносное ПО.
В большинстве случаев AV в конечном итоге вызывает эту проблему в Firefox, потому что он ведет себя так, как будто MITM (человек посередине) находится на вашем компьютере. В большинстве случаев это происходит из-за того, что сторонний AV отправляет информацию о ваших подключениях (IIRC).
Несколько затронутых пользователей, с которыми мы также столкнулись с этой проблемой, сообщили, что им удалось решить проблему только после того, как они удалили сторонний пакет со своего компьютера, и убедились, что они не оставили никаких оставшихся файлов, которые могут все еще вызывать эту проблему.
Вот краткое руководство по этому:
- Нажмите клавишу Windows + R, чтобы открыть диалоговое окно «Выполнить». Затем введите «appwiz.cpl», затем нажмите Enter, чтобы открыть меню «Программы и компоненты».
Введите «appwiz.cpl» в диалоговом окне «Выполнить» и нажмите Enter
- Как только вы увидите список приложений, найдите запись, связанную с вашим AV, затем щелкните по ней правой кнопкой мыши и выберите «Удалить», чтобы начать процедуру удаления.
Выберите Avast и нажмите кнопку Удалить
- В окне удаления следуйте инструкциям на экране для завершения процедуры, а затем перезагрузите компьютер.
Примечание. В качестве дополнительного шага вы можете следовать этому руководству, чтобы убедиться, что вы не оставляете сторонние AV-файлы.
Contents
- What is the ‘MOZILLA_PKIX_ERROR_MITM_DETECTED’ Error?
- How to Fix the ‘MOZILLA_PKIX_ERROR_MITM_DETECTED’ Issue
- Method 1: Switching Off the HTTPS Scanning Feature
- Method 2: Disabling the HTTPS Scanning Feature on Firefox

Mozilla Firefox continues to be one of the most popular web browsers across the globe. Even during its beta phase, it was lauded for its security, speed, and efficient add-ons. However, like other browsers, it is also prone to issues. For example, many Firefox users are having trouble accessing various websites, especially those with an HTTPS prefix. Most of them get the following error messages:
- MOZILLA_PKIX_ERROR_MITM_DETECTED
- SEC_ERROR_UNKNOWN_ISSUER
- ERROR_SELF_SIGNED_CERT
It is worth noting that these error messages indicate that your web browser does not trust the integrity of the certificates issued to the websites you’re visiting. The great news is, there are still ways to access the sites. In this post, we will teach you how to fix the ‘MOZILLA_PKIX_ERROR_MITM_DETECTED’ issue.
What is the ‘MOZILLA_PKIX_ERROR_MITM_DETECTED’ Error?
If you saw this error message, it is likely that something on your network or system is disrupting your connection and certificates. Consequently, Firefox ends up distrusting the certificates. Usually, this happens when malware attempts to use its certificate to replace a legitimate certificate. As such, it is crucial that you have reliable security software on your computer to prevent this problem.
There are many antivirus software programs out there, but Auslogics Anti-Malware is the product that can provide you with comprehensive protection. Aside from checking your system memory for malicious programs, it also scans your browser extensions. It prevents data leaks and detects suspicious items that may threaten the security of your computer.
How to Fix the ‘MOZILLA_PKIX_ERROR_MITM_DETECTED’ Issue
Most of the users affected by the problem mentioned that the issue occurred on the Nightly version of Firefox. If this is the case, then you can try using a stable build to access secure websites. However, if that does not work, you can always learn how to troubleshoot security error codes on secure websites, using Firefox. Here are the methods:
Method 1: Switching Off the HTTPS Scanning Feature
You can configure the security options of any anti-virus software program. So, if your security software has HTTPS scanning functionality, we suggest that you switch it off. It is worth noting that you may find this feature under various names, including the following:
- Scan SSL
- Do not scan encrypted connections
- Show safe results
Method 2: Disabling the HTTPS Scanning Feature on Firefox
It is not recommended to disable the HTTPS scanning functionality on Firefox. However, this can be your last resort for fixing the ‘MOZILLA_PKIX_ERROR_MITM_DETECTED’ error.
- Launch Mozilla Firefox.
- Inside the URL box, type “about:config” (no quotes), then hit Enter.
- If an info message shows up, click the ‘I accept the risk!’ button.
- Look for the security.enterprise_roots.enabled entry.
- Once you find it, double-click it.
- Modify the value to ‘true’.
- Restart Firefox.
After performing the steps above, Firefox will import all the custom certificates from other security software programs on your computer. Consequently, the process will ensure that the sources can be trusted from now on, and you will cease to see the ‘MOZILLA_PKIX_ERROR_MITM_DETECTED’ error message.
Can you recommend other methods for resolving the ‘MOZILLA_PKIX_ERROR_MITM_DETECTED’ error?
Join the discussion below and share your tips with our readers!
Do you like this post? 🙂
Please rate and share it and subscribe to our newsletter!
15 votes,
average: 4.20 out of
5
Loading…
If you’re having some problem browsing multiple websites on the Firefox browser on your Windows 10 computer, then this post might be of help. One of the most common problems you could encounter in Firefox is mostly related to HTTPS and one of them is the MOZILLA PKIX ERROR MITM DETECTED or ERROR SELF SIGNED CERT or SEC ERROR UNKNOWN ISSUER error which means that Firefox was unable to trust certificates issued on secured websites.
If you encounter the MOZILLA_PKIX_ERROR_MITM_DETECTED error in Firefox, this indicates that something in your network or system is interrupting your connection and injecting certificates and when that happens, Firefox won’t trust it. In such cases, one of the culprits is malware. Malware will try to replace a legitimate certificate with its certificate. Another cause is security software where it keeps a tab on a secure connection and creates a false positive, for instance:
“In Microsoft Windows accounts protected by Family Safety settings, secure connections on popular websites like Google, Facebook and YouTube might be intercepted and their certificates replaced by a certificate issued by Microsoft in order to filter and record search activity.”
And if you are connected to a corporate network, there might be a monitoring/filtering product that could be replacing certificates. Moreover, there are also users who reported getting this issue when they use the Nightly version of Firefox. And if that’s the case, you have to try accessing secure websites using only the stable build especially when it comes to payments. However, if you are not doing that, then here are some options you need to check out.
Option 1 – Try turning off HTTPS Scanning on your security and antivirus programs
Each security-based software has a security option that allows you to turn off the HTTPS scanning functionality. They may be available under different names such as HTTPS Scanning, Scan SSL, Show safe result, Do not scan encrypted connections, etc. Find what is applicable for your security or antivirus software and then try turning it off temporarily and see if it helps in fixing the MOZILLA_PKIX_ERROR_MITM_DETECTED error in Firefox.
Option 2 – Try to disable security.enterprise_roots.enabled
The next thing you can do if the first option didn’t work is to disable security.enterprise_roots.enabled which is an HTTPS certificate check on Firefox. Note that this is not recommended but you have to at least try in order to fix the error.
- Open Firefox and then type “about: config” in the Firefox address bar and hit Enter.
- After that, if an info message appears, confirm it.
- Next, search for the security.enterprise_roots.enabled preference and once you found it, double click on it.
- Then change its value to true and restart the Firefox browser once. This will import all the custom certificates from the other security software into Firefox. As a result, it will make sure to mark those sources as trusted and you won’t get the MOZILLA_PKIX_ERROR_MITM_DETECTED error.
Advanced System Repair Pro
One-click automated PC repair solution
![]()
With Advanced System Repair Pro you can easily
DOWNLOAD
Advanced System Repair Pro is compatible with all versions of Microsoft Windows including Windows 11
Share this article:
You might also like
Error 0x800706be is a Windows error code that pops up when a particular system file is having some issue. This error pops up on other Windows-compatible software as well as driver vendors. This error signifies a misconfigured or corrupted system file so you might encounter this error in different instances. For instance, this error might pop up when you click the audio icon from the system tray or when the Windows Upgrade or Update has failed. Needless to say, this error can be caused by different factors. Anyhow, this post will show you what you can do to fix the problem when the error pops up during a Windows Update or Upgrade. If you are seeing this error when you try to install the latest Windows updates, it will show a Windows Update failed message and you obviously won’t be able to update your Windows 10 PC until you fix this error. You will keep seeing this error even when you try to reboot or update it a couple of times.
As mentioned, the error code 0x800706be appears when there is something wrong with your system files – they are either corrupted or misconfigured. This error is most likely caused by the corrupted Windows Update Components. Corruption of these files is not unusual and it could happen anytime. So since the Windows Update files or components are corrupted, you won’t be able to successfully install the latest Windows Updates.
Here are some options you can try to fix the problem.
Option 1 – Try running the Windows Update Troubleshooter
Running the Windows Update troubleshooter is one of the basic things to do when facing any kind of issue with Windows Updates. As long as it can it will detect the issue and automatically solve them so that there will be no need for you to do more technical steps to resolve the issue.
- Tap the Windows and R keys on your keyboard to open the Run dialog box.
- Then type in “control.exe /name Microsoft.Troubleshooting” in the field and tap Enter to open the Windows Update Troubleshooter.
- After that, click Windows Update and follow the next on-screen instructions.
Option 2 – Try resetting the Windows Update Components
This is another basic thing to do in fixing the error 0x800706be. It is also one of the solutions that mostly worked for users who also got this error when trying to install Windows updates. And since the problem is caused by corrupted Windows update components, the most logical thing to do is to delete old files and reset components.
To reset the Windows Update components, follow the given instructions below carefully.
- Tap the Windows key once.
- Then in the Windows Start Search, type in “command prompt”.
- From the search results displayed, right-click on Command Prompt and select the “Run as administrator” option.
- After that, type in “net stop wuauserv” and tap Enter.
- Next, type in “net stop cryptSvc” and tap Enter.
- Then type in “net stop bits” and tap Enter.
- Type in “ren C:WindowsSoftwareDistribution SoftwareDistribution.old” and then tap Enter.
- Afterward, type in “C:WindowsSystem32catroot2Catroot2.old” and tap Enter.
- Next, type “net start cryptSvc” and tap Enter.
- Then type “net start bits” and tap Enter.
- Finally, type in “net start msiserver” and tap Enter.
- Now close Command Prompt and then try updating Windows once more.
Read More
Since Windows 10 introduced the concept of notifications, almost any application installed on your computer sends you one. However, there are times when too many notifications can be quite annoying. Although some of them are important, most of them are not and are only getting in the way of your tasks. So if you don’t like to be flooded with tons of notifications on your Windows 10 computer, say no more as this post will help you out in disabling notifications for any apps installed.
And now with the new feature in Windows 10 called Focus Assist, you will be able to manage the level of notifications that you receive. This new feature also allows you to disable all notifications except for the ones from important or priority apps. You will just have to maintain a list of priority applications or you could also disable all the notifications except for the important ones like alarms. In addition, you could also set up some automatic rules such as the Focus Assist timings which means that you can make Focus Assist enabled for a certain period of time during the day or when you are duplicating your display or playing a game and whatnot. So if there is an application that keeps on spamming you with notifications, you can just disable the notifications for that application.
To get started on disabling notifications, refer to the steps given below.
- Step 1: Go to Settings > System.
- Step 2: From there, open Notifications and actions and then scroll down to the “Get notifications from these apps” section.
- Step 3: After that, look for the application that you want to disable notifications for and click on the toggle button that corresponds to disabling notifications for that application. You could also click open to explore additional settings for that particular application.
Note: You can disable notifications or just the notification banners, your choice. Aside from that, you can also control the notification sound as well as its behavior when the computer screen is locked. What’s more, is that you can also adjust the number of notifications displayed in the Action Center or select the priority applications. As stated earlier, Windows 10 gives you control that allows you to customize every nook and cranny of the notification on your Windows 10 computer. Apart from applications, there are also other notifications-related settings that you can control including disabling notifications about tips, tricks, and suggestions as well as summary notifications from Windows Defender that you get every time you use or scan your computer.
Read More
 Parallels is an application developer for MAC OS mostly known for its PC virtualization software Parallels Desktop, a PC virtualization software running on Macs enabling running Windows and Linux with respective software on your MAC.
With its latest Desktop 17 version, the software can run natively on both Intel-based and M1-based MACs. Thanks to this feature MAC users will be able to benefit from various speed improvements while running both Windows 10 or Windows 11 preview.
On both Intel and M1 setups, Parallels resumes Windows and Linux up to 38% faster, provides an up to 25% bump in 2D graphics and a six-time increase in OpenGL graphics processing. M1-centric stats include 33% faster Windows start-up times, up to 28% faster DirectX 11 performance, and up to 20% better disk performance on Windows 10 Insider Preview.
Parallels Desktop 17 delivers a set of fresh features including a new video driver that enhances video and game playback and boosts Windows UI responsiveness. An improved Coherence mode lets users run Windows apps within the Mac environment, cutting down on distracting changes in appearance during Windows sign-in, shut down, and software updates.
Drag-and-drop operations are also improved, with support for text and graphics between Mac and Windows applications. This function works well with MAC OS Monterey’s Quick Note feature, which can accept content from any Windows app.
USB support, disk management, copy and paste unformatted text, and automatic virtual machine optimization also receive upgrades.
Read More
If you are using a couple of graphics-intensive applications like video rendering software or some games, then something in the background of the system could get messed up and you might encounter the “LoadLibrary failed with error 1114, A dynamic link library (DLL) initialization routine failed” error message. This kind of error can usually get fixed by twerking some graphic settings, fixing and updating the drivers, and allowing your PC to work by leveraging the maximum use of the resources it’s got. Thus, in this post, you will be guided on some measures you can apply to resolve this kind of error message as soon as possible.
Before you go over the options given below, if you have made any changes to any software component in your computer or installed new software recently, then you might want to undo them and then check if it fixes the “LoadLibrary failed with error 1114 “ error. Once you have that covered but you’re still getting the error, use the options given below as a reference to fix the error.
Option 1 – Try to modify the Dynamic Graphics Settings
You might want to modify the Dynamic Graphics Settings in order to fix the error. To do so, follow the steps below.
- Open Control Panel and then Power Options.
- From there, click on the Change plan settings option for your chosen power plan.
- After that, click on Change advanced power settings.
- Then look for the Switchable Dynamic Graphics option and then click on it to expand it.
- Afterward, expand the Global Settings option and then select Maximize Performance for both the “On battery” and “Plugged in” options.
- Now click on the Apply button and then OK to save the changes made.
Note: If the Switchable Dynamic Graphics option is not available on your computer, you can try the next given option below.
Option 2 – Try switching the Graphics card to High-Performance mode
Note that this second option varies from computer to computer since most computers use the Graphics card made by NVIDIA, while some by AMD and others use Intel HD Graphics. Thus, depending on which graphics card your computer uses, pick one of the three fixes below.
NVIDIA Graphics Drivers:
If your computer uses a graphics card made by NVIDIA and has the drivers are properly installed and updated, then follow the steps below.
- Right-click on any empty space on your desktop and then click on the NVIDIA Control Panel.
- After that, expand the 3D Settings on the left-hand side tree-structured list and then click on Manage 3D Settings.
- Next, select your preferred GPU on the right-side panel and then set it to the High-Performance NVIDIA Card from the drop-down menu.
- As an alternative, you can also go to the Program Settings tab,
- From there, select the program that you are trying to run from the drop-down menu and click on Add.
- Now set the graphics processor to a High-performing processor and then restart your computer to apply the changes made.
AMD Graphics card:
If your computer uses a graphics card made by AMD and has the drivers are properly installed and updated, then follow the steps below.
- Right-click on any empty space on your desktop.
- Click on AMD Control or Configure Switchable Graphics.
- Next, click on Browse and select the program where you encounter the error.
- Finally, click on High Performance for the selected program and then restart your computer to successfully apply the changes made.
Intel HD graphics:
If your computer uses the Intel HD graphics and then its drivers are properly installed and updated, then follow these steps:
- Right-click on any empty space on your desktop and then click on the Intel Graphics Settings.
- Next, click on the Power menu.
- After that, select a Graphics Power Plan for both the “On battery” and “Plugged in” options to High-Performance Power Plan.
- Then click on the Apply button and restart your computer.
Read More
If you encounter an error saying, “Boot Device Not Found” when you turn on your Windows 10 computer, then you’ve come to the right place as this post will guide you on how you can fix this problem. Apart from the error message, you will also see a message that states, “Please install an operating system on your hard disk, Hard Disk<xxx>”. You will then be asked to tap the F2 key to initiate the System Diagnostics.
If you install the Windows operating system, it becomes the boot device, and when your computer boots, the UEFI or the BIOS looks for the operating installed on your drive and continues the process. So when you encounter the “Boot Device Not Found” error, this means that the UEFI or the BIOS wasn’t able to locate the drive where it can boot.
There are several suggestions you can check out to resolve this error. You can try checking the connection with your boot drive or change the boot order. You can also fix the Boot Record from Recovery and see if the primary partition is active or not. But before you troubleshoot the problem, make sure that you have a bootable Windows USB drive ready since two of the options provided below will require you to boot into the Advanced Recovery mode. Once you have this covered, proceed to each one of the following options.
Option 1 – Try checking the connection with the boot drive
If you have a custom computer that comes with a cabinet, you might want to open it and remove any connected power supply, and then check the wires. As you know, drives are connected with the motherboard using a cable. So all you have to do is check if both ends are connected properly and make sure that the connection is not loose. You could also try to unplug the cable and plug it back in.
Option 2 – Try changing the boot order
You might also want to try changing the boot order of your computer. Each time a computer boots, the BIOS or the UEFI follows a boot order. It is the one that tells where to first look for the boot drive and if for some reason, a USB is connected to your computer and the first boot device found in the USB, then you have resolved the problem. All you have to do is to remove the USB device and boot or go into the BIOS and change the boot order yourself.
Option 3 – Try to rebuild the BCD files
The next thing you can do to resolve the issue is to Rebuild Boot Configuration Data or BCD files.
- You can start by booting into the installation environment for Windows 10 from an installation media.
- After that, click on Repair your computer and on the blue screen, select Troubleshoot and then select the Advanced options menu.
- From there, select Command Prompt and once you open it, enter each one of the commands given below by sequence.
- bootrec /FixMbr
- bootrec /FixBoot
- bootrec /ScanOS
- bootrec /RebuildBcd
- Once you’re done executing the commands given above, type “exit” to close the Command Prompt window and then restart your computer and see if it fixed the “Boot Device Not Found” error.
Option 4 – Try setting the System Partition to Active
Like the first given option, you also have to make sure that you have a bootable Windows 10 USB drive before you proceed to set the System Partition to Active. Once you have it covered, refer to these steps:
- Boot your computer using the bootable Windows 10 USB drive.
- Next, click Next when you get to the Welcome Screen.
- Then click on Repair your computer located at the bottom left part of the window and select Troubleshoot > Advanced Options > Command Prompt.
- After opening Command Prompt, type the following command and hit Enter to start the Diskpart utility. It is a command line-based utility just like Command Prompt but has a UAC prompt once you provoke it. So if you encounter a UAC prompt, just click on Yes to proceed.
diskpart
- Now type the following command:
list disk
- From there, select your primary disk by typing the following command:
select disk number
- After that, list all the partitions on the selected disk by entering the following command:
list partition
- The command you just entered will list all the partitions created on your PC including both types of partitions that are visible to a normal user in the File Explorer as well as the ones created by Windows 10 by default which helps it in storing the boot files and other important system files.
- Now type the following command to select the partition that is usually around 100 MB in size:
select partition number
- Finally, type the following command to mark the partition active:
active
- Then type the “exit” command to exit the disk part utility.
Once it’s done, the primary drive should now be active and you should now be able to boot into your computer without the “Boot Device Not Found” error.
Read More
If you encounter Error 0xc0000005 when you try to launch a program on your Windows 10 computer then this means that Windows was unable to process the files and the configuration correctly needed in order to run the program properly. You can encounter this kind of error with an installed program and even as the installer for a particular program. To fix this error, this post will provide you with some potential fixes that might help.
Error 0xc0000005 occurs due to Access Violation which happens when a user tries to open a program and this error code may be accompanied by any of the following three error messages:
- The application was unable to start correctly
- Access violation Exception Error
- Windows Installation Error
To fix this error, you need to follow the given options below carefully but before you do that, you can try to use System Restore Point first to put your computer back to its previously known stable state.
- Tap the Win + R keys to open the Run dialog box.
- After that, type in “sysdm.cpl” in the field and tap Enter.
- Next, go to the System Protection tab then click the System Restore button. This will open a new window where you have to select your preferred System Restore point.
- After that, follow the on-screen instructions to finish the process and then restart your computer and check if the problem is fixed or not.
After performing System Restore check if Error 0xc0000005 is now fixed or not. If not, then make sure to use the options given below to resolve the problem.
Option 1 – Update or rollback drivers
If the System Restore didn’t work, then it’s time to either update or roll back the device drivers. It is most likely that after you updated your Windows computer that your driver also needs a refresh. On the other hand, if you have just updated your device drivers then you need to roll back the drivers to their previous versions. Whichever applies to you, refer to the steps below.
- Open the Devices Manager from the Win X Menu.
- Then locate the device drivers and right-click on them to open the Properties.
- After that, switch to the Driver tab and click on the Uninstall Device button.
- Follow the screen option to completely uninstall it.
- Finally, restart your computer. It will just reinstall the device drivers automatically.
Note: You can install a dedicated driver on your computer in case you have it or you could also look for it directly from the website of the manufacturer.
Option 2 – Try running the System File Checker Scan
The SFC or System File Checker scan could detect and automatically repair damaged system files that could be causing Error 0xc0000005. SFC is a built-in command utility which helps in restoring corrupted files as well as missing files. It replaces bad and corrupted system files to good system files. To run the SFC command, follow the steps given below.
- Tap Win + R to launch Run.
- Type in cmd in the field and tap Enter.
- After opening Command Prompt, type in sfc /scannow
The command will start a system scan which will take a few whiles before it finishes. Once it’s done, you could get the following results:
- Windows Resource Protection did not find any integrity violations.
- Windows Resource Protection found corrupt files and successfully repaired them.
- Windows Resource Protection found corrupt files but was unable to fix some of them.
Now restart your computer.
Option 3 – Run the Windows Memory Diagnostic tool
Since this error could be caused by some issues in the memory, you can try running the Windows Memory Diagnostic tool and see if it helps.
- Tap the Win + R keys to open Run and type exe and hit Enter to open the Windows Memory Diagnostic Tool.
- After that, it will give two options such as:
- Restart now and check for problems (Recommended)
- Check for problems the next time I start my computer
- Once your computer has restarted, perform a basic scan or you could also go for the “Advanced” options such as “Test mix” or “Pass count”. Simply tap the F10 key to start the test.
Note: After you select the option, your PC will restart and check for memory-based issues. If it finds any issues, it will automatically fix them and if there’s no issue found, then it’s most likely not a memory-based issue so you should try the other options given below.
Option 4 – Try recreating the Boot records
If your system files are infected and modified by some malware, then it’s no wonder why you’re getting Error 0xc0000005 since this error can also be due to malware. To fix this, you can try to recreate the boot records on your computer. How? Follow these steps:
- Tap the Win + R keys to open the Run dialog box.
- Then type “cmd” in the field and hit Enter to open Command Prompt.
- After that, type in each one of the following commands below and hit Enter right after you input each one of them.
- Del D:WindowsSystem32xOsload.exe
- Del D:WindowsSystem32xNtKrnl.exe
- Del D:WindowsSystem32Driversoem-drv64.sys
- attrib c:bootbcd -h -r –s
- ren c:bootbcd bcd.old
- bootrec /rebuildbcd
- After you input the listed commands above, it will recreate all the files needed inside the boot record.
Option 5 – Try turning off Data Execution Prevention or DEP
You might want to turn off Data Execution Prevention or DEP if it could be the one that’s blocking your process to run a particular program. To disable DEP, refer to the steps below.
- Type “cmd” in the Start Search and then right-click on Command Prompt from the results and select Run as Administrator.
- After that, type the following command and hit Enter to disable DEP:
bcedit.exe /set {current} nx AlwaysOff
- Restart your computer.
Option 6 – Try to fix Registry
- Tap the Win + R keys to open the Run dialog box.
- Next, type “Regedit” in the field and hit Enter to open the Registry Editor.
- After that, go to this registry path: HKEY_LOCAL_MACHINESOFTWAREMicrosoftWindows NTCurrentVersionWindows
- From there, double click on LoadAppInit_DLLs located at the right side of the panel and change its value from “0” to “1”.
- Now restart your computer.
Option 7 – Try checking RAM
You can also check RAM physically and see if it is in an operable condition. You might want to consider replacing it and see if it fixes the error.
Option 8 – Try to disable your antivirus program temporarily
Disabling the antivirus program or any security software installed in your computer might help in resolving the error since there is a good chance that it’s blocking the program from execution due to suspicious behavior. Just don’t forget to enable the antivirus program back again.
Option 9 – Troubleshot the problem in a Clean Boot State
There are some instances that some conflicting programs installed in your computer might be the one that’s causing Error 0xc0000005. To identify which program is causing the problem, you need to put your computer in a Clean Boot State. To do so, follow the steps below.
- Log onto your PC as an administrator.
- Type in MSConfig in the Start Search to open the System Configuration utility.
- From there, go to the General tab and click “Selective startup”.
- Clear the “Load Startup items” check box and make sure that the “Load System Services” and “Use Original boot configuration” options are checked.
- Next, click the Services tab and select the “Hide All Microsoft Services” check box.
- Click Disable all.
- Click on Apply/OK and restart your PC. (This will put your PC into a Clean Boot State. And configure Windows to use the usual startup, just simply undo the changes.)
- From there, start to isolate the problem by checking which one of the programs you installed recently is the root cause of the problem.
Option 10 – Try resetting Windows 10
To fix this error, you can try resetting Windows 10. Doing so won’t get rid of any file in your system – instead of erasing all your media files and documents, this reset option resets all the system settings and files.
Read More
Encountering errors is never a pleasant experience and fixing errors can sometimes take a large amount of time. Also depending on your expertise and knowledge about computers and the operating systems themselves could be determining factor would you try to wrestle with error.

We will explore and analyze the advantages of both methods so you can choose and know when to apply one and when to reach for the other.
Advantages of manual method
Full control is the main advantage of manually solving errors, when you go deep dive into manually fixing problematic issues you are one that has control. Complete freedom is also another, sometimes fixing things can be done in several different ways and when you are the man behind the wheel, you are the one that can choose how to approach and what solution to apply in order to solve the issue.
Disadvantages of using manual method
The main disadvantage that some users might encounter is that they will need to know ins and outs of computer and operating systems’ workings. Of course, the more complicated errors, the more knowledge it will require in order to apply the proper fix. There is also a risk to break something else if the person that is doing the fixing is not fully competent so this is also something to think about.
Another thing that goes against manual fixing is the time it will require in order to actually fix it, some more complex stuff will probably depend on searching for some external resources like searching for compatible drivers for example, or navigating complex registry keys inside Windows.
Advantages of automatic solutions
If you are a user that has no knowledge about how the operating system works, if you do not know what is a registry or how to properly navigate through the Windows folder then the automated solution is for you. The main advantage of automated systems is that you can easily fix errors without any kind of technical knowledge and usually with just one click of a button.
Saving time is also one of the advantages of fully automated solutions because they will work much faster than manually locating the problem and then fixing it. Also, most of these systems will have in place active monitoring that will check always if your system is in top form and alert you when something is not right.
Disadvantages of one-click solutions
Automated solutions are great, they can solve various issues and errors without any knowledge from the user, but they are not perfect. Like security suites sometimes an automated system can misinterpret something as an error when in fact it is not and fixing it could mean some apps not working anymore, luckily you can choose would you like to apply the suggested solution. So if you are using one do not just click fix without looking at what it is trying to fix and maintain.
Another problem with this is the price it is carrying, manually solving your computer error will cost you your time and knowledge but good automated software will come with a price tag. Some people might not be too happy to pay for this kind of application but at the end of the day, it will still be cheaper than a professional technician. The last thing that you should be aware of is that in order for the app to do its work properly it will need to be active all the time, now for modern computers, this is not the issue but for some older ones with a small amount of memory might lead to some slowing them down. This is a price to be paid in order to have your system always errors free.
Should you use an automated solution at all?
This depends on your knowledge and time available, professional IT technicians will not need this type of solution nor will power users but for most common people this will offer computers free of errors for an affordable price.
Read More
Socket Error 10060 — What is it?
Socket Error 10060 is basically a connection time-out error. This error occurs when the remote FTP server does not respond to CuteFTP.
This time-out error occurs after an FTP session is established but even the server doesn’t respond. The error message is displayed in the following format:
‘Connection timed out. A connection attempt failed because the connected party did not properly respond after a period of time, or established connection failed because connected host failed to respond.’
Solution
 Error Causes
 Error Causes
Socket Error 10060 may occur due to multiple reasons including:
- Blocked port
- Data connection incorrect settings
- When the web proxy connection setting does not allow enough time to receive a response from the destination website and therefore the connection is timed-out.
- Registry issues
- Viral infection
Further Information and Manual Repair
Here are some of the best and quick DIY methods to resolve Socket Error 10060 on your PC.
Method 1: Troubleshoot the Web Proxy Connection
This method is workable and effective if Socket Error 10060 occurs only when the web proxy service is used. To execute it, here’s what you need to do: install the Winsock Proxy Client on your PC.
Disable the web proxy settings under the LAN settings on the Connections tab of the internet options. Once you disable the settings, then try to go to the website that you giving you the error. If the site is accessible, the error is resolved.
Method 2: Increase Web Proxy Time out Settings
If disabling the web proxy settings doesn’t work, then try increasing time-out settings. To do so, you will also have to modify the registry.
Remember serious problems may occur if you modify the registry incorrectly.
- Here’s what you need to do, click start, run and then type Regedit in the dialogue box.
- Navigate to the following registry subkey: HKEY_LOCAL_MACHINESYSTEMCurrentControlSetServicesW3ProxyParameters.
- On the right side of the Registry Editor, right-click Request TimeoutSecs and then click Modify.
- Click decimal, they type the number of seconds that you want the proxy service to wait until the session times out.
- To confirm changes, click OK.
- Now restart WWW publishing service by going to start, run and type cmd. Click OK to continue.
- Type net stop iisadmin/y and then press enter. After that type net start iisadmin /y and then press enter. Test the new settings by going to the website that displayed the Socket Error 10060 message.
Method 3: Switch from Passive Mode to Active Port Mode
This method is effective if the error occurs due to incorrect data connection settings.
CuteFTP uses passive mode by default so to ensure the error is resolved, you may have to switch from passive mode to active port mode. To make this switch, open the site manager and then click once on the name of the problem website.
Now on the Type tab change the data connection type to use the port.
Method 4: Configure Firewall Settings
Sometimes the error may also occur due to Firewall. To resolve, configure Firewall settings to allow FTP protocol.
Method 5: Download Restoro
Whether the error occurs due to viral infection or registry issues, it is advisable to download Restoro.
This is an advanced and multi-functional PC fixer embedded with multiple utilities like antivirus and a registry cleaner. The registry cleaning utility removes junk files, cookies, and invalid entries damaging the registry.
It cleans, repairs, and restores the registry while the antivirus removes all types of viruses like spyware and Trojans in seconds thereby resolving socket error code 10060.
It is safe, user-friendly, and compatible with all Windows versions. Click here to download Restoro today.
Read More
Operating systems now give users a feature that allows them to create separate partitions out of HDD or SSD-based storage in order to store data in an organized manner. This small yet powerful feature has always been supported by Microsoft. However, there are times when users might fill up on some particular very soon. This may result in the lack of space for that partition which makes the entire process of using PCs slower since there is a large chunk of files that has to be indexed in a smaller partition. If you are one of the users experiencing this dilemma, you need to either delete the other partitions to allocate their storage to the partition that is short on storage or simply recreate the partition so that all the useless data will be deleted and you can start afresh with the overflowing partition.
In this post, you will be guided on how you can delete any storage partition from your Windows 10 PC via Disk Management, Command Prompt as well as Windows PowerShell.
Option 1 – Delete storage partition via Disk Management
This is one of the simplest ways you can use to delete a storage partition. Go to the WinX Menu and from there, open Disk Management and then select the Drive you want to get rid of, right-click on it and then select Delete Volume.
Option 2 – Delete storage partition via Command Prompt
- Tap the Win + X keys or right-click on the Start button and select Command Prompt (Admin) or you could also type in “cmd” in the Cortana search box and right-click on the Command Prompt icon and then select the “Run as Administrator” option from the context menu.
- Once you have Command Prompt pulled up as admin, type in and enter this command – diskpart
- After entering this command, the Diskpart Utility will start. Diskpart Utility is a command line-based utility just like Command Prompt but it will get a UAC Prompt after you invoke it so you have to click Yes for the UAC Prompt.
- After that, type in list volume and tap Enter to see the list of all the partitions created on your PC. This includes both types of partitions that are visible to a normal user in the File Explorer as well as the ones that are created by Windows 10 by default which helps it in storing the boot files and other essential system files.
- You should see a list of all the partitions made on your computer. Select the partition you want to delete by its Unique Identification number as Volume X where X denotes the Unique Identification Number.
- Next, type in the select volume number command and hit Enter to select the desired volume.
- Then delete the volume you’ve selected and type in the delete volume command and hit Enter to delete the volume you just selected and convert it into unallocated space.
Option 3 – Delete storage partition via Windows PowerShell
- Start by tapping the Win + X keys or simply right click on the Start button and select Windows PowerShell (Admin) or you could also type in “windows powershell” in the Cortana search box and right-click on the Windows PowerShell icon and select the “Run as administrator” option.
- Once you’ve opened the Windows PowerShell, type in the Get-Volume command and hit Enter to get a list of all the partitions on your PC.
- Next, select the drive letter you want to delete and then type in the Remove-Partition –DriveLetter command and hit Enter to delete the selected partition. Note that you need to replace the drive letter with the letter of the partition you want to get rid of.
- After that, it will ask you for confirmation. Just hit the Y key for Yes or hit the A key to say Yes to All. This will delete all the partition you’ve selected and will move them in as unallocated space.
And that’s how you delete a Drive Partition or Volume in Windows 10. Note that you should only follow the last two options given in case the Disk Management is not able to fulfill the user requirements.
Read More
If you receive an error code of “0x80073afc” in Windows Defender after you boot your Windows 10 computer or when you try to manually run Windows Defender, then it could be that the Windows Defender files are corrupted. In such cases, this error could also occur if there is third-party security software that interferes with the smooth functioning of this Microsoft Security Client.
If you are one of the users who are currently facing this issue, then here are some suggestions you can check out to resolve the Windows Defender error code 0x80073afc.
Option 1 – Try to check the status of all the Windows Defender-related services
- In the Cortana search box, type “services” and click on the Services icon to open the Services Manager. Alternatively, you can also tap the Win + R keys to launch the Run prompt and then type “msc” in the field and hit Enter to open the Services Manager
- After opening the Services Manager, look for the following services and make sure that their Startup type is set to their default values:
- Windows Defender Advanced Threat Protection Service – Manual
- Windows Defender Antivirus Network Inspection Service – Manual
- Windows Defender Antivirus Service – Manual
- Windows Defender Firewall Service – Automatic
- You can right-click on each one of the listed services and then select Start to start them.
- And if some of the services don’t have their default values, just double-click on the Services to change the Startup types and select the correct option from the drop-down menu of the Startup type under the Properties box.
- Next, set up the Startup type of these services to Automatic and then click on the Start button if the services are not running yet.
- Now click on the Apply and OK buttons to save the changes made and then see if it fixed the problem or not.
Option 2 – Try to re-register the concerned DLL files
You could also try to re-register some Dynamic Link Library or DLL files on your computer as this could also help in fixing the Windows Defender error.
- In the Start search, type “cmd” and from the search results that appear, right-click on Command Prompt and select the “Run as administrator” option from the context menu.
- After opening Command Prompt as admin, type the following commands one after the other:
- regsvr32 dll
- regsvr32 dll
- regsvr32 dll
- regsvr32 dll
- Once you’ve entered the commands given above, it will re-register the concerned DLL files in your system.
- Now restart your computer for the changes to take effect.
Option 3 – Try to use the Registry Editor
- Tap the Win + R keys to open the Run dialog box,
- Then type “Regedit” in the field and hit Enter to open the Registry Editor.
- Afterward, navigate to this registry path: ComputerHKEY_LOCAL_MACHINESOFTWAREMicrosoftWindows NTCurrentVersionImage File Execution Options
- Next, look for the DWORDs named “MSASCui.exe”, “MpCmdRun.exe”, “MpUXSrv.exe” and “msconfig.exe”.
- If you can’t find these DWORDs, refer to the next given option below.
- Restart your computer.
Option 4 – Check the Environmental Values
- Type “View advanced system settings” in the Windows search box and select the appropriate result.
- This will open a new mini window. From there, go to the Advanced tab and click on the “Environment Variables…” button located at the bottom part of the window.
- Next, look for the “%ProgramData%” variable name and make sure that its value is set to C:/ProgramData.
- Then click OK to save the changes made.
Option 5 – Run the System File Checker Scan
System File Checker or SFC is a built-in command utility that helps in restoring corrupted files as well as missing files. It replaces bad and corrupted system files to good system files. To run the SFC command, follow the steps given below.
- Tap Win + R to launch Run.
- Type in cmd in the field and tap Enter.
- After opening Command Prompt, type in sfc /scannow
The command will start a system scan which will take a few whiles before it finishes. Once it’s done, you could get the following results:
- Windows Resource Protection did not find any integrity violations.
- Windows Resource Protection found corrupt files and successfully repaired them.
- Windows Resource Protection found corrupt files but was unable to fix some of them.
- Restart your computer.
Option 6 – Perform a System Restore
Performing a System Restore on your computer can also help you fix the Windows Defender error. You can do this option either by booting into Safe Mode or in System Restore. If you are already in the Advanced Startup Options, just directly select System Restore and proceed with the next steps. And if you have just booted your PC into Safe Mode, refer to the steps below.
- Tap the Win + R keys to open the Run dialog box.
- After that, type in “sysdm.cpl” in the field and tap Enter.
- Next, go to the System Protection tab then click the System Restore button. This will open a new window where you have to select your preferred System Restore point.
- After that, follow the on-screen instructions to finish the process and then restart your computer and check if the problem is fixed or not.
Read More
![]()
Copyright © 2022, ErrorTools. All Rights Reserved
Trademarks: Microsoft Windows logos are registered trademarks of Microsoft. Disclaimer: ErrorTools.com is not affiliated with Microsoft, nor claim direct affiliation.
The information on this page is provided for information purposes only.
![]()
Repair your PC with one click
Please be aware that our software needs to be installed on a PC system with Windows on it, Open this website on a desktop PC and download the software for easy and quick elimination of your issues.
The MOZILLA_PKIX_ERROR_MITM_DETECTED error occurs when affected users attempt to access one or more nameservers. This is typically reported with duckduckgo.com, reddit.com and a few other HTTPS websites. For most affected users, the issue only occurs on Mozilla Firefox – the website is accessible from other browsers.
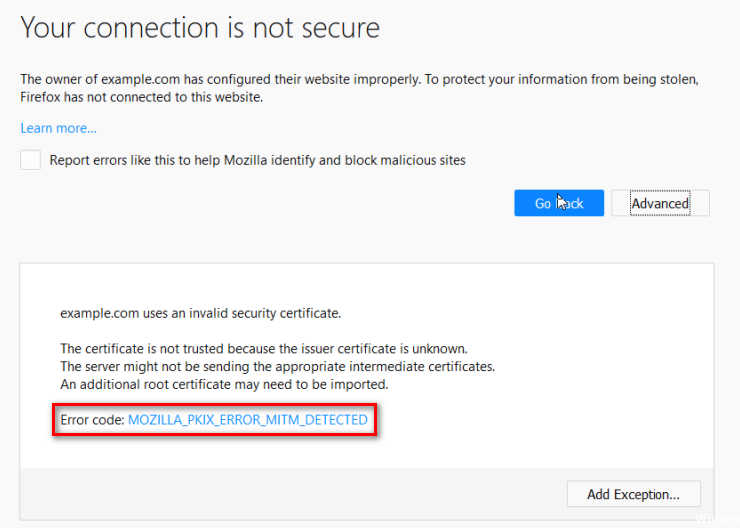
Most commonly this issue is caused by a 3rd party AV interference caused by HTTPS scanning or filtering. You can fix this either by disabling the security feature or by uninstalling the security suite altogether.
Although it’s not recommended, you can also avoid this error by disabling the HTTPS certificate check from your Mozilla Firefox browser. This is dangerous, mainly because this error can also be occurred by a malware app (Legendas) that is known to mine cryptocurrencies and extract behavioral data.
In rare circumstances, a VPN network or a Proxy server can also trigger this error in your Firefox browser.
1. Enabling HTTPS Scanning/ filtering
As it turns out, one of the most common causes with the potential of triggering this issue is a security option that’s typically enforced by 3rd party AV suite. Avast, Kaspersky, ESET and a few other security suites all use HTTPS scanning/filtering functionality.
In most cases, this issue will occur due to a false positive that convinces your browser that a MITM (man in the middle) is underway on your computer. In most cases, this happens because a 3rd party AV is sending details about your connections (IIRC).
Of course, depending on the 3rd suite that you’re using, you might find it under different names in the settings menu:
Scan SSL
Enable SSL / TLS filtering
Enable HTTPS scanning
Show Safe Results Only
If this scenario is applicable and you’re using a 3rd party suite that you suspect might be using HTTPS scanning or filtering, you’ll need to access your AV settings and disable the option that might be causing the issue.
If you don’t know how to do this yourself, search online for specific steps.
Note: Here’s how to fix the SSL_ERROR_BAD_CERT_DOMAIN in Mozilla.
For example, in ESET Smart Security, you can do this by going to Web and Email > SSL / TLS and disabling the toggle associated with Enable SSL / TLS protocol filtering. After you do this, click Ok to save the changes, then click Yes at the UAC (User Account Control) to grant administrative privileges.

After you do this, restart your machine and see if the issue is resolved at the next system startup. In case you’re still encountering the same MOZILLA_PKIX_ERROR_MITM_DETECTED error even after you disabled HTTPS filtering, move down to the next potential fix below.
2. Disabling HTTPS certificate check (not recommended)
If you want to expedite the MOZILLA_PKIX_ERROR_MITM_DETECTED error without to much hassle, disabling HTTPS certificate checks is about your quickest option. But I would not recommend going this route unless you really know what you are doing.
Doing this will certainly stop the error from occurring, but it will also leave your system vulnerable to security threats that originate from your web surfing.
However, if you’re still determined to disable HTTPS certificate check, here’s how to do this from the hidden ‘about:config‘ advanced configuration preferences menu of Mozilla Firefox:
- Open Mozilla Firefox, paste ‘about:config‘ inside the navigation bar and press Enter to open up the Advanced Settings menu of this browser.

about:config in Firefox - Once you see the Proceed with Caution prompt, click on Accept the Risk and Continue button to make the advanced settings menus visible.

Mozilla Firefox about:config - After you manage to get inside the Advanced Preferences menu, use the search bar to find the following preference:
security.enterprise_roots.enabled
- Once you manage to find the correct settings, change it’s value from false to true by clicking on the switch icon.

Changing the value of security.enterprise_roots.enabled - Once the modification has been enforced, restart your computer and see if the issue is resolved at the next startup.


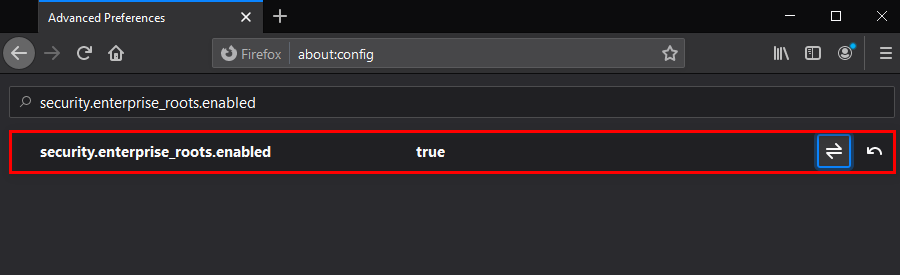
In case the same MOZILLA_PKIX_ERROR_MITM_DETECTED issue is still occurring, move down to the next potential fix below.
3. Uninstall Legendas and disable the Com+ Leg Service (if applicable)
As it turns out, this particular issue can also occur due to a process belonging to a subtitle program Legendas. Apparently, this application is most likely taking advantage of it’s permissions to mine cripto-croins using the RAM that’s made available to them. Even more, there are security concerns that the application is also after personal user information and behavior.
Firefox and a few other browsers will detect that it’s sending data against regulations so it will trigger the MOZILLA_PKIX_ERROR_MITM_DETECTED as a result.
If you got this Legendas application installed on your computer (especially windows 3.7), you need to uninstall it ASAP. Even more, it’s known to leave behind a process that continues to mine data, so you need to remove that also.
And as an extra security precaution, you should also enforce a security scan, just to make sure you are completely saved.
Here’s a quick on getting rid of Legendas and it’s associated process:
- Press Windows key + R to open up a Run dialog box. Next, type ‘appwiz.cpl’ and press Enter to open up the Programs and Features menu.

Type appwiz.cpl and Press Enter to Open Installed Programs List - Once you’re inside the Programs and Features menu, scroll down through the list of installed applications and locate the entry associated with Legendas.
- When you see it, right-click on it and choose Uninstall from the newly appeared context menu.

Uninstalling Legendas - Inside the uninstallation prompt, follow the steps to get rid of it for good. Once the uninstallation is complete, restart your computer and wait for the next startup to complete.
- Press Windows key + R to open up a Run dialog box again. Next, type ‘services.msc’ and press Enter to open up the services screen.

Type “services.msc” into the Run dialog and press Enter Note: If you see the UAC (User Account Control) prompt, click Yes to grant admin access.
- Inside the Services screen, move over to the right section of the screen and identify the service called COM+ Leg Service. When you see it, double-click on it, then select the General tab and change the Startup type to Disabled and click Apply to save the changes.

Disabling the COM+ Leg Service via the Services screen - After the service is restarted, restart your computer and, once the next startup is complete, initiate a scan with Malwarebytes in order to make sure that the malware infection is dealt with.

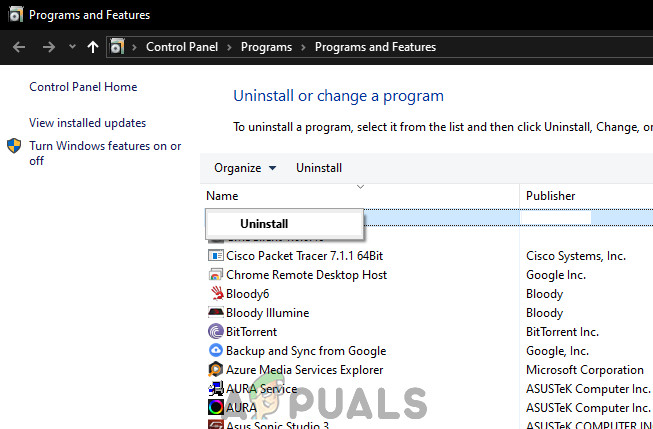
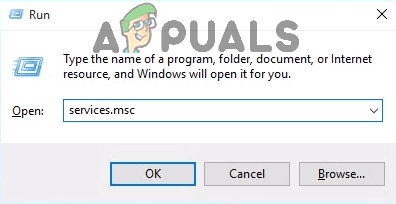
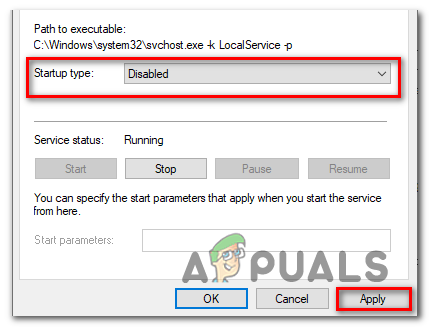
In case this scenario wasn’t applicable or you’re still encountering this issue even after removing the malware, move down to the next potential fix below.
4. Disable VPN or Proxy server
If we were to analyze the error code, it’s essentially saying that some kind of the third party is intercepting the HTTPS connection to the website that your browser is attempting to load.
Well, another possible culprit that might cause this problem is a VPN or Proxy server that is filtering the connection. Several affected users have confirmed that they managed to fix the issue after they uninstalled their VPN client or disabled the Proxy server (depending on the service that they used).
To accommodate both potential scenarios, we created two different guides that will help you resolve the MOZILLA_PKIX_ERROR_MITM_DETECTED:
Disable Proxy Server
- Open up a Run dialog box by pressing Windows key + R. Next, from the text box, type ‘ms-settings:network-proxy’ and press Enter to open up the Proxy tab of the native Settings app.

Run dialog: ms-settings:network-proxy - Once you manage to arrive inside the Proxy tab, scroll all the way down to the Manual proxy setup section, then disable the toggle associated with ‘Use a proxy server‘.

Disabling the use of a proxy server - After you enforce this modification, restart your computer and see if the problem is fixed at the next system startup.
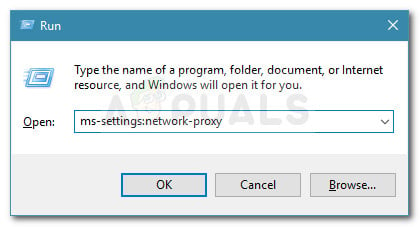
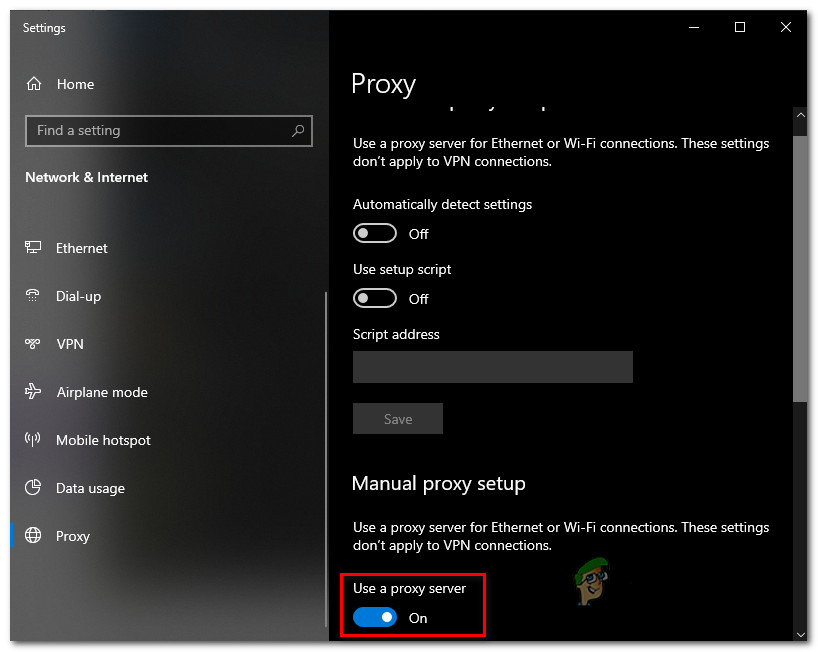
Disable VPN Connection
- Open up a Run dialog box by pressing Windows key + R. Next, once you’re inside the text box, type ‘appwiz.cpl’ and press Enter to open up the Programs and Features menu.
Type appwiz.cpl and Press Enter to Open Installed Programs List - Inside the Programs and Features screen, scroll down through the list of installed applications and locate the 3rd party VPN that you suspect might be causing the issue. When you see it, right-click on it and choose Uninstall from the newly appeared context menu.

Uninstalling a VPN tool - Inside the uninstallation screen, follow the instructions to get rid of the application. Once the process is complete, restart your machine and see if the problem is resolved at the next startup.
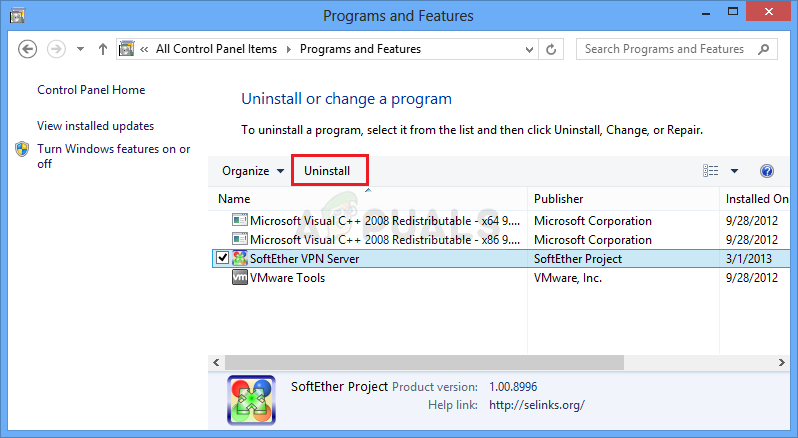
In case this scenario wasn’t applicable, move down to the final fixing method below.
5. Uninstall 3rd party firewall
We already established that this issue can be easily be caused by actual malware that is after data & crypto mining. However, it turns out that this problem can also occur due to an antivirus that is coincidentally acting like malware.
In most cases, an AV will end up causing this issue in Firefox because it’s acting like a MITM (man in the middle) is underway on your computer. In most cases, this happens because a 3rd party AV is sending details about your connections (IIRC).
Several affected users that we’re also encountering this issue have reported that they only managed to fix the issue after they uninstalled the 3rd party suite from their computer and ensured that they didn’t leave behind any remnant files that might still cause this problem.
Here’s a quick guide on doing this:
- Press Windows key + R to open up a Run dialog box. Next, type ‘appwiz.cpl’, then press Enter to open up the Programs and Features menu.

Type “appwiz.cpl” into the Run dialog and press Enter - Once you see the list of applications, look for the entry associated with your AV, then right-click on it and choose Uninstall to initiate the uninstallation procedure.

Select Avast and Click Uninstall - Inside the uninstallation prompt, follow the on-screen instructions to complete the procedure, then restart your computer.
Note: As an extra step, you can follow this guide to ensure that you’re not leaving behind any 3rd Party AV files.
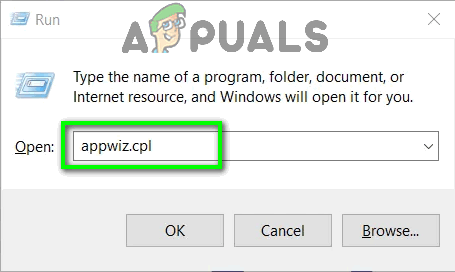
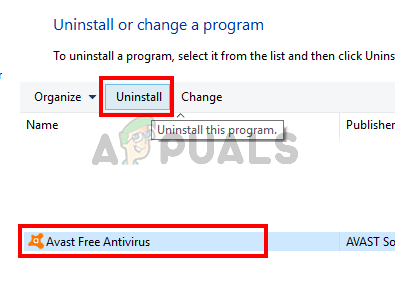
При попытке открыть некоторые сайты HTTPS неожиданно браузер возвращает ошибку MOZILLA_PKIX_ERROR_MITM_DETECTED. Она указывает на то, что предоставленный сертификат, который требуется для установки защищенного соединения, не известен Firefox. Проблема возникает только в Firefox, в других браузерах сайт доступен.
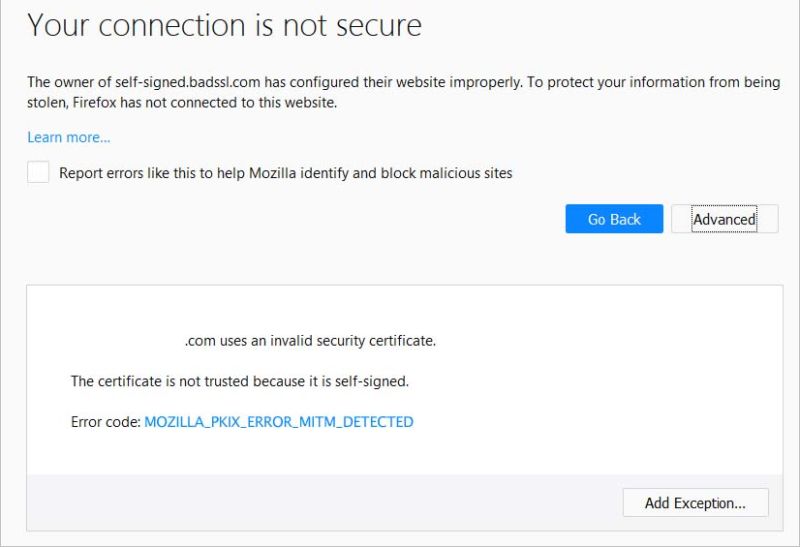
Содержание
- 1 Чем вызвана ошибка?
- 2 Отключение фильтрации HTTPS
- 3 Отключение проверки сертификата HTTPS
- 4 Отключение клиента VPN или прокси-сервера
- 5 Удаление Legendas и отключение зависимой службы
Чем вызвана ошибка?
В большинстве случаев к этой ошибке причастен сторонний антивирус. В этом случае нужно отключить функцию сканирования или фильтрации HTTPS, либо полностью удалить антивирус.
Хотя это делать не рекомендуется, можно исправить ошибку путем отключения проверки сертификата HTTPS в браузере Mozilla Firefox. Это небезопасно, поскольку ошибка может также вызвана вредоносной программой, в частности Legendas, которая добывает криптовалюты и извлекает поведенческие данные.
Отключение фильтрации HTTPS
Одной из самых распространенных причин, вызывающей ошибку MOZILLA_PKIX_ERROR_MITM_DETECTED, является параметр безопасности, который используется сторонними антивирусными приложениями. Антивирус Касперского, Eset и прочие используют функцию сканирования или фильтрации HTTPS.
Во многих случаях ошибка возникает из-за ложного срабатывания, которое убеждает браузер, что на компьютере выполняется MITM (атака «человек посередине»). Это происходит по причине того, что антивирус передает сведения о ваших соединениях (IIRC).
Чтобы исправить ошибку, попробуйте отключить эту функцию. Ее наименование отличается от используемого антивирусного приложения и может быть следующим: «сканирование SSL», «включить фильтрацию SSL/TLS», «проверка HTTPS», «Show safe results only» и прочие.
Например, если используете ESET Smart Security, перейдите в раздел «Интернет и электронная почта» — SSL/TLS и отключите переключатель на опции включения фильтрации протоколов SSL / TLS. Сохраните изменения на «ОК», и перезагрузите компьютер.
Попробуйте открыть сайт, на котором сталкивались с ошибкой MOZILLA_PKIX_ERROR_MITM_DETECTED.
Отключение проверки сертификата HTTPS
Этот способ предоставляется в информационных целях, постольку применять его не рекомендуется. Несмотря на то, что с его помощью можно быстро избавиться от ошибки MOZILLA_PKIX_ERROR_MITM_DETECTED, он также сделает систему уязвимой для угроз безопасности. Чтобы отключить проверку сертификатов, следуйте инструкции:
В адресной строке Mozilla Firefox наберите «about:config» для входа в меню расширенных настроек. При отображении экрана «Продолжайте с осторожностью» нажмите на «Принять риск и продолжить».
В навигационной строке наберите:
security.enterprise_roots.enabled
При отображении параметра переключите ее значение с false на true.
После применения изменений перезагрузите компьютер и перейдите на сайт, доступ к которому был заблокирован ошибкой MOZILLA_PKIX_ERROR_MITM_DETECTED.
Отключение клиента VPN или прокси-сервера
Препятствовать установке защищенного HTTPS-соединения между сайтом и Firefox также может установленный VPN-клиент или прокси-сервер. Поэтому для устранения ошибки MOZILLA_PKIX_ERROR_MITM_DETECTED, попробуйте их отключить.
Отключение прокси-сервера
Откройте вкладку Прокси командой ms-settings:network-proxy из окна «Выполнить» (Win + R).
В правой части окна отключите переключатель «Использовать прокси-сервер».
Перезагрузите компьютер и проверьте, устранена ли проблема.
Удаление VPN-клиента
Откройте раздел Удаления или изменения программ командой appwiz.cpl из окна Win + R.
Найдите в списке приложение VPN, щелкните на него правой кнопкой мыши и выберите «Удалить». Следуйте инструкциям на экране до завершения удаления и перезагрузите компьютер.
После попробуйте открыть сайт в Firefox, который вызывал ошибку MOZILLA_PKIX_ERROR_MITM_DETECTED.
Удаление Legendas и отключение зависимой службы
Проблема также может возникнуть из-за процесса, принадлежащего программе Legendas. Приложение, имеющее разрешение на майнинг криптовалют, использует оперативную память, которая ему доступна. Кроме того, есть опасения безопасности, что оно извлекает личную информацию о пользователе и поведенческие данные.
Firefox и несколько других браузеров при обнаружении неправомерной отправки данных выбрасывают ошибку MOZILLA_PKIX_ERROR_MITM_DETECTED. Поэтому, чтобы избежать ошибки, нужно удалить Legendas. Более того, он оставляет после себя процесс, который продолжает добывать данные, поэтому также требуется его удаление.
Перейдите в раздел «Программы и компоненты» командой appwiz.cpl из окна «Выполнить» (Win + R).
Найдите в списке Legendas, щелкните на него правой кнопкой мыши и выберите «Удалить». Подтвердите все запросы, возникающие в процессе удаления. После перезагрузите компьютер.
Откройте системные службы командой services.msc из окна «Выполнить».
Найдите запись COM+ Leg Service и дважды щелкните на ней, чтобы открыть свойства.
На вкладке «Общие» раскройте список типа запуска, установите значение «Отключена». Затем нажмите на «Применить», чтобы сохранить изменения.
После перезагрузки компьютера запустите сканирование Malwarebytes для проверки, что вредоносная инфекция устранена.
Download PC Repair Tool to quickly find & fix Windows errors automatically
Having trouble browsing multiple websites on Firefox? Are they mostly on HTTPS? If you receive error message, MOZILLA PKIX ERROR MITM DETECTED or ERROR SELF SIGNED CERT or SEC ERROR UNKNOWN ISSUER, then it means that Firefox is not able to trust certificates issued on secured websites.

This means that something on your system or network is intercepting your connection and injecting certificates. When that happens, Firefox does not trust it. This usually happens when malware tries to replace a legitimate certificate with its certificate. Surprisingly, this also happens with security software. They keep a tab on a secure connection and create a false positive. For example:
In Microsoft Windows accounts protected by Family Safety settings, secure connections on popular websites like Google, Facebook and YouTube might be intercepted and their certificates replaced by a certificate issued by Microsoft in order to filter and record search activity.
Similarly, in a corporate network, there might be a monitoring/filtering product which could be replacing certificates.
Read: What are Man In The Middle (MITM) attacks?
Multiple users have reported this issue when using the Nightly version of Firefox. If that’s the case, try accessing secure websites with stable build only. Especially, if its related to payments. However, if you are not doing that, here are two solutions you can try.
1] Turn off HTTPS Scanning in your Anit-Virus & Security Software
Every Security based software has a Security option. It allows you to turn off HTTPS scanning functionality. They are available under different names. I have mentioned a few of them below:
- Scan SSL
- Show safe result
- Do not scan encrypted connections
Make sure to find what is applicable for your security software by visiting their help section.
2] Disable security.enterprise_roots.enabled
You can also disable HTTPS certificate check on Firefox. Again, not recommended, but do it if you have to do it.

- Type about: config in the Firefox address bar, and hit enter.
- Confirm the info message in case it shows up.
- Search for the preference security.enterprise_roots.enabled.
- When you find it, double-click it and change its value to true and restart firefox once
This will import all custom certificates from any other security software into Firefox. This, in turn, will make sure to mark those sources as trusted, and it will not throw any error.
Let us know this helped you to fix MOZILLA_PKIX_ERROR_MITM_DETECTED with multiple HTTPs websites.

Ashish is a veteran Windows and Xbox user who excels in writing tips, tricks, and features on it to improve your day-to-day experience with your devices. He has been a Microsoft MVP (2008-2010).