Содержание
- Error — задача
- Параметры
- Remarks
- Пример
- Error task
- Parameters
- Remarks
- Example
- Диагностика сбоев задач MSBuild
- Определение задачи, завершиющейся сбоем
- Дополнительные сведения о сбоях
- Практическое руководство. Игнорирование ошибок в задачах
- Использование атрибута ContinueOnError
- Игнорирование ошибки в задаче
- Пример
- Diagnose MSBuild task failures
- Identify the failing task
- Find more failure information
Error — задача
Останавливает сборку и регистрирует ошибку в журнале событий на основании вычисленного условного оператора.
Параметры
В следующей таблице приводятся параметры задачи Error .
| Параметр | Описание |
|---|---|
| Code | Необязательный параметр String .
Код ошибки для связи с ошибкой. |
| File | Необязательный параметр String .
Имя файла, содержащего ошибку. Если имя файла не указано, используется файл, содержащий задачу Error. |
| HelpKeyword | Необязательный параметр String .
Ключевое слово справки для связи с ошибкой. Только для внутреннего использования. |
| HelpLink | Необязательный параметр String .
Ссылка на дополнительные сведения об ошибке. |
| Text | Необязательный параметр String .
Текст ошибки, регистрируемый в журнале MSBuild, если результат вычисления параметра Condition оказывается равным true . |
Задача Error позволяет передавать текст ошибок в средства ведения журнала и останавливать выполнение сборки в проектах MSBuild.
Если результат вычисления параметра Condition оказывается равным true , сборка останавливается, а ошибка регистрируется в журнале. Если параметр Condition не существует, ошибка регистрируется в журнале, а выполнение сборки останавливается. Дополнительные сведения о ведении журнала см. в разделе Получение журналов сборки.
Помимо перечисленных выше параметров, эта задача наследует параметры от класса TaskExtension, который, в свою очередь, наследует от класса Task. Список этих дополнительных параметров и их описания см. в статье Базовый класс TaskExtension.
HelpKeyword используется Visual Studio для поддержки функции контекстной справки (F1). С помощью HelpLink можно связать страницу справки в Интернете с сообщением об ошибке.
Пример
В следующем примере кода проверяется, что установлены все обязательные свойства. Если это не так, проект инициирует событие ошибки и регистрирует в журнале значение параметра Text задачи Error .
Источник
Error task
Stops a build and logs an error based on an evaluated conditional statement.
Parameters
The following table describes the parameters of the Error task.
| Parameter | Description |
|---|---|
| Code | Optional String parameter.
The error code to associate with the error. |
| File | Optional String parameter.
The name of the file that contains the error. If no file name is provided, the file containing the Error task will be used. |
| HelpKeyword | Optional String parameter.
The help keyword to associate with the error. For internal use only. |
| HelpLink | Optional String parameter.
A link to more information about the error. |
| Text | Optional String parameter.
The error text that MSBuild logs if the Condition parameter evaluates to true . |
The Error task allows MSBuild projects to issue error text to loggers and stop build execution.
If the Condition parameter evaluates to true , the build is stopped, and an error is logged. If a Condition parameter does not exist, the error is logged and build execution stops. For more information on logging, see Obtaining build logs.
In addition to the parameters listed above, this task inherits parameters from the TaskExtension class, which itself inherits from the Task class. For a list of these additional parameters and their descriptions, see TaskExtension base class.
HelpKeyword is used by Visual Studio to support the contextual help feature (F1). You can use HelpLink to associate an online help page with an error message.
Example
The following code example verifies that all required properties are set. If they are not set, the project raises an error event, and logs the value of the Text parameter of the Error task.
Источник
Диагностика сбоев задач MSBuild
MSB6006 вызывается, когда класс, производный от ToolTask, выполняет процесс средства, возвращающий ненулевой код выхода, если задача не зарегистрировала более конкретную ошибку.
Определение задачи, завершиющейся сбоем
При возникновении ошибки задачи в первую очередь нужно определить задачу, которая завершается сбоем.
В тексте ошибки указывается имя инструмента (понятное имя, предоставленное реализацией задачи ToolName, или имя исполняемого файла) и числовой код выхода. Например, в error MSB6006: «custom tool» exited with code 1. имени средства используется custom tool код 1 выхода.
Чтобы найти неудачную задачу MSBuild, выполните следующие действия.
В сборках командной строки: если сборка была настроена для включения сводки (по умолчанию), сводка будет выглядеть следующим образом:
Этот результат указывает, что ошибка произошла в задаче, определенной в строке 19 файла S:MSB6006_demoMSB6006_demo.csproj , в целевом объекте с именем InvokeToolTask в проекте S:MSB6006_demoMSB6006_demo.csproj .
В пользовательском интерфейсе Visual Studio: те же сведения доступны в списке ошибок Visual Studio в столбцах Project File и Line .
Дополнительные сведения о сбоях
Эта ошибка возникает, если задача не регистрирует определенную ошибку. Сбой регистрации ошибки часто возникает, так как в задаче не предусмотрено распознавание формата ошибки, генерируемой средством, которое она вызывает.
Правильно работающие средства обычно выдают некоторые контекстные сведения или сведения об ошибках в стандартный вывод или поток ошибок, а задачи записывают эти сведения по умолчанию. Просмотрите записи журнала до возникновения ошибки, чтобы получить дополнительные сведения. Для сохранения этих сведений может потребоваться перезапустить сборку с более высоким уровнем ведения журнала. Надеемся, что дополнительный контекст или ошибки, обнаруженные в журнале, позволят выявить основную причину проблемы. В противном случае может потребоваться сузить потенциальные причины, проверив свойства и элементы, которые являются входными данными для неудающейся задачи.
MSBuild распознает определенный формат выходных данных диагностики. Сведения об этом формате задокументированы в разделе Формат MSBuild и Visual Studio для диагностических сообщений.
Источник
Практическое руководство. Игнорирование ошибок в задачах
Иногда требуется, чтобы сборка была отказоустойчивой при выполнении определенных задач. В случае появления ошибки в таких некритических задачах сборку можно продолжить, поскольку это не помешает получить требуемый результат. Например, если в проекте используется задача SendMail для отправки сообщения электронной почты после сборки каждого компонента, вы можете пожелать продолжить сборку до полного завершения даже в том случае, если почтовые серверы оказываются недоступными и не удается отправить сообщения о состоянии. Или, например, если промежуточные файлы обычно удаляются во время сборки, вы можете пожелать продолжить выполнение сборки до полного завершения даже в том случае, если эти файлы не удается удалить.
Использование атрибута ContinueOnError
Атрибут ContinueOnError элемента Task определяет, следует ли остановить или продолжить сборку в случае, если в задаче произошла ошибка. Этот атрибут также контролирует, обрабатываются ли ошибки в виде ошибки или предупреждения, когда сборка продолжается.
Атрибут ContinueOnError может содержать одно из следующих значений:
WarnAndContinue или true. При сбое задачи последующие задачи в элементе Target и сборке продолжают выполняться, а все ошибки из задачи рассматриваются как предупреждения.
ErrorAndContinue. При сбое задачи последующие задачи в элементе Target и сборке продолжают выполняться, а все ошибки из задачи рассматриваются как ошибки.
ErrorAndStop или false (по умолчанию). При сбое задачи остальные задачи в элементе Target и сборке не выполняются, и считается, что возник сбой всего элемента Target и всей сборки.
Версии платформы .NET Framework, предшествовавшие 4.5, поддерживали только значения true и false .
Значением свойства ContinueOnError по умолчанию является ErrorAndStop . Если задать для атрибута значение ErrorAndStop , можно сделать такое поведение явным для всех объектов, считывающих файл проекта.
Игнорирование ошибки в задаче
Используйте атрибут ContinueOnError задачи. Пример:
Пример
В следующем примере кода показано, что целевой объект Build по-прежнему выполняется, а сборка считается успешной, даже если задача Delete завершается с ошибкой.
Источник
Diagnose MSBuild task failures
MSB6006 is emitted when a ToolTask–derived class runs a tool process that returns a nonzero exit code if the task did not log a more specific error.
Identify the failing task
When you encounter a task error, the first step is to identify the task that is failing.
The text of the error specifies the tool name (either a friendly name provided by the task’s implementation of ToolName or the name of the executable) and the numeric exit code. For example, in error MSB6006: «custom tool» exited with code 1. the tool name is custom tool and the exit code is 1 .
To find the failed MSBuild task:
In the command-line builds: If the build was configured to include a summary (the default), the summary will look like this:
This result indicates that the error occurred in a task defined on line 19 of the file S:MSB6006_demoMSB6006_demo.csproj , in a target named InvokeToolTask , in the project S:MSB6006_demoMSB6006_demo.csproj .
In the Visual Studio UI: The same information is available in the Visual Studio error list in the columns Project , File , and Line .
Find more failure information
This error is emitted when the task did not log a specific error. The failure to log an error is often because the task is not configured to understand the error format emitted by the tool it calls.
Well-behaved tools generally emit some contextual or error information to their standard output or error stream, and tasks capture and log this information by default. Look in the log entries before the error occurred for additional information. Rerunning the build with a higher log level may be required to preserve this information. Hopefully, the additional context or errors identified in logging reveal the root cause of the problem. If not, you may have to narrow down the potential causes by examining the properties and items that are inputs to the failing task.
MSBuild recognizes a specific diagnostic output format. The details of this format are documented at MSBuild and Visual Studio format for diagnostic messages.
Источник
MSBuild error codes
User-facing errors encountered in MSBuild should have an error code in the form of a four-digit number prefixed by MSB, for example MSB3021: Unable to copy file.
Errors that should not be user-facing (because they’re a result of a problem internal to MSBuild like an InternalErrorException) do not need an error code.
This code is defined in the .resx file that includes the string representation of the error. For example, MSB3021 is defined as:
  <data name="Copy.Error">
    <value>MSB3021: Unable to copy file "{0}" to "{1}". {2}</value>
    <comment>{StrBegin="MSB3021: "}</comment>
  </data>
This is consumed with a method that extracts the error code from the string and ensures that the appropriate metadata is applied to the error event:
Log.LogErrorWithCodeFromResources("Copy.Error", SourceFiles[i].ItemSpec, DestinationFolder.ItemSpec, e.Message);
MSBuild error codes must be unique (ideally across all versions of MSBuild).
Error code ranges
MSBuild error codes are divided into ranges referred to as buckets. The initial digit of the code is the coarsest bucket:
MSB1xxxerrors are problems encountered when handling the MSBuild command line.MSB2xxxerrors are problems encountered in the (deprecated)Microsoft.Build.Conversionprocess.MSB3xxxerrors are problems encountered in tasks shipped as part ofMicrosoft.Build.Tasks.Core.dll.MSB4xxxerrors are problems encountered in the MSBuild engine.MSB5xxxerrors are problems encountered in code that is shared between multiple MSBuild assemblies.MSB6xxxerrors are problems encountered inMicrosoft.Build.Utilities.
Creating a new error code
To create a new error code, first find the Strings.resx file for the assembly in which you plan to produce the error.
A comment at the bottom of the .resx will have an index of the error codes it contains and possibly a list of retired error codes, for example
The engine message bucket is: MSB4001 - MSB4999

MSB4128 is being used in FileLogger.cs (can't be added here yet as strings are currently frozen)
MSB4129 is used by SharedXmlUtilities.cs (can't be added here yet as strings are currently frozen)

Next message code should be MSB4259.

Some unused codes which can also be reused (because their messages were deleted, and UE hasn't indexed the codes yet):
    <none>

Retired codes, which have already shipped, but are no longer needed and should not be re-used:
MSB4056
MSB4005
...

Don't forget to update this comment after using a new code.
Finding a code number
You should select the next message code mentioned in the comment, after doing a repo-wide search to make sure it’s not already in use. If it is, increment the number in the comment and try again.
The MSB3xxx bucket for Tasks is subdivided into buckets for each individual task. If a bucket is exhausted, allocate another bucket range for that task with the comment Task: {whatever} overflow and allocate a new code within that range.
Adding a new error
After finding a not-in-use-or-retired error number, add a new resource with a meaningful name whose string begins with that error, a colon, and a space. Add this in the resx file in numeric order.
  <data name="FeatureArea.DescriptiveName">
    <value>MSBxxxx: User-facing description of the error. Use {0} specifiers if you will need to fill in values at runtime.</value>
    <!-- Only if necessary:
    <comment>LOCALIZATION: Notes to translators. Mention the nature of {} blocks, and any key words or phrases that might get mistranslated.</comment>
     -->
  </data>
Then use the new resource’s name in code when throwing or logging the error.
Localization
Error codes are never localized, but the text in the error resource will be localized into many languages. After adding a new error resource (as with any resource change), run a full build to generate placeholder localizations in *.xlf files. The strings will be translated by a localization team.
This follows the overall repo localization process.
TL;DR: MSBuild is at the heart of every .NET project. It’s the system that ultimately invokes tools like NuGet or the C# compiler. Additional tools can be integrated via custom MSBuild tasks, however, working with these can be very daunting at first. Knowing a few tricks and tools, the process of implementing, packaging, and debugging a custom task can be greatly simplified. A sample project is available on GitHub.
Much of the tooling around .NET projects ends up having to integrate with MSBuild, the low-level build system in the .NET ecosystem. A few examples of these tools are:
- Refit – REST APIs are generated based on interface declarations before compilation
- Fody – IL code gets rewritten after compilation to add null-checks, merge assemblies to a single file, notify on property changes and much more
- NSwag – Swagger specifications, C#/TypeScript clients and proxies are generated from C# ASP.NET controllers as part of the build
- GitVersion – Semantic versions are calculated based on our commit history and propagated into MSBuild properties before compilation to make them part of the assembly metadata
Some of the scenarios that involve code generation could eventually move to Source Generators, which are already available in the .NET 5 previews. Source generators remove a lot of the burden of writing MSBuild tasks – and sharing workspaces – but still aren’t easy to debug:
It should be available for debugging, its a pain to debug this thing but much nicer than writing an msbuild task.
Clearly that sets the mood for what a pleasure it is to write an MSBuild task! 😅
MSBuild Integration Options
When we want hook into the execution of MSBuild, we have several options:
- Inline Tasks – We can write code fragments directly into
.targetsfiles. They will be compiled into tasks by theRoslynCodeTaskFactoryand executed by MSBuild when run. This is great for drafting ideas, but falls short in maintainability and debugging. - Exec Tasks – Any executable can be invoked in a similar way to
Process.Start. We can capture output, validate exit codes, or define regular expressions for custom error/warning messages. However, we will miss some integration points, and if we need to get complex data out of the process, we’ll have to encode it in a single line and decode it in the target. - Custom Tasks – We can operate with MSBuild infrastructure directly, including
ITask,IBuildEngine, andITaskItemobjects. This allows us to log error/warning/info events, inspect item groups with their metadata, create more object-like results, and even to support incremental builds.
Since custom tasks are the most scalable solution, we will put focus on them for the rest of this article.
Implementing the Task
From my own experience, I’d recommend to keep the task assembly small and move complex logic into their own projects. This is also the approach most of the projects mentioned above have taken. Some of the most important types for custom MSBuild tasks are ITask, IBuildEngine, and ITaskItem. In order to gain access, we need to add references for them:
Note that the MSBuild references are part of every MSBuild installation and therefore should not be deployed with our final NuGet package. In order to achieve that, we set the
CopyLocalandPublishattribute for each reference tofalse. We will also need to remove those references from theReferenceCopyLocalPathsitem group:
As already hinted, our task assembly will likely have dependencies to other projects or NuGet packages. A while back, this would have taken a huge effort:
task assemblies that have dependencies on other assemblies is really messy in MSBuild 15. Working around it could be its own blog post
Meanwhile we’re at MSBuild 16, and some of the problems that Nate described in his blog have already been addressed. I am by no means an expert in properly resolving dependencies, but Andrew Arnott came up with the
ContextAwareTask– originally used in Nerdbank.GitVersion – which is working out great for many folks:
As for the actual implementation, we won’t go into too much detail but focus on the most important bits. MSBuild calls the
Executemethod which will later delegate toExecuteInnerand its return value signals whether the task succeeded or failed. The inheritedBuildEngineproperty allows us to log information, warning, and error messages. Users of the task can opt-in to treat warnings of the task as errors by setting theTreatWarningsAsErrorsproperty. TheStringParameterproperty is a required input value. TheFilesParameteritem group is optional and can contain a list of files. In many situations, aITaskItemcan also be a ordinary string value, like forPackageReference.Wiring the Task
In this next step we’ll wire up the task implementation in a
.targetsfile, which will be included in our NuGet package and automatically loaded from a referencing project. In this file – hereCustomTasks.targetswe’ll load the task assembly, create a new XML task element, define a couple default values, and create a new target that calls the task:
Defining the
CustomTasksAssembly(Line 5) does not only help us to not repeat ourselves when we reference multiple tasks from the same assembly (Line 8), but is also great for debugging, as we’ll see later. Also note that we’re using a couple of well-known MSBuild properties likeMSBuildThisFileDirectoryandMSBuildThisFileNameto avoid magic strings being scattered around our file. Following best practices makes renaming or relocating the task more effortless! The task invocation also uses theContinueOnErrorproperty (Line 18) – one of the common properties available to all task elements.Creating the NuGet Package
As already mentioned, we won’t pack the MSBuild tasks project directly, but have another project
MainLibraryinclude the task infrastructure in its package. In order to load theCustomTasks.targetsfile from the previous section, we create anotherMainLibrary.propsandMainLibrary.targetsfile in ourMainLibraryproject:
In the
.propsfile, we’re defining a propertyCustomTasksDirectorythat points to the directory containing our task. Note that we need to take the MSBuild runtime into account by checkingMSBuildRuntimeType(Line 5-6). A project targetingnetcoreapp2.1would still use .NET Framework for running MSBuild inside Visual Studio, while the same project would use MSBuild for .NET Core when compiling viadotnet buildfrom the command-line. I.e., it must not be subject to framework version folder structure. In the.targetsfile, we will import theCustomTasks.targetsfile:
We also add a condition to check if
CustomTasksEnabledis enabled (Line 4). This little trick allows us to easily opt-out from attaching the task. Faulty MSBuild tasks have a high chance to completely break a referencing project and to cause confusion about where the error originates from:I really try to like @JetBrainsRider — but I just don’t have enough time for it…
As one of the last steps, we define the package structure in our
MainLibrary.csprojproject file:
It is important to remember, that to properly create the package, we first need to call
dotnet publishfor the supported target frameworks. The complete list of invocations should be as follows:
Debugging a Task
Let’s get to the most interesting part of how we can effectively debug MSBuild integration in a test project:
Is there a decent workflow for writing MSBuild tasks? Finally looking at adding a proper MSBuild task to FunctionMonkey (it currently uses a console app — that’ll stay too). Writing it seems straightforward…. debugging it looks like it might be painful.
Indeed, with the console application approach, things are rather easy. On Windows we can call
System.Diagnostics.Debugger.Launch(), which fires up the Just-In-Time Debugger so that we can attach to the process. By default, this will use the Visual Studio JIT Debugger, but we can also configure JetBrains Rider as the Just-In-Time Debugger. As of now, this strategy is not supported on Linux/macOS. The best workaround I’ve found is to callSpinWait.SpinUntil(() => Debugger.IsAttached), which will wait until the debugger is actually attached.Taking the custom MSBuild task approach, we have a bit more footwork to do. Referencing a package via
PackageReference, their main.propsand.targetsfiles get automatically included. This is not the case when usingProjectReferenceon the same project! We could create an actual package, but that has the unpleasant side-effect of getting persisted in our global NuGet cache:I want to point to to a nupckg file directly ideally. The problem with local feeds is that packages get cached.
Deleting from the cache, or incrementing versions – all those are rather poor workarounds compared to a possible better development and testing experience for NuGet packages. A better alternative is to manually wire up our test project:
The
.propsfile should be imported at the very beginning of the project file (Line 3), allowing to set default property values. Meanwhile, the.targetsfile should be important at the very end of the project file (Line 16), to ensure the task is run with the relevant input values. Here, we will also utilize our trick from the previous section, and set a default forCustomTasksEnabled(Line 8), which can either be overridden from the outside (hence the condition) or manually changed to test behavior in the IDE. We should also not forget about adjusting theCustomTasksDirectoryproperty to point to the local version of our task.With JetBrains Rider we can use run configurations to make this process more convenient. In the first configuration
Publish CustomTasks, we will publish the MSBuild task project:
In a second configuration
Run CustomTaskswe will depend on the first one (see Before launch), and callMSBuild.dll /t:Clean;Restore;Pack /p:CustomTasksEnabled=Trueto invoke MSBuild on the test project:
Note that this is the place when we need to override the
CustomTasksEnabledproperty to execute our task. Also we should make an educated choice of which targets should be invoked. If our task integrates with theRestoretarget, then we really need to executeCleanbefore, because otherwise it may be skipped for consecutive builds.Now that we’re all set up, we can use the
Run CustomTasksconfiguration to finally debug our task implementation:
Troubleshooting MSBuild
Sooner or later we will run into issues with our MSBuild integration, especially regarding the
.propsand.targetsfiles. We might reference a wrong property, forget about escaping, or just have a typo in our identifiers. The Project Properties dialog is a good place to start investigations and to see evaluated properties and imports for a project file:
Using the common keyboard shortcut, we can also easily copy values from grid cells. If we need even more insight, then the MSBuild Structured Log Viewer created by Kirill Osenkov can be of great help:
2 years ago I rewrote our entire build pipeline in mostly msbuild. Once I learned about structured log viewer my estimations were cut in half. MSBuild has become a lot more of a regular programming task since then.
The Structured Log Viewer operates on binary log files, which can be created by passing
/binaryLogger:output.binlogto the MSBuild invocation. Binary log files provide the highest level of completeness and verbosity, even compared to most-diagnostic level for text logs. Imports of files and execution of targets are hierarchically visualized using a tree view. Particularly when trying to find a proper target build order for our integration, we can easily check on the flattened temporal order view:The latest MSBuild Log Viewer adds a new option to display targets in one flat list chronologically, it may be easier to see in which order the targets actually ran:
Another benefit is that when testing our task on large projects that imply a time-consuming compilation, we can replay a single task without executing all its dependencies:
Soon in MSBuild Structured Log Viewer: run or debug MSBuild tasks by using the exact parameter values from the binlog! «Replay» tasks in isolation outside of the build.
For developers on Windows there is a special surprise in JetBrains Rider! We can right-click the test project, choose Advanced Build Actions and execute Rebuild Selected Projects with Diagnostics:
Given that Structured Log Viewer can already run on Avalonia UI, maybe we can see the same feature also for macOS and Linux soon.
Acknowledgements
I want to add that much of my adventures with MSBuild are only of good nature and happy endings because my friend Martin Ullrich is such an MSBuild wizard. If you don’t follow him yet, you really should. Sorry Martin for sending more MSBuild enthusiasts your way! 🤗


Цель статьи — рассказать немного о MSBuild, показать что такое таргеты и таски в MSBuild, научить работать с файлом .csproj, дать полезные ссылки. Если у вас будет более подходящее название для статьи, то буду рад обсудить в комментариях.
Меню
- Основные понятия — что такое target и task в MSBuild
- Жизненный цикл сборки MSBuild — какая последовательность вызова таргетов
- Подготовка окружения для примеров
- Таргеты в MSBuild — пример использования некоторых таргетов MSBuild
- Создание собственного таргета MSBuild
- Таски в MSBuild — пример использования некоторых тасков MSBuild
- Переменные и макросы в .csproj
- Ссылки
Основные понятия (Меню)
MSBuild устроен таким образом, что сборка проекта разбита на несколько этапов.
Target — это некоторый этап (событие), происходящее во время сборки проекта. Можно использовать стандартные таргеты, либо определять собственные.
Task — это некоторая задача, которая может выполняться на определенном этапе. Можно использовать стандартные таски или создавать собственные.
Цитата из документации о таргетах (https://docs.microsoft.com/en-us/visualstudio/msbuild/msbuild-targets):
Targets group tasks together in a particular order and allow the build process to be factored into smaller units.
For example, one target may delete all files in the output directory to prepare for the build, while another
compiles the inputs for the project and places them in the empty directory.
Жизненный цикл сборки MSBuild (Меню)
Для работы MSBuild Microsoft определил ряд стандартных таргетов (в файлах Microsoft.Common.targets, Microsoft.CSharp.targets и т.д.). Определено огромное множество различных таргетов, но в данной статье мы не будем на этом подробно останавливаться. Некоторые стандартные таргеты (упорядочены):
Список таргетов (спойлер)
- BeforeRebuild
- Clean
- BeforeBuild
- BuildOnlySettings
- PrepareForBuild
- PreBuildEvent
- ResolveReferences
- PrepareResources
- ResolveKeySource
- Compile
- UnmanagedUnregistration
- GenerateSerializationAssemblies
- CreateSatelliteAssemblies
- GenerateManifests
- GetTargetPath
- PrepareForRun
- UnmanagedRegistration
- IncrementalClean
- PostBuildEvent
- AfterBuild
- AfterRebuild
Таргеты BeforeBuild и AfterBuild специально созданы для переопределения и их можно использовать. Остальные таргеты из списка не рекомендую использовать, чтобы ничего не сломалось.
Для более подробного просмотра списка таргетов можно использовать параметр /pp:. Благодаря этому параметру будет сформирован файл, в который будут включены все импорты (включая файлы .targets). В нем можно найти множество таргетов и переменных (спасибо aikixd за подсказку).
Подготовка окружения для примеров (Меню)
Для примеров необходимо:
- Установленная среда разработки Visual Studio
- Создать проект типа Console Application с именем MSBuildExample
- Открыть папку проекта и найти там файл MSBuildExample.csproj
- Открыть файл MSBuildExample.csproj в блокноте или другом редакторе
Во всех примерах этой статьи понадобится редактировать файл MSBuildExample.csproj. Каждый пример подразумевает удаление кода предыдущего примера и добавление нового. Код необходимо добавлять в конец файла .csproj до последней строчки, содержащей закрывающий тег Project.

Внимание! В файле .csproj регистр букв важен.
Для запуска примера необходимо запускать build в среде разработки Visual Studio. Для некоторых примеров потребуется выбирать solution конфигурацию.

Результат будет выводиться в окно Output в Visual Studio (внизу). Если его нет, то откройте его через пункты меню View => Output.
Таргеты в MSBuild (Меню)
Для примеров будем использовать таск Message, который будет выводить информацию в окно Output в Visual Studio. Как говорилось ранее есть стандартные таргеты BeforeBuild и AfterBuild, воспользуемся ими. Про подготовку читать в разделе Подготовка окружения для примеров.
Пример использования таргетов (спойлер)
Код примера:
<Target Name="AfterBuild">
  <Message Text="AfterBuild event" Importance="high"></Message>
</Target>
<Target Name="BeforeBuild">
  <Message Text="BeforeBuild event" Importance="high"></Message>
</Target>
Результат выполнения (лишнее исключено):
…
BeforeBuild event
…
AfterBuild event
…
Как видно, был выполнен task Message, который вывел указанный нами текст в момент BeforeBuild и AfterBuild в окно Output в Visual Studio.
При определении таргета с одним и тем же именем он перезаписывается!
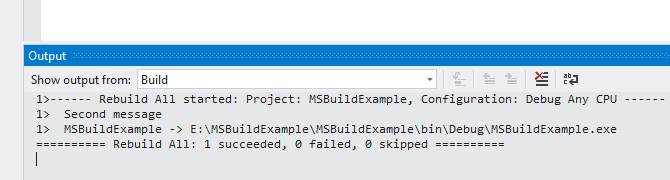
Пример перезаписи таргета (спойлер)
Код примера:
<Target Name="BeforeBuild">
  <Message Text="First message" Importance="high"></Message>
</Target>
<Target Name="BeforeBuild">
  <Message Text="Second message" Importance="high"></Message>
</Target>
Результат выполнения (лишнее исключено):
…
Second message
…
Вывело только второе сообщение, потому что использовали таргеты с одним именем и он был перезаписан вторым значением.
Создание собственного таргета MSBuild (Меню)
Если таргетов BeforeBuild и AfterBuild недостаточно или нужно, чтобы таски выполнялись на другом этапе жизненного цикла сборки, то можно определить собственный таргет. Для этих целей есть параметры BeforeTargets и AfterTargets.
Пример определения собственных таргетов (спойлер)
Код примера:
 <Target Name="BeforeBuild">
    <Message Text="BeforeBuild event" Importance="high"></Message>
  </Target>
  <Target Name="MyCustomBeforeTarget" BeforeTargets="BeforeBuild">
    <Message Text="MyCustomBeforeTarget event" Importance="high"></Message>
  </Target>
  <Target Name="MyCustomAfterTarget" AfterTargets="BeforeBuild">
    <Message Text="MyCustomAfterTarget event" Importance="high"></Message>
  </Target>
Результат выполнения (лишнее исключено):
…
MyCustomBeforeTarget event
BeforeBuild event
MyCustomAfterTarget event
…
Было определено два собственных таргета — MyCustomBeforeTarget и MyCustomAfterTarget.
Таргет MyCustomBeforeTarget выполняется до таргета BeforeBuild, потому что мы указали:
BeforeTargets="BeforeBuild"Таргет MyCustomAfterTarget выполняется после таргета BeforeBuild, потому что мы указали:
AfterTargets="BeforeBuild"Таски в MSBuild (Меню)
В данной статье не рассматривается как можно писать собственные таски, но прежде чем писать таск, ознакомьтесь со списком тасков, предоставляемых Microsoft.
Рассмотрим несколько примеров использования тасков и макросов.
Параметр Condition (спойлер)
Параметр Condition присутствует у всех тасков. Цитата из документации docs.microsoft.com/en-us/visualstudio/msbuild/msbuild-task-reference:
A Boolean expression that the MSBuild engine uses to determine whether this task will be executed.
Код примера:
<Target Name="BeforeBuild">
    <Message Text="Current configuration is Debug" Condition="'$(Configuration)' == 'Debug'" Importance="high"></Message>
    <Message Text="Current configuration is Release" Condition="'$(Configuration)' == 'Release'" Importance="high"></Message>
</Target>
Если будет выбрана solution конфигурация Debug, то результат будет выглядеть так (лишнее исключено):
…
Current configuration is Debug
…
Если будет выбрана solution конфигурация Release, то результат будет выглядеть так (лишнее исключено):
…
Current configuration is Release
…
Информацию о макросе $(Configuration) и других макросах можете найти в разделе переменные и макросы в .csproj.
Информацию о синтаксисе условий можно прочитать там https://docs.microsoft.com/en-us/visualstudio/msbuild/msbuild-conditions
Определение переменной в csproj (спойлер)
В примере выше у нас есть текст, который можно унифицировать. Чтобы исключить дублирование вынесем в отдельную переменную текст сообщения.
Код примера:
<PropertyGroup>
    <MessageText>Current configuration is $(Configuration)</MessageText>
  </PropertyGroup>

  <Target Name="BeforeBuild">
    <Message Text="$(MessageText)" Condition="'$(Configuration)' == 'Debug'" Importance="high"></Message>
    <Message Text="$(MessageText)" Condition="'$(Configuration)' == 'Release'" Importance="high"></Message>
  </Target>
Для определения собственной переменной используется элемент PropertyGroup.
Проверка существования файла, выдача ошибки (спойлер)
В данном примере сделаем таск, который проверяет создан ли файл App.Debug.config. Если он не создан, то выдаем ошибку. В случае ошибки билд будет остановлен и ошибка будет отображена как ошибки компиляции в окне Error List.
Используем для этого таск Error и уже знакомый нам параметр Condition.
Код примера:
<Target Name="BeforeBuild">
  <Error Condition="!Exists('App.Debug.config')" Text="File App.Debug.config not found"></Error>
</Target>
Результат:

В условии Exists используется относительный путь от папки, в которой находится файл .csproj. Для обращения к папке выше текущей использовать ‘../’. Если нужно обратиться к вложенной папке, то использовать формат ‘[DirectoryName]/App.Debug.config’.
Копирование файлов (спойлер)
В данном примере будем использовать таск Copy. С помощью таска скопируем файл App.config в папку bin/[Configuration]/Config в два файла App.config и App.test.config.
Код примера:
<Target Name="BeforeBuild">
    <Copy SourceFiles="App.config;App.config" DestinationFiles="$(OutputPath)/Test/App.config;$(OutputPath)/Test/App.test.config"></Copy>
</Target>
Свойство SourceFiles — массив файлов, которые необходимо скачать. Указывать без кавычек, через точку с запятой.
Свойство DestinationFiles — массив файлов куда будут копироваться файлы. Указывать без кавычек, через точку с запятой.
Подробнее о макросе $(OutputPath) читать в разделе переменные и макросы в .csproj.
Переменные и макросы в .csproj (Меню)
В файле .csproj можно использовать ряд стандартных макросов, их список можно найти здесь https://msdn.microsoft.com/en-us/library/c02as0cs.aspx и здесь https://msdn.microsoft.com/en-us/library/bb629394.aspx. Рассмотрим некоторые полезные макросы:
- $(MSBuildToolsPath) — указывает на путь к папке MSBuild. Например, C:Program Files (x86)MSBuild14.0Bin. Данный макрос при комбинировании пути использовать со слешем. Например, $(MSBuildToolsPath)Microsoft.Web.Publishing.Tasks.dll. Иначе он может некорректно формировать путь и выдавать ошибку, что файл не найден.
- $(OutputPath) — относительный путь к выходной папке. Например, binStage. Данный макрос использовать со слешем, например, $(OutputPath)$(TargetFileName).config.
- $(TargetFileName) — имя выходного файла вместе с расширением. Например, MSBuildExample.exe. Расширение и формат имени выходного файла может отличаться от различных типов проектов. С помощью этого макроса можно безопасно определить какое будет имя у файла конфига. Может быть полезно для трасформаций конфигов.
- $(Configuration) — имя текущей конфигурации. Например, Release, Debug
- $(IntermediateOutputPath) — путь к папке obj. Например, objStage.
Для определения собственных параметров использовать PropertyGroup . Пример определения собственной переменной можно найти в разделе таски в MSBuild.
Ссылки (Меню)
- документация по таргетам
- документация по таскам
- список тасков, предоставляемых Microsoft
- условия
- информация о макросах
- информация о переменных
- информация о процессе билда
- порядок выполнения таргетов
- информация о таргет файлах
- еще немного информации о таргетах и процессе билда. Там же ссылки на серию статей про трансформации
1 / 1 / 0
Регистрация: 11.11.2015
Сообщений: 92
1
16.04.2017, 19:35. Показов 1674. Ответов 0

Здравствуйте! Следовал по инструкции — указал в Tools — Options — Library — Library Path и Browsing Path путь к разархивированной папке DelphiXE8, после чего и там, и там нажимал Add.
После открытия и попытки скомпилировать acntDelphiXE8_R, выдаёт следующую ошибку:
[MSBuild Error] The «CreateRcFile» task failed unexpectedly.
System.UnauthorizedAccessException: Access to the path ‘C:Program Files (x86)EmbarcaderoStudio16.0acnt_regdelphixe8De lphiXE8acntDelphiXE8_R.vrc’ is denied.
at System.IO.__Error.WinIOError(Int32 errorCode, String maybeFullPath)
at System.IO.FileStream.Init(String path, FileMode mode, FileAccess access, Int32 rights, Boolean useRights, FileShare share, Int32 bufferSize, FileOptions options, SECURITY_ATTRIBUTES secAttrs, String msgPath, Boolean bFromProxy)
at System.IO.FileStream..ctor(String path, FileMode mode, FileAccess access, FileShare share, Int32 bufferSize, FileOptions options)
at System.IO.StreamWriter.CreateFile(String path, Boolean append)
at System.IO.StreamWriter..ctor(String path, Boolean append, Encoding encoding, Int32 bufferSize)
at System.IO.StreamWriter..ctor(String path, Boolean append)
at Borland.Build.Tasks.Shared.CreateRcFile.WriteWindo wsRC()
at Borland.Build.Tasks.Shared.CreateRcFile.Execute()
at Microsoft.Build.BuildEngine.TaskEngine.ExecuteInst antiatedTask(EngineProxy engineProxy, ItemBucket bucket, TaskExecutionMode howToExecuteTask, ITask task, Boolean& taskResult)
Добавлено через 24 минуты
Решил проблему, запустив Delphi от имени администратора.
__________________
Помощь в написании контрольных, курсовых и дипломных работ, диссертаций здесь
0
Я управляю MSBuild задача с Продолжить при ошибке= правда:
<MSBuild Projects="@(ComponentToDeploy)"
    Targets="$(DeploymentTargets)"
    Properties="$(CommonProperties);%(AdditionalProperties)"
    ContinueOnError="true"
    Condition="%(Condition)"/>
Так что моя сборка всегда успешна.
Есть ли способ узнать, возникает ли какая-либо ошибка?
Я не мог найти ни одного Результат MSBuild задание, содержащее эту информацию. Единственный способ, который я знаю, — это проанализировать файл журнала на наличие ошибок, но для меня это похоже на обходной путь.
(Я использую MSBuild 4.0)
Это ответ на последний отзыв @Ilya.
Я использую обратную связь/ответ из-за ограничений длины и форматирования комментариев.
Журнал ограничен отдельными целями или более конкретными задачами…
Это действительно был первый вопрос, который возник, когда я читал ваш комментарий с предложением использовать Log.HasLoggedErrors«Был ли это объем журнала?«.
К сожалению, мне не удалось найти надлежащую документацию. MSND не сильно помогает…
Почему вы знали, что это связано с задачей?
Я нисколько не сомневаюсь в вашем утверждении! Мне просто интересно, есть ли где-нибудь надлежащая документация.. (я не использовал MSBuild годами 
В любом случае, что вы строите как проект?
Мои тестовые проекты очень просты.
MyTest.проект
<?xml version="1.0" encoding="utf-8" ?>
<Project xmlns="http://schemas.microsoft.com/developer/msbuild/2003" DefaultTargets="ElenasTarget" ToolsVersion="4.0">

    <UsingTask AssemblyFile="$(MSBuildProjectDirectory)MyCompany.Tools.MSBuild.Tasks.dll" TaskName="MSBuildWithHasLoggedErrors" />

    <ItemGroup>
        <MyProjects Include="CopyNotExistingFile.proj" />
    </ItemGroup>

    <Target Name="ElenasTarget">
        <MSBuildWithHasLoggedErrors Projects="@(MyProjects)" ContinueOnError="true" >
            <Output TaskParameter="HasLoggedErrors" PropertyName="BuildFailed" />
         </MSBuildWithHasLoggedErrors>

         <Message Text="BuildFailed=$(BuildFailed)" />
  </Target>
</Project>
Компания CopyNotExistingFile.proj просто пытается скопировать несуществующий файл:
<?xml version="1.0" encoding="utf-8" ?>
<Project xmlns="http://schemas.microsoft.com/developer/msbuild/2003" DefaultTargets="Target1" ToolsVersion="4.0">
    <Target Name="Target1">
         <Copy SourceFiles="C:lalala.bum" DestinationFiles="C:tralala.bam" />
  </Target>
</Project>
А это моя заказная задача MSBuildWithHasLoggedErrors
namespace MyCompany.Tools.MSBuild.Tasks
{
    public class MSBuildWithHasLoggedErrors : Microsoft.Build.Tasks.MSBuild
    {
        [Output]
        public bool HasLoggedErrors { get; private set; }

        public override bool Execute()
        {
            try
            {
                base.Execute();
                HasLoggedErrors = Log.HasLoggedErrors;
            }
            catch (Exception e)
            {
                Log.LogErrorFromException(e, true);
                return false;
            }

            return true;
        }
    }
}
Если я создам свой MyTest.proj, HasLoggedErrorsбудет установлен на false хотя ошибка(MSB3021) был зарегистрирован (?) в журнале консоли:
Project "C:Userselenamytest.proj" on node 1 (default targets).
Project "C:Userselenamytest.proj" (1) is building "C:UserselenaCopyNotExistingFile.proj" (2) on node 1 (default targets).
Target1:
  Copying file from "C:lalala.bum" to "C:tralala.bam".
C:UserselenaCopyNotExistingFile.proj(5,4): error MSB3021: Unable to copy file "C:lalala.bum" to "C:tralala.bam". Could not find file 'C:lalala.bum'.
Done Building Project "C:UserselenaCopyNotExistingFile.proj" (default targets) -- FAILED.
ElenasTarget:
  BuildFailed=False
Done Building Project "C:Userselenamytest.proj" (default targets).

Build succeeded.
мое ожидание было HasLoggedErrors будет установлен на true.
один из способов — построить себя, но с другой целью, например, ваша DefaultTargets запускает вашу пользовательскую задачу MSBuildWrapper, указывающую на себя (т.е. $(MSBuildProjectFile)), но с другой целью, которая выполняет другие сборки, копирует
Я уже пробовал (это были мои исследования, которые я имел в виду в своем посте). К сожалению, тоже не работает 
(Я знаю, что вы сказали в теории). Мой новый одинарной проект выглядит так:
<?xml version="1.0" encoding="utf-8" ?>
<Project xmlns="http://schemas.microsoft.com/developer/msbuild/2003" DefaultTargets="ElenasTarget" ToolsVersion="4.0">

    <UsingTask AssemblyFile="$(MSBuildProjectDirectory)MyCompany.Tools.MSBuild.Tasks.dll" TaskName="MSBuildWithHasLoggedErrors" />

    <Target Name="ElenasTarget">
        <MSBuildWithHasLoggedErrors Projects="$(MSBuildProjectFile)" Targets="CopyNotExistingFile" ContinueOnError="true" >
            <Output TaskParameter="HasLoggedErrors" PropertyName="BuildFailed" />
         </MSBuildWithHasLoggedErrors>

         <Message Text="BuildFailed=$(BuildFailed)" />
  </Target>

  <Target Name="CopyNotExistingFile" >
         <Copy SourceFiles="C:lalala.bum" DestinationFiles="C:tralala.bam" />
  </Target>
</Project>
Если я создам этот проект HasLoggedErrors все равно будет установлено false.
(Кроме того, моя «настоящая» сборка, которую я в настоящее время поддерживаю, намного сложнее и содержит несколько файлов проекта с целями… поэтому я не могу упаковать их все в один файл проекта).
или написать собственный регистратор и передать его через командную строку
Это была моя последняя надежда!
Моя «настоящая» сборка и через командную строку проходил пользовательский регистратор (я не использовал его для своего тестового проекта для простоты). Это фактически создает журнал (файл XML), который я собираюсь проанализировать, чтобы узнать, были ли зарегистрированы какие-либо ошибки.
Кстати, я думал, что консольный регистратор — это своего рода «глобальный» регистратор. Я ошибаюсь?
В любом случае, кастомный логгер тоже не помогает, т.к. Log.HasLoggedErrors по-прежнему установлен на false.
Есть ли какой-то способ, о котором я не знаю, чтобы сослаться на конкретный регистратор (например, мой собственный регистратор), чтобы спросить, зарегистрировал ли он какие-либо ошибки?
Это действительно похоже Log ограничивается отдельными целями.
Хм… если отражение экземпляра buildengine является последним средством, я бы все же предпочел анализ журнала.
(Не вини меня! :-))
Мое решение
После некоторых исследований я решил придерживаться своего первоначального решения: проанализировать журнал, чтобы узнать, не удалось ли выполнить сборку.
Проверьте мои комментарии, чтобы понять, почему я предпочитаю это предложениям, которые были предоставлены до сих пор.
Если у кого-то есть другие идеи, не стесняйтесь поделиться 
(В противном случае этот вопрос можно закрыть, я полагаю…)