In this quick article, you will learn how to solve the “ERROR 1130 (HY000): Host x.x.x.x is not allowed to connect to this MySQL server” error in MySQL/MariaDB database deployment on a Linux system. This is one of the common remote database connection errors encountered by users.
Test Environment:
- Application Server IP: 10.24.96.5
- Database Server IP: 10.24.96.6
We encountered the error while testing database connection from one of our app servers to a database server, using the mysql client as shown.
# mysql -u database_username -p -h 10.24.96.6

The error indicates that the host 10.24.96.5 that the database user is connecting from is not allowed to connect to the MySQL server. In this case, we have to make some changes to the database server to enable the user to connect remotely.
On the database server, we have to check the host the user above is allowed to connect from.
# mysql -u root -p
Run the following SQL commands to check the user’s host:
MariaDB [(none)]> SELECT host FROM mysql.user WHERE user = "database_username";
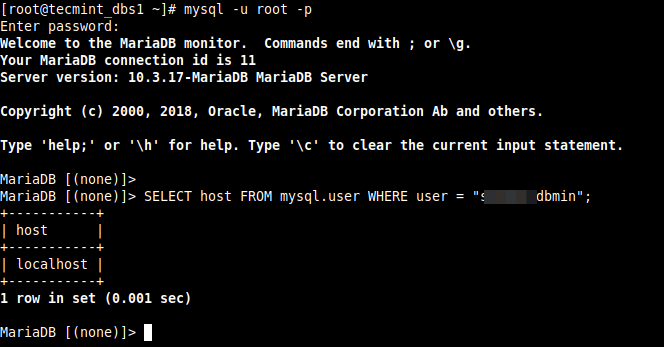
From the output of the command, the user is only allowed to connect to the database server from the localhost. So, we need to update the user’s hosts as follows.
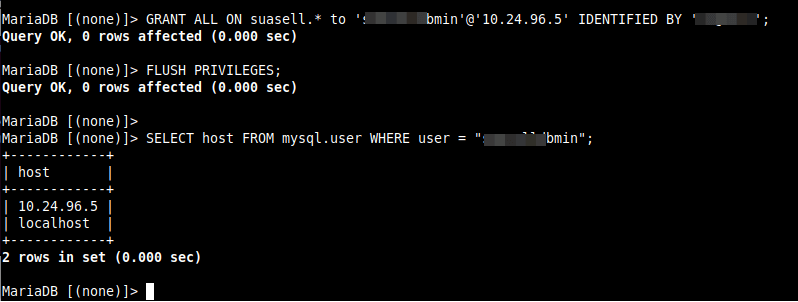
Run the following GRANT command to enable MySQL access for the remote user from a remote host. Make sure to replace “10.24.96.6” with the IP address of the remote system, and “database_password” to the password that you want “database_username” to use:
MariaDB [(none)]> GRANT ALL ON database_name.* to 'database_username'@'10.24.96.5' IDENTIFIED BY 'database_password';
MariaDB [(none)]> FLUSH PRIVILEGES;
MariaDB [(none)]> SELECT host FROM mysql.user WHERE user = "database_username";
To give a user remote access from all host on a network, use the syntax below:
MariaDB [(none)]> GRANT ALL ON database_name.* to 'database_username'@'10.24.96.%' IDENTIFIED BY 'database_password';
After making the above changes, try to remotely connect to the MySQL database server once more. The connection should be successful as shown in the following screenshot.
# mysql -u database_username -p -h 10.24.96.6

We hope this solution helped you in solving your Mysql remote connection error. If have any queries reach us via the feedback form below.
If You Appreciate What We Do Here On TecMint, You Should Consider:
TecMint is the fastest growing and most trusted community site for any kind of Linux Articles, Guides and Books on the web. Millions of people visit TecMint! to search or browse the thousands of published articles available FREELY to all.
If you like what you are reading, please consider buying us a coffee ( or 2 ) as a token of appreciation.

We are thankful for your never ending support.
Application developers may encounter difficulties connecting to a database hosted on a server other than the local server. In this article, we will resolve a common error that occurs when connecting to a MySQL database remotely from outside the network or from another host.
SQLSTATE[HY000] [1130] Host '172.19.0.11' is not allowed to connect to this MySQL server error occurs when the connection request is rejected by the MySQL server. By default, the MySQL server only accepts connections from local hosts and not from other hosts.
To enable the remote connections, we need to do the following steps –
- Enable remote connections from the config
- Create a new user and allow it to connect to the database server from the specific host (or all hosts)
- Flush privileges
Enable Remote connections from MySQL config
Open the MySQL config using your favorite text editor, such as nano. The MySQL file is usually located at /etc/mysql/my.cnf or /etc/my.cnf or /etc/mysql/mysql.conf.d/mysqld.cnf. The location of the MySQL configuration file depends on the version of MySQL you’re using. Check all of these locations to see if you can find the configuration file. Please join our Discord server and let us know if you haven’t found the config file yet. Perhaps we can assist you.
Once found the config file, open it and comment out the line bind-address = 127.0.0.1.
Just add # before the line to comment it out.
# bind-address = 127.0.0.1Create new MySQL user
We create a mysql user with the host as ‘localhost’ for local use, but when adding a user for remote connections, we must replace the localhost with the IP address of the remote computer.
Login to MySQL as root –
sudo mysql

Or

mysql -u root -p
Depending on the method you select, you will be prompted to enter your password. If you’re using the second method, enter the MySQL root user’s password, or the sudo password if you’re logging in with sudo.
Once in the MySQL command-line, create a new user –
> CREATE USER 'username'@'ip-address' IDENTIFIED BY 'set-password';You should see the following message if the new user is created –
Query OK, 0 rows affected (0.02 sec)We will now give the newly created user permissions to manage a specific database on the server. We can also give this user access to all of the databases on the server, but this is not recommended. I recommend that you create a new database(s) for your application(s) and grant this user permissions to manage the database(s).
> GRANT ALL PRIVILEGES ON database_name.* TO 'username'@'ip-address';Once done, please flush the privileges for the changes to take effect.
> FLUSH PRIVILEGES;Allow all remote connections
As in the preceding command, I instructed to replace the ip-address with the remote computer’s IP address. Only connections from that remote computer will be permitted. However, we can also use the ‘%’ wildcard to allow all connections, regardless of whether they are from your computer or from that basement guy who needs access to your database for personal reasons. 😉 They will, however, need to enter the correct credentials to access the database.
> GRANT ALL PRIVILEGES ON database_name.* TO 'username'@'%';If your database server is in production, it is highly recommended to not use ‘%’ wildcard.
Allow connections from a range of IP address
If the remote servers are on the same network, their IP addresses can easily be allowed to allow remote connections without the need for multiple MySQL users.
> GRANT ALL PRIVILEGES ON database_name.* TO 'username'@'172.19.0.*';Notice how the last octet of the IP address has been replaced with * in the above command. This allows all servers with that IP address to begin with 172.19.0.
Receiving ‘MySQL error 1130’? We can help you in fixing it.
Normally, the error code 1130 pops up when trying to access the MySQL servers.
At Bobcares, we receive requests to fix the MySQL errors as a part of our Server Management Services.
Today, let’s know the causes of this error and see how our Support Engineers fix it in MYSQL servers.
Why does MySQL error 1130 occur?
We’ve seen many of our customers experiencing this error message while accessing the MySQL servers.
The error code 1130 normally occurs if there is any networking problem.
Now, let’s go through the main reasons for this error message to appear.
1. If the server is not able to resolve the hostname of the client.
2. In case if the host isn’t allowed to connect to the MySQL server.
The error message appears as:

How we fix MySQL error 1130?
Till now, we discussed the reasons for this error to occur. Now, let’s see how our Support Engineers fix this error for our customers.
Recently, one of our customers approached us with the same error message.
Allow access permission to the IP-Address of the client.
Basically, this means we are allowing permission to specific IP addresses to access the MYSQL server.
For this, we run the below command to grant the permissions to the database.
grant all on db.* to 'username'@'192.168.0.1';Finally, this fixed the error message.
Allow users from any network.
To allow users from any network, we perform the below steps.
Initially, we access the configuration file which is located in the path /etc/mysql/my.cnf.
vi /etc/mysql/my.cnfThen we comment the below lines within the configuration file
#bind-address = 127.0.0.1
#skip-networking
Then we restart the MySQL server
service mysql restartFinally, we login to MySQL and change the grant privileges. For that, we run the below command.
GRANT ALL ON *.* to root@'%' IDENTIFIED BY 'root_password';Also, we ensure that the customers MySQL port 3306 is opened which is the default port of MySQL Database Server.
This resolves the error effectively.
[Need any further assistance with MySQL errors? – We’ll help you]
Conclusion
Today, we saw the causes of the error “Mysql error 1130: Host is not allowed to connect to this MySQL server” and saw how our Support Engineers fix it for our customers.
PREVENT YOUR SERVER FROM CRASHING!
Never again lose customers to poor server speed! Let us help you.
Our server experts will monitor & maintain your server 24/7 so that it remains lightning fast and secure.
GET STARTED
var google_conversion_label = «owonCMyG5nEQ0aD71QM»;
If you are trying to access your database server remotely and getting below error during MySQL login:
Error:
“ERROR 1130 (HY000): Host ‘10.120.152.137’ is not allowed to connect to this MySQL server”
Then this article will help you to resolve this issue. In this article I will show you how to fix this error.
Mostly this error comes when your root user only have been added with localhost access. You can check using below command, first of all go to your mysql database server and type the below command to check:
mysql> SELECT host FROM mysql.user WHERE User = 'root';
+-----------+
| host      |
+-----------+
| 127.0.0.1 |
| ::1       |
| localhost |
+-----------+
3 rows in set (0.00 sec)
As you can see that root is only allowed from localhost 127.0.0.1. you cannot connect from an external source. If you see other IP addresses.
Next You will need to add the IP address of each system that you want to grant access to, and then grant privileges like below:
CREATE USER 'root'@'ip_address' IDENTIFIED BY 'some_pass';
GRANT ALL PRIVILEGES ON *.* TO 'root'@'ip_address';
You can also allow your root to connect from any remote source use the below command:
CREATE USER 'root'@'%' IDENTIFIED BY 'some_pass';
GRANT ALL PRIVILEGES ON *.* TO 'root'@'%';
Finally, reload the permissions, and you should be able to have remote access:
FLUSH PRIVILEGES;
If still you are getting same error check open your my.cnf file and check for below line:
bind-address = 127.0.0.1
Now Comment out the bind address from the file /etc/mysql/my.cnf.
#bind-address = 127.0.0.1
Next restart mysqld service to apply above changes.
# /etc/init.d/mysqld restart
Thank you! for visiting LookLinux.
If you find this tutorial helpful please share with your friends to keep it alive.
For more helpful topic browse my website www.looklinux.com.
To become an author at LookLinux Submit Article.
Stay connected to Facebook.
You may also like
About the author

Hi! I’m Santosh and I’m here to post some cool article for you. If you have any query and suggestion please comment in comment section.