(PHP 4, PHP 5)
mysql_error — Returns the text of the error message from previous MySQL operation
Description
mysql_error(resource $link_identifier = NULL): string
Parameters
-
link_identifier -
The MySQL connection. If the
link identifier is not specified, the last link opened by
mysql_connect() is assumed. If no such link is found, it
will try to create one as if mysql_connect() had been called
with no arguments. If no connection is found or established, an
E_WARNINGlevel error is generated.
Return Values
Returns the error text from the last MySQL function, or
'' (empty string) if no error occurred.
Examples
Example #1 mysql_error() example
<?php
$link = mysql_connect("localhost", "mysql_user", "mysql_password");mysql_select_db("nonexistentdb", $link);
echo mysql_errno($link) . ": " . mysql_error($link). "n";mysql_select_db("kossu", $link);
mysql_query("SELECT * FROM nonexistenttable", $link);
echo mysql_errno($link) . ": " . mysql_error($link) . "n";
?>
The above example will output
something similar to:
1049: Unknown database 'nonexistentdb'
1146: Table 'kossu.nonexistenttable' doesn't exist
See Also
- mysql_errno() — Returns the numerical value of the error message from previous MySQL operation
- » MySQL error codes
aleczapka _at) gmx dot net 
18 years ago
If you want to display errors like "Access denied...", when mysql_error() returns "" and mysql_errno() returns 0, use $php_errormsg. This Warning will be stored there. You need to have track_errors set to true in your php.ini.
Note. There is a bug in either documentation about error_reporting() or in mysql_error() function cause manual for mysql_error(), says: "Errors coming back from the MySQL database backend no longer issue warnings." Which is not true.
Florian Sidler 
13 years ago
Be aware that if you are using multiple MySQL connections you MUST support the link identifier to the mysql_error() function. Otherwise your error message will be blank.
Just spent a good 30 minutes trying to figure out why i didn't see my SQL errors.
Pendragon Castle 
14 years ago
Using a manipulation of josh ><>'s function, I created the following. It's purpose is to use the DB to store errors. It handles both original query, as well as the error log. Included Larry Ullman's escape_data() as well since I use it in q().
<?php
function escape_data($data){
global $dbc;
if(ini_get('magic_quotes_gpc')){
$data=stripslashes($data);
}
return mysql_real_escape_string(trim($data),$dbc);
}
function
q($page,$query){
// $page
$result = mysql_query($query);
if (mysql_errno()) {
$error = "MySQL error ".mysql_errno().": ".mysql_error()."n<br>When executing:<br>n$queryn<br>";
$log = mysql_query("INSERT INTO db_errors (error_page,error_text) VALUES ('$page','".escape_data($error)."')");
}
}
// Run the query using q()
$query = "INSERT INTO names (first, last) VALUES ('myfirst', 'mylast'");
$result = q("Sample Page Title",$query);
?>
l dot poot at twing dot nl 
16 years ago
When creating large applications it's quite handy to create a custom function for handling queries. Just include this function in every script. And use db_query(in this example) instead of mysql_query.
This example prompts an error in debugmode (variable $b_debugmode ). An e-mail with the error will be sent to the site operator otherwise.
The script writes a log file in directory ( in this case /log ) as well.
The system is vulnerable when database/query information is prompted to visitors. So be sure to hide this information for visitors anytime.
Regars,
Lennart Poot
http://www.twing.nl
<?php
$b_debugmode = 1; // 0 || 1$system_operator_mail = 'developer@company.com';
$system_from_mail = 'info@mywebsite.com';
function
db_query( $query ){
global $b_debugmode;// Perform Query
$result = mysql_query($query);// Check result
// This shows the actual query sent to MySQL, and the error. Useful for debugging.
if (!$result) {
if($b_debugmode){
$message = '<b>Invalid query:</b><br>' . mysql_error() . '<br><br>';
$message .= '<b>Whole query:</b><br>' . $query . '<br><br>';
die($message);
}raise_error('db_query_error: ' . $message);
}
return $result;
}
function
raise_error( $message ){
global $system_operator_mail, $system_from_mail;$serror=
"Env: " . $_SERVER['SERVER_NAME'] . "rn" .
"timestamp: " . Date('m/d/Y H:i:s') . "rn" .
"script: " . $_SERVER['PHP_SELF'] . "rn" .
"error: " . $message ."rnrn";// open a log file and write error
$fhandle = fopen( '/logs/errors'.date('Ymd').'.txt', 'a' );
if($fhandle){
fwrite( $fhandle, $serror );
fclose(( $fhandle ));
}// e-mail error to system operator
if(!$b_debugmode)
mail($system_operator_mail, 'error: '.$message, $serror, 'From: ' . $system_from_mail );
}?>
Anonymous 
18 years ago
My suggested implementation of mysql_error():
$result = mysql_query($query) or die("<b>A fatal MySQL error occured</b>.n<br />Query: " . $query . "<br />nError: (" . mysql_errno() . ") " . mysql_error());
This will print out something like...
A fatal MySQL error occured.
Query: SELECT * FROM table
Error: (err_no) Bla bla bla, you did everything wrong
It's very useful to see your query in order to detect problems with syntax. Most often, the output message from MySQL doesn't let you see enough of the query in the error message to let you see where your query went bad- it a missing quote, comma, or ( or ) could have occured well before the error was detected. I do -not- recomend using this procedure, however, for queries which execute on your site that are not user-specific as it has the potential to leak sensative data. Recomended use is just for debugging/building a script, and for general user-specific queries which would at the worst, leak the users own information to themself.
Good luck,
-Scott
olaf at amen-online dot de 
18 years ago
When dealing with user input, make sure that you use
<?php
echo htmlspecialchars (mysql_error ());
?>
instead of
<?php
echo mysql_error ();
?>

Otherwise it might be possible to crack into your system by submitting data that causes the SQL query to fail and that also contains javascript commands.
Would it make sense to change the examples in the documentation for mysql_query () and for mysql_error () accordingly?
Anonymous 
21 years ago
some error can't handle. Example:
ERROR 1044: Access denied for user: 'ituser@mail.ramon.intranet' to database 'itcom'
This error ocurrs when a intent of a sql insert of no authorized user. The results: mysql_errno = 0 and the mysql_error = "" .
Gianluigi_Zanettini-MegaLab.it 
15 years ago
"Errors coming back from the MySQL database backend no longer issue warnings." Please note, you have an error/bug here. In fact, MySQL 5.1 with PHP 5.2:
Warning: mysql_connect() [function.mysql-connect]: Unknown MySQL server host 'locallllllhost' (11001)
That's a warning, which is not trapped by mysql_error()!
scott at rocketpack dot net 
19 years ago
My suggested implementation of mysql_error():
$result = mysql_query($query) or die("<b>A fatal MySQL error occured</b>.n<br />Query: " . $query . "<br />nError: (" . mysql_errno() . ") " . mysql_error());
This will print out something like...
<b>A fatal MySQL error occured</b>.
Query: SELECT * FROM table
Error: (err_no) Bla bla bla, you did everything wrong
It's very useful to see your query in order to detect problems with syntax. Most often, the output message from MySQL doesn't let you see enough of the query in the error message to let you see where your query went bad- it a missing quote, comma, or ( or ) could have occured well before the error was detected. I do -not- recomend using this procedure, however, for queries which execute on your site that are not user-specific as it has the potential to leak sensative data. Recomended use is just for debugging/building a script, and for general user-specific queries which would at the worst, leak the users own information to themself.
Good luck,
-Scott
josh ><> 
19 years ago
Oops, the code in my previous post only works for queries that don't return data (INSERT, UPDATE, DELETE, etc.), this updated function should work for all types of queries (using $result = myquery($query);):
function myquery ($query) {
$result = mysql_query($query);
if (mysql_errno())
echo "MySQL error ".mysql_errno().": ".mysql_error()."n<br>When executing:<br>n$queryn<br>";
return $result;
}
phpnet at robzazueta dot com 
16 years ago
This is a big one - As of MySQL 4.1 and above, apparently, the way passwords are hashed has changed. PHP 4.x is not compatible with this change, though PHP 5.0 is. I'm still using the 4.x series for various compatibility reasons, so when I set up MySQL 5.0.x on IIS 6.0 running PHP 4.4.4 I was surpised to get this error from mysql_error():
MYSQL: Client does not support authentication protocol requested by server; consider upgrading MySQL client
According to the MySQL site (http://dev.mysql.com/doc/refman/5.0/en/old-client.html) the best fix for this is to use the OLD_PASSWORD() function for your mysql DB user. You can reset it by issuing to MySQL:
Set PASSWORD for 'user'@'host' = OLD_PASSWORD('password');
This saved my hide.
miko_il AT yahoo DOT com 
19 years ago
Gianluigi_Zanettini-MegaLab.it 
15 years ago
A friend of mine proposed a great solution.
<?php
$old_track = ini_set('track_errors', '1');
.....
if (
$this->db_handle!=FALSE && $db_selection_status!=FALSE)
{
$this->connected=1;
ini_set('track_errors', $old_track);
}
else
{
$this->connected=-1;
$mysql_warning=$php_errormsg;
ini_set('track_errors', $old_track);
throw new mysql_cns_exception(1, $mysql_warning . " " . mysql_error());
}
?>
Gerrit 
8 years ago
The following code returns two times the same error, even though I would have expected only one:
$ conn = mysql_connect ('localhost', 'root', '');
$ conn2 = mysql_connect ('localhost', 'root', '');
mysql_select_db ('db1', $ conn);
mysql_select_db ('db2', $ conn2);
$ result = mysql_query ("select 1 from dual", $ conn);
$ result2 = mysql_query ("select 1 from luad", $ conn2);
echo mysql_error ($ conn) "<hr>".
echo mysql_error ($ conn2) "<hr>".
The reason for this is that mysql_connect not working as expected a further connection returns. Since the parameters are equal, a further reference to the previous link is returned. So also changes the second mysql_select_db the selected DB of $conn to 'db2'.
If you change the connection parameters of the second connection to 127.0.0.1, a new connection is returned. In addition to the parameters new_link the mysql_connect() function to be forced.
Если выбирать из этих двух, то второй, разумеется. Он на порядок лучше первого:
— в отличие от первого, он будет выдавать ошибки туда же, куда и весь остальной РНР. На машине разработчика это может быть экран, на боевом сайте — лог. Первый плюёт ошибки в браузер ВСЕГДА, чего на боевом сайте не должно быть никогда
— в отличие от первого, он сообщит номер строки и имя файла, где произошла ошибка, что является критически важным для того самого отлова ошибки. Рекомендую попробовать поискать ошибочный запрос в коде на пару тысяч строк по сообщению от первого варианта. Подробнее про то, как правильно обрабатывать ошибки, можно почитать здесь: Обработка ошибок, часть 1
Примечание: на самом деле ни тот, ни другой коды работать не будут, поскольку mysqli_error() тоже требует $link в обязательном порядке.
Дальше уже идут более продвинутые варианты.
Для начала, mysqli умеет кидать исключения из коробки:
mysqli_report(MYSQLI_REPORT_ERROR | MYSQLI_REPORT_STRICT);
и после этого любая ошибка mysqli будет порождать исключение.
Но у этого подхода есть два минуса:
1. Такой вариант может понадобиться только в случае, если обращения к mysqli_query разбросаны по всему коду, чего делать нельзя ни в коем случае.
2. В брошенном исключении будет отсутствовать сам запрос, который может быть очень полезен при отладке.
Поэтому идеальным вариантом будет такой:
Во-первых, все обращения к mysqli API в обязательном порядке надо завернуть в какую-либо библиотеку, которая возьмёт на себя выполнение всей грязной и повторяющейся работы. Пример такой библиотеки — SafeMysql
Во-вторых, в этой библиотеке оформить код обращения к mysqli_query такм образом:
$res = $link->query($query);
if (!$res) throw new Exception($link->error() ." [$query]");
В результате мы получим идеальную обработку ошибок:
— этот код уже из коробки будет так же следовать настройкам РНР, и не будет выдавать ошибки на экран на боевом сервере, но при этом программист всегда будет о ней проинформирован.
— этот код будет выдавать трассировку вызовов — бесценную информацию, без которой найти место, где произошла ошибка, будет очень сложно.
— брошенное исключение можно будет поймать в хендлере или блоке try..catch (однако если нет опыта работы с этими двумя вещами, то на первое время лучше оставить исключение как есть. В обработке ошибок есть много нюансов, неизвестных среднему кодеру, и поэтому лучше оставить эту задачу для РНР).
За последние 24 часа нас посетили 11453 программиста и 1126 роботов. Сейчас ищет 281 программист …
-

- С нами с:
- 2 июл 2015
- Сообщения:
- 4
- Симпатии:
- 0
Здравствуйте. У меня скрипт на mysql_query и возник вопрос, в каких случаях использовать после запроса — or die(mysql_error() ? Я посмотрел скрипт, он то используется, то нет. Вот пример:
-
- С нами с:
- 12 окт 2012
- Сообщения:
- 3.625
- Симпатии:
- 158
а вы знаете что делает это or die(mysql_error()) ?
если незнаете — то прочтите в мануале.
когда/если узнаете — сможете сами ответить на свой вопрос. ибо дело ваше. хотите используйте — хотите нет. -
Команда форума
Модератор- С нами с:
- 11 июн 2010
- Сообщения:
- 10.827
- Симпатии:
- 1.174
- Адрес:
- там-сям
маааленькая подсказка:
A or B вычисляет B только если A ложно. об этом говорят на самых базовых занятиях по информатике, но кто, б*, их слушает!вторая маааленькая подсказка:
приоритет у операции or настолько маленький, что он выполняется позже, чем операция = -
Команда форума
Модератор- С нами с:
- 25 июл 2013
- Сообщения:
- 12.162
- Симпатии:
- 1.770
- Адрес:
- :сердА
Третья маленькая подсказка — приоритеты операторов рассматриваются лишь внутри границ выражения, в котором они находятся. Эх, если бы была возможность как-то указывать эти границы…
-
- С нами с:
- 15 дек 2013
- Сообщения:
- 3.010
- Симпатии:
- 58
подобную конструкцию вот вообще лучше не использовать, такое есть только в говнокоде.
-
Команда форума
Модератор- С нами с:
- 20 июн 2012
- Сообщения:
- 8.493
- Симпатии:
- 1.732
Не, это актуально не для всех языков. Для C-производных — да. Pascal, с которого я начинал, считает оба выражения. А чтоб считал не оба, у компилятора Borland, к примеру, специальная опция имелась раньше. Сейчас — не знаю, давно с паскалем не работал
-
Команда форума
Модератор- С нами с:
- 11 июн 2010
- Сообщения:
- 10.827
- Симпатии:
- 1.174
- Адрес:
- там-сям
Насколько я помню, все распостраненные языки считают как C. В т.ч. Pascal/Delphi. Я поискал и нашел упоминание, что в GNU Pascal это поведение можно изменить опциями. Но по умолчанию «лишняя» часть выражения не вычисляется, точно так же как в C! пруф
Я знаю только один проприетарный язык где всегда считаются обе части логического and и or.
Это жутко неудобно на самом деле! Например не получится в одном выражении учесть случай не-инициализированного объекта и проверку его свойства, типа:-
if (!isset($obj) || $obj->get() == ‘x’) {
придется писать костыли вроде:
-
if ($obj->get() == ‘x’) {
Теперь представьте, что в языке есть цикл while, но нет break и continue. Получается что все условия должны быть только в while и при том ограничении, что я выше показал. Это АД!
-
а если так
-
if (!isset($obj) | $obj->get() == ‘x’) {
-
-
Команда форума
Модератор- С нами с:
- 11 июн 2010
- Сообщения:
- 10.827
- Симпатии:
- 1.174
- Адрес:
- там-сям
mahmuzar, для чего? чтобы в нормальном языке сэмулировать говёный язык? да, у тебя получилось. в случае если переменная не инициирована, будет ошибка при попытке вызвать метод.
я рассматривал прямо обратный пример: если язык не может не вычислять правую половину выражения — тогда приходится изворачиваться чтобы уйти от ошибки.
-
Команда форума
Модератор- С нами с:
- 20 июн 2012
- Сообщения:
- 8.493
- Симпатии:
- 1.732
artoodetoo, когда я писал на паскале, по умолчанию у компилятора было {$B+}, т.е. полное вычисление. Это оооочень давно было
На уроке будет рассмотрен пример соединения с базой данных mySQL посредством языка php и необходимые для этого функции php; разобраны конкретные примеры соединения с mySQL
Содержание:
- Соединение с базой данных посредством php
- Соединение с сервером посредством php
- Выбор базы данных mySQL и соединение с ней
- Создание запроса к базе данных
- Обработка результатов запроса к базе mySQL
- Решение проблем с кодировкой
- Использование для обработки цикла foreach
- Точечная выборка (одной записи)
- Дополнительные php функции для работы с mySQL
Соединение с базой данных происходит в 4 этапа:
- Открыть соединение с сервером
- Выбрать базу данных
- Послать запрос базе дынных
- Закрытие БД (не всегда)
Рассмотрим на примерах каждый этап отдельно:
Соединение с сервером посредством php
- Создание переменной, ассоциирующейся с соединением с сервером mySql:
"localhost"— сервер, при работе локально указывается значение «localhost»"root"— имя пользователя, при работе локально обычно указывается «root»""— третий параметр — пароль, локально пароль отсутствует- Обработка возможной ошибки
1 2 3 4 5 |
<?php $conn = mysql_connect ("localhost", "root", ""); … mysql_close($conn); ?> |
Функция языка php
mysql_connect— открывает соединение с сервером MySQL. Три параметра функции:
1 2 3 4 5 6 7 |
<?php $conn = mysql_connect ("localhost", "root", "") or die("Нет соединения: " . mysql_error()); print ("Удачно соединено"); … mysql_close($conn); ?> |
or die (mysql_error())
Функция phpmysql_error()возвращает строку ошибки последней операции с MySQL и может быть использована не только при попытке соединения с сервером, но и в других вариантах работы с базой данных mysql
Выбор базы данных mySQL и соединение с ней
$conn = mysql_connect ("localhost", "root", "")
 	or die("Нет соединения: " . mysql_error());
print ("Удачно соединено");
mysql_select_db("db_name", $conn);
?>
Функция php
mysql_connect— выбирает базу данных MySQL. Два параметра функции:"db_name"— имя базы данных$conn— указатель на соединение
Создание запроса к базе данных
$conn = mysql_connect ("localhost", "root", "")
 	or die("Нет соединения: " . mysql_error());
print ("Удачно соединено");
mysql_select_db("db_name", $conn);
$sql="SELECT * FROM  `teachers` WHERE  `name`='Иванов'" ;
$sql= (string) $sql;
$result = mysql_query($sql, $conn)
or die ("no!".mysql_error());
?>
Функция php
mysql_query— посылает запрос активной базе данных сервера, на который ссылается переданный указатель. Два параметра функции:$sql— запрос$conn— указатель на соединение
Важно: Чтобы проще обнаружить ошибку можно выводить запрос:
Обработка результатов запроса к базе mySQL
1 2 3 4 5 6 7 8 9 10 11 12 13 |
<?php … mysql_select_db("db_name", $conn); $sql="SELECT * FROM `teachers` WHERE `name`='Иванов'" ; $sql= (string) $sql; $result = mysql_query($sql, $conn) or die ("no!".mysql_error()); while($row = mysql_fetch_array($result)) { $name=$row["name"]; $zp= $row["zarplata"]; echo $name.' '. $zp; } ?> |
Функция php
mysql_fetch_array— возвращает массив с обработанным рядом результата запроса илиFALSE, если рядов, отвечающих параметрам запроса, нет
Решение проблем с кодировкой
Важно: в ряде случаев, если результаты не выдаются, следует поменять кодировку на windows12-51
1 2 3 4 5 |
$conn = mysql_connect ("localhost", "root", "") or die("Нет соединения: " . mysql_error()); print ("Удачно соединено"); mysql_select_db("institute", $conn); mysql_query("SET NAMES cp1251"); |
Использование для обработки цикла foreach
1 2 3 4 |
foreach($result as $row){ $name=$row["name"]; $zp= $row["zarplata"]; } |
Пример: вывести все записи для фамилии Иванов
1 2 3 4 5 6 7 8 9 10 11 |
$conn = mysql_connect ("localhost", "root", "") or die("Нет соединения: " . mysql_error()); print ("Удачно соединено"); mysql_select_db("institute", $conn); $sql="SELECT * FROM `teachers` WHERE `name`='Иванов'" ; $sql= (string) $sql; $result = mysql_query($sql, $conn) or die ("no!".mysql_error()); // сохраняем результат в виде массива $row $row=mysql_fetch_array($result); print_r($row); |

Функция
print_r()в php предназначена для вывода удобочитаемой информации о переменной
Важно: Абсолютно одинаковым результатом будет обращение к полю по его имени и по его номеру:
и
Для отображения всех значений используется цикл:
while($row=mysql_fetch_assoc($result)){
  echo $row["name"]."<br>";
}
Точечная выборка (одной записи)
Синтаксис:
mysql_result($result, int row, string field)
Пример: Выбираем значение поля "name" в записи под номером 1
mysql_result($result, 1, "name")
Задание php mysql 1: Выполните запрос на выборку id и name из таблицы учителей.
Отобразите данные на странице в виде: id: name
Дополнительные php функции для работы с mySQL
mysql_num_rows($result); // Количество записей
// пример:
echo mysql_num_rows($result); // Количество записей

mysql_num_fields($result); // Количество полей
// пример:
echo mysql_num_fields($result); // Количество полей

mysql_field_name($result,1); // имя поля под номером 1
// пример:
echo mysql_field_name($result,1); // имя поля под номером 1

mysql_affected_rows([$conn]); // количество изменений

mysql_insert_id([$conn]); //id последней записи
MySQL[edit | edit source]
MySQL is the most popular database used with PHP. PHP with MySQL is a powerful combination showing the real power of Server-Side scripting. PHP has a wide range of MySQL functions available with the help of a separate module. In PHP5, this module has been removed and must be downloaded separately.
MySQL allows users to create tables, where data can be stored much more efficiently than the way data is stored in arrays.
In order to use MySQL or databases in general effectively, you need to understand SQL, or Structured Query Language.
Note that this page uses the mysqli functions and not the old mysql functions.
How to — Step By Step[edit | edit source]
Connecting to the MySQL server[edit | edit source]
PHP has the function mysqli_connect to connect to a MySQL server that handles all of the low level socket handling. We will supply 4 arguments; the first is the name of your MySQL server, the second a MySQL username, third a MySQL password and last a database name. In this example, it is assumed your server is localhost. If you are running a web server on one system, and MySQL on another system, you can replace localhost with the IP address or domain name of the system that MySQL resides on (ensure all firewalls are configured to open the appropriate ports). mysqli_connect returns a link_identifier that we can now use for communicating with the database. We will store this link in a variable called $cxn.
<?php
  $cxn = mysqli_connect ("localhost", "your_user_name", "your_password", "database_name");
?>
Running a Query[edit | edit source]
We have connected to the mysql server and then selected the database we want to use, now we can run an SQL query over the database to select information, do an insert, update or delete. To do this we use mysqli_query. This takes two arguments: the first is our link_identifier and the second is an SQL query string. If we are doing a select sql statement mysqli_query generates a resource or the Boolean false to say our query failed, and if we are doing a delete, insert or update it generates a Boolean, true or false, to say if that was successful or not.
The basic code for running a query is the php function «mysqli_query($cxn, $query)». The «$query» argument is a MySQL query. The database argument is a database connection(here, the connection represented by $cxn). For example, to return the query «SELECT * FROM customers ORDER BY customer_id ASC», you could write
<?php
    mysqli_query($cxn, "SELECT * FROM customers ORDER BY customer_id ASC");
?>
However, this straightforward method will quickly become ungainly due to the length of MySQL queries and the common need to repeat the query when handling the return. All (or almost all) queries are therefore made in two steps. First, the query is assigned a variable (conventionally, this variable is named «$query» or «$sql_query» for purposes of uniformity and easy recognition), which allows the program to call simply «mysqli_query($cxn, $sql_query)».
$sql_query = "SELECT * FROM customers ORDER BY customer_id ASC";
Secondly, to handle the information returned from the query, practical considerations require that the information returned also be assigned to a variable. Again by convention rather than necessity (i.e. you could name it anything you wanted), this information is often assigned to «$result», and the function is called by the assignment of the variable.
It is important to understand that this code calls the function mysqli_query, in addition to assigning the return to a variable «$result». [NOTE: The queries that ask for information — SELECT, SHOW, DESCRIBE, and EXPLAIN — return what is called a resource. Other types of queries, which manipulate the database, return TRUE if the operation is successful and FALSE if not, or if the user does not have permission to access the table referenced.]
To catch an error, for debugging purposes, we can write:
<?php
   $result = mysqli_query ($cxn, $sql_query)
     or die (mysqli_error () . " The query was:" . $sql_query);
?>
NOTE: The semi colon for the function before the die statement is omitted.
If the function mysqli_query returns false, PHP will terminate the script and print an error report from MySQL (such as «you have an error in your SQL syntax») and the query.
Thus, our final code would be, assuming that there were a database connection named $cxn:
<?php
$sql_query = "SELECT * FROM customers ORDER BY customer_id ASC";
$result = mysqli_query ($cxn, $sql_query)
    or die (mysqli_error () . " The query was:" . $sql_query);
?>
Putting it all together[edit | edit source]
In the previous sections we looked at three commands, but not at how to use them in conjunction with each other. So let’s take a look at selecting information for a table in our mysql database called MyTable, which is stored in a mysql database called MyDB.
<?php
	 //Connect to the mysql server and get back our link_identifier
	 $link = mysql_connect ("your_database_host", "your_user_name", "your_password")
                   or die('Could not connect: ' . mysql_error());

	 //Now, we select which database we would like to use
	 mysql_select_db ("MyDB", $link) or die('could not select database');

 //Our SQL Query
 $sql_query = "Select * From MyTable";

 //Run our sql query
 $result = mysql_query($sql_query)or die('query failed'. mysql_error());


	 //Close Database Connection
	 mysql_close ($link);
 ?>
NOTE: If the link identifier is not specified, the last link opened by mysql_connect() is assumed.
The Create Database Query[edit | edit source]
[By admin@technofranchise.com : We have used my_sqli connector that is the latest construct. There are some other tutorials that use my_sql construct to make the database connections (Don’t confuse with it. Our constructor is the latest one)
The creation of the database is our first step when accessing the backend MySql Server with php script. This can be achieved by connecting with the server. After that, creating the database.
<?php
$cn=mysqli_connect("localhost","your_username","my_password");

//connecting the server
if (mysqli_connect_errno())
{
echo "Error in establisihng the connection:" . mysqli_connect_error();
}
$sql_query="CREATE DATABASE  MyDB";
if (mysqli_query($cn,$sql_query))
{
echo "Database has been created";
}
else
{
echo "Error while creating the database: ” . mysqli_error($cn);
}
?>
The Create Table Query[edit | edit source]
The process of creating the table is as easy as creating the database. We have to execute the create table query using the mysqli construct
<?php
$cn=mysqli_connect("localhost","my_username","my_password","MyDatabase");

if (mysqli_connect_errno())
{
echo "Connection failed : " . mysqli_connect_error();
}
$sql_query="CREATE TABLE  MyTable(firstName VARCHAR(18), lastName VARCHAR(18), salary DECIMAL(5,4) )";
if (mysqli_query($cn,$sql_query))
{
echo "Table created successfully";
}
else
{
echo "Error encountered  while creating the table : " . mysqli_error($cn);
}
?>
Getting Select Query Information with older connector construct[edit | edit source]
Well that doesn’t help, because what are we to do with $result? Well when we do a select query we select out information from a database we get back what is known as a resource, and that is what is stored in $result, our resource identifier. A resource is a special type of PHP variable, but lets look at how to access information in this resource.
We can use a function called mysql_fetch_assoc it takes one parameter, our resource identifier $result, and generates an associative array corresponding to the fetched row. Each column in the table corresponds to an index with the same name. We can now extract out information and print it like so:
<?php
 //Connect to the mysql server and get back our link_identifier
 $link = mysql_connect("localhost", "your_user_name", "your_password")
         or die('Could not connect: ' . mysql_error());


 //Now, we select which database we would like to use
 mysql_select_db("MyDB") or die('could not select database');

 //Our SQL Query
 $sql_query = "Select * From MyTable";

 //Run our sql query
 $result = mysql_query($sql_query)or die('query failed'. mysql_error());

 //iterate through result
 while($row = mysql_fetch_assoc($result))
 {
     //Prints out information of that row
     print_r($row);
     echo $row['foo'];
     //Prints only the column foo.
 }

 // Free resultset (optional)
 mysql_free_result($result);


 //Close the MySQL Link
 mysql_close($link);
 ?>
Inserting the records with latest connector construct[edit | edit source]
<?php
$cn=mysqli_connect("localhost","your_username","your_password","MyDB");
if (mysqli_connect_errno())
{
echo "Connection failed : " .
mysqli_connect_error();
}
mysqli_query($cn,"INSERT INTO MyTable(firstName, lastName, salary) VALUES ('George','Smith' ,55000)");

mysqli_close($cn);

?>
Updating the records with latest connector construct[edit | edit source]
<?php
$cn=mysqli_connect("localhost","your_username","your_password","MyDB");
if (mysqli_connect_errno())
{
echo "Connection failed : " . mysqli_connect_error();
}
mysqli_query($cn,”Update MyTable Set salary=6000 Where firstName='George' AND lastName='Smith' ");
mysqli_close($cn);
?>
Delete the records[edit | edit source]
<?php
$cn=mysqli_connect("localhost","your_username","your_password","MyDB");
if (mysqli_connect_errno())
{
echo "Connection failed : " . mysqli_connect_error();
}
mysqli_query($cn,"Delete From MyTable Where firstName='George' AND lastName='Smith' “);
mysqli_close($cn);
?>
PHP + MySQL + Sphinx[edit | edit source]
Once you understand the basics of how MySQL functions with PHP you might want to start learning about full text search engines. Once your site gets large (millions of database records) MySQL queries will start to get painfully slow, especially if you use them to search for text with wildcards:
There are many free/paid solutions to stop this problem. A good open source full text search engine is Sphinx Search. There is a WikiBook on how to use it with PHP and MySQL that explains the concepts of how Indexing works. You might want to read it before reading the official documentation.
External links[edit | edit source]
- PHP Manual: MySQL Extension and Functions
- MySQL Homepage
- MySQL Developer’s Homepage and manual
- Database Operations with PHP
Chapter 4. Connecting PHP to MySQL
Now that you’ve seen a bit of the power both of PHP and MySQL, it’s time to bring these two juggernauts together. With many programming languages, anytime you want to talk to a database, you have to download and install extra code, or install little plug-in models that give your programs support for talking to that database. PHP isn’t like that though; it comes ready to connect to MySQL from the moment you run the php command.
Even though you’ve only recently begun your journey to PHP mastery, you’re ready to use a database from your scripts. You just need to learn a few new commands and how to deal with the problems that can come up when you’re working with a database. In fact, you’re going to build a simple form that lets you enter SQL and run it against your MySQL database. When you’re a PHP programmer you can go beyond the mysql command-line tool.
Then, to put a cherry on top of your towering sundae of PHP and MySQL goodness, you’ll write another script. This script will take all the information from the forms you’ve built, add that information to a database, and then add one more form to let your users search for another user by name. All that in one chapter? Yes indeed.
Writing a Simple PHP Connection Script
No matter how simple or advanced your PHP scripts, if they talk to a database, they’ll begin with the same few steps:
-
Connect to a MySQL installation.
-
USE the right MySQL database.
-
Send SQL to the database.
-
Get the results back.
-
Do something with the results.
Steps 3, 4, and 5 will change depending on what you’re doing. A script that creates tables looks a little different from a script that searches through existing tables.
But those first couple of steps—connecting to MySQL and using the right database—are always the same, no matter how fancy your script. Just think, then: the code you’re about to write is the same code that programmers making $150 or $200 an hour are writing somewhere. (They’re just writing that code in much fancier houses with robots serving them iced tea as they lounge by the pool.)
Connecting to a MySQL Database
First, you have to tell your PHP script how to connect to a database. This process is basically telling PHP to do what you did when you started up your MySQL command-line client (MySQL on Mac OS X). When you connected to your web server’s database, you probably used a command like the followng:
bmclaugh@akila:~$ mysql --host=dc2-mysql-02.kattare.com
                        --user=bmclaugh --password
You need those same pieces of information to give PHP so it can connect: your database host, your username, and a password.
Fire up your text editor and create a new script; call it connect.php. This script will be as simple as possible, because all you need it to do is connect to your database, USE the right database, and then run a sample SQL query to make sure things are working correctly.
In your script, type the following lines:
<?php
  mysql_connect("your.database.host",
                "your-username", "your-password")
    or die("<p>Error connecting to database: " .
           mysql_error() . "</p>");

  echo "<p>Connected to MySQL!</p>";
?>
Note
If you’re running your database on the same machine as your PHP and web-serving files, your database hostname is usually localhost. localhost is just a way to say “the local machine.”
It’s really that simple! And like most of the other PHP scripts you’ve been writing, although there are some new commands, you probably already know almost exactly what’s going on here.
First, there’s a new command: mysql_connect. This command simply takes in a database host, a username, and a password, and connects. It’s exactly as if you’re running your mysql tool and connecting to a remote database.
Note
Make sure you change your.database.host, your-username, and your-password to the values for your own database.
But what about the die bit? Sounds a little gruesome (like Lord of the Flies gruesome, not Twilight teen-angst gruesome). In fact, it is a bit nasty: you use die when something may go wrong in your script. Think of die as saying, “If my code dies, then do something less nasty than tossing out an error code to my user. In this case, die prints an error message that won’t scare off your users.
But before you can understand die, you have to know a little bit about the inner workings of mysql_connect. When mysql_connect runs, it either creates or reuses an existing connection to your database. It then returns that connection to your PHP program, and makes available all the other PHP-to-MySQL commands you’ll learn about soon. But if mysql_connect can’t create that connection—for example, if your database isn’t running or you’ve got a bad host or username—mysql_connect returns a very different value: false.
So what’s really happening in your script is something like this:
<?php
  // This isn't working code, but you get the idea
  if (i_can_connect_to_mysql_with("my.database.host",
                                 "my-username", "my-password"))
    go_do_cool_database_stuff();
  else
    send_error_to_user_using_die
?>
But that's a lot of typing, so PHP lets you shorten it to the following:
<?php
  mysql_connect("your.database.host",
                "your-username", "your-password")
    or die("<p>Error connecting to database: " .
           mysql_error() . "</p>");

  echo "<p>Connected to MySQL!</p>";
?>
Not only is this script shorter, but it flips things around a bit. It basically says, try to connect (using mysql_connect), and if the result isn’t true (the or part of the code), then die. die prints out an error message, but it also “dies.” In other words, it ends your script. So if mysql_connect returns false, and die runs, your script will exit. Your users won’t ever see the “Connected to MySQL!” line because the script will have stopped running. It’s dead on the server room floor, in search of a working database connection. (See the box on Everybody Dies at Some Point for more detail on the die command.)
Not only that, but mysql_connect sets up another function when it can’t connect. It makes the errors it ran into in trying to connect available through another command, mysql_error. So you can call mysql_error as part of your die statement to show what really happened.
Note
Technically, mysql_connect, mysql_error, and die are all examples of functions. A function is a block of code, usually with a name assigned to it, which you can call from your own code anytime you need that block. It’s a lot quicker and better to call a function by name than to rewrite the block of code that function represents over and over again.
Don’t worry about functions for now, though. Just use them like any old PHP command. Before long, not only will you understand functions better, but you’ll be writing your own.
If mysql_connect connects without any problems, it returns that connection. PHP will skip the die line, and then execute this line:
echo "<p>Connected to MySQL!</p>";
To see this command in action, create a simple HTML form, and call it connect.html. You can use this HTML to get you going:
<html>
 <head>
  <link href="../css/phpMM.css" rel="stylesheet" type="text/css" />
 </head>

 <body>
  <div id="header"><h1>PHP & MySQL: The Missing Manual</h1></div>
  <div id="example">Example 4-1</div>

  <div id="content">
    <h1>SQL Connection test</h1>
    <form action="scripts/connect.php" method="POST">
      <fieldset class="center">
        <input type="submit" value="Connect to MySQL" />
      </fieldset>
    </form>
  </div>
  <div id="footer"></div>
 </body>
</html>
This script is about as simple as it gets: it builds a form, drops a single button into place, and attaches that button to your new connect.php script. Load up your form in a browser (see Figure 4-1), and click “Connect to MySQL.”
Hopefully, you see one of the simplest, happiest messages of your burgeoning PHP and MySQL programming career: you’re connected! Check out Figure 4-2 for the sweet sight of success.
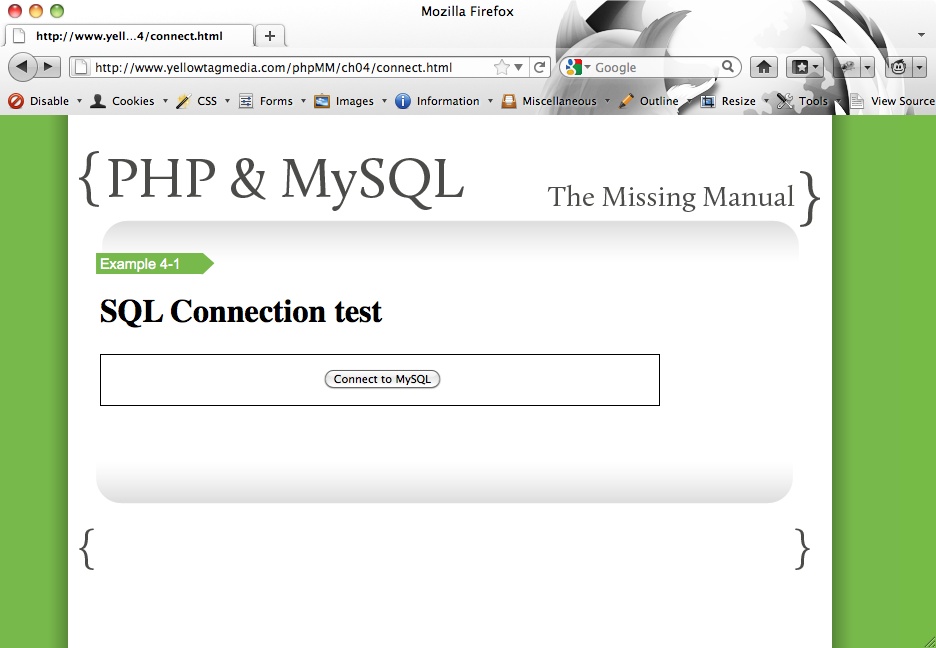
Figure 4-1. Sure, you could have made connect.html even simpler. You could have ditched all the structure and CSS referencing. But who wants to connect to a database without showing off a little? Besides, customers like a nice, clean site. You don’t have to spend hours on CSS, but make even your most basic demos look professional, and your clients will love you for it.
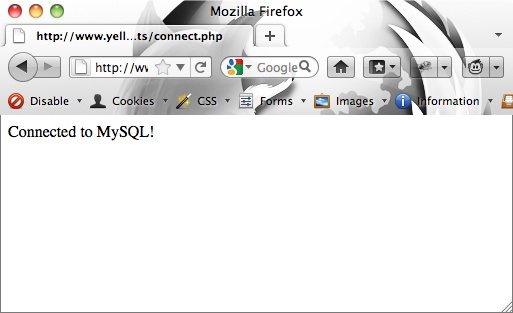
Figure 4-2. These three words mean that your PHP script now can do virtually anything you can imagine with your database. But there’s something missing: how does MySQL know which database is yours? You still need to tell PHP which database to USE.
Selecting the Database to USE
There’s something wonderful waiting around the programming corner now: almost all the mysql_ family of functions works the same: you give them some values, and they return something useful. If something bad happens, you usually get back either false or a nonexistent object (something most programmers call null or nil).
So now you need to tell MySQL which database your PHP script wants to use. There’s a function for that: mysql_select_db.
Note
There’s an extended family of mysql_ functions. You might want to bookmark their documentation page: www.php.net/manual/en/ref.mysql.php. If you ever get stuck, head over there and see if a function might do what you need.
You give mysql_select_db a database name, and—you guessed it—it USEs that database, or returns false. So update connect.php to USE the right database:
<?php
  mysql_connect("your.database.host",
                "your-username", "your-password")
    or die("<p>Error connecting to database: " .
           mysql_error() . "</p>");

  echo "<p>Connected to MySQL!</p>";

  mysql_select_db("your-database-name")
    or die("<p>Error selecting the database bmclaugh: " .
           mysql_error() . "</p>");

  echo "<p>Connected to MySQL, using database bmclaugh.</p>";
?>
You should already see the pattern. die makes sure that if bad things happen, your script reports an error, your users read that error, and then the script exits. If things do go well, another happy message should get printed.
Try this new version out. Visit connect.html again and try and connect (and now USE) your database. You want to see something like Figure 4-3. Next up: talking SQL to your database.

Figure 4-3. Once again, a few simple words, and major things are going on behind the scenes. Your script now has a connection to MySQL, and is USEing the right database.
SHOW Your Database’s Tables
Now that you’ve got a connection, and you’re tied in to the right database, you should see just what you’ve got to work with. In your MySQL tool, one of the first things you did was see what tables existed, and then start creating tables of your own. There’s some more work to do in creating tables, and you’ll do that in a bit, with a new HTML form and a new script.
But before diving into that, you can easily have your script see which tables are available in your database. Open up connect.php again, and add the following line:
<?php
  // All your existing database connection code

  $result = mysql_query("SHOW TABLES;");
?>
Here’s another new PHP-to-MySQL function: mysql_query. You’ll become very, very familiar with this one; it’s the key to passing SQL in to your database. This function takes in SQL, and you’ve given it some really simple SQL:
SHOW TABLES;
This command is exactly like typing SQL into your command-line tool.
Handling Errors By Seeing If Your Results are Not
But what about die? What about error handling? There’s none of that, and by now, you know there should be. But there’s something different about this line: whatever comes back from mysql_query is stuffed into a variable called $result.
So it’s really $result that you want to examine. It should either have a list of tables, from SHOW TABLES, or it’s reporting an error of some sort. And if it’s reporting an error, then $result is false, because the mysql_ functions return false when there’s a problem.
You know how to check for a false value, though, so you can add this code to handle problems:
<?php
  // All your existing database connection code

  $result = mysql_query("SHOW TABLES;");

  if ($result === false) {
    die("<p>Error in listing tables: " . mysql_error() . "</p>");
  }
?>
Now, this works, but it’s really not how most PHP programmers do things. The === is a fairly unusual thing to use in PHP, at least for checking to see whether a variable is false. What’s more common—and the way it’s usually done in PHP—is to use the negation operator (also called the bang operator), which is an exclamation point: !. So if you want to see if a variable called $some-variable is false, you can say if (!$some-variable). And that ! says something like, “see whether $some-variable is false.”
Even better, think of ! as being “not.” So what you really want to say in your code is, “If not $result, then die.” Accordingly, you can rewrite your code to look like this:
<?php
  // All your existing database connection code

  $result = mysql_query("SHOW TABLES;");

  if (!$result) {
    die("<p>Error in listing tables: " . mysql_error() . "</p>");
  }
?>
This kind of code is much better PHP, and now you’ve got any problems covered.
Note
It may seem weird to hear about “the way it’s done in PHP.” If code works, then it works, right? Well, yes…but have you ever heard someone who’s just learning English speak? Often, their words are correct, but the order, usage, and idiom are wrong. Try and explain why more than one sheep is still just “sheep,” and you’ve got the idea.
Programming languages are the same. There’s writing code that works, and there’s writing code that looks like you know the language. Sometimes this is called being eloquent. There are actually some great books for “speaking properly” in JavaScript and Ruby called Eloquent JavaScript (Marijn Haverbeke; No Starch Press) and Eloquent Ruby (Russ Olsen; Addison Wesley). It’s worth learning not just how to write working PHP, but to write PHP that looks natural.
In fact, just to make sure your code deals with errors, change your SQL query to have a misspelling:
<?php
  // All your existing database connection code

  $result = mysql_query("SHOWN TABLES;");

  if (!$result) {
    die("<p>Error in listing tables: " . mysql_error() . "</p>");
  }
?>
Now load up connect.html in a browser, and run your connection test. Figure 4-4 is similar to what you should see: still a little cryptic, but clearly a case where your code realized there was a problem and handled it with an error message rather than a massive meltdown.
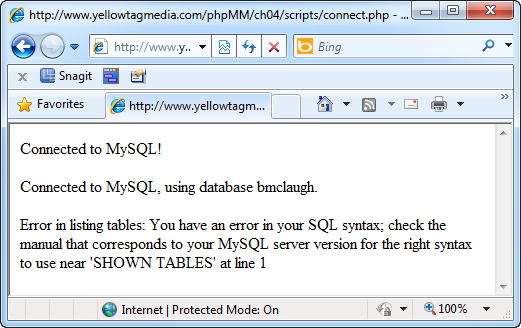
Figure 4-4. Deal with errors every step along the way. The better you handle errors, and the more specific your messages are, the easier it is to figure out what’s gone wrong with your code. That means code that works well for your users, and that you can easily fix when bugs crop up.
Printing Out Your SQL Results
Errors are handled, problems are reported, and now you can finally deal with what’s actually in $result when things don’t go wrong. Unfortunately, things get a little trickier here. $result is actually not a PHP type you’ve used, or even one that you’ll need to learn how to work with directly. It’s something called a resource, which is PHP-speak for a special variable that’s related to something outside of PHP.
Think about it like this: In the case of mysql_query, you’ve asked for the SQL results from running the query SHOW TABLES. But while PHP can talk to MySQL, it really doesn’t know how to interpret SQL. So it can’t know that $result should hold a list of rows, each of which with one value: a table name. All it knows is that something else—your MySQL database—is getting a query through the mysql_query function. And think about it: depending on what query you pass mysql_query, $result might hold rows with multiple pieces of information, like a first name and Facebook URL, or just an indication of whether a CREATE TABLE statement worked or not.
So in these cases, you usually end up with a PHP resource. That resource means something; it’s just that PHP doesn’t really know what that something is. So your PHP needs help. What it needs is something that knows about MySQL and can figure out how to work with $result. That’s exactly what you get with another MySQL function, mysql_fetch_row. You pass this function in a resource returned from mysql_query, and it lets you cycle through each row in the results returned from your SQL query.
Here’s the basic pattern:
-
Write your SQL query, and store it in a string or a variable.
-
Pass your query into mysql_query and get back a PHP resource.
-
Pass that resource into mysql_fetch_row to get back rows of results, one at a time.
-
Cycle through those rows and pull out the information you need.
-
Buy a really nice guitar with all the cash you’re making.
Note
That last step is optional, but highly recommended.
You’ve got a resource in $result, so now pass it in to mysql_fetch_row, like this:
<?php
  // All your existing database connection code

  $result = mysql_query("SHOW TABLES;");

  if (!$result) {
    die("<p>Error in listing tables: " . mysql_error() . "</p>");
  }

  echo "<p>Tables in database:</p>";
  echo "<ul>";
  while ($row = mysql_fetch_row($result)) {
    // Do something with $row
  }
  echo "</ul>";

?>
Even though PHP doesn’t know what to do with the resource returned from mysql_query, mysql_fetch_row does. It takes in your $result resource and starts spitting out rows, one at a time, in an array.
And then there’s that while loop, which is also new, but probably makes sense to you already. A while loop continues to loop as long as something is true. In this case, the loop keeps looping while $row—which is the next row of results from your SQL query—is getting a value from mysql_fetch_row($result). When there are no more result rows, mysql_fetch_row doesn’t return anything, so $row is empty, and the while loop says, “Ok, I’m done. I’ll stop looping now.”
And, you’ve got a nice unordered list (ul) ready to spit out each row, so there’s just one thing left to add:
<?php
  // All your existing database connection code

  $result = mysql_query("SHOW TABLES;");

  if (!$result) {
    die("<p>Error in listing tables: " . mysql_error() . "</p>");
  }

  echo "<p>Tables in database:</p>";
  echo "<ul>";
  while ($row = mysql_fetch_row($result)) {
    echo "<li>Table: {$row[0]}</li>";
  }
  echo "</ul>";

?>
This code should start looking familiar again. Each time mysql_fetch_row returns $row, it’s actually returning an array, something you’ve see before (The $_REQUEST Variable). That array has all the different pieces of information from your SQL query. For SHOW TABLES, that’s just one thing, at $row[0]: the table name. Pretty soon, you’ll write some more complex queries, and you may need to grab the value in $row[1] or $row[2] or even $row [10].
So in this case, you get back $row, you grab the table name by getting the first item in the array, at index 0, and then you print that with echo. There’s just one other wrinkle here: those curly braces inside the string passed to echo. What’s up with those?
Well, you could rewrite this line like this:
while ($row = mysql_fetch_row($result)) {
  echo "<li>Table: " . $row[0] . "</li>";
}
Nothing wrong there, except all the extra quotation marks and period to stick strings together.
Note
Major nerd points if you remembered that mashing strings together was called concatenation (Combining Text).
But PHP is pretty savvy, and the folks that wrote the language are programmers, too. They realized, like you, that you’re constantly having to drop variables into the middle of strings. So instead of constantly ending a string and adding a variable, you can just wrap a variable inside of { }, and PHP will print the value of that variable instead of “$row[0]”. It makes for a lot simpler code, and that’s a good thing.
Save connect.php, revisit connect.html in your browser, and see what tables you’ve got in your database. Figure 4-5 is connect.php running against a database with a lot of tables. You may just have one or two, and that’s fine. Just make sure you see a list of your tables.
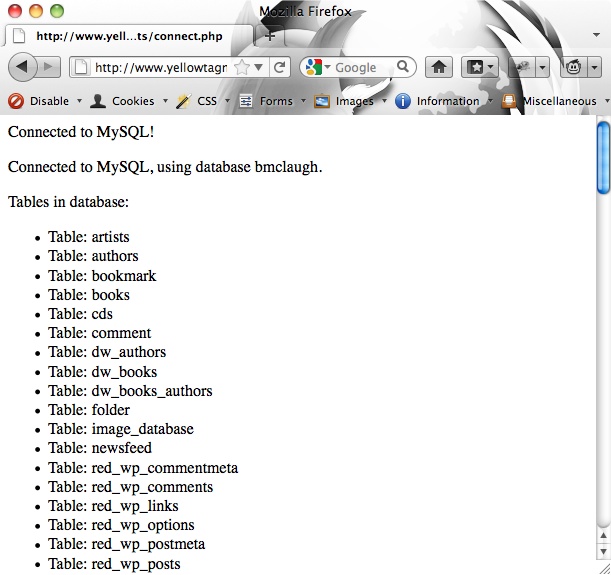
Figure 4-5. SHOW TABLES turns out to be pretty useless in a browser pretty fast. This result may look like a huge number of tables, but you’re likely to be writing web applications that have 20, 30, or even 100 tables in a single app. For now, though, it’s a really easy way to make sure your PHP scripts are talking to your MySQL databases.
Cleaning Up Your Code with Multiple Files
Even if you don’t realize it yet, there’s something problematic about your connect.php script. Look at the first few MySQL calls you make:
<?phpmysql_connect("your.database.host","your-username", "your-password")or die("<p>Error connecting to database: " . mysql_error() . "</p>"); echo "<p>Connected to MySQL!</p>";mysql_select_db("your-database-name")or die("<p>Error selecting the database bmclaugh: " . mysql_error() . "</p>"); echo "<p>Connected to MySQL, using database bmclaugh.</p>"; // And so on... ?>
You’re manually typing your database host, your username, your password, and your database name into your script. Now suppose you have 10 scripts and you’re typing that 10 times. The chance of a typo is pretty high.
Not only that, what happens when you change your password? Or you upgrade to a better hosting plan to handle all the web traffic your apps are generating, and you need to change your database host? You’ve got to track down every place you put that information, in every PHP script. That’s a nightmare, and keeps you from actually writing new code and making more cash. Not good.
You need a way to abstract out those pieces of information. Abstraction is a programming term that means hiding the implementation, the way something (like a password) works, from the programs that uses it. You basically have a symbol, or a name, and that name refers to something else with a lot more detail. And even if that detail changes, the name still points to the right thing.
It’s like saying “Leigh,” and meaning my wife, without having to say, “that hot 34-year old woman with short blond hair and great legs.” And the beauty of “Leigh” is that every birthday, you can keep saying, “Leigh,” instead of changing your description.
Replacing Hand-Typed Values with Variables
So suppose you want your code to look more like this (actually, you really do want it to look more like this):
<?phpmysql_connect($database_host, $username, $password)or die("<p>Error connecting to database: " . mysql_error() . "</p>"); echo "<p>Connected to MySQL!</p>";mysql_select_db($database_name)or die("<p>Error selecting the database bmclaugh: " . mysql_error() . "</p>"); echo "<p>Connected to MySQL, using database bmclaugh.</p>"; // And so on... ?>
All you’re doing is writing something that looks a bit like a variable in place of hand-typing the username or database name. Now you can define those variables up above your connection code:
<?php$database_host = "your.database.host";$username = "your-username";$password = "your-password";$database_name = "your-database-name";// Database connection code ?>
But is this really that much better? Not yet; you’ve still got these same values hand-typed into your script. You want to stick the values in a file so no human has to type them. Read on.
Abstracting Important Values into a Separate File
Your goal is to get these values out of connect.php, into some place that all your PHP scripts can access them with no typing from you. Open up a new file, and call it app_config.php. Now drop your variables into this new file:
<?php
// Database connection constants
$database_host = "your.database.host";
$username = "your-username";
$password = "your-password";
$database_name = "your-database-name";

?>
Note
Be sure and save app_config.php somewhere that makes sense for all your application’s scripts to access it. In this book’s examples, app_config.php is in the root of the site, under scripts/. So if you’re in the ch04/scripts/ directory, you’d access this file at ../../scripts/app_config.php, or [site_root]/scripts/app_config.php. You can save the file wherever you want, as long as you get the path right in your PHP scripts that reference it.
When you move to a production version of your application, you probably want to place this file outside of the site root. That way, web users can’t simply type the path to your configuration script and get all your passwords. Alternatively, you could add security to this directory, although simply getting it out of the web-serving directories altogether is usually easiest.
Now, you can have all your different PHP scripts use these shared variables. Change a variable here in app_config.php, and that change affects all your PHP scripts that use these shared variables.
But how do you actually access these variables? Go back to connect.php, and remove where you defined these variables yourself. If you try and access connect.php through connect.html now, though, you’ll get a nasty error, as shown in see Figure 4-6.
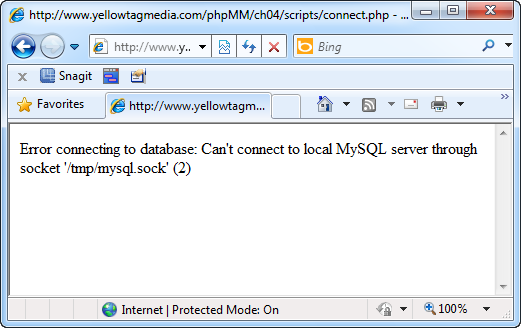
Figure 4-6. You defined your variables in app_config. php, but connect.php doesn’t know this. You need to tell your connection script that it shouldn’t run until it loads app_config.php. Then things will behave, because the variables connect.php uses will be set properly.
The error occurs because connect.php now has no idea what $username or $password refers to. You need to inform PHP that before it tries to do anything in connect.php, it’s required to load app_config.php. And that’s (almost) exactly what you type in your script:
<?php

  require '../../scripts/app_config.php';

  // Database connection code
?>
Now, PHP loads the file ../../scripts/app_config.php before it runs your mysql_connect function. In effect, require says, “Hey PHP, if you can’t load the file I’m giving, then throw a nasty error, because nothing else is going to work.”
Warning
Make sure the path and filename you give require matches where you actually put app_config.php, or you’ll see the error that require produces up close and personal.
Try and run your connection script again, and you should see your table listing, which means things are working well again.
Variables Vary, But Constants Stay Constant
There’s just one more nagging little problem with your code: you’re still using variables for your username and password, along with the database host and database name. And what’s a variable? Something that varies or changes. Accordingly, PHP happily lets you write the following code in connect.php:
mysql_connect($database_host, $username, $password)
  or die("<p>Error connecting to database: " . mysql_error() . "</p>");

// This is allowed, but some bad mojo
$password = "hijinks";
So what happens when some other script—which also requires app_config.php—tries to connect with mysql_connect? It’s going to use $password, but now $password isn’t correct anymore. It’s set to “hijinks,” and chaos will ensue.
What you really want is for those values in app_config.php to be constant, and never change. You can do this with the special define function. Open up app_config.php and change your code:
<?php // Database connection constantsdefine("DATABASE_HOST", "your.database.host");define("DATABASE_USERNAME", "your-username");define("DATABASE_PASSWORD", "your-password");define("DATABASE_NAME", "your-database-name");?>
You define the name of a constant and the value for that constant, and PHP creates a new constant. That way, you can type DATABASE_HOST into your code, and PHP really sees “your.database.host”. Perfect! And since this is a constant, it can’t be changed anywhere along the line.
Constants are typed in all-uppercase letters. Caps aren’t required, but it’s another one of those “speak like a PHP programmer” things. You want constants to look different from variables, and using all uppercase names is one way to do that. Constants also don’t have the $ before their name, which is yet another way to differentiate a constant from a variable.
Now you need to make some quick changes to connect.php to use these new capitalized names of constants:
<?php require '../../scripts/app_config.php';mysql_connect(DATABASE_HOST, DATABASE_USERNAME, DATABASE_PASSWORD)or die("<p>Error connecting to database: " . mysql_error() . "</p>"); echo "<p>Connected to MySQL!</p>";mysql_select_db(DATABASE_NAME)or die("<p>Error selecting the database ". DATABASE_NAME .mysql_error() . "</p>");echo "<p>Connected to MySQL, using database " . DATABASE_NAME . "</p>";// SQL query-running goodness proceeds... ?>
Warning
You can’t use the { } inside your quotes to print constants. It’s only when you surround a variable (which starts with $) with { } that PHP prints the value of that variable. Instead, use the normal string concatenation approach where you end your string and add the constants using the dot (.), as discussed on Combining Text.
Try connect.php again. You should get a perfectly good list of table names. But this time, you’ve got constants for your important information, safely tucked away in a file separated out of connect.php.
Note
It’s also a good idea to add some additional security to app_config.php, and any other scripts that contain special values like passwords. You can set the permissions on the file to be more restrictive, or move the file to some place your PHP script can access, but your web users can’t. Ask your web or server admin for help if you’re not sure how to do that.
Building a Basic SQL Query Runner
Now that you can connect to SQL, you’re ready to take on something more ambitious: building your own version of a MySQL command-line tool. Of course, you’re a PHP developer and programmer now, so mentally scratch out “command-line” and replace it with “web-based.”
It turns out that you’ve already got most of the tools you need. You can easily build an HTML form that lets you and your users enter in a SQL query, you know how to connect to MySQL and select a database, and you can run a query. All that’s left is to figure out how to interpret that PHP resource that mysql_query returns when it’s not a list of table names.
Creating an HTML Form with a Big Empty Box
Before getting to mysql_query and its results, though, start with what you know: an HTML form. Keep things simple for now, and just create a form with a single text area into which you can type queries, and a few basic buttons.
Open up your text editor, and create queryRunner.html:
<html>
 <head>
  <link href="../css/phpMM.css" rel="stylesheet" type="text/css" />
 </head>

 <body>
  <div id="header"><h1>PHP & MySQL: The Missing Manual</h1></div>
  <div id="example">Example 4-2</div>

  <div id="content">
    <h1>SQL Query Runner</h1>
    <p>Enter your SQL query in the box below:</p>
    <form action="scripts/run_query.php" method="POST">
      <fieldset>
        <textarea id="query_text" name="query"
                  cols="65" rows="8"></textarea>
      </fieldset>
      <br />
      <fieldset class="center">
        <input type="submit" value="Run Query" />
        <input type="reset" value="Clear and Restart" />
      </fieldset>
    </form>
  </div>

  <div id="footer"></div>
 </body>
</html>
Fire up your favorite browser, and make sure things look like Figure 4-7.
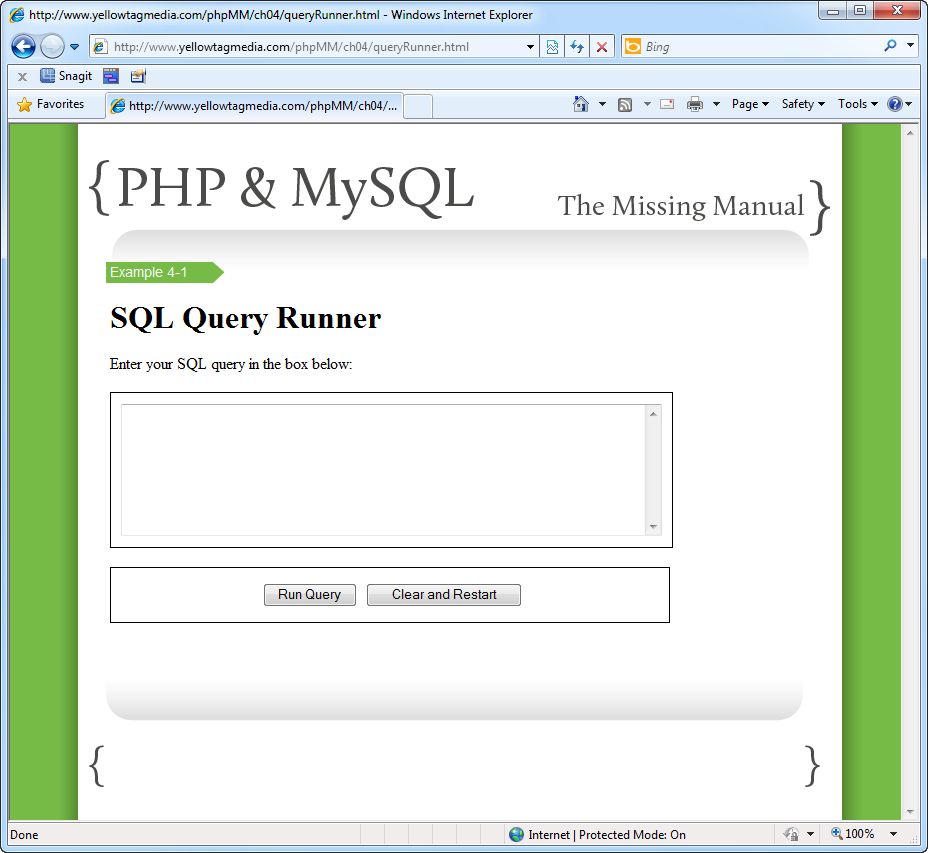
Figure 4-7. Who ever said you wouldn’t spend plenty of time writing HTML and CSS when you became a full-fledged web programmer? Even with a basic SQL query runner, good structure and style make a huge difference in presentation and how easy your code is to update.
Connecting to Your Database (Again)
You know what’s next: you need to connect to MySQL and then USE your database. This code should be pretty familiar by now; open up run_query.php and go to work:
<?php
  require '../../scripts/app_config.php';

  mysql_connect(DATABASE_HOST, DATABASE_USERNAME, DATABASE_PASSWORD)
    or die("<p>Error connecting to database: " .
           mysql_error() . "</p>");

  echo "<p>Connected to MySQL!</p>";

  mysql_select_db(DATABASE_NAME)
    or die("<p>Error selecting the database " . DATABASE_NAME .
           mysql_error() . "</p>");

  echo "<p>Connected to MySQL, using database " . DATABASE_NAME . "</p>";
?>
But wait…this is familiar. You’ve written this code before, back on Selecting the Database to USE, and in fact, you have to write it every single time you connect to MySQL. That sort of duplication isn’t good. That’s why you moved your database constants into app_config.php: you wanted to be able to keep code that is always the same in a single place, rather than ten or a hundred places.
You’ve seen how easy it is to require a file (Abstracting Important Values into a Separate File), and pull in some constant values. You can do the same thing with your database connection code. Open up a new file, and call it database_connection.php. Save this new script right alongside app_config.php, and type the following code:
<?php
  require 'app_config.php';

  mysql_connect(DATABASE_HOST, DATABASE_USERNAME, DATABASE_PASSWORD)
    or die("<p>Error connecting to database: " .
           mysql_error() . "</p>");

  echo "<p>Connected to MySQL!</p>";

  mysql_select_db(DATABASE_NAME)
    or die("<p>Error selecting the database " .
           DATABASE_NAME . mysql_error() . "</p>");

  echo "<p>Connected to MySQL, using database " .
       DATABASE_NAME . ".</p>";
?>
Note
Make sure your path to app_config.php matches where you stored that file. If you’re saving data-base_connection.php in the same directory as app_config.php, you just need the file name, without any directory paths.
Now you’ve got all your database code tucked nicely away, which means you can radically overhaul run_query.php:
<?php
  require '../../scripts/database_connection.php';
?>
How’s that for short code? Also notice that you no longer have a reason to require app_config.php. Your script requires database_connection.php, and it’s data-base_connection.php that handles bringing in app_config.php. Your code is much nicer and neater now.
Just to make sure this works, you should visit your queryRunner.html page and click Run Query. You should get something like Figure 4-8—all without anything but a single require in your main script!
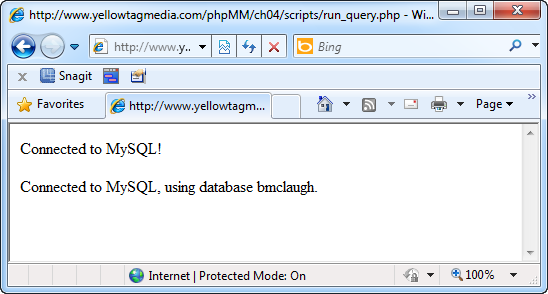
Figure 4-8. It may seem strange to write a script that (at least so far) does nothing more than require another script. Actually, the more comfortable you get coding, the more you’ll favor this sort of reuse. You want to write just enough new code to get the job done. If you can reuse 100, or 1,000, lines of existing code, then you should.
Running Your User’s SQL Query (Again)
At this point, you finally get to combine what you know about PHP and what you know about SQL. You already have anything the user puts into the big text area on your form through the $REQUEST variable, which as you remember is an array (The $_REQUEST Variable). And you also can use mysql_query to run a query.
You just need to put those two things together:
<?php require '../../scripts/database_connection.php';$query_text = $_REQUEST['query'];$result = mysql_query($query_text);if (!$result) {die("<p>Error in executing the SQL query " . $query_text . ": " .mysql_error() . "</p>");}echo "<p>Results from your query:</p>";echo "<ul>";while ($row = mysql_fetch_row($result)) {echo "<li>{$row[0]}</li>";}echo "</ul>";?>
Just grab the appropriate field from the input from your HTML form, pass it to mysql_query, and you’re good to go. You can then pass in the returned PHP resource, $result, to an error-handling if statement, and finally to mysql_fetch_row to print out the results from the query.
The script looks pretty good, so now you’re ready to actually try things out.
Entering Your First Web-Based Query
You probably don’t have much in your database at this point, so start by creating a new table called urls. Here’s the SQL you’ll need:
CREATE TABLE urls (id int, url varchar(100), description varchar(100));
Of course, since you’ve got a nice big text area, you could also spread that out:
CREATE TABLE urls ( id int, url varchar(100), description varchar(100) )
Either way, you want a form that looks something like Figure 4-9.
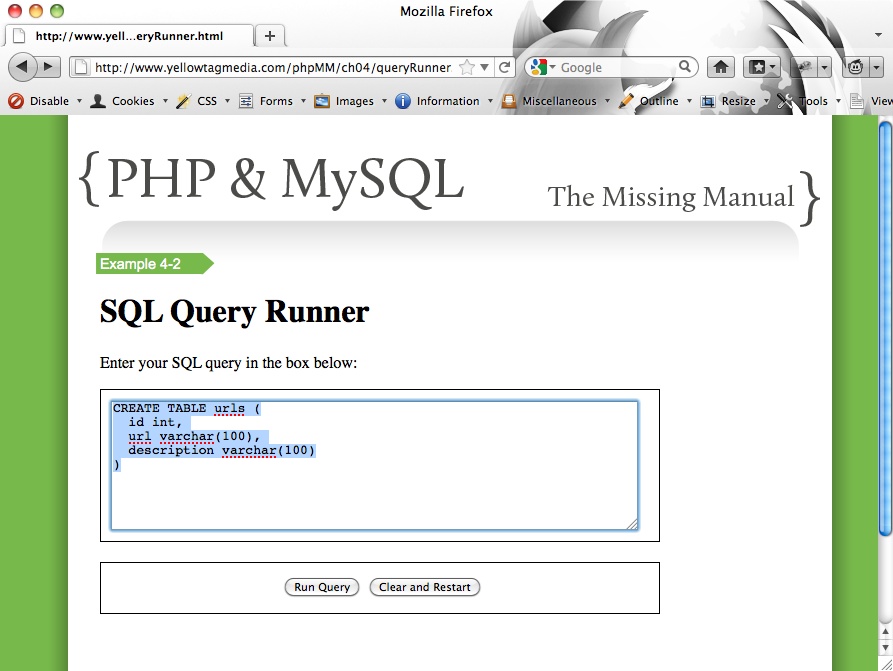
Figure 4-9. Using a textarea here lets your users enter SQL however they like. It’s a small thing, but these little bits of flexibility and user-centric design make your web forms a lot more enjoyable to use. You wouldn’t want to write a big long SQL statement in a giant input box on one line, so why would your users?
Now click Run Query. What did you get? Well, you’re probably staring at a surprising screen, sort of like the one shown in Figure 4-10.
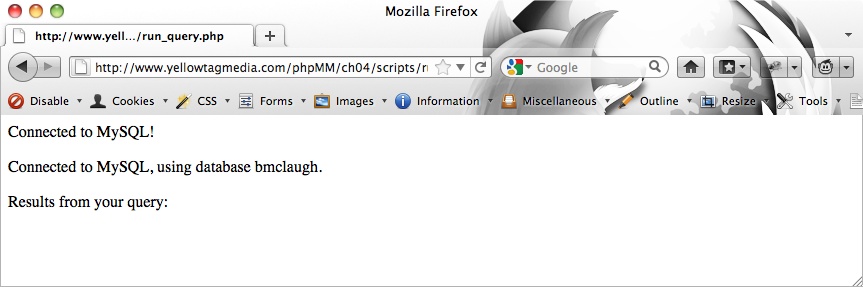
Figure 4-10. Sometimes the worst possible error message is not an error message. Nothing here helps you see what went wrong with your script. In cases like this, an error message would help, not cause frustration.
Well, what happened? If you want to really get confused, click the Back button on your browser, and run your CREATE query again. You’ll see a message like the one shown in Figure 4-11.
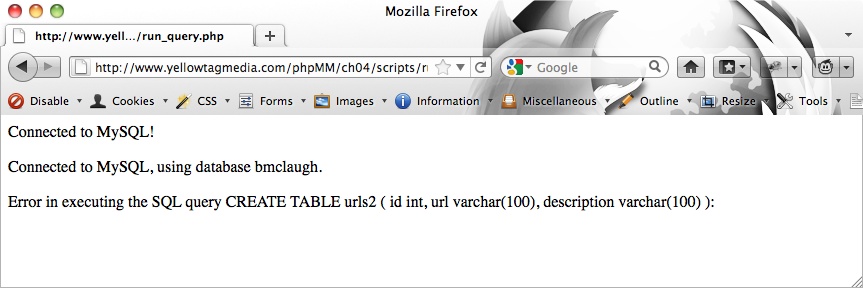
Figure 4-11. First, you had nothing, and now an error. What’s going on? Even worse, although you know you have an error, what is the actual problem? There’s still plenty of work to do here.
The first time you ran the CREATE TABLE query on Making Tables with CREATE, you got nothing—no results at all. The next time, MySQL tells you the urls table already exists! In fact, if you hop to your command-line tool, you see that, yes, the table does exist in your database:
mysql> describe urls; +-------------+--------------+------+-----+---------+-------+ | Field | Type | Null | Key | Default | Extra | +-------------+--------------+------+-----+---------+-------+ | id | int(11) | YES | | NULL | | | url | varchar(100) | YES | | NULL | | | description | varchar(100) | YES | | NULL | | +-------------+--------------+------+-----+---------+-------+ 3 rows in set (0.00 sec)
Look carefully at your code again:
<?php
  require '../../scripts/database_connection.php';

  $query_text = $_REQUEST['query'];
  $result = mysql_query($query_text);

  if (!$result) {
    die("<p>Error in executing the SQL query " . $query_text . ": " .
        mysql_error() . "</p>");
  }

  echo "<p>Results from your query:</p>";
  echo "<ul>";
  while ($row = mysql_fetch_row($result)) {
    echo "<li>{$row[0]}</li>";
  }
  echo "</ul>";
?>
The if (!$result) code block is not running, so clearly $result came back as something other than false. But the while loop never ran; you never saw any results.
But wait a second. Your query was a CREATE query. What rows would be returned from that sort of query? There wouldn’t be any rows, because you weren’t asking for rows. You were just asking MySQL to create a table; in fact, a place to put rows.
Handling Queries That Don’t SELECT Information
The secret here is that mysql_query is happy to take in a CREATE statement. It even does what you asked, which is why the second time you entered that query, MySQL gave you an error, saying that the urls table was already created. When mysql_query gets a CREATE statement, it returns false if there was an error—which your script handles—but true if there’s not an error. And if there’s not an error, it doesn’t return any rows. You get a true value in $result, but nothing else. And that’s where things went wrong.
When mysql_query gets most of the SQL statements that don’t select data, like CREATE, INSERT, UPDATE, DELETE, DROP, and a few others, it just returns true (if things worked) or false (if they didn’t).
Note
A few of those SQL commands, like UPDATE and DELETE, may look new to you. Don’t worry, though. They do just what they look like they do: UPDATE updates information in a table, and DELETE removes it. And when you need to use those functions in this book, you’ll get a lot more detail about exactly how to use each of them.
Fortunately, now that you know what’s going on, it’s not too hard to deal with the problem. You just need your script to find out whether the SQL query string the user supplied has one of these special words. If so, you must handle it differently. And it just so happens you’re plenty comfortable with searching through strings.
So think this through; what you really want is something like this:
-
Grab the user’s query from the HTML form.
-
Pass the query into mysql_query, and store the result in a variable.
-
Determine whether the result is false, which is bad no matter what type of SQL got passed in.
-
If the result is not false, see whether the query has one of the special keywords in it: CREATE, INSERT, UPDATE, DELETE, or DROP. (There are others, but these are the most common ones to check for.)
-
If the query has one of these special words, see whether the result of running the query was true, and let the user know things went well.
-
If the query does not have one of these words, try and print out the result rows like you’ve already been doing.
You’ve already got a lot of this code, so you need to only add an if (or maybe a few ifs, actually), and some searching:
$return_rows = false;
$location = strpos($query_text, "CREATE");
if ($location === false) {
  $location = strpos($query_text, "INSERT");
  if ($location === false) {
    $location = strpos($query_text, "UPDATE");
    if ($location === false) {
      $location = strpos($query_text, "DELETE");
      if ($location === false) {
        $location = strpos($query_text, "DROP");
        if ($location === false) {
          // If we got here, it's not a CREATE, INSERT, UPDATE,
          //   DELETE, or DROP query. It should return rows.
          $return_rows = true;
        }
      }
    }
  }
}
Warning
Be sure to use that triple-equals sign (===) in your if statements to check whether $location is false.
This code may appear tricky, but it’s straightforward if you walk through it line by line. Basically, you have the same if statement, repeated over and over, with each of those having another nested if statement:
$location = strpos($query_text, "SEARCH_STRING");
if ($location === false) {
  // Try again with another SEARCH_STRING
}
Finally, if all the if statements fail, then you don’t have CREATE, INSERT, UPDATE, DELETE, or DROP anywhere in the query string:
// This is the innermost if statement
if ($location === false) {
  // If we got here, it's not a CREATE, INSERT, UPDATE,
  //   DELETE, or DROP query. It should return rows.
  $return_rows = true;
}
But why is this so complex? The problem here is that you really want to search the user’s query string, not just for a single matching word, like CREATE or INSERT, but for several matching words. That’s a little tricky, so you’ve got to work with one call to strpos at a time.
Note
Make sure you understand this code, but don’t get too attached to it. It’s really ugly, and in the next chapter, you’re going to add an extremely new tool to your PHP programming kit, and rework this code to be a lot slimmer and sleeker.
At each step, if the search string is found, the user has put in one of those special SQL keywords that doesn’t return rows, so the variable $return_rows is set to false, different from its original value, true.
Finally, at the end of this curly-brace love fest, the if statements unwind back to the main program, and either $returns_rows has a value of true because none of the searches matched, or false because one of them did.
Now you’re ready to use $returns_rows to print a result:
<?php // require and database connection code // run the query // handle errors in the result // see if the query has result rows or notif ($return_rows) {// We have rows to show from the queryecho "<p>Results from your query:</p>";echo "<ul>";while ($row = mysql_fetch_row($result)) {echo "<li>{$row[0]}</li>";}echo "</ul>";} else {// No rows. Just report if the query ran or notif ($result) {echo "<p>Your query was processed successfully.</p>"echo "<p>{$query_text}</p>";}}?>
Note
Remember that if ($return_rows) is just the same as if ($return_rows === true). The same goes for if ($result).
Most of this script is familiar. All the code you’ve been using to print out rows stays the same. That code just moves inside the if ($return_rows) block, because it only applies if the user put in something like a SELECT that returns (potentially) lots of results.
Then, in the else to that if, your script just reports whether or not things went OK. As an additional help, this section of the if prints out the original query so the user can know what was executed.
Now, technically, you don’t really need that if ($result). Since you tested earlier to see if $result is false, if your script gets to this last bit, you know that $result is true, so you can simplify things at the end a bit:
if ($return_rows) {
  // We have rows to show from the query
  echo "<p>Results from your query:</p>";
  echo "<ul>";
  while ($row = mysql_fetch_row($result)) {
    echo "<li>{$row[0]}</li>";
  }
  echo "</ul>";
} else {
  // No rows. Just report if the query ran or not
  echo "<p>Your query was processed successfully.</p>"
  echo "<p>{$query_text}</p>";
}
This script is getting to be a little long, but you know what every single line is doing at this point. Go ahead and try it out.
You probably created the urls table (Entering Your First Web-Based Query)—even though your PHP script didn’t let you know that. So try entering DROP TABLE urls; as your SQL query. Then run your query, and this time, you should get a helpful message back, specific to your rowless query, as you can see in Figure 4-12.
Dealing with Humans
Unfortunately, there’s still a problem in one of the lines in the code in the previous section. Right now, if your user types the following query, what happens?
DROP TABLE urls;
Your set of if statements understands that DROP is part of the query, realizes it has no return rows, and does the right thing: reports that the query either ran without problems, or that an error occurred.
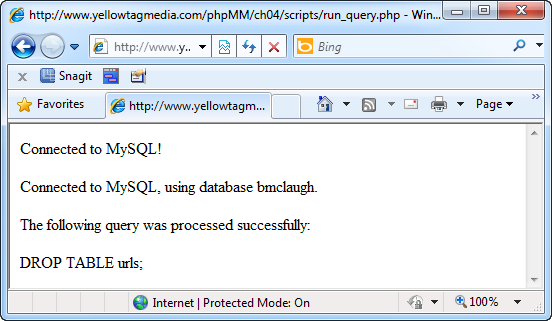
Figure 4-12. Now run_query.php, as shown on page 119, figures out whether it’s been passed a query with one of the keywords that indicates there aren’t any return rows. The message when things go well is still a little terse, but at least there’s no blank space from trying to show result rows when there aren’t any result rows to show.
But what about this query? Do you see where the problem is?
drop table urls;
Here’s the statement that should indicate a match:
$location = strpos($query_text, "DROP");
if ($location === false) {
  // this should return true, and so there are no return rows
}
But that line searches for DROP, which doesn’t match “drop” at all. strpos searches for strings, but it sees a lowercase letter, like “d”, as a different letter from an uppercase “D”. So that search finds “DROP” but not “drop” or “dRoP”.
And, as always, you’ve got humans using your app, not robots. You can’t just assume that those humans will be good SQL citizens and always use capital letters. You could put a little message on the form: Please type your SQL in all capital letters, but humans will be humans, and they tend to ignore instructions like this.
You’ll spend at least as much of your time dealing with the human factor in your code as writing code that handles the so-called normal flow of operation. In fact, once you add real people to your line of thinking, you’ll realize that “normal” isn’t a very useful concept. Instead, your code simply has to deal with as many possibilities as you can imagine (and some you can’t).
Fixing the lowercase and uppercase issue turns out to be fairly simple: you can simply convert $query_string to all capital letters before starting to search through it:
$return_rows = false;
$query_text = strtoupper($query_text);
$location = strpos($query_text, "CREATE");
// All the nested if blocks.
Now, if a user types drop table urls or DROP table UrLS, the search string is DROP TABLE URLS, and searching for “DROP” will return a match.
But there’s another problem! Before you read on, see if you can figure out what it is.
Note
Yes, there really are this many wrinkles and problems with just one simple program. That’s why there are lots of programmers, but so few really great programmers: the difference is handling all these little details without throwing your iPhone through a nearby wall.
Avoid Changing User Input Whenever Possible
To spot this potential problem with your query script, take a look at the last bit of your code that’s run if the user enters a rowless query like DROP or INSERT:
// No rows. Just report if the query ran or not
echo "<p>Your query was processed successfully.</p>"
echo "<p>{$query_text}</p>";
Run this code, and you’ll get something like you see in Figure 4-13.
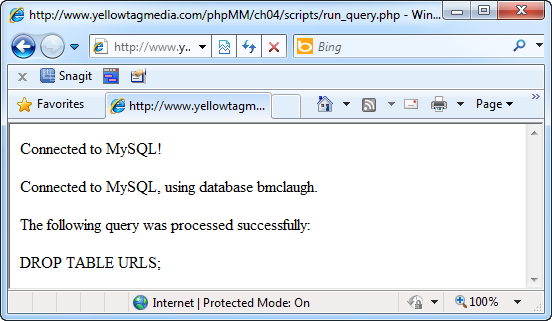
Figure 4-13. Sometimes the best problem you can solve is the problem that hasn’t yet occurred. Look closely at the SQL query here, and compare it to the query in Figure 4-12. This sort of tedious detective work takes hours, but it’s absolutely critical for getting web applications to work in the real world.
Note
If you’re following along, you may need to DROP TABLE urls; before you can CREATE it again, or CREATE the table before you can DROP it.
Carefully compare the code in Figure 4-12 and Figure 4-13. In Figure 4-13, you’ll notice everything is in uppercase. That makes sense, because to make searching easier, you added this line to your script:
$query_text = strtoupper($query_text);
Then, when you output $query_text at the end, the output is shown in all uppercase letters. Is this a big deal? Well, it doesn’t seem to be, at least not here. But it does reveal something: after that $query_text string is converted to uppercase, any time it’s used, it’s coming back with all uppercase letters. So suppose the original query was something like this:
SELECT *
  FROM users
 WHERE last_name = "MacLachlan";
Now consider this same query, turned into all uppercase letters:
SELECT *
  FROM USERS
 WHERE LAST_NAME = "MACLACHLAN";
Believe it or not, these are not the same query. SELECT—and most of the other SQL queries—are going to treat a last name of “MacLachlan” as being totally different from “MACLACHLAN.” So those two queries are not identical at all.
At the moment, this doesn’t create any trouble. Your script never re-runs the query, and mysql_query runs with $query_text before its turned into its uppercase version. But this is a problem waiting to happen.
In general, you want to try to avoid directly changing input from a user. That’s because you get exactly this sort of problem: you may need to use that input again, and once you’ve changed it, you can’t go back.
Luckily, the remedy is simple: instead of changing the user’s input, you instead use a new variable to store the uppercase version of the query:
$return_rows = false;
$uppercase_query_text = strtoupper($query_text);
$location = strpos($query_text, "CREATE");
You should use this new variable in all your string comparisons:
$return_rows = false; $uppercase_query_text = strtoupper($query_text);$location = strpos($uppercase_query_text, "CREATE");if ($location === false) {$location = strpos($uppercase_query_text, "INSERT");if ($location === false) {$location = strpos($uppercase_query_text, "UPDATE");if ($location === false) {$location = strpos($uppercase_query_text, "DELETE");if ($location === false) {$location = strpos($uppercase_query_text, "DROP");if ($location === false) { // If we got here, it's not a CREATE, INSERT, UPDATE, // DELETE, or DROP query. It should return rows. $return_rows = true; } } } } }
As small a change as that is, it protects you in case you ever need to use that query string again.
And just like that you’ve actually got a tool that will execute any SQL query you throw at it. But there’s work still to do. All that search code really does clutter up your script, and there’s just no getting around it: your script is pretty hard to understand at first (and even second) glance. In the next chapter, you’ll tackle all this, taking your form from a basic handy form to a really nice exercise of your PHP muscle.
Давайте теперь научимся работать с базами
данных через PHP. Для этого прежде всего
необходимо установить соединение с сервером
базы данных.
Делается это с помощью функции mysql_connect,
которая принимает 3 параметра: имя
хоста (сервера), имя пользователя, под которым
мы работаем с базой и пароль для этого пользователя.
Если вы работаете на своем компьютере, то
это будут localhost, root и
пароль в виде пустой строки (на некоторых
серверах он тоже может быть root).
Если ваша база данных в интернете — то эти
данные выдает вам хостинг.
Итак, давайте установим соединение с базой данных:
<?php

	$host = 'localhost'; // имя хоста

	$user = 'root';      // имя пользователя

	$pass = '';          // пароль

	$name = 'mydb';      // имя базы данных
$link = mysqli_connect($host, $user, $pass, $name);
?>
Если указанные нами доступы правильные, то
установится соединение к базе данных. При
этом в переменную $link запишется
специальный объект соединения, который мы
будем использовать в дальнейшем для всех
обращений к нашей базе данных.
Посылаем запросы к базе данных
После соединения с базой к ней можно отправлять
запросы. Это делается с помощью функции mysqli_query.
Первым параметром эта функция принимает принимает
переменную, в которую мы записали результат
mysqli_connect, а вторым — строку
с SQL запросом.
К примеру, выполним запрос, который достанет
все записи из таблицы users:
<?php

	$result = mysqli_query($link, 'SELECT * FROM users');

?>
Текст запроса не обязательно писать прямо
в параметре функции mysqli_query.
Давайте вынесем его в переменную:
<?php

	$query = 'SELECT * FROM users';

	$result = mysqli_query($link, $query);

?>
Отлавливаем ошибки базы данных
Как вы уже знаете, в PHP вывод ошибок на
экран включается с помощью функции error_reporting.
Эта функция, однако, не включает вывод ошибок,
допущенных в тексте SQL запроса.
Чтобы вывести ошибки SQL команд, следует
пользоваться функцией mysqli_error,
которую необходимо добавлять к каждому запросу
к БД, вот так:
<?php

	$query = 'SELECT * FROM users';

	$result = mysqli_query($link, $query) or die(mysqli_error($link));

?>
Пока не будем разбираться с тем, как работает
эта конструкция. Просто добавляйте ее и,
в случае ошибочного SQL запроса вы увидите
сообщение об этом в окне браузера.
Тестируем работоспособность
Давайте теперь напишем тестовый код, который
вы сможете запустить у себя, чтобы убедится
в том, что у вас все подключилось верно.
Для начала убедитесь, что у вас есть база
данных mydb, а в ней таблица users,
заполненная какими-нибудь данными.
Затем запустите у себя следующий код:
<?php

	$host = 'localhost'; // имя хоста

	$user = 'root';      // имя пользователя

	$pass = '';          // пароль

	$name = 'mydb';      // имя базы данных
$link = mysqli_connect($host, $user, $pass, $name);
$query = 'SELECT * FROM users';
$result = mysqli_query($link, $query) or die(mysqli_error($link));
var_dump($result);
?>
Если на экране нет ошибок и вы видите результат
var_dump — значит все хорошо. Если
же есть какие-то ошибки — исправьте их и
попробуйте снова.
Скопируйте и запустите у себя приведенный
тестовый код.