Содержание
- Fix: ERROR 2003 (HY000): Can’t connect to MySQL server on ‘127.0.0.1’ (111)
- If You Appreciate What We Do Here On TecMint, You Should Consider:
- MYSQL ERROR 2003 (HY000): Can’t connect to MySQL server on ‘xx.xx.xx.xx’ (111)
Fix: ERROR 2003 (HY000): Can’t connect to MySQL server on ‘127.0.0.1’ (111)
This tutorial is intended to explain the necessary steps for solving the “ERROR 2003 (HY000): Can’t connect to MySQL server on ‘127.0.0.1’ (111)” which might occur when you try to access the MySQL database server.
Before moving any further, if you are a Linux user who is new to MySQL/MariaDB, then you may consider learning MySQL / MariaDB for Beginners – Part 1 and 20 MySQL (Mysqladmin) Commands for Database Administration in Linux as well.
On the other hand, if you are already a intermediate/experienced MySQL user, you can master these 15 Useful MySQL/MariaDB Performance Tuning and Optimization Tips.
Note: For this tutorial, it is assumed that you have already installed mysql database server.
Coming back to the point of focus, what are some of the possible causes of this error?
- Network failure especially if mysql database server is running on remote host.
- No mysql server is running on the mentioned host.
- Firewall blocking TCP-IP connection or other related reasons.
Below are the essential steps to deal with it.
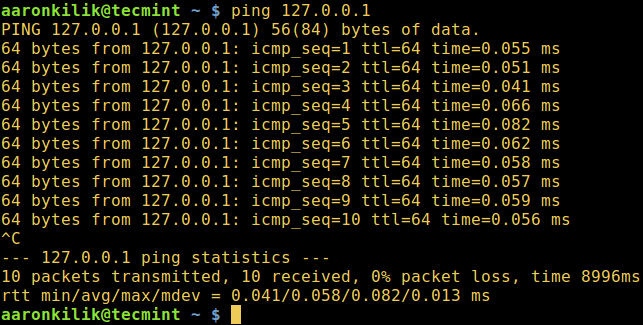
1. If database server is on a remote machine, then try to test the client-server connectivity using ping command, for instance:
![]() Ping Host Machine
Ping Host Machine
Once there is connectivity, use the ps command below which shows information about a selection of the active processes, together with a pipe and grep command, to check that the mysql daemon is running on your system.
where the option:
- -A – activates selection of all processes
- -f – enables full format listing
![]() Check MySQL Process
Check MySQL Process
If there is no output from the previous command, start the mysql service as follows:
After starting mysql service, try to access the database server:
2. If you still get the same error, then determine the port (default is 3306) on which the mysql daemon is listening by running the netstat command.
where the options:
- -l – displays listening ports
- -n – enables display of numerical addresses
- -p – shows PID and name of the program owning the socket
![]() Find MySQL Port Number
Find MySQL Port Number
Therefore use the -P option to specify the port you see from the output above while accessing the database server:
3. If all the above commands run successfully, but you still see the error, open the mysql config file.
Look for the line below and comment it out using the # character:
Save the file and exit, afterwards restart the mysql service like so:
However, if you have firewallD or Iptables running try to review firewall services and open the mysql port, assuming it is firewall blocking TCP-IP connections to your mysql server.
That’s all! Do you know other methods or have suggestions for solving the MySQL connection error above? Let us know by dropping a comment via the feedback form below.
Tutorial Feedback.
If You Appreciate What We Do Here On TecMint, You Should Consider:
TecMint is the fastest growing and most trusted community site for any kind of Linux Articles, Guides and Books on the web. Millions of people visit TecMint! to search or browse the thousands of published articles available FREELY to all.
If you like what you are reading, please consider buying us a coffee ( or 2 ) as a token of appreciation.

We are thankful for your never ending support.
Источник
MYSQL ERROR 2003 (HY000): Can’t connect to MySQL server on ‘xx.xx.xx.xx’ (111)
При попытке подключиться к MySQL или Percona сервер с настройками по-умолчанию с другой рабочей станции или сервера, можно получить ошибку
ERROR 2003 (HY000): Can’t connect to MySQL server on ‘xx.xx.xx.xx’ (111)
Далее описаны 3 шага, которые нужно пройти для установления соединения.
The first thing we can check is to see if the user from the remote host is allowed.
1. Login as root on mysql server
mysql -u root -p
2. Select database and show users.
select * from mysql.userG
**A vertical list will be displayed. Look at the first two fields for each entry. If the user is only allowed to connect from localhost, this may be the problem.
Example:
Host: localhost
User: mydbuser
A user will have to be defined with the same parameters as mydbuser for the remote host (or hosts)
Here’s where your documentation will come in handy (or you can hope the old query exists in the mysql buffer!)
3. Allow remote hosts to connect
grant select,insert,update,delete,create,drop,index,alter on mydbname.* to mydbuser@’192.168.1.%’ identified by ‘mydbpassword’ ;
Note: if you only want to allow a certain host, specify the IP instead of the wildcard.
The second issue that may cause this error is a MySQL configuration.
1. Open MySQL config file
nano /etc/my.cnf
2. Ensure that the following are commented out.
#skip-external-locking
#skip-networking
#bind-address = xx.xx.xx.xx
3. Restart mysql service
service mysqld start
The third issue that may contribute to this error may be the security configuration rejecting incoming requests on the server.
1. Login as root on db server
2. Add rule to iptables
/sbin/iptables -A INPUT -i eth0 -s 192.168.1.0/24 -p tcp —destination-port 3306 -j ACCEPT
** this grants access to the entire subnet, use a specific IP where applicable.
service iptables save
3. Restart iptables service
service iptables restart
Источник
MySQL — система управления базами данных (СУБД) с открытым исходным кодом от компании Oracle. Она была разработана и оптимизирована специально для работы веб-приложений. MySQL является неотъемлемой частью таких веб-сервисов, как Facebook, Twitter, Wikipedia, YouTube и многих других.
Эта статья расскажет, как определять, с чем связаны частые ошибки на сервере MySQL, и устранять их.
Не удаётся подключиться к локальному серверу
Одной из распространённых ошибок подключения клиента к серверу является «ERROR 2002 (HY000): Can’t connect to local MySQL server through socket ‘/var/run/mysqld/mysqld.sock’ (2)».

Эта ошибка означает, что на хосте не запущен сервер MySQL (mysqld) или вы указали неправильное имя файла сокета Unix или порт TCP/IP при попытке подключения.
Убедитесь, что сервер работает. Проверьте процесс с именем mysqld на хосте сервера, используя команды ps или grep, как показано ниже.
$ ps xa | grep mysqld | grep -v mysqldЕсли эти команды не показывают выходных данных, то сервер БД не работает. Поэтому клиент не может подключиться к нему. Чтобы запустить сервер, выполните команду systemctl.
$ sudo systemctl start mysql        #Debian/Ubuntu
$ sudo systemctl start mysqld       #RHEL/CentOS/Fedora
Чтобы проверить состояние службы MySQL, используйте следующую команду:
$ sudo systemctl status mysql       #Debian/Ubuntu
$ sudo systemctl status mysqld      #RHEL/CentOS/Fedora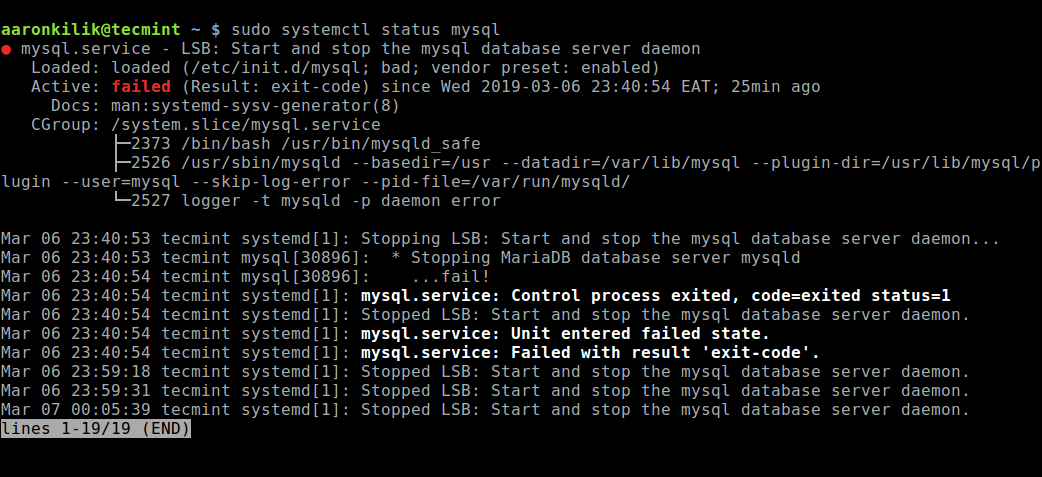
Если в результате выполнения команды произошла ошибка службы MySQL, вы можете попробовать перезапустить службу и ещё раз проверить её состояние.
$ sudo systemctl restart mysql
$ sudo systemctl status mysql
Если сервер работает (как показано) и вы по-прежнему видите эту ошибку, вам следует проверить, не заблокирован ли порт TCP/IP брандмауэром или любой другой службой блокировки портов.
Для поиска порта, который прослушивается сервером, используйте команду netstat.
$ sudo netstat -tlpn | grep "mysql"Ещё одна похожая и часто встречающаяся ошибка подключения — «(2003) Can’t connect to MySQL server on ‘server’ (10061)». Это означает, что в сетевом соединении было отказано.
Следует проверить, работает ли в системе сервер MySQL (смотрите выше) и на тот ли порт вы подключаетесь (как найти порт, можно посмотреть выше).
Похожие частые ошибки, с которыми вы можете столкнуться при попытке подключиться к серверу MySQL:
ERROR 2003: Cannot connect to MySQL server on 'host_name' (111)
ERROR 2002: Cannot connect to local MySQL server through socket '/tmp/mysql.sock' (111)
Ошибки запрета доступа в MySQL
В MySQL учётная запись (УЗ) определяется именем пользователя и клиентским хостом, с которого пользователь может подключиться. УЗ может также иметь данные для аутентификации (например, пароль).
Причин для запрета доступа может быть много. Одна из них связана с учётными записями MySQL, которые сервер разрешает использовать клиентским программам при подключении. Это означает, что имя пользователя, указанное в соединении, может не иметь прав доступа к базе данных.
В MySQL есть возможность создавать учётные записи, позволяющие пользователям клиентских программ подключаться к серверу и получать доступ к данным. Поэтому при ошибке доступа проверьте разрешение УЗ на подключение к серверу через клиентскую программу.
Увидеть разрешённые привилегии учётной записи можно, выполнив в консоли команду SHOW GRANTS
Входим в консоль (пример для Unix, для Windows консоль можно найти в стартовом меню):
В консоли вводим команду:
> SHOW GRANTS FOR 'tecmint'@'localhost';Дать привилегии конкретному пользователю в БД по IP-адресу можно, используя следующие команды:
> grant all privileges on *.test_db to 'tecmint'@'192.168.0.100';
> flush privileges;
Ошибки запрещённого доступа могут также возникнуть из-за проблем с подключением к MySQL (см. выше).
Потеря соединения с сервером MySQL
С этой ошибкой можно столкнуться по одной из следующих причин:
- плохое сетевое соединение;
- истекло время ожидания соединения;
- размер BLOB больше, чем
max_allowed_packet.
В первом случае убедитесь, что у вас стабильное сетевое подключение (особенно, если подключаетесь удалённо).
Если проблема с тайм-аутом соединения (особенно при первоначальном соединении MySQL с сервером), увеличьте значение параметра connect_timeout.
В случае с размером BLOB нужно установить более высокое значение для max_allowed_packet в файле конфигурации /etc/my.cnf в разделах [mysqld] или [client] как показано ниже.
[mysqld]
connect_timeout=100
max_allowed_packet=500M
Если файл конфигурации недоступен, это значение можно установить с помощью следующей команды.
> SET GLOBAL connect_timeout=100;
> SET GLOBAL max_allowed_packet=524288000;
Слишком много подключений
Эта ошибка означает, что все доступные соединения используются клиентскими программами. Количество соединений (по умолчанию 151) контролируется системной переменной max_connections. Устранить проблему можно, увеличив значение переменной в файле конфигурации /etc/my.cnf.
[mysqld]
max_connections=1000
Недостаточно памяти
Если такая ошибка возникла, это может означать, что в MySQL недостаточно памяти для хранения всего результата запроса.
Сначала нужно убедиться, что запрос правильный. Если это так, то нужно выполнить одно из следующих действий:
- если клиент MySQL используется напрямую, запустите его с ключом
--quick switch, чтобы отключить кешированные результаты; - если вы используете драйвер MyODBC, пользовательский интерфейс (UI) имеет расширенную вкладку с опциями. Отметьте галочкой «Do not cache result» (не кешировать результат).
Также может помочь MySQL Tuner. Это полезный скрипт, который подключается к работающему серверу MySQL и даёт рекомендации по настройке для более высокой производительности.
$ sudo apt-get install mysqltuner     #Debian/Ubuntu
$ sudo yum install mysqltuner         #RHEL/CentOS/Fedora
$ mysqltuner
MySQL продолжает «падать»
Если такая проблема возникает, необходимо выяснить, заключается она в сервере или в клиенте. Обратите внимание, что многие сбои сервера вызваны повреждёнными файлами данных или индексными файлами.
Вы можете проверить состояние сервера, чтобы определить, как долго он работал.
$ sudo systemctl status mysql       #Debian/Ubuntu
$ sudo systemctl status mysqld      #RHEL/CentOS/Fedora
Чтобы узнать время безотказной работы сервера, запустите команду mysqladmin.
$ sudo mysqladmin version -p 
Кроме того, можно остановить сервер, сделать отладку MySQL и снова запустить службу. Для отображения статистики процессов MySQL во время выполнения других процессов откройте окно командной строки и введите следующее:
$ sudo mysqladmin -i 5 statusИли
$ sudo mysqladmin -i 5 -r statusЗаключение
Самое важное при диагностике — понять, что именно вызвало ошибку. Следующие шаги помогут вам в этом:
- Первый и самый важный шаг — просмотреть журналы MySQL, которые хранятся в каталоге
/var/log/mysql/. Вы можете использовать утилиты командной строки вродеtailдля чтения файлов журнала. - Если служба MySQL не запускается, проверьте её состояние с помощью
systemctl. Или используйте командуjournalctl(с флагом-xe) в systemd. - Вы также можете проверить файл системного журнала (например,
/var/log/messages) на предмет обнаружения ошибок. - Попробуйте использовать такие инструменты, как Mytop, glances, top, ps или htop, чтобы проверить, какая программа использует весь ресурс процессора или блокирует машину. Они также помогут определить нехватку памяти, дискового пространства, файловых дескрипторов или какого-либо другого важного ресурса.
- Если проблема в каком-либо процессе, можно попытаться его принудительно остановить, а затем запустить (при необходимости).
- Если вы уверены, что проблемы именно на стороне сервера, можете выполнить команды:
mysqladmin -u root pingилиmysqladmin -u root processlist, чтобы получить от него ответ. - Если при подключении проблема не связана с сервером, проверьте, нормально ли работает клиент. Попробуйте получить какие-либо его выходные данные для устранения неполадок.
Перевод статьи «Useful Tips to Troubleshoot Common Errors in MySQL»
This tutorial is intended to explain the necessary steps for solving the “ERROR 2003 (HY000): Can’t connect to MySQL server on ‘127.0.0.1’ (111)” which might occur when you try to access the MySQL database server.
Before moving any further, if you are a Linux user who is new to MySQL/MariaDB, then you may consider learning MySQL / MariaDB for Beginners – Part 1 and 20 MySQL (Mysqladmin) Commands for Database Administration in Linux as well.
On the other hand, if you are already a intermediate/experienced MySQL user, you can master these 15 Useful MySQL/MariaDB Performance Tuning and Optimization Tips.
Note: For this tutorial, it is assumed that you have already installed mysql database server.
Coming back to the point of focus, what are some of the possible causes of this error?
- Network failure especially if mysql database server is running on remote host.
- No mysql server is running on the mentioned host.
- Firewall blocking TCP-IP connection or other related reasons.
Below are the essential steps to deal with it.
1. If database server is on a remote machine, then try to test the client-server connectivity using ping command, for instance:
$ ping server_ip_address
Once there is connectivity, use the ps command below which shows information about a selection of the active processes, together with a pipe and grep command, to check that the mysql daemon is running on your system.
$ ps -Af | grep mysqld
where the option:
-A– activates selection of all processes-f– enables full format listing

If there is no output from the previous command, start the mysql service as follows:
$ sudo systemctl start mysql.service
$ sudo systemctl start mariadb.service
OR
# sudo /etc/init.d/mysqld start
After starting mysql service, try to access the database server:
$ mysql -u username -p -h host_address
2. If you still get the same error, then determine the port (default is 3306) on which the mysql daemon is listening by running the netstat command.
$ netstat -lnp | grep mysql
where the options:
-l– displays listening ports-n– enables display of numerical addresses-p– shows PID and name of the program owning the socket

Therefore use the -P option to specify the port you see from the output above while accessing the database server:
$ mysql -u username -p -h host_address -P port
3. If all the above commands run successfully, but you still see the error, open the mysql config file.
$ vi /etc/mysql/my.cnf
OR
$ vi /etc/mysql/mysql.conf.d/mysqld.cnf
Look for the line below and comment it out using the # character:
bind-address = 127.0.0.1
Save the file and exit, afterwards restart the mysql service like so:
$ sudo systemctl start mysql.service
$ sudo systemctl start mariadb.service
OR
# sudo /etc/init.d/mysqld start
However, if you have firewallD or Iptables running try to review firewall services and open the mysql port, assuming it is firewall blocking TCP-IP connections to your mysql server.
That’s all! Do you know other methods or have suggestions for solving the MySQL connection error above? Let us know by dropping a comment via the feedback form below.
If You Appreciate What We Do Here On TecMint, You Should Consider:
TecMint is the fastest growing and most trusted community site for any kind of Linux Articles, Guides and Books on the web. Millions of people visit TecMint! to search or browse the thousands of published articles available FREELY to all.
If you like what you are reading, please consider buying us a coffee ( or 2 ) as a token of appreciation.
We are thankful for your never ending support.
I am unable to connect to on my ubuntu installation a remote tcp/ip which contains a mysql installation:
viggy@ubuntu:~$ mysql -u user.name -p -h xxx.xxx.xxx.xxx -P 3306
Enter password:
ERROR 2003 (HY000): Can't connect to MySQL server on 'xxx.xxx.xxx.xxx' (111)
I commented out the line below using vim in /etc/mysql/my.cnf:
# Instead of skip-networking the default is now to listen only on
# localhost which is more compatible and is not less secure.
#bind-address           = 127.0.0.1
Then I restarted the server:
sudo service mysql restart
But still I get the same error.
This is the content of my.cnf:
#
# The MySQL database server configuration file.
#
# You can copy this to one of:
# - "/etc/mysql/my.cnf" to set global options,
# - "~/.my.cnf" to set user-specific options.
#
# One can use all long options that the program supports.
# Run program with --help to get a list of available options and with
# --print-defaults to see which it would actually understand and use.
#
# For explanations see
# http://dev.mysql.com/doc/mysql/en/server-system-variables.html

# This will be passed to all mysql clients
# It has been reported that passwords should be enclosed with ticks/quotes
# escpecially if they contain "#" chars...
# Remember to edit /etc/mysql/debian.cnf when changing the socket location.
[client]
port        = 3306
socket      = /var/run/mysqld/mysqld.sock

# Here is entries for some specific programs
# The following values assume you have at least 32M ram

# This was formally known as [safe_mysqld]. Both versions are currently parsed.
[mysqld_safe]
socket      = /var/run/mysqld/mysqld.sock
nice        = 0

[mysqld]
#
# * Basic Settings
#
user        = mysql
pid-file    = /var/run/mysqld/mysqld.pid
socket      = /var/run/mysqld/mysqld.sock
port        = 3306
basedir     = /usr
datadir     = /var/lib/mysql
tmpdir      = /tmp
lc-messages-dir = /usr/share/mysql
skip-external-locking
#
# Instead of skip-networking the default is now to listen only on
# localhost which is more compatible and is not less secure.
#bind-address       = 127.0.0.1
#
# * Fine Tuning
#
key_buffer      = 16M
max_allowed_packet  = 16M
thread_stack        = 192K
thread_cache_size       = 8
# This replaces the startup script and checks MyISAM tables if needed
# the first time they are touched
myisam-recover         = BACKUP
#max_connections        = 100
#table_cache            = 64
#thread_concurrency     = 10
#
# * Query Cache Configuration
#
query_cache_limit   = 1M
query_cache_size        = 16M
#
# * Logging and Replication
#
# Both location gets rotated by the cronjob.
# Be aware that this log type is a performance killer.
# As of 5.1 you can enable the log at runtime!
#general_log_file        = /var/log/mysql/mysql.log
#general_log             = 1
#
# Error logging goes to syslog due to /etc/mysql/conf.d/mysqld_safe_syslog.cnf.
#
# Here you can see queries with especially long duration
#log_slow_queries   = /var/log/mysql/mysql-slow.log
#long_query_time = 2
#log-queries-not-using-indexes
#
# The following can be used as easy to replay backup logs or for replication.
# note: if you are setting up a replication slave, see README.Debian about
#       other settings you may need to change.
#server-id      = 1
#log_bin            = /var/log/mysql/mysql-bin.log
expire_logs_days    = 10
max_binlog_size         = 100M
#binlog_do_db       = include_database_name
#binlog_ignore_db   = include_database_name
#
# * InnoDB
#
# InnoDB is enabled by default with a 10MB datafile in /var/lib/mysql/.
# Read the manual for more InnoDB related options. There are many!
#
# * Security Features
#
# Read the manual, too, if you want chroot!
# chroot = /var/lib/mysql/
#
# For generating SSL certificates I recommend the OpenSSL GUI "tinyca".
#
# ssl-ca=/etc/mysql/cacert.pem
# ssl-cert=/etc/mysql/server-cert.pem
# ssl-key=/etc/mysql/server-key.pem


[mysqldump]
quick
quote-names
max_allowed_packet  = 16M

[mysql]
#no-auto-rehash # faster start of mysql but no tab completition

[isamchk]
key_buffer      = 16M

#
# * IMPORTANT: Additional settings that can override those from this file!
#   The files must end with '.cnf', otherwise they'll be ignored.
#
!includedir /etc/mysql/conf.d/
(Note that I can log into my local mysql install just fine by running mysql (and it will log me in as root) and also note that I can get into mysql in the remote server by logging into via ssh and then invoking mysql), but I am unable to connect to the remote server via my terminal using the host, and I need to do it that way so that I can then use mysql workbench.