This “access denied” error is one of the most common errors you’ll get when working with MySQL.
Learn how to fix it, and see a range of solutions if the suggested fix does not work, in this article.
When you try to connect to a MySQL database on your own computer (called “localhost”), you may get this error:
Access denied for user 'root'@'localhost' (using password: YES)
You might get an error code in front of it:
ERROR 1045 (28000): Access denied for user 'root'@'localhost' (using password: YES)
You might also get the error with “using password no”:
Access denied for user 'root'@'localhost' (using password: NO)
You’ll see this if you log into MySQL using the command line:
mysql -u root -p
You might also see this if you log in to MySQL using an IDE such as MySQL Workbench. Or even if you use phpMyAdmin.
What does this mean? How can you fix it?
There are a few solutions to this, which I’ve detailed below. Try one, and if it doesn’t work, try another one.
Also a tip for logging in: don’t enter your password in the command line itself, because this will be stored in your command history. Use the -p option, as mentioned above, and then you’ll be prompted to enter the password.
Solution 1: Sudo then Change Password
If you get the “access denied” error, one way to solve it is by using sudo to log in to mysql and change the root password.
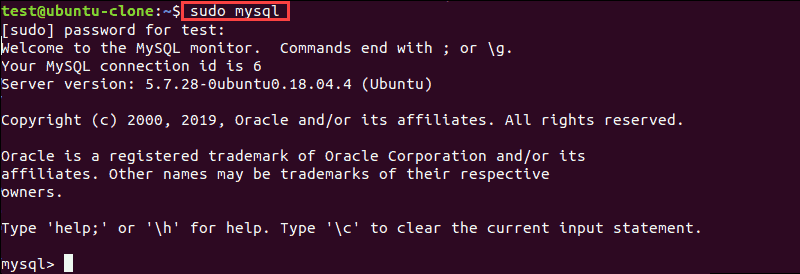
Step 1: Open the command line on your system.
Step 2: Open mysql using the sudo command:
sudo mysql
Step 3: Enter the password for this account.
Step 4: Change the auth_plugin to mysql_native_password, and the password for the root account, in a single command:
ALTER USER 'root'@'localhost'
IDENTIFIED WITH mysql_native_password BY 'your_new_password';
Substitute the word your_new_password with a new secure password that you want to use for the root account.
The mysql_native_password method is a traditional method of authentication and will allow you to login.
Step 5: Flush the privileges, which tells the server to refresh the grant tables and apply your changes, with this command:
FLUSH PRIVILEGES;Step 6: You can confirm that the new authentication method, or plugin, is used by selecting from the mysql.user table.
SELECT user, plugin
FROM mysql.user
Results:
| user | plugin |
| root | mysql_native_password |
Step 7: Exit the console by pressing CTRL + D or typing exit.
exit;
Step 8: Log in to mysql using the root account and the new password you set, which should work:
mysql -u root -p
You should now be logged in to the root account in mysql.
Solution 2: Edit My.cnf File
If the above solution did not work, you may need to edit the mysql.cnf file to allow for changes to the root account.
Step 1: Open the my.cnf file. This may be stored in:
/etc/my.cnf
/etc/mysql/my.cnf
If you’re not sure where it is, search your MySQL installation folder (e.g. on Windows or Mac) for the file.
If you don’t have a my.cnf file (MacOS does not include one by default). You can create one in the /etc folder if you like.
Step 2: Add the word skip-grant-tables under the word [mysqld]. Your file may look like this:
[mysqld]
skip-grant-tables
Step 3: Restart the MySQL server.
Step 4: Login to the root account:
mysql -u root -p
Step 5: Flush the privileges, which tells the server to refresh the grant tables and apply your changes, with this command:
FLUSH PRIVILEGES;Step 6: Set a new password for the account:
ALTER USER 'root'@'localhost' IDENTIFIED BY 'your_new_password';Substitute the word your_new_password with a new secure password that you want to use for the root account.
Step 7: Open the my.cnf file you opened in step 1, and remove the line about skip-grant-tables, and save the file.
Step 8: Restart the MySQL server again.
Step 9: Log in to the root account again:
mysql -u root -p
You should now be able to log in successfully with your new password and not get an error.
Conclusion
Either of these two solutions should hopefully solve the problem for you, and you should no longer get the error “Access denied for user ‘root’@’localhost’”.
If you have any questions, feel free to use the comments section below.
Если вы захотите настроить резервное копирование базы данных на другой сервер, или протестировать соединение с базой данных из другого сервера. И тогда вы можете столкнуться с ошибкой access denied for user root localhost, даже если вы указали верное имя пользователя, базу данных и пароль.
В этой небольшой статье мы рассмотрим почему возникает эта ошибка, а также как ее исправить и подключиться к MySQL из другого сервера через интернет.
Если переводить дословно, то эта ошибка означает что у вас нет доступа к данной базе данных от имени этого пользователя. В примере я использовал пользователя root, но вы можете использовать и другого пользователя. Это может быть вызвано несколькими причинами:
- Пароль введен неверно;
- По каким-либо причинам у пользователя нет прав на доступ к базе данных;
- В настройках этого пользователя запрещено авторизоваться с этого сервера;
Для безопасности базы данных в mysql была придумана настройка хоста, из которого пользователь может авторизоваться. По умолчанию для пользователей устанавливается разрешение на авторизацию только с localhost. Чтобы разрешить подключение с других хостов, нужно менять настройки. Рассмотрим как это делается с помощью Phpmyadmin и в терминале.
Исправляем ошибку access denied for user root localhost
1. Подключение с другого хоста
Сначала рассмотрим как работать с Phpmyadmin. Это намного проще для начинающих и тех, кто не любит работать в терминале. Откройте Phpmyadmin, авторизуйтесь в программе с правами root и перейдите на вкладку «Учетные записи пользователей»:
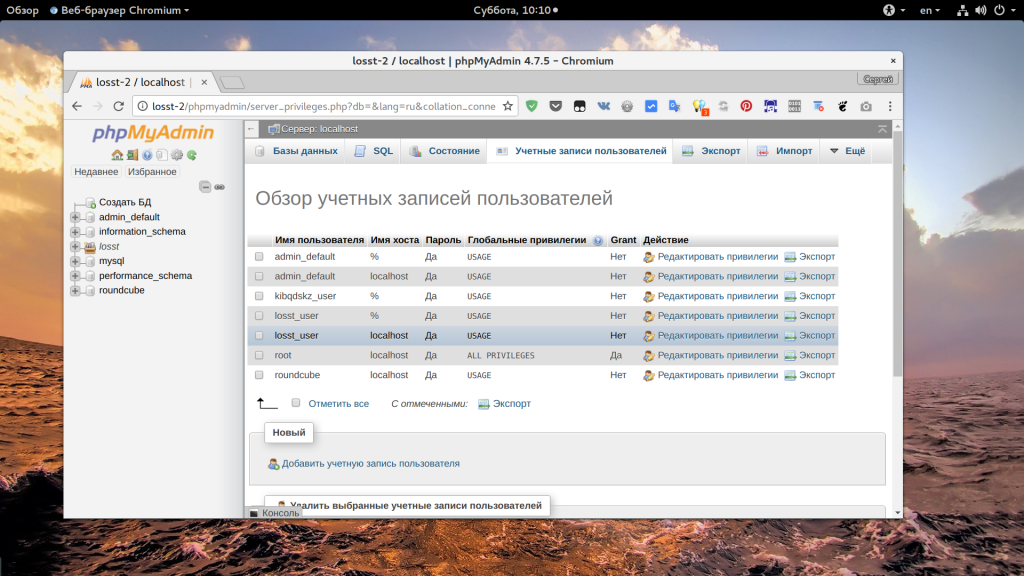
Здесь, вы увидите, кроме обычных полей, поле «имя хоста», которое указывает с какого хоста может подключаться пользователь. Если в этом поле написано localhost, значит этот пользователь может авторизоваться только с локальной машины. Также, в этом поле может находиться IP адрес, с которого есть разрешение или символ %, который означает, что пользователь может подключаться с любого IP.
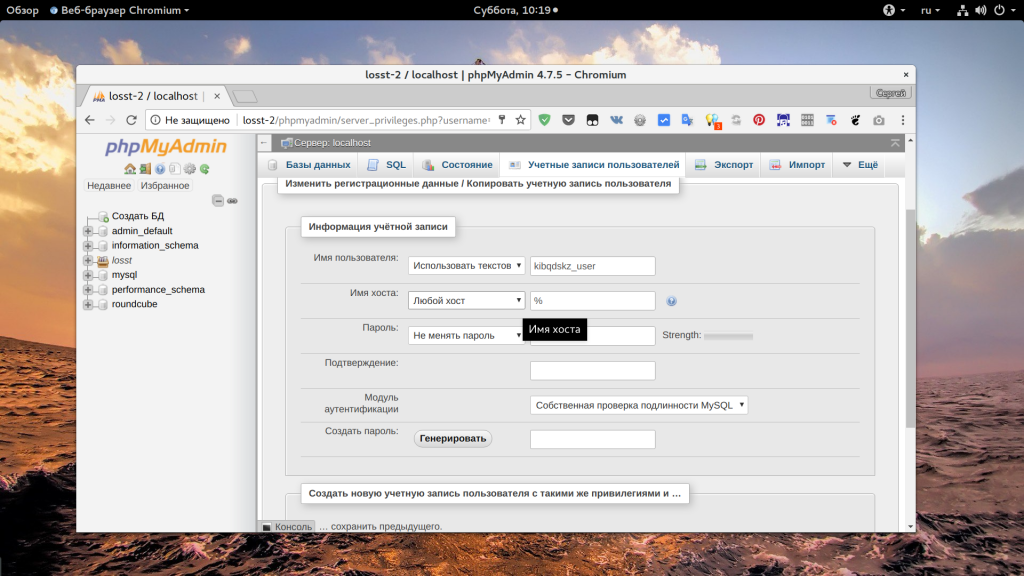
Чтобы изменить права для пользователя, нужно нажать на ссылку «Редактировать привилегии» для него, на открывшейся странице перейдите на вкладку «Информация об учетной записи»:
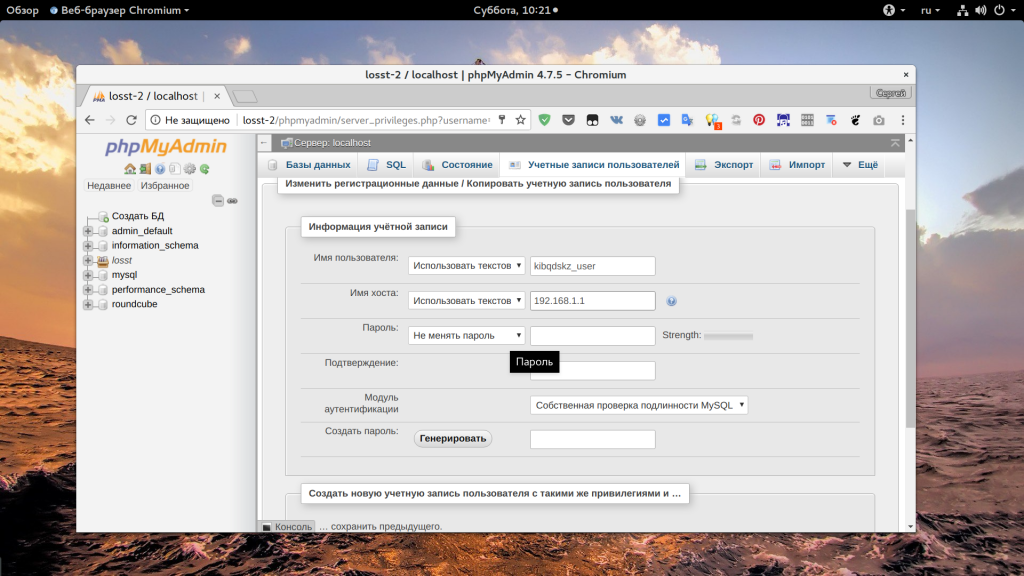
Затем установите в поле «Имя хоста» значение «Любой хост» чтобы разрешить этому пользователю авторизоваться с любого IP. Если вы хотите разрешить только определенный IP, выберите «Использовать текстовое поле» и укажите нужный адрес или подсеть:
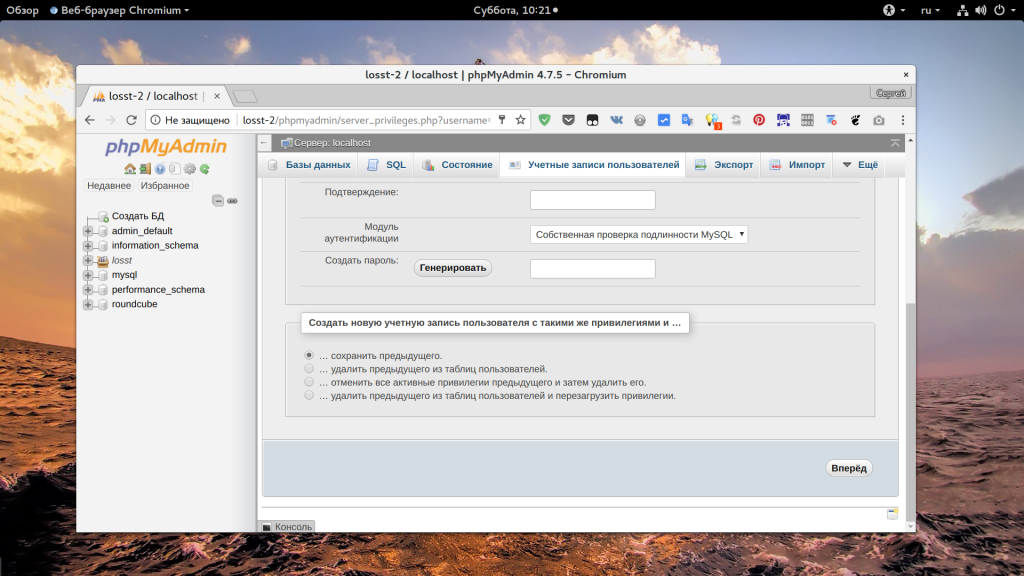
После этого останется нажать кнопку «Вперед» чтобы сохранить настройки. Если вам нужно чтобы был доступ и с локального IP, и с другого, то необходимо создать еще одного пользователя. После этого вы сможете авторизоваться от имени этого пользователя.
Теперь рассмотрим другой способ решить ошибку 1045 access denied for user root localhost, с помощью терминала. Это немного проще, поскольку вам нужно только выполнить несколько команд:
mysql
> UPDATE mysql.user SET Host='%' WHERE Host='localhost' AND User='имя_пользователя';

> UPDATE mysql.db SET Host='%' WHERE Host='localhost' AND User='имя_пользователя';

> FLUSH PRIVILEGES;
Уже после этого, вы можете подключаться к серверу баз данных с любого другого компьютера и не получите никаких ошибок. Вместо символа %, можно указать нужный ip или localhost, если ограничение нужно вернуть обратно.
2. Неверный пароль root
Иногда случается, что при установке базы данных пароль для root задается, но вы его не знаете. Поскольку это главный пользователь и если вы не можете войти от его имени, то вы не сможете ничего исправить. Сначала попробуйте авторизоваться от имени root в системе и подключиться к базе без пароля:
mysql
Иногда это работает. Если не сработало, остановите службу mysql и запустите ее без проверки безопасности, а затем попробуйте снова:
systemctl stop mysqld
mysqld --skip-grant-tables
mysql
> USE mysql;

> UPDATE user SET Password=PASSWORD('ваш_пароль') where USER='root';

> FLUSH PRIVILEGES;
Еще можно попытаться выдать права над всеми таблицами нашему пользователю, если это необходимо:
> GRANT ALL ON *.* TO 'root'@'localhost' WITH GRANT OPTION;
Обратите внимание на хост localhost, если вы хотите чтобы удаленные узлы тоже могли подключаться к этому пользователю, то нужно использовать %. Дальше можно перезапустить базу данных и работать как обычно.
Выводы
Теперь вы знаете как решается mysql access denied for user root localhost и что делать в таких ситуациях, чтобы решить проблему. Надеюсь, эта информация была полезной для вас. Если у вас остались вопросы, спрашивайте в комментариях!
https://youtu.be/avnitMoiJww

Статья распространяется под лицензией Creative Commons ShareAlike 4.0 при копировании материала ссылка на источник обязательна .
Об авторе
![]()
Основатель и администратор сайта losst.ru, увлекаюсь открытым программным обеспечением и операционной системой Linux. В качестве основной ОС сейчас использую Ubuntu. Кроме Linux, интересуюсь всем, что связано с информационными технологиями и современной наукой.
grep 'temporary password' /var/log/mysqld.log
Sort date (newest date)
You may see something like this;
[root@SERVER ~]# grep 'temporary password' /var/log/mysqld.log
2016-01-16T18:07:29.688164Z 1 [Note] A temporary password is generated for root@localhost: O,k5.marHfFu
2016-01-22T13:14:17.974391Z 1 [Note] A temporary password is generated for root@localhost: b5nvIu!jh6ql
2016-01-22T15:35:48.496812Z 1 [Note] A temporary password is generated for root@localhost: (B*=T!uWJ7ws
2016-01-22T15:52:21.088610Z 1 [Note] A temporary password is generated for root@localhost: %tJXK7sytMJV
2016-01-22T16:24:41.384205Z 1 [Note] A temporary password is generated for root@localhost: lslQDvgwr3/S
2016-01-22T22:11:24.772275Z 1 [Note] A temporary password is generated for root@localhost: S4u+J,Rce_0t
[root@SERVER ~]# mysql_secure_installation
Securing the MySQL server deployment.
Enter password for user root:

The existing password for the user account root has expired. Please set a new password.

New password:

Re-enter new password:
If you see it says
... Failed! Error: Your password does not satisfy the current policy requirements
That means your password needs to have a character such as ! . # - etc...
mix characters well, upper case, lower case, ! . , # etc...

New password:

Re-enter new password:
The 'validate_password' plugin is installed on the server.
The subsequent steps will run with the existing configuration
of the plugin.
Using existing password for root.

Estimated strength of the password: 100
Change the password for root ? ((Press y|Y for Yes, any other key for No) : Y

New password:

Re-enter new password:

Estimated strength of the password: 100
Do you wish to continue with the password provided?(Press y|Y for Yes, any other key for No) : Y
By default, a MySQL installation has an anonymous user,
allowing anyone to log into MySQL without having to have
a user account created for them. This is intended only for
testing, and to make the installation go a bit smoother.
You should remove them before moving into a production
environment.

Remove anonymous users? (Press y|Y for Yes, any other key for No) : Y
Success.


Normally, root should only be allowed to connect from
'localhost'. This ensures that someone cannot guess at
the root password from the network.

Disallow root login remotely? (Press y|Y for Yes, any other key for No) : Y
Success.

By default, MySQL comes with a database named 'test' that
anyone can access. This is also intended only for testing,
and should be removed before moving into a production
environment.


Remove test database and access to it? (Press y|Y for Yes, any other key for No) : Y
 - Dropping test database...
Success.

 - Removing privileges on test database...
Success.

Reloading the privilege tables will ensure that all changes
made so far will take effect immediately.

Reload privilege tables now? (Press y|Y for Yes, any other key for No) : Y
Success.

All done!
[root@SERVER ~]# mysql -u root -p
Enter password:
Welcome to the MySQL monitor.  Commands end with ; or g.
Your MySQL connection id is 11
Server version: 5.7.10 MySQL Community Server (GPL)
Watch the last 10 minutes of this video, it teaches you how you do it.
Introduction
Most MySQL users encountered the ERROR 1698 (28000): Access denied for user ‘root’@’localhost’. This error message usually appears for new installations of MySQL when you try to connect to MySQL with the root user.
This guide will show you how to quickly resolve the access denied for user root on localhost. The outlined instructions apply to both MySQL and MariaDB. There will be no need to modify any tables or to perform complex configuration.
Prerequisites
- Access to a command line or terminal window
- MySQL or MariaDB installed
- User with sudo or root privileges
When you install MySQL and try to access it on the local machine with the root user, the command you use is:
mysql -u root -pIn most cases, you will receive the error message Access denied for user ‘root’@’localhost’.

You can enable access for root using one MySQL command.
Solve Access Denied for User Root Error
To be able to log into MySQL as root, first use sudo to modify the root user:
sudo mysqlEnter your password at the prompt. A MySQL shell loads.
Use the ALTER USER command and change the authentication method to log into MySQL as root:
ALTER USER 'root'@'localhost' IDENTIFIED WITH mysql_native_password BY 'insert_password';
This command changes the password for the user root and sets the authentication method to mysql_native_password. This is a traditional method for authentication, and it is not as secure as auth_plugin. In the example above, we set “root” as the password, but we encourage you to set a stronger password.
Test Root User MySQL Access
After you run the commands listed above, exit the MySQL shell by pressing CTRL + D on your keyboard or type exit; and hit enter. There is no need to restart the mysqld service to log in.
Now try again to access MySQL with root. In the terminal, type in:
mysql -u root -pEnter the password you used with the ALTER USER command. Do not type in the system password to access MySQL as it will not work. If everything worked fine, you should see the MySQL welcome message.
NOTE: The ALTER USER command may not work for MySQL and MariaDB versions older than 5.7.6 and 10.1.20 respectively.
Conclusion
Now you know how to bypass the MySQL ERROR 1698 (28000): Access denied for user ‘root’@’localhost’.
There are different ways to approach this issue, but we selected the easiest and fastest method. Make sure to enter the commands as listed in the article to avoid errors in SQL syntax.