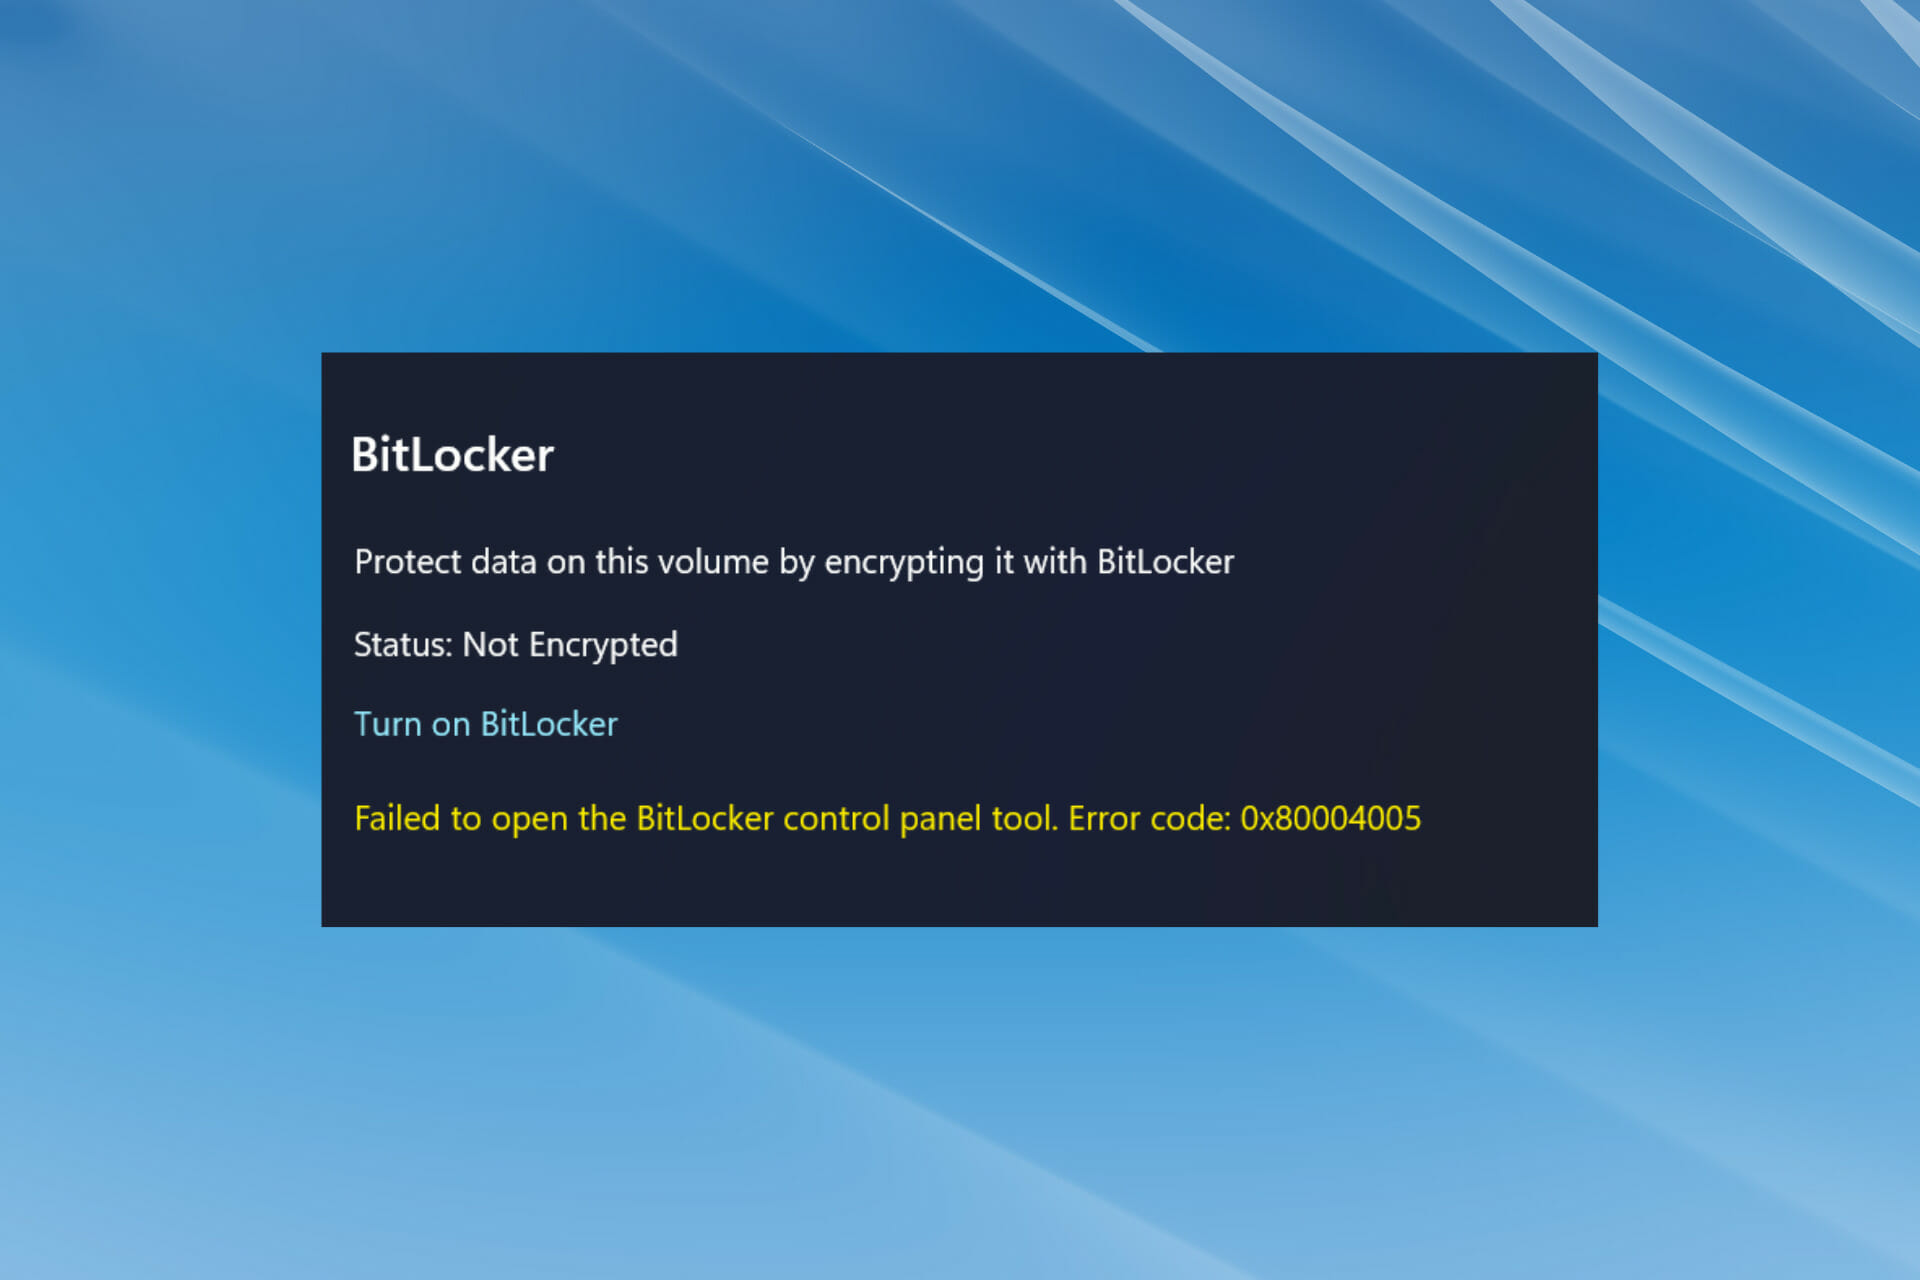
BitLocker — это функция Windows, которая позволяет пользователям шифровать данные, хранящиеся на диске, и помогает обеспечить конфиденциальность и защиту от вторжений. Но многие пользователи сообщают, что столкнулись с сообщением об ошибке «Не удалось открыть панель управления BitLocker» в Windows 11.
За этим сообщением часто следует код ошибки 0x80004005, который может помочь определить основную причину и легко устранить ошибку. Хотя, это не всегда так.
Поэтому мы решили посвятить эту статью перечислению причин ошибки инструмента «Не удалось открыть панель управления BitLocker» в Windows 11 и наиболее эффективных способов ее устранения.
Почему я вижу ошибку «Не удалось открыть панель управления BitLocker» в Windows 11?
Всякий раз, пытаясь определить основную причину, всегда помните, что она может быть совершенно разной для разных пользователей. Таким образом, если метод сработал для одного пользователя, нет гарантии, что он сработает и для вас.
Но, при правильном понимании каждой из них, вы, скорее всего, выявите и устраните ее.
Ошибка «Не удалось открыть панель управления BitLocker» в Windows 11 может быть вызвана множеством причин, но в большинстве случаев установленная версия Windows 11 не предлагает функцию BitLocker.
Если вы уверены, что эта функция доступна, это, скорее всего, связано с неработающими критически важными службами или поврежденными системными файлами. Кроме того, ошибка в установленной версии Windows также может привести к ошибке.
Теперь, когда у вас есть общее представление о проблемах, которые вызывают ошибку «Не удалось открыть панель управления BitLocker» в Windows 11, давайте перейдем к решениям. Следуйте им в указанной последовательности для быстрого и эффективного устранения неполадок.
Как исправить ошибку «Не удалось открыть панель управления BitLocker» в Windows 11?
1. Проверьте, доступен ли BitLocker в установленной версии Windows 11.
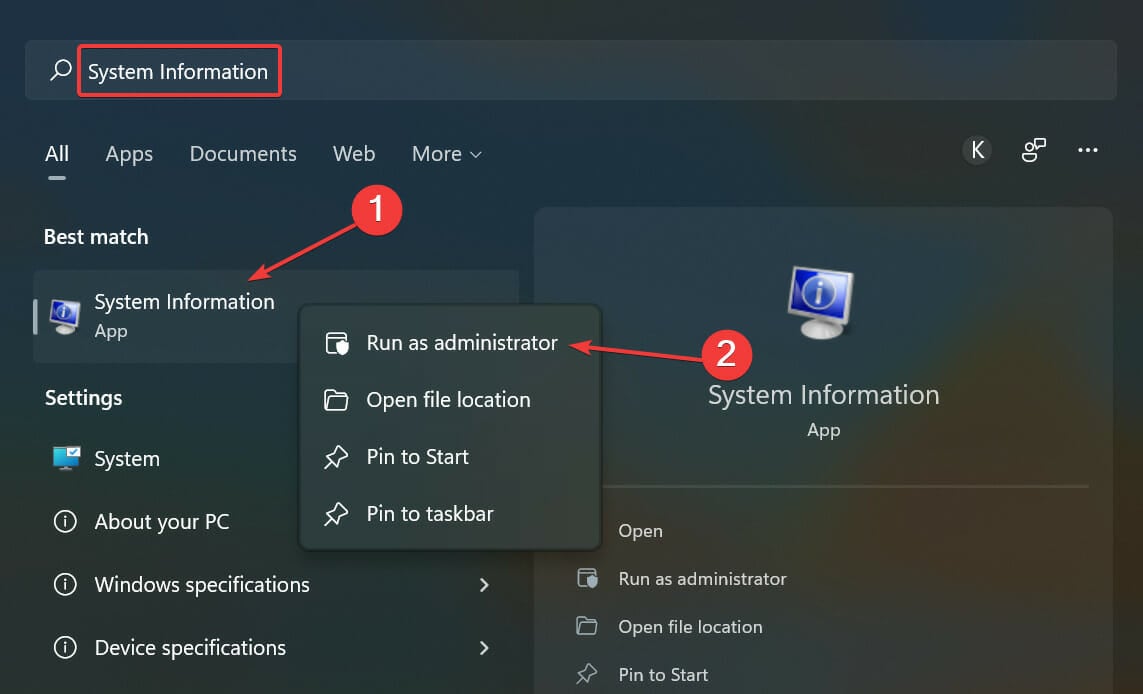
- Нажмите Windows+ S, чтобы запустить меню поиска , введите « Информация о системе» в текстовое поле вверху, щелкните правой кнопкой мыши соответствующий результат поиска и выберите « Запуск от имени администратора» в контекстном меню.
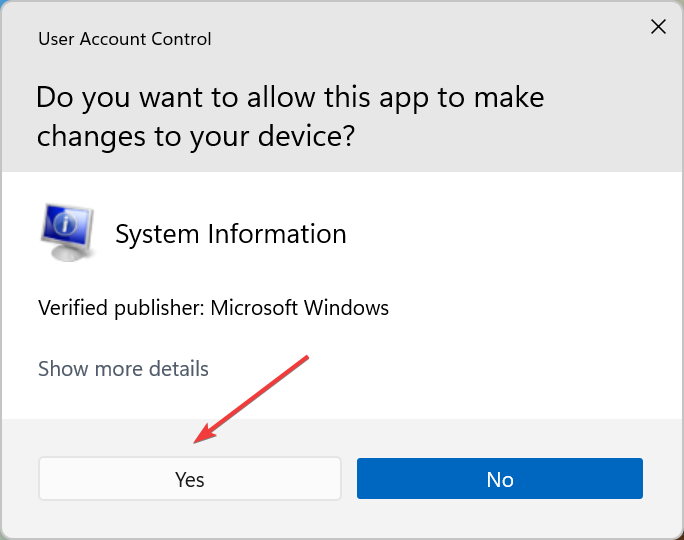
- Нажмите « Да » в появившемся окне UAC (Контроль учетных записей).
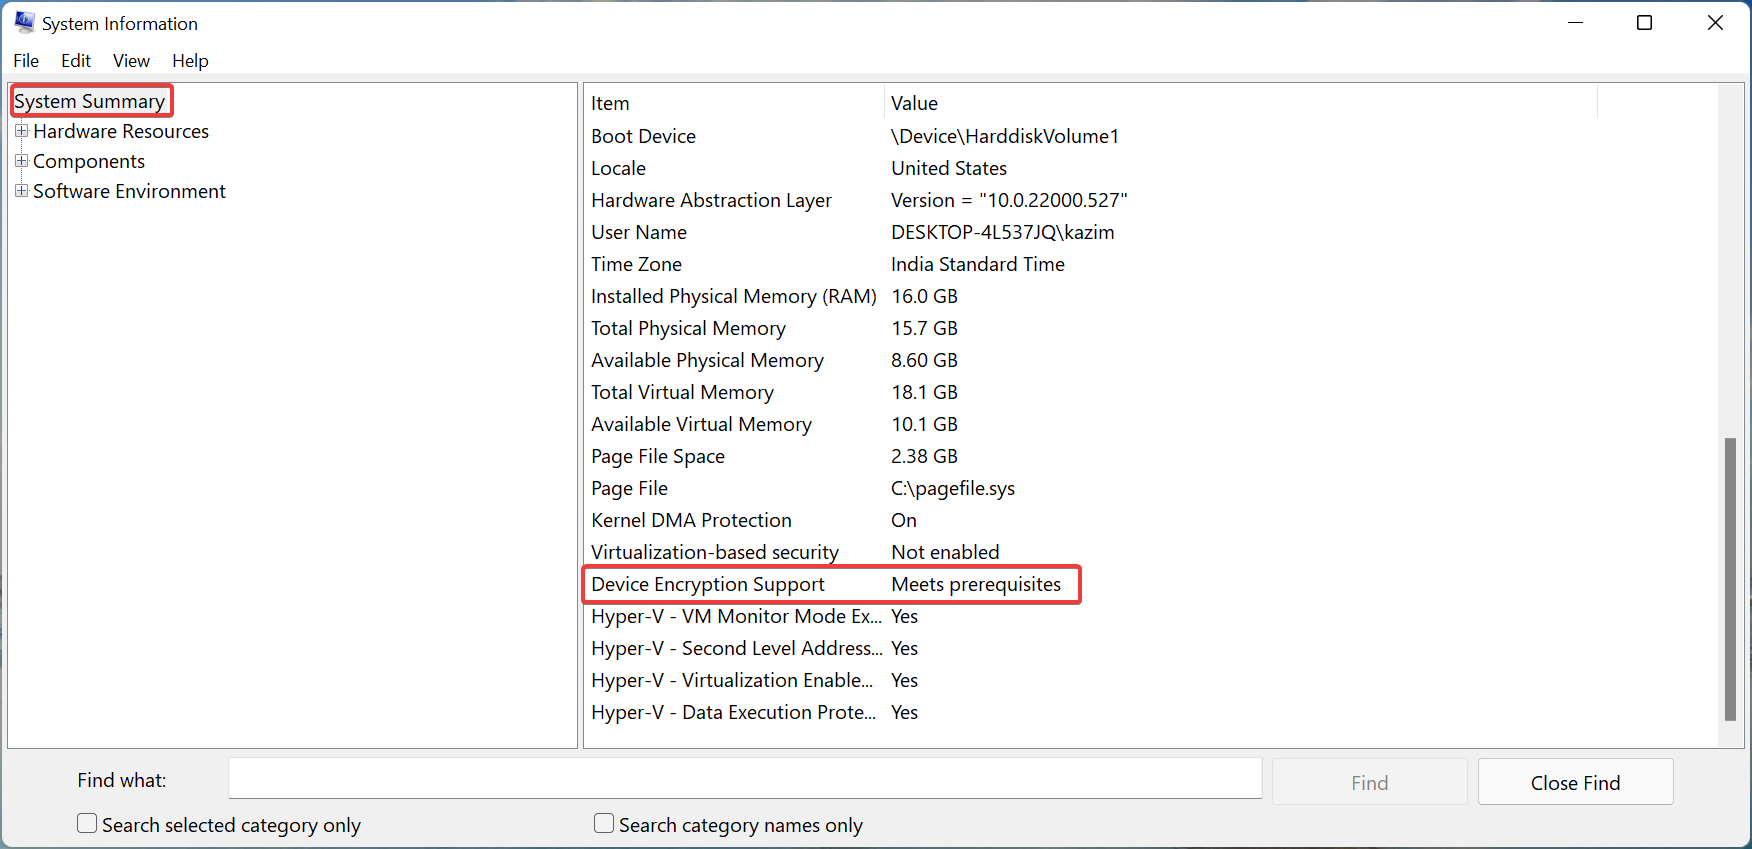
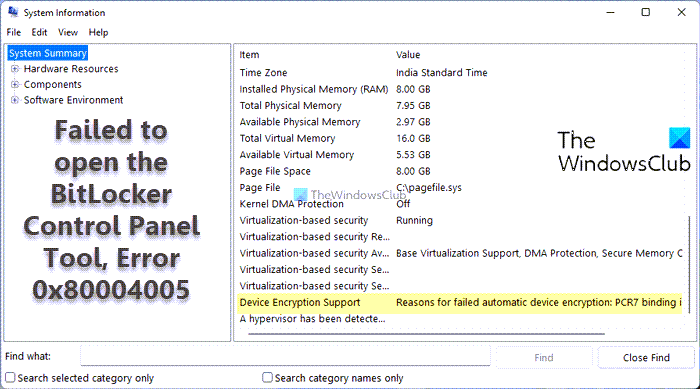
- Теперь прокрутите вниз вправо на вкладке « Сводка системы » и проверьте, что если читать рядом с «Поддержка шифрования устройства». Если указано « Соответствует предварительным требованиям », выполните другие шаги, перечисленные здесь, чтобы настроить и запустить BitLocker.
В большинстве случаев было обнаружено, что пользователи, столкнувшиеся с ошибкой инструмента панели управления BitLocker «Не удалось открыть» в Windows 11, используют версию Home, которая не поддерживает BitLocker. Он поддерживается в версии Pro Windows 11.
Итак, если вы используете домашнюю версию, пришло время сделать обновление, чтобы получить доступ к функциям, которые являются эксклюзивными для версии Pro.
Однако некоторые устройства (ноутбуки и планшеты 2-1), работающие под управлением Windows 11 Home edition, поддерживают шифрование устройств — функцию, аналогичную BitLocker.
2. Выполните сканирование DISM и SCF.
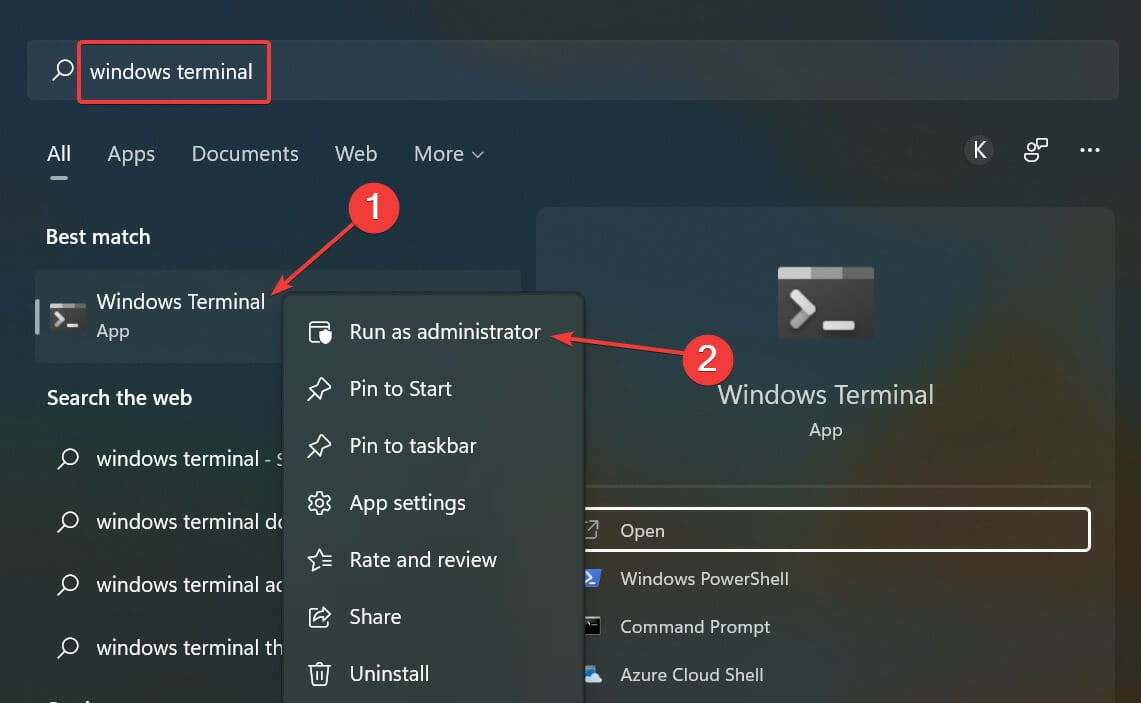
- Нажмите Windows+ S, чтобы запустить меню поиска , введите Windows Terminal в текстовое поле, щелкните правой кнопкой мыши соответствующий результат поиска и выберите «Запуск от имени администратора» в контекстном меню.
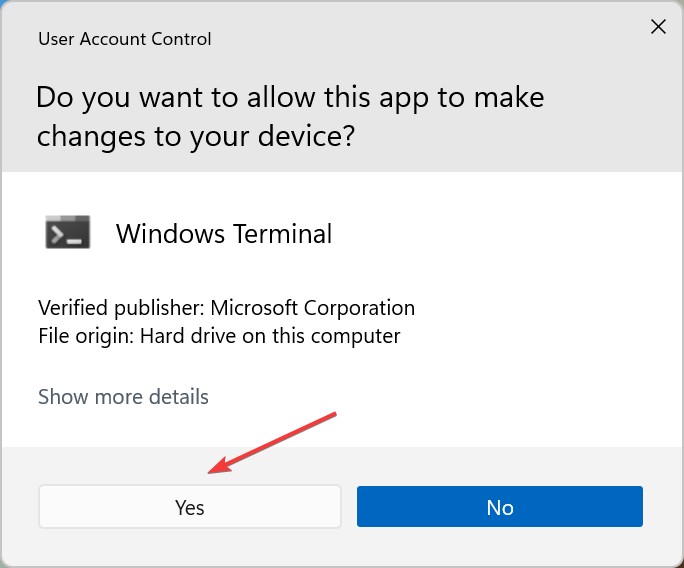
- Нажмите « Да » в появившемся окне UAC (Контроль учетных записей).
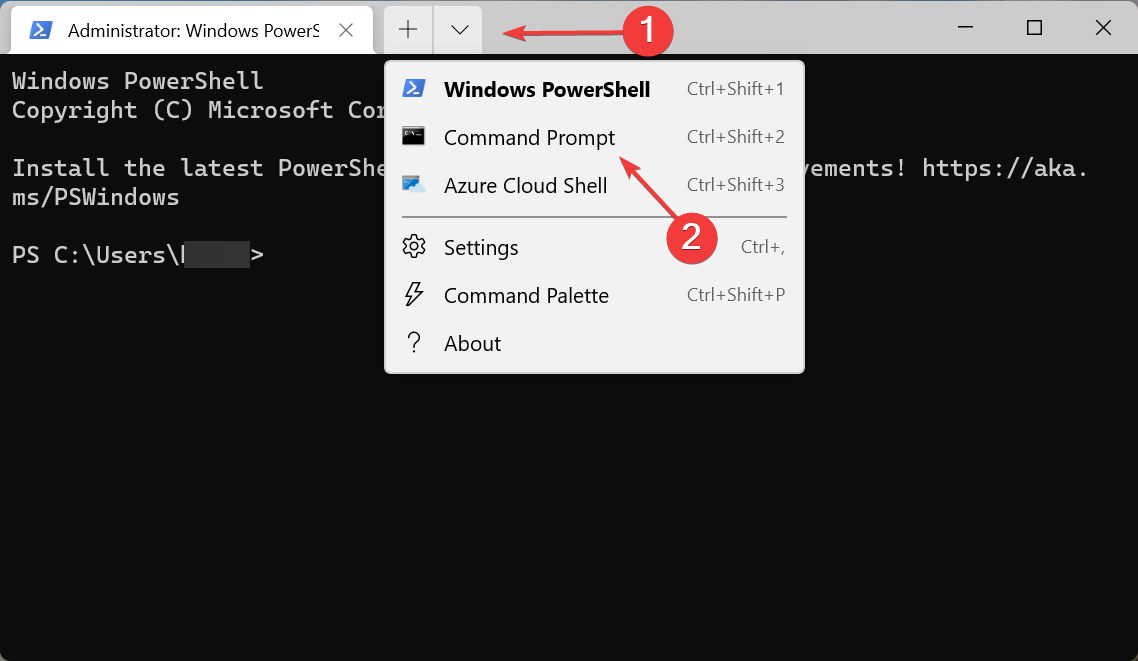
- Теперь щелкните стрелку вниз вверху и выберите « Командная строка » в списке параметров. Кроме того, вы можете нажать Ctrl+ Shift+ 2, чтобы запустить командную строку на новой вкладке.
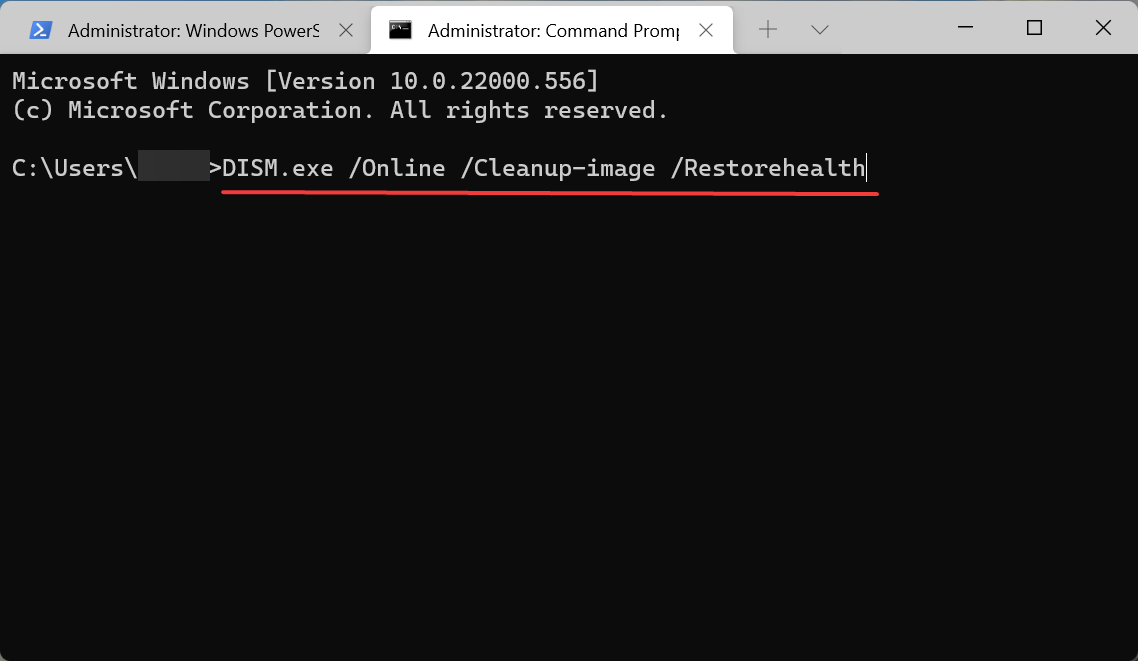
- Теперь вставьте следующее и нажмите Enter, чтобы запустить инструмент DISM.
DISM.exe /Online /Cleanup-image /Restorehealth - Наконец, выполните следующую команду, чтобы запустить сканирование SFC.
sfc /scannow
Если вы столкнулись с ошибкой инструмента «Не удалось открыть панель управления BitLocker» в Windows 11 из-за повреждения системных файлов, запуск сканирования DISM (система обслуживания образов развертывания и управления ими) и SFC (средство проверки системных файлов) может исправить ошибку.
Или вы можете использовать сторонний инструмент для восстановления, который автоматически определит и устранит большинство ошибок. Мы рекомендуем использовать Outbyte PC Repair Tool, так как он сканирует поврежденные системные файлы и вредоносные программы, устраняет ущерб, причиненный последними, а также регулярно устраняет неполадки.
3. Запустите службу шифрования устройства Bitlocker.
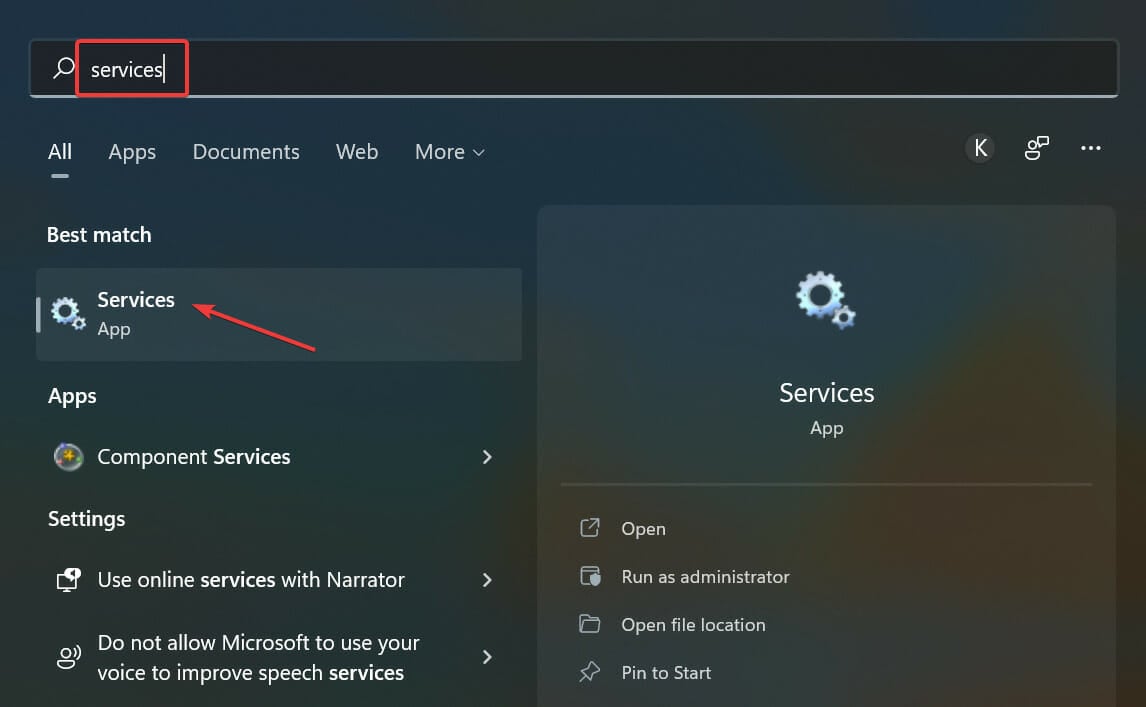
- Нажмите Windows+ S, чтобы открыть меню « Поиск », введите « Услуги » в текстовое поле вверху и щелкните соответствующий результат поиска.
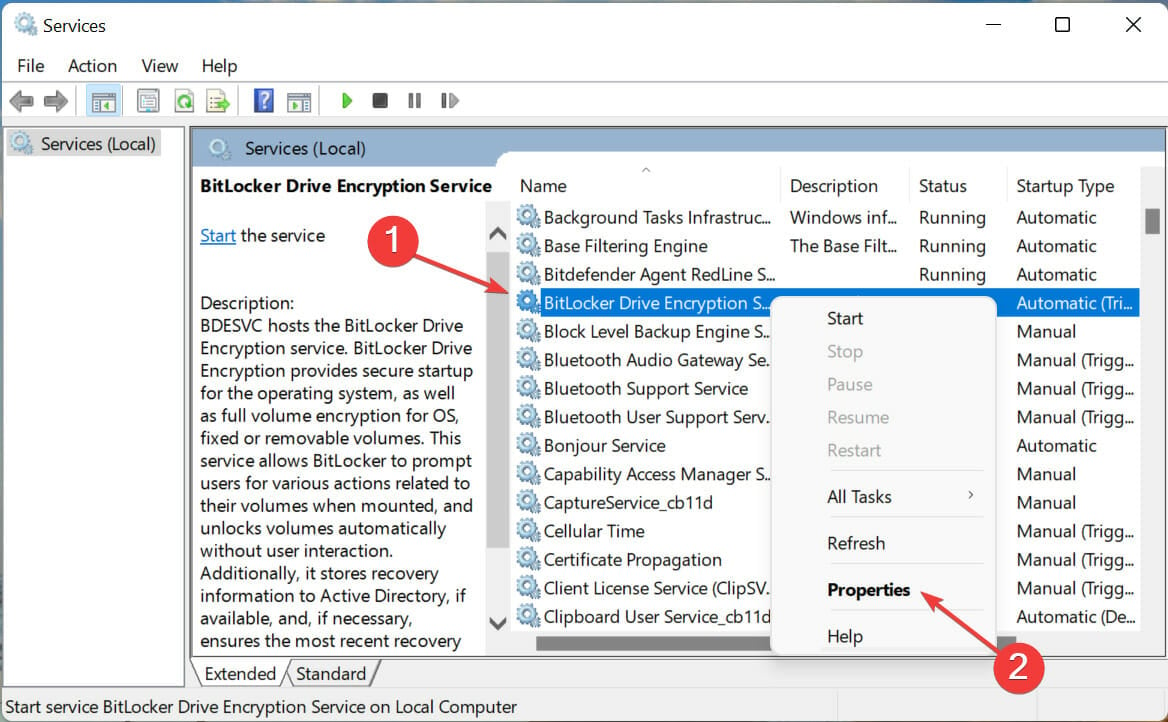
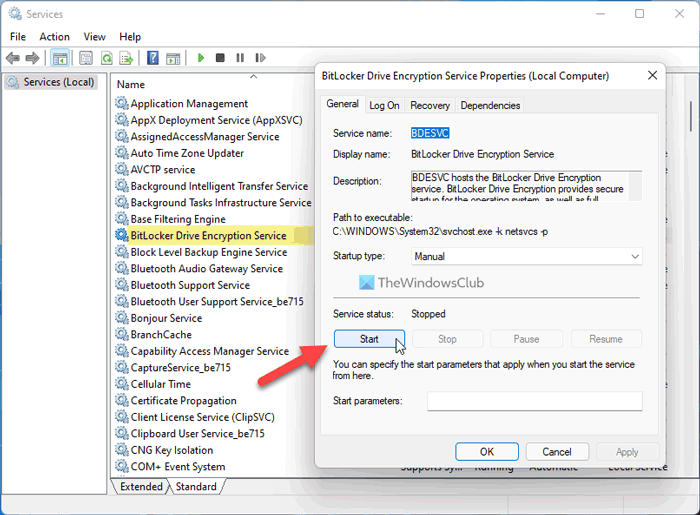
- Теперь найдите службу шифрования устройств BitLocker, щелкните ее правой кнопкой мыши и выберите « Свойства » в контекстном меню.
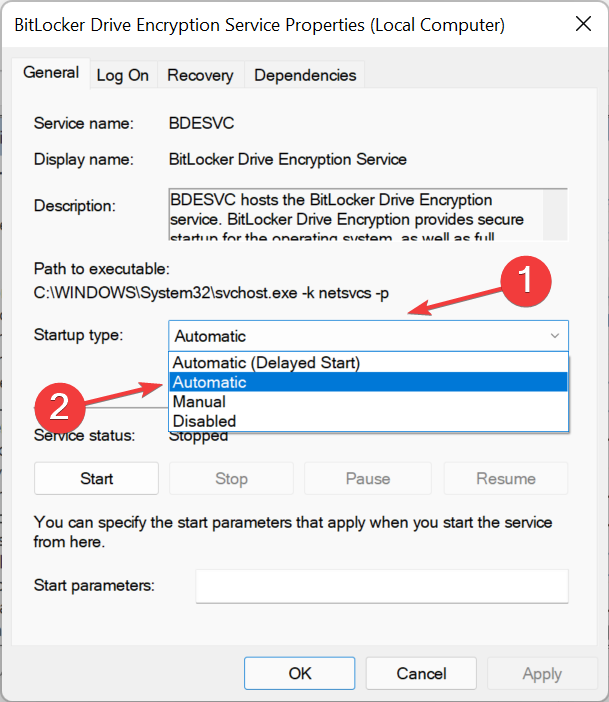
- Теперь выберите « Автоматически » в раскрывающемся меню «Тип запуска».
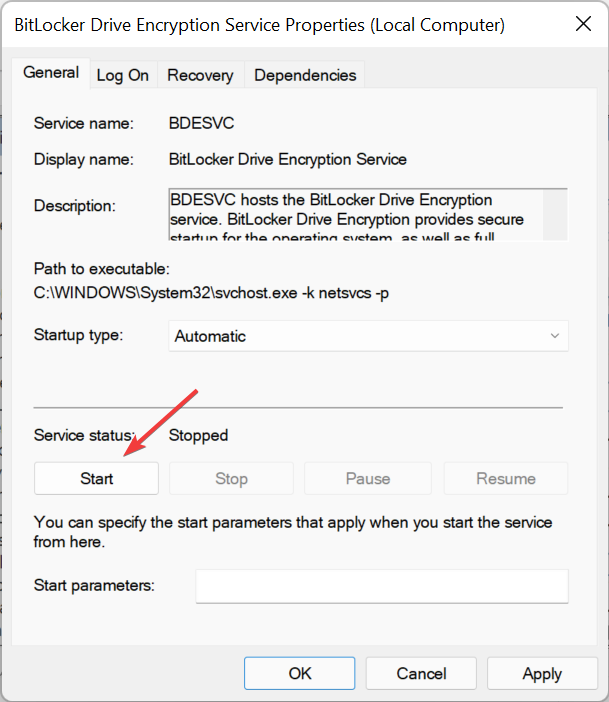
- Если служба не запущена, нажмите кнопку « Пуск » в разделе «Статус службы».
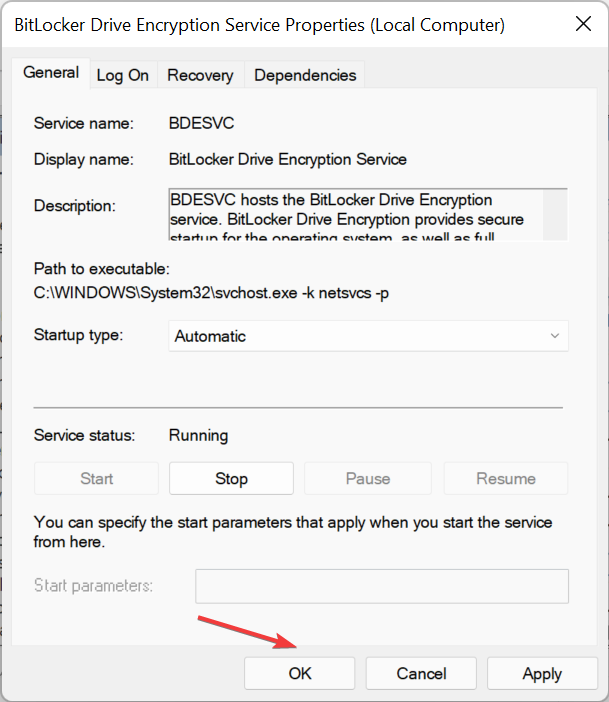
- После этого нажмите OK внизу, чтобы сохранить изменения.
Как упоминалось ранее, если на вашем устройстве не запущены критически важные службы, вы можете столкнуться с ошибкой инструмента панели управления BitLocker «Не удалось открыть» в Windows 11. Поэтому просто обязательно запустите его и перезагрузите компьютер, чтобы изменения полностью вступили в силу.
4. Внесите изменения в редактор локальной групповой политики.
- Нажмите Windows+ R, чтобы запустить команду « Выполнить» , введите gpedit в поле и либо нажмите « ОК », либо нажмите Enter, чтобы запустить редактор локальной групповой политики.
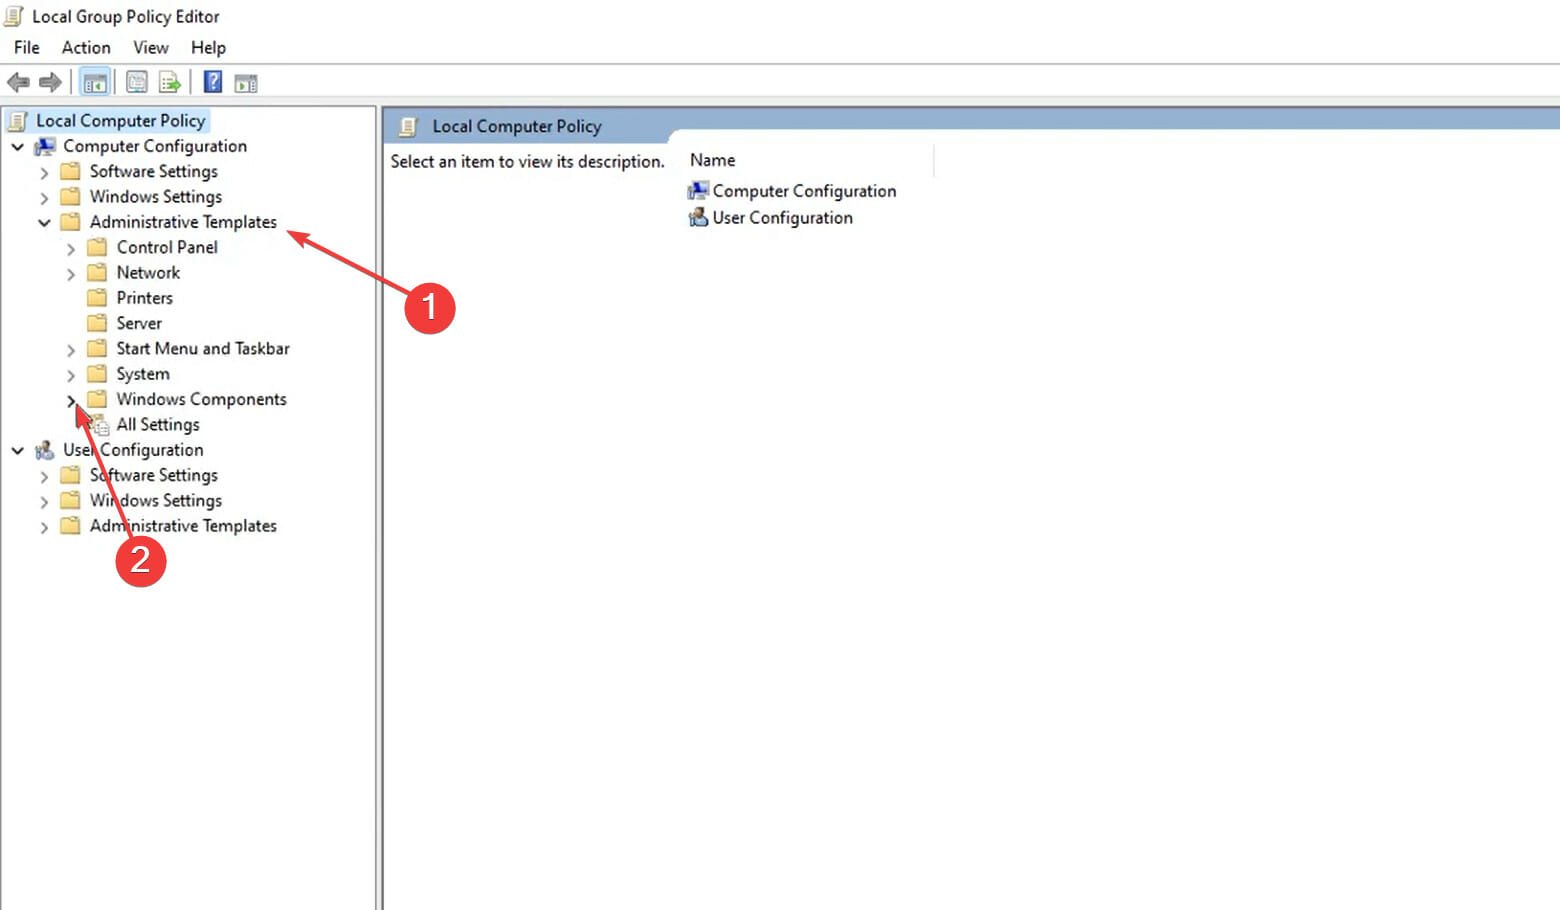
- Теперь дважды щелкните « Административные шаблоны » на панели навигации слева, а затем параметр «Компоненты Window », который появляется под ним.
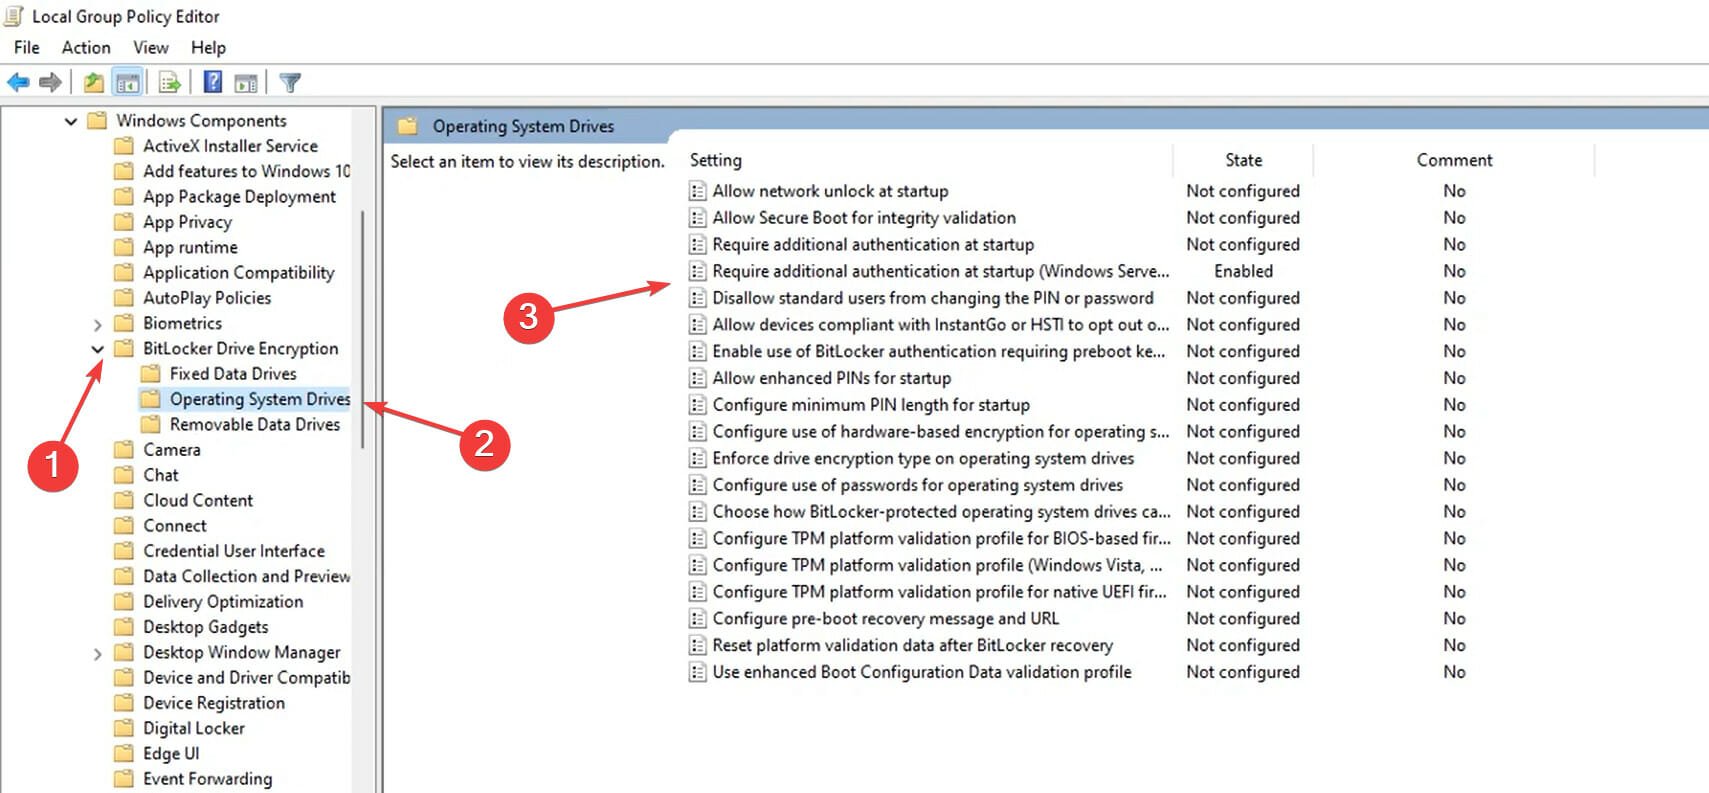
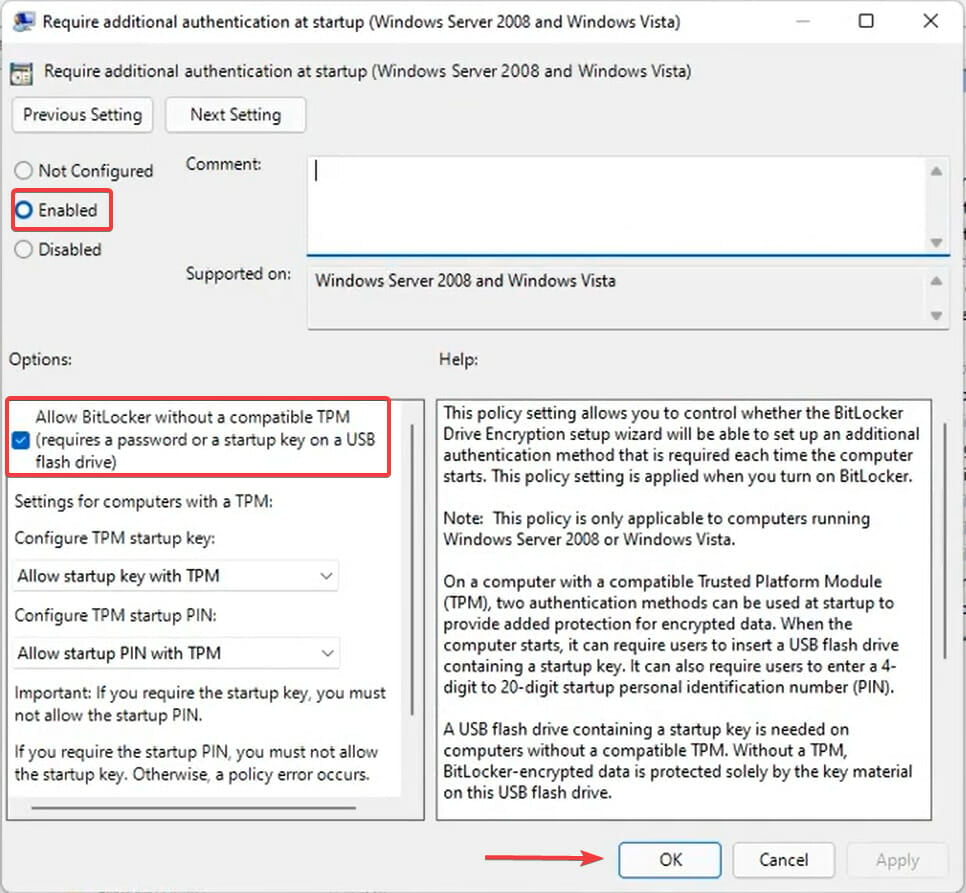
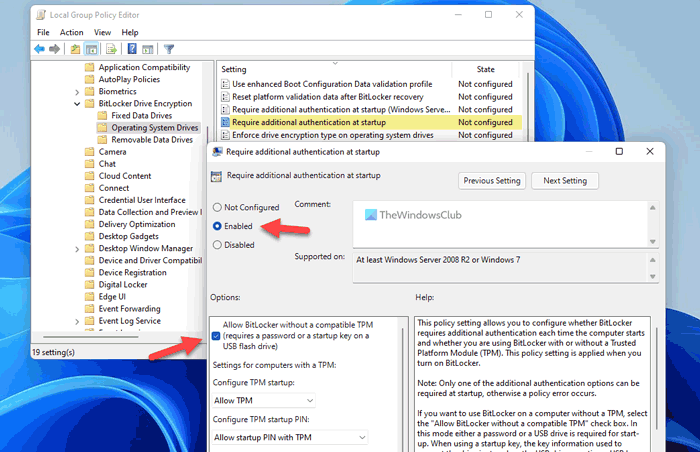
- Затем дважды щелкните « Шифрование диска BitLocker », затем «Диски операционной системы» на панели навигации и, наконец, запись « Требовать дополнительную проверку подлинности при запуске» (Windows Server 2008 и Windows Vista) справа.
- Оказавшись здесь, убедитесь, что он включен , установлен флажок « Разрешить BitLocker без совместимого TPM », а затем нажмите « ОК » внизу, чтобы сохранить изменения.
5. Выполните восстановление системы
Если ничего не помогло, у вас не остается другого выбора, кроме как выполнить восстановление системы. Вероятно, это самый простой способ устранить даже самые сложные проблемы.

Но помните, что вы можете в конечном итоге потерять приложения и настроенные параметры, хотя личные файлы не будут затронуты.
Идея восстановления системы состоит в том, чтобы вернуть компьютер в то время, когда ошибки еще не было. Для этого вам нужно будет выбрать точку восстановления, созданную до того, как вы впервые столкнулись с проблемой.
Кроме того, если процесс пойдет не по плану или вы не достигнете желаемых результатов, всегда есть возможность отменить восстановление системы в Windows 11.
Это все способы исправить ошибку «Не удалось открыть панель управления BitLocker» в Windows 11, чтобы снова получить доступ к BitLocker и внести необходимые изменения.
Расскажите нам, какое исправление сработало, и ваш опыт работы с BitLocker в разделе комментариев ниже.
BitLocker is not available in the Windows 11 Home edition
by Kazim Ali Alvi
Kazim has always been fond of technology, be it scrolling through the settings on his iPhone, Android device, or Windows. And at times, unscrewing the device to take… read more
Updated on September 7, 2022
Reviewed by
Vlad Turiceanu

Passionate about technology, Windows, and everything that has a power button, he spent most of his time developing new skills and learning more about the tech world. Coming… read more
- Many users have reported encountering the Failed to open BitLocker control panel tool error in Windows 11 when launching it.
- First, check if the installed edition of Windows 11 offers the BitLocker feature.
- If it does, you can perform a DISM and SFC scan, or run the related services, amongst other methods here to fix the issue.
XINSTALL BY CLICKING THE DOWNLOAD FILE
- Download Restoro PC Repair Tool that comes with Patented Technologies (patent available here).
- Click Start Scan to find Windows 11 issues that could be causing PC problems.
- Click Repair All to fix issues affecting your computer’s security and performance
- Restoro has been downloaded by 0 readers this month.
BitLocker is a feature in Windows that allows users to encrypt the data stored on the drive and helps ensure privacy and safety against intrusion.
But many users have reported encountering the Failed to open BitLocker Control Panel tool error message in Windows 11.
This message is often followed by an error code, 0x80004005, which may help identify the underlying cause and easily troubleshoot the error. Though, that’s not always the case.
Therefore, we have decided to dedicate this article to list out the reasons for the Failed to open BitLocker control panel tool error in Windows 11 and the most effective fixes for it.
Why do I see Failed to open BitLocker Control Panel tool error in Windows 11?
Whenever trying to identify the underlying cause, always understand that it can be completely different for various users. So, if a method has worked for one user, there’s no surety that it would work for you as well.
But, with a proper understanding of each, you are more likely to identify and eliminate it.
The Failed to open BitLocker control panel tool error in Windows 11 can be caused by a bunch of reasons, but in most cases, the installed edition of Windows 11 does not offer the BitLocker feature.
If you are certain that the feature is available, it most likely has to do with critical services not running or corrupt system files.
Other than that, a bug in the installed version of Windows is also likely to lead to BitLocker not showing in Control Panel in Windows 10/11.
Now that you have a basic understanding of the issues that cause the Failed to open BitLocker control panel tool error in Windows 11, let’s head to the solutions. Follow them in the listed sequence for quick and effective troubleshooting.
1. Check if BitLocker is available on the installed edition of Windows 11
- Press Windows + S to launch the Search menu, enter system Information in the text field at the top, right-click on the relevant search result, and select Run as administrator from the context menu.

- Click Yes in the UAC (User Account Control) prompt that pops up.

- Now, scroll down on the right in the System Summary tab and check what it reads next to Device Encryption Support. If it says Meets prerequisites, follow the other steps listed here to get BitLocker up and running.

In most cases, users who encountered the Failed to open BitLocker control panel tool error in Windows 11 were found to be running the Home edition which does not support BitLocker. It’s supported on the Pro edition of Windows 11.
So, if you are running the Home edition, it’s time you make the upgrade to access features that are exclusive to the Pro edition.
Some PC issues are hard to tackle, especially when it comes to corrupted repositories or missing Windows files. If you are having troubles fixing an error, your system may be partially broken.
We recommend installing Restoro, a tool that will scan your machine and identify what the fault is.
Click here to download and start repairing.
However, certain devices (2-1 laptops and tablets) running the Windows 11 Home edition support Device Encryption, a feature similar to BitLocker.
2. Perform the DISM and SFC scans
- Press Windows + S to launch the Search menu, enter windows terminal in the text field, right-click on the relevant search result, and select Run as administrator from the context menu.

- Click Yes on the UAC (User Account Control) prompt that pops up.

- Now, click on the downward-facing arrow at the top, and select Command Prompt from the list of options. Alternatively, you can hit Ctrl + Shift + 2 to launch Command Prompt in a new tab.

- Now, paste the following and hit Enter to run the DISM tool:
DISM.exe /Online /Cleanup-image /Restorehealth - Finally, execute the following command to run the SFC scan:
sfc /scannow
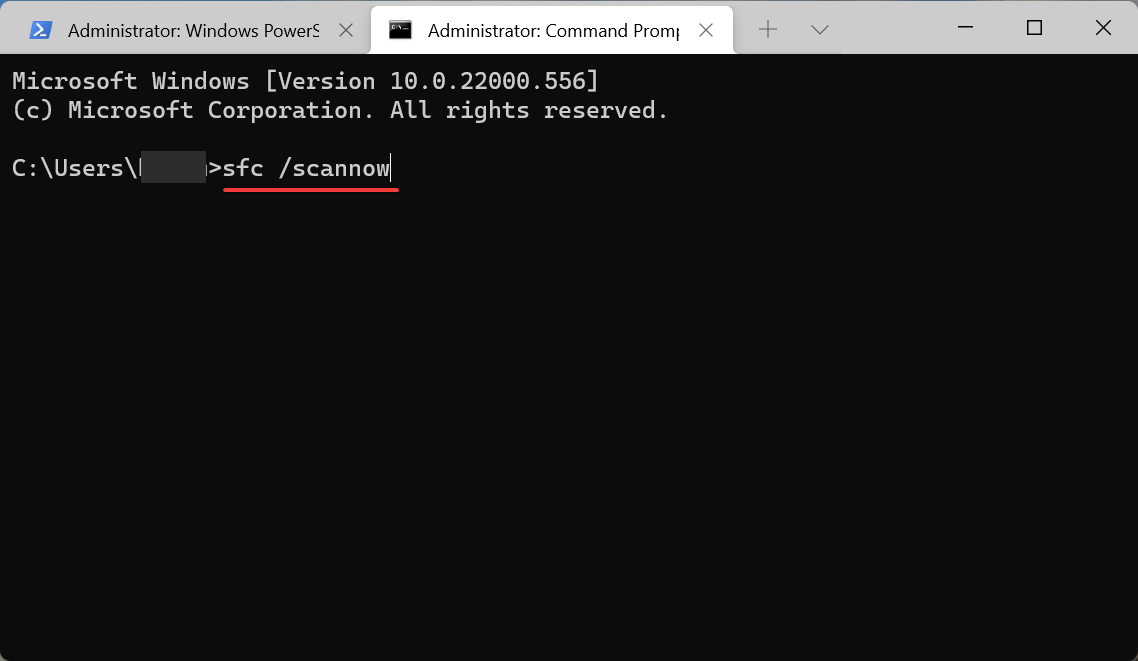
If you are encountering the Failed to open BitLocker control panel tool error in Windows 11 due to corrupt system files, running the DISM (Deployment Image Servicing and Management) and SFC (System File Checker) scan could fix the error.
Or you could use a third-party repair tool that will automatically identify and eliminate most of the errors.
An automatic repair tool simplifies the process of protecting your computer from malware and improves its health to perform maximally at all times.
Restoro is a complex Windows system repair solution that scans your PC for various issues and fixes all critical system files and registry errors, as well as the damage left by viruses (not antivirus software). With a few clicks, the program frees up space on your disk and restores all compromised Windows settings to their default value.
Here’s how you can perform this action:
- Download and install Restoro.
- Launch Restoro.
- Wait for it to find any system stability issues and possible malware infections.
- Press Start Repair.
- Restart your PC for all the changes to take effect.
Restoro’s technology replaces severely damaged Windows system files with clean, up-to-date ones from its secure online database. You can allow it to perform this action without harming your user data.
This the ideal all-in-one tool for fixing Windows errors, PC crashes, or registry issues. It can boost the performance of your device and make it more secure within a few minutes.
⇒ Get Restoro
Disclaimer: This program needs to be upgraded from the free version in order to perform some specific actions.
3. Run the Bitlocker Device Encryption Service
- Press Windows + S to launch the Search menu, enter services in the text field at the top, and click on the relevant search result.

- Now, locate the BitLocker Device Encryption Service, right-click on it, and select Properties from the context menu.

- Now, select Automatic from the Startup type dropdown menu.

- If the service is not running, click on the Start button under Service status.
- Once done, click on OK at the bottom to save the changes.
As mentioned earlier, if the critical services are not running on your device, you might face the Failed to open BitLocker control panel tool error in Windows 11.
So, just make sure to run it, and restart the computer for the changes to fully come into effect.
- How to Quickly Change the Drive Letter in Windows 11: 5 Ways
- How to Disable Guest Mode in Chrome on Windows 11
- How to Fix the Parameter Is Incorrect Error on Windows 11
- How to Merge Folders in Windows 11: 3 Simple Methods
- Windows 11 Can’t Change Background: 10 Ways to Force It
4. Make changes to the Local Group Policy Editor
- Press Windows + R to launch the Run console, enter gpedit in the field, and either click on OK or hit Enter to launch the Local Group Policy Editor.

- Now, double-click on Administrative Templates in the navigation pane on the left and then on the Windows Components option that appears under it.

- Next, double-click on BitLocker Drive Encryption, then on Operating System Drives in the navigation pane, and finally on the Require additional authentication at startup (Windows Server 2008 and Windows Vista) entry on the right.

- Once here, make sure that it’s Enabled, the Allow BitLocker without a compatible TPM option is checked, and then click on OK at the bottom to save the changes.


5. Perform a system restore
- Press Windows Key + R and enter rstrui, then click OK or press Enter.

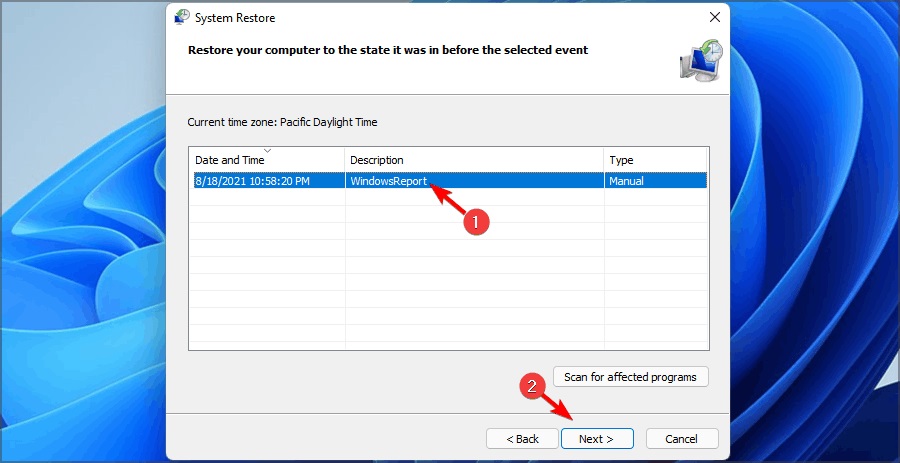
- Click on Next to proceed and in the next window, select the restore point you wish to revert to and click on Next again.

- After you click Finish the PC will restart and restore itself to the selected restore point.

If nothing else has worked, you are left with no option but to perform a system restore. It’s probably the easiest way to eliminate even the most intricate of issues.
But remember that you might end up losing applications and configured settings, though the personal files won’t be affected.
The idea behind a system restore is to take your computer back in time to a point when the error didn’t exist. To achieve that, you will have to select a restore point created before you first encountered the problem.
Also, if the process doesn’t go as planned, or you don’t achieve the desired results, there’s always the option to undo a system restore in Windows 11.
These are all the ways you fix the Failed to open BitLocker control panel tool error in Windows 11, be able to access BitLocker again and make the desired changes.
Also, find out how to disable BitLocker in Windows 11. Besides, if you are encountering an error with BitLocker, the fixes are rather simple, and you can have it up and running in no time.
Tell us which fix worked and your experience with BitLocker, in the comments section below.
Still having issues? Fix them with this tool:
SPONSORED
If the advices above haven’t solved your issue, your PC may experience deeper Windows problems. We recommend downloading this PC Repair tool (rated Great on TrustPilot.com) to easily address them. After installation, simply click the Start Scan button and then press on Repair All.
![]()
Newsletter
BitLocker is not available in the Windows 11 Home edition
by Kazim Ali Alvi
Kazim has always been fond of technology, be it scrolling through the settings on his iPhone, Android device, or Windows. And at times, unscrewing the device to take… read more
Updated on September 7, 2022
Reviewed by
Vlad Turiceanu
Passionate about technology, Windows, and everything that has a power button, he spent most of his time developing new skills and learning more about the tech world. Coming… read more
- Many users have reported encountering the Failed to open BitLocker control panel tool error in Windows 11 when launching it.
- First, check if the installed edition of Windows 11 offers the BitLocker feature.
- If it does, you can perform a DISM and SFC scan, or run the related services, amongst other methods here to fix the issue.
XINSTALL BY CLICKING THE DOWNLOAD FILE
- Download Restoro PC Repair Tool that comes with Patented Technologies (patent available here).
- Click Start Scan to find Windows 11 issues that could be causing PC problems.
- Click Repair All to fix issues affecting your computer’s security and performance
- Restoro has been downloaded by 0 readers this month.
BitLocker is a feature in Windows that allows users to encrypt the data stored on the drive and helps ensure privacy and safety against intrusion.
But many users have reported encountering the Failed to open BitLocker Control Panel tool error message in Windows 11.
This message is often followed by an error code, 0x80004005, which may help identify the underlying cause and easily troubleshoot the error. Though, that’s not always the case.
Therefore, we have decided to dedicate this article to list out the reasons for the Failed to open BitLocker control panel tool error in Windows 11 and the most effective fixes for it.
Why do I see Failed to open BitLocker Control Panel tool error in Windows 11?
Whenever trying to identify the underlying cause, always understand that it can be completely different for various users. So, if a method has worked for one user, there’s no surety that it would work for you as well.
But, with a proper understanding of each, you are more likely to identify and eliminate it.
The Failed to open BitLocker control panel tool error in Windows 11 can be caused by a bunch of reasons, but in most cases, the installed edition of Windows 11 does not offer the BitLocker feature.
If you are certain that the feature is available, it most likely has to do with critical services not running or corrupt system files.
Other than that, a bug in the installed version of Windows is also likely to lead to BitLocker not showing in Control Panel in Windows 10/11.
Now that you have a basic understanding of the issues that cause the Failed to open BitLocker control panel tool error in Windows 11, let’s head to the solutions. Follow them in the listed sequence for quick and effective troubleshooting.
1. Check if BitLocker is available on the installed edition of Windows 11
- Press Windows + S to launch the Search menu, enter system Information in the text field at the top, right-click on the relevant search result, and select Run as administrator from the context menu.
- Click Yes in the UAC (User Account Control) prompt that pops up.
- Now, scroll down on the right in the System Summary tab and check what it reads next to Device Encryption Support. If it says Meets prerequisites, follow the other steps listed here to get BitLocker up and running.
In most cases, users who encountered the Failed to open BitLocker control panel tool error in Windows 11 were found to be running the Home edition which does not support BitLocker. It’s supported on the Pro edition of Windows 11.
So, if you are running the Home edition, it’s time you make the upgrade to access features that are exclusive to the Pro edition.
Some PC issues are hard to tackle, especially when it comes to corrupted repositories or missing Windows files. If you are having troubles fixing an error, your system may be partially broken.
We recommend installing Restoro, a tool that will scan your machine and identify what the fault is.
Click here to download and start repairing.
However, certain devices (2-1 laptops and tablets) running the Windows 11 Home edition support Device Encryption, a feature similar to BitLocker.
2. Perform the DISM and SFC scans
- Press Windows + S to launch the Search menu, enter windows terminal in the text field, right-click on the relevant search result, and select Run as administrator from the context menu.
- Click Yes on the UAC (User Account Control) prompt that pops up.
- Now, click on the downward-facing arrow at the top, and select Command Prompt from the list of options. Alternatively, you can hit Ctrl + Shift + 2 to launch Command Prompt in a new tab.
- Now, paste the following and hit Enter to run the DISM tool:
DISM.exe /Online /Cleanup-image /Restorehealth - Finally, execute the following command to run the SFC scan:
sfc /scannow
If you are encountering the Failed to open BitLocker control panel tool error in Windows 11 due to corrupt system files, running the DISM (Deployment Image Servicing and Management) and SFC (System File Checker) scan could fix the error.
Or you could use a third-party repair tool that will automatically identify and eliminate most of the errors.
An automatic repair tool simplifies the process of protecting your computer from malware and improves its health to perform maximally at all times.
Restoro is a complex Windows system repair solution that scans your PC for various issues and fixes all critical system files and registry errors, as well as the damage left by viruses (not antivirus software). With a few clicks, the program frees up space on your disk and restores all compromised Windows settings to their default value.
Here’s how you can perform this action:
- Download and install Restoro.
- Launch Restoro.
- Wait for it to find any system stability issues and possible malware infections.
- Press Start Repair.
- Restart your PC for all the changes to take effect.
Restoro’s technology replaces severely damaged Windows system files with clean, up-to-date ones from its secure online database. You can allow it to perform this action without harming your user data.
This the ideal all-in-one tool for fixing Windows errors, PC crashes, or registry issues. It can boost the performance of your device and make it more secure within a few minutes.
⇒ Get Restoro
Disclaimer: This program needs to be upgraded from the free version in order to perform some specific actions.
3. Run the Bitlocker Device Encryption Service
- Press Windows + S to launch the Search menu, enter services in the text field at the top, and click on the relevant search result.
- Now, locate the BitLocker Device Encryption Service, right-click on it, and select Properties from the context menu.
- Now, select Automatic from the Startup type dropdown menu.
- If the service is not running, click on the Start button under Service status.
- Once done, click on OK at the bottom to save the changes.
As mentioned earlier, if the critical services are not running on your device, you might face the Failed to open BitLocker control panel tool error in Windows 11.
So, just make sure to run it, and restart the computer for the changes to fully come into effect.
- How to Quickly Change the Drive Letter in Windows 11: 5 Ways
- How to Disable Guest Mode in Chrome on Windows 11
- How to Fix the Parameter Is Incorrect Error on Windows 11
4. Make changes to the Local Group Policy Editor
- Press Windows + R to launch the Run console, enter gpedit in the field, and either click on OK or hit Enter to launch the Local Group Policy Editor.
- Now, double-click on Administrative Templates in the navigation pane on the left and then on the Windows Components option that appears under it.
- Next, double-click on BitLocker Drive Encryption, then on Operating System Drives in the navigation pane, and finally on the Require additional authentication at startup (Windows Server 2008 and Windows Vista) entry on the right.
- Once here, make sure that it’s Enabled, the Allow BitLocker without a compatible TPM option is checked, and then click on OK at the bottom to save the changes.
5. Perform a system restore
- Press Windows Key + R and enter rstrui, then click OK or press Enter.
- Click on Next to proceed and in the next window, select the restore point you wish to revert to and click on Next again.
- After you click Finish the PC will restart and restore itself to the selected restore point.
If nothing else has worked, you are left with no option but to perform a system restore. It’s probably the easiest way to eliminate even the most intricate of issues.
But remember that you might end up losing applications and configured settings, though the personal files won’t be affected.
The idea behind a system restore is to take your computer back in time to a point when the error didn’t exist. To achieve that, you will have to select a restore point created before you first encountered the problem.
Also, if the process doesn’t go as planned, or you don’t achieve the desired results, there’s always the option to undo a system restore in Windows 11.
These are all the ways you fix the Failed to open BitLocker control panel tool error in Windows 11, be able to access BitLocker again and make the desired changes.
Also, find out how to disable BitLocker in Windows 11. Besides, if you are encountering an error with BitLocker, the fixes are rather simple, and you can have it up and running in no time.
Tell us which fix worked and your experience with BitLocker, in the comments section below.
Still having issues? Fix them with this tool:
SPONSORED
If the advices above haven’t solved your issue, your PC may experience deeper Windows problems. We recommend downloading this PC Repair tool (rated Great on TrustPilot.com) to easily address them. After installation, simply click the Start Scan button and then press on Repair All.
![]()
Newsletter
While setting up the BitLocker on your Windows 11/10 PC, if you get the Failed to open the BitLocker control panel tool error with a code 0x80004005, this article will troubleshoot the issue. Whether you encounter this error on Windows 11 or Windows 10, you need to follow the same solutions across all versions.
The entire error message says something like this:
Failed to open the BitLocker control panel tool, Error code: 0x80004005
To fix the BitLocker Control Panel Tool, Error Code 0x80004005 on Windows 11/10, follow these suggestions:
- Check compatibility
- Enable BitLocker Drive Encryption Service
- Enable Group Policy setting
- Enable Registry setting
Let’s check out these steps in detail.
1] Check compatibility
It is the very first thing you need to check when you get the Failed to open the BitLocker control panel tool error on your computer. If you do not have the correct components installed, you won’t be able to use BitLocker on your computer. The best thing is that you can find this compatibility without using third-party apps.
To check if your computer is BitLocker compatible or not, follow these steps:
- Search for system information in the Taskbar search box.
- Click the Run as administrator option.
- Click the Yes button in the UAC prompt.
- Find the Device Encryption Support section.
If it shows Meets perquisites, you can use BitLocker on your computer. However, if it displays any other message denoting the incompatibility, you cannot use the BitLocker on your Windows 11/10 PC.
2] Enable BitLocker Drive Encryption Service
There is a service named BitLocker Drive Encryption Service, which is responsible for running BitLocker on your computer. Whether you use Windows 11 or Windows 10, you need to run this service in the background in order to continue having the BitLocker facility. However, if it is stopped or turned off due to any reason, you won’t be able to use BitLocker.
Therefore, follow these steps to enable BitLocker Drive Encryption Service:
- Search for services in the Taskbar search box.
- Click on the individual search result.
- Double-click on the BitLocker Drive Encryption Service.
- Click the Start button.
- Click the OK button.
After that, you will be able to use BitLocker without any error.
3] Enable Group Policy setting
You need to turn on the additional authentication when you sign in to your user account. Otherwise, you can encounter the aforementioned error. Therefore, follow these steps to turn on the corresponding setting:
- Press Win+R to open the Run prompt.
- Type gpedit.msc and hit the Enter button.
- Navigate to this path: Computer Configuration > Administrative Templates > Windows Components > BitLocker Drive Encryption > Operating System Drives
- Double-click on the Require additional authentication at startup setting.
- Choose the Enabled option.
- Tick the Allow BitLocker without a compatible TPM checkbox.
- Click the OK button.
After that, close all windows of the Local Group Policy Editor, and restart your computer. Next time, you won’t find any problem regarding the BitLocker.
Note: You do not need to change any other setting, such as Configure TPM startup, Configure TPM start PIN, Configure TPM startup key, and so on.
4] Enable Registry setting
The same setting, as above, can be set up using the Registry Editor. Although it is pretty time-consuming to use the Registry Editor method, you can check when you are getting the aforementioned error with BitLocker. When the GPEDIT method is not working for you, you can certainly opt for the Registry Editor method.
To enable the Registry setting, follow these steps:
Press Win+R to open the Run dialog.
Type regedit and press the Enter button.
Click the Yes button.
Navigate to this path:
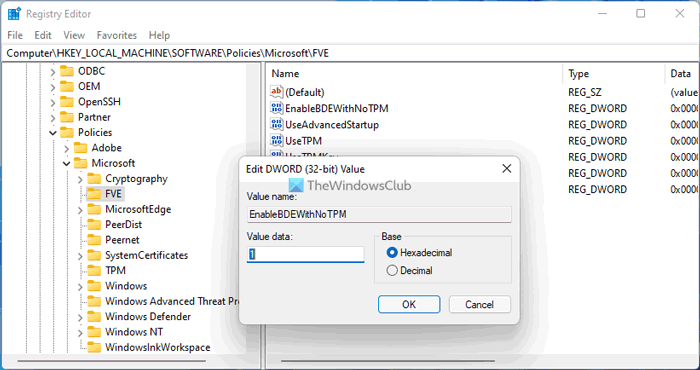
HKEY_LOCAL_MACHINESOFTWAREPoliciesMicrosoft
Right-click on Microsoft > New > Key and name it as FVE.
Right-click on FVE > New > DWORD (32-bit) Value.
Set the name as EnableBDEWithNoTPM.
Double-click on it to set the Value data as 1.
Create five more REG_DWORD values.
Set the name and Value data as follows:
- UseAdvancedStartup: 1
- UseTPM: 2
- UseTPMKey: 2
- UseTPMKeyPIN: 2
- UseTPMPIN: 2
Once done, close all windows and restart your computer to get the change. Following that, you will be able to use BitLocker without any problem on your Windows 11 or Windows 10 PC.
How do I enable BitLocker in Control Panel?
To enable or disable BitLocker, you need to follow this guide. However, your computer must have BitLocker encryption support. Otherwise, you will come across the aforementioned error message while accessing BitLocker. To check that, you can follow the very first solution mentioned in this article.
Read: Error 0xc0210000, BitLocker key required to unlock the volume wasn’t loaded correctly
Why is BitLocker not in my Control Panel?
To use BitLocker on your computer, you need to have a few things in the line. For example, TPM or Trusted Platform module 1.2 (minimum) is required. On the other hand, your computer must have at least two partitions to encrypt one of them. If your PC doesn’t meet these requirements, you won’t be able to find BitLocker in Control Panel.
Hope this guide helped.
Read:
- The Startup options on this PC are configured incorrectly Bitlocker error
- A problem occurred during BitLocker setup.
While setting up the BitLocker on your Windows 11/10 PC, if you get the Failed to open the BitLocker control panel tool error with a code 0x80004005, this article will troubleshoot the issue. Whether you encounter this error on Windows 11 or Windows 10, you need to follow the same solutions across all versions.
The entire error message says something like this:
Failed to open the BitLocker control panel tool, Error code: 0x80004005
To fix the BitLocker Control Panel Tool, Error Code 0x80004005 on Windows 11/10, follow these suggestions:
- Check compatibility
- Enable BitLocker Drive Encryption Service
- Enable Group Policy setting
- Enable Registry setting
Let’s check out these steps in detail.
1] Check compatibility
It is the very first thing you need to check when you get the Failed to open the BitLocker control panel tool error on your computer. If you do not have the correct components installed, you won’t be able to use BitLocker on your computer. The best thing is that you can find this compatibility without using third-party apps.
To check if your computer is BitLocker compatible or not, follow these steps:
- Search for system information in the Taskbar search box.
- Click the Run as administrator option.
- Click the Yes button in the UAC prompt.
- Find the Device Encryption Support section.
If it shows Meets perquisites, you can use BitLocker on your computer. However, if it displays any other message denoting the incompatibility, you cannot use the BitLocker on your Windows 11/10 PC.
2] Enable BitLocker Drive Encryption Service
There is a service named BitLocker Drive Encryption Service, which is responsible for running BitLocker on your computer. Whether you use Windows 11 or Windows 10, you need to run this service in the background in order to continue having the BitLocker facility. However, if it is stopped or turned off due to any reason, you won’t be able to use BitLocker.
Therefore, follow these steps to enable BitLocker Drive Encryption Service:
- Search for services in the Taskbar search box.
- Click on the individual search result.
- Double-click on the BitLocker Drive Encryption Service.
- Click the Start button.
- Click the OK button.
After that, you will be able to use BitLocker without any error.
3] Enable Group Policy setting
You need to turn on the additional authentication when you sign in to your user account. Otherwise, you can encounter the aforementioned error. Therefore, follow these steps to turn on the corresponding setting:
- Press Win+R to open the Run prompt.
- Type gpedit.msc and hit the Enter button.
- Navigate to this path: Computer Configuration > Administrative Templates > Windows Components > BitLocker Drive Encryption > Operating System Drives
- Double-click on the Require additional authentication at startup setting.
- Choose the Enabled option.
- Tick the Allow BitLocker without a compatible TPM checkbox.
- Click the OK button.
After that, close all windows of the Local Group Policy Editor, and restart your computer. Next time, you won’t find any problem regarding the BitLocker.
Note: You do not need to change any other setting, such as Configure TPM startup, Configure TPM start PIN, Configure TPM startup key, and so on.
4] Enable Registry setting
The same setting, as above, can be set up using the Registry Editor. Although it is pretty time-consuming to use the Registry Editor method, you can check when you are getting the aforementioned error with BitLocker. When the GPEDIT method is not working for you, you can certainly opt for the Registry Editor method.
To enable the Registry setting, follow these steps:
Press Win+R to open the Run dialog.
Type regedit and press the Enter button.
Click the Yes button.
Navigate to this path:
HKEY_LOCAL_MACHINESOFTWAREPoliciesMicrosoft
Right-click on Microsoft > New > Key and name it as FVE.
Right-click on FVE > New > DWORD (32-bit) Value.
Set the name as EnableBDEWithNoTPM.
Double-click on it to set the Value data as 1.
Create five more REG_DWORD values.
Set the name and Value data as follows:
- UseAdvancedStartup: 1
- UseTPM: 2
- UseTPMKey: 2
- UseTPMKeyPIN: 2
- UseTPMPIN: 2
Once done, close all windows and restart your computer to get the change. Following that, you will be able to use BitLocker without any problem on your Windows 11 or Windows 10 PC.
How do I enable BitLocker in Control Panel?
To enable or disable BitLocker, you need to follow this guide. However, your computer must have BitLocker encryption support. Otherwise, you will come across the aforementioned error message while accessing BitLocker. To check that, you can follow the very first solution mentioned in this article.
Read: Error 0xc0210000, BitLocker key required to unlock the volume wasn’t loaded correctly
Why is BitLocker not in my Control Panel?
To use BitLocker on your computer, you need to have a few things in the line. For example, TPM or Trusted Platform module 1.2 (minimum) is required. On the other hand, your computer must have at least two partitions to encrypt one of them. If your PC doesn’t meet these requirements, you won’t be able to find BitLocker in Control Panel.
Hope this guide helped.
Read:
- The Startup options on this PC are configured incorrectly Bitlocker error
- A problem occurred during BitLocker setup.
BitLocker is a Windows-native encryption tool used to protect your hard drive(s) and USB flash drives. We have already discussed how to enable, disable, and manage BitLocker using the Graphical User Interface (GUI), as well as the Command Line Interface (CLI).
However, users have often reported that they see the following error while trying to enable BitLocker on their Windows PC:
Failed to open the BitLocker control panel tool. Error code: 0x80004005
 2")
The error can occur on either Windows 10 or Windows 11.
It is still uncertain why this error occurs. However, there are a few theories:
- BitLocker is not supported on the current operating system.
- Critical system files linking to BitLocker have been corrupted.
- The relevant Windows service is not running.
Today we are going to show you how to mitigate this error and get BitLocker back to working normally again.
Performing only one of these tasks may not fix the issue for you. We suggest you perform all the following mitigation methods to try and fix BitLocker.
Check if BitLocker is Supported
The first thing to do is check whether BitLocker is supported on your operating system or not. Microsoft has only made BitLocker available on the Enterprise and Professional editions of Windows. Therefore, if you are using any other edition, it is likely that you cannot run BitLocker.
To check our OS edition, type in winver in the Run Command box.
Follow the steps below to check if your system supports BitLocker:
-
Type in msinfo32 in the Run Command box, then press the CTRL + Shift + Enter shortcut keys to open System Information with administrative rights.
 3")
Open System Information -
Here, in the System Summary tab, you will find the entry “Device Encryption Support” in the right pane. Search for it and look what it states.
 4")
Check BitLocker support If it states “Meets prerequisites,” it means BitLocker is supported. If it does not, you either need to install a supported OS or choose a BitLocker alternative.
 3")
 4")
Run BitLocker Device Encryption Service
As we mentioned, one of the reasons for the said error is that the dependent Windows service isn’t running, which is the “BitLocker Device Encryption” service. Perform the following steps to make sure it is enabled:
-
Open the Services console by typing in services.msc in the Run Command box.
Open Services console -
Here, double-click the service “BitLocker Drive Encryption Service.”
 6")
Open service -
From the popup Properties window, select “Startup type” as Automatic, then click Start.
Start service -
Now click Apply and Ok to save the changes.
Save changes
 5")
 6")
 7")
 8")
Now check to see if you can perform the task which earlier prompted the BitLocker error.
Run DISM and SFC Repairs
In case the error is caused by any missing or corrupted system files, you can attempt to repair them by running the System File Checker (SFC) and the Deployment Image Servicing and Management (DISM) tools.
Perform these steps to use these tools to attempt to repair BitLocker:
-
Launch the Command Prompt with administrative privileges.
-
Now execute the following command:
DISM.exe /Online /Cleanup-image /Checkhealth 9")
Check health -
The command above will run and should only take a few seconds. Run the following command when it is completed:
DISM.exe /Online /Cleanup-image /ScanhealthScan health -
The command above may take a minute or two as it performs a deep scan. When finished, run the following command to repair the system image (if any anomalies are detected):
DISM.exe /Online /Cleanup-image /RestorehealthRestore health -
Once the 3 DISM cmdlets are finished, run the following SFC cmdlet:
sfc /scannow 12")
Run System File Checker The SFC command can take a few minutes to fully scan your PC and perform any repairs in case of any anomalies. We suggest that you allow ample time for the tool to perform its task.
-
Once completed, restart the computer.
 9")
 10")
 11")
 12")
As the computer reboot, check to see if the issue persists.
Configure Additional BitLocker Authentication
You may need to configure additional BitLocker authentication when the computer starts up using the Group Policy editor. Here is how:
-
Open the Group Policy editor by typing in gpedit.msc in the Run Command box.
 13")
Open Group Policy editor -
Now navigate to the following from the left pane:
Computer Concifguration >> Administrative Templates >> Windows Components >> BitLocker Drive Encryption >> Operating System Drives
-
Double-click the policy “Require additional authentication at startup (Windows Server 2008 and Windows Vista)” in the right pane.
 14")
Open policy -
From the popup, select the Enabled radio button and leave all default settings. Then click Apply and Ok.
 15")
Enable policy -
To implement the changes, run the following cmdlet in an elevated Command Prompt.
GPUpdate /Force 16")
Enforce Group Policy
 13")
 14")
 15")
 16")
Closing Words
BitLocker can add significant protection to the PC, encrypting your data, thus only making it accessible to you. However, if it does not work, then all your content is available in plain text, making it easily accessible.
We certainly hope that the methods discussed above will fix the issue for you. However, if these fail, then as a last resort, you would need to clean install a Windows edition that does support BitLocker.
Also see:
Subhan Zafar is an established IT professional with interests in Windows and Server infrastructure testing and research, and is currently working with Itechtics as a research consultant. He has studied Electrical Engineering and is also certified by Huawei (HCNA & HCNP Routing and Switching).
- Remove From My Forums
-
Question
-
So we still get one small error on our image. There is another post so I am following that for a fix on this issue. Basically we make it into windows and the drive is encrypting. I can go into the control panel and turn on bitlocker and
everything works fine. So I was originally attempting to fix this issue. When I ran into a problem. Now whenever I attempt to image the laptop again. As soon as the imaging starts I get the error80004005 Pre-provisioning Bitlocker stage.
When I look in the errors it says that C: is not a valid FAT32 or NTFS drive type, and that X: is the same.
I had not edited the task sequence at that time. I suspect that if I decrypt the hard drive this error will go away. So the question remains that if we do successfully deploy laptops with bitlocker how do we image them after the first time? It
seems like a huge waste of time to decrypt the drives by hand just to image again.
Answers
-
I would not spend any time on trying to modify Task Sequence because of that. As I see, you have to options:
1. In Refresh Scenario, just suspend Bitlocker protection before re-imagning Computer.
2. In PXE boot scenario, use diskpart -> sel disk 0 -> clean -> exit.
-
Proposed as answer by
Thursday, June 11, 2015 9:17 PM
-
Marked as answer by
Jon Barnes
Friday, June 12, 2015 1:07 PM
-
Proposed as answer by
На чтение 6 мин Просмотров 3.8к. Опубликовано 13.07.2022
Ошибка 0x80004005 переводится как неуточненная ошибка и обычно возникает, когда пользователь не может получить доступ к общей папке, дискам и виртуальным машинам, а также когда обновления Windows не могут быть установлены. Решение зависит от происхождения и происхождения сообщения об ошибке. Поскольку ошибка не указывает, в чем заключается проблема, даже в книгах Microsoft она определяется как «номер ошибки»
С помощью этого руководства вы сможете решить проблему. Я собрал рабочие решения для различных сценариев и включил их в этот пост. Прочитайте следующие разделы, а затем используйте то решение, которое применимо к вашей ситуации.
Содержание
- Восстановление поврежденных системных файлов
- Ошибка 0x80004005 в VirtualBox
- Ошибка 0x80004005 при доступе к общему диску
- Ошибка 0x80004005 при установке Windows 7 или Windows Server 2008 R2 SP1
- YouTube video: (решено) как исправить ошибку 0x80004005.
- E_FAIL (0x80004005) при настройке VirtualBox в Ubuntu
- Не удается войти в виртуальную машину
- Удалите Microsoft 6to4
- Ошибка 0x80004005 при извлечении файлов
- Способ 1: попробуйте другую утилиту извлечения
- Способ 2: отключите защиту в реальном времени вашего AV
- Метод 3: перерегистрировать jscript.dll и vbscript.dll
Восстановление поврежденных системных файлов
Инструмент проверки системных файлов (SFC) используется для проверки поврежденных или отсутствующих системных файлов Windows и восстановления их прежнего состояния.
- SFC — это инструмент, основанный на командах, поэтому для его запуска вам понадобится командная строка.
- Откройте командную строку, найдя cmd в меню «Пуск», щелкните ее правой кнопкой мыши и выберите «Запуск от имени администратора».
- Теперь в командной строке введите следующую команду: SFC /scannow
- Нажмите enter и начнется сканирование поврежденных файлов windows.

- Он автоматически исправит поврежденные файлы, если таковые будут найдены. Если вы не нашли поврежденных файлов, перейдите к следующему методу.
Читать — Как ускорить работу компьютера с Windows 10 (мастер-руководство)
Ошибка 0x80004005 в VirtualBox
Обычно причиной проблем является ключ реестра.
- Зажмите клавишу Windows и нажмите R. В окне запуска введите Regedit и нажмите OK.
- Перейдите к следующему пути журнала:
- HKEY_LOCAL_MACHINESOFTWAREMicrosoftWindows NTCurrentVersion AppCompatFlagsLayers
- «C: Program FilesOracleVirtualBoxVirtualBox.exe» =»DISABLEUSERCALLBACKEXCEPTION»
- В случае, если вышеуказанный ключ присутствует, удалите его и попробуйте снова. Если удаление ключа не помогло, отключите антивирус.
Ошибка 0x80004005 при доступе к общему диску

Мы будем использовать regedit для создания значения LocalAccountTokenFilterPolicy.
- Нажмите клавишу Windows и нажмите R.
- Введите regedit и нажмите OK
- Перейдите по следующему пути в regedit
- HKLM SOFTWARE Microsoft Windows CurrentVersion Policies System
- Для 32-битной системы создайте новое значение DWORD под названием LocalAccountTokenFilterPolicy.
- Для 64-битной системы создайте QWORD (64-битный) под названием LocalAccountTokenFilterPolicy.
- В обоих случаях установите числовое значение 1 (то есть, включено) и не забудьте нажать OK.
- Обычно значение LocalAccountTokenFilterPolicy создается до того, как вы сможете установить количество данных. Нет проблем, просто дважды щелкните и измените значение с 0 на 1.
- Затем перезагрузите компьютер и посмотрите, можете ли вы теперь получить доступ к общим дискам или папкам.
- Если проблема не исчезла после выполнения всех предыдущих шагов, то
- Нажмите клавишу Windows и затем нажмите R. Затем введите hdwwiz.cpl, чтобы открыть диспетчер устройств.
- Выберите Сетевые адаптеры, нажмите Показать в меню, а затем нажмите Показать скрытые устройства.
- Расширьте сетевые адаптеры. Если вы видите адаптеры Microsoft 6to4, удалите все адаптеры, щелкнув правой кнопкой мыши и выбрав Удалить устройство.
- Затем перезагрузите компьютер и проверьте его.
Ошибка 0x80004005 при установке Windows 7 или Windows Server 2008 R2 SP1
Скачайте CheckSUR здесь и запустите его. Запустите SFC Scan после того, как System Update Preparation Tool завершит проверку компонентов системы.
YouTube video: (решено) как исправить ошибку 0x80004005.
E_FAIL (0x80004005) при настройке VirtualBox в Ubuntu
Если вы пытаетесь выделить виртуальной машине более 3 ГБ оперативной памяти, убедитесь, что хост является 64-битной системой и что разрешена реальная аппаратная передача (VT-x).
Не удается войти в виртуальную машину
Следующая ошибка может появиться в некоторых сеансах на виртуальной машине (VirtualBox). Откройте Network Center и выберите Изменить параметры адаптера, чтобы устранить эту проблему. Щелкните правой кнопкой мыши на адаптере виртуального хоста Virtualbox и выберите Свойства. Включите «Virtualbox NDIS6 Bridget Networking Driver», если он отключен, и повторите попытку. Теперь VirtualBox должен запуститься правильно. Если нет, разрешите сетевой драйвер Virtualbox NDIS6 Bridget для всех существующих сетевых адаптеров (Ethernet, WiFi и т.д.) и всегда отключайте NDIS6 и пробуйте.
Удалите Microsoft 6to4
Чтобы решить эту проблему, вы должны удалить устройства Microsoft 6to4 из диспетчера задач. Обратите внимание, что вы можете не увидеть эти устройства, поскольку по умолчанию они скрыты. Поэтому вы увидите их только после активации опции Показать скрытые устройства.
Вот шаги для удаления этих устройств.
- Нажмите клавишу Windows и затем нажмите R.
- Введите devmgmt.msc и нажмите Enter
- Нажмите Показать и выберите Показать скрытые устройства.
- Дважды щелкните Сетевые адаптеры
- Щелкните правой кнопкой мыши на устройстве Microsoft 6to4 и выберите Удалить. Повторите этот шаг для всех перечисленных устройств Microsoft 6to4
После этого перезагрузите компьютер. Проблема должна быть решена, как только вы снова войдете в Windows.
Ошибка 0x80004005 при извлечении файлов
Если эта ошибка возникает при извлечении или открытии файлов ZIP или RAR, есть несколько возможных решений.
Способ 1: попробуйте другую утилиту извлечения
Сначала убедитесь, что файл не защищен паролем, а ваша утилита извлечения не предназначена для обработки защищенных паролем данных. Для этого можно загрузить другой сервис, например 7Zip, и проверить, требуется ли пароль при попытке открыть или извлечь тот же файл ZIP или RAR.
Способ 2: отключите защиту в реальном времени вашего AV
Еще одна возможная причина — осторожность стороннего пакета безопасности. При определенных обстоятельствах несколько наборов сторонних антивирусов блокируют извлечение сжатых файлов.
Если вы используете внешний сторонний антивирус вместо стандартного пакета безопасности (Windows Defender), вы можете попробовать временно отключить защиту или защиту в реальном времени вашего стороннего антивируса и посмотреть, решится ли проблема.
Если ошибка 0x80004005 больше не возникает, вам следует удалить ваш текущий сторонний пакет и выбрать другой пакет безопасности.
Если вы хотите избежать других проблем, подобных этой, вам следует выбрать интегрированное решение безопасности.
Метод 3: перерегистрировать jscript.dll и vbscript.dll
Если два вышеуказанных возможных решения не помогли, мы попробуем другой подход. Некоторые пользователи успешно устранили проблему, перерегистрировав некоторые библиотеки динамических связей (DLL) в поднятой командной строке. Если быть более точным, этот метод пытается решить проблему путем перерегистрации jscript.dll (библиотека, используемая при запуске JScript) и vbscript.dll (модуль, содержащий функции API для VBScript). Вот краткая справка о том, как это сделать:
Нажмите Windows Key + R, чтобы открыть окно запуска. Затем введите «cmd» и Ctrl + Shift + Enter и нажмите Yes в приглашении User Account Control (UAC), чтобы немедленно открыть повышенную командную строку.
В повышенной командной строке введите следующую команду и нажмите Enter:
regsvr32 jscript.dll
В той же повышенной командной строке введите следующую команду и нажмите Enter:
regsvr32 vbscript.dll
Перезагрузите компьютер и проверьте, можете ли вы получить доступ или извлечь.ZIP или.RAR файлы без получения ошибки 0x80004005
.