Давным-давно Apple использовала файловую систему HFS +. Поскольку это уже известная файловая система, технологической компании потребовались десятилетия, чтобы обновить ее. Только в 2017 году Apple наконец выпустила обновленную версию HFS +, в которой были улучшены шифрование, распределение пространства и целостность файлов. Ее удачно назвали файловой системой Apple или APFS.
Хотя новая файловая система казалась идеальной, некоторые конечные пользователи столкнулись с неожиданными проблемами и несовместимостью. Одна из них — ошибка 49153 com.apple.DiskManagement.disenter.
Что такое ошибка com.apple.DiskManagement.disenter 49153?
Ошибка 49153 com.apple.DiskManagement.disenter — это ошибка, которая появляется после сбой сжимающегося раздела. Сообщается, что пользователи видели ошибку после сжатия раздела с помощью Дисковой утилиты.
Хотя существует множество возможных причин ошибки 49153 com.apple.DiskManagement.disenter, например вредоносные объекты и системный мусор, эксперты предполагают, что основными виновниками являются локально сохраненные снимки резервных копий Time Machine в системном разделе.
Как исправить ошибку com.apple.DiskManagement.disenter 49153
Перед тем, как попробовать любое из приведенных ниже решений, мы рекомендуем сначала создать резервную копию вашей системы. Это позволит вам быстро восстановить файлы в случае появления новых ошибок.
Теперь, если вы столкнетесь с ошибкой 49153 com.apple.DiskManagement.disenter, вот несколько решений, которые вы можете Попробуйте:
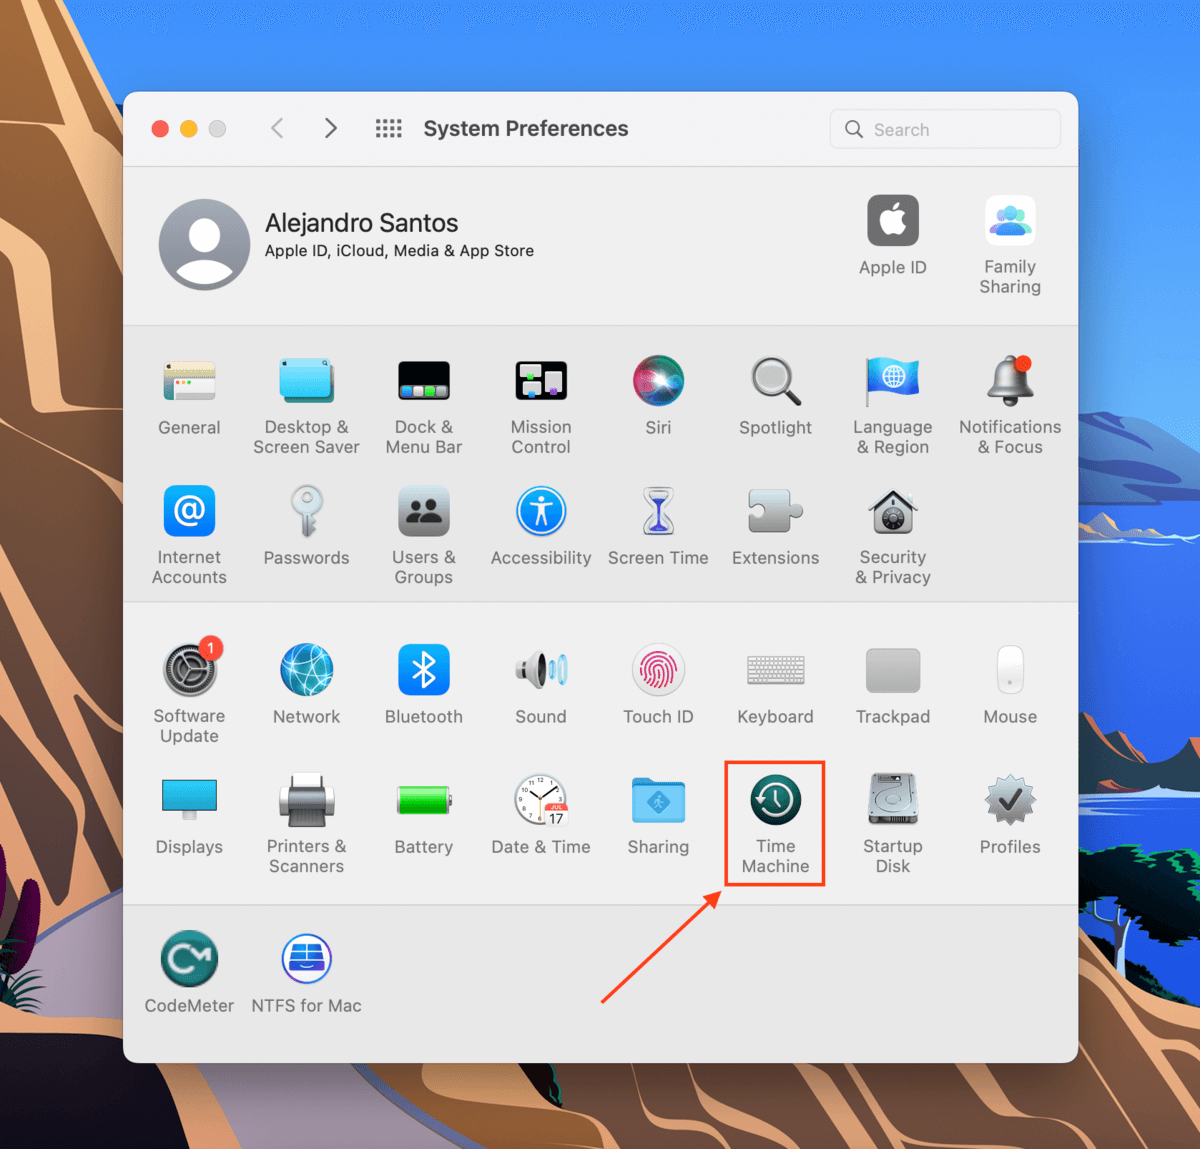
Решение №1: Отключите Time Machine
Как уже упоминалось, Time Machine является возможной причиной ошибки 49153 com.apple.DiskManagement.disenter. Таким образом, отключение может просто решить проблему.
Чтобы выключить Time Machine, выполните следующие действия:
Решение №2. Перезагрузите Mac в однопользовательском режиме и используйте FSCK.
На вашем Mac есть встроенный инструмент, который можно использовать для исправить любые проблемы с файловой системой. Это называется проверкой файловой системы или FSCK.
Чтобы использовать FSCK, выполните следующие действия:
Решение № 3. Используйте сторонний инструмент для восстановления Mac.
При условии, что первые два решения выше не помогли исправить ошибку 49153 com.apple.DiskManagement.disenter, вы можете попробовать использовать сторонний инструмент для восстановления Mac, например приложение для ремонта Mac.
MacRepair позволяет вашему Mac работать быстрее и эффективнее, очищая ценное системное пространство, избавляясь от разного рода системного мусора и оптимизируя оперативную память, чтобы освободить место для более важных процессов и приложений.
Помимо MacRepair, есть есть множество других онлайн-инструментов. Некоторые из них доступны бесплатно, другие — по определенной цене. Но независимо от вашего выбора имейте в виду, что вы получаете то, за что платите. Если вы инвестируете в дешевый или бесплатный инструмент, есть вероятность, что ему нельзя доверять, и никогда не безопасно доверять свои ценные данные ненадежному инструменту, верно?
Решение №4: начать сеанс терминала
Использование утилиты «Терминал» может исправить ошибку com.apple.DiskManagement.disenter 49153, с которой вы можете столкнуться.
Вот подробное руководство о том, что делать:
Решение №5: Обратитесь к специалистам.
Если вы имеете дело с критически важными данными и не можете позволить себе подвергать их риску, или вы просто не работаете с ними. уверенный в своих навыках поиска и устранения неисправностей, лучше всего обратиться за помощью к профессионалам. Посетите ближайший ремонтный центр Apple и обратитесь к сертифицированному специалисту для проверки вашего Mac.
Резюме
Вначале может быть сложно разобраться с ошибкой com.apple.DiskManagement.disenter 49153. Однако, если вы будете следовать решениям шаг за шагом, вы поймете, что процесс довольно прост.
Какое из приведенных выше решений позволило устранить ошибку 49153 com.apple.DiskManagement.disenter? Вы знаете другие способы исправить это? Не стесняйтесь обращаться к нам через раздел комментариев ниже!
YouTube видео: Как исправить ошибку 49153 com.apple.DiskManagement.disenter
02, 2023
Long ago, Apple used a file system called HFS+. As it was already a venerable file system, it took decades for the tech company to update it. It was only in 2017 when Apple finally released an updated version of the HFS+ that sported improvements to encryption, space allocation, and file integrity. It was aptly named the Apple File System or APFS.
While the new file system seemed perfect, some end users have run into unexpected issues and incompatibilities. One of which is the com.apple.DiskManagement.disenter error 49153.
What is com.apple.DiskManagement.disenter Error 49153?
The com.apple.DiskManagement.disenter error 49153 is an error that surfaces after a shrinking partition failure. Users have reportedly seen the error after performing a partition shrink using Disk Utility.
Although there are many possible causes of com.apple.DiskManagement.disenter error 49153 such as malware entities and system junk, experts suggest that the primary culprits are the locally stored snapshots of Time Machine backups on the system partition.
How to Fix com.apple.DiskManagement.disenter Error 49153
Before you try any of the solutions below, we suggest that you back up your system first. This will allow you to quickly recover your files in the event that more errors surface along the way.
Now, if you come across the com.apple.DiskManagement.disenter error 49153, here are some solutions you can try:
Solution #1: Turn Off Time Machine
As mentioned, Time Machine is a possible culprit for the com.apple.DiskManagement.disenter error 49153. So, turning it off might just resolve the problem.
To turn off Time Machine, here’s what you should do:
- Go to System Preferences.
- Select Time Machine.
- Untick the Backup Automatically option.
Solution #2: Restart Your Mac in Single User Mode and Use FSCK
Your Mac has a built-in tool that can be used to repair any file system issues. It’s called the File System Check or FSCK.
To use FSCK, follow these steps:
- Reboot your Mac into Single User Mode. You can do it by long-pressing the Power button and holding down the CMD + S keys while your Mac is booting.
- The moment the Command Prompt screen shows, input the /sbin/fsck -fy Hit Enter.
- Next, input reboot into the command line to restart your Mac.
- Check if your Mac reboots in a normal fashion. If it does not, try the next solution.
Solution #3: Use a Third-Party Mac Repair Tool
Provided that the first two solutions above did not work to fix the com.apple.DiskManagement.disenter error 49153, you may try to use a third-party Mac repair tool like Mac repair app.
macAries makes your Mac run faster and more efficiently by clearing valuable system space, getting rid of all sorts of system junk, and optimizing the RAM to give room to more important processes and apps.
Aside from macAries, there are plenty of other tools online. While some are available for free, others come at a certain price. But regardless of your choice, keep in mind that you get what you pay for. If you invest in a cheap or free tool, there is a chance that it can’t be trusted, and it’s never safe to entrust your valuable data on an unreliable tool, right?
Solution #4: Start a Terminal Session
Using the Terminal utility can fix the com.apple.DiskManagement.disenter error 49153 you might be facing.
Here is a detailed guide on what to do:
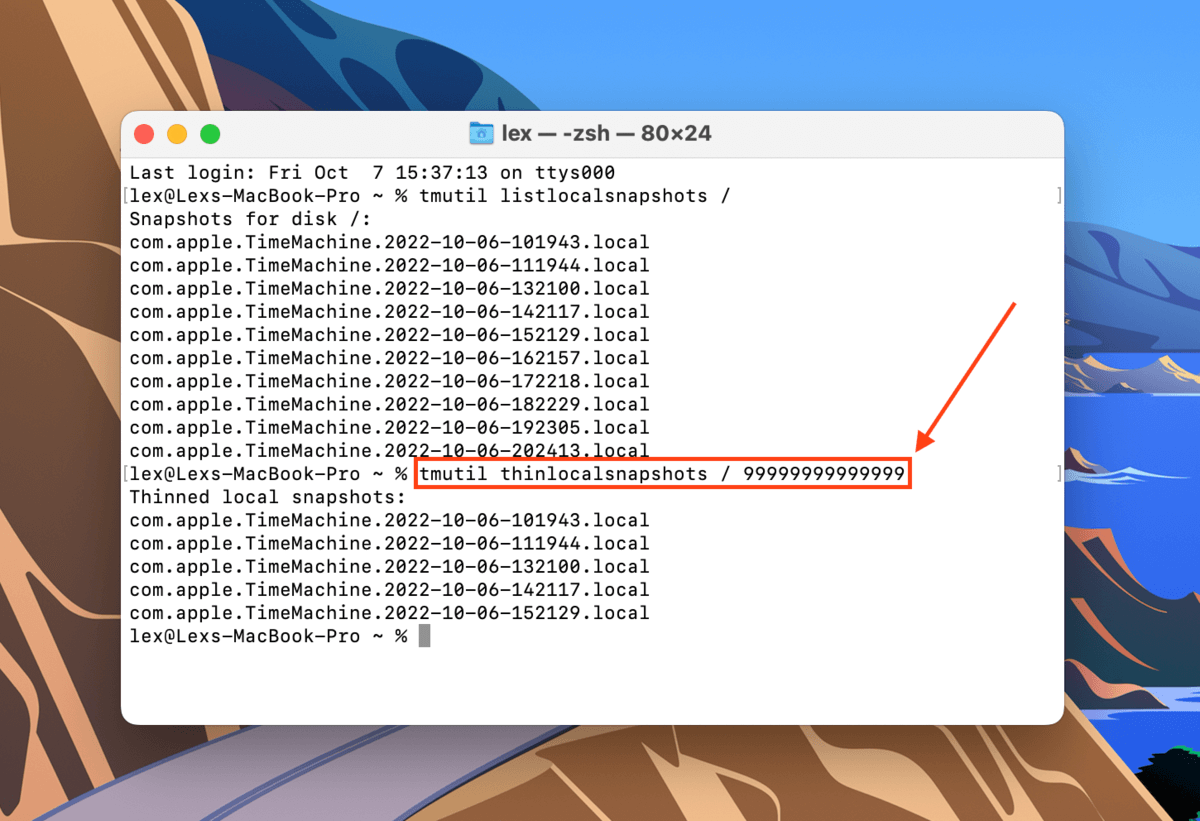
- Launch Terminal.
- Into the command line, input tmutil listlocalsnapshots. This command will compile a list of all Time Machine snapshots for a certain partition.
- Next, input tmutil thinlocalsnapshots /99999999999999 to delete any recorded snapshots.
- Finally, check if the snapshots are completely gone by entering the tmutil listlocalsnaphots into the comand line again.
Solution #5: Contact Professionals.
If you are dealing with critical data and you cannot afford to put them at risk, or you simply aren’t confident with your troubleshooting skills, your best resort is to seek help from professionals. Visit the nearest Apple Repair Center and have your Mac checked by a certified technician.
Summary
It might be challenging to deal with the com.apple.DiskManagement.disenter error 49153 at the beginning. However, if you follow the solutions step-by-step, you’ll realize that the process is quite simple.
Which of the solutions above resolved the com.apple.DiskManagement.disenter error 49153? Do you know other ways to fix it? Feel free to reach us via the comments section below!

Vic is a certified gadget freak who feels the need to surround himself with cutting-edge technology. And this passion has helped him a lot in creating content that informs and guides users on using and troubleshooting the latest technology. He is an avid researcher who is always hungry for the latest news and updates on the most cutting-edge technology.
Vic is the one in charge of keeping our website running smoothly and efficiently, to make sure that our readers have a wonderful experience while visiting the website. He’s good at troubleshooting errors and fixing Windows issues that come up either when playing games or working on the computer.

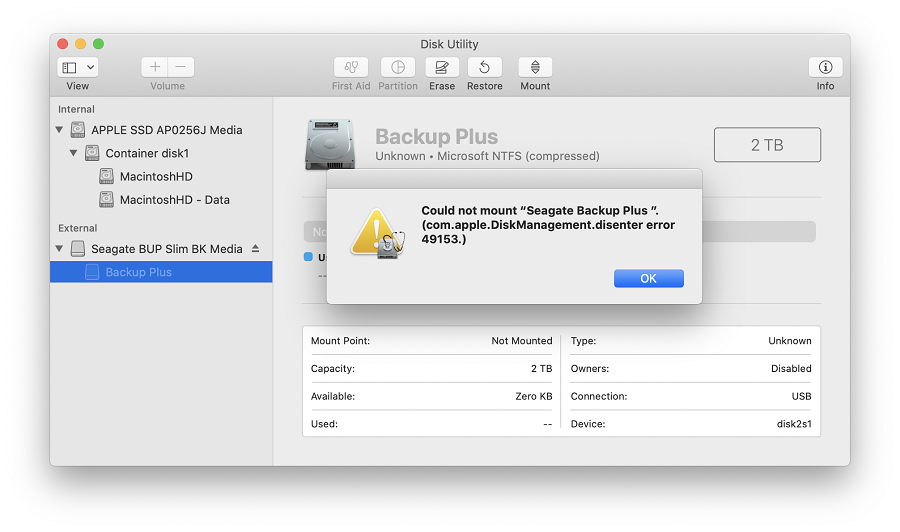
Did you get a com.apple.diskmanagement.disenter error when you tried to mount your external hard drive on Mac? This indicates a problem with either your external hard drive or macOS. Unfortunately, either case may lead to data loss – but don’t lose hope!
In this article, we’ll explore the possible reasons we encounter DiskManagement Distenter 49135 and how to fix it (without losing your data), as well as other common disk errors. Read on.
Need to recover data from the drive? Go to data recovery section ⤵
When you plug in your external hard drive, the system mounts it and makes its contents viewable in Finder. If it doesn’t show up there, you should still see it in Disk Utility (Finder > Applications > Utilities) where you can also attempt to mount it.
But there are cases when your external hard drive won’t mount, even using Disk Utility. In this scenario, you’ll probably encounter an error that says “Could not mount *name of the drive*”(com.apple.DiskManagement.disenter error 49513).
Several factors could lead to this problem. You may have an incompatible file system. Or, you may be using a Mac Superdrive while running macOS Catalina. Beyond those common reasons, error 49153 may occur simply due to malware, bugs, issues while resizing partitions and interference from local Time Machine backups.
Don’t worry – we’ll show you how to get rid of this pesky error in the next section.
How to Fix com.apple.diskmanagement.disenter error 49153?
There are several ways to address this specific error code, but most fixes can potentially harm your data. We suggest opening your external hard drive in read only mode and copying your files to a separate storage device or to the cloud.
To set your drive to read only mode, right-click your drive > Get Info and scroll down to Sharing and Permissions. Set your user’s privilege to Read only.
Method #1: Connect Your Drive to Another Mac
Disk Utility errors can be caused by either your drive or your Mac. To figure out which methods to try first, connect your drive to another Mac or even a PC. If your drive doesn’t work on other machines, then the problem likely lies with your drive.
If it works on another Mac, then your Mac might be experiencing glitches due to a faulty update or other issue. If it works on a PC, then it’s likely a formatting problem – we wrote more about that in the section of this article that covers other common DiskManagement Disenter errors.
Method #2: Restart your Mac
A temporary bug or glitch may have simply gotten macOS stuck while it attempted to recognize your drive. You may also have a lot of apps running in the background using up the resources macOS needs to properly recognize and mount your drive.
To get your system going, a simple restart might solve the problem. This will automatically close all running apps and reboot the operating system.
Method #3: Use First Aid in Disk Utility
First Aid is a useful tool that finds and repairs disk errors – specifically, it scans the drive and its partitions for issues related to its structure and formatting. These may prevent your drive from properly mounting.
Fortunately, First Aid is a feature of the Disk Utility app, which can recognize unmountable drives or partitions. To repair your drive using First Aid:
Step 1.Launch Disk Utility (Finder > Applications > Utilities).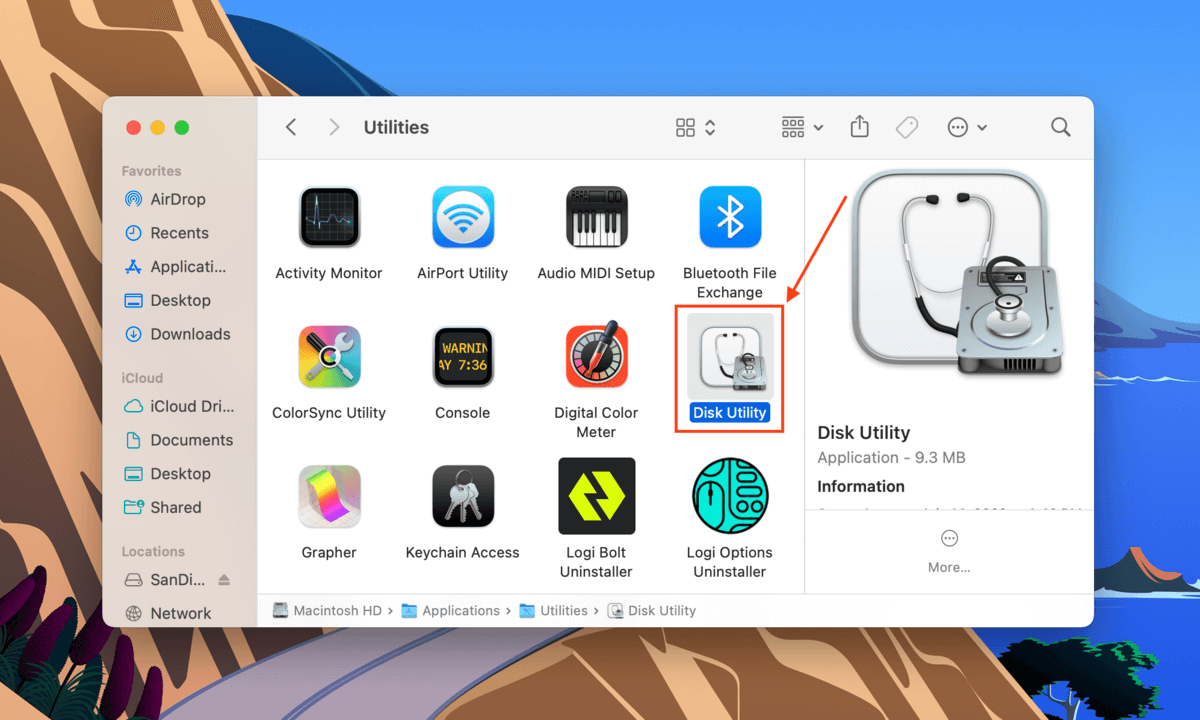
Step 2.Select your drive from the left sidebar, then click the First Aid button at the top of the window.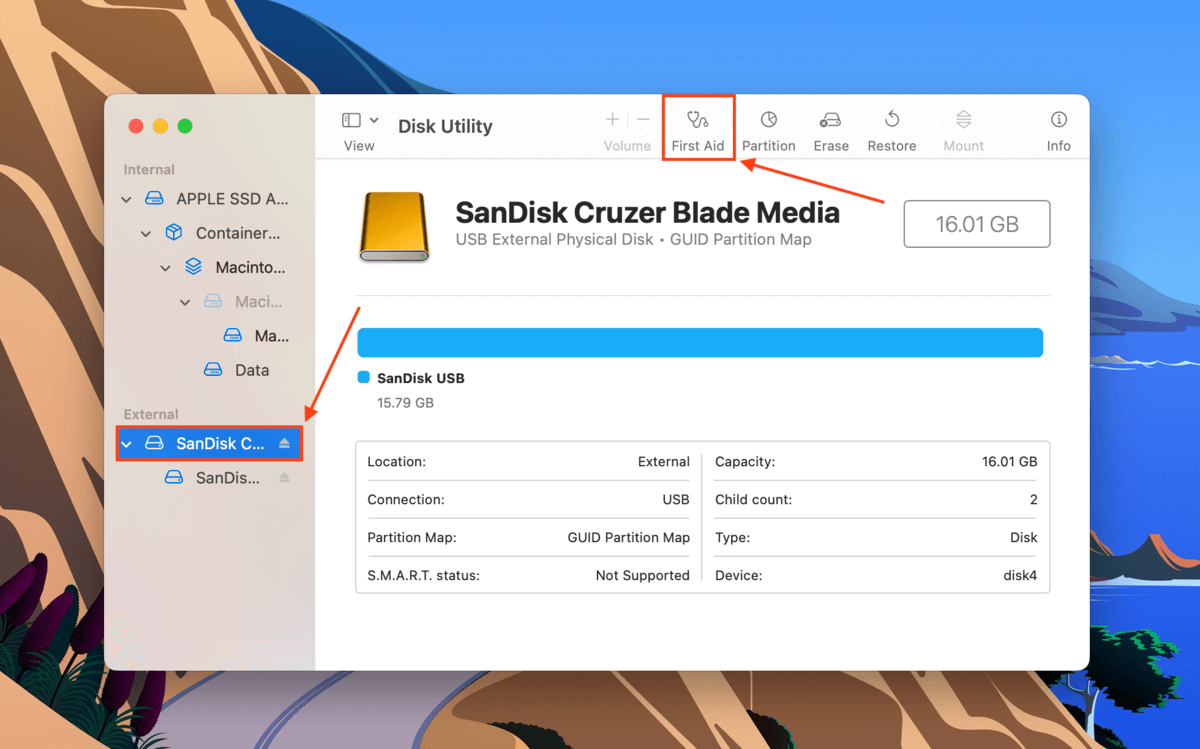
Step 3.In the dialogue box that appears, click Run.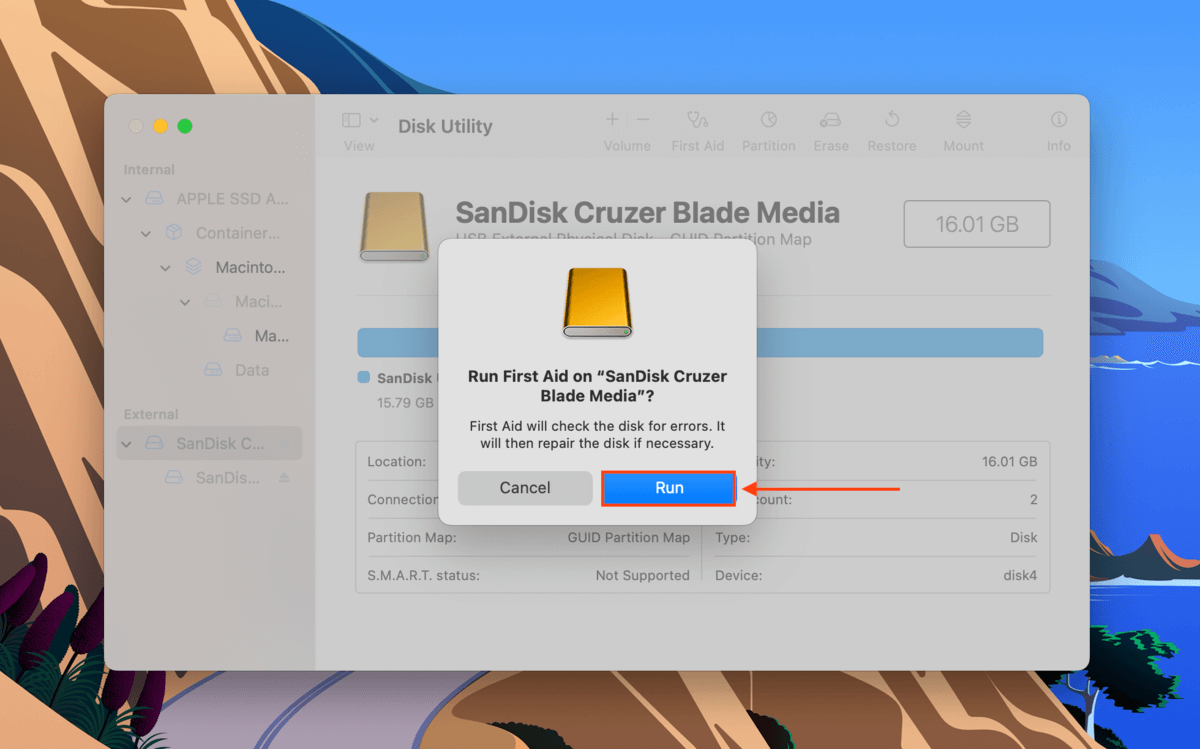
Step 4.Wait for the process to finish. Then, manually mount your hard drive in Disk Utility by selecting your drive or volume in the left sidebar and clicking the Mount button.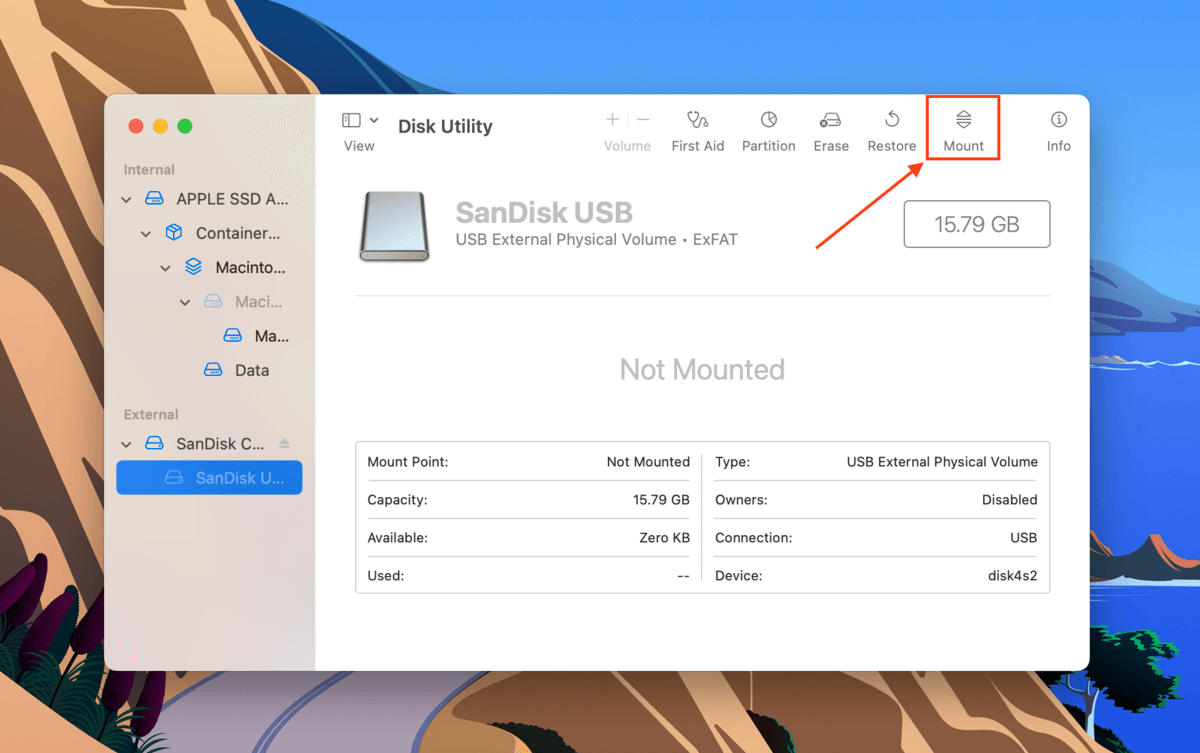
Method #4: Use the fsck Command in Single User Mode
Your external hard drive may not be mounting because of a file system issue. To resolve this problem, you can use Mac’s File System Check command or FSCK through Single User Mode. Here’s how:
Step 1.Enter Single User Mode. To do so, restart your Mac. As soon as it starts to reboot, press and hold the Power button and the CMD + S keys at the same time.
Step 2.You’ll know that you’ve successfully booted into Single User Mode when you see a window that looks like the Terminal app. Once the white text stops appearing, type the following command and hit Return.
/sbin/fsck -fy
Step 3.Once the process is complete, type reboot. This will command your Mac to restart itself.
If you remove your hard drive before ejecting it from Mac, fsck will automatically scan and repair it the next time you use it. This could potentially take a long time, which makes your drive unmountable. To deal with this, force quit the fsck command (Open the Activity Monitor > search fsck > click the x button).
Method #5: Disable Time Machine
Time Machine is a Mac built-in tool that regularly backs up your data, usually automatically. It works well, but on bad days, it can cause the operating system to get stuck while preparing your backup drive. Try disabling Time Machine to free your drive from this process and hopefully allow it to get mounted.
To disable Time Machine, open its settings window by launching System Preferences > Time Machine.
Then, untick the box beside the Back Up Automatically setting.
Method #6: Delete Time Machine snapshots using Terminal
Deleting Time Machine snapshots from your Mac may also resolve this disk utility error. Learn how to do it using the Terminal app by following the steps below:
Step 1.Launch Terminal (Finder > Applications > Utilities > Terminal).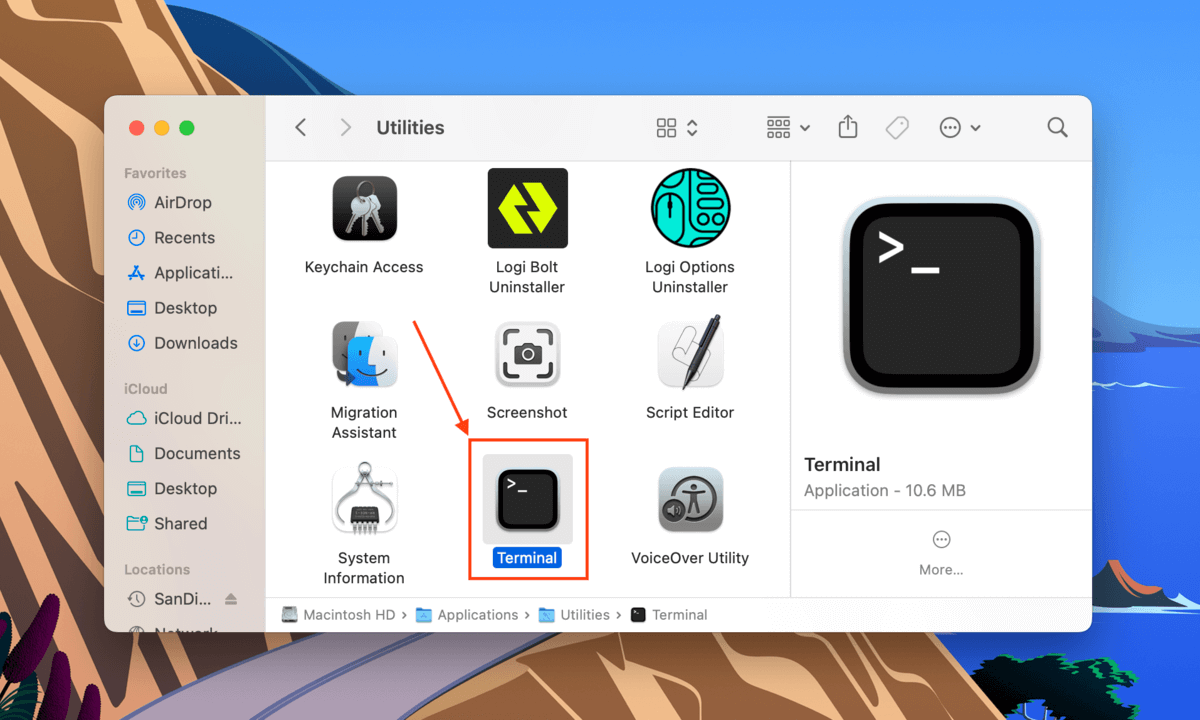
Step 2.The first command we’ll execute will list all locally stored Time Machine snapshots. Type the following command and hit Return:
Tmutil listlocalsnapshots /
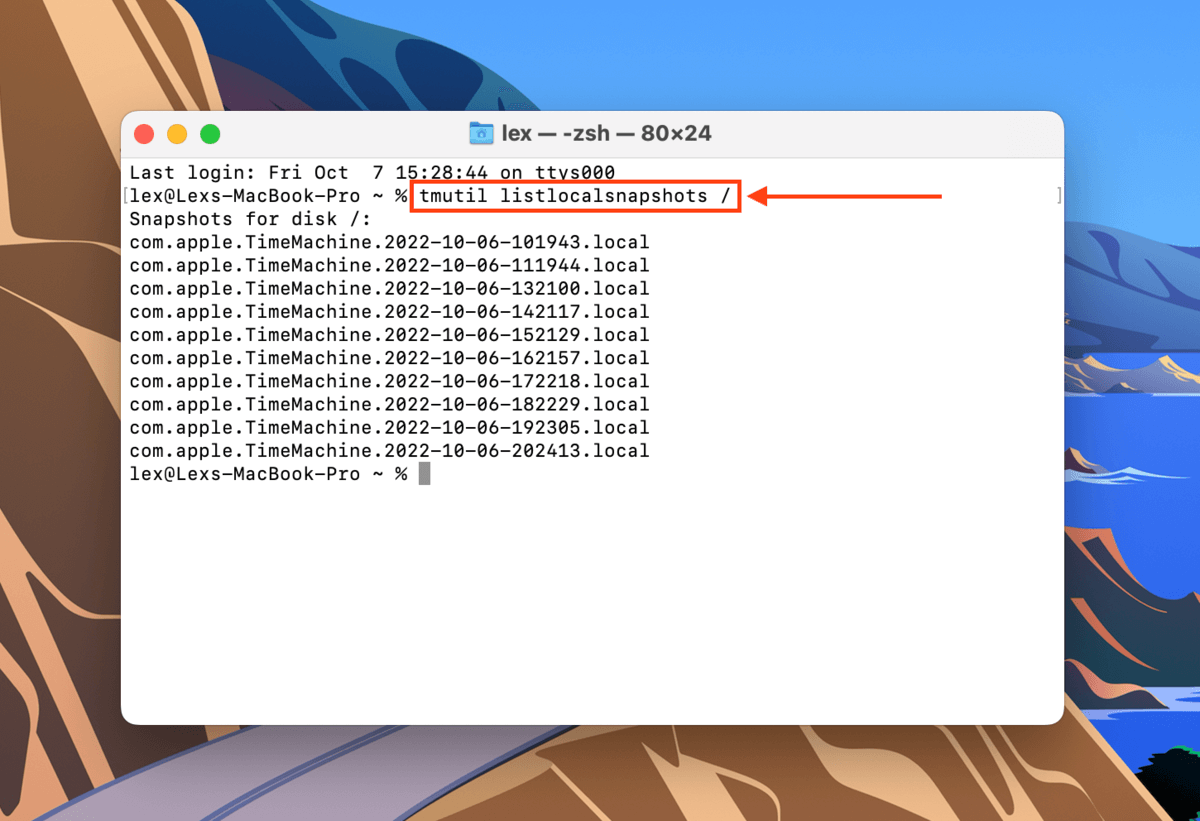
Step 3.Type the following command and hit Return:
Tmutil thinlocalsnapshots /99999999999999
Step 4.Keep using the tmutil listlocalsnaphots and tmutil thinlocalsnapshots commands to make sure you delete all your snapshots.
Method #7: Format Your Drive
If all the above methods failed to get rid of the disk errors, your last resort is to format the drive. As we’ve already discussed earlier, formatting your drive will wipe the disk – including errors, viruses, corruption, and unfortunately, your data. We suggest copying your files to a secure location first.
To transfer your files safely, set your drive to read only mode first. To do this, read our pro tip in the introduction of this section.
Fortunately, formatting your drive on Mac is very easy thanks to the Disk Utility app. First, launch Disk Utility (Finder > Applications) and select your drive from the left sidebar. Then, click the Erase button on the top of the window.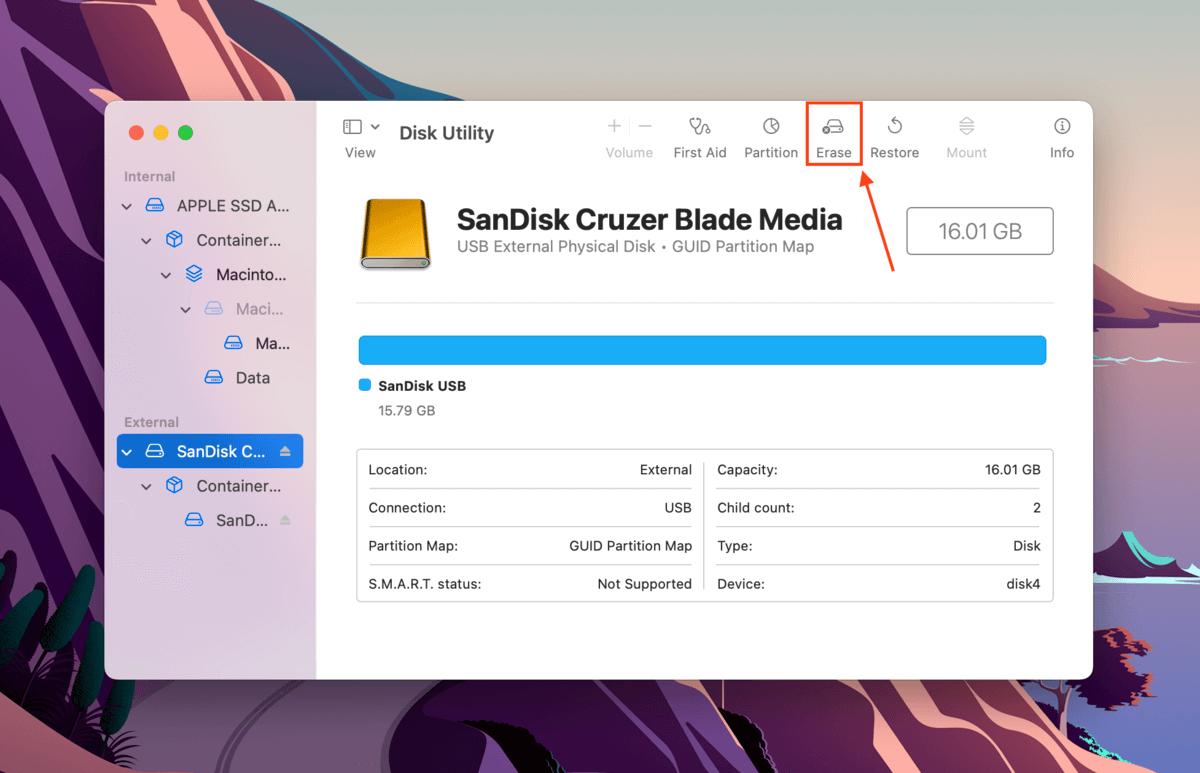
In the dialogue box that appears, name your drive and select a format. If you will only be using your drive with Mac computers, choose APFS. Otherwise, we suggest exFAT for maximum compatibility. Select GUID Partition Map for its scheme, then click Erase to proceed with the format.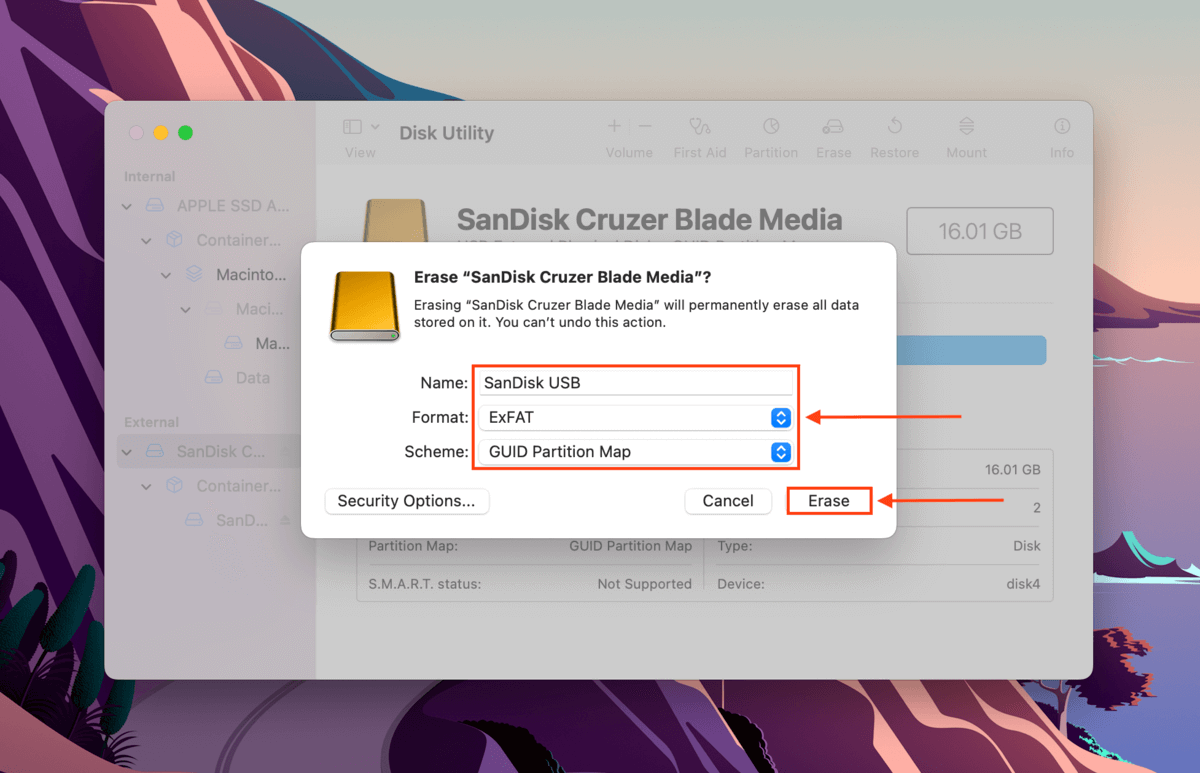
Other Types of DiskManagement Disenter Error
Aside from DiskManagement Disenter Error 49153, there are other DiskManagement Disenter errors that you may encounter that are represented by different codes. Below, we’ve listed the most common ones along with their solutions:
- DiskManagement Disenter Error 49223. An exFAT hard drive that’s been formatted using Windows can cause this error when connected to a Mac, as macOS doesn’t support all the storage block sizes available on Windows. This incompatibility makes MacOS unable to recognize and mount the drive.If you want to use this drive on both Mac and Windows, you need to format it using Mac (but first, back up your data!). If you intend to use it solely on Mac, we suggest formatting it to Apple-based APFS.
- DiskManagement Disenter Error 49221.This error is caused by a glitch in the security updates 2021-003 and 2022-003. After the update, you’ve probably tried to mount a NTFS hard drive in Disk Utility when you got this error. To fix this, reinstall macOS or use a third-party software to mount your NTFS drive.
- DiskManagement Disenter Error 49244. This error often appears when you try to mount your hard drive in Disk Utility while running macOS Catalina. You can use third-party software to mount your drive. If that doesn’t work, you need to format your drive to APFS (again, don’t forget to create a backup!).
- DiskManagement Disenter Error 49218. You might get this error when you remove a hard drive without proper ejection while using macOS Monterey. This error may also be caused by bugs from macOS Monterey itself.To fix it, (1) execute the sudo pkill -f command in the Terminal app, (2) execute the fsck /dev/disk_user_id/ command in single user mode, and finally (3) execute the mount -f /dev/disk_user_id/ command. Remember to replace “disk_user_id” with your disk’s identifier (diskutil list). To boot into single user mode, follow the first instruction in Method #4. If your drive still fails to work after this fix, you may need to format it.
- DiskManagement Disenter Error 49180. This error occurs when there’s a raw partition on the drive, which can happen if you connect an APFS drive to an old Mac or if something went wrong while you were shrinking your partition. You have two ways to address this error: (1) resize the external hard drive using Terminal or (2) format the hard drive altogether.
What to Do If You’d Lost Data After DiskManagement Disenter Error?
Disk Utility errors always have the potential to cause data loss and there’s no guarantee that your files will remain intact after fixing them. The safest and most efficient way to restore data caused by disk errors is to use data recovery software.
Data recovery software can restore files regardless of format – it will even work if you decided to format your drive due to the errors. For this article, we’ll be using a tool called Disk Drill. It’s easy to use and works with most disk formats, and it can restore data even from non-mounting drives. Here’s how to use it:
Disk Drill Basic for Mac does not offer free recovery. However, you can back up and preview your files for free. There are free data recovery solutions available on the internet, but they each have their own limitations – your mileage may vary.
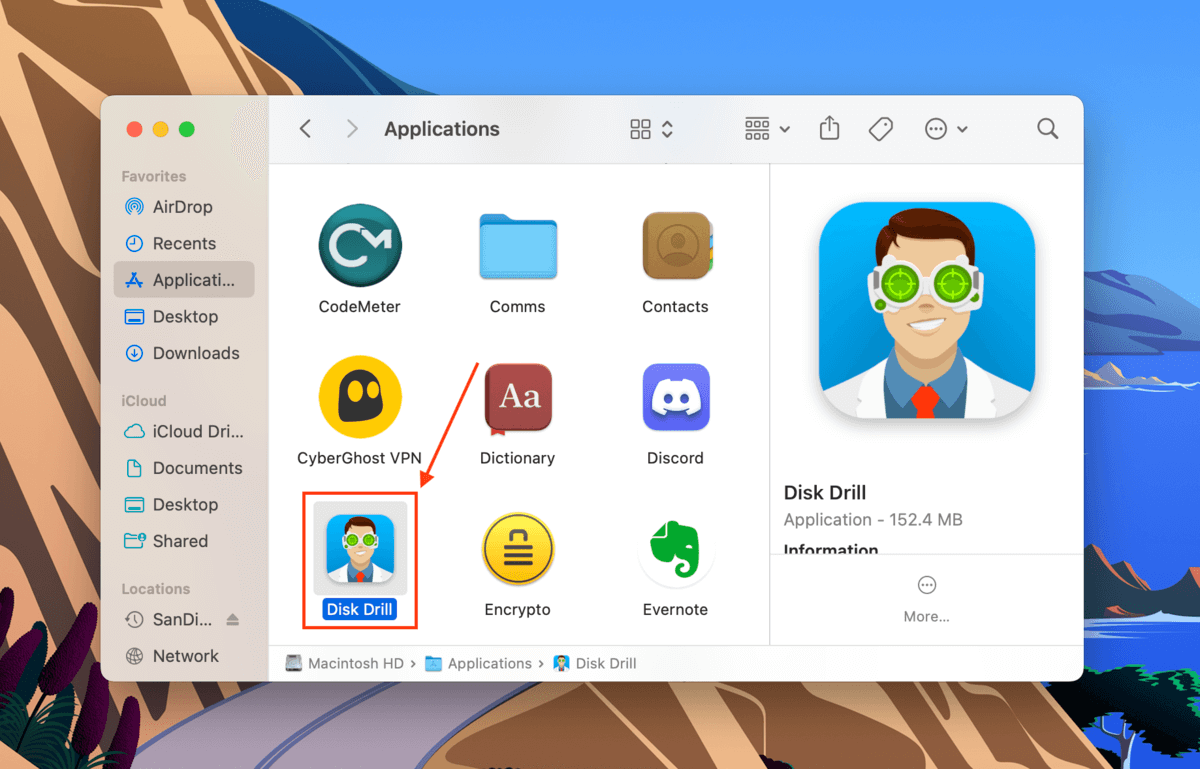
Step 1.Download and install Disk Drill for Mac.
Step 2.Launch Disk Drill (Finder > Applications > Disk Drill).
Step 3.Select your drive from the middle pane and click Search for lost data.
Step 4.Wait for the scan to finish, then click Review found items.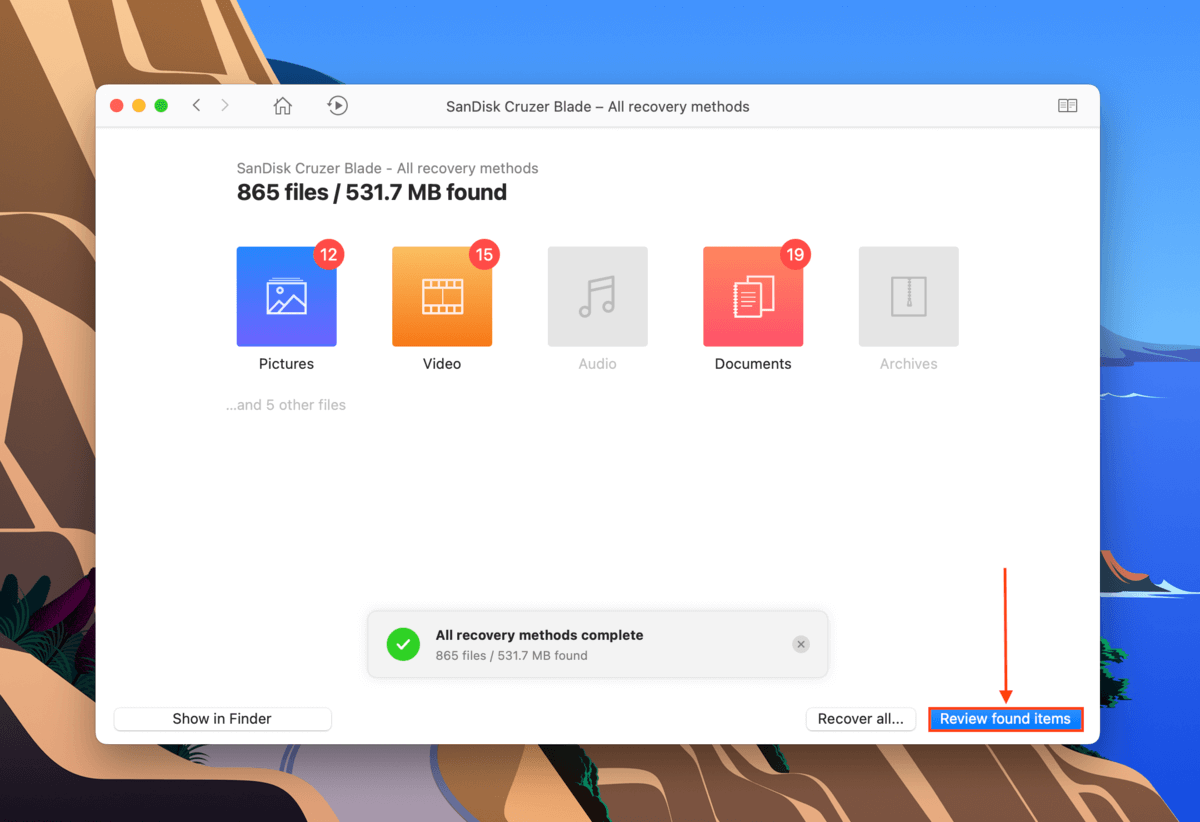
Step 5.Use the search bar to filter the results by name or by file extension, or use the left sidebar. You can also hover your mouse pointer beside any file to enable preview.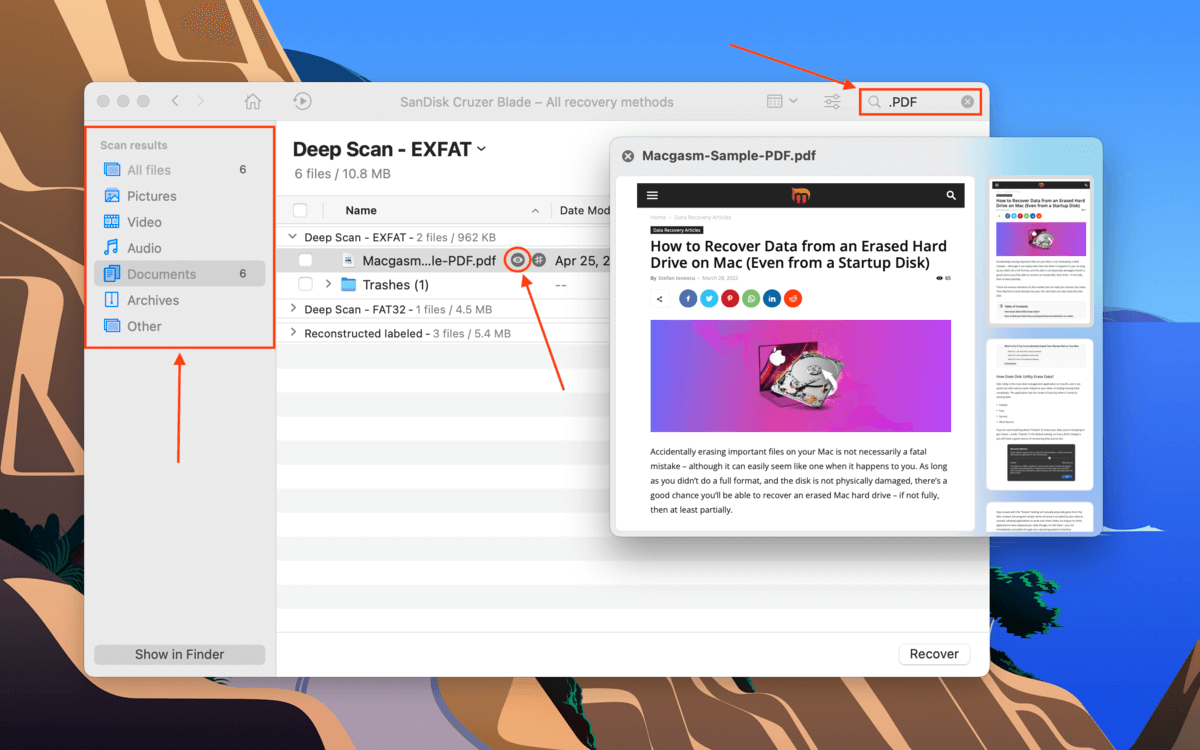
Step 6.Use the boxes in the left-most column to select the files you want to restore, then click Recover.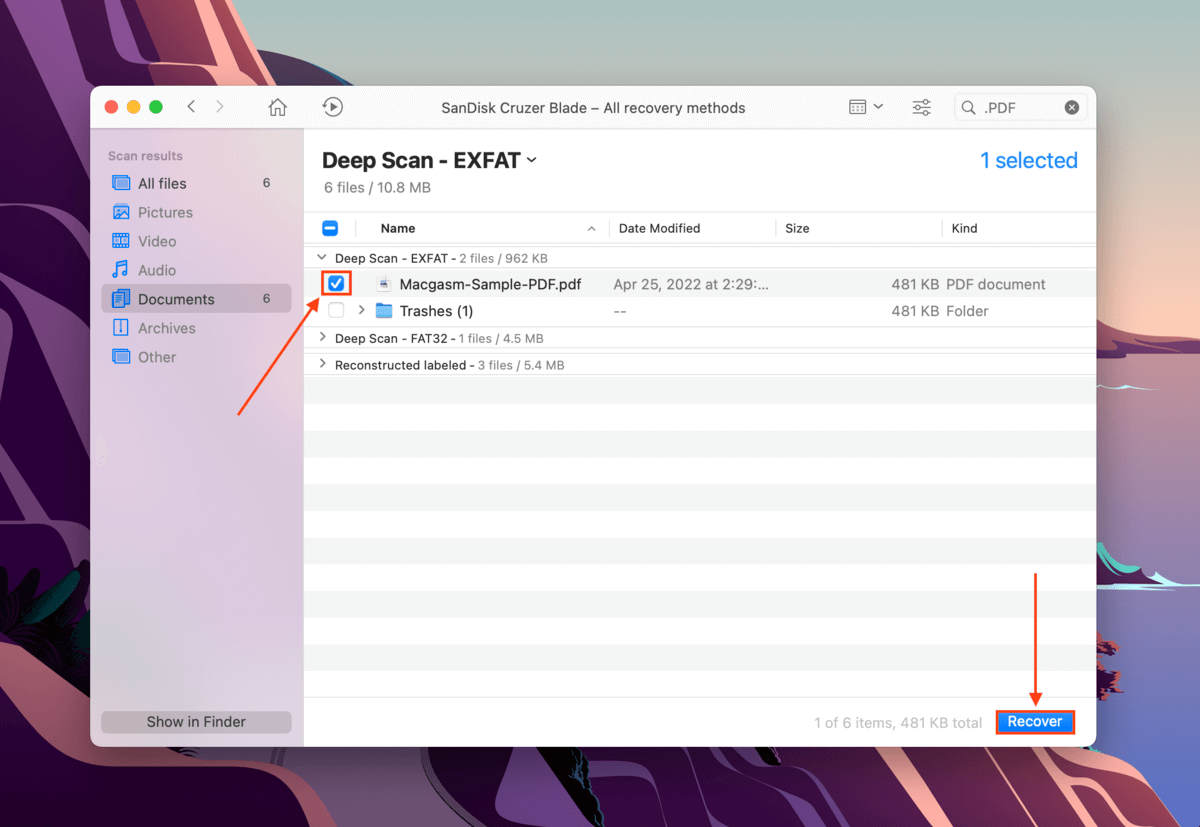
Step 7.Select a location on your non-malfunctioning drive to save the recovered files. Then, click OK.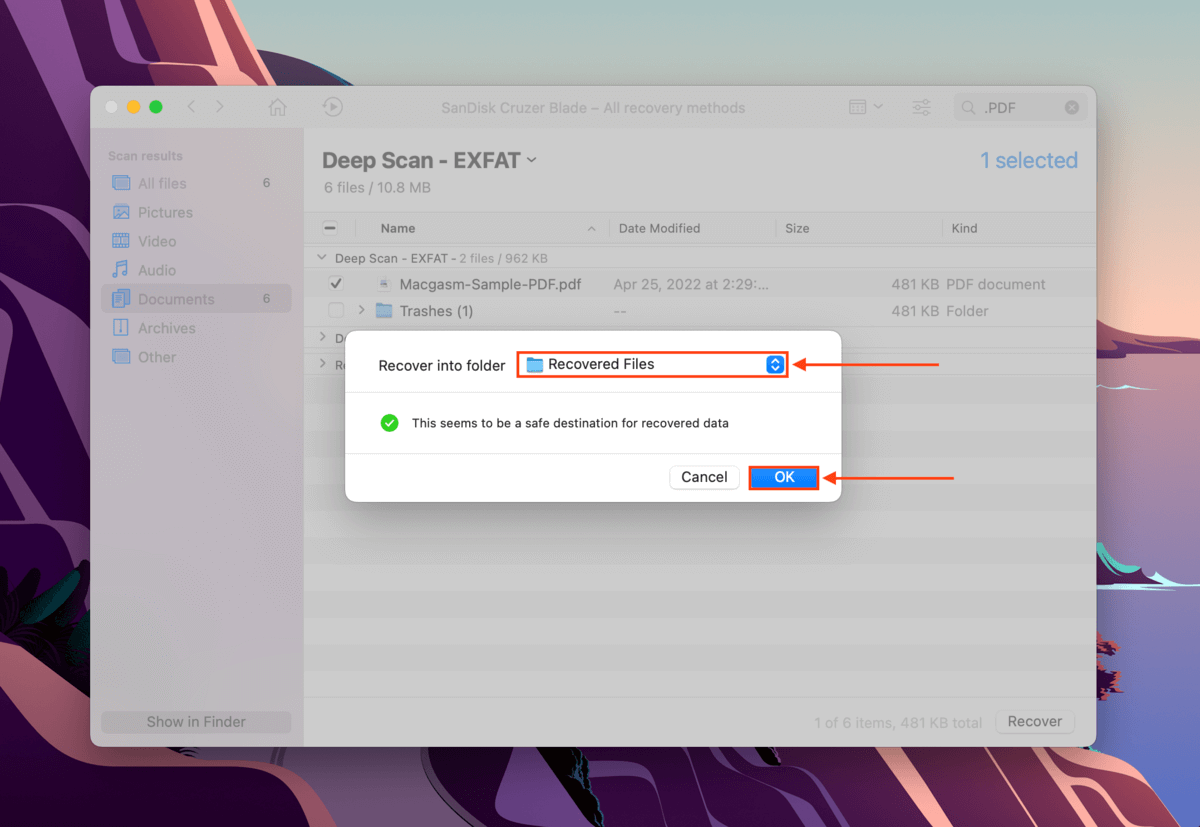
Conclusion
Bluntly, disk utility errors are inevitable. Buggy system updates, improper ejection, power surges, and other factors beyond the user’s control can cause one or multiple disk errors. Not only can these errors cause data loss by themselves, but the process of actually fixing them can also harm your files. The best you can do is to routinely back up your files to avoid the worst consequences of these errors.
Содержание
- Вставленный Вами диск не может быть прочитан на этом компьютере — как действовать в этом случае
- Дисковая утилита для macOS 10.11 и более поздних версий: ошибки и вопросы
- How to Fix com.apple.DiskManagement.disenter Error -119930868
- What is Com.apple.DiskManagement.disenter Error -119930868?
- What Causes Com.apple.DiskManagement.disenter Error -119930868?
- How to Solve com.apple.DiskManagement.disenter Error -119930868
- Fix #1: Change macOS Settings.
- Fix #2: Reset Mac Firmware Settings.
- Fix #3: Repair Disk with Disk Utility.
- Fix #4: Fix Macintosh HD via Terminal.
- Fix #5: Restore from a Time Machine Backup.
Вставленный Вами диск не может быть прочитан на этом компьютере — как действовать в этом случае
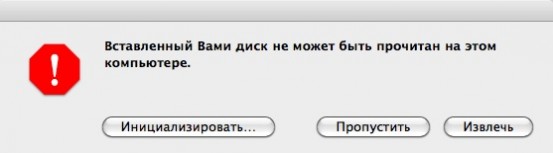
Окно выше — пожалуй, самое неприятное сообщение об ошибке, которое только может увидеть пользователь Mac OS X. Как правило, оно появляется при монтировании флешки или внешнего диска и означает, что носитель приказал долго жить. Но ещё хуже, если вы увидите это сообщение без подключённых флешек. Тогда оно будет означать, что вы лишились одного из жёстких дисков.
Впрочем, в панике восстанавливать информацию из Time Machine (конечно, если у вас есть бэкап) не стоит. У сообщения «Вставленный Вами диск не может быть прочитан на этом компьютере» может быть как минимум две категории причин:
- диск физически неисправен или находится на грани умирания
- диск исправен, но испорчена таблица разделов, поэтому система не может с ним взаимодействовать
В первом случае мало что поможет (разве что специализированные утилиты восстановления данных типа R-Studio). Но во втором случае сдаваться категорически не стоит.
Во-первых, надо проверить, в каком состоянии находится диск. Нажмите в окошке с ошибкой кнопку «Инициализировать», а потом запустите на Маке Дисковую утилиту. Слева посмотрите, как отображается ваш диск:
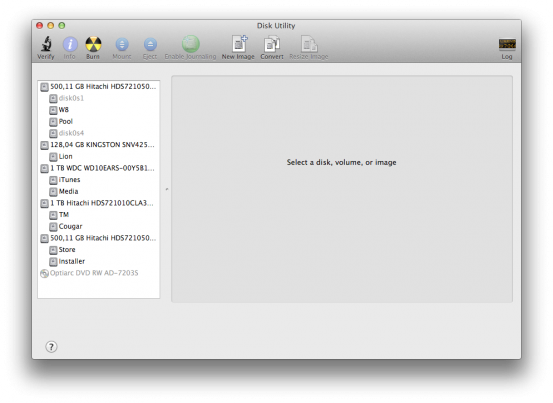
Возможны следующие варианты:
- видно только название раздела, но не видны разделы. Это хуже всего, в этом случае шансов на благополучный исход мало
- видны разделы, но все они показаны серым и не хотят монтироваться при их выборе и нажатии на кнопку «Монтировать» (Mount) на панели инструментов. Это уже лучше
- видны разделы, и некоторые из них монтируются, а некоторые — нет
Второй и третий варианты означают, что испорчена таблица разделов диска. Способов её испортить — масса. Например, это может произойти при неудачном завершении Дисковой утилиты или Ассистента Boot Camp при разбиении диска, изменении разделов, их добавлении и удалении. Ещё одна возможная причина — неудачное отключение питания при загрузке или завершении работы компьютера. Ну а на хакинтошах самая частая причина — неудачные попытки поставить Windows на GPT-диск через утилиту gptsync.
Важно: не нажимайте в Дисковой утилите на кнопку «Исправить диск»! Она может вам так его поправить, что потом не помогут даже специализированные программы!
Что делать? Всё зависит от того, в какой схеме разделов размечен диск. Не путайте разметку диска с файловой системой диска! Файловая система — это способ размещения файлов на разделе диска. А разметка — это способ размещения самих разделов на диске. На Маке чаще всего встречаются:
- разметка GPT (GUID Partition Table) — используется по умолчанию
- разметка MBR (Master Boot Record) — является стандартом на PC-компьютерах, но совместима и с Маком
Разметка GPT хороша тем, что в ней драгоценная информация о состоянии разделов диска прописывается дважды — в начале и в конце диска. Если запись в начале будет повреждена, у вас будет шанс восстановить таблицу разделов с конца диска.
Для этого запустите Терминал и вводите команды:
Затем введите пароль от аккаунта вслепую и нажмите Enter.
Вы увидите список всех дисков компьютера:
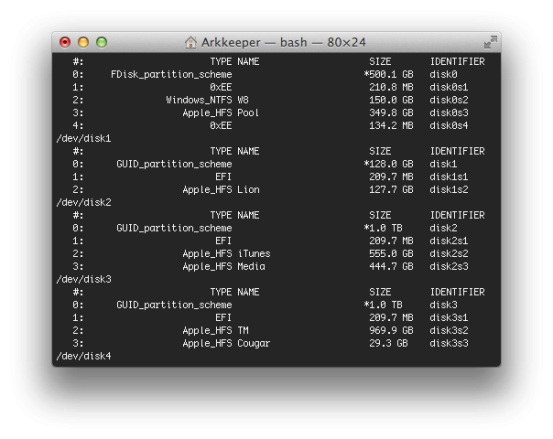
Найдите здесь номер нужного диска (например, disk2). Трижды проверьте, что это именно тот диск, иначе может стать ещё хуже. Если на исправляемом диске есть подключённые разделы, их нужно отключить (тоже через Дисковую утилиту, кнопкой «Размонтировать» / Unmount).
[php]gpt recover disk2[/php]
disk2 замените на верный идентификатор диска. Если вам повезёт, то диск вернётся в работоспособное состояние.
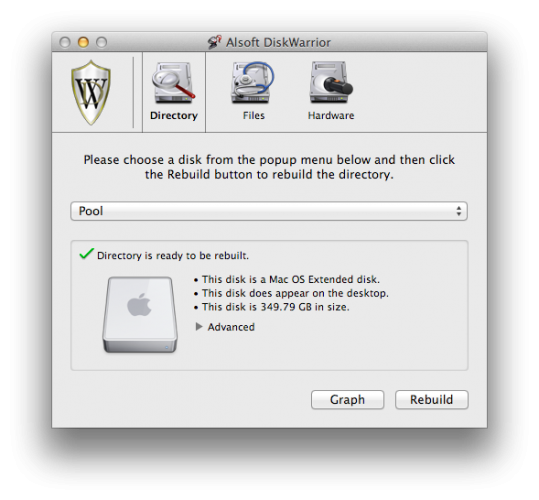
Если восстановление GPT не помогло или если у вас MBR-диск, вся надежда на сторонние инструменты восстановления. Мы бы посоветовали вам воспользоваться DiskWarrior. В списке разделов выберите нужный (если нет названия, опознайте его по размеру), а потом нажмите Rebuild.
И два совета напоследок:
- всегда пользуйтесь Time Machine
- всегда следуйте первому совету
Любому маководу желаем, чтобы описанные в этой статье действия ему никогда не пришлось бы выполнять 😉
Источник
Дисковая утилита для macOS 10.11 и более поздних версий: ошибки и вопросы
В этой статье рассматриваются распространенные вопросы и сообщения об ошибках, связанные с использованием приложения «Дисковая утилита». Данный список сообщений не является исчерпывающим, поэтому вашей ошибки здесь может не быть.
Эта статья предназначена для пользователей следующих версий macOS:
- macOS 10.15 (Catalina);
- macOS 10.14 (Mojave);
- macOS 10.13 (High Sierra);
- macOS 10.12 (Sierra);
- macOS 10.11 (El Capitan).
Не знаете, какая у вас версия? Проверьте.
Примечание. При переформатировании все данные с накопителя удаляются, поэтому нужную информацию следует предварительно скопировать на другой диск.
Если у вас macOS 10.13 (High Sierra) или более поздней версии, обязательно смените режим просмотра в Дисковой утилите. Нажмите «Вид» и выберите вместо стандартного режима «Показывать только тома» опцию Показывать все устройства. В версиях 10.11 и 10.12 эта опция недоступна.

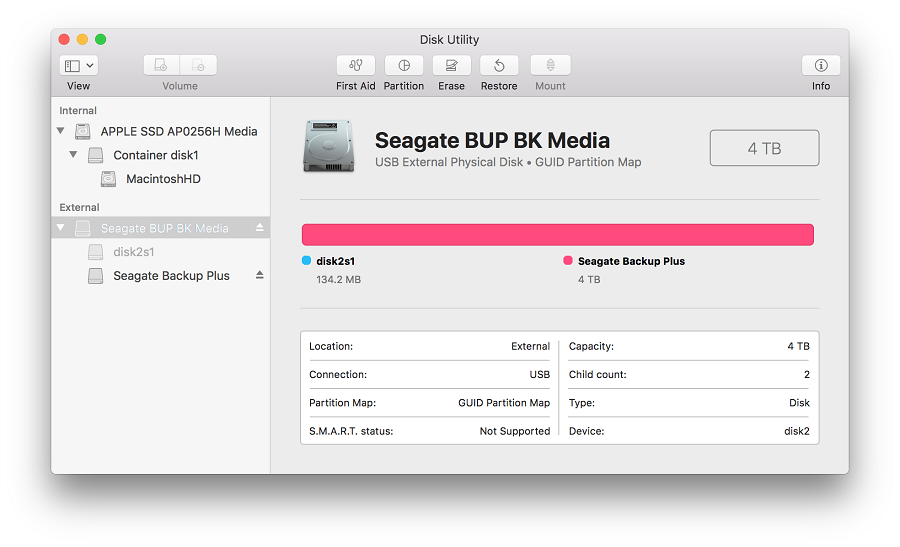
Вашему накопителю в Дисковой утилите будут соответствовать две или три записи. Это зависит от того, как он отформатирован. Запись верхнего уровня (без отступа) обозначает физический накопитель. Как правило, его название содержит слово «Носитель» или Media. Прямо под ней находятся дочерние записи с отступами — они соответствуют томам (разделам).

Это нужно знать на случай, если вам понадобится стереть с накопителя данные. Доступные варианты будут зависеть от того, какую запись вы выберете — для всего накопителя или для отдельного тома. Поэтому при форматировании важно выбирать запись верхнего уровня (без отступа).
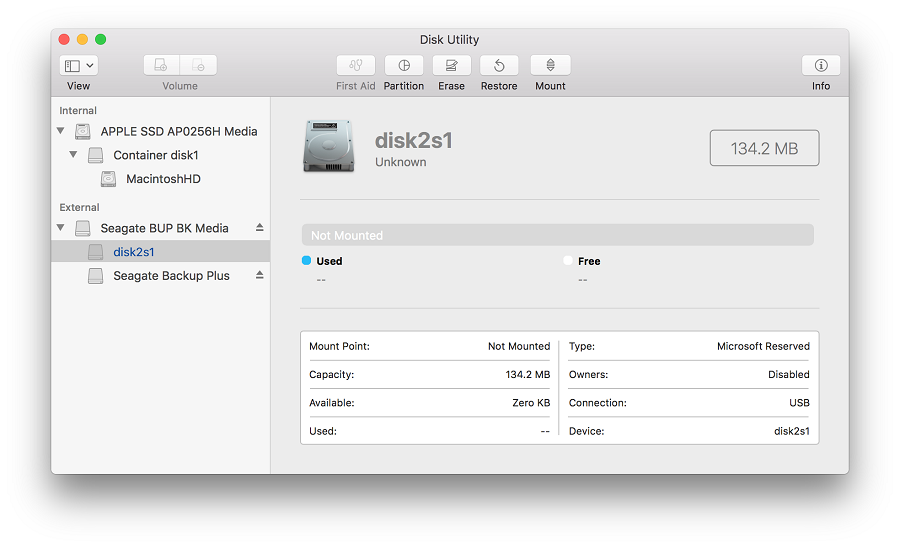
Откуда на накопителе взялся том размером 134,2 МБ?
Он отображается, потому что ваш накопитель настроен для ОС Windows с использованием схемы разделов GUID и файловой системы NTFS. В Дисковой утилите тип этого тома обозначается как Зарезервировано Microsoft. Это нормально для накопителей, отформатированных в NTFS. Технические подробности см. в документации Microsoft. Если вы собираетесь использовать накопитель только с Mac, рекомендуем его переформатировать. Если же вы планируете подключать его и к компьютерам с ОС Windows, ничего делать не нужно.
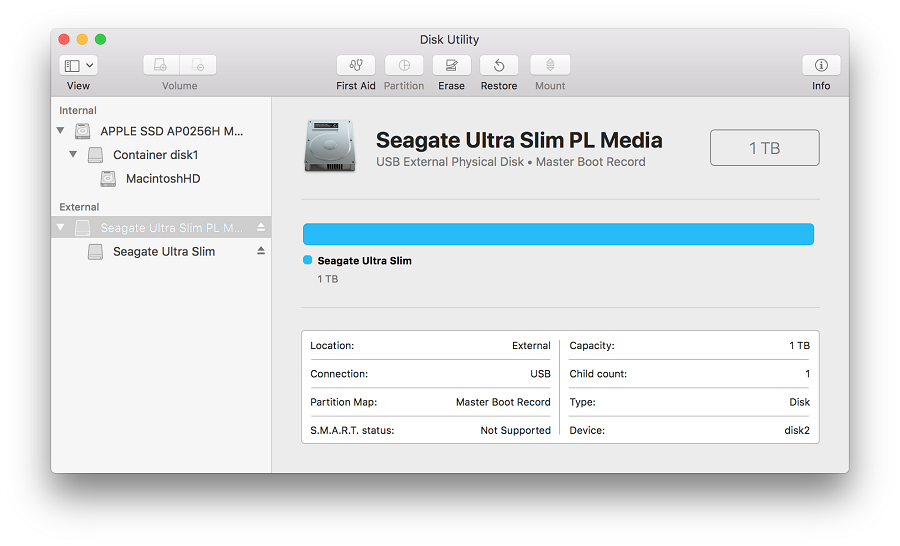
Почему кнопка «Разбить на разделы» неактивна?
Эта проблема появилась в macOS 10.11 (El Capitan) и свойственна всем более поздним версиям macOS. Кнопка неактивна, потому что на накопителе используется главная загрузочная запись (MBR), которая обычно применяется на дисках емкостью до 3 ТБ. Если навести курсор мыши на кнопку «Разбить на разделы», появится подсказка от Apple с соответствующей информацией.

Чтобы решить проблему, отформатируйте накопитель с использованием схемы разделов GUID. Если накопитель планируется использовать только с компьютерами Mac, выберите специализированный формат для macOS — например, Mac OS Extended (журналируемая) или APFS. Если же вы планируете подключать накопитель и к компьютерам с ОС Windows, задайте формат exFAT.
Если накопитель будет использоваться и с macOS, и с Windows, сделайте резервную копию всех важных данных с него и отформатируйте его в exFAT под macOS. Как отформатировать накопитель в exFAT…
Если вы планируете использовать накопитель только в macOS, отформатируйте его в Mac OS Extended (журналируемая). Этот формат оптимизирован специально для устройств Apple. По-другому он называется HFS+. Как отформатировать накопитель в HFS+…
Ошибка: MediaKit сообщает, что на устройстве недостаточно свободного места
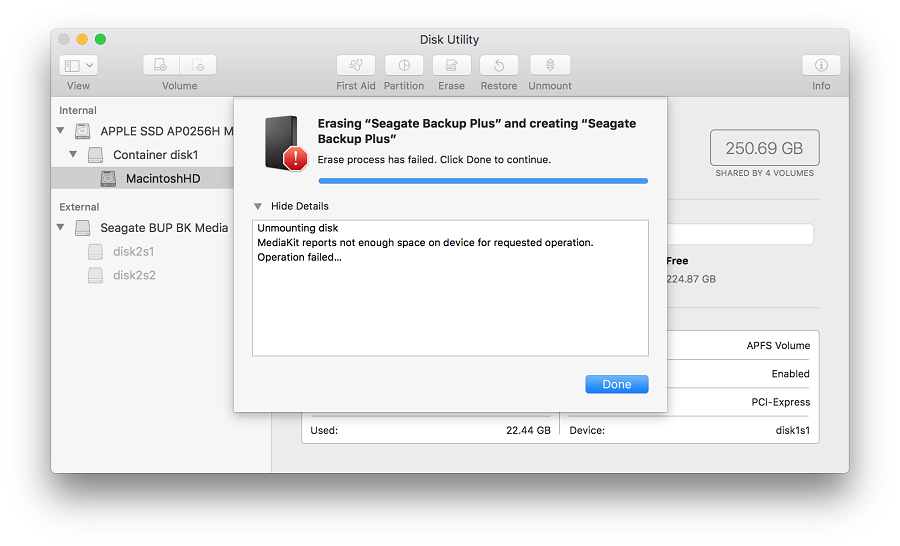
Такая ошибка может возникать при стирании данных и разбиении на разделы. Это происходит, потому что ОС пытается использовать том «Зарезервировано Microsoft» емкостью 134,2 МБ для тома EFI, минимальный размер которого — 200 МБ. Технические подробности см. в документации Apple.
Эту проблему можно решить разными способами, но проще всего отформатировать накопитель с использованием схемы разделов GUID. Тогда Дисковая утилита сможет создать на нем собственные тома. Если этот вариант недоступен, включите режим просмотра Показывать все устройства вверху слева (см. начало этой статьи).
Если накопитель будет использоваться и с macOS, и с Windows, сделайте резервную копию всех важных данных с него и отформатируйте его в exFAT под macOS. Как отформатировать накопитель в exFAT…
Если вы планируете использовать накопитель только в macOS, отформатируйте его в Mac OS Extended (журналируемая). Этот формат оптимизирован специально для устройств Apple. По-другому он называется HFS+. Как отформатировать накопитель в HFS+…
Ошибка: не удалось отключить диск
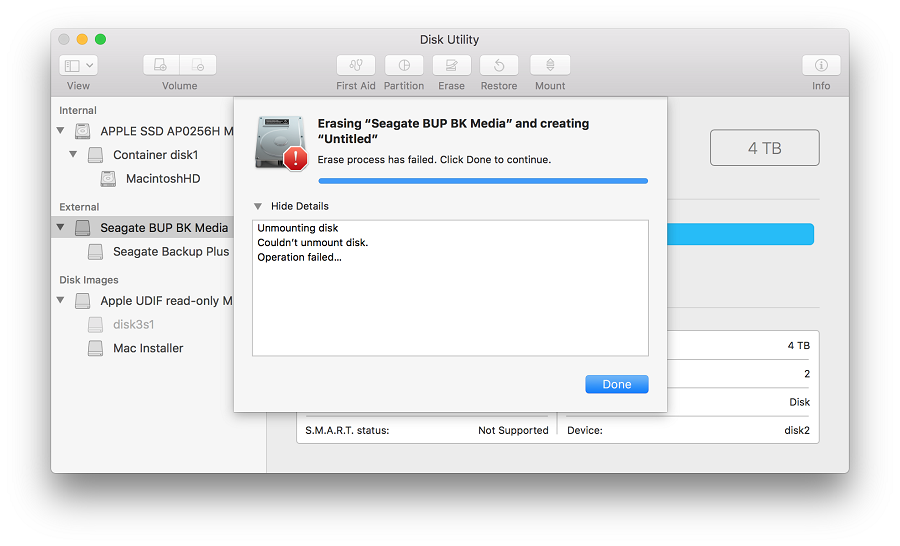
Такая ошибка может возникать по ряду причин. Это происходит, если накопитель занят — например, когда на нем открыт образ диска. В таком случае извлеките образ и еще раз попробуйте отформатировать диск.
Если вы считаете, что диск не занят никаким процессом, просто запустите форматирование еще раз. Если это не поможет, выделите том и нажмите «Отключить». После этого мешающий процесс должен завершиться.
Если и это не поможет, выключите компьютер, отключите накопитель и перезагрузите компьютер. Когда ОС загрузится, подключите накопитель и вновь попробуйте его отформатировать.
Ошибка: ошибка com.apple.DiskManagement.disenter 49223
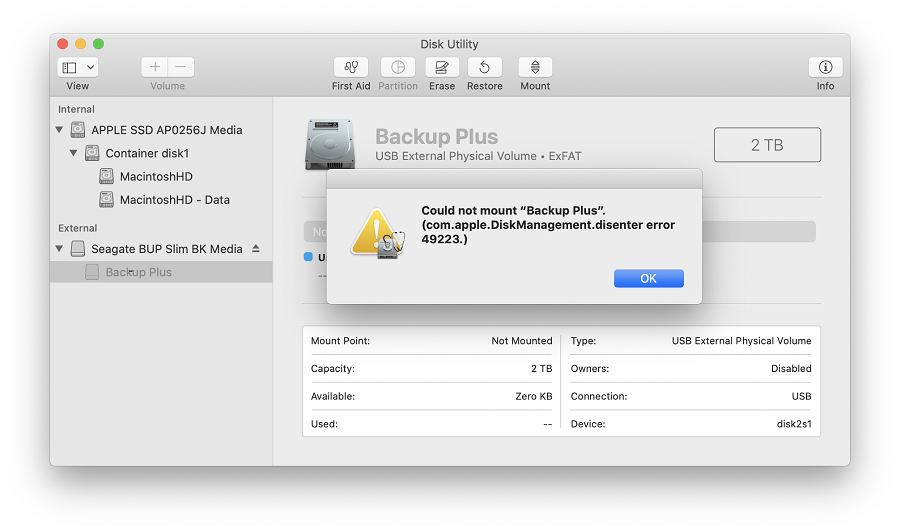
Такая ошибка случается с накопителями, отформатированными в exFAT. Если накопитель используется и с macOS, и с ОС Windows, его нужно форматировать только на компьютере с macOS. Дело в том, что она не поддерживает некоторые размеры кластеров (блоков), создаваемые при форматировании в ОС Windows. Из-за этого накопитель может не подключаться. Это сообщение об ошибке выводится, если попытаться вручную подключить накопитель в Дисковой утилите.
Если накопитель будет использоваться и с macOS, и с Windows, сделайте резервную копию всех важных данных с него и отформатируйте его в exFAT под macOS. Как отформатировать накопитель в exFAT…
Если вы планируете использовать накопитель только в macOS, отформатируйте его в Mac OS Extended (журналируемая). Этот формат оптимизирован специально для устройств Apple. По-другому он называется HFS+. Как отформатировать накопитель в HFS+…
Ошибка: ошибка com.apple.DiskManagement.disenter 49153
Такая ошибка характерна для внешних жестких дисков и некоторых других накопителей. Она возникает, если диск отформатирован в NTFS и для него используется драйвер Paragon. Обычно причина проблемы заключается именно в драйвере.
Чтобы решить проблему, удалите и заново установите драйвер Paragon. Как удалить драйвер Paragon… Если у вас macOS 10.13 (High Sierra) или более поздней версии, при установке обязательно выберите для расширения ядра опцию «Разрешить». Если кнопка «Разрешить» отсутствует, попробуйте смонтировать накопитель с помощью программного обеспечения Paragon и проверить, не выдается ли сообщение об ошибке. После этого кнопка «Разрешить» может появиться на панели «Защита и безопасность».
ПРИМЕЧАНИЕ. Версия Paragon для дисков Seagate несовместима с накопителями LaCie. Если вы используете полную версию Paragon, удалите и вновь установите ее, следуя инструкциям в Paragon.
Что делать, если решить проблему не удалось?
Если у вас есть доступ к другому компьютеру Mac, попробуйте подключить накопитель к нему и вновь запустить стирание данных.
Если у вас есть возможность воспользоваться другим компьютером с ОС Windows, подключите накопитель к этому компьютеру и отформатируйте его с помощью утилиты diskpart. Как пользоваться diskpart… Затем вновь подключите накопитель к компьютеру Mac и попробуйте стереть данные.
Источник
Download and try Outbyte MacAries right now to see what it can do for your Mac.
Developed for macOS
When your Macintosh HD (disk0s2) cannot be mounted in Disk Utility, it means that there is something wrong somewhere and your Mac won’t turn on. Several Mac users who have upgraded to macOS Big Sur have complained of getting the com.apple.DiskManagement.disenter error -119930868 when mounting their hard drives. Not being able to mount their drives means not being able to access that drive. This poses a huge issue especially for those who decided to install macOS on that drive.
com.apple.DiskManagement.disenter error -119930868 is not a new error because Mac users have also encountered this in earlier versions of macOS. However, the occurrence of this error this time means that it is related to the recent upgrade to macOS Big Sur.
What causes the com.apple.DiskManagement.disenter error -119930868 and how do you successfully mount your drive without getting this error? If you’re wondering about these questions, then read on to find out more.
When you connect an external hard drive on your Mac, it usually shows up on the Desktop, Finder, and Disk Utility. But there are times when the external drive doesn’t appear on any of these places and the data inside the unmounted external hard drive becomes inaccessible. When users encounter this issue, the easiest way to resolve this is by mounting the drive manually. Unfortunately, several users have reported getting the com.apple.DiskManagement.disenter error -119930868 whenever they try to mount the external drive using Disk Utility or the Terminal.
Pro Tip: Scan your Mac for performance issues, junk files, harmful apps, and security threats
that can cause system issues or slow performance.
In some cases, the drive is already mounted but not visible. In other instances, the disk error appears no matter what action the user is trying to perform on the drive — whether it’s formatting, mounting, or erasing.
The complete error message reads:
Could not mount “disk name”.
(com.apple.DiskManagement.disenter error -119930868)
If you can’t mount your hard drive and the com.apple.DiskManagement.disenter error -119930868 appears, it could be due to any of the following reasons:
- File system damage. File system is responsible for how data is organized and stored in a drive. If the file system of the Macintosh HD is corrupted, the master file table will be impacted in a direct manner so the Mac won’t mount the drive.
- Virus attacks. Perhaps, your Mac system or the Macintosh HD is attacked by virus or malware, resulting in data corruption. Then your Mac won’t mount the Macintosh HD, either.
- Catalog file corruption. Catalog files contain the record files of partitioned volumes. So if any catalog file becomes corrupt, the Mac won’t be able to get volume size location, description of volume content and other volume information, let alone mount the drive.
- Disk Utility failures The Macintosh HD not mounted issue may be caused by Disk Utility faults, too.
- System malfunctions. System malfunctions include machine malfunctions and operating system errors. If the Mac operating system crashes, it cannot mount any drive.
Before you proceed with fixing this error, here is a checklist you need to consider when connecting your hard drive:
- Reconnect the USB connector or adapter to fit the hard drive snugly.
- Connect the hard drive to a different USB port or a different Mac.
- Replace the USB cable or adapter in case you suspect it to be damaged.
- Connect to an external power source if the hard drive requires one.
- Check the LED light to ensure the storage device is powered on and working.
- Swap the hard drive with a different case if you presume it to be faulty.
It is also recommended that you run a scan of your computer using a reliable antivirus program to make sure that the error is not being caused by a malware infection.
Once you’ve gone through the checklist and the error still appears, then proceed with the steps below.
Fix #1: Change macOS Settings.
Ensure Finder’s preference to show external disks on Desktop or Finder is enabled. To do this:
- Open Finder from Dock. From the top Menu Bar, go to Finder > Preferences.
- On the Finder Preferences window, click the General tab.
- Under the Show these items on the Desktop section, select the External disks checkbox. Your Desktop will now show the external hard drive icon.
- Click the Sidebar tab. Under the Locations section, select the External disks checkbox. Your Finder sidebar will now show the external hard drive.
You also need to ensure Disk Utility’s View menu has the “Show All Devices” option selected.
- Press Command + Space Bar keys to open Spotlight.
- Type disk utility and hit Return to open Disk Utility.
- Click the View menu located at the top left corner of Disk Utility and select Show All Devices. Your Disk Utility’s sidebar should now show the external hard drive.
Fix #2: Reset Mac Firmware Settings.
To reset NVRAM (Non-volatile RAM) & PRAM (Parameter RAM):
- Restart Mac then immediately press and hold Option + Command + P + R keys until you hear a second chime.
- Reset SMC (System Management Controller) on your Mac by using the instructions below:
- For iMac, Mac Pro/mini, or laptop with a removable battery—detach the power cable or take out the battery then press and hold the Power button for 5 seconds.
- For MacBook Air, MacBook Pro, or MacBook with non-removable battery—press and hold Shift + Control + Option + Power Button for 10 seconds.
Fix #3: Repair Disk with Disk Utility.
If your Mac computer won’t boot, you can boot your Mac into macOS Recovery mode and then repair unmounted Macintosh HD (disk0s2).
Follow these steps to repair unmounted Macintosh with Disk Utility:
- Turn on your Mac by pressing the Power button.
- Press and hold down Command+R keys immediately upon hearing the startup chime. Hold down the keys until you see the Apple logo, a spinning globe or other startup screen. Startup is complete when you see the macOS Utilities window.
- Select Disk Utility and click Continue.
- Select the unmounted Macintosh HD (disk0s2) from the left sidebar of Disk Utility window.
- Click First Aid in the toolbar of the Disk Utility window.
- Click Run to check and repair file system errors.
- Wait until the procedure is completed. If you get a message saying success, restart your Mac and see if your Mac can be booted.
If a message says that the disk utility cannot repair the disk, go to the next solution.
Fix #4: Fix Macintosh HD via Terminal.
If Disk Utility stopped repairing Macintosh HD in macOS, you can then try to fix it with Terminal.
- Boot your Mac into Recovery Mode.
- Click Utilities from the menu bar and select Terminal from the drop-down list.
- Enter diskutil list. This will list out the available volumes.
- Check the volume identifier from the table that appears. (For example disk 2s1)
- Enter diskutil repairVolume/disk 2s1. (Replace disk 2s1 with the volume identifier of your Macintosh HD)
Fix #5: Restore from a Time Machine Backup.
If you have a Time Machine backup, you can restore the backup and fix unmounted Macintosh HD (disk0s2).
- Boot your Mac into macOS Recovery mode.
- Select Disk Utility and click Continue.
- Select Macintosh HD (disk0s2) and click Erase.
- Before erasing, make sure you don’t lose any data.
- Return to macOS Utilities window.
- Select Restore from Time Machine Backup and click Continue.
- Select your Time Machine backup disk as the restore source and then click Continue.
- Select a backup and then click Continue.
- Select the hard disk as the restore destination and then click Restore to continue.
- Restart your Mac computer when the restore is done.
Источник
Replies
Nevermind, figured it out myself
Arguably, «figured it out myself» is not a very helpful answer to a situation like this, as people looking for answers reach a dead end.
Anyways, if your disk happens to be ExFAT, and you remember improperly removing the disk the last time you used it, chances are, fsck is holding it hostage (metaphorically, of course). fsck is trying to repair the disk, but it will stall forever, so you want to launch Disk Utility, and the Terminal. Try to mount the disk, and switch to Terminal and write sudo pkill -f fsck. The disk will mount in read-only mode, and from there, you can repair it with First Aid in Disk Utility. This won’t work for non-ExFat drives, as macOS manages them differently.
This solved my problem thanks. Just a note to future users, the repair took a really long time for my 5TB drive. Be patient.
This happened for me on a Big Sur MacOS, clicking the ‘First Aid’ option in Disk Utility kept giving me this same error. What ended up working for me was restarting my laptop, then continuously trying ‘First Aid’ until one time it suddenly didn’t give me the error, and after waiting about 20minutes the drive mounted properly. I don’t think I did anything differently other than trying over and over again.
Thank you for posting the fix. It worked and saved my years of work
—
Vishnu
https://www.YinandYang.studio
Just to note to @jkrosado instructions: it worked with Mac OS Extended drive format too.
@jkrosado tysm!! it worked for me and saved me from panicking due to all my homework and software I need for my classes in that hard drive
This still isn’t working for me. I don’t understand what this «and the Terminal» means. When I try to mount my drive, the error that is the title of the forum comes up and it appears I am at a dead end. I tried to repair the drive, and it seemed to do something (with a bunch of green check marks) saying it was fixed, but it still won’t open or be recognized by my finder or desktop. If anyone is able to walk me through this, I would be very appreciative.
I also got this working on my HFS+ drive. Worked exactly the same as an ExFAT not sure what the technical background on this is but for those wondering.
Thanks @jkrosado
Your answer was helpful.
Drive should be ExFAT and it worked after killing process and first aid.
What about Mac OS Plus drives ? How can I solve it?
This article covers some of the common error messages and questions you might encounter while using Disk Utility. The following is not an exhaustive list of error messages, so you may not find your specific error here.
This article applies to the following versions of macOS:
- macOS 10.15 (Catalina)
- macOS 10.14 (Mojave)
- macOS 10.13 (High Sierra)
- macOS 10.12 (Sierra)
- macOS 10.11 (El Capitan)
Not sure what version you are using? Click here to determine your version of macOS.
Note: Reformatting the drive will erase all data on the drive, so you should copy any data you want off the drive prior to formatting.
If you are running macOS 10.13 (High Sierra) or later it is important to change the view in Disk Utility. Change the view to Show All Devices instead of the default which is Show Only Volumes. If you are running 10.12 or 10.11 this step is not required as the option is not available.

You should see at least two, sometimes three, entries for your drive depending on how it is formatted. The non-indented entry is the physical disk which typically has Media in the name. The indented entries directly below are the volumes (partitions).
This is important because when erasing the drive you will get different options depending on whether you have the volume or disk selected. Which is why selecting the non-indented entry is important when formatting the drive.
What is that 134.2 MB volume on the drive?
This volume exists because the drive is set up for Windows using GUID/ NTFS. It is shown as Microsoft Reserved in Disk Utility. This is typical and not an issue when using the drive as NTFS. For more technical information see Microsoft documentation — here. If you plan on using the drive for Mac only then you will want to erase the disk. If you will be going between Mac and Windows then there should be no issues.

Why is the partition button greyed out?
This was first seen in macOS 10.11 (El Capitan) and has continued. The button is greyed out because the drive is set up as MBR which is typically used for drives less than 3 TB. If you hover your mouse over the partition button you can see the tooltip provided by Apple.
To resolve this, you must first erase the disk and set the Scheme to GUID Partition Map. If you are using it for Mac only then select a format specifically for macOS. For example Mac OS Extended (Journaled) or APFS. If you need to go between Mac and Windows then you would want to select ExFAT.
If you are using this drive between macOS and Windows, back up any important data on the drive and reformat the drive ExFAT on macOS. Instructions for ExFAT formatting can be found here.
If you are using this drive for macOS only, then reformat the drive Mac OS Extended (Journaled) also referred to as HFS+ for best compatibility. Instructions for HFS+ formatting can be found here.
Error Message — MediaKit reports not enough space
This error can occur when either erasing or partitioning the disk. It’s caused by Apple trying to use the 134.2 MB Microsoft Reserved volume for their EFI volume. Apple requires at least 200 MB for this volume which is why this error occurs. For more technical information see Apple documentation — here.
There may be other ways to resolve this issue, but the easiest way is to erase the disk and set it up with a GUID scheme. This will allow Apple’s Disk Utility to create its own volumes. Remember if GUID is not an available option then Show All Devices in the upper left is not selected as shown in the beginning of the article.
If you are using this drive between macOS and Windows then back up any important data on the drive and reformat the drive ExFAT on macOS. Instructions for ExFAT formatting can be found here.
If you are using this drive for macOS only, then reformat the drive Mac OS Extended (Journaled) also referred to as HFS+ for best compatibility. Instructions for HFS+ formatting can be found here.
Error Message — Couldn’t unmount disk
This error can be caused for a few reasons. If you have something open on the drive like a Disk Image or if something else is keeping the drive busy, you may see this error. Eject the Disk Image and try formatting again.
If you believe there is nothing keeping the drive busy then simply try to format the drive again. If that does not work then highlight the volume and click unmount. With the volume unmounted it should allow the process to complete.
If that doesn’t resolve the issue then try shutting your computer down, then unplug the disk and reboot with the drive disconnected. Once rebooted, reconnect the drive and try to format the drive again.
Error Message — com.apple.DiskManagement.disenter error 49223

This error message has been seen with drives formatted ExFAT. When using a drive between macOS and Windows, drives should always be formatted on macOS because not all Windows allocation unit sizes (block sizes) are supported by macOS. An unsupported allocation unit size will keep the drive from mounting. This error will be displayed when trying to mount the drive manually with Disk Utility.
If you are using this drive between macOS and Windows, then back up any important data on the drive and reformat the drive ExFAT on macOS. Instructions for ExFAT formatting can be found here.
If you are using this drive for macOS only, then reformat the drive Mac OS Extended (Journaled) also referred to as HFS+ for best compatibility. Instructions for HFS+ formatting can be found here.
Error Message — com.apple.DiskManagement.disenter error 49153

This error has been seen with external hard drives as well has other media. This error may be seen when the external drive is formatted NTFS and using the Paragon driver software. If you are using the Paragon driver software then there may be an issue related to the software.
To resolve this issue, try uninstalling Paragon driver software and reinstall the software. Instructions for uninstalling Paragon can be found here. For customers using macOS 10.13 (High Sierra) or later, please make sure to ‘Allow’ the kernel extension during the installation process. If the ‘Allow’ button is not visible then try mounting the drive using the Paragon software to see if it provides an error message. This may cause the ‘Allow’ button to become visible in Security & Privacy.
NOTE: If you are using a LaCie drive the Seagate version of Paragon will not work with your drive. If you are using the full version of Paragon, uninstall and reinstall according to Paragon’s instructions.
What to do if nothing else is working?
If you have access to another Mac then try the Erase process there.
If you have access to a Windows machine then you can try to diskpart the drive there. Instructions for diskpart can be found — here. Then bring it back to your Mac and try to erase the drive again.
I am inserting external Drives but they are not showing up. I went to disk utility and I tried First Aid and then mounting and I keep on getting «could not mount «New Volume». (com.apple.diskmanagement.disenter [error -119930872.)]
error message. I tried it with multiple drives and in multiple user profiles on the same Mac. Any help is appreciated.

Thanks
Replies
I am having the same issue. I get the message: Could not mount “New Volume”. (com.apple.DiskManagement.disenter error -119930878.). It initially worked but when I moved some files from my machine to make room for Monterey update, I am getting this message. So many important files are in this drive and I haven’t seen anything that could be of help anywhere else. Let me know if you get it to work and I will if I do on my end.
Good luck!.
same issue here. Very problematic. I am certain it is not a problem with the hard drive. all 5 of my drives are doing the same thing — same error code. Just started recently. Apple broke something and needs to fix
Am seeing same issue when am trying to connect external hardisk, is there any resolution to this issue ? am on Mac Monterey version.
I got this error when trying to use a USB 3.1 HD plugged into a USB-C docking station on my MacBook Pro. When I tried on a Mac Mini with its own USB Type-A ports, the drive mounted happily. Makes me think the error could be a problem with the adapter.
The «fix» for me is log out the existing user and then log right back in, same user, no changes. The drives appear in finder and disk util and work as expected.
I spent an hour+ with Apple support and their answers were to «repair the drive», «run first aid», and «reinstall the OS». Starting in recovery mode, the drives show up and are mounted. As soon as I restart normally, the same issue…drives are unable to be mounted.
I am not sure why the process of logging out and back in and booting into recovery mode can’t illuminate what might be the issue.
Log out and back in…drives visible and usable. But every time you disconnect the drives you have to do the same thing in order to mount them.
I am inserting external Drives but they are not showing up. I went to disk utility and I tried First Aid and then mounting and I keep on getting «could not mount «New Volume». (com.apple.diskmanagement.disenter [error -119930872.)]
error message. I tried it with multiple drives and in multiple user profiles on the same Mac. Any help is appreciated.
Thanks
Replies
I am having the same issue. I get the message: Could not mount “New Volume”. (com.apple.DiskManagement.disenter error -119930878.). It initially worked but when I moved some files from my machine to make room for Monterey update, I am getting this message. So many important files are in this drive and I haven’t seen anything that could be of help anywhere else. Let me know if you get it to work and I will if I do on my end.
Good luck!.
same issue here. Very problematic. I am certain it is not a problem with the hard drive. all 5 of my drives are doing the same thing — same error code. Just started recently. Apple broke something and needs to fix
Am seeing same issue when am trying to connect external hardisk, is there any resolution to this issue ? am on Mac Monterey version.
I got this error when trying to use a USB 3.1 HD plugged into a USB-C docking station on my MacBook Pro. When I tried on a Mac Mini with its own USB Type-A ports, the drive mounted happily. Makes me think the error could be a problem with the adapter.
The «fix» for me is log out the existing user and then log right back in, same user, no changes. The drives appear in finder and disk util and work as expected.
I spent an hour+ with Apple support and their answers were to «repair the drive», «run first aid», and «reinstall the OS». Starting in recovery mode, the drives show up and are mounted. As soon as I restart normally, the same issue…drives are unable to be mounted.
I am not sure why the process of logging out and back in and booting into recovery mode can’t illuminate what might be the issue.
Log out and back in…drives visible and usable. But every time you disconnect the drives you have to do the same thing in order to mount them.