Если ваш Macintosh HD (disk0s2) не может быть смонтирован с помощью Дисковой утилиты, это означает, что где-то что-то не так и ваш Mac не включается. Несколько пользователей Mac, которые обновились до macOS Big Sur, жаловались на получение ошибки com.apple.DiskManagement.disenter -119930868 при установке своих жестких дисков. Невозможность смонтировать свои диски означает невозможность доступа к этому диску. Это создает огромную проблему, особенно для тех, кто решил установить macOS на этот диск.
com.apple.DiskManagement.disenter error -119930868 не является новой ошибкой, потому что пользователи Mac также сталкивались с ней в более ранних версиях macOS. Однако появление этой ошибки на этот раз означает, что она связана с недавним обновлением до macOS Big Sur.
Что вызывает ошибку com.apple.DiskManagement.disenter -119930868 и как успешно смонтировать ехать без этой ошибки? Если вас интересуют эти вопросы, читайте дальше, чтобы узнать больше.
Что такое Com.apple.DiskManagement.disenter Ошибка -119930868?
Когда вы подключаете внешний жесткий диск к Mac, он обычно отображается на рабочем столе, в Finder и в Дисковой утилите. Но бывают случаи, когда внешний диск не отображается ни в одном из этих мест, и данные на немонтируемом внешнем жестком диске становятся недоступными. Когда пользователи сталкиваются с этой проблемой, самый простой способ решить эту проблему — установить диск вручную. К сожалению, несколько пользователей сообщали об ошибке com.apple.DiskManagement.disenter -119930868 всякий раз, когда они пытались подключить внешний диск с помощью Дисковой утилиты или Терминала.
В некоторых случаях диск уже смонтирован, но невидимый. В других случаях ошибка диска появляется независимо от того, какое действие пользователь пытается выполнить с диском — будь то форматирование, монтирование или стирание.
Полное сообщение об ошибке гласит:
Не удалось смонтировать «имя диска».
(ошибка com.apple.DiskManagement.disenter -119930868)
Что вызывает ошибку Com.apple.DiskManagement.disenter -119930868?
Если не удается смонтировать жесткий диск и появляется ошибка com.apple.DiskManagement.disenter -119930868, это может быть вызвано одной из следующих причин:
- Повреждение файловой системы. Файловая система отвечает за организацию и хранение данных на диске. Если файловая система Macintosh HD повреждена, основная файловая таблица будет затронута напрямую, поэтому Mac не сможет подключить диск.
- Вирусные атаки. Возможно, ваша система Mac или Macintosh HD подверглась атаке вируса или вредоносного ПО, что привело к повреждению данных. Тогда ваш Mac также не сможет смонтировать Macintosh HD.
- Файл каталога поврежден. Файлы каталога содержат файлы записей разделенных томов. Таким образом, если какой-либо файл каталога окажется поврежденным, Mac не сможет получить местоположение размера тома, описание содержимого тома и другую информацию о томе, не говоря уже о монтировании диска.
- Сбои Дисковой утилиты. Проблема с подключением Macintosh HD также может быть вызвана сбоями Дисковой утилиты.
- Неисправности системы. К системным сбоям относятся сбои в работе машины и ошибки операционной системы. В случае сбоя операционной системы Mac она не может подключить ни один диск.
Как решить ошибку com.apple.DiskManagement.disenter -119930868
Прежде чем приступить к исправлению этой ошибки, вот контрольный список, который вы При подключении жесткого диска необходимо учитывать следующее:
- Повторно подключите разъем USB или адаптер, чтобы он плотно прилегал к жесткому диску.
- Подключите жесткий диск к другому USB-порту или другой Mac.
- Замените USB-кабель или адаптер, если вы подозреваете, что он поврежден.
- Подключите img к внешнему источнику питания, если он требуется для жесткого диска.
- Проверьте светодиод, чтобы убедиться, что устройство хранения включено и работает.
- Замените жесткий диск другим корпусом, если вы считаете, что он неисправен.
Также рекомендуется запустить сканирование вашего компьютера с помощью надежной антивирусной программы, чтобы убедиться, что ошибка не вызвана заражением вредоносным ПО.
После того, как вы выполнили контрольный список и ошибка по-прежнему появляется, затем выполните следующие действия.
Исправление №1: измените настройки macOS.
Убедитесь, что Finder предпочитает показывать внешние диски на рабочем столе или в Finder. Для этого:
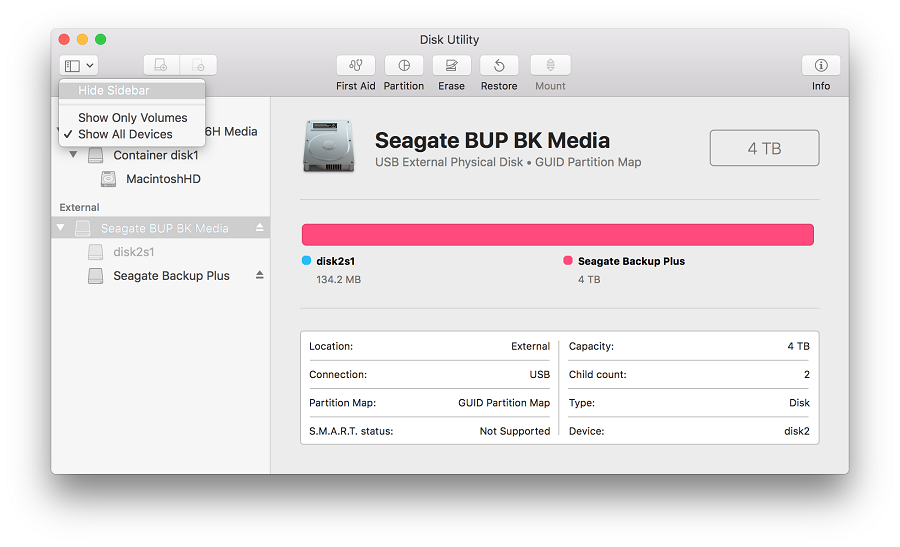
Вам также необходимо убедиться, что в меню View Disk Utility выбран параметр «Показать все устройства».
Исправление №2: сброс настроек прошивки Mac.
Чтобы сбросить NVRAM (энергонезависимую RAM) & amp; PRAM (ОЗУ параметров):
- Для iMac, Mac Pro / mini или ноутбука со съемным аккумулятором: отсоедините кабель питания или выньте аккумулятор, затем нажмите и удерживайте кнопку питания в течение 5 секунд.
- Для MacBook Air, MacBook Pro или MacBook с несъемным аккумулятором: нажмите и удерживайте кнопку Shift + Control + Option + Power . в течение 10 секунд.
Исправление №3: Восстановите диск с помощью Дисковой утилиты.
Если ваш компьютер Mac не загружается, вы можете загрузить Mac в режиме восстановления macOS, а затем восстановить размонтированный Macintosh HD (disk0s2).
Выполните следующие действия, чтобы восстановить размонтированный Macintosh с помощью Дисковой утилиты:
Если в сообщении говорится, что дисковая утилита не может восстановить диск, перейдите к следующему решению.
Исправление №4: исправить Macintosh HD через терминал.
Если Дисковая утилита перестала восстанавливать Macintosh HD в macOS, вы можете попытаться исправить это с помощью терминала.
Исправление №5: Восстановление из резервной копии Time Machine.
Если у вас есть резервная копия Time Machine, вы можете восстановить резервную копию и исправить отключенный Macintosh HD ( disk0s2).
Если все остальное не поможет , сотрите диск и переустановите macOS.
Если нет важных данных или вы успешно восстановили потерянные данные, вы можете стереть диск и переустановить macOS, используя режим восстановления. Выберите Дисковую утилиту, выберите свой диск и сотрите его. Вернитесь в главное окно и нажмите «Переустановить macOS». Имейте в виду, что это должен быть ваш последний вариант. Надеюсь, это должно устранить ошибку com.apple.DiskManagement.disenter -119930868 и решить проблему с диском.
YouTube видео: Как исправить ошибку com.apple.DiskManagement.disenter -119930868
02, 2023
When your Macintosh HD (disk0s2) cannot be mounted in Disk Utility, it means that there is something wrong somewhere and your Mac won’t turn on. Several Mac users who have upgraded to macOS Big Sur have complained of getting the com.apple.DiskManagement.disenter error -119930868 when mounting their hard drives. Not being able to mount their drives means not being able to access that drive. This poses a huge issue especially for those who decided to install macOS on that drive.
com.apple.DiskManagement.disenter error -119930868 is not a new error because Mac users have also encountered this in earlier versions of macOS. However, the occurrence of this error this time means that it is related to the recent upgrade to macOS Big Sur.
What causes the com.apple.DiskManagement.disenter error -119930868 and how do you successfully mount your drive without getting this error? If you’re wondering about these questions, then read on to find out more.
What is Com.apple.DiskManagement.disenter Error -119930868?
When you connect an external hard drive on your Mac, it usually shows up on the Desktop, Finder, and Disk Utility. But there are times when the external drive doesn’t appear on any of these places and the data inside the unmounted external hard drive becomes inaccessible. When users encounter this issue, the easiest way to resolve this is by mounting the drive manually. Unfortunately, several users have reported getting the com.apple.DiskManagement.disenter error -119930868 whenever they try to mount the external drive using Disk Utility or the Terminal.
In some cases, the drive is already mounted but not visible. In other instances, the disk error appears no matter what action the user is trying to perform on the drive — whether it’s formatting, mounting, or erasing.
The complete error message reads:
Could not mount “disk name”.
(com.apple.DiskManagement.disenter error -119930868)
What Causes Com.apple.DiskManagement.disenter Error -119930868?
If you can’t mount your hard drive and the com.apple.DiskManagement.disenter error -119930868 appears, it could be due to any of the following reasons:
- File system damage. File system is responsible for how data is organized and stored in a drive. If the file system of the Macintosh HD is corrupted, the master file table will be impacted in a direct manner so the Mac won’t mount the drive.
- Virus attacks. Perhaps, your Mac system or the Macintosh HD is attacked by virus or malware, resulting in data corruption. Then your Mac won’t mount the Macintosh HD, either.
- Catalog file corruption. Catalog files contain the record files of partitioned volumes. So if any catalog file becomes corrupt, the Mac won’t be able to get volume size location, description of volume content and other volume information, let alone mount the drive.
- Disk Utility failures The Macintosh HD not mounted issue may be caused by Disk Utility faults, too.
- System malfunctions. System malfunctions include machine malfunctions and operating system errors. If the Mac operating system crashes, it cannot mount any drive.
How to Solve com.apple.DiskManagement.disenter Error -119930868
Before you proceed with fixing this error, here is a checklist you need to consider when connecting your hard drive:
- Reconnect the USB connector or adapter to fit the hard drive snugly.
- Connect the hard drive to a different USB port or a different Mac.
- Replace the USB cable or adapter in case you suspect it to be damaged.
- Connect to an external power source if the hard drive requires one.
- Check the LED light to ensure the storage device is powered on and working.
- Swap the hard drive with a different case if you presume it to be faulty.
It is also recommended that you run a scan of your computer using a reliable antivirus program to make sure that the error is not being caused by a malware infection.
Once you’ve gone through the checklist and the error still appears, then proceed with the steps below.
Fix #1: Change macOS Settings.
Ensure Finder’s preference to show external disks on Desktop or Finder is enabled. To do this:
- Open Finder from Dock. From the top Menu Bar, go to Finder > Preferences.
- On the Finder Preferences window, click the General tab.
- Under the Show these items on the Desktop section, select the External disks checkbox. Your Desktop will now show the external hard drive icon.
- Click the Sidebar tab. Under the Locations section, select the External disks checkbox. Your Finder sidebar will now show the external hard drive.
You also need to ensure Disk Utility’s View menu has the “Show All Devices” option selected.
- Press Command + Space Bar keys to open Spotlight.
- Type disk utility and hit Return to open Disk Utility.
- Click the View menu located at the top left corner of Disk Utility and select Show All Devices. Your Disk Utility’s sidebar should now show the external hard drive.
Fix #2: Reset Mac Firmware Settings.
To reset NVRAM (Non-volatile RAM) & PRAM (Parameter RAM):
- Restart Mac then immediately press and hold Option + Command + P + R keys until you hear a second chime.
- Reset SMC (System Management Controller) on your Mac by using the instructions below:
- For iMac, Mac Pro/mini, or laptop with a removable battery—detach the power cable or take out the battery then press and hold the Power button for 5 seconds.
- For MacBook Air, MacBook Pro, or MacBook with non-removable battery—press and hold Shift + Control + Option + Power Button for 10 seconds.
Fix #3: Repair Disk with Disk Utility.
If your Mac computer won’t boot, you can boot your Mac into macOS Recovery mode and then repair unmounted Macintosh HD (disk0s2).
Follow these steps to repair unmounted Macintosh with Disk Utility:
- Turn on your Mac by pressing the Power button.
- Press and hold down Command+R keys immediately upon hearing the startup chime. Hold down the keys until you see the Apple logo, a spinning globe or other startup screen. Startup is complete when you see the macOS Utilities window.
- Select Disk Utility and click Continue.
- Select the unmounted Macintosh HD (disk0s2) from the left sidebar of Disk Utility window.
- Click First Aid in the toolbar of the Disk Utility window.
- Click Run to check and repair file system errors.
- Wait until the procedure is completed. If you get a message saying success, restart your Mac and see if your Mac can be booted.
If a message says that the disk utility cannot repair the disk, go to the next solution.
Fix #4: Fix Macintosh HD via Terminal.
If Disk Utility stopped repairing Macintosh HD in macOS, you can then try to fix it with Terminal.
- Boot your Mac into Recovery Mode.
- Click Utilities from the menu bar and select Terminal from the drop-down list.
- Enter diskutil list. This will list out the available volumes.
- Check the volume identifier from the table that appears. (For example disk 2s1)
- Enter diskutil repairVolume/disk 2s1. (Replace disk 2s1 with the volume identifier of your Macintosh HD)
Fix #5: Restore from a Time Machine Backup.
If you have a Time Machine backup, you can restore the backup and fix unmounted Macintosh HD (disk0s2).
- Boot your Mac into macOS Recovery mode.
- Select Disk Utility and click Continue.
- Select Macintosh HD (disk0s2) and click Erase.
- Before erasing, make sure you don’t lose any data.
- Return to macOS Utilities window.
- Select Restore from Time Machine Backup and click Continue.
- Select your Time Machine backup disk as the restore source and then click Continue.
- Select a backup and then click Continue.
- Select the hard disk as the restore destination and then click Restore to continue.
- Restart your Mac computer when the restore is done.
If all else fails, erase the drive and reinstall macOS.
If there is no important data or you have recovered lost data successfully, you can erase the drive and reinstall macOS instead using Recovery mode. Choose Disk Utility, select your drive and erase it. Go back to the main window and click Reinstall macOS. Keep in mind that this should be your last option. Hopefully this should resolve the com.apple.DiskManagement.disenter error -119930868 and fix your disk problem.
Vic is a certified gadget freak who feels the need to surround himself with cutting-edge technology. And this passion has helped him a lot in creating content that informs and guides users on using and troubleshooting the latest technology. He is an avid researcher who is always hungry for the latest news and updates on the most cutting-edge technology.
Vic is the one in charge of keeping our website running smoothly and efficiently, to make sure that our readers have a wonderful experience while visiting the website. He’s good at troubleshooting errors and fixing Windows issues that come up either when playing games or working on the computer.
В этом руководстве мы покажем вам различные способы исправления ошибки Diskmanagement.disenter с кодами ошибок 119930868, 119930872, 49218, 49223, 0 и т. д. Многие пользователи выразили обеспокоенность тем, что не могут подключить внешние жесткие диски к своему Mac. . Эта проблема не зависит от ОС, о ней сообщалось в Big Sur, Monterey и даже Ventura.
Всякий раз, когда они пытаются смонтировать диск с помощью Дисковой утилиты, они приветствовал с ошибкой Diskmanagement.disenter вместе с одним из следующих кодов ошибок 119930868, 119930872, 49218, 49223, 0 и т. д. Невозможность доступа пользователей к данным на отключенном внешнем жестком диске доставляет им массу неудобств. Если вы тоже находитесь в одной лодке, то это руководство поможет вам. Следите за исправлениями.
Рекомендуется попробовать каждый из нижеперечисленных обходных путей, а затем посмотреть, какой из них приводит к успеху. Итак, имея это в виду, давайте начнем. Droidwin и его участники не будут нести ответственность в случае термоядерной войны, если ваш будильник не разбудит вас, или если что-то случится с вашим Mac и данными, выполнив следующие шаги.
ИСПРАВЛЕНИЕ 1. Завершение процесса fsck
Одна из наиболее распространенных причин этой ошибки может быть связана с тем, что «fsck» может держать ее в заложниках. Поэтому вам придется убить этот процесс и повторить попытку монтирования диска. Вот как это можно сделать:
- Для начала запустите Терминал и Дисковую утилиту.
- Затем попробуйте смонтировать диск и сразу переключитесь на Терминал.
- Теперь выполните следующую команду в окне терминала: sudo pkill -f fsck
- Диск смонтируется в режиме только для чтения. Теперь вы можете восстановить его с помощью программы «Первая помощь» в Дисковой утилите.
- Ремонт займет время. После этого это должно исправить ошибку Diskmanagement.disenter.
ИСПРАВЛЕНИЕ 2: использование терминала
- Для начала загрузите Mac в режим восстановления, как указано ниже: Apple Silicon: нажмите и удерживайте кнопку питания, пока не появится «Загрузка параметров запуска». Затем выберите Функции > Продолжить. Intel: перезагрузите Mac и одновременно нажмите и удерживайте сочетание клавиш Command+R.
- Затем нажмите «Утилиты» и выберите «Терминал». Теперь введите следующую команду: diskutil list
- Появится список всех дисков. Запишите идентификатор тома вашего диска [such as disk3s1].
- Наконец, выполните приведенную ниже команду [replace diskX with your volume identifier].diskutil repairVolume/diskX
- Проверьте, исправляет ли он ошибку Diskmanagement.disenter 119930868, 119930872, 49218, 49223, 0.
ИСПРАВЛЕНИЕ 3. Изменение размера выделяемого диска
Некоторые старые Mac не смогут смонтировать диск, если размер выделения больше 1024. Поэтому, чтобы решить эту проблему, перейдите на компьютер с Windows или Linux (или используйте виртуальную машину) и переформатируйте диск в ExFAT и выберите 1024 как размер выделения. Теперь попробуйте установить его на свой Mac, и на этот раз вы не получите никаких кодов ошибок.
Вот и все. Это были три метода, которые должны помочь вам исправить ошибку Diskmanagement.disenter с кодами ошибок 119930868, 119930872, 49218, 49223, 0 и т. д. Если у вас есть какие-либо вопросы относительно вышеупомянутых шагов, сообщите нам об этом в комментариях. Мы вернемся к вам с решением в ближайшее время.
О главном редакторе
Looks like no one’s replied in a while. To start the conversation again, simply
ask a new question.
An external disk refuses to mount, com.apple.DiskManagement.disenter error -119930868.
What causes this particular error and what can I do to mount this drive or retrieve the data from it?
iMac Line (2012 and Later)
Posted on Oct 9, 2019 3:22 AM
Similar questions
-
External Disk Won’t Mount with Apple’s Big Sur Operating System
I get this error message: com.apple.DiskManagement.disenter error 49153
How can I resolve it?
1085
6
-
Could not mount “disk2s2”. (com.apple.DiskManagement.disenter error -119930868.)
Dear, I got this message trying to mount an MSDOS FAT32 external usb stick that has files I want to work on from a windows computer.
I also tried to look for similar issues but the error wasn’t even the same actually I could not find nowhere that error number.Why does not work?
what I need to do?
thanks806
2
-
can’t mount USB flash drive
how do i fix this error Could not mount “disk3s2”. (com.apple.DiskManagement.disenter error -119930868.) need a help pliz
138
1
7 replies
Question marked as
★
Helpful
Dec 16, 2019 2:10 AM in response to mhicks
Ok so its been a week since i pressed the «i have this problem too button»
i spent most of my days not being able to write on the disk only read it and last night i tried to repair the disk again in disk utility. it didnt seem to do anything but this morning i noticed it finished the process and i pressed mount and it worked.
Sharing & permissions changed to » you have custom access». what i want to say is ease us and tuxera didnt do anything or the western digital discovery. The only thing that worked was my patience.
Question marked as
★
Helpful
Oct 29, 2019 7:03 PM in response to mhicks
Open Activity monitor and forse quit there fsck_ext. Will solve issuer.
Question marked as
★
Helpful
Oct 19, 2019 6:53 AM in response to chuck_3rd
This doesn’t really help. I don’t want to lose all the info I have on my external drive. You’ve made it sound like it’s the drive issue but it’s really with how the new Catalina update is working to read these drives. Please provide a better fix. I need drive access without reformatting & it’s worked fine up till the latest update.
Question marked as
★
Helpful
Oct 23, 2019 11:36 AM in response to mhicks
On my system, I just have to wait for some time till I can mount my external drive (SD, for example).
Seems like Catalina runs fsck on them if they were not safely removed last time.
Drive mounts itself after it’s checked for errors. It just takes time.
Question marked as
★
Helpful
Oct 25, 2019 1:42 AM in response to chuck_3rd
I’m having a similar issue — «com.apple.DiskManagement.disenter error 0.» since the Catalina upgrade.
I’ve a partitioned 2Tb drive — half I drag & drop files to, the other half is for Time Machine. I have another disc that I use as a backup for the files/data but not as Time Machine.
My partition for dragging files into mounts but the Time Machine partition won’t. It wt was last seen in action trying to backup a few days ago but announced it had insufficient space.
An ideas?
I’ll also post on a Time Machine forum
Question marked as
★
Helpful
Oct 30, 2019 5:45 AM in response to mac1317
The only solution I could find was to install Tuxera. This suggestion was posted on a similar Q as the solution & it worked for me. Microsoft NTFS for Mac by Tuxera 2019
Question marked as
★
Helpful
Oct 19, 2019 6:52 PM in response to mhicks
I recently purchased a new IMac and upgraded it to Catalina. BIG mistake!! I have this same problem and it will not mount any external hard drives. These drives all still work fine on my old macBook running Mojave 10.14.1. This problem started when I Accidentally unplugged a drive and didn’t trash the icon first. Another problem is Disk Utility and some other programs will not respond to a QUIT command. The only way to get them to quit is to force quit them. I assume you will have a fix soon???
273 replies
Nov 12, 2019 9:29 AM in response to mhicks
Have the same issue with my external drive on my MacBook Pro
com.apple.DiskManagement.disenter error -119930868
The drive cannot be mounted in OS Catalina (10.15.1), drive is APFS 3TB HDD. Disk Utility shows it greyed out and if I try to mount it I get that error.
I tried to plug this drive in my friend’s iMac with Mojave 10.14.6- it works just fine! Does anyone know how to make it work with Catalina?
Nov 13, 2019 5:33 AM in response to roman127
This is really interesting..I did a bit of investigating myself. Seems like while Catalina starts, codes like «fsck -fy» would be running in the background to determine if a drive is mounting or not. I wonder if something is missing in those codes that disallowing some external disks be read (My HD is Seagate — 3TB — NTFS) or there is a link between Catalina’s security code that sends a signal to your antivirus software saying that, the drive is a virus and should not be mounted. I suspects that because I formatted my Mac and it was under OS X Lion, whenever I plugged my HD in, a window of my antivirus popped up and said «blocked autorun.inf because it was infected with INF: Autorun-BH(Wm)» and I am back to Catalina with the same computer, there is no message when I plug in my HD. Yet, my drive is grey out from the list. All of my other WD drives are ok in Catalina.
Nov 15, 2019 8:39 AM in response to mhicks
My Lacie 2TB portable hard drive suddenly couldn’t be mounted on my Macbook Pro (Running Catalina) after it shut down because of low battery power. When I restarted… nothing. I tried to mount it on my MacPro, (High Sierra), same thing and I freaked.
After reading here that all I had to do to restore it, is wait, I didn’t think it could be that easy… but it was. It took about an hour, leaving the drive connected before the computer could mount the drive. All is good.
Nov 15, 2019 9:33 AM in response to dhbaker
Now I wonder what affected that @dhbaker. I mean, one second it is working and after the update, it has to take an hour to recover the drive. I have a few 3TB drives and they are all mounted quickly (all WDs). I found out that Lacie is owned by Seagate and so they use Seagate’s drive. The drive I could not mount is a Seagate! coincident?
Nov 15, 2019 9:51 AM in response to BiilCanada
My drive is also Seagate! Probably it’s a Seagate thing? I tried to leave it over night- it didn’t mount ( other drives I have are WDs and they mount ok.
Nov 15, 2019 10:07 AM in response to roman127
@roman127 right…even though I called the apple support and they claimed it is something to do with my drive. They said they could send me to Seagate support. I didnt think it was anything to do with Seagate but I tried going through Seagate’s website. It looks like they have a data recovery app called pixel8 and it could read my drive, just wouldnt mount but it discovers the files I have in the drive. It will cost $99US for a year of subscription to recover my HD. I wonder why they came up with this software pixel8. I also found out that Seagate does not have a lot of support on Mac side. On PC side they have firmwares and softwares. So I am not sure what the problem between Seagate and Apple is, not supporting each other. For customers, we are in the middle and cant get our problems solved.
Nov 15, 2019 10:23 AM in response to BiilCanada
So I think I will also contact Apple Support regarding this issue. But I have really strong argument here- my Seagate drive mounts and works ok with Mojave, so they won’t be able to tell me that this is the problem with my drive.
Nov 15, 2019 5:01 PM in response to roman127
Excellent. Great idea @roman127. I need to reverse back to Mojave and see if it would work. It is a pain because I just got back to Catalina from X Lion. I think I will try a time machine method to backup this computer.
Nov 16, 2019 5:51 AM in response to roman127
The only solution I could find after much research was to download Tuxera. Now I can access my external drive quickly like before.
Nov 16, 2019 6:13 PM in response to BiilCanada
As unsettling as this is, it’s good to know it’s not just me having this issue.. hopefully at some point a fix can be found!
-Cleo
Nov 16, 2019 9:04 PM in response to Composercleo
Apple must fix this and soon or the future of OSX will be compromised.
Nov 20, 2019 2:44 PM in response to mhicks
OK, first off I’m quite a junior when it comes to Mac’s. However I got this issue resolved. I did the the convert to APFS system as it seemed to be the «smart» thing to do. However the drive showed out grey. I couldn’t mount or erase or restore, just nothing. I believed that in the conversion the drive would be partitioned. It was not. After a call to Apple Care they determined they didn’t know what the problem was either. After the call I tried the partition option. Problem fixed in 10 seconds. I don’t know if that’s the issue but it worked for me. Good luck!
Nov 22, 2019 4:25 AM in response to mac1317
That saved my bacon!! Thanks very much, worked like a charm
Nov 23, 2019 7:18 AM in response to BiilCanada
Running OS Catalina on a new MacBook Pro. I just had a drive fail on me (WD 2TB) after mounting quickly for the past 24 hrs. Did not eject it manually — literally the drive unmounted itself while I was adding a Word document to it for backup. Other drives I own work fine (WD and Seagate), I could open the drive great on a windows PC, and a recovery app found the documents while loaded onto the problem Mac. The fsck command was not running in background, per activity monitor. So now I’m recovering my recovery drive on a second backup until this temper tantrum fixes itself.
I don’t think it’s just a Seagate thing, this definitely seems like a Catalina thing.
An external disk refuses to mount, com.apple.DiskManagement.disenter error -119930868.
Содержание
- Вставленный Вами диск не может быть прочитан на этом компьютере — как действовать в этом случае
- Дисковая утилита для macOS 10.11 и более поздних версий: ошибки и вопросы
- How to Fix com.apple.DiskManagement.disenter Error -119930868
- What is Com.apple.DiskManagement.disenter Error -119930868?
- What Causes Com.apple.DiskManagement.disenter Error -119930868?
- How to Solve com.apple.DiskManagement.disenter Error -119930868
- Fix #1: Change macOS Settings.
- Fix #2: Reset Mac Firmware Settings.
- Fix #3: Repair Disk with Disk Utility.
- Fix #4: Fix Macintosh HD via Terminal.
- Fix #5: Restore from a Time Machine Backup.
Вставленный Вами диск не может быть прочитан на этом компьютере — как действовать в этом случае
Окно выше — пожалуй, самое неприятное сообщение об ошибке, которое только может увидеть пользователь Mac OS X. Как правило, оно появляется при монтировании флешки или внешнего диска и означает, что носитель приказал долго жить. Но ещё хуже, если вы увидите это сообщение без подключённых флешек. Тогда оно будет означать, что вы лишились одного из жёстких дисков.
Впрочем, в панике восстанавливать информацию из Time Machine (конечно, если у вас есть бэкап) не стоит. У сообщения «Вставленный Вами диск не может быть прочитан на этом компьютере» может быть как минимум две категории причин:
- диск физически неисправен или находится на грани умирания
- диск исправен, но испорчена таблица разделов, поэтому система не может с ним взаимодействовать
В первом случае мало что поможет (разве что специализированные утилиты восстановления данных типа R-Studio). Но во втором случае сдаваться категорически не стоит.
Во-первых, надо проверить, в каком состоянии находится диск. Нажмите в окошке с ошибкой кнопку «Инициализировать», а потом запустите на Маке Дисковую утилиту. Слева посмотрите, как отображается ваш диск:
Возможны следующие варианты:
- видно только название раздела, но не видны разделы. Это хуже всего, в этом случае шансов на благополучный исход мало
- видны разделы, но все они показаны серым и не хотят монтироваться при их выборе и нажатии на кнопку «Монтировать» (Mount) на панели инструментов. Это уже лучше
- видны разделы, и некоторые из них монтируются, а некоторые — нет
Второй и третий варианты означают, что испорчена таблица разделов диска. Способов её испортить — масса. Например, это может произойти при неудачном завершении Дисковой утилиты или Ассистента Boot Camp при разбиении диска, изменении разделов, их добавлении и удалении. Ещё одна возможная причина — неудачное отключение питания при загрузке или завершении работы компьютера. Ну а на хакинтошах самая частая причина — неудачные попытки поставить Windows на GPT-диск через утилиту gptsync.
Важно: не нажимайте в Дисковой утилите на кнопку «Исправить диск»! Она может вам так его поправить, что потом не помогут даже специализированные программы!
Что делать? Всё зависит от того, в какой схеме разделов размечен диск. Не путайте разметку диска с файловой системой диска! Файловая система — это способ размещения файлов на разделе диска. А разметка — это способ размещения самих разделов на диске. На Маке чаще всего встречаются:
- разметка GPT (GUID Partition Table) — используется по умолчанию
- разметка MBR (Master Boot Record) — является стандартом на PC-компьютерах, но совместима и с Маком
Разметка GPT хороша тем, что в ней драгоценная информация о состоянии разделов диска прописывается дважды — в начале и в конце диска. Если запись в начале будет повреждена, у вас будет шанс восстановить таблицу разделов с конца диска.
Для этого запустите Терминал и вводите команды:
Затем введите пароль от аккаунта вслепую и нажмите Enter.
Вы увидите список всех дисков компьютера:
Найдите здесь номер нужного диска (например, disk2). Трижды проверьте, что это именно тот диск, иначе может стать ещё хуже. Если на исправляемом диске есть подключённые разделы, их нужно отключить (тоже через Дисковую утилиту, кнопкой «Размонтировать» / Unmount).
[php]gpt recover disk2[/php]
disk2 замените на верный идентификатор диска. Если вам повезёт, то диск вернётся в работоспособное состояние.
Если восстановление GPT не помогло или если у вас MBR-диск, вся надежда на сторонние инструменты восстановления. Мы бы посоветовали вам воспользоваться DiskWarrior. В списке разделов выберите нужный (если нет названия, опознайте его по размеру), а потом нажмите Rebuild.
И два совета напоследок:
- всегда пользуйтесь Time Machine
- всегда следуйте первому совету
Любому маководу желаем, чтобы описанные в этой статье действия ему никогда не пришлось бы выполнять 😉
Источник
Дисковая утилита для macOS 10.11 и более поздних версий: ошибки и вопросы
В этой статье рассматриваются распространенные вопросы и сообщения об ошибках, связанные с использованием приложения «Дисковая утилита». Данный список сообщений не является исчерпывающим, поэтому вашей ошибки здесь может не быть.
Эта статья предназначена для пользователей следующих версий macOS:
- macOS 10.15 (Catalina);
- macOS 10.14 (Mojave);
- macOS 10.13 (High Sierra);
- macOS 10.12 (Sierra);
- macOS 10.11 (El Capitan).
Не знаете, какая у вас версия? Проверьте.
Примечание. При переформатировании все данные с накопителя удаляются, поэтому нужную информацию следует предварительно скопировать на другой диск.
Если у вас macOS 10.13 (High Sierra) или более поздней версии, обязательно смените режим просмотра в Дисковой утилите. Нажмите «Вид» и выберите вместо стандартного режима «Показывать только тома» опцию Показывать все устройства. В версиях 10.11 и 10.12 эта опция недоступна.
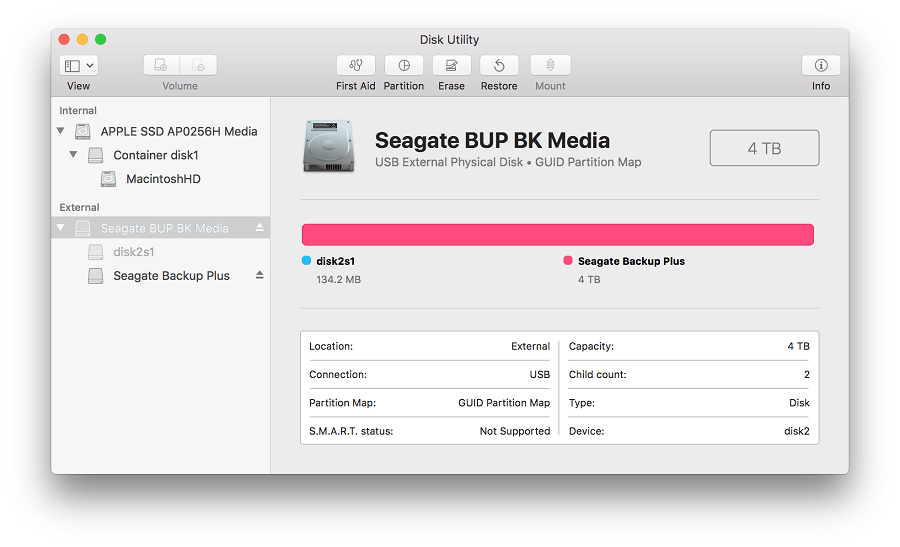
Вашему накопителю в Дисковой утилите будут соответствовать две или три записи. Это зависит от того, как он отформатирован. Запись верхнего уровня (без отступа) обозначает физический накопитель. Как правило, его название содержит слово «Носитель» или Media. Прямо под ней находятся дочерние записи с отступами — они соответствуют томам (разделам).
Это нужно знать на случай, если вам понадобится стереть с накопителя данные. Доступные варианты будут зависеть от того, какую запись вы выберете — для всего накопителя или для отдельного тома. Поэтому при форматировании важно выбирать запись верхнего уровня (без отступа).
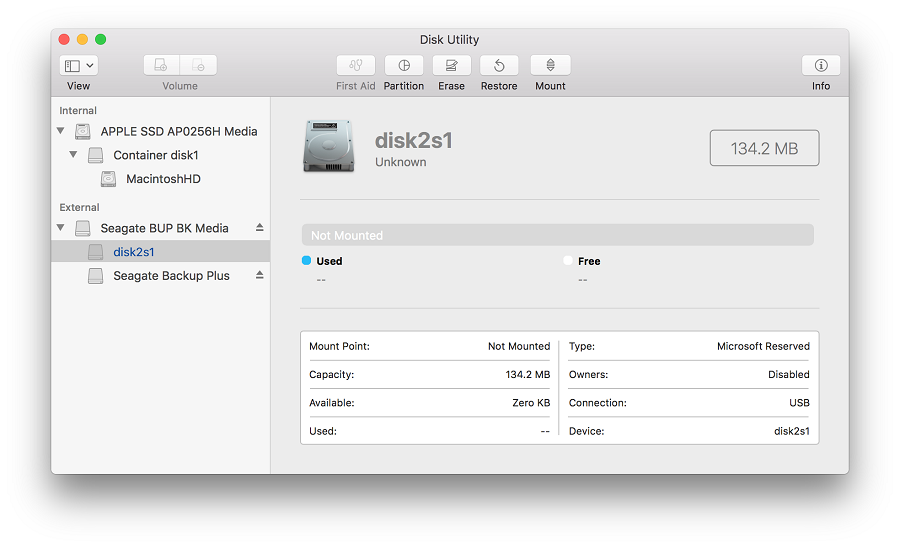
Откуда на накопителе взялся том размером 134,2 МБ?
Он отображается, потому что ваш накопитель настроен для ОС Windows с использованием схемы разделов GUID и файловой системы NTFS. В Дисковой утилите тип этого тома обозначается как Зарезервировано Microsoft. Это нормально для накопителей, отформатированных в NTFS. Технические подробности см. в документации Microsoft. Если вы собираетесь использовать накопитель только с Mac, рекомендуем его переформатировать. Если же вы планируете подключать его и к компьютерам с ОС Windows, ничего делать не нужно.
Почему кнопка «Разбить на разделы» неактивна?
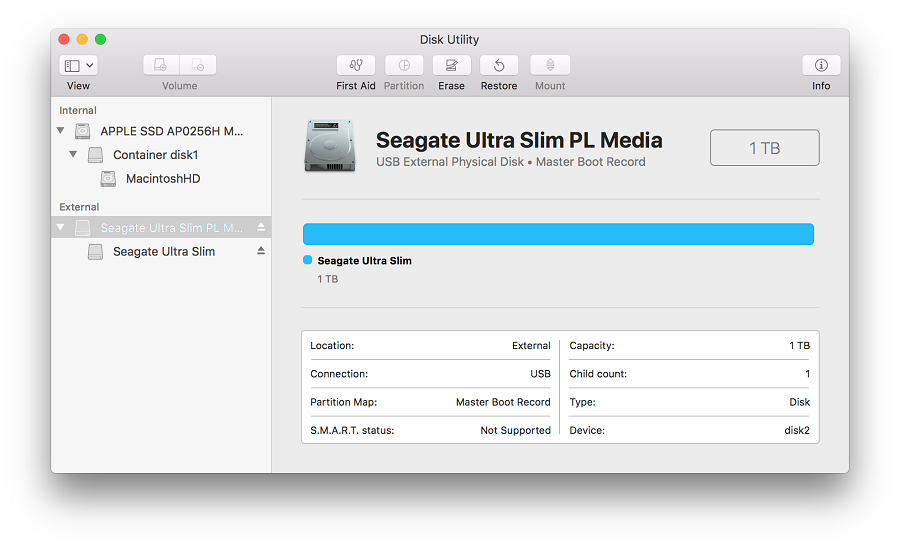
Эта проблема появилась в macOS 10.11 (El Capitan) и свойственна всем более поздним версиям macOS. Кнопка неактивна, потому что на накопителе используется главная загрузочная запись (MBR), которая обычно применяется на дисках емкостью до 3 ТБ. Если навести курсор мыши на кнопку «Разбить на разделы», появится подсказка от Apple с соответствующей информацией.
Чтобы решить проблему, отформатируйте накопитель с использованием схемы разделов GUID. Если накопитель планируется использовать только с компьютерами Mac, выберите специализированный формат для macOS — например, Mac OS Extended (журналируемая) или APFS. Если же вы планируете подключать накопитель и к компьютерам с ОС Windows, задайте формат exFAT.
Если накопитель будет использоваться и с macOS, и с Windows, сделайте резервную копию всех важных данных с него и отформатируйте его в exFAT под macOS. Как отформатировать накопитель в exFAT…
Если вы планируете использовать накопитель только в macOS, отформатируйте его в Mac OS Extended (журналируемая). Этот формат оптимизирован специально для устройств Apple. По-другому он называется HFS+. Как отформатировать накопитель в HFS+…
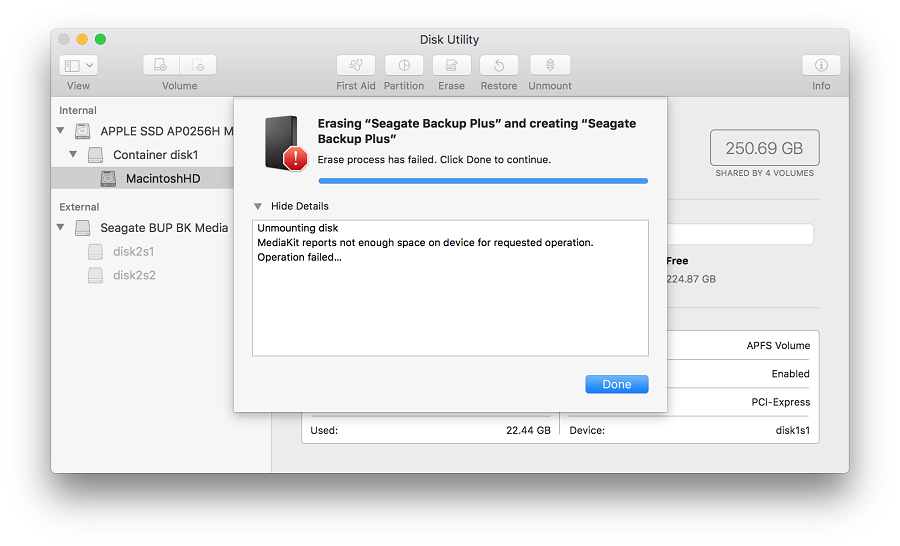
Ошибка: MediaKit сообщает, что на устройстве недостаточно свободного места
Такая ошибка может возникать при стирании данных и разбиении на разделы. Это происходит, потому что ОС пытается использовать том «Зарезервировано Microsoft» емкостью 134,2 МБ для тома EFI, минимальный размер которого — 200 МБ. Технические подробности см. в документации Apple.
Эту проблему можно решить разными способами, но проще всего отформатировать накопитель с использованием схемы разделов GUID. Тогда Дисковая утилита сможет создать на нем собственные тома. Если этот вариант недоступен, включите режим просмотра Показывать все устройства вверху слева (см. начало этой статьи).
Если накопитель будет использоваться и с macOS, и с Windows, сделайте резервную копию всех важных данных с него и отформатируйте его в exFAT под macOS. Как отформатировать накопитель в exFAT…
Если вы планируете использовать накопитель только в macOS, отформатируйте его в Mac OS Extended (журналируемая). Этот формат оптимизирован специально для устройств Apple. По-другому он называется HFS+. Как отформатировать накопитель в HFS+…
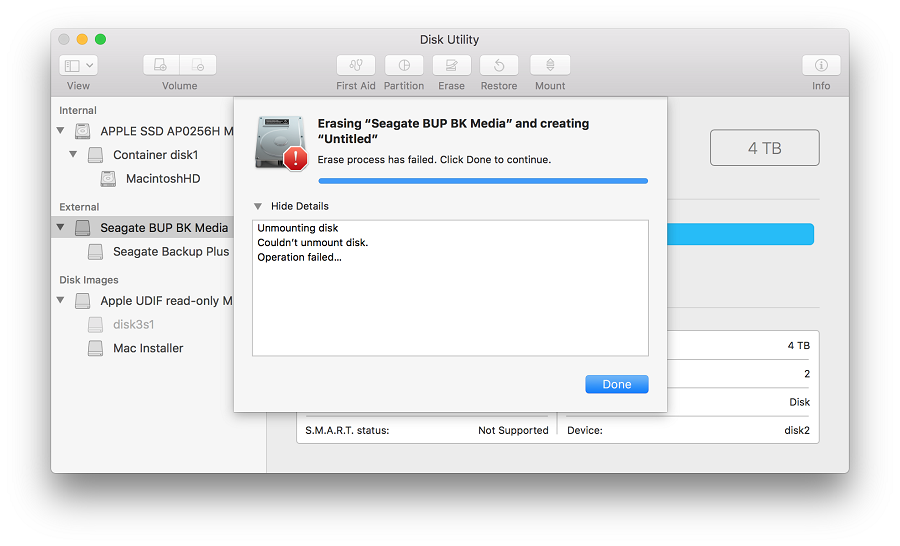
Ошибка: не удалось отключить диск
Такая ошибка может возникать по ряду причин. Это происходит, если накопитель занят — например, когда на нем открыт образ диска. В таком случае извлеките образ и еще раз попробуйте отформатировать диск.
Если вы считаете, что диск не занят никаким процессом, просто запустите форматирование еще раз. Если это не поможет, выделите том и нажмите «Отключить». После этого мешающий процесс должен завершиться.
Если и это не поможет, выключите компьютер, отключите накопитель и перезагрузите компьютер. Когда ОС загрузится, подключите накопитель и вновь попробуйте его отформатировать.
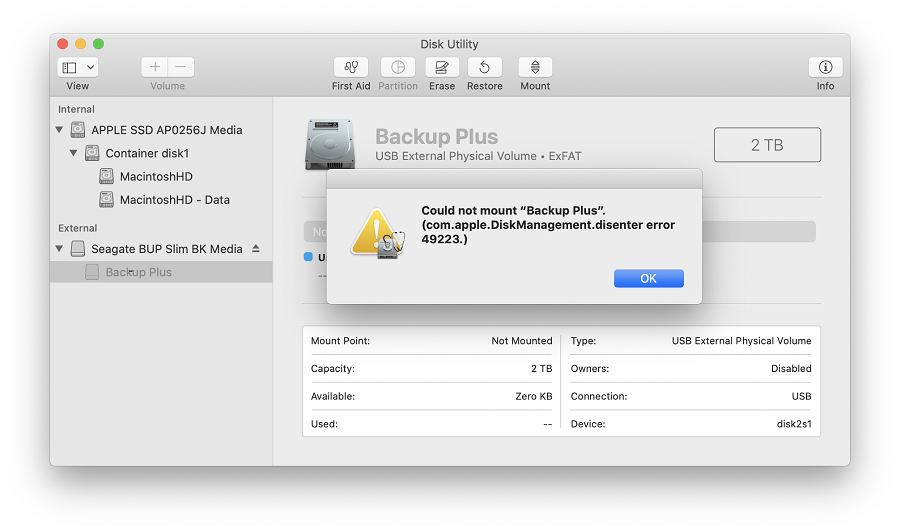
Ошибка: ошибка com.apple.DiskManagement.disenter 49223
Такая ошибка случается с накопителями, отформатированными в exFAT. Если накопитель используется и с macOS, и с ОС Windows, его нужно форматировать только на компьютере с macOS. Дело в том, что она не поддерживает некоторые размеры кластеров (блоков), создаваемые при форматировании в ОС Windows. Из-за этого накопитель может не подключаться. Это сообщение об ошибке выводится, если попытаться вручную подключить накопитель в Дисковой утилите.
Если накопитель будет использоваться и с macOS, и с Windows, сделайте резервную копию всех важных данных с него и отформатируйте его в exFAT под macOS. Как отформатировать накопитель в exFAT…
Если вы планируете использовать накопитель только в macOS, отформатируйте его в Mac OS Extended (журналируемая). Этот формат оптимизирован специально для устройств Apple. По-другому он называется HFS+. Как отформатировать накопитель в HFS+…
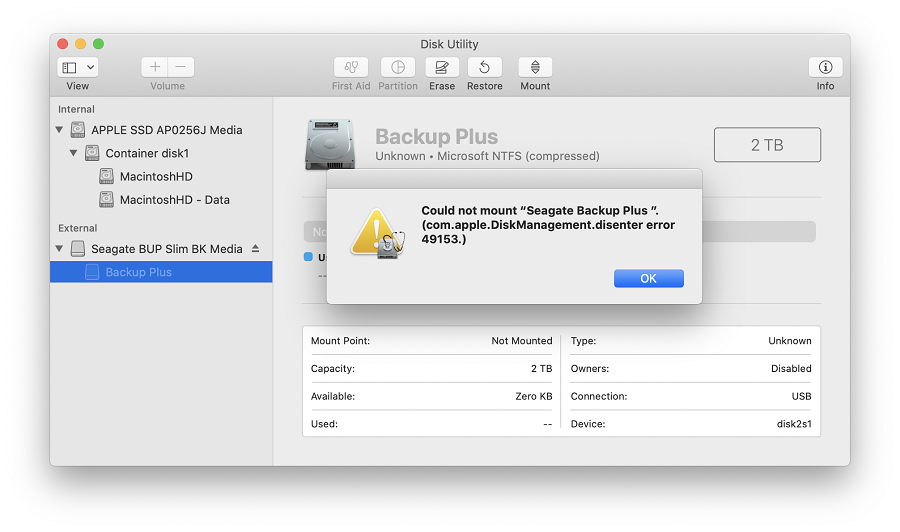
Ошибка: ошибка com.apple.DiskManagement.disenter 49153
Такая ошибка характерна для внешних жестких дисков и некоторых других накопителей. Она возникает, если диск отформатирован в NTFS и для него используется драйвер Paragon. Обычно причина проблемы заключается именно в драйвере.
Чтобы решить проблему, удалите и заново установите драйвер Paragon. Как удалить драйвер Paragon… Если у вас macOS 10.13 (High Sierra) или более поздней версии, при установке обязательно выберите для расширения ядра опцию «Разрешить». Если кнопка «Разрешить» отсутствует, попробуйте смонтировать накопитель с помощью программного обеспечения Paragon и проверить, не выдается ли сообщение об ошибке. После этого кнопка «Разрешить» может появиться на панели «Защита и безопасность».
ПРИМЕЧАНИЕ. Версия Paragon для дисков Seagate несовместима с накопителями LaCie. Если вы используете полную версию Paragon, удалите и вновь установите ее, следуя инструкциям в Paragon.
Что делать, если решить проблему не удалось?
Если у вас есть доступ к другому компьютеру Mac, попробуйте подключить накопитель к нему и вновь запустить стирание данных.
Если у вас есть возможность воспользоваться другим компьютером с ОС Windows, подключите накопитель к этому компьютеру и отформатируйте его с помощью утилиты diskpart. Как пользоваться diskpart… Затем вновь подключите накопитель к компьютеру Mac и попробуйте стереть данные.
Источник
Download and try Outbyte MacAries right now to see what it can do for your Mac.
Developed for macOS
When your Macintosh HD (disk0s2) cannot be mounted in Disk Utility, it means that there is something wrong somewhere and your Mac won’t turn on. Several Mac users who have upgraded to macOS Big Sur have complained of getting the com.apple.DiskManagement.disenter error -119930868 when mounting their hard drives. Not being able to mount their drives means not being able to access that drive. This poses a huge issue especially for those who decided to install macOS on that drive.
com.apple.DiskManagement.disenter error -119930868 is not a new error because Mac users have also encountered this in earlier versions of macOS. However, the occurrence of this error this time means that it is related to the recent upgrade to macOS Big Sur.
What causes the com.apple.DiskManagement.disenter error -119930868 and how do you successfully mount your drive without getting this error? If you’re wondering about these questions, then read on to find out more.
When you connect an external hard drive on your Mac, it usually shows up on the Desktop, Finder, and Disk Utility. But there are times when the external drive doesn’t appear on any of these places and the data inside the unmounted external hard drive becomes inaccessible. When users encounter this issue, the easiest way to resolve this is by mounting the drive manually. Unfortunately, several users have reported getting the com.apple.DiskManagement.disenter error -119930868 whenever they try to mount the external drive using Disk Utility or the Terminal.
Pro Tip: Scan your Mac for performance issues, junk files, harmful apps, and security threats
that can cause system issues or slow performance.
In some cases, the drive is already mounted but not visible. In other instances, the disk error appears no matter what action the user is trying to perform on the drive — whether it’s formatting, mounting, or erasing.
The complete error message reads:
Could not mount “disk name”.
(com.apple.DiskManagement.disenter error -119930868)
If you can’t mount your hard drive and the com.apple.DiskManagement.disenter error -119930868 appears, it could be due to any of the following reasons:
- File system damage. File system is responsible for how data is organized and stored in a drive. If the file system of the Macintosh HD is corrupted, the master file table will be impacted in a direct manner so the Mac won’t mount the drive.
- Virus attacks. Perhaps, your Mac system or the Macintosh HD is attacked by virus or malware, resulting in data corruption. Then your Mac won’t mount the Macintosh HD, either.
- Catalog file corruption. Catalog files contain the record files of partitioned volumes. So if any catalog file becomes corrupt, the Mac won’t be able to get volume size location, description of volume content and other volume information, let alone mount the drive.
- Disk Utility failures The Macintosh HD not mounted issue may be caused by Disk Utility faults, too.
- System malfunctions. System malfunctions include machine malfunctions and operating system errors. If the Mac operating system crashes, it cannot mount any drive.
Before you proceed with fixing this error, here is a checklist you need to consider when connecting your hard drive:
- Reconnect the USB connector or adapter to fit the hard drive snugly.
- Connect the hard drive to a different USB port or a different Mac.
- Replace the USB cable or adapter in case you suspect it to be damaged.
- Connect to an external power source if the hard drive requires one.
- Check the LED light to ensure the storage device is powered on and working.
- Swap the hard drive with a different case if you presume it to be faulty.
It is also recommended that you run a scan of your computer using a reliable antivirus program to make sure that the error is not being caused by a malware infection.
Once you’ve gone through the checklist and the error still appears, then proceed with the steps below.
Fix #1: Change macOS Settings.
Ensure Finder’s preference to show external disks on Desktop or Finder is enabled. To do this:
- Open Finder from Dock. From the top Menu Bar, go to Finder > Preferences.
- On the Finder Preferences window, click the General tab.
- Under the Show these items on the Desktop section, select the External disks checkbox. Your Desktop will now show the external hard drive icon.
- Click the Sidebar tab. Under the Locations section, select the External disks checkbox. Your Finder sidebar will now show the external hard drive.
You also need to ensure Disk Utility’s View menu has the “Show All Devices” option selected.
- Press Command + Space Bar keys to open Spotlight.
- Type disk utility and hit Return to open Disk Utility.
- Click the View menu located at the top left corner of Disk Utility and select Show All Devices. Your Disk Utility’s sidebar should now show the external hard drive.
Fix #2: Reset Mac Firmware Settings.
To reset NVRAM (Non-volatile RAM) & PRAM (Parameter RAM):
- Restart Mac then immediately press and hold Option + Command + P + R keys until you hear a second chime.
- Reset SMC (System Management Controller) on your Mac by using the instructions below:
- For iMac, Mac Pro/mini, or laptop with a removable battery—detach the power cable or take out the battery then press and hold the Power button for 5 seconds.
- For MacBook Air, MacBook Pro, or MacBook with non-removable battery—press and hold Shift + Control + Option + Power Button for 10 seconds.
Fix #3: Repair Disk with Disk Utility.
If your Mac computer won’t boot, you can boot your Mac into macOS Recovery mode and then repair unmounted Macintosh HD (disk0s2).
Follow these steps to repair unmounted Macintosh with Disk Utility:
- Turn on your Mac by pressing the Power button.
- Press and hold down Command+R keys immediately upon hearing the startup chime. Hold down the keys until you see the Apple logo, a spinning globe or other startup screen. Startup is complete when you see the macOS Utilities window.
- Select Disk Utility and click Continue.
- Select the unmounted Macintosh HD (disk0s2) from the left sidebar of Disk Utility window.
- Click First Aid in the toolbar of the Disk Utility window.
- Click Run to check and repair file system errors.
- Wait until the procedure is completed. If you get a message saying success, restart your Mac and see if your Mac can be booted.
If a message says that the disk utility cannot repair the disk, go to the next solution.
Fix #4: Fix Macintosh HD via Terminal.
If Disk Utility stopped repairing Macintosh HD in macOS, you can then try to fix it with Terminal.
- Boot your Mac into Recovery Mode.
- Click Utilities from the menu bar and select Terminal from the drop-down list.
- Enter diskutil list. This will list out the available volumes.
- Check the volume identifier from the table that appears. (For example disk 2s1)
- Enter diskutil repairVolume/disk 2s1. (Replace disk 2s1 with the volume identifier of your Macintosh HD)
Fix #5: Restore from a Time Machine Backup.
If you have a Time Machine backup, you can restore the backup and fix unmounted Macintosh HD (disk0s2).
- Boot your Mac into macOS Recovery mode.
- Select Disk Utility and click Continue.
- Select Macintosh HD (disk0s2) and click Erase.
- Before erasing, make sure you don’t lose any data.
- Return to macOS Utilities window.
- Select Restore from Time Machine Backup and click Continue.
- Select your Time Machine backup disk as the restore source and then click Continue.
- Select a backup and then click Continue.
- Select the hard disk as the restore destination and then click Restore to continue.
- Restart your Mac computer when the restore is done.
Источник
LeoElicker
- Joined
- Mar 31, 2020
- Messages
- 2
- Motherboard
-
X79
- CPU
-
I7-3930K
- Graphics
-
RX 570
-
#1
What’s up guys, I hope you all are fine.
I’m having some trouble while trying to mount my Sata HDD on the Disk Manager, before installing the OS (This disk was previously on my MacBook Pro, but I’ve swapped for a SSD).
I’ve previously installed Windows on it, but have cleaned it to NTFS. At the Disk Manager utility, before installing, I’ve managed to, apparently, erase it to macOS Journaling, which is the Apple recommended format for new installations (found an article on help section).
So, the disk have unmounted itself and now I was not able to mount it anymore. When I try to mount, format ou even part the disk, I’ve got a different error. In mounting the disk case, the error is (com.apple.DiskManagement.disenter error -119930868) and I’m stuck at that.
Can someone help me?
Thanks!
LeoElicker
- Joined
- Mar 31, 2020
- Messages
- 2
- Motherboard
-
X79
- CPU
-
I7-3930K
- Graphics
-
RX 570
-
#2
Well, I solved this question myself a few minutes after posting.
What I was trying to do is to erase just one part of the disk, not the entire (didn’t knew that this was possible).
So, if anyone get stuck at that, just go to View->Show All Devices and the erase your disk from the root.
That’s it, thanks!
mindkindness
- Joined
- Jul 25, 2020
- Messages
- 3
- Motherboard
-
motherboard OR system make & model # > See Rules!
- CPU
-
Intel> Need model # > See Rules!
- Graphics
-
Radeon Pro 555X
- Mac
-
-
#3
Hello.
My system disk (taken out of the disabled iMac) is not mounting.
It contains softwares that I need to recover. I cannot format it.
(Note: my Time Machine disk crashed shortly before this problem.)
I have the error:
(error -119930868 in com.apple.DiskManagement.dissenter.) Unable to mount «disk6s2».
How did you solve the problem?
Thank you !
[Catalina 10.15.6 (19G73)]
Last edited: Jul 25, 2020
-
#4
How did you solve the problem?
See Post #2.
So, if anyone get stuck at that, just go to View->Show All Devices and the erase your disk from the root.
mindkindness
- Joined
- Jul 25, 2020
- Messages
- 3
- Motherboard
-
motherboard OR system make & model # > See Rules!
- CPU
-
Intel> Need model # > See Rules!
- Graphics
-
Radeon Pro 555X
- Mac
-
-
#5
Thank you.
I must not make a mistake. The softwares to be recovered is essential and expensive.
I get in «disk user»:
«Show all devices» =
> JMicron Generic DISK03 Media (selectable, SOS = good, GUID partition table with 2TB)
> disk6s2 (in gray)
How to erase the root while keeping the rest safe?
mindkindness
- Joined
- Jul 25, 2020
- Messages
- 3
- Motherboard
-
motherboard OR system make & model # > See Rules!
- CPU
-
Intel> Need model # > See Rules!
- Graphics
-
Radeon Pro 555X
- Mac
-
-
#6
Thank you Pilgrim-Moderator.
How to «erase your disk from the root» without risking the rest of the contents of the disk? Procedures ?
Only select JMIcron and click «Delete»?
Thank you.
-
#7
How to «erase your disk from the root» without risking the rest of the contents of the disk?
If your objective is to preserve data then my advice to you would be to not erase anything.
Disconnect the drive.
Install the OS on a new disk and then connect the damaged disk to recover data.
If this fails then there are professional data recovery specialists available who can recover your data for a fee.
In this guide, we will show you various methods to fix Diskmanagement.disenter error with error codes 119930868, 119930872, 49218, 49223, 0, etc. Many users have voiced their concern that they are unable to mount their external hard drives to their Mac. This issue is independent of the OS and has been reported across Big Sur, Monterey, and even Ventura.
Whenever they are trying to mount the disk using the Disk Utility, they are greeted with the Diskmanagement.disenter error along with one of the following error codes 119930868, 119930872, 49218, 49223, 0, etc. The inability of the users to access data on the unmounted external hard drive is causing them a great deal of inconvenience. If you are also in the same boat, then this guide will help you out. Follow along for the fixes.
It is recommended that you try out each of the below-mentioned workarounds and then see which one spells out success. So with that in mind, let’s get started. Droidwin and its members wouldn’t be held responsible in case of a thermonuclear war, your alarm doesn’t wake you up, or if anything happens to your Mac and data by performing the below steps.
FIX 1: Kill the fsck Process
One of the most common reasons for this error could be due to the fact that “fsck” might be holding it hostage. So you will have to kill this process and retry mounting the disk. Here’s how it could be done:
- To begin with, launch both Terminal and Disk Utility.
- Then try to mount the disk and straightaway switch to Terminal.
- Now execute the below command in the terminal window:
sudo pkill -f fsck
- The disk will mount in read-only mode. You could now repair it via First Aid in Disk Utility.
- The repairing will take time. Once done, it should fix the Diskmanagement.disenter error.
FIX 2: Using Terminal
- To begin with, boot your mac to Recovery Mode as instructed below:
Apple Silicon: Press and hold the power button until “Loading startup options” appear. Then select Options > Continue.
Intel: Restart your Mac and while doing so press and hold the Command+R shortcut keys.
- Then click Utilities and select Terminal. Now type in the below command:
diskutil list
- It will bring up a list of all disks. Note down your disk’s volume identifier [such as disk3s1].
- Finally, execute the below command [replace diskX with your volume identifier].
diskutil repairVolume/diskX
- Check if it fixes Diskmanagement.disenter error 119930868, 119930872, 49218, 49223, 0.
FIX 3: Change the Disk Allocation Size
Some older Macs wouldn’t be able to mount the drive if the allocation size is larger than 1024. So to resolve this, go to a Windows or Linux machine (or use a Virtual machine) and reformat the drive in ExFAT and select 1024 as the allocation size. Now try mounting it on your Mac and this time you wouldn’t get any error codes.
That’s it. These were the three methods that should help you fix the Diskmanagement.disenter error with error codes 119930868, 119930872, 49218, 49223, 0, etc. If you have any queries concerning the aforementioned steps, do let us know in the comments. We will get back to you with a solution at the earliest.
- No Disk to Install macOS: How to Fix
- Western Digital Hard Disk Drive disconnecting randomly on Mac [Fixed]
- Cannot Format Drive using Disk Utility in Mac: How to Fix
- Disk Not Ejected Properly message after waking Mac from Sleep [Fixed]
About Chief Editor
Sadique Hassan
administrator
A technical geek by birth, he always has a keen interest in the Android platform right since the birth of the HTC Dream. The open-source environment always seems to intrigue him with the plethora of options available at his fingertips. “MBA by profession, blogger by choice!”


