-
#1
I just ordered 5 5231’s from @EMPIRETECANDY which I received yesterday (THANK YOU!). I’m trying to get them setup 1-by-1 here first with the latest firmware, and then modified to my specific IP addresses I want. However… I don’t know what I’m doing wrong as I can’t get them initialized. I get a notice saying…
NOTICE: Device in other segment cannot be initialized
At the moment, I have my laptop setup locally on 192.168.1.7, connected to a PoE switch, that the 5231 is also plugged into.
I’ve got the latest config tool installed on the laptop.
I click the search setting and have it search the range 192.168.1.1 to 192.168.1.254
It comes back and shows the CAM was discovered
Status: Uninitalized
Type: IPC
Model: IP Camera
IP: 192.168.1.108
Version: 2.800.000005.0.R
I click the tick mark to select it, and then try hitting «Initialize» and it throws me the error above…. What am I doing wrong?
-
#2
type 192.168.1.108 on the webpage to activate the camera firstly, and then use dahua configtool to change the ip address that you need.
Clieck search setting, and put the right password that you set for the camera. Then the IP address can be changed
Here has a guide.
Dahua ConfigTool using Instruction
-
#3
type 192.168.1.108 on the webpage to activate the camera firstly, and then use dahua configtool to change the ip address that you need.
Clieck search setting, and put the right password that you set for the camera. Then the IP address can be changed
View attachment 43195
Here has a guide.
Dahua ConfigTool using Instruction
Awesome thank you!
-
#4
type 192.168.1.108 on the webpage to activate the camera firstly, and then use dahua configtool to change the ip address that you need.
Clieck search setting, and put the right password that you set for the camera. Then the IP address can be changed
View attachment 43195
Here has a guide.
Dahua ConfigTool using Instruction
Hi. I’m a newbie. I bought a Dahua IPC online Model DH-IPCHDW4433C-A. I’ve tried to initialize the camera on the web, but the browser can’t find the IP address 192.168.1.108. Dahua’s Config Tool 4.011 sees the IP camera — Status Unitialized. But when I try to initialize, enter new password etc. I get the following error: «Network Error, maybe timeout». My router and laptop IP is 192.168.2.xxx. Any ideas? I’d appreciate any help walking me through this. Thanks!
-
#5
Hi. I’m a newbie. I bought a Dahua IPC online Model DH-IPCHDW4433C-A. I’ve tried to initialize the camera on the web, but the browser can’t find the IP address 192.168.1.108. Dahua’s Config Tool 4.011 sees the IP camera — Status Unitialized. But when I try to initialize, enter new password etc. I get the following error: «Network Error, maybe timeout». My router and laptop IP is 192.168.2.xxx. Any ideas? I’d appreciate any help walking me through this. Thanks!
You need to be on the same subnet as the camera when configuring it. In otherwords, your IP needs to be 192.168.1.x to connect to the 192.168.1.108 default address, unless your router specifically has a route setup between the 192.168.2 subnet and the 192.168.1 subnet which I’m guessing it doesn’t.
Easiest way… just plug the camera directly into a laptop or computer with an ethernet port directly (make sure it’s powered), change your IP address to 192.168.1.2, subnet mask 255.255.255.0, and leave the rest blank. Then open up a browser and enter: http://192.168.1.108. once it’s initialized you can change the camera’s IP address in the configuration page to 192.168.2.whatever you want, and plug it into the router where it should work.
For me, I’ve setup a CISCO SG500-28P (PoE commercial switch) rack mounted in the attic with ventilation, with a dedicated 10G trunk run down to my wiring closet where I keep my main router that it plugs into. From the switch, I run a single ethernet cable to each camera which is all that’s needed to have it powered, but I had to configure each camera ahead of time so that it would be setup for the network. If you’re running outdoor security cameras, I find this the easiest method.
Also, anyone else looking for good blue iris server options… the Dell M4600 laptop is a beast. I have a 4TB WD Purple drive hooked to it via USB 3.0, with a 2TB internal SSD, 32 GB Ram, It runs an i7 processor and it’s running 5 cameras at the moment (i have 3 more to hook up) + Runs a Plex Media Server, and 2 VMs all at the same time… never gets over 20% utilization. You can pick up used / beat up M4600s (just make sure they have an i7 in them) for pretty cheap nowadays off ebay. They make great servers.
-
#6
You need to be on the same subnet as the camera when configuring it. In otherwords, your IP needs to be 192.168.1.x to connect to the 192.168.1.108 default address, unless your router specifically has a route setup between the 192.168.2 subnet and the 192.168.1 subnet which I’m guessing it doesn’t.
Easiest way… just plug the camera directly into a laptop or computer with an ethernet port directly (make sure it’s powered), change your IP address to 192.168.1.2, subnet mask 255.255.255.0, and leave the rest blank. Then open up a browser and enter: http://192.168.1.108. once it’s initialized you can change the camera’s IP address in the configuration page to 192.168.2.whatever you want, and plug it into the router where it should work.
For me, I’ve setup a CISCO SG500-28P (PoE commercial switch) rack mounted in the attic with ventilation, with a dedicated 10G trunk run down to my wiring closet where I keep my main router that it plugs into. From the switch, I run a single ethernet cable to each camera which is all that’s needed to have it powered, but I had to configure each camera ahead of time so that it would be setup for the network. If you’re running outdoor security cameras, I find this the easiest method.
Also, anyone else looking for good blue iris server options… the Dell M4600 laptop is a beast. I have a 4TB WD Purple drive hooked to it via USB 3.0, with a 2TB internal SSD, 32 GB Ram, It runs an i7 processor and it’s running 5 cameras at the moment (i have 3 more to hook up) + Runs a Plex Media Server, and 2 VMs all at the same time… never gets over 20% utilization. You can pick up used / beat up M4600s (just make sure they have an i7 in them) for pretty cheap nowadays off ebay. They make great servers.
Thanks usafltg! I was able to go to 192.168.1.108 and initialize the camera. Can I change the IP address using the browser under the TCP/IP menu? It looks like my wireless IP address is 192.168.2.xxx but this is a POE camera and my wired ethernet ip is 169.254.155.xxx and gateway 255.255.0.0. So do I change the IP address to 169.254.155. xxx Or do I need to us configtool? Thanks again.
-
#7
Thanks usafltg! I was able to go to 192.168.1.108 and initialize the camera. Can I change the IP address using the browser under the TCP/IP menu? It looks like my wireless IP address is 192.168.2.xxx but this is a POE camera and my wired ethernet ip is 169.254.155.xxx and gateway 255.255.0.0. So do I change the IP address to 169.254.155. xxx Or do I need to us configtool? Thanks again.
169.254.155.xx is the standard IP address assigned to an Ethernet card in Windows when it’s not hooked up to a DHCP server. Your router is a DHCP server, unless you have done some super fancy networking configuration, but I’m guessing by your questioning that this is not the case.
Are you planning to hook the camera directly into your router via an Ethernet cable? If so, your router will be serving out DHCP assigned IP addresses on the 192.168.2 subnet regardless of whether it’s a wireless or physically connected device. For sake of simplicity, if you can get to the webpage of the camera, I would configure it to a set IP address of 192.168.2.something. In my network environment I have mine all set with static IP addresses ranging from .11 — .25 so I know where they all are. But you can assign whatever you want as long as it’s not already taken by another device. Just remember the IP you set it to. After you’ve set it, you can then plug it directly into your router and you should be able to access it via the IP you assigned from any device within your network.
Sent from my iPhone using Tapatalk
-
#8
169.254.155.xx is the standard IP address assigned to an Ethernet card in Windows when it’s not hooked up to a DHCP server. Your router is a DHCP server, unless you have done some super fancy networking configuration, but I’m guessing by your questioning that this is not the case.
Are you planning to hook the camera directly into your router via an Ethernet cable? If so, your router will be serving out DHCP assigned IP addresses on the 192.168.2 subnet regardless of whether it’s a wireless or physically connected device. For sake of simplicity, if you can get to the webpage of the camera, I would configure it to a set IP address of 192.168.2.something. In my network environment I have mine all set with static IP addresses ranging from .11 — .25 so I know where they all are. But you can assign whatever you want as long as it’s not already taken by another device. Just remember the IP you set it to. After you’ve set it, you can then plug it directly into your router and you should be able to access it via the IP you assigned from any device within your network.
Sent from my iPhone using Tapatalk
You are guessing well….. No I plan to hook it up to an NVR. Should I still set the IP address to 192.168.2. something?
-
#9
Your NVR will most likely get a assigned a DHCP value from your router then, assuming you’re planning to hook the nvr into your network. The NVR will also act as a DHCP server, so… in theory you could just set the camera to assign itself via DHCP, or you could assign it a static IP. It’s possible your NVR might subnet itself by default (in other words, takes an IP of 192.169.2.something… but then assigns each of the cameras a different IP subnet… say like 192.168.5.something). Since you’re hooking it to an NVR then your safest bet is to configure each camera to use a DHCP assigned IP address and leave the guessing out for now.
Sent from my iPhone using Tapatalk
-
#10
Your NVR will most likely get a assigned a DHCP value from your router then, assuming you’re planning to hook the nvr into your network. The NVR will also act as a DHCP server, so… in theory you could just set the camera to assign itself via DHCP, or you could assign it a static IP. It’s possible your NVR might subnet itself by default (in other words, takes an IP of 192.169.2.something… but then assigns each of the cameras a different IP subnet… say like 192.168.5.something). Since you’re hooking it to an NVR then your safest bet is to configure each camera to use a DHCP assigned IP address and leave the guessing out for now.
Sent from my iPhone using Tapatalk
-
#11
You are guessing well….. No I plan to hook it up to an NVR. Should I still set the IP address to 192.168.2. something?
Another way to change your camera address, change your address of your computer to a static address, something like 192.168.1.100 (https://www.howtogeek.com/howto/19249/how-to-assign-a-static-ip-address-in-xp-vista-or-windows-7/) and connect your computer directly to the camera with a network cable. Then access it via the web browser interface (192.168.1.108) and change it to either DHCP and let your router assign a IP address (you can reserve an IP address in your router, see below), or modify the static IP address to your 192.168.2.xxx range. Then change your computer back to auto assign IP address, and connect the cam and computer to your router.
If your router is using DHCP to assign IP addresses to your network devices, you have a couple options:
1) Check the MAC address of the camera (see if it’s on the label, something like 76:00:B3:E5:0F), then in the router, use the MAC address to assign a 192.168.2.xxx IP address to it, this will reserve this address. If power goes out and your router and/or camera reboots, it will be assigned the same address (i.e netgear router: How do I reserve an IP address on my NETGEAR router? | Answer | NETGEAR Support).
2) Check your router and see what address range is used to connect your devices. For example, if your router assigns DHCP addresses in the range of 192.168.2.100 to 192.168.2.254, then you could try statically assign your camera to something under 192.168.2.100, i.e. 192.168.2.90 and check to see if you can reach the cam.
Содержание
- login problem with SD29204S-GN
- camsmith
- beingaware
- TVT73
- camsmith
- Dahua 5231 — Can’t Initialize
- usafltg
- EMPIRETECANDY
- usafltg
- Gary99
- usafltg
- Gary99
- Newbie difficulties with IPC-HDW5231R-ZE
- bob4321
- Arjun
- bob4321
- Arjun
- Arjun
- bob4321
- Guido87
- bob4321
- looney2ns
- bob4321
- Arjun
- CliveS
- bob4321
- Guido87
- bob4321
- bob4321
- Heire
- Heire
- aristobrat
- bob4321
- Network error maybe timeout config tool dahua
- Инициализация
- Вход на WEB интерфейс устройства
login problem with SD29204S-GN
camsmith
Young grasshopper
beingaware
Pulling my weight
Delete the entry out of blue IRIS, restart the camera and try to log in via the web gui.
Otherwise factory reset the camera, find it with SmartPSS and reconfigure?
Default username and password is admin/admin.
TVT73
Pulling my weight
It´s unusual to use the cam with default ip address. Do you use the latest config tool? To be sure that blue iris isn´t trying to log in and close the admin account it´s better to shutdown blueiris and then after reboot of cam try it again.
Sometimes the ip can´t be canged, when you are in different subnet. you can temporarily change to 192.168.1.100 your local ip and try again.
Here is a documentation for it.
Camera Troubleshoot/Change IP Cameras IP Address — Dahua Wiki
And please change the admin password. Default passwords are dangerous.
camsmith
Young grasshopper
Delete the entry out of blue IRIS, restart the camera and try to log in via the web gui.
Otherwise factory reset the camera, find it with SmartPSS and reconfigure?
Default username and password is admin/admin.[/QUOTE
Ok, I deleted the entry out of blue iris, and I shut blue iris down. Restarted the camera, cant log in via web gui.
Out of curiosity after being unsuccessful in logging in with this cam, I unplugged this cam and tried with a new cam on the same cat5 cable a dahua starlight turret. The config tool lists it with the default IP and i was able to change the ip and assign a new password. I could also play with the zoom and it worked fine.
Back to the ptz , I tried the factory reset by pushing the pin hole button on the back and now the config tool and smart pss doesn’t see it. The camera still boots up and does its dance.
Источник
Dahua 5231 — Can’t Initialize
usafltg
Young grasshopper
I just ordered 5 5231’s from @EMPIRETECANDY which I received yesterday (THANK YOU!). I’m trying to get them setup 1-by-1 here first with the latest firmware, and then modified to my specific IP addresses I want. However. I don’t know what I’m doing wrong as I can’t get them initialized. I get a notice saying.
At the moment, I have my laptop setup locally on 192.168.1.7, connected to a PoE switch, that the 5231 is also plugged into.
I’ve got the latest config tool installed on the laptop.
I click the search setting and have it search the range 192.168.1.1 to 192.168.1.254
It comes back and shows the CAM was discovered
Status: Uninitalized
Type: IPC
Model: IP Camera
IP: 192.168.1.108
Version: 2.800.000005.0.R
I click the tick mark to select it, and then try hitting «Initialize» and it throws me the error above. What am I doing wrong?
EMPIRETECANDY
IPCT Vendor
usafltg
Young grasshopper
Gary99
usafltg
Young grasshopper
You need to be on the same subnet as the camera when configuring it. In otherwords, your IP needs to be 192.168.1.x to connect to the 192.168.1.108 default address, unless your router specifically has a route setup between the 192.168.2 subnet and the 192.168.1 subnet which I’m guessing it doesn’t.
Easiest way. just plug the camera directly into a laptop or computer with an ethernet port directly (make sure it’s powered), change your IP address to 192.168.1.2, subnet mask 255.255.255.0, and leave the rest blank. Then open up a browser and enter: http://192.168.1.108. once it’s initialized you can change the camera’s IP address in the configuration page to 192.168.2.whatever you want, and plug it into the router where it should work.
For me, I’ve setup a CISCO SG500-28P (PoE commercial switch) rack mounted in the attic with ventilation, with a dedicated 10G trunk run down to my wiring closet where I keep my main router that it plugs into. From the switch, I run a single ethernet cable to each camera which is all that’s needed to have it powered, but I had to configure each camera ahead of time so that it would be setup for the network. If you’re running outdoor security cameras, I find this the easiest method.
Also, anyone else looking for good blue iris server options. the Dell M4600 laptop is a beast. I have a 4TB WD Purple drive hooked to it via USB 3.0, with a 2TB internal SSD, 32 GB Ram, It runs an i7 processor and it’s running 5 cameras at the moment (i have 3 more to hook up) + Runs a Plex Media Server, and 2 VMs all at the same time. never gets over 20% utilization. You can pick up used / beat up M4600s (just make sure they have an i7 in them) for pretty cheap nowadays off ebay. They make great servers.
Gary99
You need to be on the same subnet as the camera when configuring it. In otherwords, your IP needs to be 192.168.1.x to connect to the 192.168.1.108 default address, unless your router specifically has a route setup between the 192.168.2 subnet and the 192.168.1 subnet which I’m guessing it doesn’t.
Easiest way. just plug the camera directly into a laptop or computer with an ethernet port directly (make sure it’s powered), change your IP address to 192.168.1.2, subnet mask 255.255.255.0, and leave the rest blank. Then open up a browser and enter: http://192.168.1.108. once it’s initialized you can change the camera’s IP address in the configuration page to 192.168.2.whatever you want, and plug it into the router where it should work.
For me, I’ve setup a CISCO SG500-28P (PoE commercial switch) rack mounted in the attic with ventilation, with a dedicated 10G trunk run down to my wiring closet where I keep my main router that it plugs into. From the switch, I run a single ethernet cable to each camera which is all that’s needed to have it powered, but I had to configure each camera ahead of time so that it would be setup for the network. If you’re running outdoor security cameras, I find this the easiest method.
Also, anyone else looking for good blue iris server options. the Dell M4600 laptop is a beast. I have a 4TB WD Purple drive hooked to it via USB 3.0, with a 2TB internal SSD, 32 GB Ram, It runs an i7 processor and it’s running 5 cameras at the moment (i have 3 more to hook up) + Runs a Plex Media Server, and 2 VMs all at the same time. never gets over 20% utilization. You can pick up used / beat up M4600s (just make sure they have an i7 in them) for pretty cheap nowadays off ebay. They make great servers.
Источник
Newbie difficulties with IPC-HDW5231R-ZE
bob4321
Arjun
Known around here
bob4321
I currently use blue iris as an NVR steaming RTSP from a old analogue speco dvr. Looking to eliminate the dvr and convert to new IP cameras.
I connected the camera to my existing 8 port Unifi POE switch. All the documentation stated it should default to 192.168.1.108. From what my router is saying, the MAC address is connected to the network, but does not have an IP address at all.
I just downloaded advanced IP Scanner and ran it. It found the MAC address at IP address 192.168.1.108. No manufacturer on the description.
But ping fails and it does not appear at that IP in the unifi software
Arjun
Known around here
Could be possible IP Conflict, which I never default to a 192.168.x.x range,
Check this (this should work),
Camera Troubleshoot/Change IP Cameras IP Address — Dahua Wiki
«How to Modify IP Address of IP Camera / Change IP Camera that is stuck on «192.168.1.108»
Resetting the camera helps as well, but the detailed steps disclosed in the Dahua-Wiki should definitely help
Arjun
Known around here
Requires a pin within the camera assembly to be pressed while power is feeding the camera
You’ll need to carefully disassemble the assembly in order to locate the reset button
bob4321
Guido87
Getting the hang of it
bob4321
looney2ns
bob4321
Thanks for all the suggestions and hints — I finally got it working. There seems to be some issue with my Unifi managed 8 port POE switch and the camera. If I plug the camera into a POE injector (I had a spare Unifi POE injector) and into my network it works fine. When I plug it into the PoE switch, it will not communicate correctly (ping fails). The switch is detecting it as PoE+ and shows current draw that increases when the room is dark (IR goes on). The switch works fine for all my other equipment plugged in, so not sure what the issue is.
Does anyone else plug a Dahua camera into a Unifi managed PoE switch? My switch supports 802.3af/at for PoE so should be compatible.
What switches are others using? Was hoping to use another Unifi managed switch for the cameras so I could manage and track network usage.
Arjun
Known around here
Thanks for all the suggestions and hints — I finally got it working. There seems to be some issue with my Unifi managed 8 port POE switch and the camera. If I plug the camera into a POE injector (I had a spare Unifi POE injector) and into my network it works fine. When I plug it into the PoE switch, it will not communicate correctly (ping fails). The switch is detecting it as PoE+ and shows current draw that increases when the room is dark (IR goes on). The switch works fine for all my other equipment plugged in, so not sure what the issue is.
Does anyone else plug a Dahua camera into a Unifi managed PoE switch? My switch supports 802.3af/at for PoE so should be compatible.
What switches are others using? Was hoping to use another Unifi managed switch for the cameras so I could manage and track network usage.
That is great to know, for some reason I may have skimmed over the part where you disclosed the camera’s voltage, that is certainly low and if that is that is the only PoE device connected to your UniFi switch then something needs to be looked into. There are two versions of the 8 port switch, one being a 4 port PoE and other being 8-port PoE
Some don’t prefer switches containing fans
BV-Tech and Zyxel are both good options
CliveS
Thanks for all the suggestions and hints — I finally got it working. There seems to be some issue with my Unifi managed 8 port POE switch and the camera. If I plug the camera into a POE injector (I had a spare Unifi POE injector) and into my network it works fine. When I plug it into the PoE switch, it will not communicate correctly (ping fails). The switch is detecting it as PoE+ and shows current draw that increases when the room is dark (IR goes on). The switch works fine for all my other equipment plugged in, so not sure what the issue is.
Does anyone else plug a Dahua camera into a Unifi managed PoE switch? My switch supports 802.3af/at for PoE so should be compatible.
What switches are others using? Was hoping to use another Unifi managed switch for the cameras so I could manage and track network usage.
bob4321
I have the 8 port 150W Unifi switch US-8-150W. Just tested the camera again in the switch. No IR = 2.34W, with IR = 2.78W. When plugged into the switch, no communication. Put back into the poe injector to my main non-poe switch works great.
My network configuration is pretty simple. cable modem to USG. USG to 8 port Unifi PoE switch (feeds 3 APs and cloud key). Fifth port on the PoE switch feeds my 24 port main unmanaged switch.
just tried an experiment to isolate the issue. I used the PoE injector to supply power to the camera, and plugged it into the PoE switch. So the switch was not supplying power. It did not communicate. So the issue is not power related, but a network problem of some sort.
More experiments to follow.
Guido87
Getting the hang of it
Thanks for all the suggestions and hints — I finally got it working. There seems to be some issue with my Unifi managed 8 port POE switch and the camera. If I plug the camera into a POE injector (I had a spare Unifi POE injector) and into my network it works fine. When I plug it into the PoE switch, it will not communicate correctly (ping fails). The switch is detecting it as PoE+ and shows current draw that increases when the room is dark (IR goes on). The switch works fine for all my other equipment plugged in, so not sure what the issue is.
Does anyone else plug a Dahua camera into a Unifi managed PoE switch? My switch supports 802.3af/at for PoE so should be compatible.
What switches are others using? Was hoping to use another Unifi managed switch for the cameras so I could manage and track network usage.
bob4321
bob4321
Heire
I have a unifi 24ports with 1 camera connected and works without problem.
Still waiting on my other cameras but then one will be connected on a 8 ports.
All I had to do was log in to the camera on the same network, switch to dhcp and done. The config tool doesnt work at start cause you need to configure a password at first time.
Heire
aristobrat
bob4321
I spent the weekend trying to figure this out, but have pretty much given up. I have it isolated to an issue between the switch and the camera. I have the camera hooked to a PoE injector for power (to eliminate power as a factor). When I plug it into the Unifi 8-150 it shows up in the unifi network with a MAC address only but does not get an IP (if static still gets no IP). Cannot ping it (static or DHCP). Tried multiple ports on the switch.
If I then plug the camera into a 25 port unmanaged switch fed from the 8-150, the camera works great.
I then tried the same test, but used a old 4 port 10/100 switch fed from the 8-150 Unifi switch. It did not work. Same affect as plugging the camera directly to the Unifi switch.
So, no clue at this point. I’m thinking some hardware, software issue in the camera that is a timing or handshake error that is on the edge of working/not-working.
Not worth the aggragvation — will purchase a new PoE switch to use for the cameras and test that out. Just lose the ability to manage the switch from Unifi.
Источник
Мы оказываем дистанционную техническую помощь по настройке системы видеонаблюдения. Для этого у вас должна быть установлена последняя версия программы Teamviewer для управления вашим компьютером удалённо. Компьютер должен находиться в одной локальной сети с оборудованием подлежащим настройке. Чтобы узнать стоимость настройки/консультации, свяжитесь с нами и кратко опишите задачу. Вайбер: +380685214735 Telegram: @hdmaster_ua
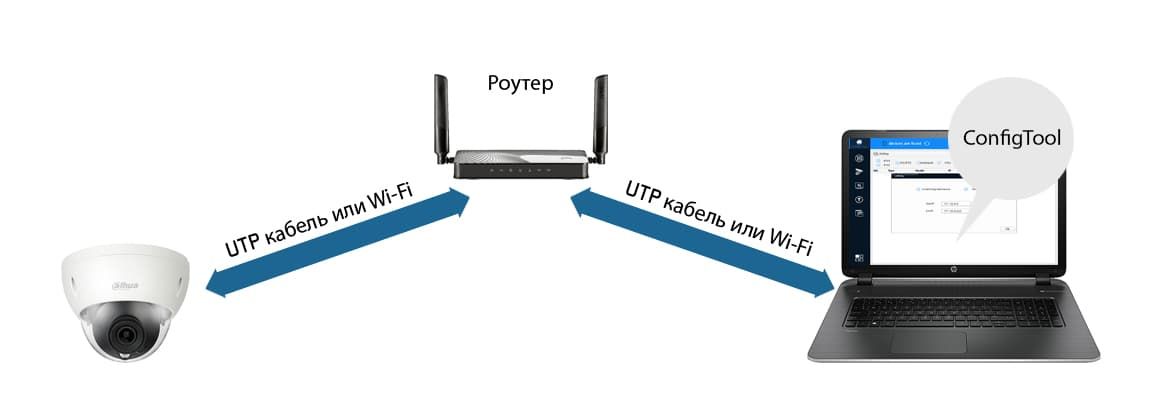
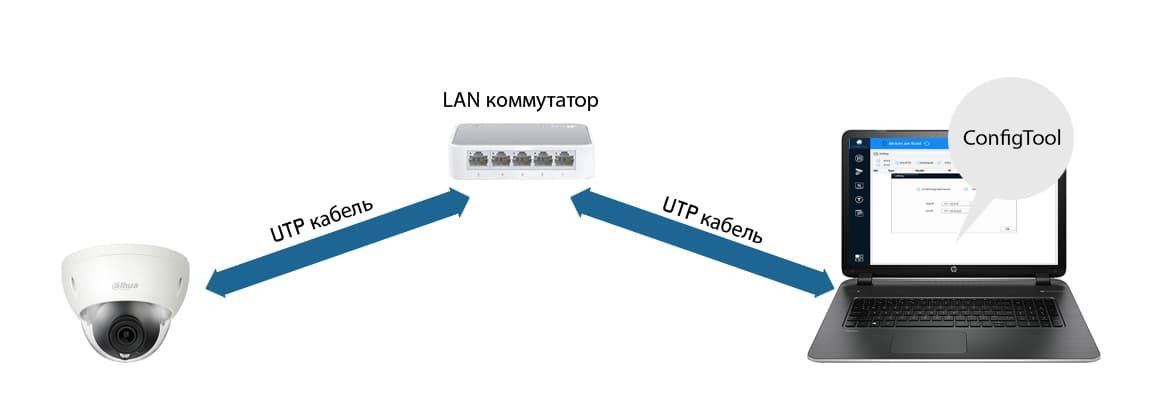
Есть несколько способов подключения к IP камере с помощью ПК. Камеру можно подключить к сети через роутер или через коммутатор.
Вариант подключения через роутер показан на Рис.1.
Рис. 1
Вариант подключения через сетевой коммутатор показан на Рис.2.
Рис. 2
Для того чтобы найти устройство в сети, а также иметь возможность менять сетевые параметры устройства, в первую очередь, установите одну из программ, способных определять сетевые устройства Dahua в вашей сети. Например — утилиту ConfigTool.
С помощью служебной программы ConfigTool, необходимо изменить IP адрес камеры в соответствие с диапазоном IP адресов вашей локальной сети.
Предположим, что у IP камеры Dahua программа ConfigTool определила IP адрес 192.168.1.108, в то время как ваша сеть имеет диапазон адресов 192.168.0.1 -192.168.0.254. В данном случае, без изменения IP адреса камеры, попасть на её интерфейс с помощью ПК из вашей локальной сети будет невозможно до тех пор, пока вы не измените её адрес на один из свободных адресов, соответствующий вашему диапазону.
Установите маску подсети и шлюз соответствующими вашей подсети. IP адресом шлюза вашей сети является IP адрес роутера вашей сети.
Инициализация
Если вы используете устройство впервые, необходимо инициализировать устройство. Ниже приведен порядок инициализации с помощью WEB интерфейса камеры. Вы также можете инициализировать устройство с помощью утилиты ConfigTool, сетевого видеорегистратора Dahua и платформ мониторинга. Для гарантии безопасного соединения храните пароль в надёжном месте и периодически меняйте его.
Шаг 1.
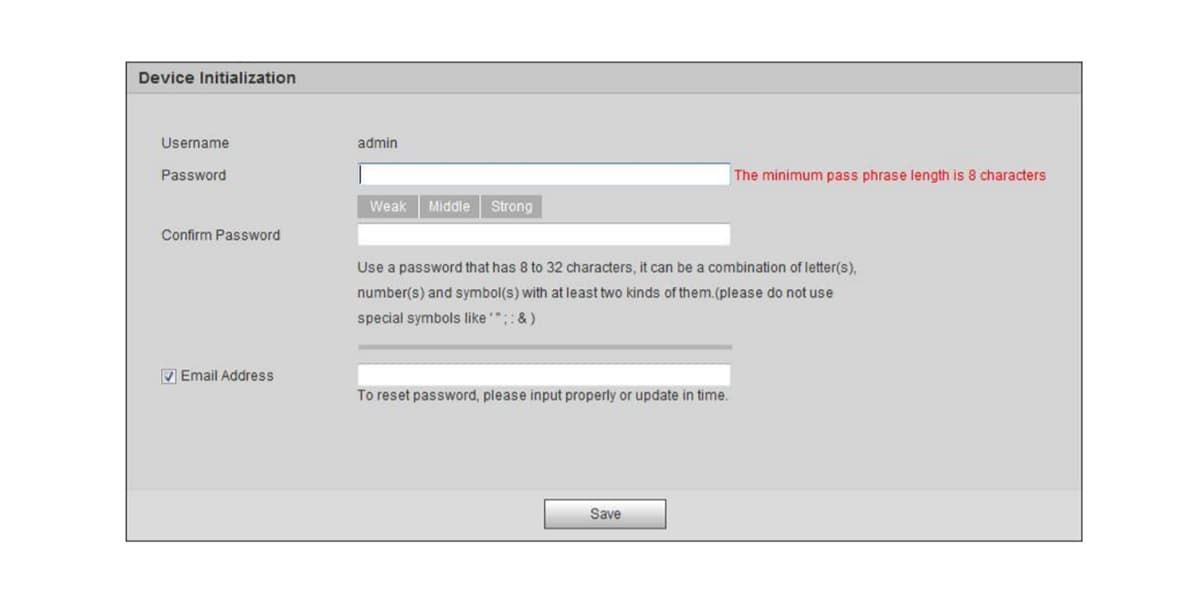
Откройте браузер IE, введите IP адрес камеры и кликните Enter. После удачного соединения система покажет интерфейс инициализации устройства (Рис.3).
Шаг 2.
Придумайте пароль и укажите адрес своей электронной почты для восстановления пароля.
Внимание! Обязательно указывайте ваш действительный e-mail для сохранения возможности самостоятельного восстановления пароля. Если вы всё-таки забудете пароль, а это довольно распространённый случай, когда на интерфейс устройства заходят не часто, вы сможете отправить на свой e-mail секретный код для сброса старого пароля из интерфейса устройства.
Если вы забыли e-mail или указали недействительный e-mail, в этом случае сбросить пароль можно будет только в сервисном центре.
Имя пользователя по умолчанию — admin
Пароль должен состоять из 8-32 символов. Безопасный пароль должен включать как цифры так и буквы в обоих регистрах. Пароль не должен содержать специальных знаков “’”,“»”,“;”,“:”,“&”
Введите ваш e-mail для возможности последующего сброса пароля. В случае если вы забудете пароль в будущем – вам на e-mail прийдёт код для сброса пароля.
Шаг 3.
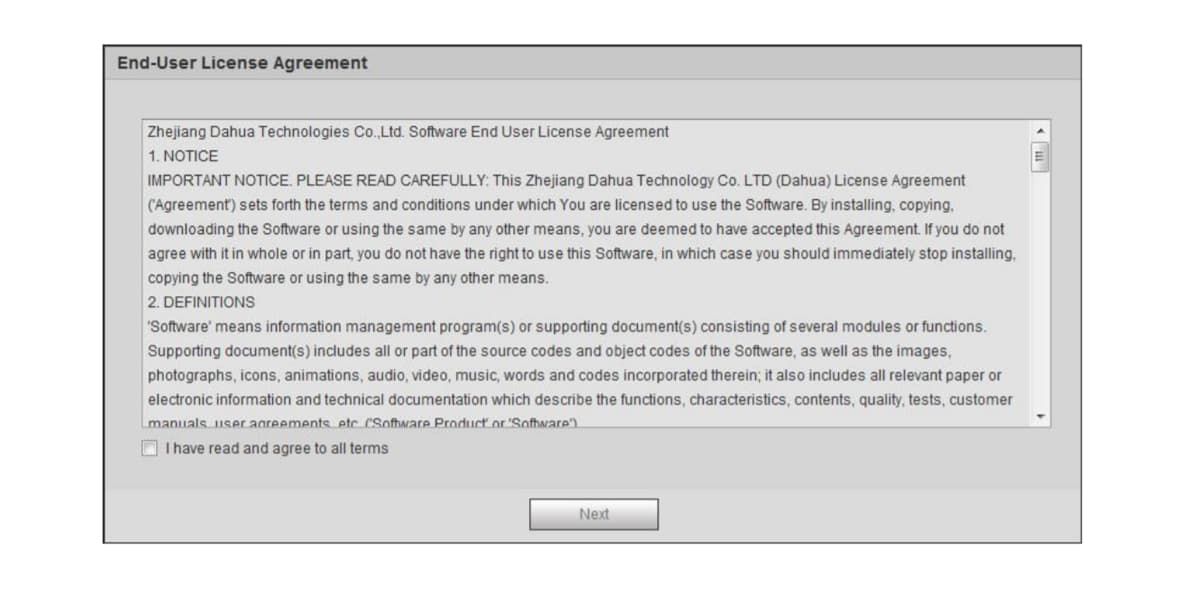
Нажмите «Сохранить». Система выведет пользовательское лицензионное. Ознакомьтесь и согласитесь с лицензионным соглашением.
Шаг 4.
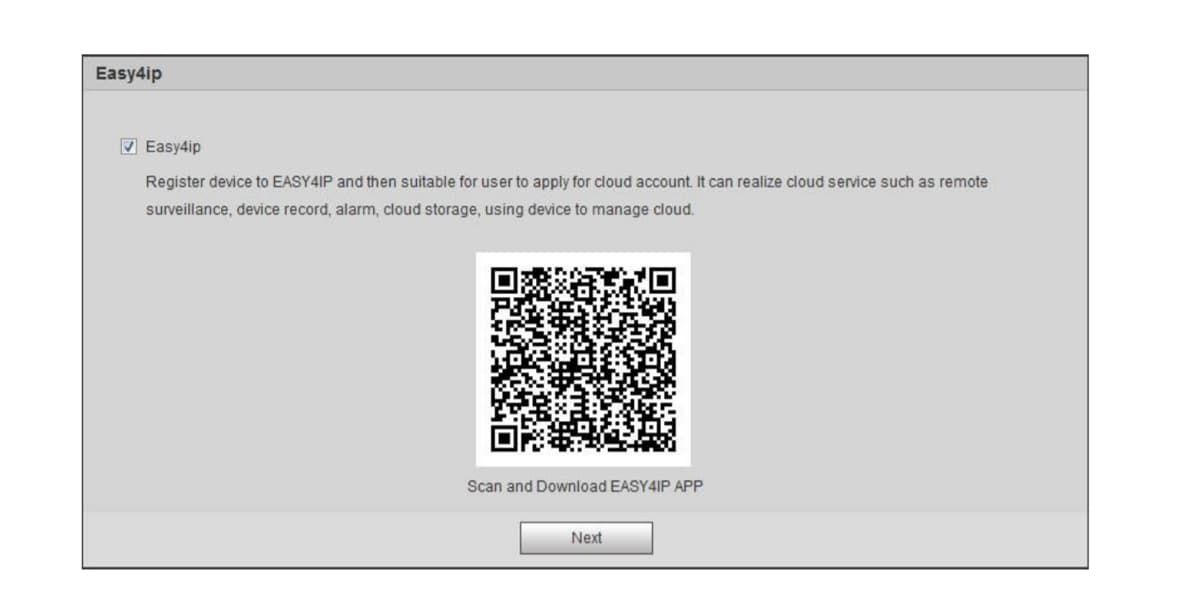
Система продемонстрирует интерфейс Easy4IP. Вы можете зарегистрировать устройство в облаке при инициализации или отложить регистрацию сняв галочку с чекбокса.
В случае необходимости воспользуйтесь сервисом Easy4IP для регистрации устройства
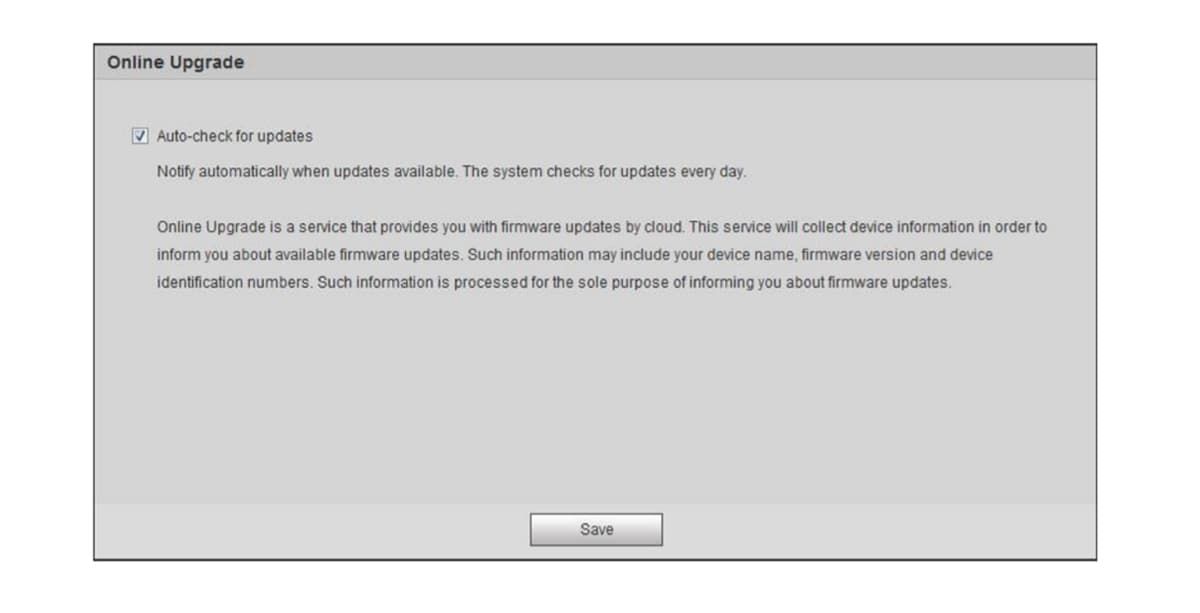
При необходимости включите автообновление. Нажмите «Сохранить». Инициализация закончена.
Вход на WEB интерфейс устройства
После входа на интерфейс IP камеры пользователи могут просматривать живое видео, воспроизводить архив записи и конфигурировать устройство после входа на интерфейс устройства. Вход на интерфейс камеры возможен после инициилизации.
При первом входе на интерфейс устройства будет предложено установить плагин. Пожалуйста загрузите и установите плагин для коректной работы с устройством.
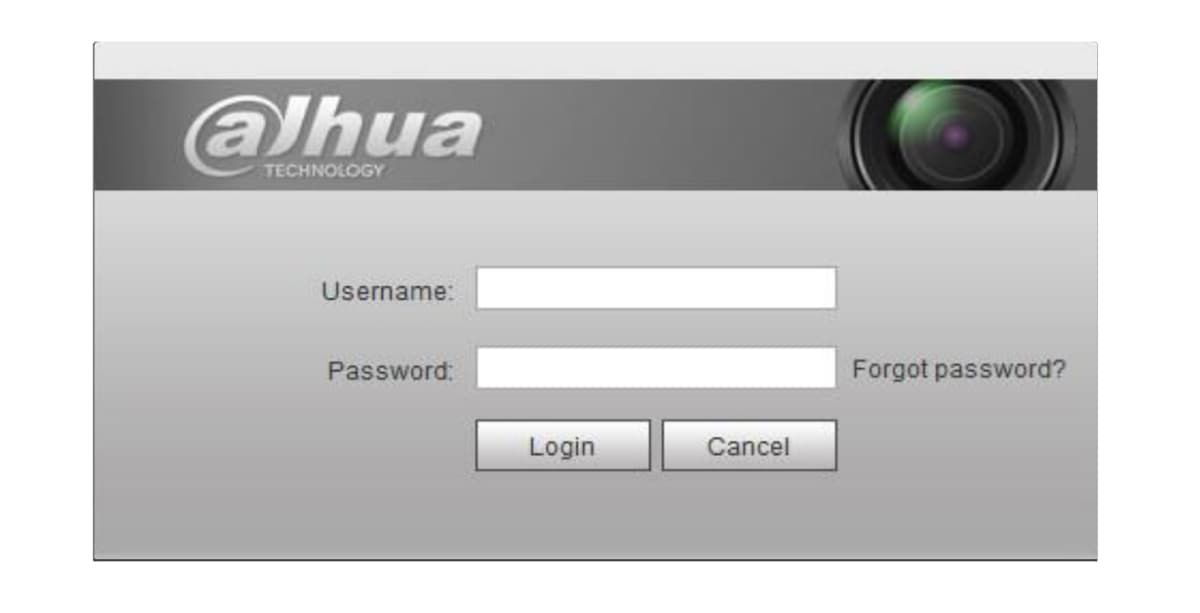
Откройте IE браузер введите IP адрес камеры в адресной строке и нажмите Enter. Система отобразит интерфейс верификации пользователя.
Введите имя пользователя и пароль. Нажмите Login. Вы переходите на интерфейс живого видео.
Источник
Инструкция по инициализации IP-камер Dahua
Инструкция по инициализации IP-камер Dahua
В этой статье мы предоставим мануал, который позволит осуществить ручную инициализацию IP-камер Dahua перед их использованием.
Инструкции действительны для Dahua и ее OEM-версий, продаваемых под различными торговыми марками.
Начнем с объяснения, что такое инициализация камеры. При настройке новой IP-камеры в первый раз (или после сброса пароля / заводских настроек) перед использованием камеры необходимо выполнить процесс инициализации.
Другими словами, вы инициализируете камеру, создавая пароль (по умолчанию камера поставляется без пароля).
Этот процесс был введен для повышения безопасности путем удаления пароля администратора по умолчанию (который раньше был 123456), вместо того, чтобы добавить метод, позволяющий установщику создать этот пароль самостоятельно во время установки.
Раньше эти камеры легко взламывали, так как пользователи не удосужились изменить пароль по умолчанию.
Инициализация может быть выполнена через (локальный) пользовательский интерфейс регистратора.
На видеорегистраторах со встроенными портами PoE этот процесс происходит автоматически, и текущий пароль «admin» записывающего устройства копируется на камеры. Таким образом, пароль, который вы установили для PoE NVR, будет установлен и для камер.
Старые видеорегистраторы (до 2018 г.) требуют инициализировать камеры вручную с помощью компьютера или ноутбука, прежде чем их можно будет использовать.
Если вы устанавливаете несколько камер, которые будут подключены к внешнему коммутатору PoE, камеры необходимо будет инициализировать, и самый быстрый способ сделать это — использовать инструмент настройки.
Инициализация с помощью Config Tool
Процесс инициализации можно выполнить с помощью последней версии инструмента Dahua Config, который представляет собой программное обеспечение, которое позволяет обнаруживать камеры в сети и изменять их настройки. Для ускорения процесса Config Tool также позволяет инициализировать сразу несколько камер.
Шаг 1. Загрузите ( нажмите здесь ), установите, а затем откройте Config Tool. Инструмент автоматически просканирует все камеры, обнаруженные в вашей локальной сети. Установите флажок рядом с устройством, которое нужно инициализировать, и нажмите кнопку «Инициализировать».
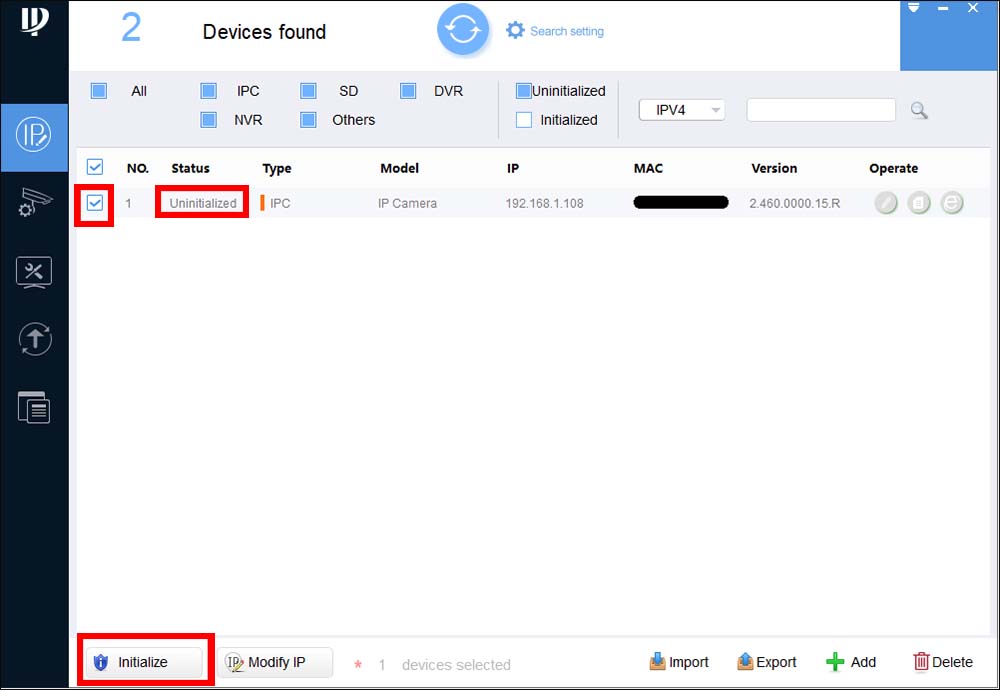
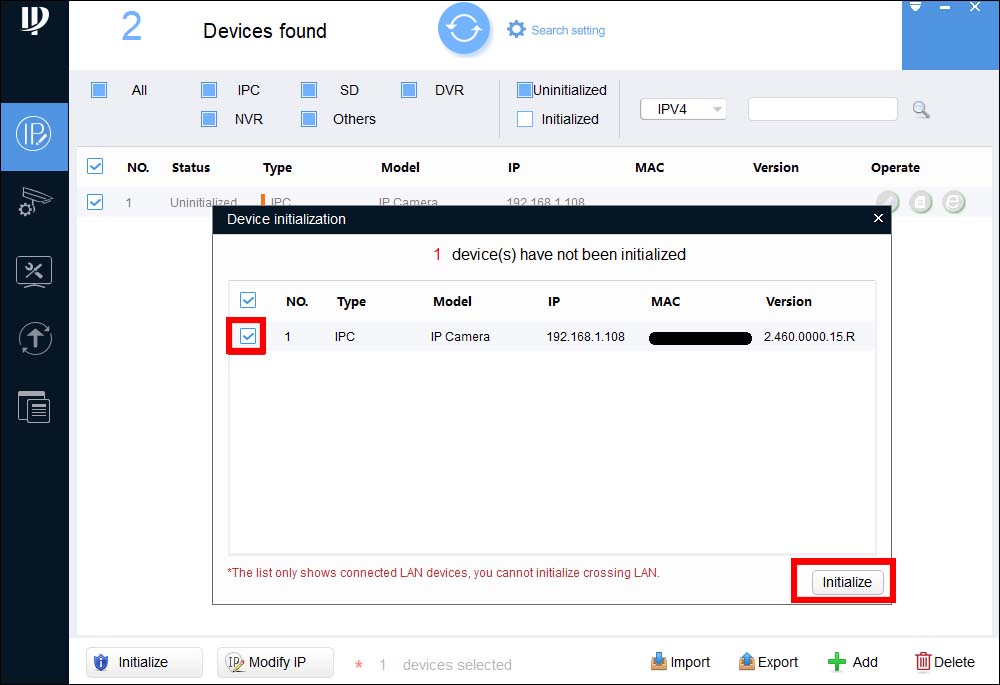
Не используйте неверный адрес электронной почты, возможно, вам потребуется сбросить пароль. Затем выберите « Далее» .
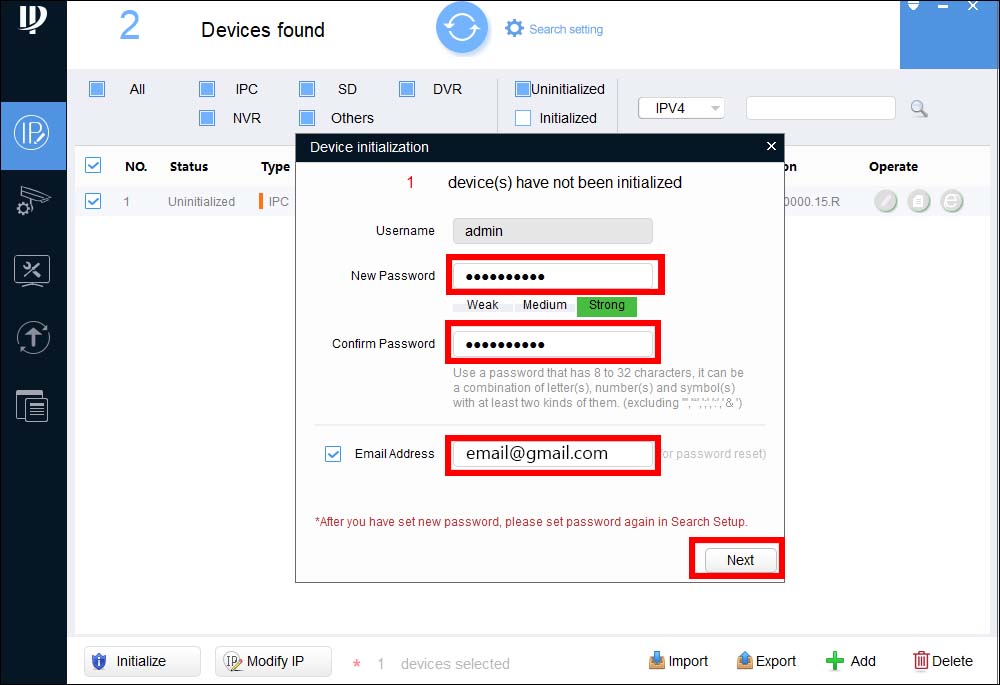
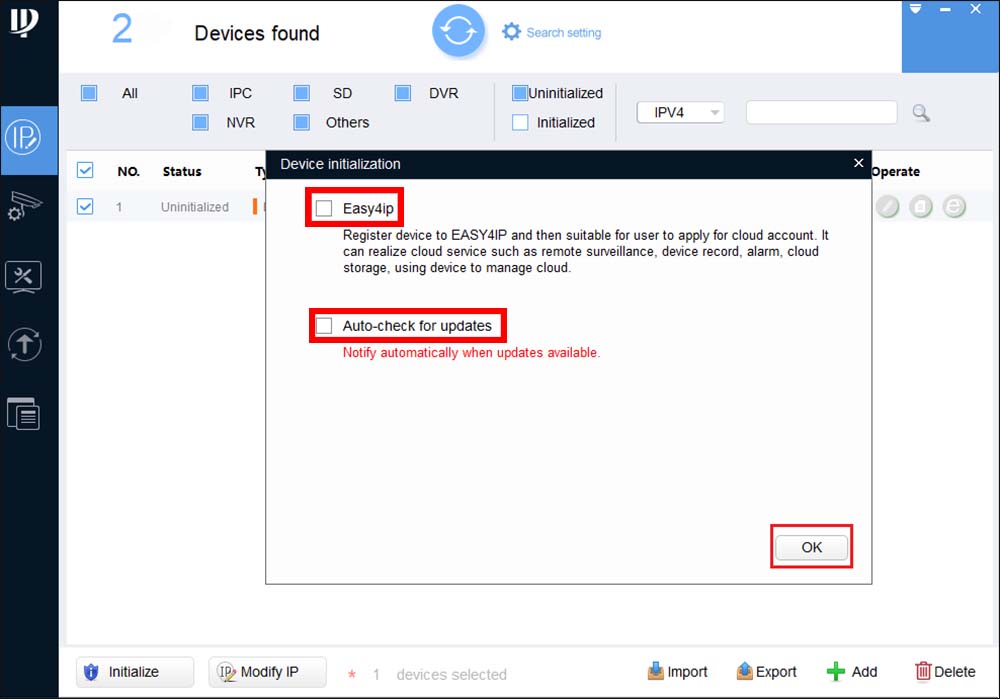
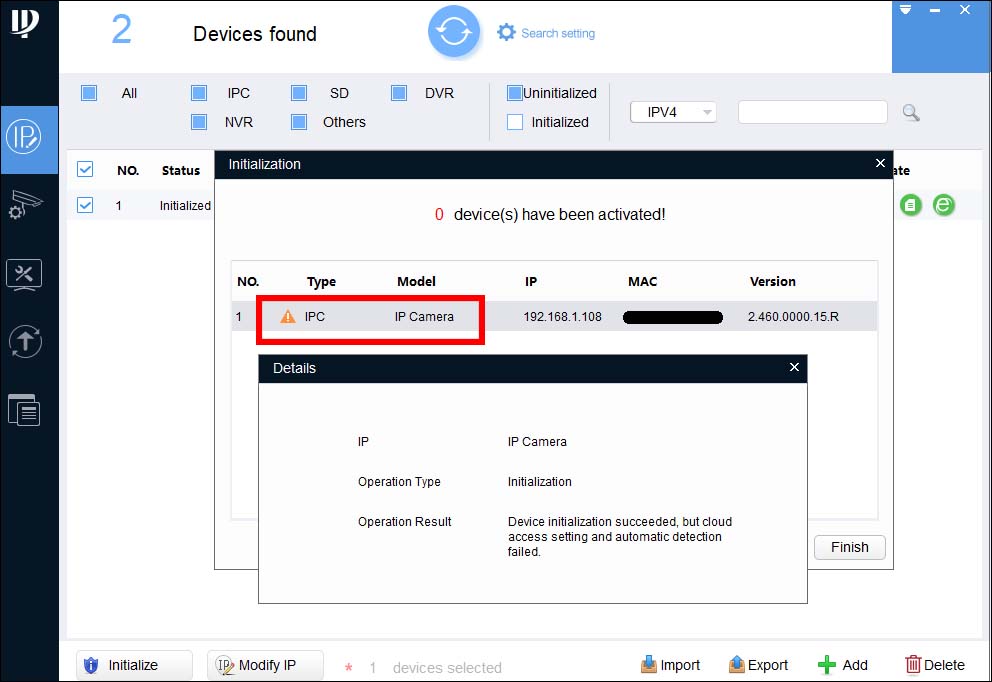

Просто отметьте все камеры, которые необходимо инициализировать, а затем выполните шаги один за другим.
Инициализация с использованием веб-интерфейса
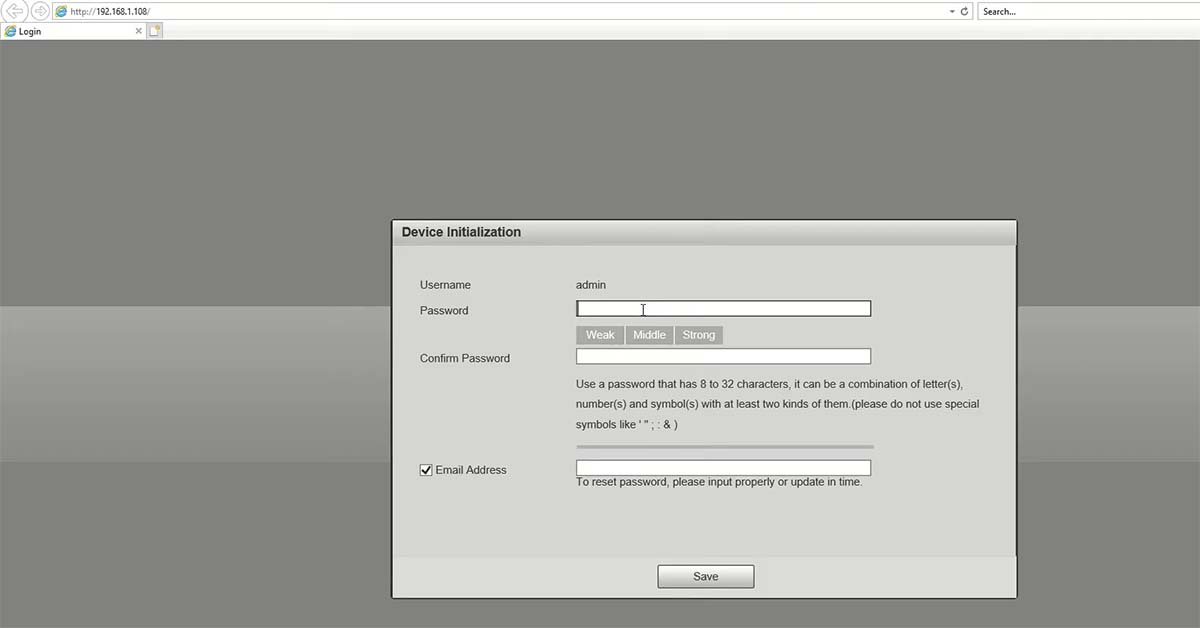
Этот метод не требует использования программного обеспечения Config Tool, его можно использовать, если у вас есть одна IP-камера для настройки и у вас нет доступа к Интернету для загрузки Config Tool.
Введите IP-адрес камеры в строке URL-адреса Internet Explorer, IP-адрес по умолчанию — 192.168.1.108 . Установите любой плагин, который может попросить.
Как видно на рисунке, камера попросит вас создать надежный пароль (поскольку он не имеет предварительно установленного пароля).
Создайте пароль, и он будет инициализирован. После этого вы можете выполнять другие действия с камерой, например изменять IP-адрес.
Добавление камеры в сетевой видеорегистратор
После завершения инициализации следующим шагом будет добавление камеры к записывающему устройству.
Если вы будете подключать камеру напрямую к встроенным портам PoE сетевого видеорегистратора, просто подключите камеру, и она будет обнаружена и добавлена автоматически.
Если камера не показывает изображение, а вместо этого отображает сообщение «Недействительное имя пользователя или пароль», выполните следующие действия.
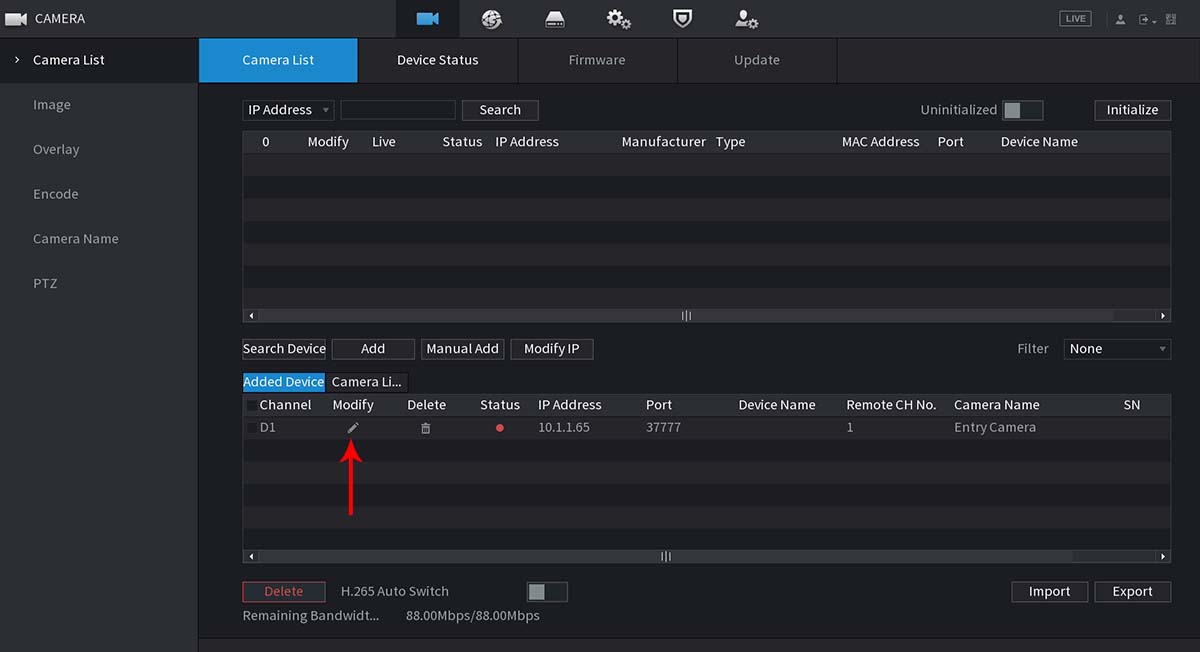
Шаг 1. Откройте раздел «Регистрация камеры», выбрав Главное меню> Камера> Список камер.
Шаг 2. Щелкните карандашом «Изменить / Изменить» камеры с ошибкой. Его статус, скорее всего, будет отмечен красной точкой (как показано ниже).
Шаг 3. В окне «Изменить» введите пароль камеры (он должен был быть установлен во время процесса инициализации в Config Tool) и нажмите «Подключить», затем «ОК».
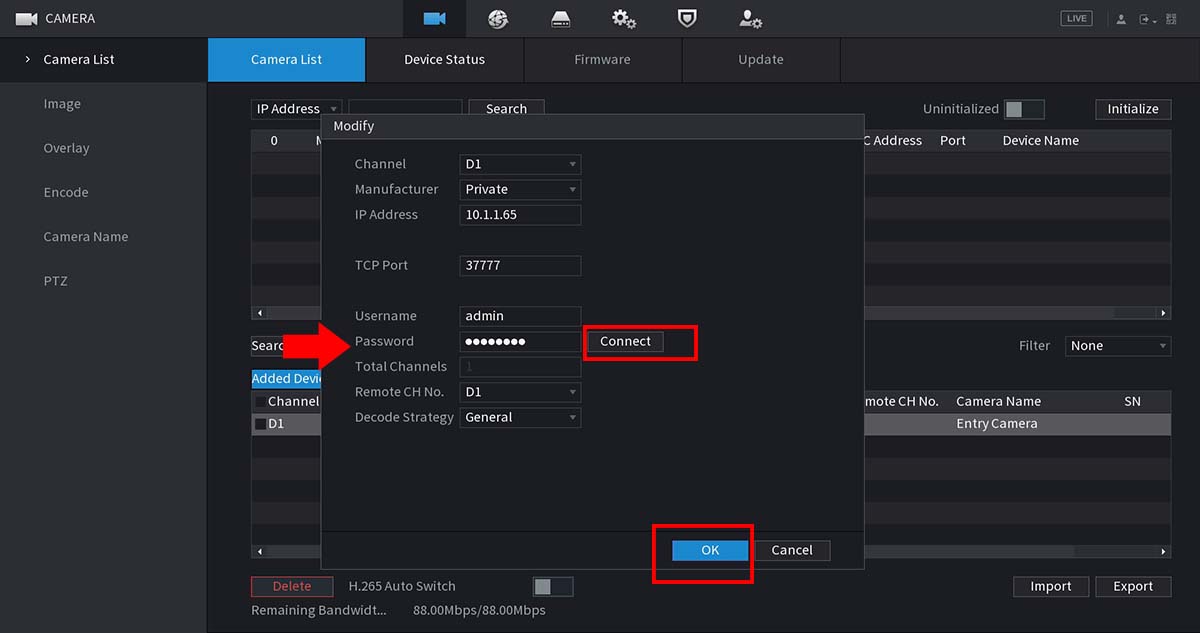
Другими словами, если изображение не отображается, все, что вам нужно сделать, это ввести вновь созданный пароль для камеры.
Как только вы это сделаете, NVR сможет получить доступ к камере и отобразить канал с камеры на экране.
Примечание. Если вы подключаете камеру к записывающему устройству через внешний сетевой коммутатор, IP-адрес камеры должен быть вручную установлен на адрес в пределах сетевого диапазона записывающего устройства.
То есть, если IP-адрес рекордера 192.168.1.100, то IP-адрес камеры должен быть в том же диапазоне (например, 192.168.1.110).
Затем все, что вам нужно сделать, это получить доступ к NVR, перейти в раздел «Устройство / Регистрация» и добавить камеру вручную (введите IP-адрес, введите имя пользователя и пароль).
Затем нажмите «Сохранить», и через 1-2 минуты, если настройки верны, вы сможете увидеть видеоизображение с камеры наблюдения.
Похожие записи
Мы оказываем дистанционную техническую помощь по настройке системы видеонаблюдения. Для этого у вас должна быть установлена последняя версия программы Teamviewer для управления вашим компьютером удалённо. Компьютер должен находиться в одной локальной сети с оборудованием подлежащим настройке. Чтобы узнать стоимость настройки/консультации, свяжитесь с нами и кратко опишите задачу. Вайбер: +380685214735 Telegram: @hdmaster_ua
Есть несколько способов подключения к IP камере с помощью ПК. Камеру можно подключить к сети через роутер или через коммутатор.
Вариант подключения через роутер показан на Рис.1.
Рис. 1
Вариант подключения через сетевой коммутатор показан на Рис.2.
Рис. 2
Для того чтобы найти устройство в сети, а также иметь возможность менять сетевые параметры устройства, в первую очередь, установите одну из программ, способных определять сетевые устройства Dahua в вашей сети. Например — утилиту ConfigTool.
С помощью служебной программы ConfigTool, необходимо изменить IP адрес камеры в соответствие с диапазоном IP адресов вашей локальной сети.
Предположим, что у IP камеры Dahua программа ConfigTool определила IP адрес 192.168.1.108, в то время как ваша сеть имеет диапазон адресов 192.168.0.1 -192.168.0.254. В данном случае, без изменения IP адреса камеры, попасть на её интерфейс с помощью ПК из вашей локальной сети будет невозможно до тех пор, пока вы не измените её адрес на один из свободных адресов, соответствующий вашему диапазону.
Установите маску подсети и шлюз соответствующими вашей подсети. IP адресом шлюза вашей сети является IP адрес роутера вашей сети.
Инициализация
Если вы используете устройство впервые, необходимо инициализировать устройство. Ниже приведен порядок инициализации с помощью WEB интерфейса камеры. Вы также можете инициализировать устройство с помощью утилиты ConfigTool, сетевого видеорегистратора Dahua и платформ мониторинга. Для гарантии безопасного соединения храните пароль в надёжном месте и периодически меняйте его.
Шаг 1.
Откройте браузер IE, введите IP адрес камеры и кликните Enter. После удачного соединения система покажет интерфейс инициализации устройства (Рис.3).
Шаг 2.
Придумайте пароль и укажите адрес своей электронной почты для восстановления пароля.
Внимание! Обязательно указывайте ваш действительный e-mail для сохранения возможности самостоятельного восстановления пароля. Если вы всё-таки забудете пароль, а это довольно распространённый случай, когда на интерфейс устройства заходят не часто, вы сможете отправить на свой e-mail секретный код для сброса старого пароля из интерфейса устройства.
Если вы забыли e-mail или указали недействительный e-mail, в этом случае сбросить пароль можно будет только в сервисном центре.
|
User name |
Имя пользователя по умолчанию — admin |
|
Password |
Пароль должен состоять из 8-32 символов. Безопасный пароль должен включать как цифры так и буквы в обоих регистрах. Пароль не должен содержать специальных знаков “’”,“»”,“;”,“:”,“&” |
|
Confirm Password |
|
|
|
Введите ваш e-mail для возможности последующего сброса пароля. В случае если вы забудете пароль в будущем – вам на e-mail прийдёт код для сброса пароля. |
Шаг 3.
Нажмите «Сохранить». Система выведет пользовательское лицензионное. Ознакомьтесь и согласитесь с лицензионным соглашением.
Шаг 4.
Система продемонстрирует интерфейс Easy4IP. Вы можете зарегистрировать устройство в облаке при инициализации или отложить регистрацию сняв галочку с чекбокса.
Шаг 5.
В случае необходимости воспользуйтесь сервисом Easy4IP для регистрации устройства
При необходимости включите автообновление. Нажмите «Сохранить». Инициализация закончена.
Вход на WEB интерфейс устройства
После входа на интерфейс IP камеры пользователи могут просматривать живое видео, воспроизводить архив записи и конфигурировать устройство после входа на интерфейс устройства. Вход на интерфейс камеры возможен после инициилизации.
При первом входе на интерфейс устройства будет предложено установить плагин. Пожалуйста загрузите и установите плагин для коректной работы с устройством.
Откройте IE браузер введите IP адрес камеры в адресной строке и нажмите Enter. Система отобразит интерфейс верификации пользователя.
Введите имя пользователя и пароль. Нажмите Login. Вы переходите на интерфейс живого видео.
Подробное руководство по установке и настройке IP камеры Dahua
Утилита ConfigTool V3.20.0 (Скачать 16,4 Mb)
Читайте также:
IP видеорегистратор Dahua — передача Push уведомлений по движению на смартфон
Выбираем IP камеру — обзор популярных моделей
Первое включение видеорегистратора Dahua
Сброс пароля в XVR видеорегистраторах Dahua
Сброс пароля в NVR видеорегистраторах Dahua
Выбираем IP камеру в 2020 году: обзор моделей, характеристики, видеоролики
Видеодомофон и электрозамок: выбор кабеля и правила монтажа
Как правильно прокладывать кабель для видеонаблюдения?
Как установить видеонаблюдение самостоятельно?
Acusense DVR и IVMS-4200 — поиск авто и людей
Видеонаблюдение для магазина — устанавливаем камеру над кассой
Проводная или беспроводная? Выбираем охранную сигнализацию
Обзор беспроводной охранной сигнализации Hikvision DS-PWA32-NKG
Охранная сигнализация AX-PRO от Hikvision
В интернет-магазине Hd-master можно купить современные камеры видеонаблюдения, видеорегистраторы, аксессуары и специальный кабель для монтажа, с доставкой по Киеву и Украине, а также получить консультацию по выбору оборудования для самостоятельной установки системы.
Звоните:
(044) 357-22-10 (066) 490-54-71
(098) 103-87-27 (093) 212-26-03


