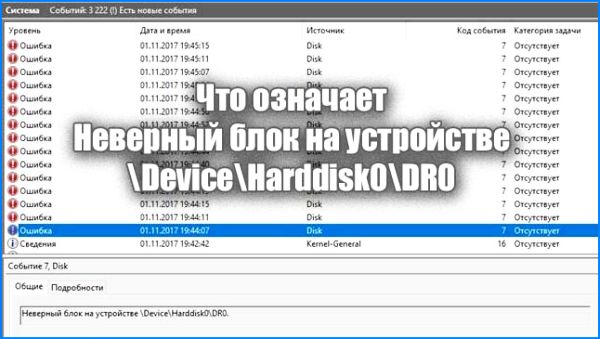
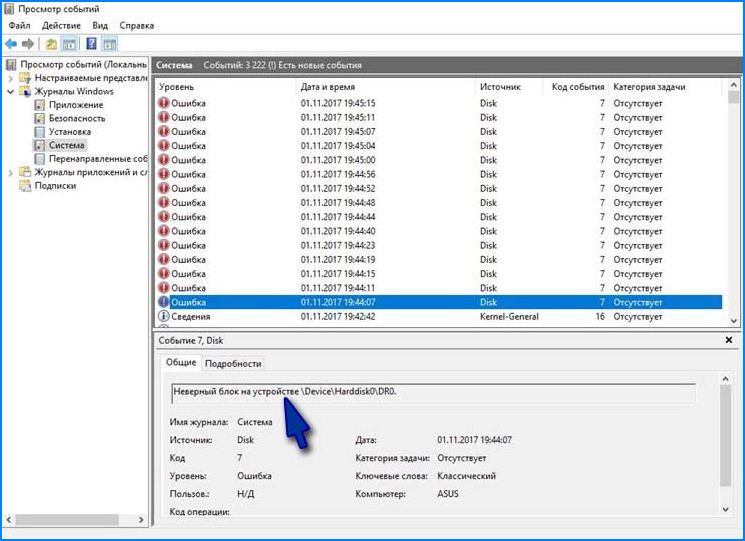
При просмотре журнала событий иногда можно столкнуться с записями «неверный блок на устройстве device harddisk0 dr0». При их постоянном появлении также можем заметить снижение производительности системы.
Содержание
- 1 Что вызывает ошибку в дисковом устройстве
- 2 Способ 1: Сканирования CHKDSK
- 3 Способ 2: Проверка файловой системы
- 4 Способ 3: Сканирование утилитой DISM
Что вызывает ошибку в дисковом устройстве
Эта ошибка указывает на то, что в первом разделе жесткого диска система обнаружила бэд блоки. Нужно помнить, что из такого битого сектора информацию уже считать невозможно, нет никакого способа восстановить его. Но можно заставить операционную систему считать его непригодным для чтения/записи и не использовать в дальнейшем. Таким образом, можно избежать любых сценариев потери данных, когда будем их извлекать программой восстановления.
К сожалению, ошибка «неверный блок на дисковом устройстве device harddisk0 dr0» является одним из первых признаков того, что диск начинает сыпаться. Если наблюдаете такие сообщения, нужно сделать резервное копирование и, таким образом, защитить свои данные от потери.
Предлагаем несколько шагов по устранению этой неполадки.
Внимание! Приведенные ниже методу будут работать до тех пор, пока на диске в наличии рабочие неиспользуемые сектора, которые могут быть использованы для замены битых. В противном случае у вас не будет вариантов, кроме как приобрести новый диск и перенести туда свои данные.
Способ 1: Сканирования CHKDSK
Самый простой способ разрешить ошибку «неверный блок на дисковом устройстве device harddisk0 dr0» — выполнить сканирование CHKDSK. Это встроенная утилита проверяет жесткий диск на наличие битых блоков и переносит любые поврежденные вхождения на рабочие сектора.
Краткая инструкция по запуску утилиты для устранения ошибки:
- Нажмите клавиши Windows + R для вызова диалогового окна «Выполнить». Наберите «cmd» и нажмите Ctrl + Shift + Enter, чтобы открыть командную строку от имени администратора. При запросе контроля учетных записей кликните «Да», чтобы предоставить администраторские права.
- В консоли командной строки введите следующую команду и нажмите Enter для запуска сканирования:
chkdsk /f /r - Если отобразится уведомление, хотите ли вы запланировать операцию при следующей загрузке Windows, введите «Y». Перезагрузите компьютер, и дождитесь завершения проверки устройства.
Примечание. Не выключайте компьютер во время работы утилиты CHKDSK. Это может привести к необратимому повреждению накопителей HDD/SSD, следовательно, к сбою Windows.
Откройте журнал событий. Проверьте, появляются ли новые записи о неверных блоках на device harddisk0 dr0.
Способ 2: Проверка файловой системы
Если утилите CHKDSK не удалось найти битые сектора, попробуйте проверить системную область Windows утилитой SFC. Этот инструмент сканирует все защищенные системные файлы и заменяет поврежденные рабочими копиями, которые хранятся локально в сжатой папке Systemdllcache.
Иногда после сканирования SFC записи с неверными блоками в журнале событий больше не появляются. Это, по-видимому, объясняется тем, что в некоторых случаях ошибка ложно срабатывает через повреждения системных файлов, а не вследствие появления битого сектора.
Нажмите совместно Windows + R, наберите в диалоговом окне «cmd». В результатах поиска кликните правой кнопкой мыши на найденную позицию и выберите запуск от имени администратора.
В командной строке наберите указанную команду и кликните Enter для запуска проверки:
sfc /scannow
После завершения процесса перезагрузите компьютер. Посмотрите, появляются ли неверные блоки на диске device harddisk0 dr0 в журнале.
Если наблюдаете новые события об ошибке устройства, перейдите к следующему шагу.
Способ 3: Сканирование утилитой DISM
Еще одна программа, которая может решить проблему. Система обслуживания образов развертывания и управления (DISM) использует Центр обновления WIndows для загрузки файлов, необходимых для исправления поврежденных копий. Для ее использование потребуется активное подключение к интернету.
Нажмите Win + R для открытия окна «Выполнить». Наберите в поле ввода команду «cmd». Затем сочетанием клавиш Ctrl + Shift + Enter запустите командную строку с правами администратора.
В консоли наберите указанную ниже команду и подтвердите ее запуск на Enter:
DISM.exe /Online /Cleanup-image /Restorehealth
После завершения перезагрузите компьютер. Проверьте, возникают ли в журнале событий новые уведомления о неверных блоках на первом устройстве DeviceHarddisk0DR0.
A number of users encountered the error message “the Device DeviceHarddisk0DR0 has a Bad Block” when opening the Event Viewer. This annoying problem is found to occur on multiple Windows versions. In today’s article, MiniTool solution will assist you with a few accessible methods to fix the issue.
About “Device DeviceHarddisk0DR0 has a Bad Block” Error
Here is what a user described his issue on a forum:
Ok so recently, I was checking my event viewer and found out a lot of errors showing «The device, DeviceHarddisk0DR0, is a bad block. I downloaded seatools from the seagate website and ran it and it failed short DST test but it passed S.M.A.R.T. Currently, I am making a backup of all the data on the hard disk to my external hard drive. Does deleting all partitions and re-creating them solve the bad blocks issue?https://forums.tomshardware.com/threads/getting-the-device-device-harddisk0-dr0-has-a-bad-block-in-event-viewer.2777128/
The device harddisk0 dr0 has a bad block indicates that there may be a bad block on your hard disk. Once a data block goes bad, there is no way to make it recover health status. Fortunately, you can force your operating system to avoid using the block as being bad. This will prevent any data loss.
If you receive the error message “The Device DeviceHarddisk0DR0 has a bad block”, it’s highly recommended that you back up all your data as soon as possible since this error is one of the first signs that your hard drive is going bad.
Possible Causes for the Device Has a Bad Block Issue
You may be curious about the possible causes of this problem. According to the reports we have explored, here are possible causes for the Device DeviceHarddisk0DR0 has a Bad Block issue:
- There are bad sectors on the hard drive. Or any corrupted file system appears in the health sector.
- There may be physical bad tracks or sectors on your hard disk that cause the hard drive cannot work properly.
Well, you may also be struggling to resolve the bad hard disk block issue. Some users are wondering whether I should format the hard disk or delete all partitions like the user on TenForums. To this point, this post will provide you with a few accessible troubleshooting methods.
Note:
The first three methods will be only helpful as long as there are still some healthy unused sectors on the hard drive, which can be used to replace the bad sectors.
In order to get rid of the device harddisk0 dr0 has a bad block error smoothly and gain some other useful tips, here we recommend that you perform each method we have presented one by one.
Solution 1. Running a CHKDSK Scan to Fix Hard Disk Errors
CHKDSK is a built-in utility in Windows that can be used to scan and fix your hard drive error caused by bad sectors, improper or sudden shutdowns, corrupted software, and Meta data corruption. CHKDSK scan is the most common way to fix “the Device DeviceHarddisk0DR0 has a Bad Block” issue.
Here is a full guide on using this built-in utility to fix bad hard disk block error.
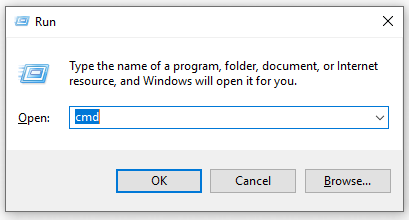
Step 1. Press Win + R key to call out a Run dialog box. Then type “cmd” in the box and press Ctrl + Shift + Enter to open up an elevated Command Prompt. Click Yes to run as administrator when prompted by the UAC (User Account Control).
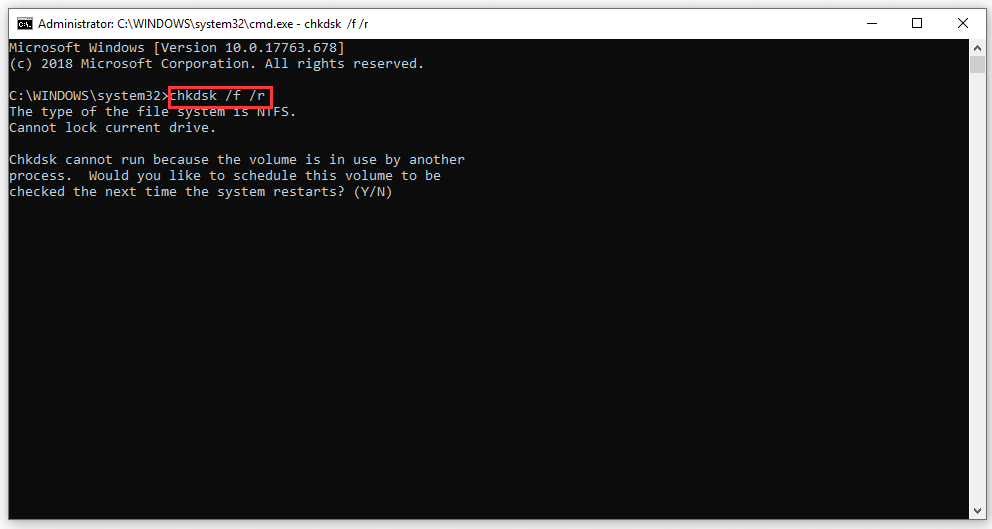
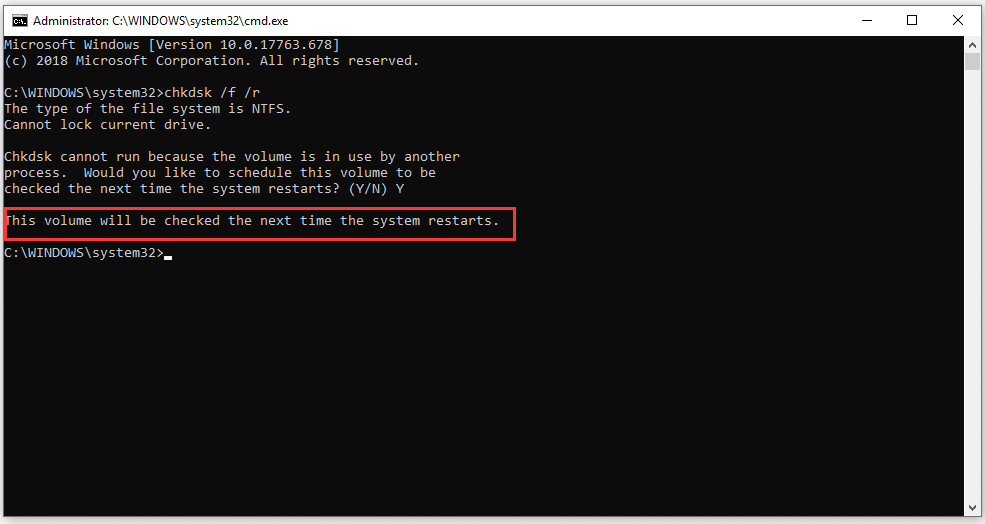
Step 2. Inside the elevated Command Prompt, type the following command and hit Enter to run the CHKDSK scan command: chkdsk /f /r (Note that there is a space in front of the slash).
Step 3. As is shown, you will be asked whether you would like to schedule this operation to be checked the next time, type the letter Y and then hit Enter to schedule it.
Step 4. Reboot your computer, then this built-in utility will check and fix the hard drive errors automatically at the next system startup.
Note: Please make sure your computer keeps running while performing the CHKDSK scan. If your computer is shut down or out of power accidentally during this process, the HDD or SSD might suffer irreversible damage and make your Windows installation unusable.
Step 5. Open the Event Viewer to see if ‘’the Device DeviceHarddisk0DR0 has a Bad Block” still can be seen in new events.
In addition to run a CHKDSK scan, here is a professional third-party software MiniTool Partition Wizard you can use to check and fix the logical errors of your hard drive freely. It is very easy to use and only requires two simple steps.
Solution 2. Running a System File Checker Scan Command
It is not impossible that the CHKDSK scan fails to find any bad sectors on your hard disk. So, you can try to run a system file checker scan to solve the “the device has a bad block” problem.
System File Checker (SFC) is a kind of Windows built-in utility that enables users to scan and restore corrupted system files./p>
There are two simple ways to run a System File Checker scan. The first one is to run sfc /scannow in an elevated Command Prompt. The second choice is to run an SFC scan inside the Windows Powershell (Admin).
Note: Before you perform this scan, please make sure you have updated your Windows 10 to the latest version.
Here is a quick guide on running a system file checker scan in an elevated Command Prompt:
Step 1. Press Win + R key to call out a Run dialog box. Then type “cmd” in the box and press Ctrl + Shift + Enter to open up an elevated Command Prompt. Then you will run an SFC scan with admin privilege.
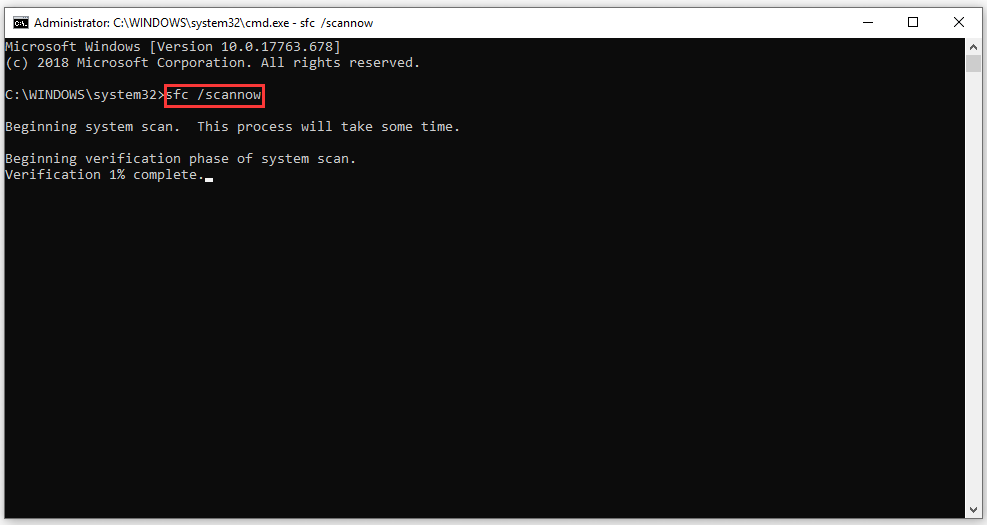
Step 2. Inside the elevated Command Prompt, type the following command and press Enter to start running an SFC scan: sfc /scannow (Note that there is a space in front of the slash).
Step 3. This process will take some time. Once this verification is 100% completed, restart your computer and check if the “The Device DeviceHarddisk0DR0 has a bad block” error is no longer appearing inside the Event Viewer.
Besides, you can also run an SFC scan. Here are detailed steps as follow:
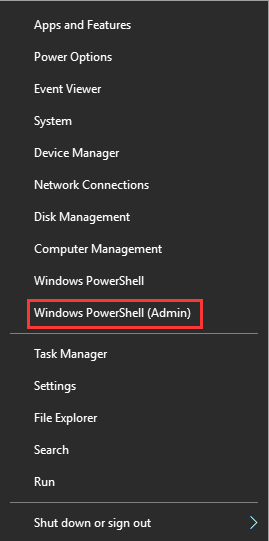
Step 1. Right-click the Start menu at the bottom left and select Powershell (Admin). Then you will get an admin privilege to run a sfc /scannow command.
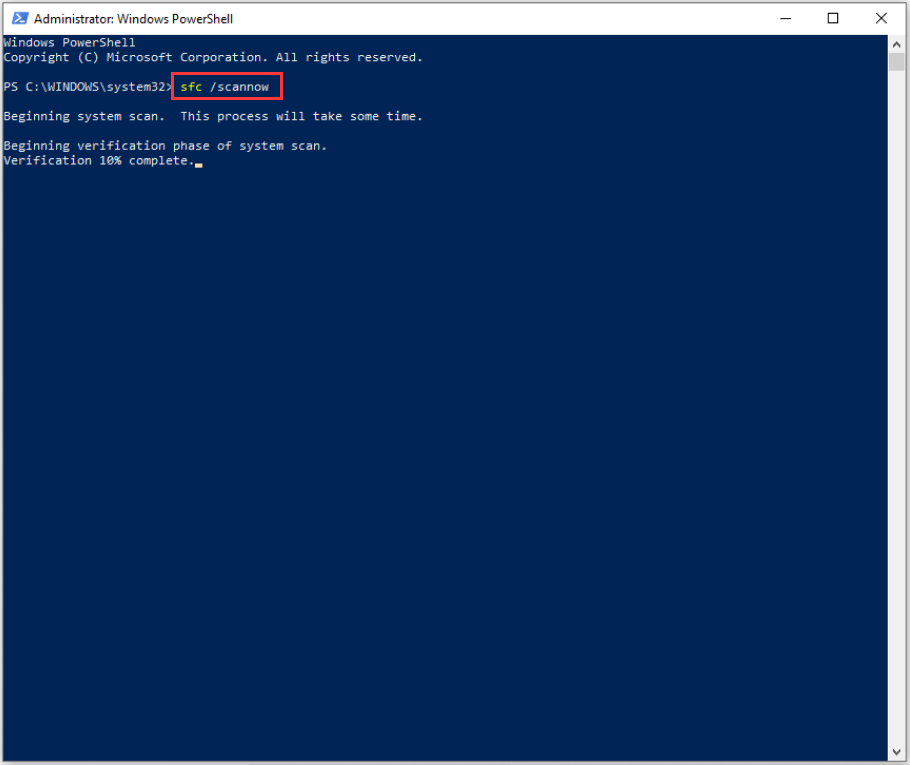
Step 2. Inside the command prompt, type in sfc /scannow command and hit Enter.
Step 3. Then the errors of your hard drive will be fixed automatically in this process. This process will take some time, please wait for the process to complete.
If the above two methods failed to fix bad hard disk block error, try the next method below.
Solution 3. Run DISM Scan Inside Poweshell (Admin)
DISM (Deployment Image Service and Management) scan is another built-in utility in Windows that might get rid of this vexing error. A DISM offers the files that can be used to fix the corrupted instances in Windows Update. In order to run a DISM scan smoothly, here you need a stable internet connection status. /p>
Step 1. Right-click the Start menu at the bottom left and select Powershell (Admin).
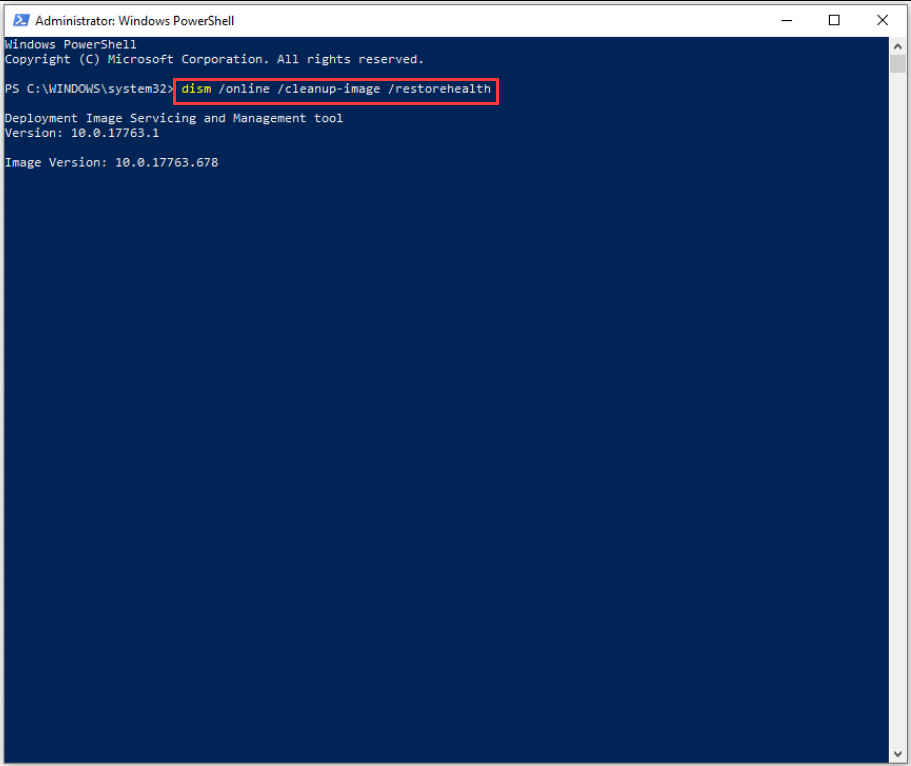
Step 2. In the pop-up window, type the following command: dism /online /cleanup-image /restorehealth and hit Enter.
Step 3. Wait for the process of repairing errors to complete. After that, check if the device has a bad block.
Solution 4. Check If There Are Any Physical Bad Sectors on Your Hard Disk
If all the above methods failed to find and fix the error, then perhaps you need to consider making a disk surface test to check if there are any physical bad sectors in your hard drive.
Here, it is highly recommended that you try to use a free third-party tool MiniTool Partition Wizard. This marvelous software breaks some limitations and offers flexible solutions to optimize your hard drive, such as rebuild MBR, wipe disk, disk surface test and so forth.
It is very easy to make a disk surface test with MiniTool Partition Wizard. Here is a full guide as follow:
Step 1. Download this tool and install it. Then launch this tool to enter the main interface.
Free Download
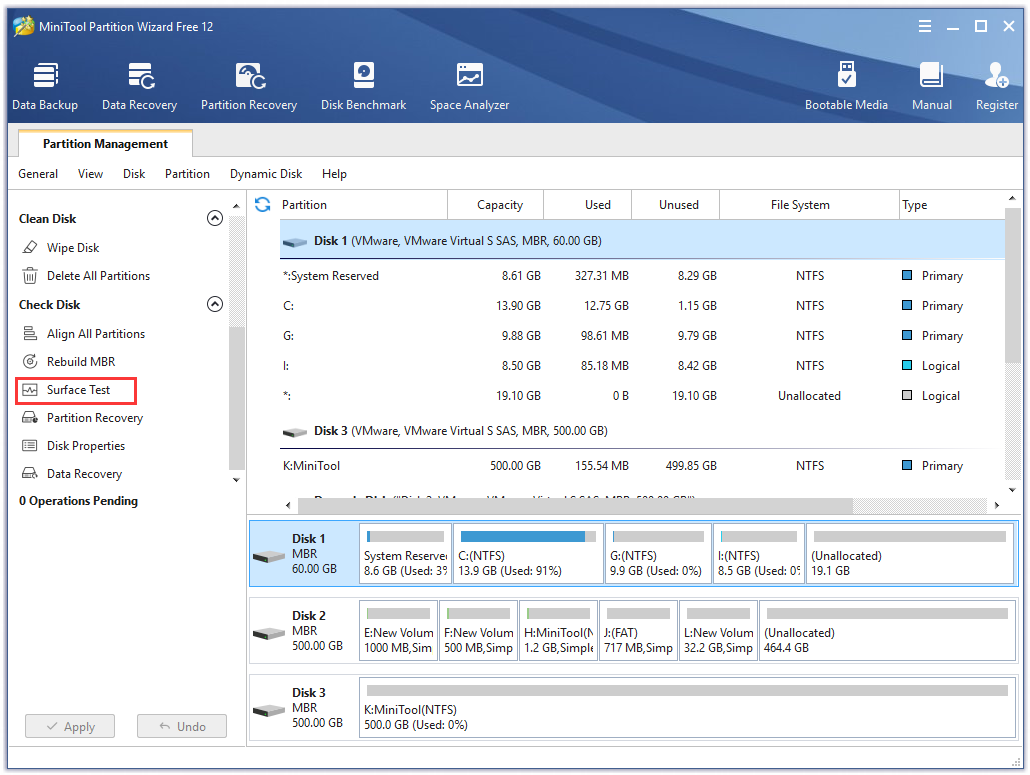
Step 2. Select the hard disk with the device harddisk0 dr0 has a bad block error and select the Surface Test feature from the left action panel.
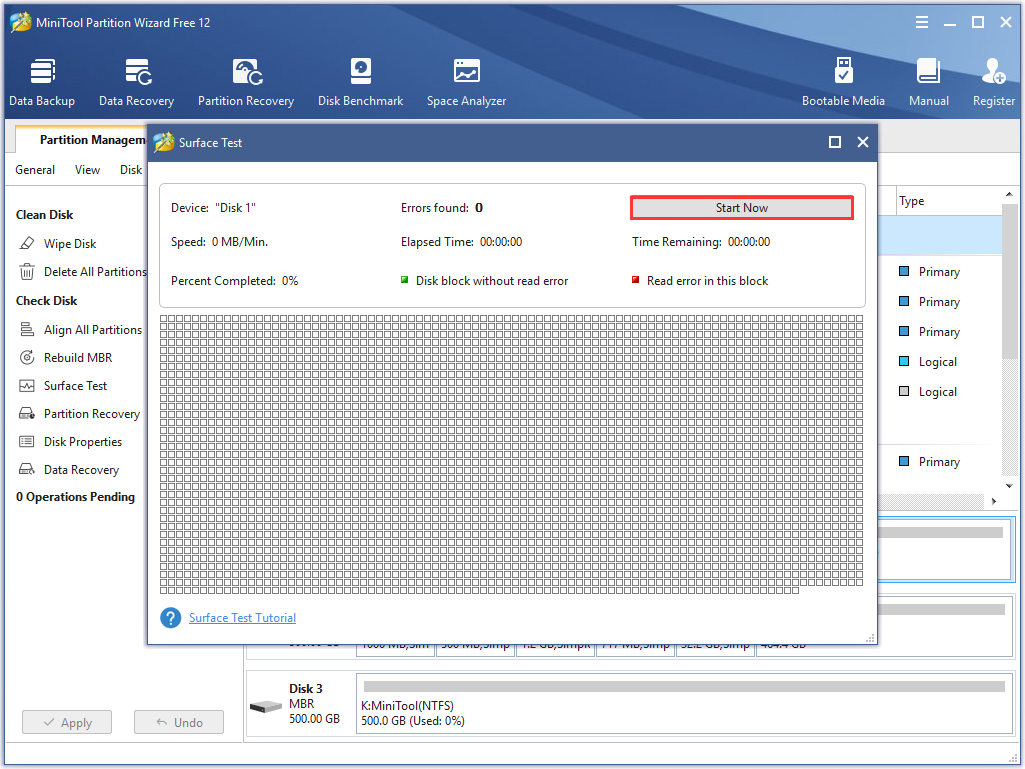
Step 3. Inside the disk surface test window, click on the Start Now button.
Step 4. After that, this program will automatically test the hard disk and show the test result. If there is a bad sector on this disk, the disk block will be marked with a red color. On the contrary, the disk block without bad sectors will be marked as green color.
If there is a large size of the red area, it is an indicator that you should consider using a new trusted hard disk to replace it.
As we mentioned above, some users want to delete all partitions on a hard disk (except the system partition) to solve this problem. Of course, you can, but this method is not beneficial for optimizing your hard disk and causes data loss. Furthermore, you may see “the Device DeviceHarddisk0DR0 has a Bad Block‘’ error later. So, it would be better to purchase a new trusted hard disk.
Solution 5. Use a New Trusted Hard Drive
After all the above methods failed to solve your problem, you have to consider buying a new hard disk. As you know, the first step you need to do is to back up all data of the undesired hard disk.
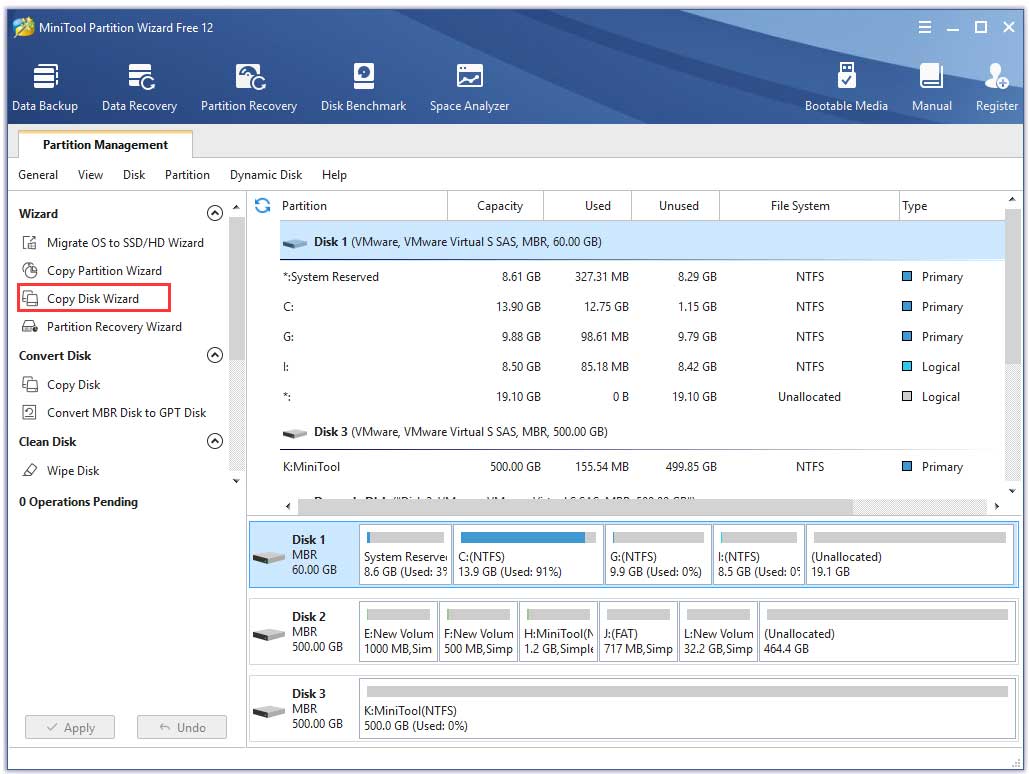
Here you can use MiniTool Partition Wizard to back up the entire disk to a new hard drive.
Tip: Make sure the target disk has enough space to save all data.
Here it is recommended that you purchase a reliable hard drive since we found some users reported that they encounter device harddisk0 dr0 has a bad block after using the hard drive 2 years.
Click to Tweet
Final Words
In today’s article, we explored several methods to troubleshoot the device harddisk0 dr0 has a bad block issue. Hope this post can really solve your problem.
Well, you are welcome to leave your ideas about this problem or send us an email to [email protected]. Much appreciated.
Как исправить ошибку «Неверный блок на устройстве Device Harddisk0 DR0»
При просмотре журнала событий иногда можно столкнуться с записями «неверный блок на устройстве device harddisk0 dr0». При их постоянном появлении также можем заметить снижение производительности системы.
Что вызывает ошибку в дисковом устройстве
Эта ошибка указывает на то, что в первом разделе жесткого диска система обнаружила бэд блоки. Нужно помнить, что из такого битого сектора информацию уже считать невозможно, нет никакого способа восстановить его. Но можно заставить операционную систему считать его непригодным для чтения/записи и не использовать в дальнейшем. Таким образом, можно избежать любых сценариев потери данных, когда будем их извлекать программой восстановления.
К сожалению, ошибка «неверный блок на дисковом устройстве device harddisk0 dr0» является одним из первых признаков того, что диск начинает сыпаться. Если наблюдаете такие сообщения, нужно сделать резервное копирование и, таким образом, защитить свои данные от потери.
Предлагаем несколько шагов по устранению этой неполадки.
Внимание! Приведенные ниже методу будут работать до тех пор, пока на диске в наличии рабочие неиспользуемые сектора, которые могут быть использованы для замены битых. В противном случае у вас не будет вариантов, кроме как приобрести новый диск и перенести туда свои данные.
Способ 1: Сканирования CHKDSK
Самый простой способ разрешить ошибку «неверный блок на дисковом устройстве device harddisk0 dr0» — выполнить сканирование CHKDSK. Это встроенная утилита проверяет жесткий диск на наличие битых блоков и переносит любые поврежденные вхождения на рабочие сектора.
Краткая инструкция по запуску утилиты для устранения ошибки:
- Нажмите клавиши Windows + R для вызова диалогового окна «Выполнить». Наберите «cmd» и нажмите Ctrl + Shift + Enter, чтобы открыть командную строку от имени администратора. При запросе контроля учетных записей кликните «Да», чтобы предоставить администраторские права.
- В консоли командной строки введите следующую команду и нажмите Enter для запуска сканирования:
chkdsk /f /r - Если отобразится уведомление, хотите ли вы запланировать операцию при следующей загрузке Windows, введите «Y». Перезагрузите компьютер, и дождитесь завершения проверки устройства.
Примечание. Не выключайте компьютер во время работы утилиты CHKDSK. Это может привести к необратимому повреждению накопителей HDD/SSD, следовательно, к сбою Windows.
Откройте журнал событий. Проверьте, появляются ли новые записи о неверных блоках на device harddisk0 dr0.
Способ 2: Проверка файловой системы
Если утилите CHKDSK не удалось найти битые сектора, попробуйте проверить системную область Windows утилитой SFC. Этот инструмент сканирует все защищенные системные файлы и заменяет поврежденные рабочими копиями, которые хранятся локально в сжатой папке Systemdllcache.
Иногда после сканирования SFC записи с неверными блоками в журнале событий больше не появляются. Это, по-видимому, объясняется тем, что в некоторых случаях ошибка ложно срабатывает через повреждения системных файлов, а не вследствие появления битого сектора.
Нажмите совместно Windows + R, наберите в диалоговом окне «cmd». В результатах поиска кликните правой кнопкой мыши на найденную позицию и выберите запуск от имени администратора.
В командной строке наберите указанную команду и кликните Enter для запуска проверки:
После завершения процесса перезагрузите компьютер. Посмотрите, появляются ли неверные блоки на диске device harddisk0 dr0 в журнале.
Если наблюдаете новые события об ошибке устройства, перейдите к следующему шагу.
Способ 3: Сканирование утилитой DISM
Еще одна программа, которая может решить проблему. Система обслуживания образов развертывания и управления (DISM) использует Центр обновления WIndows для загрузки файлов, необходимых для исправления поврежденных копий. Для ее использование потребуется активное подключение к интернету.
Нажмите Win + R для открытия окна «Выполнить». Наберите в поле ввода команду «cmd». Затем сочетанием клавиш Ctrl + Shift + Enter запустите командную строку с правами администратора.
В консоли наберите указанную ниже команду и подтвердите ее запуск на Enter:
DISM.exe /Online /Cleanup-image /Restorehealth
После завершения перезагрузите компьютер. Проверьте, возникают ли в журнале событий новые уведомления о неверных блоках на первом устройстве DeviceHarddisk0DR0.
Новочеркасск.net
городской форум
Новочеркасск.net
городской форум Новочеркасска
выскакивает ошибка «В устройстве нет диска. Вставте диск в у
Модератор: MaxP
выскакивает ошибка «В устройстве нет диска. Вставте диск в у
Re: выскакивает ошибка «В устройстве нет диска. Вставте диск в у
Как отключить автозапуск
Нажмите Пуск –> Выполнить…;
– откроется окно Запуск программы;
– в текстовое поле Открыть введите gpedit.msc –> OK;
– в окне Групповая политика выберите Политика «Локальный компьютер» –> Конфигурация компьютера –> Административные шаблоны –> Система;
– справа выберите политику Отключить автозапуск;
– выберите меню Действие –> Свойства (или сделайте двойной щелчок левой кнопкой мыши по строке Отключить автозапуск);
– в окне Свойства: Отключить автозапуск установите переключатель Включен (состояние по умолчанию – Не задан);
– в выпадающем списке «Отключить автозапуск на:» выберите «всех дисководах» –> OK;
– выберите Конфигурация пользователя –> Административные шаблоны –> Система;
– справа выберите политику Отключить автозапуск;
– выберите меню Действие –> Свойства (или сделайте двойной щелчок левой кнопкой мыши по строке Отключить автозапуск);
– в окне Свойства: Отключить автозапуск установите переключатель Включен (состояние по умолчанию – Не задан);
– в выпадающем списке «Отключить автозапуск на:» выберите «всех дисководах» –> OK;
– закройте окно Групповая политика;
– для вступления в силу изменений без перезагрузки ПК сверните все открытые окна (щелкнув кнопку Свернуть все окна на панели Быстрый запуск, или нажав сочетание клавиш – клавиши с логотипом Windows + D), нажмите клавишу F5 (или щелкните правой кнопкой мыши по свободной от значков поверхности Рабочего стола, в открывшемся контекстном меню выберите Обновить).
Отключение автозапуска с помощью Редактора реестра
Нажмите Пуск –> Выполнить… –> в поле Открыть введите regedit –> OK;
– в окне Редактор реестра раскройте ветвь [HKEY_CURRENT_USERSoftwareMicrosoftWindowsCurrentVersionPoliciesExplorer];
– для отключения всех дисководов установите значение REG_DWORD-параметра NoDriveTypeAutoRun равным ff;
– раскройте ветвь [HKEY_LOCAL_MACHINESYSTEMCurrentControlSetServicesCdrom];
– для отключения автозапуска компакт-дисков установите значение REG_DWORD-параметра AutoRun равным 0;
– закройте Редактор реестра.
РЕШЕНО: В устройстве нет диска. Вставьте диск в устройство
На одном из компьютеров после включения и запуска любой программы стала появляться ошибка: В устройстве нет диска. Вставьте диск в устройство. Появлялась эта ошибка при запуске абсолютно любой программы.
Алгоритм действий: чистим автозагрузку от любых подозрительных программ и утилит. Проверяем всё антивирусом. Желательно запустить утилиты dr.web, avz, malwarebytes. Так как даже наличие антивируса со свежими базами не гарантия. У меня стоял касперский со свежими базами.
Далее после того как прогнали антивирусом и утилитами смотрим на результат. Если Это ничего не дало, пробуем вариант №2: запускаем реестр regedit.exe. Идём в ветку реестра hkey_local_machine — system — CurrentControlSet — Control- Windows. Справа находим параметр ErrorMode, нажимаем, ставим десятичную систему и вместо 0 ставим 2. Ниже на скриншотах:
Нажимаем Ок. И выходим из реестра. Проверяем. После этого у меня заработало всё в обычном режиме. Ошибка пропала
Драйвер обнаружил исправление ошибки контроллера
Каждый раз, когда вы подключаете USB-накопитель к компьютеру, вы снова и снова получаете это сообщение об ошибке. водитель обнаружил ошибку управления на жестком диске устройства 1 DR1 или DR3? Многие пользователи сообщили об этой проблеме. Но не волнуйтесь, вы можете попробовать следующие решения для ее решения.
Может ли большой файл подкачки и недостаточно ОЗУ вызвать эту ошибку?
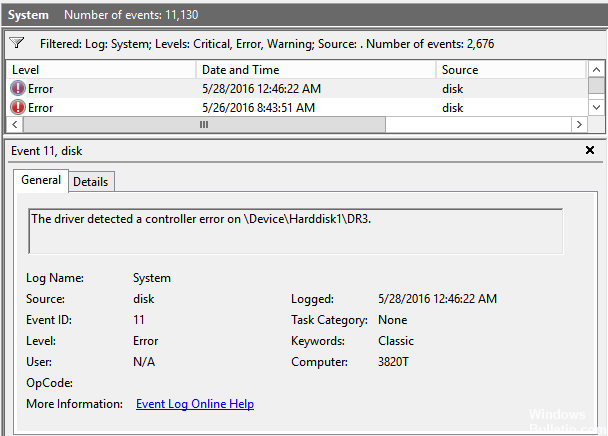
Сообщение об ошибке в окне просмотра событий выглядит примерно так:
Драйвер обнаружил ошибку контроллера в Device Harddisk1 DR3
Использование управления дисками
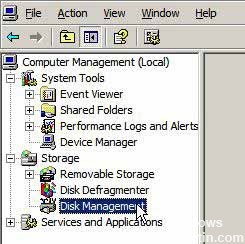
Управление дисками было улучшено в Windows 2000 и более поздних операционных системах. Вы можете использовать управление дисками для отображения этой информации без использования редактора реестра. Чтобы узнать, где находится конкретный жесткий диск в вашей системе, выполните следующие действия:
Запустите консоль управления дисками (diskmgmt.msc).
Исправление обновления января 2020 года:
Мы рекомендуем вам попробовать этот новый инструмент. Он исправляет множество компьютерных ошибок, а также защищает от таких вещей, как потеря файлов, вредоносное ПО, сбои оборудования и оптимизирует ваш компьютер для максимальной производительности. Это исправило наш компьютер быстрее, чем делать это вручную:
- Шаг 1: Скачать PC Repair & Optimizer Tool (Windows 10, 8, 7, XP, Vista — Microsoft Gold Certified).
- Шаг 2: Нажмите «Начать сканирование”, Чтобы найти проблемы реестра Windows, которые могут вызывать проблемы с ПК.
- Шаг 3: Нажмите «Починить все», Чтобы исправить все проблемы.

(дополнительное предложение для Advanced System Repair Pro -> Cайт | Лицензионное соглашение | Политика Kонфиденциальности | Удалить)
Показать графическое представление ваших жестких дисков. Щелкните правой кнопкой мыши на серой области базового или динамического диска, номер диска которого соответствует номеру жесткого диска # в сообщении об ошибке.
Нажмите на свойства. Свойства содержат информацию о типе устройства, которая сообщает вам, является ли диск IDE или SCSI, а также отображает имя изготовителя оборудования физического устройства и имя адаптера, к которому оно подключено.
Перенесите свой USB-ключ на другой порт.
Некоторые области вашего компьютера могут быть повреждены, и вы можете попробовать изменить порт USB-накопителя. Для некоторых пользователей это сработало. Если это не решит вашу проблему «Драйвер обнаружил ошибку контроллера в проблеме Device Harddisk1 DR1 ″», то вам следует повторить попытку.
Обновление драйвера USB
Иногда USB-порт не распознает подключенное устройство, и для «поиска» устройства требуется перезагрузка системы.
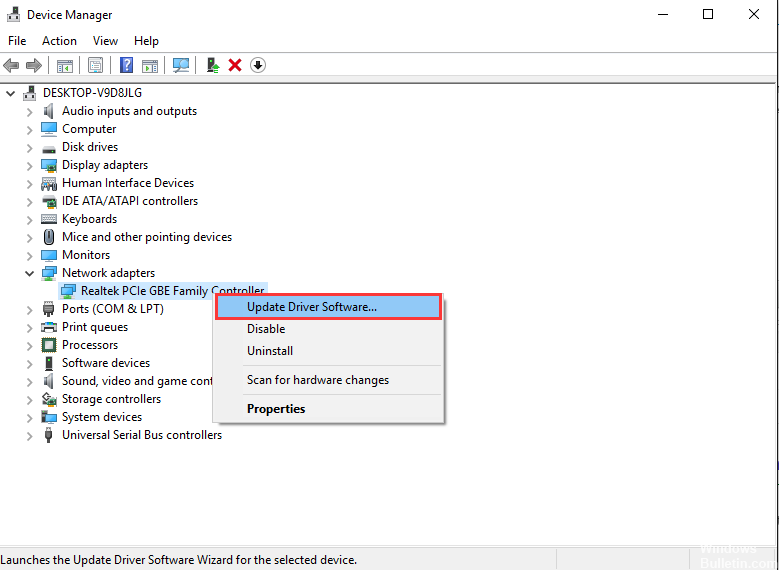
Устаревший USB драйверы также может быть проблемой и вызывать высокий процент ошибки в USB операция. В системе Windows вы можете обновить драйвер, выполнив следующие действия:
- Нажмите Пуск / Управление системой / Система.
- Нажмите на вкладку «Оборудование», затем нажмите «Диспетчер устройств».
- Нажмите на Универсальный контроллер последовательной шины.
- Нажмите здесь, чтобы выделить и выбрать USB-компонент, который вы хотите обновить.
- Щелкните правой кнопкой мыши выделенный выбор и выберите «Обновить программное обеспечение драйвера» в раскрывающемся меню.
- Следуйте инструкциям мастера обновления драйверов, чтобы обновить драйверы USB.
Я надеюсь, что это поможет вам. Если у вас есть какие-либо вопросы или предложения, пожалуйста, не стесняйтесь оставлять комментарии.
CCNA, веб-разработчик, ПК для устранения неполадок
Я компьютерный энтузиаст и практикующий ИТ-специалист. У меня за плечами многолетний опыт работы в области компьютерного программирования, устранения неисправностей и ремонта оборудования. Я специализируюсь на веб-разработке и дизайне баз данных. У меня также есть сертификат CCNA для проектирования сетей и устранения неполадок.
РЕШЕНО: В устройстве нет диска. Вставьте диск в устройство
На одном из компьютеров после включения и запуска любой программы стала появляться ошибка: В устройстве нет диска. Вставьте диск в устройство. Появлялась эта ошибка при запуске абсолютно любой программы.
Алгоритм действий: чистим автозагрузку от любых подозрительных программ и утилит. Проверяем всё антивирусом. Желательно запустить утилиты dr.web, avz, malwarebytes. Так как даже наличие антивируса со свежими базами не гарантия. У меня стоял касперский со свежими базами.
Далее после того как прогнали антивирусом и утилитами смотрим на результат. Если Это ничего не дало, пробуем вариант №2: запускаем реестр regedit.exe. Идём в ветку реестра hkey_local_machine — system — CurrentControlSet — Control- Windows. Справа находим параметр ErrorMode, нажимаем, ставим десятичную систему и вместо 0 ставим 2. Ниже на скриншотах:
Нажимаем Ок. И выходим из реестра. Проверяем. После этого у меня заработало всё в обычном режиме. Ошибка пропала
��� � ����� ����:
�� ���������� ������� smartctl -t long /dev/sda:
ID# ATTRIBUTE_NAME FLAG VALUE WORST THRESH TYPE UPDATED WHEN_FAILED RAW_VALUE
1 Raw_Read_Error_Rate 0x002f 200 200 051 Pre-fail Always — 0
3 Spin_Up_Time 0x0027 150 150 021 Pre-fail Always — 9475
4 Start_Stop_Count 0x0032 100 100 000 Old_age Always — 13
5 Reallocated_Sector_Ct 0x0033 200 200 140 Pre-fail Always — 0
7 Seek_Error_Rate 0x002e 200 200 000 Old_age Always — 0
9 Power_On_Hours 0x0032 081 081 000 Old_age Always — 14281
10 Spin_Retry_Count 0x0032 100 253 000 Old_age Always — 0
11 Calibration_Retry_Count 0x0032 100 253 000 Old_age Always — 0
12 Power_Cycle_Count 0x0032 100 100 000 Old_age Always — 11
192 Power-Off_Retract_Count 0x0032 200 200 000 Old_age Always — 9
193 Load_Cycle_Count 0x0032 193 193 000 Old_age Always — 21230
194 Temperature_Celsius 0x0022 118 107 000 Old_age Always — 34
196 Reallocated_Event_Count 0x0032 200 200 000 Old_age Always — 0
197 Current_Pending_Sector 0x0032 200 200 000 Old_age Always — 37
198 Offline_Uncorrectable 0x0030 200 200 000 Old_age Offline — 17
199 UDMA_CRC_Error_Count 0x0032 200 200 000 Old_age Always — 0
200 Multi_Zone_Error_Rate 0x0008 200 200 000 Old_age Offline — 30
����� ���������� ������� smartctl -t long /dev/sda:
ID# ATTRIBUTE_NAME FLAG VALUE WORST THRESH TYPE UPDATED WHEN_FAILED RAW_VALUE
1 Raw_Read_Error_Rate 0x002f 200 200 051 Pre-fail Always — 0
3 Spin_Up_Time 0x0027 150 150 021 Pre-fail Always — 9475
4 Start_Stop_Count 0x0032 100 100 000 Old_age Always — 13
5 Reallocated_Sector_Ct 0x0033 200 200 140 Pre-fail Always — 0
7 Seek_Error_Rate 0x002e 200 200 000 Old_age Always — 0
9 Power_On_Hours 0x0032 081 081 000 Old_age Always — 14298
10 Spin_Retry_Count 0x0032 100 253 000 Old_age Always — 0
11 Calibration_Retry_Count 0x0032 100 253 000 Old_age Always — 0
12 Power_Cycle_Count 0x0032 100 100 000 Old_age Always — 11
192 Power-Off_Retract_Count 0x0032 200 200 000 Old_age Always — 9
193 Load_Cycle_Count 0x0032 193 193 000 Old_age Always — 21263
194 Temperature_Celsius 0x0022 119 107 000 Old_age Always — 33
196 Reallocated_Event_Count 0x0032 200 200 000 Old_age Always — 0
197 Current_Pending_Sector 0x0032 200 200 000 Old_age Always — 37
198 Offline_Uncorrectable 0x0030 200 200 000 Old_age Offline — 19
199 UDMA_CRC_Error_Count 0x0032 200 200 000 Old_age Always — 0
200 Multi_Zone_Error_Rate 0x0008 200 200 000 Old_age Offline — 33
������� ��� ����� �������� ����������. �� �������, ������ ��������� 1, 5, 196 — �������, � 197, 198, 200 — ���������…
� �������� 199 �������� �� ��, ��� ����� ������������ ����� � ������������ ��������� �ӣ ������, ��?
�� ��������� �� 193 ��������, ��� ����� ������ 4-�?
����� �� ������ SMART, ��� �������?

