Содержание
- Устранение проблемы с ошибкой обнаружения аудиоустройства
- Способ 1: Средство устранения проблем
- Способ 2: Включение аудиоустройства в «Панели управления»
- Способ 3: Включение аудиоадаптера
- Способ 4: Установка драйверов
- Способ 5: Восстановление системы
- Вопросы и ответы
Одной из причин, почему может отсутствовать звук на компьютерах под управлением Виндовс 7 является ошибка «Выходное устройство не установлено». Давайте разберемся, в чем состоит её суть и как бороться с указанной проблемой.
Читайте также:
Не работают наушники в Виндовс 7
Проблема с отсутствием звука на ПК под управлением Виндовс 7
Устранение проблемы с ошибкой обнаружения аудиоустройства
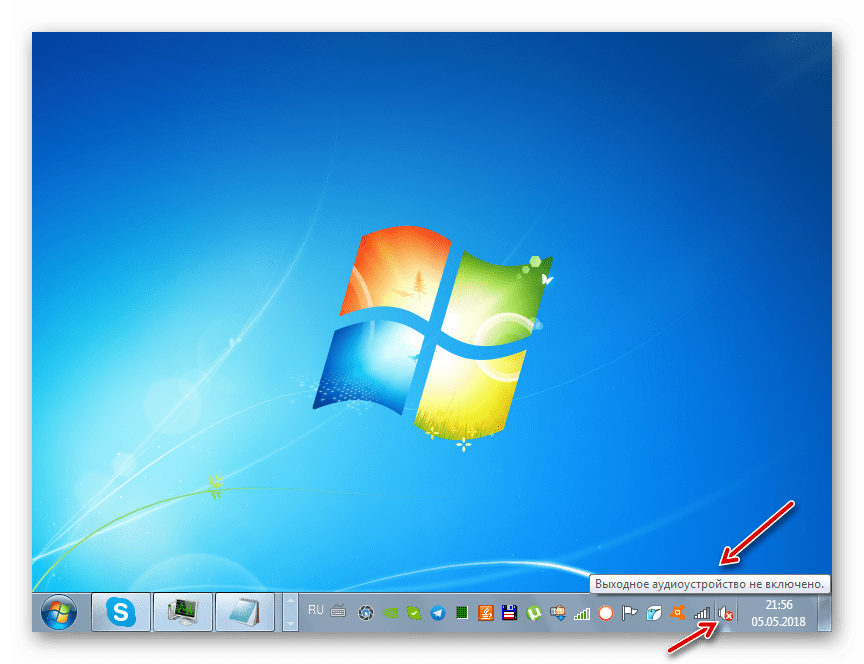
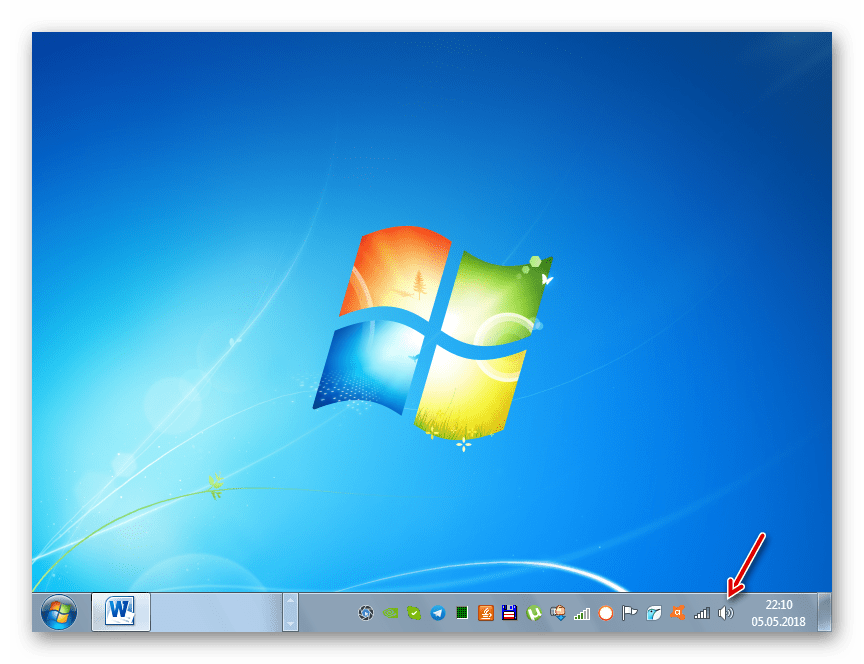
Основным признаком изучаемой нами ошибки является отсутствие звука у подключенных к ПК аудиоустройств, а также крестик на значке в виде динамика в области уведомлений. При наведении курсора на эту иконку появляется всплывающее сообщение «Выходное устройство не включено (не установлено)».
Вышеуказанная ошибка может возникнуть как вследствие банального отключения аудиоустройства самим пользователем, так и по причине различных сбоев и неполадок в системе. Выясним способы решения проблемы на Виндовс 7 в различных ситуациях.
Способ 1: Средство устранения проблем
Наиболее простой и интуитивно понятный способ ликвидации указанной ошибки осуществляется через системное средство устранения проблем.
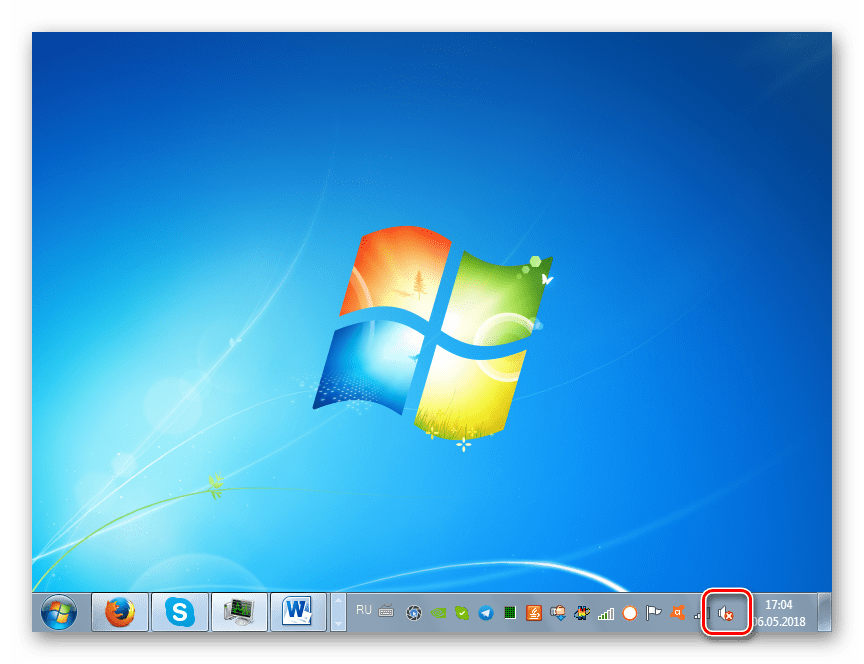
- Если у вас в области уведомлений на значке динамика появился крестик, сигнализирующий о возможных неполадках со звуком, то в этом случае для запуска средства устранения проблем достаточно щелкнуть по нему левой кнопкой мыши.
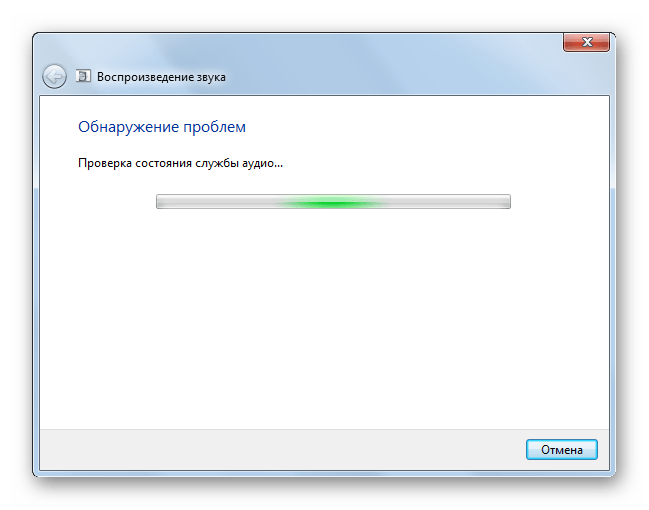
- Средство устранения проблем будет запущено и произведет проверку системы на предмет наличия неполадок со звуком.
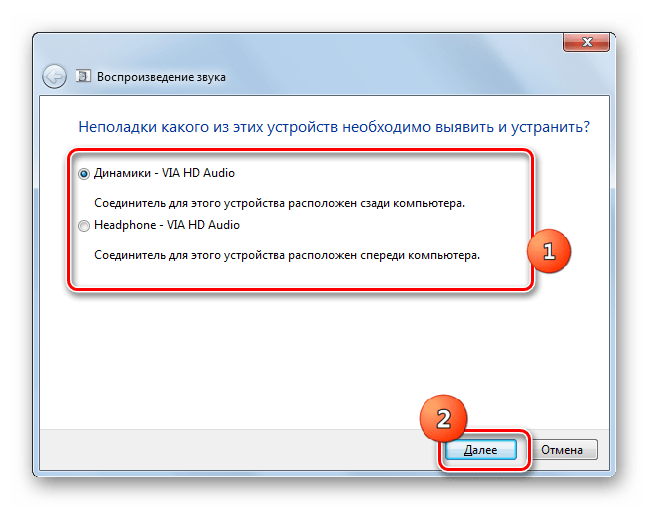
- После того как неполадки будут обнаружены, утилита предложит их исправить. Если будет предоставлено несколько вариантов действий, то необходимо выбрать наиболее предпочтительный для вас. После того как выбор сделан, жмите «Далее».
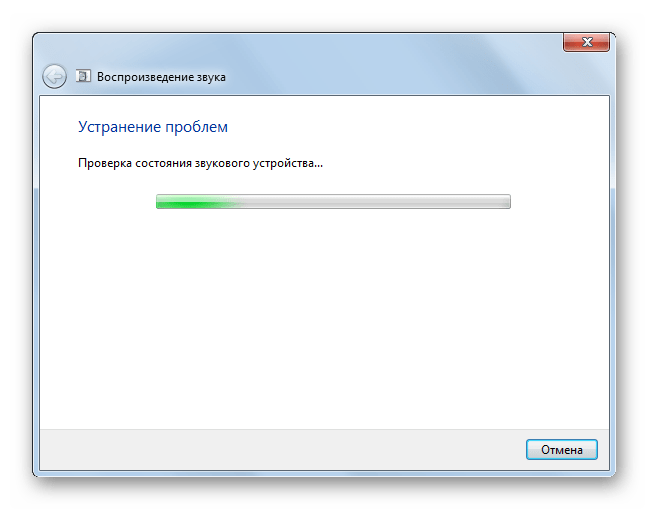
- Будет запущена и выполнена процедура устранения проблемы.
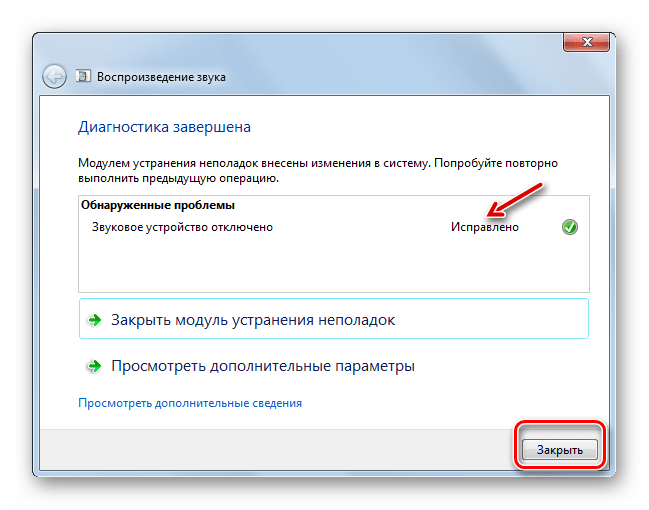
- Если ее результат будет успешным, в окне утилиты напротив наименования проблемы отобразится статус «Исправлено». После этого ошибка с обнаружением выходного устройства будет устранена. Вам остается только нажать на кнопку «Закрыть».
Если же средство устранения проблем не смогло исправить ситуацию, то в этом случае переходите к следующим способам ликвидации неисправности со звуком, описанным в этой статье.
Способ 2: Включение аудиоустройства в «Панели управления»
При возникновении указанной ошибки вы должны проверить, а не отключено ли аудиоустройства в разделе «Панели управления», отвечающем за звук.
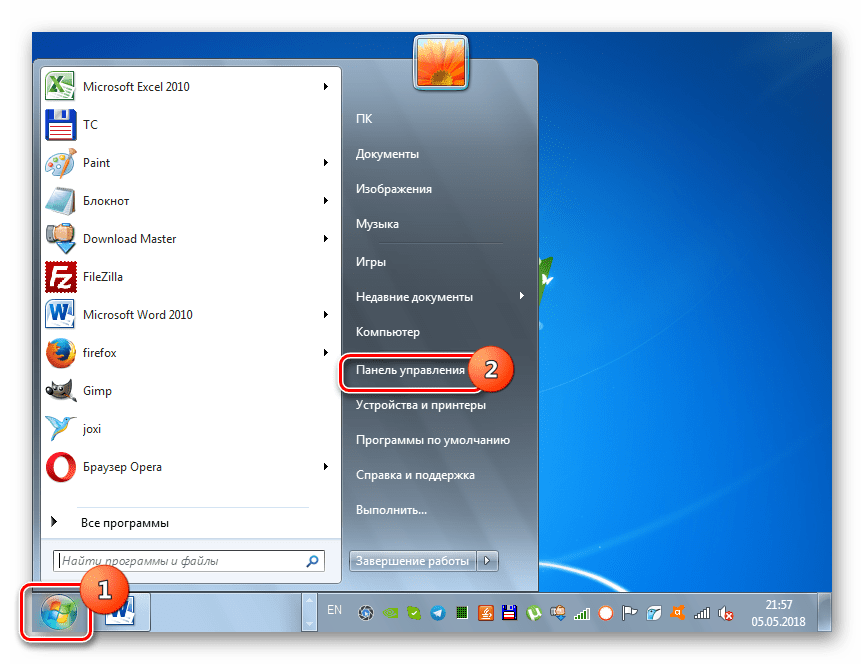
- Щелкайте «Пуск» и заходите в «Панель управления».
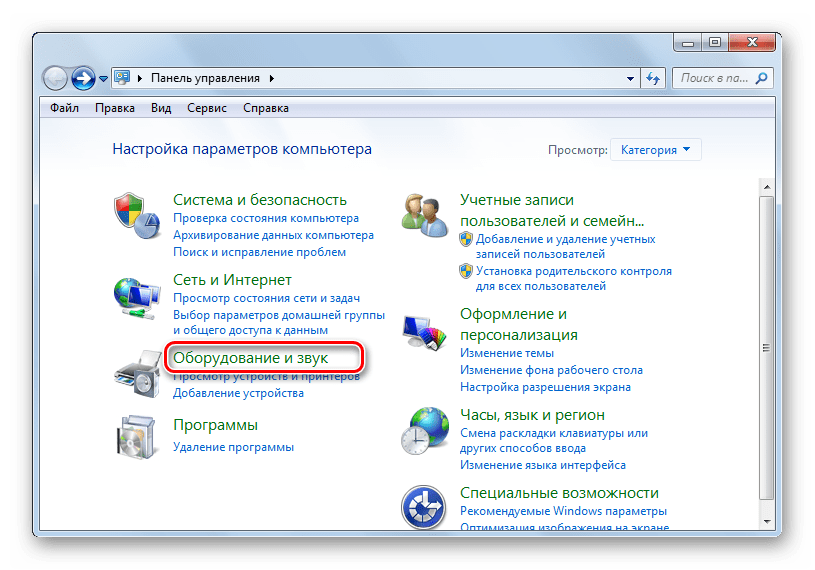
- Переходите в раздел «Оборудование и звук».
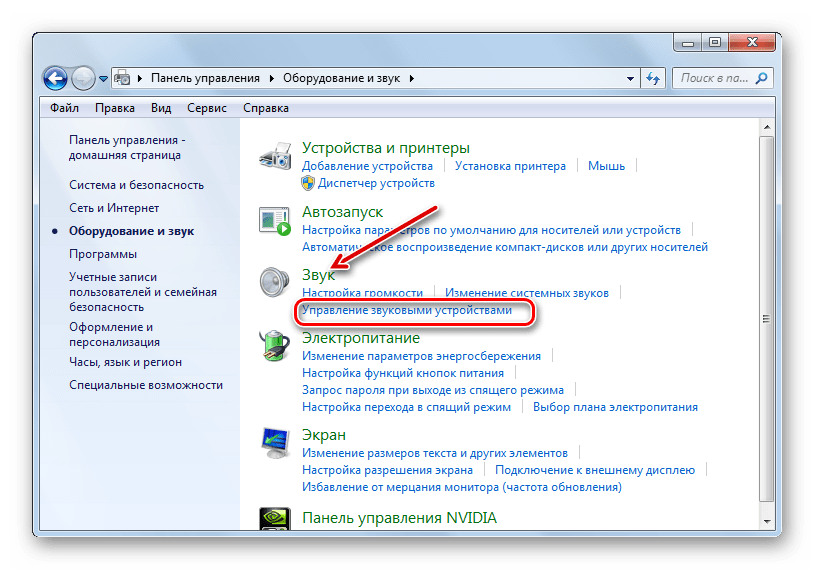
- Кликнете по надписи «Управление звуковыми устройствами» в блоке «Звук».
- Откроется инструмент управления звуковыми устройствами. Если в нем будут отображены варианты подключенной гарнитуры, то можете пропускать данный шаг и сразу переходить к следующему этапу. Но если в открывшейся оболочке вы увидите только надпись «Звуковые устройства не установлены», потребуется произвести дополнительное действие. Щелкайте правой кнопкой мыши (ПКМ) по внутренней части оболочки окна. В контекстном меню выберите «Показать отключенные…».
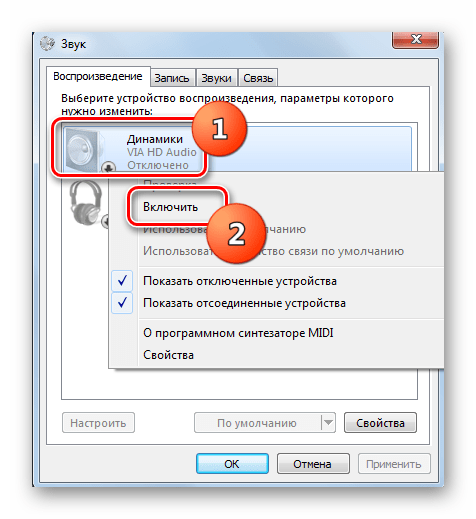
- Отобразятся все отключенные устройства. Щелкайте ПКМ по наименованию того из них, через которое желаете выводить звук. Выберите вариант «Включить».
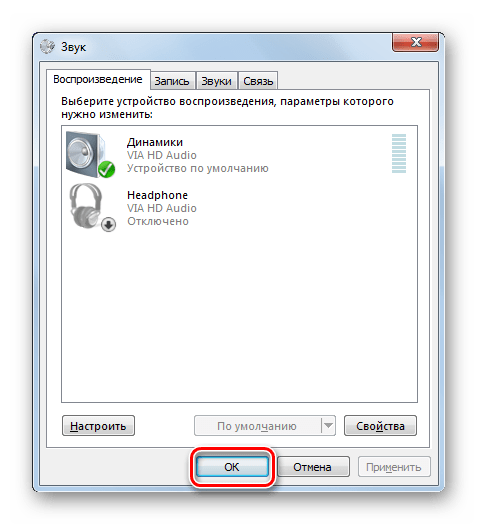
- После этого выбранное устройство будет активировано. Вам останется нажать на кнопку «OK».
- Проблема с изучаемой нами ошибкой будет решена и звук начнет выводиться.
Способ 3: Включение аудиоадаптера
Ещё одной причиной описываемой нами ошибки может быть отключение аудиоадаптера, то есть звуковой карты ПК. Задействовать её можно, произведя манипуляции в «Диспетчере устройств».
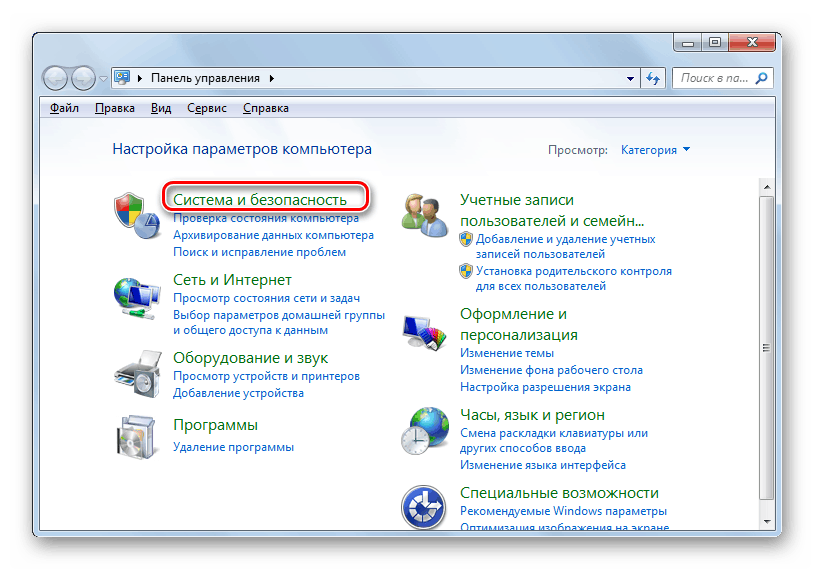
- Перейдите в «Панель управления» таким же способом, который был описан ранее. Откройте раздел «Система и безопасность».
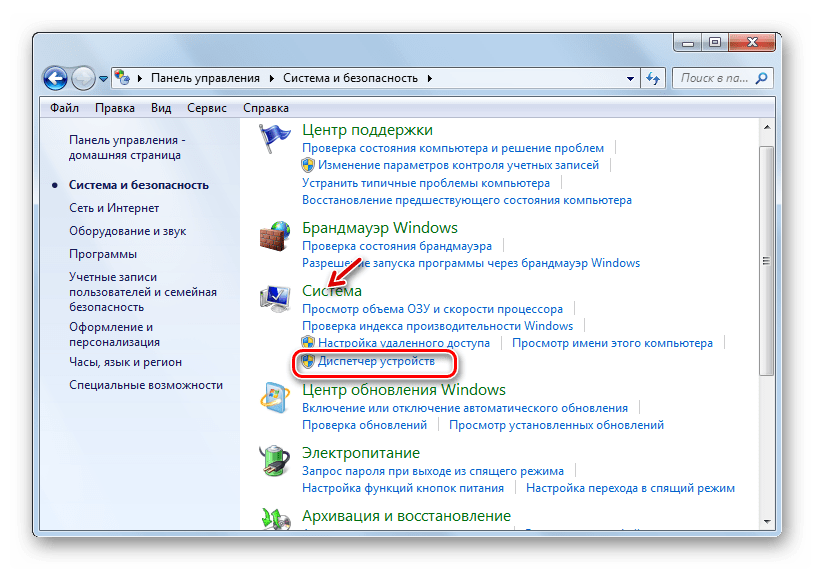
- В группе «Система» жмите по надписи «Диспетчер устройств».
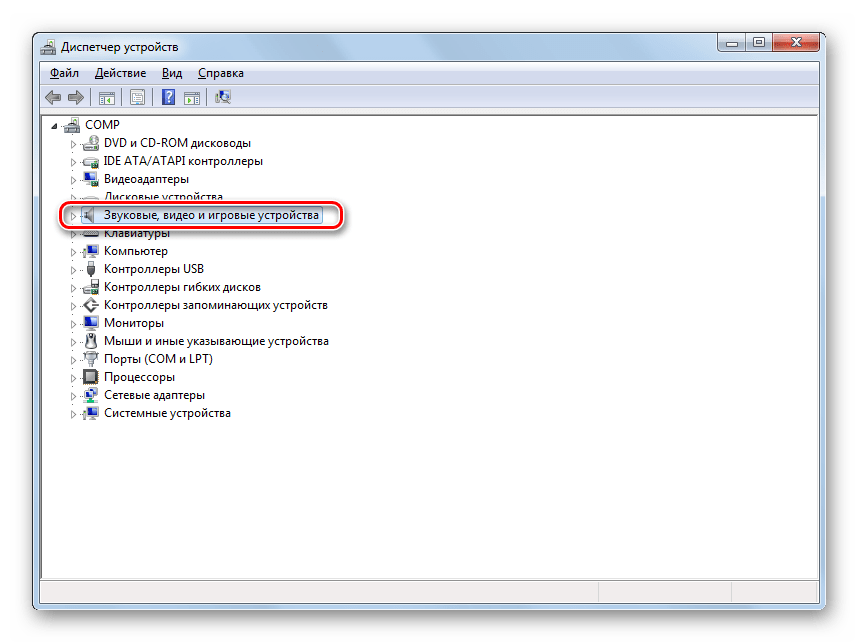
- Открывается окошко указанного «Диспетчера». Щелкайте по наименованию раздела «Звуковые устройства…».
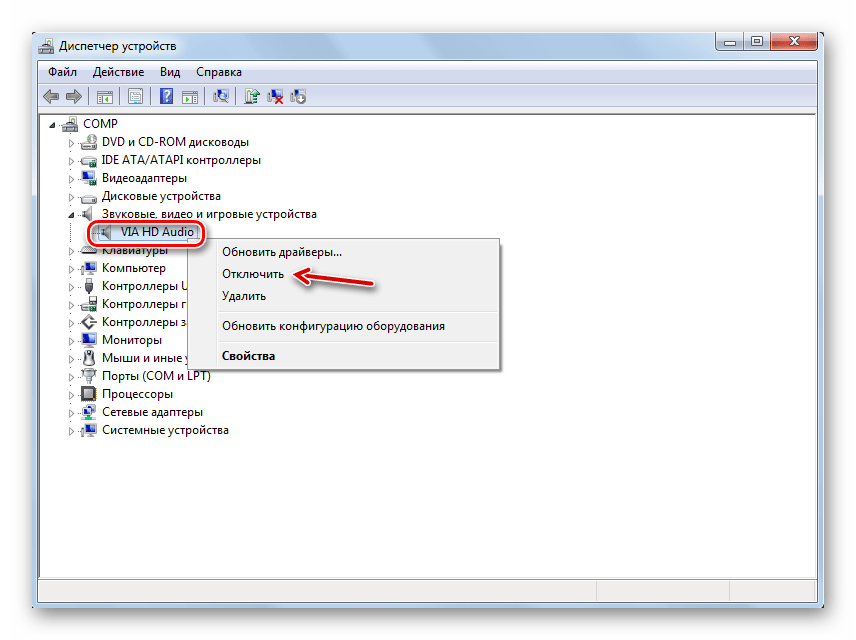
- Откроется список звуковых карт и других адаптеров. Но может быть в списке и только один элемент. Щелкайте ПКМ по наименованию той звуковой карты, через которую должен выводиться звук на ПК. Если в открывшемся контекстном меню присутствует пункт «Отключить», это значит, что адаптер включен и нужно искать другую причину проблемы со звуком.
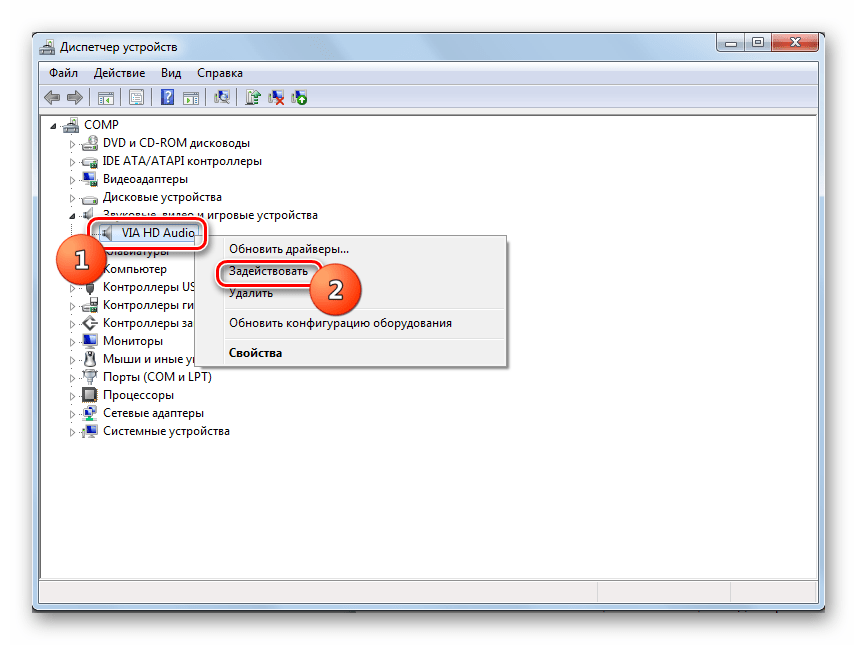
Если же вместо пункта «Отключить» в указанном меню вы наблюдаете позицию «Задействовать», это значит, что звуковая карта деактивирована. Щелкайте по указанному пункту.
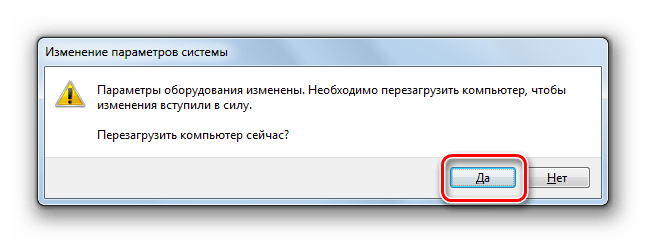
- Откроется диалоговое окно, в котором будет предложено произвести перезапуск ПК. Закройте все активные приложения и жмите «Да».
- После перезагрузки компьютера аудиоадаптер включится, а значит, проблема с ошибкой выходного устройства будет решена.
Способ 4: Установка драйверов
Следующим фактором, который может вызвать изучаемую проблему, является отсутствие необходимых драйверов на компьютере, их некорректная установка или сбои в работе. В этом случае их необходимо инсталлировать или переустановить.
Прежде всего, попробуйте переустановить те драйвера, которые уже имеются на ПК.
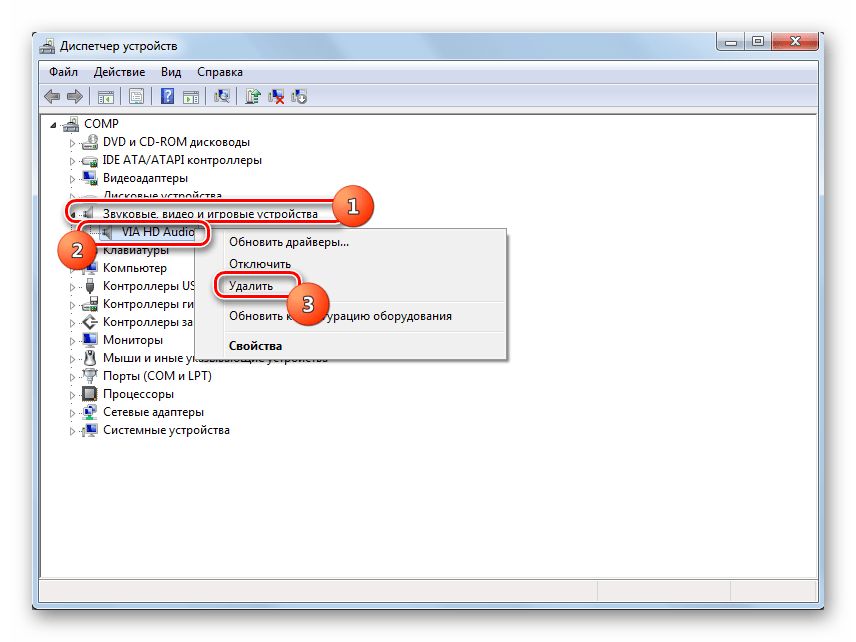
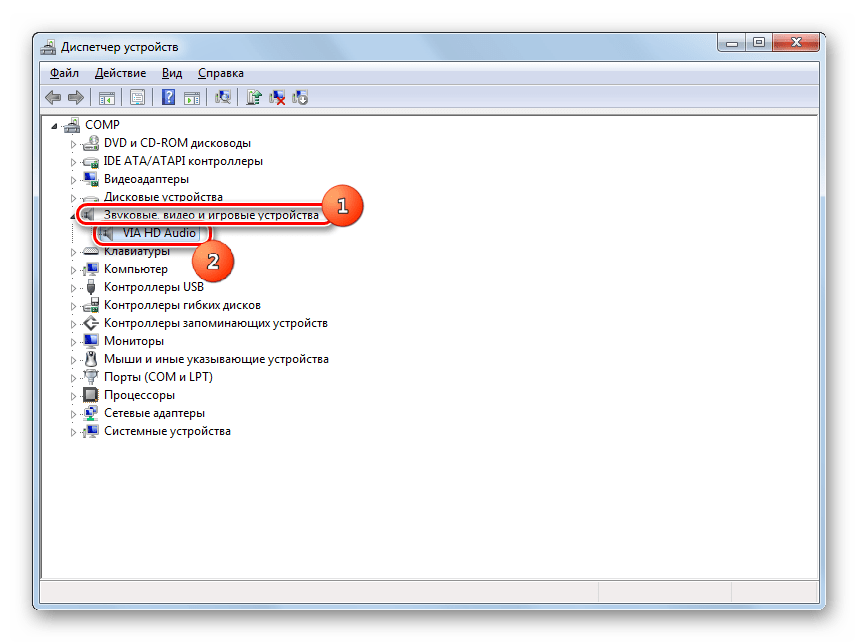
- Перейдите в «Диспетчер устройств» и, зайдя в раздел «Звуковые устройства», щелкайте ПКМ по наименованию нужного адаптера. Выберите вариант «Удалить».
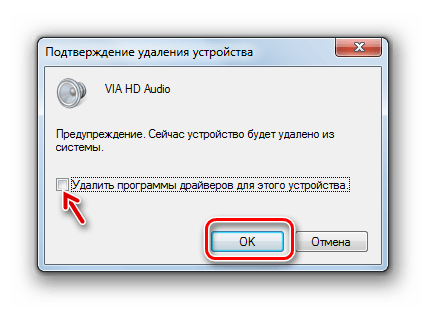
- Откроется окно предупреждения, в котором сказано о том, что аудиоадаптер будет удален из системы. Ни в коем случае не устанавливайте галочку напротив надписи «Удалить программы драйверов». Подтвердите свои действия, нажав «OK».
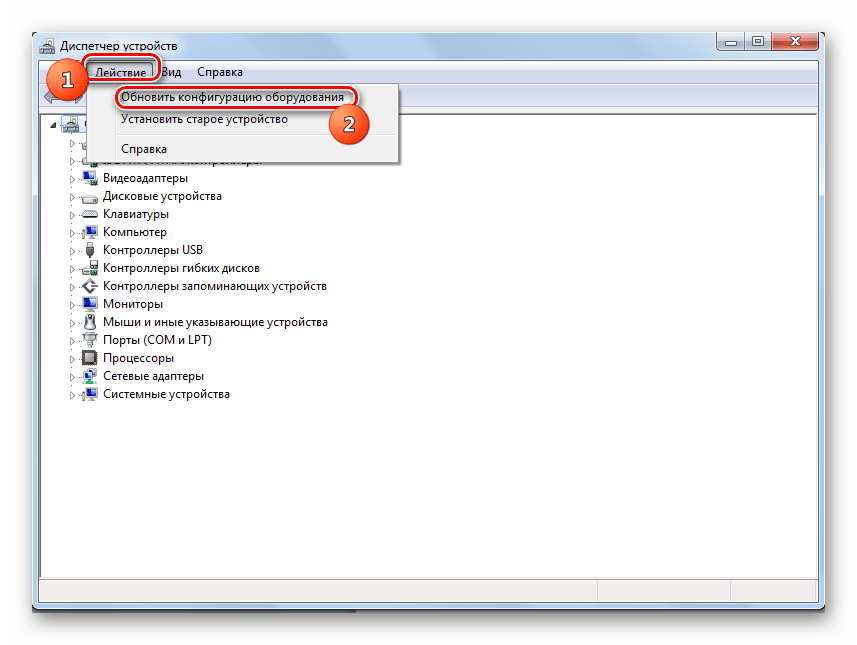
- Аудиоустройство будет удалено. Теперь необходимо его подключить снова. Жмите в меню «Диспетчера» по пункту «Действие» и выбирайте «Обновить конфигурацию…».
- Аудиоустройство будет отыскано и заново подключено. При этом произойдет переустановка драйверов на него. Возможно, это действие решит проблему с изучаемой нами ошибкой.
Если описанный способ не помог, но ошибка появилась совсем недавно, то есть вероятность, что слетели «родные» драйвера вашего аудиоадаптера.
Они могли повредиться или удалиться вследствие какого-то сбоя, переустановки системы и некоторых действий пользователя, а взамен них произошла установка стандартного аналога Виндовс, который не всегда работает корректно с некоторыми звуковыми картами. В этом случае можно попробовать откатить драйвера.
- Откройте «Диспетчер устройств», перейдите в раздел «Звуковые устройства…» и щелкните по наименованию активного адаптера.
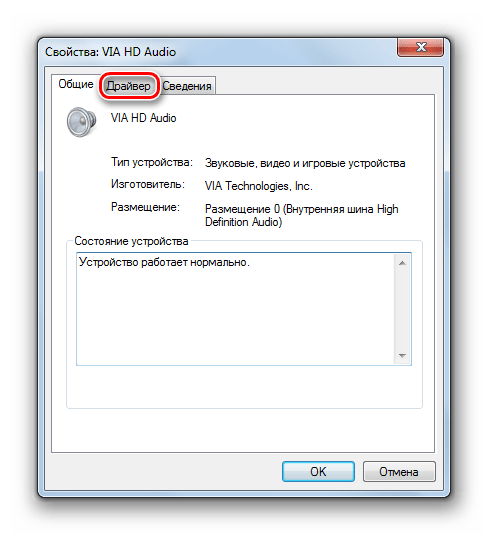
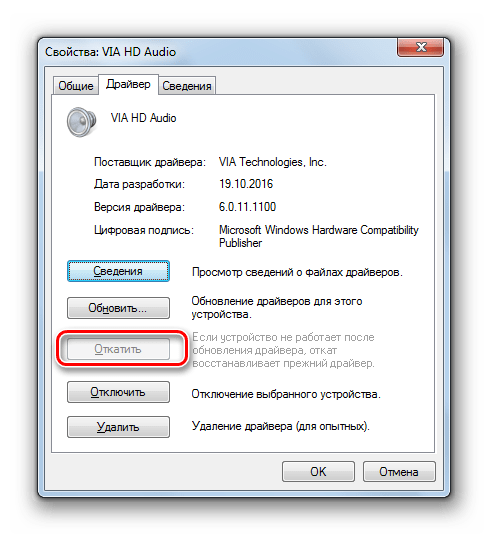
- В открывшемся окне перейдите во вкладку «Драйвер».
- В отобразившейся оболочке жмите по кнопке «Откатить».
- Произойдет откат драйвера к прежнему варианту. После этого перезагрузите ПК — возможно, проблемы со звуком вас перестанут беспокоить.
Но может быть и такой вариант, что кнопка «Откатить» не будет активной или же после отката никаких положительных изменений не произойдет. В этом случае нужно заново установить драйвера звуковой карты. Для этого просто возьмите установочный диск, который поставлялся вместе с аудиоадаптером, и инсталлируйте нужные объекты. Если его у вас по какой-то причине нет, можно перейти на официальный сайт производителя звуковой карты и скачать последний обновленный вариант.
Если же вы это сделать не можете или не знаете адрес сайта производителя, то в таком случае можно произвести поиск драйверов по ИД звуковой карты. Конечно, этот вариант хуже, чем установка с официального сайта изготовителя, но за неимением другого выхода можно воспользоваться им.
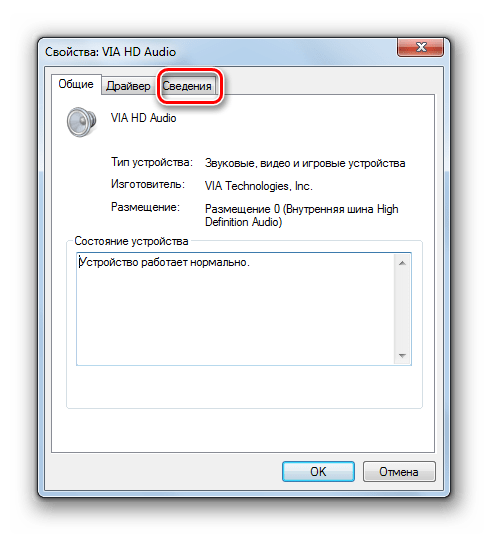
- Снова зайдите в окошко свойств звуковой карты в «Диспетчере устройств», но на этот раз перейдите в раздел «Сведения».
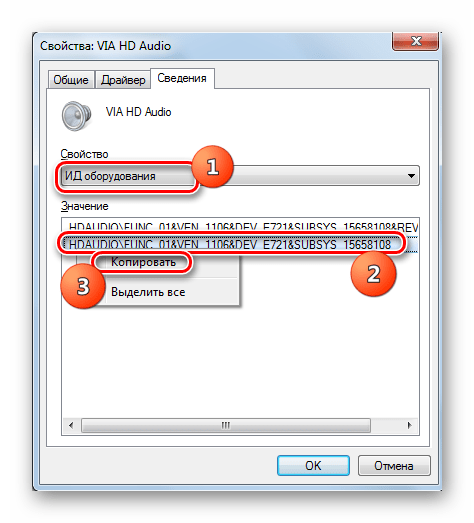
- В открывшейся оболочке из выпадающего списка выберите вариант «ИД оборудования». Откроются сведения с ID аудиоадаптера. Щелкните по его значению ПКМ и скопируйте.
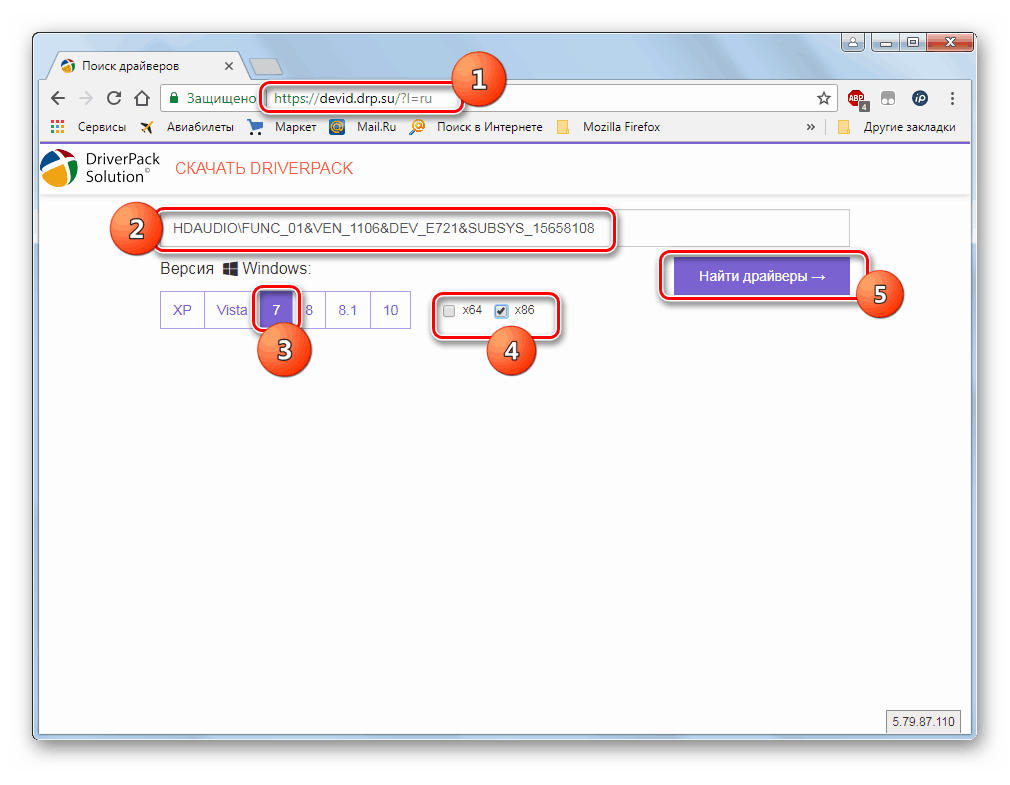
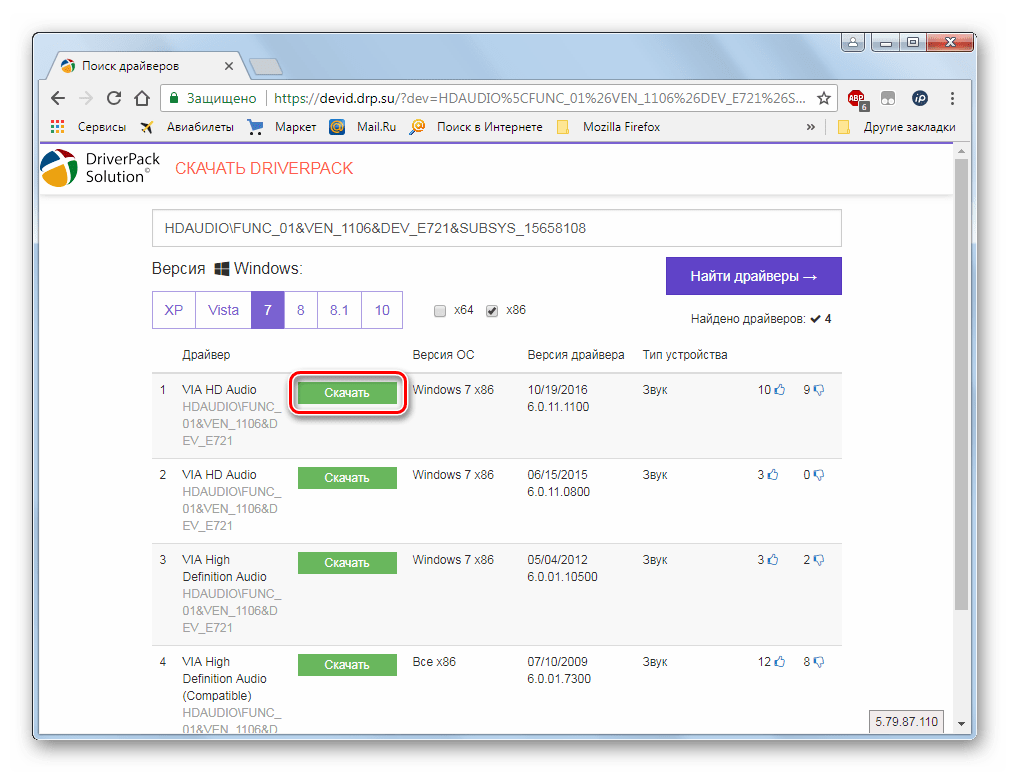
- Запустите браузер и откройте сайт DevID DriverPack. Ссылка на него представлена ниже в отдельном материале. На открывшейся странице в поле ввода вставьте ранее скопированный ID. В блоке «Версия Windows» выберите цифру «7». Справа укажите разрядность вашей системы – «x64» (для 64 бит) или «x86» (для 32 бит). Жмите на кнопку «Найти драйверы».
- После этого откроются результаты с поисковой выдачей. Щелкайте по кнопке «Скачать» напротив самого верхнего в списке варианта. Это будет последняя версия нужного драйвера.
- После того как произойдет загрузка драйвера, запустите его. Он будет установлен в систему и заменит стандартный вариант Windows. После этого перезагрузите компьютер. Изучаемая нами проблема должна быть устранена.
Урок: Поиск драйверов по ИД устройства
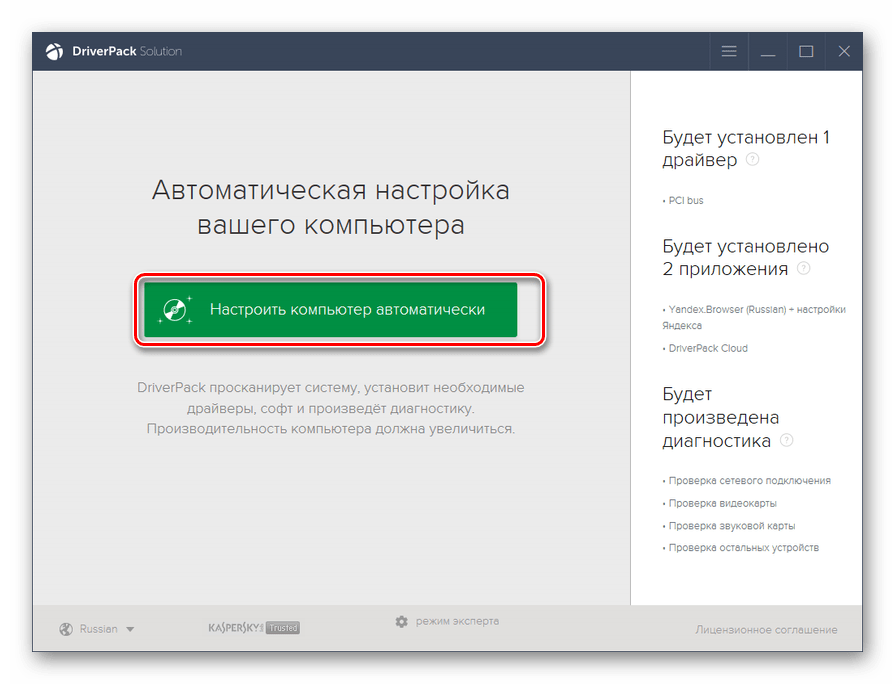
Если вы не хотите производить вышеуказанные действия по поиску драйверов по ID, можно все сделать проще, установив на компьютер специальную программу для поиска и инсталляции драйверов. Один из лучших вариантов – это DriverPack Solution. После запуска этого софта произойдет автоматическое сканирование ОС на наличие всех необходимых драйверов. В случае отсутствия нужного варианта драйвера, он будет автоматически загружен и установлен.
Урок: Обновление драйвера на ПК при помощи DriverPack Solution
Способ 5: Восстановление системы
Если у вас проблемы с выходным аудиоустройством ранее не было и она появилась не так давно, а все вышеуказанные способы решения не помогли, то можно попытаться с помощью различных вариантов произвести восстановление системы.
Прежде всего, можно произвести проверку на целостность системных файлов. Они могут быть повреждены вследствие различных сбоев или вирусного заражения. Кстати, при наличии подозрений на присутствие вирусов, обязательно выполните проверку системы антивирусной утилитой.
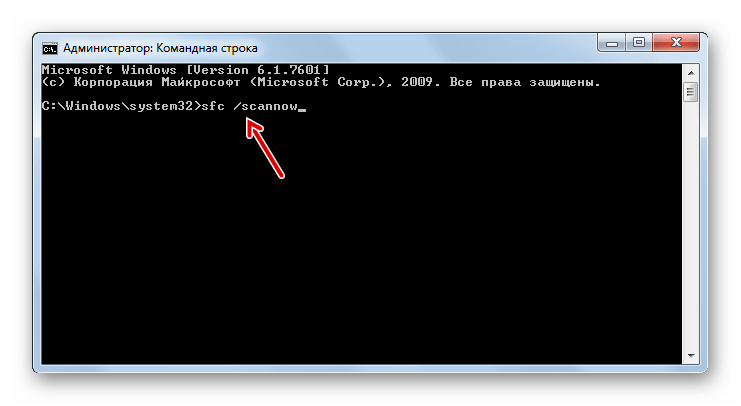
Непосредственно сканирование системы на наличие поврежденных файлов можно выполнить через «Командную строку» в стандартном режиме или из среды восстановления, используя для этого следующую команду:
sfc /scannow
В случае обнаружения отсутствия системных файлов или нарушения в их структуре будет выполнена процедура восстановления поврежденных объектов.
Урок: Проверка целостности файлов ОС в Виндовс 7
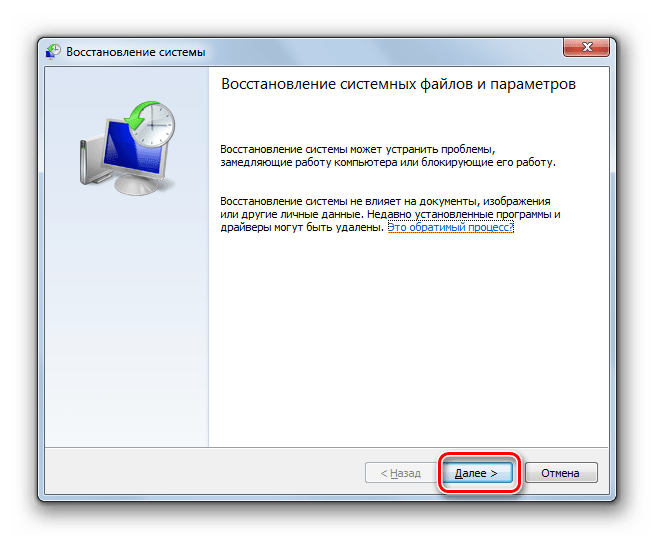
Если указанный выше вариант не принес желаемого результата, но у вас имеется резервная копия системы или точка восстановления, созданная ещё до того, как возникла проблема со звуком, то можно произвести откат к ней. Недостаток данного метода заключается в том, что не у всех пользователей имеется заранее созданный бэкап системы, который отвечает вышеописанному условию.
Если ни один из перечисленных вариантов действий не помог, а нужного бэкапа у вас нет, то для исправления ситуации остается только произвести переустановку системы.
Урок: Восстановление ОС Виндовс 7
Как видим, существует довольно много причин возникновения ошибки с установкой выходного устройства. Соответственно, для каждого фактора существует своя группа способов устранения проблемы. Далеко не всегда получается сразу установить непосредственную причину указанной неполадки. Поэтому используйте способы в порядке их усложнения: так, как они перечислены в статье. Наиболее радикальные методы, включающие восстановление или переустановку системы, используйте только тогда, когда остальные варианты не помогли.
No matter what, you should update your sound driver
by Matthew Adams
Matthew is a freelancer who has produced a variety of articles on various topics related to technology. His main focus is the Windows OS and all the things… read more
Updated on January 17, 2023
Reviewed by
Vlad Turiceanu
Passionate about technology, Windows, and everything that has a power button, he spent most of his time developing new skills and learning more about the tech world. Coming… read more
- When no audio device is installed d in Windows 11, your PC’s sound devices might be disabled or have outmoded or corrupted drivers.
- To fix the No audio output device installed error, you might need to reinstall or update some device drivers.
- Don’t hesitate to enable sound devices to resolve this issue for good.
XINSTALL BY CLICKING THE DOWNLOAD FILE
This software will keep your drivers up and running, thus keeping you safe from common computer errors and hardware failure. Check all your drivers now in 3 easy steps:
- Download DriverFix (verified download file).
- Click Start Scan to find all problematic drivers.
- Click Update Drivers to get new versions and avoid system malfunctionings.
- DriverFix has been downloaded by 0 readers this month.
The No audio output device is installed in Windows 11 error arises when no output devices are found in Windows 11. When that issue occurs, the taskbar’s sound icon has a red x.
That icon also displays a No audio output device installed error message when you hover the cursor over it. As a consequence of that error, Windows 11 has no sound. Therefore, users need to fix this error for the sake of restoring audio on their PCs.
Why does my computer say no audio output device installed?
Here are the reasons why no output devices are found installed in Windows 11:
- Outdated or corrupt drivers – This is the most common reason behind the issue, and simply reinstalling or updating the driver should do the trick.
- Misconfigured settings – Certain audio settings are known to affect the way things work and cause problems with audio devices.
- Bugs in the installed version of the OS – If the problem started after an update, it’s likely a bug in the latest version.
- Using a driver not signed by Microsoft – Oftentimes, the issue arises when using a driver not digitally signed by Microsoft, and this, too, is easily fixable. But we recommend that you install only the verified drivers.
Users have reported numerous Windows 11 devices on which they encountered the No output devices found. Some of the most common are the following:
- No audio device is installed in Windows 11 (HP)- Updating the audio drivers will do the trick in this situation and many others.
- No audio output device is installed in Windows 11 (Dell) – You may plug in a wired audio device. Also, try reinstalling the driver for the problematic one.
- No audio device is installed in Lenovo – The faulty installation of an audio driver on the system is the root cause of this problem, which may be fixed by following our solutions.
Without further ado, let’s jump into the list of solutions specifically dedicated to the No output devices found in Windows 11. Follow along!
How do I fix No output devices found in Windows 11?
- Why does my computer say no audio output device installed?
- How do I fix No output devices found in Windows 11?
- 1. Reinstall the audio driver
- 2. Reset the audio controller
- 3. Disable Driver Signature Enforcement
- 4. Update the sound driver
- 5. Change Mono audio settings
- 6. Uninstall the last Windows Update
Before we try the slightly more complex solutions here, let’s first do a few quick checks:
- Restart the computer.
- Update the computer to the latest version of the OS.
- Make sure any third-party antivirus or firewall installed on the PC is disabled.
If these don’t work, these methods surely would.
1. Reinstall the audio driver
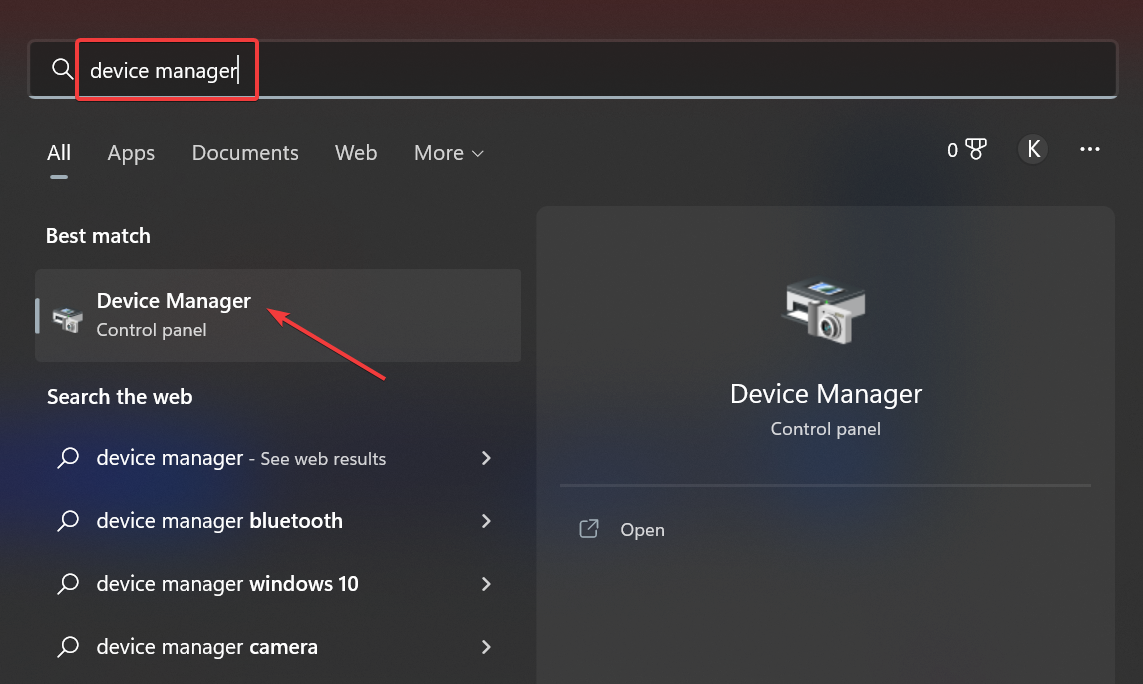
- Press Windows + S to open the Search menu, enter Device Manager in the text field, and click on the relevant search result.
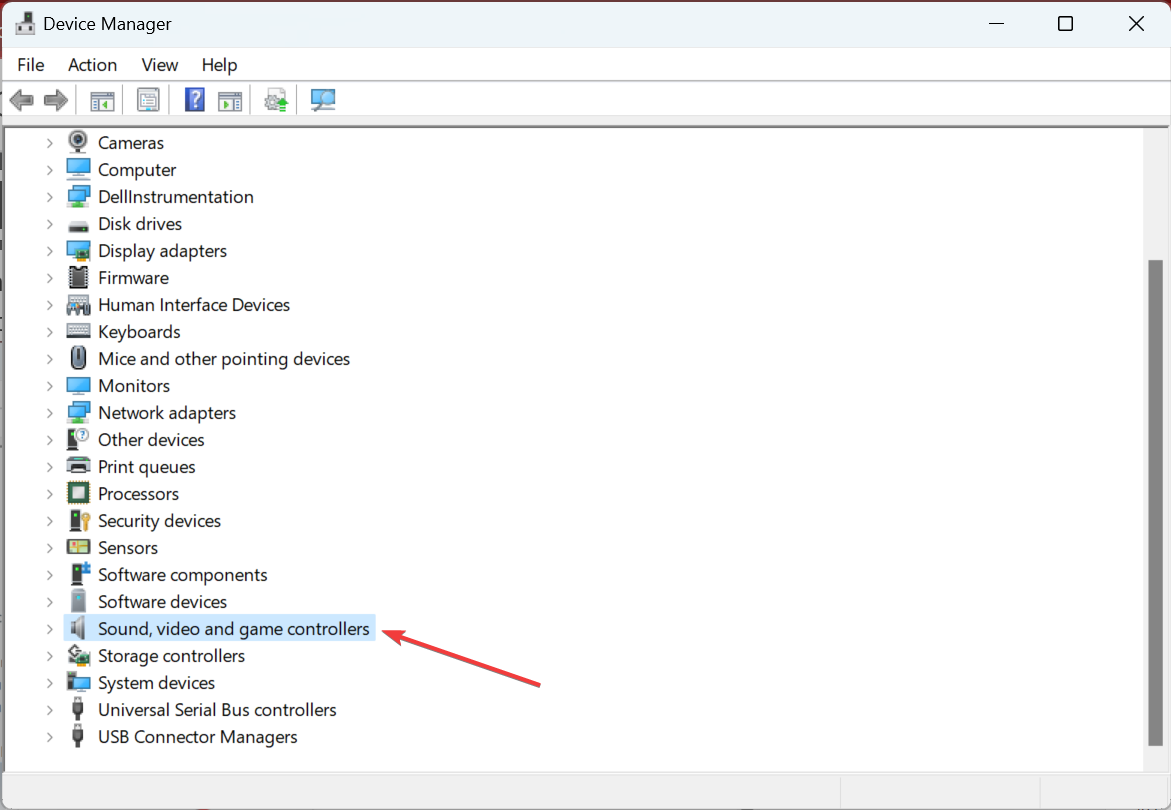
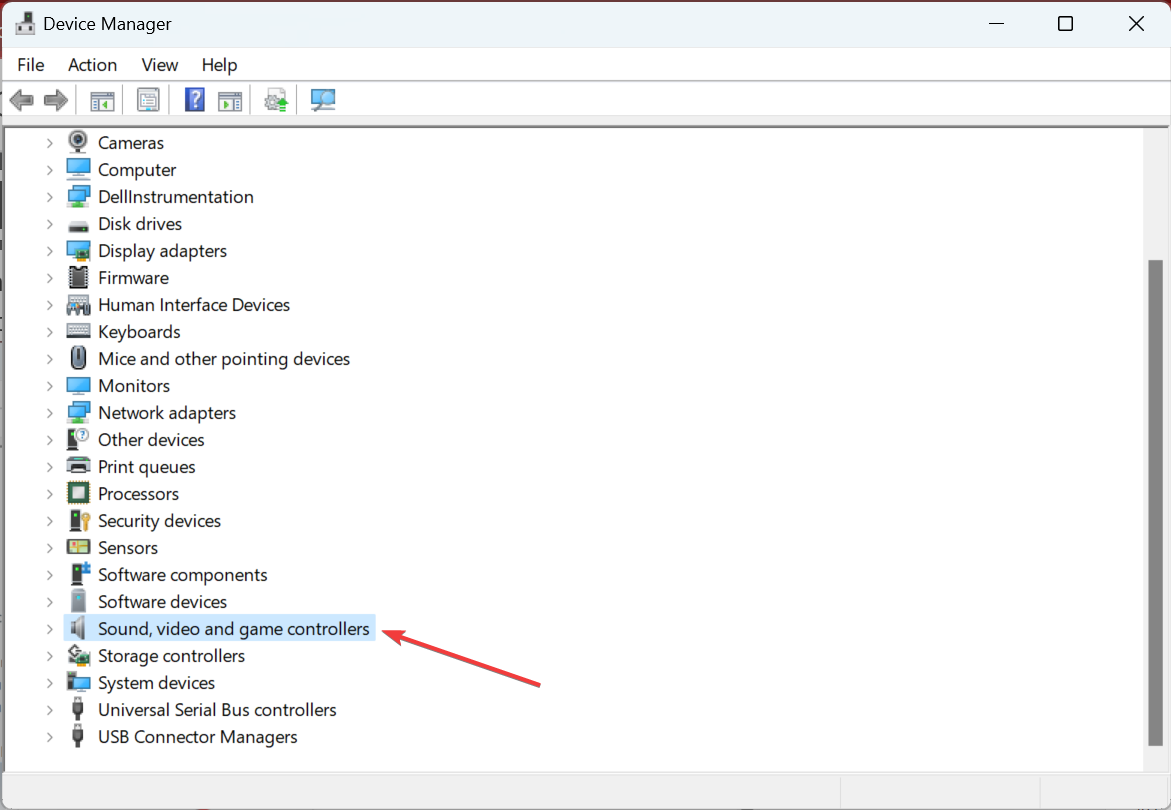
- Double-click Sound, video, and game controllers to view the devices for that category.
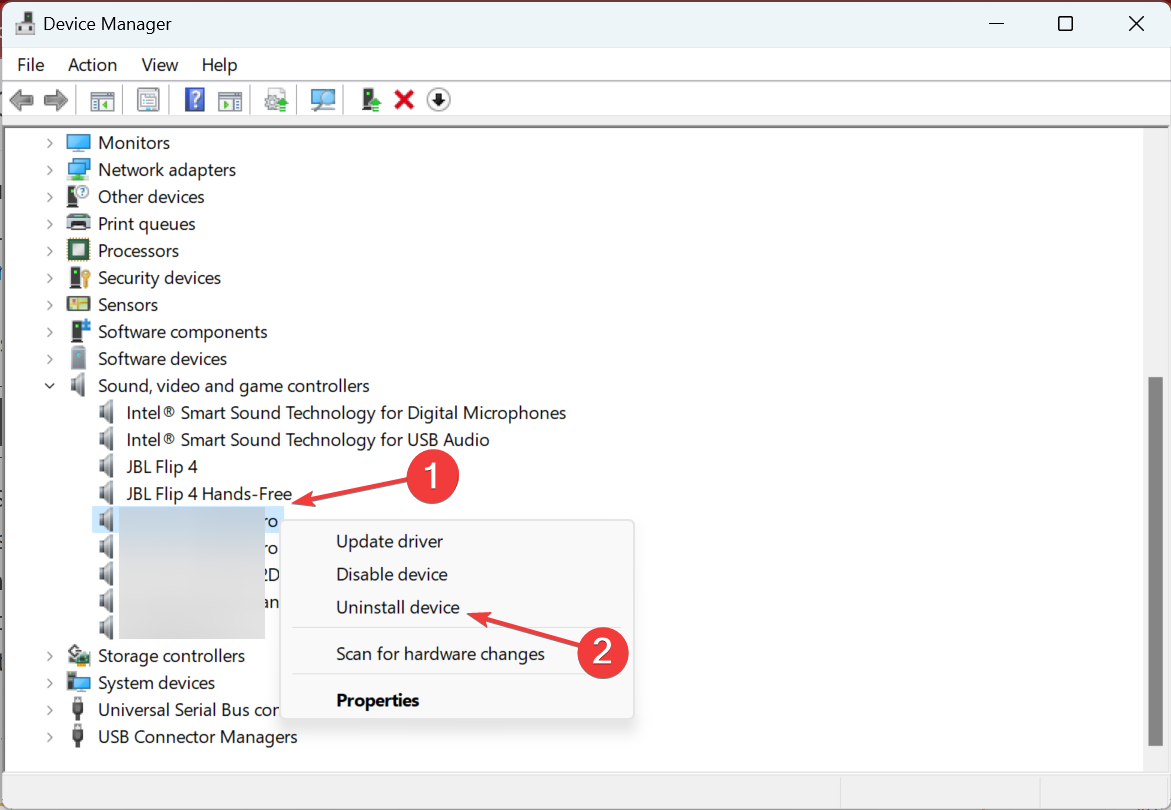
- Next, right-click your PC’s sound device, and select Uninstall device.
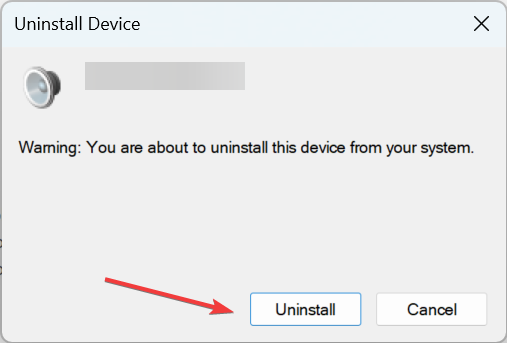
- Click Uninstall in the confirmation prompt that appears.
- Also, look for a device with SST in its name under System devices, and reinstall it too.
- Once done, restart the computer, and Windows will automatically install the best driver for the device.
If no audio output device is installed, your primary approach should be to uninstall the driver for the affected device(s) and let Windows install the best one. It is especially helpful in the case of a corrupt driver, usually identified by a warning sign next to it.
If Windows doesn’t identify the device after the restart, go to the Action menu, and select Scan for hardware changes.
2. Reset the audio controller
If simply reinstalling the audio controller doesn’t work, you will have to reset the audio controller. To do that, first, uninstall the High Definition Audio Device from the Device Manager.
Once done, shut down the PC, remove the power cable, and then hold the power button for at least 60 seconds. After that, wait another 10 minutes or so, and restart the computer after plugging in the power cable.
This may seem trivial but it often does the tick when there is a problem with your audio device.
3. Disable Driver Signature Enforcement
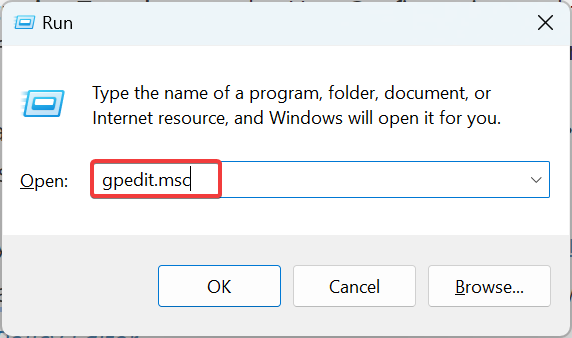
- Press Windows + R to open Run, type gpedit.msc in the text field, and hit Enter.
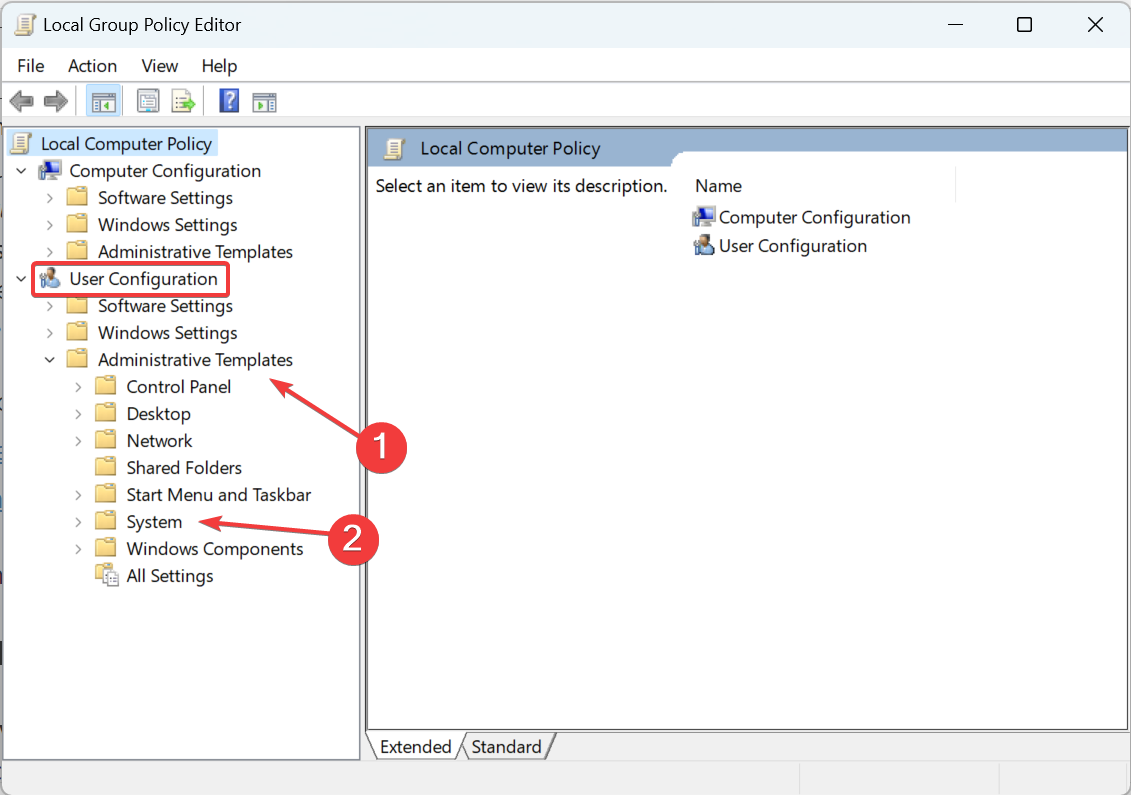
- Now, double-click Administrative Templates under User Configuration, and then on System.
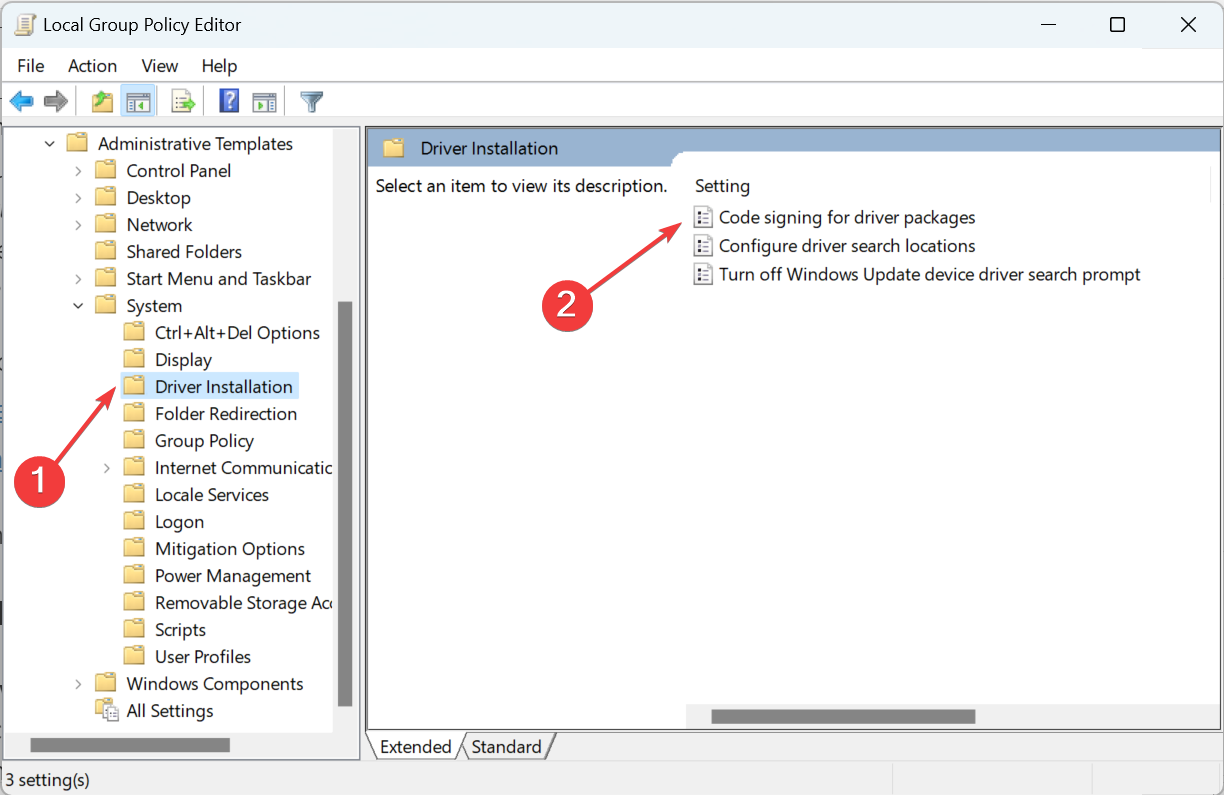
- Select Driver Installation from the left, and then double-click on Code signing for driver packages.
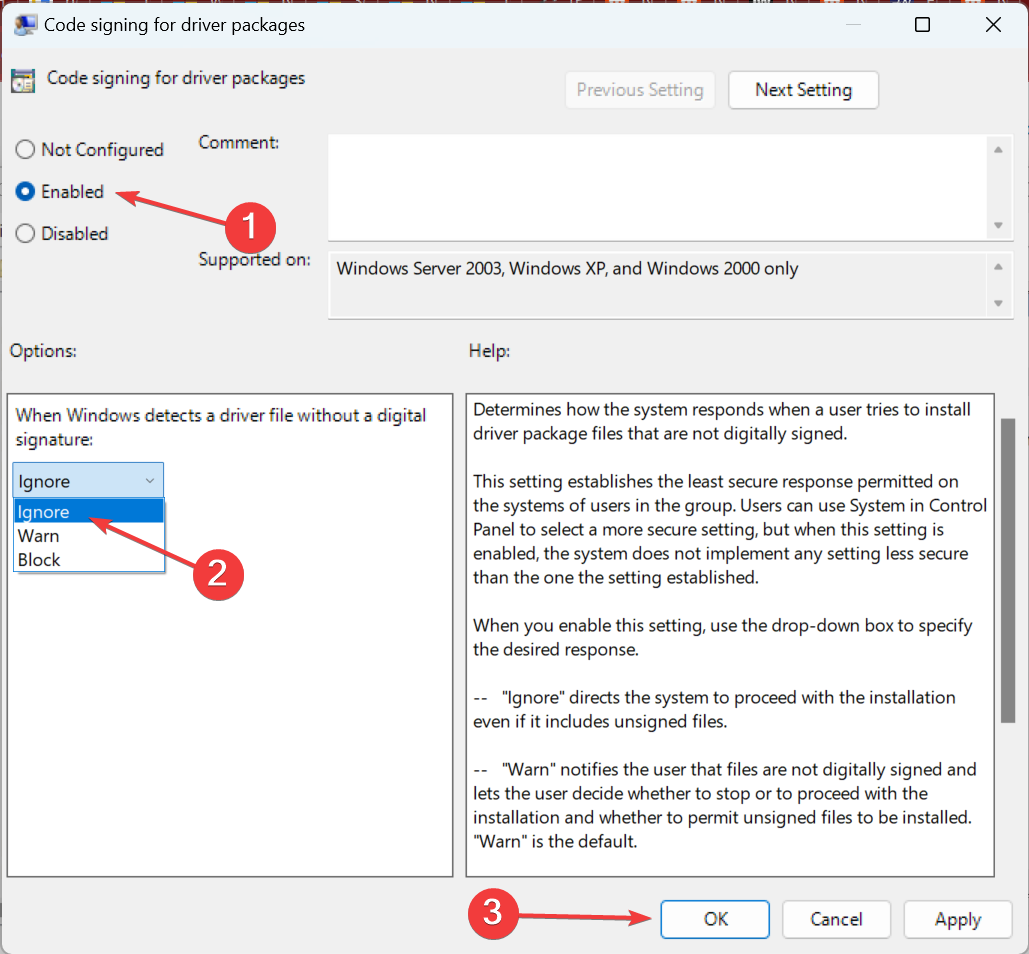
- Check the Enabled option, then from the When Windows detects a driver file without a digital signature dropdown menu, select Ignore, and finally click on OK to save the changes.
This is the quickest way, though you can also disable Driver Signature Enforcement after booting Windows in Recovery Mode. In case you are running the Home edition of Windows 11, you will have to manually install the Local Group Policy Editor.
Once done, check whether no output or input devices are found, or the issue is fixed.
- Windows couldn’t find your audio device [Fixed]
- Fix: Lenovo laptop sound not working in Windows 10/11
- Browser does not support output device selection [QUICK FIX]
- How to play sound on two devices at once in Windows 10/11
4. Update the sound driver
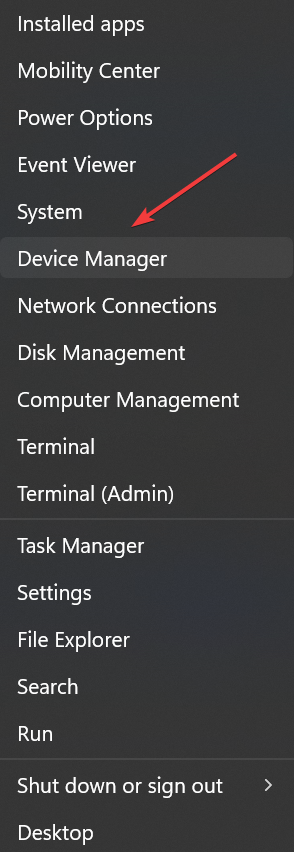
1. Press Windows + X to open the Power User menu.
2. Select Device Manager from the list.
3. Double-click the category for Sound, video, and game controllers.
Some PC issues are hard to tackle, especially when it comes to corrupted repositories or missing Windows files. If you are having troubles fixing an error, your system may be partially broken.
We recommend installing Restoro, a tool that will scan your machine and identify what the fault is.
Click here to download and start repairing.
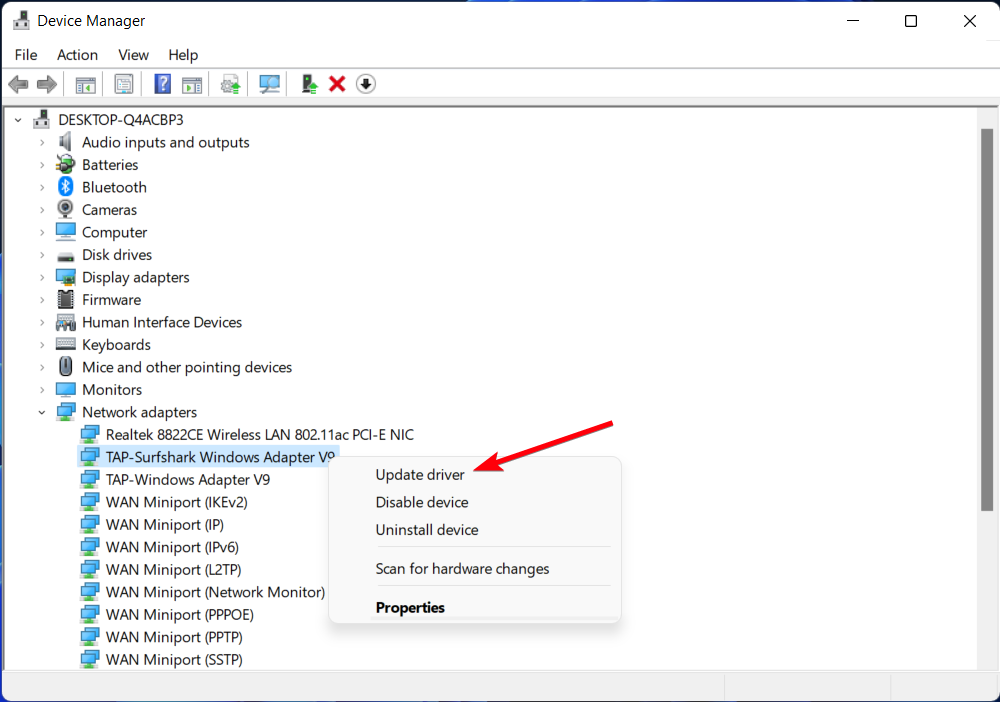
4. Then right-click your PC’s sound device, such as High Definition Audio Device, and select Update driver.
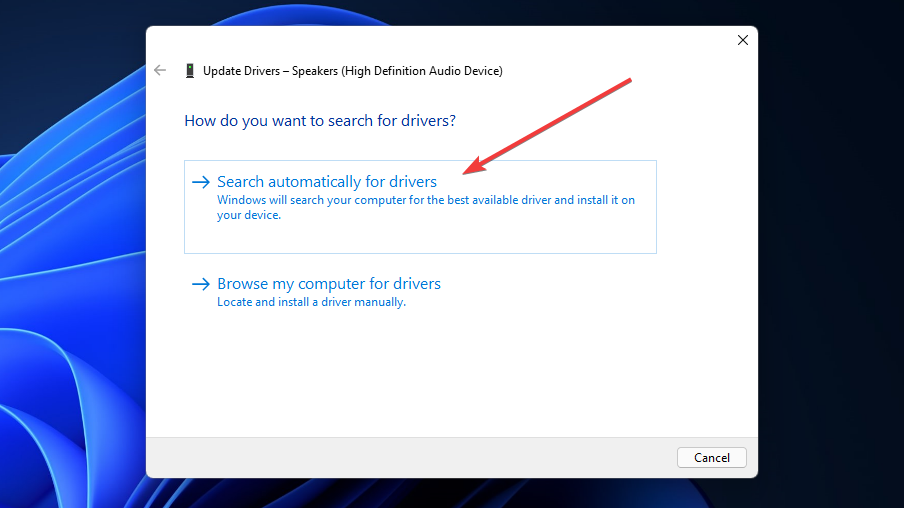
5. Click the Search automatically for drivers option.
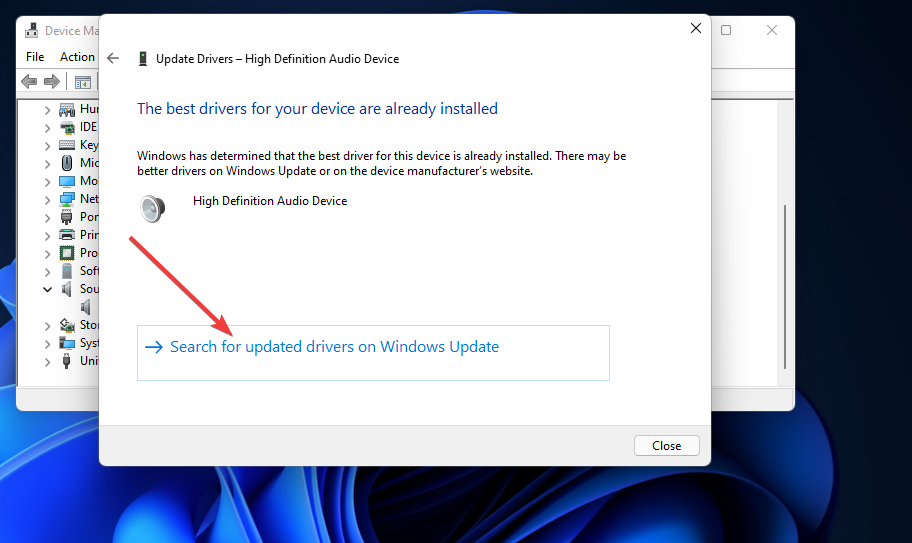
6. If selecting that option doesn’t install a new driver, select the Search for updated drivers on Windows Update option.
7. Next, press the Check for updates button on the Windows Update tab that opens.
8. Select to download and install available updates.
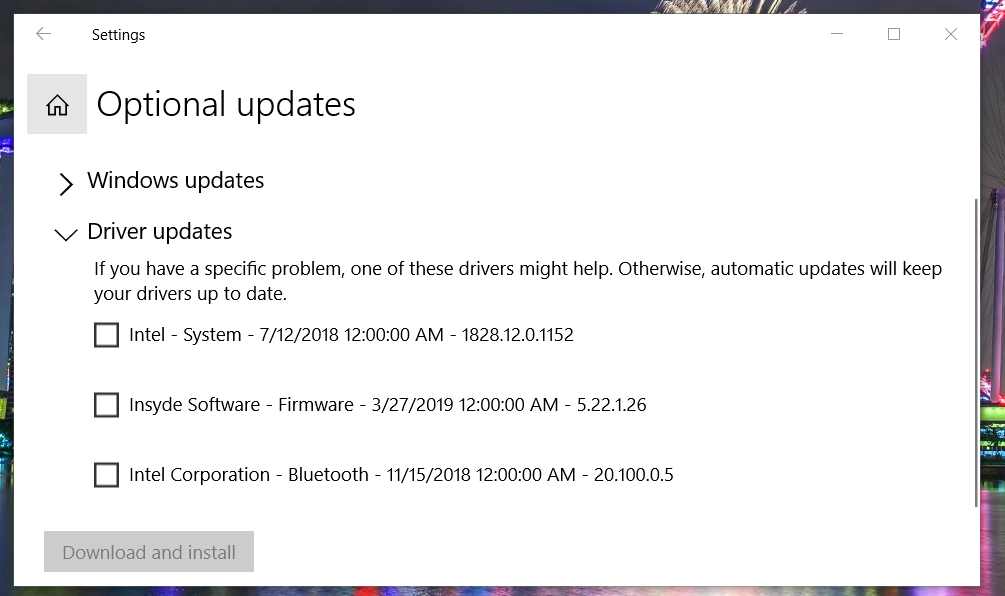
9. In addition, click on Advanced options, then Optional updates.
10. Select the checkboxes for optional driver updates, and then on Download & install.
If you’re encountering the No Audio Output Device is Installed error on your Windows 11 device, you should update your audio drivers.
This is likely to solve the problem without you having to try out other more complicated solutions. The fastest way of doing this is via Device Manager.
Some users prefer to update drivers with third-party driver updater software, like DriverFix. This third-party driver updater will scan your PC and display what devices on it need new drivers.
If your sound device is among them, you can select to download and install the latest driver for it within the software.

DriverFix
An amazing program you can use to easily update your drivers, either the outdated or missing ones.
5. Change Mono audio settings
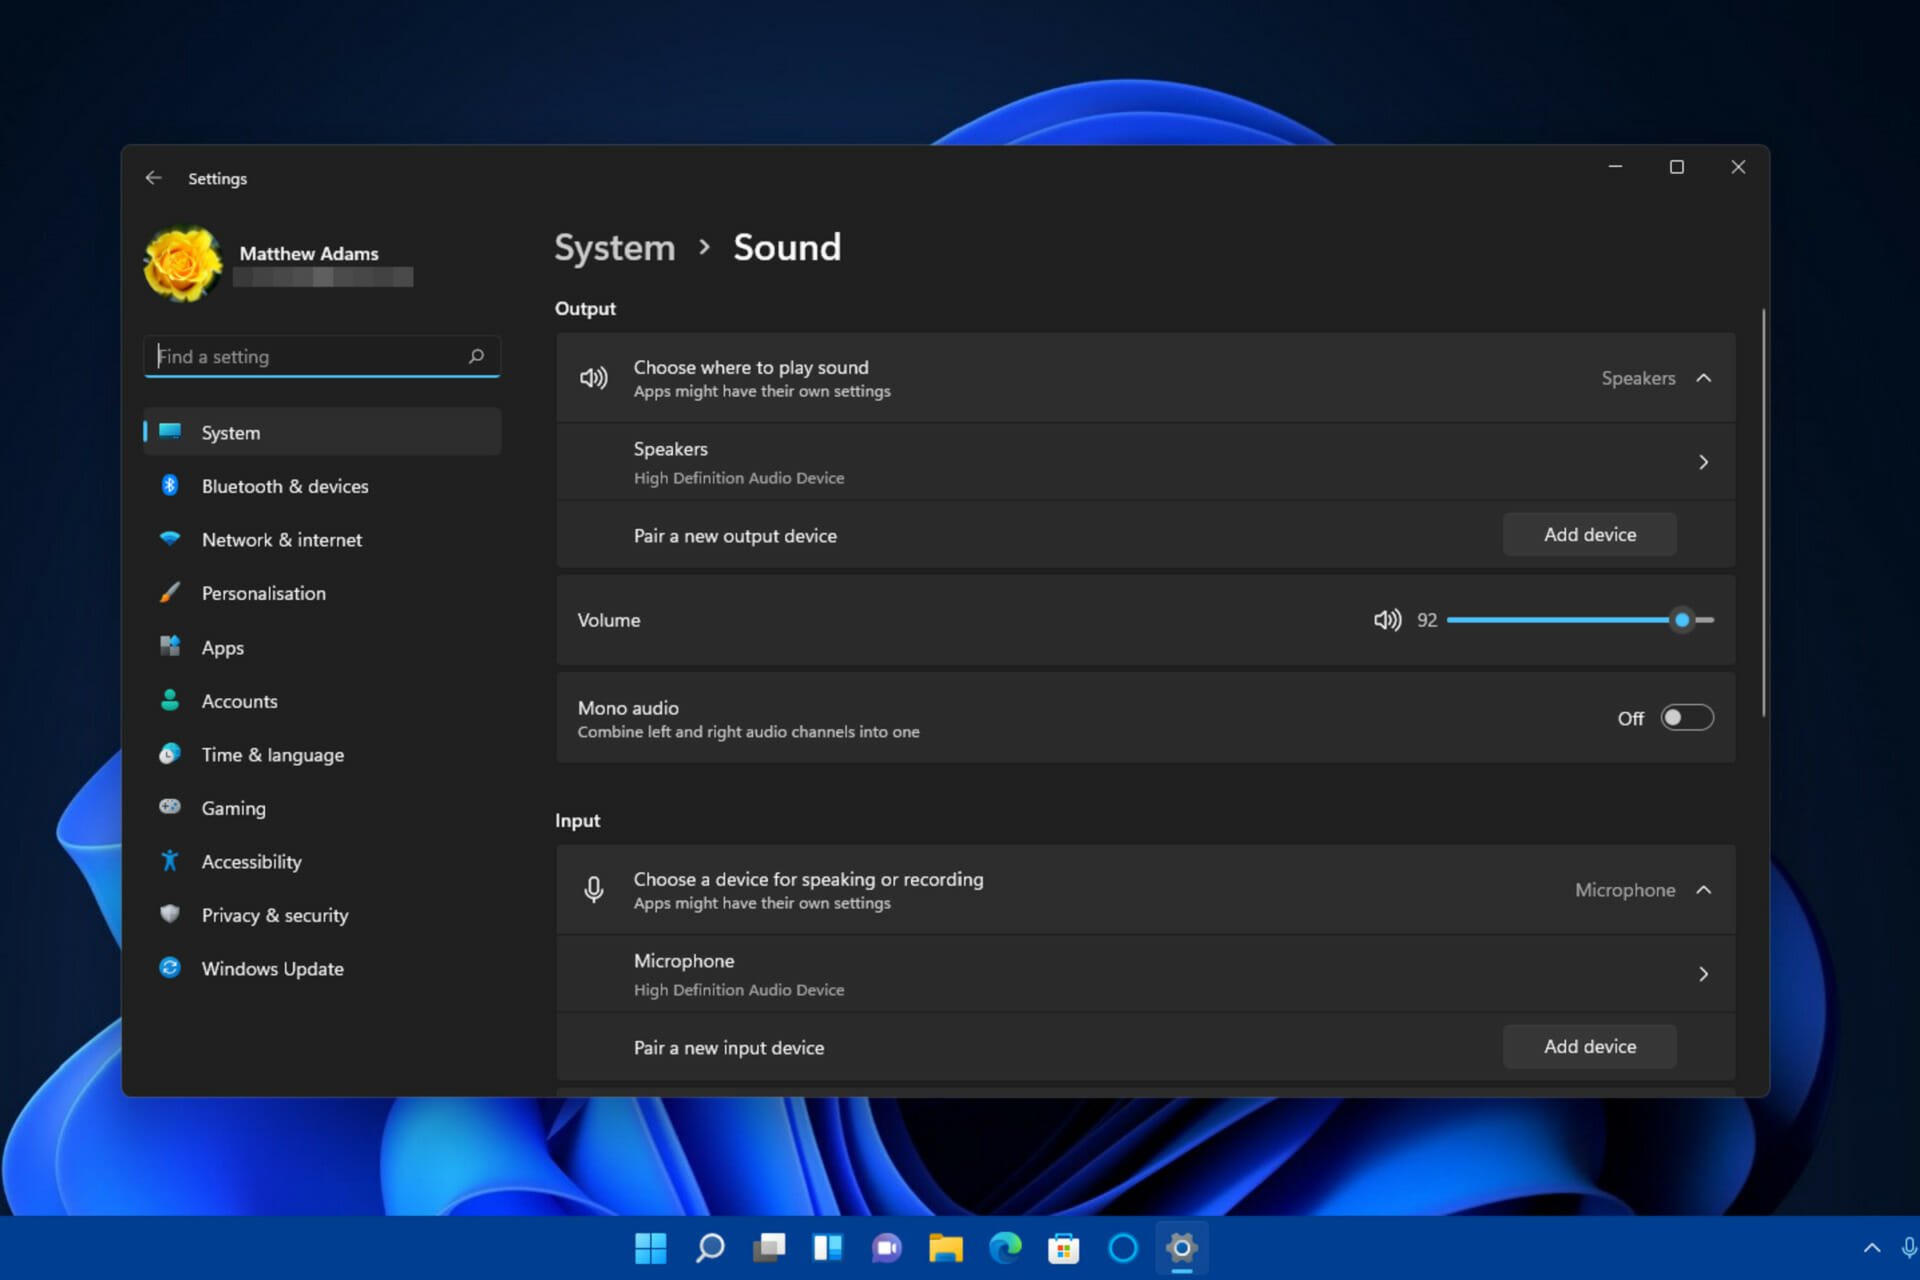
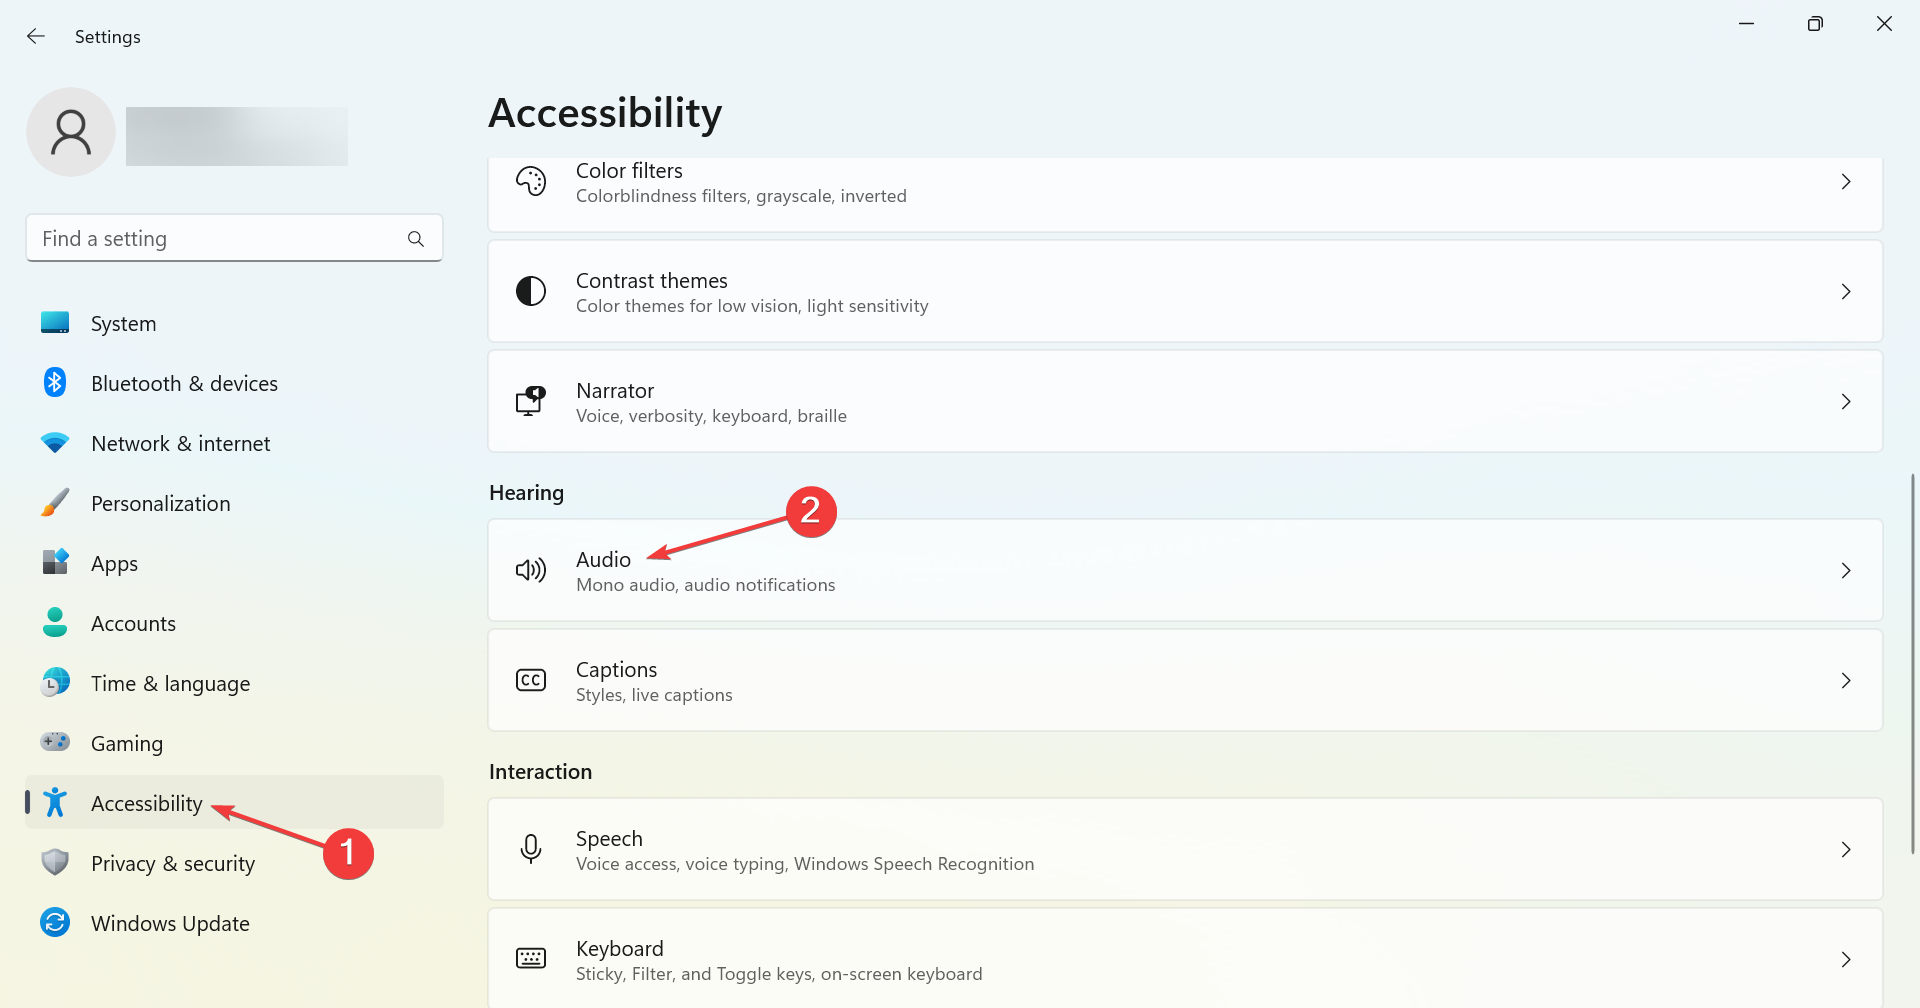
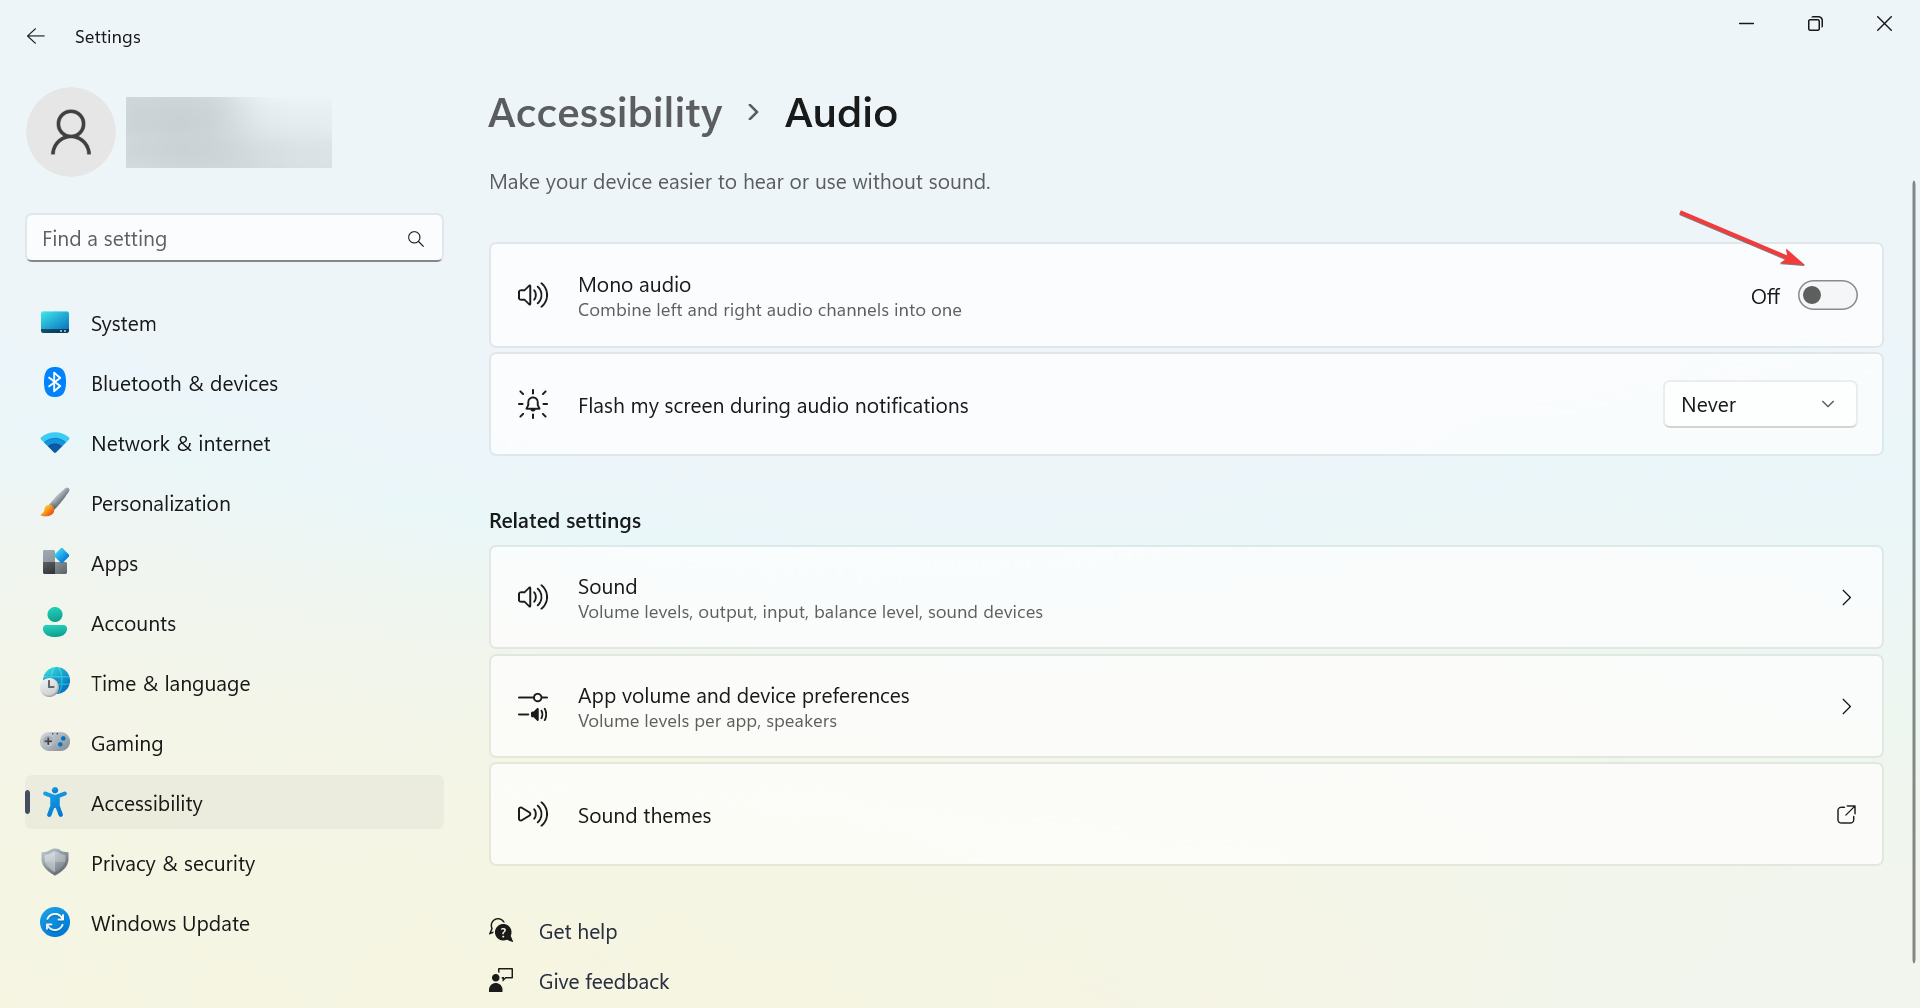
- Press Windows + I to open Settings, select Accessibility from the navigation pane, and then click on Audio under Hearing.
- Now, check the Mono audio setting. If it’s already Enabled, turn it off, while if it’s Disabled, click on the toggle to turn it on.
If no output devices are found in Windows 11, change the Mono audio setting and verify if that fixes the problem. It’s a proven workaround, and we recommend you try it should the audio device be disabled on your PC.
6. Uninstall the last Windows Update
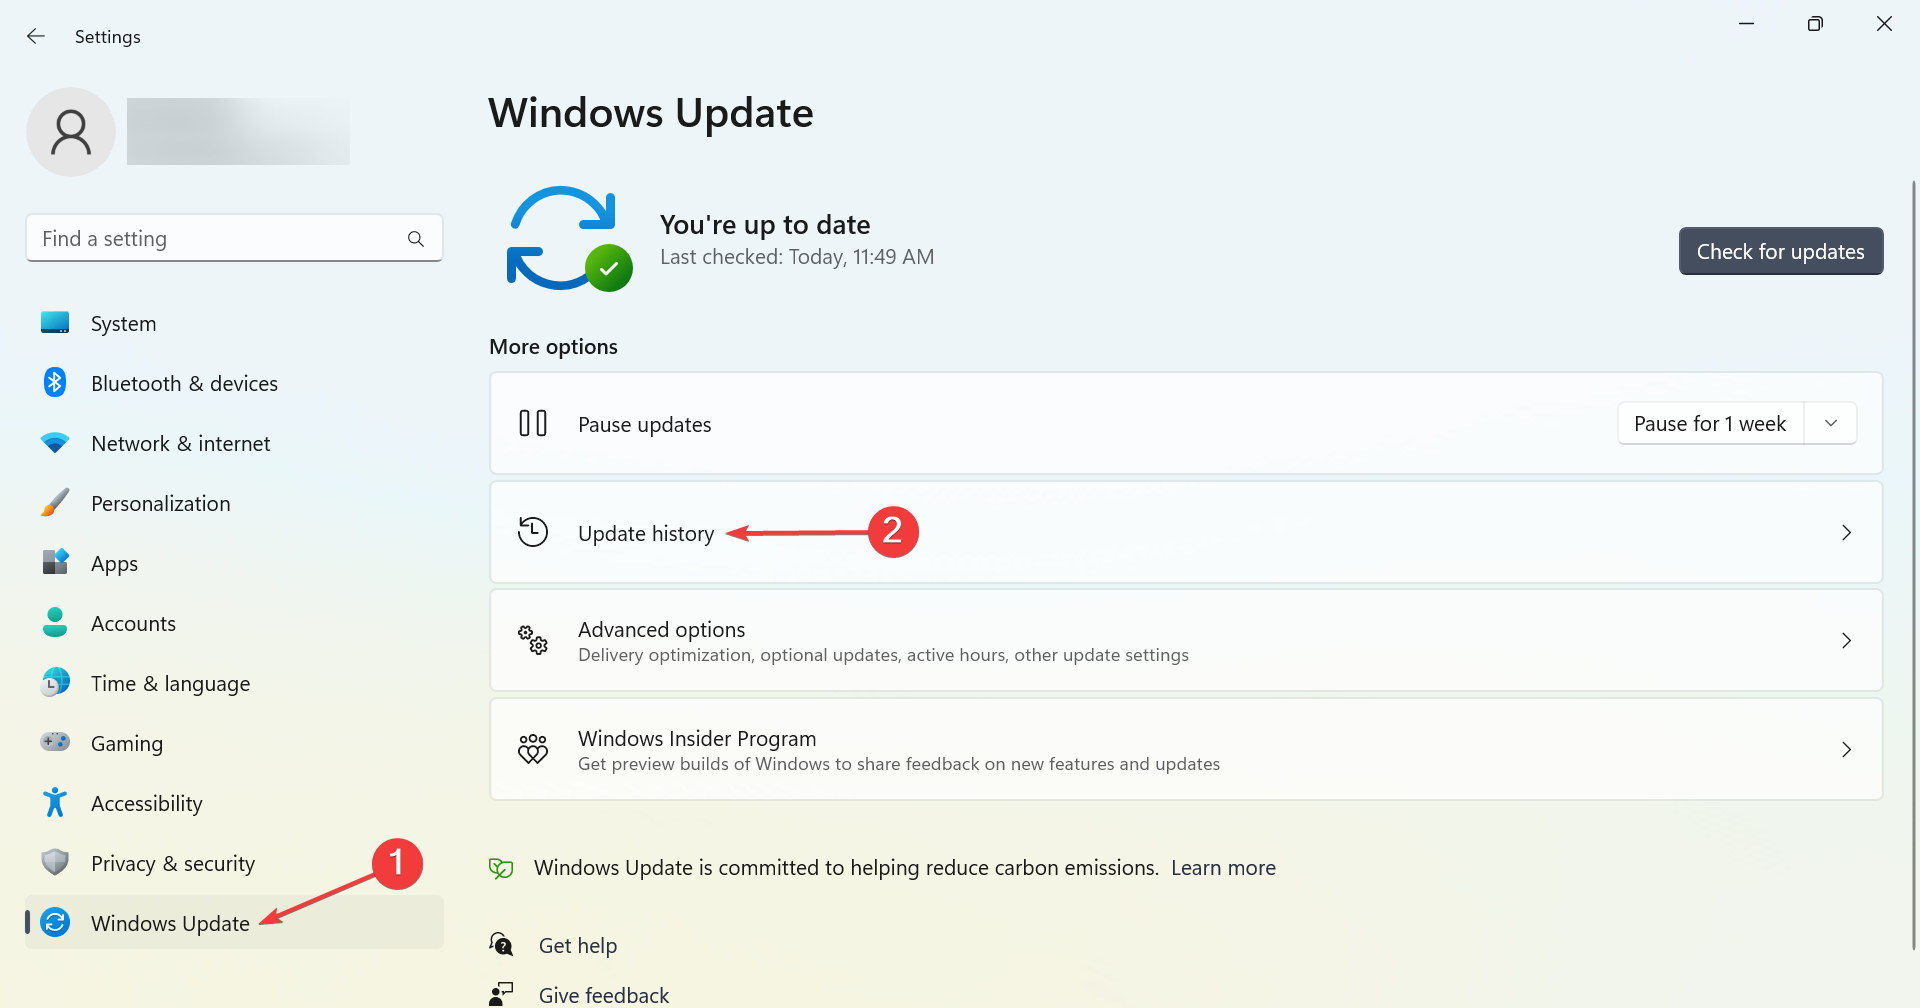
- Press Windows + I to open Settings, select Windows Update from the left, and then click on Update history.
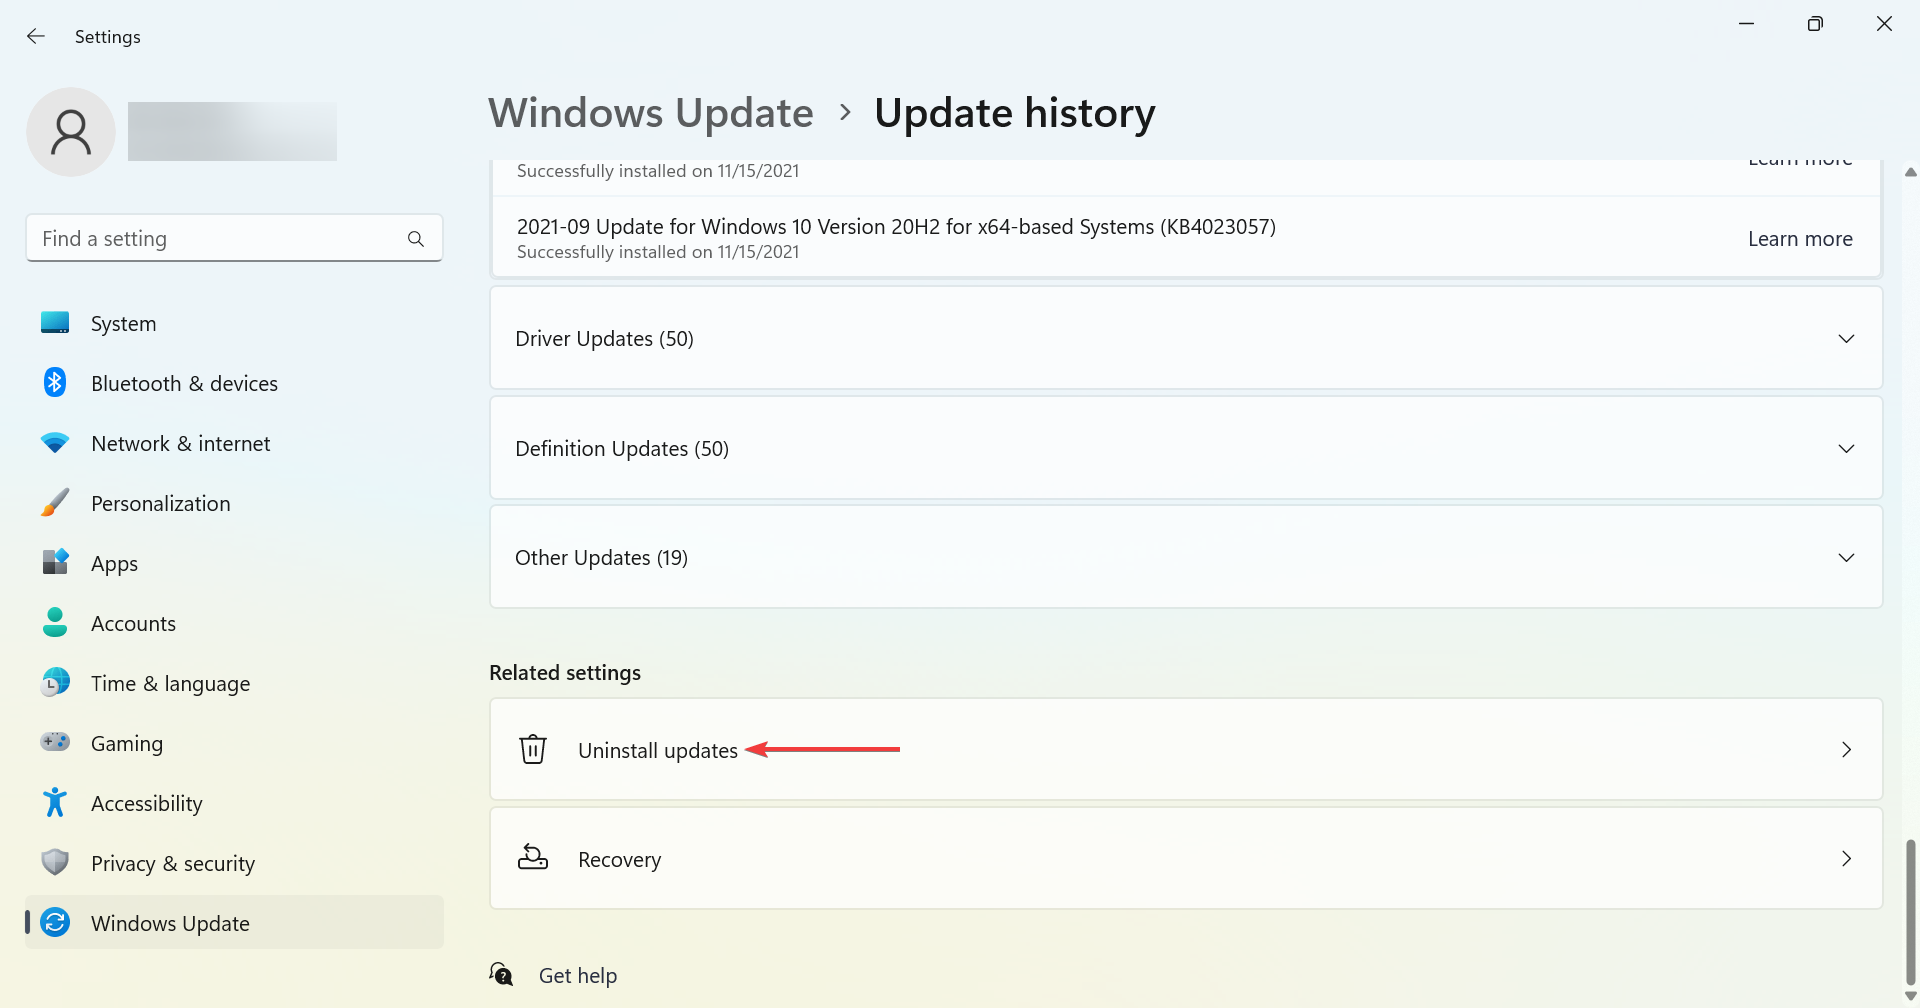
- Now, scroll down to the bottom and click on Uninstall updates.
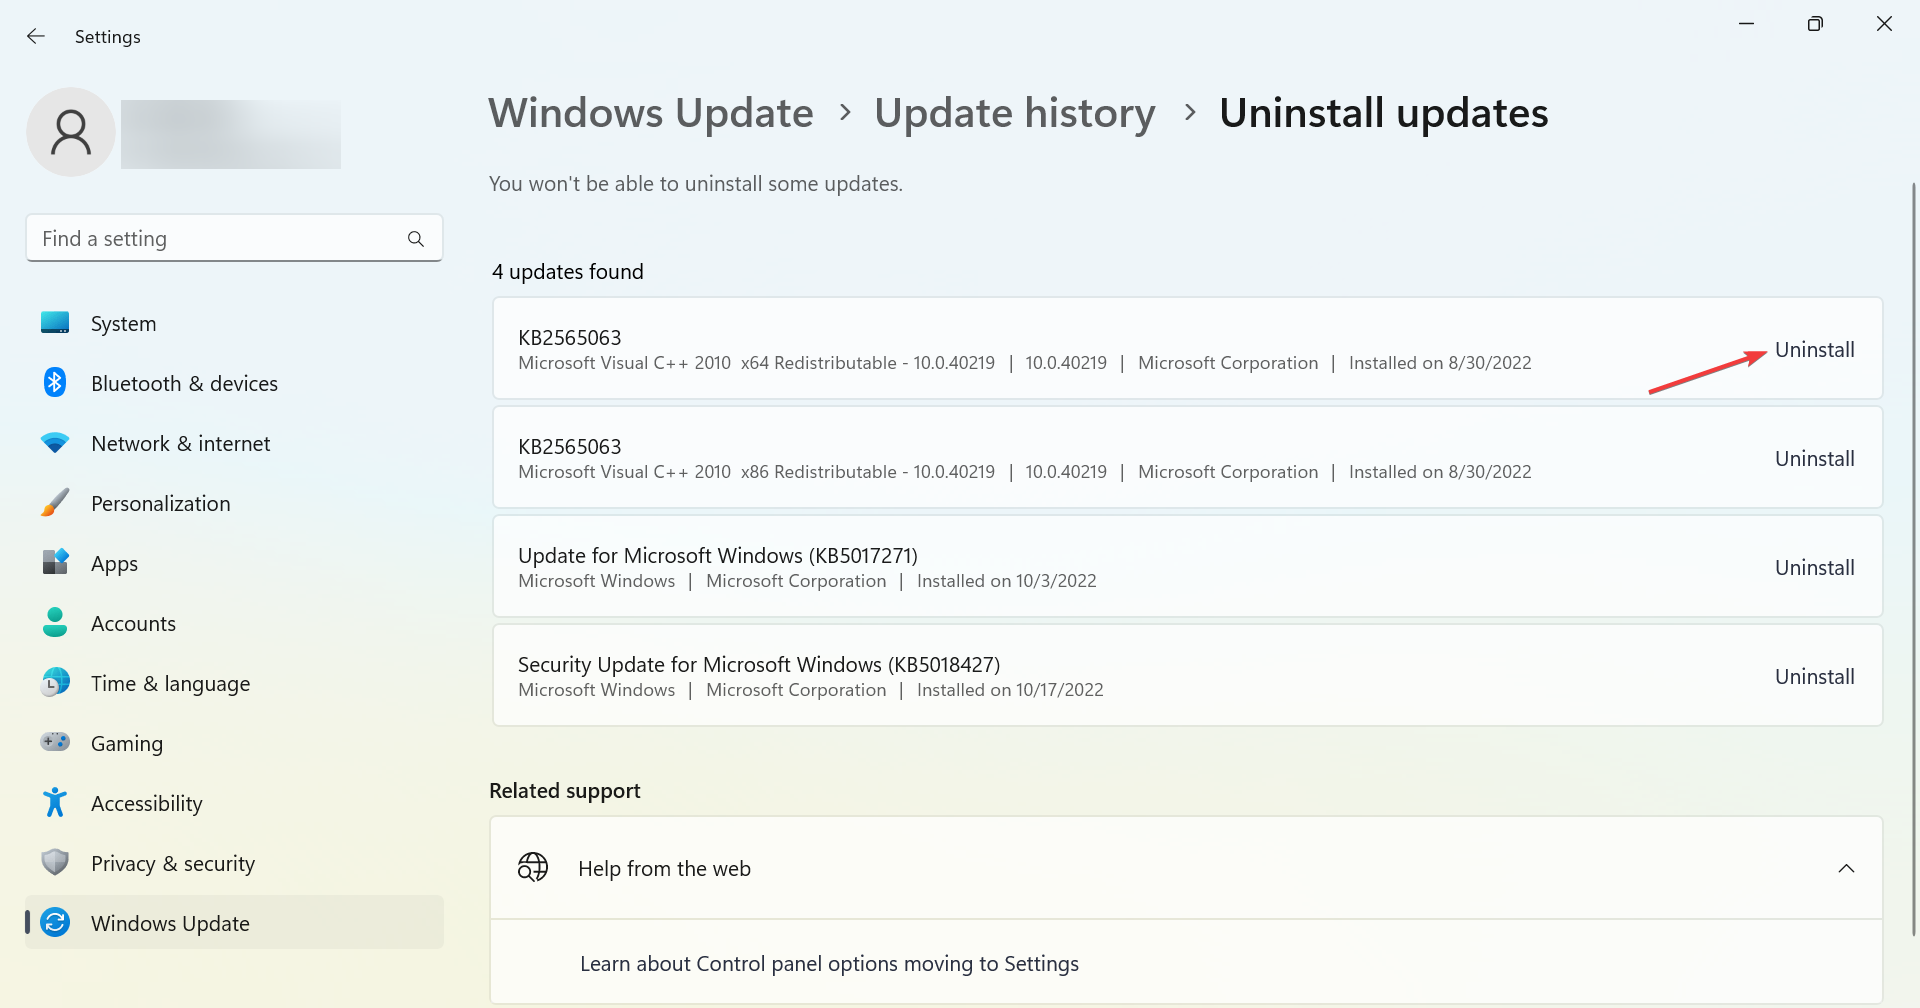
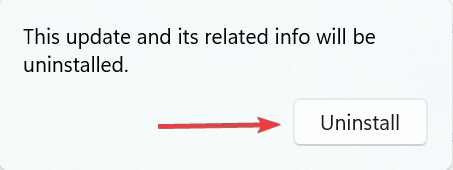
- Click on Uninstall next to the last installed update.
- Again, click Uninstall in the confirmation prompt.
If no output devices were found after Windows 11 update, it could be a bug in the last installed version of the OS. And the simplest solution here would be to uninstall that version. Once done, make sure to disable the automatic installation of Windows updates.
Now, all you have to do is wait for a newer version to be released, install it, and again enable automatic updates.
There might also be more ways to fix the No audio output device installed issue. Some solutions are common here and when Windows can’t find an audio device. So, you may try those as well.
Also, before you leave, find out the bloatware installed in Windows 11, and remove these today to free up storage space and boost the computer’s performance.
Users who have fixed this sound error with different methods are welcome to share their alternative resolutions below.
Newsletter
No matter what, you should update your sound driver
by Matthew Adams
Matthew is a freelancer who has produced a variety of articles on various topics related to technology. His main focus is the Windows OS and all the things… read more
Updated on January 17, 2023
Reviewed by
Vlad Turiceanu
Passionate about technology, Windows, and everything that has a power button, he spent most of his time developing new skills and learning more about the tech world. Coming… read more
- When no audio device is installed d in Windows 11, your PC’s sound devices might be disabled or have outmoded or corrupted drivers.
- To fix the No audio output device installed error, you might need to reinstall or update some device drivers.
- Don’t hesitate to enable sound devices to resolve this issue for good.
XINSTALL BY CLICKING THE DOWNLOAD FILE
This software will keep your drivers up and running, thus keeping you safe from common computer errors and hardware failure. Check all your drivers now in 3 easy steps:
- Download DriverFix (verified download file).
- Click Start Scan to find all problematic drivers.
- Click Update Drivers to get new versions and avoid system malfunctionings.
- DriverFix has been downloaded by 0 readers this month.
The No audio output device is installed in Windows 11 error arises when no output devices are found in Windows 11. When that issue occurs, the taskbar’s sound icon has a red x.
That icon also displays a No audio output device installed error message when you hover the cursor over it. As a consequence of that error, Windows 11 has no sound. Therefore, users need to fix this error for the sake of restoring audio on their PCs.
Why does my computer say no audio output device installed?
Here are the reasons why no output devices are found installed in Windows 11:
- Outdated or corrupt drivers – This is the most common reason behind the issue, and simply reinstalling or updating the driver should do the trick.
- Misconfigured settings – Certain audio settings are known to affect the way things work and cause problems with audio devices.
- Bugs in the installed version of the OS – If the problem started after an update, it’s likely a bug in the latest version.
- Using a driver not signed by Microsoft – Oftentimes, the issue arises when using a driver not digitally signed by Microsoft, and this, too, is easily fixable. But we recommend that you install only the verified drivers.
Users have reported numerous Windows 11 devices on which they encountered the No output devices found. Some of the most common are the following:
- No audio device is installed in Windows 11 (HP)- Updating the audio drivers will do the trick in this situation and many others.
- No audio output device is installed in Windows 11 (Dell) – You may plug in a wired audio device. Also, try reinstalling the driver for the problematic one.
- No audio device is installed in Lenovo – The faulty installation of an audio driver on the system is the root cause of this problem, which may be fixed by following our solutions.
Without further ado, let’s jump into the list of solutions specifically dedicated to the No output devices found in Windows 11. Follow along!
How do I fix No output devices found in Windows 11?
- Why does my computer say no audio output device installed?
- How do I fix No output devices found in Windows 11?
- 1. Reinstall the audio driver
- 2. Reset the audio controller
- 3. Disable Driver Signature Enforcement
- 4. Update the sound driver
- 5. Change Mono audio settings
- 6. Uninstall the last Windows Update
Before we try the slightly more complex solutions here, let’s first do a few quick checks:
- Restart the computer.
- Update the computer to the latest version of the OS.
- Make sure any third-party antivirus or firewall installed on the PC is disabled.
If these don’t work, these methods surely would.
1. Reinstall the audio driver
- Press Windows + S to open the Search menu, enter Device Manager in the text field, and click on the relevant search result.
- Double-click Sound, video, and game controllers to view the devices for that category.
- Next, right-click your PC’s sound device, and select Uninstall device.
- Click Uninstall in the confirmation prompt that appears.
- Also, look for a device with SST in its name under System devices, and reinstall it too.
- Once done, restart the computer, and Windows will automatically install the best driver for the device.
If no audio output device is installed, your primary approach should be to uninstall the driver for the affected device(s) and let Windows install the best one. It is especially helpful in the case of a corrupt driver, usually identified by a warning sign next to it.
If Windows doesn’t identify the device after the restart, go to the Action menu, and select Scan for hardware changes.
2. Reset the audio controller
If simply reinstalling the audio controller doesn’t work, you will have to reset the audio controller. To do that, first, uninstall the High Definition Audio Device from the Device Manager.
Once done, shut down the PC, remove the power cable, and then hold the power button for at least 60 seconds. After that, wait another 10 minutes or so, and restart the computer after plugging in the power cable.
This may seem trivial but it often does the tick when there is a problem with your audio device.
3. Disable Driver Signature Enforcement
- Press Windows + R to open Run, type gpedit.msc in the text field, and hit Enter.
- Now, double-click Administrative Templates under User Configuration, and then on System.
- Select Driver Installation from the left, and then double-click on Code signing for driver packages.
- Check the Enabled option, then from the When Windows detects a driver file without a digital signature dropdown menu, select Ignore, and finally click on OK to save the changes.
This is the quickest way, though you can also disable Driver Signature Enforcement after booting Windows in Recovery Mode. In case you are running the Home edition of Windows 11, you will have to manually install the Local Group Policy Editor.
Once done, check whether no output or input devices are found, or the issue is fixed.
- Windows couldn’t find your audio device [Fixed]
- Fix: Lenovo laptop sound not working in Windows 10/11
- Browser does not support output device selection [QUICK FIX]
- How to play sound on two devices at once in Windows 10/11
4. Update the sound driver
1. Press Windows + X to open the Power User menu.
2. Select Device Manager from the list.
3. Double-click the category for Sound, video, and game controllers.
Some PC issues are hard to tackle, especially when it comes to corrupted repositories or missing Windows files. If you are having troubles fixing an error, your system may be partially broken.
We recommend installing Restoro, a tool that will scan your machine and identify what the fault is.
Click here to download and start repairing.
4. Then right-click your PC’s sound device, such as High Definition Audio Device, and select Update driver.
5. Click the Search automatically for drivers option.
6. If selecting that option doesn’t install a new driver, select the Search for updated drivers on Windows Update option.
7. Next, press the Check for updates button on the Windows Update tab that opens.
8. Select to download and install available updates.
9. In addition, click on Advanced options, then Optional updates.
10. Select the checkboxes for optional driver updates, and then on Download & install.
If you’re encountering the No Audio Output Device is Installed error on your Windows 11 device, you should update your audio drivers.
This is likely to solve the problem without you having to try out other more complicated solutions. The fastest way of doing this is via Device Manager.
Some users prefer to update drivers with third-party driver updater software, like DriverFix. This third-party driver updater will scan your PC and display what devices on it need new drivers.
If your sound device is among them, you can select to download and install the latest driver for it within the software.

DriverFix
An amazing program you can use to easily update your drivers, either the outdated or missing ones.
5. Change Mono audio settings
- Press Windows + I to open Settings, select Accessibility from the navigation pane, and then click on Audio under Hearing.
- Now, check the Mono audio setting. If it’s already Enabled, turn it off, while if it’s Disabled, click on the toggle to turn it on.
If no output devices are found in Windows 11, change the Mono audio setting and verify if that fixes the problem. It’s a proven workaround, and we recommend you try it should the audio device be disabled on your PC.
6. Uninstall the last Windows Update
- Press Windows + I to open Settings, select Windows Update from the left, and then click on Update history.
- Now, scroll down to the bottom and click on Uninstall updates.
- Click on Uninstall next to the last installed update.
- Again, click Uninstall in the confirmation prompt.
If no output devices were found after Windows 11 update, it could be a bug in the last installed version of the OS. And the simplest solution here would be to uninstall that version. Once done, make sure to disable the automatic installation of Windows updates.
Now, all you have to do is wait for a newer version to be released, install it, and again enable automatic updates.
There might also be more ways to fix the No audio output device installed issue. Some solutions are common here and when Windows can’t find an audio device. So, you may try those as well.
Also, before you leave, find out the bloatware installed in Windows 11, and remove these today to free up storage space and boost the computer’s performance.
Users who have fixed this sound error with different methods are welcome to share their alternative resolutions below.
Newsletter
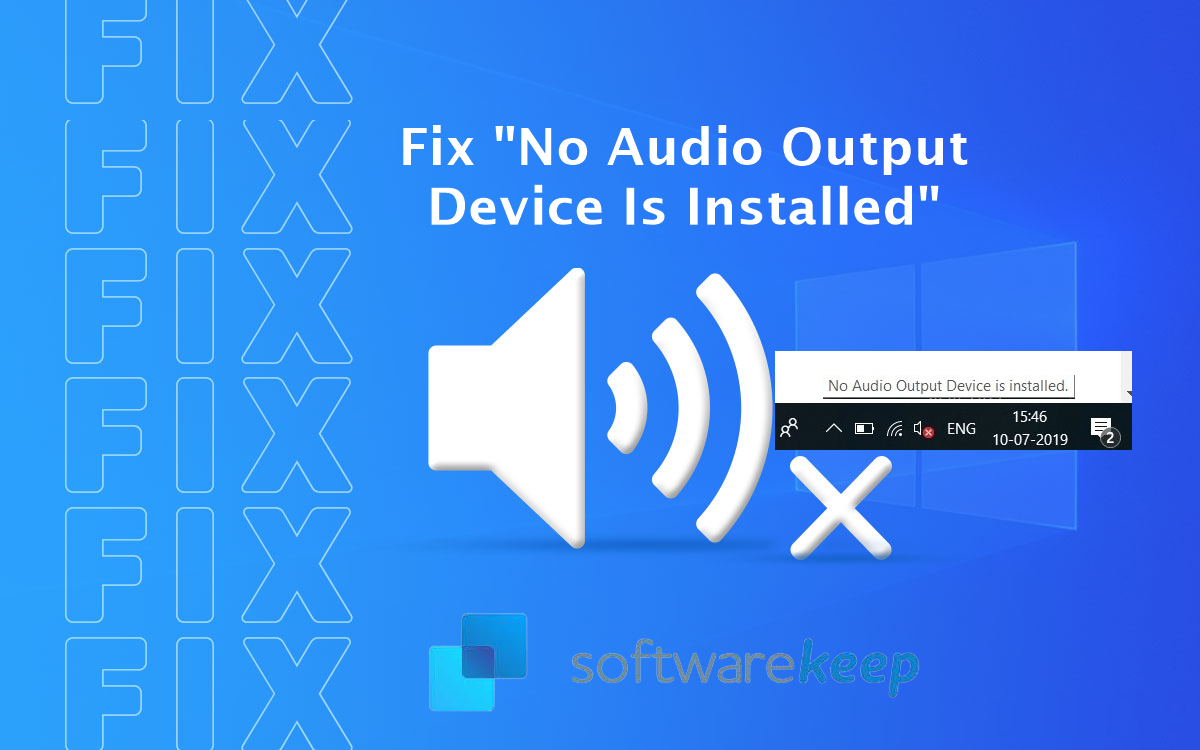
Whenever the speaker icon in the taskbar shows a red, cross mark on it, it means your audio adapter (card) is not working anymore. Once you move the cursor over the icon, you will get the message “No audio output device is installed”. And most of the time this problem is triggered due to system upgrade and resulting hardware or software malfunction. When users upgrade their systems, the drivers stop working due to their lack of compatibility. If you are struggling with this type of issue and want to fix “no audio output device is installed windows 10” error then here we have complete information to over this error.
First Check your speaker and headphone connections for loose cables or the wrong jack. New PCs these days are equipped with 3 or more jacks.
- Microphone jack
- line-in jack
- line-out jack.
These jacks connect to a sound processor. So make sure your speakers are plugged into the line-out jack. If unsure which is the right jack, try plugging speakers into each of the jacks and see it produces any sound.
Restart Windows Audio Service
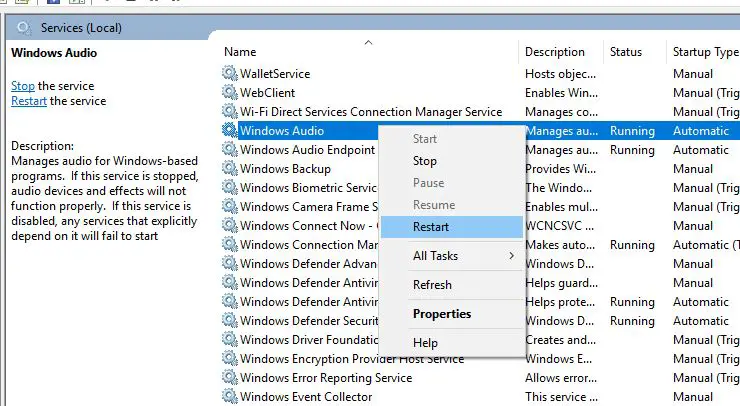
Sometimes this error “no audio output device is installed” occurs if the Windows Audio service not started or stopped responding. It’s better to check and Make sure windows audio and dependency services are running.
- Press Windows + R and type services.msc and ok.
- This will open the Windows services console,
- Scroll down and locate Windows audio service,
- Check if its running status
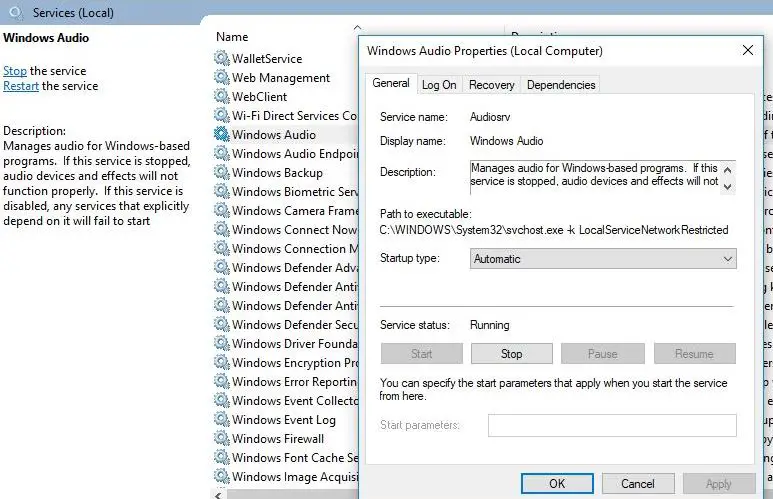
Also, check and make sure that the following services have Running Status and their Startup Type is set to Automatic.
- Windows Audio
- Windows Audio Endpoint Builder
- Plug and Play
- Multimedia Class Scheduler
Note: If you find any of these services don’t have Running Status and their Startup Type is not set to Automatic, then double-click the service and set this in the service’s property sheet.
Check after performing these steps, is the audio started working or not. Also, check this post If you find the Microphone not working after install windows 10 version 21H1.
Use The Windows Audio Troubleshooter
Run the Build in Audio sound Troubleshooter, and let windows detect and fix the problem itself first.
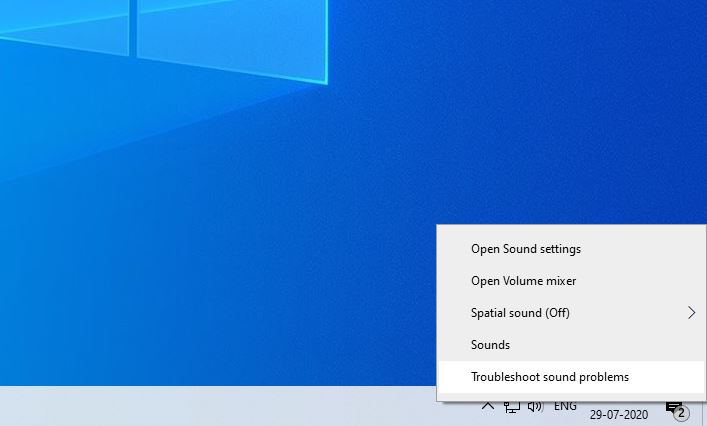
- Simply Right-click on the Speaker Icon, a pop-up will appear,
- Click Troubleshoot sound problems.
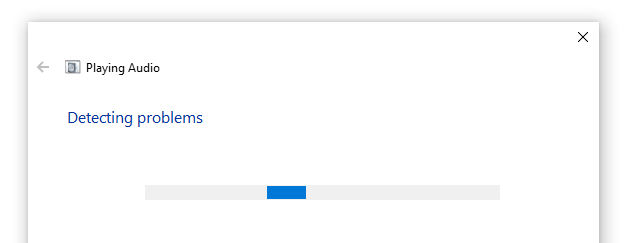
Also, you can Run the Audio troubleshooter from settings -> update & security -> troubleshooting -> click on playing audio and run the troubleshooter. And follow on Screen instructions To complete the troubleshooting process.
The audio troubleshooter will look for the issues and display the results once the search is completed. Play any audio file to check for sound. If there is sound your issue is resolved. Otherwise, click Explore additional options and proceed accordingly.
Enable audio output device windows 10
If the problem started after the recent windows 10 upgrade there is a chance due to incompatibility issues or bed driver windows automatically Disable the audio device, then you might not see it under the list of playback devices.
- On the Start menu search Type sound and select it from the search results.
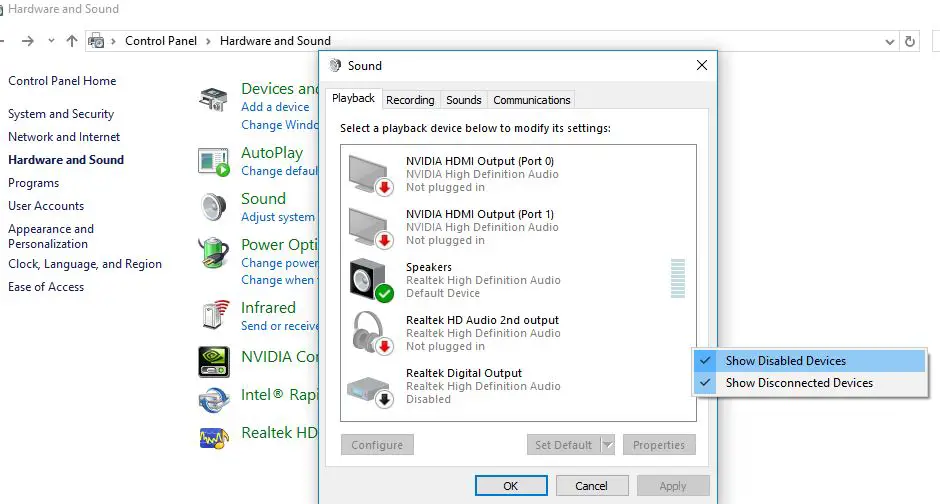
- Here Under the Playback tab, right-click on the empty area
- Make sure “Show Disabled Devices” has a checkmark on it.
- If headphones/Speakers are disabled, it will now show up in the list.
- Right-click on the device and Enable it
- Select “Set Default” Check if it helps.
Roll Back and install generic audio Driver
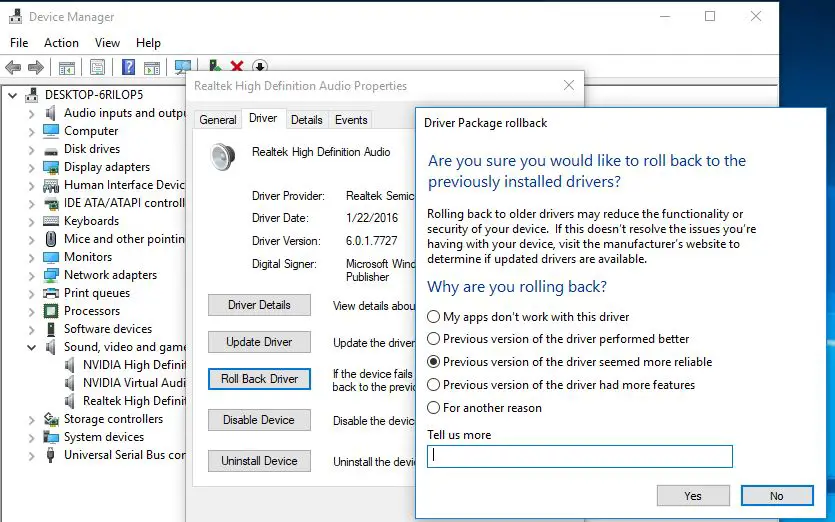
If the issue started after a recent Windows 10 Update, or install the latest audio driver then there is a chance new installed driver causing the issue. Simply try to roll it back to the last good configuration.
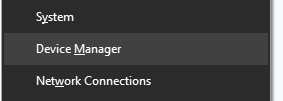
- Right-click the Start button, select Device Manager,
- Right-click your sound driver, select Properties,
- Next move to the Driver tab.
- Press the Roll Back Driver option if available, and Windows 10 will begin the process.
Reinstall the audio driver
Again if the installed audio driver gets corrupted during the upgrade process, it’s not compatible with the current Windows 10 version this may also cause no sound issue. That causes try to update the current driver to the latest version or uninstall the old audio driver and install the latest one to fix the problem.
- First to update the old audio driver
- Right-click on the start menu and select Device manager
- Expand Sound, video and game controllers.
- Right-click your audio device and then select Uninstall.
- Restart your device and Windows will attempt to reinstall the driver.
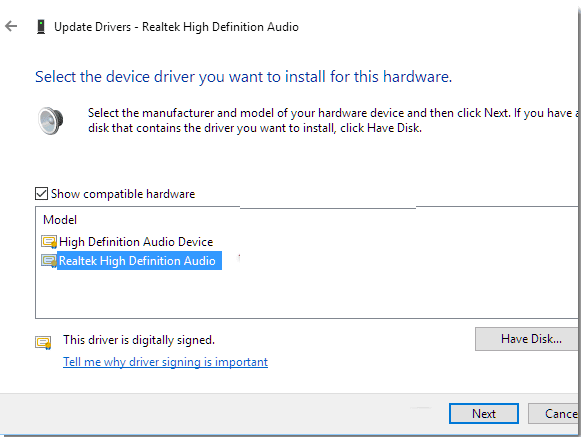
If that didn’t work, try using the generic audio driver that comes with Windows.
- Again open Device Manager,
- Expand Sound, video and game controllers.
- Right-click on the current installed audio driver and select update driver software.
- Browse my computer for driver software
- Let me pick from a list of device drivers on my computer.
- Select High Definition Audio Device, select next and follow the instructions to install it.
After Install once Restart the windows and check the problem is fixed That’s it. Your computer speakers should now be able to play sound normally. If the sound is still not working, then try downloading and installing the latest sound card drivers for Windows 10 from the manufacturer’s website.
Change Different Sound Card
If you still have a problem even after trying windows reinstallation then it’s 100% a hardware fault. Try with a new sound card to your system and check. This time Windows 10 no audio sound problem gets solved.
Also read:
- Solved: BSOD error Driver irql_not _less_or_ equal Windows 10
- Can’t connect to this network error on Windows 10 version 2004
- How to fix cannot start print spooler 1068 windows 10
- Top 5 Free Antivirus Software for Windows 10, 8.1 and 7 | 2020 Edition
- Google Chrome Slow, Not perform well on Windows 10? Try these solutions
Many Windows 10 users, especially those who use HP or Dell laptops and PCs, run into an error that says “No Audio Output Device is Installed.” This means that you’re unable to listen to any sound on your computer, making it hard to relax or potentially do your work.
The error usually shows up with a red cross symbol next to the audio control in the system tray.
In this article, we’ll be sure to help you learn more about this error, and show you the most effective ways to troubleshoot it. Continue reading to find out how you can fix the “No Audio Output Device is Installed” error.
Causes of“No Audio Output Device is Installed” error?
Just like most Windows 10 errors, it’s quite hard to pinpoint only one source for your audio not working properly. However, we were able to collect some of the most common causes for this error, which may help you identify why you’re unable to hear any sound on your device.
Here’s a list of reported cases from various Windows 10 user reports. Keep in mind that your issue can be unique, and there may be many more causes for this error not mentioned below!
- A major Windows 10 update rolled out. You wouldn’t expect it, but one of the major causes of errors on Windows 10 is the updates themselves. While they bring many new features, security patches, and more goodies, they can also mess your system up.
- Your audio drivers are damaged or outdated. Drivers are core parts of your device, as they make the functionality of connected devices possible even if they aren’t from Microsoft. If your audio devices are messed up, you most likely won’t be able to properly use them.
- Your playback device has been disabled. It’s possible that you or another source has disabled the playback device you’re trying to use. This means that audio will not be playing from the device as Windows 10 doesn’t recognize it. This may be causing the “No Audio Output Device is Installed” error.
- Your playback device isn’t connected to the right port. If the port you’re using is damaged or not configured to be used on your system, the device you plugged in it won’t function as intended.
- Your wireless device isn’t paired with your computer. Every piece of wireless technology needs to be properly connected with your computer in order to be used. Make sure that you’ve gone through the proper connection process if using wireless headphones, earbuds, or speakers.
Now that we’ve taken a look at some possible causes, it’s time to get to work. Below are several methods used for troubleshooting the “No Audio Output Device is Installed” error on Windows 10.
Tip: All of these methods can be performed by anybody, as our guides are easy to follow and don’t require any previous Windows 10 experience. If you know anyone who’s experiencing issues with their system, don’t forget to recommend us!
Let’s start.
Method 1: Use Windows 10’s audio troubleshooter
Windows 10 comes equipped with multiple troubleshooters that specialize in finding and resolving issues on your device. Luckily, the one used for getting rid of audio-related errors is readily available on your computer without the need to download a single file.
Here’s what you need to do to run the Windows 10 audio troubleshooter.
- Right-click on the volume icon in your system tray, then click on “Troubleshoot sound problems”.
- Wait for the troubleshooter to detect issues. If anything is identified, you’ll be able to fix it with the click of a button.
- Test if your audio works now.
Method 2: Update your audio driver
It’s important to keep your drivers up to date no matter what. They allow your computer to handle third-party equipment and are a core part of your system. If you’re experiencing the “No Audio Output Device Is Installed” error, it might be because of your audio drivers.
Here are the steps to follow to update your audio driver on Windows 10.
- Press the Windows + X keys on your keyboard and click on the Device Manager option from the menu.
- Expand the Sound, video and game controllers menu by clicking on the arrow next to it.
- Right-click on your audio device listed in the menu and choose Update Driver.
- Allow Windows 10 to look for the newest driver on your local computer or online, then follow any on-screen instructions.
Method 3: Manually uninstall your device’s driver
If the update didn’t work, we recommend manually uninstalling and allowing Windows 10 to re-install your audio driver. Here’s everything you need to do.
- Press the Windows + X keys on your keyboard and click on the Device Manager option from the menu.
- Expand the Sound, video and game controllers menu by clicking on the arrow next to it.
- Right-click on your audio device listed in the menu and choose the Uninstall device option.
- Restart your computer. Windows 10 should automatically re-download the latest version of your audio device driver.
Method 4: Update Windows 10 to the latest version
Some users report that simply updating to the newest version release of Windows 10 made the “No Audio Output Device Is Installed” error go away. As a bonus, you might even get access to new and exciting features, improved security, and more optimization.
- Open the Settings application using the Start menu or the Windows + I keyboard shortcut.
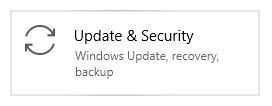
- Click on Update & Security.
- In the Windows Update tab, click on the Check for updates button.
- If a new update is found, click on the Install button.
- After your system successfully installs the newest Windows 10 update, you might be able to see the volume icon showing up properly and your audio functioning again.
Method 5: Check for hardware issues
When none of the methods above work for you, it’s a sign that you might be dealing with hardware issues. This means that your audio device may be damaged, or that the plug you’re using is damaged or not compatible with the device.
We recommend testing the device on a different computer to check whether or not it’s playing any audio. If it isn’t, attempt getting in touch with Microsoft customer service, HP’s support team, or the Dell support agents.
We hope that our guide was able to help you restore your audio on your Windows operating device. If you experience similar issues in the future, feel free to return to our articles and follow our steps once again! We’re always here to assist you.
Are you interested in learning more about Windows 10? Check our guide on how to fix audio and Video out of Sync on Windows 10. You can browse our dedicated blog section and find articles about everything related to Microsoft’s groundbreaking operating system. Click here to proceed.
If you’re looking for a software company you can trust for its integrity and honest business practices, look no further than SoftwareKeep. We are a Microsoft Certified Partner and a BBB Accredited Business that cares about bringing our customers a reliable, satisfying experience on the software products they need. We will be with you before, during, and after all the sales.
That’s our 360 Degree SoftwareKeep Guarantee. So, what are you waiting for? Call us Today on +1 877 315 1713 or email sales@softwarekeep.com. As well, you can reach us via Live Chat.

