-
Partition Wizard
-
Partition Manager
- How to Fix Not in a Hypervisor Partition Error
By Linda | Follow |
Last Updated February 03, 2023
If you use VirtualBox, you may encounter the error «not in a hypervisor partition (hvp=0) (verr_nem_not_available)» when you try to start a virtual machine. In this case, you may need to enable virtualization in BIOS. Here MiniTool Partition Wizard shows you how to do that.
Information about Not in a Hypervisor Partition Error
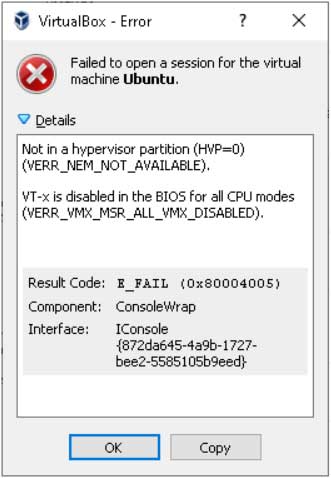
When you try to run a virtual system in VirtualBox, you may get an error message: Not in a hypervisor partition (HVP=0) (VERR_NEM_NOT_AVAILABLE). Under this message, the detailed reasons will be listed. The reasons are as follows:
- VT-x is disabled in the BIOS for all CPU modes (VERR_VMX_MSR_ALL_VMX_DISABLED).
- AMD-V is disabled in the BIOS (or by the host OS) (VERR_SVM_DISABLED).
Then, what is VT-x/AMD-V? Both they are virtualization technologies.
1. VT-x
VT-x is the virtualization technology developed by Intel (abbreviated as Intel-VT or IVT). With this technology, a set of hardware devices can be virtualized through the virtual machine viewer (VMM, Virtual Machine Monitor) for the operating system of the virtual machine.
These technologies have been implemented by software on VMware and Virtual PC in the past, but the hardware support with VT enabled can accelerate the progress of such software.
The 32-bit/64-bit VT extension is called «VT-x»; the VT of the IA-64 processor is called VT-i; of course, there are other virtualization technologies called VT-c (Intel network card) and VT-d (Virtualization for Directed I/O).
In Linux, Intel processors that support virtualization will have a flag named «vmx» in a special file /proc/cpuinfo.
2. AMD-V
AMD-V, short for AMD Virtualization, is the name of the virtualization extension provided by AMD for the 64-bit x86 architecture. In some BIOS versions, AMD-V is also called AMD SVM. In Linux, AMD processors that support virtualization will have a flag named «svm» in a special file /proc/cpuinfo.
Fix Not in a Hypervisor Partition Error
Virtualization technology not only needs the support from processors, but also needs the support from chipsets and BIOS. When the error «not in a hypervisor partition (hvp=0) (verr_nem_not_available)» appears, it means that your computer has the virtualization disabled at the BIOS level and you need to enable this technology to set up a new virtual machine.
Here is the tutorial on how to enable virtualization technology (VT-x or AMD-V) in BIOS:
Step 1: Restart your laptop/desktop. Then, on the boot screen, press the BIOS key to enter into BIOS mode. (The BIOS key may vary depending on computer models. But you can follow the on-screen instructions or search it online)
Step 2: In the BIOS interface, use arrow keys to skip to Configuration tab. In most cases, the virtualization item is under Configuration, System Configuration, Advanced Configuration, or something like those.
Step 3: After finding the virtualization item (IVT, AMD-V, or something related to virtualization), press Enter key to make sure it is enabled.
Step 4: Press F10 to save the changes and then exit from BIOS.
After enabling Virtualization in BIOS, you should then restart your computer to run the virtual machine in VirtualBox again. This time, you will open this VM smoothly.
VMware vs VirtualBox, Which Is Better For You
About The Author

Position: Columnist
Author Linda has been working as an editor at MiniTool for 1 year. As a fresh man in IT field, she is curious about computer knowledge and learns it crazily. Maybe due to this point, her articles are simple and easy to understand. Even people who do not understand computer can gain something.
By the way, her special focuses are data recovery, partition management, disk clone, and OS migration.
-
Partition Wizard
-
Partition Manager
- How to Fix Not in a Hypervisor Partition Error
By Linda | Follow |
Last Updated February 03, 2023
If you use VirtualBox, you may encounter the error «not in a hypervisor partition (hvp=0) (verr_nem_not_available)» when you try to start a virtual machine. In this case, you may need to enable virtualization in BIOS. Here MiniTool Partition Wizard shows you how to do that.
Information about Not in a Hypervisor Partition Error
When you try to run a virtual system in VirtualBox, you may get an error message: Not in a hypervisor partition (HVP=0) (VERR_NEM_NOT_AVAILABLE). Under this message, the detailed reasons will be listed. The reasons are as follows:
- VT-x is disabled in the BIOS for all CPU modes (VERR_VMX_MSR_ALL_VMX_DISABLED).
- AMD-V is disabled in the BIOS (or by the host OS) (VERR_SVM_DISABLED).
Then, what is VT-x/AMD-V? Both they are virtualization technologies.
1. VT-x
VT-x is the virtualization technology developed by Intel (abbreviated as Intel-VT or IVT). With this technology, a set of hardware devices can be virtualized through the virtual machine viewer (VMM, Virtual Machine Monitor) for the operating system of the virtual machine.
These technologies have been implemented by software on VMware and Virtual PC in the past, but the hardware support with VT enabled can accelerate the progress of such software.
The 32-bit/64-bit VT extension is called «VT-x»; the VT of the IA-64 processor is called VT-i; of course, there are other virtualization technologies called VT-c (Intel network card) and VT-d (Virtualization for Directed I/O).
In Linux, Intel processors that support virtualization will have a flag named «vmx» in a special file /proc/cpuinfo.
2. AMD-V
AMD-V, short for AMD Virtualization, is the name of the virtualization extension provided by AMD for the 64-bit x86 architecture. In some BIOS versions, AMD-V is also called AMD SVM. In Linux, AMD processors that support virtualization will have a flag named «svm» in a special file /proc/cpuinfo.
Fix Not in a Hypervisor Partition Error
Virtualization technology not only needs the support from processors, but also needs the support from chipsets and BIOS. When the error «not in a hypervisor partition (hvp=0) (verr_nem_not_available)» appears, it means that your computer has the virtualization disabled at the BIOS level and you need to enable this technology to set up a new virtual machine.
Here is the tutorial on how to enable virtualization technology (VT-x or AMD-V) in BIOS:
Step 1: Restart your laptop/desktop. Then, on the boot screen, press the BIOS key to enter into BIOS mode. (The BIOS key may vary depending on computer models. But you can follow the on-screen instructions or search it online)
Step 2: In the BIOS interface, use arrow keys to skip to Configuration tab. In most cases, the virtualization item is under Configuration, System Configuration, Advanced Configuration, or something like those.
Step 3: After finding the virtualization item (IVT, AMD-V, or something related to virtualization), press Enter key to make sure it is enabled.
Step 4: Press F10 to save the changes and then exit from BIOS.
After enabling Virtualization in BIOS, you should then restart your computer to run the virtual machine in VirtualBox again. This time, you will open this VM smoothly.
VMware vs VirtualBox, Which Is Better For You
About The Author
Position: Columnist
Author Linda has been working as an editor at MiniTool for 1 year. As a fresh man in IT field, she is curious about computer knowledge and learns it crazily. Maybe due to this point, her articles are simple and easy to understand. Even people who do not understand computer can gain something.
By the way, her special focuses are data recovery, partition management, disk clone, and OS migration.
На чтение 4 мин. Просмотров 568 Опубликовано 19.01.2021
Если вы пытаетесь создать новую виртуальную машину с помощью VirtualBox в Windows 10 или любой другой версии Windows, вы можете получить следующую ошибку:
Не в разделе гипервизора (HVP = 0) (VERR_NEM_NOT_AVAILABLE).
VT-x отключен в BIOS для всех режимов ЦП (VERR_VMX_MSR_ALL_VMX_DISABLED).

Прежде чем мы увидим исправление этой проблемы VirtualBox, давайте сначала рассмотрим причину.
Содержание
- Причина:
- «Не в разделе гипервизора» Решение:
- Шаг 1 :
- Шаг 2:
- Шаг 3:
- Сообщение об ошибке при попытке запустить виртуальный компьютер
Причина:
Ошибка « VT-x отключен в BIOS для всех режимов ЦП »отображается, если на вашем компьютере с Windows не включена виртуализация. На многих компьютерах с Windows виртуализация отключена по умолчанию на уровне BIOS, и ее необходимо включить, чтобы настроить новую виртуальную машину.
Я объясняю это для ноутбука DELL с Windows 10, но решение будет таким же для других компьютеров с небольшими вариациями в способе включения виртуализации.
Если вы используете компьютер Lenovo, прочтите это – Включить виртуализацию на компьютерах Lenovo
ПРИМЕЧАНИЕ. Запишите все решение и затем продолжайте, поскольку для этого требуется перезагрузка системы в качестве шага и не может сопровождаться чтением.
«Не в разделе гипервизора» Решение:
Шаг 1 :
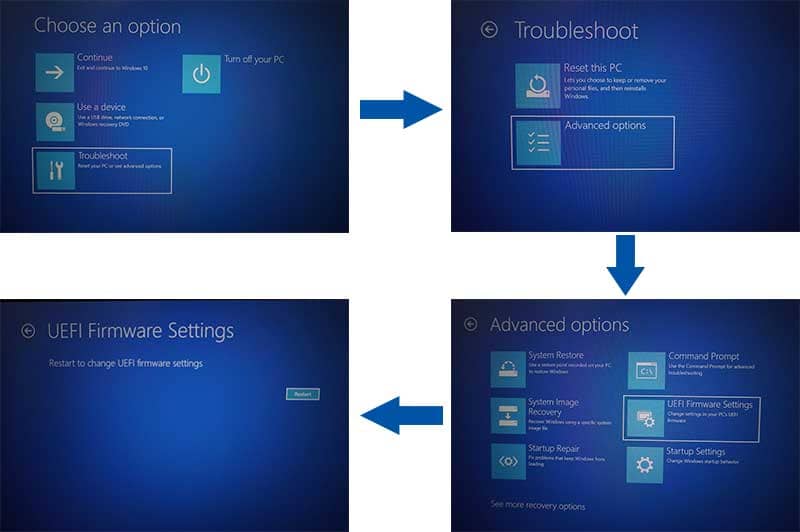
На компьютере с Windows перейдите в Настройки -> Обновление и безопасность -> Восстановление . Существует параметр Перезагрузить сейчас , выделенный в разделе «Расширенный запуск». Прочтите следующие шаги, прежде чем переходить к расширенным настройкам.

Читайте также: [FIX] «Не удалось открыть сеанс для виртуальной машины» в VirtualBox
Шаг 2 :
После нажатия кнопки Перезагрузить сейчас необходимо последовательно выполнить следующие параметры:
Устранение неполадок → Дополнительно вариант → Настройки прошивки UEFI → Перезагрузить 
Шаг 3 :
- После нажатия кнопки перезагрузки система переходит в режим BIOS.
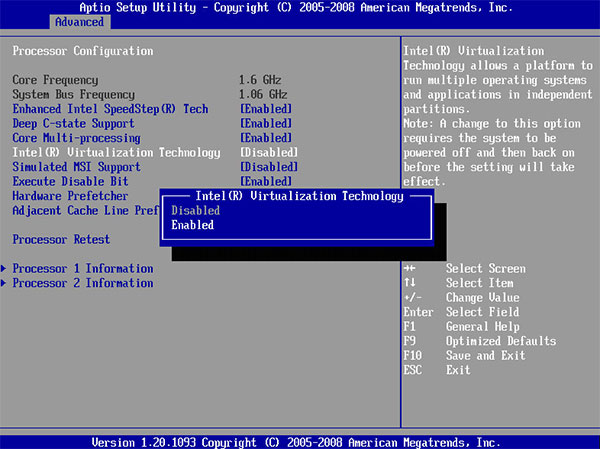
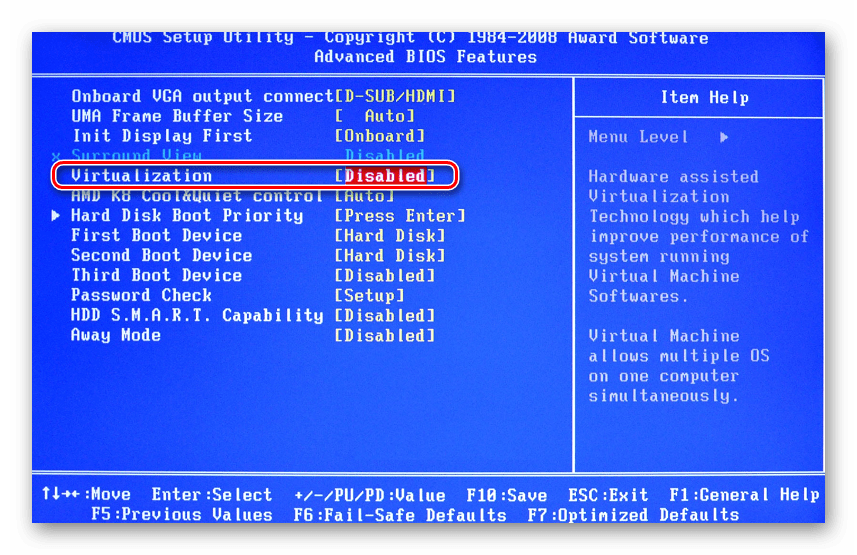
- В BIOS найдите параметр Виртуализация , который находится в разделе Advanced или System Configuration для большинства компьютеров.
- Система показывает, что Виртуализация отключена .
- Измените его на включенный.

Один раз готово, вы можете выйти с сохранением ( F10 – это ярлык для большинства компьютеров).
Вы можете столкнуться с проблемой полноэкранного режима после того, как ваша виртуальная машина откроется в VirtualBox. Вот исправление.
Сделать VirtualBox полноэкранным
Это устранит проблему «Не в разделе гипервизора в VirtualBox»/«VT-x отключен в BIOS для всех режимов ЦП ».
Удачного обучения 🙂
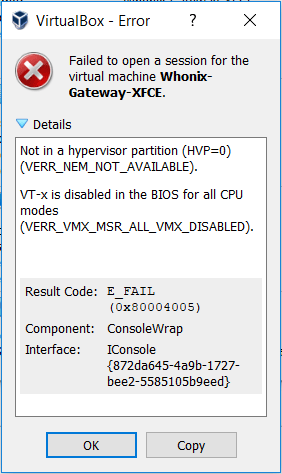
Сообщение об ошибке при попытке запустить виртуальный компьютер
Я новичок в виртуальных машинах. Я получаю это сообщение об ошибке, когда пытаюсь запустить виртуальную систему:
[Не в разделе гипервизора (HVP = 0) (VERR_NEM_NOT_AVAILABLE) .VT-x отключен в BIOS для всех режимов ЦП (VERR_VMX_MSR_ALL_VMX_DISABLED). Код результата: E_FAIL (0x80004005) Компонент: ConsoleWrapInterface: IConsole {872da645-4a9b-1727-bee2-5585105b9eed}]
img src = “/images/soft/658/658/foto-0.png”>
В этом случае сообщение об ошибке очень четкое. Параметры виртуализации вашего процессора отключены в BIOS.
Вам необходимо перезагрузиться в BIOS и включить VT-x.
Согласно руководству: http: //h10032.www1.hp.com/ctg/Manual/c06002345
«Включите или перезагрузите компьютер, быстро нажмите esc, а затем нажмите f10».
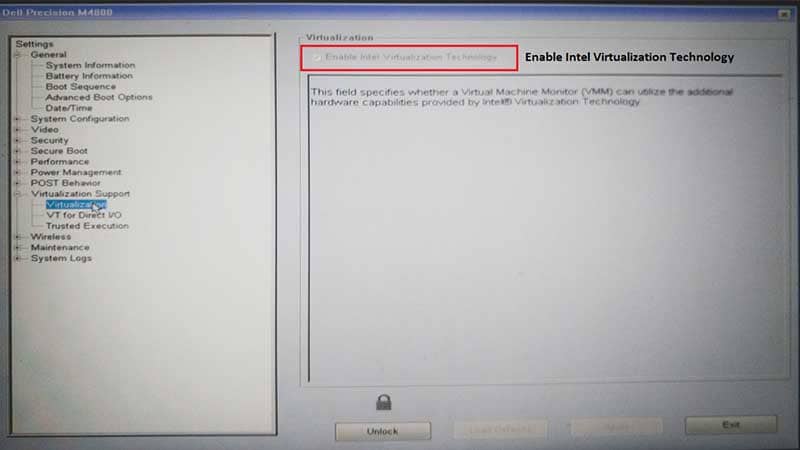
На вкладке Конфигурация системы . Проверьте, есть ли в списке Технология виртуализации .
Включите ее.
отредактировал 7 февраля ’19 в 23:28
ответ дан 7 фев ’19 в 23:18

-
МБ – это 15-ce019dx, и я запускаю windows 10 – Грег Штекель, 7 февраля 2019 г., 23:23
-
Пожалуйста, не только отвечайте в комментариях. Вместо этого отредактируйте сообщение, указав эту информацию. – Я говорю: “Восстановите Монику” 7 февраля ’19 в 23:25
-
На AMD-Ryzen это называется режим SVM – скобки, 22 марта 2020 г., 20:39
добавить комментарий |
В этом случае сообщение об ошибке очень четкое. Параметры виртуализации вашего процессора отключены в BIOS.
Вам необходимо перезагрузиться в BIOS и включить VT-x.
Согласно руководству: http: //h10032.www1.hp.com/ctg/Manual/c06002345
«Включите или перезагрузите компьютер, быстро нажмите esc, а затем нажмите f10».
На вкладке Конфигурация системы . Проверьте, есть ли в списке Технология виртуализации .
Включите ее.
Содержание
- Причины возникновения ошибки 0x80004005 в VirtualBox
- Способ 1: Переименование внутренних файлов
- Способ 2: Включение поддержки виртуализации в BIOS
- Способ 3: Обновление VirtualBox
- Способ 4: Отключение Hyper-V
- Способ 5: Изменение типа запуска гостевой ОС
- Способ 6: Удаление/исправление обновления Windows 7
- Вопросы и ответы

При попытке запуска операционной системы Windows или Linux в виртуальной машине VirtualBox пользователь может столкнуться с ошибкой 0x80004005. Она возникает до старта ОС и препятствует любой попытке ее загрузки. Есть сразу несколько способов, помогающих устранить существующую проблему и продолжить пользоваться гостевой системой в обычном режиме.
Ситуаций, из-за которых не получается открыть сессию для виртуальной машины, может быть несколько. Зачастую данная ошибка возникает спонтанно: еще вчера вы спокойно работали в операционной системе на VirtualBox, а сегодня выполнить то же самое не удается из-за сбоя при запуске сессии. Но в некоторых случаях не удается выполнить первичный (установочный) запуск ОС.
Это может произойти вследствие одной из следующих причин:
- Ошибка при сохранении последней сессии.
- Отключенная поддержка виртуализации в BIOS.
- Некорректно работающая версия VirtualBox.
- Конфликт гипервизора (Hyper-V) с VirtualBox на 64-разрядных системах.
- Проблемное обновление хостовой Windows.
Далее мы рассмотрим, как устранить каждую из этих проблем и начать/продолжить пользоваться виртуальной машиной.
Способ 1: Переименование внутренних файлов
Сохранение сессии может завершиться ошибочно, в результате чего последующий ее запуск будет невозможен. В этом случае достаточно выполнить переименование файлов, связанных с запуском гостевой ОС.
Для выполнения дальнейших действий вам необходимо включить отображение расширений файлов. Это можно сделать через «Параметры папок» (в Windows 7) или «Параметры Проводника» (в Windows 10).
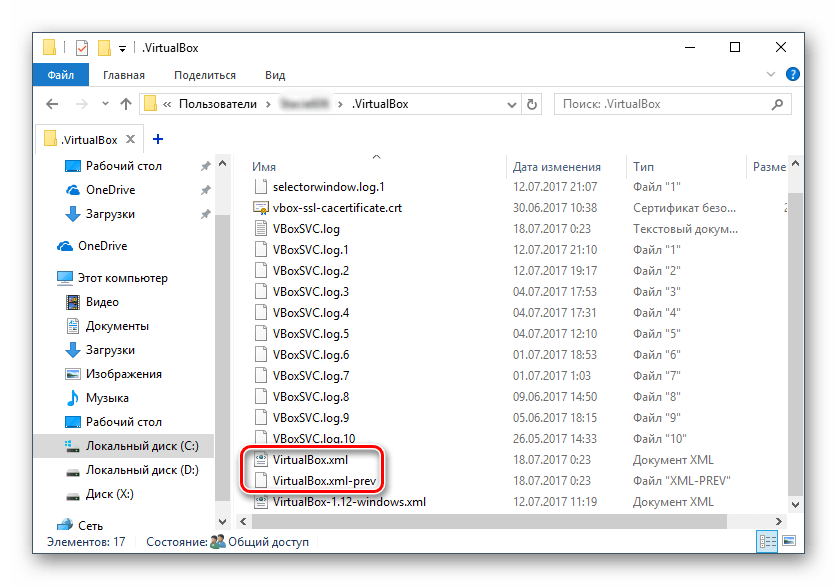
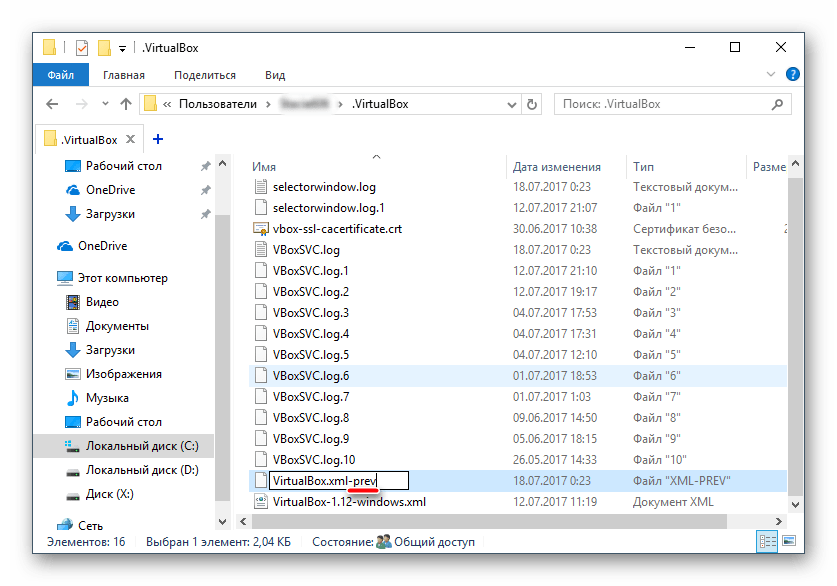
- Откройте папку, где хранится файл, отвечающий за запуск операционной системы, т.е. сам образ. Он располагается в папке VirtualBox VMs, место сохранения которой вы выбирали при установке самой VirtualBox. Обычно она находится в корне диска (диска С или диска D, если HDD разбит на 2 раздела). Также она может располагаться в персональной папке пользователя по пути:
С:UsersИМЯ_ПОЛЬЗОВАТЕЛЯVirtualBox VMsИМЯ_ГОСТЕВОЙ_ОС - В папке с операционной системой, которую вы хотите запустить, должны быть следующие файлы: Name.vbox и Name.vbox-prev. Вместо Name будет имя вашей гостевой операционной системы.

Скопируйте файл Name.vbox в другое место, например, на рабочий стол.
- Файл Name.vbox-prev необходимо переименовать вместо перемещенного файла Name.vbox, то есть удалить «-prev».
- Эти же действия необходимо проделать и внутри другой папки, находящейся по следующему адресу:
C:UsersИМЯ_ПОЛЬЗОВАТЕЛЯ.VirtualBox
Здесь вы будете менять файл VirtualBox.xml — скопируйте его в любое другое место.
- У файла VirtualBox.xml-prev удалите приписку «–prev», чтобы получилось имя VirtualBox.xml.
- Попробуйте запустить операционную систему. Если не сработало, восстановите все назад.


Способ 2: Включение поддержки виртуализации в BIOS
Если вы решили воспользоваться ВиртуалБокс впервые, и сразу же столкнулись с вышеупомянутой ошибкой, то, возможно, загвоздка кроется в не настроенном BIOS для работы с технологией виртуализации.
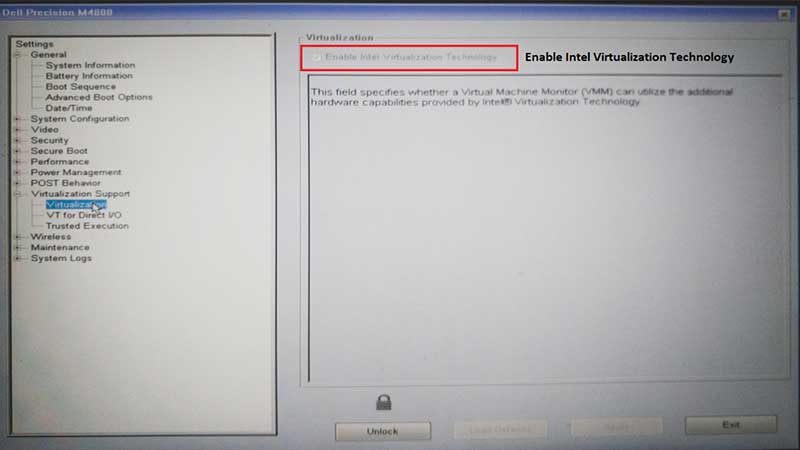
Чтобы осуществить запуск виртуальной машины, в БИОС достаточно включить всего лишь одну настройку, которая называется Intel Virtualization Technology.
- В Award BIOS путь к этой настройке следующий: Advanced BIOS Features > Virtualization Technology (или просто Virtualization) > Enabled.

- В AMI BIOS: Advanced > Intel(R) VT for Directed I/O > Enabled.

- В ASUS UEFI: Advanced > Intel Virtualization Technology > Enabled.

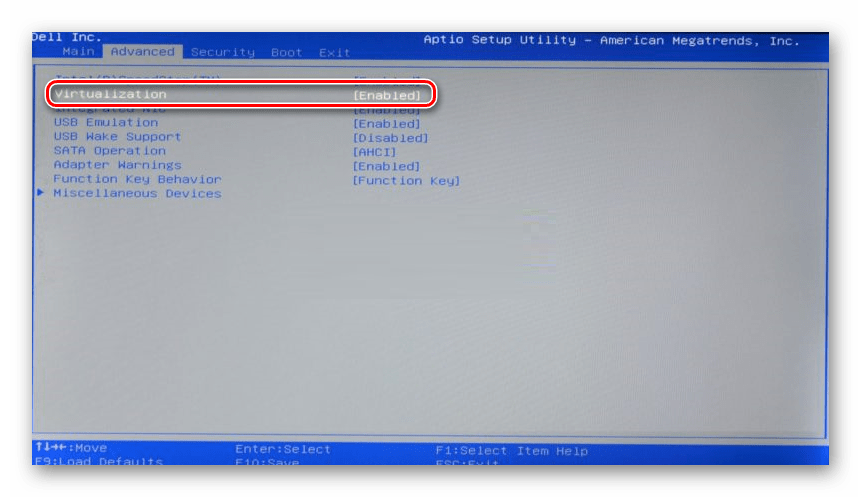
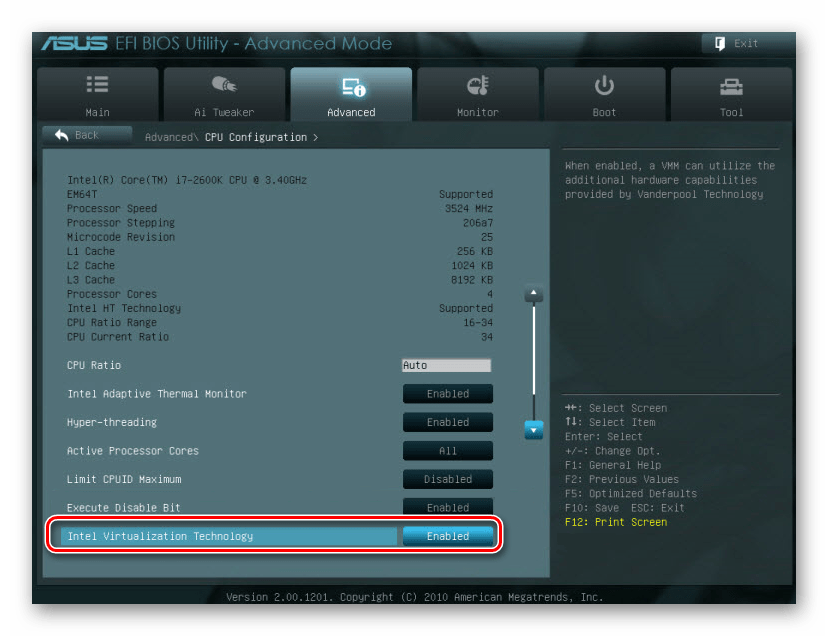
Настройка может иметь и другой путь (например, в BIOS на ноутбуках HP или в БИОС Insyde H20 Setup Utility):
- System Configuration > Virtualization Technology > Enabled;
- Configuration > Intel Virtual Technology > Enabled;
- Advanced > Virtualization > Enabled.
Если вы не нашли данной настройки в своей версии BIOS, то ищите ее вручную во всех пунктах меню по ключевым словам virtualization, virtual, VT. Для включения выбирайте состояние Enabled.
Способ 3: Обновление VirtualBox
Возможно, состоялось очередное обновление программы до последней версии, после чего и появилась ошибка запуска «E_FAIL 0x80004005». Есть два выхода из сложившейся ситуации:

- Дождитесь выхода стабильной версии VirtualBox.
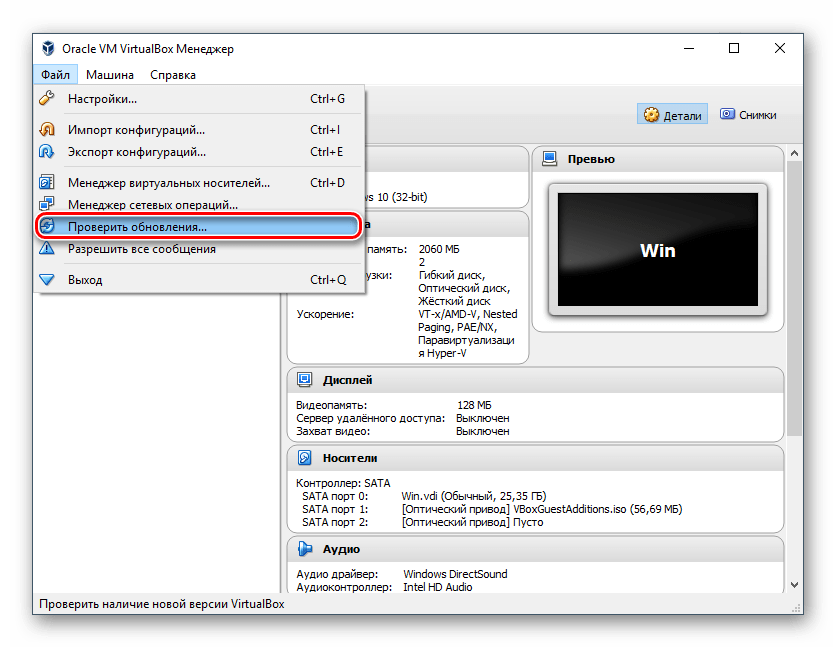
Те, кто не хочет заморачиваться с выбором рабочей версии программы, может просто дождаться обновления. Узнать о выходе новой версии можно на официальном сайте VirtualBox или через интерфейс программы:
- Запустите Менеджер виртуальных машин.
- Нажмите «Файл» > «Проверить обновления…».

- Дождитесь проверки и при необходимости установите обновление.
- Переустановите VirtualBox на текущую или предыдущую версию.
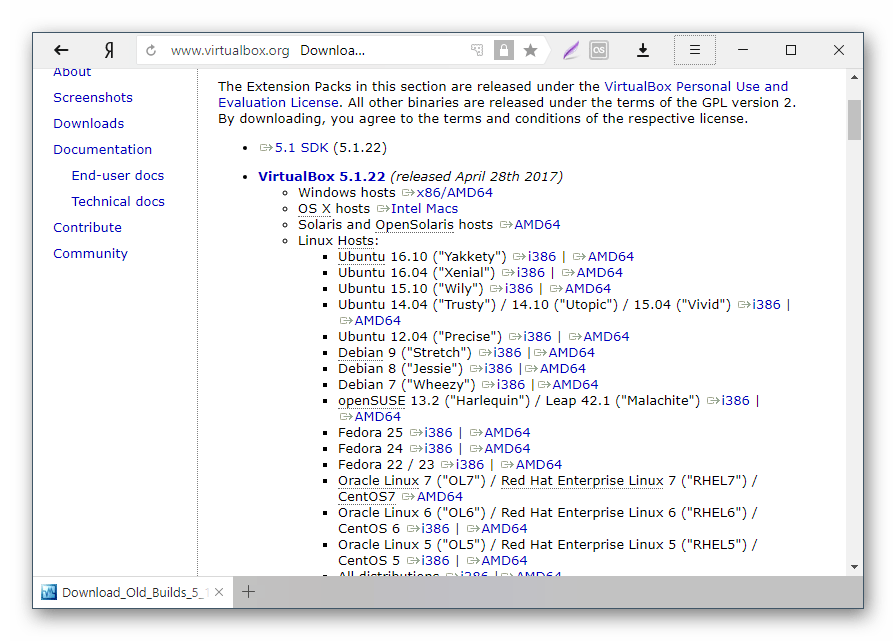
- Если у вас есть установочный файл VirtualBox, то используйте его для переустановки. Для повторного скачивания актуальной или предыдущей версии перейдите по этой ссылке.
- Нажмите на ссылку, ведущую к странице со списком всех предыдущих релизов для текущей версии VirtualBox.

- Выберите подходящую для хостовой ОС сборку и скачайте ее.
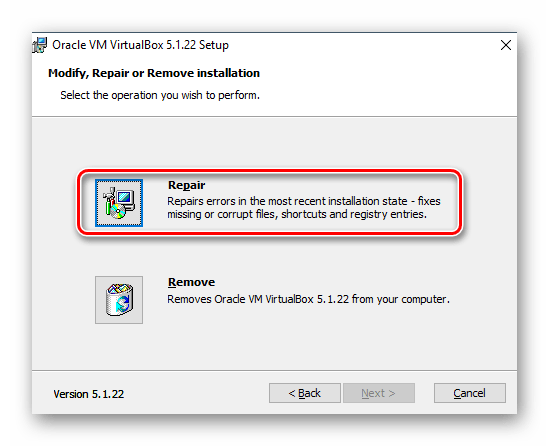
- Для переустановки установленной версии VirtualBox: запустите инсталлятор и в окне с типом установки выберите «Repair». Установите программу в обычном режиме.

- Если вы делаете откат до предыдущей версии, то лучше сперва удалить VirtualBox через «Установку и удаление программ» в Windows.

Или через установщик VirtualBox.
Не забудьте сделать резервные копии своих папок с образами ОС.


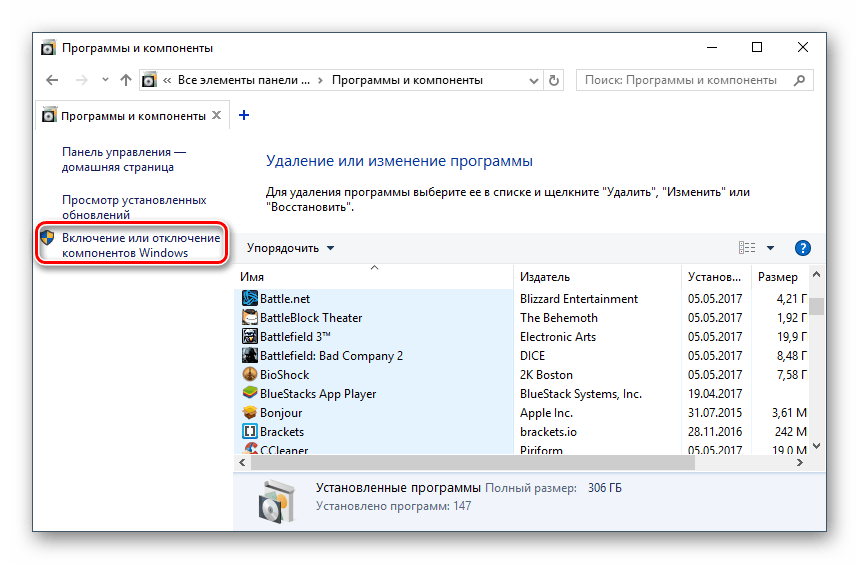
Способ 4: Отключение Hyper-V
Hyper-V — система виртуализации для 64-разрядных систем. Иногда у нее может возникнуть конфликт с VirtualBox, что и провоцирует появление ошибки при старте сессии для виртуальной машины.
Для отключения гипервизора выполните следующее:
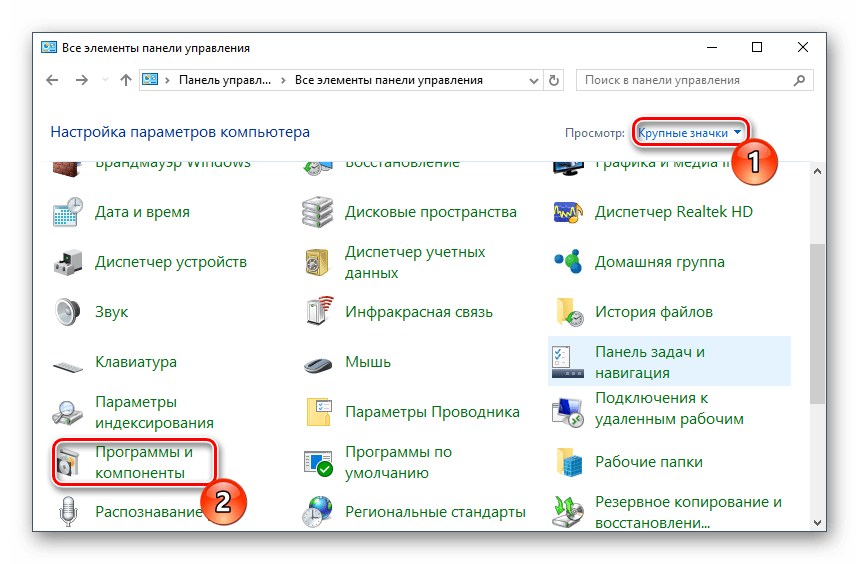
- Запустите «Панель управления».

- Включите просмотр по значкам. Выберите пункт «Программы и компоненты».
- В левой части окна нажмите на ссылку «Включение или отключение компонентов Windows».
- В открывшемся окне необходимо снять галочку с компонента Hyper-V, а затем нажать «ОК».

- Перезагрузите компьютер (необязательно) и попробуйте запустить ОС в VirtualBox.


Способ 5: Изменение типа запуска гостевой ОС
В качестве временного решения (например, до выпуска новой версии VirtualBox) можно попробовать изменить тип запуска ОС. Этот способ помогает не во всех случаях, но, возможно, сработает у вас.
- Запустите Менеджер VirtualBox.
- Нажмите по проблемной операционной системе правой кнопкой мыши, наведите курсор на пункт «Запустить» и выберите вариант «Запуск в фоновом режиме с интерфейсом».


Данная функция доступна только в VirtualBox, начиная с версии 5.0.
Способ 6: Удаление/исправление обновления Windows 7
Этот способ считается устаревшим, поскольку после неудачного патча KB3004394, приводящего к прекращению работы виртуальных машин в ВиртуалБокс, была выпущена заплатка KB3024777, устраняющая данную проблему.
Тем не менее, если у вас на компьютере по каким-то причинам отсутствует фикс-патч, а проблемный присутствует, то есть смысл либо удалить KB3004394, либо установить KB3024777.
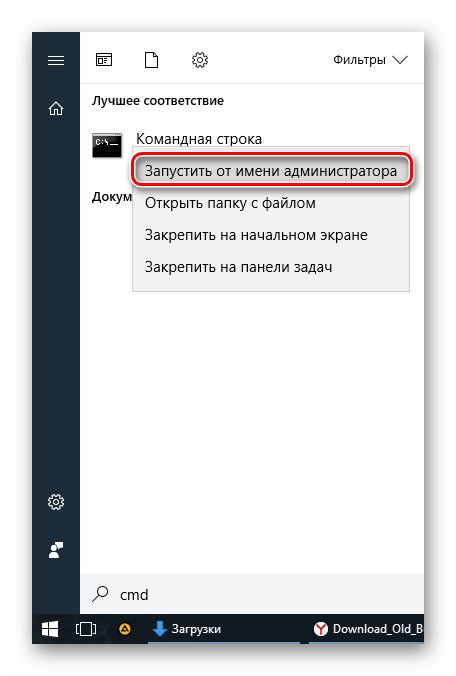
Удаление KB3004394:
- Откройте «Командную строку» с правами администратора. Для этого откройте окно «Пуск», напишите cmd, правым кликом мыши выберите пункт «Запустить от имени администратора».

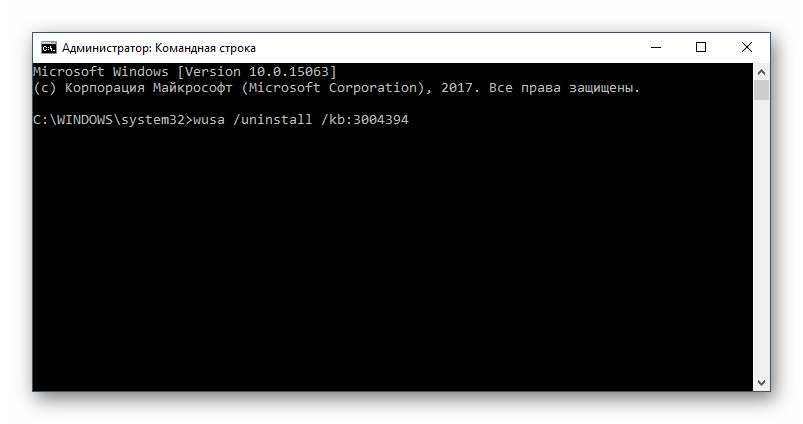
- Пропишите команду
wusa /uninstall /kb:3004394и нажмите Enter.

- После выполнения этого действия может потребоваться перезагрузка компьютера.
- Попробуйте еще раз запустить гостевую ОС в ВиртуалБоксе.
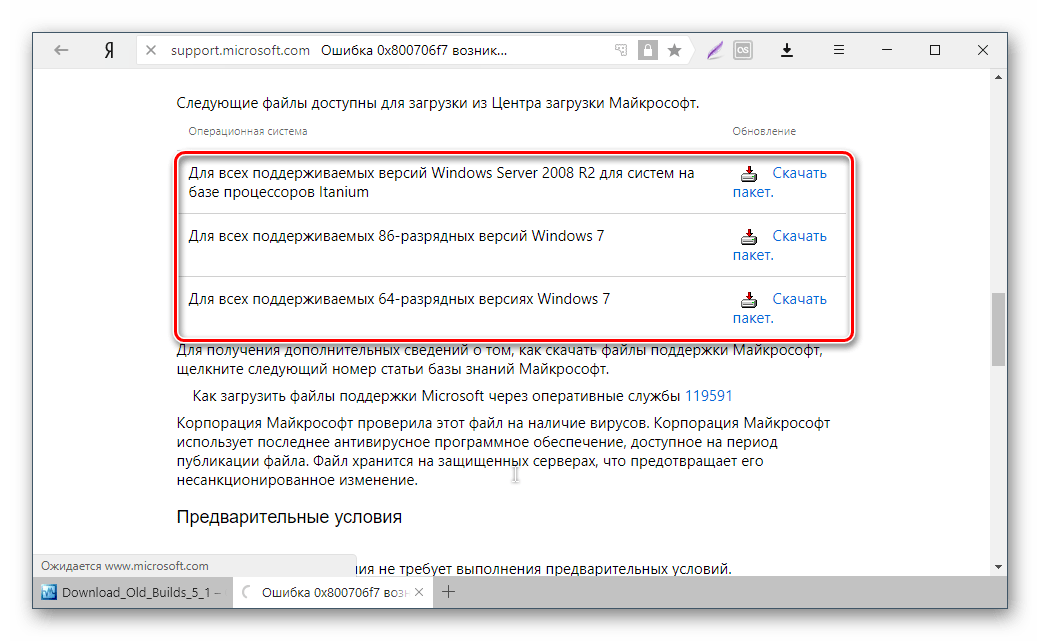
Установка KB3024777:
- Перейдите по этой ссылке на сайт Microsoft.
- Скачайте версию файла с учетом разрядности своей ОС.

- Установите файл вручную, если необходимо, перезагрузите ПК.
- Проверьте запуск виртуальной машины в VirtualBox.
В подавляющем большинстве случаев точное выполнение данных рекомендаций приводит к устранению ошибки 0x80004005, и пользователь может без труда начать или продолжить работать с виртуальной машиной.
If you are trying to create a new virtual machine using VirtualBox on Windows 10 or any other Windows versions, you may get an error as below:
Not in a hypervisor partition (HVP=0)(VERR_NEM_NOT_AVAILABLE).
VT-x is disabled in the BIOS for all CPU modes (VERR_VMX_MSR_ALL_VMX_DISABLED).
Before we see the fix for this VirtualBox issue, let’s go through the reason first.
Reason:
The error “VT-x is disabled in the BIOS for all CPU modes” appears if virtualization is not enabled in your Windows computer. Many Windows computers have the virtualization disabled by default at the BIOS level and it needs to be enabled to set up a new virtual machine.
I am explaining this for a DELL laptop with windows 10 but the solution would be the same for other computers with slight variations in the way they allow enabling virtualization.
If you are using a Lenovo computer, read this – Enable virtualization on Lenovo Computers
NOTE: Make a note of the entire solution and then proceed as it requires system restart as a step and cannot be followed along with reading.
“Not in a hypervisor partition” Solution:
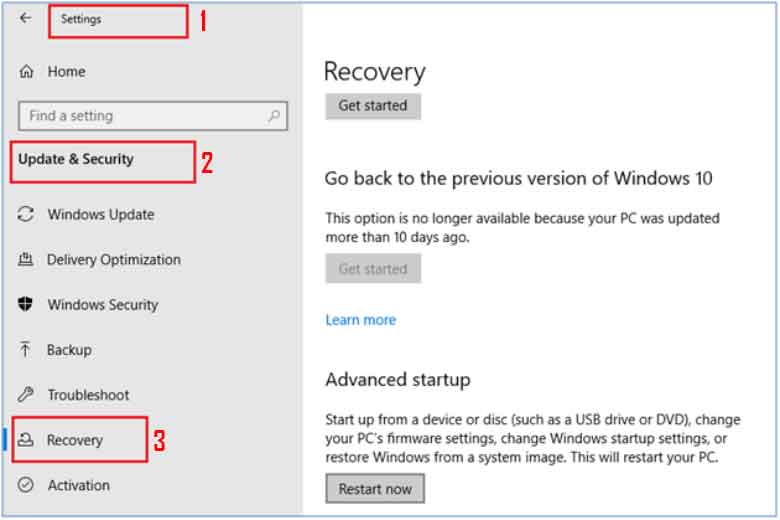
Step 1:
In windows machine go to Settings -> Update & Security -> Recovery. There is a Restart Now option as highlighted under Advanced startup. Read the below steps before clicking on the advanced setup.

Read also: [FIX] “Failed to open a session for the virtual machine” in VirtualBox
Step 2:
Once the Restart Now is clicked the below options need to be followed in sequence:
Troubleshoot → Advanced option → UEFI Firmware Settings → Restart

Step 3:
- Once the restart is clicked the system enters BIOS mode.
- In the BIOS look for option Virtualization which is under Advanced or System Configuration for most of the computers.
- The system shows that Virtualization is disabled.
- Change it to enabled.
Once done you can exit with save (F10 is the shortcut for most computers).
You may face the full-screen issue once your VM opens in VirtualBox. Here is the fix.
Make VirtualBox Full Screen
To enable Virtualization on AMD, read AMD-V is disabled in the BIOS (VERR_SVM_DISABLED)
This will fix the issue “Not in a hypervisor partition in VirtualBox” / “VT-x is disabled in the BIOS for all CPU modes”.
Happy learning 🙂
[Fix] not in a hypervisor partition (hvp=0) (verr_nem_not_available). vt-x is disabled in the bios for all cpu modes (verr_vmx_msr_all_vmx_disabled).
This blog post is about a fix for the not-in-a-hypervisor partition (hvp=0)
(verr_nem_not_available) error. This error occurs when installing VMware ESXi 5.5 on some Dell PowerEdge systems,
such as the R210 II and C-series rack servers. This is not the fix that solves this error by, but no one has a clear answer.
If you get an error reading “ERR: Out of disk space for scratch, please define smaller size [VERR_NEM_NOT_AVAILABLE]” when trying to create a new virtual machine in VirtualBox on Windows 10 or any other Windows version.
Reason:
The following error message indicates that your Windows computer does not support Virtualization: “VT-x is disabled in the BIOS for all CPU modes”.
On a Windows PC, it’s possible to disable Hyper-V, and this needs to be done in advance of setting up a new virtual machine.
I’m trying to figure out a fix for this Dell laptop running Windows 10, but I think the solution would be similar in other computers with minor variations on how they allow Virtualization to be enabled.
Lenovo users read this – How to Enable Virtualization on Lenovo computers
The solution to the above issue includes making a note of the entire solution and then restarting your system. It cannot be followed while reading this article.
Not in a hypervisor partition, It’s worth a try, no matter what.
1:
To bypass the error listed above, restart your device and get to Settings -> Update & Security -> Recovery. Click on the blue “Restart Now” button under Advanced startup.
2:
Once you click the restart now option, follow these in order:
Troubleshoot → Advanced options → Restart UEFI Firmware Settings
3:
Turning on your laptop may bring you to the BIOS menu screen.
Your computer may need to be set up to support a virtualization environment for us to fix the current issue you’re experiencing.
The system shows that Virtualization is disabled Could you change it to set as enabled?
Once finished, click ‘Save’ and then close the program. This method will fix the issue “Not in a hypervisor partition.”
We will also give you three NEW options for fixing it.
Option One:
If you have a Dell F-series server, then the problem might be that it comes with its CD drive. The ESXi installer needs to boot from this disk and try and install it on the local disk. However, because of how legacy BIOSes work,
They tend not to support an option where hard drives are first in the list of bootable devices (odd-numbered).
Put your CD drive into position number two on your device priority order so that it is second in line when you turn on or reboot your system (for some systems, like ours at Proactive IT Solutions.
We need to change our bios settings as well). This should make sure VMware sees these servers correctly and allows installs.
Option Two:
If you’re using ESXi on a system that doesn’t have the option for booting from CD, then it is possible to create a USB key with VMware tools and install ESXI from there.
Insert your USB device into one of your laptop’s or desktop computer’s ports and follow these instructions here: “How-to Create Bootable ESXi Installer” (link below)
Here are some other additional posts about fixing not in a hypervisor partition errors if you want to read more into them as well: “Fix an Error Code 0x40000057 when Launching vSphere Client” or “Fix Error Code Vmware_bootbank_ver r ernem_not_available.”
If you have an ESXi installation already installed, just use VMware to upgrade your system and solve it.
Option Three:
Check for hardware errors by running a diagnostic test on the machine with memtest86+ from here: “How-to Test Memory” (link below) or run SeaTools for Windows to check storage devices.
Events like these are caused by corruption of data within memory that is not being appropriately written to disk and storage media failures such as disks;
this can be due to physical damage or improper formatting. The best thing would be to boot from CD and install VMware tools again, initializing any bad sectors before installing.
Why is vt-x is disabled in the bios for all CPU modes (verr_vmx_msr_all_vmx_disabled). Windows 10?
The following are some probable causes of the error message “VT-x is deactivated in BIOS”:
-
In the BIOS, Virtualization is Disabled
The majority of the time, this problem arises due to the machine’s BIOS level disabling VT-X. Virtualization Technology (VTx) must be activated in the BIOS of a 64-bit host. You may also need to activate Virtualization Technology Directed I/O on some computers (VTd).
-
Your CPU Does not Support VT-X and AMD-V.
There’s also the chance that your CPU is insufficiently powerful to enable virtualization. This can happen with outdated hardware and a dated CPU.
-
VM’s PAE or NX Settings are Incorrect.
According to several customers, the problem was fixed once they verified that the virtualized CPU was set up to work with Physical Adress Extension (PAE) and NX.
-
Third-party Security Software is Obstructing VT-X and VT-D.
Several third-party AV programs have a reputation for interfering with VirtualBox. The conflict can be resolved by creating a rule to uninstall the Av client completely.
-
Attempting to use more than 4 GB of RAM with a 32-bit guest OS
Many customers having the same problem have found a complete resolution by altering the default Base Memory setting.
Some Other Reasons can be-
- Virtualization-based security applications bring on interference.
- The conflict between VirtualBox and Hyper-V or HAXM.
- Issues in Intel HAXM.