Сообщение об ошибке жёсткого диска SMART 301 отображается прямо перед загрузкой Windows и указывает на неисправность носителя. Данная проблема характерна только для ноутбуков HP, поскольку является результатом проверки HP SMART – индивидуальной версии самотестирования при включении питания, также известной как POST.
Как только начнётся последовательность загрузки, пользователи, столкнувшиеся с этой неполадкой, увидят следующее сообщение:
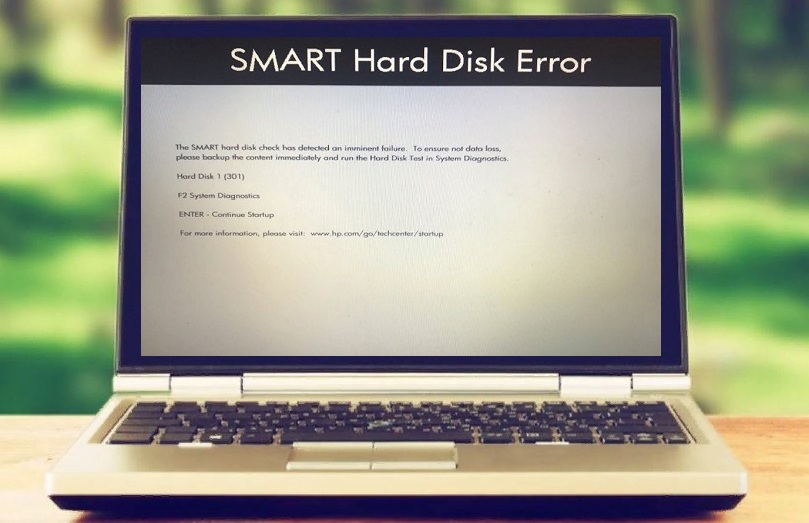
SMART Hard Disk Error
Проверка жёсткого диска SMART выявила неизбежный сбой. Чтобы не допустить потери данных, немедленно создайте резервную копию содержимого и запустите тест жёсткого диска в программе диагностики системы.
Hard Disk 1 (301)
Как говорится в сообщении, важно сделать резервную копию всех данных, хранящихся на носителе. Однако не всегда удаётся загрузиться, чтобы сделать это. И хотя, в большинстве случаев ошибка связана с неисправным или повреждённым жёстким диском, встречаются и другие причины данного сообщения. Ниже приведены варианты исправления проблемы, в случае, если сбой всё-таки не связан с поломкой диска.
Содержание
- Решение 1. Выполните полную перезагрузку компьютера
- Решение 2. Тестирование жёсткого диска из BIOS
- Решение 3. Запустите проверку диска
- Решение 4. Проверьте наличие ошибок файловой системы
- Решение 5. Сделайте резервную копию данных и замените жёсткий диск
Решение 1. Выполните полную перезагрузку компьютера
Если вы впервые столкнулись с ошибкой жёсткого диска SMART 301, нужно попытаться перезагрузить компьютер. Так как это может быть ложным срабатыванием, и стоит проверить, не возникает ли она снова после перезапуска ноутбука. Если это не помогло, попробуйте выполнить полную перезагрузку.
- Полностью выключите ноутбук. Зажмите на несколько секунд кнопку выключения, и дождитесь, пока не погаснут экран и все лампочки на клавиатуре и боковых панелях.
- Вытащите штекер аккумулятора, если он подключён к розетке.
- Отсоедините батарею ноутбука.
- Теперь нажмите кнопку питания и удерживайте её около 30 секунд.
- Вставьте аккумулятор обратно и попробуйте запустить устройство ещё раз – посмотрите, решена ли проблема.
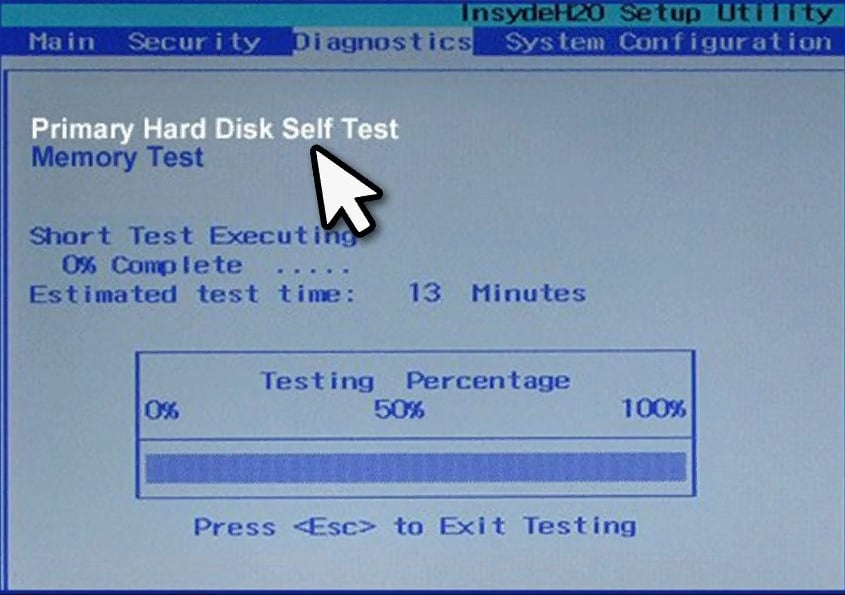
Решение 2. Тестирование жёсткого диска из BIOS
Если не получается нормально загрузиться в Windows, можно запустить проверку жёсткого диска в среде BIOS.
- Перезагрузите ваше устройство.
- Когда ноутбук начнёт загружаться, короткими и быстрыми нажатиями жмите кнопку F10 на клавиатуре, чтобы открыть доступ к BIOS.
- Используйте клавиши со стрелками для навигации по меню.
- Перейдите на вкладку “Диагностика”.
- Выберите Primary Hard Drive Self Test и нажмите Enter.
- Дождитесь окончания – это может занять некоторое время.
- Если проверка обнаружит проблемы, она дополнительно подтвердит, что жёсткий диск неисправен. Если ошибок не обнаружено, выполните действия из следующих решений.
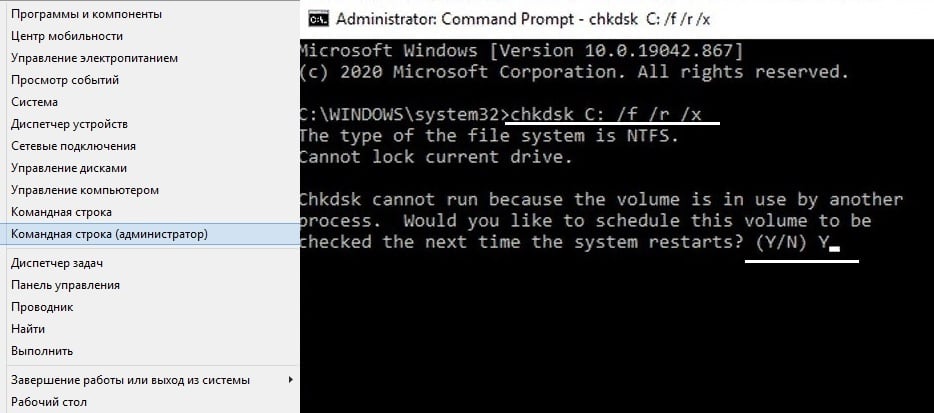
Решение 3. Запустите проверку диска
В большинстве случаев при ошибке SMART Hard Disk Error 301 всё-таки удаётся получить доступ к обычному интерфейсу Windows. Поэтому после загрузки системы необходимо выполнить диагностику жёсткого диска с помощью специальных команд. Это может исправить повреждённые сектора и ошибки каталогов, которые часто являются причиной выше описанного сообщения.
- Нажмите правой кнопкой мыши по значку Windows, и выберите Командная строка (Администратор).
- В новом окне скопируйте и вставьте следующую команду, нажав Enter после этого: chkdsk C: /f /r /x
- Далее необходимо подтвердить запуск диагностики, введите Y и нажать Enter.
- По завершении сканирования, перезагрузите компьютер.
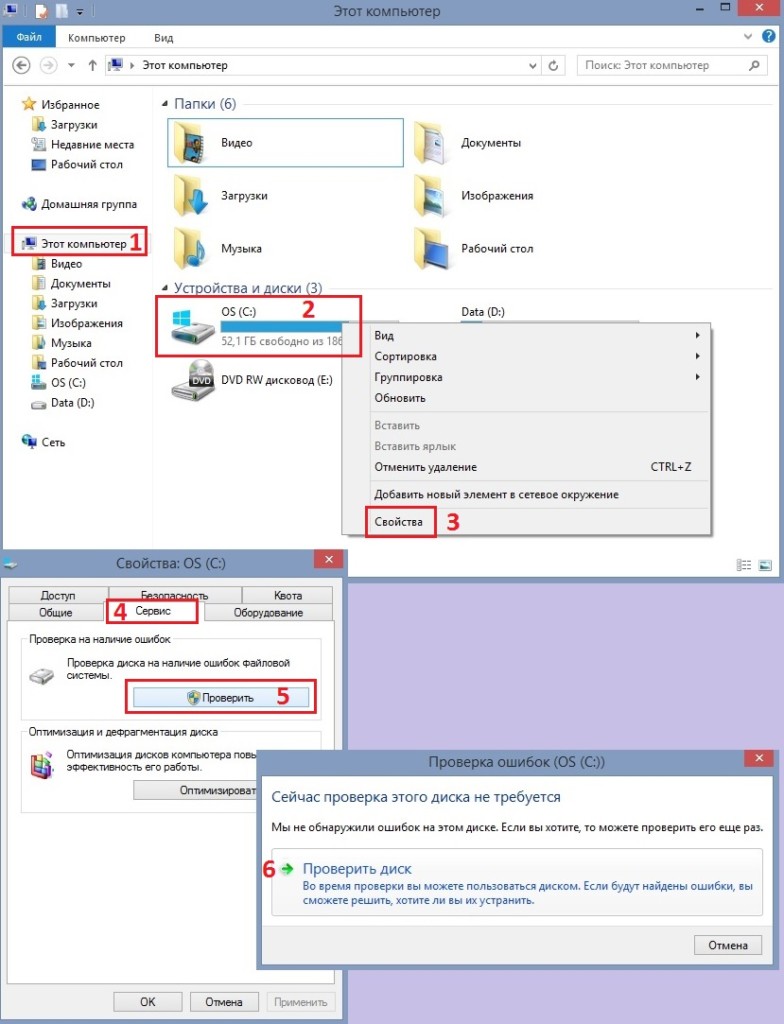
Решение 4. Проверьте наличие ошибок файловой системы
Как это сделать:
- Откройте любую папку на компьютере, и слева нажмите Этот компьютер.
- Щёлкните ПКМ по основному диску (по умолчанию это C:), и выберите Свойства.
- В новом окне перейдите на вкладку Сервис.
- В подразделе “Проверка на наличие ошибок” нажмите “Проверить”.
- Если отобразится окно Контроля учётных записей, нажмите Да.
- Если во всплывающем окне говорится, что проверка этого диска не требуется, нажмите Проверить диск.
- Дождитесь окончания процесса, пока система и не сообщит о результатах, из которых можно делать дальнейшие выводы.
Решение 5. Сделайте резервную копию данных и замените жёсткий диск
Если все вышеперечисленные шаги не помогли исправить ошибку SMART Hard Disk Error 301, вам необходимо заменить жёсткий диск. Поскольку данная проблема обычно появляется на ноутбуках, этот процесс немного сложнее, чем на ПК. Поэтому лучше обратиться к специалисту.
Если ноутбук находится на гарантии, настоятельно рекомендуется обратиться в местное отделение HP и объяснить ситуацию. Вполне вероятно, что вы получите полную поддержку и замену жёсткого диска.
Наконец, прежде чем что-либо делать, обязательно сделайте резервную копию всех личных файлов, которые хранятся на вашем компьютере, поскольку повреждение носителя может привести к полной потере этих данных.
The computer runs a SMART Hard Disk test during startup. If there is a potential hard disk issue, you might see an error message
displayed on a black screen.

The SMART Hard Disk test creates a prediction about the potential for hard drive failure, not an actual failure. A SMART Hard
Disk error warning can occur for a variety of reasons, such as the computer having been jarred sharply or the hard disk being
subjected to higher than usual temperatures.
If you receive this error message, perform the following actions:
-
Immediately back up all important data and files. While the SMART hard disk error might not indicate the imminent loss of
the hard disk, it is best to be prepared, just in case the disk does fail. -
Run a Hard Disk Test to verify the condition of the hard disk.
If the error code includes 3F0, then see HP PCs — 3F0 boot device not found error displays on a black screen in Windows 10.
Back up your data
In Windows 10, use the File History backup feature to back up to an external drive or network location.
For more information, see Backup and Restore in Windows 10 (in English).
-
In Windows, search for and open Backup settings.
-
Click Add a drive. Windows searches your computer for usable backup drives.
-
Choose an external drive or network location to store your backup files.
Open the Component Tests menu when Windows won’t start
When Windows won’t start, use the following instructions to open the Component Tests menu.
-
Hold the power button for at least five seconds to turn off the computer.
-
Turn on the computer and immediately press esc repeatedly, about once every second. When the menu is displayed, press the f2 key.
-
On the main menu, click Component Tests.
The Component Tests menu is displayed.
Your Component Tests menu might be different, depending on the components installed on your computer.
Perform hard drive tests in HP PC Hardware Diagnostics
HP PC Hardware Diagnostics provides multiple tests to test the hard drive on your computer and confirm hardware failures.
First, run the Quick Test (two to three minutes). If the Quick Test does not find a problem, run the Extensive Test (two hours
or more). It can run once or loop until an error occurs.
-
On the Component Tests menu, click .
-
Click Run once. The Quick Test begins.
-
If the computer has more than one hard drive, select the drive to test. To test all the hard drives, select Test All Hard Drives.
When the test is complete, the screen displays the results. Test results are also available in the Test Logs on the main menu.
-
If the hard drive passes the Quick Test, but there is still a problem with the hard drive, run the Extensive Test. This test
includes the SMART Check, Short DST, Optimized DST, and Long DST. To run these tests individually, select them from the Hard
Drive Tests menu. -
If the hard drive fails a test, click Troubleshoot.
-
Follow the on-screen instructions to attempt to resolve the problem, and then click Yes.
-
If the problem is not resolved, click Yes to contact HP Customer Support.
-
Write down or copy the failure ID (24-digit code) and product ID for when you contact HP Customer Support. The information
is also available in Test Logs on the main menu. -
If your computer is online, click NEXT to go to the HP Customer Support website.
If your computer is offline, use your mobile device to scan the provided QR Code and access HP Customer Support.
Review the hard drive test results
When the hard drive test is complete, a message indicates the actions that were taken.
|
Test result |
Suggested action |
|---|---|
|
Hard Disk Test passed |
Resume normal computer use. |
|
Problem found and repaired |
Resume normal computer use. |
|
Bad sector found and remapped |
Restart the computer.
|
|
Specific error message and 24-digit failure ID code is displayed |
If the Hard Drive Test displays an error message and a warranty ID code, contact HP. The customer service agent will ask you for the 24-digit code if you need to setup a repair or hard drive replacement. Note: When you contact HP, the agent will verify whether your computer is still under warranty. |
Давайте мы первым делом дадим ответ на поставленный в заголовке вопрос, чтобы нетерпеливые пользователи не читали всю статью в поисках одной маленькой истины.
Сообщение при загрузке компьютера Smart Hard Disk Error 301 HP как исправить? Ответ — никак! Нет нет, не в том плане, что компьютер больше нельзя загрузить, а в том плане, что скорее всего необходимо будет менять винчестер.
Полное послание вашей системы выглядит следующим образом:
«Smart Hard Disk Error
The smart hard disk check has detected an imminent failure. To ensure not data loss, please backup the content immediately and run the Hard Disk Test in system diagnostics.
Hard Disk 1 (301)
F2 system diagnostics
Enter — continue startup».
Собственно говоря, если вы нажмете Enter, то возможно вам повезет и ваш компьютер запустится, однако происходит это не всегда.
.jpg)
Если вы увидели сообщение при загрузке компьютера, которое гласит Smart Hard Disk Error, то имейте в виду у вашего винчестера появились проблемы. Загрузиться вы загрузитесь, но скорее всего, вам нужно копить деньги на покупку нового жесткого диска. Впрочем, если вы не храните ничего важного, то пользуйтесь винчестером, пока он окончательно не помрет.
О чем нам говорит сообщение Smart Hard Disk Error? Данное сообщение говорит нам о том, что на винчестере появилось много бэдов (битых секторов), а невозможность загрузится говорит о том, что эти сектора расположены в загрузочной области.
Так что же делать?
Снимаем винчестер и подключаем к другому компьютеру в качестве второстепенного.
После мы берем любую программу которая умеет исправлять бэды, можно воспользоваться встроенной в операционную систему Windows утилиту ScanDisk. Сканирует ваш жесткий диск и устраняем все бэды, которые можно устранить.
Дальше, вы можете вставить винчестер назад себе в компьютер и если бэды в загрузочной части устранены, то ваша операционная система Windows загрузится.
Мы рекомендуем скопировать вашу информацию на другой носитель и купить себе новый жесткий диск — так вы хотя бы не потеряете свою информацию, в случае если ваш винчестер выйдет из строя или говоря компьютерным языком посыпется.
Бэды могут появиться как в результате физического воздействия, так и в результате времени, если ваш винчестер уже старый. Также и неумелое обращение с компьютером, в программном смысле, может тоже привести к появлению бэдов.
Избавиться от бэдов можно и даже просто, но как правило такой винчестер уже будет работать с некоторыми перебоями и по хорошему нуждается в замене.
Если вы пользуетесь ноутбуком, то при копировании фалов желательно чтобы ваш ноутбук стоял, а не висел в воздухе сотрясаясь. При тряске в момент записи вы можете запросто получить бэды.
Если не стоит, как бы это банально не звучало бить свой системный блок ногами. Зачастую, в большинстве случаев, бэды возникают по причине того, что системный блок стоит под столом и частенько ему прилетает от нерадивого пользователя, причем прилетает в прямом смысле.
В следующий раз, увидев жуткое сообщение:
«Smart Hard Disk Error
The smart hard disk check has detected an imminent failure. To ensure not data loss, please backup the content immediately and run the Hard Disk Test in system diagnostics.
Hard Disk 1 (301)
F2 system diagnostics
Enter — continue startup»
Не пугайтесь, ведь теперь вы знаете что делать.
1. Диагностика жесткого диска.
2. Бэкап важных данных
3. Замена жесткого диска (винчестера на новый).
Спасибо за внимание, берегите свою информацию и не забывайте делать резервную копию всего, что вам дорого.
Удачи!
-
#1
Добрый день всем.
the SMART hard disk check has detected an imminent failure. to ensure not data loss, pleas backup the content immediately and run the hard disk test in system diagnostics.
hard disk 1 (301)
f2 system diagnostics
enter- continue startup
Вот такая беда у меня на ноутбуке( HP G62) выскакивает при включении, хочу ее отключить. У меня стоит Windows 7, версия Biosa F14(В биосе не могу отключить SMART, сам биос выглядит так: Main, Security, Diagnostics, System Configuration, Exit). если мало инфы, спрашивайте. заранее благодарен
-
#2
SMART Hard disk error как ошибку при запуске?
Alex88888888
Необходимо увидеть SMART данного диска. Сделайте как ТУТ написано. Нужен СМАРТ из Виктории.
————
Скорее всего диску всё. Если он еще как-то дышит, то скорейшим образом копируйте важные данныедокументы на другой физический носитель.
-
#3
да да я в курсе что диску все и думаю Victoria мне не поможет да и не надо, мне необходимо просто убрать это уведомление при запуске, чтоб запуск был обычный без показа ошибки, думаю вы меня правильно поняли
-
#4
Alex88888888
Отключите в биос проверку SMART, если есть такая опция. Если нет, то это сообщение никак не убрать.
-
#5
я пробовал найти, как отключить эту проверку в Biose, но не получается, здесь все на англ. и не как найти не могу, как выглядит Bios я описал сверху, может быть вы мне сможете помочь, спасибо
-
#6
Alex88888888
в БИОС вы можете только запустить тест самодиагности ЖД
если бук на гарантии — то прямая дорога туда.
правда с данными вероятней всего придется прощаться (хотя как договоритесь, за отдельную денюшку)
если гарантия ёк — вынимаете винт и цепляете к стационарнику (там контроль SMART моно отключить), снимаете данные и идете за новым винтом (можно сразу за новым)
если нет возможности подключить к стационарнику — покупаете коробочку-box для внешних винтов и цепляете по USB
Alex88888888 написал(а):
мануал
-
#7
Воспользуйтесь этим Ремонт HDD в домашних условиях. после проведите ремап викторией. На ноутах перед разборкой надо снять кожух.
-
#8
Alex88888888
DDX777 написал(а):
На ноутах перед разборкой надо снять кожух.
На всякий случай уточняю — уважаемый DDX777 имел ввиду кожух ноута, а не HDD. А то мало ли… :biggrin:
-
#9
Столкнулся с такой же проблемой после разборки и сборки ноутбкуа при чистке пыли, ответ оказался прост, там есть 2 шлейфа саташных, один на дивидюк а второй на винт, проходят рядом и легко могут быть воткнуты неправильно, всмысле шлейф от двд воткнут в винт и наоборот винтовый шлейф вштырен в двд, поменял местами и все нормализовалось, ошибки все ушли и бук залетал, самое интересное что шлейфы дотягиваются и туда и туда, ненавижу фирму HP в обслуживании!!! регнулся специально чтоб знали люди….

-
#10
superflint написал(а):
один на дивидюк а второй на винт, проходят рядом и легко могут быть воткнуты неправильно
Странно как-то.. Вообще-то Sata — система самоопределяющаяся (в оличие от достаточно капризной ide). Хотя к капризам НР уже начинаю привыкать..
-
#11
та же проблема
Тот же комп и та же проблема. Алекс,удалось ли тeбе отключить SMART? спасибо.
-
#12
michaelk, проверка SMART отключается в биос. Это не сложно.
В биос есть функция smart on(off) или enable(disable)
-
#13
спасибо за быстрый ответ.Как писал Алекс выше ее там нет,или я допускаю,я ее не нашел также как и он.
в сообщении 6 есть мануал,я посмотрел,нет там отключения smart. Но читал где-то,что если отключить вентилятор,то сообщение о неполадке хард диска исчезнет. Но не вызовет ли это перегрева?
-
#14
michaelk написал(а):
Но читал где-то,что если отключить вентилятор,то сообщение о неполадке хард диска исчезнет.
Полнейшая глупость. Вентилятор ни как не связан с жёстким диском. Тем более, что в ноутбуке он один, и если вы его отключите, то получите кучку неработающей электроники. Выскакивающее предупреждение SMART, говорит вам о том, что с диском что-то не в порядке и пора озаботится сохранением важных данных и его заменой.
-
#15
Quick test в биос хард проходит,HDDscan-одна ошибка…
[upd=1398616074][/upd]
Прoxoжий написал(а):
Вентилятор ни как не связан с жёстким диском
я это и сам понимаю…
-
#16
michaelk, покажите SMART этого диска.
-
#18
michaelk, покажите с помощью этой программы, а то ваша самого интересного не показывает — значения атрибутов
-
#20
michaelk, у вас диск начинает сыпаться, почти две тысячи переназначенных секторов. И ещё один кандидат на переназначение имеется. Так что:
Прoxoжий написал(а):
пора озаботится сохранением важных данных и его заменой.
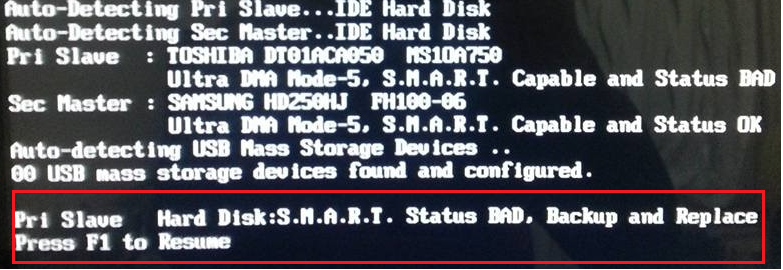
Результат инициализации найденная проблема с жестким диском — smart hard disk error 301
Некоторые пользователи персональных компьютеров или ноутбуков при включении своего компьютера могут наблюдать сообщение smart status bad backup and replace. В ноутбуках HP это же сообщение имеет чуть другой вид – smart hard disk error 301, но имеет тот же самый смысл.
Причиной его появления является стечение двух обстоятельств:
- В настройках BIOS включена проверка S.M.A.R.T. жесткого диска;
- Сам S.M.A.R.T. жесткого диска имеет сообщения о неполадках.
Что значит Smart status bad backup and replace?
Если вы видите данное сообщение на своем компьютере или ноутбуке это значит лишь одно – жесткий диск (винчестер) с большой вероятностью в самое ближайшее время потребует замены.
Первое, что стоит сделать в данном случае это скопировать с жесткого диска все важные для вас данные на любой другой носитель, такой как флешка, облако или внешний жесткий диск.
Следующим шагом будет проверка того самого S.M.A.R.T. который является своеобразной информационной системой любого жесткого диска, отображающей все возникающие ошибки и проблемы.
Чаще всего возникают ошибки по позиции 05 Reallocated sector count. Количество переназначенных секторов превысило допустимое значение. Другими словами на жестком диске появилось много БЭД блоков.
При возникновении данной ошибки рекомендуется проверить жесткий диск на наличие BAD блоков.
Конечно можно продолжать использовать винчестер при таком сообщении S.M.A.R.T. но хранить на нем важные данные крайне не рекомендуется, так как в любой момент он может окончательно выйти из строя, что грозит потерей всех данных или их дорогостоящей процедурой восстановления.
Как убрать Smart status bad backup and replace?
Если вы не собираетесь менять жесткий диск и продолжать его использование, то данное сообщение можно попробовать отключить в настройках BIOS.
Для этого заходим в BIOS.
Далее ищем что – нибудь связанное со словом S.M.A.R.T. В разных версиях BIOS данный параметр может находиться в разных местах.
Часто настройка S.M.A.R.T. находится на начальном экране BIOS, где показаны все подключенные устройства IDE и SATA.
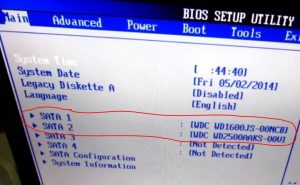
Как убрать Smart status bad backup and replace
Здесь нужно выбрать ваш жесткий диск клавишей “Enter” и выключить проверку S.M.A.R.T., переведя его в состояние Disabled.
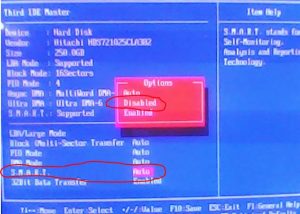
Отключаем Smart status bad backup and replace в настройках BIOS
Также эта настройка может находиться во вкладке “advanced”

Smart settings
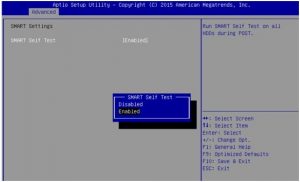
Отключаем smart hard disk error 301 hp
В любом случае отключение данного сообщения это не решение проблемы. Самое правильное – это менять жесткий диск, так как если сообщение о плохом состоянии СМАРТ появляется при включении, то это будет единственным правильным его устранением.
Лучшая благодарность автору — репост к себе на страничку:
Hard disk error 3F1 is a problem that mainly happens on HP laptops. If you encounter this error, you will be unable to boot the system and access the desktop. Don’t worry. In this post from the MiniTool Partition Wizard website, you can find some solutions to this problem.
What is hard disk error 3F1? What will happen when you encounter 3F1? Let’s start with a post from the forum:
Hi guys, I have this odd error that appears at bootup. “Hard Disk Error 3F1. Press F2 for system diagnostics.” Now when I do diagnostics, I get no errors, everything passes. Plus if I just f2 and then escape, the system goes on to boot with no problem.http://forum.notebookreview.com/
As you can see, hard disk error 3F1 usually happens on startup with a blue or black screen. It mainly appears on HP laptops and desktops. This error always comes with the following message:
Hard Disk Error
Please run the Hard Disk Test in System Diagnostics
Hard Disk 1 (3F1)
F2 System Diagnostics
In some cases, the error just disappears after a simple restart. In other cases, the odd error appears again and again, which prevents the computer from booting.
Some users also encounter this problem suddenly while the computer is on. They first receive a blue screen of death with the error code “CRITICAL PROCESS DIED”. Then they restart the computer and the hard disk error 3F1 appears.
Why does the hard disk 1 (3F1) error happen? There are various reasons, such as improper BIOS settings, hard drive failure, etc. Don’t worry. If you are bothered by this issue, you can try the following fixes one by one to solve it.
Fix 1: Power Reset Your HP Laptop
If you get HP hard disk error 3F1 on a laptop, you can try performing a power reset to solve the problem. In this way, you can clear information from the laptop’s memory without deleting personal data. Here are the detailed steps.
Step 1: Turn off your laptop.
Step 2: Disconnect the power cord and any other peripheral devices.
Step 3: Remove the battery. Then press and hold the power button for at least 15 seconds to drain the capacitors.
Tip: If the battery is not removable, you just need to disconnect the power cord and any peripheral devices, and then press and hold the power button.
Step 4: Insert the battery and connect the power cord. Please don’t connect other peripheral devices now.
Step 5: Turn on the laptop and check if it works properly.
If your laptop still runs into hard disk error 3F1, you need to move on to the next solution.
Fix 2: Reset BIOS Settings
BIOS refers to Basic Input/Output System, the firmware preinstalled on a computer’s board. It is used to initialize hardware during the booting process. It also provides runtime services for operating systems and programs. BIOS is the first software to run when the computer is turned on. Therefore, if the BIOS settings are improper, the computer might run into a problem like hard disk error 3F1.
To solve the problem in this case, you can try resetting BIOS settings. You won’t lose any personal data by resetting BIOS settings. It just restores the BIOS settings to default.
Here is how to reset BIOS settings on HP computers.
Generally, there are three ways to reset BIOS settings:
- Reset BIOS settings from the BIOS or UEFI
- Reset BIOS settings by reinstalling or replacing the CMOS
- Reset BIOS settings by clearing the jumper on the motherboard.
The last two methods might be too complicated to operate for most common users. Therefore, I’d like to introduce how to reset BIOS settings from the BIOS or UEFI menu. It is easier and you can follow the steps below for operation.
Step 1: Turn off your HP computer and wait for about 10 seconds.
Step 2: Turn on your computer. When you see the HP logo, press F10 quickly to enter BIOS settings.
Tip: You can also boot your computer into Windows Recovery Environment. Then click Troubleshoot > Advanced Options > UEFI Firmware Settings > Restart. Then press the required key to enter BIOS settings.
Step 3: Under the Main tab, select the Restore Defaults option with the up and down arrow keys.
Tip: Depending on the models of laptops, the steps in your case might be different. If you don’t find the Restore Defaults option, you might need to look for phrases like Load Setup Defaults or Load Default Options.
Step 4: Select Yes to confirm the operation. Then select Save Changes and Exit.
After that, you just need to wait patiently until the process is finished. Your computer will restart during the process. If HP disk error 3F1 appears again, keep trying the next method.
Fix 3: Check for Hard Drive Issues
In addition to improper BIOS settings, hard drive issues could also lead to HP hard disk error 3F1. How to fix hard disk error 3F1 in this case? You can boot your computer into Safe Mode with Networking and run hard drive error-checking tools.
Boot into Safe Mode with Networking
If you can’t access the desktop due to hard disk 1 (3F1), you can try booting the computer into Safe Mode with Networking by following the steps below.
Step 1: Shut down your computer. Then turn it on. Once you see the HP logo, turn off your computer. Repeat the process three times.
Step 2: When you turn on your computer for the fourth time, you will enter Windows Recovery Environment. Go to Troubleshoot > Advanced options > Startup Settings > Restart.
Step 3: Press the F5 key to select the Enable Safe Mode with Networking option.
Run Disk Error Checking Tool in Windows
In Safe Mode, you can check for hard drive issues with built-in Windows tools. You just need to:
Step 1: Press Win + E to open File Explorer. Then click This PC.
Step 2: Right-click a logical drive on your computer and select Properties.
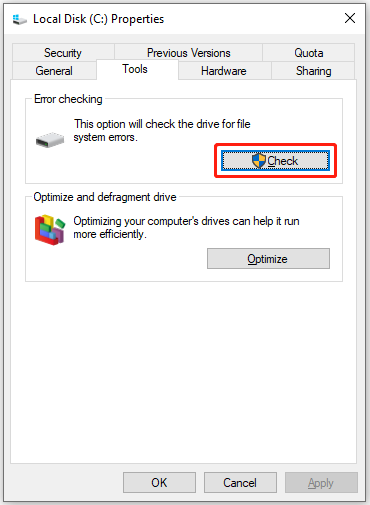
Step 3: In the pop-up window, switch to the Tools tab. Then click the Check button under the Error checking section. Follow the on-screen instructions to finish the process.
Step 4: Repeat the operation to check and repair other logical drives.
Run CHKDSK in Command Prompt
If the error checking tool can’t find any problems, you should run the CHKDSK command in Command Prompt to check and repair your hard drive.
CHKDSK is a built-in utility in Windows operating systems that can check the file system and file system metadata of a volume for logical and physical errors. To check and fix hard drive errors, it needs to be used with certain parameters. Let’s see how to use this tool.
Step 1: Press Win + R to invoke the Run window. Then input cmd in the box and click OK to open Command Prompt.
Step 2: In Command Prompt, type the command chkdsk d: /f /r and press Enter.
- d: refers to the drive letter of a logical drive.
- /f: fixes errors on the disk.
- /r: locates bad sectors and tries to recover readable information.
Step 3: When the error checking process is finished, use the same command and replace the drive letter to check other logical drives.
After checking and repairing hard drive errors, you can exit Command Prompt and restart your computer. Then check whether the hard disk error 3F1 has been solved.
Fix 4: Run HP PC Hardware Diagnostic UEFI
HP PC hardware Diagnostics for Windows is a tool preinstalled in HP computers. It can be used to determine if there is something wrong with the hardware of an HP computer. It has an HP PC Hardware Diagnostics UEFI feature that you can use to check for hard drive issues when you encounter hard disk error 3F1. Follow the steps below to access this tool.
Step 1: Turn off your computer if it is on. Then turn it on and press the ESC key immediately about 5 times until a menu shows up.
Tip: If you can access the desktop, you can just search for HP PC Hardware Diagnostic for Windows to open this tool.
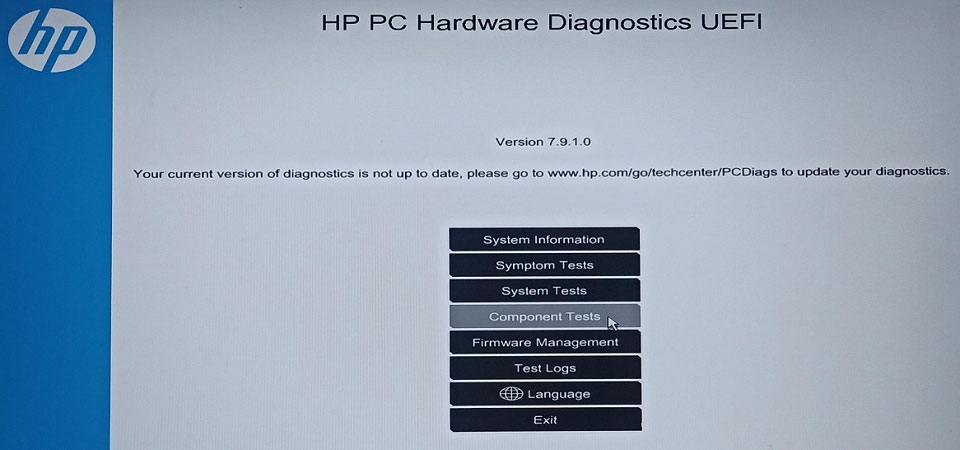
Step 2: Press the F2 key to enter HP PC Hardware Diagnostic UEFI. Then select your language. In the Main Menu of HP PC Hardware Diagnostic UEFI, select Component Tests.
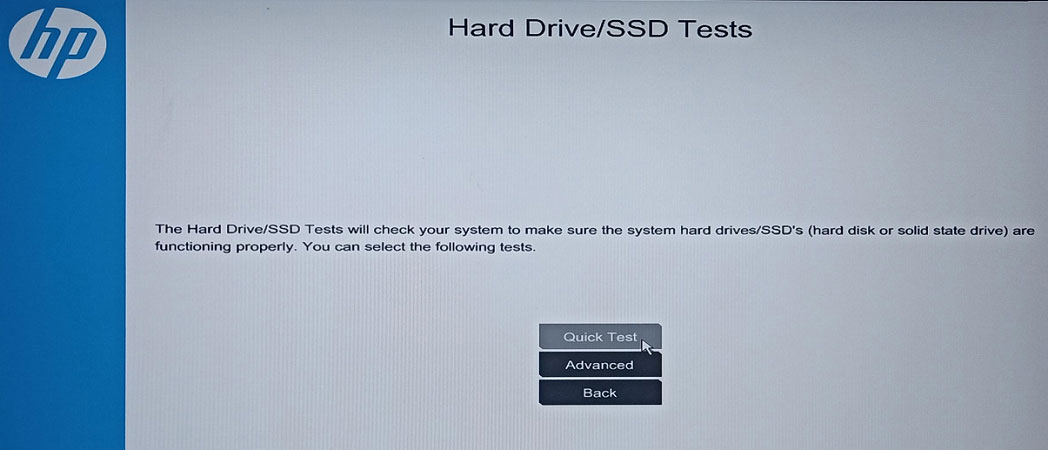
Step 3: Select the Storage category to test your hard drive. Then choose Quick Test.
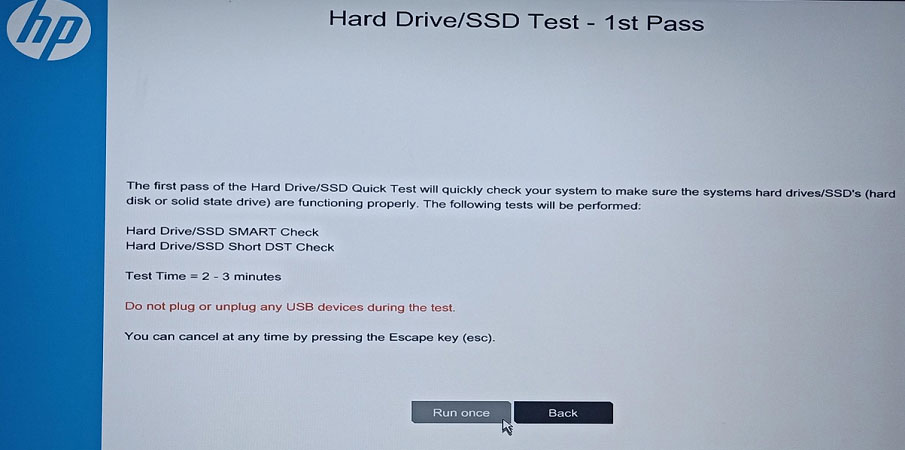
Step 4: On the next page, select the Run once button. Then wait patiently and follow the on-screen instructions to complete. Please note that if any issues are found, you need to click the Troubleshoot button to solve them.
You can visit the official website of HP to know more detailed information about HP PC Hardware Diagnostics for Windows.
After hard-drive testing, you can also run a System Test with this tool if you need it. Then you can restart your computer and check if it helps to fix hard disk error 3F1.
Fix 5: Reconnect Your Hard Drive or Test It on Another PC
You might also encounter hard disk 1 (3F1) when the connection between your laptop and the hard drive. It could happen if your laptop was hit or fall on the ground accidentally. To fix the problem, you need to make sure the hard drive is installed properly.
Just shut down your computer, and disconnect the power cables as well as other peripheral devices such as the keyboard, mouse, etc. Then uninstall the battery, remove the case, and then disconnect the hard drive.
After that, reinstall the hard drive and put everything back, and turn on your laptop. You can also install the hard drive on another computer to test the hard drive.
For more details, you can refer to our previous post: 7 Steps: How to Remove Hard Drive from Laptop.
If the problem still appears, go to the final solution.
Fix 6: Recover Data and Reinstall the Operating System
If the hard disk error 3F1 appears anyway, you might need to format the hard drive on your HP computer and reinstall the operating system. You can also replace the old hard drive with a new one, which is a recommended and better way since the old one is corrupted.
However, you need to recover your data and save it to an external hard drive before that.
As for the data recovery tool, I recommend MiniTool Partition Wizard, a professional and reliable disk manager and data recovery utility.
It can help you recover lost data due to various reasons, such as hard drive corruption, operating system crash, virus attack, deleted or formatted partition, etc.
Here is how to use this tool.
Step 1: Download, install, and launch MiniTool Partition Wizard on another computer.
Buy Now
Step 2: Create a bootable USB drive with Bootable Media Builder via a USB drive. Then connect an external hard drive that is large enough to hold the recovered data to your HP laptop and boot the laptop with this USB drive.
Step 3: On the main interface of MiniTool Partition Wizard, click the Data Recovery feature. Then double-click a logical drive to scan.
Tip: You can also go to the Devices tab to scan the whole hard drive.

Step 4: Once the scanning process is finished, check the files you want to recover and click the Save button.
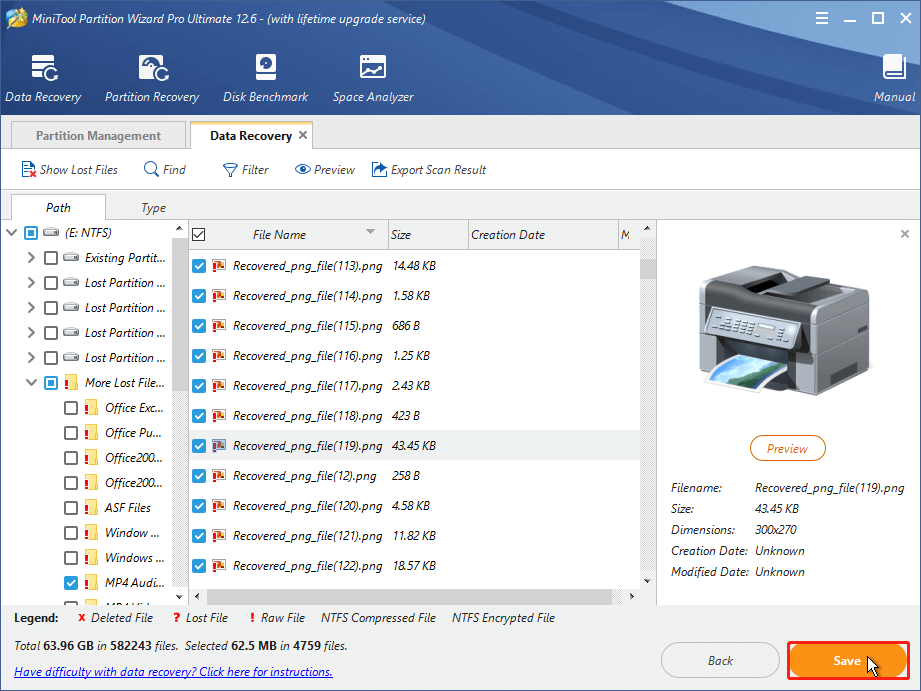
Step 5: In the pop-up window, select a location on your external hard drive to store your files.
After recovering your data, you can reinstall the operating system or replace the old hard drive without any worries. And the following posts might help:
- Detailed Steps and Instructions to Reinstall Windows 10
- How to Upgrade Laptop from HDD to SSD Without Reinstalling OS
How to repair hard disk error 3F1? This post can help.Click to Tweet
Bottom Line
How to fix hard disk error 3F1? You can try the above fixes one by one. You can share your ideas with us in the following comment zone. And for any problems with MiniTool Partition Wizard, you can contact our support team via [email protected].
Hard disk error 3F1 is a problem that mainly happens on HP laptops. If you encounter this error, you will be unable to boot the system and access the desktop. Don’t worry. In this post from the MiniTool Partition Wizard website, you can find some solutions to this problem.
What is hard disk error 3F1? What will happen when you encounter 3F1? Let’s start with a post from the forum:
Hi guys, I have this odd error that appears at bootup. “Hard Disk Error 3F1. Press F2 for system diagnostics.” Now when I do diagnostics, I get no errors, everything passes. Plus if I just f2 and then escape, the system goes on to boot with no problem.http://forum.notebookreview.com/
As you can see, hard disk error 3F1 usually happens on startup with a blue or black screen. It mainly appears on HP laptops and desktops. This error always comes with the following message:
Hard Disk Error
Please run the Hard Disk Test in System Diagnostics
Hard Disk 1 (3F1)
F2 System Diagnostics
In some cases, the error just disappears after a simple restart. In other cases, the odd error appears again and again, which prevents the computer from booting.
Some users also encounter this problem suddenly while the computer is on. They first receive a blue screen of death with the error code “CRITICAL PROCESS DIED”. Then they restart the computer and the hard disk error 3F1 appears.
Why does the hard disk 1 (3F1) error happen? There are various reasons, such as improper BIOS settings, hard drive failure, etc. Don’t worry. If you are bothered by this issue, you can try the following fixes one by one to solve it.
Fix 1: Power Reset Your HP Laptop
If you get HP hard disk error 3F1 on a laptop, you can try performing a power reset to solve the problem. In this way, you can clear information from the laptop’s memory without deleting personal data. Here are the detailed steps.
Step 1: Turn off your laptop.
Step 2: Disconnect the power cord and any other peripheral devices.
Step 3: Remove the battery. Then press and hold the power button for at least 15 seconds to drain the capacitors.
Tip: If the battery is not removable, you just need to disconnect the power cord and any peripheral devices, and then press and hold the power button.
Step 4: Insert the battery and connect the power cord. Please don’t connect other peripheral devices now.
Step 5: Turn on the laptop and check if it works properly.
If your laptop still runs into hard disk error 3F1, you need to move on to the next solution.
Fix 2: Reset BIOS Settings
BIOS refers to Basic Input/Output System, the firmware preinstalled on a computer’s board. It is used to initialize hardware during the booting process. It also provides runtime services for operating systems and programs. BIOS is the first software to run when the computer is turned on. Therefore, if the BIOS settings are improper, the computer might run into a problem like hard disk error 3F1.
To solve the problem in this case, you can try resetting BIOS settings. You won’t lose any personal data by resetting BIOS settings. It just restores the BIOS settings to default.
Here is how to reset BIOS settings on HP computers.
Generally, there are three ways to reset BIOS settings:
- Reset BIOS settings from the BIOS or UEFI
- Reset BIOS settings by reinstalling or replacing the CMOS
- Reset BIOS settings by clearing the jumper on the motherboard.
The last two methods might be too complicated to operate for most common users. Therefore, I’d like to introduce how to reset BIOS settings from the BIOS or UEFI menu. It is easier and you can follow the steps below for operation.
Step 1: Turn off your HP computer and wait for about 10 seconds.
Step 2: Turn on your computer. When you see the HP logo, press F10 quickly to enter BIOS settings.
Tip: You can also boot your computer into Windows Recovery Environment. Then click Troubleshoot > Advanced Options > UEFI Firmware Settings > Restart. Then press the required key to enter BIOS settings.
Step 3: Under the Main tab, select the Restore Defaults option with the up and down arrow keys.
Tip: Depending on the models of laptops, the steps in your case might be different. If you don’t find the Restore Defaults option, you might need to look for phrases like Load Setup Defaults or Load Default Options.
Step 4: Select Yes to confirm the operation. Then select Save Changes and Exit.
After that, you just need to wait patiently until the process is finished. Your computer will restart during the process. If HP disk error 3F1 appears again, keep trying the next method.
Fix 3: Check for Hard Drive Issues
In addition to improper BIOS settings, hard drive issues could also lead to HP hard disk error 3F1. How to fix hard disk error 3F1 in this case? You can boot your computer into Safe Mode with Networking and run hard drive error-checking tools.
Boot into Safe Mode with Networking
If you can’t access the desktop due to hard disk 1 (3F1), you can try booting the computer into Safe Mode with Networking by following the steps below.
Step 1: Shut down your computer. Then turn it on. Once you see the HP logo, turn off your computer. Repeat the process three times.
Step 2: When you turn on your computer for the fourth time, you will enter Windows Recovery Environment. Go to Troubleshoot > Advanced options > Startup Settings > Restart.
Step 3: Press the F5 key to select the Enable Safe Mode with Networking option.
Run Disk Error Checking Tool in Windows
In Safe Mode, you can check for hard drive issues with built-in Windows tools. You just need to:
Step 1: Press Win + E to open File Explorer. Then click This PC.
Step 2: Right-click a logical drive on your computer and select Properties.
Step 3: In the pop-up window, switch to the Tools tab. Then click the Check button under the Error checking section. Follow the on-screen instructions to finish the process.
Step 4: Repeat the operation to check and repair other logical drives.
Run CHKDSK in Command Prompt
If the error checking tool can’t find any problems, you should run the CHKDSK command in Command Prompt to check and repair your hard drive.
CHKDSK is a built-in utility in Windows operating systems that can check the file system and file system metadata of a volume for logical and physical errors. To check and fix hard drive errors, it needs to be used with certain parameters. Let’s see how to use this tool.
Step 1: Press Win + R to invoke the Run window. Then input cmd in the box and click OK to open Command Prompt.
Step 2: In Command Prompt, type the command chkdsk d: /f /r and press Enter.
- d: refers to the drive letter of a logical drive.
- /f: fixes errors on the disk.
- /r: locates bad sectors and tries to recover readable information.
Step 3: When the error checking process is finished, use the same command and replace the drive letter to check other logical drives.
After checking and repairing hard drive errors, you can exit Command Prompt and restart your computer. Then check whether the hard disk error 3F1 has been solved.
Fix 4: Run HP PC Hardware Diagnostic UEFI
HP PC hardware Diagnostics for Windows is a tool preinstalled in HP computers. It can be used to determine if there is something wrong with the hardware of an HP computer. It has an HP PC Hardware Diagnostics UEFI feature that you can use to check for hard drive issues when you encounter hard disk error 3F1. Follow the steps below to access this tool.
Step 1: Turn off your computer if it is on. Then turn it on and press the ESC key immediately about 5 times until a menu shows up.
Tip: If you can access the desktop, you can just search for HP PC Hardware Diagnostic for Windows to open this tool.
Step 2: Press the F2 key to enter HP PC Hardware Diagnostic UEFI. Then select your language. In the Main Menu of HP PC Hardware Diagnostic UEFI, select Component Tests.
Step 3: Select the Storage category to test your hard drive. Then choose Quick Test.
Step 4: On the next page, select the Run once button. Then wait patiently and follow the on-screen instructions to complete. Please note that if any issues are found, you need to click the Troubleshoot button to solve them.
You can visit the official website of HP to know more detailed information about HP PC Hardware Diagnostics for Windows.
After hard-drive testing, you can also run a System Test with this tool if you need it. Then you can restart your computer and check if it helps to fix hard disk error 3F1.
Fix 5: Reconnect Your Hard Drive or Test It on Another PC
You might also encounter hard disk 1 (3F1) when the connection between your laptop and the hard drive. It could happen if your laptop was hit or fall on the ground accidentally. To fix the problem, you need to make sure the hard drive is installed properly.
Just shut down your computer, and disconnect the power cables as well as other peripheral devices such as the keyboard, mouse, etc. Then uninstall the battery, remove the case, and then disconnect the hard drive.
After that, reinstall the hard drive and put everything back, and turn on your laptop. You can also install the hard drive on another computer to test the hard drive.
For more details, you can refer to our previous post: 7 Steps: How to Remove Hard Drive from Laptop.
If the problem still appears, go to the final solution.
Fix 6: Recover Data and Reinstall the Operating System
If the hard disk error 3F1 appears anyway, you might need to format the hard drive on your HP computer and reinstall the operating system. You can also replace the old hard drive with a new one, which is a recommended and better way since the old one is corrupted.
However, you need to recover your data and save it to an external hard drive before that.
As for the data recovery tool, I recommend MiniTool Partition Wizard, a professional and reliable disk manager and data recovery utility.
It can help you recover lost data due to various reasons, such as hard drive corruption, operating system crash, virus attack, deleted or formatted partition, etc.
Here is how to use this tool.
Step 1: Download, install, and launch MiniTool Partition Wizard on another computer.
Buy Now
Step 2: Create a bootable USB drive with Bootable Media Builder via a USB drive. Then connect an external hard drive that is large enough to hold the recovered data to your HP laptop and boot the laptop with this USB drive.
Step 3: On the main interface of MiniTool Partition Wizard, click the Data Recovery feature. Then double-click a logical drive to scan.
Tip: You can also go to the Devices tab to scan the whole hard drive.
Step 4: Once the scanning process is finished, check the files you want to recover and click the Save button.
Step 5: In the pop-up window, select a location on your external hard drive to store your files.
After recovering your data, you can reinstall the operating system or replace the old hard drive without any worries. And the following posts might help:
- Detailed Steps and Instructions to Reinstall Windows 10
- How to Upgrade Laptop from HDD to SSD Without Reinstalling OS
How to repair hard disk error 3F1? This post can help.Click to Tweet
Bottom Line
How to fix hard disk error 3F1? You can try the above fixes one by one. You can share your ideas with us in the following comment zone. And for any problems with MiniTool Partition Wizard, you can contact our support team via [email protected].