Problem
After updating my MacBook macOS Big Sur to version 11.6.5, I was getting the below NS_ERROR_FAILURE error while trying to launch the Windows virtual machine on VirtualBox 6.1. I was unable to launch the virtual machine. I got the same error after updating macOS Big Sur to version 11.6.8 as well.
Errors
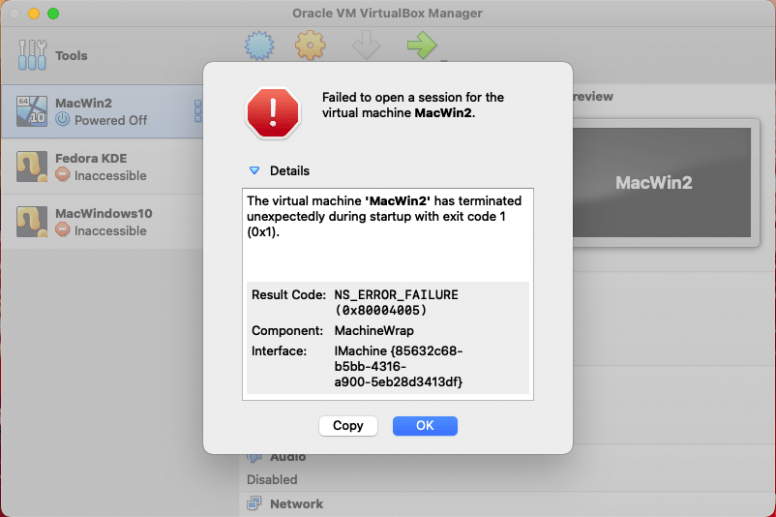
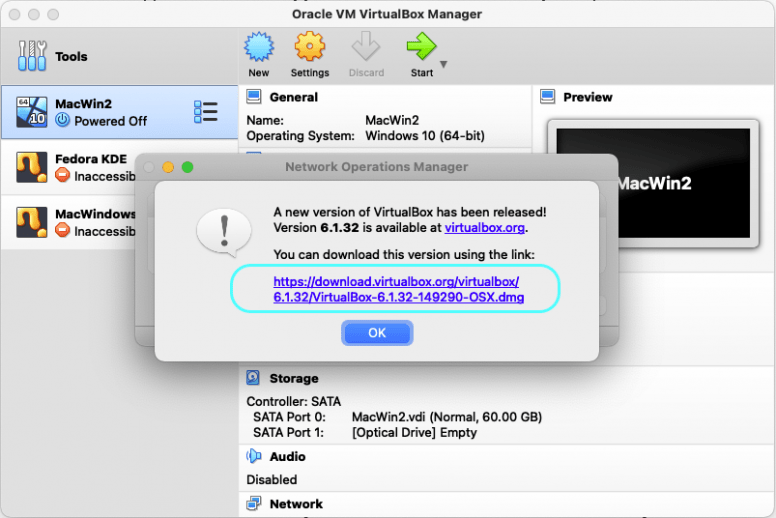
Failed to open a session for the virtual machine MacWin2.
The virtual machine ‘MacWin2’ has terminated unexpectedly during startup with exit code 1 (0x1).
Result Code: NS_ERROR_FAILURE (0x80004005)
Component: MachineWrap
Interface: IMachine {85632c68-b5bb-4316-a900-5eb28d3413df}
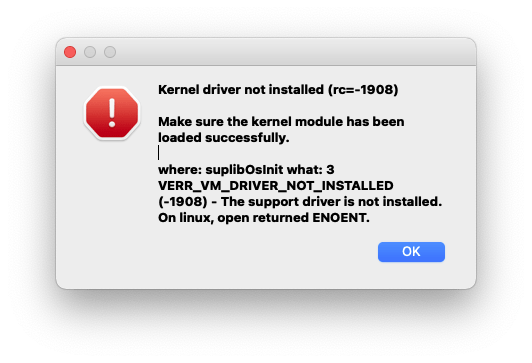
At the same time another error window appeared with the below error:
Kernel driver not installed (rc=-1908)
Make sure the kernel module has been loaded successfully.
where: suplibOsInit what: 3 VERR_VM_DRIVER_NOT_INSTALLED (-1908) – The support driver is not installed. On linux, open returned ENOENT.
Solution 1: (Restart The Mac)
Before thinking too much, make sure you have restarted your Mac after completing the OS update.
In my case, after updating the OS, even before restarting my Mac, I tried to launch the virtual machine and got the errors. After restarting the Mac, the errors vanished. So, before trying anything dramatic, try restarting the Mac. If you are still getting the error, then try the below solutions one by one.
Solution 2: (Re-enable SIP)
The next thing to do is to check and make sure SIP (System Integrity Protection) is enabled. To check it, run this command in the terminal.
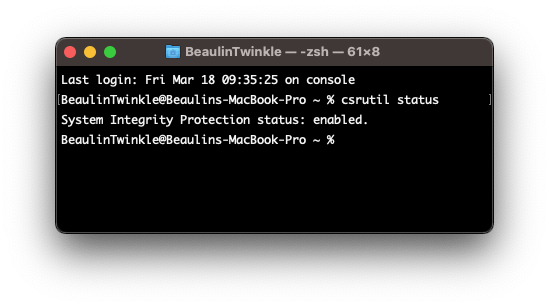
System Integrity Protection should be in enabled state. If it is in disabled state for some reason, then enable it by following these steps:
- Restart the Mac by holding the Command and R keys together.
- Leave the keys when the apple logo appears.
- In the recovery mode, go to the Utilities menu.
- Select Terminal.
- In the terminal window, run the below command to enable SIP and reboot the Mac.
- Allow the mack to launch in normal mode.
- Launch terminal and run the command csrutil status and make sure SIS is enabled.
Solution 3: (Access Device Permission)
- Quit VirtualBox.
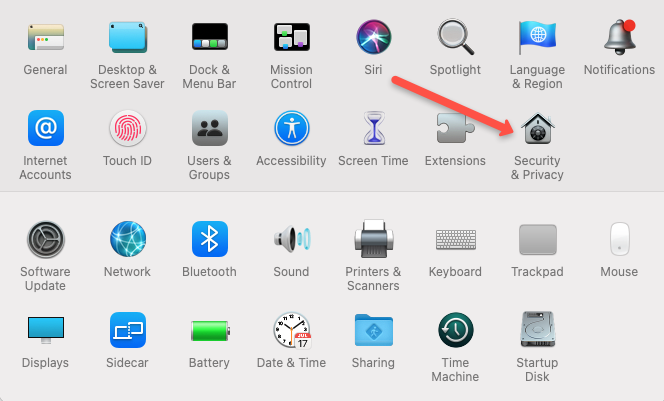
- In the Mac, launch the System Preferences.
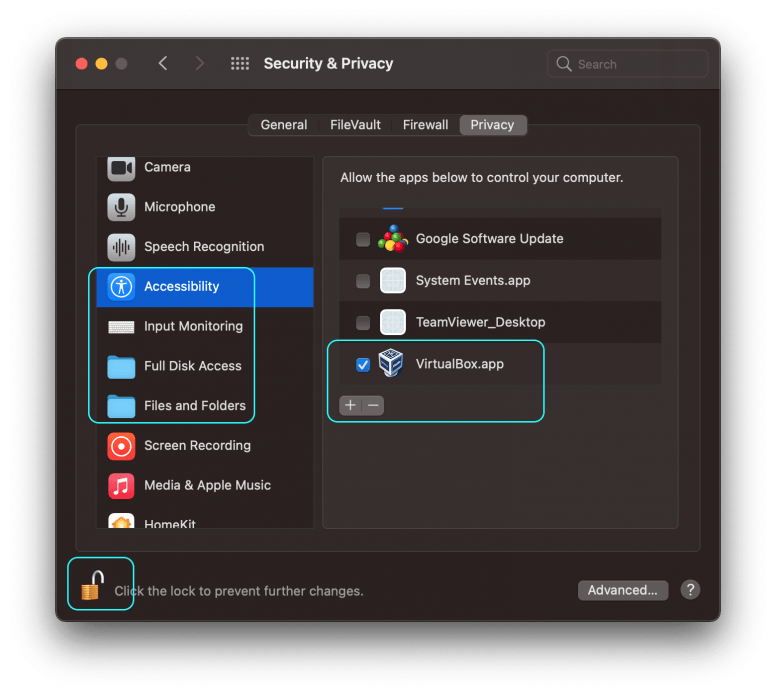
- Go to Security & Privacy.
- Go to the Privacy tab.
- Unlock the privacy screen to make changes by pressing the lock icon at the bottom left of the screen and provide your authentication.
- From the left panel, go through the permissions Accessibility, Input Monitoring, Full Disk Access, Files and Folders and make sure VirtualBox.app is listed under the allow list (right panel) and the checkbox is selected. If not then add it to the list using the + button and select the check boxes.
- Launch VirtualBox and the virtual machine.
If you are still getting the NS_ERROR_FAILURE (0x80004005) error, then try the below solution.
Solution 4: (Allow identified developer in Security & Privacy)
Usually this solution is needed when you get errors after installing VirtualBox. As we are discussing the errors obtained after updating macOS, this solution may be irrelevant. Still I’m adding this solution here, just to check the settings before moving to the next solution.
- Quit VirtualBox.
- Launch the System Preferences.
- Go to Security & Privacy >> General tab.
- In the General tab, Unlock the security and privacy screen to make changes by clicking on the lock icon at the bottom of the screen and provide your authentication.
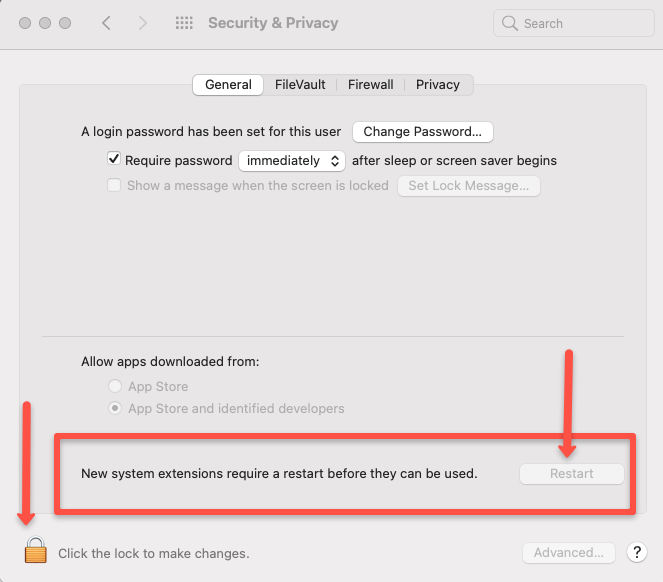
- Under the Allow apps downloaded from section, make sure the App Store and identified developers option is selected.
- Keep the System Preferences screen open and launch the virtual box and then the virtual machine. If the errors appear again, check the System Preferences >> Security & Privacy >> General tab and see if there is a warning like System software from developer “Oracle America, Inc.” was blocked from loading along with an Allow button that appears below the App Store and identified developers option. If so, press the Allow button.
- Quit the VirtualBox and launch it again.
Solution 5: (Update VirtualBox)
If the above solution were not fixing the problem, then see if there is any update available for the VirtualBox and install the update if there is any. To update the VirtualBox to its latest version follow these steps:
- Launch VirtualBox.
- From the menu select VirtualBox >> Check for updates…
- A small screen will popup and check for any update.
- If there is any update available, another window will popup and display the available update and the link of the dmg file.
- Download the dmg and follow the installation process.
- Once installed, perform the steps listed in Solution 4 above.
Solution 6: (Re-install VirtualBox)
If none of the above solutions are not fixing the NS_ERROR_FAILURE (0x80004005) error, then uninstall the VirtualBox and re-install it again.
Uninstalling VirtualBox
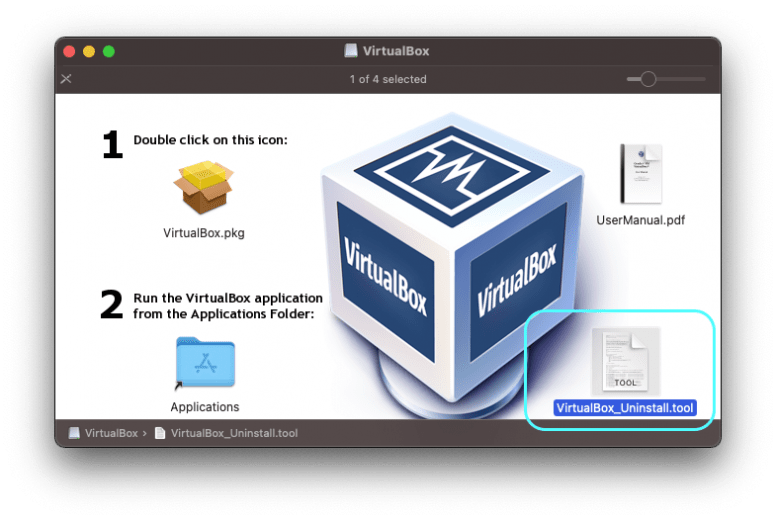
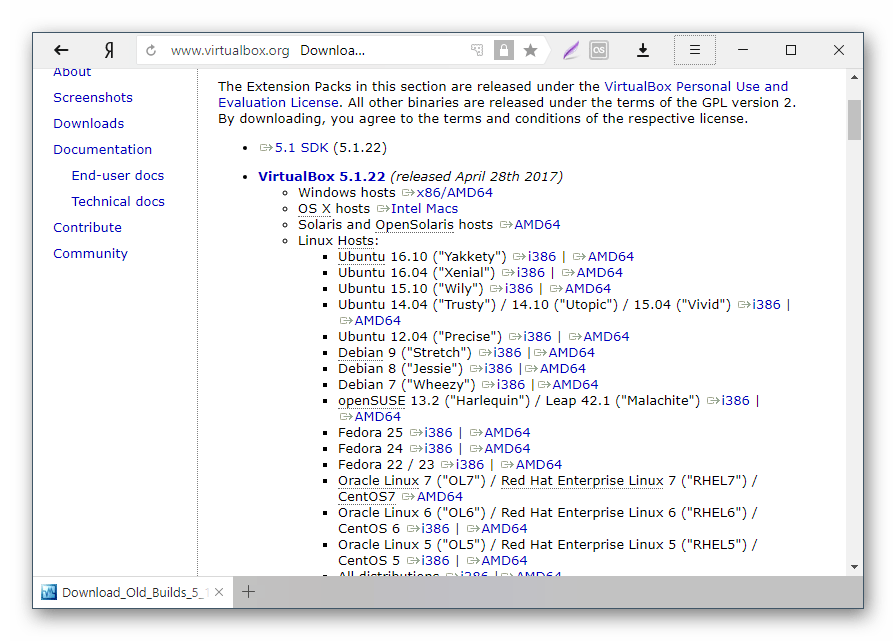
- To uninstall the VirtualBox, download the latest version from https://www.virtualbox.org/wiki/Downloads. Open the installation package. In the installation screen, you can see the uninstallation package VistualBox_Uninstall.tool at the bottom right corner.
- Right click VistualBox_Uninstall.tool and select Open with >> Terminal.
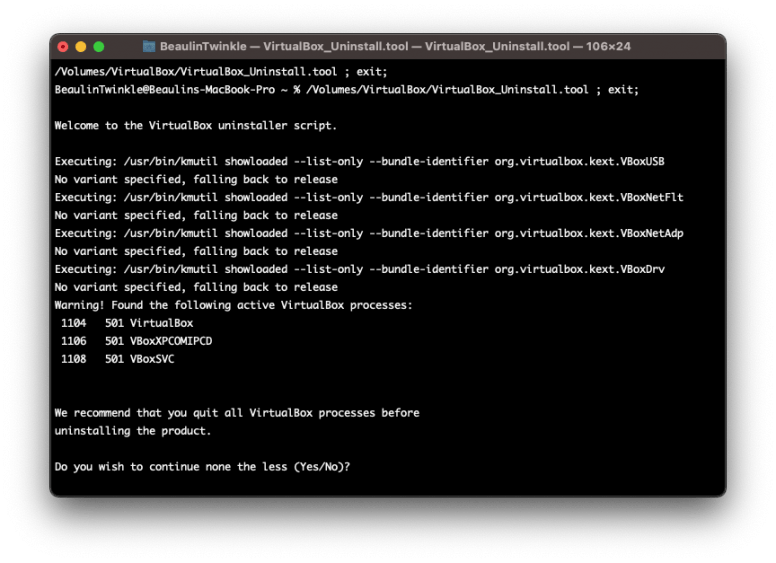
- In the terminal window, the uninstallation scripts will be opened and executed. Finally displays the list of VirtualBox programs installed in the Mac.
- Type Yes to confirm the installation process.
Clear existing permissions
- Restart the Mac in recovery mode by holding the Command and R keys together.
- Leave the keys when the apple logo appears.
- In the recovery mode, go to the Utilities menu.
- Select Terminal.
- In the terminal window, run the below command to clear all the existing permissions and then reboot the Mac.
Instal VirtualBox
Finally install the fresh copy of the VirtualBox using the dmg file downloaded earlier. After installation, if needed, perform the steps mentioned in Solution 4 and then Solution 3 above.
Reference
- Details about NS_ERROR_FAILURE error at VirtualBox.org Forums.
Related Topics
- Shrinking VirtualBox virtual machine vdi on macOS with Windows 10 guest OS.
- Increasing the disk space of Windows guest OS In VirtualBox on macOS.
Содержание
- VirtualBox error NS_ERROR_FAILURE (0x80004005) on macOS
- Problem
- Errors
- Solution 1: (Restart The Mac)
- Solution 2: (Re-enable SIP)
- Solution 3: (Access Device Permission)
- Solution 4: (Allow identified developer in Security & Privacy)
- Solution 5: (Update VirtualBox)
- Solution 6: (Re-install VirtualBox)
- Uninstalling VirtualBox
- Clear existing permissions
- Instal VirtualBox
- virtualbox.org
- NS_ERROR_FAILURE (0x80004005) OSX 10.11.6 VBX 5.1.4
- NS_ERROR_FAILURE (0x80004005) OSX 10.11.6 VBX 5.1.4
- Re: NS_ERROR_FAILURE (0x80004005) OSX 10.11.6 VBX 5.1.4
- Re: NS_ERROR_FAILURE (0x80004005) OSX 10.11.6 VBX 5.1.4
- Re: NS_ERROR_FAILURE (0x80004005) OSX 10.11.6 VBX 5.1.4
- Re: NS_ERROR_FAILURE (0x80004005) OSX 10.11.6 VBX 5.1.4
- Re: NS_ERROR_FAILURE (0x80004005) OSX 10.11.6 VBX 5.1.4
- Re: NS_ERROR_FAILURE (0x80004005) OSX 10.11.6 VBX 5.1.4
VirtualBox error NS_ERROR_FAILURE (0x80004005) on macOS
Problem
After updating my MacBook macOS Big Sur to version 11.6.5, I was getting the below NS_ERROR_FAILURE error while trying to launch the Windows virtual machine on VirtualBox 6.1. I was unable to launch the virtual machine. I got the same error after updating macOS Big Sur to version 11.6.8 as well.
Errors
Failed to open a session for the virtual machine MacWin2.
The virtual machine ‘MacWin2’ has terminated unexpectedly during startup with exit code 1 (0x1).
Result Code: NS_ERROR_FAILURE (0x80004005)
At the same time another error window appeared with the below error:
Kernel driver not installed (rc=-1908)
Make sure the kernel module has been loaded successfully.
where: suplibOsInit what: 3 VERR_VM_DRIVER_NOT_INSTALLED (-1908) – The support driver is not installed. On linux, open returned ENOENT.
Solution 1: (Restart The Mac)
Before thinking too much, make sure you have restarted your Mac after completing the OS update.
In my case, after updating the OS, even before restarting my Mac, I tried to launch the virtual machine and got the errors. After restarting the Mac, the errors vanished. So, before trying anything dramatic, try restarting the Mac. If you are still getting the error, then try the below solutions one by one.
Solution 2: (Re-enable SIP)
The next thing to do is to check and make sure SIP (System Integrity Protection) is enabled. To check it, run this command in the terminal.
System Integrity Protection should be in enabled state. If it is in disabled state for some reason, then enable it by following these steps:
- Restart the Mac by holding the Command and R keys together.
- Leave the keys when the apple logo appears.
- In the recovery mode, go to the Utilities menu.
- Select Terminal.
- In the terminal window, run the below command to enable SIP and reboot the Mac.
- Allow the mack to launch in normal mode.
- Launch terminal and run the command csrutil status and make sure SIS is enabled.
Solution 3: (Access Device Permission)
- Quit VirtualBox.
- In the Mac, launch the System Preferences.
- Go to Security & Privacy.
- Go to the Privacy tab.
- Unlock the privacy screen to make changes by pressing the lock icon at the bottom left of the screen and provide your authentication.
- From the left panel, go through the permissions Accessibility, Input Monitoring, Full Disk Access, Files and Folders and make sure VirtualBox.app is listed under the allow list (right panel) and the checkbox is selected. If not then add it to the list using the + button and select the check boxes.
- Launch VirtualBox and the virtual machine.
If you are still getting the NS_ERROR_FAILURE (0x80004005) error, then try the below solution.
Solution 4: (Allow identified developer in Security & Privacy)
Usually this solution is needed when you get errors after installing VirtualBox. As we are discussing the errors obtained after updating macOS, this solution may be irrelevant. Still I’m adding this solution here, just to check the settings before moving to the next solution.
- Quit VirtualBox.
- Launch the System Preferences.
- Go to Security & Privacy >>General tab.
- In the General tab, Unlock the security and privacy screen to make changes by clicking on the lock icon at the bottom of the screen and provide your authentication.
- Under the Allow apps downloaded from section, make sure the App Store and identified developers option is selected.
- Keep the System Preferences screen open and launch the virtual box and then the virtual machine. If the errors appear again, check the System Preferences >>Security & Privacy >>General tab and see if there is a warning like System software from developer “Oracle America, Inc.” was blocked from loading along with an Allow button that appears below the App Store and identified developers option. If so, press the Allow button.
- Quit the VirtualBox and launch it again.
Solution 5: (Update VirtualBox)
If the above solution were not fixing the problem, then see if there is any update available for the VirtualBox and install the update if there is any. To update the VirtualBox to its latest version follow these steps:
- Launch VirtualBox.
- From the menu select VirtualBox >>Check for updates…
- A small screen will popup and check for any update.
- If there is any update available, another window will popup and display the available update and the link of the dmg file.
- Download the dmg and follow the installation process.
- Once installed, perform the steps listed in Solution 4 above.
Solution 6: (Re-install VirtualBox)
If none of the above solutions are not fixing the NS_ERROR_FAILURE (0x80004005) error, then uninstall the VirtualBox and re-install it again.
Uninstalling VirtualBox
- To uninstall the VirtualBox, download the latest version from https://www.virtualbox.org/wiki/Downloads. Open the installation package. In the installation screen, you can see the uninstallation package VistualBox_Uninstall.tool at the bottom right corner.
- Right click VistualBox_Uninstall.tool and select Open with >>Terminal.
- In the terminal window, the uninstallation scripts will be opened and executed. Finally displays the list of VirtualBox programs installed in the Mac.
- Type Yes to confirm the installation process.
Clear existing permissions
- Restart the Mac in recovery mode by holding the Command and R keys together.
- Leave the keys when the apple logo appears.
- In the recovery mode, go to the Utilities menu.
- Select Terminal.
- In the terminal window, run the below command to clear all the existing permissions and then reboot the Mac.
Instal VirtualBox
Finally install the fresh copy of the VirtualBox using the dmg file downloaded earlier. After installation, if needed, perform the steps mentioned in Solution 4 and then Solution 3 above.
Источник
virtualbox.org
End user forums for VirtualBox
- Board index‹General‹VirtualBox on Mac OS X Hosts
- Change font size
- Print view
- FAQ
- Login
NS_ERROR_FAILURE (0x80004005) OSX 10.11.6 VBX 5.1.4
NS_ERROR_FAILURE (0x80004005) OSX 10.11.6 VBX 5.1.4
by razorj7 » 1. Sep 2016, 19:15
Recently my Virtual Box for Ubuntu has stopped working. The only things that have changed recently, I have updated virtual box to 5.1.4 from 5.0.26 and I have installed VMware Fusion for work purposes (it’s what they support). I have a simple Ubuntu install, and all was working fine. Then, after the recent changes, I am getting this error: NS_ERROR_FAILURE (0x80004005). Which is annoying since it’s doesn’t seem to tell me what’s wrong, and I really want to get this solved. I have been searching all over, and nothing has been helpful so far.
Re: NS_ERROR_FAILURE (0x80004005) OSX 10.11.6 VBX 5.1.4
by DuckPuppy » 12. Sep 2016, 16:57
There’s another thread here with a similar problem, and it was NAT networking causing it.
Here is a link to my post in the other thread about switching from NAT to NAT Network mode which fixes the problem for me.
https://forums.virtualbox.org/viewtopic.php?p=369450#p369450
Re: NS_ERROR_FAILURE (0x80004005) OSX 10.11.6 VBX 5.1.4
by mpack » 12. Sep 2016, 17:58
Re: NS_ERROR_FAILURE (0x80004005) OSX 10.11.6 VBX 5.1.4
by razorj7 » 19. Sep 2016, 18:47
Thanks for the replies!
DuckPuppy, you’re thread solved my issue, thanks!
I have attached the log requested by mpack.
Re: NS_ERROR_FAILURE (0x80004005) OSX 10.11.6 VBX 5.1.4
by socratis » 19. Sep 2016, 19:00
Re: NS_ERROR_FAILURE (0x80004005) OSX 10.11.6 VBX 5.1.4
by rwelty » 14. Oct 2016, 19:20
i have this error coming up in a different context. i’m running Ubuntu 16.04 in a VM on an external WD drive with locking software. virtual box version is 5.0.26 r108824, OS X is 10.11.6
the external drive hiccuped, and the Ubuntu filesystems in the VM went read only. i had to rerun the WD unlocker software. however, VBox went into eternal beach ball mode and i had to force quite. i am now getting the following variant on the error when i try to restart it:
Failed to open a session for the virtual machine NTS 16.04.
The VM session was closed before any attempt to power it on.
Result Code: NS_ERROR_FAILURE (0x80004005)
Component: SessionMachine
Interface: ISession
is there any way to recover this? there’s stuff in the filesystem that i would like to retrieve.
Re: NS_ERROR_FAILURE (0x80004005) OSX 10.11.6 VBX 5.1.4
by rwelty » 14. Oct 2016, 19:40
Источник
- Reply with quote
NS_ERROR_FAILURE (0x80004005) on Mac VirtualBox
Hello,
I’ve just updated my Mac with MacOS Big Sur 11.0.1. When I try to use any of my VMs through virtualbox I’m presented with the following error:
Result Code: NS_ERROR_FAILURE (0x80004005)
Compontent: MachineWrap
Interface: IMachine {85632c68-b5bb-4316-a900-5eb28d3413df}
I have tried reinstalling Virtualbox, reinstalling extensions and discarding saved states for the VMs to no prevail.
Thanks in advance
- Ashj89
- Posts: 1
- Joined: 21. Nov 2020, 14:28
- Reply with quote
Re: NS_ERROR_FAILURE (0x80004005) on Mac VirtualBox
![]() by mhwill55 » 21. Nov 2020, 15:47
by mhwill55 » 21. Nov 2020, 15:47
I am experiencing the exact same failure (same error code). In addition, if I create a new VM, it fails as well. So clearly it is not a problem with the VMs themselves.
- mhwill55
- Posts: 5
- Joined: 21. Nov 2020, 15:45
- Reply with quote
Re: NS_ERROR_FAILURE (0x80004005) on Mac VirtualBox
![]() by cybermario » 21. Nov 2020, 17:31
by cybermario » 21. Nov 2020, 17:31
Same error here on Big Sur final, on a MBP mid 2012… tried reinstall, restart mbp, create a new virtual machine, nothing works…
- Code: Select all Expand viewCollapse view
Fallo al abrir una sesión para la máquina virtual kali.The virtual machine 'kali' has terminated unexpectedly during startup with exit code 1 (0x1).
Código resultado: NS_ERROR_FAILURE (0x80004005)
Componente: MachineWrap
Interfaz: IMachine {85632c68-b5bb-4316-a900-5eb28d3413df}
Hope anyone helps us…
- cybermario
- Posts: 6
- Joined: 9. Nov 2019, 17:18
- Reply with quote
Re: NS_ERROR_FAILURE (0x80004005) on Mac VirtualBox
![]() by Steffen M. » 21. Nov 2020, 22:12
by Steffen M. » 21. Nov 2020, 22:12
mhwill55 wrote:I am experiencing the exact same failure (same error code). In addition, if I create a new VM, it fails as well. So clearly it is not a problem with the VMs themselves.
Do you have SIP disabled (by doing «csrutil disable» in Apple’s recovery mode)?
- Steffen M.
- Posts: 17
- Joined: 12. Sep 2013, 16:56
- Reply with quote
Re: NS_ERROR_FAILURE (0x80004005) on Mac VirtualBox
![]() by mhwill55 » 21. Nov 2020, 23:05
by mhwill55 » 21. Nov 2020, 23:05
Steffen M. wrote:
mhwill55 wrote:I am experiencing the exact same failure (same error code). In addition, if I create a new VM, it fails as well. So clearly it is not a problem with the VMs themselves.
Do you have SIP disabled (by doing «csrutil disable» in Apple’s recovery mode)?
Yes, SIP is disabled so that I can run TotalSpaces2.
I will re-enable SIP and see if that fixes the problem. If it does, then I need to decide with is more important — VirtualBox or TotalSpaces2. Given that it appears that Oracle will not be able to support VirtualBox on the new Apple Silicon chips, this may be the early warning that I should not depend upon VirtualBox for the future.
- mhwill55
- Posts: 5
- Joined: 21. Nov 2020, 15:45
- Reply with quote
Re: NS_ERROR_FAILURE (0x80004005) on Mac VirtualBox
![]() by cybermario » 22. Nov 2020, 00:06
by cybermario » 22. Nov 2020, 00:06
mhwill55 wrote:
Steffen M. wrote:
mhwill55 wrote:I am experiencing the exact same failure (same error code). In addition, if I create a new VM, it fails as well. So clearly it is not a problem with the VMs themselves.
Do you have SIP disabled (by doing «csrutil disable» in Apple’s recovery mode)?
Yes, SIP is disabled so that I can run TotalSpaces2.
I will re-enable SIP and see if that fixes the problem. If it does, then I need to decide with is more important — VirtualBox or TotalSpaces2. Given that it appears that Oracle will not be able to support VirtualBox on the new Apple Silicon chips, this may be the early warning that I should not depend upon VirtualBox for the future.
please keep informed if enabling SIP correct the problem.
- cybermario
- Posts: 6
- Joined: 9. Nov 2019, 17:18
- Reply with quote
Re: NS_ERROR_FAILURE (0x80004005) on Mac VirtualBox
![]() by Steffen M. » 22. Nov 2020, 02:37
by Steffen M. » 22. Nov 2020, 02:37
cybermario wrote:
mhwill55 wrote:I will re-enable SIP and see if that fixes the problem. If it does, then I need to decide with is more important — VirtualBox or TotalSpaces2. Given that it appears that Oracle will not be able to support VirtualBox on the new Apple Silicon chips, this may be the early warning that I should not depend upon VirtualBox for the future.
please keep informed if enabling SIP correct the problem.
In my case, VirtualBox 6.1.16 started to work again after re-enabling SIP.
Unfortunately, in this case, I don’t have LAN access because ASIX (the manufacturer of the AX88179 chipset of my Thunderbolt-to-GigabitEthernet adapter) does not provide the new form of drivers needed for Big Sur. So I can choose between VirtualBox or LAN — and to switch between them, I have to boot into recovery mode. This is very user-unfriendly and needs to be fixed.
Regards,
Steffen
- Steffen M.
- Posts: 17
- Joined: 12. Sep 2013, 16:56
- Reply with quote
Re: NS_ERROR_FAILURE (0x80004005) on Mac VirtualBox
![]() by granada29 » 22. Nov 2020, 03:55
by granada29 » 22. Nov 2020, 03:55
Steffen M. wrote:Unfortunately, in this case, I don’t have LAN access because ASIX (the manufacturer of the AX88179 chipset of my Thunderbolt-to-GigabitEthernet adapter) does not provide the new form of drivers needed for Big Sur. So I can choose between VirtualBox or LAN — and to switch between them, I have to boot into recovery mode. This is very user-unfriendly and needs to be fixed.
Yes — I agree it would be good to get fixed. Please contact the maufacturer of your adaptor and ask them to provide a Big Sur compatible driver.
- granada29
- Volunteer
- Posts: 518
- Joined: 3. Mar 2015, 07:27
- Primary OS: Mac OS X other
- VBox Version: OSE other
- Guest OSses: Linux, macOS, Windows
- Reply with quote
Re: NS_ERROR_FAILURE (0x80004005) on Mac VirtualBox
![]() by mhwill55 » 22. Nov 2020, 19:11
by mhwill55 » 22. Nov 2020, 19:11
please keep informed if enabling SIP correct the problem.
Yes, I can confirm that enabling SIP corrects the problem and all my VirtualBox VMs run just fine. As a double check, I went back and disabled SIP and, as expected, my VirtualBox VMs failed to launch but successfully launched once I re-enabled SIP.
Interestingly, Parallels and VMware Fusion is able to successfully launch their VMs regardless of whether SIP is enabled or Disabled.
- mhwill55
- Posts: 5
- Joined: 21. Nov 2020, 15:45
- Reply with quote
Re: NS_ERROR_FAILURE (0x80004005) on Mac VirtualBox
![]() by cybermario » 24. Nov 2020, 05:52
by cybermario » 24. Nov 2020, 05:52
mhwill55 wrote:
please keep informed if enabling SIP correct the problem.
Yes, I can confirm that enabling SIP corrects the problem and all my VirtualBox VMs run just fine. As a double check, I went back and disabled SIP and, as expected, my VirtualBox VMs failed to launch but successfully launched once I re-enabled SIP.
Interestingly, Parallels and VMware Fusion is able to successfully launch their VMs regardless of whether SIP is enabled or Disabled.
I also confirm that enabling SIP the problem has been solved.
- cybermario
- Posts: 6
- Joined: 9. Nov 2019, 17:18
- Reply with quote
Re: NS_ERROR_FAILURE (0x80004005) on Mac VirtualBox
![]() by SchroedersKater » 2. Dec 2020, 16:14
by SchroedersKater » 2. Dec 2020, 16:14
mhwill55 wrote:
please keep informed if enabling SIP correct the problem.
Yes, I can confirm that enabling SIP corrects the problem and all my VirtualBox VMs run just fine. As a double check, I went back and disabled SIP and, as expected, my VirtualBox VMs failed to launch but successfully launched once I re-enabled SIP.
Interestingly, Parallels and VMware Fusion is able to successfully launch their VMs regardless of whether SIP is enabled or Disabled.
So someone at Oracle should have a look at this problem. I.e. I need SIP disabled to run TotalFinder.
BTW, it’s been working with SIP disabled with macOS 10 Catalina.
- SchroedersKater
- Posts: 23
- Joined: 15. Mar 2019, 18:14
- Reply with quote
Re: NS_ERROR_FAILURE (0x80004005) on Mac VirtualBox
![]() by multiOS » 2. Dec 2020, 16:27
by multiOS » 2. Dec 2020, 16:27
It’s been reported on another thread that the latest ‘Test Build’ available here:
https://www.virtualbox.org/wiki/Testbuilds
allows VirtualBox to run with SIP disabled. In fact test Builds can only be installed with SIP disabled because they aren’t notarised by Apple.
If you don’t want to try running a Test Build, then the alternative is to wait for the next official release.
- multiOS
- Volunteer
- Posts: 718
- Joined: 14. Sep 2019, 16:51
- Location: United Kingdom
- Primary OS: Mac OS X other
- VBox Version: PUEL
- Guest OSses: WIN11,10, 7, Linux (various)
- Reply with quote
Re: NS_ERROR_FAILURE (0x80004005) on Mac VirtualBox
![]() by cybermario » 2. Dec 2020, 17:57
by cybermario » 2. Dec 2020, 17:57
SchroedersKater wrote:
mhwill55 wrote:
please keep informed if enabling SIP correct the problem.
Yes, I can confirm that enabling SIP corrects the problem and all my VirtualBox VMs run just fine. As a double check, I went back and disabled SIP and, as expected, my VirtualBox VMs failed to launch but successfully launched once I re-enabled SIP.
Interestingly, Parallels and VMware Fusion is able to successfully launch their VMs regardless of whether SIP is enabled or Disabled.
So someone at Oracle should have a look at this problem. I.e. I need SIP disabled to run TotalFinder.
BTW, it’s been working with SIP disabled with macOS 10 Catalina.
yes, in catalina works perfectly, big sur need some improvements or virtualbox adjust to big sur
- cybermario
- Posts: 6
- Joined: 9. Nov 2019, 17:18
- Reply with quote
Re: NS_ERROR_FAILURE (0x80004005) on Mac VirtualBox
![]() by SchroedersKater » 2. Dec 2020, 19:38
by SchroedersKater » 2. Dec 2020, 19:38
multiOS wrote:It’s been reported on another thread that the latest ‘Test Build’ available here:
https://www.virtualbox.org/wiki/Testbuilds
allows VirtualBox to run with SIP disabled. In fact test Builds can only be installed with SIP disabled because they aren’t notarised by Apple.
If you don’t want to try running a Test Build, then the alternative is to wait for the next official release.
Great! Thank’s a lot for this information!
- SchroedersKater
- Posts: 23
- Joined: 15. Mar 2019, 18:14
Return to VirtualBox on Mac OS X Hosts
Who is online
Users browsing this forum: No registered users and 13 guests
[Solved] VBoxManage: error: Details: code NS_ERROR_FAILURE (0x80004005), component MachineWrap, interface IMachine
Issue
When starting up Virtual Box VMs using vagrant in mac, it throws the following errors.
VBoxManage: error: Details: code NS_ERROR_FAILURE (0x80004005), component MachineWrap, interface IMachineVBoxManage: error: Failed to create the host-only adapterIn this blog, we have given a step-by-step guide to solve this issue.
Solution For VBoxManage: error: Details: code
This component MachineWrap interface IMachine issue happens when there is insufficient permission for the Virtual box to start up the VM in mac.
Follow the steps given below to resolve this issue.
Step 1: Open MAC system preferences
Step 2: Select the security and privacy option.
Step 3: Select the General tab and enable the lock icon to make changes. Then there will be an option to enable system extensions. Instead of the restart, you will see another option. Once you click that, you will see Oracle on the list. Enable that in the checkbox. It will ask for a system restart and restart the system.
Now if you try to bring up the VM, you won’t see the component MachineWrap, interface machine issue.
VBoxManage: error: Failed to create the host-only adapter
“Failed to create the host-only adapter” is also related to MAC security. You need to allow the changes in the security setting as explained in step 3 of the before section.
Mac OS Issue: error: VBoxNetAdpCtl: Error while adding new interface
There is also an issue with the new MAC OS Monterey version. Which is fixed in the latest Virtual box build. So you need to remove the existing version of Virtualbox and reinstall the latest build to get rid of this issue.
There was an error while executing `VBoxManage`, a CLI used by Vagrant
for controlling VirtualBox. The command and stderr is shown below.

Command: ["hostonlyif", "create"]

Stderr: 0%...
Progress state: NS_ERROR_FAILURE
VBoxManage: error: Failed to create the host-only adapter
VBoxManage: error: VBoxNetAdpCtl: Error while adding new interface: failed to open /dev/vboxnetctl: No such file or directory
VBoxManage: error: Details: code NS_ERROR_FAILURE (0x80004005), component HostNetworkInterfaceWrap, interface IHostNetworkInterface
VBoxManage: error: Context: "RTEXITCODE handleCreate(HandlerArg *)" at line 95 of file VBoxManageHostonly.cpp
Let me know if it fixes your virtual box error.
Error Creating Network
With OS Monterey update you could get errors with networks if you try to create an IP other than the 198 range.
To rectify this issue, open the networks file.
sudo vi /etc/vbox/networks.confAdd the following to the file.
* 0.0.0.0/0 ::/0It should solve the network create error.
Содержание
- Ошибка VirtualBox «NS_ERROR_FAILURE (0x80004005)» (РЕШЕНО)
- Устраняем ошибку 0x80004005 в VirtualBox
- Причины возникновения ошибки 0x80004005 в VirtualBox
- Способ 1: Переименование внутренних файлов
- Способ 2: Включение поддержки виртуализации в BIOS
- Способ 3: Обновление VirtualBox
- Способ 4: Отключение Hyper-V
- Способ 5: Изменение типа запуска гостевой ОС
- Способ 6: Удаление/исправление обновления Windows 7
Ошибка VirtualBox «NS_ERROR_FAILURE (0x80004005)» (РЕШЕНО)
После обновления VirtualBox перестали работать все виртуальные машины, независимо от гостевой операционной системы и их настроек.
Ситуация осложнена тем, что вместо точного указания на проблему при попытке запустить виртуальную машину выводится только общее сообщение о том, что сессия была прервана, а также номер ошибки, который является общим для ряда ошибок, связанных с невозможностью запустить сессию виртуальной машины.
Полный текст ошибки:

Одной из возможных причин является несоответствие версий VirtualBox Extension Pack и установленной версии VirtualBox.
VirtualBox Extension Pack — это расширение, которое добавляет функции такие функции как: поддержка устройств USB 2.0 и USB 3.0, VirtualBox RDP, шифрование диска, загрузка NVMe и PXE для карт Intel.
Чтобы убедиться в том, что причина именно в VirtualBox Extension Pack, вы можете в настройках виртуальной машины отключить функции, которые предоставляет пакет расширений (например, откатиться на версию USB 1.1) — после этого виртуальная машина должна заработать без ошибок. Либо сразу переходите к обновлению пакета расширений, что решит указанную проблему.
Для исправления данной проблемы достаточно установить версию VirtualBox Extension Pack, соответствующую версии вашего VirtualBox.
Если вы устанавливали пакет расширений вручную, то перейдите на страницу скачивания VirtualBox https://www.virtualbox.org/wiki/Downloads и найдите там VirtualBox Oracle VM VirtualBox Extension Pack.
Скачайте и запустите файл двойным кликом.
Во время установки новой версии вам будет предложено удалить старую версию.
В репозиториях Linux также содержится VirtualBox Extension Pack.
В Debian и производных дистрибутивах (Linux Mint, Ubuntu, Kali Linux и прочих) для установки VirtualBox Extension Pack из репозитория выполните:
В Arch Linux и производных дистрибутивах (Manjaro, BlackArch и прочих) для установки VirtualBox Extension Pack из репозитория выполните:
Если вы получите сообщение, что команда pikaur не найдена, то смотрите статью «Автоматическая установка и обновление пакетов AUR».
Если вы получили сообщение об ошибке, что VirtualBox Extension Pack уже установлен, например:
VBoxManage: error: Extension pack ‘Oracle VM VirtualBox Extension Pack’ is already installed. In case of a reinstallation, please uninstall it first
То вам необходимо начать с того, что удалить его вручную. Для этого откройте VirtualBox, перейдите в меню File → Preferences → Extensions.

Удалите VirtualBox Extension Pack.
После этого заново запустите установку VirtualBox Extension Pack из репозитория.
После обновления VirtualBox Extension Pack ошибка «NS_ERROR_FAILURE (0x80004005)» исчезла.
Источник
Устраняем ошибку 0x80004005 в VirtualBox

При попытке запуска операционной системы Windows или Linux в виртуальной машине VirtualBox пользователь может столкнуться с ошибкой 0x80004005. Она возникает до старта ОС и препятствует любой попытке ее загрузки. Есть сразу несколько способов, помогающих устранить существующую проблему и продолжить пользоваться гостевой системой в обычном режиме.
Причины возникновения ошибки 0x80004005 в VirtualBox
Ситуаций, из-за которых не получается открыть сессию для виртуальной машины, может быть несколько. Зачастую данная ошибка возникает спонтанно: еще вчера вы спокойно работали в операционной системе на VirtualBox, а сегодня выполнить то же самое не удается из-за сбоя при запуске сессии. Но в некоторых случаях не удается выполнить первичный (установочный) запуск ОС.
Это может произойти вследствие одной из следующих причин:
- Ошибка при сохранении последней сессии.
- Отключенная поддержка виртуализации в BIOS.
- Некорректно работающая версия VirtualBox.
- Конфликт гипервизора (Hyper-V) с VirtualBox на 64-разрядных системах.
- Проблемное обновление хостовой Windows.
Далее мы рассмотрим, как устранить каждую из этих проблем и начать/продолжить пользоваться виртуальной машиной.
Способ 1: Переименование внутренних файлов
Сохранение сессии может завершиться ошибочно, в результате чего последующий ее запуск будет невозможен. В этом случае достаточно выполнить переименование файлов, связанных с запуском гостевой ОС.
Для выполнения дальнейших действий вам необходимо включить отображение расширений файлов. Это можно сделать через «Параметры папок» (в Windows 7) или «Параметры Проводника» (в Windows 10).
- Откройте папку, где хранится файл, отвечающий за запуск операционной системы, т.е. сам образ. Он располагается в папке VirtualBox VMs, место сохранения которой вы выбирали при установке самой VirtualBox. Обычно она находится в корне диска (диска С или диска D, если HDD разбит на 2 раздела). Также она может располагаться в персональной папке пользователя по пути:
С:UsersИМЯ_ПОЛЬЗОВАТЕЛЯVirtualBox VMsИМЯ_ГОСТЕВОЙ_ОС
В папке с операционной системой, которую вы хотите запустить, должны быть следующие файлы: Name.vbox и Name.vbox-prev. Вместо Name будет имя вашей гостевой операционной системы. 
Скопируйте файл Name.vbox в другое место, например, на рабочий стол.

C:UsersИМЯ_ПОЛЬЗОВАТЕЛЯ.VirtualBox 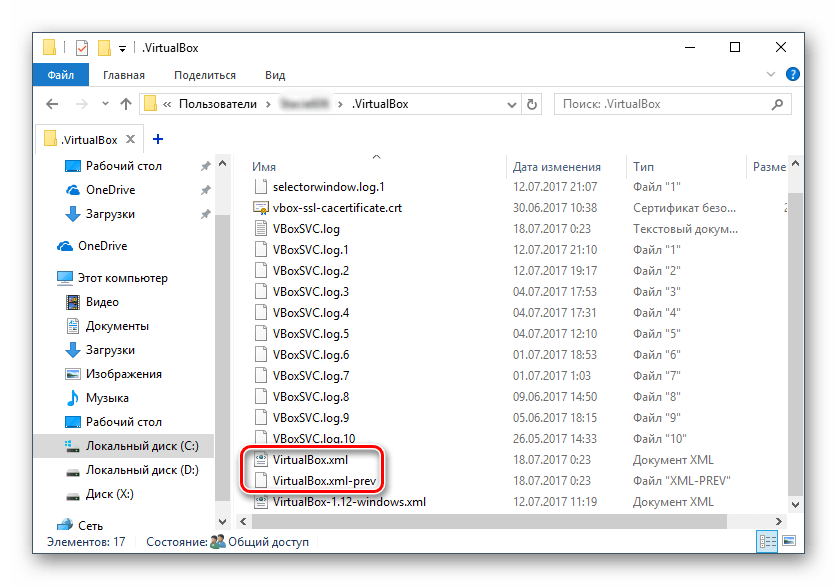
Здесь вы будете менять файл VirtualBox.xml — скопируйте его в любое другое место.
Способ 2: Включение поддержки виртуализации в BIOS
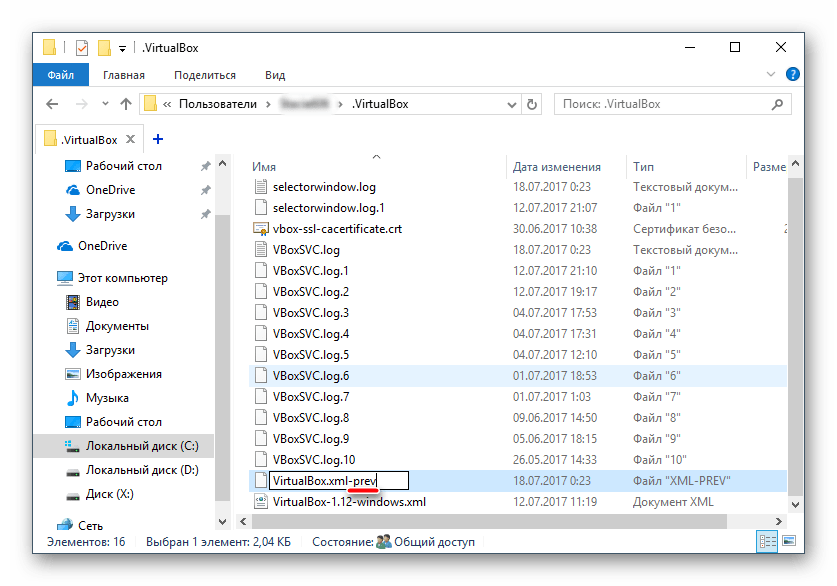
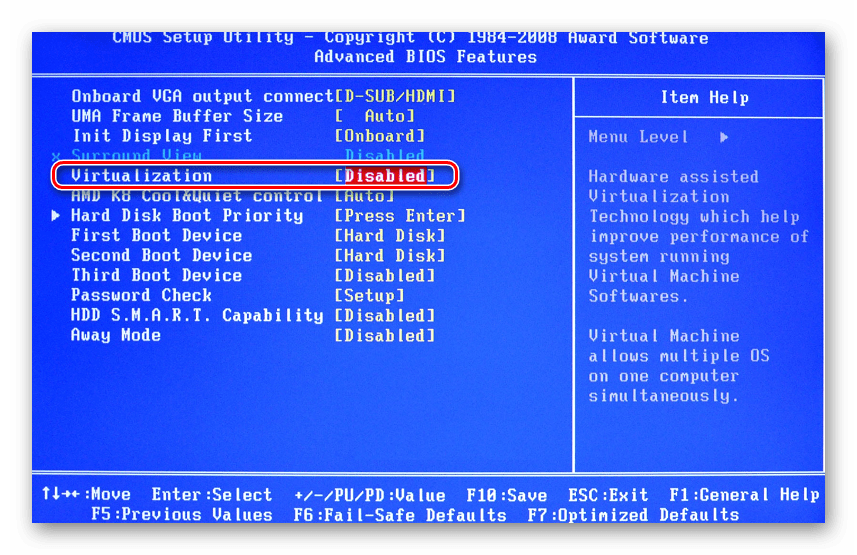
Если вы решили воспользоваться ВиртуалБокс впервые, и сразу же столкнулись с вышеупомянутой ошибкой, то, возможно, загвоздка кроется в не настроенном BIOS для работы с технологией виртуализации.
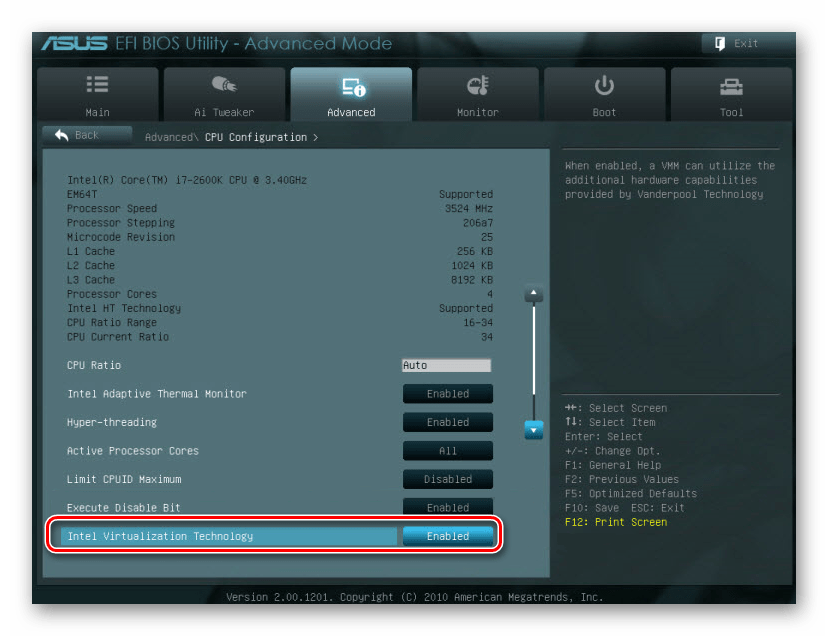
Чтобы осуществить запуск виртуальной машины, в БИОС достаточно включить всего лишь одну настройку, которая называется Intel Virtualization Technology.
- В Award BIOS путь к этой настройке следующий: Advanced BIOS Features >Virtualization Technology (или просто Virtualization) >Enabled.
В AMI BIOS: Advanced >Intel(R) VT for Directed I/O >Enabled.
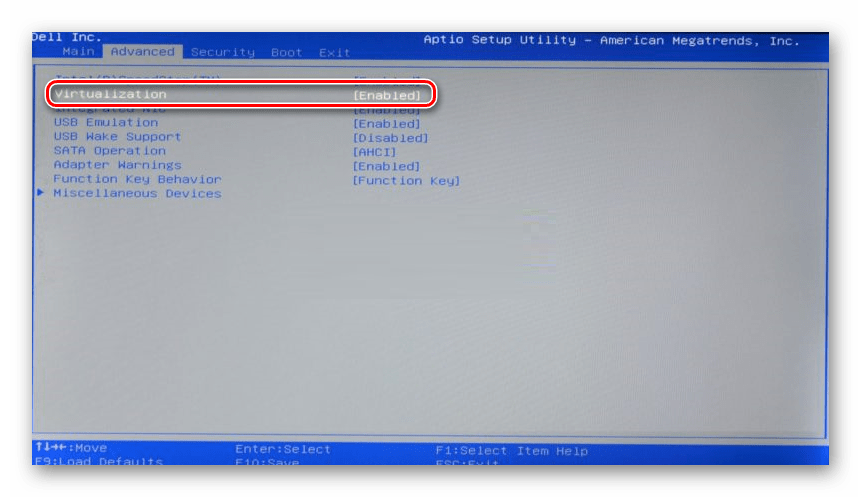
В ASUS UEFI: Advanced >Intel Virtualization Technology >Enabled.
Настройка может иметь и другой путь (например, в BIOS на ноутбуках HP или в БИОС Insyde H20 Setup Utility):
- System Configuration >Virtualization Technology >Enabled;
- Configuration >Intel Virtual Technology >Enabled;
- Advanced >Virtualization >Enabled.
Если вы не нашли данной настройки в своей версии BIOS, то ищите ее вручную во всех пунктах меню по ключевым словам virtualization, virtual, VT. Для включения выбирайте состояние Enabled.
Способ 3: Обновление VirtualBox
Возможно, состоялось очередное обновление программы до последней версии, после чего и появилась ошибка запуска «E_FAIL 0x80004005». Есть два выхода из сложившейся ситуации:

- Дождитесь выхода стабильной версии VirtualBox.
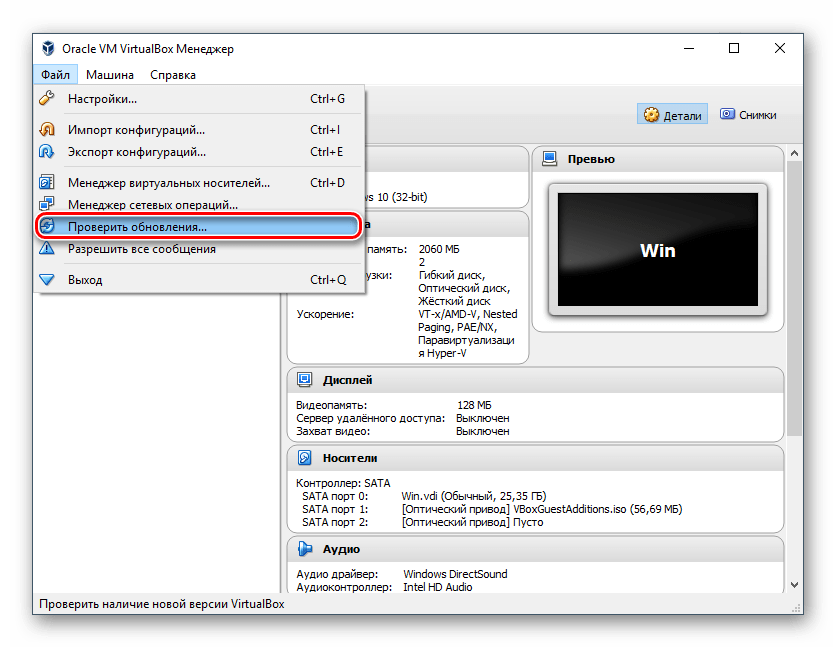
Те, кто не хочет заморачиваться с выбором рабочей версии программы, может просто дождаться обновления. Узнать о выходе новой версии можно на официальном сайте VirtualBox или через интерфейс программы:
- Запустите Менеджер виртуальных машин.
- Нажмите «Файл» >«Проверить обновления…».
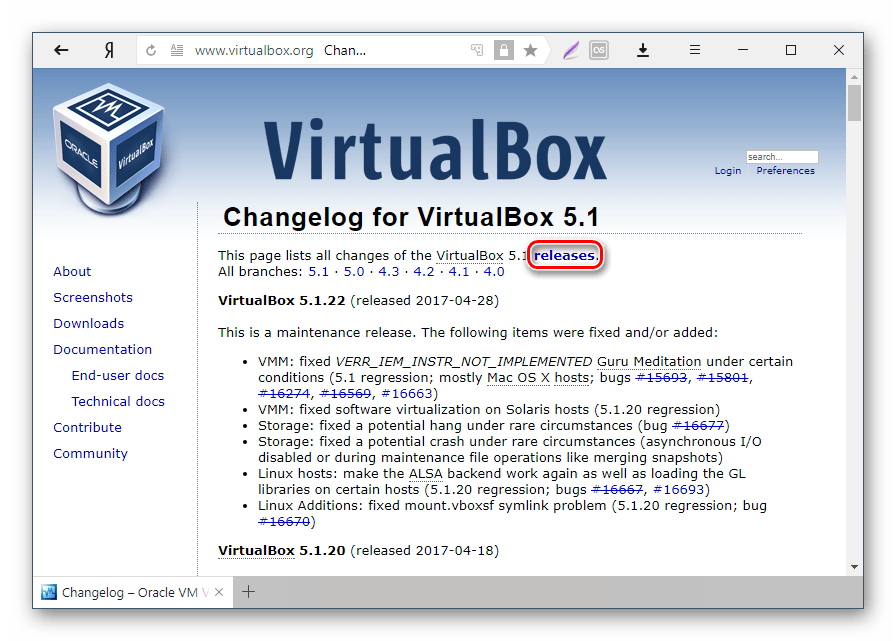
- Если у вас есть установочный файл VirtualBox, то используйте его для переустановки. Для повторного скачивания актуальной или предыдущей версии перейдите по этой ссылке.
- Нажмите на ссылку, ведущую к странице со списком всех предыдущих релизов для текущей версии VirtualBox.

Выберите подходящую для хостовой ОС сборку и скачайте ее.
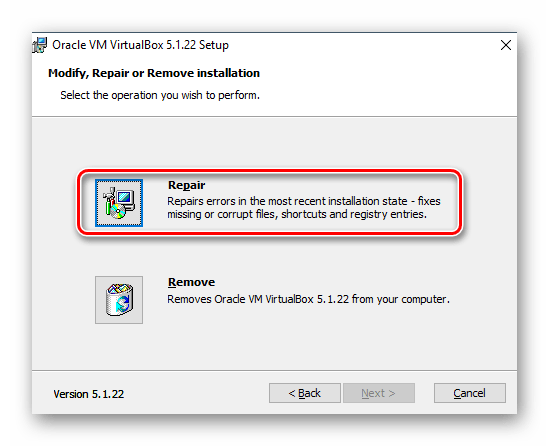
Для переустановки установленной версии VirtualBox: запустите инсталлятор и в окне с типом установки выберите «Repair». Установите программу в обычном режиме.
Если вы делаете откат до предыдущей версии, то лучше сперва удалить VirtualBox через «Установку и удаление программ» в Windows.Или через установщик VirtualBox.
Не забудьте сделать резервные копии своих папок с образами ОС.
Способ 4: Отключение Hyper-V
Hyper-V — система виртуализации для 64-разрядных систем. Иногда у нее может возникнуть конфликт с VirtualBox, что и провоцирует появление ошибки при старте сессии для виртуальной машины.
Для отключения гипервизора выполните следующее:
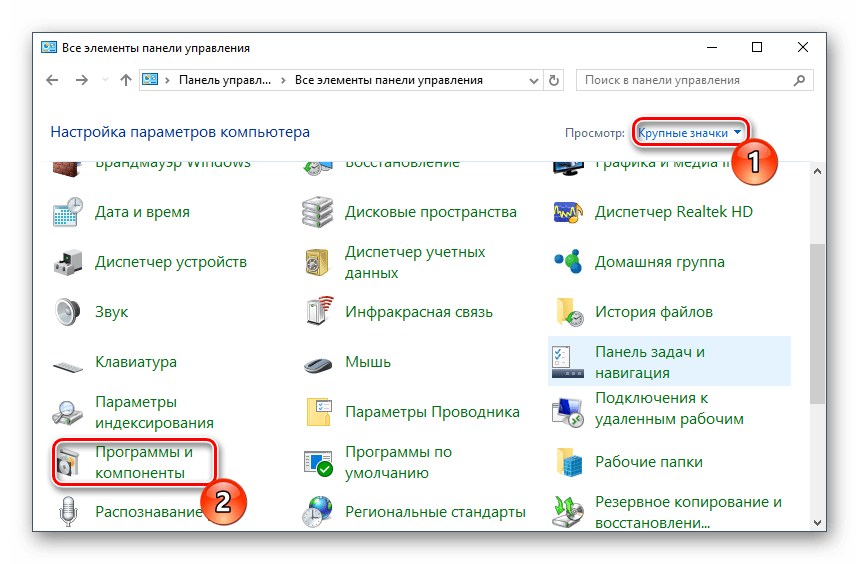
- Запустите «Панель управления».
- Включите просмотр по значкам. Выберите пункт «Программы и компоненты».

В левой части окна нажмите на ссылку «Включение или отключение компонентов Windows».
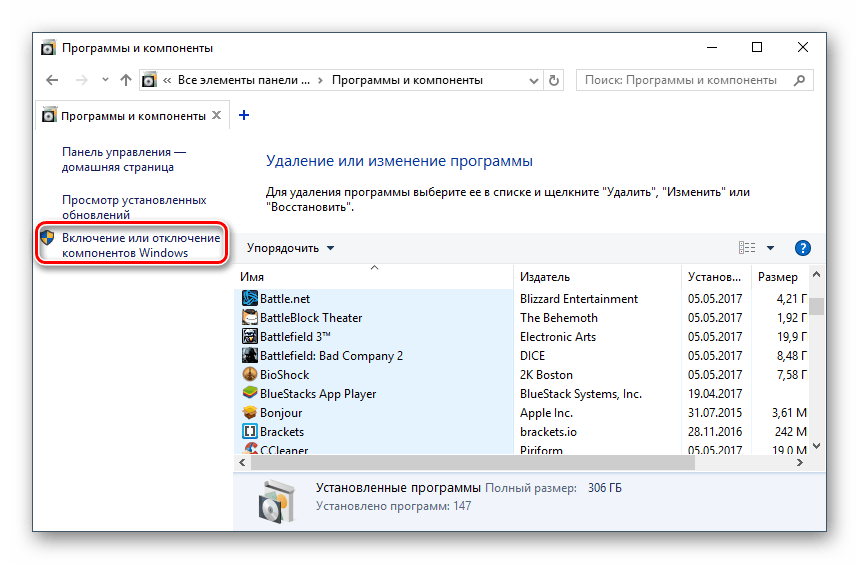
В открывшемся окне необходимо снять галочку с компонента Hyper-V, а затем нажать «ОК».

Способ 5: Изменение типа запуска гостевой ОС
В качестве временного решения (например, до выпуска новой версии VirtualBox) можно попробовать изменить тип запуска ОС. Этот способ помогает не во всех случаях, но, возможно, сработает у вас.
- Запустите Менеджер VirtualBox.
- Нажмите по проблемной операционной системе правой кнопкой мыши, наведите курсор на пункт «Запустить» и выберите вариант «Запуск в фоновом режиме с интерфейсом».

Данная функция доступна только в VirtualBox, начиная с версии 5.0.
Способ 6: Удаление/исправление обновления Windows 7
Этот способ считается устаревшим, поскольку после неудачного патча KB3004394, приводящего к прекращению работы виртуальных машин в ВиртуалБокс, была выпущена заплатка KB3024777, устраняющая данную проблему.
Тем не менее, если у вас на компьютере по каким-то причинам отсутствует фикс-патч, а проблемный присутствует, то есть смысл либо удалить KB3004394, либо установить KB3024777.
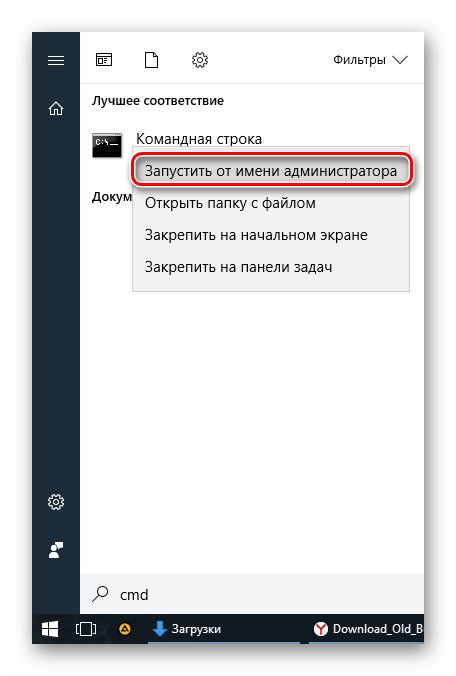
- Откройте «Командную строку» с правами администратора. Для этого откройте окно «Пуск», напишите cmd, правым кликом мыши выберите пункт «Запустить от имени администратора».
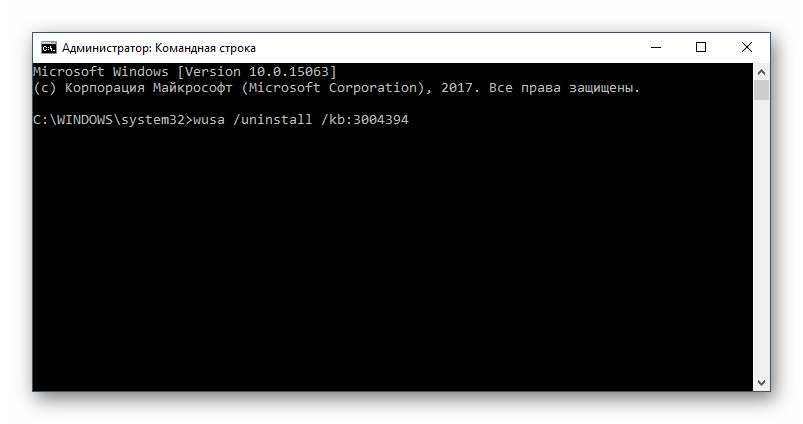
Пропишите команду
wusa /uninstall /kb:3004394
и нажмите Enter.
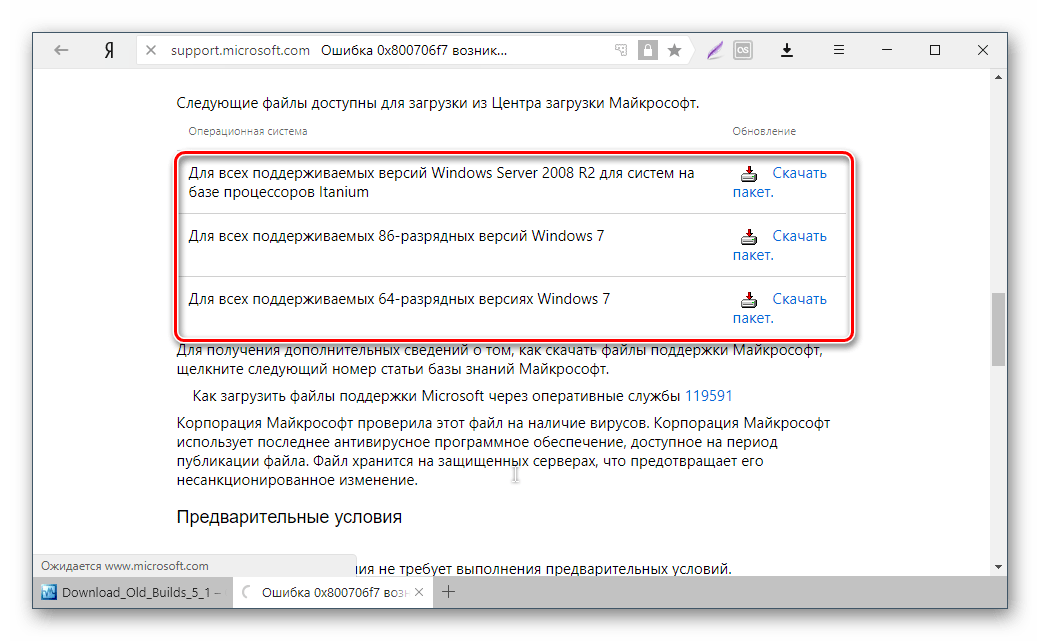
- Перейдите по этой ссылке на сайт Microsoft.
- Скачайте версию файла с учетом разрядности своей ОС.
В подавляющем большинстве случаев точное выполнение данных рекомендаций приводит к устранению ошибки 0x80004005, и пользователь может без труда начать или продолжить работать с виртуальной машиной.
Источник
I have the same setup as above.
I am running into the exact same problem, here is the log after using --v 10 --logtostderr
I1020 13:44:25.048618 51830 notify.go:109] Checking for updates…
I1020 13:44:26.407541 51830 cache_images.go:226] Attempting to cache image: gcr.io/google_containers/k8s-dns-dnsmasq-nanny-amd64:1.14.4 at /Users/hokho/.minikube/cache/images/gcr.io/google_containers/k8s-dns-dnsmasq-nanny-amd64_1.14.4
I1020 13:44:26.407594 51830 cache_images.go:226] Attempting to cache image: gcr.io/google_containers/kubernetes-dashboard-amd64:v1.6.3 at /Users/hokho/.minikube/cache/images/gcr.io/google_containers/kubernetes-dashboard-amd64_v1.6.3
I1020 13:44:26.407600 51830 cache_images.go:226] Attempting to cache image: gcr.io/google_containers/k8s-dns-kube-dns-amd64:1.14.4 at /Users/hokho/.minikube/cache/images/gcr.io/google_containers/k8s-dns-kube-dns-amd64_1.14.4
I1020 13:44:26.407679 51830 cache_images.go:226] Attempting to cache image: gcr.io/google-containers/kube-addon-manager:v6.4-beta.2 at /Users/hokho/.minikube/cache/images/gcr.io/google-containers/kube-addon-manager_v6.4-beta.2
I1020 13:44:26.407738 51830 cluster.go:67] Machine exists!
I1020 13:44:26.407701 51830 cache_images.go:226] Attempting to cache image: gcr.io/google_containers/k8s-dns-sidecar-amd64:1.14.4 at /Users/hokho/.minikube/cache/images/gcr.io/google_containers/k8s-dns-sidecar-amd64_1.14.4
I1020 13:44:26.407732 51830 cache_images.go:226] Attempting to cache image: gcr.io/google_containers/pause-amd64:3.0 at /Users/hokho/.minikube/cache/images/gcr.io/google_containers/pause-amd64_3.0
I1020 13:44:26.407858 51830 cache_images.go:77] Successfully cached all images.
COMMAND: /usr/local/bin/VBoxManage showvminfo minikube —machinereadable
STDOUT:
{
name=»minikube»
groups=»/»
ostype=»Linux 2.6 / 3.x / 4.x (64-bit)»
UUID=»32a9e1ec-66f9-446c-85da-2442cf06b252″
CfgFile=»/Users/hokho/.minikube/machines/minikube/minikube/minikube.vbox»
SnapFldr=»/Users/hokho/.minikube/machines/minikube/minikube/Snapshots»
LogFldr=»/Users/hokho/.minikube/machines/minikube/minikube/Logs»
hardwareuuid=»32a9e1ec-66f9-446c-85da-2442cf06b252″
memory=2048
pagefusion=»off»
vram=8
cpuexecutioncap=100
hpet=»on»
chipset=»piix3″
firmware=»BIOS»
cpus=2
pae=»on»
longmode=»on»
triplefaultreset=»off»
apic=»on»
x2apic=»off»
cpuid-portability-level=0
bootmenu=»disabled»
boot1=»dvd»
boot2=»dvd»
boot3=»disk»
boot4=»none»
acpi=»on»
ioapic=»on»
biosapic=»apic»
biossystemtimeoffset=0
rtcuseutc=»on»
hwvirtex=»on»
nestedpaging=»on»
largepages=»on»
vtxvpid=»on»
vtxux=»on»
paravirtprovider=»default»
effparavirtprovider=»kvm»
VMState=»poweroff»
VMStateChangeTime=»2017-10-19T06:47:28.000000000″
monitorcount=1
accelerate3d=»off»
accelerate2dvideo=»off»
teleporterenabled=»off»
teleporterport=0
teleporteraddress=»»
teleporterpassword=»»
tracing-enabled=»off»
tracing-allow-vm-access=»off»
tracing-config=»»
autostart-enabled=»off»
autostart-delay=0
defaultfrontend=»»
storagecontrollername0=»SATA»
storagecontrollertype0=»IntelAhci»
storagecontrollerinstance0=»0″
storagecontrollermaxportcount0=»30″
storagecontrollerportcount0=»30″
storagecontrollerbootable0=»on»
«SATA-0-0″=»/Users/hokho/.minikube/machines/minikube/boot2docker.iso»
«SATA-ImageUUID-0-0″=»06942dcc-dbe6-47e9-8cb6-437cd0aef706»
«SATA-tempeject»=»off»
«SATA-IsEjected»=»off»
«SATA-1-0″=»/Users/hokho/.minikube/machines/minikube/disk.vmdk»
«SATA-ImageUUID-1-0″=»33cd734e-ac30-43a8-b1af-17586b52fdf5»
«SATA-2-0″=»none»
«SATA-3-0″=»none»
«SATA-4-0″=»none»
«SATA-5-0″=»none»
«SATA-6-0″=»none»
«SATA-7-0″=»none»
«SATA-8-0″=»none»
«SATA-9-0″=»none»
«SATA-10-0″=»none»
«SATA-11-0″=»none»
«SATA-12-0″=»none»
«SATA-13-0″=»none»
«SATA-14-0″=»none»
«SATA-15-0″=»none»
«SATA-16-0″=»none»
«SATA-17-0″=»none»
«SATA-18-0″=»none»
«SATA-19-0″=»none»
«SATA-20-0″=»none»
«SATA-21-0″=»none»
«SATA-22-0″=»none»
«SATA-23-0″=»none»
«SATA-24-0″=»none»
«SATA-25-0″=»none»
«SATA-26-0″=»none»
«SATA-27-0″=»none»
«SATA-28-0″=»none»
«SATA-29-0″=»none»
natnet1=»nat»
macaddress1=»080027D30C2B»
cableconnected1=»on»
nic1=»nat»
nictype1=»82540EM»
nicspeed1=»0″
mtu=»0″
sockSnd=»64″
sockRcv=»64″
tcpWndSnd=»64″
tcpWndRcv=»64″
Forwarding(0)=»ssh,tcp,127.0.0.1,55759,,22″
hostonlyadapter2=»vboxnet0″
macaddress2=»0800274C990F»
cableconnected2=»on»
nic2=»hostonly»
nictype2=»82540EM»
nicspeed2=»0″
nic3=»none»
nic4=»none»
nic5=»none»
nic6=»none»
nic7=»none»
nic8=»none»
hidpointing=»ps2mouse»
hidkeyboard=»ps2kbd»
uart1=»off»
uart2=»off»
uart3=»off»
uart4=»off»
lpt1=»off»
lpt2=»off»
audio=»coreaudio»
audio_in=»false»
audio_out=»false»
clipboard=»disabled»
draganddrop=»disabled»
vrde=»off»
usb=»off»
ehci=»off»
xhci=»off»
SharedFolderNameMachineMapping1=»Users»
SharedFolderPathMachineMapping1=»/Users»
videocap=»off»
videocapscreens=0
videocapfile=»/Users/hokho/.minikube/machines/minikube/minikube/minikube.webm»
videocapres=1024×768
videocaprate=512
videocapfps=25
videocapopts=
GuestMemoryBalloon=0
}
STDERR:
{
}
I1020 13:44:26.765910 51830 cluster.go:74] Machine state: Stopped
COMMAND: /usr/local/bin/VBoxManage showvminfo minikube —machinereadable
STDOUT:
{
name=»minikube»
groups=»/»
ostype=»Linux 2.6 / 3.x / 4.x (64-bit)»
UUID=»32a9e1ec-66f9-446c-85da-2442cf06b252″
CfgFile=»/Users/hokho/.minikube/machines/minikube/minikube/minikube.vbox»
SnapFldr=»/Users/hokho/.minikube/machines/minikube/minikube/Snapshots»
LogFldr=»/Users/hokho/.minikube/machines/minikube/minikube/Logs»
hardwareuuid=»32a9e1ec-66f9-446c-85da-2442cf06b252″
memory=2048
pagefusion=»off»
vram=8
cpuexecutioncap=100
hpet=»on»
chipset=»piix3″
firmware=»BIOS»
cpus=2
pae=»on»
longmode=»on»
triplefaultreset=»off»
apic=»on»
x2apic=»off»
cpuid-portability-level=0
bootmenu=»disabled»
boot1=»dvd»
boot2=»dvd»
boot3=»disk»
boot4=»none»
acpi=»on»
ioapic=»on»
biosapic=»apic»
biossystemtimeoffset=0
rtcuseutc=»on»
hwvirtex=»on»
nestedpaging=»on»
largepages=»on»
vtxvpid=»on»
vtxux=»on»
paravirtprovider=»default»
effparavirtprovider=»kvm»
VMState=»poweroff»
VMStateChangeTime=»2017-10-19T06:47:28.000000000″
monitorcount=1
accelerate3d=»off»
accelerate2dvideo=»off»
teleporterenabled=»off»
teleporterport=0
teleporteraddress=»»
teleporterpassword=»»
tracing-enabled=»off»
tracing-allow-vm-access=»off»
tracing-config=»»
autostart-enabled=»off»
autostart-delay=0
defaultfrontend=»»
storagecontrollername0=»SATA»
storagecontrollertype0=»IntelAhci»
storagecontrollerinstance0=»0″
storagecontrollermaxportcount0=»30″
storagecontrollerportcount0=»30″
storagecontrollerbootable0=»on»
«SATA-0-0″=»/Users/hokho/.minikube/machines/minikube/boot2docker.iso»
«SATA-ImageUUID-0-0″=»06942dcc-dbe6-47e9-8cb6-437cd0aef706»
«SATA-tempeject»=»off»
«SATA-IsEjected»=»off»
«SATA-1-0″=»/Users/hokho/.minikube/machines/minikube/disk.vmdk»
«SATA-ImageUUID-1-0″=»33cd734e-ac30-43a8-b1af-17586b52fdf5»
«SATA-2-0″=»none»
«SATA-3-0″=»none»
«SATA-4-0″=»none»
«SATA-5-0″=»none»
«SATA-6-0″=»none»
«SATA-7-0″=»none»
«SATA-8-0″=»none»
«SATA-9-0″=»none»
«SATA-10-0″=»none»
«SATA-11-0″=»none»
«SATA-12-0″=»none»
«SATA-13-0″=»none»
«SATA-14-0″=»none»
«SATA-15-0″=»none»
«SATA-16-0″=»none»
«SATA-17-0″=»none»
«SATA-18-0″=»none»
«SATA-19-0″=»none»
«SATA-20-0″=»none»
«SATA-21-0″=»none»
«SATA-22-0″=»none»
«SATA-23-0″=»none»
«SATA-24-0″=»none»
«SATA-25-0″=»none»
«SATA-26-0″=»none»
«SATA-27-0″=»none»
«SATA-28-0″=»none»
«SATA-29-0″=»none»
natnet1=»nat»
macaddress1=»080027D30C2B»
cableconnected1=»on»
nic1=»nat»
nictype1=»82540EM»
nicspeed1=»0″
mtu=»0″
sockSnd=»64″
sockRcv=»64″
tcpWndSnd=»64″
tcpWndRcv=»64″
Forwarding(0)=»ssh,tcp,127.0.0.1,55759,,22″
hostonlyadapter2=»vboxnet0″
macaddress2=»0800274C990F»
cableconnected2=»on»
nic2=»hostonly»
nictype2=»82540EM»
nicspeed2=»0″
nic3=»none»
nic4=»none»
nic5=»none»
nic6=»none»
nic7=»none»
nic8=»none»
hidpointing=»ps2mouse»
hidkeyboard=»ps2kbd»
uart1=»off»
uart2=»off»
uart3=»off»
uart4=»off»
lpt1=»off»
lpt2=»off»
audio=»coreaudio»
audio_in=»false»
audio_out=»false»
clipboard=»disabled»
draganddrop=»disabled»
vrde=»off»
usb=»off»
ehci=»off»
xhci=»off»
SharedFolderNameMachineMapping1=»Users»
SharedFolderPathMachineMapping1=»/Users»
videocap=»off»
videocapscreens=0
videocapfile=»/Users/hokho/.minikube/machines/minikube/minikube/minikube.webm»
videocapres=1024×768
videocaprate=512
videocapfps=25
videocapopts=
GuestMemoryBalloon=0
}
STDERR:
{
}
COMMAND: /usr/local/bin/VBoxManage list hostonlyifs
STDOUT:
{
Name: vboxnet0
GUID: 786f6276-656e-4074-8000-0a0027000000
DHCP: Disabled
IPAddress: 192.168.99.1
NetworkMask: 255.255.255.0
IPV6Address:
IPV6NetworkMaskPrefixLength: 0
HardwareAddress: 0a:00:27:00:00:00
MediumType: Ethernet
Status: Up
VBoxNetworkName: HostInterfaceNetworking-vboxnet0
}
STDERR:
{
}
Searching for hostonly interface for IPv4: 192.168.99.1 and Mask: ffffff00
Found: vboxnet0
COMMAND: /usr/local/bin/VBoxManage list dhcpservers
STDOUT:
{
NetworkName: HostInterfaceNetworking-vboxnet0
IP: 192.168.99.6
NetworkMask: 255.255.255.0
lowerIPAddress: 192.168.99.100
upperIPAddress: 192.168.99.254
Enabled: Yes
}
STDERR:
{
}
Removing orphan DHCP servers…
COMMAND: /usr/local/bin/VBoxManage list hostonlyifs
STDOUT:
{
Name: vboxnet0
GUID: 786f6276-656e-4074-8000-0a0027000000
DHCP: Disabled
IPAddress: 192.168.99.1
NetworkMask: 255.255.255.0
IPV6Address:
IPV6NetworkMaskPrefixLength: 0
HardwareAddress: 0a:00:27:00:00:00
MediumType: Ethernet
Status: Up
VBoxNetworkName: HostInterfaceNetworking-vboxnet0
}
STDERR:
{
}
Adding/Modifying DHCP server «192.168.99.6» with address range «192.168.99.100» — «192.168.99.254»…
COMMAND: /usr/local/bin/VBoxManage list dhcpservers
STDOUT:
{
NetworkName: HostInterfaceNetworking-vboxnet0
IP: 192.168.99.6
NetworkMask: 255.255.255.0
lowerIPAddress: 192.168.99.100
upperIPAddress: 192.168.99.254
Enabled: Yes
}
STDERR:
{
}
COMMAND: /usr/local/bin/VBoxManage modifyvm minikube —nic2 hostonly —nictype2 82540EM —nicpromisc2 deny —hostonlyadapter2 vboxnet0 —cableconnected2 on
STDOUT:
{
}
STDERR:
{
}
COMMAND: /usr/local/bin/VBoxManage modifyvm minikube —natpf1 delete ssh
STDOUT:
{
}
STDERR:
{
}
COMMAND: /usr/local/bin/VBoxManage modifyvm minikube —natpf1 ssh,tcp,127.0.0.1,55782,,22
STDOUT:
{
}
STDERR:
{
}
COMMAND: /usr/local/bin/VBoxManage startvm minikube —type headless
STDOUT:
{
Waiting for VM «minikube» to power on…
}
STDERR:
{
VBoxManage: error: The virtual machine ‘minikube’ has terminated unexpectedly during startup with exit code 1 (0x1)
VBoxManage: error: Details: code NS_ERROR_FAILURE (0x80004005), component MachineWrap, interface IMachine
}
Checking vm logs: /Users/hokho/.minikube/machines/minikube/minikube/Logs/VBox.log
E1020 13:44:27.979022 51830 start.go:146] Error starting host: Error starting stopped host: Unable to start the VM: /usr/local/bin/VBoxManage startvm minikube —type headless failed:
VBoxManage: error: The virtual machine ‘minikube’ has terminated unexpectedly during startup with exit code 1 (0x1)
VBoxManage: error: Details: code NS_ERROR_FAILURE (0x80004005), component MachineWrap, interface IMachine
.
Retrying.
E1020 13:44:27.979076 51830 start.go:152] Error starting host: Error starting stopped host: Unable to start the VM: /usr/local/bin/VBoxManage startvm minikube —type headless failed:
VBoxManage: error: The virtual machine ‘minikube’ has terminated unexpectedly during startup with exit code 1 (0x1)
VBoxManage: error: Details: code NS_ERROR_FAILURE (0x80004005), component MachineWrap, interface IMachine
Содержание
- Как исправить ошибку Kernel driver not installed (rc=-1908) в VirtualBox на macOS
- Virtual Box: критическая ошибка при работе виртуальной машины [закрыто]
- Виртуальный ящик Guru Mediation
- VirtualBox NS_ERROR_FAILURE (0x80004005) macOS
- 9 Answers 9
- Устраняем ошибку 0x80004005 в VirtualBox
- Причины возникновения ошибки 0x80004005 в VirtualBox
- Способ 1: Переименование внутренних файлов
- Способ 2: Включение поддержки виртуализации в BIOS
- Способ 3: Обновление VirtualBox
- Способ 4: Отключение Hyper-V
- Способ 5: Изменение типа запуска гостевой ОС
- Способ 6: Удаление/исправление обновления Windows 7
- [FIX] VirtualBox Ошибка установки на Mac
- Метод 1: разрешить сертификат
- Метод 2: разрешить приложения неопознанных разработчиков
- Метод 3: выполнить сценарий
Как исправить ошибку Kernel driver not installed (rc=-1908) в VirtualBox на macOS

Пользователи macOS (в особенности Big Sur) сталкиваются со следующей ошибкой при использовании виртуализации VirtualBox от Oracle:
Kernel driver not installed (rc=-1908)
Make sure the kernel module has been loaded successfully.
where: suplibOsInit what: 3
VERR_VM_DRIVER_NOT_INSTALLED
(-1908) — The support driver is not installed.
On linux, open returned ENOENT.
Исправить эту ошибку крайне просто. Вероятнее всего, причина её возникновения в том, что на этапе установки VirtualBox вы проигнорировали уведомление о том, что в настойках нужно предоставить одно из разрешений:

Чтобы исправить это, перейдите в «Системные настройки» macOS, откройте раздел «Защита и безопасность». В нём снимите замок в левом нижнем углу, а затем кликните на кнопку «Разрешить» рядом с появившемся пунктом «Загрузка системного ПО разработчика „Oracle America, Inc.” была заблокирована».

Если этого пункта у вас нет, попробуйте переустановить VirtualBox.
Источник
Virtual Box: критическая ошибка при работе виртуальной машины [закрыто]

Я использую виртуальную машину VirtualBox в качестве локального веб-сервера (это виртуальная машина Open Suse). Но на несколько дней с моей ВМ возникают проблемы.
Во-первых, я не могу удалить свой самый старый снимок, причина в следующем:
Сегодня пришла еще одна проблема:
Вот ссылка на файл журнала VirtualBox
Почему я получаю критические ошибки при попытке запустить виртуальную машину?
Сегодня я получил такое же сообщение об ошибке и решил его, закрыв эмулятор Android, который также работал.
Я придумал ответ. В 99 процентах случаев, включая меня, будет такое же решение. Мы выделили больше памяти для виртуальной машины, поэтому хост-системе не хватает памяти для обработки виртуальной машины. Вы можете избавиться от медитации гуру, выделив виртуальной машине меньше памяти. Вы можете сделать это: Откройте Vm> Настройки> Система> И уменьшите выделенную память до меньшего значения.
Надеюсь, это поможет.
Я столкнулся с этой ошибкой, попробовал и сработал для меня
1- Откройте виртуальную машину VirtualBox
3- Отметьте расширенные функции: включите PAE / NX.
По умолчанию машины VBox linux допускают максимум 128 МБ видеопамяти. Эта ошибка может возникнуть, если вы когда-либо настраивали видеопамять до 256 МБ. Для меня эта ошибка возникла после нескольких дней настройки видеопамяти 256 МБ. Когда я вернул его к 128 МБ (по умолчанию), критическая ошибка (Guru Meditation) исчезла.
Вот что случилось со мной.

Я создал другую виртуальную машину, и проблема больше не возникает.
В моем случае ошибка Guru Meditation появлялась каждый раз, когда я пытался обновить свою машину Lubuntu 18.04 в VirtualBox 6.04. Это было связано со следующей ошибкой Vbox.log:
Следуя предложению, описанному здесь: Не в текстовом режиме! Ошибка (гостевая Windows PE 3.0), о активация I / O APIC в конфигурации виртуальной машины, проблема решена.
По умолчанию машины VBox linux допускают максимум 128 МБ видеопамяти. Эта ошибка может возникнуть, если вы когда-либо настраивали видеопамять до 256 МБ. Для меня эта ошибка возникла после нескольких дней настройки видеопамяти 256 МБ. Когда я вернул его к 128 МБ (по умолчанию), критическая ошибка (Guru Meditation) исчезла.
Источник
VirtualBox NS_ERROR_FAILURE (0x80004005) macOS
I’m using macOS and installed VirtualBox.
When I start a machine, I’m getting the following error :
9 Answers 9
This error seems to appear with VirtualBox installs on versions of macOS 10.13.
To fix this issue, you have to uninstall VirtualBox (use the VirtualBox_uninstall.tool of the VirtualBox downloaded dmg).

This should solve your issue.

Here is what worked for me. I kept getting that error when I was trying to ‘add’ the ISO after clicking start on the VM to set it up.
However, when I clicked on ‘Tools’ on the left sidebar, then click «Media». From there I was able to add my Kali Linux ISO so when I started the VM again, the ISO showed up in the list.


Using a readonly filesystem, blocking VBox files wrtiting access causes this error. Move VBox virtual machines files to a new location with writing permissions must resolves this problem. In my case, i use a Linux server, with VBOx software but my machine was moved to a Windows partition with BitLocker active and the windows Disk was mounted in ReadOnly, causing this problem.
Let’s look at this from a troubleshooting perspective. The number one thing to do instead of guessing is diagnose and the best way to do that when you don’t know what the problem is. I’ll take you through the steps for my particular use case but it should give you a general idea on how to look at the problem in order to find the correct solution.
a.-Have a look at the actual logs of the VM:
Click on the Menu Item, you should see three choices:
Look for this error code: VMSetError and look for the matching RETURN CODE (rc) rc=VERR_VD_IMAGE_READ_ONLY
In the example below the file under /build/virtualbox. is in read only mode.
b.-Interpret what that means: But the problem is the /build directory does not exist at all. So what the rc above really means is that it cannot FIND that file, because /build doesn’t even exist (nor it seems to be supposed to).
Another thing to notice is that for my case other VMs with VDIs in the same location don’t have the problem. That completely discards two possibilities:
The possibility is that the VM got corrupted at some point during shut down and that created the config corruption, not a VDI corruption at the VM level, not VirtualBox level.
Unless you power off your VM the «Close» function on your Vm window will ALWAYS save the state of the machine, so «Discarding» the state is only possible when you have two or more states because in that case at a minimum there is always the LAST state.
The conclusion is then that the corruption is at the VM state level and we need to get rid of that.
Create a linked Clone. That will simply copy the config files to the right place and link with the same VDI.
Start that one. If it starts you know you have a problem with the original VM. You can either re-create the VM and point to the existing VDI or create a full clone (it will take longer) and the delete the original.
To prevent this (at least for my case), avoid sending the Power Off Message to your VM when closing, better use the ACPI Shutdown method as Power off can leave (as we saw) your machine on an unwanted state.
Источник
Устраняем ошибку 0x80004005 в VirtualBox
При попытке запуска операционной системы Windows или Linux в виртуальной машине VirtualBox пользователь может столкнуться с ошибкой 0x80004005. Она возникает до старта ОС и препятствует любой попытке ее загрузки. Есть сразу несколько способов, помогающих устранить существующую проблему и продолжить пользоваться гостевой системой в обычном режиме.
Причины возникновения ошибки 0x80004005 в VirtualBox
Ситуаций, из-за которых не получается открыть сессию для виртуальной машины, может быть несколько. Зачастую данная ошибка возникает спонтанно: еще вчера вы спокойно работали в операционной системе на VirtualBox, а сегодня выполнить то же самое не удается из-за сбоя при запуске сессии. Но в некоторых случаях не удается выполнить первичный (установочный) запуск ОС.
Это может произойти вследствие одной из следующих причин:
Далее мы рассмотрим, как устранить каждую из этих проблем и начать/продолжить пользоваться виртуальной машиной.
Способ 1: Переименование внутренних файлов
Сохранение сессии может завершиться ошибочно, в результате чего последующий ее запуск будет невозможен. В этом случае достаточно выполнить переименование файлов, связанных с запуском гостевой ОС.
Для выполнения дальнейших действий вам необходимо включить отображение расширений файлов. Это можно сделать через «Параметры папок» (в Windows 7) или «Параметры Проводника» (в Windows 10).
Способ 2: Включение поддержки виртуализации в BIOS
Если вы решили воспользоваться ВиртуалБокс впервые, и сразу же столкнулись с вышеупомянутой ошибкой, то, возможно, загвоздка кроется в не настроенном BIOS для работы с технологией виртуализации.
Чтобы осуществить запуск виртуальной машины, в БИОС достаточно включить всего лишь одну настройку, которая называется Intel Virtualization Technology.
Настройка может иметь и другой путь (например, в BIOS на ноутбуках HP или в БИОС Insyde H20 Setup Utility):
Если вы не нашли данной настройки в своей версии BIOS, то ищите ее вручную во всех пунктах меню по ключевым словам virtualization, virtual, VT. Для включения выбирайте состояние Enabled.
Способ 3: Обновление VirtualBox
Возможно, состоялось очередное обновление программы до последней версии, после чего и появилась ошибка запуска «E_FAIL 0x80004005». Есть два выхода из сложившейся ситуации:
Те, кто не хочет заморачиваться с выбором рабочей версии программы, может просто дождаться обновления. Узнать о выходе новой версии можно на официальном сайте VirtualBox или через интерфейс программы:

Или через установщик VirtualBox.

Не забудьте сделать резервные копии своих папок с образами ОС.
Способ 4: Отключение Hyper-V
Hyper-V — система виртуализации для 64-разрядных систем. Иногда у нее может возникнуть конфликт с VirtualBox, что и провоцирует появление ошибки при старте сессии для виртуальной машины.
Для отключения гипервизора выполните следующее:
Способ 5: Изменение типа запуска гостевой ОС
В качестве временного решения (например, до выпуска новой версии VirtualBox) можно попробовать изменить тип запуска ОС. Этот способ помогает не во всех случаях, но, возможно, сработает у вас.
Данная функция доступна только в VirtualBox, начиная с версии 5.0.
Способ 6: Удаление/исправление обновления Windows 7
Этот способ считается устаревшим, поскольку после неудачного патча KB3004394, приводящего к прекращению работы виртуальных машин в ВиртуалБокс, была выпущена заплатка KB3024777, устраняющая данную проблему.
Тем не менее, если у вас на компьютере по каким-то причинам отсутствует фикс-патч, а проблемный присутствует, то есть смысл либо удалить KB3004394, либо установить KB3024777.
wusa /uninstall /kb:3004394
В подавляющем большинстве случаев точное выполнение данных рекомендаций приводит к устранению ошибки 0x80004005, и пользователь может без труда начать или продолжить работать с виртуальной машиной.
Помимо этой статьи, на сайте еще 12345 инструкций.
Добавьте сайт Lumpics.ru в закладки (CTRL+D) и мы точно еще пригодимся вам.
Отблагодарите автора, поделитесь статьей в социальных сетях.
Источник
[FIX] VirtualBox Ошибка установки на Mac
Популярность виртуальных машин растет день ото дня и не зря. Возможность использовать совершенно другую систему поверх существующей — это то, о чем простой народ даже не догадывался некоторое время назад. VirtualBox — один из самых известных гипервизоров, доступный для всех различных платформ. Однако в некоторых случаях процедура установки может пойти не так, как ожидалось. Как оказалось, некоторые пользователи сталкиваются с сообщением об ошибке «Ошибка установки» при попытке установить VirtualBox в своей системе Mac.

Это сообщение об ошибке появляется из-за того, что сертификат, который использует установщик, не разрешен macOS. Установщик VirtualBox фактически подписан с использованием сертификата Oracle America, который должен быть разрешен, чтобы установщик продолжил установку. Однако в этом случае, поскольку сертификат блокируется, установщик выдает указанное сообщение об ошибке.
Теперь есть несколько способов решения этой проблемы. Первый — просто разрешить сертификат в настройках безопасности и конфиденциальности. Однако есть некоторые проблемы с этим, если вы подключены к системе удаленно. Тем не менее, мы рассмотрим все возможные сценарии и предложим обходной путь. Итак, без лишних слов, приступим.
Метод 1: разрешить сертификат
Первое, что вам следует сделать, когда вы столкнетесь с указанным сообщением об ошибке, — это разрешить сертификат из системных настроек. Как оказалось, сертификат не разрешен по умолчанию и, следовательно, ожидает утверждения в разделе «Безопасность и конфиденциальность» в системных настройках. Следовательно, вам придется разрешить это оттуда. Однако важно отметить, что если вы подключены к системе удаленно, это может не сработать для вас. Поэтому у нас есть другие обходные пути, которые вы можете использовать для решения проблемы. С учетом сказанного, следуйте приведенным ниже инструкциям, чтобы решить проблему:
Метод 2: разрешить приложения неопознанных разработчиков
Другой способ исправить указанное сообщение об ошибке — разрешить использование приложений неизвестных разработчиков на вашем Mac. Это позволит открывать приложения от неизвестных разработчиков. Это не то, что вы должны делать обычно, но в этом случае это может быть исключением. Также важно отметить, что вам придется отключить это после установки VirtualBox в своей системе. Для этого следуйте приведенным ниже инструкциям:
После успешной установки VirtualBox вам придется отключить этот параметр. Для этого следуйте инструкциям ниже:
Метод 3: выполнить сценарий
Как мы уже упоминали ранее, для некоторых людей нажатие кнопки «Разрешить» в первом методе может не работать. Это особенно случается с теми, кто не находится локально перед своим Mac и удаленно подключается / использует экран. В таком случае вы можете выполнить сценарий, который сообщает Mac нажать кнопку «Разрешить». Чтобы это работало, убедитесь, что вы не перемещаете окно «Безопасность и конфиденциальность». Это действительно важно. С учетом сказанного выполните следующие шаги, чтобы создать и выполнить сценарий:
Источник