Ticket #18343
(new defect)
| Reported by: | tsenay | Owned by: | |
|---|---|---|---|
| Component: | other | Version: | VirtualBox 6.0.2 |
| Keywords: | import | Cc: | |
| Guest type: | Linux | Host type: | Linux |
$ vboxmanage import packer_cache/31bc31daafd70a05b35eef0741b96f878b356b4721385a42056d02b946cc22d2.ova
0%...10%...20%...30%...40%...50%...60%...70%...80%...90%...100%
Interpreting /var/lib/jenkins/tsenay/packer-core-os-builder/packer_cache/31bc31daafd70a05b35eef0741b96f878b356b4721385a42056d02b946cc22d2.ova...
OK.
Disks:
  vmdisk1       41943040000     -1      http://www.vmware.com/interfaces/specifications/vmdk.html#streamOptimized       rhel-75-x86_64-core-os-disk001.vmdk     -1      -1

Virtual system 0:
 0: Suggested OS type: "RedHat_64"
    (change with "--vsys 0 --ostype <type>"; use "list ostypes" to list all possible values)
 1: Suggested VM name "rhel-75-x86_64-core-os"
    (change with "--vsys 0 --vmname <name>")
 2: Suggested VM group "/"
    (change with "--vsys 0 --group <group>")
 3: Suggested VM settings file name "/home/ldapccs/tsenay/VirtualBox VMs/rhel-75-x86_64-core-os/rhel-75-x86_64-core-os.vbox"
    (change with "--vsys 0 --settingsfile <filename>")
 4: Suggested VM base folder "/home/ldapccs/tsenay/VirtualBox VMs"
    (change with "--vsys 0 --basefolder <path>")
 5: Description "packer-core-os-image Virtual Machine"
    (change with "--vsys 0 --description <desc>")
 6: Number of CPUs: 2
    (change with "--vsys 0 --cpus <n>")
 7: Guest memory: 2048 MB
    (change with "--vsys 0 --memory <MB>")
 8: Network adapter: orig NAT, config 3, extra slot=0;type=NAT
 9: IDE controller, type PIIX4
    (disable with "--vsys 0 --unit 9 --ignore")
10: IDE controller, type PIIX4
    (disable with "--vsys 0 --unit 10 --ignore")
11: Hard disk image: source image=rhel-75-x86_64-core-os-disk001.vmdk, target path=rhel-75-x86_64-core-os-disk001.vmdk, controller=9;channel=0
    (change target path with "--vsys 0 --unit 11 --disk path";
    disable with "--vsys 0 --unit 11 --ignore")
0%...10%...20%...30%...40%...50%...
Progress state: NS_ERROR_INVALID_ARG
VBoxManage: error: Appliance import failed
VBoxManage: error: Code NS_ERROR_INVALID_ARG (0x80070057) - Invalid argument value (extended info not available)
VBoxManage: error: Context: "RTEXITCODE handleImportAppliance(HandlerArg*)" at line 957 of file VBoxManageAppliance.cpp
Attachments
Change History
follow-up:
↓ 3
Changed 4 years ago by tsenay
↓ 3
in reply to:
↑ 1
;
follow-up:
↓ 4
Changed 3 years ago by imtiaz
↑ 1
;
follow-up:
↓ 4
in reply to:
↑ 3
Changed 3 years ago by shiskey
↑ 3
Note: See
TracTickets for help on using
tickets.
- Печать
Страницы: [1] Вниз

Тема: ошибка при добавлении готовой машины в virtualbox (Прочитано 10902 раз)
0 Пользователей и 1 Гость просматривают эту тему.

userubuntu

при попытке добавления виртуальной машины получаю сообщение:
Не удалось открыть виртуальную машину, расположенную в /media/OS/xxxxxxxxxxxxxxxxxxxxxxxxxxxx.vbox.
Shared folder path ‘D:VirtualBoxFolder’ is not absolute.
Код ошибки: NS_ERROR_INVALID_ARG (0x80070057)
Компонент: SharedFolder
Интерфейс: ISharedFolder {8388da11-b559-4574-a5b7-2bd7acd5cef8}
Вызванный интерфейс: IVirtualBox {c28be65f-1a8f-43b4-81f1-eb60cb516e66}
Что это может быть, и как с этим бороться? Если это от кривых рук — извиняйте, какие имеем)
spk-ubuntu
может к этой ВМ подключена шара с таким путём? в свойствах ВМ в Shared Folders ничего про этот ‘D:VirtualBoxFolder’ не написано? если написано — то удалить.
userubuntu
да как же посмотрю, коли при добавлении этот глюк и вылазит(
ZwS
открой файл любым текстовым редактором и поправь путь.
Dell Inspiron One 2330 | Intel+Radeon HD7650A | 8GB RAM | Ubuntu GNOME 17.10
userubuntu
открыл, чего какие строки и как править?
Пользователь решил продолжить мысль 15 Декабря 2012, 13:54:58:
На чём вообще написан этот файл? Есть какой мануал по этой фигне?
« Последнее редактирование: 15 Декабря 2012, 13:54:58 от userubuntu »
слушай голос Машины!
ZwS
xml там.
просто найди строчку с D:VirtualBoxFolder и и замени D:VirtualBoxFolder на какую то другую папку.
Dell Inspiron One 2330 | Intel+Radeon HD7650A | 8GB RAM | Ubuntu GNOME 17.10
Señor_Gaga
По вашему варианту — нет прав доступа.
Легче переустановить заново на /home/user_name/VirtualBox
- Печать
Страницы: [1] Вверх
Автор Владимир!
Привет, друзья. В этой статье предлагаю поговорить о проблеме импорта файлов конфигурации виртуальных машин OVA программой VirtualBox. Об этой проблеме вы не единожды упоминали в комментариях к одной из статей сайта, где приводились инструкции по скачиванию готовой машины с Windows 8.1. Процесс импорта программой VirtualBox машин, экспортированных нами ранее или скачанных в Интернете, увы, не всегда проходит успешно. И иногда мы можем столкнуться с ошибкой типа «Не удалось импортировать конфигурацию виртуальной машины». Ниже поговорим о том, что может привести к такой ошибке импорта, а также рассмотрим универсальный способ решения этой проблемы.
Рабочие виртуалки VirtualBox вместе с их настройками и содержимым виртуального жёсткого диска можно экспортировать в универсальный файл конфигурации формата OVA, а затем импортировать его после переустановки основной Windows, на другом компьютере или на другом гипервизоре. С механизмом экспорта-импорта с участием формата OVA работают программы VirtualBox, VMware Workstation, а при дополнительных усилиях — ещё и Hyper-V. Готовые виртуальные машины в Интернете обычно выкладывают именно в формате OVA.
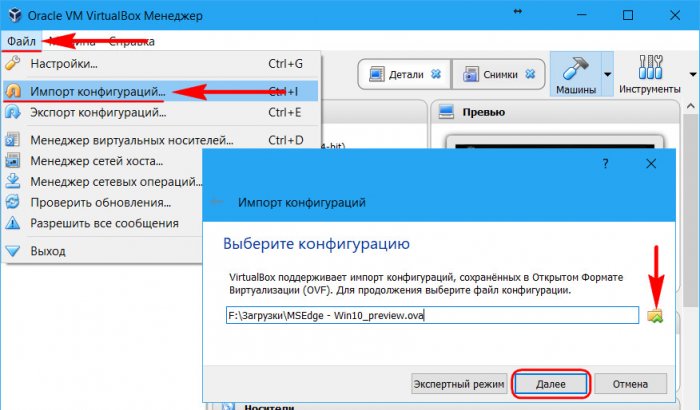
В идеале механизм импорта в программе VirtualBox прост: выбираем «Импорт конфигураций», указываем путь к файлу OVA, жмём «Далее».
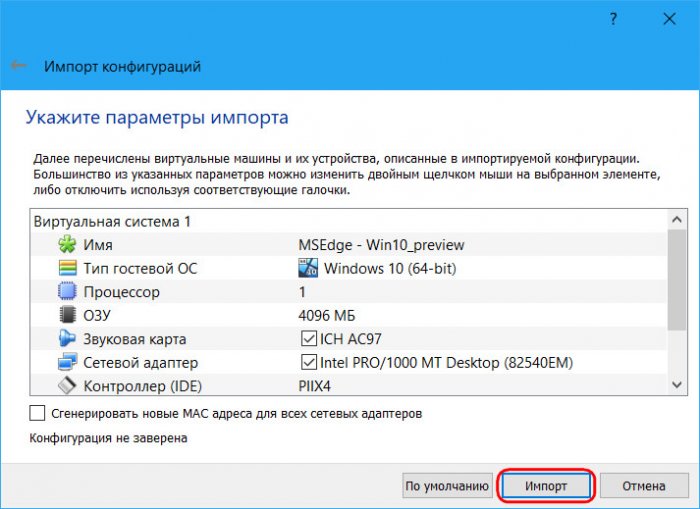
При необходимости меняем кое-какие настройки и жмём «Импорт».
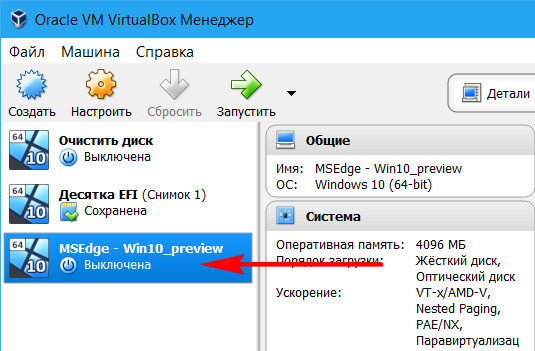
И через какое-то время можем уже запускать виртуалку.
Но это так в идеале. Что может препятствовать этому процессу?
Сообщением типа «Не удалось импортировать конфигурацию виртуальной машины» процесс импорта может завершиться банально из-за проблем с файлом OVA (если он повреждён) или из-за нехватки места на диске, куда распаковывается виртуальная машина. Если с самим OVA всё в порядке, при возникновении такой проблемы можно попытаться извлечь виртуалку на другой раздел диска. Или на исходный, только после очистки системной корзины. Можно даже попробовать дефрагментировать такой раздел (если, конечно же, это раздел HDD).
У раздела диска, куда распаковывается импортируемая машина, естественно, должна быть файловая система NTFS. На раздел с FAT32 не запишется файл виртуального жёсткого диска в составе машины, который обычно весит больше 4 Гб.
Если мы говорим о виртуалке, скачанной с Интернета, нужно тщательно проверить параметры импорта. Возможно, тот, кто её экспортировал, работал на более мощном компьютере и указал большой объём оперативной памяти или слишком много ядер процессора.
Но часто, друзья, бывает так, что в одной версии VirtualBox не хочет осуществлять импорт, а в другой, к примеру, в более старой версии – делает это без каких-либо проблем.
За исключением случаев порченного OVA и раздела с FAT32 решить проблему ошибки импорта виртуальной машины можно путём извлечения из OVA файла виртуального жёсткого диска и формирования на его базе новой машины.
Создание новых машин на базе файлов виртуальных жёстких дисков – это более удобный, чем экспортирование в формат OVA, способ восстановления виртуалок. Особенно, если их много. Кто активно работает с гипервизорами, обычно больше привязан к виртуальным дискам машин, а не к их конфигурации. Такие пользователи прекрасно знают, какие настройки виртуалок они используют. И им проще создать новую машину на базе имеющегося виртуального диска, чем возиться с созданием увесистого файла экспорта OVA.
Но где взять диск виртуальной машины, если последняя, например, в формате OVA скачана с Интернета? Друзья, OVA – это контейнер архива TAR, его содержимое можно увидеть и извлечь какую-то часть данных с помощью программ 7-zip, WinRAR или любого иного архиватора, который поддерживает формат архивов «.tar». Этими частично извлечёнными данными и станет виртуальный жёсткий диск, на базе которого мы создадим новую виртуалку. Что же, поехали.
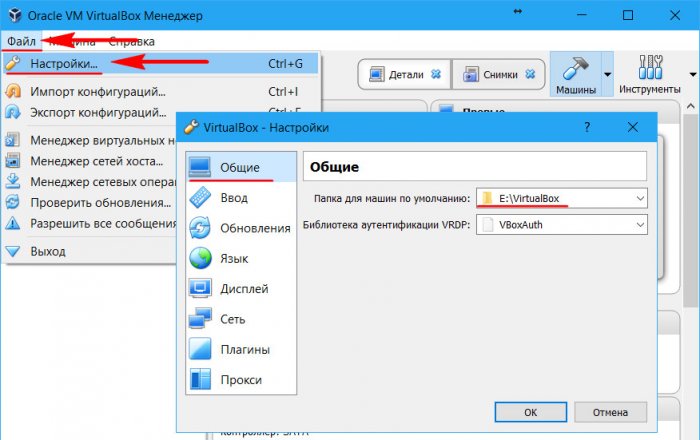
- Примечание: друзья, каталогом хранения содержимого виртуальных машин в программе VirtualBox по умолчанию является папка на системном диске. И чтобы не захламлять диск С, рекомендую вам отвести под работу с виртуалками специальную папку на несистемном каком-нибудь разделе. Или даже выделить под это целый раздел, например, самый быстрый по результатам тестирования скорости чтения и записи данных, если мы говорим об HDD. Путь хранения данных виртуалок можно прописать в общих настройках программы, чтобы каждый раз при создании новой машины не отвлекаться на смену пути по умолчанию.
Этап 1. Создание новой машины
В окне VirtualBox создаём новую машину.
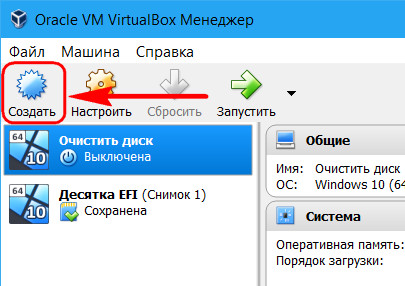
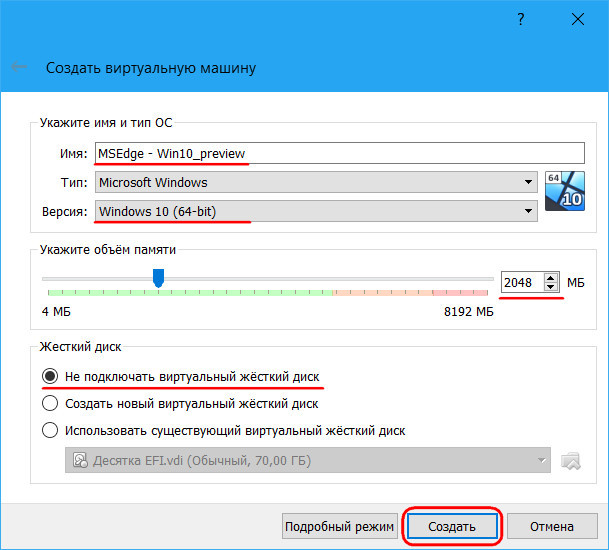
Называем её, указываем версию Windows, задаём показатель оперативной памяти. В графе «Жёсткий диск» выставляем пункт «Не подключать виртуальный жёсткий диск». Жмём «Создать».
И пока сворачиваем окно VirtualBox.
Этап 2. Работа с архиватором
Теперь, друзья, с помощью архиватора нам нужно извлечь из OVA виртуальный жёсткий диск.
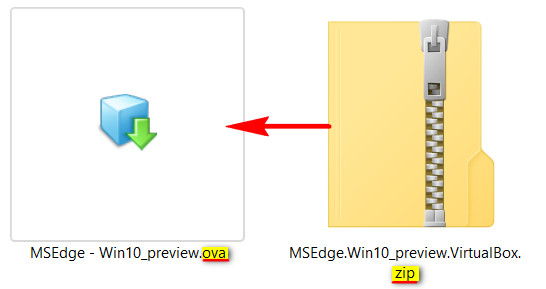
- Примечание: если вы скачали виртуалку с Интернета в архиве RAR, ZIP и т.п, не забудьте распаковать такой архив путём обычной разархивации, чтобы на выходе получился именно контейнер OVA.
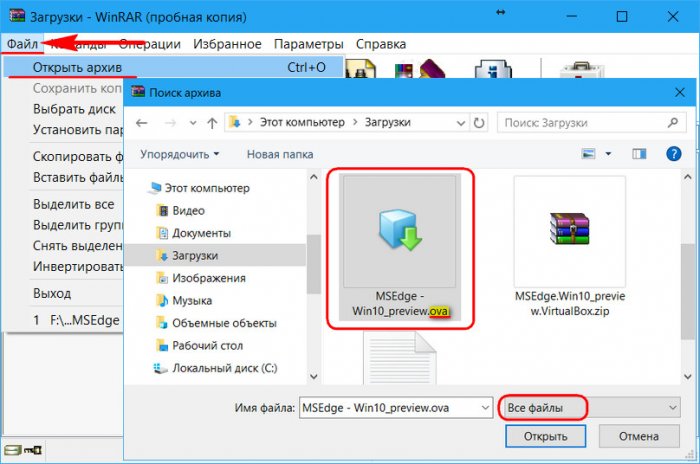
Запускаем архиватор. Я буду использовать классику жанра – программу WinRAR. Открываем наш OVA в окне архиватора с помощью меню «Файл — Открыть». Важно: архиваторы по умолчанию могут отображать не все поддерживаемые типы архивов. Чтобы OVA был виден в меню обзора для открытия, необходимо указать тип отображаемых данных «Все файлы».
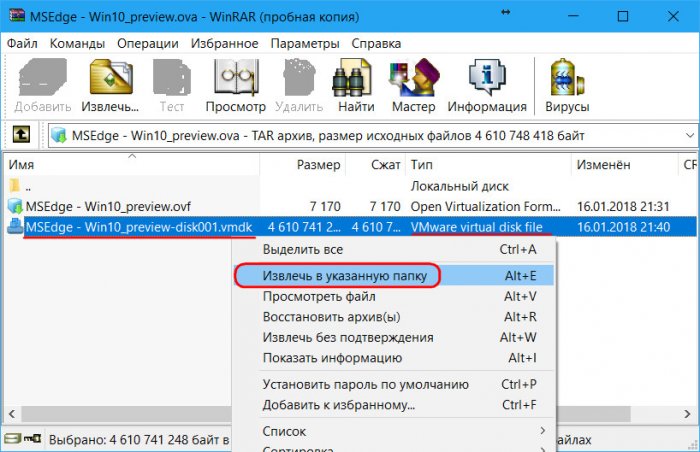
После успешного открытия в окне архиватора увидим содержимое OVA. В моём случае это файл конфигурации виртуальной машины OVF и совместимый с VirtualBox и VMware Workstation файл виртуального жёсткого диска VMDK. Последний нам-то и нужен. Кликаем его, вызываем контекстное меню и в случае с WinRAR выбираем пункт меню «Извлечь в указанную папку». В архиваторе 7-zip используем пункт контекстного меню «Копировать в…».
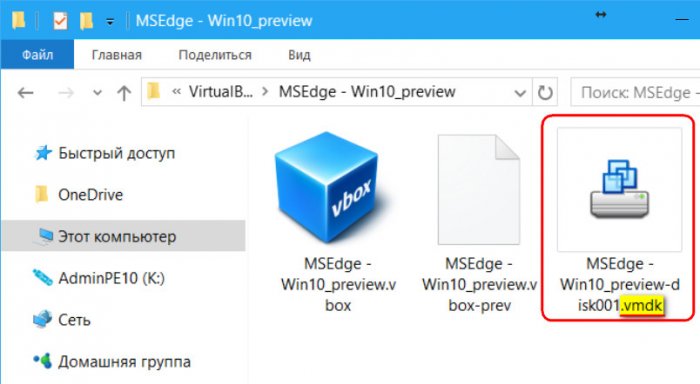
Файл виртуального диска для удобства можем распаковать в папку хранения созданной нами на предыдущем этапе новой виртуалки.
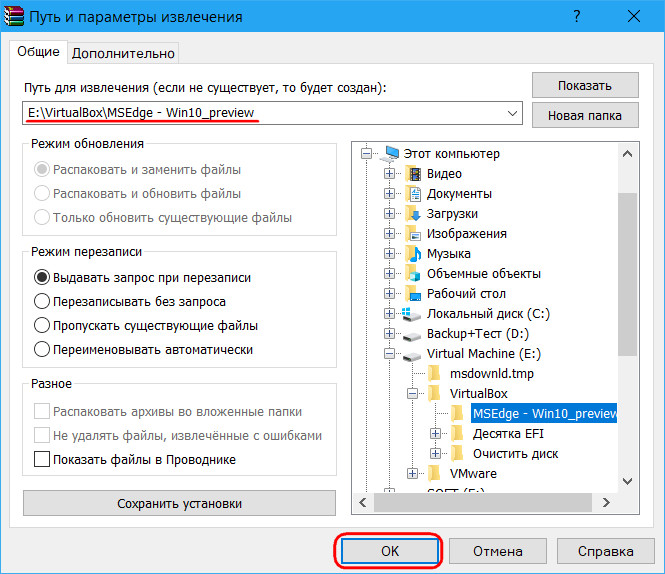
Таким образом все её составляющие будут аккуратненько сосуществовать в одном месте.
Теперь возвращаемся к программе VirtualBox.
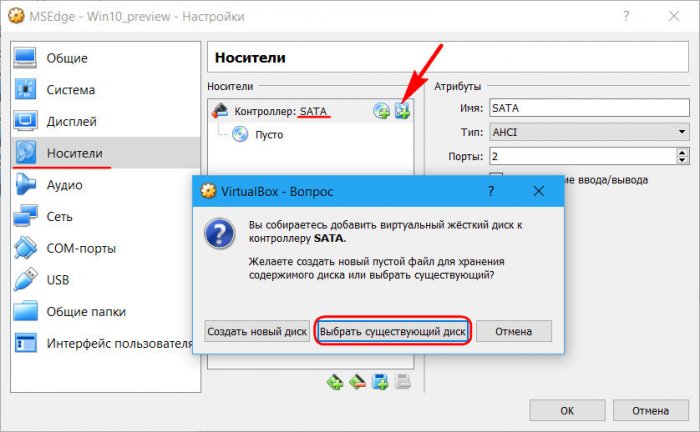
Этап 3. Подключение виртуального жёсткого диска
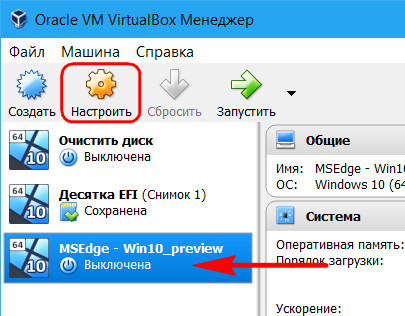
На первом этапе мы создали машину без жёсткого диска. Выделяем её и жмём кнопку настроек.
В окошке настроек идём в раздел «Носители», жмём кнопку контроллера SATA и добавляем новый жёсткий диск из числа существующих.
Указываем путь хранения файла, который мы извлекали с помощью архиватора на предыдущем этапе.
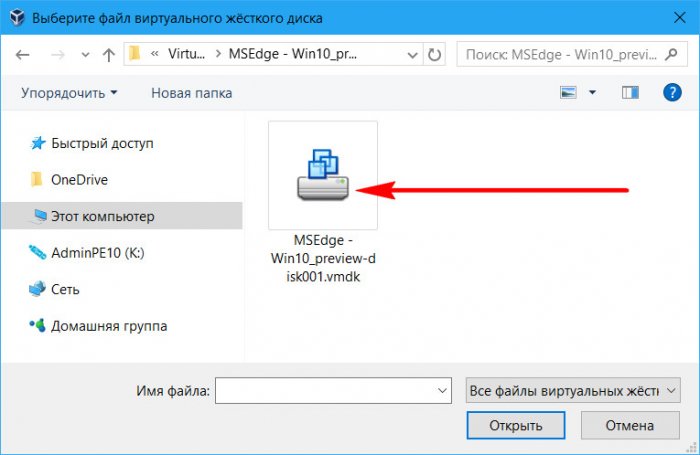
Жмём «Ок».
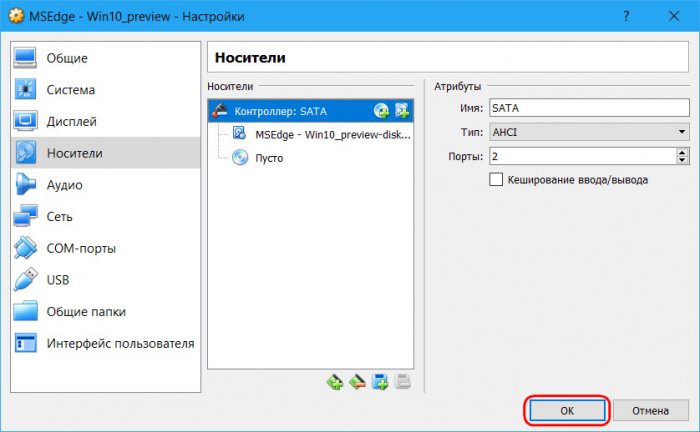
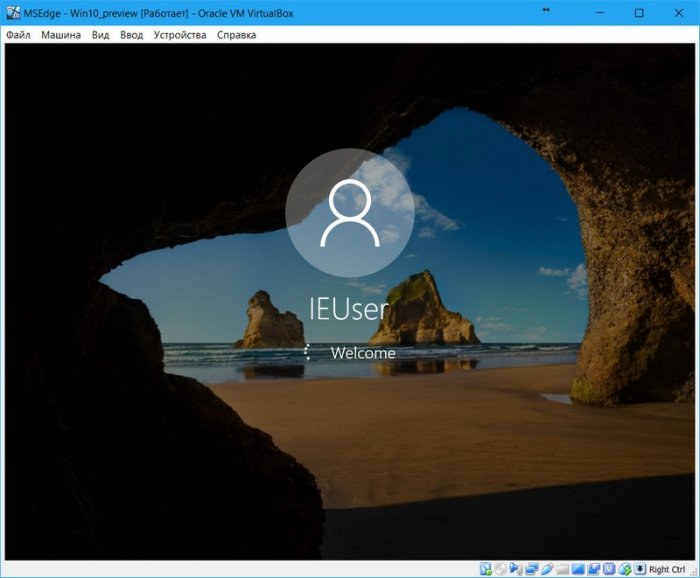
***
Всё – машина настроена. Можем запускать её.
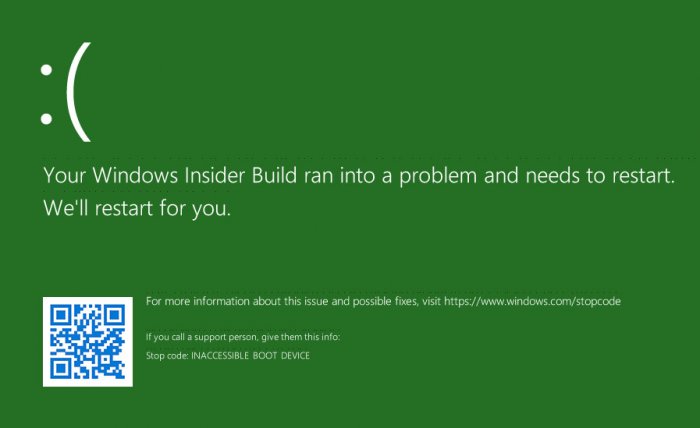
Если запуск виртуалки прошёл успешно, однако на этапе запуска Windows возникли проблемы в виде синего экрана смерти, возможно, друзья, мы имеем дело с проблемой контроллера виртуального жёсткого диска. Это мелкий недостаток способа создания новой машины на базе извлечённого из OVA файла диска. Когда мы импортируем машину вместе с её конфигурацией, в этой конфигурации предусматривается нужный тип контроллера. Когда же эту конфигурацию мы формируем по новой, мы можем указать не тот тип контроллера. А Windows даже в актуальной версии 10 пока ещё не умеет на ходу менять драйверы контроллера носителей. И вот реагирует экраном смерти.
Для скачанных с ресурсов Microsoft готовых виртуальных машин подойдёт установленный по умолчанию в VirtualBox тип контроллера SATA. Если мы скачаем виртуалку с Windows, в среде которой установлены драйверы под тип контроллера IDE, но подключим его через контроллер SATA, операционная система в большинстве случаев запустится. Но вот если мы на каком-нибудь сайте в Интернете скачаем машину, где Windows установлена на виртуальный диск, подключённый через контроллер SCSI, с большой долей вероятности получим BSOD. Или наоборот: BSOD будем лицезреть при подключении через SCSI виртуального диска с Windows, которая устанавливалась на виртуалке с типом контроллера SATA или IDE.
В таком случае просто нужно переподключить виртуальный диск через другой тип контроллера. Необходимо вернуться в раздел настроек машины «Носители», удалить диск из числа устройств текущего контроллера, затем добавить новый тип контроллера (SCSI, SATA или IDE).
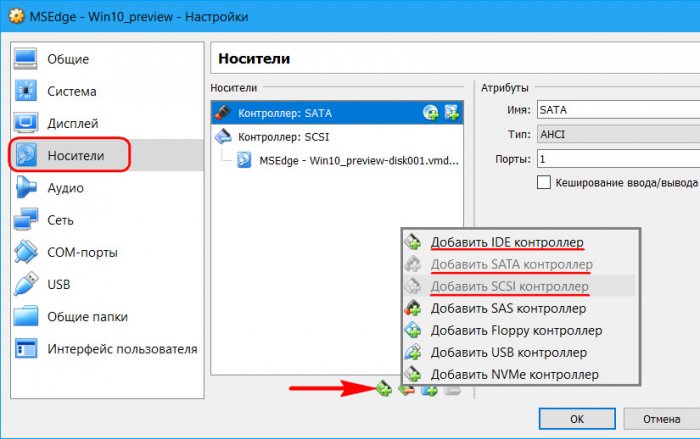
И подключить диск уже через новый контроллер.
ВМ, экспортированная в убунте не импортируется в манджаре
manjaro, ubuntu, virtualbox
0
1
в виртаулбоксе экспортировал ВМ из убунты 18.04. сейчас пытаюсь ее импортировать в виртуалбокс манджары 18.04. оно не хочет:
Не удалось импортировать конфигурацию
Код ошибки: NS_ERROR_INVALID_ARG (0x80070057)
втф?
- Ссылка

Ответ на:
комментарий
от symon2014 22.03.19 13:55:40 MSK

ну наверно деб в арче не установится, а аур к убунте не подрубить, а чо?
я думал виртуалбокс делает «универсальный контейнер» с ВМ.
chenbr0 ☆
(22.03.19 13:57:55 MSK)
- Показать ответ
- Ссылка
Ответ на:
комментарий
от symon2014 22.03.19 13:55:40 MSK
![]()
Ну и что?
Deleted
(22.03.19 14:06:23 MSK)
- Ссылка
![]()
Это весь вывод в стартпосте?
Deleted
(22.03.19 14:07:27 MSK)
- Ссылка
Ответ на:
комментарий
от chenbr0 22.03.19 13:57:55 MSK
А если просто перенести файл с диском .vdi , создать виртуалку и пдключить имеющийся диск?
- Ссылка
оу, а файл то битый. попробовал сейчас переименовать .ova в .tgz, после чего разархивировать, и вправду, оно побилось. видимо не хватает несколько метров. попробую перекачать или другую версию бекапа заюзать.
chenbr0 ☆
(22.03.19 14:29:20 MSK)
- Ссылка
все, круть, завелось.  symon2014, спасибо за совет подпихивания диска, так бы я не начал разархивировать ову и не понял бы что что-то побилось.
chenbr0 ☆
(22.03.19 14:46:21 MSK)
- Показать ответ
- Ссылка
Ответ на:
комментарий
от chenbr0 22.03.19 14:46:21 MSK
![]()
Очевидно же было, лол. Но я так понимаю, что битый образ просто вводил в заблуждение изначально
- Ссылка
Вы не можете добавлять комментарии в эту тему. Тема перемещена в архив.
All,
I am using Oracle VirtualBox 3.2.8. We have started moving away from VMWare and started using VirtualBox. I am having issues sometimes with the deletion and creation of snapshots using the VBoxManage command. I have a script the runs via cron each day:
+#!/bin/bash+
+# BackupVBox.sh — Backup Virtual Box Virtual Machines+
+# Written by Jesse Becker, OIT+
+#+
+# Use: ./BackupVBox.sh <day_of_week> (ie. ./BackupVBox.sh Mon)+
+#Set Variables+
VMBackupPath=»/media/backups/VirtualServers/VirSer02/»
VMBackupLogPath=»/media/backuplogs/Backup Logs/»
VMBackupFileName=»$(date %Y)_$(date +%m)_$(date +%d)_$HOSTNAME.log»+
+VBoxMachinePath=»/var/vbox/Machines»+
+VBoxHardDiskPath=»/var/vbox/HardDisks»+
+VMListFile=»/home/oitadmin/VMs»+
+#Remove Local Log File+
+rm -f logfile.txt+
+# Start Time Post in Log+
+echo «$(date) Backup Started» &> logfile.txt+
+echo «====================================================================» &>> logfile.txt+
+echo «Backup of virtual machines on $HOSTNAME has started…» &>> logfile.txt+
+echo » » &>> logfile.txt+
+echo «The following VMs are running on $Hostname:» | &>> logfile.txt+
+echo » » &>> logfile.txt+
+echo » » &>> logfile.txt+
+# List current Virtual Machines running on this host+
+VBoxManage list runningvms &>> logfile.txt+
+# Create snapshots+
+while read line+
+do+
+echo «Removing old snapshot Nightly from machine $line» &>> logfile.txt+
+echo «====================================================================» &>> logfile.txt+
+VBoxManage snapshot $line delete Nightly &>> logfile.txt+
+echo «Creating snapshot Nightly for machine: $line» &>> logfile.txt+
+echo «====================================================================» &>> logfile.txt+
+VBoxManage snapshot $line take Nightly &>> logfile.txt+
+done < $VMListFile+
+echo » » &>> logfile.txt+
+echo » » &>> logfile.txt+
+while read line+
+do+
+echo «Deleting $VMBackupPath$1$line.tar.gz» &>> logfile.txt+
+echo «====================================================================» &>> logfile.txt+
+rm -fR $VMBackupPath$1$line.tar.gz &>> logfile.txt+
+echo «Backing up $line to tar.gz file» &>> logfile.txt+
+echo «====================================================================» &>> logfile.txt+
+tar -cvzf $VMBackupPath$1$line.tar.gz $VBoxMachinePath/$line/* $VBoxHardDiskPath/$line* &>> logfile.txt+
+done < $VMListFile+
+echo «Deleting $VMBackupPath$1VBoxConfig.tar.gz» &>> logfile.txt+
+echo «====================================================================» &>> logfile.txt+
+rm -fR $VMBackupPath$1VBoxConfig.tar.gz &>> logfile.txt+
+echo «Backing up VirtualBox Configuration to tar.gz file» &>> logfile.txt+
+echo «====================================================================» &>> logfile.txt+
+tar -cvzf $VMBackupPath$1VBoxConfig.tar.gz ~/.VirtualBox &>> logfile.txt+
+echo » » &>> logfile.txt+
+echo «Done.» &>> logfile.txt+
+# Post End Time to Log file+
+echo «$(date) Backup Ended» &>> logfile.txt+
+# Copy Log File+
+cp logfile.txt «$VMBackupLogPath$VMBackupFileName»+
+# End+
The script above runs every day. It is suppose to delete the existing Nightly snapshot (merging the differencing disks back together) and then create a new snapshot call Nightly. It then tar’s the Hard Drive and Machine files to remote store (backup). The purpose for the snapshot is to correct any corruption that may occur as the hard disk may change while the taring happens.
Sometimes I get an error ERROR: code NS_ERROR_INVALID_ARG (0x80070057) with either the deleting or creation of the snapshot. This then puts me in a bind as I have a corrupt difference disk that I cannot delete nor can I replace. This then requires editing of XML files to remove the snapshot and in most cases losing changes that happened between snapshots.
Can anyone help me out with this one? Is there a better back strategy?
Thanks,
Jes
Sometimes, Windows operating system may throw the VirtualBox – Error. This error comes along with the detailed error information “failed to import appliance result code: e_invalidarg (0x80070057)” or something like this. This error annoys many users. Here, MiniTool will talk about this error including its causes and fixes.
About Result Code: E_Invalidarg (0x80070057)
You may frequently encounter errors if you run VirtualBox on your Windows device. One of the most common errors is the result code: e_invalidarg (0x80070057). When you look through Windows-based forums or communities on the Internet, you will find that plenty of users ask favors for this issue.
For instance, a user from Reddit forum posts this error and wants to get some help from others. Here is the detailed information of his post.
Hello All, I get the following error: Failed to import appliance C:/Users/MyLaptop/Desktop/PenT/Lab Virtual Machines/kali-linux-2018.3-vbox-amd64.ova. Result Code: E_INVALIDARG (0x80070057)https://www.reddit.com/r/virtualbox/comments/bpzdck/failed_to_import_appliancee_invalidarg_0x80070057/
Why e_invalidarg (0x80070057) occurs to your computer? The next section will analyze the possible causes behind this issue. So, you can pay attention to the following content
Why Result Code: E_Invalidarg (0x80070057) Appears
It is vital to know the possible reasons for the error — e_invalidarg 0x80070057. If you just look at the error message, you will not find any clues. The potential causes are found according to the time that the error happens and other signs of the error.
Given to the fact that the e_invalidarg (0x80070057) error appears when Windows cannot access the storage drive or a standard hard disk or an SSD, we conclude that the leading reason for the error is inefficient free storage space on the hard drive.
The improper file system on your drive can also be the cause for the result code: e_invalidarg (0x80070057). To be specific, the FAT32 doesn’t support a file that is more than 4GB. In this case, you need to convert the file system of your drive from FAT32 to NTFS.
If there are two or three partitions on the hard drive, the error could happen due to one of corrupted partitions on the drive. The drive or partition can get corrupted over time. Besides, the bit rot will also occur after a long time. For this, you can utilize some tools to check the health and performance of your drive.
What’s more, virus and inherent problems on the installed software can also trigger the result code: e_invalidarg (0x80070057). Except the above causes, other elements can also result in the e_invalidarg (0x80070057) error.
All the above causes are possible for the error, but there’s no exact method to know the actual reason for the issue. So, you can try the following methods one by one until you fix the issue successfully.
Top 7 Solutions to Result Code: E_Invalidarg (0x80070057)
- Obtain enough disk storage space
- Modify the file system of your drive
- Check and change time and date on your PC
- Scan for virus
- Find and fix corrupted drive
- Perform system restore
- Perform Windows clean install
Fix 1: Get Enough Disk Storage Space
If you don’t have enough storage space on your drive, you can get this error when carrying out operations on your PC that runs VirtualBox. In fact, issues like 0x80300024 error and runtime error also happen due to insufficient free disk space.
To get more disk space for your drive, you can utilize MiniTool Partition Wizard. The resize/move partition and extend partition features enable you to obtain more space for your drive. Of course, you can also find what is taking up your space with Space Analyzer that this program offers and then delete the corresponding items.
Download and install MiniTool Partition Wizard by clicking the button below, and then begin resizing and extending your storage space. Here, you just need the MiniTool Partition Wizard Free Edition. If you would like to recover missing data or lost partition, you need to pick its Pro Ultimate Edition instead.
Free Download Buy Now
Steps for resizing and moving partition
Before starting to resize/move your partition, you need to check the location of partition on the hard drive. To resize a partition, you have to ensure that there’s unallocated or free space next to the partition that you are going to resize. If there isn’t, you utilize the extend partition feature instead.
Step 1: Right click the partition to extend and choose the Move/Resize feature from the pop-up menu.
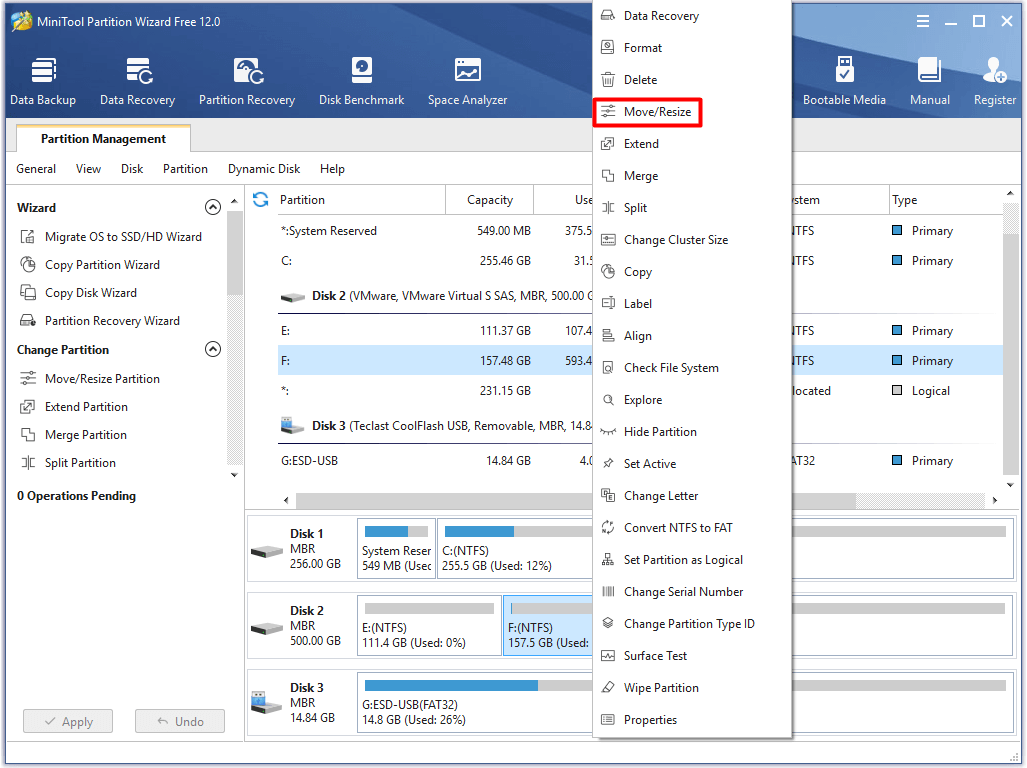
Step 2: In the next window, move the button to resize your partition. Alternatively, you can also enter the exact number behind the Partition Size to resize partition. After that, click OK to save the change.
Tip: You should move the button rightward. If you move leftward, you will shrink the size of your partition.
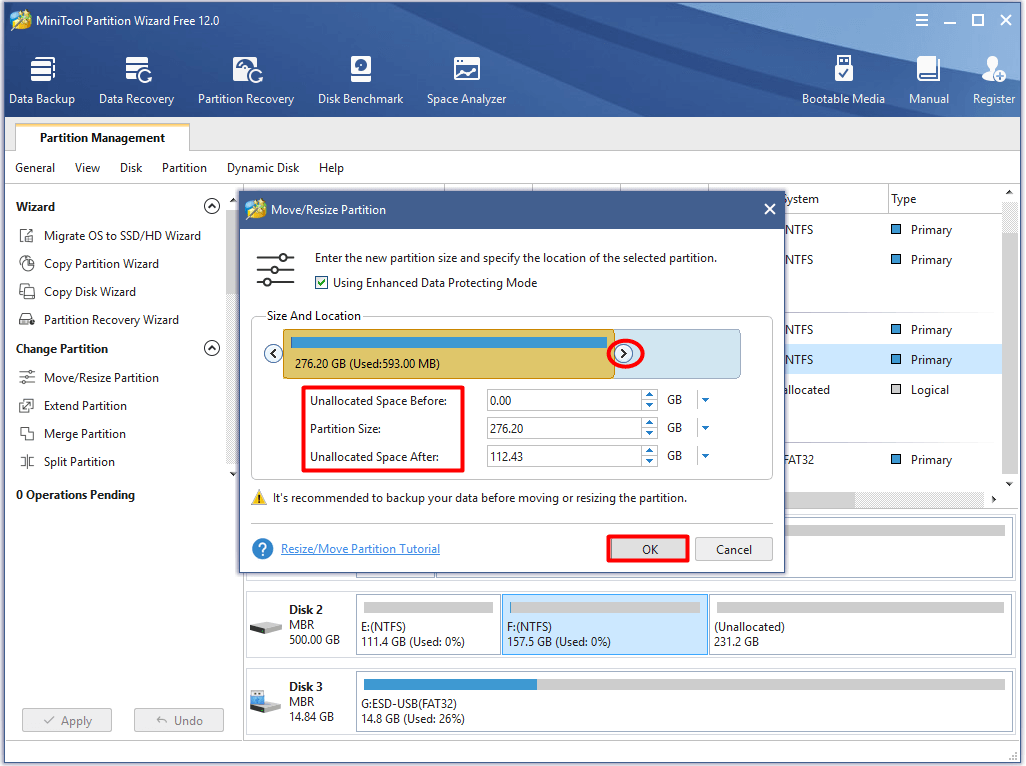
Step 3: After backing to the main interface, you will view the size and layout of target partition. However, it won’t take effect until you click on Apply to carry out the operation.

Steps for extending partition
Both moving/resizing and extending partition can enlarge your partition. However, extending partition is suggested under the following 2 cases.
- You would like to extend a partition to non-contiguous unallocated or free space.
- There is no unallocated or free space on the hard disk.
Step 1: Right click the target partition, and then select the Extend feature from the elevated menu.
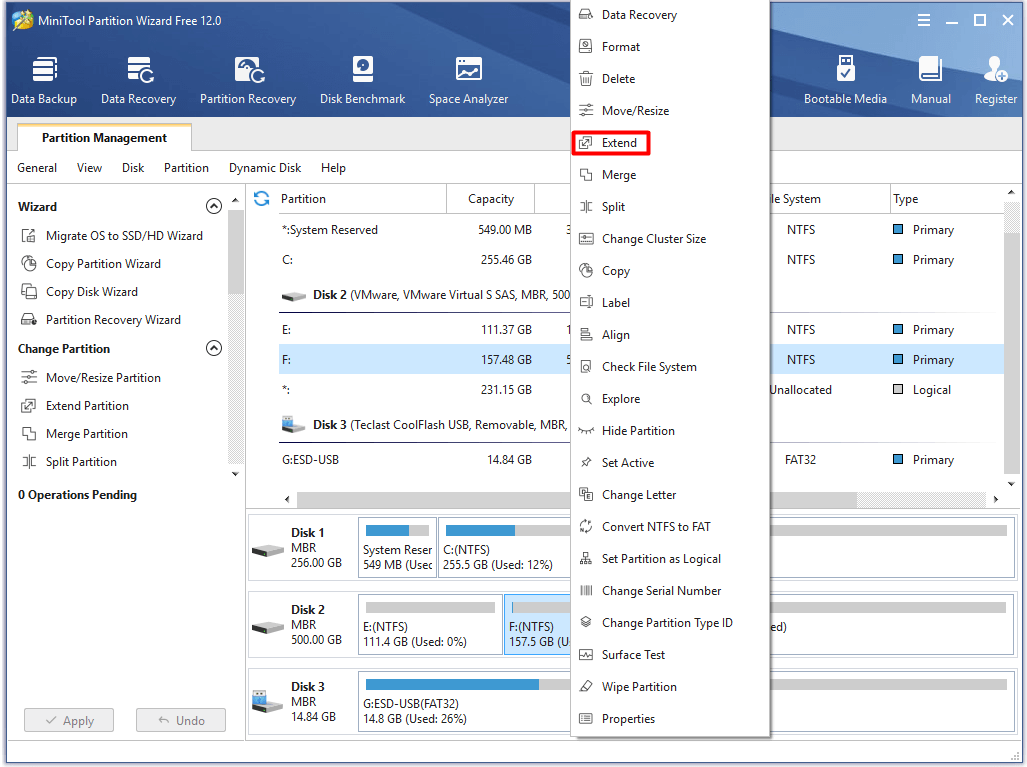
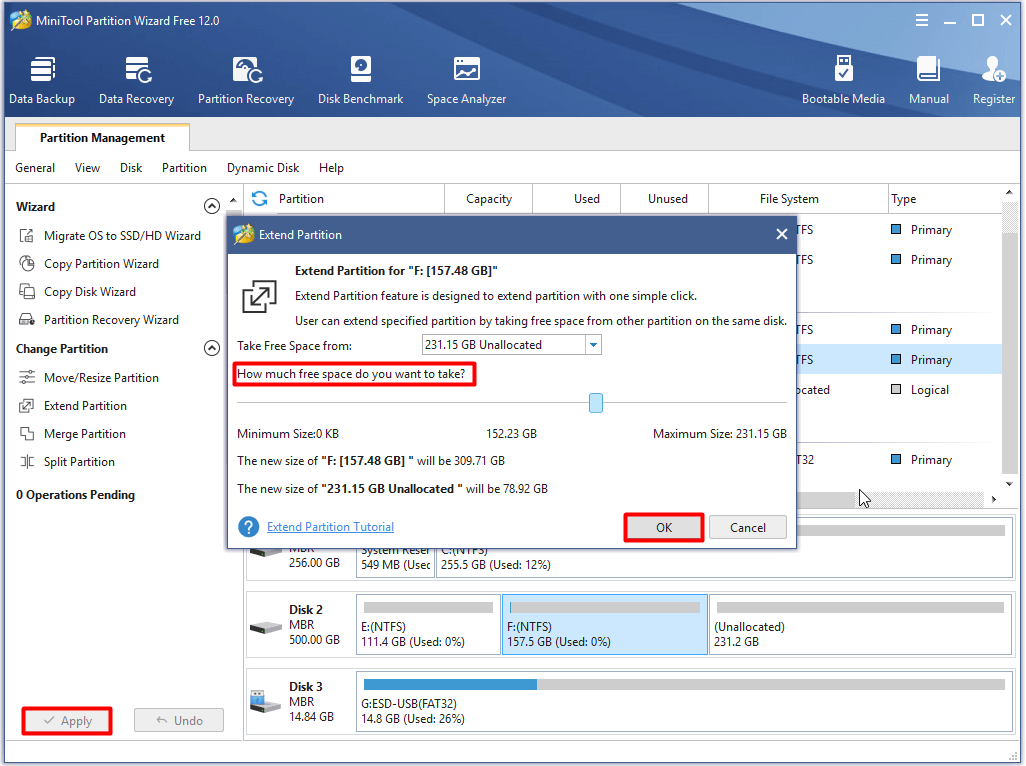
Step 2: Open the drop-down menu behind Take Free Space from to pick a partition or unallocated space that you can take space from. Then, you can move the sliding handle leftwards or rightwards to determine the space volume that you would like to take from the target partition or unallocated space.
Step 3: After that, click OK and then click on Apply on the main interface to execute the operation.
Fix 2: Change the File System of Your Drive
The incorrect file system of the drive can also lead to the virtualbox e_invalidarg error. Hence, one of solutions to the error is to change the file system of your drive. You can do that during the process of formatting your partition, but you may suffer from data loss due to this operation.
What does formatting a hard drive do? You can get the detailed information from this post.
If you use MiniTool Partition Wizard, things are different. It enables you convert FAT32 to NTFS without losing data. How to do? You can follow the steps below after downloading and installing this tool.
Free Download
Step 1: Right click the partition that you want to change the file system and choose Convert FAT to NTFS option.
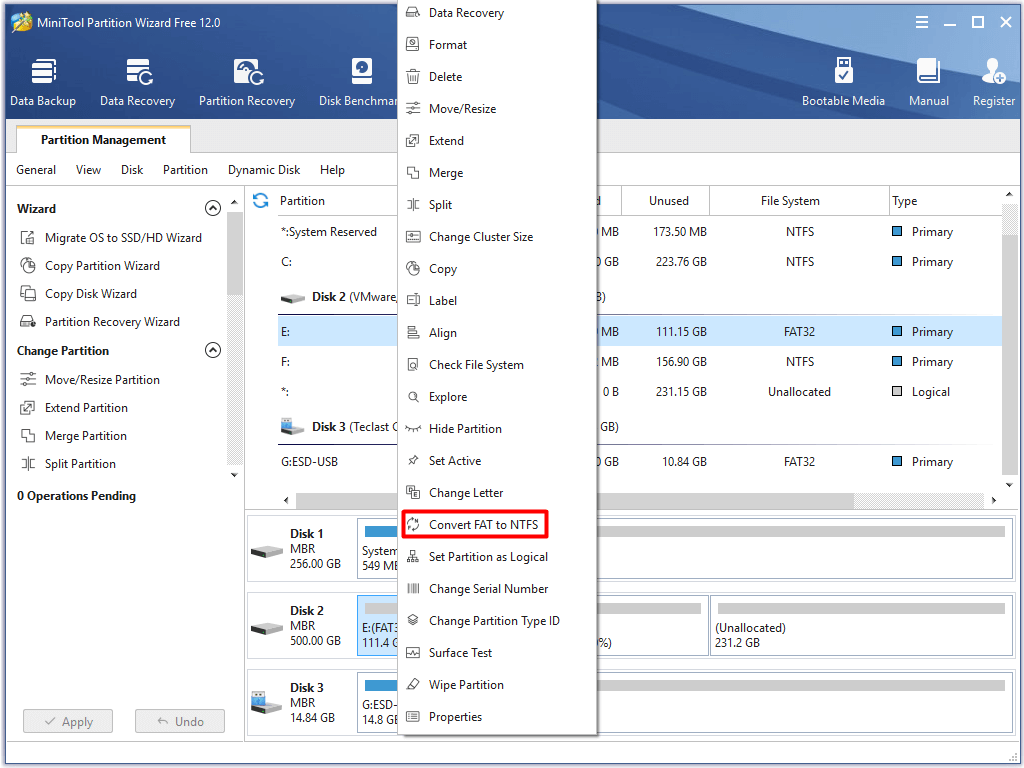
Step 2: In the next window, click on the Start button. Then, MiniTool Partition will start converting file system automatically.

If you encounter file system error — 2147219196, you can fix it by referring to this guide: 7 Fixes to File System Error – 2147219196 [Fix 3 Works Well]
Fix 3: Check and Modify Time and Date
The wrong date/time combination sometimes will sparkle the e_invalidarg (0x80070057) error. Though this possibility is small, you’d better try to check the time and data on your computer.
For instance, the battery on your motherboard that is used to keep the BIOS working is low on power or cannot work properly, which can make your computer date/time reset to its default value each time you turn off your PC.
There’s no doubt that the default time is a value not matched with the current date/time. And this will lead to issues like result code: e_invalidarg (0x80070057) for you. How to check and change time and date? This post will show you the details.
If there are any viruses or malware on your PC, e_invalidarg (0x80070057) may also happen to you. Here comes the need of running an anti-virus program on your computer. If you have installed one, just run it to scan for virus and other malicious software on your device. If you don’t have, you can choose one piece of antivirus software to do that job.
If you want to make sure that your system is clean, you can use these methods to clean up your computer.
Fix 5: Find and Fix Corrupted Drive
When the drive gets corrupted or damaged, you will also encounter various of issues such as 0x80070017, xlive.dll missing error, SFC Scannow failed to fix error, result code: e_invalidarg (0x80070057), and so forth.
Therefore, it is necessary to check the heath of you hard drive. How to do? Well, MiniTool Partition Wizard helps again. It can scan for bad sectors on your hard drive.
Free Download
If you find any, you are able to fix it. Here’s a full guide for you to check your hard drive and fix the error.
If your hard drive cannot work completely, you can consider replacing it with a new one.
Fix 6: Perform System Restore
The Windows built-in system restore feature is very helpful when you encounter certain types of crashes and some computer problems, because it can help you restore your computer to a previous state. In this way, your PC will run properly again. This is a quick fix.
Top recommendation: Why Does My Computer Keeps Crashing? Here Are Answers and Fixes
However, you will lose the changes that you have made on your computer such as, the newly installed applications, newly created folders, etc. So, you need to back up your important data before performing the system restore. After that, you can follow the steps in this post to restore computer to earlier data in Windows 10/8/7.
Fix 7: Clean Install Windows OS
If you cannot fix the result code: e_invalidarg (0x80070057) error after trying methods above, try performing a clean install of Windows. Similarly, you’d better back up your important data on the hard drive before that.
Then, you can use these detailed steps and instructions to reinstall Windows operating system.
I fixed the result code: e_invalidarg (0x80070057) error with methods offered by this post. Are you still bothered by this issue? You can try the methods in the post to fix it. Click to Tweet
Conclusion
When you receive the error message “failed to import appliance result code: e_invalidarg (0x80070057)” on your computer, you can use the top 7 methods in this post to fix it. It is rather easy to operate as the detailed steps have been offered to you directly or related links.
If you have any questions about MiniTool software, please send us an email via [email protected]. You can also share your thoughts on the topic — virtualbox e_invalidarg, e_invalidarg 0x80070057 in the below comment area.
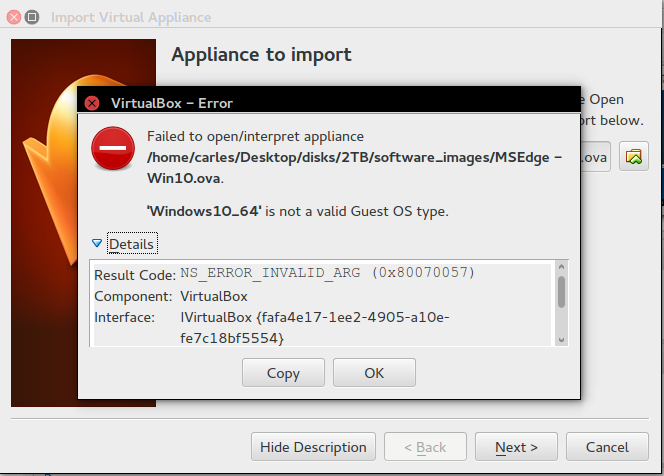
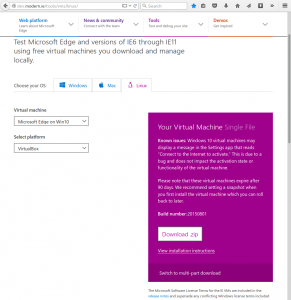 Microsoft has released Windows 10, and with it the possibility to Download a Windows 10 Appliance to run under Virtual Box, VMWare player, HyperV (for windows), Parallels (Mac). Their idea is to allow you to test Microsoft Edge new browser in addition of being able to test the older browsers in older VM images.
I wanted to use Windows 10 to check compatibility with my messenger c-client.
Also I wanted to know how Java behaves.
The Windows 10 VM image will work for 90 days. You can download it from here (http://dev.modern.ie/tools/vms/linux/).
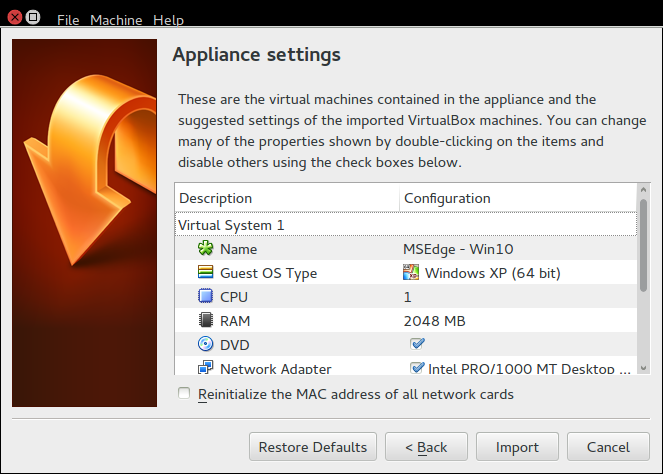
Instructions are very precarious and they didn’t specify a minimum version, however if you use Virtual Box under Ubuntu 14.04, so Virtual Box 4.3.10, you’ll not be able to import the Appliance as you’ll get an error.
Update: Thanks to Razvan and Eric!, readers that reported that this also works for Mac OS 10.9.5. + Virtual Box 4.3.12 and VirtualBox 4.3.20 running under Windows 7 respectively.
‘Windows10_64’ is not a valid Guest OS type.
| Result Code: | NS_ERROR_INVALID_ARG (0x80070057) |
| Component: | VirtualBox |
| Interface: | IVirtualBox {fafa4e17-1ee2-4905-a10e-fe7c18bf5554} |
| Callee: | IAppliance {3059cf9e-25c7-4f0b-9fa5-3c42e441670b} |
I was looking to find a solution and found no solution on the Internet, so I decided to give a chance and try to fix it by myself.
The error is: ‘Windows10_64’ is not a valid Guest OS type. so obviously, the Windows10_64 is not on the list of the VirtualBox yet, it is a pretty new release. Microsoft could had shipped it with OS Type Windows 64 Other, or Windows 8 64 bits, but they did’t. I wondered if I could edit the image to trick it to appear as a recognized image.
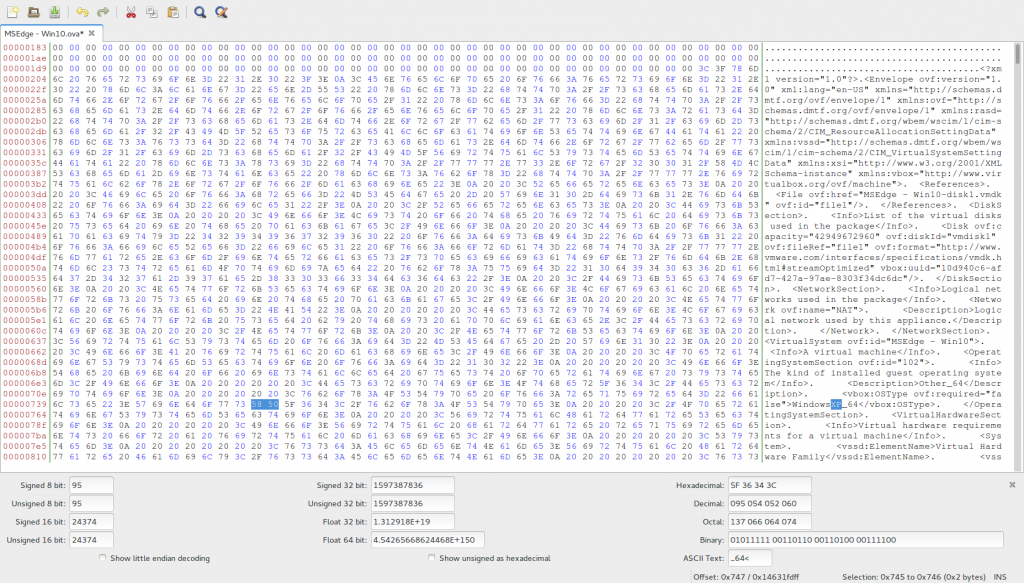
I edited the file (MSEdge – Win10.ova) with Bless Hex Editor, an hexadecimal editor.
I looked for the String “Windows10_64” and found two occurrences.
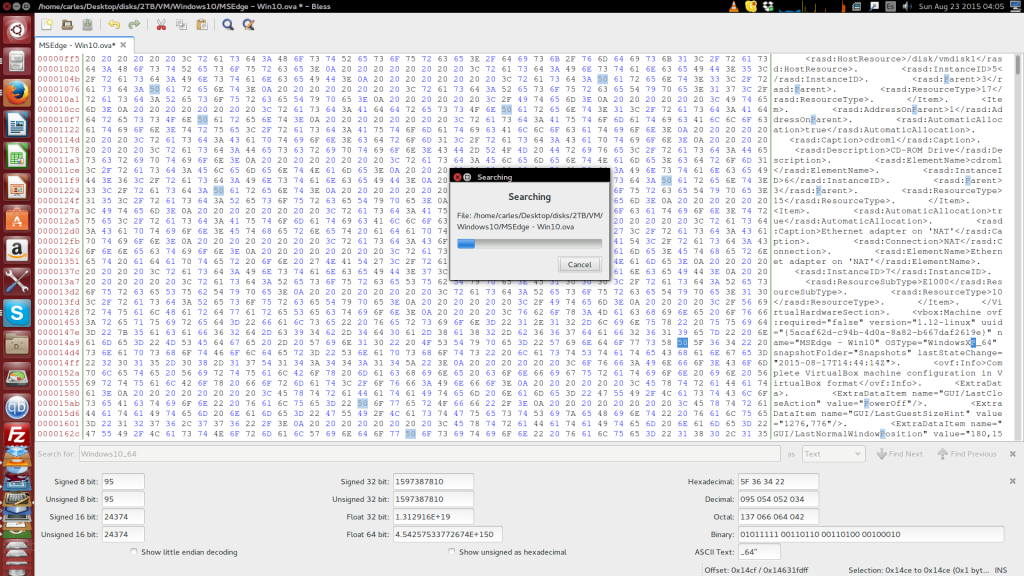 I had to replace the string and leave it with exact number of bytes it has, so the same length (do not insert additional bytes). I searched for the list of supported OSes and found that “WindowsXP_64” would be a perfect match. I replaced that 10 for XP twice.
 Then tried to import the Appliance and it worked.
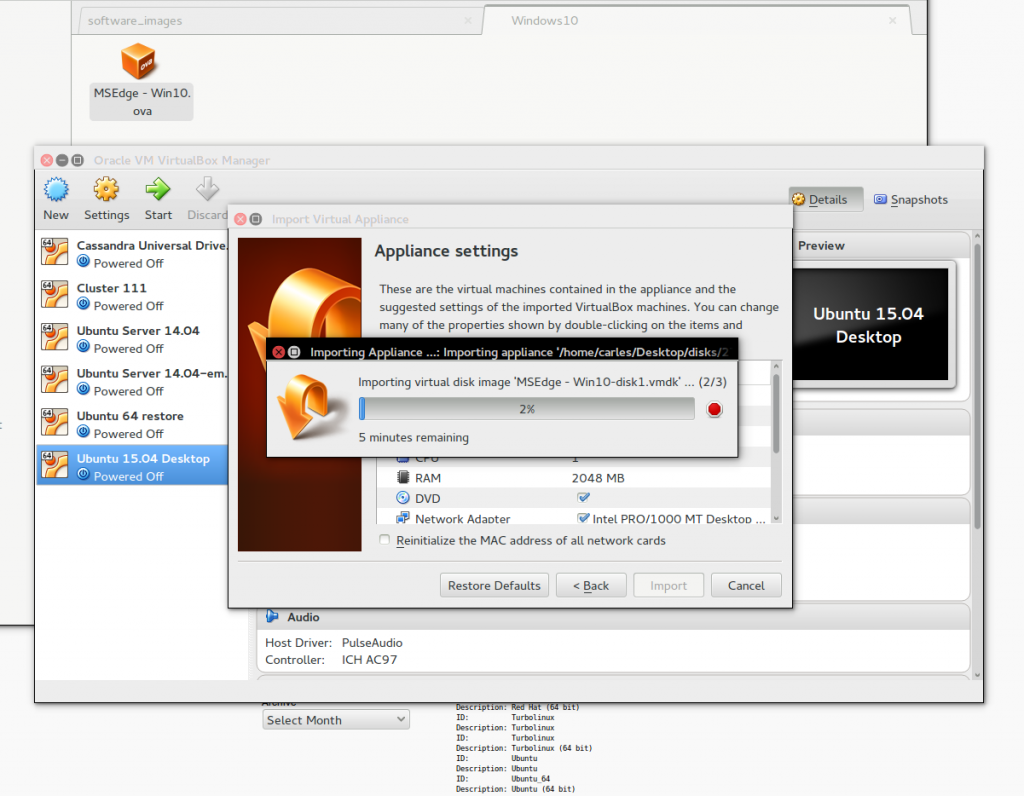
 I tried to run it like that, but it froze on the boot, with the new blue logo of windows.
I figured out that Windows XP would probably not be the best similar architecture, so I edited the config and I set Windows 8.1 (64 bit). I also increased the RAM to 4096 MB and set a 32 MB memory for the video card.
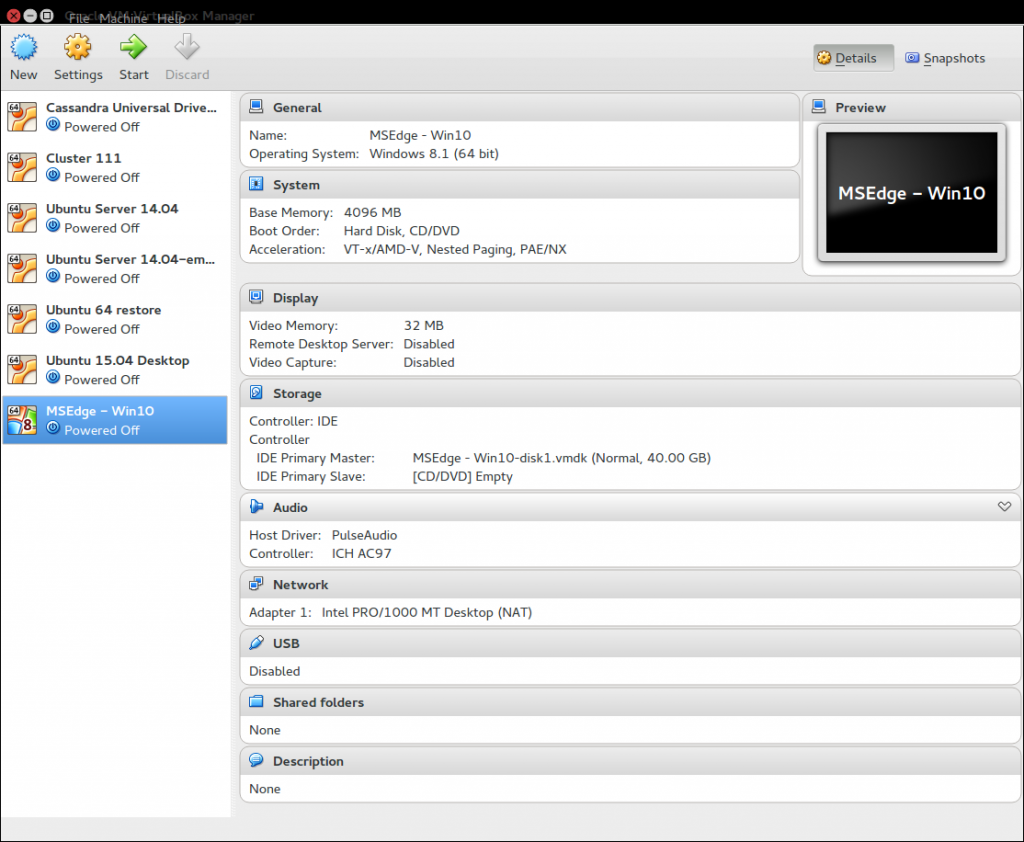
Then I just started the VM and everything worked.
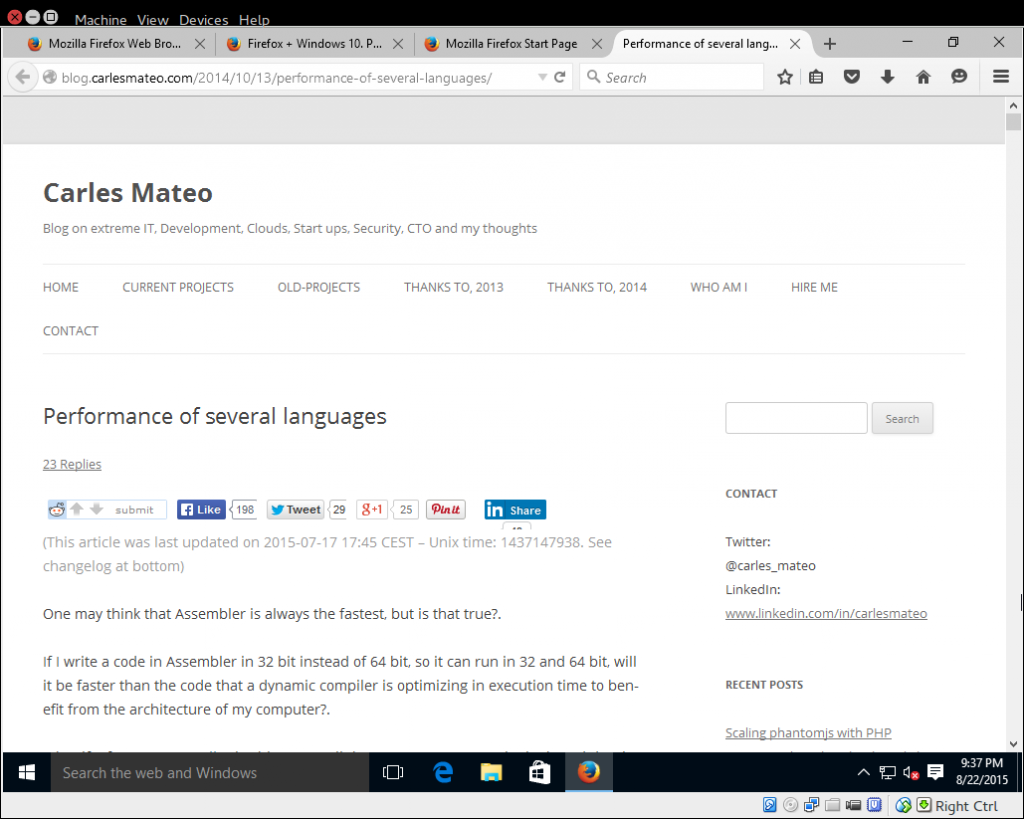
Ok, a funny note: Just started, it installed me an update without asking 
How to fix VirtualBox error when you try to import an ova file
If you download an ova file to import it to Virtualbox, maybe you will see the following message:
Failed to import appliance filename.ova.
Seeking within the archive failed (VERR_TAR_UNEXPECTED_EOS).
Result Code: VBOX_E_IPRT_ERROR (0x80BB0005)
Component: ApplianceWrap
Interface: IAppliance {8398f026-4add-4474-5bc3-2f9f2140b23e}
If you do it the same throught VBoxManage you will get:
# VBoxManage import filename.ova
Progress state: VBOX_E_IPRT_ERROR
VBoxManage: error: Appliance import failed
VBoxManage: error: Seeking within the archive failed (VERR_TAR_UNEXPECTED_EOS)
VBoxManage: error: Details: code VBOX_E_IPRT_ERROR (0x80bb0005), component ApplianceWrap, interface IAppliance
VBoxManage: error: Context: «RTEXITCODE handleImportAppliance(HandlerArg*)» at line 877 of file VBoxManageAppliance.cpp
To fix it, you must extract ova content and compress again as follows:
tar xvf filename.ova
tar cvf newfilename.ova filename.ovf filename.vmdk
Also, you can import the virtual machine with double click on .ovf file
Enjoy it!
Popular posts from this blog
from: can’t read /var/mail/ in Python scripts
If you add a Python file to your PATH, maybe you will see this error: from: can’t read /var/mail/$First_Library_Name This happend, because you need to be explicit with application you want to run your script. To fix it, just add in the first line of your script the following line: #! /usr/bin/python Enjoy it!
How to fix Android when developer options are not available for this user

I have an Android One with Oreo version and suddenly my Android rebooted and after that it started to behave strangely: 1) Notification section doesn’t work. I can’t see notifications from my apps and the arrow and the screw icon to settings access don’t work. 2) As I can’t access to the notification area, I can’t enable Use USB to Transfer Files to access to my phone memory. 3) I can’t access to developer mode (I before active it with a lot of taps over Build number). Clicking on developer options just shows developer options are not available to this user. 4) I can’t update or install the apps on google play. They freeze on Download pending… message 5) Home and Switch buttons don’t work. They light up and vibrate when I tap them but they do nothing. This issue is apparently related to a deconfiguration of user accounts. To fix it, you need re-setup the users. As you can’t access to the user manager (you are in guest mode
Exception: Could not find a default OpenFlow controller in Mininet
If you try to run a mininet script like this , maybe you will get this problem if you are under Ubuntu. Exception: Could not find a default OpenFlow controller This is trigger because your system don’t find a default controller . To enable it just add the first line and add the controller argument to net variable like the second line: from mininet.node import OVSController net = Mininet(topo=topo,host=CPULimitedHost, link=TCLink,controller = OVSController) Now, you will get the following error: c0 Cannot find required executable ovs-controller. Please make sure that it is installed and available in your $PATH: (/usr/local/sbin:/usr/local/bin:/usr/sbin:/usr/bin:/sbin:/bin:/snap/bin) ovs-controller is a legacy name. You need to be sure that you has it. sudo apt-get install openvswitch-testcontroller sudo cp /usr/bin/ovs-testcontroller /usr/bin/ovs-controller If you run it again, you should kill ovs-testcontroller first to avoid this: Exception: Please shut d