Nuxt introduces a new fetch with the latest release of version 2.12. Fetch provides a brand new way to bring data into Nuxt applications.
In this post, we will explore different features of the fetch hook and try to understand how it works.
Fetch Hook and Nuxt Lifecycle
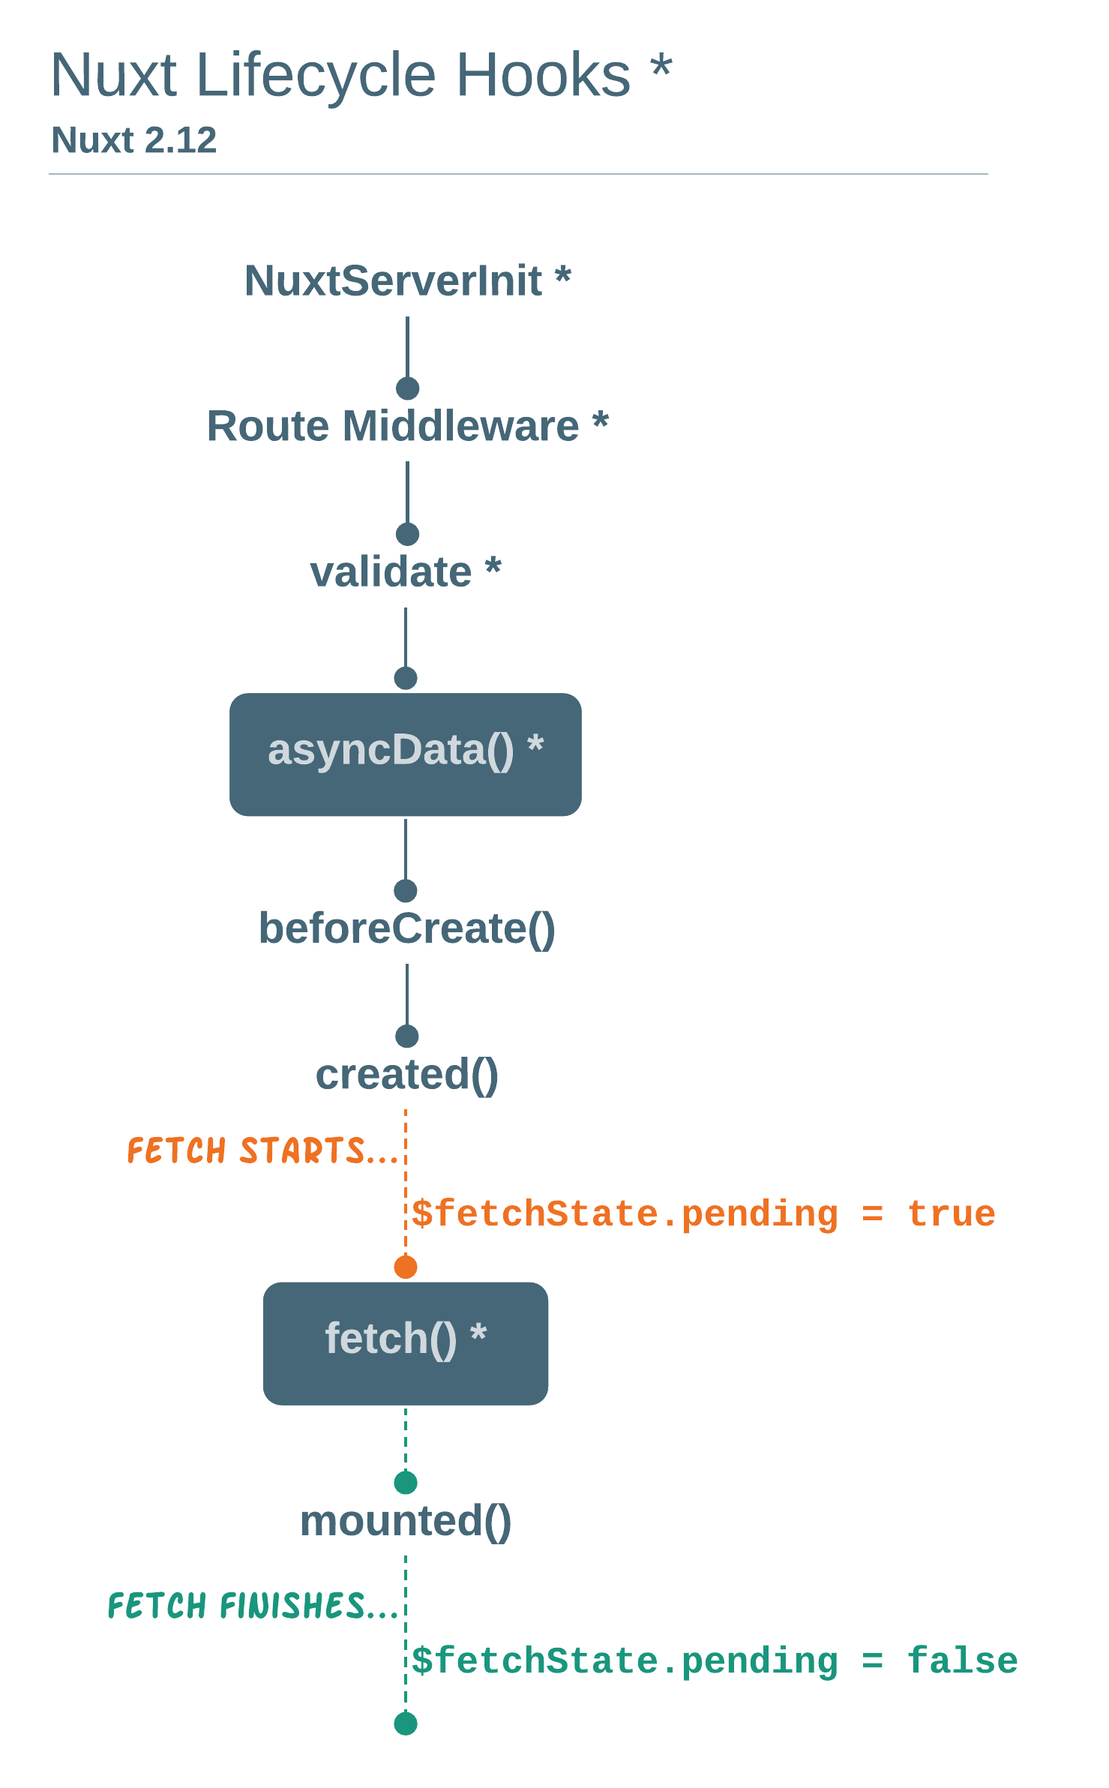
In terms of Nuxt lifecycle hooks, fetch sits within Vue lifecycle after created hook. As we already know that, all Vue lifecycle hooks are called with their this context. The same applies to fetch hook as well.
Fetch hook is called after the component instance is created on the server-side. That makes this context available inside the fetch.
export default {
  fetch() {
    console.log(this)
  }
}
Let’s see what this could mean for page components.
Page Components
With the help of this context, fetch is able to mutate component’s data directly. It means we can set the component’s local data without having to dispatch Vuex store action or committing mutation from the page component.
As a result, Vuex becomes optional, but not impossible. We can still use this.$store as usual to access Vuex store if required.
Availability of fetch hook
With fetch, we can pre-fetch the data asynchronously in any Vue components. It means, other than page components found in /pages directory, every other .vue components found in /layouts and /components directories can also benefit from the fetch hook.
Let’s see what this could mean for layout and building-block components.
Layout Components
Using new fetch, now we can make API calls directly from the layout components. This was impossible prior to the release of v2.12.
Possible use cases
- Fetch config data from the back-end in Nuxt layouts to generate footer and navbar dynamically
- Fetch user related data (i.e. user profile, shopping-cart item count) in the navbar
- Fetch site relevant data on
layouts/error.vue
Building-block (Child/Nested) Components
With fetch hook available in child components as well, we can off-load some of the data-fetching tasks from page-level components, and delegate them over to nested components. This was also impossible prior to the release of v2.12.
This reduces the responsibility of route-level components to a great extent.
Possible use case — We can still pass props to child components, but if the child components need to have their own data-fetching logic, now they can!
Call order of multiple fetch hooks
Since each component can have its own data-fetching logic, you may ask what would be the order in which each of them are called?
Fetch hook is called on server-side once (on the first request to the Nuxt app) and then on client-side when navigating to further routes. But since we can define one fetch hook for each component, fetch hooks are called in sequence of their hierarchy.
Disabling fetch on server-side
In addition, we can even disable fetch on the server-side if required.
export default {
  fetchOnServer: false
}
And this way, the fetch hook will only be called on client-side. When fetchOnServer is set to false, $fetchState.pending becomes true when the component is rendered on server-side.
Error Handling
New fetch handles error at component level. Let’s see how.
Because we’re fetching data asynchronously, the new fetch() provides a $fetchState object to check whether the request has finished and progressed successfully.
Below is what the $fetchState object looks like.
$fetchState = {
  pending: true | false,
  error: null | {},
  timestamp: Integer
};
We have three keys,
- Pending — lets you display a placeholder when fetch is being called on client-side
- Error — lets you show an error message
- Timestamp — shows timestamp of the last fetch which is useful for caching with
keep-alive
These keys are then used directly in the template area of the component to show relevant placeholders during the process of fetching data from the API.
<template>
  <div>
    <p v-if="$fetchState.pending">Fetching posts...</p>
    <p v-else-if="$fetchState.error">Error while fetching posts</p>
    <ul v-else>
      …
    </ul>
  </div>
</template>
When error occurs at component-level, we can set HTTP status code on server-side by checking process.server in fetch hook and follow it up with throw new Error() statement.
async fetch() {
  const post = await fetch(`https://jsonplaceholder.typicode.com/posts/${this.$route.params.id}`)
                     .then((res) => res.json())

  if (post.id === this.$route.params.id) {
      this.post = post
    } else {
      // set status code on server and
      if (process.server) {
        this.$nuxt.context.res.statusCode = 404
      }
      // use throw new Error()
      throw new Error('Post not found')
    }
}
Setting the HTTP status code this way is useful for correct SEO.
Fetch as a method
New fetch hook also acts as a method that can be invoked upon user interaction or invoked programmatically from the component methods.
<!-- from template in template  -->
<button @click="$fetch">Refresh Data</button>
// from component methods in script section
export default {
  methods: {
    refresh() {
      this.$fetch()
    }
  }
}
Making Nuxt pages more performant
We can use :keep-alive-props prop and activated hook to make Nuxt page components more performant using a new fetch hook.
Nuxt allows caching a certain number of pages in the memory along with their fetched data. And also allows adding a number of seconds before we can re-fetch the data.
For any of the above methods to work, we have to use the keep-alive prop in generic <nuxt /> and <nuxt-child> components.
layouts/default.vue
<template>
  <div>
    <nuxt keep-alive />
  </div>
</template>
In addition, we can pass :keep-alive-props to <nuxt /> component to cache a number of pages along with their fetched data.
:keep-alive-props prop allow us to indicate the maximum number of pages that should be kept in the memory while we navigate elsewhere within the site.
layouts/default.vue
<nuxt keep-alive :keep-alive-props="{ max: 10 }" />
Above is one way to boost page performance which is more high-level and generic, while the next one drills down to optimize the fetch request calls by using the timestamp property of $fetchState and comparing it against the number of seconds delay before it re-fetches the data.
Vue’s activated hook is used here with Nuxt’s keep-alive prop to re-fetch the data.
export default {
  activated() {
    // Call fetch again if last fetch more than a minute ago
    if (this.$fetchState.timestamp <= Date.now() - 60000) {
      this.$fetch()
    }
  }
}
asyncData vs Fetch
As far as page components are concerned, new fetch seems way too similar to asyncData() because they both deal with the local data. But there are some key differences worth taking note of as below.
As of Nuxt 2.12, asyncData method is still an active feature. Let’s examine some of the key differences between asyncData and new fetch.
AsyncData
asyncDatais limited to only page-level componentsthiscontext is unavailable- Adds payload by returning the data
export default {
  async asyncData(context) {
    const data = await context.$axios.$get(
      `https://jsonplaceholder.typicode.com/todos`
    )
    // `todos` does not have to be declared in data()
    return { todos: data.Item }
    // `todos` is merged with local data
  }
}
New Fetch
fetchis available in all Vue componentsthiscontext is available- Simply mutates the local data
export default {
  data() {
    return {
      todos: []
    }
  },
  async fetch() {
    const { data } = await axios.get(
      `https://jsonplaceholder.typicode.com/todos`
    )
    // `todos` has to be declared in data()
    this.todos = data
  }
}
Fetch before Nuxt 2.12
If you have been working with Nuxt for a while, then you’ll know that the previous version of fetch was significantly different.
Is this a breaking change?
No, it isn’t. Actually, the old fetch can still be used by passing the
contextas the first argument to avoid any breaking changes in your existing Nuxt applications.
Here’s the list of notable changes in fetch hook compared with before and after v2.12.
1. Call order of fetch hook
Before — fetch hook was called before initiating the component, hence this wasn’t available inside the fetch hook.
After — fetch is called after the component instance is created on the server-side when the route is accessed.
2. this vs context
Before — We had access to the Nuxt context on page-level components, given that the context is passed as a first parameter.
export default {
  fetch(context) {
    // …
  }
}
After — We can access this context just like Vue client-side hooks without passing any parameters.
export default {
  fetch() {
    console.log(this)
  }
}
3. Availability of fetch hook
Before — Only page (route-level) components were allowed to fetch data on the server-side.
After — Now, we can pre-fetch the data asynchronously in any Vue components.
4. Call order of fetch hook
Before — fetch could be called server-side once (on the first request to the Nuxt app) and client-side when navigating to further routes.
After — New fetch is the same as an old fetch, but…
…since we can have one fetch for each component, fetch hooks are called in sequence of their hierarchy.
5. Error Handling
Before — We used the context.error function that showed a custom error page when an error occurred during API calls.
After — New fetch uses the $fetchState object to handle errors in the template area during API calls.
Error handling is performed at component level.
Does this mean we cannot show users a custom error page like we did prior to Nuxt 2.12?
Yes we can, but only with asyncData() when it’s about page-level component data. When using fetch, we can utilize this.$nuxt.error({ statusCode: 404, message: 'Data not found' }) to show a custom error page.
Conclusion
New fetch hook brings a lot of improvements and provides more flexibility in fetching data and organising route-level & building-block components in a whole new way!
It will certainly make you think a little differently when you plan and design your new Nuxt project that requires multiple API calls within the same route.
I hope this article has helped you get acquainted with the new fetch feature. I’d love to see what you build with it.
What’s next
- Read Sergey Bedritsky’s article to see new
fetchhook in action as he shows how to buid dev.to clone! - Already missed March newsletter? Subscribe to Nuxt newsletter and get latest articles and resources delivered right into your inbox.
Learn how to catch errors in different lifecycle.
Handling Errors
Nuxt 3 is a full-stack framework, which means there are several sources of unpreventable user runtime errors that can happen in different contexts:
- Errors during the Vue rendering lifecycle (SSR + SPA)
- Errors during API or Nitro server lifecycle
- Server and client startup errors (SSR + SPA)
Errors During the Vue Rendering Lifecycle (SSR + SPA)
You can hook into Vue errors using onErrorCaptured.
In addition, Nuxt provides a vue:error hook that will be called if any errors propagate up to the top level.
If you are using an error reporting framework, you can provide a global handler through vueApp.config.errorHandler. It will receive all Vue errors, even if they are handled.
Example With Global Error Reporting Framework
export default defineNuxtPlugin((nuxtApp) => { nuxtApp.vueApp.config.errorHandler = (error, context) => { // ... }})Server and Client Startup Errors (SSR + SPA)
Nuxt will call the app:error hook if there are any errors in starting your Nuxt application.
This includes:
- running Nuxt plugins
- processing
app:createdandapp:beforeMounthooks - mounting the app (on client-side), though you should handle this case with
onErrorCapturedor withvue:error - processing the
app:mountedhook
Errors During API or Nitro Server Lifecycle
You cannot currently define a server-side handler for these errors, but can render an error page (see the next section).
Rendering an Error Page
When Nuxt encounters a fatal error, whether during the server lifecycle, or when rendering your Vue application (both SSR and SPA), it will either render a JSON response (if requested with Accept: application/json header) or an HTML error page.
You can customize this error page by adding ~/error.vue in the source directory of your application, alongside app.vue. This page has a single prop — error which contains an error for you to handle.
When you are ready to remove the error page, you can call the clearError helper function, which takes an optional path to redirect to (for example, if you want to navigate to a ‘safe’ page).
Make sure to check before using anything dependent on Nuxt plugins, such as $route or useRouter, as if a plugin threw an error, then it won’t be re-run until you clear the error.
Example
error.vue
<template> <button @click="handleError">Clear errors</button></template><script setup>const props = defineProps({ error: Object})const handleError = () => clearError({ redirect: '/' })</script>Error Helper Methods
useError
function useError (): Ref<Error | { url, statusCode, statusMessage, message, description, data }>
This function will return the global Nuxt error that is being handled.
createError
function createError (err: { cause, data, message, name, stack, statusCode, statusMessage, fatal }): Error
You can use this function to create an error object with additional metadata. It is usable in both the Vue and Nitro portions of your app, and is meant to be thrown.
If you throw an error created with createError:
- on server-side, it will trigger a full-screen error page which you can clear with
clearError. - on client-side, it will throw a non-fatal error for you to handle. If you need to trigger a full-screen error page, then you can do this by setting
fatal: true.
Example
pages/movies/[slug].vue
<script setup>const route = useRoute()const { data } = await useFetch(`/api/movies/${route.params.slug}`)if (!data.value) { throw createError({ statusCode: 404, statusMessage: 'Page Not Found' })}</script>showError
function showError (err: string | Error | { statusCode, statusMessage }): Error
You can call this function at any point on client-side, or (on server side) directly within middleware, plugins or setup() functions. It will trigger a full-screen error page which you can clear with clearError.
It is recommended instead to use throw createError().
clearError
function clearError (options?: { redirect?: string }): Promise<void>
This function will clear the currently handled Nuxt error. It also takes an optional path to redirect to (for example, if you want to navigate to a ‘safe’ page).
Rendering Errors Within Your App
Nuxt also provides a <NuxtErrorBoundary> component that allows you to handle client-side errors within your app, without replacing your entire site with an error page.
This component is responsible for handling errors that occur within its default slot. On client-side, it will prevent the error from bubbling up to the top level, and will render the #error slot instead.
The #error slot will receive error as a prop. (If you set error = null it will trigger re-rendering the default slot; you’ll need to ensure that the error is fully resolved first or the error slot will just be rendered a second time.)
If you navigate to another route, the error will be cleared automatically.
Example
pages/index.vue
<template> <!-- some content --> <NuxtErrorBoundary @error="someErrorLogger"> <!-- You use the default slot to render your content --> <template #error="{ error }"> You can display the error locally here. <button @click="error = null"> This will clear the error. </button> </template> </NuxtErrorBoundary></template>Начиная с версии 2.12 в Nuxt появился новый подход к получению данных приложением.
Хук Fetch и жизненный цикл Nuxt
Сверху вниз
    NuxtServerInit
        |
   Route Middleware
        |
     validate
        |
    asyncData()
        |
   beforeCreate()
        |
     created()
        |
[$fetchState.pending = true]
  >>> fetch() <<<
        |
     mounted()
[$fetchState.pending = false]
Хук fetch() вызывается после того, как экземпляр компонента создан на стороне сервера. Это делает доступным контекст this внутри fetch().
export default {
	fetch() {
        console.log(this)
    }
}
Page Components
И так что же это означает для компонентов страниц (pages). При помощи контекста this, fetch может изменить данные компонента напрямую. Это значит, что можно определить локальные данные компонента, без необходимости вызывать события/фиксировать изменения через Vuex Store для Page компонента.
В результате Vuex становиться не обязательным. Конечно по прежнему можно использовать this.$store, как обычно для доступа к Vuex Store, если необходимо.
Доступность хука fetch()
Используя fetch() можно асинхронно загружать данные в любых компонентах. Это означает, что не только компоненты в директории /pages/*, но и любые другие .vue компоненты в /layouts и /components могут использовать этот подход.
Layouts (макеты)
Теперь, используя новый подход с fetch(), возможно делать запросы непосредственно из Layout компонентов. Что было невозможно до версии Nuxt 2.12.
Возможное применение:
- Загрузка конфигурации с сервера, для динамической генерации футер (footer) или навигации (navbar)
- Загрузка данных пользователя, например профиль, корзина в navbar
- Загрузка соответствующих сайту данных в
layouts/error.vue
Блочные (Child/Nested) компоненты
Используя fetch() в дочерних, можно исключить загрузку некоторых данных из уровня компонента страницы Page, делегировать часть задач загрузки в дочерние компоненты. Все еще можно передать параметры в дочерние компоненты, но данные каждый компонент сможет загрузить самостоятельно.
Порядок выполнения при множественном использовании fetch()
Очевидный вопрос, если каждый компонент может сам загружать данные, то в каком порядке происходит загрузка.
fetch() выполняется на стороне сервера один раз (при первом запросе Nuxt приложения) и затем выполняется на стороне клиента при запросе соответствующего маршрута. Но поскольку можно определить fetch() для каждого компонента, все они будут исполняться последовательно в соответствие с иерархией.
Отключение fetch() на стороне сервера
Можно отключить выполнение fecth() на стороне сервера, выполнение будет проходить только на стороне клиента:
export default {
    fetchOnServer: false
}
Свойство $fetchState.pending на стороне сервера будет установлено в true
Обработка ошибок
Обработка ошибок теперь происходит на уровне компонента. Поскольку данные загружаются асинхронно, fetch() предлагает объект $fetchState для контроля за состоянием запроса:
$fetchState = {
    pending: true | false,
    error: null | [],
    timestamp: Integer
}pending— поможет в отображении статуса загрузкиError— сообщения об ошибкахTimestamp— отображает временную метку последнего запроса, которую можно использовать при кешировании совместно сkeep-alive
<template>
    <div>
      <p v-if="$fetchState.pending">Loading data...</p>
	  <p v-else-if="$fetchState.error">Error while lodaing!</p>
      <ul v-else>
          <li v-for="..." />
      </ul>
    </div>
</template>
При возникновении ошибки на уровне компонента, можно установить HTTP статус на стороне сервера используя проверку process.server внутри fetch() и передать через throw new Error()
async fetch() {
    const post = await fetch('//url/post').then((res) => res.json())
    if (post.id === this.$route.params.id) {
        this.post = post
    } else {
        // on server
        if (process.server) {
            this.$nuxt.context.res.statusCode = 404
        }

        // throw
        throw new Error('Post not found')
    }
}
Установка правильного статуса ответа кране важна для SEO.
fetch() как метод
fetch() можно использовать как обычный метод. Например для программного обновления данных
<button @click="$fetch">refresh</button>или в методе компонента
export default {
    methods: {
        refresh() {
            this.$fetch()
        }
    }
}
Эффективность страниц
Используем :keep-alive-props, хук activated и хук fetch() вместе, для повышения эффективности страниц.
Nuxt может кешировать в памяти страницы вместе с извлеченными данными. И указать количество секунд, через которое следует запросить данные снова.
Используем keep-alive на <nuxt /> и <nuxt-child />
<template>
	<div>
    	<nuxt keep-alive />
    </div>
</template>
для добавления параметров используем :keep-alive-props
<nuxt keep-alive :keep-alive-props="{ max: 10 }" />Это один из способов повышения производительности страниц. Это общий универсальный способ. Другой подход использовать свойство $fetchData.timestamp для более точной настройки. Используется Vue хук activated
export default {
    activated() {
        // more than 1 minute ago
        if (this.$fetchState.timestamp <= Date.now() - 60000) {
            this.$fetch()
        }
    }
}
asyncData vs Fetch
asyncData
asyncDataработает только для page-компонентовthisконтекст не доступен- Добавляет результат возвращая значение
export default {
	async asyncData(context) {
        const data await context.$axios.$get('//fetch/url')
        return  {
            todos: data.item
        }
    }
}
новый fetch()
- Доступен во всех Vue компонентах
thisконтекст доступен- Просто изменяет локальные данные
export default {
    data() {
        return {
            todos: []
        }
    },
    async fetch() {
        const { data } = await axios.get('//fetch/url')
        this.todos = data
    }
}
И так
Новый fetch() предлагает множество улучшений, большую гибкость при получении данных и организации маршрутов, а также возможность загружать данные на уровне отдельных строительных блоков страницы (pages, layouts, componnets). Новый подход предполагает множество запросов к API для одной страницы, что требует внимательней относиться к проектированию страниц и приложения в целом.
| title | description |
|---|---|
|
API: The fetch Method |
The `fetch` method is used to fill the store before rendering the page, it’s like the `asyncData` method except it doesn’t set the component data. |
Nuxt >= 2.12
Nuxt.js v2.12 introduces a new hook called fetch in any of your Vue components.
See live demo and code example.
fetch(context) has been deprecated, instead you can use an anonymous middleware in your page: middleware(context)
When to use fetch?
Every time you need to get asynchronous data. fetch is called on server-side when rendering the route, and on client-side when navigating.
It exposes $fetchState at the component level:
$fetchState.pending:Boolean, allows you to display a placeholder whenfetchis being called on client-side.$fetchState.error:nullorError, allows you to display an error message$fetchState.timestamp:Integer, is a timestamp of the last fetch, useful for caching withkeep-alive
If you want to call the fetch hook from your template use:
<button @click="$fetch">Refresh</button>
or component method:
// from component methods in script section
export default {
  methods: {
    refresh() {
      this.$fetch();
    }
  }
};
You can access the Nuxt context within the fetch hook using this.$nuxt.context.
Options
fetchOnServer:BooleanorFunction(default:true), callfetch()when server-rendering the pagefetchDelay:Integer(default:200), set the minimum executing time in milliseconds (to avoid quick flashes)
When fetchOnServer is falsy (false or returns false), fetch will be called only on client-side and $fetchState.pending will return true when server-rendering the component.
<script>
export default {
  data () {
    return {
      posts: []
    }
  },
  async fetch () {
    this.posts = await this.$http.$get('https://jsonplaceholder.typicode.com/posts')
  },
  fetchOnServer: false
}
</script>
Example
We are going to use the official http module to make HTTP requests.
Let’s have a blog with our home page listing our posts:
pages/index.vue
<template>
  <div>
    <h1>Blog posts</h1>
    <p v-if="$fetchState.pending">Fetching posts...</p>
    <p v-else-if="$fetchState.error">Error while fetching posts: {{ $fetchState.error.message }}</p>
    <ul v-else>
      <li v-for="post of posts" :key="post.id">
        <n-link :to="`/posts/${post.id}`">{{ post.title }}</n-link>
      </li>
    </ul>
  </div>
</template>

<script>
export default {
  data () {
    return {
      posts: []
    }
  },
  async fetch () {
    this.posts = await this.$http.$get('https://jsonplaceholder.typicode.com/posts')
  }
}
</script>
If you go directly to http://localhost:3000/, you will see directly the full list of posts which has been server-rendered (great for SEO).

Nuxt will intelligently detect what data you mutated inside fetch and will optimise the JSON included in the returned HTML.
Now, let’s add pages/posts/_id.vue page to display a post on /posts/:id.
pages/posts/_id.vue
<template>
  <div v-if="$fetchState.pending">Fetching post #{{$route.params.id}}...</div>
  <div v-else>
    <h1>{{ post.title }}</h1>
    <pre>{{ post.body }}</pre>
    <p><n-link to="/">Back to posts</n-link></p>
  </div>
</template>

<script>
export default {
  data () {
    return {
      post: {}
    }
  },
  async fetch() {
    this.post = await this.$http.$get(`https://jsonplaceholder.typicode.com/posts/${this.$route.params.id}`)
  }
}
</script>
When navigating, you should now see "Loading post #..." on client-side, and no loading when refreshing a post (hard refresh on the browser).

If the component contains the fetch hook, you will also have access to this.$fetch() to re-call the fetch hook ($fetchState.pending will become true again).
Listening to query string changes
The fetch hook is not called on query string changes by default. To watch for query changes you can add a watcher on $route.query and call $fetch:
export default {
  watch: {
    '$route.query': '$fetch'
  },
  async fetch() {
    // Called also on query changes
  }
}
Caching
You can use keep-alive directive in <nuxt/> and <nuxt-child/> component to save fetch calls on pages you already visited:
layouts/default.vue
<template>
  <nuxt keep-alive />
</template>
You can also specify the props passed to <keep-alive> by passing a prop keep-alive-props to the <nuxt> component.
Example: <nuxt keep-alive :keep-alive-props="{ max: 10 }" /> to keep only 10 page components in memory.
Using activated hook
Nuxt will directly fill this.$fetchState.timestamp (timestamp) of the last fetch call (SSR included). You can use this property combined with activated hook to add a 30 seconds cache to fetch:
pages/posts/_id.vue
<template>
  ...
</template>

<script>
export default {
  data () {
    return {
      post: {}
    }
  },
  activated() {
    // Call fetch again if last fetch more than 30 sec ago
    if (this.$fetchState.timestamp <= (Date.now() - 30000)) {
      this.$fetch()
    }
  },
  async fetch() {
    this.post = await this.$http.$get(`https://jsonplaceholder.typicode.com/posts/${this.$route.params.id}`)
  }
}
</script>
The navigation to the same page will not call fetch if last fetch call was before 30 sec ago.

Nuxt <= 2.11
The fetch method is used to fill the store before rendering the page, it’s like the
asyncDatamethod except it doesn’t set the component data.
- Type:
Function
The fetch method, if set, is called every time before loading the component (only for page components). It will be called server-side once (on the first request to the Nuxt app) and client-side when navigating to further routes.
The fetch method receives the context object as the first argument, we can use it to fetch some data and fill the store. To make the fetch method asynchronous, return a Promise, Nuxt.js will wait for the promise to be resolved before rendering the component.
Warning: You don’t have access to the component instance through this inside fetch because it is called before initiating the component.
Example of pages/index.vue:
<template>
  <h1>Stars: {{ $store.state.stars }}</h1>
</template>

<script>
export default {
  fetch ({ store, params }) {
    return axios.get('http://my-api/stars')
    .then((res) => {
      store.commit('setStars', res.data)
    })
  }
}
</script>
You can also use async/await to make your code cleaner:
<template>
  <h1>Stars: {{ $store.state.stars }}</h1>
</template>

<script>
export default {
  async fetch ({ store, params }) {
    let { data } = await axios.get('http://my-api/stars')
    store.commit('setStars', data)
  }
}
</script>
Vuex
If you want to call a store action, use store.dispatch inside fetch, make sure to wait for the end of the action by using async/await inside:
<script>
export default {
  async fetch ({ store, params }) {
    await store.dispatch('GET_STARS');
  }
}
</script>
store/index.js
// ...
export const actions = {
  async GET_STARS ({ commit }) {
    const { data } = await axios.get('http://my-api/stars')
    commit('SET_STARS', data)
  }
}
Listening to query string changes
The fetch method is not called on query string changes by default. If you want to change this behavior, for example when building a pagination component, you can setup parameters that should be listened to through the watchQuery property of your page component. Learn more on the API watchQuery page.
In the process of studying Nuxt source code, I found that the operation process of FETCH was completely different from what was said on the official website, so I had a brainwave and went to the English official website… As expected, FETCH has been updated in Nuxt 2.12, which can be said to be completely changed and more powerful. However, the document on the Chinese official website is still 2.11.x and has not been updated. After reading the English document, I found this blog post on the official website. It is very good and I want to translate it for the reference of students learning Nuxt. After all, there are basically no Chinese materials at present.
introduce
Nuxt introduced a new method called Fetch in the latest release 2.12. Fetch provides an entirely new way to bring data into Nuxt applications. In this article, we’ll explore the different capabilities of the Fetch hook and try to understand how it works.
Fetch hook function Nuxt life cycle
Nuxt’s fetch function runs after Vue’s CREATE hook function. As we know, all Vue lifecycle hook functions are called in their this context, and FETCH is no exception.

this
export default {
  fetch() {
    console.log(this); }};Copy the code
Let me take a look at what this means for page components.
For page components
With the help of this context, FETCH can change the component’s data directly, which means that we can set the component’s local data directly without using external stores like Vuex to store the data. This makes the Vuex an option. You can still use this.$store if you want to use it.
Availability of the Fetch hook function
With the fetch function we can prefetch asynchronous data from any Vue component. This means that the previous restriction that could only be used by Vue components in the Page directory is removed and all Vue components can use the FETCH function. Examples are vue components in the /layouts and/Components directories. What does this mean for layouts and build-block components
Layout components
By using the new FETCH function, we can make API calls directly from the Layout component. This was not possible before V2.12 was released. Some examples of usage:
- Get the configuration data from the back end and dynamically generate the footer and navigation bar
- Get user related information, such as user profile, number of items in shopping cart
- Can be found in
layouts/error.vueGet site-related data
Build-block components
Since we can use the hook function in the child component, we can delegate all the data fetching that was previously done in the page component to the child component fetch. This greatly reduces the task of routing level (Page) components. We can still use props to pass data to the child component, but if the child component needs its own fetching logic, this is now possible!
The order in which multiple hook functions are run
Since each component can have its own data retrieval logic, you might ask, what is the order in which each component is called? The Fetch hook is called once on the server side (at the first request of the Nuxt application, and then when the client navigates to another path. But since we can define a FETCH hook for each component, the FETCH hooks are invoked in their hierarchical order. The page hook function runs before the Components hook function.
Disable FETCH on the server
You can easily disable the FETCH function on the server if you want.
export default {
  fetchOnServer: false
};
Copy the code
Error handling
The new FETCH error handling mechanism is component-level, let’s see how this is implemented. Since we are retrieving data asynchronously, the new fetch () provides an object to check whether the request has ended and succeeded. This is what this object looks like —$fetchState
$fetchState = {
  pending: true | false.error: null | {},
  timestamp: Integer
};
Copy the code
There are three properties:
- Peding — lets you display a placeholder (whether a request is being made) when a client calls fetch.
- Error — Allows you to display Error messages
- **Timestamp **- displays the Timestamp of the last fetch call, which is useful for components that use caching via keep-alive
These values can be used directly in the component’s template to show Loding during the data acquisition process.
template
  div
    p v-if="$fetchState.pending"Fetching posts.../p
    p v-else-if="$fetchState.error"Error while fetching posts/p
    ul v-else
      …
    /ul
  /div
/template
Copy the code
When errors occur at the component level, we can set the HTTP status code on the server side by judging process.server in the FETCH hook, and use the Throw New Error() statement for subsequent processing.
async fetch() {
  const post = await fetch(`https://jsonplaceholder.typicode.com/posts/The ${this.$route.params.id}`)
                     .then((res) =  res.json())

  if (post.id === this.$route.params.id) {
      this.post = post
    } else {
      // Set the status code on the server
      if (process.server) {
        this.$nuxt.context.res.statusCode = 404
      }
      // Then throw an error
      throw new Error('Post not found')}}Copy the code
Setting HTTP status codes like this is helpful for proper SEO.
Fetch can also be invoked using methods
The new Fetch hook is also a method that can be invoked during user interaction or within Methods.
! -- from template in template --
button @click="$fetch"Refresh Data/button
Copy the code
// from component methods in script section
export default {
methods: {
refresh() {
this.$fetch(); }}};Copy the codeEnhanced performance of Nuxt pages
Nuxt allows you to cache a certain number of pages and their fetched data in memory by using the keep-alive-props and activated hook functions. You can also set the expiration time of these caches. If we want to use the method mentioned above, we need to add keep-alive Prop to the and component.
! -- layouts/default.vue --
template
  div
    nuxt keep-alive /
  /div
/template
Copy the code
We can also control the number of cached pages by adding :keep-alive-props.
nuxt keep-alive :keep-alive-props="{ max: 10 }" /
Copy the code
The above is an advanced and generic way to improve page performance. We can also optimize the call of the fetch request by using $fetchstate.timestamp, mainly by comparing the timestamp of the last request, to achieve a more liberal caching strategy
export default {
  activated() {
    // If the last request has been more than a minute, make the request again
    if (this.$fetchState.timestamp = Date.now() - 60000) {
      this.$fetch(); }}};Copy the code
asyncData vs Fetch
For page components, the new FETCH seems too similar to asyncData. Since they are both responsible for handling local data, there are still some key differences worth noting, as follows:
AsyncData
- The asyncData method can only be used in the page component (routing level component)
- AsyncData is called before the component is instantiated, so this is not accessible
- Add data to the component through retrun
export default {
  async asyncData(context) {
    const data = await context.$axios.$get(
      `https://jsonplaceholder.typicode.com/todos`
    );
    // 'todos' does not need to be declared in data
    return { todos: data.Item };
    // 'todos' will merge with local data}};Copy the code
New Fetch
- Fetch is available in all VUE components
- Fetch is called after the component is instantiated and can access this
- It is very simple to modify local data directly
export default {
  data() {
    return {
      todos: []}; },async fetch() {
    const { data } = await axios.get(
      `https://jsonplaceholder.typicode.com/todos`
    );
    // `todos` has to be declared in data()
    this.todos = data; }};Copy the code
Fetch before Nuxt 2.12
If you’ve been using Nuxt for a while, you’ll notice that the new FETCH is completely different from the previous version.
Is this a destructive update (does it make the previous fetch unavailable)
In fact, no, we can still pass the context parameter to fetch to use the fetch from the previous version, that is, without making any disruptive changes to your application. Here are some comparisons of fetch between the old and new versions
1. When to call the fetch hook
** Old: ** was called before the component was instantiated, so this cannot be accessed ** New: ** When accessing a route is called after the component was instantiated, this can be accessed
2. this VS context
** Old: ** We can access the Nuxt context on the page-level component if the context is passed as the first argument.
export default {
  fetch(context) {
    / /...}};Copy the code
** New: ** We can access this context as if it were a Vue client hook function, without passing any arguments.
export default {
  fetch() {
    console.log(this.data); }};Copy the code
3. The availability
** Old: ** can only be called on the server side in a page component (routing level component). ** New: ** can be used in any VUE component to get asynchronous data.
4. Fetch hook call sequence
** Old: ** Fetch can be called once on the server (when the first request arrives on the NUxT server), and every time before navigating to the component that contains fetch on the client ** new: ** The new fetch and the old fetch are actually the same calls, but since the new FETCH can be set in a child component, the order of calls to the fetch is based on their structural hierarchy.
5. Error handling
Old: We use context.error to display a custom error page when an error occurs during an API call. New: The new FETCH uses the $fetchState object to handle errors in the template area during API calls. Its error handling is component-level.
Does this mean we can’t show custom error pages to users in Nuxt 2.12? ** Of course not, we can still use asyncData() in page-level components to display custom error pages by calling this.$nuxt.error({statusCode: 404, message: ‘Data not found’}).
conclusion
The new Fetch hook function brings many improvements and provides more flexibility to fetch data and organize routing-level and building-block components in a whole new way! When you’re planning and designing a new Nuxt project that requires multiple API calls in a single route, it definitely makes you think a little differently. I hope this article has helped you get familiar with the new FETCH feature. I look forward to seeing what you can do with it.