Содержание
- Ошибка с кодом 0x0001 в GeForce Experience — что делать?
- Решение ошибки 0x0001 в GeForce Experience
- Решение №1 Обновление видеодрайвера
- Решение №2 Выставление нужных параметров для служб GFE
- Решение №3 Переустановка видеодрайвера и GeForce Experience
- Код ошибки 0x0001 и 0x0003 в NVIDIA GeForce Experience
- Как исправить код ошибки 0x0001 или 0x0003 NVIDIA GeForce Experience
- 1. Проверить службы Nvidia
- 2. Обновите драйвер видеокарты NVIDIA или перейдите на бета-версию
- 3. Полное удаление и чистая установка
- Не запускается Nvidia GeForce Experience код ошибки 0x0001: как исправить?
- Что вызывает ошибку 0x0001 при запуске приложения Nvidia?
- Способ 1: Установка бета-версии GeForce Experience
- Способ 2: Разрешение службам NVIDIA взаимодействовать с локальной учетной записью
- Способ 3: Принадлежность папок Nvidia к группе Система
- Способ 4: Утилита для удаления драйвера GeForce Experience
- Исправляем Something went wrong. Try restarting GeForce Experience
- Ошибка geforce experience something went wrong try restarting
- Решение ошибки
- Ошибка error code 0x0001 geforce experience
- Обновите драйвера видеокарты
- Ошибка error code: 0x0001
- Решение ошибки путем обновления Windows
Ошибка с кодом 0x0001 в GeForce Experience — что делать?
При открытии программы GeForce Experience пользователи Windows могут столкнуться с ошибкой 0x0001. Никакой полезной информации в сообщении нет, однако на данный момент известен ряд решений для этой неполадки.
Решение ошибки 0x0001 в GeForce Experience

Решение №1 Обновление видеодрайвера
Самое банальное решение — это обновление драйвера для видеокарты. Перейдите на официальный сайт Nvidia (в раздел загрузок), скачайте установщик и запустите его, а после следуйте инструкциям на экране. Как только видеодрайвер будет обновлен, перезагрузите свой ПК и проверьте наличие ошибки 0x0001 в GeForce Experience.
Решение №2 Выставление нужных параметров для служб GFE
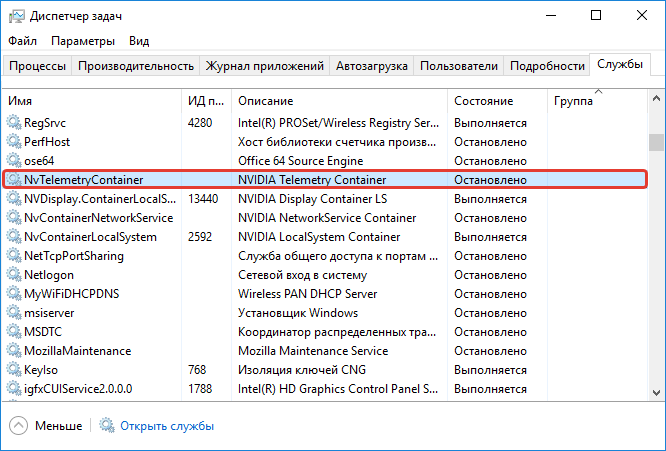
Нормальная работа GeForce Experience гарантирована только в том случае, если параметры относящихся к этой программе служб заданы корректно. Нажмите Win+R, а затем выполните services.msc. Далее открываем свойства нижеуказанных служб и разделе типа запуска выставляем следующее:
- Display Container LS – Автоматически
- NetworkService Container – Вручную
- LocalSystem Container – Автоматический
- Telemetry Container – Автоматически
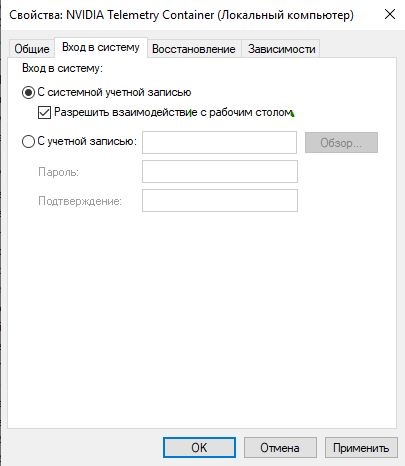
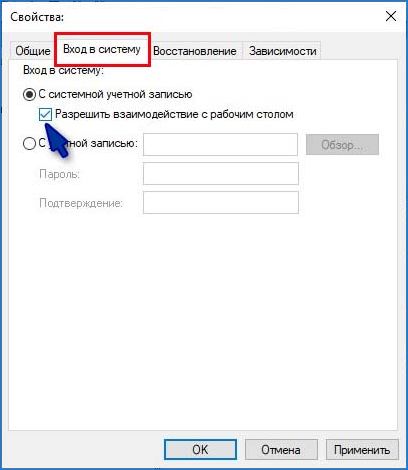
Как только закончите возиться с параметрами служб, перезагрузите ПК. Ошибка 0x0001 в GeForce Experience была решена? Если нет, то снова откройте свойства NVIDIA Telemetry Container и поставьте галочку возле опции «Разрешить взаимодействие с рабочим столом» во вкладке «Вход в систему». Еще раз перезагрузите компьютер и проверьте наличие проблемы.
Решение №3 Переустановка видеодрайвера и GeForce Experience
Ничего из вышеуказанного не помогает? Тогда мы предлагаем вам заняться полной переустановкой видеодрайвера и программы GeForce Experience. Сделать это можно с помощью такой небольшой утилиты, как Display Driver Uninstaller (DDU). Запустите DDU и следуйте всем рекомендациям, которая утилита вам предоставит.
После удаления всего ПО от Nvidia со своего ПК перейдите по этой ссылке, чтобы скачать и установить актуальные версии видеодрайвера и GeForce Experience. Ошибка 0x0001 больше не должна вас беспокоить.
Источник
Код ошибки 0x0001 и 0x0003 в NVIDIA GeForce Experience
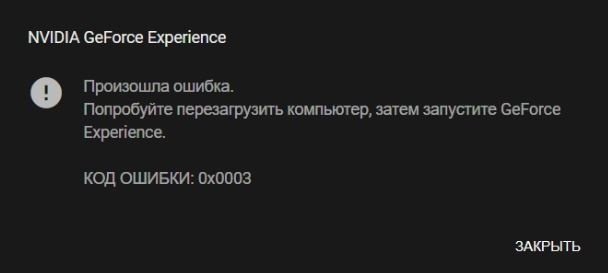
GeForce Experience — это очень полезная программа для игр на графических картах от NVIDIA. Некоторые пользователи могут столкнуться с ошибкой 0x0001 или 0x0003 при открытии NVIDIA GeForce Experience. Ошибка звучит следующим образом:
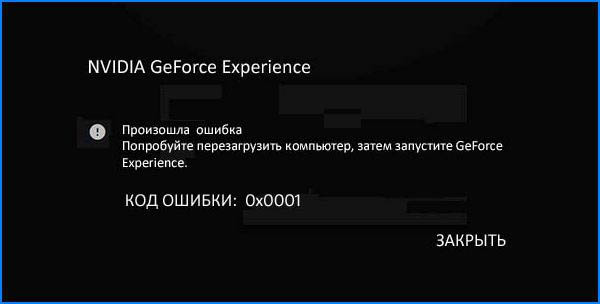
Произошла ошибка. Попробуйте перезагрузить компьютер, затем запустите GeForce Experience. Код ошибки 0x0001 или 0x0003.
Как исправить код ошибки 0x0001 или 0x0003 NVIDIA GeForce Experience
Давайте рассмотрим некоторые исправления, чтобы избавиться от этой проблемы в Windows 10. Прежде чем начать, попробуйте перезагрузить компьютер, а затем запустите GeForce Experience и посмотрите, работает ли он. Также, если вы обычно создаете точку восстановления системы , то вы можете откатить систему назад в рабочее состояние.
1. Проверить службы Nvidia
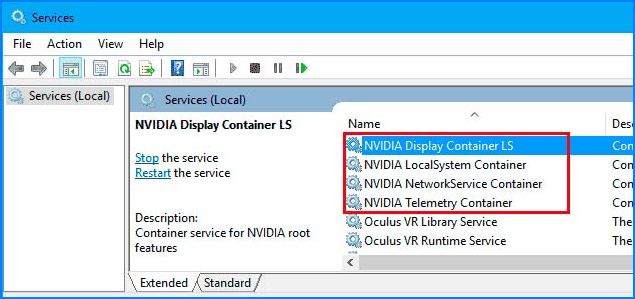
Нажмите комбинацию кнопок Win + R и введите в диалоговое окно services.msc, чтобы открыть службы. Теперь обратите внимание на следующие службы и убедитесь, что их типы запуска следующие:
- NVIDIA Display Container LS — Автоматически
- NVIDIA NetworkService Container — Ручной
- NVIDIA LocalSystem Container — Автоматический
- NVIDIA Telemetry Container — Автоматически
Дважды щелкните по службе, чтобы открыть окно свойств. Если служба еще не запущена, просто выберите «Запустить«. А лучше нажмите на каждой «Остановить», а потом «Запустить», таким образом они перезапустятся.
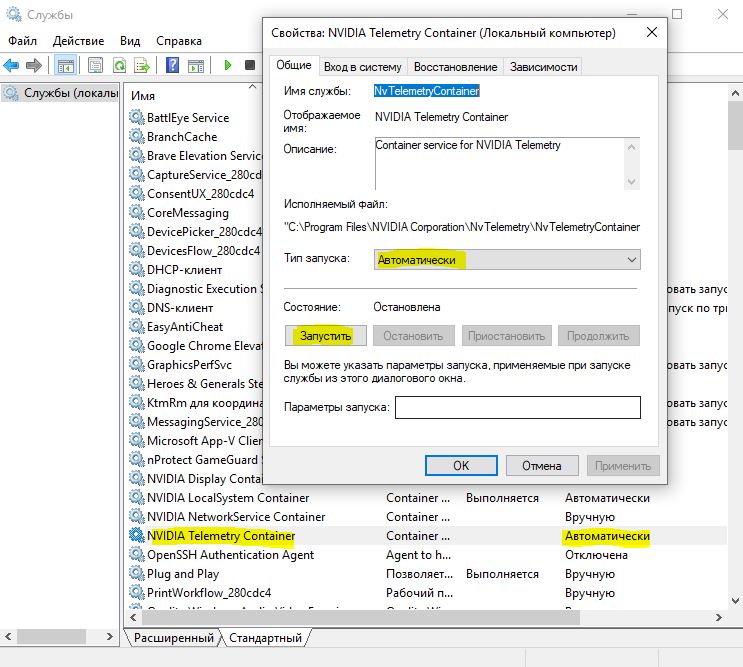
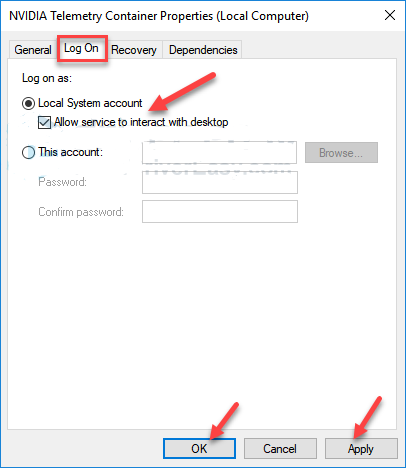
Если выше не сработало, то хочу обратить внимание на службу NVIDIA Telemetry Container. Нажмите по ней два раза, чтобы открыть свойства. Далее перейдите во вкладку «Вход в систему«, выберите пункт «С системной учетной записью» и поставьте галочку напротив «Разрешить взаимодействие с рабочим столом«. Перезагрузите ПК.
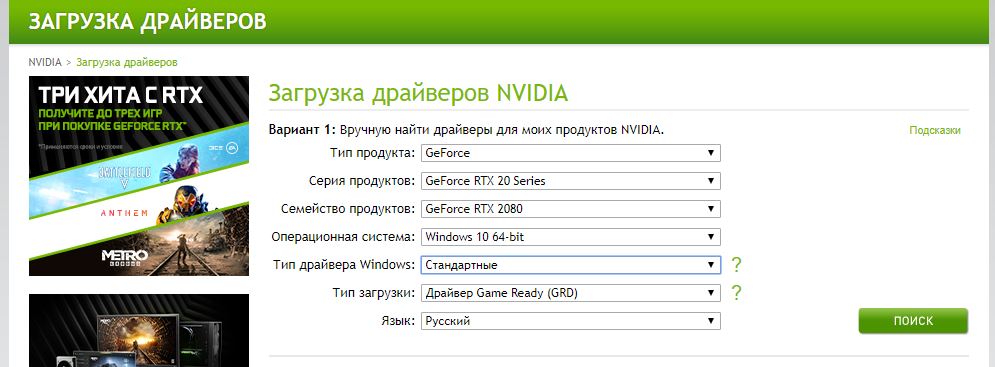
2. Обновите драйвер видеокарты NVIDIA или перейдите на бета-версию
Одной из основных задач, которую вы должны сделать, является обновление драйверов видеокарты NVIDIA. Для этого вам просто нужно зайти на их сайт загрузки драйверов видеокарт и скачайте последнюю версию драйвера. Перезагрузите компьютер, чтобы изменения вступили в силу.
Если вы хотите попробовать бета-версию, вы можете найти ее здесь . Вы должны понимать, что бета-версия программного обеспечения содержит ошибки и нестабильна, вызывая ряд различных ошибок, но в то же время будет содержать некоторые исправления для некоторых ошибок в стабильном выпуске.

3. Полное удаление и чистая установка
Вы можете использовать программу для удаления драйвера видеокарты, которая полностью удаляет остаточные файлы в системе. После этого вы можете загрузить и установить последнюю версию графических драйверов NVIDIA. Обратитесь к руководству ниже, как:
Источник
Не запускается Nvidia GeForce Experience код ошибки 0x0001: как исправить?
При попытке открыть приложение GeForce Experience можно столкнуться с ошибкой 0x0001. Узнаем подробнее причины возникновения и способы ее исправить.
Что вызывает ошибку 0x0001 при запуске приложения Nvidia?
Есть несколько причин, при которых возникает уведомление в Nvidia Geforce Experience с кодом ошибки 0x0001:
- Баг GeForce Experience. Неполадка может возникнуть из-за внутренней ошибки, которая в настоящее время проявляется в последней «стабильной» версии. Ее можно решить после установки бета-версии GeForce Experience.
- Службы контейнеров NVIDIA не имеют разрешения для взаимодействия с локальной учетной записью. В основном служба контейнеров Nvidia Telemetry и ряд других процессов вызывают ошибку 0x0001, если им не разрешено взаимодействовать с локальной учетной записью пользователя. В этом случае проблема быстро решается настройкой дополнительных параметров службы.
- Папки Nvidia не принадлежат группе «Система». Ошибка может появиться, если папки приложения не входят в группу SYSTEM. Решить проблему можно путем изменения принадлежности каждой папки Nvidia к группе «Система».
- Поврежденные файлы. Как оказалось, поврежденные файлы внутри папки Nvidia или драйвер видеокарты могут нести ответственность за отображение уведомления об ошибке 0x0001. Поскольку их непросто удалить обычным способом, можно использовать специальную утилиту, способную полностью деинсталлировать GeForce Experience вместе с соответствующими драйверами, прежде чем устанавливать заново в чистой среде.
В статье представлено несколько шагов по устранению неполадки. Поскольку потенциальные решения упорядочены по эффективности, рекомендуем следовать их в том порядке, в котором они представлены.
Способ 1: Установка бета-версии GeForce Experience
Можно избавится от проблемы после удаления текущей версии Nvidia Experience и установки последней бета-версии. Многие предполагают, что эта версия включает исправление, которое еще не интегрировано с основным установщиком.
Поскольку этот способ подтвержден многими пользователями, рекомендуем начать с него.
Пошаговая инструкция по удалению текущей программы GeForce Experience и установке последней бета-версии:
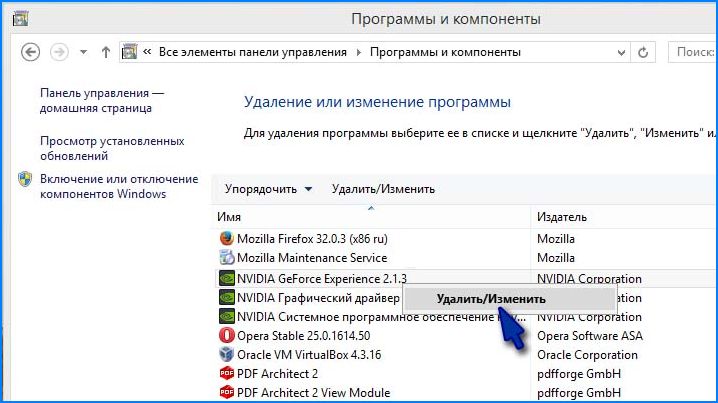
- Нажмите сочетание Windows + R для вывода диалогового окна «Выполнить». Наберите команду «appwiz.cpl» и кликните на Enter для входа в раздел Программы и компоненты.
- В списке программ найдите Nvidia Experience. Кликните по ней правой кнопкой мыши и выберите Удалить/Изменить.

- Следуйте инструкциям на экране до завершения процесса удаления Nvidia GeForce Experience.
- После удаления приложения перезагрузите компьютер.
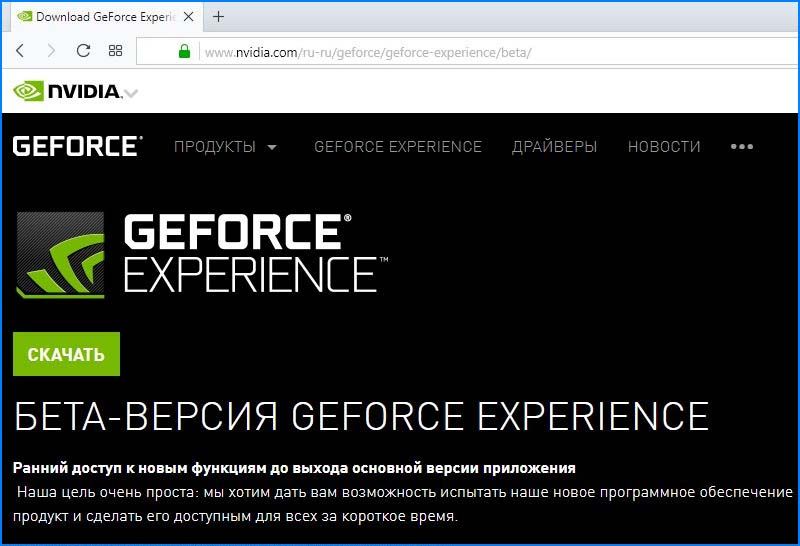
- После перезагрузки откройте сайт производителя и скачайте последнюю бета-версию Nvidia Experience.
- Запустите загруженный файл и следуйте инструкциям установщика программы.
- После установки не запускайте приложение. Вместо этого перезагрузите компьютер еще раз.
После перезапуска запустите бета-версию GeForce Experience и проверьте, отображается ли ошибка с кодом 0x0001. Если не удалось ее исправить, перейдите к следующему шагу.
Способ 2: Разрешение службам NVIDIA взаимодействовать с локальной учетной записью
Как оказалось, еще одна возможная причина возникновения ошибки заключается в том, что служба контейнеров телеметрии (NvTelemetryContainer), не имеет необходимых разрешений для правильного взаимодействия с локальной учетной записью.
В основном виновником является телеметрия, но есть другие случаи, когда проблема была решена только после изменения настроек всех контейнеров NVIDIA.
- Совместным нажатием на клавиши Windows + R откройте диалоговое окно «Выполнить». Наберите команду «services.msc» для входа на экран «Службы». При появлении уведомления контроля учетных записей пользователей (UAC) нажмите «Да», чтобы предоставить права администратора.
- Прокрутите список служб пока не найдете четыре контейнера, используемых NVIDIA.
- Кликните на каждом по очереди правой кнопкой мыши и выберите Свойства.
- Перейдите на вкладку «Вход в систему» и убедитесь, что установлен переключатель, связанный с системной учетной записью. Установите флажок «Разрешить взаимодействие с рабочим столом», затем нажмите «Применить» для сохранения изменений.
Когда все службы контейнеров будут настроены на взаимодействие с рабочим столом, перезагрузите компьютер.
После проверьте, отображается ли уведомление с кодом ошибки 0x0001 в Geforce Experience. Если с помощью этого способа не удалось ее исправить, перейдите к следующему шагу.
Способ 3: Принадлежность папок Nvidia к группе Система
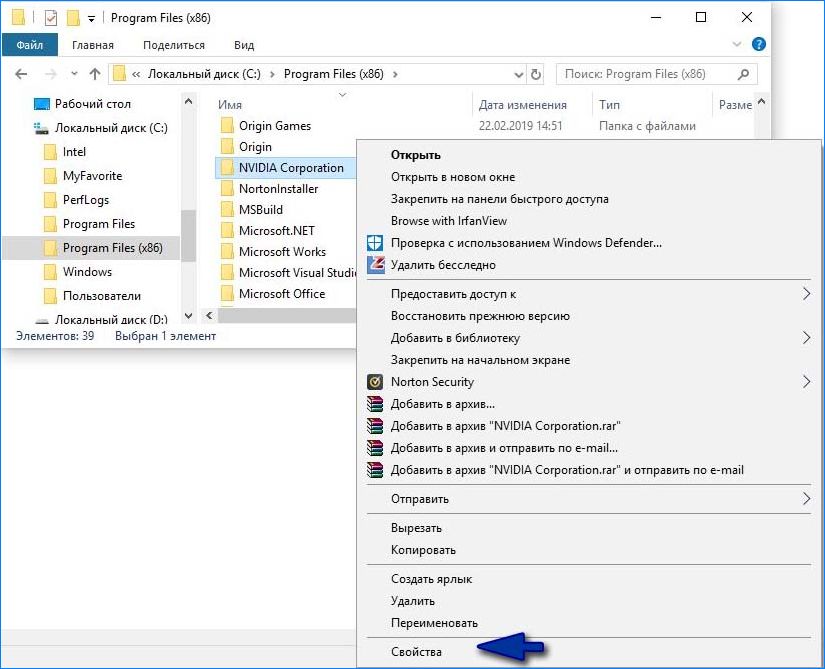
В большинстве случаев уведомление об ошибке 0x0001 возникает, если папки, используемые NVIDIA, не имеют необходимых разрешений. Для ее решения измените принадлежность всех папок приложения к группе «Система».
- Откройте Проводник и перейдите по пути:
C:Program Files (x86) - Правым кликом мыши на NVIDIA Corporation откройте меню и выберите Свойства.
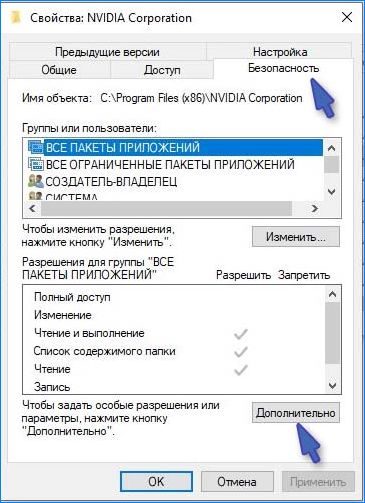
- Перейдите на вкладку Безопасность и кликните «Дополнительно».
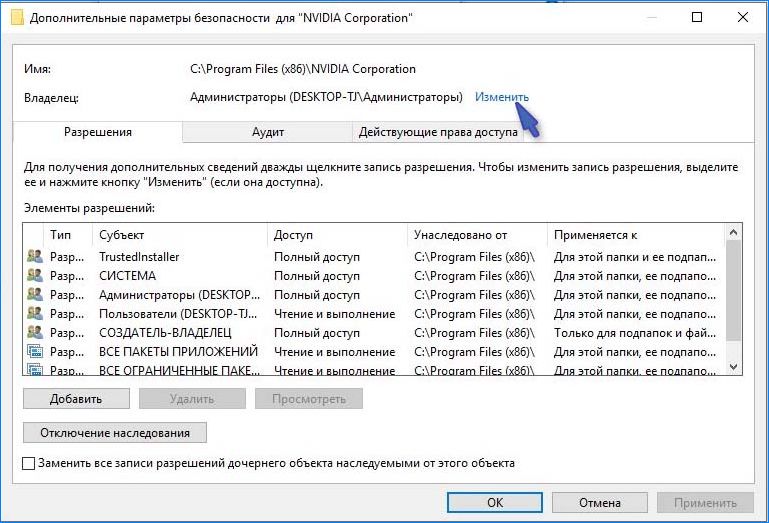
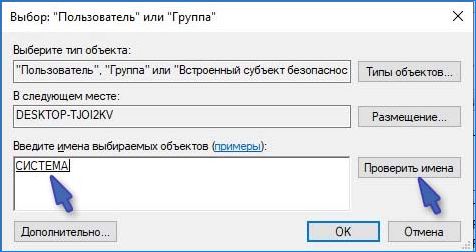
- Убедитесь, что в дополнительных параметрах владелец установлен как «Система». В противном случае кликните «Изменить».
- В поле «Выберите имена выбираемых объектов» введите «Система», нажмите «Проверить имена» и кликните ОК.
- Нажмите кнопку «Применить», чтобы сохранить текущую конфигурацию разрешений. Затем перезапустите компьютер.

После проверьте, возникает ли ошибка с кодом 0x0001 при запуске приложения Nvidia.
Способ 4: Утилита для удаления драйвера GeForce Experience
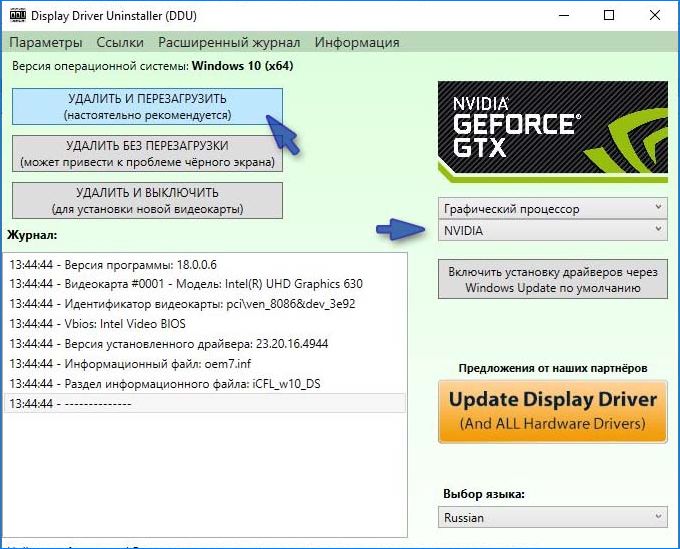
Есть несколько утилит, которые позволяют полностью удалить текущую версию GeForce Experience и драйвер видеокарты. Воспользуемся программой Display Driver Uninstaller.
Скачайте последнюю версию утилиты. Программа будет загружена на компьютер в архиве, и для ее распаковки потребуется архиватор 7Zip или WinZip.

Дважды щелкните на файле DDU, выберите удобное расположение и кликните «Извлечь», чтобы распаковать содержимое утилиты.
После распаковки запустите исполняемый файл. При появлении уведомления контроля учетных записей.
В интерфейсе выберите GPU в раскрывающемся меню «Выбор видеодрайвера». Затем нажмите «Удалить и перезапустить», чтобы начать процедуру очистки.
После завершения процесса перезапустите ПК. Откройте официальный сайт NVIDIA и перейдите в раздел Драйверы. Выберите графический процессор, операционную систему и язык, нажмите кнопку «Поиск». Следуйте подсказкам на экране, чтобы установить последний драйвер Game Ready.
После загрузите последнюю версию сборки GeForce Experience и установите ее на компьютере.
После уведомление с ошибкой «Nvidia Geforce Experience error code 0x0001» уже не должно препятствовать запуску приложения.
Источник
Исправляем Something went wrong. Try restarting GeForce Experience
Если во время открытия программы GeForce Experience на компьютере произошла одна из следующих ошибок «Something went wrong. Try restarting GeForce Experience», не стоит паниковать, пользователи по всему миру регулярно сталкиваются с подобного рода проблемами и существует ряд методов по их решению. Что более важно, варианты простые и можно воспользоваться одним из них самостоятельно.
О разрешении указанной проблемы далее:
Ошибка geforce experience something went wrong try restarting
Решение ошибки
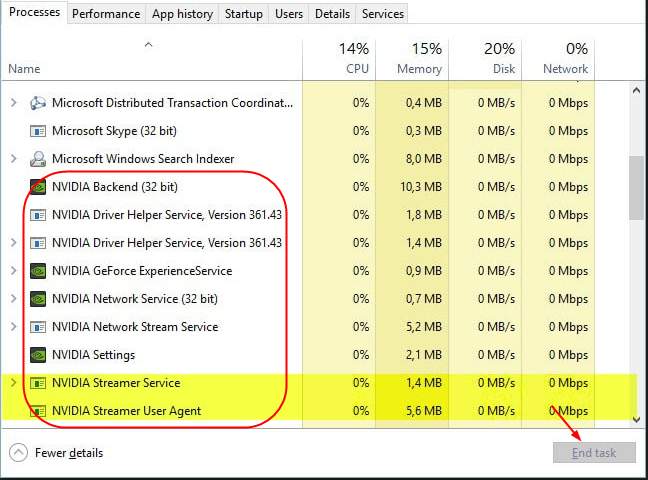
Необходимо выключить все задачи GeForce и перезапустить программу. Следуйте инструкции:
- Открываем панель задач
- Выберите все задачи NVIDIA и нажмите «Завершить задачу»
- После проделанного, нажимаете по программе правой кнопкой мыши и выбираете «Запустить от имени администратора«. Проверяете работоспособность.
Второй способ включает в себя проверку на работоспособность и отсутствие сбоев задач видеокарты.
Для осуществления вышеуказанного проделайте следующие шаги:
- На клавиатуре, удерживая нажатой клавишу с логотипом Windows, нажмите R, чтобы вызвать окно «Выполнить»
- Вводим команду services.msc.
- Находим и щелкаем правой кнопкой мыши по NVIDIA контейнер, что бы выбрать вкладку «свойства»
- Убеждаемся, что служба «Разрешить взаимодействие с рабочим столом» отмечена во вкладке «Вход в систему». Если галочки не стоит — ставим, жмем «Применить», далее «Ок».
- Посмотрите, запущен ли телеметрический контейнер в панели задач. Если он отключен. просто нажимаем правой кнопкой мыши и включаем.
Теперь запускаем наше приложение что бы узнать работает ли оно корректно. Если нет — не стоит расстраиваться, есть еще определенные способы избавиться от обозначенной проблемы.
Ошибка error code 0x0001 geforce experience
Обновите драйвера видеокарты
Третий способ состоит в том. что бы поставить более новые драйвера видеокарты.
Проблема может быть вызвана устаревшими или поломанными, забагованными драйвера видеокарты. Простейший способ — перейти по ссылке на официальный сайт, скачать и установить. Либо же скачайте и установите программу по ссылке, которая автоматически поставит новейшие
Приложение автоматически распознает тип вашей видеокарты, а также систему, на которую необходимо установить драйвера, после чего сделает все за вас
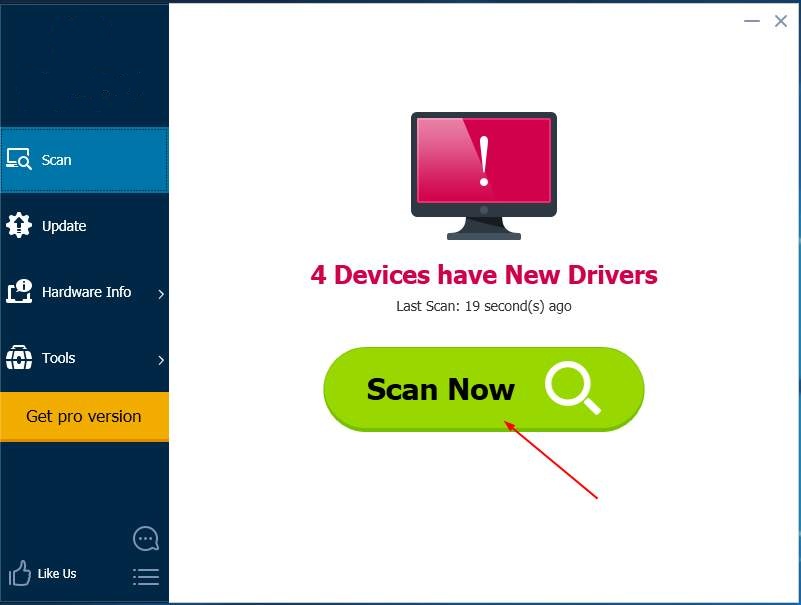
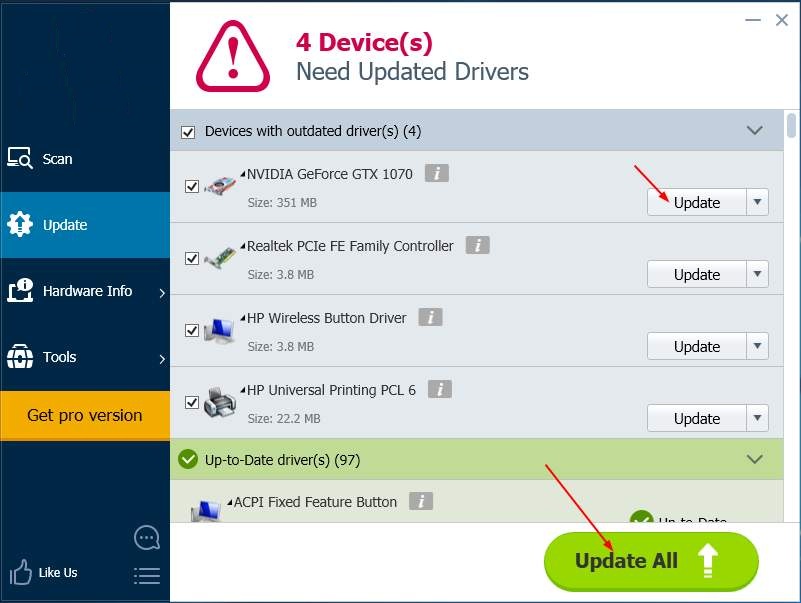
- Скачиваем приложение
- Жмем «Просканировать сейчас». Приложение найдет все проблемные драйвера компьютера и обновит их.
- Нажимаем «Обновить все», что бы автоматически скачать и обновить устаревшие или забагованные драйвера.
- После проделанных шагов перезагрузите компьютер и протестируйте работает ли теперь обозначенный драйвер
Ошибка error code: 0x0001
Четвертый метод заключается в переустановке проблемной программы.
- Введите команду «feature» как указано на картинке снизу:
- Выберите «джифорс» и удалите
- Скачайте на официальном сайте и установите заново
- Смотрим работает или нет

Решение ошибки путем обновления Windows
В случае, если ни один из вышеперечисленных методов не помог — попробуйте обновить виндоус до последней версии.
Устаревшее программное обеспечение может приводить к конфликтам и различным багам.
Если используется Windows 10:
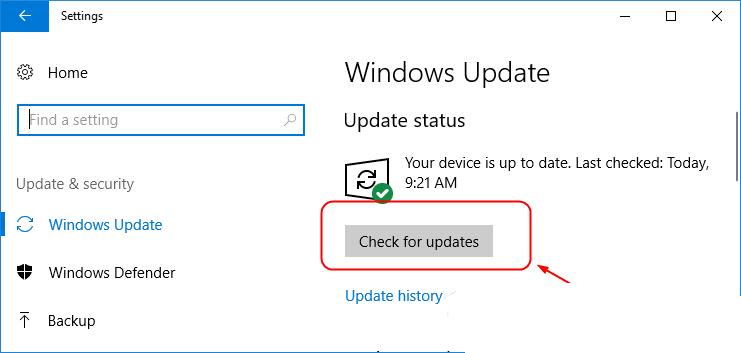
- Нажмите на клавиатуре кнопку Windows и R одновременно что бы открыть настройки Windows
- Нажмите по «Обновление и безопасность»
- Жмем «Обновления»
- Обновляем
- Перезагружаем компьютер что бы увидеть как работает нужный драйвер

Если используется любая другая версия Windows:
- Переходим в панель управления
- Выбираем «Обновления Виндоус«
- Далее «Проверить наличие обновлений«
- Обновляем
- Проверяем
Источник
При попытке открыть приложение GeForce Experience можно столкнуться с ошибкой 0x0001. Узнаем подробнее причины возникновения и способы ее исправить.
Содержание
- 1 Что вызывает ошибку 0x0001 при запуске приложения Nvidia?
- 2 Способ 1: Установка бета-версии GeForce Experience
- 3 Способ 2: Разрешение службам NVIDIA взаимодействовать с локальной учетной записью
- 4 Способ 3: Принадлежность папок Nvidia к группе Система
- 5 Способ 4: Утилита для удаления драйвера GeForce Experience
Что вызывает ошибку 0x0001 при запуске приложения Nvidia?
Есть несколько причин, при которых возникает уведомление в Nvidia Geforce Experience с кодом ошибки 0x0001:
- Баг GeForce Experience. Неполадка может возникнуть из-за внутренней ошибки, которая в настоящее время проявляется в последней «стабильной» версии. Ее можно решить после установки бета-версии GeForce Experience.
- Службы контейнеров NVIDIA не имеют разрешения для взаимодействия с локальной учетной записью. В основном служба контейнеров Nvidia Telemetry и ряд других процессов вызывают ошибку 0x0001, если им не разрешено взаимодействовать с локальной учетной записью пользователя. В этом случае проблема быстро решается настройкой дополнительных параметров службы.
- Папки Nvidia не принадлежат группе «Система». Ошибка может появиться, если папки приложения не входят в группу SYSTEM. Решить проблему можно путем изменения принадлежности каждой папки Nvidia к группе «Система».
- Поврежденные файлы. Как оказалось, поврежденные файлы внутри папки Nvidia или драйвер видеокарты могут нести ответственность за отображение уведомления об ошибке 0x0001. Поскольку их непросто удалить обычным способом, можно использовать специальную утилиту, способную полностью деинсталлировать GeForce Experience вместе с соответствующими драйверами, прежде чем устанавливать заново в чистой среде.
В статье представлено несколько шагов по устранению неполадки. Поскольку потенциальные решения упорядочены по эффективности, рекомендуем следовать их в том порядке, в котором они представлены.
Способ 1: Установка бета-версии GeForce Experience
Можно избавится от проблемы после удаления текущей версии Nvidia Experience и установки последней бета-версии. Многие предполагают, что эта версия включает исправление, которое еще не интегрировано с основным установщиком.
Поскольку этот способ подтвержден многими пользователями, рекомендуем начать с него.
Пошаговая инструкция по удалению текущей программы GeForce Experience и установке последней бета-версии:
- Нажмите сочетание Windows + R для вывода диалогового окна «Выполнить». Наберите команду «appwiz.cpl» и кликните на Enter для входа в раздел Программы и компоненты.
- В списке программ найдите Nvidia Experience. Кликните по ней правой кнопкой мыши и выберите Удалить/Изменить.

- Следуйте инструкциям на экране до завершения процесса удаления Nvidia GeForce Experience.
- После удаления приложения перезагрузите компьютер.
- После перезагрузки откройте сайт производителя и скачайте последнюю бета-версию Nvidia Experience.

- Запустите загруженный файл и следуйте инструкциям установщика программы.
- После установки не запускайте приложение. Вместо этого перезагрузите компьютер еще раз.
После перезапуска запустите бета-версию GeForce Experience и проверьте, отображается ли ошибка с кодом 0x0001. Если не удалось ее исправить, перейдите к следующему шагу.
Способ 2: Разрешение службам NVIDIA взаимодействовать с локальной учетной записью
Как оказалось, еще одна возможная причина возникновения ошибки заключается в том, что служба контейнеров телеметрии (NvTelemetryContainer), не имеет необходимых разрешений для правильного взаимодействия с локальной учетной записью.
В основном виновником является телеметрия, но есть другие случаи, когда проблема была решена только после изменения настроек всех контейнеров NVIDIA.
- Совместным нажатием на клавиши Windows + R откройте диалоговое окно «Выполнить». Наберите команду «services.msc» для входа на экран «Службы». При появлении уведомления контроля учетных записей пользователей (UAC) нажмите «Да», чтобы предоставить права администратора.
- Прокрутите список служб пока не найдете четыре контейнера, используемых NVIDIA.

- Кликните на каждом по очереди правой кнопкой мыши и выберите Свойства.
- Перейдите на вкладку «Вход в систему» и убедитесь, что установлен переключатель, связанный с системной учетной записью. Установите флажок «Разрешить взаимодействие с рабочим столом», затем нажмите «Применить» для сохранения изменений.

Когда все службы контейнеров будут настроены на взаимодействие с рабочим столом, перезагрузите компьютер.
После проверьте, отображается ли уведомление с кодом ошибки 0x0001 в Geforce Experience. Если с помощью этого способа не удалось ее исправить, перейдите к следующему шагу.
Способ 3: Принадлежность папок Nvidia к группе Система
В большинстве случаев уведомление об ошибке 0x0001 возникает, если папки, используемые NVIDIA, не имеют необходимых разрешений. Для ее решения измените принадлежность всех папок приложения к группе «Система».
Пошаговая инструкция:
- Откройте Проводник и перейдите по пути:
C:Program Files (x86) - Правым кликом мыши на NVIDIA Corporation откройте меню и выберите Свойства.

- Перейдите на вкладку Безопасность и кликните «Дополнительно».

- Убедитесь, что в дополнительных параметрах владелец установлен как «Система». В противном случае кликните «Изменить».

- В поле «Выберите имена выбираемых объектов» введите «Система», нажмите «Проверить имена» и кликните ОК.

- Нажмите кнопку «Применить», чтобы сохранить текущую конфигурацию разрешений. Затем перезапустите компьютер.
После проверьте, возникает ли ошибка с кодом 0x0001 при запуске приложения Nvidia.
Способ 4: Утилита для удаления драйвера GeForce Experience
Есть несколько утилит, которые позволяют полностью удалить текущую версию GeForce Experience и драйвер видеокарты. Воспользуемся программой Display Driver Uninstaller.
Скачайте последнюю версию утилиты. Программа будет загружена на компьютер в архиве, и для ее распаковки потребуется архиватор 7Zip или WinZip.
Дважды щелкните на файле DDU, выберите удобное расположение и кликните «Извлечь», чтобы распаковать содержимое утилиты.
После распаковки запустите исполняемый файл. При появлении уведомления контроля учетных записей.
В интерфейсе выберите GPU в раскрывающемся меню «Выбор видеодрайвера». Затем нажмите «Удалить и перезапустить», чтобы начать процедуру очистки.
После завершения процесса перезапустите ПК. Откройте официальный сайт NVIDIA и перейдите в раздел Драйверы. Выберите графический процессор, операционную систему и язык, нажмите кнопку «Поиск». Следуйте подсказкам на экране, чтобы установить последний драйвер Game Ready.
После загрузите последнюю версию сборки GeForce Experience и установите ее на компьютере.
После уведомление с ошибкой «Nvidia Geforce Experience error code 0x0001» уже не должно препятствовать запуску приложения.
Содержание:
- 1 Приложение не запускается и выдает ошибку
- 2 Старые драйвера
- 3 Некорректная работа службы Nvidia Telemetry Container
- 4 Другой владелец каталогов Nvidia
- 5 Повреждение файлов установки
Известная компания NVIDIA Corporation не только производит видеокарты, но также разрабатывает программное обеспечение, например, драйвера и различные утилиты, предназначенные для обслуживания графических систем. Одной из таких утилит является Nvidia Geforce Experience – комплексный инструмент для поиска и обновления драйверов, записи видео и оптимизации игрового контента. Также программа способна оказать помощь при настройке LED-подсветки и передаче игр с ПК на портативные геймерские устройства Nvidia Shield. Обычно приложение работает стабильно и не вызывает нареканий, но в ряде случаев в нем могут возникать сбои.
Приложение не запускается и выдает ошибку
Речь в данном примере пойдет об ошибке GeForce Experience Error 0x0001, возникающей при запуске приложения. В результате интерфейс не открывается, а вместо него на экране появляется окошко с кодом ошибки и предложением перезагрузить компьютер. Причиной неполадки часто становятся временные программные сбои, устраняемые перезагрузкой, но как быть, если этого оказывается недостаточно?

Старые драйвера
Если ошибка 0x0001 в Nvidia Geforce Experience дала о себе знать сразу после установки программы, проверьте актуальность драйверов видеокарты. Возможно, вам стоит посетить сайт компании и скачать более новую версию ПО. Хотя устаревшие драйвера, по идее, не должны вызывать неполадку, поскольку программа сама предназначена для их обновления. В любом случае апдейт не помешает, в крайнем случае, можете откатиться к старой, но более стабильной версии. Альтернативным решением является переход на бета-версию драйвера.
Некорректная работа службы Nvidia Telemetry Container
Если при запуске Nvidia Geforce Experience произошла ошибка с кодом 0x0001 или 0x0003, это может указывать на некорректную работу некоторых связанных служб, а именно Display Container LS, NetworkService Container, LocalSystem Container и особенно Telemetry Container. Откройте оснастку управления службами (команда services.msc в строке Выполнить) и проверьте тип запуска каждой из перечисленных служб: все они, кроме NetworkService Container, должны иметь тип запуска «Автоматически».

Ошибка Geforce Experience 0x0001 иногда появляется и в том случае, когда одна из указанных служб не имеет соответствующих разрешений, позволяющих взаимодействовать с учетной записью владельца компьютера. Исправляется неполадка изменением дополнительных параметров. Откройте свойства службы Nvidia, переключитесь на вкладку «Вход в систему» и установите галочку в чекбоксе «Разрешить взаимодействие с рабочим столом». Сохраните настройки и перезагрузите ПК.

В некоторых случаях помогает отключение службы телеметрии. Деактивируем ее либо через оснастку управления службами, либо через Диспетчер задач.

То, что не запускается Nvidia Geforce Experience, выдавая error code 0x0001, может указывать на некорректность владельца папок приложения. Перейдите в расположение C:/Program Files и найдите там директорию NVIDIA Corporation. Далее откройте ее свойства, на вкладке «Безопасность» нажмите «Дополнительно» и убедитесь, что владельцем папки является СИСТЕМА. Если имя владельца отличается, нажмите «Изменить» и введите в поле открывшегося окошка «СИСТЕМА». Сохраните настройки и перезагрузитесь.


Повреждение файлов установки
Наконец, код ошибки 0x0001 в Geforce Experience зачастую свидетельствует о нарушении целостности файлов самой программы. В этом случае устранить ошибку получится только путем переустановки приложения. Удалив программу через соответствующий апплет Панели управления, скачайте с официальной страницы разработчика ее последнюю версию и установите повторно.
К слову, повреждение драйверов NVIDIA также может вызвать ошибку 0x0001 в Geforce Experience. Чтобы ее исправить, на этот раз придется переустановить также и пакет драйверов, предварительно удалив его утилитой Display Driver Uninstaller.

GeForce Experience — это очень полезная программа для игр на графических картах от NVIDIA. Некоторые пользователи могут столкнуться с ошибкой 0x0001 или 0x0003 при открытии NVIDIA GeForce Experience. Ошибка звучит следующим образом:
Произошла ошибка. Попробуйте перезагрузить компьютер, затем запустите GeForce Experience. Код ошибки 0x0001 или 0x0003.
Как исправить код ошибки 0x0001 или 0x0003 NVIDIA GeForce Experience
Давайте рассмотрим некоторые исправления, чтобы избавиться от этой проблемы в Windows 10. Прежде чем начать, попробуйте перезагрузить компьютер, а затем запустите GeForce Experience и посмотрите, работает ли он. Также, если вы обычно создаете точку восстановления системы, то вы можете откатить систему назад в рабочее состояние.
1. Проверить службы Nvidia
Нажмите комбинацию кнопок Win + R и введите в диалоговое окно services.msc, чтобы открыть службы. Теперь обратите внимание на следующие службы и убедитесь, что их типы запуска следующие:
- NVIDIA Display Container LS — Автоматически
- NVIDIA NetworkService Container — Ручной
- NVIDIA LocalSystem Container — Автоматический
- NVIDIA Telemetry Container — Автоматически
Дважды щелкните по службе, чтобы открыть окно свойств. Если служба еще не запущена, просто выберите «Запустить«. А лучше нажмите на каждой «Остановить», а потом «Запустить», таким образом они перезапустятся.
Если выше не сработало, то хочу обратить внимание на службу NVIDIA Telemetry Container. Нажмите по ней два раза, чтобы открыть свойства. Далее перейдите во вкладку «Вход в систему«, выберите пункт «С системной учетной записью» и поставьте галочку напротив «Разрешить взаимодействие с рабочим столом«. Перезагрузите ПК.
2. Обновите драйвер видеокарты NVIDIA или перейдите на бета-версию
Одной из основных задач, которую вы должны сделать, является обновление драйверов видеокарты NVIDIA. Для этого вам просто нужно зайти на их сайт загрузки драйверов видеокарт и скачайте последнюю версию драйвера. Перезагрузите компьютер, чтобы изменения вступили в силу.
Если вы хотите попробовать бета-версию, вы можете найти ее здесь. Вы должны понимать, что бета-версия программного обеспечения содержит ошибки и нестабильна, вызывая ряд различных ошибок, но в то же время будет содержать некоторые исправления для некоторых ошибок в стабильном выпуске.
3. Полное удаление и чистая установка
Вы можете использовать программу для удаления драйвера видеокарты, которая полностью удаляет остаточные файлы в системе. После этого вы можете загрузить и установить последнюю версию графических драйверов NVIDIA. Обратитесь к руководству ниже, как:
- Полностью удалить драйвера видеокарты Nvidia, AMD, Intel
Смотрите еще:
- Как обновить драйвер Nvidia не устанавливая GeForce Experience
- Видеодрайвер Nvidia перестал отвечать и был успешно восстановлен
- Драйверы NVIDIA, AMD, Realtek не устанавливаются в Windows 10
- Не удалось инициализировать драйвер этого устройства (Код 37)
- Как удалить старые ненужные драйвера в Windows
[ Telegram | Поддержать ]
Видеокарты Nvidia могут выдавать различные сбои. Одна из распространенных, это ошибка «Nvidia Geforce Experience код ошибки: 0x0001 и 0x0003». Данная ошибка может появиться из-за сбоя в программном обеспечении Windows. Ниже мы расскажем, как исправить данную проблему.

Код ошибки: 0x0001, 0x0003
NVIDIA Telemetry Container отключение
NTC — собирает данные пользователей для стабильной работы приложений; сюда входят отчеты о сбоях и проблемах, а также информация о системе, необходимая для предоставления правильных драйверов и оптимальных настроек. Не бойтесь программа не передает вашу личную информацию.
Существует несколько способов как исправить код ошибки: 0x0001, 0x0003 при запуске. Мы перечислим два из этих методов, включая скриншоты:
Первый вариант:
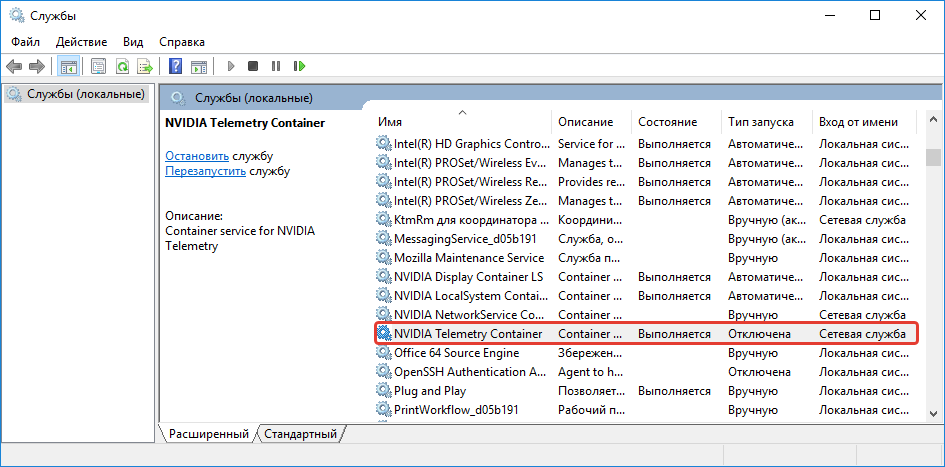
- Нажмите на клавишу Windows на клавиатуре, введите services.msc и нажмите клавишу Enter. Это должно открыть список установленных Сервисов локального ПК.
- Найдите сервис Nvidia Telemetry Container нажмите правой кнопкой.
- Выберите «свойства».
- Открываем вкладку «Вход в систему»
- Перейдите на вкладку убедитесь, что все сеансы переключаются на учетную запись локальной системы.
Если данный способ вам не помог, читайте следующий.
Второй вариант:
Прочитав на различных формах, пользователи рекомендовали отключить NTC:
- Откройте диспетчер задач «ctrl + alt + delete».
- Открываем последнюю вкладку «Службы».
- Находим в списке «NVIDIA Telemetry Container».
- Нажимаем правой кнопкой «Остановить».
Запомните эти действия, вам придется проделывать их снова в будущем, если вы обновите драйвера.
Читайте также: Launched application does not respond при установке игры
Эта проблема также может быть связана с самой GeForce Experience. Следующее, что вам нужно сделать, это удалить все программы Nvidia и установить последнюю версию.
- Введите название приложения в поле поиск.
- Нажмите правой кнопкой, затем удалите.
- Скачайте новую версию GeForce Experience с официального сайта NVIDIA .
- Запустите установщик.
После этого вы должны снова запустить программу и посмотреть, работает ли она.
Если это не работает, перейдите к следующему шагу.
Обновление ПО
Если вы давно не обновляли программное обеспечение, проделываем следующие:
- В поле поиска пишем «Проверить наличие обновления»
- Нажмите «Проверка наличия обновления».
- Установите доступные обновления.
- Перезагрузите Windows 10 и запустите GeForce Experience, чтобы посмотреть, работает ли он.
Проверьте корректные названия папок в «C:Program Files» не должно быть русских символов и чисел.
Nvidia Network Service включение
Последний способ запустить Сервис Нвидиа. Следуйте простым шагам ниже.
- Откройте окно «Службы», как мы делали выше.
- Найдите сетевой сервис NVIDIA.
- Щелкните правой кнопкой мыши и запустите сервис.
- Вы должны заметить, что статус службы теперь изменился с «запускается» на «запущен»
Заключение
Наши советы должны помочь в решении не только этой проблемы, но и похожих в Nvidia. Не забудьте отписаться какой из вариантов вам помог.
Оценка статьи:
![]() Загрузка…
Загрузка…
The GeForce Experience on graphics card manufactured by NVIDIA is an advantage for users who loves gaming as it makes enhances users’ gaming experience. However, there are times when it may also encounter some problems. One of the problems users may encounter is the error code 0x0001. This kind of error occurs when users open the NVIDIA GeForce Experience utility. Here’s the full content of the error message:
“Something went wrong, try rebooting your PC and then launch GeForce Experience, ERROR CODE: 0x0001.”
Errors like this one diminish the overall experience of users due to the fact that when this error occurs, the NVIDIA GeForce experience wouldn’t even start which renders its features useless. There are several potential fixes you can check out to resolve this error but before you check them out, you can try to restart your computer first and then open the NVIDIA GeForce Experience once again, if you still encounter the error, then you need to check the NVIDIA Display Driver Services or update your NVIDIA display drivers or switch to the BETA release. You could also try to install and reinstall the NVIDIA display drivers or perform System Restore and see if it helps. For detailed instructions, follow the given options below.
Option 1 – Try to check the NVIDIA Display driver services
- Tap the Win + R keys to open Run and then type “services.msc” in the field and hit Enter to open the Services Manager.
- From there, look for the following NVIDIA services and make sure that their Startup types are as follows:
- NVIDIA Display Container LS – Automatic
- NVIDIA NetworkService Container – Manual
- NVIDIA LocalSystem Container – Automatic
- NVIDIA LocalSystem Container – Automatic
- NVIDIA GeForce Experience Service – Automatic (Delayed Start)
- NVIDIA Geforce Experience Backend Service – Automatic (Delayed Start)
- NVIDIA Telemetry Container service – Automatic
- Next, double click on each one of the services and go to Properties. Here, check if the service is running. If it’s not, just click on the Start button. On the other hand, if they’re already running, just click on Stop and then click on Start again.
Option 2 – Try to update the NVIDIA Display drivers
You can also try updating the NVIDIA display drivers as it might help in fixing the error. To update them, follow the steps below.
- Tap the Win + R keys to open the Run dialog box.
- Next type in “dxdiag” in the field and click OK or hit Enter to open the DirectX Diagnostic Tool.
- From there, you can see what type of NVIDIA graphics card that your system is on.
- Take note of your graphics card information and then look for the best drivers for your operating system. Once you’ve downloaded and installed the file, restart your PC.
Note: If you want to try out the beta release of the NVIDIA display drivers, click on this link. Beware though that the beta software is unstable and buggy and may cause some different bugs.
Option 3 – Try to roll back the driver to the previous version
If updating the NVIDIA display drivers didn’t work for you, then it’s time to roll back the device drivers. It is most likely that after you updated your Windows computer that your driver also needs a refresh.
- Tap the Win + R keys to launch the Run window and then type in the “msc” command and hit Enter to open the Device Manager window.
- Under the Device Manager, you will see a list of drivers. From there, look for the NVIDIA Drivers and expand it.
- Next, select the driver entries that are labeled appropriately.
- Then select each one of them and double click to open a new mini window.
- After that, make sure that you’re on the Driver tab and if you are not, just navigate to it then click the Roll Back Driver button to switch back to the previous version of the NVIDIA Drivers.
- Now restart your computer to successfully apply the changes made.
Option 4 – Try to run System Restore
You could also run System Restore as it might help fix the error code 0x0001 in NVIDIA GeForce Experience.
- Tap the Win + R keys to open the Run dialog box.
- After that, type in “sysdm.cpl” in the field and tap Enter.
- Next, go to the System Protection tab then click the System Restore button. This will open a new window where you have to select your preferred System Restore point.
- After that, follow the on-screen instructions to finish the process and then restart your computer and then check if the error code 0x0001 in GeForce Experience is now fixed.
Option 5 – Do a clean install on the NVIDIA driver
- Before you do a clean install on the NVIDIA driver, you have to download the latest version of the Display Driver first.
- Boot your Windows 10 PC into Safe Mode.
- After that, double click on the executable file of the Display Driver Uninstaller to run and install it.
- After the installation, open the program. Once you do, you should see the following window on your screen:
- In the program window, click on the “Clean and restart” button.
- After your PC has rebooted, download the NVIDIA drivers.
- Then select your Product Type, Product Series, Product, Operating System, and Language appropriate for your hardware specifications as well as personal requirements.
- Next, click on Search to display the latest available driver as per the information you entered.
- And click on Agree and Download to start downloading the latest driver executable file.
- Run the executable file after you finished downloading the latest driver executable file and then select Custom and click on Next.
- Afterward, select “Clean Install” and proceed. Doing so would install the latest driver on your PC.
- Restart your PC and check if the error’s now fixed. If not, you can try installing an older version of the driver instead.
Advanced System Repair Pro
One-click automated PC repair solution
![]()
With Advanced System Repair Pro you can easily
DOWNLOAD
Advanced System Repair Pro is compatible with all versions of Microsoft Windows including Windows 11
Share this article:
You might also like
So, you have finished with work, game, movie, music, email, or whatever on your PC, you look at the clock, it is late, you decide to go to sleep or outside, you click on the power button and choose shutdown. Now when a PC is shut down you feel good and go with your business but the next time you power it up you get the same error like the computer never really shut down in the first place. You wonder why and reboot it, just in case and all of the sudden error is gone.
If something similar has happened to you or you had the feeling that after shutting down your computer has not really felt like shutting it down, do not seek professional help, everything is OK with you because when you click on shut down, your computer does not really shut down!
Truth is that Microsoft has changed how to shut down works and how rebooting works in Windows with an update but has not publicly said anything about it so some users may experience this feeling of not shutdown phenomenon and might even think there is something wrong with their PC.
Why this change?
A few years ago shutdown button and option in Windows were really shutting down OS, but things changed when Microsoft wanted to increase boot-up speed. Now when that decision was made shutdown option was changed. So, what was changed? Well in order to increase Windows booting time, the shutdown will now turn off power to PC components and it will look like everything is indeed shutdown but the Windows kernel will actually be saved to a hard drive with all settings and just awaken once the PC is turned back ON. This will result in all errors and other stuff being just still present same as they were once the system was instructed to be turned off.
Rebooting your PC will now clear kernel and file from the hard drive and you will get a clean system startup without any issues tied with the kernel itself.
Workaround
Now that we know why and what change has been made to Windows logical question is can we shut down our PC at all properly? Luckily for us, the answer is yes and we will not need any external application to do it, we can still do it inside Windows itself and it is quite quick and easy.
Bringing back the old shutdown
In order to bring the old shutdown functionality of your PC please follow the instructions but be aware that by doing this your PC will boot a little bit slower since it will have to load the kernel from scratch each time computer is turned ON.
First thing is to go to settings and go to System

Then once you are inside the system, navigate to the power and sleep and click on it to select it. Once you have it selected to all the way to the right and click on additional power settings.

When you click on advanced power settings you should be led to the control panel’s power options. Inside this panel click on top left link where it says Choose what the power button does.

Inside options, you will need to untick the box next to Turn on fast startup (recommended), this option has been ticked ON by the Windows update and probably without notifying you. Option means exactly what was described, it will save kernel state on the hard drive for faster boot time but sadly it can cause some issues since it will never be reloaded from 0.
If you are unable to uncheck the box click on the text beside the shield icon that says: Change settings that are currently unavailable (you will have to be logged in as administrator).

Conclusion
Altho turning off fast startup and shutting down the PC completely will for sure extend your bootup time I still believe that it is the right choice since sometimes a lot of clutter and bad things accumulate over time inside the OS and can cause a vast variety of problems in a long run. So stay safe and shut down that PC as it used to be in the past.
Read More
Error Code 7 — What is it?
This is a typical system error that occurs during Windows setup. To be precise, this error may pop on your computer screen during the text mode portion of Windows setup.
The setup hangs and stops responding and the error message is displayed in either one of the following formats:
‘The file I386Ntkrnlmp.exe could not be loaded. The error code is 7.’
or
‘The file I386L_intl.nlf could not be loaded. The error code is 7.’
Solution
 Error Causes
 Error Causes
Error 7 may be triggered due to several reasons but the 2 most common causes for this error code are:
- Incorrect settings of the BIOS
- Faulty RAM modules
- Registry corruption
Further Information and Manual Repair
To resolve this error on your system, here are some easy and effective DIY methods that you can try.
Method 1 — Change Back the BIOS to its Default Settings
If the underlying cause of error code 7 is related to incorrect BIOS settings, then it is recommended to restore default settings to resolve.
You can reset your computer’s BIOS (basic input and output system) settings to factory defaults by selecting the restore defaults option within BIOS or by removing CMOS ( Complementary Metal Oxide Semi-Conductor) battery from your unplugged computer for about five minutes.
The battery removal method requires opening the computer case, so only attempt it if you are unable to access BIOS.
To reset BIOS follow these steps, reboot your PC and then press the key assigned to loading BIOS during your computer boot splash screen.
The key assigned to load and access BIOS varies from manufacturer to manufacturer but usually, it’s F1, F2, or F12. Once you enter the BIOS, select the ‘Restore Defaults’ option listed in the menu. I
t may be a keyboard shortcut or be under the Advanced settings menu. Confirm settings and then exit BIOS. Hopefully, this will resolve Error 7.
Method 2 — Remove the Faulty RAM
When error code 7 is triggered by faulty RAM modules, then to resolve it simply remove the memory modules that are installed in the computer.
If the error code is displayed again after you remove the memory module, remove a different memory module. This procedure requires you to reboot your PC several times to identify the specific memory module that is not working properly.
Method 3 — Repair the Corrupted Registry
Error code 7 is sometimes also linked with registry issues. If the reason for the error occurrence is a damaged or corrupted registry, then simply download Restoro.
This is a powerful PC Fixer embedded with a registry cleaner. It is easy to operate and user-friendly. The registry cleaner detects and removes all errors in seconds. It cleans the registry and repairs the damages in no time.
Click here to download Restoro.
Read More
If you suddenly see a black border in your computer’s display then you might be wondering how come this happened but worry not for this post will give you a couple of suggestions that could help you resolve the problem.
The black bar could appear at the bottom or just the sides of the screen. Whichever it may be, there are options you can check out. Refer to the options givens below and make sure to follow them carefully.
Option 1 – Try checking the screen resolution
You might want to try checking the resolution of your screen.
- Open the Windows 10 Settings and go to Display.
- Next, go for the “100% (Recommended)” option under Scale and layout for the size of the text, apps, and other items.
- After that, select the Recommended setting again under Resolution.
Now check to see if the black bars are still there. They should be gone at this point, but if for some strange reason nothing has changed, then attempt the steps below.
Option 2 – Try updating Graphics & Monitor drivers
You might want to try updating your graphics and monitor drivers if you haven’t updated them for some time now. To do that, refer to these steps:
- First, boot your computer into Safe Mode.
- After that, tap the Win + R keys to launch Run.
- Type in devmgmt.msc into the box and tap Enter or click OK to open the Device Manager.
- After that, a list of device drivers will be displayed. From there, look for the Graphics drivers or the Monitor drivers and then click each one of them.
- After that, right-click on each entry and select the “Uninstall Device” option from the menu.
- Now restart your computer.
- After restarting your computer, go to the Settings app and Check for Updates in the Windows Update section.
Note: You can also try to roll back the graphics and monitor drivers back to their previous versions if updating them didn’t work. You can also try visiting the manufacturer’s website and download the graphics or monitor driver setup for your operating system.
Option 3 – Try to run the DISM tool
You can also run the DISM Tool as it might also help in getting rid of the black border or bar on your Windows 10 computer. Using this built-in tool, you have various options such as the “/ScanHealth”, “/CheckHealth”, and “/RestoreHealth” which could help you resolve the problem.
- Open the Command Prompt with admin privileges.
- Then type in the following commands and make sure to hit Enter right after you type each one of them:
- Dism /Online /Cleanup-Image /CheckHealth
- Dism /Online /Cleanup-Image /ScanHealth
- exe /Online /Cleanup-image /Restorehealth
- Do not close the window if the process takes a while as it will probably take a few minutes to finish.
Option 4 – Troubleshot the problem in a Clean Boot State
There are some instances that some conflicting programs installed in your computer might be the one that’s causing the Black border issue. To identify which program is causing the problem, you need to put your computer in a Clean Boot State. To do so, follow the steps below.
- Log onto your PC as an administrator.
- Type in MSConfig in the Start Search to open the System Configuration utility.
- From there, go to the General tab and click “Selective startup”.
- Clear the “Load Startup items” check box and make sure that the “Load System Services” and “Use Original boot configuration” options are checked.
- Next, click the Services tab and select the “Hide All Microsoft Services” check box.
- Click Disable all.
- Click on Apply/OK and restart your PC. (This will put your PC into a Clean Boot State. And configure Windows to use the usual startup, just simply undo the changes.)
- From there, start to isolate the problem by checking which one of the programs you installed recently is the root cause of the problem.
Read More
Google Chrome is the most used browser in the world with the most user downloads. Most users are using browsers how it is, open it up and just surf but Chrome offers more than just plain surfing. Here we are presenting you with some interesting features that most users do not use but should.

Use Omnibox to search inside websites
Chrome’s Omnibox, also known as the address bar got its name because it can do much more than just search the internet. You already probably know that just by typing any word you will search the internet with Google or another search engine of choice.
You can also set specific keywords inside Chrome settings to tie them with specific websites, for example, you can tie the letter E with errortools, and then just by typing E windows error you will search term windows error on website errortools. There are some already predefined things and you can add anything you want so this is a great feature in order to speed up your work skipping part of actually opening the site.
Search the internet for selected text
On any webpage, you can simply select any text and right-click on it to get a new menu entry that will say search Google for «your selected text» and by clicking on it you will automatically search the net for the selected term.
Grouping tabs
When we surf the internet some of us tend to have plenty of open tabs and over time they can clutter and shrink in width making the surfing experience an unpleasant one.
Chrome has tab groups and you really need to start using them since you can organize much better all the tabs, even color-code them.
Search all open tabs
On top right part on title bar right next to minimize button there is small arrow pointing down, once you clik on it all opened tabs will be displayed by name as a listand by clicking on it you will automatically switch to it.
Change download location
Google Chrome has its default download destination but you can change that destination and even turn on option to be asked where you would like your download to be saved each time.
Live Captions
YouTube has cations for its videos but Chrome itself has live caption option in order to provide you with automatic AI captions for any type of video or audio on any website. If you are struggling with following what is being said try this awesome option.
Extensions
Using extensions in Chrome is awesome, specialy if extensions are usefull but if you go incognito they are not active. There is an option in Chrome to turn on the extensions even in incognito mode and even better, you can even choose which ones you want to be active, you do not need to turn all of them.
Read More
Roblox is a very popular online game with millions of gamers playing it each day and as such it will naturally bring a lot of malware and attack on players trying to steal and exploit them for monetary gains. The latest attack and high-profile stealing of currency and assets happened exactly in Roblox.
Malicious activities have been reported to come from chrome extensions. So far 2 extensions have been identified that have hidden malware inside them but there could be more of them currently undetected. Extensions work as a front while in the back they mine user logins and other data in order to steal stuff from the Roblox platform.
To make things worse some of the malware is within long extensions like SearchBlox. The SearchBlox extension allows you to search quickly for other users if it was legitimate but has been compromised within the last month. There is evidence that people are stealing Roblox currency with the data gathered by the hidden backdoor in it.
SearchBlox extension is still Active in Chrome Web Store, with the primary listing still with the «Featured » badge. Google is actively removing malicious software from its storefront on a regular basis but this one still lingers in it.
If you or your kid have this Chrome extension installed, uninstall it right away and always be careful about which extension you install and give access to your system, keep them updated and check various blogs and article sites to inform yourself when a bad one is found.
Read More
Windows 11 brought with it a simplified right-click menu that has limited options. If you would like to bring the old Windows 10 right-click menu you will have to do some registry tweaking but it is doable.
 Since this requires registry tweak, please follow given solution step by step
- Press Start and type RegEdit
- Click on Registry Editor
- Inside registry editor find next key:
ComputerH_KEY_CURRENT_USERSOFTWARECLASSESCLSID - Right click in the right part of editor window and select New > Key
- Type in as a name: {86ca1aa0-34aa-4e8b-a509-50c905bae2a2}
- Right click on {86ca1aa0-34aa-4e8b-a509-50c905bae2a2} key and select New > Key again to create new key inside this one
- Name inside key InprocServer32
- Double click the “(Default)” key in InprocServer32 to open it
- When the Default key opens close it without making any changes by clicking on OK. This will make its value property Blank instead of value not set
- Close Registry Editor
- Restart your PC
Once the system is up if the followed solution is applied you will now have an old school menu once right-click is used.
Read More
If your Windows 10 laptop suddenly turns off when you unplug its power cord, then you’ve come to the right place as this post will guide you on how you can fix this issue.
One of the most common causes for this kind of issue is that there is some problem with your laptop’s battery. It is possible that it might have gone bad or has been damaged. However, this couldn’t be the case especially if the laptop is new. The problem could have something to do with the system settings, connections, laptop hardware, and so on. To fix it, there are various suggestions you can check out such as follows:
Option 1 – Perform a hard reset on your laptop
This option works in most cases when the laptop with a removable battery is charging slowly as it is plugged in constantly. Refer to the steps below to do a hard reset on your laptop.
- Switch off the power of your laptop.
- Disconnect your laptop’s charger and then remove the battery.
- Tap and hold the power button for at least 30 seconds – doing so will discharge the capacitors of the motherboard and reset the memory chips that were active constantly.
- Plug the battery back and then charge the laptop again.
Check if the problem is fixed, if not, proceed to the next option below.
Option 2 – Try to change the Power Options
- Tap the Win + R keys to open the Run utility.
- Then type “powercfg.cpl” and tap Enter to open the Power Options window.
- Next, go to your selected power plan and click the “Change plan settings” option to open a new page.
- From there, click on the “Change advanced power settings” option. This will open a new window where you can see various power consumption options.
- Now on the next window that appears, click on “Change advanced power settings”. This will open another window where you have to expand the Processor power management > Maximum processor state.
- Then change the value for On battery mode to 25% and enable Adaptive brightness.
- Now shut down your computer and try to boot it with the power cord unplugged.
Option 3 – Try to run the Power troubleshooter
The next thing you can do is to run the Power troubleshooter. To do so, follow these steps:
- Go to Settings and navigate to Update & Security > Troubleshoot.
- After that, look for the “Power” option from the given list of built-in troubleshooters and click on it.
- Next, click on the “Run the troubleshooter” button to run the Power troubleshooter.
- Once the troubleshooter is done identifying the problems, follow the next on-screen instructions to resolve the problem.
Option 4 – Try to run the Power Efficiency Diagnostics Report
You could also try to run the Power Efficiency Diagnostics Report to fix the problem. This tool is helpful and will help you analyze the status of the battery but note that this can be quite overwhelming especially if you’re not well-versed in this matter.
Option 5 – Try to uninstall or reinstall the Battery driver
You might also want to uninstall or reinstall the battery driver as it can also resolve the problem. But before you start, you have to shut down your computer and remove the power chord as well as the battery. Once you’re done, follow these steps:
- Plug the power cord and restart your computer.
- Once your computer has restarted, tap the Win + R keys to open the Run utility and type “devmgmt.msc” in the field and tap Enter to open the Device Manager.
- After that, look for the “Batteries” driver from the list of drivers and expand it.
- Then right-click on the “Microsoft ACPI-Compliant System” driver and click on the “Uninstall device” option.
- Once it’s done, restart shut down your computer and remove the power cord and then attach the battery.
- Now attach the power chord again and restart your computer to automatically install the driver.
Option 6 – Try to update the BIOS
Updating the BIOS can help you fix the problem but as you know, BIOS is a sensitive part of a computer. Even though it is a software component, the functioning of the hardware depends on it largely. Thus, you must be careful when modifying something in the BIOS. So if you don’t know much about it, it’s best if you skip on this option and try the other ones instead. However, if you are well-versed in navigating the BIOS, then follow the steps below.
- Tap the Win + R keys to open the Run dialog box.
- Next, type “msinfo32” in the field and press Enter to open System Information.
- From there, you should find a search field on the bottom where you have to search for the BIOS version and then press Enter.
- After that, you should see the developer and version of the BIOS installed on your PC.
- Go to your manufacturer’s website and then download the latest version of BIOS on your computer.
- If you are using a laptop, make sure that you keep it plugged in until you have updated the BIOS.
- Now double click on the downloaded file and install the new BIOS version on your computer.
- Now restart your computer to apply the changes made.
Note: If updating the BIOS didn’t help, you might want to consider resetting it instead.
Read More
Black Screen During Installation — What Is It?
Many are upgrading their OS to Windows 10, however, it’s not always smooth sailing because users have been reportedly experiencing different bugs including Black Screen after a successful update.
One common issue in installing Windows 10 is the appearance of a black screen after installation. This usually occurs when the user restarts the computer. Initially, there will be a black screen only appearing on the monitor. There are also cases where a mouse cursor is present, while some cases have no cursor at all.
Not only that, it seemed that you’ve lost all your desktop icons when experiencing this bug.
Solution
Error Causes
Just like the other bugs experienced by Windows 10 users, booting to a black screen has reasons. Before you even try to look for the solution, you first have to determine the cause of the error, in this case, the error would be black screen when booting.
- Error on external devices such as printer or mouse.
- Having outdated display/video drivers that normally result in black screen when OS is updated.
If error messages are left unsolved, you may encounter other Windows 10 related issues such as error code 0xc0000142.
Further Information and Manual Repair
Before you even think of upgrading your OS to Windows 10, you need to know that there are specific system requirements and specifications to be able to successfully update your operating system.
- Minimum of 1 gigahertz (GHz) Processor
- Either 1 (GB) (32-bit) or 2 GB (64-bit) Ram
- You need at least 16 GB of free hard disk space
- A Microsoft DirectX 9 graphics device or later with WDDM 1.0 driver graphics card
- 800 x 600 display
- A Microsoft account and Internet access.
There are more system requirements in order to use other certain Windows 10 features, but we’ll focus on solving your black screen problem in this article.
IMPORTANT NOTE: While it’s possible that you’ll be able to find the solution for your black screen during Windows 10 update, contacting the service of a professional technician or using an automated tool is advisable if you’re not confident in performing the methods to be discussed.
Method 1: Windows 10 DVD Boot
- Hit Repair your computer at the Install Now screen.
- Press Advanced Options
- When you’re in the Advanced Options find Troubleshoot and click it.
- Proceed to pressing Startup Repair
- Simply follow the instructions of the screen and check if that helps solve the black screen problem.
Method 2: Safe Mode from Windows 10 DVD Boot
- Go to Install Now screen
- Hit Repair your computer button
- Go to Advanced Options
- Click Safe Mode option
There’s a chance that you’ll get an error prompt saying, “installation cannot be completed in safe mode.” If this happens, simply press Shift + F10. This command will redirect you to the Command Prompt. You just open Device Manager by keying in devmgmt.msc then disable the display adapters, now check if you’ll be able to successfully boot in normal mode.
This process will normally allow you to complete the Windows 10 installation, if that’s the case you can just update the display adapter drivers from the manufacturer’s website. Restart your computer and see if this solves the problem.
Method 3: Driver Roll Back
- Hit Windows Key + X then press the Device Manager
- Expand the Display Adapters option
- Right-click the listed Display Adapter and press on properties
- Find the Driver Tab and click on it, then press Roll Back Driver
Do take note, however, that the Roll Back Driver option is not available if there was no previous version installed.
Method 4: Check External Devices
Since one common cause of black screen during a Windows 10 update is the external devices you use in your computer, you might want to consider these steps as well.
- Simply unplug all of the external devices you currently use
- Restart your computer
- If in case this solved your black screen problem, carefully plug back the devices one at a time to determine which of the device is the culprit.
- Update the drivers for the outdated hardware using a reliable third party tool.
Method 5: Fast Startup Disabled
Some Windows 10 users had success in solving their black screen problem by disabling the fast startup.
- Go to the Control Panel, find Power Options and press “Choose what the power button does,” which is located in the left pane of the panel.
- Hit the “Change settings that are currently unavailable.”
- Make sure to unmark the checkbox button saying, “Turn on fast startup.”
Read More
You have probably heard a lot of good things about gaming mice, how they are better feeling, better in any way possible and it is all true, everything you heard is actually true, they are superior in any way to a regular mouse but with one big disadvantage, and that would be the price. While you can find a regular mouse for pocket change, a gaming mouse is in comparison very expensive even for entry-level ones.

In this article we will explore all advantages and compare it with the regular one so you can come up with your own conclusion about do you really need one for yourself or if you are fine with regular.
Price
As stated price is one factor that does not favor gaming mice. Regular mouse for a personal computer goes around 10 or 20 USD, while entry-level in gaming one will be 40 USD and can go up to 250 USD, this large gap in price is usually determining factor why people pick up regular one. If you are on a really tight budget go for the regular one, but if you can afford a gaming one get it without second thoughts.
Software
This is where you will see the big difference between mice. Regular ones when connected are recognized and the driver is automatically installed and you can use it, same goes with gaming ones but with one big difference, you have an option to install additional manufacturers’ software specially tailored for your mouse. In the application, you will be able to access some features that are specific to the mouse model that you could not set in typical Windows mouse properties. Beside more options software can also have features like setting your profiles and saving them to be recalled when you need them on the fly.
Sensitivity of mouse
The sensitivity of the mouse is measured in dots per one inch or short DPI, this is directly shown on your screen by how fast your mouse can move, higher sensitivity means your mouse will move faster across the screen and lower means it will move slower. All gaming mice come with buttons and settings that will allow you to change DPI on the fly and you can choose precise DPI settings in the software.
The regular mouse comes with DPI around 800 and goes to 1200 typically and does not have usually the option to change this while gaming mice start at 400 and can go as high as 26000 with the option to change it. Some regular mice can have only 1 option of DPI, usually very cheap ones.
Polling rates in mice
Pooling rate is the measurement of how often your mouse reports where it is positioned on the computer. The higher the pooling rate, the more responsive your mouse will be and vice versa. It is measured in hertz (Hz) and regular mice have them around 125Hz that is enough if you are using a computer for office, internet, and mail work.
If you are working in design or gaming you will need more than 125Hz polling rate, luckily gaming mice come with a minimum of 500Hz as an entry point and some hi-end models are going as far as 8000Hz. This very high pooling rate will get some extra load on your CPU but the mouse itself will be maximally responsive and will respond even to the smallest moves.
Ergonomics
Regular mice are well just mice, they are typical shape and size, gaming mice are made with ergonomics in mind. How they are made for extensive daily use of several hours per day they are constructed in a way to offer a pleasant and pain-free experience.
If you work on a computer for long periods of time consider gaming an ergonomic mouse since it will take the strain from hands and place them in a more natural position.
Macro keys
Gaming mice most of the time come with more keys compared with regular ones and good thing is that via its software you can tie certain actions to these extra keys making work or gaming more pleasant and quicker.
Components and material quality
In order to make regular mice more affordable and cheaper materials and quality of components had to suffer. Gaming mice have millions of guaranteed clicks by companies that make them before they break and regular ones usually do not guarantee a single one. This is due of course quality of materials that have been used in constructing these devices.
In the long term, if you use a gaming mouse for typical daily tasks it will outlive your regular one and on the side offer you more pleasant and responsive use along the way.
Read More
 Windows 11 release date is closing in, some people have tried it via insider build, some have decided not to. It has come to our attention that there is a little website made by BlueEdge that offers a virtual Windows 11 desktop.
Opening the Website will put you right inside Windows 11 desktop, now take note that this is not Windows 11, it is a simulation of Microsoft’s newest OS and therefore many things will not work like File Explorer, etc.
One thing you can make sure it is working is UI itself, you can see how you do like the new Taskbar, start menu, widgets, and some other things. You can just pop up on the site and check how you do like the overall new look and feel of Windows 11 UI before installing it or trying it.
We are sure that many more options will come in time but even now you can get a feel of the newest OS.
Windows 11 BlueEdge site: https://win11.blueedge.me/
Read More
![]()
Copyright © 2022, ErrorTools. All Rights Reserved
Trademarks: Microsoft Windows logos are registered trademarks of Microsoft. Disclaimer: ErrorTools.com is not affiliated with Microsoft, nor claim direct affiliation.
The information on this page is provided for information purposes only.
![]()
Repair your PC with one click
Please be aware that our software needs to be installed on a PC system with Windows on it, Open this website on a desktop PC and download the software for easy and quick elimination of your issues.
Пошаговое руководство по устранению ошибки GeForce Experience 0×0001.
Самый быстрый и простой способ решить досадную ошибку GeForce Experience — просто удалить и переустановить инструмент.
Это не только решит проблему, но и даст вам новую установку, в которой также не должно быть других ошибок.
С тех пор, как NVIDIA решила обновить свой инструмент GeForce Experience, многие сталкивались с раздражающим сообщением «Что-то пошло не так, ошибка 0×0001». Просто представьте это; ваш компьютер впервые за несколько дней загружается плавно — более гладко, чем свежеиспеченная, все еще теплая, горячая булочка с кусочками английского масла комнатной температуры — а затем внезапно появляется GeForce, чтобы испортить вам день сокрушительным ударом. Что ж, может быть, это немного натянуто, но суть вы поняли — ошибка GeForce Experience 0×0001 невероятно раздражает.
К счастью, есть несколько исправлений, которые работают с этой конкретной ошибкой, и все они требуют ограниченного уровня технических знаний.
В следующей статье мы рассмотрим наиболее эффективные способы устранения ошибки GeForce Experience 0×0001.
Содержание
- Что такое GeForce Experience
- Как исправить GeForce Experience 0×0001
- Переустановите GeForce Experience
- Установка
- Заключение
Что такое GeForce Experience
GeForce Experience — это графический помощник NVIDIA для всех графических процессоров GeForce. Это чрезвычайно эффективный инструмент, который позволяет пользователям не только обновлять свои драйверы, но также позволяет пользователям сохранять снимки экрана и видео, обмениваться прямыми трансляциями и даже оптимизировать настройки игры одним нажатием кнопки.
Хотя GeForce Experience считается одним из лучших графических приложений, оно предлагает уникальный набор ошибок, которые могут быть невероятно раздражающими. Вот наши быстрые исправления для кода ошибки 0×0001.
Как исправить GeForce Experience 0×0001
Есть несколько различных способов исправить досадную ошибку GeForce Experience 0×0001. В этой статье мы расскажем о самых простых и эффективных решениях.
Переустановите GeForce Experience
Первый и наиболее эффективный способ исправить GeForce Experience — просто переустановить приложение. Вот как это сделать.
1. Откройте функцию «Добавить или удалить программы».
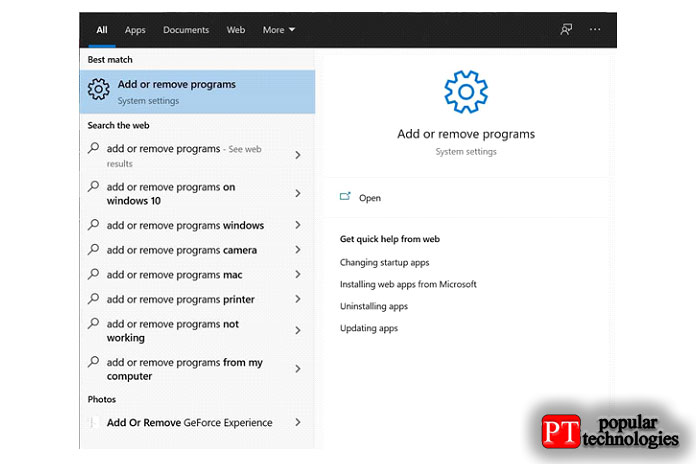
Чтобы начать, нажмите клавишу WIN и введите «добавить или удалить программы» в поле поиска. Щелкните функцию добавления или удаления программ.
2. Найдите NVIDIA GeForce Experience в списке приложений.
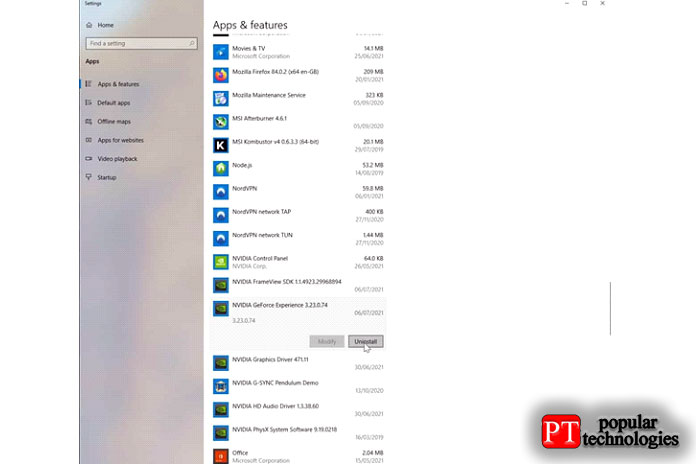
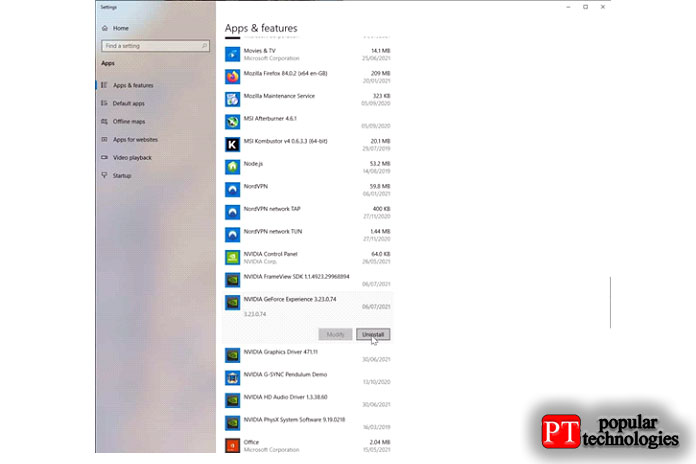
В разделе «Приложения и функции» прокрутите вниз, пока не найдете «NVIDIA GeForce Experience (версия)». Найдя, просто щелкните по нему и выберите Удалить из опций.
3. Подтвердите удаление и перезагрузите компьютер.
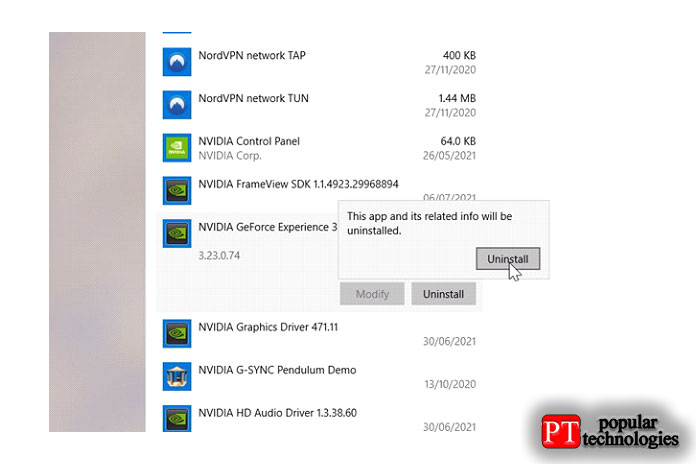
Вам будет предложено сообщение, подтверждающее, что приложение будет удалено, просто выберите «Удалить», чтобы начать процесс.
На этом этапе начнется удаление GeForce Experience. Дайте ему возможность удалить, а затем перезагрузите компьютер.
Теперь вам нужно загрузить последнюю версию GeForce Experience с веб-сайта NVIDIA и переустановить приложение.
Установка
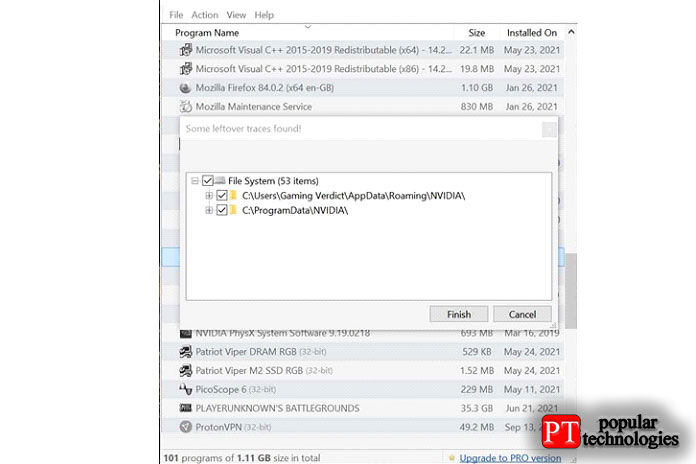
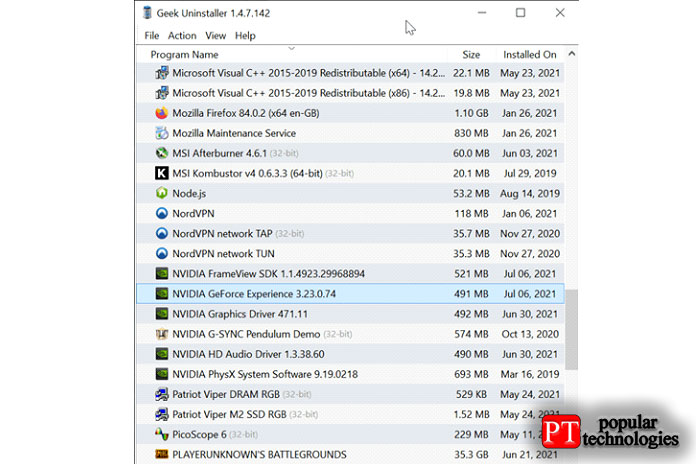
Иногда файлы трассировки часто могут быть причиной ошибок в различных приложениях. Использование такого инструмента, как Geek Uninstaller, поможет удалить эти проблемные файлы и позволит выполнить новую установку. Вот как это сделать.
1. Установите Geek Uninstaller
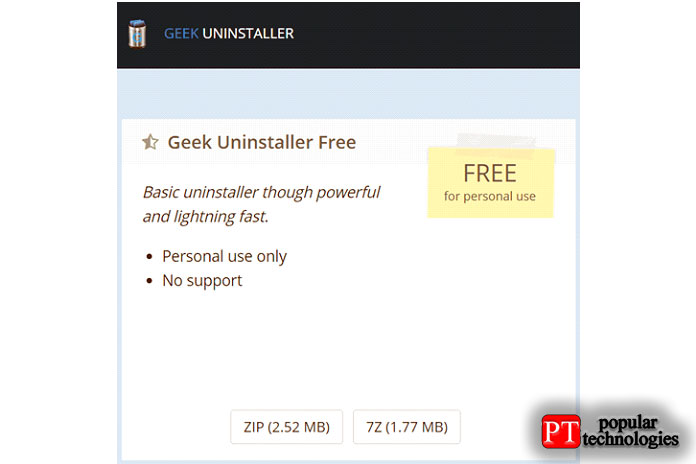
Начните с загрузки установщика Geek по следующей ссылке.
После загрузки установите приложение и перезагрузите компьютер.
2. Загрузите программу удаления Geek и удалите GeForce Experience
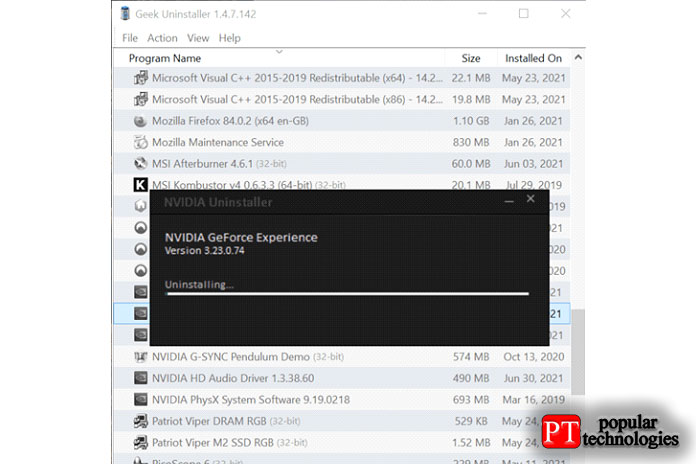
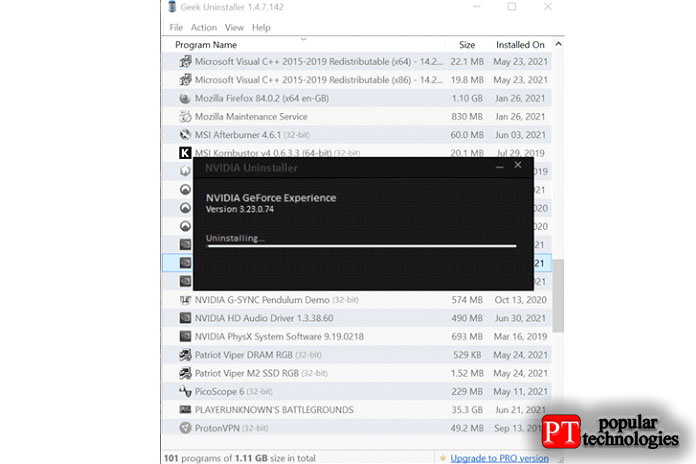
Загрузите приложение и найдите в списке приложение GeForce Experience. Щелкните по нему и выберите из списка «Удалить».
3. Удалите файлы трассировки после удаления GeForce Experience
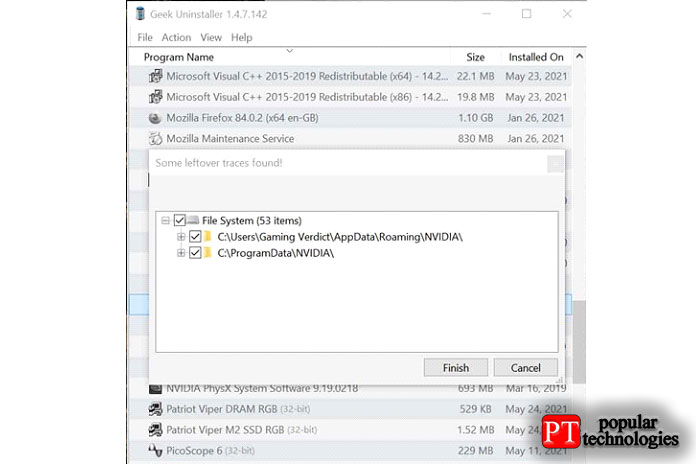
После удаления GeForce Experience Geek Uninstaller предложит вам удалить все файлы трассировки, найденные для приложения.
Просто выберите «Готово», и программа удаления автоматически удалит файлы трассировки.
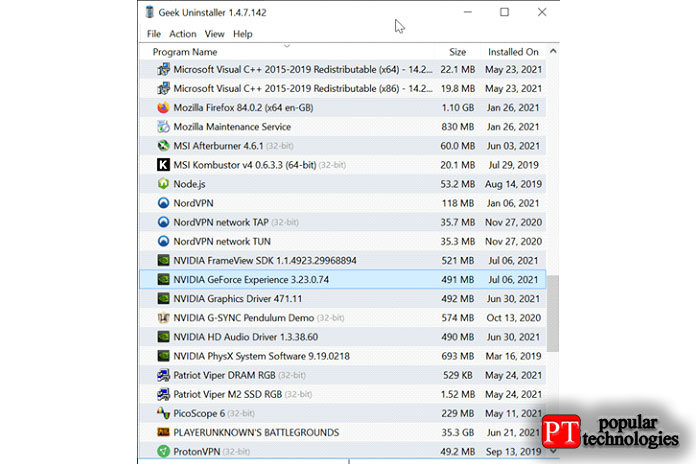
4. Переустановите GeForce Experience
На этом этапе вы можете переустановить GeForce Experience, зная, что вы устанавливаете его на новый диск.
После установки просто перезагрузите компьютер, и вам больше не придется беспокоиться об ошибках GeForce.
Заключение
Итак, вот оно, наше краткое руководство по исправлению кода ошибки GeForce Experience 0×0001. К счастью, это исправить невероятно просто и не требует особых технических знаний.
Однако, если у вас возникли проблемы с этим исправлением, не стесняйтесь оставить нам комментарий в разделе ниже, и мы сделаем все возможное, чтобы помочь решить проблему.
GeForce Experience is a boon for people who like gaming on graphic cards made by NVIDIA. But some users have been reporting error code 0x0001 while trying to open the NVIDIA GeForce Experience utility. The whole error reads as-
Something went wrong, Try rebooting your PC and then launch GeForce Experience, ERROR CODE: 0x0001.

This kills the overall experience of the graphics card users because of the fact that NVIDIA GeForce Experience would not even start at this point. Hence, making it and the useful features unusable. But, if you encounter this error, too, we will be discussing some potential fixes to get rid of it.
We will be taking a look at the following fixes to get rid of the error 0x0001 for NVIDIA GeForce Experience on Windows 10. But before you begin, do try rebooting your PC and then launch GeForce Experience and see if it works. Go through the entire list first and decide the suggestions you want to try.
- Check the NVIDIA Display Driver Services.
- Update your NVIDIA Display Drivers or migrate to the BETA release.
- Clean Install, and Reinstall the Drivers.
- Relaunch GeForce Experience
- Check NVIDIA Telemetry Container Settings
- Reinstall GeForce Experience
- Update Windows and check for Optional Updates
- Install the latest version
- Use Local account for services
- Create a local user account.
If you create a System Restore point usually, you can undo any modifications on your computer by performing System Restore. In case you do not have a habit of creating a System Restore point, I suggest you start doing so because it is a powerful feature that will let you fix your computer in some scenarios.
1] Check the NVIDIA Display Driver Services
You will have to open Windows Services Manager. Start by hitting the WINKEY + R button combination to launch the Run utility. Then type in, services.msc and then hit Enter. It will now launch the Services window and will populate a list of services.
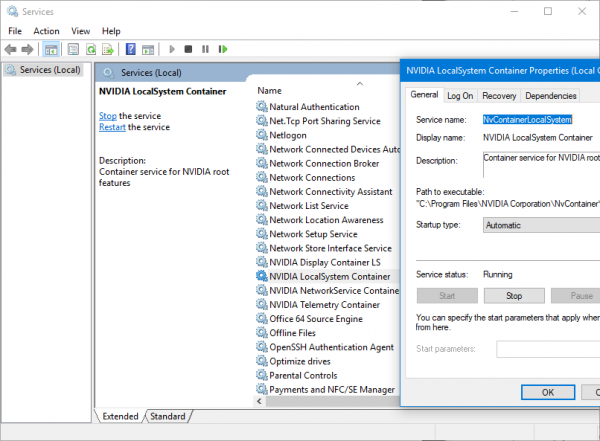
Now, look out for the following Services, and ensure that their Startup types are as follows:
- NVIDIA Display Container LS – Automatic
- NVIDIA NetworkService Container – Manual
- NVIDIA LocalSystem Container – Automatic
- NVIDIA LocalSystem Container – Automatic
- NVIDIA GeForce Experience Service – Automatic (Delayed Start)
- NVIDIA Geforce Experience Backend Service – Automatic (Delayed Start)
- NVIDIA Telemetry Container service – Automatic
Double-click on it to open its Properties box. If the service is not running already, select Start to start running them else, first select Stop and then select Start to restart them.
You may also restart NVIDIA Services and see if that helps.

- Open Run prompt using Win + R
- Type services.msc, and press the Enter key
- Locate services that start with NVIDIA
- Right-click on them, and choose to restart.
Check if this fixes your issue.
2] Update your NVIDIA Display Drivers or migrate to the BETA release
One of the main things that you should be doing is updating your NVIDIA Display Drivers. For that, you need to head to their latest Display Driver Download Website to download the NVIDIA driver.
From the drop-down menus, you need to select the exact model of your Graphics Card. Then upon hitting the Search button, you should be able to see the latest release of the driver for your graphics card. Accept the terms of use and then download the driver. Finally, run the downloaded file to install your latest drivers.
Reboot your computer for the changes to take effect.
But in case you want to try out the beta release, you can find it here. Before moving forward, you must be aware that beta software is buggy and unstable, causing several different bugs, but at the same time, it will contain some fixes for some bugs in the stable release.
Related: Fix NVIDIA Container high Disk, GPU, Memory usage.
3] Uninstall and Reinstall NVIDIA Drivers
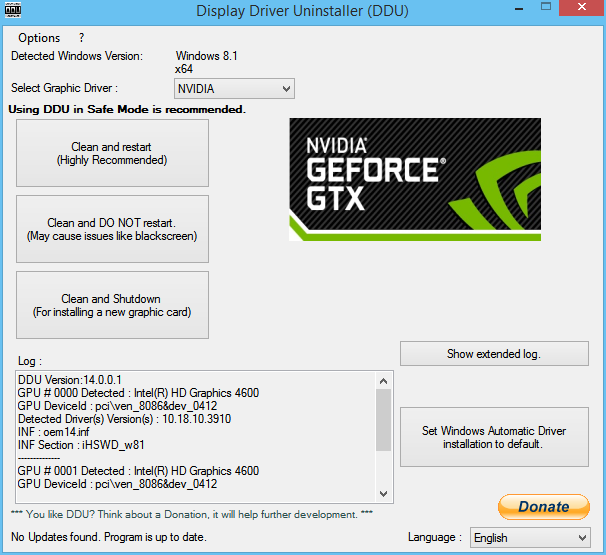
You can use Display Driver Uninstaller to uninstall your NVIDIA Display Driver. After that, you can download & install the latest version of the NVIDIA Graphics Drivers.
4] Relaunch GeForce Experience
GeForce Experience from NVidia Corporation is software, and like any other, it can have software issues. Sometimes closing the application and starting it again can help you resolve the problem.
5] Check NVIDIA Telemetry Container Settings
The software houses a Telemetry container that can collect data from graphics card drivers to improve it further. You may try reducing the amount of data collected as part of the telemetry in the current version.
6] Reinstall GeForce Experience
If nothing else works, you can choose to reinstall the software. First, you need to go to the applications list and uninstall it. You can also take a look at the Program Files folder, which houses the uninstaller. Then go to the Nvidia website, and download the latest stable version of the software. Then install it on the computer by following the screen instructions. Open the software, and check if the issue is resolved.
You can also enable it in the startup settings, so it launches and keeps the experience ready. If it doesn’t work, you can also think of clean installation of the software by using third-party software that can remove traces of the file from the computer and remove it. At times corrupted files may be left behind.
7] Update Windows and check for Optional Updates
At times Windows Updates cause problems. As part of the update, optional updates are also released, which can be installed if you are facing a problem with that particular software or device driver.
Go to Windows 10 Settings > Update and Security and click on the link of Optional Updates. Check there is any update available for NVIDIA Driver Services. Install it. Make sure to restart and then check on the software.
8] Install the latest version of GeForce Experience
Starting with the easiest, it is always a good idea to check if there is an update or download the newest version of the software and install it. If the issue is because of an outdated version, then it should help you fix it. Ensure to restart the service.
9] Use Local Account for NVIDIA Services

Among all the NVIDIA services, there is an NVIDIA LocalSystem Container. Services such as these need to be run through the Local System Account, so there is no permission issue, and it’s secure. However, if it is set to run with your account, then it can be a problem.
- Use Win + S to open search, type servcies.msc, and click to launch when it appears.
- Locate the NVIDIA Services and double-click on NVIDIA LocalSystem Container
- Select Local System Account under the Log On tab instead of any other account, including yours
- Click Apply and then on the OK button to close.
Launch the GeForce Experience to check if the issue persists. If yes, then repeat the same steps for all the NVIDIA services, and check again.
10] Create Local Account
The last in the list is creating another local admin account and test with it. You will need to do this if nothing else works, and it’s better than reinstalling Windows. Follow the linked guide to creating one.
Once done, log in to the account, and install the latest version of NVIDIA GeForce Experience and a few games if possible. Launch the software, and check if you see any issue. To verify further, play some games, and use them for some time. If all goes smoothly, your user account may have some problems.
The way out is to migrate everything to the new local account either using software or manually, whatever works for you. Once done, you can choose to remove the old account for backup for some time and then remove it with due time.
What is a Local System Account in Windows?
It is a predefined local account used by the service control manager. It has extensive privileges on the local computer and acts as the computer on the network. That said, it is best not to use this account unless you have a direct option available to use it. Only if you have a clear idea of what you are doing, use this anywhere else on the PC.
What is GeForce Experience?
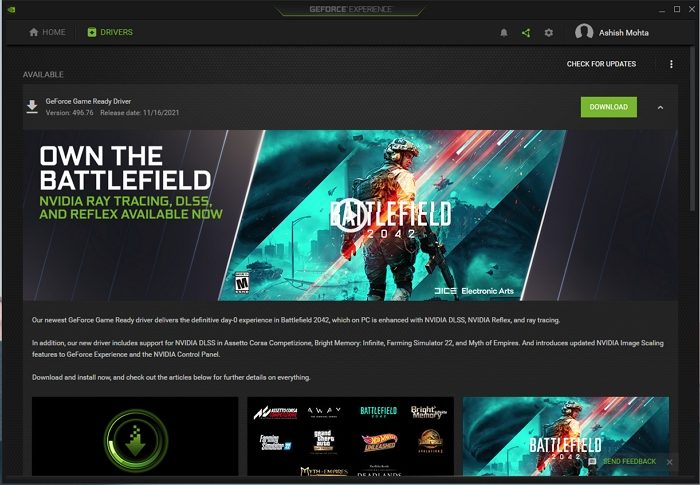
At the core, it is a Driver Updater software, but NVIDIA has evolved it to deliver customization specific to the game and delivers regular updates. You get access to optical settings to use directly. NVIDIA calls these experiences Game Ready Driver, which offers enhancements such as DLSS, Reflex, and Ray tracing. The application not only offers driver updates to NVIDIA GPU but also custom driver settings to enhance game performance. The games are automatically detected, and you get to see a quick comparison between the Current and Optimal settings.
I hope this helps!