Цветные принтеры OKI на сегодняшний день являются пожалуй самыми инновационными. Одна только светодиодная технология чего стоит. Не все об этом знаю, но цветные принтеры и МФУ OKI так же имеют монохромный режим печати. При печати в этом режиме цветной тонер не тратится в отличии от остальных производителей. Данный режим достигается достаточно просто, для этого в монохромном режиме производится физическое отсоединение цветных драм-картриджей от привода.
За отключение цветных драм картриджей в 300-й и 500 серии цветных принтеров и МФУ OKI отвечает специальная муфта. При активации монохромного режима в драйвере принтера муфта сдвигает в сторону планку, которая приподнимает цветные драм-картридж вверх. В этом режиме драм-картриджей не касается бумага и прочие подвижные части процесса печати. Данный режим позволяет не только избежать расхода тонера, но и в разы увеличить ресурс цветных драм-картриджей. Кстати в этом режиме так же повышается скорость печати стразу на несколько страниц.
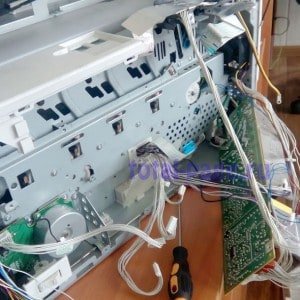
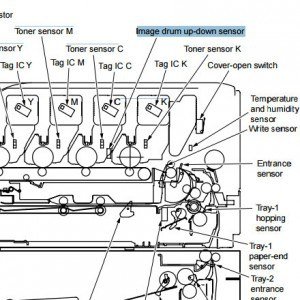
Image drum up-down sensor
Несмотря на все достоинства реализации монохромного режима, этот режим иногда доставляет неудобства в связи с возникновением ошибки «SERVICE CALL 142:ERROR». Эта ошибка указывает на сбой переключения режимов «монохромного» и «полноцветного». Эта ошибка чаще всего возникает из-за застревания одного из драм-картриджей в своем посадочном месте. У муфты привода не хватает мощности приподнять драмы и датчик «Image drum up-down sensor» выдает ошибку SERVICE CALL 142. Решается проблема переустановкой драм-картриджей и смазкой посадочных мест. Бывает, что датчик «Image drum up-down sensor» запылился или вышел из строя. В нашем последнем ремонте причиной возникновения ошибки стал выход из строя самой муфты переключения режимов. Муфту приобрести оказалось нереально сложно, но нам повезло, так как на складе лежал списанный трудяга OKI C511, вот с него эту муфту и переставили.
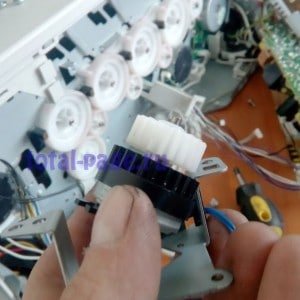
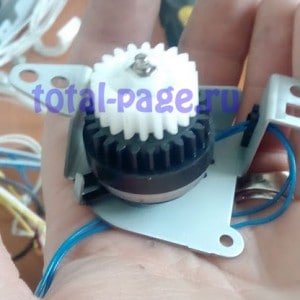
Муфта переключения с полноцветного режима в монохромный
Оцените качество заметки
![]() Загрузка…
Загрузка…
4 комментария
-

Ренат / 02.11.2015
Спасибо за статью!
Ушло в копилку знаний. -
Дмитрий / 07.02.2018
Спасибо!!! очень помогла статья.
-
Михаил / 30.11.2021
Похоже у меня тоже муфта накрылась. Снял панель слева, там на плате стоит оптопара которая регистрирует поднятие. Полоска с зубцами двигается вперед, поднимает картриджи и перекрывает оптопару. Замерял время от включения(нажал на кнопку) до момента когда картриджи поднялись, оказалось 16,31 секунды (выскакивает ошибка). Выключил аппарат. Потом нажал кнопку включения и пальцем подталкивал эту полоску начиная с 13 секунды, аппарат стартанул нормально.
-
Если муфту не найдете, пишите, есть донор
-


Оставить комментарий
Обращаю внимание, что ошибки с номерами 300-600 являются пользовательскими ошибками, которые кроме номера содержат довольно подробное описание самой ошибки, а при нажатии на кнопку HELP можно получить подробное описание того, как эти ошибки разрешить.*Некоторые из этих ошибок приведены ниже
Пользовательские ошибки
Содержание
- Thread: OKI MC861+ Fatal Error 142
- OKI MC861+ Fatal Error 142
- Re: OKI MC861+ Fatal Error 142
- Re: OKI MC861+ Fatal Error 142
- Re: OKI MC861+ Fatal Error 142
- Re: OKI MC861+ Fatal Error 142
- Re: OKI MC861+ Fatal Error 142
- Oki error 142 fatal error
- Oki error 142 fatal error
- Error Messages
Thread: OKI MC861+ Fatal Error 142
Thread Tools
Display
Field Supervisor 500+ Posts 
 Join Date Jun 2009 Location oxford Posts 652 Rep Power 34
OKI MC861+ Fatal Error 142
I have error 142 on a MC861+ which is an ID up/Down error.
I can see the drums moving up and down so I suspect the ID up/down sensor.
I am struggling to find this in the parts guide and wondered if anyone here would know if it is part of another assembly..
Re: OKI MC861+ Fatal Error 142
If I remember , its part of the board on the left side. Did you check the motor in test mode, with and without drums? Couple of times I had this code on that copier, it was due to binding mechanism. Cleaning and greasing was ok.
Service Manager 10,000+ Posts

 Join Date Jul 2016 Location Raleigh NC Posts 19,751 Rep Power 551
Re: OKI MC861+ Fatal Error 142
I have error 142 on a MC861+ which is an ID up/Down error.
I can see the drums moving up and down so I suspect the ID up/down sensor.
I am struggling to find this in the parts guide and wondered if anyone here would know if it is part of another assembly..
is the ITB seated properly? I have seen it where it was not seated correctly and caused this error.
Field Supervisor 500+ Posts
Join Date Jun 2009 Location oxford Posts 652 Rep Power 34
Re: OKI MC861+ Fatal Error 142
Thanks!
I didn’t check the motor because I could see the drums lifting when I fooled the top cover.
Is it a strip down to gain access to the lift mechanism?
I had them change the cyan drum and it worked for a couple of days.
Also is the board on the left side when looking at the printer from the front?
Field Supervisor 500+ Posts
Join Date Jun 2009 Location oxford Posts 652 Rep Power 34
Re: OKI MC861+ Fatal Error 142
Thanks for your response.
Yes I did reseat the ITB and it is in as it should.
Re: OKI MC861+ Fatal Error 142
Yes, this board is on the left side , standing in front of copier.
Источник
Oki error 142 fatal error
Цветные принтеры OKI на сегодняшний день являются пожалуй самыми инновационными. Одна только светодиодная технология чего стоит. Не все об этом знаю, но цветные принтеры и МФУ OKI так же имеют монохромный режим печати. При печати в этом режиме цветной тонер не тратится в отличии от остальных производителей. Данный режим достигается достаточно просто, для этого в монохромном режиме производится физическое отсоединение цветных драм-картриджей от привода.
За отключение цветных драм картриджей в 300-й и 500 серии цветных принтеров и МФУ OKI отвечает специальная муфта. При активации монохромного режима в драйвере принтера муфта сдвигает в сторону планку, которая приподнимает цветные драм-картридж вверх. В этом режиме драм-картриджей не касается бумага и прочие подвижные части процесса печати. Данный режим позволяет не только избежать расхода тонера, но и в разы увеличить ресурс цветных драм-картриджей . Кстати в этом режиме так же повышается скорость печати стразу на несколько страниц.
Image drum up-down sensor
Несмотря на все достоинства реализации монохромного режима, этот режим иногда доставляет неудобства в связи с возникновением ошибки «SERVICE CALL 142:ERROR». Эта ошибка указывает на сбой переключения режимов «монохромного» и «полноцветного». Эта ошибка чаще всего возникает из-за застревания одного из драм-картриджей в своем посадочном месте. У муфты привода не хватает мощности приподнять драмы и датчик «Image drum up-down sensor» выдает ошибку SERVICE CALL 142. Решается проблема переустановкой драм-картриджей и смазкой посадочных мест. Бывает, что датчик «Image drum up-down sensor» запылился или вышел из строя. В нашем последнем ремонте причиной возникновения ошибки стал выход из строя самой муфты переключения режимов. Муфту приобрести оказалось нереально сложно, но нам повезло, так как на складе лежал списанный трудяга OKI C511, вот с него эту муфту и переставили.
Муфта переключения с полноцветного режима в монохромный
Источник
Oki error 142 fatal error
Все доброго дня!
Товарищи прошу Вас уделить время и помочь в решении проблемы с принтером Oki C9650dn
Опыт в ремонте оргтехники есть, но с Оки не приходилось работать.
Принтер с историей. Был куплен бу в начале этого года. Счетчики Color Pages 21566; Momo Pages 13156
Из-за таких показаний и соблазнился на его покупку.
В начале все было хорошо, но потом:
1. Слетали сетевые настройки — причину которых так и не выяснил. Лечилось сбросом сетевых настроек. Но потом вообще пропала сетевая карта из меню. Подробности тут: http://forum.trade-print.ru/showthread.php?t=40383
2. Стал работать через USB, но через некоторое время опять стала появляться ошибка, но немного другая.
002:Fatal Error
PC:001e8304
LR:001e8300
FR:003f2500
Появляется при отправке тиража например 10 листов. Если по одному листу, то ошибки нет. И при этом не имеет значение из какой программы печатать и какой сложности файл. Ошибка выходит так:
Печатает 4 листа нормально, потом ошибка и далее печатает 2-3 листов с дефектом.
До появления последней ошибки в принтер была установлена и использовалась не родная ОЗУ 512мб*2шт. Сейчас стоит родная 512. Так же был проведен эксперимент по установке жестких дисков. первый диск принтер не принял, второй принял. далее диски были сняты, и принтер некоторое время (неделя — две) печатал без проблем.
Есть еще подробности о появлении этой ошибки, если нужно напишу.
Во вложении конфигурация принтера.
Источник
Error Messages
Please see the explanation of the message and handle the problem.
At «XXX», a different message is displayed depending on the printer status.
If [Please see HELP for details] is displayed on the bottom line of the display screen, press the «HELP» button to display the error code and solution.
Detected an abnormality of internal database.
The data must be deleted.
After pressing [Enter], the data will be deleted, and then reboot.
Database in the machine has been broken.
Press «ENTER» button.
Turn off the machine, and then back on.
If the same error occurs, contact your dealer.
Data remains unprinted.
To manually print, press «ON LINE» button.
To delete the data without printing, press «CANCEL» button.
Display language is being changed.
Wait for a while.
Language Change Failed
Switching display languages failed.
Press the power button to turn off the machine, and then back on.
%COLOR% Toner Low.
Search keyword: P10081
The toner indicated on the screen is low. Have a new toner cartridge ready.
And replace the old image drums with new ones after a message for replacement of image drum appears.
%COLOR% Waste Toner Full. Replace Toner.
Search keyword: P40028
Waste toner is full. Replace with a new toner cartridge of the indicated color.
The printer can be used for a while when the front cover is opened and closed. However, replace with a new toner cartridge quickly as the image drum might become damaged.
%COLOR% Toner Sensor Error.
%COLOR% Non Recommended Toner.
Search keyword: P40947
An optimum toner cartridge is not installed.
Use a toner cartridge that matches your machine.
The print quality is not guaranteed.
Toner Sensor Error.
Search keyword: P40959
540, 541, 542, 543
Something is wrong with the toner sensor of the indicated color or the image drum is not installed correctly.
Install the toner cartridge or image drum of the indicated color correctly.
If the error occurred in Yellow (Y) or Magenta (M), make sure that the blue knob on the belt unit is turned sideway.
If the same error occurs, contact your dealer.
540: Yellow, 541: Magenta (red), 542: Cyan (blue), 543: Black
A postscript error has occurred.
The job has been dismissed.
PDL Error Occurred
PDL error has occurred.
To erase the message, press «ENTER» button.
%COLOR% Image Drum Near Life.
Search keyword: P10076
Prepare new image drums.
And replace the old image drums with new ones after a message for replacement of image drum appears.
Fuser Unit Near Life.
Search keyword: P10979
Prepare a new fuser unit.
And replace the old fuser unit with new ones after a message for replacement of fuser unit appears.
Belt Unit Near Life.
Search keyword: P10978
Prepare a new belt unit.
And replace the old belt unit with new ones after a message for replacement of belt unit appears.
Non Recommended Fuser Unit Detected.
Search keyword: P40439
An optimum fuser unit is not installed.
Use a fuser unit that matches your machine.
The print quality is not guaranteed.
Change Fuser Unit.
Search keyword: P40971
The fuser unit reaches its lifetime.
Replace the fuser unit with a new one.
Non Recommended Belt Unit Detected.
Search keyword: P40444
An optimum belt unit is not installed.
Use a belt unit that matches your machine.
The print quality is not guaranteed.
Change Belt Unit.
Search keyword: P40970
The belt unit reaches its lifetime.
Replace the belt unit with a new one.
%COLOR% Toner Empty.
Search keyword: P40028
The toner indicated on the screen is empty. Replace the empty toner cartridge with a new one.
%COLOR% Toner Not Installed.
Search keyword: P40902
The toner cartridge of the indicated color is not installed correctly.
Install the toner cartridge correctly.
%COLOR% Non Recommended Image Drum Detected.
Search keyword: P40485
An optimum image drum is not installed.
Use a image drum that matches your machine.
The print quality is not guaranteed.
%COLOR% Image Drum Life.
Search keyword: P40936
The image drum indicated on the screen reaches its lifetime.
Replace the image drum with a new one.
%COLOR% Image Drum Life, %PAGES% Pages Left.
Search keyword: P40936
The image drum indicated on the screen reaches its lifetime.
The number of pages you can print is displayed in «%PAGES%».
%COLOR% Image Drum Life, Print Quality Not Guaranteed.
Search keyword: P40936
The image drum indicated on the screen reaches its lifetime.
Replace the image drum with a new one.
The print quality is not guaranteed.
No paper is loaded in the indicated tray.
Other trays are available.
File System is Full
Memory in the file system is full.
Delete unnecessary files.
File System is Write Protected
The file you are trying to write is write-protected.
Contact the printer administrator.
Stored document files are being deleted.
Wait for a while.
This machine ran out of color toner. Color print data is being deleted.
Wait for a while.
Deleting data stored in private printing.
Wait for a while.
Erased Data Full
Files supposed to be deleted are full. Erase the files.
Wait Timeout is Disabled
Wait Timeout is disabled.
Job Log Buffer Full(Delete old logs)
Old job logs were deleted, because job log buffer was full.
NFC Unit Error. NFC function is not available.
Press ONLINE Button
There is something wrong in the NFC unit.
Functions related to the NFC are not available.
Turn off the machine, and then back on.
If the same error occurs, contact your dealer. To hide this message, select [Admin Setup] > [Others Setup] > [NFC Setup], and then select [Disable].
USB Hub Unsupported
Please detach it
A USB hub is connected. Remove the USB hub.
This machine does not support USB hub.
Unsupported USB Device Detected
Please detach it
An unsupported USB device is connected.
Remove the USB device.
Incompatible USB device connected
Please detach it
An unsupported USB device is connected.
Remove the USB device.
No communication with the SNTP server.
Obtaining current time from the SNTP server failed.
Check the server or network connection.
Getting target IP failed. Please check DHCP settings.
The DHCP server cannot be detected.
Check the network connection.
Collate Fail:Too Many Pages
Press ONLINE Button
A collate print error has occurred.
Reduce the data amount. If that does not work, reduce the size of the print data.
To erase the message, press «ONLINE» button.
Failed to read or write the usage management information of Print Quantity
Press ONLINE Button
The usage management information could not be read.
Press «ONLINE» button.
Duplex Print Failed
Press ONLINE Button
For the paper setting that a duplex printing is not possible, it was printed in simplex.
Check the size and thickness of paper.
Color Restricted. Mono Printed
Press ONLINE Button
A color print job was converted to a mono print job due to an unauthorized user. Contact your administrator for color printing.
To erase the message, press «ONLINE» button.
Color Restricted. Job Rejected
Press ONLINE Button
A color print job was deleted due to an unauthorized user. Contact your administrator for color printing.
To erase the message, press «ONLINE» button.
Print Restricted. Job Rejected
Press ONLINE Button
A print job was deleted due to an unauthorized user. Contact your administrator for printing.
To erase the message, press «ONLINE» button.
Log Buffer is Full. Job Rejected
Press ONLINE Button
Print data is deleted because the accounting log buffer is full.
Contact a printer administrator and remove the log buffer.
Expired saved files have been deleted
Press ONLINE Button
Private printing files whose storage period expired were automatically deleted.
To erase the message, press «ONLINE» button.
E-mail receiving has been cancelled
Press ONLINE Button
Indicates that Email receiving has been canceled.
It has the following possibilities.
The format of email that has received is illegal or not supported.
The attached file is illegal or not supported.
The attached file that has received is too large.
Network connection has disconnected.
File System Operation failed
Press ONLINE Button
An error has occurred in the file system.
To erase the message, press «ONLINE» button.
Invalid Print Data Received
Press ONLINE Button
Invalid data received.
If you performed private printing, the data was deleted because it was incomplete. Print again.
To erase the message, press «ONLINE» button.
Job Log Database Error
Contact the device administrator
Press ONLINE Button
A data base access error has occurred while writing or reading the job log.
Turning off and on the machine may resolve the problem.
To erase the message, press «ONLINE» button.
IPv4 Address is conflicted
Change IPv4 Address
The IP address assigned to this machine is duplicated with that of another device.
Check the IP addresses, and then assign another IP address.
Press ONLINE Button
The PDF file is damaged.
To erase the message, press «ONLINE» button.
Press ONLINE Button
Notifies that the entered password does not match the password set to encrypted PDF.
The file will not be printed unless the passwords match.
PDF Cache Write Error
Press ONLINE Button
Notifies that writing a PDF file to the cache has failed.
To erase the message, press «ONLINE» button.
Decode error occurred
Press ONLINE Button
Indicates that an error has occurred during analysis of image data input from an external source.
This appears when an error has occurred during analysis of TIFF or JPEG data in USBMemoryPrint, DirectPrint, E-mailPrint mode.
To erase the message, press «ONLINE» button.
Can not read the file
Press ONLINE Button
The USB Memory was removed while printing from USB Memory. Do not remove USB Memory while printing is in progress.
To erase the message, press «ONLINE» button.
Color toner empty. Job cancelled
Press ONLINE Button
The print data was cancelled because color toner is empty.
To erase the message, press «ONLINE» button.
Job Type restricted
Press ONLINE Button
A job of a JobLimitation setting violation is received, and when discarding the job, it’s indicated.
To print this job, contact the printer administrator.
Press ONLINE Button
Manual Printing from the MP tray is specified.
Load the paper of the size indicated in the MP tray, and then press the «ONLINE» button.
Change Paper in %TRAY%
Press ONLINE Button
Please see HELP for details
661, 662, 663, 664, 665
Paper loaded on the indicated tray does not match selected paper size. Check the paper settings on the application and on the tray, and match the settings.
661: Tray 1, 662: Tray 2, 663: Tray 3, 664: Tray 4, 665: Tray 5
Change Paper in MPTray
Press ONLINE Button
Please see HELP for details
Paper loaded on the MP tray does not match selected paper size. Check the paper settings on the application and on the MP tray, and match the settings.
Change Paper in %TRAY%
Press ONLINE Button
Please see HELP for details
461, 462, 463, 464, 465
Paper loaded on the indicated tray does not match selected paper size. Check the paper settings on the application and on the tray, and match the settings.
For paper which can be set both horizontally and vertically, check the direction of paper.
461: Tray 1, 462: Tray 2, 463: Tray 3, 464: Tray 4, 465: Tray 5
Press ONLINE Button
Please see HELP for details
Paper loaded on the MP tray does not match selected paper size. Check the paper settings on the application and on the MP tray, and match the settings.
For paper which can be set both horizontally and vertically, check the direction of paper.
Summary Account balance is 0.
Increase the balance and press [Enter]
Press [Cancel] to cancel.
The number of print jobs excesses the limit.
No more print jobs are authorized.
Contact the printer administrator.
Please see HELP for details
Paper in the output tray is full.
Remove the handout.
Press ONLINE Button for Restoration
Please see HELP for details
Data is too complicated.
Memory full error has occurred during processing.
Reduce the volume of the print data.
If the same error is displayed again, contact your dealer.
If using multiple functions, finish the function being used before attempting another.
If the problem does not improve, reduce the resolution.
Press ONLINE Button
Print after the ongoing operation is over.
If the error persists, lower the image quality on the printer driver.
Wireless startup failed
Press ONLINE Button
Please see HELP for details
Restart this machine.
If the error still persists even after the reboot, power off this machine and check if the wireless LAN module is installed.
If the wireless LAN module is not installed, set [Wireless Module] in [Boot Menu] to [Disable].
If the wireless LAN module is installed, check if the model name of the wireless LAN module is compatible with this machine.
If the model name is incorrect, replace the wireless LAN module with the one suitable for this machine.
If the model name is correct, contact your dealer.
This wireless firmware version does not operate on this device
Press ONLINE Button
Please see HELP for details
The version of the firmware does not match this machine.
Contact your dealer.
Wireless settings are incomplete
Press ONLINE Button
Please see HELP for details
Wrong values are set or items remain unset in the wireless LAN settings.
Check the wireless settings.
If the error persists, initialize the network settings, and set up the wireless LAN settings again.
Not connected to wireless access point
Press ONLINE Button
Please see HELP for details
No wireless LAN access points are found.
Make sure that the access point is turned on.
Disconnect and re-connect to wireless LAN.
Message Data Processing
Updating messages displayed on the operator panel.
Message Data Writing
Updating messages displayed on the operator panel.
Message Data Received OK
Updating messages displayed on the operator panel is completed.
Turn the power of the printer off and on again.
Message Data Write Error
Writing of message data to be uploaded to a printer has been failed.
Check if the message data to be updated matches the printer.
Press ONLINE Button for Restoration
Receiving Data Timeout
Please see HELP for details
When receiving data by Port9100, LPR, FTP, IPP, WSD, or Email, a timeout occurred in stream.
Firmware Update Error
Please try again
If network doesn’t work, please try firmware update over USB
Updating the firmware failed.
Please see HELP for details
491, 492, 493, 494, 495
No paper is loaded in the indicated tray. Load paper of the displayed size.
491: Tray 1, 492: Tray 2, 493: Tray 3, 494: Tray 4, 495: Tray 5
Please see HELP for details
MP tray is empty.
If paper is set, paper set cover is not set. Lower the paper set cover.
Install Paper Cassette
Please see HELP for details
430, 431, 432, 433, 434, 440, 441, 442, 443
A paper cassette is not in the indicated tray.
Insert the paper cassette into the indicated tray.
If the cassette is already inserted in the printer, pull out the cassette and set it again to correctly locate it.
%COLOR% Waste Toner Full
Please see HELP for details
Waste toner of the toner cartridge is full. Opening and closing the front cover can resume printing for a while, but it may damage the image drum. Replace the toner cartridge with a new one as soon as possible.
415: Magenta (red), 416: Cyan (blue)
Please see HELP for details
410, 411, 412, 413
The indicated cartridge ran out of toner.
Opening and closing the front cover can resume printing for a while, but it may damage the image drum. Replace the toner cartridge with a new one as soon as possible.
410: Yellow, 411: Magenta (red), 412: Cyan (blue), 413: Black
Non Recommended Toner
Please see HELP for details
549, 550, 551, 552, 553, 554, 555, 556, 557, 614, 615, 616, 617, 620, 621, 622, 623
The indicated toner cartridge is not optimum.
We recommend using an optimum toner cartridge.
550, 554, 614, 620: Yellow
551, 555, 615, 621: Magenta (red)
552, 556, 616, 622: Cyan (blue)
549, 553, 557, 617, 623: Black
Toner Not Installed
Please see HELP for details
610, 611, 612, 613
The supplied starter toner cartridges are installed in the consumable image drums.
Install the consumable toner cartridges in the consumable image drums.
610: Yellow, 611: Magenta (red), 612: Cyan (blue), 613: Black
Non Recommended Image Drum
Please see HELP for details
684, 685, 686, 687, 690, 691, 692, 693, 700, 701, 702, 703, 704, 705, 706, 707
The indicated image drum is not optimum.
We recommend using an optimum Image Drum.
684, 690, 700, 704: Yellow
685, 691, 701, 705: Magenta (red)
686, 692, 702, 706: Cyan (blue)
687, 693, 703, 707: Black
Image Drum Not Installed
Please see HELP for details
694, 695, 696, 697
The indicated image drum is not installed.
Install the image drum.
694: Yellow, 695: Magenta (red), 696: Cyan (blue), 697: Black
Caution: Non-Genuine Consumable detected
Check user’s manual «Trouble Shooting» to restore machine operation
This error means that a non-OKI Original consumable has been installed in the machine.
The warranty is applicable when the product is used with its designated OKI Original consumables. Use caution when choosing other consumables. The entire risk as to the quality and performance of the product due to the use of non-OKI Original consumables is with you. Should the product prove defective due to non-OKI Original consumables, you assume the cost of all necessary servicing, repair or correction, as our warranty may not cover these defects.
To accept these risks and to restore function:
1) Turn off your printer.
2) Turn the machine on. Press the «CANCEL» button when [PLEASE WAIT] is displayed.
3) Release the «CANCEL» button when [Ready To Print] is displayed.
Note: This operation will be recorded for future reference.
Paper jam occurred
Paper remained in %NUM% place(s)
Remove the paper
Press Help for details
632, 633, 634, 635
A paper jam has occurred and paper remains in the paper input area.
Remove the jammed paper.
632: Tray2, 633: Tray3, 634: Tray4, 635: Tray5
Paper has jammed around the front cover. Open the front cover and remove the jammed paper.
Paper has jammed under the image drum.
Remove the jammed paper.
A paper jam has occurred and paper remains near the fuser unit.
Remove the jammed paper.
639, 640: Fuser unit
A paper jam has occurred and paper remains near the duplex unit.
Remove the jammed paper.
641: Duplex unit, Backside of the duplex unit
642: Duplex unit, Middle part of the duplex unit
Toner Sensor Error
Please see HELP for details
540, 541, 542, 543
The toner cartridge of the indicated color is not locked properly.
Check to make sure the blue lever (toner cartridge lock lever) of the toner cartridge is turned until it lines up with the  in the far end.
If the error occurred in Cyan and the toner cartridge lock lever is turned until it is lined up with the in the far end, check if the 2 blue knobs on the belt unit are properly locked.
540: Yellow, 541: Magenta (red), 542: Cyan (blue), 543: Black
Paper Multi Feed
Please see HELP for details
The indicated tray fed multiple sheets of paper at a time.
Remove the cassette from the tray, and then load paper again.
After loading, open and close the front cover to release the error.
Paper Size Error
Please see HELP for details
Paper size error has occurred in the indicated tray. Make sure that the size made by paper loaded in the tray matches the setting made by the paper size dial in the paper cassette. Load paper according to the paper size and direction set for the paper size dial.
If the setting made by the paper size dial is wrong, cancel printing first, set the paper size dial, and then print again.
Make sure that the cassette does not feed multiple sheets of paper at a time after starting printing. If it happens, remove paper, and then load paper correctly.
Open and close the front cover to release the error.
Paper jam occurred
Paper remained in %NUM% place(s)
Remove the paper
Press Help for details
A paper jam has occurred in the paper feed path from the MP tray.
Remove the jammed paper.
391, 392, 393, 394, 395
A paper jam has occurred in the paper feed path from the indicated tray.
Remove the jammed paper.
If paper is not jammed, feeding paper may fail.
Reduce the number of sheets of paper loaded on the paper cassette. Make sure that the paper stoppers are set in the right position.
391: Tray 1, 392: Tray 2, 393: Tray 3, 394: Tray 4, 395: Tray 5
A paper jam has occurred around the front cover.
Open the front cover and remove the jammed paper.
If jammed paper is invisible, close the front cover. If the error persists, paper jams may occur in the duplex unit.
Paper has jammed under the image drum.
Remove the jammed paper.
A paper jam has occurred around the fuser unit.
Remove the jammed paper.
382: The back of the machine, around the output bin
383: The back of the machine, around the duplex unit
385: Inside of the machine, around the fuser unit
A paper jam has occurred around the duplex unit.
Pull out the duplex unit and remove the jammed paper.
For the Error code 373, make sure that paper does not remain inside the printer after pulling out the duplex unit.
A paper jam has occurred in the paper feeding path from the duplex unit.
Open the front cover and remove the jammed paper.
If paper is invisible, pull out the duplex unit from the back side of the machine and check if paper jams inside of the duplex unit or machine.
Install Duplex Unit
Please see HELP for details
The duplex unit is not properly installed. Install the duplex unit.
Install New Image Drum
Image Drum Life
Please see HELP for details
350, 351, 352, 353
The image drum indicated on the screen reaches its lifetime.
Replace the image drum with a new one.
Opening and closing the front cover can resume printing for a while. Replace with a new one as soon as possible, however.
350: Yellow, 351: Magenta (red), 352: Cyan (blue), 353: Black
Install New Image Drum
Image Drum Life
Please see HELP for details
560, 561, 562, 563
The image drum indicated on the screen reaches its lifetime.
Replace the image drum with a new one.
560: Yellow, 561: Magenta (red), 562: Cyan (blue), 563: Black
Install New Image Drum
Image Drum Life
To Exceed the Life, Press Online Button
Please see HELP for details
564, 565, 566, 567
The image drum indicated on the screen reaches its lifetime.
Replace the image drum with a new one.
Pressing «ONLINE» button can resume printing for a while. Replace with a new one as soon as possible for maintaining the print quality.
564: Yellow, 565: Magenta (red), 566: Cyan (blue), 567: Black
Install New Image Drum
Printing disabled due to low threshold of Image Drum life.
Please see HELP for details
680, 681, 682, 683
Printing has stopped because the image drum indicated on the screen reached its lifetime. Replace with a new image drum to print.
680: Yellow, 681: Magenta (red), 682: Cyan (blue), 683: Black
Install New Fuser Unit
Fuser Unit Life
Please see HELP for details
The fuser unit reaches its lifetime.
Replace the fuser unit with a new one.
Opening and closing the front cover can resume printing for a while. Replace with a new one as soon as possible for maintaining the print quality.
Install New Belt Unit
Please see HELP for details
The belt unit reaches its lifetime.
Replace the belt unit with a new one.
Opening and closing the cover can resume printing for a while. Replace with a new one as soon as possible for maintaining the print quality.
Check Fuser Unit
Please see HELP for details
The fuser unit is not properly installed. Remove and re-install the fuser unit. If the error persists after re-installing, replace the fuser unit with a new one.
Install New Belt Unit
Please see HELP for details
Waste toner of the belt unit is full. Replace the belt unit with a new one. Opening and closing the front cover can resume printing. Printing stops after 500 sheets are printed.
Check Toner Cartridge
Improper Lock Lever Position
Please see HELP for details
544, 545, 546, 547
A color toner cartridge indicated on the screen is not installed.
Make sure to turn the toner cartridge lock lever (blue) on the right side of the cartridge until it lines up with the in the far end. If the lever is in the correct position, check that the white protective tape has been removed.
544: Yellow, 545: Magenta (red), 546: Cyan (blue), 547: Black
Check Image Drum
Please see HELP for details
340, 341, 342, 343
The indicated image drum is not installed correctly.
Remove and re-install the image drum.
340: Yellow, 341: Magenta (red), 342: Cyan (blue), 343: Black
Check Fuser Unit
Please see HELP for details
The fuser unit is not properly installed. Remove and re-install the fuser unit.
Non Recommended Fuser Unit
Please see HELP for details
698-01, 698-02, 698-03, 698-04, 698-06
Check the model number of the fuser unit mentioned in the User’s manual. Use a fuser unit that matches your machine.
Fuser Unit Not Installed
Please see HELP for details
The fuser unit is not properly installed. Remove and reinstall the fuser unit.
Check Belt Unit
Please see HELP for details
The belt unit is not properly installed. Remove and re-install the belt unit.
Non Recommended Belt Unit
Please see HELP for details
688-01, 688-02, 688-03, 688-04
Check the model number of the belt unit mentioned in the User’s manual. Use a belt unit that matches your machine.
Belt Unit Not Installed
Please see HELP for details
The belt unit is not properly installed. Remove and reinstall the belt unit.
Please see HELP for details
Indicated cover is open. Close the cover.
310: Output tray (Top cover), 311: Front cover
Rebooting the printer.
Wait for a while.
Power Off and Wait for a while
A condensation has occurred inside a printer.
Turn the printer off and turn on again after a while.
131, 132, 133, 134
The LED head cannot be detected.
136-02, 136-03, 136-04, 980
An error has occurred in or around the fuser unit.
Turn off the printer and turn on again after a while.
If the error persists after rebooting, contact your dealer and tell them the number in the error message and how the machine works.
The inside of the printer is hot. Remove any objects blocking the ventilation holes on the printer, and restart the printer. If the same error is displayed again, contact your dealer.
The inside of the printer is at a low temperature. Raise the room temperature, then restart the printer. If the same error is displayed again, contact your dealer.
This is a duplex unit error. Turn the power off, and re-install the duplex unit. If the same error is displayed again, contact your dealer.
231-05, 231-06, 231-07, 231-08, 231-23
Reading the consumables information failed.
If the following number is displayed, replace the corresponding consumable.
231-05 to 231-08: Toner cartridge / Image drum
231-23: Fuser unit/ Belt unit
Turn off the printer and turn on again after a while.
If the error persists after rebooting, contact your dealer and tell them the number in the error message and how the machine works.
260, 261, 262, 263, 264, 265, 266, 267, 268, 269, 270, 271, 272, 273, 274
An error has occurred in or around the fuser unit.
Check that size and thickness of paper in the tray is correctly.
Turn off the printer and turn on again after a while.
If the error persists after rebooting, contact your dealer and tell them the number in the error message and how the machine works.
The belt unit is at a low temperature. Raise the room temperature, then restart the printer. If the same error is displayed again, contact your dealer.
An error occurred inside the printer.
Turn off the machine, and then back on.
If the same error occurs, contact your dealer.
«*» is a 3-digit error code. The number that is displayed changes according to the error content.
011, F0C, F0D, FFE, FFF
A fatal error occurred on the printer.
Contact your dealer and tell them the number in the error message and how the machine works.
The error code is displayed within the range 0x001 to 0xfff.
Copyright © 2018 Oki Electric Industry Co., Ltd. All rights reserved.
Источник
Click here follow the steps to fix Oki Printer Error 142 and related errors.
|
|
|
|
To Fix (Oki Printer Error 142) error you need to |
|
|
Step 1: |
|
|---|---|
| Download (Oki Printer Error 142) Repair Tool |
|
|
Step 2: |
|
| Click the «Scan» button | |
|
Step 3: |
|
| Click ‘Fix All‘ and you’re done! | |
|
Compatibility:
Limitations: |

Oki Printer Error 142 Error Codes are caused in one way or another by misconfigured system files
in your windows operating system.
If you have Oki Printer Error 142 errors then we strongly recommend that you
Download (Oki Printer Error 142) Repair Tool.
This article contains information that shows you how to fix
Oki Printer Error 142
both
(manually) and (automatically) , In addition, this article will help you troubleshoot some common error messages related to Oki Printer Error 142 error code that you may receive.
Note:
This article was updated on 2023-02-03 and previously published under WIKI_Q210794
Contents
- 1. What is Oki Printer Error 142 error?
- 2. What causes Oki Printer Error 142 error?
- 3. How to easily fix Oki Printer Error 142 errors
What is Oki Printer Error 142 error?
The Oki Printer Error 142 error is the Hexadecimal format of the error caused. This is common error code format used by windows and other windows compatible software and driver vendors.
This code is used by the vendor to identify the error caused. This Oki Printer Error 142 error code has a numeric error number and a technical description. In some cases the error may have more parameters in Oki Printer Error 142 format .This additional hexadecimal code are the address of the memory locations where the instruction(s) was loaded at the time of the error.
What causes Oki Printer Error 142 error?
The Oki Printer Error 142 error may be caused by windows system files damage. The corrupted system files entries can be a real threat to the well being of your computer.
There can be many events which may have resulted in the system files errors. An incomplete installation, an incomplete uninstall, improper deletion of applications or hardware. It can also be caused if your computer is recovered from a virus or adware/spyware
attack or by an improper shutdown of the computer. All the above actives
may result in the deletion or corruption of the entries in the windows
system files. This corrupted system file will lead to the missing and wrongly
linked information and files needed for the proper working of the
application.
How to easily fix Oki Printer Error 142 error?
There are two (2) ways to fix Oki Printer Error 142 Error:
Advanced Computer User Solution (manual update):
1) Start your computer and log on as an administrator.
2) Click the Start button then select All Programs, Accessories, System Tools, and then click System Restore.
3) In the new window, select «Restore my computer to an earlier time» option and then click Next.
4) Select the most recent system restore point from the «On this list, click a restore point» list, and then click Next.
5) Click Next on the confirmation window.
6) Restarts the computer when the restoration is finished.
Novice Computer User Solution (completely automated):
1) Download (Oki Printer Error 142) repair utility.

2) Install program and click Scan button.
3) Click the Fix Errors button when scan is completed.
4) Restart your computer.
How does it work?
This tool will scan and diagnose, then repairs, your PC with patent
pending technology that fix your windows operating system registry
structure.
basic features: (repairs system freezing and rebooting issues , start-up customization , browser helper object management , program removal management , live updates , windows structure repair.)
 Thanks: 0
 Likes: 0
 Dislikes: 0
-
08-04-2019
#1

Field Supervisor
500+ Posts
- Rep Power
- 34
OKI MC861+ Fatal Error 142
I have error 142 on a MC861+ which is an ID up/Down error.
I can see the drums moving up and down so I suspect the ID up/down sensor.
I am struggling to find this in the parts guide and wondered if anyone here would know if it is part of another assembly..
Thanks
-
08-05-2019
#2
Senior Tech
250+ Posts
- Rep Power
- 34
Re: OKI MC861+ Fatal Error 142
If I remember , its part of the board on the left side. Did you check the motor in test mode, with and without drums? Couple of times I had this code on that copier, it was due to binding mechanism. Cleaning and greasing was ok.
-
08-05-2019
#3
Re: OKI MC861+ Fatal Error 142
Originally Posted by jonbonse
I have error 142 on a MC861+ which is an ID up/Down error.
I can see the drums moving up and down so I suspect the ID up/down sensor.
I am struggling to find this in the parts guide and wondered if anyone here would know if it is part of another assembly..
Thanks
is the ITB seated properly? I have seen it where it was not seated correctly and caused this error.
-
08-07-2019
#4
Field Supervisor
500+ Posts
- Rep Power
- 34
Re: OKI MC861+ Fatal Error 142
Originally Posted by onetek
If I remember , its part of the board on the left side. Did you check the motor in test mode, with and without drums? Couple of times I had this code on that copier, it was due to binding mechanism. Cleaning and greasing was ok.
Thanks!
I didn’t check the motor because I could see the drums lifting when I fooled the top cover.
Is it a strip down to gain access to the lift mechanism?I had them change the cyan drum and it worked for a couple of days….
Also is the board on the left side when looking at the printer from the front?
thanks
-
08-07-2019
#5
Field Supervisor
500+ Posts
- Rep Power
- 34
Re: OKI MC861+ Fatal Error 142
Originally Posted by Phil B.
is the ITB seated properly? I have seen it where it was not seated correctly and caused this error.
Thanks for your response.
Yes I did reseat the ITB and it is in as it should.
-
08-07-2019
#6
Senior Tech
250+ Posts
- Rep Power
- 34
Re: OKI MC861+ Fatal Error 142
Yes, this board is on the left side , standing in front of copier.


Tags for this Thread
Bookmarks
Bookmarks
Posting Permissions

- You may not post new threads
- You may not post replies
- You may not post attachments
- You may not edit your posts
- BB code is On
- Smilies are On
- [IMG] code is On
- [VIDEO] code is On
- HTML code is Off
Forum Rules
Fatal Errors 140,141,142 on Oki C7200

The printer displays a «Fatal Error — 140 Contact Service». The error codes can range from 140, 141, & 142.
This error indicates that the Image Drum Up/Down Process is not working properly.
The errors are as follows:
140 — Yellow Drum Up/Down error
141 — Magenta Drum Up/Down error
142 — Cyan Drum Up/Down error
Solution:
1. Reseat the Image Drums. Ensure they are in seating properly into the drum carriage.
2. Reseat the Toner Cartridges. Ensure they are seating properly into the Image Drums.
3. Reseat the Contact Sensor Spring assembly and inspect it for damage or mis-alignment. If the springs appear bent or dis-lodged reseat them.

4. Try a new Transfer Belt.
Source: Oki knowledge base
Popular posts from this blog
The error B204 could happen after a cartridge replacement. First of all, when installing, remove the cartridges from the plastic package, but do not drill any plastic membranes, as this will cause this error when placing the cartridge. The error may also appear if you change a completely empty cartridge: when installing a full cartridge, the printer enters a cleaning cycle, but the printhead has not yet received ink from the newly inserted cartridge. Here are some tips to cancel this error B204:: Solution 1: Remove the cartridges Power the printer for 2 minutes Switch on the printer Install the cartrdiges Solution 2: Switch on the printer Unplug the power cable Open the cover Move the print head carriage manually to the usual place where it goes for the cartridge change (If the printhead carriage is not movable, reconnect and then turn on the printer, then unplug it again when the head carriage is in the moving position). Change the cartridges. Close the fr
MAJ11/06/17 Error B200 means the printhead voltage or temperature is not normal. The Printhead could be defective…. but first, try these solutions below: Solution 1 : Disconnect the power cable from the printer. Wait 1 hour. Connect the power cable Solution 2 : Check and Clean Head contact pin condition of the carriage unit Check Cable connection especially the carriage FFC Solution 3 : Turn off the power Open the panel Turn on the power Wait for print carriage to start moving to the left. Let it go past half way Before print carriage reaches left hand side shut the cover. Leave the Printer turned on Solution 4 : Unplug the power cable. Open the printer Push the whole print head mechanic to the center While the printer still open, plug the power and turn it ON. When the printhead still moving and is going to the very LEFT, close the cover. Wait until its boot up. Solution 4a: Take out all of the ink cartridges Lift up the gr
MAJ 25/08/17 The Service Tool V3400 allow to reset the counter of some Canon printers. For the error code 006 , try this : Solution 1: Check your cartridges: an empty cartridge can lead to error 006 Solution 2 : After you avec clicked on «Main», wait a few minutes. If the error still here, restarts the Service Tool Solution 3 : Close the service tool Disconnect the USB cable from the printer After 10 seconds, plug back the cable to the printer On Windows, click next when appears «New device» Open the service tool
Коды ошибок OKI, сервисные коды и фатальные ошибки цветных принтеров и МФУ OKI (Service Call, Fatal Error, Error Code) расшифровка фатальной ошибки, обнуление сервисной ошибки, сброс ошибки OKI. Что делать при появлении на экране аппарата критической | фатальной ошибки:
Вызов технической помощи
XXX: Неисправимая ошибка
Появление фатальных/неисправимых ошибок с индикацией сервисного кода (ХХХ на сообщении выше) обычно означает наличие довольно серьёзной ошибки в принтере, которая не может быть разрешена простым выключением/включением. Ниже можно ввести номер ошибки и получить её описание. Эта информация предоставляется только как справочная: решение о корректных действиях по устранению ошибки должен принимать авторизованный сервисный инженер!
Обратите внимание, что процедуры сброса ошибок не существует: после устранения причины возникновения ошибки, сообщение об ошибке автоматически пропадает с дисплея принтера!
Для получения описания фатальной ошибки введите её номер в соответствующее поле ниже и нажмите кнопку [Расшифровать ошибку]. Например, при появлении ошибки, как указано на изображении ниже, нужно ввести в поле ввода число 134 и получить описание ошибки.

Обращаю внимание, что ошибки с номерами 300-600 являются пользовательскими ошибками, которые кроме номера содержат довольно подробное
описание самой ошибки, а при нажатии на кнопку HELP можно получить подробное описание того, как эти ошибки разрешить.*
Сведения об ошибках, расшифровку которых можно получить выше, подходят для следующих цветных принтеров и МФУ OKI:
C301 / C310 / C321 / C330 / C3100 / C3200 / C3300 / C331 / C332 / C3400 / C3450 / C3520 MFP / C3530 MFP / C3600 / C510 / C5100 / C511 / C5200 / C530 /
C5300 / C531 / C532 / C5400 / C542 / C5510 MFP / C5540 MFP / C5550 MFP / C5600 / C5650 / C5700 / C5750 / C5800 / C5850 / C5900 / C5950 / C610 / C612 /
C710 / C711 / C711WT / C712 / C7100 / C7200 / C7300 / C7350 / C801 / C810 / C821 / C822 / C823 / C824 / C830 / C831 / C833 / C834 / C841 / C843 / C844 / C8600 / C8800 /
C9200 / C9300 / C9400 / C9500 / C9600 / C9650 / C9655 / C911 / C931 / C9800 / C9800 MFP / C9850 / C9850 MFP / MC332 / MC342 / MC350 / MC351 / MC352 /
MC360 / MC361 / MC362 / MC363 / MC560 / MC561 / MC562 / MC563 / MC573 / MC760 / MC770 / MC780 / MC851 / MC853 / MC860 / MC861 / MC873 / Pro6410NC /
Pro7411WT / Pro8432WT / Pro9420WT / Pro9431 / Pro9541 / Pro9542 / Pro9431E / Pro9541E / Pro9542E
* — ошибки распространяются только на принтеры OKI C9600 / C9650 / C9800 / C9850 и МФУ на их базе
Четырехзначные ошибки распространяются только на принтеры C911/C931, ES9431/ES9541/ES9542 и Pro9431/Pro9541/Pro9542.
Список ошибок существенно пополнен по сравнению с той версией, что была ранее размещена на старой версии этого сайта и скопипастена всеми, кому не лень. Именно поэтому теперь отображается не таблица,
а форма для расшифровки конкретной ошибки.
Дата последнего обновления базы ошибок:
26 Апреля 2022.