ОШИБКА 557 на принтере или МФУ OKI означает, что в устройство установлен тонер-картридж, предназначенный для другого региона или с ресурсом, превышающим допустимый для данной модели. Может, также, указывать на некорректный чип в случае использования совместимого чипа при заправке. Ниже приведена более подробная информация о причинах возникновения ошибки и путях её решения.
Ошибка ERROR 557 на принтерах и МФУ OKI выглядит следующим образом:
REPLACE TONER
ERROR 557: NON
RECOMMENDED TONER
или в русском варианте:
ЗАМЕНИТЕ ТОНЕР
ОШИБКА 557: НЕ
РЕКОМЕНДОВАННЫЙ ТОНЕР
Вкратце эта ошибка означает, что аппарат обнаружил тонер-картридж, который ему не подходит. Причин тому, почему тонер не подходит, может быть две:
1. В принтер установлен тонер-картридж чужого региона
Регион, для работы в котором предназначен принтер или МФУ OKI, определяется установкой системного параметра OKIUSER (региональный идентификатор) и не зависит от места производства устройства. Параметр OKIUSER находится в меню управления системой, вход в которое осуществляется путём удерживания стрелок вверх и вниз при включении устройства. Этот параметр является первым при входе в меню управления системой. Возможные значения этого параметра следующие:
ODA — OKI DATA America — устройства предназначены для рынков Америки. Формат по умолчанию — Letter. Является установкой по умолчанию для устройств, поставляемых в Америку.
OEL — OKI Europe Limited — устройства предназначены для всех Европейских рынков, включая Россию, а также страны ближнего востока и Африку. Формат по умолчанию — А4. Является установкой по умолчанию для устройств, поставляемых в Европейские страны, в том числе в Россию.
APS — Австралия и океания — устройства предназначены для рынков соответствующего региона. Формат по умолчанию не определён: используется автоматическое определение.
JP1 — Япония — устройства для внутреннего рынка Японии. Обычно они там же и производятся: для остальных регионов работают заводы в Китае и Тайланде.
JPOEM1 — Для ОЕМ-партнёров в Японии. Являясь разработчиком устройств, OKI предоставляет свои устройства другим производителям, которые продают их под своими торговыми марками. В Японии этот бизнес особенно развит.
OEMA — Для международных ОЕМ-партнёров с форматом по умолчанию А4
OEML — Для международных ОЕМ-партнёров с форматом по умолчанию Letter
Важно понимать, что для каждого из региональных идентификаторов существует свой тип расходных материалов, а в случае с ОЕМ-вариантами для каждого регионального идентификатора может существовать по несколько типов расходных материалов. Эти типы определяются соответствующим параметром, записанным в чипе тонер-картриджа.
При установке, например, в принтер OKI B432, предназначенного для работы в Европе (т.е. с установленным значением OEL в параметре OKIUSER) тонер-картриджа с артикулом 45807110 (оригинального тонер-картриджа с ресурсом 12 000 страниц, но предназначенного для продаже в США) возникнет ошибка 557, так как американский картридж является не подходящим для европейского принтера, хотя и является оригинальным.
Надо сказать, что подобная региональная привязка в той или иной степени существует у большинства производителей, так что ничего уникального здесь нет. Соответственно, решением для этого случая будет либо замена тонера на европейский, т.е. на тонер-картридж TONER-B432/512/MB492/562-12K-NEU [45807121] или TONER-B432/512/MB492/562-12K [45807111] (эти два являются равнозначными и отличались в своё время логистическими цепочками и ограничениями, связанными с торговыми квотами в Евросоюзе — с 2021 года в продажу поступают только тонеры EU, т.е. TONER-B432/512/MB492/562-12K [45807111]), либо изменение значения параметра OKIUSER в меню управления системой с OEL на ODA. Не забудьте вернуть этот параметр в значение OEL, когда в следующий раз приобретёте нормальный европейский тонер-картридж
2. В принтер установлен тонер-картридж не подходящего ресурса
Тут всё чуть проще, но в силу специфики корпоративных продаж в России, эта причина является более распространённой. Суть проблемы заключается в том, что в аппарат установлен тонер-картридж, ресурс которого превосходит установленный для данной модели предел.
Самый распространённый пример: в МФУ OKI MB472 (или Kraftway KRP 472), в которых можно использовать только картриджи с ресурсом 3000 страниц (артикулы 45807119 / 45807102) или 7000 страниц (артикулы 45807120 / 45807106) установили тонер-картридж от принтера OKI B432 (Kraftway KRP 432) с ресурсом 12 000 страниц (артикулы 45807121 / 45807111). Эти ограничения, конечно, чисто маркетинговые, но обойти их каким-то обходным манёвром, типа изменения того же OKIUSER, как показано выше, увы, нельзя. В данном случае картридж большого объёма из аппарата придётся вынуть и поставить вместо него подходящий по ресурсу.
Если речь идёт о совместимых тонерах или о заправке с заменой чипа, то ко всему вышесказанному добавляется ещё один фактор: некорректно прописанный или отсутствующий региональный идентификатор в чипе. В данном случае алгоритм очевиден: чип придётся заменить на нормальный, благо таких большинство.
Ну и в заключении нужно напомнить, что процедуры сброса ошибок на OKI не существует. Как только будет устранена причина возникновения ошибки, принтер/МФУ автоматически перейдёт в нормальный рабочий режим и продолжит печатать.
OKI MB472, на тонер-картридже поменял чип, выдает ошибку 557 (Тонер OKI неверного региона, заменить тонер Black (появляется в том случае, если в принтер, приобретённый в одном регионе устанавливается тонер приобретённый в другом. Регионы у OKI — Европа, Азия, Америка). Подскажите, как можно устранить эту ошибку?
Чипы покупал в «Тонер Всем», говорят, что они EUR. Как можно узнать регион моего OKI?
Здравствуйте, Александр!
Нас очень удивил Ваш вопрос. Потому что:
1. Мы не являемся официальным уполномоченным сервисом OKI, и не обладаем доскональным знанием от производителя. Почему вопрос именно к нам?
2. Возможно, проверить регион принтера можно, распечатав какой-либо отчет принтера, но мы не знаем, что и где нужно смотреть.
3. Все наши знания — это сумма технического образования и, прежде всего, опыта. Поэтому , чтобы точно выяснить, какой у Вас регион принтера надо взять драм картридж в паре с тонер-картриджем из такого же работающего принтера и проверить в своём принтере. Зная, какого региона аппарат-донор, после проверки можно будет установить совпадает ли регион Вашего принтера с регионом принтера-донора или нет.
4. Также логично задать вопрос продавцу чипа — «Подходит ли купленный Вами чип для Вашего МФУ МВ472?». Кстати, Вы не сообщили а какой чип Вы купили, Возможно, его фото помогло бы сделать какой-то вывод.
5.У Вас же была рабочая туба с рабочим чипом. Возможно, надписи на старом чипе помогут сделать вывод о регионе Вашего принтера.
6. Несложным поиском в сети по ключевому слову «Oki error 557» легко находим несколько более подробное описание ошибки, чем привели Вы:
«Тонер OKI неверного региона, заменить тонер Black (появляется в том случае, если в принтер, приобретённый в одном регионе устанавливается тонер приобретённый в другом. Регионы у OKI — Европа, Азия, Америка). Ошибка, также, может возникать в случаях, когда в устройство установлен тонер от этой же серии, но неподдерживаемого объёма. Например в МФУ MB472 установлен тонер на 12000 страниц (при максимально допустимом ресурсе тонера для этой модели 7000 страниц)»
Возможно, Вы купили чип именно на 12 тысяч копий, который не поддерживается Вашим МФУ, как в приведённом примере?
7. В общем, для решения задачи не хватает условий — необходимо знать какой чип Вы купили. Лучше прислать читаемое фото с двух сторон чипа.
Ждём дополнительной инфы.
С уважением,
Техподдержка RAMIS.RU
Обращаю внимание, что ошибки с номерами 300-600 являются пользовательскими ошибками, которые кроме номера содержат довольно подробное описание самой ошибки, а при нажатии на кнопку HELP можно получить подробное описание того, как эти ошибки разрешить.*Некоторые из этих ошибок приведены ниже
Пользовательские ошибки
![]() Загрузка…
Загрузка…

Все мы понимаем, что основная прибыль производителей печатной техники получается с продажи оригинальных расходных материалов. Но значительные валютные колебания привели к тому, что покупка оригинальных расходных материалов стала роскошью, а не повседневностью. Наученные горьким опытом большинство компании, прежде чем приобретать печатную технику, первым делом интересуются возможностью заправки этой самой техники. Если техника не заправляется и не обладает уникальным функционалом в своей ценовой категории, то продать ее почти нереально, если конечно оригинальная «расходка» не стоит копейки. В рамках этой заметки хотел бы раскрыть тему про заправку принтеров и МФУ OKI B412 / B432/ B512/ MB472 / MB492/ MB562 построенных на единой печатной платформе.
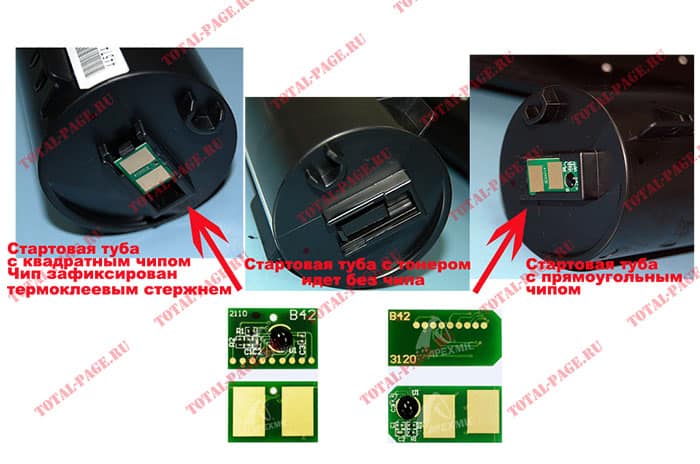
Про чипы.
Наконец в конце января пришла первая партия долгожданных чипов от производителя ApexMic. Прежде всего, оказалось, что производитель выпускает чипы двух видов. Первый вид чипов напоминает стандартные чипы OKI B411 и предназначен для установки в стартовые тубы с тонером. Второй вид чипов предназначен для установки в отдельно купленные тубы и по форме ближе к квадрату. Не смотря на значительные визуальные отличия чип нового формата, довольно легко устанавливается в стартовую тубу с последующей его фиксацией термоклеевым стержнем. Стоимость чипов напрямую зависит от их ресурса. Самый дешевый на 3000 страниц и самый дорогой на 12000 страниц. Разброс цен у поставщиков весьма колоссален и достигает до 1000 рублей за штуку. Чипы, протестированные мною, были закуплены в компании Рамис по самой адекватной цене 890 рублей за чип на 3000 страниц, тот же чип в компании Чипкарт стоит 1690 рублей. Чипы тестировал на аппарате OKI MB492DN и перед тестированием чипов произвел прошивку аппарата до последней версии. Протестированные мною чипы стартовали с первого раза без проблем, и аппарат реагировал на них надписью об установке оригинальной продукции OKI. Я тестировал чипы объемом на 3к и 7к, смысла в покупке чипов на 12к на мой взгляд нет смысла, чип самый дорогой, а картридж самый доступный по цене. Картридж максимального объема 45807121 на 12000 страниц продается по разумной цене в 6650 рублей.
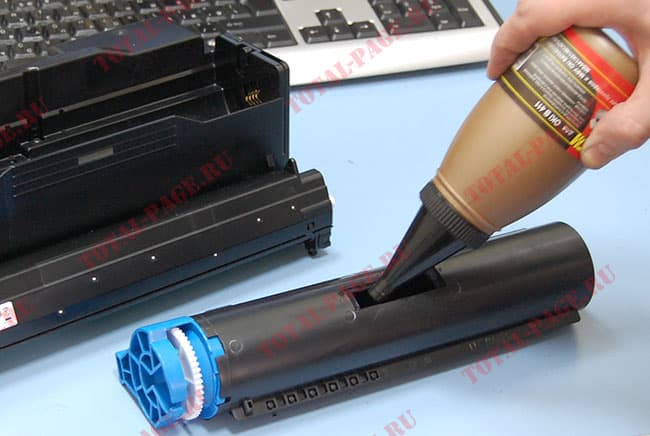
Про тонеры
Как и все аппараты, использующие раздельные расходные материалы аппараты OKI требуют тщательного подбора тонера для исключения появления фона при печати. Часто сталкиваюсь с тем, что люди рекомендуют использовать для заправки картриджей OKI монохромные тонеры Samsung. Это весьма сильное заблуждение, которое может привести аппарат к поломке. У принтеров OKI печка имеет более низкую температуру закрепления и для нормальной фиксации тонера на бумаге необходимо использовать специальные легкоплавки тонеры. Использование тугоплавких тонеров приводит появления налета на тефлоновом валу, с последующие выгоранием тефлонового покрытия. Вместо положенных 200.000 страниц, печки выходят из строя уже при пробеге не более 15000 страниц. Это я к тому, что при заправке картриджей для OKI MB472DN и прочих современных аппаратов OKI не стоит использовать дешевые китайские тонеры и прочие тонеры от других вендоров. Для заправки картриджей OKI наша компания использует тонеры производства Tomoegawa предназначенные для нового поколения монохромных принтеров OKI B411. В случае отсутствия этого тонера у поставщика, используется универсальный тонер Static Control в килограммовой фасовке. Все эти тонеры не требуют чистки драма от остатков старого тонера и имеют низкую температуру плавления.
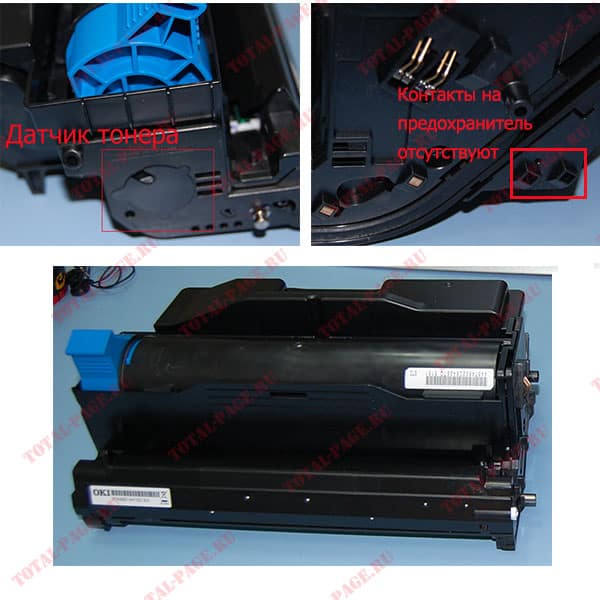
Про драм-картриджи и сброс.
За драм-картриджи инженерам OKI отдельное спасибо. Наконец-то они избавились от рециклинговой системы печати. Новые драмы подросли в размере аж в два раза, обзавелись емкой полостью для отработанного тонера. Также драм обзавелся качественным датчиком тонера, позаимствованным от цветных аппаратов OKI. Счетчик драм-картриджа сбрасывается стандартным предохранителем заимствованным с цветных принтеров OKI. Стартовый драм картридж не содержит контактов для сброса счетчика и для сброса необходимо устанавливать предохранитель непосредственно на контакты в аппарате.
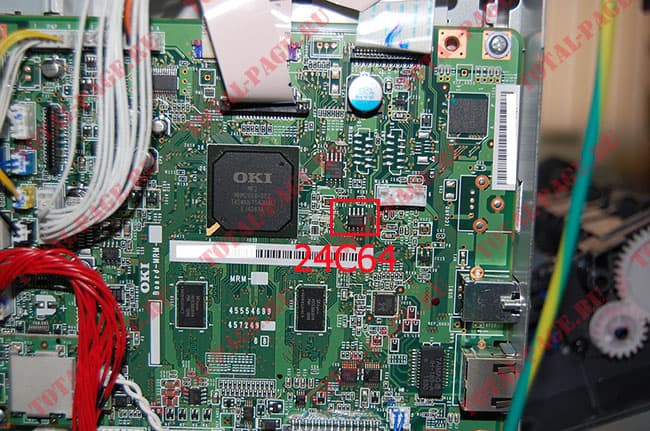
Про тонер-картридж и бесчиповый режим.
А вот с картриджами для новых принтеров и МФУ OKI повезло. Предыдущее поколение принтеров и МФУ OKI и новое используют один и тот же драм-картридж 44574302, поэтому конструктивно тубы идентичные и как я писал выше все отличите только в креплении чипа. Стартовый картридж и новый картридж на 7000 страниц имеют одинаковые размеры. Поэтому стартовый картридж можно заправлять на 7000 страниц. А вот картридж на 12000 страниц имеет несколько большие размеры. Кстати в стартовом картридже отсутствует чип и данные о емкости стартового картриджа хранятся в микросхеме 24с64 на плате форматера. Фактически можно снять дамп микросхемы с нового аппарата и переделав микросхему под разъем DIP8 посаженную в «кроватку» можно получить вечный бесчиповый режим, просто время от времени перепрошивая микросхему на программаторе считанным ранее дампом.
На этом пожалуй закончу заметку. В заметке я старался осветить моменты, которые на мой взгляд являются ключевыми. От себя рекомендую использовать исключительно оригинальные драм-картриджи и не доводить их до «ручки».
Exception hardware problem was detected (PCB failure or insufficient power capacity)
(PDL only)
When CE1 was not detected, SC001 occurs
002:Error
003:Error
005:Error
Replace the printer control PCB
003:Error xxxxxxxx xxxxxxxx xxxxxxx
004:Error xxxxxxxx xxxxxxxx xxxxxxx
005:Error xxxxxxxx xxxxxxxx xxxxxxx
006:Error xxxxxxxx xxxxxxxx xxxxxxx
007:Error xxxxxxxx xxxxxxxx xxxxxxx
009:Error Recovered from an error.
010:Error Recovered from an error.
011:Error
012:Error
Replace the printer control PCB
020:Error
Replace the printer control PCB
024:Error
024:Error
Replace the printer control PCB
030:Error
030:Error
Replace the printer control PCB
040:Error
040: Error
Replace the printer control PCB
042:Error
043:Error
045:Error
The NIC-F/W must be written with the maintenance utility after formatting.) If the error remains replace the printer control PCB
051: Error
Abnormal condition of the CPU cooling fan on the CU PCB
Does it recover from the error by replacing the fan?
Yes
No
Replace the fan.
Replace the printer control PCB.
052:Error
Replace the printer control PCB
Does this error message reappear?
Yes
Replace the CU/PU board.
067: Error
069:Error
Replace the printer control PCB
070:Error
Replace the printer control PCB
072:Error
Replace the printer control PCB
073:Error
xxxxxxxx
Replace the printer control PCB
074:Error
xxxxxxxx
075:Error
xxxxxxxx
Replace the printer control PCB
077:Error xx
Replace the printer control PCB
081:Error
Replace the printer control PCB
104:Error
Replace the printer control PCB
106:Error
Replace the printer control PCB
108:Error
Replace the printer control PCB
Replace the printer control PCB
Replace the printer control PCB
Replace the printer control PCB
Replace the printer control PCB
Does this error message reappear after power restoration?
Yes
Replace the Printer Control PCB
Does this error message reappear after power restoration?
Yes
Replace the Printer Control PCB
Does this error message reappear after power restoration?
Yes
Replace the Printer Control PCB
Does this error message reappear after power restoration?
Yes
Replace the Printer Control PCB
Does this error message reappear after power restoration?
Yes
Replace the Printer Control PCB
Does this error recur?
Yes
Replace the spot color PCB
Replace the printer control PCB
Does this error recur?
Yes
Replace the driver relay PCB
Replace the printer control PCB
111:Error
112:Error
113:Error
114:Error
115:Error
121:Error
Is the cable connecting the printer control PCB to the high voltage power supply unit connected properly?
Is there any defective contact point?
Re-connect it properly.
Check for defective contact points of the high voltage system
Replace the high voltage power supply unit.
Is the FAN connector connected correctly?
Yes
No
Yes
123:Error
Does this error recur?
Yes
Replace the environmental sensor board and the FFC
Replace the printer control PCB
124:Error
Does this error recur?
Yes
Replace the environmental sensor board and the FFC
Replace the printer control PCB
125:Error
Home Error
No
Check the hopping motor and the gear train for abnormal condition.
126: Condensing Error
Leave the printer for 2 hours to half a day at room temperature, and turn on the power.
Does this error recur?
Does this error recur?
Yes
Replace the environmental sensor board and the FFC.
Replace the printer control PCB
Does this error recur?
Yes
Yes
128:Error
Fan 1
02: Low Voltage Fan
03: PU Fan
05: Station 1 ID
Intake Fan
09: Second Transfer
Absorption Fan
0A: Fuser Intake Fan
0B: Station 2 ID
Intake Fan
0C: Duplex Fan
0D: Fuser Exhaust
Fan 2
0E: Station 3 ID
Intake Fan
0F: Station 4 ID
Intake Fan
10: Station 5 ID
Intake Fan
Does this error recur?
Yes
No
Replace the fan motor.
Replace the applicable PCB
01: Driver relay PCB
02: Printer Control PCB
03: Printer Control PCB
05: Driver Relay PCB
09: Rail unit relay PCB
0A: Driver relay PCB
0B: Driver relay PCB
0C: Duplex unit PCB
0D Driver relay PCB
0E: Driver relay PCB
0F: Driver relay PCB
10: Driver relay PCB
134: Error
(01=K, 02=C, 03=M, 04=Y, 05=W/CL)
134-5: Spot color PCB
134-01 to 04: Printer
control PCB
Does this error recur?
Does this error recur?
No
Yes
Yes
Correct the FFC connection condition between the LED head and the PCB
Correct the FFC connection condition.
Replace the LED head unit
Replace either applicable PCB.
134-01 to 04:
Printer control PCB
134-05: Spot color PCB
135: Error
Motor Error
02: Tray 2 Lift-up
Motor Error
03: Tray 3 Lift-up
Motor Error
04: Tray 4 Lift-up
Motor Error
05: Tray 5 Lift-up
Motor Error
Is the fuse on the PCB blown?
Is the motor resistant value abnormal, or is the motor wire disconnected or shorted?
No
Yes
Yes
No
Do the following check on motors and PCBs:
Replace the PCB.
Replace the motor.
Replace the PCB.
01: Printer Control PCB
02 to 05: Option tray PCB
Is there any abnormality with the mechanism, such as a blown motor fuse, a disconnected or shorted motor wire, and a broken gear?
No
Yes
No
Do the following check on motors and PCBs:
Replace the motor, cable and belt motor driving mechanism.
Replace the printer control PCB
135: Error
Is there any abnormality with the mechanism, such as a blown motor fuse, a disconnected or shorted motor wire and a broken gear?
No
Yes
No
Do the following check on motors and PCBs:
Replace the motor, cable, fuser motor driving mechanism.
Replace the printer control PCB
12: Station 2 ID Motor Lock Error
13: Station 3 ID Motor Lock Error
14: Station 4 ID Motor Lock Error
15: Station 5 ID Motor Lock Error
Is the motor fuse blown?
Is the motor wire broken or shorted
Does the error recur?
No
Yes
No
Yes
Do the following check on motors and PCBs:
Replace the motor.
Replace the driver relay PCB
Replace the ID motor driving mechanism
143: Error
(01=K, 02=C, 03=M, 04=Y, 05=W/CL)
Detach the ID unit. Remove the rear cover and inspect the initial movement. Is there any abnormality with up/down movement?
No
Yes
Replace the ID unit.
Inspect the driver replay PCB, ID up/down sensor, ID motor driving mechanism.
147: Error
error (01=K, 02=C, 03=M, 04=Y, 05=W/CL)
Is the motor resistant value abnormal, the motor wire disconnected or shorted?
Does the error recur?
No
Yes
No
Yes
Do the following check on motors and PCBs
Replace the motor.
Replace the driver relay PCB
Replace the Toner supply mechanism.
No
Yes
Move the lock lever of toner cartridge to the lock position. Replace the toner sensor assembly.
No
Yes
Move the lock lever of toner cartridge to the lock position. Replace the toner sensor assembly.
163: Error
(01=K, 02=C, 03=M, 04=Y, 05=W/CL)
This error does not occur with the factory default settings.
Is the ID unit prism soiled?
Does this error recur?
Does this error recur?
Yes
No
Yes
Yes
Clean it.
Replace the ID unit.
Replace the driver replay PCB
Replace the toner low sensor board and the cable.
166: Error
01: The power supply thermistor is detected as shorted.
02: The power supply thermistor is detected as open.
03: The power supply thermistor indicates high temperature error
04: The power supply thermistor indicates low temperature error
Replace the printer control PCB
167: Error
Does this error recur?
Yes
After leaving the printer for 30 minutes, turn on the power
168: Error
detected as shorted
02: Thermistor is
detected as open
03: Thermistor is
indicates high
temperature error
04: Thermistor indicates
low temperature
error
Does this error recur?
Yes
After leaving the printer for 30 minutes, turn on the power again. When the power is restored for the 168-03 error, the display changes to Service Call 994: Error
169: Error
02: Thermistor is detected as open
03: Thermistor is indicates high temperature error
04: Thermistor indicates low temperature error
Does this error recur?
Yes
After leaving the printer for 30 minutes, turn on the power again.
170: Error
171: Error
Replace the fuser unit.
172: Error
173: Error
temperature of the fuser thermistor was
detected
Replace the fuser unit.
When the power is restored, the display may change to Service Call 994: Error in some cases.
181: Error
182: Error
183: Error
184: Error
185: Error
(181 = Duplex Unit.
182, 183, 184, 185 = Optional Tray)
Check to make sure the contact points of the connector and replace the optional unit
188: Error
communication
with Port CPU
Replace the printer control PCB
communication
with Driver CPU
190: Error
Replace the printer control PCB
203: Error
204: Error
Replace the printer control PCB
207: Error
208: Error
Replace the printer control PCB
213: Error
214: Error
Replace the printer control PCB
230: Error
Does this error recur?
Yes
Replace the tag reader/writer PCB and the FFC.
Replace the printer control PCB
231: Error
02: Tag Reader circuit abnormality
03: Tag Interface error
Does this error recur?
Yes
Replace the tag reader/writer PCB and the FFC.
Replace the printer control PCB
241: Error
245 Error
Memory Error
241: DUPLEX Flash memory error
242: Option Tray 2
243: Option Tray 3
244: Option Tray 4
245: Option Tray 5
241: Replace the DUPLEX PCB.
242-5: Replace the option try PCB
247: Error
Program Memory Error
Replace the printer control PCB
249: Error
CPU Program Memory Error
Replace the printer control PCB
250: Error
Did the user accept to execute HDD ERASE?
HDD ERASE
Informing the user of the necessity to execute Disk
ERASE to delete the encrypted file and restore the HDD defaults
251: Error
Replace the HDD
254: Error
Error cause information is displayed after the error code number
Regenerate an encryption key. If it doesn’t solve the problem, replace the CU PCB
257: Error
Error cause information is displayed after the error code number
Format the HDD again. If it does not solve the problem, replace the HDD
260: Error
Replace the Fuser Unit.
If error not cleared, power OFF and check conditions of cables between CU/PU board (ME2 PCB) and the relay board (MER PCB) and the Fuser Unit.
If no damage to cables replace CU/PU board (ME2 PCB) and the relay board (MER PCB).
261: Error
262: Error
263: Error
264: Error
265: Error
266: Error
267: Error
268: Error
269: Error
270: Error
271: Error
272: Error
273: Error
274: Error
If error not cleared, power OFF and check conditions of cables between CU/PU board (ME2 PCB) and the relay board (MER PCB) and the Fuser Unit.
If no damage to cables replace CU/PU board (ME2 PCB) and the relay board (MER PCB).
Press the [Details] button for help.
Press the [Details] button for help.
340
341
342
343
Error 340 — Yellow Image Drum
Error 341 — Magenta Image Drum
Error 342 — Cyan Image Drum
Error 343 — Black Image Drum
Press the [Details] button for help.
Press the [Details] button for help.
350
351
352
353
Error 350 — Yellow Image Drum
Error 351 — Magenta Image Drum
Error 352 — Cyan Image Drum
Error 353 — Black Image Drum
However, you should replace the image drum as soon as possible.
Press the [Details] button for help.
Replace the fuser unit with a new one.
Install new fuser unit.
Press the [Details] button for help.
Replace the belt unit with a new one.
Replace with a new transfer belt unit as soon as possible to maintain print quality.
Press the [Details] button for help.
Replace with a new belt unit as soon as possible to maintain print quality.
Press the [Details] button for help.
Press the [Details] button for help.
370
371
372
373
Press the [Details] button for help.
Press the [Details] button for help.
381
382
383
384
385
389
Press the [Details] button for help.
Press the [Details] button for help.
Press the [Details] button for help.
Press the [Details] button for help.
Press the [Details] button for help.
Press the [Details] button for help.
Reset paper in tray.
Press the [Details] button for help.
Open and close cover to perform recovery printing, and continue.
Press the [Details] button for help.
410
411
412
413
C: Cyan (blue)
M: Magenta
Y: Yellow
K: Black
414
415
Y: Yellow,
M: Magenta
Something is wrong with the Yellow Image Drum sensor.
If the message persists, uninstall the toner cartridge and install it again.
If the toner cartridge is not installed, install it.
Press the [Details] button for help.
Something is wrong with the Magenta Image Drum sensor.
If the message persists, uninstall the toner cartridge and install it again.
If the toner cartridge is not installed, install it.
Press the [Details] button for help.
Something is wrong with the Cyan Image Drum sensor.
If the message persists, uninstall the toner cartridge and install it again.
If the toner cartridge is not installed, install it.
Press the [Details] button for help.
Something is wrong with the Black Image Drum sensor.
If the message persists, uninstall the toner cartridge and install it again.
If the toner cartridge is not installed, install it.
Press the [Details] button for help.
544
545
546
547
Error 544 — Yellow
Error 545 — Magenta
Error 546 — Cyan
Error 547 — Black
Make sure that the lever on the toner cartridge is fully turned and locked, and the protective tape is removed.
Press the [Details] button for help.
550
551
552
553
Error 550 — Yellow
Error 551 — Magenta
Error 552 — Cyan
Error 553 — Black
Press the [Details] button for help.
554
555
556
557
Error 554 — Yellow
Error 555 — Magenta
Error 556 — Cyan
Error 557 — Black
Press the [Details] button for help.
560
561
562
563
Error 560 — Yellow Image Drum
Error 561 — Magenta Image Drum
Error 562 — Cyan Image Drum
Error 563 — Black Image Drum
Press the [Details] button for help.
564
565
566
567
Error 564 — Yellow Image Drum
Error 565 — Magenta Image Drum
Error 566 — Cyan Image Drum
Error 567 — Black Image Drum
Install new image drum.
Press the [Details] button for help.
Close the rear output tray and tray again.
Press the [Details] button for help.
Press the [Details] button for help.
Press the [Details] button for help.
Press the [Details] button for help.
614
615
616
617
Error 614 — Yellow
Error 615 — Magenta
Error 616 — Cyan
Error 617 — Black
Press the [Details] button for help.
620
621
622
623
Error 620 — Yellow
Error 621 — Magenta
Error 622 — Cyan
Error 623 — Black
Press the [Details] button for help.
680
681
682
683
Error 680 — Yellow Image Drum
Error 681 — Magenta Image Drum
Error 682 — Cyan Image Drum
Error 683 — Black Image Drum
Press the [Details] button for help.
You can use any consumables in your product, but you must accept the risks of using non-genuine consumables.
If the use of non-genuine consumables causes damage to the product or results in your product not functioning to its full specification, then such damage or effect on the product is not covered by warranty.
1. Turn off your product
2. Press and hold the (CANCEL) button and turn on your product
3. After start up, release the (CANCEL) button. Note: This operation will be recorded for future reference
901: Error
902: Error
No
Replace the driver relay PCB
903: Error
904: Error
903: too high
904: too low
No
Replace the driver relay PCB
980 : Error
Replace the fuser.
990 : Error
Does the error occur again?
Yes
Be sure of cable connection, and then perform board replacement.
993: Error
Does this error recur?
Yes
Replace the paper thickness sensor and the cable
Replace the printer control PCB
994: Error
Replace the fuser unit
FOC: Error
Replace the Printer control PCB
FFF: Error
Replace the Printer control PCB
Service call errors, 171: Error, 166-02: Error, 168-02: Error, 169-02: Error 0169-04: Error and 902: Error can occur when the printer temperature is under 0 degrees centigrade; therefore, if the printer temperature is low, turn on the printer after the printer temperature has risen enough.
Содержание
- Oki c822 toner sensor error
- Oki c822 toner sensor error
- Error Message List
Oki c822 toner sensor error
Причина в том, что принтер «не видит» прыгающей в своём окошке шторки датчика тонера (см. статью о механизме работы датчика). Есть пять простых вариантов причины возникновения этой проблемы:
1. Не до упора повёрнута ручка запирания тонер-картриджа. Окошко в торце ручки должно находиться строго напротив отверстия в корпусе принтера, за которым расположена оптопара датчика тонера. Нажмите ручку до упора.
2. На белую шторку, появляющуюся в окошке, налип тонер, отчего она перестаёт отражать свет оптопары. Шторку необходимо очистить от тонера, чтобы пропало сообщение об ошибке датчика.
3. В принтере, где уже побывал покупной картридж, оказался вновь стартовый. В комплекте поставки всех младших принтеров, начиная с лета 2004 года, идут стартовые тонер-картриджи, у которых нет датчика тонера (см. выше), а вместо него просто наклеен кусочек фольги. Такой картридж может нормально работать в принтере только с самого начала. При его наличии принтер считает расход тонера только по формуле и когда достчитывает до конца, требует заменить картридж. После этого в принтер необходимо установить покупной картридж, в котором есть датчик тонера. Как только такой картридж попадает в принтер, он переходит в режим контроля датчика тонера и если после этого в него опять вставить стартовый картридж, то принтер, не увидев работающего датчика, выдаст ошибку датчика тонера.
4. Размер окошка слишком велик. Возможна ситуация, когда окошко, за которым находится белая шторка, слишком велико и поэтому оптопара не может корректно сфокусировать отражение от шторки и получить устойчивое срабатывание. Исправить ситуацию можно следующим образом: необходимо заклеить чёрным не блестящим скотчем окошко сверху так, чтобы высота прорези была не более 4мм:

5. Установлен не тот фотокартридж.  В нижней части фотокартриджа расположен небольшой металлический штифт (или несколько штифтов), которые попадают в прорези на металлической пластине, расположенной на правой части внутри принтера.
Штифты могут быть установлены в разные позиции. Именно положение штифтов определяет «совместимость» того или иного фотокартриджа с тем или иным принтером. Если в принтер вставлен фотокартридж не того типа, то картридж устанавливается в принтере не под нужным углом и окошко датчика тонера просто не попадает напротив оптопары. Штифт, в принципе, можно переставить, но для этого необходимо разобрать картридж, так как вынуть его наружу невозможно: на его конце находится шляпка, не позволяющая вытянуть его. Поэтому где-то эту причину тоже можно отнести к сложным вариантам. Впрочем, можно открутить металлическую пластину внутри принтера, ту самую, в которую упираются эти металлические штырьки, тогда в принтер можно будет установить печатный картридж от любого принтера 3000й или 5000й серии.
Теперь «сложные» варианты сами по себе. Вынув тонер-картридж и удерживая его в том же положении, как он стоит в принтере, покрутите пальцем шестерню снизу. Белая шторка должна периодически на короткое время убираться вверх из окошка. Если этого не происходит, значит возникла механическая проблема.
1. Заклинил рычажок датчика. Белая шторка застряла либо в верхнем либо в нижнем положении. Попробуйте вручную (например иголкой) раскачать шторку вверх и вниз. Обычно это можно сделать не разбирая картриджа.
2. Оторвалась мешалка внутри тонер-картриджа. При вращении шестерни мешалка не вращается внутри картриджа, отчего и шторка тоже не прыгает. Очевидно, что для восстановления работоспособности необходимо разобрать картридж и восстановить вращение мешалки.
3. В картридж засыпан магнитный тонер. О такой проблеме доводилось слышать только по отношению к чёрному картриджу, который пытались заправлять чёрным магнитным тонером от ч/б принтеров. Такой тонер, находящийся в картридже, «навсегда» притягивает к себе магнитик, отчего шторка уходит из своего окошка вверх, давая на датчике постоянное false. Решение очевидно – воспользоваться немагнитным тонером, тщательно вычистив внутренности тонер-картриджа от остатков магнитного порошка.
У новой серии принтеров С3000 и C5000 датчик тонера расположен в фотокартридже. Снаружи он виден как прямоугольное окошко, расположенное на торце фотокартриджа с той стороны, где располагается запирающая ручка тонер-картриджа:

Это окошко закрывается специальной шторкой, когда тонер-картридж отсоединяется от фотокартриджа (на рисунке ниже мигает красным, но на самом деле эта шторка — чёрная):

Так вот, ошибка датчика тонера может возникать на этих принтерах от того, что при закрывании ручки тонер-картриджа шторка не ушла наверх. В этом случае оптопара «не увидит» движущегося за окошком отражающего сектора, который и вызывает срабатывание оптопары. Соответственно, закрыть ручку тонер-картриджа до упора или если это не помогает, принять другие меры для того, чтобы эта шторка ушла вверх.
Источник
Oki c822 toner sensor error
mariam » 01:47 — 23.10.07
KudesNIK » 10:08 — 23.10.07
Гость » 10:33 — 23.10.07
До этого — печатали. Ошибка датчика синего тонера. Ничего особенного не делали, пару раз бумага застревала на ленте переноса, вытаскивала картриджи аккуратненько, извлекала бумагу и дальше печатала. Но это реально пару раз всего и было, и проблем не вызывало. Я конечно куплю сейчас новый картридж, и/или фотокартридж если проблема в нем, принтер очень нужен в рабочем состоянии и времени разбираться особенно нет, но все равно очень хочу понять что случилось и как быть в таких ситуциях. Заранее спасибо за помощь 
KudesNIK » 16:04 — 23.10.07
Вариантов с этим датчиком несколько.
1. Не до конца закрыта ручка, запирающая тонер-картридж в драм-картридже.
2. При закрытии картриджа не полностью поднялась шторка, закрывающая отверстие для отражалки в драм-картридже.
3. На оптопару насыпался тонер и свет просто не проходит
У меня тут пара фоток есть, ща я их обработаю и в соответствующий FAQ положу для простоты восприятия.
Кстати, в FAQ фотки и пояснения к ним уже прицепил, так что желающие могут их там посмотреть.
mariam » 16:53 — 24.10.07
Слов нет, одни эмоции. С тех пор как принтер встал, приходили два разных мальчика-ремонтника (не ОКИ, у нас нет специализированного сервиса в городе), чесали репы, бормотали что-то про чипы. А я, после недолгого, но проникновенного рассматривания новых картинок в «соответствующем FAQ» (не пойму как ссылки добавлять, простите) у KudesNIKa, залезла, что-то интуитивно поковыряла в окошке датчика, почистила на всяк. случ. еще раз оптопару, закрыла крышку и на глазах у изумленной публики принтер заработал.
KudesNIK
Спасибо! Мы будем покупать принтеры А3 формата, и тот факт, что это будут OKI во многом определил тот факт, что у OKI есть такой замечательный KudesNIK Я теперь Ваша фанатка.
KudesNIK » 10:33 — 25.10.07
mariam , а в каком городе у нас сервис-центр отсутствует?  Судя по IP-адресу ты пишешь из Казани. А в Казани есть сервис по OKI. Но IP-адрес вещь неверная, поэтому расскажи, в какую сторону надо развиваться?
А ссылки просто вставляются — надо нажать кнопку URL и добавить нужную ссылку в тег
» [url=http:\www.ссылка.ru] «, потом написать то, что должно появиться и снова нажать кнопку URL. Усё.
mariam » 12:30 — 25.10.07
В данный момент вещаю из г. Набережные Челны. Гипотетически сервис может и есть, но его никак не найти, мы честно и долго искали, с тех пор еще когда у нас старые ОКИ стояли. Опять же, теоретически Казань недалеко, но не тащиться же туда из-за мелких проблем. Картриджи и проч. заказываю через Инет и вожу Грузовозоффым, т.к. в городе в продаже тоже нету. Но, насколько мне известно, здесь не так много ОКИ вообще в городе, у нас два с5900, да еще пару мест всего знаю. Да и городишко малюсенький.
Источник
Error Message List
Wait a moment. Network initializing .
The network is being initialized.
Wait for a while until the machine connects to the network.
Checking File System
File system in the hard disk is being checked. Wait for a while.
Inspection is required. PU Flash Error
Turn the machine off, and then back on. If the same error occurs, contact your dealer.
Inspection is required. PU Communication Error
Turn the machine off, and then back on. If the same error occurs, contact your dealer.
Offline Mode
The machine is offline. Press the Online button to set it to [Online].
Data present.
Data remains unprinted.
Deleting data.
The job was cancelled or user is unauthorized.
Warming up.
The machine is adjusting the temperature of the fuser unit. Wait for a while.
Preparing .
Color registration and density are being adjusted. Wait for a while.
Updating firmware. Do not turn OFF the power.
The programs on the machine are being updated.
Do not turn the machine off until the update completes.
The machine automatically restarts after the update completes.
Toner Low.
The toner indicated on the screen is low. Have a new toner cartridge ready.
Waste Toner Full Replace with new Toner Cartridge.
Waste toner is full. Replace the toner cartridge with a new one.
C: Cyan (blue), M: Magenta (red)
C Non Recommended Toner.
An optimum C (Cyan, blue) toner cartridge is not installed.
Use a toner cartridge that matches your machine.
M Non Recommended Toner.
An optimum M (Magenta, red) toner cartridge is not installed.
Use a toner cartridge that matches your machine.
Y Non Recommended Toner.
An optimum Y (Yellow) toner cartridge is not installed.
Use a toner cartridge that matches your machine.
K Non Recommended Toner.
An optimum K (Black) toner cartridge is not installed.
Use a toner cartridge that matches your machine.
Error Postscript
A postscript error has occurred.
Image Drum Near Life.
The image drum indicated on the screen is near life. Have a new image drum ready.
C: Cyan (blue), M: Magenta (red), Y: Yellow, K: Black
Fuser Near Life.
The fuser unit is near life. Have a new fuser unit ready.
Belt Unit Near Life.
The belt unit is near life. Have a new belt unit ready.
Fuser Unit Life. Install New Fuser Unit.
The fuser unit reaches its lifetime.
Replace the fuser unit with a new one.
Belt Unit Life. Install New Belt Unit.
The belt unit reaches its lifetime.
Replace the belt unit with a new one.
Toner empty. Replace with new Toner Cartridge.
The toner indicated on the screen is empty. Replace the empty toner cartridge with a new one.
C: Cyan (blue), M: Magenta (red), Y: Yellow, K: Black
Toner cartridge not installed.
A color toner cartridge indicated on the screen is not installed.
Install the toner cartridge.
C: Cyan (blue), M: Magenta (red), Y: Yellow, K: Black
Image Drum Life. Please install new Image Drum Unit.
The image drum indicated on the screen reaches its lifetime.
Replace the image drum with a new one.
C: Cyan (blue), M: Magenta (red), Y: Yellow, K: Black
TRAY is empty.
No paper is loaded in the tray. Load paper.
File System is full.
Memory in the file system is full.
Delete unnecessary files.
The File System is write-protected.
The file you are trying to write is write-protected.
Check the file name.
Insufficient page memory to collate.
Insufficient memory error has occurred during collate printing.
Reduce the number of pages to print.
Insufficient memory. Error: 014
Memory full error has occurred during PC Fax reception. Press [Close].
Unauthorized user, job cancelled.
Unauthorized job was sent or unauthorized user attempted to print or send a fax. Data was deleted. Contact your administrator to use this machine.
File erasing .
Files stored for authentication print are being deleted.
Wait for a while.
Deleting encrypted authentication print data.
Files stored for encrypted authentication print are being deleted. Wait for a while.
Erased Data Full
Files supposed to be deleted are full. Erase the files.
Secure job storage period exceeded.
Files whose authentication print data storage period expired were automatically deleted.
Disk Read/Write Error
An error has occurred in the file system. Press [Close].
Flash Error
An error has occurred when firmware was being updated.
Contact the administrator.
Invalid print data received.
Invalid print data or PC fax data was received. To erase the message, press [Close].
If you performed authentication printing, the data was deleted because it was incomplete. Print again.
Received data has been discarded because Job Type is restricted.
Data whose job type is not defined in the acceptable job type settings was received. The data was discarded without being processed.
Select a job type defined in the acceptable job type settings for [Job Type] of the printer driver and print again.
Manual Request. Error : 500
Print on paper fed manually. Load paper in the MP tray.
Please change [MEDIA_SIZE] [MEDIA_TYPE] in [TRAY]. Error: 461, 462, 463, 464
The size and type of fed paper do not match those indicated on the screen. Use the same size and type of paper selected on the application.
Please change [MEDIA_SIZE] [MEDIA_TYPE] in MP Tray Error: 460
The size and type of paper loaded in the MP tray do not match those indicated on the screen. Make sure that the size and type of paper loaded in the MP tray match those selected on the application.
Wait a moment. Message Data processing .
Messages to be displayed on the machine are being updated. Wait for a while.
Wait a moment. Message Data writing .
Messages to be displayed on the machine are being updated. Wait for a while.
Restart the machine. Writing message data has been complete.
Messages to be displayed on the machine are now updated.
Turn the machine off, and then back on.
Wait for a while.
Please check data. Message Data Write Error
Updating messages to be displayed on the machine failed.
Make sure that you use right data for this machine.
Wait a moment. Network Configuration writing .
Network settings for this machine is changed. The new settings are being stored. Wait for a while.
Wait a moment. Network initializing .
Network settings for this machine are initializing.
Paper [TRAY] is empty Set [MEDIA_SIZE] Error: 490, 491, 492, 493, 494
No paper is loaded in the indicated tray. Load paper of the displayed size.
[TRAY] cassette is missing. Open and Close the indicated cassette. Error: 440, 441, 442, 430, 431, 432, 433
The tray is not installed. Install the cassette. If the cassette is already inserted, pull it out, and then insert it again.
Insufficient memory. Error: 420
Data is too complicated. Memory full error has occurred during processing. Reduce the volume of the print data.
Waste Toner Full Replace with new Toner Cartridge. Error: 414, 415, 416, 417
Waste toner of the toner cartridge is full. Opening and closing the front cover can resume printing for a while, but it may damage the image drum. Replace the toner cartridge with a new one as soon as possible.
C: Cyan (blue), M: Magenta (red)
Toner empty. Replace with new Toner Cartridge. Error: 410, 411, 412, 413
The indicated cartridge ran out of toner.
Opening and closing the front cover can resume printing for a while, but it may damage the image drum. Replace the toner cartridge with a new one as soon as possible.
C: Cyan (blue), M: Magenta (red), Y: Yellow, K: Black
Incompatible C Toner. Error: 552, 556, 616, 622
The installed C (Cyan, blue) toner cartridge is not optimum.
We recommend using an optimum toner cartridge.
Incompatible M Toner. Error: 551, 555, 615, 621
The installed M (Magenta, red) toner cartridge is not optimum.
We recommend using an optimum toner cartridge.
Incompatible Y Toner. Error: 550, 554, 614, 620
The installed Y (Yellow) toner cartridge is not optimum.
We recommend using an optimum toner cartridge.
Incompatible K Toner. Error: 553, 557, 617, 623
The installed K (Black) toner cartridge is not optimum.
We recommend using an optimum toner cartridge.
Toner Not Installed. Error: 610, 611, 612, 613
A color toner cartridge indicated on the screen is not installed.
Install the toner cartridge.
C: Cyan (blue), M: Magenta (red), Y: Yellow, K: Black
Image Drum Sensor Error Check Image Drum. Error: 540, 541, 542, 543
The sensor error has occurred in the image drum indicated on the screen.
Uninstall the image drum, and then install it again.
If the message persists, uninstall the toner cartridge and install it again.
If the toner cartridge is not installed, install it.
C: Cyan (blue), M: Magenta (red), Y: Yellow, K: Black
Multiple sheets of paper have been fed. Reset Paper in [TRAY]. Error: 401
The indicated tray fed multiple sheets of paper at a time.
Remove the cassette from the tray, and then load paper again.
Paper Size Error. Reset Paper in [TRAY]. Error: 400
Paper size error has occurred in the indicated tray. Make sure that the size made by paper loaded in the tray matches the setting made by the paper size dial in the paper cassette. Load paper according to the paper size and direction set for the paper size dial.
If the setting made by the paper size dial is wrong, cancel printing first, set the paper size dial, and then print again.
Make sure that the cassette does not feed multiple sheets of paper at a time after starting printing. If it happens, remove paper, and then load paper correctly.
Paper jam has occurred. Open the front cover and remove the paper. Error: 390
Paper jammed via the paper feed path from the MP tray.
If the edge of the jammed paper is not visible, open the front cover and remove the paper.
Paper jam has occurred. Pull out the [TRAY] cassette and then remove the paper. Error: 391, 392, 393, 394
A paper jammed via the paper feed path from the indicated tray.
Pull out the cassette, and then remove paper. If multiple sheets of paper are fed at a time, remove paper and reload paper.
Make sure that the paper stoppers are set in the right position.
Paper jam has occurred. Open the front cover and remove the paper. Error: 372, 380
Paper jammed in the paper feed path of the machine. Open the front cover and remove the jammed paper.
A paper jam has occurred under the image drum or around the fuser unit. Please remove paper. Error: 381, 382, 383, 348, 389
A paper jam has occurred inside the machine.
Open the cover and remove jammed paper.
A Paper Jam has occurred and paper remains near the Duplex Unit. Please remove paper. Error: 370, 371, 373
Paper jammed near the duplex printing unit.
Pull out the duplex unit on the back of the machine, and then remove jammed paper.
The 2-Sided Printing unit is not set correctly. Error: 360
The duplex unit is not properly installed. Install the duplex unit.
Image Drum Life. Please install new Image Drum Unit. Error: 350, 351, 352, 353
The image drum indicated on the screen reaches its lifetime.
Replace the image drum with a new one.
Opening and closing the cover can resume printing for a while. Replace with a new one as soon as possible, however.
C: Cyan (blue), M: Magenta (red), Y: Yellow, K: Black
Image Drum Life. Please install new Image Drum Unit. Error: 560, 561, 562, 563, 564, 565, 566, 567
The image drum indicated on the screen reaches its lifetime.
Replace the image drum with a new one.
C: Cyan (blue), M: Magenta (red), Y: Yellow, K: Black
Image Drum Life. Please install new Image Drum Unit. Error: 680, 681, 682, 683
Printing has stopped because the image drum indicated on the screen reached its lifetime. Replace with a new image drum to print.
C: Cyan (blue), M: Magenta (red), Y: Yellow, K: Black
Fuser Unit Life. Install New Fuser Unit. Error: 354
The fuser unit reaches its lifetime.
Replace the fuser unit with a new one.
Opening and closing the cover can resume printing for a while. Replace with a new one as soon as possible for maintaining the print quality.
Belt Unit Life. Install New Belt Unit. Error: 355
The belt unit reaches its lifetime.
Replace the belt unit with a new one.
Opening and closing the cover can resume printing for a while. Replace with a new one as soon as possible for maintaining the print quality.
The Fuser Unit is not installed correctly. Reset Fuser Unit. Error: 348
The fuser unit is not properly installed. Remove and re-install the fuser unit. If the error persists after re-installing, replace the fuser unit with a new one.
Waste Toner Full. Install New Belt Unit. Error: 356
Waste toner of the belt unit is full. Replace the belt unit with a new one. Opening and closing the cover can resume printing. Printing stops after 500 sheets are printed.
Toner cartridge not properly installed. Error: 544, 545, 546, 547
A color toner cartridge indicated on the screen is not installed.
Make sure that the lever on the toner cartridge is fully turned and the protective tape is removed.
C: Cyan (blue), M: Magenta (red), Y: Yellow, K: Black
Image Drum not properly installed. Check Image Drum. Error: 340, 341,342, 343
The indicated image drum is not installed correctly.
Remove and re-install the image drum.
C: Cyan (blue), M: Magenta (red), Y: Yellow, K: Black
The Fuser Unit is not installed correctly. Reset Fuser Unit. Error: 320
The fuser unit is not properly installed. Remove and re-install the fuser unit.
Belt Unit not installed correctly. Re-set the Belt Unit. Error: 330
The belt unit is not properly installed. Remove and re-install the belt unit.
[COVER] Open. Error: 310, 311, 587
Indicated cover is open. Close the cover.
Error: 310 The output tray, 311 The front cover, 587 The upper output tray
Please check data. Program Data Write Error
An error occurred when firmware was being updated.
Use a correct update file.
Power OFF/ON
Turn the machine off, and then back on.
If the same error occurs, contact your dealer.
Inspection is required.
Turn the machine off, and then back on.
If the same error occurs, contact your dealer.
Cancelling .
The cancel button was pressed while copying. The copy job is being cancelled. Wait for a while.
Automatic document feeder (ADF) cover is open.
The ADF cover of the scanner is open. Close the cover.
Document jam has occurred. Open the automatic document feeder (ADF) cover on the scanner to check.
Paper jammed in the ADF of the scanner.
Open the ADF cover and remove jammed paper.
Multiple sheets of document have been fed. Open the automatic document feeder (ADF) cover on the scanner to check.
Multiple sheets of document have been fed. Fan a stack of the paper well and place them on the automatic document feeder (ADF). Use the document glass if a tag or label is affixed to the document.
Scanner lamp error check the lamp.
Light volume of the scanner is low. Contact your dealer.
Power OFF/ON Carriage Error
An error has occurred on the carriage of the scanner. Turn the machine off, and then back on.
If the same error occurs, contact your dealer.
USB Memory Full
Scan To USB Memory was cancelled because the USB Memory is full.
Check the free space in the USB Memory.
Writing to USB memory failed.
The USB Memory is write-protected. Unlock the protection.
USB Memory disconnected.
The USB Memory was removed while performing Scan To USB Memory.
Connect to PC failed.
No destination computer was found for Scan to Computer. Make sure that your computer is turned on and recordable.
To erase the message, press [Close].
Insufficient memory occurred during Rx.
Memory full error has occurred during fax reception. Ensure available memory.
Communication Error
An error has occurred during fax transmission or fax reception.
Telephone
The external phone is in use.
File Transmission Error
An error such as a malfunction of the server or disconnection of a network cable has occurred while performing Scan To shared folder.
Check the network connection.
To erase the message, press [Close].
E-mail Transmission Error
An error such as a malfunction of the server or disconnection of a network cable has occurred while performing Scan To E-mail. Check the network connection.
To erase the message, press [Close].
Please check SMTP settings.
Cannot connect to the SMTP server. Check the network settings.
Please check POP3 settings.
Cannot connect to the POP3 server. Check the network settings.
SMTP Login failed.
An attempt to log into the SMTP server ended up an authentication error.
Check the network settings.
SMTP Auth. Unsupported
The SMTP server does not support the authentication system.
Check the network settings.
POP3 Login failed.
An attempt to log into the POP3 server ended up an authentication error.
Check the network settings.
Getting target IP failed. Please Check DHCP settings.
The DHCP server cannot be detected. Check the network connection.
Please check DNS settings.
Cannot connect to the DNS server. Check the network connection.
Please check Server settings.
Cannot connect to the file server. Check the network settings.
Server Login failed.
Logging into the file server failed. Check the server settings.
Entering directory failed.
Connecting to the directory of the FTP server failed. Check the server settings.
Changing data Transfer Type failed.
File transmission failed because the file transfer type was not accepted by the FTP server. Change the FTP transfer type to «binary».
File writing failed.
Files sent using Scan To shared folder could not be written. Check the access rights for the shared folder.
FTP destination Full.
Memory in the FTP server is low. Delete unnecessary files and ensure the free space.
Please change File Name.
The specified file name is not acceptable. Check the FTP server settings and change the file name.
Device communication protocol not supported.
The server does not support CIFS or FTP. Check the server settings.
Please check Network Share Name.
The name of the network shared folder is not correct. Check the folder name.
Please check data. Program Data Write Error
An error has occurred when program was being updated.
Please insert USB Memory.
Scan To USB Memory or print from USB Memory with USB Memory not inserted was attempted.
Insert USB Memory.
[TRAY] cassette missing.
The cassette in the indicated tray is pulled out.
Install the cassette.
Access Limitation Error Monochrome printing was performed due to the color printing limitation.
A color print job was converted to a mono print job due to an unauthorized user. Contact your administrator for color printing.
Access Limitation Error Data was deleted due to the color printing limitation.
A color print job was deleted due to an unauthorized user. Contact your administrator for color printing.
Restricted access error Data deleted due to printing restrictions.
A print job was deleted due to an unauthorized user. Contact your administrator for printing.
Incompatible USB device connected. Remove the connected USB device.
An unsupported USB device is connected. Remove the USB device.
Please remove the connected USB device. USB device has not been recognized.
The connected USB device was not recognized. Remove the USB device.
Please remove the USB Hub. USB Hub is connected.
A USB hub is connected. Remove the USB hub. This machine does not support USB hub.
Inspection is required. SIP Error
Turn the machine off, and then back on. If the same error occurs, contact your dealer.
Please call service. Scanner unit failed to detect printer unit.
Turn the machine off, and then back on. If the same error occurs, contact your dealer.
HDD Error 0
While initializing this machine, a hard disk which needs formatting was detected.
HDD Error 250
While initializing this machine, a damaged file for encrypted authentication printing was found. Format the hard disk again.
Accounting Log buffer is near full.
The accounting log buffer is almost full.
Acquire the log and free the buffer.
Accounting Log Writing Error
An accounting log writing error has occurred.
To erase the message, press [Close].
Job Log Database Error
A data base access error has occurred while writing or reading the job log. Turning the machine off and on may resolve the problem.
To erase the message, press [Close].
Accounting Log Buffer Full (Delete old logs)
Old logs were deleted, because accounting log buffer was full. Acquire the log and free the buffer.
Power OFF/ON
Turn the machine off, and then back on. If the same error occurs, contact your dealer.
A decoding error occurred. Check the image data.
An error has occurred in the image data sent to this machine. Check the image data.
Process has been canceled as there is no space on the device. Please free up enough memory space by reducing usage and try again.
Processing data was cancelled due to memory full.
Reduce the usage on the device to ensure available memory, and then retry.
Process has been canceled by a device error. After maintenance or change of the device, please try again.
Processing data was cancelled because an error occurred on the device.
Repair or replace the device, and then retry.
Access denied to PC. Please check PC.
Connecting to a computer failed when performing Scan to Computer. Check the settings on the computer.
Deleting data.
This machine ran out of color toner. Color print data is being deleted.
Error PDF
The PDF file is damaged.
This PDF file is password protected.
This PDF file is password protected. Enter a password to print.
Valid password required to print document.
This PDF needs authentication. Enter a password to print.
No communication with the SNTP server.
Obtaining current time from the SNTP server failed. Check the server.
USB Memory disconnected.
The USB Memory was removed while printing from USB Memory. Do not remove USB Memory while printing is in progress.
Cannot open the file.
The specified file could not be Opened. Check the file.
Cannot read the file.
Files could not be read. Check the device where the files are stored.
File loading from USB.
Data is being read from USB Memory.
Press the Stop button to cancel reading.
An error occurred. Scanning is pending.
Printing has stopped due to an error.
Image Drum Sensor Error.
The toner sensor error has occurred in the image drum indicated on the screen.
Printing was stopped. Rear Output Tray was opened during printing. Open the Output Tray. Error code: 409
The rear output tray was moved while printing.
Place the rear output tray in the correct position, and then open and close the output tray.
Toner empty. Replace with new Toner Cartridge.
The indicated cartridge ran out of toner.
Replace the empty toner cartridge with a new one.
Wait Timeout in menu is disabled. Printing is disabled except by USB. Clear page buffer and enable time out in menu.
Wait Timeout is disabled.
Insufficient memory occurred during Fax Tx reservation.
Insufficient memory error has occurred during Scan To fax.
Insufficient memory.
Insufficient memory error has occurred during fax reception.
E-mail receiving has been cancelled.
E-mail reception was cancelled.
Check the file format and size of the attached file.
Wireless settings are incomplete.
Wrong values are set or items remain unset in the wireless LAN settings. Check the wireless settings.
Not connected to wireless access point.
No wireless LAN access points are found.
Make sure that the access point is turned on.
Disconnect and re-connect to wireless LAN.
Wireless startup failed.
Restart the machine. If the error persists, contact your dealer.
Firmware Update Error Please try again. If network doesn’t work, please try firmware update over USB.
Updating the firmware failed. Update again.
Registering with Google Cloud Print. Don’t turn off the power until registration is complete.
This machine is being registered to the Google Cloud Print service. Wait for a while.
Deleting from Google Cloud Print.
This machine is being removed from the Google Cloud Print service. Wait for a while.
Caution, unknown Consumable detected Go to User Manual «Trouble Shooting» to restore operation Error 709
You can use any consumables in your product, but you must accept the risks of using non-genuine consumables.
If the use of non-genuine consumables causes damage to the product or results in your product not functioning to its full specification, then such damage or effect on the product is not covered by warranty.
To accept these risks and to restore function;
Turn off the machine.
Holding the [CLEAR] button, turn on the machine.
Release the [CLEAR] button when «RAM CHECK 100%» is displayed.
This operation log is recorded in the product.
If you have any questions, contact your dealer.
Replace the image drum. [PAGES] Pages Left.
The image drum indicated on the screen reaches its lifetime.
Replace the image drum with a new one.
C: Cyan (blue), M: Magenta (red), Y: Yellow, K: Black
Replace the image drum. Print Quality Not Guaranteed.
The image drum indicated on the screen reaches its lifetime.
Replace the image drum with a new one.
C: Cyan (blue), M: Magenta (red), Y: Yellow, K: Black
Receiving data timeout.
Data could not received within a certain period of time.
IPv4 address is conflicted. Please change IPv4 address.
The IP address assigned to this machine is duplicated with that of another device.
Check the IP addresses, and then assign another IP address.
Incompatible [COLOR] Image Drum. Error: 984, 685, 686, 687, 690, 691, 692, 693, 700, 701, 702, 703, 704, 705, 706, 707
Non-optimum image drum is installed.
C: Cyan (blue), M: Magenta (red), Y: Yellow, K: Black
C Image Drum Not Installed. Error: 696
Cyan (blue) image drum is not installed.
Install the image drum.
M Image Drum Not Installed. Error: 695
Magenta (red) image drum is not installed.
Install the image drum.
Y Image Drum Not Installed. Error: 694
Yellow image drum is not installed.
Install the image drum.
K Image Drum Not Installed. Error: 697
Black image drum is not installed.
Install the image drum.
Blank pages were detected on all pages. Please check how the document was set.
Scanned pages are all blank. Turn over the document.
In order to set paper that cannot be output to the Upper Output Tray, the paper was output from Output Tray. To turn off this display, press the [Close] button.
Check the type of the specified paper.
Simplex printing was performed as the paper setting did not allow duplex printing.
Duplex printing is not available on the specified paper.
Check the size and thickness of paper.
Multi-purpose tray has not been set to be used as the tray, so multiple copies have been printed. Please verify multi-purpose tray settings. Press [Close] button to remove this dialog
MP tray setting is set to [Do Not Use]. Change the MP tray setting.
Output Paper Full. Remove the paper on [TRAY]. Error: 480, 485
Paper in the output tray is full.
Remove the handout.
Changing Language. Panel operation is disabled.
Display language is being changed.
Wait for a while.
Language Change Failed. Error num: %CODE%
Switching display languages failed. Press the power button to turn the machine off, and then back on.
Detected an abnormality of internal database. The data must be deleted. After pressing [Format], the data will be deleted, and then reboot.
Data base is beyond restoration.
To delete the data base, press [Format].
Cannot print because your Summary Account balance is 0. User name for Printing: [USERNAME] Summary Account Name for Insufficient Balance: [ACCOUNTNAME] To continue the print job, increase the balance and select [Start]. To increase the balance, please contact the device administr. To cancel the print job, select [Cancel].
The number of print jobs excesses the limit. No more print jobs are authorized. Contact your administrator.
Copyright © 2015 Oki Electric Industry Co., Ltd. All rights reserved.
Источник