I just shared the latest Nokia Online Service Tool v6.2.8 with detailed steps to patch it with the crack file. Once you have installed the Nokia OST Tool on your computer, you can easily flash the stock ROM or firmware with .nb0 and .mlf extension on the Nokia phones. Whether you own a Nokia 9 PureView, Nokia 8 Sirocco, Nokia 7.2. Nokia 7 Plus, Nokia 6.1, Nokia 5.1 Plus, Nokia 4.2, or any other Nokia smartphone, this tutorial is just for you.
Nokia OST Tool is a very simple firmware flash tool like Samsung Odin. In normal circumstances, you might never need to flash a stock ROM on your Nokia phone. Since Nokia devices come with the stock Android or Android One ROM, they get speedy updates. However, in certain situations, you might want to install the stock firmware.
Nokia OST Tool Update Options
The Nokia Online Service Tool offers a range of options that let you customize your Nokia firmware installation as per your preference.
- Normal Download
- Emergency Download
- Erase user data
- Erase error data
- Switch SKUID
- Only backup NV
- Erase FRP
- Unlock Screen Lock
- Check System AP Status
Using these firmware update options, you can flash the stock ROM on your Nokia phone.
- To manually update the software of your Nokia device.
- You can unroot your phone by installing the stock firmware.
- If you have installed a custom ROM or recovery, you can return your device to stock.
- You can flash the stock ROM to fix a boot loop.
- To erase all user data and settings for a clean installation of the OS.
- By flashing the stock ROM on your Nokia smartphone, you can also remove FRP or firmware reset protection on your device.
- If you are not able to get past the lock screen on your Nokia phone, you can unlock the screen lock by flashing the firmware using the Nokia OST tool.
- The Nokia Online Service tool has a feature that lets you backup your device’s NV (non-volatile) data that contains sensitive information like the IMEI, Serial number, Baseband, etc.
Please note that the Nokia OST Tool won’t perform all the above-listed tasks by default. You must select the appropriate options/s carefully while flashing the stock ROM.
Prerequisites to Flash the Stock ROM
Before you can flash the stock ROM on your Nokia device, here are a few things to download and some preparations to make.
- The first thing you need the stock ROM or flash file for your Nokia phone’s model. Unfortunately, there’s no firmware download tool like Frija for Nokia devices, but you can download Nokia firmware from sites like Easy Firmware, Hikaricalyx, or any other source. If the firmware file you downloaded is a ZIP archive, unzip it to get the .nb0 and .mlf flash file.
- Take a full backup of your apps and data.
- Make sure that your phone is amply charged and has at least 60-70% of battery level.
- Enable USB debugging on your Nokia phone.
- Download the latest Nokia OST Tool (crack) v.6.2.8 and set it up on your Windows PC.
- Since the Nokia Online Service Tool automatically installs the required drivers including the ones listed below, you don’t need to install them separately.
- Nokia Phone USB Driver
- Phone F USB Driver
- Phone M USB Driver
- Please note that to be able to flash the stock ROM on your Nokia phone, it must have an unlocked bootloader. Otherwise, you’ll get ‘SE_ERR_ADB_CMD_GET_FAIL_RESULT’ error. The bootloader unlock command for Nokia devices varies from model to model. You can search online for the command to unlock your Nokia smartphone.
Now that you have installed the Nokia OST Tool and have the firmware file for your phone, you can follow the instructions given below to flash it.
- Launch Nokia Online Service Tool (OST). There are 2 ways to do that.
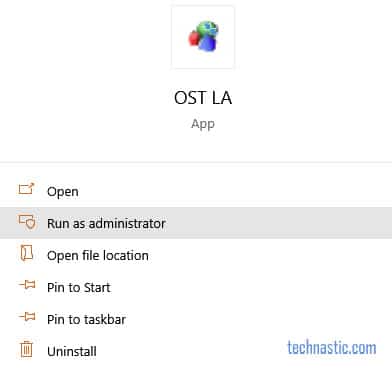
- Click the Search icon on the Windows taskbar, type “OST LA” and click the Run as administrator option.

Nokia OST LA app
- Navigate to C:Program Files (x86)OST LA and double-click OnlineUpdateTool.exe.
- Click the Search icon on the Windows taskbar, type “OST LA” and click the Run as administrator option.
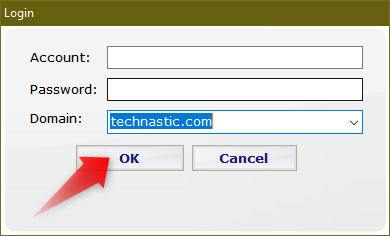
- When you see the Login screen asking you to type the Account ID and Password, just click the OK button.

Bypass login account and password
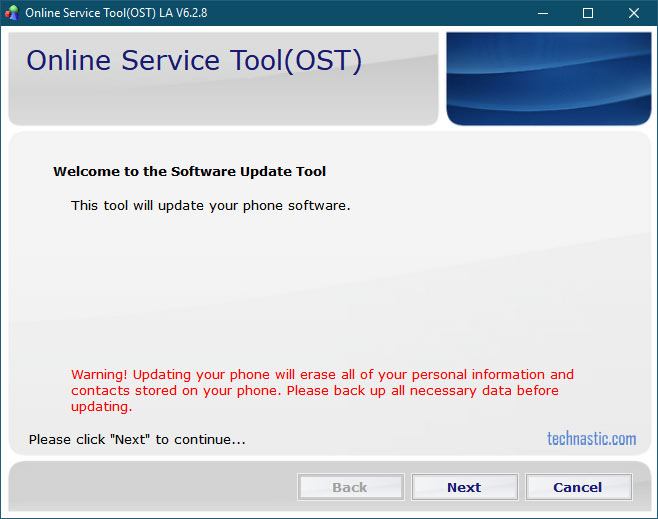
- You’ll then be greeted by the Online Service Tool (OST) welcome screen. Click the Next button.

Online Service Tool (OST) screen
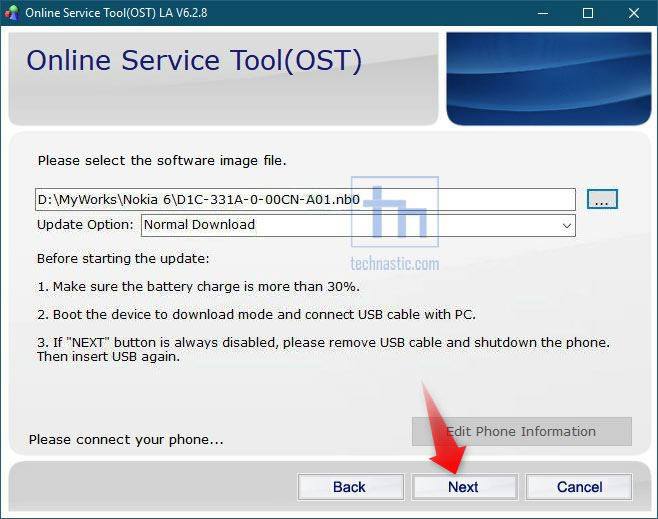
- Now, click the ‘…’ button, navigate to the folder where you have saved the firmware file with .mlf or .nb0 extension and click the Open button to select it.
Add stock ROM file to Nokia OST Tool
- It’s time to boot your Nokia device into the Download Mode and connect it to the PC. Some Nokia phones automatically boot into the Download Mode when connected to the PC via USB with Nokia OST Tool open. Of course, the phone needs to be turned off for that. Here’s how you can do that manually.
- Power off your Nokia device.
- Now, connect your phone to your PC using the USB cable.
- When it starts charging, press and hold the Volume Down + Power buttons at the same time. Keep both the buttons pressed until your phone vibrates and you see a screen with ‘Download Mode‘ written on the top-left corner.

Download Mode on Nokia
- In case the Next button is not enabled in the Nokia OST Tool, even after connecting your phone to the PC with the Download Mode on, click the Edit Phone Information button. Wait until you get an error message pop-up saying ‘Failed to reboot to FTM mode’. Just ignore that error and click OK. The Next button should now be enabled.
- If you want to install the firmware while retaining your phone’s data, apps and settings, just click the Next button on the Online Service Tool window. In case you want the tool to wipe your phone’s data, erase Firmware Reset Protection (FRP), click the down arrow ‘∨’ icon in the Update Option section. You’ll now have a range of options to select. Be careful while making a choice. For a normal clean installation, just select the Erase error data option.

OST Tool firmware update options
- When you have added the stock ROM to the OST Tool and selected the suitable update option, click the Next button to initiate the firmware flashing.
Firmware installation progress in Nokia OST Tool
- All you need to do now is to wait until the firmware file is flashed.
Once the stock ROM is flashed on your Nokia phone, it will reboot automatically with the newly installed firmware.
Fix OST Tool Error 0xC6DA
Some users have reported getting the following errors while using the OST Tool:
- 0xc6da (SE_ERR_ADB_CMD_GET_FAIL_RESULT (0xC6DA) error
- ERROR_INVALID_HANDLE (0x6)
- Reflash service bootloader
Full error message goes like this:
Error code : 0xc6da
Error : Download fails,
Error = SE_ERR_ADB_CMD_GET_FAIL_RESULT (0xC6DA)
If you get the 0xC6DA error in the OST Tool 6.0.4 and 6.1.2 while downloading the firmware on your Nokia phone, try the following fixes
- Install the latest Nokia USB driver
- Use the latest Nokia OST Tool 6.2.8
- Make sure you are flashing the correct firmware for your device model.
In case you are getting the variable product id error in the OST Tool, it means you got an MTK phone. The Online Service Tool supports only the Nokia devices with Qualcomm chipset.
Supported Nokia Devices
In short, we can say that the stock ROM flashing method described above works with all Android-powered Nokia smartphones that don’t have an MTK (MediaTek) chipset. I have made a list of all major Nokia phones on which you can flash stock firmware using the Nokia Online Service Tool.
- Nokia 2
- Nokia 4.2
- Nokia 5
- Nokia 5.1
- Nokia 5.1 Plus (X5)
- Nokia 5.3
- Nokia 6
- Nokia 6.1
- Nokia 6.1 Plus (X6)
- Nokia 6.2
- Nokia X71
- Nokia 7
- Nokia 7.1
- Nokia 7 Plus
- Nokia 7.2
- Nokia 8
- Nokia 8 Sirocco
- Nokia 8.1 (X7)
- Nokia 9 PureView
Finally, it’s time to stop typing. I have tried to be as detailed and clear while describing the steps. In case you still have any questions, blurt it out via comments.
melltoo
New member
- Joined
- Jan 8, 2019
- Messages
- 117
- Reaction score
- 0
- Points
- 0
-
#1
Nd1-617d-0-00ww-b04
need this file

dhanu yadav
GD Support Team
- Joined
- Dec 10, 2016
- Messages
- 1,868
- Reaction score
- 5
- Points
- 38
- Age
- 29
- Location
-
Hyderabad
-
#3
Nd1-617d-0-00ww-b04
need this file
This is the latest version found tested and working with OST la tool
StackPath
Sent from my GM1911 using Tapatalk
melltoo
New member
- Joined
- Jan 8, 2019
- Messages
- 117
- Reaction score
- 0
- Points
- 0
-
#4
ost
the update process failed
error code : oxc6a
error: downlod fails
error=se-err-adb_cmd_get_fail_result 0xc6da
dhanu yadav
GD Support Team
- Joined
- Dec 10, 2016
- Messages
- 1,868
- Reaction score
- 5
- Points
- 38
- Age
- 29
- Location
-
Hyderabad
-
#5
ost
the update process failed
error code : oxc6a
error: downlod fails
error=se-err-adb_cmd_get_fail_result 0xc6da
Install latest driver’s connect phone in power off condition when software asks for connection
Sent from my GM1911 using Tapatalk

Greetings to you we are here with another beautiful tutorial for you. If you are on this page, that means you are a Nokia user looking for how to Flash Nokia Firmware using OST Tool. Before going into in the tutorial itself, i will like to give you tell you something about the Nokia flashier OST.
What is OST?
OST stands for Online Service tool. This Nokia Flasher is a tool that is design used to flash Nokia device back to original state. You can flash any Nokia device Stock Rom firmware using OST tool. If you are looking to flash Nokia device Firmware, then OST is the tool you need. Only Authorizes Nokia Service Partners register PC can only use this tool earlier, but the good news is that any Customer End PC use this tool without any problem.
You heard me right! Yes! Now we have a OST tool working for all PC by using the patched OST tool provided in this post. All tanks to Quixote78 for patching the OST tool and the step by steps guide on how to install the firmware. Full Credits goes to him for this work.
If you have bricked your Nokia device, then this unique guide will be helpful to unbrick it. If you have rooted or installed any custom Rom, then this post will help you to revert to stock ROM. This way you can claim the warranty given to you.
The Merit of Using Online Service Tool
- Fix lag or battery issue.
- Unbrick any Nokia device.
- You can revert to stock ROM anytime on any Nokia devices.
- Downgrade or Upgrade
- Flashing firmware on any Nokia smartphone is made easy.
- Fix boot loop issue or the soft brick on any Nokia device
- Unroot your device.
How to Flash Nokia Firmware using OST
- First of all, Make sure you have downloaded the files in this post such as Nokia OST LA File and Patch File
- Now unpack the OST file and Install the software on your PC.
- Don’t open the OST Software after installation, now you have to unpack the patch file using this password: 123.
- Now open the installed OST program folder (C:Program Files (x86)OST LA)
- In the Above folder, you will see the .exe file which you have to replace from the extracted patch file folder.
- Unpack the software with 7zip
- Launch the OST LA Patched from the same folder mentioned above by double left click on the .exe file.
- If you have done correctly, you will open the OST Tool without it requesting login and password to hookup with the Nokia server.
- Select the original software
- Now boot the Nokia device into download mode
- Connect your USB cable to the PC with Nokia.
- After your Nokia device has entered into Download mode, the button Edit Phone Information will be available for you. Push the button and wait for an error (like failed to reboot to FTM mode) being appeared. Press OK and see the button Next should be activated.
- After the above, Next become active, press on it and wait for the flashing process to complete or have a drink not to kill time.
- Your Nokia device will reboot, and you may congratulate oneself.
Congratulation! You have successfully flashed your Nokia device Using Online Service tool.
You can download the Nokia’s PC Flasher software, Online Service Tool, from the link given below. The OST is used to install the Stock firmware on Nokia device. Installing a Stock firmware by yourself is a good thing: It saves you time from going through the inconvenience of visiting a Nokia centre service to get software repaired on your smartphone. You can go back to stock Rom on your Nokia device using this.
Download
- Nokia OST tools 6.0.4 latest Here
Nokia OST tools 6.0.4 Patched here - OST 6.2.8 For Service Point Here
- Nokia OST tools Optional Here


-
#1
Сабж.Пришел в режиме download mode.Test-point нашел.Но что best2,что см2 qlm ругаются на загрузчик.Есть вариант зацепить?
Лог прилагаю:
Wait for phone…
Device Found!
Initialize …
Handshake passed!
BB_IDC_SWB : 00000000
ID_BLOCK_S : BC86E84A
ID_BLOCK_I : 000CC0E1
ID_BLOCK_L : D786B96E89CF47945C4CD10D8A1C7D0A
ID_BLOCK_L : E86845AB412BBD05C523AE27CD779E0E
Use BEST Internal LoaderError : Prepare target failed! Unsupported yet CPU!
Send log and report.log to support! Include device info also!Reconnect Power/Cable!


-
#2
Да можно зацепить, почему нет. Зачем?
DM это же и fastboot. Слот менять не пробовали? На **** есть что почитать.

-
#3
На саппорте ntool есть прошивка. Он же и прошьет, только за деньги…
-
#4
Да можно зацепить, почему нет. Зачем?
DM это же и fastboot. Слот менять не пробовали? На **** есть что почитать.
Пробовал.Reset проходит.Но все равно вываливается в fastboot и DM.По словам клиента при обновлении отключили эл.энергию и wi-fi сдох.
-
#5
А на fastboot getvar all что говорит?
Вообще, соберите максимум информации об этом ТА. Окирпичить еще глубже вы всегда успеете. Аттач вам в помощь.
-
199,3 КБ
Просмотры: 182
![]()
-
#6
Выложите пожалуйста фото тест поинта
Сабж.Пришел в режиме download mode.Test-point нашел.Но что best2,что см2 qlm ругаются на загрузчик.Есть вариант зацепить?
Лог прилагаю:можно фото теспоинта ?
Последнее редактирование модератором: 4/4/19

-
#7
Сабж.Пришел в режиме download mode.Test-point нашел.Но что best2,что см2 qlm ругаются на загрузчик.Есть вариант зацепить?
Лог прилагаю:
Можно фото testpoint в студию?

-
#8
День Добрый шил кто либо Nokia 7.1 NTool? TA-1095 Подниму аппарат? В Бутлупе., смена слотов не помогает.
В итоге тестпоинт найден колдуем с QcFire.

В общем пришел к выводу что нужен полный дамп с рабочего аппарата версия прошивки Device : FIH GSI-00WW
Software : 00WW_3_51F, 00WW_3_51F [Wed Feb 27 15:13:33 CST 2019]
Android Ver. : 9
Patch Level : 2019-03-01
NTool показывает версию СTL-353A-0-00WW-B01
Если есть у кого возможность слить фулл с рабочего аппарата просьба поделитесь!
Добавлю NTool на данный момент не шьёт аппараты с последней версией безопасности!!! (Новая ИНФА СЕГОДНЯ NTool НАЧАЛ шить!!!!)
АППАРАТ ВОССТАНОВЛЕН!
Остался полный бекап аппарата в Download Mode слитый QcFire и EFS
Последнее редактирование модератором: 29/5/19
![]()
-
#9
Где купить 20 кредитов. Вроде как временно недоступно.. И хватит ли 20 кредитов на решение проблемы «Download mode»?


-
#10
Кредиты не помогут. В данный момент Ntool работает только с картой защиты.
the_laser сказал(а):
карты отосланы дистрибутору, а когда продажи начнутся, ответить не могу — я этим не занимаюсь.


-
#11
Кредиты не помогут. В данный момент Ntool работает только с картой защиты.
это что и «с чем её едят»?
Давно желаю приобрести тот бокс/донгл, но инфы мало и какой именно не понятно.
-
#12
Автор программы — the_laser, официальный форум поддержки — мобайл файлз.
![]()
-
#13
День Добрый шил кто либо Nokia 7.1 NTool? TA-1095 Подниму аппарат? В Бутлупе., смена слотов не помогает.
В итоге тестпоинт найден колдуем с QcFire.Посмотреть вложение 330822
В общем пришел к выводу что нужен полный дамп с рабочего аппарата версия прошивки Device : FIH GSI-00WW
Software : 00WW_3_51F, 00WW_3_51F [Wed Feb 27 15:13:33 CST 2019]
Android Ver. : 9
Patch Level : 2019-03-01
NTool показывает версию СTL-353A-0-00WW-B01
Если есть у кого возможность слить фулл с рабочего аппарата просьба поделитесь!Добавлю NTool на данный момент не шьёт аппараты с последней версией безопасности!!! (Новая ИНФА СЕГОДНЯ NTool НАЧАЛ шить!!!!)
АППАРАТ ВОССТАНОВЛЕН!Остался полный бекап аппарата в Download Mode слитый QcFire и EFS
День добрый. Поделитесь плизз прошивкой. И подскажите как прошить через NTool. Проблема аналогичная, висит в DM, меняю слоты заходит в рекавери, жму ресет и аппарат уходит в перезагрузку, перезагружается несколько раз и опять в DM выходит.
![]()
-
#14
День Добрый шил кто либо Nokia 7.1 NTool? TA-1095 Подниму аппарат? В Бутлупе., смена слотов не помогает.
В итоге тестпоинт найден колдуем с QcFire.Посмотреть вложение 330822
В общем пришел к выводу что нужен полный дамп с рабочего аппарата версия прошивки Device : FIH GSI-00WW
Software : 00WW_3_51F, 00WW_3_51F [Wed Feb 27 15:13:33 CST 2019]
Android Ver. : 9
Patch Level : 2019-03-01
NTool показывает версию СTL-353A-0-00WW-B01
Если есть у кого возможность слить фулл с рабочего аппарата просьба поделитесь!Добавлю NTool на данный момент не шьёт аппараты с последней версией безопасности!!! (Новая ИНФА СЕГОДНЯ NTool НАЧАЛ шить!!!!)
АППАРАТ ВОССТАНОВЛЕН!Остался полный бекап аппарата в Download Mode слитый QcFire и EFS
можете скинуть инструкцию?такая же проблема


-
#15
Наковырял
купить чтобы получить доступ к скрытому контенту.
пару штук если прикроют я залью куда нибудь
CTL-345A-0-00WW-B01.nb0.zip
CTL-351F-0-00WW-B04.full.zip

-
#16
Наковырял
купить чтобы получить доступ к скрытому контенту.
пару штук если прикроют я залью куда нибудь
CTL-345A-0-00WW-B01.nb0.zip
CTL-351F-0-00WW-B04.full.zip
перезалей на яндекс или гугл
Перерыл весь интернет нашел 4 прошивки на данный аппарат, но возникла другая проблема — через что сейчас можно прошить данный аппарат? Через какую программу? Или через какой программатор?
Последнее редактирование модератором: 27/9/22
-
#17
купить чтобы получить доступ к скрытому контенту.
-
#18
Залил на
купить чтобы получить доступ к скрытому контенту.
Так что пробуйте Одна прошивка в nb0 вторая распечатанная пофайлово
![]()
-
#19
А теперь вопрос. Имеется Nokia 7.1 в ДМ, в рекавери не заходит, после всех обнов, версия установленного ПО выше, чем имеется в открытом доступе и при попытки прошивки через OST_LA 6.0.4 ,выскакивает ошибка 0xc6da, которая как я понял говорит о попытки прошить версию ниже чем установлена. Если шиться версией 6.1.2, то прошивка тупо зависает, оставлял на ночь, толку ноль. Есть ли версия та что именно после обнов у меня ctl-354j-0-00ww-b01. Конечно еще интересен вопрос чем из платных продуктов возможно поднять это устройство, справится ли UFI dongle, или сразу EasyBox брать?
-
#20
А теперь вопрос. Имеется Nokia 7.1 в ДМ, в рекавери не заходит, после всех обнов, версия установленного ПО выше, чем имеется в открытом доступе и при попытки прошивки через OST_LA 6.0.4 ,выскакивает ошибка 0xc6da, которая как я понял говорит о попытки прошить версию ниже чем установлена. Если шиться версией 6.1.2, то прошивка тупо зависает, оставлял на ночь, толку ноль. Есть ли версия та что именно после обнов у меня ctl-354j-0-00ww-b01. Конечно еще интересен вопрос чем из платных продуктов возможно поднять это устройство, справится ли UFI dongle, или сразу EasyBox брать?
Такая же проблема вчера через ufi хотел прошить. Он не поддерживает эту модель. Именно Nokia 7.1 нет в списке. Всего скорей только через Easy Box, но еще есть вариант Infinity Box, по крайней мере написано на их официальном сайте что он поддерживает данную модель, но у меня его нет и нет возможности протестировать. Если сделаешь напиши пожалуйста сюда как и через что прошил.
![]()
-
#21
Такая же проблема вчера через ufi хотел прошить. Он не поддерживает эту модель. Именно Nokia 7.1 нет в списке. Всего скорей только через Easy Box, но еще есть вариант Infinity Box, по крайней мере написано на их официальном сайте что он поддерживает данную модель, но у меня его нет и нет возможности протестировать. Если сделаешь напиши пожалуйста сюда как и через что прошил.
На популярном форуме есть человек который может помоч, его найти можно в ветке Nokia 7.1.
![]()
-
#22
Через ufi можно прошить эту модель через едл, фаилик загрузчика взять из любой фулл прошивки. Без проблем читаются и пишутся все разделы. Проблема в том что даже прошитая труба (прошивкой версией ниже) не заводится, а ругается на то что прошивка повреждена и опять падает в довнлоад. Перед любыми деиствиями нужно делать полный бэкап всех разделов, играясь можно убить как нефик делать и потом без родных разделов включения не добьешься, даже заливка любой фулл прошивки с неубранной галочкой на primarygpt убивает трубу в 9008й порт, вывести можно только родным разделом. Я убил кучу времени на эксперименты с этой трубой и мне кажется что если бы заиметь слитые разделы с рабочей трубы на свежей прошивке и залить через едл основное, вполне можно было бы выити из этого режима без всяких кредитов и программаторов. Проблема в отсутствии свежей фулл прошивки или дампа.
Единственное что я нарыл, если заформатить раздел persist либо modem a(или b если в b загрузка) труба прогружается дальше до надписи nokia, но опять подвисает. Если прошить этот раздел из любой другой прошивки, то имеем изначальное поведение(несколько перемаргиваний и довнлоад мод до тех пор пока не сменишь слот)
Может кому попадется такая живая нокиа, сделайте дамп.
На всякий случай прикреплю загрузчик
-
199,2 КБ
Просмотры: 57
Последнее редактирование: 19/10/19
-
#23
Прошить этот аппарат можно любым флешером куалкома.. имея какой либо бекап с такого аппарата но есть подозрения что он не заведется и будет так же висеть в DM даже с последним бекапом. Если посмотреть на лог того же нтула то он генерирует с сервака некий ключ на основе серийника которым возможно подписывается некий раздел при прошивке. Причем прошивка проходит поэтапно с переключением слотов и режимов аппарата. Поэтому говорить о том что аппарат можно поднять из dm тем же qfill ну или каким-то ufi по желанию) — рано) это всего лишь предложение)
Но бекап ефс через едл никогда не помешает, тот же фрп можно снять так же в едл. Но в остальном едл всего лишь для опытов.
Задумайся почему через ufi прошив версию ниже аппарат не заводится а через нтул сделав тоже самое аппарат в норме? Подсказка — ответ чуть выше)
Последнее редактирование: 21/10/19
В этом руководстве мы покажем вам, как загрузить и установить последнюю версию Nokia Online Service Tool (OST). Несмотря на то, что OEM-производителю было немного тяжело во время партнерства с Windows, он быстро осознал то же самое, а затем перешел на экосистему Android. Внедряя ОС Android One, он предлагает чистую и свежую стандартную ОС с гарантированно более быстрыми обновлениями. Точно так же он быстро стал активным игроком в пользовательской разработке.
Все его устройства с чипсетом Qualcomm Snapdragon получили огромную поддержку со стороны разработчиков. Существует множество модов и пользовательских двоичных файлов, которые вы можете сразу прошить на свое устройство. Однако выполнение этих настроек также сопряжено с некоторыми рисками. Если вы не прошиваете правильный файл или прошиваете файл в неправильном разделе, то вы провоцируете проблемы. В большинстве случаев существует вероятность мягкого кирпича или бутлупа, но есть вероятность и жесткого кирпича.
К счастью, вы можете развеять все эти сомнения благодаря Nokia Online Service Tool (OST). Используя этот инструмент, вы можете легко починить свое устройство и вернуть его к жизни. Кроме того, существует множество других полезных функций, которыми обладает этот инструмент. И в этом руководстве мы заставим вас поклясться и в этом. После этого мы поделимся ссылкой для скачивания и перечислим этапы установки Nokia Online Service Tool (OST). Итак, без лишних слов, приступим.
Nokia Online Service Tool (OST) — это официальный инструмент, используемый пользователем сервисного центра Nokia для прошивки стандартной прошивки на различных устройствах Nokia. Итак, все устройства Nokia с чипсетом Qualcomm и прошивкой в форматах .nb0 и .mlf. format может использовать этот инструмент. С учетом сказанного, вот все функции, которыми обладает этот инструмент:
Флэш стоковой прошивки
Как уже обсуждалось во вступительных пунктах, вы можете легко прошить стандартную прошивку на своем устройстве Nokia и исправить программный кирпич или бутлуп. Кроме того, OEM обычно выпускает обновления партиями. Это означает, что не все получат обновление OTA сразу. Однако вы можете сократить это время ожидания и сразу же вручную запустить файл обновления с помощью Nokia Online Service Tool (OST).
Стереть FRP
Вы также можете обойти защиту от сброса к заводским настройкам, если вы больше не помните идентификатор Google и пароль для своей последней учетной записи Google, в которую вы вошли на своем устройстве Nokia.
Аварийная загрузка
Инструмент также имеет возможность загрузить ваше устройство в режим аварийной загрузки. Этот режим удобен, когда ваше устройство заблокировано и вам нужно прошить файл прошивки.
Разблокировать блокировку экрана
Если вы забыли комбинацию блокировки устройства, вы можете легко обойти ее с помощью Nokia Online Service Tool (OST).
Резервное копирование и удаление данных
Инструмент также имеет возможность стереть соответствующий раздел устройства или сделать резервную копию отдельных разделов.
Теперь, когда вы знакомы с набором функций этого инструмента, давайте рассмотрим шаги по загрузке и установке последней версии Nokia Online Service Tool (OST).
Загрузить Nokia Online Service Tool (OST)
Теперь вы можете получить программное обеспечение по ссылке ниже. После того, как вы загрузили его, сразу же переходите к следующему шагу, чтобы установить его, так как процесс немного отличается.
Как установить Nokia Online Service Tool (OST)
Помните, мы упоминали в начале, что инструмент используется официальным персоналом Nokia в сервисном центре. Чтобы гарантировать, что другие пользователи не смогут использовать этот инструмент, они добавили диалоговое окно входа в систему. Только пользователи, у которых есть авторизованные учетные записи, смогут войти в этот инструмент. Или действительно? Ну, не больше, так как инструмент теперь взломан!
В результате вам больше не нужна авторизованная учетная запись для использования этого инструмента. Если вы не знаете о процессе взлома, то, проще говоря, некоторые файлы инструмента были изменены таким образом, что они могли обойти экран входа в систему. Затем эти измененные файлы будут заменены официальными, а подставка программного обеспечения взломана. Вот как вы можете сделать то же самое с помощью OST Tool.
- Для начала загрузите Nokia Online Service Tool и распакуйте его в удобное место на вашем ПК.
- Это должно дать вам папку Nokia_OST_LA_6.2.8.
- Перейдите в эту папку и запустите программу установки, дважды щелкнув файл launcher.exe.
- Нажмите «Далее» на экране приветствия и еще раз «Далее», чтобы подтвердить установку.
- Теперь начнется установка, которая займет пару минут. После этого вы будете отмечены тем же. Поэтому нажмите кнопку «Закрыть», чтобы выйти из настройки.
- Теперь установка завершена, и файлы будут установлены в папку C:Program Files (x86)OST LA.
- Пришло время взломать инструмент. Итак, перейдите в папку Nokia_OST_LA_6.2.8 > Crack и скопируйте оба файла (MobileFlashDll.dll и OnlineUpdateTool.exe)
- Теперь перейдите в папку C:Program Files (x86)OST LA и вставьте туда оба этих файла.
- Вы получите приглашение с вопросом, хотите ли вы заменить оба этих файла. Ответьте утвердительно. То есть нажмите «Заменить оба файла в месте назначения».
- Появится всплывающее окно с запросом прав администратора. Нажмите «Продолжить» для обоих файлов.
- Когда это будет сделано, откройте файл OnlineUpdateTool.exe. Он будет находиться внутри самой папки C:Program Files (x86)OST LA.
- Он запросит учетную запись и пароль, оставьте оба поля пустыми. Точно так же оставьте поле домена со значением по умолчанию и нажмите OK.
- Вот и все. Теперь вы попадете на экран приветствия OST, и процесс будет завершен.
Итак, это были шаги по установке Nokia Online Service Tool (OST) на ваш ПК с Windows. Теперь вы можете начать с желаемой задачи: перепрошить стоковую прошивку, загрузиться в EDL или обойти FRP. С учетом сказанного, если у вас есть какие-либо вопросы относительно вышеупомянутых шагов, сообщите нам об этом в разделе комментариев. Мы вернемся к вам с решением в ближайшее время.
Nokia 6 — Прошивки
 Nokia 6
Описание | Обсуждение » | Брак и ремонт » | Клуб любителей » | Обсуждение камеры » | Модификация и украшательства » | Энергопотребление (автономность) » | Прошивки »
Внимание! По умолчанию на Nokia 6 заблокирован загрузчик Android. При заблокированном загрузчике получить root права, установить кастомную прошивку или recovery можно, но это костыль.
Добиваться обновления системы на версиях телефона ТА-1021, путём сброса Google Services Framework, категорически запрещено. Это работает только на ТА-1000 и ТА-1003.
В теме нет куратора. Если в теме есть пользователь, желающий стать Куратором и соответствующий Требованиям для кандидатов, он может подать заявку, создав новую тему в разделе Хочу стать Куратором (предварительно изучив Правила и рекомендации для Кураторов).
До назначения куратора, по вопросам наполнения шапки, обращайтесь к модераторам раздела через кнопку  под сообщениями, на которые необходимо добавить ссылки.
Программа для установки сервисов гугл и активации русского языка (в прошивке он есть, но скрыт).
Пользоваться очень просто, включаете отладку по USB в опциях разработчика и подключаете телефон к компу, подтверждаете запрос на отладку и нажимаете кнопку «Install Morelocale pro» в нижнем правом углу окошка программы, после установки на экране выскочит окно с выбором языка.
Источник XDA Nokia_6_Utility_1.0.0.1.zip ( 2.07 МБ )
Данное рекавери устанавливается и работает только на TA-1000.TWRP+for+Nokia+6+-+R1.img ( 31.32 МБ )
I just shared the latest Nokia Online Service Tool v6.2.8 with detailed steps to patch it with the crack file. Once you have installed the Nokia OST Tool on your computer, you can easily flash the stock ROM or firmware with .nb0 and .mlf extension on the Nokia phones. Whether you own a Nokia 9 PureView, Nokia 8 Sirocco, Nokia 7.2. Nokia 7 Plus, Nokia 6.1, Nokia 5.1 Plus, Nokia 4.2, or any other Nokia smartphone, this tutorial is just for you.
Nokia OST Tool is a very simple firmware flash tool like Samsung Odin. In normal circumstances, you might never need to flash a stock ROM on your Nokia phone. Since Nokia devices come with the stock Android or Android One ROM, they get speedy updates. However, in certain situations, you might want to install the stock firmware.
The Nokia Online Service Tool offers a range of options that let you customize your Nokia firmware installation as per your preference.
Using these firmware update options, you can flash the stock ROM on your Nokia phone.
Please note that the Nokia OST Tool won’t perform all the above-listed tasks by default. You must select the appropriate options/s carefully while flashing the stock ROM.
Before you can flash the stock ROM on your Nokia device, here are a few things to download and some preparations to make.
Now that you have installed the Nokia OST Tool and have the firmware file for your phone, you can follow the instructions given below to flash it.
- Click the Search icon on the Windows taskbar, type “OST LA” and click the Run as administrator option.
Nokia OST LA app
Bypass login account and password
Online Service Tool (OST) screen
Add stock ROM file to Nokia OST Tool

Download Mode on Nokia

OST Tool firmware update options

Firmware installation progress in Nokia OST Tool
Once the stock ROM is flashed on your Nokia phone, it will reboot automatically with the newly installed firmware.
Fix OST Tool Error 0xC6DA
Some users have reported getting the following errors while using the OST Tool:
- 0xc6da (SE_ERR_ADB_CMD_GET_FAIL_RESULT (0xC6DA) error
- ERROR_INVALID_HANDLE (0x6)
- Reflash service bootloader
Full error message goes like this:
If you get the 0xC6DA error in the OST Tool 6.0.4 and 6.1.2 while downloading the firmware on your Nokia phone, try the following fixes
- Install the latest Nokia USB driver
- Use the latest Nokia OST Tool 6.2.8
- Make sure you are flashing the correct firmware for your device model.
In case you are getting the variable product id error in the OST Tool, it means you got an MTK phone. The Online Service Tool supports only the Nokia devices with Qualcomm chipset.
Supported Nokia Devices
In short, we can say that the stock ROM flashing method described above works with all Android-powered Nokia smartphones that don’t have an MTK (MediaTek) chipset. I have made a list of all major Nokia phones on which you can flash stock firmware using the Nokia Online Service Tool.
- Nokia 2
- Nokia 4.2
- Nokia 5
- Nokia 5.1
- Nokia 5.1 Plus (X5)
- Nokia 5.3
- Nokia 6
- Nokia 6.1
- Nokia 6.1 Plus (X6)
- Nokia 6.2
- Nokia X71
- Nokia 7
- Nokia 7.1
- Nokia 7 Plus
- Nokia 7.2
- Nokia 8
- Nokia 8 Sirocco
- Nokia 8.1 (X7)
- Nokia 9 PureView
Finally, it’s time to stop typing. I have tried to be as detailed and clear while describing the steps. In case you still have any questions, blurt it out via comments.
Источник
Error code 0xc6da nokia 5
По вопросам наполнения шапки, обращайтесь к куратору темы schtemp
Сообщение отредактировал snekt — 10.09.22, 20:08
 mfsrz, для 7.1 только тестовые сборки: ® Xposed, GravityBox не поддерживается.
Сообщение отредактировал destroyer71 — 02.07.20, 20:22
Сообщение отредактировал Бозон — 25.02.18, 10:42

Сообщение отредактировал burovikk26 — 13.12.17, 15:47


Что мешает поставить программу AnTuTu Officer
и проверить на подлинность
Нашел в тытернете иностранную статью как рутировать nokia 5 Клик
Сообщение отредактировал MaSaNA2013 — 06.09.17, 11:17
4. Now Boot to the CWM or TWRP Recovery.
4. Сейчас загружаемся в КлокворкМодРекавери или ТВРП.
Статья фейк.(причем она была ещё до выхода нокии 5)
Сообщение отредактировал crowrow — 07.09.17, 15:10
Итак прорыв. Слил со своего тела Nokia 5 qcn файл. Теперь можно играться со своим телефоном полностью и не бояться потерять связь
djhim, вопрос к Вам лишь один — как Вы ввели телефон в диагностический режим? И как законнектились с QPST.
Это действительно прорыв. Сейчас мы все USA Band вылечим.
И что за пароль на архиве?
Сообщение отредактировал vladpisarev — 07.09.17, 22:16
djhim, и инструкция готова? :yes2:
Что-то вопросов больше, чем ответов.
djhim, вопрос к Вам лишь один — как Вы ввели телефон в диагностический режим? И как законнектились с QPST.
Это действительно прорыв. Сейчас мы все USA Band вылечим.
И что за пароль на архиве?
djhim, неплохо. С рутом-то понятно, как сделать 🙂 А вот бы без рута. Но видимо никак
То, что здесь всё хитро, уже стало очевидно 🙂
Сообщение отредактировал vladpisarev — 08.09.17, 08:19
djhim, и инструкция готова?
Что-то вопросов больше, чем ответов.
Тебе потребуется режим 9008 (edl) и любая программа которая форматирует раздел frp в этом режиме. их много в свободном доступе или программатор для qualcomm
Добавлено 08.09.2017, 08:24:
djhim, неплохо. С рутом-то понятно, как сделать А вот бы без рута. Но видимо никак
То, что здесь всё хитро, уже стало очевидно
Без root никак (да и с Root он тоже хитро переходит. стандартные коды не подходят). даже программаторы не знают как перевести его в режим диагностики. сервисный код пока ожидаем
Сообщение отредактировал djhim — 08.09.17, 08:26
Вчера завалил трубу и поэтому начал эксперименты. вообще никак шЫться не хотел. Теперь имеем много нового)))
Есть еще оригинальная прошивка TA-1053 слитая до экспериментов. Заливаю на обменник скоро выложу
Оригинальная прошивка на TA-1053 без изменений
https://yadi.sk/d/rcNFNnPp3MhtMe
эта прошивка не для меню recovery. она для поднятия полного кирпича)))
Сообщение отредактировал djhim — 08.09.17, 14:25
Источник
Error code 0xc6da nokia 5
По вопросам наполнения шапки, обращайтесь к куратору темы schtemp
Сообщение отредактировал snekt — 10.09.22, 20:08
mfsrz, для 7.1 только тестовые сборки: ® Xposed, GravityBox не поддерживается.
Сообщение отредактировал destroyer71 — 02.07.20, 20:22
Сообщение отредактировал Бозон — 25.02.18, 10:42
Сообщение отредактировал burovikk26 — 13.12.17, 15:47
Что мешает поставить программу AnTuTu Officer
и проверить на подлинность
Нашел в тытернете иностранную статью как рутировать nokia 5 Клик
Сообщение отредактировал MaSaNA2013 — 06.09.17, 11:17
4. Now Boot to the CWM or TWRP Recovery.
4. Сейчас загружаемся в КлокворкМодРекавери или ТВРП.
Статья фейк.(причем она была ещё до выхода нокии 5)
Сообщение отредактировал crowrow — 07.09.17, 15:10
Итак прорыв. Слил со своего тела Nokia 5 qcn файл. Теперь можно играться со своим телефоном полностью и не бояться потерять связь
djhim, вопрос к Вам лишь один — как Вы ввели телефон в диагностический режим? И как законнектились с QPST.
Это действительно прорыв. Сейчас мы все USA Band вылечим.
И что за пароль на архиве?
Сообщение отредактировал vladpisarev — 07.09.17, 22:16
djhim, и инструкция готова? :yes2:
Что-то вопросов больше, чем ответов.
djhim, вопрос к Вам лишь один — как Вы ввели телефон в диагностический режим? И как законнектились с QPST.
Это действительно прорыв. Сейчас мы все USA Band вылечим.
И что за пароль на архиве?
djhim, неплохо. С рутом-то понятно, как сделать 🙂 А вот бы без рута. Но видимо никак
То, что здесь всё хитро, уже стало очевидно 🙂
Сообщение отредактировал vladpisarev — 08.09.17, 08:19
djhim, и инструкция готова?
Что-то вопросов больше, чем ответов.
Тебе потребуется режим 9008 (edl) и любая программа которая форматирует раздел frp в этом режиме. их много в свободном доступе или программатор для qualcomm
Добавлено 08.09.2017, 08:24:
djhim, неплохо. С рутом-то понятно, как сделать А вот бы без рута. Но видимо никак
То, что здесь всё хитро, уже стало очевидно
Без root никак (да и с Root он тоже хитро переходит. стандартные коды не подходят). даже программаторы не знают как перевести его в режим диагностики. сервисный код пока ожидаем
Сообщение отредактировал djhim — 08.09.17, 08:26
Вчера завалил трубу и поэтому начал эксперименты. вообще никак шЫться не хотел. Теперь имеем много нового)))
Есть еще оригинальная прошивка TA-1053 слитая до экспериментов. Заливаю на обменник скоро выложу
Оригинальная прошивка на TA-1053 без изменений
https://yadi.sk/d/rcNFNnPp3MhtMe
эта прошивка не для меню recovery. она для поднятия полного кирпича)))
Сообщение отредактировал djhim — 08.09.17, 14:25
Источник
| Code | Reason |
| 0 | No error |
| 1 | User-initiated client disconnect. |
| 2 | User-initiated client logoff. |
| 3 | Your Remote Desktop Services session has ended, possibly for one of the following reasons: The administrator has ended the session. An error occurred while the connection was being established. A network problem occurred. For help solving the problem, see «Remote Desktop» in Help and Support. |
| 260 | Remote Desktop can’t find the computer «». This might mean that «» does not belong to the specified network. Verify the computer name and domain that you are trying to connect to. |
| 262 | This computer can’t connect to the remote computer. Your computer does not have enough virtual memory available. Close your other programs, and then try connecting again. If the problem continues, contact your network administrator or technical support. |
| 264 | This computer can’t connect to the remote computer. The two computers couldn’t connect in the amount of time allotted. Try connecting again. If the problem continues, contact your network administrator or technical support. |
| 266 | The smart card service is not running. Please start the smart card service and try again. |
| 516 | Remote Desktop can’t connect to the remote computer for one of these reasons: 1) Remote access to the server is not enabled 2) The remote computer is turned off 3) The remote computer is not available on the network Make sure the remote computer is turned on and connected to the network, and that remote access is enabled. |
| 522 | A smart card reader was not detected. Please attach a smart card reader and try again. |
| 772 | This computer can’t connect to the remote computer. The connection was lost due to a network error. Try connecting again. If the problem continues, contact your network administrator or technical support. |
| 778 | There is no card inserted in the smart card reader. Please insert your smart card and try again. |
| 1030 | Because of a security error, the client could not connect to the remote computer. Verify that you are logged on to the network, and then try connecting again. |
| 1032 | The specified computer name contains invalid characters. Please verify the name and try again. |
| 1034 | An error has occurred in the smart card subsystem. Please contact your helpdesk about this error. |
| 1796 | This computer can’t connect to the remote computer. Try connecting again. If the problem continues, contact the owner of the remote computer or your network administrator. |
| 1800 | Your computer could not connect to another console session on the remote computer because you already have a console session in progress. |
| 2056 | The remote computer disconnected the session because of an error in the licensing protocol. Please try connecting to the remote computer again or contact your server administrator. |
| 2308 | Your Remote Desktop Services session has ended. The connection to the remote computer was lost, possibly due to network connectivity problems. Try connecting to the remote computer again. If the problem continues, contact your network administrator or technical support. |
| 2311 | The connection has been terminated because an unexpected server authentication certificate was received from the remote computer. Try connecting again. If the problem continues, contact the owner of the remote computer or your network administrator. |
| 2312 | A licensing error occurred while the client was attempting to connect (Licensing timed out). Please try connecting to the remote computer again. |
| 2567 | The specified username does not exist. Verify the username and try logging in again. If the problem continues, contact your system administrator or technical support. |
| 2820 | This computer can’t connect to the remote computer. An error occurred that prevented the connection. Try connecting again. If the problem continues, contact the owner of the remote computer or your network administrator. |
| 2822 | Because of an error in data encryption, this session will end. Please try connecting to the remote computer again. |
| 2823 | The user account is currently disabled and cannot be used. For assistance, contact your system administrator or technical support. |
| 2825 | The remote computer requires Network Level Authentication, which your computer does not support. For assistance, contact your system administrator or technical support. |
| 3079 | A user account restriction (for example, a time-of-day restriction) is preventing you from logging on. For assistance, contact your system administrator or technical support. |
| 3080 | The remote session was disconnected because of a decompression failure at the client side. Please try connecting to the remote computer again. |
| 3335 | As a security precaution, the user account has been locked because there were too many logon attempts or password change attempts. Wait a while before trying again, or contact your system administrator or technical support. |
| 3337 | The security policy of your computer requires you to type a password on the Windows Security dialog box. However, the remote computer you want to connect to cannot recognize credentials supplied using the Windows Security dialog box. For assistance, contact your system administrator or technical support. |
| 3590 | The client can’t connect because it doesn’t support FIPS encryption level. Please lower the server side required security level Policy, or contact your network administrator for assistance |
| 3591 | This user account has expired. For assistance, contact your system administrator or technical support. |
| 3592 | Failed to reconnect to your remote session. Please try to connect again. |
| 3593 | The remote PC doesn’t support Restricted Administration mode. |
| 3847 | This user account’s password has expired. The password must change in order to logon. Please update the password or contact your system administrator or technical support. |
| 3848 | A connection will not be made because credentials may not be sent to the remote computer. For assistance, contact your system administrator. |
| 4103 | The system administrator has restricted the times during which you may log in. Try logging in later. If the problem continues, contact your system administrator or technical support. |
| 4104 | The remote session was disconnected because your computer is running low on video resources. Close your other programs, and then try connecting again. If the problem continues, contact your network administrator or technical support. |
| 4359 | The system administrator has limited the computers you can log on with. Try logging on at a different computer. If the problem continues, contact your system administrator or technical support. |
| 4615 | You must change your password before logging on the first time. Please update your password or contact your system administrator or technical support. |
| 4871 | The system administrator has restricted the types of logon (network or interactive) that you may use. For assistance, contact your system administrator or technical support. |
| 5127 | The Kerberos sub-protocol User2User is required. For assistance, contact your system administrator or technical support. |
| 6919 | Remote Desktop cannot connect to the remote computer because the authentication certificate received from the remote computer is expired or invalid. In some cases, this error might also be caused by a large time discrepancy between the client and server computers. |
| 7431 | Remote Desktop cannot verify the identity of the remote computer because there is a time or date difference between your computer and the remote computer. Make sure your computer’s clock is set to the correct time, and then try connecting again. If the problem occurs again, contact your network administrator or the owner of the remote computer. |
| 8711 | Your computer can’t connect to the remote computer because your smart card is locked out. Contact your network administrator about unlocking your smart card or resetting your PIN. |
| 9479 | Could not auto-reconnect to your applications,please re-launch your applications |
| 9732 | Client and server versions do not match. Please upgrade your client software and then try connecting again. |
| 33554433 | Failed to reconnect to the remote program. Please restart the remote program. |
| 33554434 | The remote computer does not support RemoteApp. For assistance, contact your system administrator. |
| 50331649 | Your computer can’t connect to the remote computer because the username or password is not valid. Type a valid user name and password. |
| 50331650 | Your computer can’t connect to the remote computer because it can’t verify the certificate revocation list. Contact your network administrator for assistance. |
| 50331651 | Your computer can’t connect to the remote computer due to one of the following reasons: 1) The requested Remote Desktop Gateway server address and the server SSL certificate subject name do not match. 2) The certificate is expired or revoked. 3) The certificate root authority does not trust the certificate. Contact your network administrator for assistance. |
| 50331652 | Your computer can’t connect to the remote computer because the SSL certificate was revoked by the certification authority. Contact your network administrator for assistance. |
| 50331653 | This computer can’t verify the identity of the RD Gateway «». It’s not safe to connect to servers that can’t be identified. Contact your network administrator for assistance. |
| 50331654 | Your computer can’t connect to the remote computer because the Remote Desktop Gateway server address requested and the certificate subject name do not match. Contact your network administrator for assistance. |
| 50331655 | Your computer can’t connect to the remote computer because the Remote Desktop Gateway server’s certificate has expired or has been revoked. Contact your network administrator for assistance. |
| 50331656 | Your computer can’t connect to the remote computer because an error occurred on the remote computer that you want to connect to. Contact your network administrator for assistance. |
| 50331657 | An error occurred while sending data to the Remote Desktop Gateway server. The server is temporarily unavailable or a network connection is down. Try again later, or contact your network administrator for assistance. |
| 50331658 | An error occurred while receiving data from the Remote Desktop Gateway server. Either the server is temporarily unavailable or a network connection is down. Try again later, or contact your network administrator for assistance. |
| 50331659 | Your computer can’t connect to the remote computer because an alternate logon method is required. Contact your network administrator for assistance. |
| 50331660 | Your computer can’t connect to the remote computer because the Remote Desktop Gateway server address is unreachable or incorrect. Type a valid Remote Desktop Gateway server address. |
| 50331661 | Your computer can’t connect to the remote computer because the Remote Desktop Gateway server is temporarily unavailable. Try reconnecting later or contact your network administrator for assistance. |
| 50331662 | Your computer can’t connect to the remote computer because the Remote Desktop Services client component is missing or is an incorrect version. Verify that setup was completed successfully, and then try reconnecting later. |
| 50331663 | Your computer can’t connect to the remote computer because the Remote Desktop Gateway server is running low on server resources and is temporarily unavailable. Try reconnecting later or contact your network administrator for assistance. |
| 50331664 | Your computer can’t connect to the remote computer because an incorrect version of rpcrt4.dll has been detected. Verify that all components for Remote Desktop Gateway client were installed correctly. |
| 50331665 | Your computer can’t connect to the remote computer because no smart card service is installed. Install a smart card service and then try again, or contact your network administrator for assistance. |
| 50331666 | Your computer can’t stay connected to the remote computer because the smart card has been removed. Try again using a valid smart card, or contact your network administrator for assistance. |
| 50331667 | Your computer can’t connect to the remote computer because no smart card is available. Try again using a smart card. |
| 50331668 | Your computer can’t stay connected to the remote computer because the smart card has been removed. Reinsert the smart card and then try again. |
| 50331669 | Your computer can’t connect to the remote computer because the user name or password is not valid. Please type a valid user name and password. |
| 50331671 | Your computer can’t connect to the remote computer because a security package error occurred in the transport layer. Retry the connection or contact your network administrator for assistance. |
| 50331672 | The Remote Desktop Gateway server has ended the connection. Try reconnecting later or contact your network administrator for assistance. |
| 50331673 | The Remote Desktop Gateway server administrator has ended the connection. Try reconnecting later or contact your network administrator for assistance. |
| 50331674 | Your computer can’t connect to the remote computer due to one of the following reasons: 1) Your credentials (the combination of user name, domain, and password) were incorrect. 2) Your smart card was not recognized. |
| 50331675 | Remote Desktop can’t connect to the remote computer «» for one of these reasons: 1) Your user account is not listed in the RD Gateway’s permission list 2) You might have specified the remote computer in NetBIOS format (for example, computer1), but the RD Gateway is expecting an FQDN or IP address format (for example, computer1.fabrikam.com or 157.60.0.1). Contact your network administrator for assistance. |
| 50331676 | Remote Desktop can’t connect to the remote computer «» for one of these reasons: 1) Your user account is not authorized to access the RD Gateway «» 2) Your computer is not authorized to access the RD Gateway «» 3) You are using an incompatible authentication method (for example, the RD Gateway might be expecting a smart card but you provided a password) Contact your network administrator for assistance. |
| 50331679 | Your computer can’t connect to the remote computer because your network administrator has restricted access to this RD Gateway server. Contact your network administrator for assistance. |
| 50331680 | Your computer can’t connect to the remote computer because the web proxy server requires authentication. To allow unauthenticated traffic to an RD Gateway server through your web proxy server, contact your network administrator. |
| 50331681 | Your computer can’t connect to the remote computer because your password has expired or you must change the password. Please change the password or contact your network administrator or technical support for assistance. |
| 50331682 | Your computer can’t connect to the remote computer because the Remote Desktop Gateway server reached its maximum allowed connections. Try reconnecting later or contact your network administrator for assistance. |
| 50331683 | Your computer can’t connect to the remote computer because the Remote Desktop Gateway server does not support the request. Contact your network administrator for assistance. |
| 50331684 | Your computer can’t connect to the remote computer because the client does not support one of the Remote Desktop Gateway’s capabilities. Contact your network administrator for assistance. |
| 50331685 | Your computer can’t connect to the remote computer because the Remote Desktop Gateway server and this computer are incompatible. Contact your network administrator for assistance. |
| 50331686 | Your computer can’t connect to the remote computer because the credentials used are not valid. Insert a valid smart card and type a PIN or password, and then try connecting again. |
| 50331687 | Your computer can’t connect to the remote computer because your computer or device did not pass the Network Access Protection requirements set by your network administrator. Contact your network administrator for assistance. |
| 50331688 | Your computer can’t connect to the remote computer because no certificate was configured to use at the Remote Desktop Gateway server. Contact your network administrator for assistance. |
| 50331689 | Your computer can’t connect to the remote computer because the RD Gateway server that you are trying to connect to is not allowed by your computer administrator. If you are the administrator, add this Remote Desktop Gateway server name to the trusted Remote Desktop Gateway server list on your computer and then try connecting again. |
| 50331690 | Your computer can’t connect to the remote computer because your computer or device did not meet the Network Access Protection requirements set by your network administrator, for one of the following reasons: 1) The Remote Desktop Gateway server name and the server’s public key certificate subject name do not match. 2) The certificate has expired or has been revoked. 3) The certificate root authority does not trust the certificate. 4) The certificate key extension does not support encryption. 5) Your computer cannot verify the certificate revocation list. Contact your network administrator for assistance. |
| 50331691 | Your computer can’t connect to the remote computer because a user name and password are required to authenticate to the Remote Desktop Gateway server instead of smart card credentials. |
| 50331692 | Your computer can’t connect to the remote computer because smart card credentials are required to authenticate to the Remote Desktop Gateway server instead of a user name and password. |
| 50331693 | Your computer can’t connect to the remote computer because no smart card reader is detected. Connect a smart card reader and then try again, or contact your network administrator for assistance. |
| 50331695 | Your computer can’t connect to the remote computer because authentication to the firewall failed due to missing firewall credentials. To resolve the issue, go to the firewall website that your network administrator recommends, and then try the connection again, or contact your network administrator for assistance. |
| 50331696 | Your computer can’t connect to the remote computer because authentication to the firewall failed due to invalid firewall credentials. To resolve the issue, go to the firewall website that your network administrator recommends, and then try the connection again, or contact your network administrator for assistance. |
| 50331698 | Your Remote Desktop Services session ended because the remote computer didn’t receive any input from you. |
| 50331699 | The connection has been disconnected because the session timeout limit was reached. |
| 50331700 | Your computer can’t connect to the remote computer because an invalid cookie was sent to the Remote Desktop Gateway server. Contact your network administrator for assistance. |
| 50331701 | Your computer can’t connect to the remote computer because the cookie was rejected by the Remote Desktop Gateway server. Contact your network administrator for assistance. |
| 50331703 | Your computer can’t connect to the remote computer because the Remote Desktop Gateway server is expecting an authentication method different from the one attempted. Contact your network administrator for assistance. |
| 50331704 | The RD Gateway connection ended because periodic user authentication failed. Try reconnecting with a correct user name and password. If the reconnection fails, contact your network administrator for further assistance. |
| 50331705 | The RD Gateway connection ended because periodic user authorization failed. Try reconnecting with a correct user name and password. If the reconnection fails, contact your network administrator for further assistance. |
| 50331707 | Your computer can’t connect to the remote computer because the Remote Desktop Gateway and the remote computer are unable to exchange policies. This could happen due to one of the following reasons: 1. The remote computer is not capable of exchanging policies with the Remote Desktop Gateway. 2. The remote computer’s configuration does not permit a new connection. 3. The connection between the Remote Desktop Gateway and the remote computer ended. Contact your network administrator for assistance. |
| 50331708 | Your computer can’t connect to the remote computer, possibly because the smart card is not valid, the smart card certificate was not found in the certificate store, or the Certificate Propagation service is not running. Contact your network administrator for assistance. |
| 50331709 | To use this program or computer, first log on to the following website: <a href=»»></a>. |
| 50331710 | To use this program or computer, you must first log on to an authentication website. Contact your network administrator for assistance. |
| 50331711 | Your session has ended. To continue using the program or computer, first log on to the following website: <a href=»»></a>. |
| 50331712 | Your session has ended. To continue using the program or computer, you must first log on to an authentication website. Contact your network administrator for assistance. |
| 50331713 | The RD Gateway connection ended because periodic user authorization failed. Your computer or device didn’t pass the Network Access Protection (NAP) requirements set by your network administrator. Contact your network administrator for assistance. |
| 50331714 | Your computer can’t connect to the remote computer because the size of the cookie exceeded the supported size. Contact your network administrator for assistance. |
| 50331716 | Your computer can’t connect to the remote computer using the specified forward proxy configuration. Contact your network administrator for assistance. |
| 50331717 | This computer cannot connect to the remote resource because you do not have permission to this resource. Contact your network administrator for assistance. |
| 50331718 | There are currently no resources available to connect to. Retry the connection or contact your network administrator. |
| 50331719 | An error occurred while Remote Desktop Connection was accessing this resource. Retry the connection or contact your system administrator. |
| 50331721 | Your Remote Desktop Client needs to be updated to the newest version. Contact your system administrator for help installing the update, and then try again. |
| 50331722 | Your network configuration doesn’t allow the necessary HTTPS ports. Contact your network administrator for help allowing those ports or disabling the web proxy, and then try connecting again. |
| 50331723 | We’re setting up more resources, and it might take a few minutes. Please try again later. |
| 50331724 | The user name you entered does not match the user name used to subscribe to your applications. If you wish to sign in as a different user please choose Sign Out from the Home menu. |
| 50331725 | Looks like there are too many users trying out the Azure RemoteApp service at the moment. Please wait a few minutes and then try again. |
| 50331726 | Maximum user limit has been reached. Please contact your administrator for further assistance. |
| 50331727 | Your trial period for Azure RemoteApp has expired. Ask your admin or tech support for help. |
| 50331728 | You no longer have access to Azure RemoteApp. Ask your admin or tech support for help. |
В этом посте вы можете загрузить Nokia Online Service Tool v6.0.4 с исправлением. Пользователи могут использовать этот инструмент для обновления стоковой прошивки в .nb0 е .mlf для обновления, понижения (в определенных ситуациях) и восстановления своих телефонов Nokia Android.
Nokia Online Service Tool — это программное обеспечение для установки или обновления прошивки на телефонах Nokia, разработанное HMD Global для телефонов на базе Android. Он используется производителем внутри компании или в сервисных центрах для восстановления стандартного / заводского программного обеспечения в случае возникновения проблем. Инструмент часто обозначается аббревиатурой «Nokia OST LA».
Инструмент поддерживает прошивку серия в формат .nb0. Доступна также более новая версия (Nokia OST LA 6.1.2), которая поддерживает новую прошивку Oreo / Pie, но еще не удалось применить исправления. Затем, с новой прошивкой Android Oreo и Pie, вам нужно будет распаковать файл дальше. .mlf правильно отформатирован для выполнить в мигающий стоковая прошивка на вашем телефоне Nokia с Android. Вскоре мы расскажем, как это сделать.
Официальная версия инструмента доступна в Интернете, но ее можно использовать только с действующим именем пользователя и паролем, которые есть только у официальных представителей сервисного центра Nokia. Чтобы обычный пользователь мог использовать этот инструмент для прошивки стоковой прошивки, его сначала необходимо пропатчить.
Поддерживаемые устройства
Nokia OST LA 6.0.4 можно использовать для прошивки стоковой прошивки на любом телефоне Nokia Android с разблокированным загрузчиком. официально или неофициально. Ниже приведен список смартфонов Nokia, поддерживающих этот инструмент:
- Nokia 2
- Nokia 3
- Nokia 5
- Nokia 5.1
- Nokia 6
- Nokia 6.1 / X6
- Nokia 8
- Nokia 8 Sirrocco
- Nokia 9
Инструмент онлайн-обслуживания Scarica Nokia 6.0.4
Текущая версия инструмента, которую можно пропатчить и использовать для прошивки стоковой прошивки на телефонах Nokia Android, — v6.0.4. Загрузить Nokia OST LA 6.0.4 с патчем можно по ссылкам ниже.
Установите Nokia Online Service Tool на ПК
- Загрузите Nokia Online Service Tool 6.0.4 и файл исправления.
- Распакуйте файл «Nokia_OST_LA_6.0.4.zip» на свой компьютер.
- Откройте извлеченную папку и дважды щелкните исполняемый файл «Launcher.exe», чтобы запустить установщик Nokia OST LA.
- Нажмите кнопку «Далее» и «Далее» еще раз, чтобы установить Nokia Online Service Tool на свой компьютер.
- После завершения установки нажмите кнопку «Закрыть».
- Теперь распакуйте файл OnlineUpdateTool.zip на свой компьютер.
- Откройте извлеченную папку и скопируйте файл OnlineUpdateTool.exe.
- Перейдите в папку «C: Program Files (x86) OST LA» на вашем компьютере.
- Вставьте файл «OnlineUpdateTool.exe» в папку и замените существующий при появлении запроса.
- Наконец, удалите файл «OnlineUpdateTool.exe.config», находящийся в папке.
После успешного копирования файла исправления и удаления вышеупомянутого файла конфигурации инструмент будет готов к использованию.
Как прошить стоковую прошивку с помощью Nokia Online Service Tool
- Перейдите в «C: Program Files (x86) OST LA» на вашем ПК.
- Дважды щелкните исполняемый файл «OnlineUpdateTool.exe», чтобы запустить инструмент.
- Нажмите кнопку «Далее».
- Выберите для своего телефона файл стоковой прошивки в формате .nb0 или .mlf.
- Вы можете получить стандартную прошивку для своего телефона Nokia на специальном форуме XDA или из этого репозитория из Hikari_calyx .
- Полностью выключите телефон и запустите его в режиме загрузки
- Для этого одновременно нажмите и удерживайте кнопки уменьшения громкости и питания и подключите телефон к ПК с помощью кабеля USB.
- Нажмите кнопку «Изменить информацию о телефоне» в окне инструментов.
- Вы должны увидеть сообщение об ошибке на своем компьютере, нажмите кнопку «ОК», чтобы обойти его.
- Теперь должна начаться установка прошивки, поэтому подождите и держите телефон подключенным до завершения процесса.
Хотя инструмент доступен для установки оригинальной / официальной прошивки, для ручного обновления и понижения версии телефонов Nokia, его следует использовать с осторожностью и с предварительными знаниями. Использование неправильного файла прошивки или попытка перехода на более раннюю версию, не зная об ограничениях, могут заблокировать ваш телефон. Если у вас есть какие-либо вопросы об инструменте, оставьте комментарий ниже.
Вот и все, вам только что удалось скачать Nokia Online Service Tool (OST LA) 6.0.4. Теперь вы можете использовать его для прошивки стоковой прошивки на свой телефон Nokia Android.