For the benefit of anyone else who may one day search for the answer to this question…
I posed this question to OpenVPN’s tech support for Android, and got the following reply:
«The OpenVPN Connect app for Android uses our latest software based on OpenVPN3 codebase and is more secure, faster, efficient, and has more support for various methods of defeating troublesome firewalls. However, it does not support the fragment directive.
Instead, try Arne Schwabe’s OpenVPN for Android. That is the official open source OpenVPN client and it should still support the fragment directive. At the moment it still uses OpenVPN2 codebase.
The comments from the FAQ are correct, it’s best left up to the underlying transport protocol instead of forcing it inside OpenVPN. For some reason though, they appear to be forcing it in OpenVPN2 and this is causing an incompatibility with OpenVPN3 codebase. In the future they might change this, but that’s up to them, we have no control over ExpressVPN’s services.»
There are actually setup instructions for Arne Schwabe’s «OpenVPN for Android» app on ExpressVPN’s website, but they are not very complete, and make no mention of a Kill Switch. I have since questioned ExpressVPN’s tech support about this, and they provided the following instructions:
«You can try these steps to utilize Android’s Kill-switch which is called the «Always-on» feature in the meantime to be used as a kill-switch for OpenVPN for Android.
To do this for Android devices that run on Android 7 and up:
1) Turn off the VPN first. Then go to your device’s VPN settings. On some other Android devices, these can be found at Settings -> Connections -> More connection settings -> VPN, but this may vary by device.
2) Click on the gear icon next to the VPN app or connection you want to set a kill switch for.
3) Turn on both “Always -on VPN” and Block connections without VPN.
4) Confirm that you want a kill switch for your VPN
For older Android devices:
You can configure OpenVPN for Android to act as a kill switch. This may not be quite as secure as the previous method as it will not protect you if the OpenVPN for Android app crashes, but it is still pretty effective.
1) Edit the specific VPN connection in the “Profiles” tab (where your VPN connection profiles are listed).
2) Go to the “Advanced” tab and check “Persistent Tun” and set “Connection retries” to Unlimited.»
I’ve also found another Android VPN app that provides kill switch functionality and which works with ExpressVPN. It’s called «OpenVPN Client Free» and is also available on Google Play. The steps to enable the kill switch function are:
— edit the VPN
— tap on «Options»
— select «Drop packets on connect/reconnect/unexpected disconnect»
I hope the above info may help any ExpressVPN customers having the same issue. Actually, to be precise about it: ALL users of the official ExpressVPN apps for both Android and iOS have this issue, whether they realize it or not. Until ExpressVPN incorporates a kill switch (seamless tunneling) option, the official ExpressVPN app should not be considered safe to use on public wifi, and especially so in those hotspots without passwords.
Thank you to the excellent tech support at both OpenVPN.net and ExpressVPN for their assistance in providing solutions.
Содержание
- Ошибка Internet connection error: что делать и как устранить проблему простейшими способами?
- Internet connection error: что делать?
- Восстановление системы
- Проверка на вирусы и вредоносные коды
- Проверка параметров подключения
- Использование специальных утилит восстановления
- Заключение
- OpenVPN Support Forum
- ovpnagent request error?!
- ovpnagent request error?!
- Re: ovpnagent request error?!
- There was an error attempting to connect to the selected server перевод
- OpenVPN Support Forum
- How to to use ExpressVPN?
- How to to use ExpressVPN?
- Re: How to to use ExpressVPN? (SOLVED)
- Ошибки VPN
- Вы везунчик!
- Ошибки OpenVPN
- Как узнать какая OpenVPN ошибка возникла?
- Не могу выбрать «Connect» при нажатии на иконку в системном трее
- Connect to IP:Port failed, will try again in 5 seconds; No Route to Host
- Cannot load certificate file client.crt
- All TAP-Win32 adapters on this system are currently in use
- ERROR: Windows route add command failed: returned error code 1
- Initialization Sequence Completed With Errors
Ошибка Internet connection error: что делать и как устранить проблему простейшими способами?
Встретить ситуацию с пропаданием связи, когда нарушается интернет-соединение, можно достаточно часто. Отключение чаще всего происходит не по вине пользователя. Что делать, если пишет «Internet connection error» (имеется в виду предупреждение, содержащееся в системном сообщении), мы сейчас и посмотрим. Более того, попробуем разобрать основные причины возникновения таких ситуаций и обратим внимание на возможные методы их устранения.
Internet connection error: что делать?
Итак, если рассматривать основные причины отключения интернета, чаще всего в их числе приоритетное место занимает проникновение на компьютер вирусов, исполняемых апплетов, называемых Malware и Adware, а также неправильная настройка самого подключения.

Сейчас будем исходить из того, что с оплатой услуг провайдера все в порядке, а сетевое оборудование работает без сбоев. Хотя, в общем-то, в некоторых случаях при постоянном появлении сообщения об отсутствии подключения может потребоваться повторная инсталляция драйверов сетевых устройств или установка корректных параметров маршрутизатора, например роутера при наличии сетевых подключений.
Восстановление системы
Если сбой произошел ни с того ни с сего, раньше все работало как часы, а сейчас на экране появилось сообщение Internet connection error, что делать, будет понятно, если обратить внимание именно на время возникновения такой ситуации.
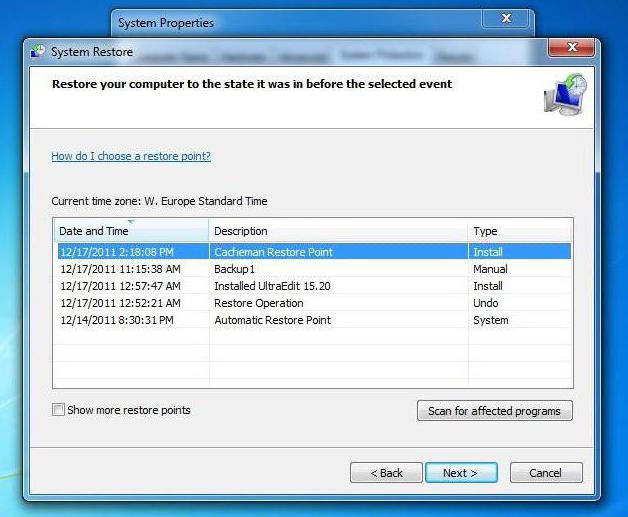
Действительно, мало ли какие настройки «слетели». Самым простым способом устранения проблемы станет обычный откат системы до контрольной точки, но она во временном промежутке может быть более ранней, чем время появления сбоя.
Проверка на вирусы и вредоносные коды
Теперь посмотрим, как поступить, если первый способ ничего не дал, и система снова выдает предупреждение Internet connection error. Что делать? В обязательном порядке проверить систему на вирусы, используя какую-нибудь портативную версию программы (ведь инсталлированный антивирус уже мог пропустить угрозу).
В качестве пакета можно взять KVRT, в наилучшей степени зарекомендовавший себя в области портативных приложений. К тому же и со штатным антивирусом конфликты полностью исключаются.

Но и такие утилиты могут не определять потенциально нежелательное ПО, заменяющее оригинальный файл HOSTS или вносящее в него собственные записи. В этом случае потребуется использовать утилиты вроде Adware Cleaner или что-то похожее.
Проверка параметров подключения
Если потенциальных или существующих угроз не обнаружено, можно проверить настройки самого подключения. Допустим, система снова выдает предупреждение вроде Internet connection error. Что делать теперь?
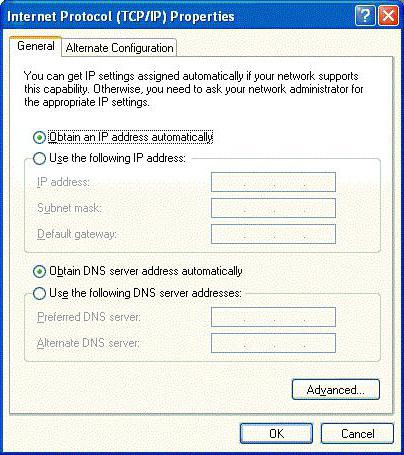
Необходимо зайти в свойства подключения и проверить настройки протокола TCP/IP. Желательно (что применяется в большинстве случаев) использовать автоматическое получение адресов IP и DNS-сервера. Иногда стоит обратить внимание на задействование прокси. Если провайдер не поддерживает предоставление таких услуг, прокси-сервер необходимо отключить (снять галочку на соответствующем поле). В крайнем случае нужно ввести правильные значения для всех задействованных полей (их предоставляет провайдер при подключении пользовательского компьютера к интернету или системный администратор в случае с сетевыми терминалами).
Использование специальных утилит восстановления
Кроме всего вышесказанного, если пользователь не хочет или не может заниматься устранением проблемы самостоятельно, могут помочь специальные программы восстановления интернет-подключения и всего, что с этим связано.
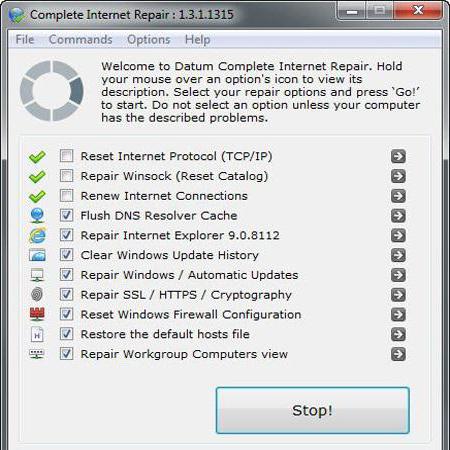
Одной из самых простых и интересных автоматизированных утилит является программа Complete Internet Repair. По большому счету пользователю нужно всего лишь запустить процесс сканирования на наличие проблем, после чего активировать их исправление. В обоих процессах участие юзера сведено к минимуму.
Заключение
Естественно, это далеко не все причины, которые могут повлиять на отключение интернета. Скажем так: здесь были рассмотрены наиболее часто возникающие штатные и нештатные ситуации. Но, как уже можно заметить, способы устранения проблемы в большинстве случаев достаточно просты и могут быть выполнены юзером любого уровня подготовки.
Источник
OpenVPN Support Forum
Community Support Forum
ovpnagent request error?!
ovpnagent request error?!
Post by nico_ar » Wed Mar 31, 2021 10:37 am

Re: ovpnagent request error?!
Post by openvpn_inc » Wed Apr 07, 2021 10:03 am
The OpenVPN agent component that is reporting a problem is the component that makes it possible for OpenVPN Connect v3 to run unprivileged (not requiring admin rights). There are certain actions that require admin privileges like opening the TUN/TAP adapter and setting up routing. The agent service takes care of that. Apparently though that agent is unable to do its job.
Given your problem description, the most likely cause of the problem is a failure to install the TUN/TAP adapter, therefore when the agent is requested to open a TUN/TAP adapter, there isn’t one, and the request fails, and therefore everything simply does not work.
I believe the root cause of the problem is related to a problem installing the driver on Windows 7. First of all I should point out that Windows 7 is no longer supported by Microsoft. But we also know that OpenVPN Connect v3 will work fine on Windows 7. But one issue that we know about is that if you don’t have Windows 7 updated to the latest still available updates, then you will not have the required update that adds support for checking code signing done with SHA256 type certificates. And that is required if you want the driver installation to proceed correctly. This update could be obtained separately.
I believe that, just likes in our test setup with Windows 7, if you have the correct update installed that adds support for SHA256 code signing, then you should be able to install the driver correctly.
And finally, some antivirus software might hold back the driver installation. So it’s possible that the problem can be resolved by temporarily disabling antivirus for the installation process to succeed.
Источник
There was an error attempting to connect to the selected server перевод
Установка на Debian Wheezy. На других дистрибутивах будут аналогичные настройки.
#установим openvpn
aptitude install openvpn
#редактируем переменные
cd /usr/share/doc/openvpn/examples/easy-rsa/2.0/
nano ./vars
#меняем строки
export KEY_SIZE=2048 #Длинна ключа
export KEY_EXPIRE=3650 #Срок действия ключа в днях
#инициализируем переменные и чистим папку keys и создаем сертификаты
. ./vars
. ./clean-all
./build-ca #корневой сертификат
./build-key-server server #сертификат сервера
./build-dh #ключ Диффи Хельман
#tls-auth (по желанию)
openvpn —genkey —secret ./keys/ta.key
#перенесем полученные сертификаты в рабочую папку
cp ./keys/ca.crt /etc/openvpn
cp ./keys/server.crt /etc/openvpn
cp ./keys/server.key /etc/openvpn
cp ./keys/dh2048.pem /etc/openvpn
#для tls-auth
cp ./keys/ta.key /etc/openvpn
#создадим сертификаты пользователей
./build-key-pkcs12 vpn.android
Серверный конфиг:
zcat /usr/share/doc/openvpn/examples/sample-config-files/server.conf.gz > /etc/openvpn/server.conf
nano /etc/openvpn/server.conf
#раскомментируем строчку
nano /etc/sysctl.conf
net.ipv4.ip_forward=1
#настройка IPTABLES
iptables -A FORWARD -s 10.8.0.0/24 -j ACCEPT
iptables -A FORWARD -m state —state RELATED,ESTABLISHED -j ACCEPT
iptables -t nat -A POSTROUTING -s 10.8.0.0/24 -o eth0 -j MASQUERADE
remote IP PORT
client
dev tun
ping 10
comp-lzo
proto udp
tls-client
remote-cert-tls server
verb 3
pull
tls-auth ta.key 1
#Сертификаты
ca ca.crt
cert vpn.android.crt
key vpn.android.key
Второй способ удобнее, я думаю.
Большая часть информации взята с Хабрахабр. Теплый и ламповый VPN
Сообщение отредактировал FacelessS — 24.04.15, 12:37
Источник
OpenVPN Support Forum
Community Support Forum
How to to use ExpressVPN?
How to to use ExpressVPN?
Post by Canadow » Sat Jul 21, 2018 5:12 am
I’m subscribed to ExpressVPN but as their Android app has no kill switch, I’m trying to setup OpenVPN Connect for Android, using ExpressVPN’s OpenVPN profiles.
Whenever I try to connect, the error message is «There was an error attempting to connect to the selected server». There is a toast message at the same time that says «OpenVPN core error».
The log shows:
EVENT: CORE_THREAD_ERROR info=’option_error: sorry, ‘fragment’ directive is not supported, nor is connecting to a server that uses ‘fragment’ directive’
So, before posting this, I found in the FAQ:
«The fragment directive is not supported due to the complexity it adds to the OpenVPN implementation and the fact that it is usually better to leave fragmentation up to the lower-level transport protocols. Note as well that the client does not support connecting to a server that uses the fragment directive.»
I have no idea what that means. but I did some tinkering and commented out the «fragment 1300» line in the profile, after which it connected without error, but I was unable to connect to any websites.
Is it possible at all to somehow get ExpressVPN to work with the OpenVPN Connect app?
Re: How to to use ExpressVPN? (SOLVED)
Post by Canadow » Sun Jul 22, 2018 11:43 am
For the benefit of anyone else who may one day search for the answer to this question.
I posed this question to OpenVPN’s tech support for Android, and got the following reply:
«The OpenVPN Connect app for Android uses our latest software based on OpenVPN3 codebase and is more secure, faster, efficient, and has more support for various methods of defeating troublesome firewalls. However, it does not support the fragment directive.
Instead, try Arne Schwabe’s OpenVPN for Android. That is the official open source OpenVPN client and it should still support the fragment directive. At the moment it still uses OpenVPN2 codebase.
The comments from the FAQ are correct, it’s best left up to the underlying transport protocol instead of forcing it inside OpenVPN. For some reason though, they appear to be forcing it in OpenVPN2 and this is causing an incompatibility with OpenVPN3 codebase. In the future they might change this, but that’s up to them, we have no control over ExpressVPN’s services.»
There are actually setup instructions for Arne Schwabe’s «OpenVPN for Android» app on ExpressVPN’s website, but they are not very complete, and make no mention of a Kill Switch. I have since questioned ExpressVPN’s tech support about this, and they provided the following instructions:
«You can try these steps to utilize Android’s Kill-switch which is called the «Always-on» feature in the meantime to be used as a kill-switch for OpenVPN for Android.
To do this for Android devices that run on Android 7 and up:
1) Turn off the VPN first. Then go to your device’s VPN settings. On some other Android devices, these can be found at Settings -> Connections -> More connection settings -> VPN, but this may vary by device.
2) Click on the gear icon next to the VPN app or connection you want to set a kill switch for.
3) Turn on both “Always -on VPN” and Block connections without VPN.
4) Confirm that you want a kill switch for your VPN
For older Android devices:
You can configure OpenVPN for Android to act as a kill switch. This may not be quite as secure as the previous method as it will not protect you if the OpenVPN for Android app crashes, but it is still pretty effective.
1) Edit the specific VPN connection in the “Profiles” tab (where your VPN connection profiles are listed).
2) Go to the “Advanced” tab and check “Persistent Tun” and set “Connection retries” to Unlimited.»
I’ve also found another Android VPN app that provides kill switch functionality and which works with ExpressVPN. It’s called «OpenVPN Client Free» and is also available on Google Play. The steps to enable the kill switch function are:
— edit the VPN
— tap on «Options»
— select «Drop packets on connect/reconnect/unexpected disconnect»
I hope the above info may help any ExpressVPN customers having the same issue. Actually, to be precise about it: ALL users of the official ExpressVPN apps for both Android and iOS have this issue, whether they realize it or not. Until ExpressVPN incorporates a kill switch (seamless tunneling) option, the official ExpressVPN app should not be considered safe to use on public wifi, and especially so in those hotspots without passwords.
Источник
Ошибки VPN
Иногда случаются проблемы с VPN подключением или VPN не работает. На данной странице вы можете найти описание возникающей ошибки впн и самостоятельно исправить ее.
Вы везунчик!
Поздравляем! Вы нашли скрытый промо-код со скидкой 75% на покупку анонимного VPN без логов.
Промо-код действует только 1 час.
Ошибки OpenVPN
Если вы не знаете как узнать ошибку, возникшую в ходе подключения, нажмите на следующую ссылку:
Ниже представлен список возможных ошибок и методы их устранения. Нажмите на ошибку, чтобы узнать как ее устранить. Названия ошибок соответствуют записям в окне лога.
Как узнать какая OpenVPN ошибка возникла?
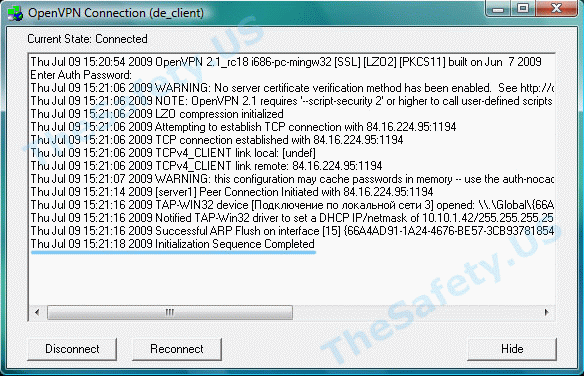
Программа OpenVPN имеет лог подключения. При подключении к OpenVPN серверу программа записывает данные подключения. Эта информация никуда не передается и остается на вашем компьютере, чтобы вы могли понять из-за чего возникла ошибка впн. Чтобы вызвать окно лога, нажмите дважды левой кнопкой мыши на иконку OpenVPN в системном трее.

Когда соединение прошло успешно, и вы подключены к VPN серверу, то окно лога должно выглядеть так:
Не могу выбрать «Connect» при нажатии на иконку в системном трее
В списке есть только «Proxy Settings», «About» и «Exit», но нет пункта «Connect».

Это означает, что вы не скачали и/или не скопировали конфигурационный файл «client.ovpn» в «C:/Program Files/OpenVPN/config». Откройте еще раз Инструкцию по настройке OpenVPN соединения для вашей ОС и проверьте все шаги установки и настройки.
Connect to IP:Port failed, will try again in 5 seconds; No Route to Host
Данная ошибка означает, что у вас нет подключения к Интернету, либо его блокирует ваш Firewall или Антивирус.
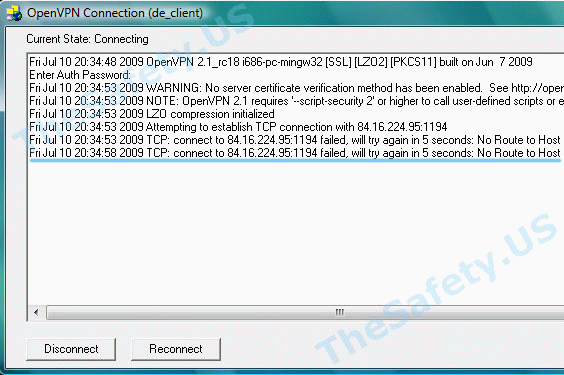
Проверьте активно ли ваше Интернет подключение, отключите Firewall, Антивирус и подключитесь еще раз.
Cannot load certificate file client.crt
Данная ошибка связана с отсутствием сертификационных файлов в папке «C:Program FilesOpenVPNconfig».
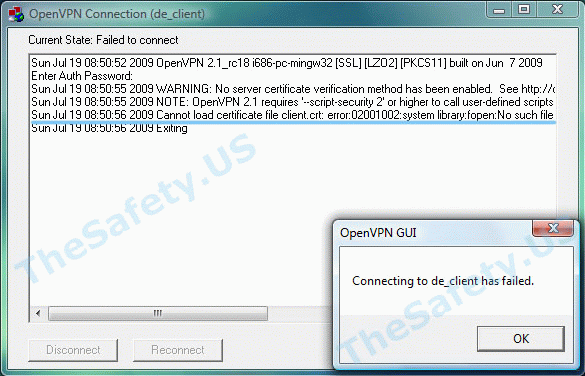
В процессе установки было необходимо скачать архив с сертификатами и распаковать его в папку с программой. Откройте еще раз Инструкцию по настройке OpenVPN соединения для вашей ОС и проверьте все шаги установки и настройки.
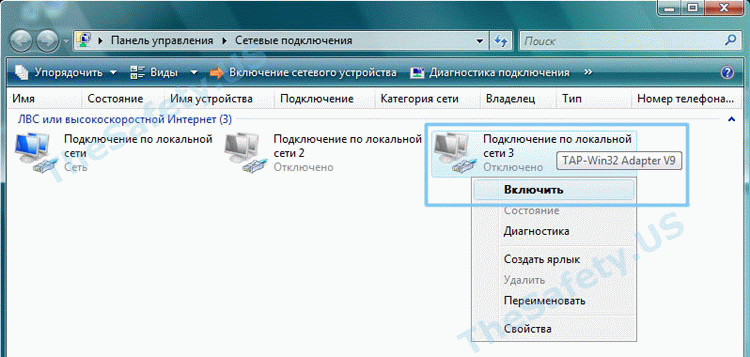
All TAP-Win32 adapters on this system are currently in use
Эта впн ошибка связана с некорректной работой Windows и программы OpenVPN. Также эта OpenVPN ошибка может возникнуть вследствие отключения Интернета без отключения сначала OpenVPN соединения. Всегда отключайте сначала OpenVPN соединение и только затем Интернет.
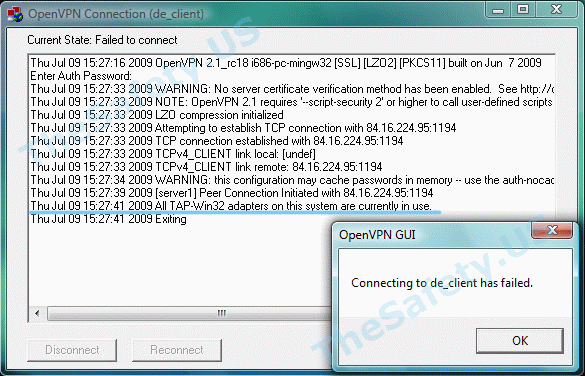
Для устранения ошибки, зайдите в «Пуск -> Сетевые подключения». Найдите «Подключение по локальной сети. TAP-Win32 Adapter» и правой кнопкой мышки щелкните на ярлыке. Выберите «Отключить».
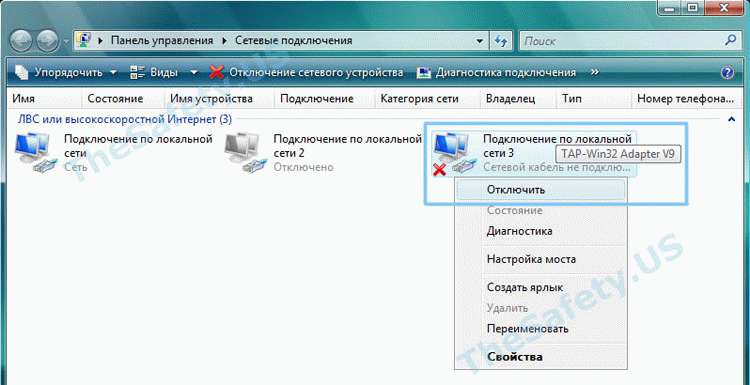
Затем, таким же образом, «Включите» данное подключение. После выполнения данных действий проблемы с VPN подключением должны исчезнуть.
ERROR: Windows route add command failed: returned error code 1
Данная ошибка связана с ограничением прав в Windows Vista, Seven.
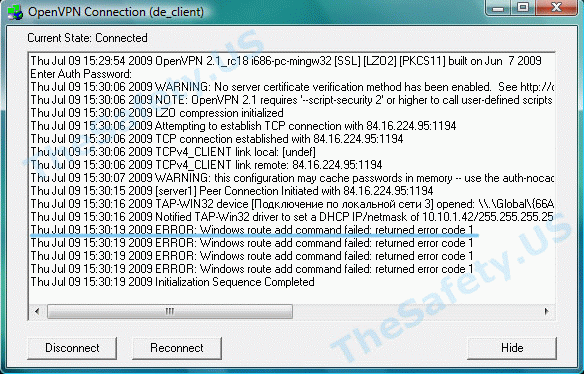
Для устранения ошибки, необходимо выйти из OpenVPN GUI. Правой кнопкой мышки нажать на иконку OpenVPN GUI на рабочем столе и выбрать пункт меню «Свойства»

На вкладке «Совместимость» поставьте галочку «Выполнять эту программу от имени администратора».
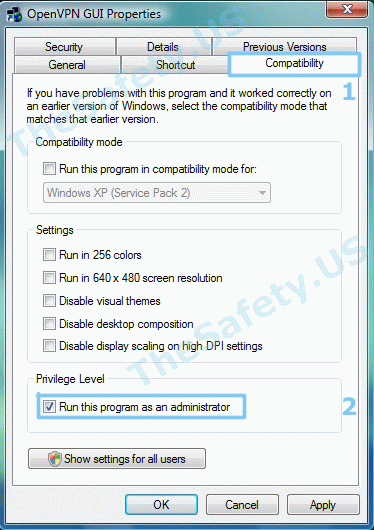
Теперь запустите OpenVPN GUI еще раз и подключитесь к VPN серверу.
Initialization Sequence Completed With Errors
Данная ошибка связана с неправильной работой службы DHCP из-за антивирусов или фаерволов.
Ошибка наблюдалась постоянно у фаервола Outpost Firewall версии 2009 и ранее, наблюдается также у антивируса Касперского. Ниже представлено решение для антивируса Касперского. Сам алгоритм ничем не отличается от решения проблемы для других антивирусов и фаерволов.
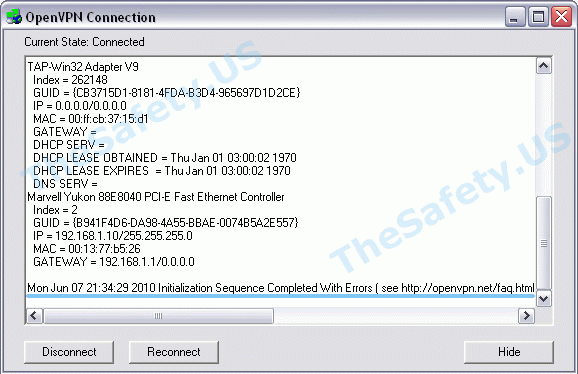
Для устранения ошибки, необходимо зайти в «Пуск -> Панель Управления -> Сетевые подключения» и зайти в «Свойства» виртуального адаптера «TAP-Win 32 Adapter». На вкладке «Общие» в списке отключить Kaspersky Anti-Virus NDIS Filter и затем нажать «ОК».
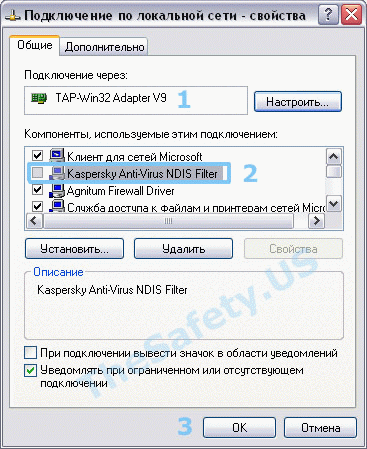
Теперь подключитесь к VPN и подключение должно пройти успешно.
Источник
Introduction
For some time now I’ve systematically used an OpenVPN-connection whenever I was using an untrusted WLAN (at hotels, restaurants, etc.). And so should you: Whether or not a hotel’s WLAN is WPA-encrypted has no influence on its trustworthyness. After all, are you really sure that among all of the connected users there’s not a single bored teen that’s having fun sniffing your passwords or doing a man-in-the-middle-attack through a few taps on his smartphone? (Yes, it’s that easy!)
And here’s the problem: You’ve set up your own OpenVPN-Server following one of the many detailed Howto guides available online and now that you’re actually abroad your VPN is failing miserably: The VPN-client connects just fine, but even the simplest webbrowsing has weird issues or doesn’t work at all. The most frequent cause (besides an overly restrictive firewall) is a problematic MTU-setting.
Here’s what it may look like in the logs:
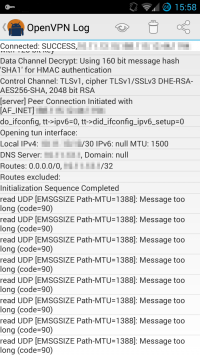
If you just want a quick’n’dirty solution that works perfectly fine (at least in my limited experience), simply change your OpenVPN’s transport protocol from the default UDP to TCP. (i.e. change «proto udp» to «proto tcp» on client and server. Better yet, have two server instances running, one for UDP and one for TCP.)
For various technical reasons (page referenced by the official manual!), such a setup is not recommended (TCP-over-TCP, reduced bandwidth), but in practice it works remarkably well “due to all kinds of magic related to mssfix” (as it’s “explained” on the OpenVPN-bugtracker, issue 375)
MTU you say?
MTU stands for Maximum Transmission Unit and represents the maximum size an IP packet can have before it must be fragmented, i.e. split up. And IP-fragmentation, even though it’s part of the IP specifications, is a feature you’ll want to avoid whenever possible. (And that’s completely independent of your using OpenVPN or not. It applies generally to any kind of IP-based traffic.) Fragmentation entails security issues, performance penalities and transmission issues. It’s obvious that on the path a given IP packet travels to its destination, it’s the smallest encountered MTU that determines whether the packet has to be fragmented. This is the so-called Path-MTU. (The expected value is 1500; this corresponds to the MTU of regular ethernet or wifi connections. Problems arise when Path-MTU is less than 1500.)
In order to detect Path-MTU most IP packets are actually transmitted with the «Don’t Fragment»-bit set. This leaves an intermediate router with an MTU less than the packet’s length no choice but to drop it. It notifies the sender by means of a special ICMP message (Destination unreachable: fragmentation needed and DF set). The sender can then progressively scale down the size of the packets it emits. (This reduces throughput, since the headers are of a fixed size and the actual payload decreases.) In essence, this process is known as Path-MTU Discovery (PMTUD).
Unfortunately, PMTUD often fails due to a misconfigured firewall dropping those precious ICMP messages. Another reason is the possibly suboptimal handling of PMTUD by OpenVPN itself. But I’m not entirely sure of that. (See this bug report or read up about the Linux-only —mtu-disc setting. Feel free to comment.)
And that’s when the OpenVPN’s various MTU-related configuration directives come into play. I won’t go in all the gory details (I’m no networking expert either…), but I’ll try my best to sum up the sometimes contradicting or incorrect information I could find.
All of the following is strictly for the case you’re using the recommended UDP as transport protocol. (link-mtu and tun-mtu are also valid for TCP as transport protocol, but normally they’re not needed in this case.)
My objective is to derive a setup that’s (hopefully) compatible with a wide range of clients (at least Linux, Windows and the two major Android clients).
On to the first step:
RTFM
Actually I read the fine manual for you and here’s the summary:
—link-mtu n
Sets an upper bound on the size of UDP packets which are sent between OpenVPN peers. It’s best not to set this parameter unless you know what you’re doing.
—tun-mtu n
Take the TUN device MTU to be n and derive the link MTU from it (default=1500). In most cases, you will probably want to leave this parameter set to its default value.
The MTU (Maximum Transmission Units) is the maximum datagram size in bytes that can be sent unfragmented over a particular network path. OpenVPN requires that packets on the control or data channels be sent unfragmented.
MTU problems often manifest themselves as connections which hang during periods of active usage. It’s best to use the
--fragmentand/or--mssfixoptions to deal with MTU sizing issues.
—fragment max
Enable internal datagram fragmentation so that no UDP datagrams are sent which are larger than max bytes.
The max parameter is interpreted in the same way as the —link-mtu parameter, i.e. the UDP packet size after encapsulation overhead has been added in, but not including the UDP header itself. […]
It should also be noted that this option is not meant to replace UDP fragmentation at the IP stack level. It is only meant as a last resort when path MTU discovery is broken. Using this option is less efficient than fixing path MTU discovery for your IP link and using native IP fragmentation instead. Having said that, there are circumstances where using OpenVPN’s internal fragmentation capability may be your only option, such as tunneling a UDP multicast stream which requires fragmentation.
—mssfix max
Announce to TCP sessions running over the tunnel that they should limit their send packet sizes such that after OpenVPN has encapsulated them, the resulting UDP packet size that OpenVPN sends to its peer will not exceed max bytes. The default value is 1450.
The max parameter is interpreted in the same way as the
--link-mtu parameter, i.e. the UDP packet size after encapsulation overhead has been added in, but not including the UDP header itself. […]
--mssfixand--fragmentcan be ideally used together, where--mssfixwill try to keep TCP from needing packet fragmentation in the first place, and if big packets come through anyhow (from protocols other than TCP),--fragmentwill internally fragment them. […] If--fragmentand--mssfixare used together,--mssfixwill take its default max parameter from the--fragmentmax option.Therefore, one could lower the maximum UDP packet size to 1300 (a good first try for solving MTU-related connection problems) with the following options:
--tun-mtu 1500 --fragment 1300 --mssfix
So, it’s not THAT complicated after all? In order to adapt to a smaller MTU, I’ll just set --tun-mtu to some smaller value, e.g. 1300?
Unfortunately, it’s not that simple. What I haven’t told you about are the various restrictions.
Caveats, restrictions, limitations, compatibility issues…
OpenVPN can’t set or modify the MTU on Windows
Quoting the official documentation:
Currently on Windows, the only way to change the TAP-Windows MTU is to go to the adapter advanced properties and do it manually. Because of this, the easiest choice is to leave the TAP-Windows MTU setting at “1500” and tell OpenVPN on both sides of the connection to use an MTU of “1500” with the config option:
tun-mtu 1500If you then need to lower the MTU because of fragmentation or router problems, use something like
fragment 1400
mssfix
to lower OpenVPN’s tunnel carrier UDP packet size to “1400”.
That’s the reason why older versions of OpenVPN (before the Windows-port) simply used --link-mtu 1300, but newer ones no longer take this route… If you want the broadest possible compatibility, you’ll always manually specify --tun-mtu 1500 even if it’s a fictitious value.
Limitations of the official Android client
Ok, then I’ll set mssfix and fragment on client and server and be done with it?
Not quite.
Neither configuration directive is supported by the official OpenVPN client for Android, “OpenVPN Connect”!
fragment — The fragment directive is not supported due to the complexity it adds to the OpenVPN implementation and the fact that it is usually better to leave fragmentation up to the lower-level transport protocols. Note as well that the client does not support connecting to a server that uses the fragment directive.
mssfix — This directive will be added in a future release. Since the functionality of mssfix can be achieved on either the client or server side, specifying it on the server side will enable it even if the client doesn’t support the directive.
(Source)
Do note that the mssfix limitation is not applicable to the excellent “OpenVPN for Android” by Arne Schwabe. (I’m not sure about fragment support, but mssfix definitely works!)
Server limitations
All of the clients connecting to the same server instance must share the same tun-mtu and fragment settings.
Recommendations
Considering all of the above, I see only one possibility that comes close to a one-size-fits-all approach and that’s setting mssfix 1300 and leaving all of the other settings at their default values: tun-mtu 1500, no fragmentation. Do note that mssfix can’t be pushed to clients (or at least it fails on OpenVPN for Android). The following snippet is included in both the client and server config files:
proto udp
dev tun
tun-mtu 1500
mssfix 1300
# no fragment setting :-/
Even though these settings should be compatible with a wide array of clients, they’re not perfect: only TCP-traffic (through the UDP-tunnel) is taken care of. As soon as the client device emits UDP packets that are too large (once encrypted and encapsulated), packet loss is still a possibility. This is entirely dependent of the traffic you generate. The good news is that most «stuff» is TCP-based (web browsing, e-mail, streaming audio/video, etc.), whereas UDP is mainly used for some «management protocols» such as DNS, DHCP and similar. Usually these UDP packets are rather small, hence unproblematic. It’s the exceptions that might prove problematic: realtime video applications (think Skype or Facetime), NFS, some types of online games. In these cases, there’s probably no way around enabling OpenVPN’s internal fragmentation routines and avoiding incompatible clients.
Conclusion
Getting OpenVPN right when confronted with non-standard networks can be cumbersome… At the same time it’s a very powerful tool that can be adapted to suit almost any secure tunneling needs.
In today’s tutorial I am going to show you how to connect to ExpressVPN using manual OpenVPN configuration files with third party OpenVPN clients for Windows, Mac, Android, and iOS.
This can be very useful if you are using ExpressVPN in China because the manual OpenVPN server IP addresses are different from the ones used in the apps. If the server IPs used in the apps get blocked by the Great Firewall, the manual OpenVPN server in the same location will often still work.
Even if you are not in China, some people still prefer to use manual OpenVPN connections because the client software is open source.
How to setup manual OpenVPN on Windows
Step 1 – Download the client
Download the latest version of the OpenVPN GUI client and install it. The OpenVPN website is blocked in China, but you can access it by using Simple DNSCrypt. Alternatively, you can download the client using the links below if you are in China.
Download OpenVPN GUI v2.5.0 for 64bit Version
Download OpenVPN GUI v2.5.0 32bit Version
Step 2 – Download the ExpressVPN .ovpn config files
Go to the ExpressVPN website and log into your account.
If you are in China without another VPN installed and the above link does not work for you, try the alternative links on the China-accessible VPN links page.
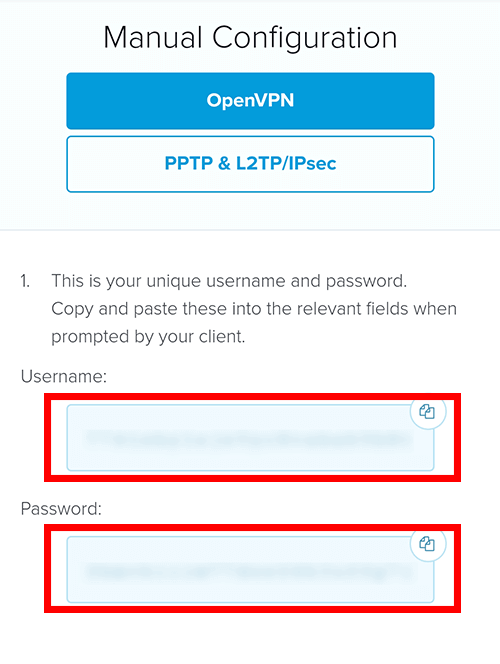
After you log into your account, go to the setup page and choose Manual Config as shown below.
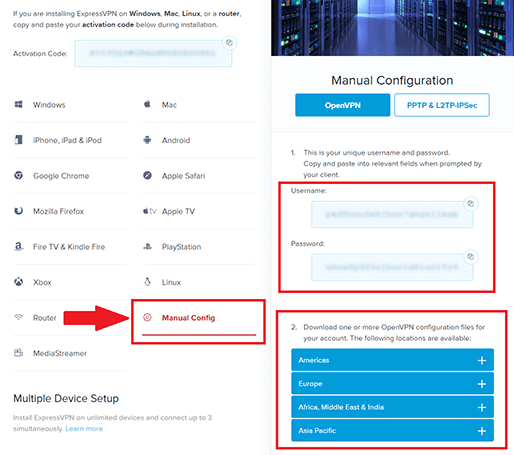
Download the configuration files for the servers that you want to connect to. I am just doing Taiwan 3 for this tutorial but you may want to set up a few different locations. Leave this page open because you will need to come back here later to copy your username and password.
Note – The servers I am using for this guide may not be working at the time you are reading this. You may have to try several different servers to find a working one. Or check the 2020 China VPN blog page for the latest servers that I’m using.
Step 3 – Edit the config to block DNS leaks (for Windows 10)
If you are using Windows 7 or Windows 8 then you can skip this step.
Windows 10 is notorious for DNS leaks and the VPN will not work properly unless we add the block-outside-dns directive to the configuration file.
Open the .ovpn file in a text editor and add a new line with the text block-outside-dns as shown below.
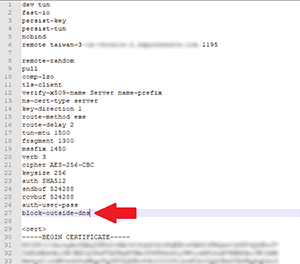
Now save the file. If you rename the file, make sure that the file extensions stays as .ovpn and not .txt.
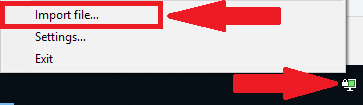
Step 4 – Import the configuration file
Open the OpenVPN GUI app and then right-click on the icon in the system tray and choose Import file…
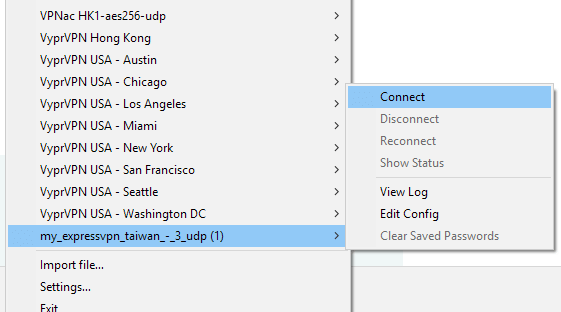
Step 5 – Connect
After importing the file, you should see a new server on the right-click menu. If I recall correctly, it won’t show you the file name when you only have 1 configuration imported. It will just say “connect” or something. In my case, I already have many configurations imported so I can see the name of the file I imported on the bottom of the list.
Choose the Connect option as shown below.
How to setup manual OpenVPN on Mac
The instructions are almost exactly the same as Windows except there is no need to edit the configuration file to block DNS leaks before importing the config files.
There is no official OpenVPN client for Mac, but you can use the open source Tunnelblick app.
Step 1 – Download the client
Download the latest version of Tunnelblick
The Tunnelblick website is blocked in China. If you are in China without another VPN, you can download Tunnelblick using the link below.
Download Tunnelblick v3.8.4
Step 2 – Download the ExpressVPN .ovpn config files
This step is the same as the Windows instructions above. Check the Windows section above for further details.
Step 3 – Install Tunnelblick and import the configuration files
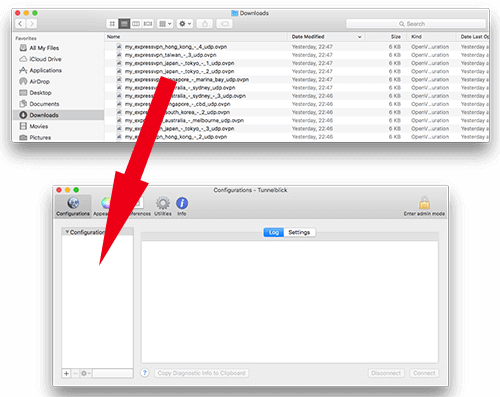
After installing the Tunnelblick client, you can drag the OpenVPN configuration files that you downloaded in step 2 into the Tunnelblick app.
After adding the files, you will be asked whether to install the configurations for all users or only me. Choose all users if you want to be able to connect to the VPN from other user accounts on your computer. Otherwise, choose only me if you only want to connect to the VPN from your current user account.

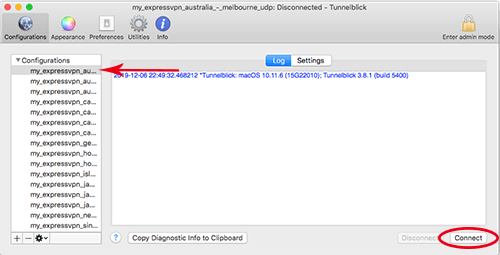
Step 4 – Choose server and connect
Choose a server location that you imported the config file for in step 3 and click Connect.
Now you will be asked to enter your OpenVPN username and password shown on the ExpressVPN website in step 2.
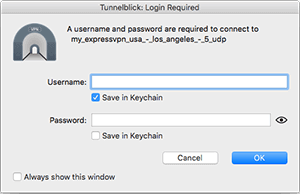
It is recommended to save both the username and password in Keychain so you don’t have to enter these every time you connect.
How to setup manual OpenVPN on Android
The official OpenVPN Connect app for Android and iOS does not work with the ExpressVPN OpenVPN configuration files. The reason for this is because ExpressVPN uses the fragment directive in their configuration, which is not supported by the OpenVPN Connect apps.
However, there is another app for Android that does support the fragment directive.
Step 1 – Install the OpenVPN for Android by Arne Schwabe app
Download the OpenVPN for Android by Arne Schwabe app.
If you are in China without another VPN and cannot access the Play Store, download the OpenVPN for Android by Arne Schwabe app below.
Download OpenVPN for Android by Arne Schwabe v0.7.21
Step 2 – Download the config files
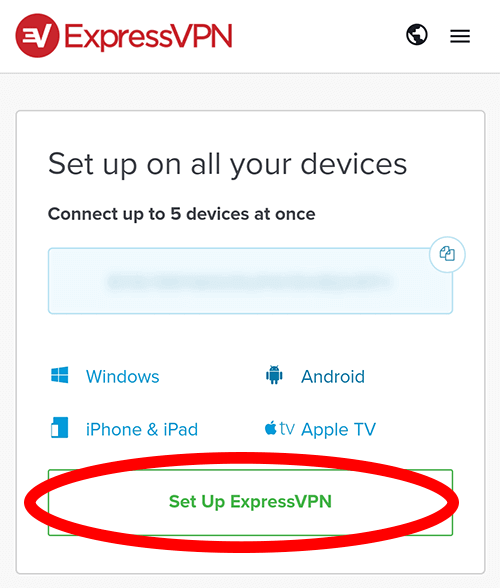
Open the ExpressVPN website on your Android device and log into your account.
If you are in China without another VPN installed and the above link does not work for you, try the alternative links on the China-accessible VPN links page.
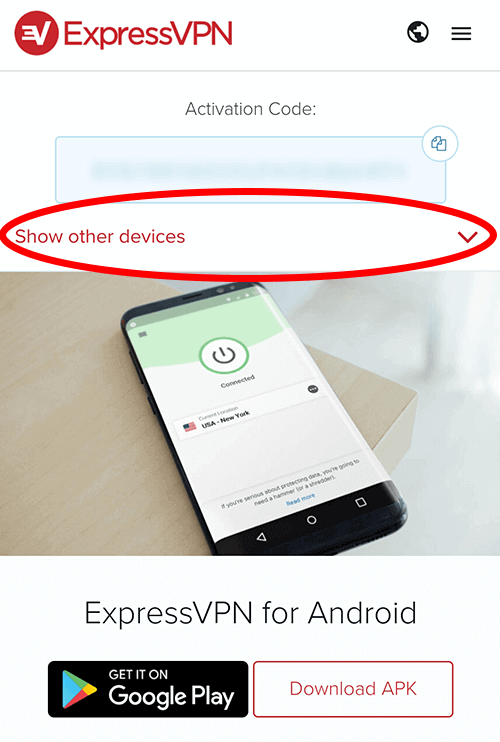
After logging into your account, choose Set Up ExpressVPN.
Then open the link that says “show other devices”.
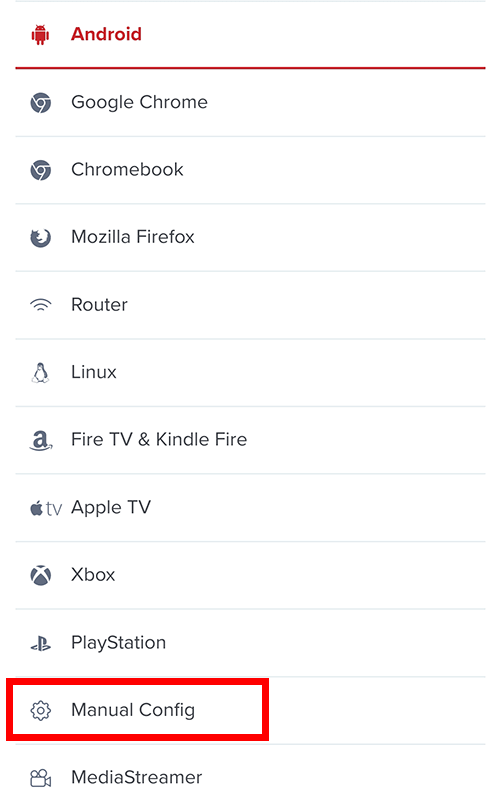
Choose Manual Config
Take note of your OpenVPN username and password. You will need to come back here later to copy these.
Download a config file from the list, which is separated by regions. I recommend Los Angeles 5 and San Jose from the Americas region, and Tokyo 3 from the Asia Pacific region. As of December 2019, these are the best working locations. Try other locations if these are not working for you.

Step 3 – Import the config file
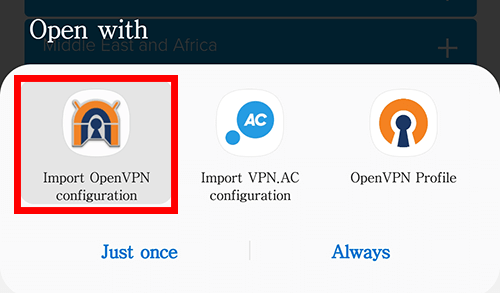
After the download is complete, most web browsers will give you an option to open the file you just downloaded. Open the file and then choose Import OpenVPN configuration with the logo of the OpenVPN for Android by Arne Schwabe app. I recommend choosing “just once” in case you want to download other config files with another client in the future.
Note – If you didn’t see an option to open the file you just downloaded in your browser, you can also import the file directly from the OpenVPN for Android by Arne Schwabe app. Open the app and then choose the + symbol on the top right, tap on the text that says “import”, and then choose the file saved on your phone.
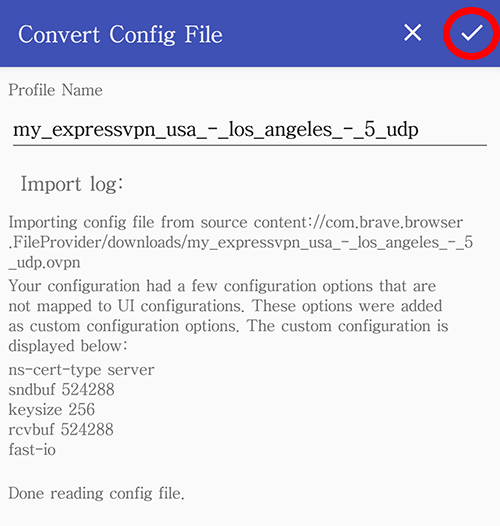
Now tap on the check-mark to confirm the import.
Now repeat this step for any additional config file locations that you want to add.
Step 4 – Connect
Choose the location you want to connect to and then enter your OpenVPN username and password (see step 2).
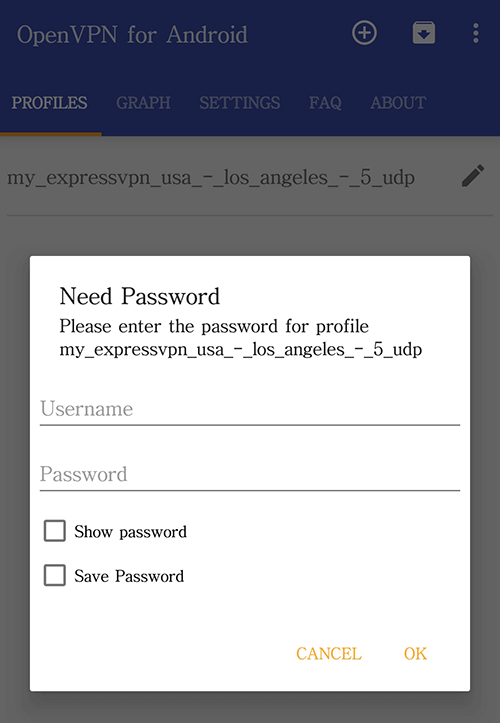
I recommend enabling the Save Password option so you don’t have to enter it every time you connect.
Tip for Android – The OpenVPN for Android by Arne Schwabe app has an option for split tunneling (choose which apps use the VPN and which apps bypass the VPN). The setting is done individually for each server. To set this up, tap on the pencil icon beside the server you want to set up. Then choose the Allowed Apps tab within the settings.
How to setup manual OpenVPN on iOS (iPhone and iPad)
After ExpressVPN ended support for manual OpenVPN TCP connections on June 30, 2019, there is currently no known solution to use manual OpenVPN connections on iOS with ExpressVPN (due to the fact that their UDP configurations use the fragment directive)
If anyone can find an iOS OpenVPN client that supports the fragment directive, please leave a comment and let me know.
Alternatively, you can set up manual L2TP connections with ExpressVPN on iOS. To do this, go to the set up page for iOS using Safari (not Chrome or other browsers), and then open the link that says “complete the ExpressVPN manual setup for iOS” in the blue box in step 1.
After you have agreed to install the configuration profile, go to the iOS Settings app, choose General, Profile (underneath VPN), and then open the ExpressVPN profile. This will automatically install 42 L2TP profiles for you.
To connect, go to Settings, General, VPN. Choose one of the profiles and then enable the toggle switch at the top where it says Status.
If you prefer to use manual OpenVPN on iOS, I suggest the following providers, which do not use the fragment directive in their OpenVPN configs and therefore will work on iOS using the OpenVPN Connect app.
Surfshark
Surfshark fully supports manual OpenVPN (TCP and UDP without fragment).
Surfshark 2 Year Deal
Get 2 Years of Surfshark for only $59
Check this guide on how to set up manual OpenVPN connections with Surfshark (confirmed working in China)
NordVPN
NordVPN is also supporting manual OpenVPN without the fragment directive.
Check the NordVPN website for the latest promotions