|
|
#1 |
|
Junior Member Регистрация: 30.09.2018 Сообщений: 3 |
Всем доброго времени суток. Подскажите… |

|
|


|
|
#2 |
|
Junior Member Регистрация: 21.03.2012 Сообщений: 7 |
Может все от версии Samba (на Win10 версия 1-отключена: надо включать руками). |
|
|
|
|
|
#3 |
|
Junior Member Регистрация: 30.09.2018 Сообщений: 3 |
Цитата:
Сообщение от rubicon Может все от версии Samba (на Win10 версия 1-отключена: надо включать руками). Вроде все включено Миниатюры
|
|
|
|


|
|
#4 |
|
Senior Member
Регистрация: 17.04.2011 Адрес: Москва Сообщений: 494 |
Попробуй не через SMB, а через «Добавить сетевой адрес…» и там прописать настройки. |
|
|
|

|
|
#5 |
|
Junior Member Регистрация: 30.09.2018 Сообщений: 3 |
Ребят спасибо за советы. Нашел причину. Да, дело не с osmc. Проблема с Win 10. В службах были отключены (вирус?) две службы:
Последний раз редактировалось Sejatel; 02.11.2019 в 19:33. Причина: ошибка
|
|
|
|
|
|
#6 |
|
Senior Member
Регистрация: 11.12.2009 Адрес: Russia Сообщений: 2,184 |
Проще уже стало NFS поднять))
__________________ ВИКИ Настройка DSPlayer: http://xbmc.ru/wiki/index.php?title=Настройка_DSPlayer |
|
|
|

![]()
Posts: 188
Joined: Dec 2017
Reputation:
1
I’ve spent hours on this one.
I have Kodi on my Android Smart TV and Tablet. Works fine connecting to one of my MyCloud NAS units. Decided to setup a «volume 2» with another MyCloud NAS I have. Keep trying to add it to Kodi and get Error 2: Share Not Available. I have compared both MyCloud devices settings by settings and they are the same. I can see the second MyCloud on my Windows 10 PC, on my Android device with ES Explorer and I can even open files on my tablet to it.
But for the life of me, I cannot get it added to my video streaming in Kodi via SMB. I give it the server name, tried browsing, added the ip address instead, added the shared folder and I get the Error 2: Share Not Available.
What could I be doing wrong? Thank you!

Posts: 13,643
Joined: Nov 2009
Reputation:
647
Klojum
Team-Kodi Member
Posts: 13,643
2018-04-22, 18:04
(This post was last modified: 2018-04-22, 18:05 by Klojum.
Edit Reason: Typos… *sigh*
)
(2018-04-22, 17:56)themusj Wrote: I’ve spent hours on this one.
So do we, explaining to people what changed and why in the latest Kodi stable and nightly builds 
In short, Kodi recently started using SMBv2 instead of the ‘ancient’ SMBv1. The old Samba version simply allowed way too much in all kinds of ways (remember the worldwide WannaCry attack?).
For correct SMBv2 usage, you need a Windows user with full credentials, meaning a password is required.
Also, SMBv2 does not support network browsing. Thus, you will need to use the «Add a network location…» in the Kodi GUI when adding video/music sources.
It is very much possible that your other devices are still using/supporting the SMBv1 protocol. Kodi decided to take the more secure step in SMB networking.
![]()
Posts: 188
Joined: Dec 2017
Reputation:
1
I can appreciate your frustration with users asking the same questions or being ignorant. [I work full time in IT and see this everyday. I have to remember why I am there and they are my ‘ministry’ so to speak.] I did spend several hours looking even on this site and just didn’t find the information. Obviously I missed it.
I was back on this post ironically to say I got it to work just now. But the only thing I did was change the share name and device name. Go figure. Didn’t have to enter any credentials or make any other changes.
I do appreciate your quick response!
Posts: 13,643
Joined: Nov 2009
Reputation:
647
Klojum
Team-Kodi Member
Posts: 13,643
(2018-04-22, 18:10)themusj Wrote: Didn’t have to enter any credentials or make any other changes.
Then you are probably still on a SMBv1 network. The walls have ears/eyes… 
![]()
Posts: 293
Joined: Dec 2015
Reputation:
6
![]()
mazey
Senior Member
Posts: 293
2018-04-23, 02:26
(This post was last modified: 2018-04-23, 02:27 by mazey.)
is 17.6 on android running smb2 because for awhile network share browsing comes up empty have to add manually which is fine. im sharing from a windows 10 pro updated machine. so i guess its using smb2?
it would be nice if it showed the smb version in kodi information in the network tab so we didnt need to guess.
![]()
Rechi
Team-Kodi Member
Posts: 785
Joined: Feb 2015
Reputation:
38
![]()
Rechi
Team-Kodi Member
Posts: 785
Kodi 17.6 (and lower) on android has only support for SMBv1.
![]()
Posts: 1
Joined: Feb 2020
Reputation:
0
![]()
2020-02-14, 12:03
(This post was last modified: 2020-02-14, 13:44 by Klojum.)
(2018-04-22, 17:56)themusj Wrote: I’ve spent hours on this one.
I have Kodi on my Android Smart TV and Tablet. Works fine connecting to one of my MyCloud NAS units. Decided to setup a «volume 2» with another MyCloud NAS I have. Keep trying to add it to Kodi and get Error 2: Share Not Available. I have compared both MyCloud devices settings by settings and they are the same. I can see the second MyCloud on my Windows 10 PC, on my Android device with ES Explorer and I can even open files on my tablet to it.
But for the life of me, I cannot get it added to my video streaming in Kodi via SMB. I give it the server name, tried browsing, added the ip address instead, added the shared folder and I get the Error 2: Share Not Available.
What could I be doing wrong? Thank you!
USE THIS
Add source
smb:// now up address /
Pick name for server — done
So, add source
smb://ip-address/ *IP address removed by moderator*
Video Store
Done
Your welcome, all these convoluted explanations, just tell me the steps and stop yammering on. Spent hours trying to read all these forums with no luck, figured it out myself.
Doinkmiester our
Posts: 13,643
Joined: Nov 2009
Reputation:
647
Klojum
Team-Kodi Member
Posts: 13,643
(2020-02-14, 12:03)Doinkmiester Wrote: USE THIS
Why are you starting your first post in an almost 2 yr old thread, and mentioning an IP address that leads to nowhere…
(2020-02-14, 12:03)Doinkmiester Wrote: Your welcome, all these convoluted explanations, just tell me the steps and stop yammering on.
Hmmm… Tell Microsoft to do just that when bringing up network connectivity. It would save us a lot of time and effort as well.
![]()
Posts: 160
Joined: May 2015
Reputation:
7
2020-02-14, 15:02
(This post was last modified: 2020-02-14, 15:02 by Schrotty.)
The latest KODi 19 builds have smb share issues too. The build from 25.01.2020 is working, after this no connections.
Log https://paste.kodi.tv/winuxikeja.kodi or https://pastebin.com/MrRaWF49
![]()
Posts: 1
Joined: May 2020
Reputation:
0
![]()
Thank you very much your answer was so easy to follow and worked first time after weeks of following other leads
Thanks once again
Posts: 13,643
Joined: Nov 2009
Reputation:
647
Klojum
Team-Kodi Member
Posts: 13,643
(2020-05-04, 12:46)mangoose Wrote: Thank you very much your answer was so easy to follow
Useless quoting of posts is not appreciated.
Also this being your first posts, which is also based on nothing (the post you quoted contained no useful info whatsoever), will keep you on our radar for the time being.
![]()
Posts: 1
Joined: Jul 2020
Reputation:
0
![]()
I have also spent a lot of time on this one…
Here is what worked for me :
You need to have a windows10 with a Microsoft account on the server side. The account has to be allowed on the shared folder you want to access.
Then back to kodi : enter the name of the computer, the name of the folder, and then for the user , here is the trick : if your email is something like «[email protected]», use «nicol» for the username. To be sure check on the windows 10 user folder, the exact name that has been used for the folder. It should work.
![]()
Posts: 1
Joined: Aug 2020
Reputation:
0
![]()
Hello everybody,
it is my first post and my first time with Kodi. I cannot connect from an Android smartphone (Samsung J5) over a wifi network to reach a shared Windows10Pro music folder. Instead to open a new thread, I try to add to this one: I also have the same error «Error 2: Share Not Available». Kodi app for Android v18.7.
I did not understand any of the previous suggestions in this thread and I would appreciate a clear explanation, if there is a solution to the issue. Anyone could help? Many thanks!
matteo
![]()
Posts: 1
Joined: Mar 2017
Reputation:
0
![]()
Im also getting this error. Does the user need to be an administrator on the windows machine?
![]()
Posts: 188
Joined: Dec 2017
Reputation:
1
(2021-01-24, 22:26)Matthew Horton Wrote: Im also getting this error. Does the user need to be an administrator on the windows machine?
I found the best solution to go to File Manager and add the source there first. Once it is recognized there, it seems to be able to be added as a source under Videos with no real issues.

Kodi is open-source software that is available free of cost and is made for home entertainment purposes. Being one of the oldest software to exist for sharing files across devices, it has made an entire crowd of users and developers who prefer using this software.
Sometimes, you may come across Error 2 on the screen while using this software due to which you will be unable to share or access any files on devices connected.
In this article, we will list down every method to fix this Kodi Error 2 for you to fix this issue with ease and not have to fret over it time and again if you come across the error in the future.
What Causes the Kodi Error 2 Share Not Available Issue?
Before we dive deep into the solution part of the article, we must figure out why this Kodi error 2 shows up on the screen.
The two reasons we could find were the network connectivity fault and failure in account permissions to the software.
If you haven’t given the appropriate permissions to Kodi then you may find the error of Kodi smb not working popping on your screen now and then.
The network misconnection may also be one good reason why your software may be displaying that message so you may want to check with your network provider once.
Now that we know about the basic reasons behind Kodi SMB share not working, we have listed down 5 different methods to fix this issue.
Fixing Kodi Error 2 Share Not Available issue:
Solution 1: Checking Account Permissions
Resetting the account permissions for some devices may fix the error of Kodi SMB share not working. At times, the devices may not receive the correct permissions required to run some software and programs thus resulting in the error appearing.
To check for the account permissions, follow the steps listed down:
- Navigate the shared folder that has access to both the devices connected.
- Click on settings.
- Go to the permission settings and enable the permissions if they are not given to the devices.
- Now run the program again to check whether the Kodi Error 2 is still visible on the screen or not.
Solution 2: Try Restarting
Giving a reboot to your software will remove any bug or error that it may be facing so this method will fix any inlaid problem to make your Kodi run error-free again.
To do this, follow the steps given ahead:
- Navigate to the power button on your device.
- Click on the power off option.
- Unplug your device and wait for 5-10 minutes.
- Plug your device back in and give a restart to your system
Solution 3: Sign Out Of Your Kodi Account
Trying out this method may be a good option if the previous two have failed to work. Logging into your Kodi account may give you a chance for your system to fix the Kodi Error 2 on your software.
The steps to be followed are extremely easy to be followed through:
- Go to the Kodi account from the device where you are facing the error 2 issues.
- Select settings.
- Click on log out.
- Now log back in using your ID and password.
Solution 4: Check the Network Connection
The Kodi software generally requires the device in which your media files are kept and your access device to have the same network connection to share files cross-platform.
Now if you have some issues with your network connection, chances are you may be greeted with the Kodi SMB not working error on your screen.
The changes in your network connection may be a result of your security system so we recommend you check whether both the devices are connected to the same network or not.
Solution 5: Add SMB to Kodi
This last method is quite effective to fix the problem of Kodi SMB shares not being available. If your device lacks SMB connectivity then you can manually add it to your Kodi software.
To do this, follow the guide given below:
- Go to settings.
- Select the browse for new shares option and from the list click on the add network location option.
- From the add network option, click on the Windows SMB protocol option and select the server name.
- Type in the device name in the Type In the Network Address Of Your Server section and you have successfully added the SMB to your device.
Now you can give a restart to your device and check for the Kodi error 2 problems persisting or not.
Conclusion
In this article, we have discussed with you the reasons why your device may be showing Kodi error 2 share not available and have listed down all the possible methods to fix the error effectively.
We hope this has been helpful for you and you can share and transfer files with ease between your devices again!
Read:
- How To Install MetalKettle Repository Addon in Kodi Krypton
- [Kodi On Roku Install Update] How to Setup and Install Kodi On Roku TV
- Install Exodus on Kodi 17.4 Krypton / Jarvis

Hi, I am Sumit Bagga, a tech blogger, writer, and SEO. I write troubleshooting guides and product reviews helping readers across the world.
Hello reader! I’m back again with yet another troubleshooting procedure for Kodi. And this time, I’ll cover the Kodi SMB not working error.
Habitual SMB users on Kodi need no explanation about SMB. However, for the benefit of the new SMB users, I’ll glance through SMB for Kodi.
Server Message Block (SMB) or Windows File Sharing is a client-server protocol Windows uses to share resources over a local network. All the Windows PCs are equipped with SMB and a home user can easily set it up. What makes SMB the best network protocol is its versatility. It can be accessed by any operating system to stream content on any Network Attached Storage (NAS) or other external remote hardware.
In the following sections, you will learn:
- How to access local files on Kodi via SMB?
- How to fix the Kodi SMB not working issue?
- Bonus Kodi SMB tips
- SMB alternatives for Kodi
- Frequently Asked Questions About Kodi SMB
How to access local files on Kodi via SMB?
There are two basic ways to add a remote media folder to Kodi via SMB. You need to give the folder containing media files Read/Write permission to add the Source Folder to Kodi.
Note: SMB v1 is no longer supported on Kodi. Make sure you are using SMB v2 or higher.
SMB v1 had security issues on Windows and was thus slashed off Windows. The only available option to access shares was to input the IP address or the device name with the path.
To enable browsing SMB shares again, Kodi v19.1 implemented the WS-Discovery protocol (a multicast delivery protocol to access files on a local network). Follow these steps to add a share to Kodi with Windows Network (SMB).
Step 1:
Go to Settings and select File manager
Step 2:
Select Browse source
Step 3:
Select Browse for new shares
Step 4:
From the list of options, choose Windows Network (SMB)
Step 5:
Now, navigate to the source folder path and select it
Step 6:
Hit OK to add the folder to Kodi
If the Windows Network (SMB) method doesn’t work for you, try adding the source folder with the device’s IP address or name. Here’s how to do it!
To add a source folder using the IP address or device name, follow these steps.
Step 1:
Reserve a static IP address for your hardware.
To create a static IP address, add the MAC address of the device to the router’s Reservation list after logging in.
Step 2:
Under Browse for new shares list in Kodi, select Add network location
Step 3:
In the Add network location window, set the protocol to Windows Network (SMB)
Step 4:
Select Server name and input the reserved static IP address of the hardware or the device name (use any one of the two methods)
Step 5:
In the Shared folder field, type in the name of the folder you would like to add as it is saved in the device along with the drive location letter (for IP address method) or just type in the folder name without drive location letter (for device name method)
Step 6:
Type in the username and password if prompted in the same window
Step 7:
Hit OK to complete adding the source media folder
Your share will appear in the Browse for new shares list. Depending on the method you used, you would either see the IP address or the device name for the share.
Before we get started with troubleshooting, make sure you are using SMBv2 or higher. These steps might help you fix the SMB not working error on Kodi 19.
Step 1:
Open Kodi on your PC and go to Settings
Step 2:
Go to Services
Step 3:
On the left pane, select SMB client. If you don’t see the SMB client option on the left pane, make sure you have enabled the Expert settings.
Step 4:
Under SMB client, set the Minimum protocol version to SMB v1 if it is set as None or other
Step 5:
Check the Maximum protocol version and change it to SMB v3. Some Kodi users suggest using SMBv1 for maximum requirement but it is considered to be not as secure as the SMBv3.
Step 6:
Go back to the Library to update the share path
Step 7:
Select a media type and go to files
Step 8:
If you have an existing path in the selected media type, click and hold and select Edit source. Otherwise, select the Add [media type] option
Step 9:
In the Add [media type source] window, click on Browse
Step 10:
If you have the shares added to Kodi, select one. Otherwise, go to Add network location.
Step 11:
Follow the above steps to add a share using the IP address or device name. Make sure to use the same username and password as that of your computer.
This will resolve the ‘Operation not permitted’ error and SMB will be up and running on Kodi in no time. You can now easily access old SMB network locations with the set username and password.
Bonus Kodi SMB Tips
If the above troubleshooting method doesn’t fix the Kodi SMB not working issue, try these fixes.
- Turn on the Use legacy security option under SMB client and restart the system and check the folder you are looking for.
- Change the WINS server under SMB client to the same IP address as your router and retry
- If all the above methods fail, downgrade to Kodi v18. Go to Settings > File manager > Add source > Windows Network (SMB) > WORKGROUP. Under WORKGROUP, you’ll see all the SMB compliant devices connected to your network. Select a device and add the share. You might have to compromise on the new features though.
If you are an avid Kodi streamer, you might want to check out the Best Kodi tips.
SMB alternatives
SMB has been the standard client-server protocol on Windows and DOS since 1992. However, there are quite a few SMB alternatives you might want to consider to enable sharing local files to Kodi. Check them out!
Univention Corporate Server
UCS is an integrated identity and infrastructure management system used to administer users and applications. It is compatible with Windows, Mac OS X, and Linux. It uses Extensive Directory functions to allow integration in Windows.
NQE
NQE is one of the best embedded implementations of the SMB protocol. It is also known as Common Internet File System (CIFS) which is a network file system protocol for providing shared access to files and printers between devices on the same network. With the help of CIFS, you can edit, add, and remove files from the Kodi library.
FAQs
To add a share on Kodi, go to Settings > File manager > Browse source > Browse for new shares > Windows Network (SMB). Finally, navigate to the folder path and hit OK.
Which is better: SMB or NFS?
SMB and NFS are network protocols used to access files over a network. With NFS, every user on an authenticated system can access a specific share as it uses the host-based authentication system. This is not possible with SMB as it uses user-based authentication, by which it is possible to separate multiple users from a single authenticated machine and enable file and printer sharing to all users at once. SMB is the ideal solution for Windows servers, whereas unencrypted NFS is the first-choice protocol for the Linux OS.
Does Windows 10 use SMB?
Currently, SMBv1, SMBv2, and SMBv3 work with Windows. However, the configuration requirements might vary from server to server.
Fix ‘Kodi SMB not working’ error
SMB not working has been a pressing issue on Kodi recently, especially after the release of Kodi 19. Kodi 18 didn’t have any issues with SMB but a lot of Kodi 19 users had trouble with using Kodi for folder share.
The above troubleshooting method should help you fix this burning issue. If not, contact Kodi support. Let us know in the comments section down below if this method worked for you.
-
Partition Wizard
-
Partition Magic
- Quick Fix the Kodi Couldn’t Connect to Network Server Error
By Amy | Follow |
Last Updated March 08, 2021
Recently, Kodi couldn’t connect to network server error is heatedly discussed. Many people wonder why the error occurs and how to fix it. Today, MiniTool would focus on this error and provide you with several solutions.
Fix 1: Check the Internet Connection
As the error message “This could be due to the network not being connected” indicates, the “couldn’t connect to network server” error might occur due to the connection of Internet. Hence, you should check if there is something go wrong with your Internet connection when encountering the error.
Tip: No matter you use a Fire TV/Stick, Android TV Box, or computer, they must be connected to Kodi via Wi-Fi.
To check the errors with network configuration, you can run Windows Network Diagnostics utility. During the running process, it troubleshoots issues and detect errors.
Recommended reading: Easily Fix Windows Was Unable to Connect to This Network Error
Fix 2: Utilize VPN
If you don’t utilize VPN is likely that your Internet Service Provider (ISP), government, or app developer access your activity and block your traffic directed to the specific IP address. Based on that, you are recommended to utilize a VPN to avoid the Kodi couldn’t connect to network server error.
Fix 3: Check the Running Status of the Source
If you add the URL but it doesn’t work properly, it might result in Kodi unable to connect to the network server error. Besides, Kodi will keep changing URLs when a domain is shot down. Hence, you need to know the new URL for the add-ons you want to install.
You are able to check the status of URL by searching the link in a web browser. If it works properly, you can see a page containing the add-on. On the contrary, if it is closed or down, you will see a page containing an error message.
Fix 4: Update Add-ons
The outdated Kodi version is also responsible for the Kodi couldn’t connect to network server firestick error. Though Kodi can update itself automatically in most cases, it sometimes may have errors. Given to that fact, you should check the updates manually.
Step 1: Launch Kodi to access its main interface and then click Add-ons.
Step 2: In the expanded menu, click My add-ons to continue.
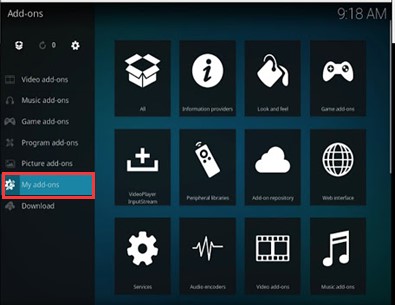
Step 3: Click the Check for Updates option. Then Kodi will install the latest version automatically.
Step 4: After installation, restart Kodi.
Fix 5: Reinstall Kodi
If the “couldn’t connect to network server Kodi” error still persists after executing the above fixes, try reinstalling Kodi. This method is simple and effective. Firstly, uninstall Kodi and delete all files of Kodi. Usually, you can find it in C:UsersfredeAppDataRoamingKodi. After uninstallation, restart your computer. Then, click here to download and install Kodi. Finally, run Kodi to see if the error is solved completely.
Are you still looking for methods for the Kodi couldn’t connect to network server error? Here are 5 available fixes. All of them are easy to operate. You can try them one by one until the error is fixed successfully.
About The Author

Position: Columnist
Having writing articles about computer tech for a long time, I am rather experienced especially on the aspect of computer optimization, PC enhancement, as well as tech terms explanation. The habit of looking through tech forums makes me a great computer issues collector. And then, many articles related to these issues are released, which benefit plenty of users. Professional, effective, and innovative are always the pursuit of an editing worker.
-
Partition Wizard
-
Partition Magic
- Quick Fix the Kodi Couldn’t Connect to Network Server Error
By Amy | Follow |
Last Updated March 08, 2021
Recently, Kodi couldn’t connect to network server error is heatedly discussed. Many people wonder why the error occurs and how to fix it. Today, MiniTool would focus on this error and provide you with several solutions.
Fix 1: Check the Internet Connection
As the error message “This could be due to the network not being connected” indicates, the “couldn’t connect to network server” error might occur due to the connection of Internet. Hence, you should check if there is something go wrong with your Internet connection when encountering the error.
Tip: No matter you use a Fire TV/Stick, Android TV Box, or computer, they must be connected to Kodi via Wi-Fi.
To check the errors with network configuration, you can run Windows Network Diagnostics utility. During the running process, it troubleshoots issues and detect errors.
Recommended reading: Easily Fix Windows Was Unable to Connect to This Network Error
Fix 2: Utilize VPN
If you don’t utilize VPN is likely that your Internet Service Provider (ISP), government, or app developer access your activity and block your traffic directed to the specific IP address. Based on that, you are recommended to utilize a VPN to avoid the Kodi couldn’t connect to network server error.
Fix 3: Check the Running Status of the Source
If you add the URL but it doesn’t work properly, it might result in Kodi unable to connect to the network server error. Besides, Kodi will keep changing URLs when a domain is shot down. Hence, you need to know the new URL for the add-ons you want to install.
You are able to check the status of URL by searching the link in a web browser. If it works properly, you can see a page containing the add-on. On the contrary, if it is closed or down, you will see a page containing an error message.
Fix 4: Update Add-ons
The outdated Kodi version is also responsible for the Kodi couldn’t connect to network server firestick error. Though Kodi can update itself automatically in most cases, it sometimes may have errors. Given to that fact, you should check the updates manually.
Step 1: Launch Kodi to access its main interface and then click Add-ons.
Step 2: In the expanded menu, click My add-ons to continue.
Step 3: Click the Check for Updates option. Then Kodi will install the latest version automatically.
Step 4: After installation, restart Kodi.
Fix 5: Reinstall Kodi
If the “couldn’t connect to network server Kodi” error still persists after executing the above fixes, try reinstalling Kodi. This method is simple and effective. Firstly, uninstall Kodi and delete all files of Kodi. Usually, you can find it in C:UsersfredeAppDataRoamingKodi. After uninstallation, restart your computer. Then, click here to download and install Kodi. Finally, run Kodi to see if the error is solved completely.
Are you still looking for methods for the Kodi couldn’t connect to network server error? Here are 5 available fixes. All of them are easy to operate. You can try them one by one until the error is fixed successfully.
About The Author
Position: Columnist
Having writing articles about computer tech for a long time, I am rather experienced especially on the aspect of computer optimization, PC enhancement, as well as tech terms explanation. The habit of looking through tech forums makes me a great computer issues collector. And then, many articles related to these issues are released, which benefit plenty of users. Professional, effective, and innovative are always the pursuit of an editing worker.