,
last updated August 29, 2022, in
Contents
- Situation
- Troubleshooting Strategy
- Analysis
- Solutions/Workarounds
- Workaround 1: Elevate
- Workaround 2: Temporarily Assign Write Permissions
This is a quick post on how to troubleshoot situations where you get error 2503 (Called RunScript when not marked in progress) followed by error 2502 (Called InstallFinalize when no install in progress) when trying to install or uninstall software with Windows Installer.
Situation
When you try to install or uninstall an MSI package (thus invoking Windows Installer), you get two errors in the following order:
- Error 2503: Called RunScript when not marked in progress
- Error 2502: Called InstallFinalize when no install in progress
Troubleshooting Strategy
When you search for Windows Installer (MSI) errors 2503 and 2502, you find many articles that mention file system permission issues as the cause. To figure out where exactly permissions could be missing, I created a Process Monitor trace of the system activity and filtered for msiexec.exe errors. This is what I got:
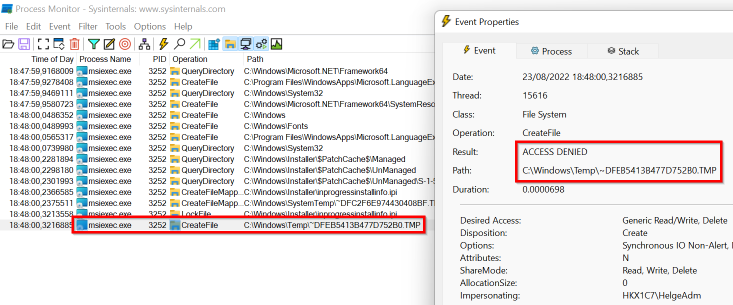
Analysis
Windows Installer (msiexec.exe) tries to create a TMP file in C:WindowsTemp, which fails with Access denied. The reason for the failure is that it tries to create the file while non-elevated, in other words, with standard user permissions. Standard users don’t have write permissions in C:WindowsTemp by default, though.
Solutions/Workarounds
In my case, I believe the root cause was an issue with the MSI package, which needs to be fixed by the software vendor that authored it. There are, however, workarounds:
Workaround 1: Elevate
Don’t rely on the installer to elevate at the right point in time. Start the installer with elevated rights yourself, e.g., from an elevated command prompt.
Workaround 2: Temporarily Assign Write Permissions
Temporarily assign write permissions to C:WindowsTemp. This is easy with my free tool SetACL Studio.
Tip: don’t modify an existing ACE (permissions entry), e.g., for the group Users. Instead, add a new ACE for your user account. This makes it easier to reverse your changes afterwards.
About the Author
Helge Klein (ex CTP, MVP and vExpert) worked as a consultant and developer before founding vast limits, the uberAgent company. Helge applied his extensive knowledge in IT infrastructure projects and architected the user profile management product whose successor is now available as Citrix Profile Management. Helge is the author of the popular tools Delprof2 and SetACL. He has presented at Citrix Synergy, BriForum, E2EVC, Splunk .conf and many other events. Helge is very active in the IT community and has co-founded Virtualization Community NRW (VCNRW).
Read more
| Номер ошибки: | Ошибка 2503 | |
| Название ошибки: | Error 2503 called RunScript when not work in progress | |
| Описание ошибки: | Error 2503 called RunScript when not work in progress. the error code occurs when trying to install or update Adobe Reader. | |
| Разработчик: | Adobe Systems Inc. | |
| Программное обеспечение: | Adobe Acrobat | |
| Относится к: | Windows XP, Vista, 7, 8, 10, 11 |
Обзор «Error 2503 called RunScript when not work in progress»
Как правило, специалисты по ПК называют «Error 2503 called RunScript when not work in progress» как тип «ошибки времени выполнения». Разработчики, такие как Adobe Systems Inc., обычно проходят через несколько контрольных точек перед запуском программного обеспечения, такого как Adobe Acrobat. Тем не менее, возможно, что иногда ошибки, такие как ошибка 2503, не устранены, даже на этом этапе.
Некоторые пользователи могут столкнуться с сообщением «Error 2503 called RunScript when not work in progress. the error code occurs when trying to install or update Adobe Reader.» при использовании Adobe Acrobat. Во время возникновения ошибки 2503 конечный пользователь может сообщить о проблеме в Adobe Systems Inc.. Затем они исправляют дефектные области кода и сделают обновление доступным для загрузки. Таким образом, когда ваш компьютер выполняет обновления, как это, это, как правило, чтобы исправить проблемы ошибки 2503 и другие ошибки внутри Adobe Acrobat.
Почему происходит ошибка времени выполнения 2503?
Сбой устройства или Adobe Acrobat обычно может проявляться с «Error 2503 called RunScript when not work in progress» в качестве проблемы во время выполнения. Вот три наиболее заметные причины ошибки ошибки 2503 во время выполнения происходят:
Ошибка 2503 Crash — это типичная ошибка «Error 2503 called RunScript when not work in progress», которая приводит к полному завершению работы программы. Когда Adobe Acrobat не может обеспечить достаточный вывод для данного ввода или действительно не знает, что выводить, он часто путает систему таким образом.
Утечка памяти «Error 2503 called RunScript when not work in progress» — при утечке памяти Adobe Acrobat это может привести к медленной работе устройства из-за нехватки системных ресурсов. Потенциальным фактором ошибки является код Adobe Systems Inc., так как ошибка предотвращает завершение программы.
Ошибка 2503 Logic Error — логическая ошибка возникает, когда компьютер генерирует неправильный вывод, даже если пользователь предоставляет правильный ввод. Это происходит, когда исходный код Adobe Systems Inc. вызывает недостаток в обработке информации.
Как правило, ошибки Error 2503 called RunScript when not work in progress вызваны повреждением или отсутствием файла связанного Adobe Acrobat, а иногда — заражением вредоносным ПО. Большую часть проблем, связанных с данными файлами, можно решить посредством скачивания и установки последней версии файла Adobe Systems Inc.. В качестве дополнительного шага по устранению неполадок мы настоятельно рекомендуем очистить все пути к неверным файлам и ссылки на расширения файлов Adobe Systems Inc., которые могут способствовать возникновению такого рода ошибок, связанных с Error 2503 called RunScript when not work in progress.
Классические проблемы Error 2503 called RunScript when not work in progress
Частичный список ошибок Error 2503 called RunScript when not work in progress Adobe Acrobat:
- «Ошибка в приложении: Error 2503 called RunScript when not work in progress»
- «Недопустимая программа Win32: Error 2503 called RunScript when not work in progress»
- «Error 2503 called RunScript when not work in progress должен быть закрыт. «
- «Не удается найти Error 2503 called RunScript when not work in progress»
- «Error 2503 called RunScript when not work in progress не найден.»
- «Проблема при запуске приложения: Error 2503 called RunScript when not work in progress. «
- «Файл Error 2503 called RunScript when not work in progress не запущен.»
- «Ошибка Error 2503 called RunScript when not work in progress. «
- «Ошибка пути программного обеспечения: Error 2503 called RunScript when not work in progress. «
Проблемы Adobe Acrobat Error 2503 called RunScript when not work in progress возникают при установке, во время работы программного обеспечения, связанного с Error 2503 called RunScript when not work in progress, во время завершения работы или запуска или менее вероятно во время обновления операционной системы. Документирование проблем Error 2503 called RunScript when not work in progress в Adobe Acrobat является ключевым для определения причины проблем с электронной Windows и сообщения о них в Adobe Systems Inc..
Корень проблем Error 2503 called RunScript when not work in progress
Проблемы Error 2503 called RunScript when not work in progress вызваны поврежденным или отсутствующим Error 2503 called RunScript when not work in progress, недопустимыми ключами реестра, связанными с Adobe Acrobat, или вредоносным ПО.
Точнее, ошибки Error 2503 called RunScript when not work in progress, созданные из:
- Недопустимый Error 2503 called RunScript when not work in progress или поврежденный раздел реестра.
- Зазаражение вредоносными программами повредил файл Error 2503 called RunScript when not work in progress.
- Другая программа (не связанная с Adobe Acrobat) удалила Error 2503 called RunScript when not work in progress злонамеренно или по ошибке.
- Другое приложение, конфликтующее с Error 2503 called RunScript when not work in progress или другими общими ссылками.
- Поврежденная установка или загрузка Adobe Acrobat (Error 2503 called RunScript when not work in progress).
Продукт Solvusoft
Загрузка
WinThruster 2022 — Проверьте свой компьютер на наличие ошибок.
Совместима с Windows 2000, XP, Vista, 7, 8, 10 и 11
Установить необязательные продукты — WinThruster (Solvusoft) | Лицензия | Политика защиты личных сведений | Условия | Удаление
-
Проблема
-
Решение 1 (удаление)
-
Решение 2 (Установка и Удаление)
-
Решение 3 (взятое из комментариев, оставленное пользователем «Дмитрий»)
-
4 решение, на видео Youtube
-
5 решение
-
Пожалуйста, оставьте свой голос
Проблема
При попытке установить или удалить программу на Windows, вы можете получить следующие ошибки:
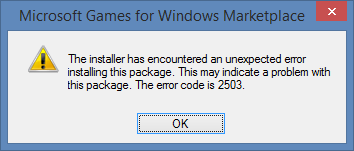
- Программа установки обнаружила непредвиденную ошибку при установке данного пакета. Это может указывать на проблему с этим пакетом.Код ошибки 2503.
- Программа установки обнаружила непредвиденную ошибку при установке данного пакета. Это может указывать на проблему с этим пакетом.Код ошибки 2502.
- Вызывается RunScript.
- Вызывается InstallFinalize.
Ошибки выявились с установкой Microsoft Games For Windows Live (GfWL), XSplit Broadcaster, VirtualBOX, ESET Smart security, но устанавливаются другие программы
к содержанию ↑
Решение 1 (удаление)
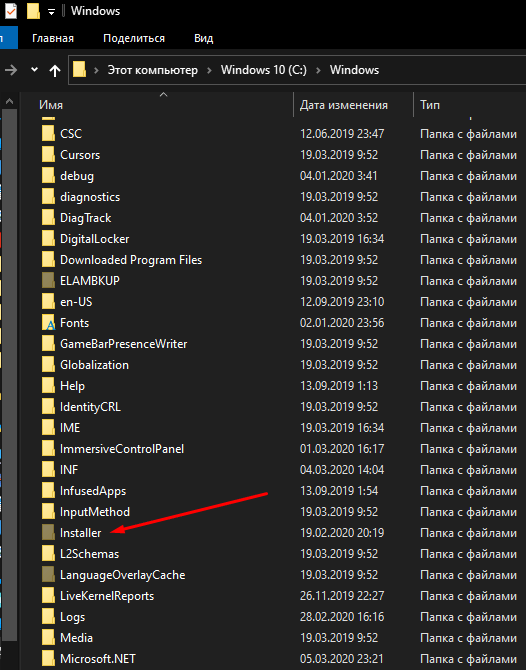
Для того чтобы удалить программу с этой проблемой, необходимо определить MSI-файл, который он использует.
- Нажмите Виндовс клавишу + R и откроется окошко «Выполнить».
- Введите C:WindowsInstaller и нажмите «ОК».

- Правым щелкчком Вид -> Таблица.

- Плитка отобразила колонки. Щелкните правой кнопкой мыши в любом месте на панели столбцов и нажмите «Подробнее»

- В списке найдите «тема». Нажмите «ОК».

- Щелкните на тему, чтобы отсортировать все в алфавитном порядке. Вы должны определить, какой файл является правильным.

- Откройте командную строку от имени администратора.
- Введите C:WindowsInstaller за которым следует имя файла программы, которую вы хотите удалить и “.msi”.
Например, файл 54c55 выведем так: C:WindowsInstaller54c55.msi
- Удаление программ успешно выполнит свою задачу. Вы можете закрыть окно командной строки
к содержанию ↑
Решение 2 (Установка и Удаление)
- Удерживайте Ctrl+Alt и нажмите Esc.
- Найдите “Windows Explorer” в “Процессах”, и правой клавишей завершите задачу.

- Сейчас нажмите «Новая задача» и запустите новую задачу.
- Введите “explorer.exe” без кавычек и отметьте флажок “Создать с привилегиями администратора”, затем нажмите “OK”.
Теперь вы должны свободно устанавливать/удалять, не получая ошибку.
к содержанию ↑
Решение 3 (взятое из комментариев, оставленное пользователем «Дмитрий»)
Ошибки 2502 и 2503 также можно решить добавлением прав группе «Все» полных привилегий на папку C:WindowsTEMP.
Есть другое решение если данное не помогло для Windows 10:
- Пройдите по пути C:Windows
- Найдите папку TEMP, нажмите ПКМ и выберите Свойства
- Откроется окно Свойства: TEMP , выберите вкладку Безопасность
- В списке «Группы и пользователи» по умолчанию отсутствует группа Все, надо ее добавить, чтобы данная ошибка исчезла.
- Нажмите Изменить
- Откроется окно Разрешения для группы TEMP , нажмем на кнопку Добавить
- Откроется окно Выбор: Пользователи или Группы , нажимаем на кнопку Дополнительно…
- Нажимаем на кнопку Поиск и в результатах поиска ищем в таблице пункт Все, выберите его, нажмите ОК
- Нажмите ОК
- Группа Все добавилась в список окна Разрешения для группы TEMP, выделите Все и ниже Разрешения для группы «Все» выберите флажки Полный доступ , все флажки из списка станут активны
- Нажмите ОК, окно закроется
- Нажмите ОК в окне Свойства: TEMP
к содержанию ↑
4 решение, на видео Youtube
5 решение
Один из комментаторов этого поста не смог решить ни одним из вышеприведенных способом. В его случае понадобилось сбросить Windows 10 («Вернуть компьютер в исходное состояние»)
Пожалуйста, оставьте свой голос
Плагин рейтинга создан автором этого блога. Буду очень признателен, если вы сможете его поддержать (ссылка)
p.s. Если статья была полезной и вас переполняет чувство благодарности, можете поддержать меня долларом на патреоне
Об авторе
Web Developer. I have expirience in FrontEnd, Backend, Devops.
PHP, Python, Javascript (Vue.js, React.js)
Смотреть посты
Иногда при взаимодействии с установщиками в Windows 10 могут появляться ошибки. Чаще всего встречаются коды 2503 и 2502. Причем это происходит как в моменты установки, так и при удалении. Я расскажу о причинах появления подобного рода проблемы и опишу несколько способов ее устранения.
В основном, причин возникновения ошибок с кодами 2502 и 2503 всего несколько, и они могут быть следующими:
- программа установлена в систему неправильно;
- инсталлятор загружен не до конца;
- скачан неправильный установщик.
Способы устранения проблемы
Определить причину появления ошибки с кодами 2503 и 2502 достаточно трудно. По этой причине при ее устранении рекомендую придерживаться следующей последовательности.
Изменение правил доступа к папке Temp
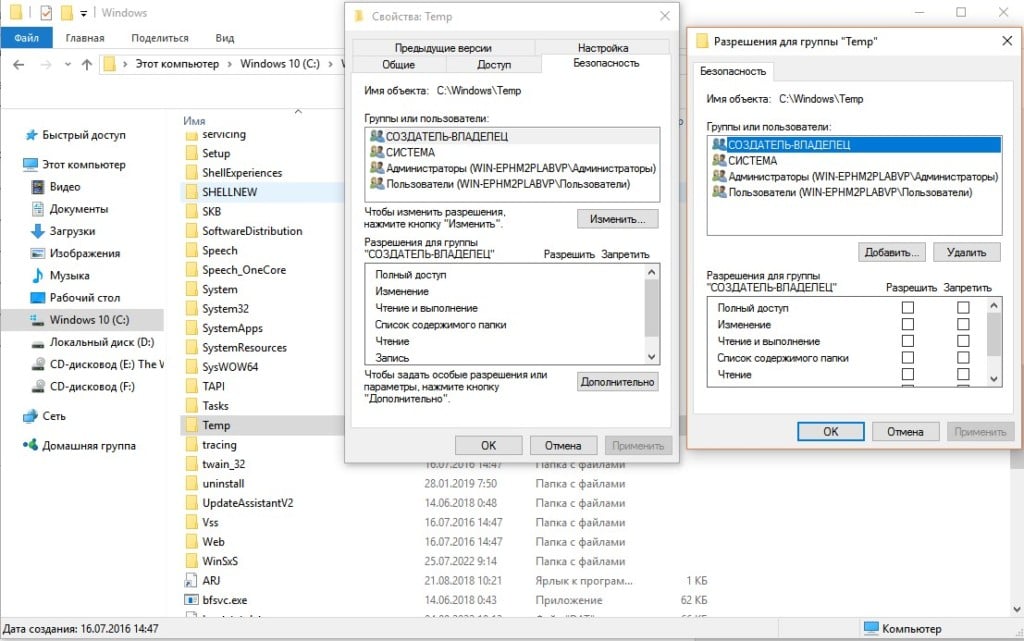
Возможно, дело кроется в отсутствии доступа программы к конкретной необходимой папке, в данном случае к папке Temp. Для решения мне понадобится сначала перейти к ней, введя в адресной строке C:WindowsTemp. Система может вывести уведомление, что постоянного доступа у меня к ней нет, тут нужно просто нажать на кнопку «Продолжить» с правами администратора. Можно даже не открывать ее, а нажать по иконке правой кнопкой мыши и выбрать в контекстном меню пункт «Свойства».
Открываю «Свойства» папки Temp для изменения доступа к ней
В новом открывшемся окне открываю вкладку «Безопасность». В списке «Группы и пользователи» выбираю первый пункт, это «СОЗДАТЕЛЬ-ВЛАДЕЛЕЦ», затем жму на кнопку «Изменить».

Выбираю пункт «СОЗДАТЕЛЬ-ВЛАДЕЛЕЦ» и приступаю к изменению прав доступа
Откроется еще одно окно. В разделе «Разрешения для группы «СОЗДАТЕЛЬ-ВЛАДЕЛЕЦ»» напротив пункта «Полный доступ» ставлю галочку на столбце «Разрешить». Затем принимаю изменения нажатием на кнопку ОК, то же самое делаю в окне «Свойства» и перезагружаю систему.
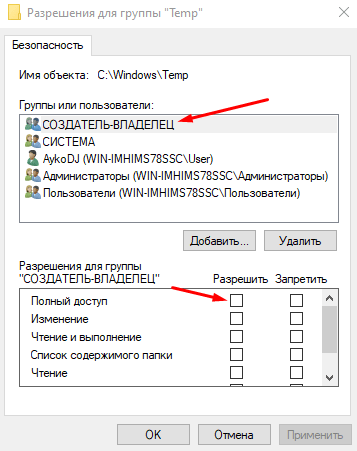
Ниже есть список разрешений, которые я могу предоставить. Открываю полный доступ к папке и принимаю изменения
![]() Загрузка …
Загрузка …
Перезапуск процесса Windows Explorer
Для проведения данной процедуры мне понадобится открыть «Диспетчер задач» нажатием на комбинацию Ctrl + Shift + Esc. Во вкладке «Процессы» нахожу пункт «Windows Explorer», жму по нему правой кнопкой мыши для вызова контекстного меню, а там уже выбираю пункт «Снять задачу».
В результате процесс отключится, заново запустить его я смогу через окно «Выполнить». Вызываю его нажатием на сочетание клавиш Win + I, в поле «Открыть» ввожу запрос explorer.exe и жму на кнопку ОК.
![]() Загрузка …
Загрузка …
Создание папки Installer
Этот способ подойдет в случае, если подобной папки в директории C:Windows вдруг не окажется. Сделать это очень просто – открываю «Проводник Windows» и перехожу по указанному пути. Кликаю правой кнопкой мыши по любому свободному пространству, вызвав тем самым контекстное меню. В списке открываю меню «Создать», там уже выбираю пункт «Папку». Даю ей название «Installer», сохраняю изменения и перезагружаю компьютер. Пробую снова удалить или установить приложения, должно получиться.
Обращаю внимание! Обычно эта папка скрыта от глаз пользователей. Не нужно спешить создавать ее заново, сначала рекомендую включить отображение скрытых защищенных файлов системы и проверить, есть ли она в списке.
Эта папка просто так не отображается. Прежде чем заново создавать ее, лучше включить отображение скрытых защищенных файлов системы и проверить, есть ли она
![]() Загрузка …
Загрузка …
Предоставление доступа к папке Installer
Этот способ в точности похож на один из вышеуказанных, только в этот раз надо настроить доступ к папке «Installer». Делаю абсолютно то же самое – открываю «Свойства», перехожу во вкладку «Безопасность», выбираю пункт «СОЗДАТЕЛЬ-ВЛАДЕЛЕЦ» и предоставляю полный доступ.
![]() Загрузка …
Загрузка …
Удаление установщика в папке Installer
Если проблема происходит с конкретным приложением, а в остальном все нормально, можно удалить его установщик из папки Installer. Но так как там все файлы пронумерованы, определить принадлежность к нужному ПО можно так – в список параметров сортировки добавить пункт «Тема».
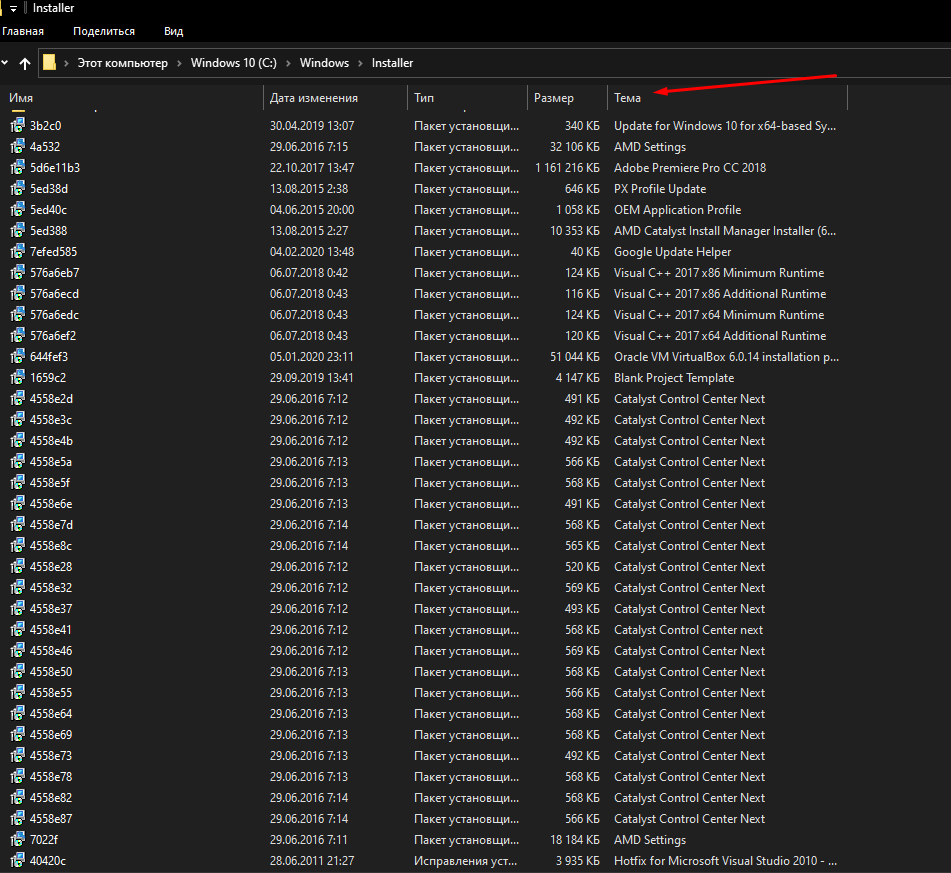
С помощью этого параметра я точно узнаю, какое приложение стоит за определенным дистрибутивом
![]() Загрузка …
Загрузка …
Запуск установщика через «Командную строку» с правами администратора
Тут для начала понадобится выяснить правильное название установщика. Я описывала выше, как это сделать – добавляю в параметры сортировки «Тема», нахожу нужное приложение и копирую наименование.
С правами администратора нужно открыть именно «Командную строку». Сделать это можно через поисковик в панели задач, введя в нем соответствующий запрос.
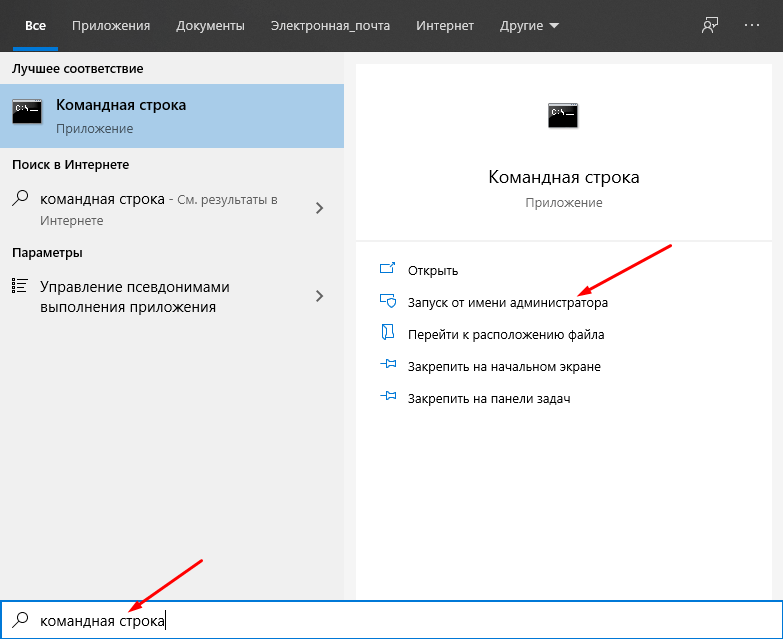
Командную строку обязательно открываю от имени администратора, чтобы установщик точно запустился
В активной строке ввожу путь к нужной папке и название приложения с указанием формата. Выглядеть это будет примерно вот таким образом:
C:WindowsInstaller644fef3.msi
Код будет отличаться, лучше быть внимательнее в этом случае. После этого попробую заново установить или удалить проблемную программу.
![]() Загрузка …
Загрузка …
Заключение
Исправить ошибку с кодами 2503 и 2502 можно с помощью встроенных в систему средств. Для этого может быть достаточно просто перезагрузить приложение, запускающее установщики. Или же понадобится открыть доступ к некоторым важным папкам. В любом случае до радикальных методов, типа восстановления, отката или переустановки Windows, дело не должно дойти.
![]() Загрузка …
Загрузка …
Post Views: 13 934

Fix Error 2502 and 2503 while installing or uninstalling: Well, if you are getting error 2502/2503 internal error when trying to install a new program or uninstalling an existing program then you are at the right place as today we are going to discuss how to resolve this error. The error 2502 and 2503 while installing or uninstalling a program seems to be caused because of permissions issue with the Temp folder of Windows which can be usually found in C:WindowsTemp.
These are the error you may encounter while installing or uninstalling a program:
- The NSIS installer has encountered an unexpected error installing this package. This may indicate a problem with this package. The error code is 2503.
- The NSIS installer has encountered an unexpected error installing this package. This may indicate a problem with this package. The error code is 2502.
- Called RunScript when not marked in progress
- Called InstallFinalize when no install in progress.

While the issue is not limited to this cause as sometimes virus or malware, incorrect registry, corrupt Windows Installer, incompatible 3rd party programs etc can also cause the error 2502/2503. So without wasting any time let’s see how to actually Fix Error 2502 and 2503 while installing or uninstalling a program in Windows 10 with the help of below-listed troubleshooting guide.
Contents
- Fix Error 2502 and 2503 while installing or uninstalling
- Method 1: Re-register Windows Installer
- Method 2: Run CCleaner and Malwarebytes
- Method 3: Run Installer with Admin rights using Command Prompt
- Method 4: Run Explorer.exe with administrative privileges
- Method 5: Set correct permissions for Windows Installer Folder
- Method 6: Set Correct Permissions for Temp Folder
Make sure to create a restore point just in case something goes wrong.
Pro Tip: Try to run the application by right-clicking and then select Run as Administrator.
Method 1: Re-register Windows Installer
1.Press Windows Key + R then type the following and hit Enter: msiexec /unreg

2.Now again open the run dialog box and type msiexec /regserver and hit Enter.

3.This would re-register the Windows Installer. Reboot your PC to save changes.
Method 2: Run CCleaner and Malwarebytes
Perform a Full antivirus scan to make sure your computer is secure. In addition to this run CCleaner and Malwarebytes Anti-malware.
1.Download and install CCleaner & Malwarebytes.
2.Run Malwarebytes and let it scan your system for harmful files.
3.If malware is found it will automatically remove them.
4.Now run CCleaner and in the “Cleaner” section, under the Windows tab, we suggest checking the following selections to be cleaned:
5.Once you’ve made certain the proper points are checked, simply click Run Cleaner, and let CCleaner run its course.
6.To clean your system further select the Registry tab and ensure the following are checked:
7.Select Scan for Issue and allow CCleaner to scan, then click Fix Selected Issues.
8.When CCleaner asks “Do you want backup changes to the registry?” select Yes.
9.Once your backup has completed, select Fix All Selected Issues.
10.Restart your PC to save changes and this should Fix Error 2502 and 2503 while installing or uninstalling a program.
Method 3: Run Installer with Admin rights using Command Prompt
1.Open File Explorer then click View > Options and make sure to check “Show hidden files, folders, and drivers.” Again in the same window uncheck “Hide protected operating system files (Recommended).“
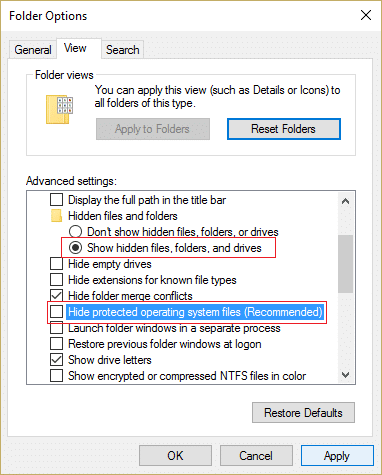
2.Click Apply followed by OK.
3.Press Windows Key + R then type the following and press Enter:
C:WindowsInstaller
4.Right click in an empty area and select View > Details.

5.Now right click on the column bar where Name, Type, Size etc is written and select More.

6.From the list check mark subject and click OK.

7.Now find the correct program which you want to install from the list.

8.Press Windows Key + X then select Command Prompt (Admin).
9.Now type the following and hit Enter:
C:WindowsInstallerProgram.msi

Note: Instead of the program.msi type the name of the .msi file causing the problem and if the file is located in Temp folder then you would type it’s path and press Enter.
10.This would run the installer with administrative rights and you would not face the Error 2502/2503.
11.Reboot your PC to save changes and this should Fix Error 2502 and 2503 while installing or uninstalling a program.
Method 4: Run Explorer.exe with administrative privileges
1.Press Ctrl + Shift + Esc keys together to open Task Manager.
2.Find Explorer.exe then right-click on it and select End Task.

3.Now click on File > Run new task and type Explorer.exe.
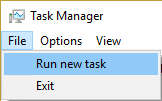
4.Check mark Create this task with administrative privileges and click OK.

5.Again try to install/uninstall the program which was earlier giving the error 2502 and 2503.
Method 5: Set correct permissions for Windows Installer Folder
1.Open File Explorer then click View > Options and make sure to check “Show hidden files, folders, and drivers.” Again in the same window uncheck “Hide protected operating system files (Recommended).“
2.Click Apply followed by OK.
3.Now navigate to the following path: C:Windows
4.Look for Installer folder then right-click on it and select Properties.
5.Switch to Security tab and click Edit under Permissions.

6.Next, make sure Full Control is checked for System and Administrators.

7.If not then select them one by one under group or user names then under permissions check mark Full Control.
8.Click Apply followed by OK.
9.Reboot your PC to save changes.
This should Fix Error 2502 and 2503 while installing or uninstalling a program but if you’re still stuck then follow the steps listed under method 6 for Windows Installer folder also.
Method 6: Set Correct Permissions for Temp Folder
1.Navigate to the following folder in File Explorer: C:WindowsTemp
2.Right-click on Temp folder and select Properties.
3.Switch to Security tab and then click Advanced.

4.Click Add button and the Permission Entry window will appear.
5.Now click “Select a principal” and type in your user account.

6.If you don’t know your user account name then click Advanced.

7.In the new window that opens click Find now.

8.Select your user account from the list and then click OK.
9.Optionally, to change the owner of all sub folders and files inside the folder, select the check box “Replace owner on subcontainers and objects” in the Advanced Security Settings window. Click OK to change the ownership.

10.Now you need to provide full access to the file or folder for your account. Right-click the file or folder again, click Properties, click the Security tab and then click Advanced.
11.Click the Add button. The “Permission Entry” window will appear on the screen.

12.Click “Select a principal” and select your account.

13.Set permissions to “Full control” and Click OK.

14.Repeat the above steps for the built-in Administrators group.
15.Reboot your PC to save changes.
Recommended for you:
- Fix Black Screen With Cursor On Startup
- Fix Windows detected a hard disk problem
- 6 Ways To Fix Windows Store Won’t Open
- How to Fix Chrome Won’t Open or Launch
That’s it you have successfully Fix Error 2502 and 2503 while installing or uninstalling a program in Windows 10 but if you still have any questions regarding this post then feel free to ask them in the comment’s section.
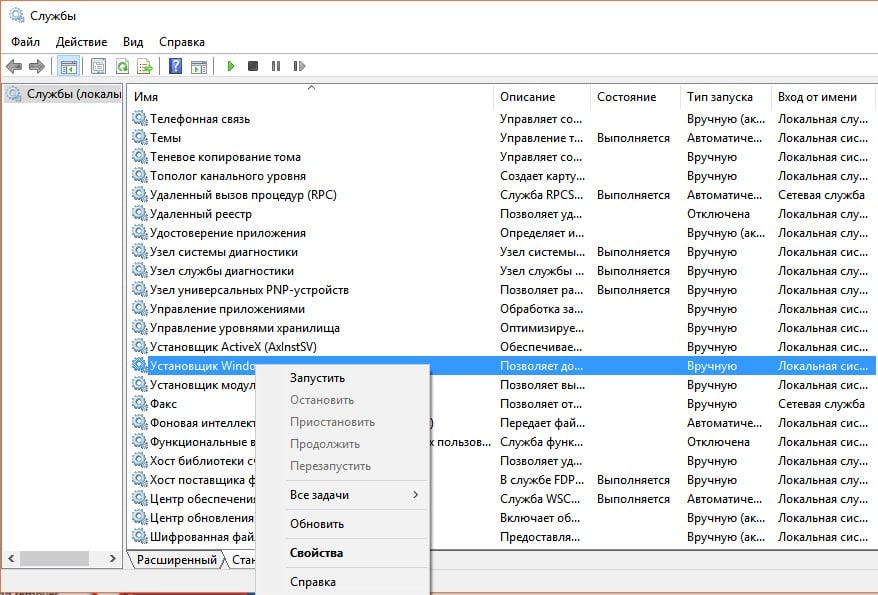
Ошибки 2503 и 2502 Windows 10 могут появляться взаимозаменяемо, обе они имеют подобные причины появления. Практически всегда они возникают в моменты, когда пользователь операционной системы пытается установить программное обеспечение. Большинство из затронутых пользователей не могут как установить, так и удалить программы, по крайней мере те, что установлены через Microsoft Store. При каждой попытке появляется код ошибки 2503 или 2502. К счастью, это вполне поправимо.
Полный текст ошибки:
The installer has encountered an unexpected error installing this package. This may indicate a problem with this package. The error code is 2503 (2502)
Содержание
- Причины
- Как исправить ошибки с кодами 2503 и 2502 в Windows 10?
- Изменение прав доступа
- Перезапуск процесса Проводник
- Восстановление Windows Installer
Причины
В сообщении к ошибке указано, что установщик Windows сталкивается с непредвиденной ошибкой. Говорится и о том, что причиной может быть сам файл, из которого выполняется установка. Это лишь часть правды, чаще всего истинная проблема другая.
Почему появляется ошибка 2503/2502 в Windows 10:
- Недостаточно привилегий для доступа к папке Temp. Она содержит временные файлы, которые генерируются и используются практически всеми программами.
- Зависание процесса Explorer.
- Повреждение Установщика Windows или его службы.
Как исправить ошибки с кодами 2503 и 2502 в Windows 10?
Большинство пользователей отметило, что у них сработал способ с изменением прав доступа к папке Temp. Именно с этого и стоит начать. Отчеты в остальных комментариях распределились приблизительно равномерно по другим оставшимся способам.
Изменение прав доступа
Все, что требуется сделать – выдать разрешение на использование папки Temp всем пользователям и системам компьютера. Сделать задуманное довольно просто.
Инструкция:
- Открываем файловый менеджер и переходим по пути C:Windows.
- Ищем папку Temp, нажимаем по ней правой кнопкой мыши и выбираем «Свойства».
- На странице «Безопасность» и жмем на кнопку «Изменить».
- Выбираем группу «Все». Если ее нет, то подойдет и «Система».
- В блоке снизу активируем элемент «Все», установив туда галочки.
- Сохраняем изменения и пробуем установить или удалить программу заново.
Если не получится, стоит выдать полные права доступа и для других пользователей.
Перезапуск процесса Проводник
Хороший вариант, так как прост в реализации и имеет ряд подтвержденных случаях, когда он сработал.
Что нужно сделать:
- Открываем «Диспетчер задач» (можно через Ctrl + Alt + Del).
- Раскрываем список кнопкой «Больше», если у вас открылся диспетчер в свернутом виде.
- Ищем «Проводник», нажимаем по нему правой кнопкой мыши и выбираем «Перезапустить».

Восстановление Windows Installer
Требуется перезапустить службу, а также перерегистрировать данный сервис в системе. Указанные действия позволят избавиться от различных неполадок с данным компонентом операционной системы.
Руководство к действию:
- Нажимаем комбинацию Win + R, вводим в строку msiexec /unreg и жмем Enter.
- В то же самое окно вводим и применяем команду msiexec /regserver.
- Теперь снова в строку «Выполнить» вводим название элемента services.msc, после чего нужно нажать «Ок».
- Ищем «Установщик Windows», кликаем по нему правой кнопкой мыши и выбираем «Перезапуск».
Перечисленных выше действия должно быть достаточно, чтобы ошибки с кодами 2503 и 2502 в Windows 10 отступили и больше не появлялись. Мы видели и более сложные способы, но, похоже, в них нет необходимости. Оставляйте свои комментарии. Если в том будет необходимость, мы добавим и более трудоемкие решения.
Internal Error 2503 — What is it?
Internal Error 2503 mostly pops up on Windows 8. It occurs when you try to uninstall or install software on Windows 8. The error code message may vary and displayed in different formats such as:
The installer has encountered an unexpected error installing this package. This may indicate a problem with this package. The error code is 2503.
Called RunScript when not marked in progress
The installer has encountered an unexpected error installing this package. This may indicate a problem with this package. The error code is 2503.
Called Install Finalize when no installation is in progress
Solution
 Error Causes
 Error Causes
Some of the most common causes for internal error 2503 are:
- Permission not granted to access the Windows Installer Folder
- Viruses
- Problems with Windows Installer
Further Information and Manual Repair
To repair this issue on your PC without any professional assistance, try the DIY methods given below:
Method 1
Internal error 2503 may occur when your account has limited privileges. You don’t have the privilege to use or access the Windows Installer folder.
Your inability to access this folder hampers you from successfully install or uninstall the desired program on your PC. To gain access, you need to ensure you have permission.
- For this navigate to the C:windows folder. Here find the installer folder and then right-click and choose properties.
- After that click on the security tab and check if the System and Administrator account has Full access permission.
- For that make sure the system group option has ‘all’ selected to allow you full permission.
Method 2 — Re-register Windows Installer
Another alternative to resolve internal error 2503 is to re-register Windows Installer.
- To do this, go to Start and click Run. Now type ‘msiexec /unreg’ in the Run box and then press enter.
- Follow the same steps and now type ‘msiexec /regserver’ in the box and then press enter. This will resolve the issue.
Method 3 — Remove Viruses
If internal error 2503 is triggered by a viral infection on your PC, then it is advisable to download an antivirus and scan your entire system.
Viruses are notorious for system failures and pose data security threats. If not removed timely, these malicious programs can damage your PC.
To remove all viruses on your system, run an antivirus. An antivirus detects all malicious software programs including viruses, malware, adware, and spyware. Delete all the malicious files found right away.
This will help resolve internal error 2503.
Advanced System Repair Pro
One-click automated PC repair solution
![]()
With Advanced System Repair Pro you can easily
DOWNLOAD
Advanced System Repair Pro is compatible with all versions of Microsoft Windows including Windows 11
Share this article:
You might also like
MovieMode is a Potentially Unwanted Program developed by GenTechnologies Apps that allegedly ads a “Lights Off” function to video streaming websites like Youtube. This feature allows a user to dim the entire background around the video, allowing for better video focus.
Although this sounds interesting and useful, upon further inspection it was discovered that this program does not work with modern browsers.
While installed, MovieMode may modify your browser settings, changing your home page, displaying additional ads, and other suspicious behavior.
From the Terms Of Use:
“Applications may be automatically enabled on your web browsers following installation. Applications or advertisements may require changing your web browser’s default home page, default page, or set of pages on startup, default search provider, and other browser settings. So that Applications can function most efficiently and with the least annoyance, Applications may modify or disable certain web browser or operating system features including, but limited to load time alerts, accelerator features, and Content Security Policy functionality. Applications may also include features to notify you when you are launching an application or visiting a web domain that may interfere with your installed Applications. “
About Potentially Unwanted Applications
What is a Potentially Unwanted Program (PUP)?
Have you ever detected an unwanted program running on your computer and wondered how the heck it got there? These unwanted programs, which are referred to as Potentially Unwanted Programs, or PUPs in short, usually tag along as a software bundle when downloading the program and could cause significant problems for users.
From the technical perspective, a PUP is not true “malware”. A basic difference between PUP and malware is distribution. Malware is normally dropped via vulnerability exploitation while PUP gets installed with the consent of the end-user, who knowingly or unintentionally approves the PUP installation on their computer system. On the other hand, it is obvious that PUPs are still bad news for computer users as they could be quite dangerous to the computer in lots of ways.
How do unwanted programs impact you?
Unwanted programs can be found in many forms. Typically, they will be found in adware bundlers that are known to use aggressive and deceptive advertising. Most bundlers install numerous adware applications from various vendors, each of which has its own EULA policy. Safebytes Anti-malware completely eradicates this threat and safeguards your PC against unwanted programs or malware infection. Additionally, most free software programs these days include a few unwanted add-ons; in many instances an internet browser toolbar or browser modification like a homepage hijacker. Not only they needlessly use up space on your screen, but toolbars may also manipulate search results, track your browsing activities, decrease your web browser’s overall performance, and slow down your web connection to a crawl.
They could seem innocent but PUPs are sometimes spyware. The worst part of setting up a PUP is the spyware, adware, and keystroke loggers that may hide inside. Most PUPs don’t have any significant value or advantages. As soon as they are installed, they could waste your valuable system resources and also drastically slow down computer performance. Many of these programs are harmful to computer systems and put your private information and perhaps your identity at stake.
The best ways to stop PUPs
• Always study the license agreement and privacy statement. Don’t agree unless you understand exactly what you’re agreeing to.
• Always pick the custom if you’re provided a choice between Recommended and Custom Installations – never ever click Next, Next, Next blindly.
• Use an ad blocker/pop-up blocker; Install anti-malware products such as Safebytes Anti-malware. These kinds of programs can establish a wall between your computer and online criminals.
• Avoid adding freeware software you simply won’t utilize. Avoid downloading and installing browser extensions and applications you aren’t familiar with.
• Always download applications from the original site. The majority of PUPs find their way to your computer is through download portals, so stay away from it entirely.
What To Do If You Cannot Install Safebytes Anti-Malware?
Malware could cause all sorts of damage after they invade your computer, from stealing your private details to deleting files on your PC. Some malware goes to great lengths to prevent you from downloading or installing anything on your computer system, especially antivirus software programs. If you’re reading this, you probably have infected by malware that prevents you from installing a computer security program like Safebytes Anti-Malware. There are a few fixes you can attempt to get around with this particular problem.
Download the software in Safe Mode with Networking
In the event the malware is set to load at Windows startup, then booting in Safe Mode should prevent it. Just bare minimum required applications and services are loaded whenever you boot your computer or laptop into Safe Mode. You will need to do the following to get rid of malware in Safe mode.
1) At power on/start-up, press the F8 key in 1-second intervals. This will invoke the Advanced Boot Options menu.
2) Use the arrow keys to choose Safe Mode with Networking and press ENTER.
3) Once you get into this mode, you should have internet access again. Now, utilize your web browser normally and go to https://safebytes.com/products/anti-malware/ to download and install Safebytes Anti-Malware.
4) Immediately after installation, do a complete scan and let the program get rid of the threats it detects.
Obtain the anti-malware program using an alternate browser
Some malware only targets certain internet browsers. If this is your situation, utilize another web browser as it might circumvent the malware. If you are not able to download the security software using Internet Explorer, this means the virus could be targeting IE’s vulnerabilities. Here, you must switch to an alternate internet browser such as Firefox or Chrome to download Safebytes Anti-malware software.
Create a portable USB antivirus for eliminating viruses
Another option is to create a portable anti-malware program on your USB stick. Follow these steps to use a thumb drive to clean your infected computer.
1) On a clean computer, install Safebytes Anti-Malware.
2) Insert the pen drive on the same system.
3) Run the setup program by double-clicking the executable file of the downloaded software, which has a .exe file extension.
4) Pick a USB flash drive as the location when the wizard asks you exactly where you want to install the software. Follow activation instructions.
5) Disconnect the USB drive. Now you can use this portable anti-malware on the infected computer system.
6) Double-click the antivirus software EXE file on the pen drive.
7) Click on “Scan Now” to run a complete scan on the affected computer for malware.
SafeBytes Anti-Malware Features
Are you looking to download the best anti-malware software for your system? There are plenty of applications in the market that comes in paid and free versions for Microsoft Windows systems. Some of them are good, some are ok types, and some will ruin your computer themselves! While looking for antimalware software, pick one which gives dependable, efficient, and total protection against all known viruses and malware. On the list of recommended software is SafeBytes AntiMalware. SafeBytes carries a really good reputation for excellent service, and customers are happy with it.
SafeBytes anti-malware is a highly effective and user-friendly protection tool that is designed for users of all levels of IT literacy. With its most advanced virus detection and repair technology, this software protects your personal computer against infections caused by various kinds of malware and similar threats, including adware, spyware, trojans horses, worms, computer viruses, keyloggers, ransomware, and potentially unwanted program (PUPs).
SafeBytes has outstanding features when compared to other anti-malware programs. Here are some of the features you might like in SafeBytes Anti-Malware.
Real-time Protection: SafeBytes gives complete and real-time security for your personal machine. It’ll monitor your computer for suspicious activity regularly and safeguards your computer from illegal access.
Most Reliable AntiMalware Protection: Built on a greatly acclaimed antivirus engine, this malware removal tool has the capacity to find and remove several obstinate malware threats like browser hijackers, potentially unwanted programs, and ransomware that other typical antivirus software will miss.
Safe Browsing: Safebytes assigns all sites a unique safety rating that helps you to have an idea of whether the webpage you are going to visit is safe to view or known to be a phishing site.
Lightweight: SafeBytes provides total protection from online threats at a fraction of the CPU load due to its advanced detection engine and algorithms.
Premium Support: You can get 24/7 technical assistance to quickly resolve any concern with your security application.
Overall, SafeBytes Anti-Malware is a solid program since it has loads of features and can identify and remove any potential threats. Malware problems can become a thing of the past once you put this application to use. If you need advanced forms of protection features and threat detections, purchasing SafeBytes Anti-Malware could be well worth the dollars!
Technical Details and Manual Removal (Advanced Users)
If you don’t wish to use malware removal software and like to get rid of Movie Mode manually, you could possibly accomplish this by going to the Add/Remove Programs menu in the control panel and removing the offending program; in cases of browser add-ons, you can remove it by visiting the browser’s Add-on/Extension manager. You may even want to reset your browser settings, and also clear your web browser cache and cookies.
To ensure the complete removal, manually check your hard drive and computer registry for all of the following and remove or reset the values as needed. Having said that, editing the Windows registry is often a hard task that only advanced computer users and professionals should attempt to fix it. Moreover, some malware keeps replicating which makes it difficult to get rid of. It is advisable that you carry out the removal process in Safe Mode.
Files:
C:ProgramDataMovieModeMovieMode.exe
C:ProgramDataMovieModeMovieModeService.exe
C:ProgramDataMovieModeUninstall.exe
C:UsersAll UsersMovieModeMovieMode.exe
C:UsersAll UsersMovieModeMovieModeService.exe
C:UsersAll UsersMovieModeUninstall.exe
C:ProgramDataMovieMode
C:UsersAll UsersMovieMode
Read More
If you were having some problems with your internet connection and you tried to run the Internet Connections troubleshooter but it displays an error message instead that says, “The default gateway is not available”, read on as this post will show you what you can do to fix this error.
The first thing you can do to fix this error is to restart your computer and then try to run the Internet Connections troubleshooter again. However, if you still see the same error message, then you might want to troubleshoot the problem further. You can try to install the Network driver or reinstall the Network adapter drivers. You could also verify the power saving mode or reset TCP/IP as well as disable the Firewall temporarily.
Option 1 – Try installing the Network driver
The very first thing you can do to resolve the error is to install the network driver. It is a common solution to this kind of problem and most users encounter it right after a fresh installation of Windows 10. So if you have done this, then you need to install the network driver so that the network adapters can start working. You can find the network driver in the motherboard CD. On the other hand, if you are using a laptop, you might have to use another computer or mobile to download the network driver from the manufacturer’s website.
Option 2 – Update the Network Adapter drivers
If the first option is not applicable to you since you already have network drivers in your computer, you might want to update the Network Adapter drivers by following these steps:
- Tap the Win + R keys to launch the Run window and then type in the “msc” command and hit Enter to open the Device Manager window.
- Under the Device Manager, you will see a list of drivers. From there, look for the Network Adapters and expand them.
- Then right-click on each one of the Network drivers and update them all.
- Restart your PC and see if it helped in fixing the BSOD error.
Note: If updating the network drivers didn’t help in fixing the “Windows could not find a driver for your network adapter” error, you can also try to uninstall the very same drivers and restart your Windows 10 PC. After that, the system itself will reinstall the drivers you just uninstalled. Alternatively, you can also download and install the drivers from the manufacturer’s website directly.
You could also try to reinstall the network adapter driver, refer to these steps:
- Open the Devices Manager from the Win X Menu.
- Then locate the device drivers and right-click on them to open the Properties.
- After that, switch to the Driver tab and click on the Uninstall Device button.
- Follow the screen option to completely uninstall it.
- Finally, restart your computer. It will just reinstall the device drivers automatically.
Option 3 – Try to verify power-saving mode
If you are using a Windows 10 laptop, then you should know that the Power Options panel plays an important role. So if you’re getting an error in your laptop, you have to check some settings that are related to the Power Saving mode. To do so, follow these steps:
- Open Control Panel and go to Hardware and Sound and click on Power Options.
- Next, click on the “Change plan settings” option of your selected plan and then click the “Change advanced power settings” option.
- After that, you should see the Power Options window, and here, expand the Wireless Adapter Settings and Power Saving Mode.
- Now make sure that the Maximum Performance option is selected. If it’s not, select it and save the changes you’ve made.
Option 4 – Try to reset the TCP/IP
As you know, the TCP/IP or the Internet Protocol is the most important thing if you want to use the internet on your computer. That’s why if it ends up getting corrupted, you need to reset the TCP/IP to fix the problem. To reset TCP/IP, refer to these steps:
- In the Windows start the search, type “command prompt” and right-click on Command Prompt from the search results.
- Then select the “Run as administrator” option to open Command Prompt with admin privileges.
- After that, execute this command: netsh int ip reset resettcpip.txt
- Once it’s done, exit Command Prompt and restart your computer and then check if the error is now fixed.
Option 5 – Temporarily disable Firewall
On the other hand, the error could also be due to the Firewall software installed on your computer. Thus, disabling them or any security software installed on your computer is always a good idea you can try when you’re not able to access the shared drive on your computer. There are times when you encounter problems like the error “The default gateway is not available” due to interference of antivirus or security programs. Thus, you have to disable both your antivirus program and Windows Defender Firewall for the meantime and check if it fixes the error or not
Read More
Error 126 — What is it?
Error 126 is a Windows PC error that mostly occurs either during program installation or removal. It is commonly experienced by Vista, XP and Windows 7 users. When the error 126 is generated, it usually terminates the program installation process, immediately.
It is advisable to take corrective error repair measures immediately to ensure that you are easily able to install your desired program and you don’t encounter the error again.
Solution
Error Causes
There are multiple reasons for the occurrence of the error code 126 including. The reasons are listed below:
- Dll file corruption
- Missing or damaged dll files
- Corrupt and misconfigured system files
- Improper program installation
- Viral infection
- Corrupt registry
- Improper hardware
Further Information and Manual Repair
To resolve the error 126 on your PC, you don’t always have to hire a technician or be a computer programmer yourself. Though this error is critical the good news is that it is very easy to resolve. You can fix the error even if you are not technically sound.
Try the solutions that we have listed below to help you resolve error 126 immediately:
Solution 1: Disable Firewall Protection
Sometimes Firewall protection may stop you from installing new programs on your PC successfully and this may display the error 126 on your PC. In such a scenario, disable Firewall protection and then try installing the desired program again. See if it works.
Solution 2: Restore Points
Sometimes dll files can go missing due to program removals and you may come across the error 126. To resolve it, restore points.
This will help you restore your PC back to the way it was functioning before you removed a program and will also help you recover the lost and missing dll files.
- This can be done, by clicking the start menu.
- Now go to all programs, then accessories, and then system tools.
- Here you will see the ‘System Restore’ option. Simply click on it.
- This will help you open a new window. Here select the option ‘Restore My Computer to an Earlier Time’ point.
- As you select it, it will show you a list of restore points.
- Choose the latest restore point you see in the list and click ‘Next’ to continue. Now confirm to finish restoration.
- Restart your PC to activate the changes.
Solution 3: Scan for Viruses
The underlying cause for the error could also be related to viruses on your PC. To remove the viruses, you will have to download a powerful antivirus and scan your entire PC.
Please note, anti-viruses are notorious for slowing down system performance, so you might have to compromise on the speed of your PC.
Solution 4: Run a Hardware Diagnostic
To find out which hardware is causing the error message to pop up, you will have to run a hardware diagnostic. For this, simply go to the start menu, type Memory Diagnostic in the search bar.
Now access this tool and click on Diagnose your Memory problems. As you click on it, it will ask you to perform the check by either restarting the PC immediately or on the next restart.
Select the immediate one to get going. The system will carry a scan on the memory and show you the list of problematic errors detected during the scan. To resolve this error then all you have to do is replace the piece of faulty hardware. Nonetheless, if no faulty hardware is detected, this means the error is related to the registry.
Solution 5: Clean and Restore the Registry
The error 126 is also sometimes generated due to poor PC maintenance which leads to registry issues.
The registry basically saves and stores all the data and activities performed on the PC. This also includes junk files, invalid registry entries, bad keys, temporary files, internet history, and cookies.
This accumulates a lot of disk space. If not removed, they damage the registry and corrupt other important files like system and dll files, thereby generating PC-related error codes like error 126.
The best way to resolve this error on your PC in seconds is to download Restoro on your PC. This is an advanced and multi-functional PC repair tool embedded with multiple powerful utilities including an intuitive registry cleaner, an antivirus, and a system optimizer.
The registry cleaning feature detects all registry issues and errors. It wipes out all the unnecessary and obsolete files cluttering the system, fixes the damaged dll files, and restores the registry back to normal.
Simultaneously, the antivirus utility scans for all privacy errors and malicious software infecting your system. This includes malware, adware, spyware, and Trojans.
The system optimizer feature ensures your PC performance does not slow down. It boosts the speed of your PC to its optimum level.
This PC fixer is safe, user-friendly, and efficient. It can be downloaded on any Windows version.
Click here to download Restoro on your system and resolve error 126 right away!
Read More
Cyclic Redundancy Check Error — What is it?
To begin with, Cyclic Redundancy Check is basically an error checking technique. This technique is used for data verification. It detects accidental changes in the data. It is used by computers to specifically check the data stored in the hard drive or optical disks (DVD’s and CD’s).
The Cyclic Redundancy Check error occurs when the data being verified on the hard drive or optical disks is corrupt.
Symptoms for this error code include program lock-ups, slow PC performance, inability to run and execute the desired program, system freeze and shutdown and startup issues.
Error Causes
The Cyclic Redundancy Check error code occurs due to the following reasons:
- Cluttered hard disk
- Registry corruption
- Misconfigured files
- Unsuccessful program installation
All these causes points towards registry issues and poor PC maintenance. The registry is the main database of the computer. This part of the PC saves practically every activity you perform on it including activities like application installation and deletion and web browsing to name a few.
With time and frequent PC usage, the files generated from every activity you execute on your system begin to load the registry. These include even the unnecessary files like junk files, internet files and files of applications that you’ve uninstalled.
All these files overload the registry and acquire a lot of hard disk space. And when you don’t remove these files on your system, eventually it leads to file misconfiguration, cluttered disk, and registry corruption.
New program versions that you want to install and run on your system also don’t function because the files of the old program version still saved in the registry.
Further Information and Manual Repair
As the Cyclic Redundancy Check Error causes data corruption on the hard disk, it is advisable to fix this error right away. The reason is that it can have serious consequences. It can lead to data loss, fatal crashes, and system failures.
When it comes to resolving Cyclic Redundancy Check Error, there are two ways to fix it:
Run the CHKDSK application.
This is a built-in feature in your Windows system. It checks for hard disk damage and attempts to resolve it.
Read More
Hello and welcome to How To Speed Up PC Startup where we will explore how to make your PC boot-up system faster. When your computer gets older, you’ll see a decrease in your PC’s load time. This can be very annoying and frustrating, especially if you’re not accustomed to exercising patience.
Your computer’s boot time does not need to be sluggish, even if it’s old.
While there are reasons why your computer is acting up and giving you the ‘slow’ sign, there are ways that you can optimize how fast your PC starts up at the beginning. Once you start speeding things up, you’ll never look back!
Start With your BIOS
You may need to tweak your PC’s start-up menu. Since the majority of issues encountered on your PC might not be related to the software running in the back end, you can focus on your computer’s hardware.
The ideal way to speed up your PC startup is to access your computer’s BIOS when booting up. This can be accessed by holding the DEL key or whichever button is used to tap into your BIOS.
You can change where your computer boots from. You can opt to put your hard disk right at the top which would elude searching for CDs and other storage media devices when your PC starts up.
Tweak Startup Programs
There are many programs that execute when your computer starts up. These programs normally run in the back end. Most times back-end programs are unnecessary and do not contribute to the productivity or performance of your computer when in use.
Instead of allowing these programs to execute when your PC boots up, why not disable them? By deactivating these programs, you’ll be reducing the amount of CPU usage which will accelerate your PC performance.
Additionally, there are some installed programs that you never use. Instead of leaving these programs to occupy needed space on your computer system, you can uninstall these to create more room on your computer. This actually increases your PC startup speed.
Put Malware on a Leash
Malware and spyware can cause problems for your start-up. A slow computer is an indication that your computer is plagued by malware.
This affects your computer’s boot time and whether or not it’ll startup as quickly as you intend it to. If your computer gives you the ‘virus alert’, you need to download an antivirus program that will be able to eradicate all virus threats.
Be mindful of where you download antivirus programs since many of them are viruses or have viruses attached to them. Some viruses are tough on your computer.
This means that if an antivirus works for your best friend, it may not work for you. Since malware differs in functions and the havoc they cause, it’s best to know what you’re up against by doing research.
Clean Your Registry
You should also clean out your registry. The fewer unused registry keys you have lying around on your computer, the faster your computer will go.
Getting a good registry cleaner from a clean source can help tremendously, but be careful; registry cleaners have the potential to be very dangerous so make sure you backup everything on your computer and only download registry cleaners from a reliable source.
By implementing the above tips, you’ll see quick improvements when using your computer.
Read More
A couple of Windows 10 users recently reported getting an error that says, “The group or resource is not in the correct state to perform the requested operation” while opening UWP Applications as well as accessing the File Explorer.
You can encounter this kind of error mostly on File Explorer, Microsoft Store application, and other UWP applications. This indicates that this error occurs during both the Windows Classic Application and the Universal Windows Platform Applications.
There are several ways to fix this error. You can try to run a System File Checker scan, or run the DISM tool or the Program Compatibility troubleshooter or Windows Store Apps troubleshooter or try to reset or reinstall Windows 10 or the affected application that’s not working. However, before you do any of these troubleshooting tips, you can try to perform System Restore first as it could undo the changes you’ve made in the system which might have caused the error.
- Tap the Win + R keys to open the Run dialog box.
- After that, type in “sysdm.cpl” in the field and tap Enter.
- Next, go to the System Protection tab then click the System Restore button. This will open a new window where you have to select your preferred System Restore point.
- After that, follow the on-screen instructions to finish the process and then restart your computer and check if the problem is fixed or not.
If System Restore wasn’t able to fix the error, then you can refer to each one of the following options.
Option 1 – Try to use the DISM tool
You might want to repair potentially corrupted files in your system as having them could also trigger the “The group or resource is not in the correct state to perform the requested operation”. To repair these corrupted system files, you can run the DISM commands:
- Tap the Win + X keys and click on the “Command Prompt (Admin)” option.
- After that, input each one of the commands listed below sequentially to execute them:
- Dism /Online /Cleanup-Image /CheckHealth
- Dism /Online /Cleanup-Image /ScanHealth
- Dism /Online /Cleanup-Image /RestoreHealth
- Once you’ve executed the commands given above, restart your computer and check if the DCOM error is now fixed.
Option 2 – Run the System File Checker Scan
Aside from the DISM tool, you can also run a System File Checker scan. It is another built-in command utility that helps in restoring corrupted files as well as missing files. It replaces bad and corrupted system files to good system files that might be the cause why you’re getting the error. To run the SFC command, follow the steps given below.
- Tap Win + R to launch Run.
- Type in cmd in the field and tap Enter.
- After opening Command Prompt, type in sfc /scannow
The command will start a system scan which will take a few whiles before it finishes. Once it’s done, you could get the following results:
- Windows Resource Protection did not find any integrity violations.
- Windows Resource Protection found corrupt files and successfully repaired them.
- Windows Resource Protection found corrupt files but was unable to fix some of them.
- Reboot your computer.
Option 3 – Try to run the Program Compatibility Troubleshooter
You might also want to run the Program Compatibility Troubleshooter. This built-in troubleshooter is available in the Windows Update & Security section. From there, select Troubleshoot. This will find a list of programs for you and since you have already downloaded the driver files, just click on Not Listed located at the top of the program list. After that, browse and select the driver files and then let the program do its job. In addition, you can try to run the Windows Store apps troubleshooter as it can also help you resolve the problem.
Option 4 – Reset your computer
- Tap the Win key or click on the Start button located in the Taskbar.
- Then click on the Power button at the bottom right portion of the screen.
- Next, press and hold the Shift key on your keyboard and then click on Restart. This will restart your Pc into the Advanced Startup options.
Note: Once you have access to the Advanced Startup options, you have to go to the setting which allows you to Reset your Windows 10 PC. All you have to do is select Troubleshoot > Reset this PC to reach the following screen
- Afterward, select either the “Keep my files” option and then proceed to the next on-screen instructions that follow to reset your Windows 10 computer without losing your files.
Read More
If you are trying to install Office but got an error saying, “Something went wrong, Sorry we ran into a problem” with error codes 12002-4, 12007-4, or 12152-4 instead, this indicates that you have a problem with your internet connection. Aside from internet connection issues, the problem could also be due to some programs that block the installation files to be downloaded so when they time out, you get these error codes.
There are several options you can try to fix the 12002-4, 12007-4, or 12152-4 error codes. You can try to install Office offline or turn off the proxy server or VPN (if you’re using one). You can also try to temporarily disable your antivirus program or Firewall. Refer to the given potential fixes below to troubleshoot and fix the problem.
Option 1 – Try to install Office offline
The first thing you can do if you encounter the error codes 12002-4, 12007-4, or 12152-4 when installing Office is to download an offline copy of Office especially when you’re certain that your internet connection is slow. Once you’ve downloaded it, install it again. The offline installer will download both the 32 and 64-bit versions of Office. Keep in mind that you must download the correct version.
Option 2 – Disable the Proxy server
The first thing you can do is to try disabling the Proxy server as it might be the reason why you’re getting error 0x80244022 for Windows Updates. To disable the proxy server, refer to the steps below.
- Tap the Win + R keys to open the Run dialog box.
- Then type “inetcpl.cpl” in the field and hit Enter to pull up the Internet Properties.
- After that, go to the Connections tab and select the LAN settings.
- From there. Uncheck the “Use a Proxy Server” option for your LAN and then make sure that the “Automatically detect settings” option is checked.
- Now click the OK and the Apply buttons.
- Restart your PC.
Note: If you are using a third-party proxy service, you have to disable it. In addition, if you are also using a VPN, you can try to disable it as well.
Option 3 – Temporarily disable the Antivirus and Firewall
As mentioned earlier, the downloading of the installation files could be blocked by either the antivirus program or Firewall or it could be both especially when the link seems suspicious. To fix this problem, you have to disable both the antivirus like Windows Defender and the Firewall or any third-party software you might be used temporarily and then download the installation files again. Once the download is completed, make sure to turn on the antivirus program and the Firewall again. On the other hand, you can also try downloading in a different location which also means that you have to try a different network. It could be that the load on the current system is too high which is why it’s not able to offer enough bandwidth to download the installation files of Microsoft Office.
Read More
If you are a gamer, you might have encountered either the CID HANDLE CREATION or VIDEO TDR ERROR errors with an error code of 0x00000016 as you play a game. These kinds of Stop errors have something to do with the Graphics card driver. It could be that your Graphics card driver needs to be updated or it may be corrupted. Whichever the case is, you can try fixing this error using the given solutions below but before you proceed, make sure to create a System Restore Point first so that you can easily roll back to the previous state of your computer in case something does not go as expected.
Option 1 – Try checking if your graphics card is enabled and update it as well
Although the problem is quite massive, the fix could be as simple as enabling the graphics card if it turns out to be disabled. There might be some strange reason why your graphics card disables itself. Thus, the best and first option you can try is to check if the graphics card is enabled or not. To do so, follow these steps:
- Tap the Win + R keys to open the Run dialog box.
- Then type “devmgmt.msc” in the field and hit Enter to open the Device Manager.
- After opening the Device Manager, look for your graphics card option among the list of device drivers. Once you found it, check if it is enabled or not. If it’s not enabled, you should see a gray arrow pointing downwards. Right-click on the card and select Enabled.
- Next, right-click on the graphics card once more and click on the Update Driver Software option and then click on the “Search automatically for updated driver software” option.
Option 2 – Reinstall the Graphics card drivers
- Tap Win + R to open Run then type “devmgmt.msc” in the field and hit Enter to open the Device Manager.
- From there, look for the Display adapters and uninstall each one of the graphics card drivers by right-clicking on them and selecting the Uninstall device option.
- After uninstalling the graphics card drivers, close the Device Manager and tap Win + R to open Run once again.
- After that, type “appwiz.cpl” in the field and hit Enter to open Programs & Features in the Control Panel.
- Next, look for any program that’s related to your GPU manufacturers like Nvidia, AMD, or Intel. Right-click on any GPU-related entry and click on Uninstall to uninstall them and then follow the next on-screen instructions that appear afterward.
- Now restart your computer.
- Once your computer has restarted, go to the GPU manufacturer’s website and download the latest driver version for your graphics card model and then install it.
- Restart your computer once again. That should fix the problem.
Option 3 – Try reinstalling the game
If updating and reinstalling your Graphics card driver didn’t help, then you can try to reinstall the game where you’re getting the CID HANDLE CREATION or VIDEO TDR ERRORS.
Option 4 – Uninstall the programs you installed recently
Chances are, some programs that you just installed might be the one that’s causing the BSOD error. Thus, you need to uninstall the program to resolve the problem.
- In the search box, type in “control” and then click on Control Panel (desktop app) among the search results.
- After that, select Programs and Features from the list which will give you a list of all the programs installed on your computer.
- From there, look for the concerned program and select it and then uninstall it.
Note: If you have downloaded the app from the Windows Store, you can simply right-click on it from the application list and then uninstall it. In addition, you might also want to check the hardware components of your computer that might not support the operating system itself. You can disconnect all the external devices like USB drives, scanners, printers, etc., and then reboot your PC. After that, add the devices again one after the other and check if the BSOD error is now fixed or not.
Option 5 – Try disabling your monitor’s Sleep functionality
There are times when the Sleep functionality of your monitor can also cause BSOD errors like CID HANDLE CREATION or VIDEO TDR errors. There are also times when the graphics card is running in the background and the display goes to sleep and then it’s turned back on but you encounter this kind of Blue Screen error. This is why you can try to disable your computer monitor’s Sleep mode.
Option 6 – Run the Blue Screen Troubleshooter
The Blue Screen troubleshooter is a built-in tool in Windows 10 that helps users in fixing BSOD errors like CID HANDLE CREATION or VIDEO TDR errors. It can be found on the Settings Troubleshooters page. To use it, refer to these steps:
- Tap the Win + I keys to open the Settings panel.
- Then go to Update & Security > Troubleshoot.
- From there, look for the option called “Blue Screen” on your right-hand side and then click the “Run the troubleshooter” button to run the Blue Screen Troubleshooter and then follow the next on-screen options. Note that you might have to boot your PC into Safe Mode.
Option 7 – Try to run the Chkdsk utility
Running the CHKDSK utility might also help you resolve the CID HANDLE CREATION or VIDEO TDR errors. If your hard drive has issues with integrity, the update will really fail as the system will think that it’s not healthy and that’s where the CHKDSK utility comes in. The CHKDSK utility repairs hard drive errors that might be causing the problem.
- Open Command Prompt with admin privileges.
- After opening Command Prompt, execute the following command and hit Enter:
chkdsk /f /r
- Wait for the process to be completed and then restart your computer.
Read More
Error Code 0xC004C770 – What is it?
If the Error Code 0xC004C770 popped up on your computer during your activation of the Windows 10 software, don’t worry. This is a fairly common error, especially for people who own more than one computer upon which Windows 10 is installed and activated. The gist of this error code is that the product key that you have entered has already been claimed or used on a different computer. Because there are limitations on the number of computers that can use any given license activation code or product key, this error code can arise when you have exceeded that limit. If you have a single-use license and have already entered the particular product key onto another machine, you may see this error come up during activation.
Both Error Code 0xC004C770 and Error Code 0x803FA071 arise from the same problem and the same steps can be used to resolve both error codes.
Solution
Error Causes
Error Code 0xC004C770 is likely to appear on your screen during activation of Windows 10 if you or anyone else in your organization have already entered in the product key used on another computer. If you have a multiple-use license, the product key that you are entering may already have been used for the maximum number of computers allowed under that license.
Further Information and Manual Repair
There are two basic methods for addressing the issues associated with Error Code 0xC004C770. These methods can easily be implemented by anyone who is comfortable interacting with the Windows Store from their computer, which makes the resolution of this particular error code fairly simple and straightforward.
If you are unable to complete the steps below or Error Code 0xC004C770 has not been resolved after following the guides below, contact a Windows technician who is familiar with the Windows 10 activation process to assist you in the process. You can also get in touch with the Windows technical support team to assist you in the process if needed.
Method One: Purchase A New Product Key from Windows
If you have already used the product key on another computer or have used it on the maximum number of allowed devices, you may need to purchase an additional product key for the computer with Error Code 0xC004C770. Product keys can be purchased physically from a retailer that sells Windows 10 software licenses or purchased directly from the Windows store.
To purchase a new product key directly from the Windows Store, follow the steps below:
- Step One: Select the Windows start button at the bottom of your toolbar. Click on “Settings,” then select the option for “Update and Security.”
- Step Two: Click on the “Activation” option.
- Step Three: In the menu that appears, choose the option to “Go to Store” and follow any on-screen instructions to finalize a purchase of the Windows 10 software and product key.
- Step Four: Use the new product key to complete the installation and activation of the Windows 10 software on your computer.
If you are unable to see the “Go to Store” option when you reach the “Activation” page, you may not be set as an administrator of your machine. In this case, get in touch with the support personnel from your company to complete the purchase, installation, and activation process on your computer.
Method Two: Attempt to Finish Activation via Phone
For users who have changed out parts of their computer’s hardware, like putting in a new motherboard or activating a new hard drive, you may have more success if you attempt activation through a phone.
In order to activate your copy of Windows 10 from your phone, follow the steps below:
- Step One: On your mobile device, open up the search box from the taskbar.
- Step Two: In the search box, enter the phrase “SLUI 04.”
- Step Three: Select the “SLUI 04” option that appears.
- Step Four: Follow the directions given on the screen to complete the activation process for your copy of Windows 10.
As with any error code resolution, if the methods above are not successful or if you are not comfortable with your ability to successfully complete the steps above, get in contact with a qualified professional who is trained in the Windows 10 activation process to assist you or download a powerful automated tool to get the job done.
Read More
This post will guide you in fixing a particular problem where your Windows 10 computer does not even let you turn it on and it appears as soon as it starts to boot the operating system and it displays an error message that says, “The Boot Configuration Data for your PC is missing or contains errors, Error code 0xc0000185”. On the other hand, it may also display a different error message saying, “The operating system couldn’t be loaded because a required file is missing or contains errors”.
There are various suggestions you can try to resolve this error. You could check the physical status of your hardware or rebuild the Boot Configuration Data, use the Automatic Startup Repair or System Restore, or better yet, reset your Windows 10 computer.
Since your computer will not boot, you will have to either try to get into the Advanced Startup Options screen, boot Windows 10 in Safe Mode, or use a bootable Windows 10 media to boot your computer.
Option 1 – Try to rebuild the BCD files
The first thing you can do to resolve the issue is to Rebuild Boot Configuration Data or BCD files.
- You can start by booting into the installation environment for Windows 10 from an installation media.
- After that, click on Repair your computer and on the blue screen, select Troubleshoot and then select the Advanced options menu.
- From there, select Command Prompt and once you open it, enter each one of the commands given below by sequence.
- bootrec /FixMbr
- bootrec /FixBoot
- bootrec /ScanOS
- bootrec /RebuildBcd
- Once you’re done executing the commands given above, type “exit” to close the Command Prompt window and then restart your computer and see if it fixed error code 0xc000014c.
Option 2 – Try to run Automatic Startup Repair
In this option, you need to boot your computer into the Advanced Startup Options and from there, run the Automatic Startup Repair and then wait until the process is completed.
Option 3 – Try running System Restore in Advanced Startup Options
Since you probably can’t boot into your Windows 10 computer, you can try to run System Restore again in the Advanced Startup Options.
- Boot your computer into the Advanced Startup Options screen.
- From there, you will see some options to troubleshoot when you can’t log in to Windows in the usual way.
- Now select Troubleshoot > Advanced Options > Command Prompt.
- After that, type “rstrui” and hit Enter to execute the command which will start the System Restore process.
Option 4 – Try to perform repair install by creating a Windows 10 installation media
- Click this link and then click the Download Tool Now button.
- Next, click the “Use the tool to create installation media (USB flash drive, DVD, or ISO file)…” option and follow the next given instructions on the screen.
- Now select the ISO file option in step 5.
- After that, you should now have an ISO file.
- Next, go to the location where you’ve downloaded the ISO file.
- Then right-click on the Windows 10 ISO file and select the Open with option and then select File Explorer.
- Now click on “setup.exe” and follow the next instructions that appear on the screen. When asked, you have to select either Nothing (clean install) or Keep personal files only option. Take note that you must not select the “Keep personal files, apps, and Windows settings since it doesn’t really work.
Option 5 – Try to physically check the hardware
You should also check the physical status of the hardware in your computer. You can clean the dust off the hardware components like the Network Card of the computer. You might want to use a small blower or you could also use a soft cloth and run the components gently. Make sure that you don’t damage any parts with moisture or cause harm to any circuits while you carry out this task.
Read More
![]()
Copyright © 2022, ErrorTools. All Rights Reserved
Trademarks: Microsoft Windows logos are registered trademarks of Microsoft. Disclaimer: ErrorTools.com is not affiliated with Microsoft, nor claim direct affiliation.
The information on this page is provided for information purposes only.
![]()
Repair your PC with one click
Please be aware that our software needs to be installed on a PC system with Windows on it, Open this website on a desktop PC and download the software for easy and quick elimination of your issues.