- Печать
Страницы: [1] 2 Все Вниз

Тема: Ошибка 255 при запуске ‘net usershare’ (Прочитано 35956 раз)
0 Пользователей и 1 Гость просматривают эту тему.

lcnet

Добрый день!
После обновления с Ubunta 9.04 до 9.10 при попытке расшарить папку периодически вылетает эта ошибка:
«Ошибка 255 при запуске ‘net usershare’: net usershare add: cannot convert name «Everyone» to a SID. Memory allocation error»
Пробовал рестатить самбу «sudo /etc/init.d/samba restart»
Пробовал расшаривать через консоль с помощью «net usershare»
Самое интересное что ошибка не постоянная, появляется после перезагрузки системы и исчезает после первой же перезагрузки ситемы, а бывает что раз по 10 рестартить приходится.
Как это лечить?
З.Ы. Сильно не ругаться я новичок в Линуксоводстве)
kosh59
лечится оно добавлением в файл /etc/samba/smb.conf
строчки
usershare owner only = falseну и конечно перезапуском самбы
sudo /etc/init.d/samba restart
nocturna
Та-же проблема.
Ошибка 255 при запуске 'net usershare': net usershare add: cannot convert name "Everyone" to a SID. Memory allocation error.
Добавление usershare owner only = false не помогло…
S.Dedal
У меня похожая проблема. Поставил Ubuntu 9.10 второй системой после Windows 7, при попытке расшарить папку, находящуюся на винте с файловой системой ntfs получаю пресловутую ошибку 255. Прописал строчку usershare owner only = false в /etc/samba/smb.conf следующим образом:
Но эта ошибка все равно появляется, перезапуск самбы и перезагрузка не помогли.
Возможно что-то сделал не так или прописал не туда, т.к. Ubuntu поставил недавно и в ней я нубас полнейший.
lcnet
kosh59, Неее тут другое… такое ощущение что все ошибки с ‘net usershare’ именуются Ошибка 255…
Вот пример:
«Ошибка 255 при запуске ‘net usershare’: net usershare add: cannot share path /media/disk as we are restricted to only sharing directories we own. Ask the administrator to add the line «usershare owner only = False» to the [global] section of the smb.conf to allow this«
— Эта ошибка значит вы пытаетесь сделать общедоступным диск или папку, владельцем которой ваша учётная запись не является.
Как ты и горишь надо в etc/samba/smb.conf и в секцию [global] в подраздел Misc дописать строчку:
usershare owner only = False.
Это разрешит нам как пользователю открывать общий доступ к чужим объектам. Так, диски находятся в ведении суперпользователя.
Опять таки ошибка с номером 255
«Ошибка 255 при запуске ‘net usershare’: net usershare add: cannot convert name «Everyone» to a SID. Memory allocation error«
— Чем она лечится я так и не понял, или мои махинации помогли то-ли этот глюк прошел сам через пару обновлений…
Я делал так.
1) Примонтировал диски таким нехитрым способом
sudo gedit /etc/mtab
скопировал нужное и в вставил в
sudo gedit /etc/fstab
заменив fuseblk на ntfs-3g
1.2) строка «usershare owner only = False«. у меня уже была прописана… если у Вас нет, вставьте на всяк пожарный
2) Поставил самбу «Sudo apt-get install samba«,
3) Расшарил папки через ГУИ Samb’ы «Система/Администрирование/Samba» назначив там нужные права доступа.
« Последнее редактирование: 27 Января 2010, 20:44:22 от lcnet »
netsloff
попробуйте так sudo /etc/init.d/samba restart Если будет так (ок) (fail) то сделайте так sudo apt-get install —reinstall samba-common-bin а потом так sudo /etc/init.d/samba restart мне помогло…
stepnoy
мне это не помогло
попробуйте так sudo /etc/init.d/samba restart Если будет так (ок) (fail) то сделайте так sudo apt-get install —reinstall samba-common-bin а потом так sudo /etc/init.d/samba restart мне помогло…
вот такая постоянно ошибка
кто может подсказать в чем тут проблема?
GrafTrahula
можно попробовать запустить sudo nautilus и через него повторить расшаривание.мне помогло
simulyant
У меня при расшаривании папки через nautilus возникает эта ошибка «Ошибка 255 при запуске ‘net usershare’: net usershare add: cannot convert name «Everyone» to a SID. Invalid parameter»
— добавление usershare owner only = false в /etc/samba/smb.conf — не помогло
— Переустановка samba-common-bin — sudo apt-get install —reinstall samba-common-bin а потом так sudo /etc/init.d/samba restart — не помогло
— Запуск sudo nautilus не помог
Что делать?
Ubuntu 10.04 Netbook Edition
Kiberman
У меня при расшаривании папки через nautilus возникает эта ошибка «Ошибка 255 при запуске ‘net usershare’: net usershare add: cannot convert name «Everyone» to a SID. Invalid parameter»
— добавление usershare owner only = false в /etc/samba/smb.conf — не помогло
— Переустановка samba-common-bin — sudo apt-get install —reinstall samba-common-bin а потом так sudo /etc/init.d/samba restart — не помогло
— Запуск sudo nautilus не помог
Что делать?
тоже такая же ошибка,решения пока не нашёл может кто из постояльцев ответит
« Последнее редактирование: 09 Марта 2011, 15:49:08 от Kiberman »
gregory5
Расшаривай через конфиг, а не наутилус, и да судо наутилус запуститься без поддержки сети из за кривизны в шине, запускать нужно sudo dbus-launch nautilus, но не расшаривай наутилусом, криво оно работает
0konstantin0
как я понял такое бывает если дополнительно установить сервер самба из репозитория помимо стандартного….
IAmABanana
Была такая же проблема с расшариванием собственых папок через роутер. Решилось всё очень просто: идём Система>Администрирование>опубликованные папки и добавляем всё что нужно.
KXStudio 14.04 дуалбут с Win7
Lenovo Thinkpad X230
ps1x0
Здравствуйте, уважаемые. Была похожая проблема: не мог расшарить папку с полным доступом на ntfs разделе.
Победил с помощью добавления строчки usershare owner only = false в секцию [global] /etc/samba/smb.conf
Потом возникла проблема с предоставлением гостевого доступа к расшаренной папке. Не знаю что тут сыграло определяющую роль, но во-первых убрал sticky-бит c usershares
sudo chmod -t /var/lib/samba/usershares
во-вторых примонтировал раздел с ntfs c правами drwxrwxrwx, путем изменения umask=007 на umask=000. В итоге строчка в fstab с ntfs разделом выглядела следующим образом:
UUID=C53D4B0FAEB1E5A1 /media/data ntfs defaults,umask=000,gid=46 0 0
Решил на всякий случай написать, может кому-нибудь пригодится. Ubuntu 10.04 LTS
« Последнее редактирование: 18 Ноября 2011, 10:56:02 от ps1x0 »
Если отдавать ужин врагу, можно приобрести друга (с)
denisyan
проблема решилась так. Началось это после установки сервера и изменении прав вна каталог VAR. Я вернул права на место и через рута (sudo nautilus) назначил общий доступ. Папка появилась в сети после перезагрузки
- Печать
Страницы: [1] 2 Все Вверх
In my code I have the following to run a remote script.
ssh root@host.domain.com "sh /home/user/backup_mysql.sh"
For some reason it keeps 255’ing on me. Any ideas?
I can SSH into the box just fine (passless keys setup)
REMOTE SCRIPT:
MUSER='root'
MPASS='123123'
MHOST="127.0.0.1"
VERBOSE=0

### Set bins path ###
GZIP=/bin/gzip
MYSQL=/usr/bin/mysql
MYSQLDUMP=/usr/bin/mysqldump
RM=/bin/rm
MKDIR=/bin/mkdir
MYSQLADMIN=/usr/bin/mysqladmin
GREP=/bin/grep

### Setup dump directory ###
BAKRSNROOT=/.snapshots/tmp

#####################################
### ----[ No Editing below ]------###
#####################################
### Default time format ###
TIME_FORMAT='%H_%M_%S%P'

### Make a backup ###
backup_mysql_rsnapshot(){
        local DBS="$($MYSQL -u $MUSER -h $MHOST -p$MPASS -Bse 'show databases')"
        local db="";
        [ ! -d $BAKRSNROOT ] && ${MKDIR} -p $BAKRSNROOT
        ${RM} -f $BAKRSNROOT/* >/dev/null 2>&1
#       [ $VERBOSE -eq 1 ] && echo "*** Dumping MySQL Database ***"
#       [ $VERBOSE -eq 1 ] && echo -n "Database> "
        for db in $DBS
        do
                local tTime=$(date +"${TIME_FORMAT}")
                local FILE="${BAKRSNROOT}/${db}.${tTime}.gz"
#               [ $VERBOSE -eq 1 ] && echo -n "$db.."
                ${MYSQLDUMP} --single-transaction -u ${MUSER} -h ${MHOST} -p${MPASS} $db | ${GZIP} -9 > $FILE
        done
#               [ $VERBOSE -eq 1 ] && echo ""
#               [ $VERBOSE -eq 1 ] && echo "*** Backup done [ files wrote to $BAKRSNROOT] ***"
}

### Die on demand with message ###
die(){
        echo "$@"
        exit 999
}

### Make sure bins exists.. else die
verify_bins(){
        [ ! -x $GZIP ] && die "File $GZIP does not exists. Make sure correct path is set in $0."
        [ ! -x $MYSQL ] && die "File $MYSQL does not exists. Make sure correct path is set in $0."
        [ ! -x $MYSQLDUMP ] && die "File $MYSQLDUMP does not exists. Make sure correct path is set in $0."
        [ ! -x $RM ] && die "File $RM does not exists. Make sure correct path is set in $0."
        [ ! -x $MKDIR ] && die "File $MKDIR does not exists. Make sure correct path is set in $0."
        [ ! -x $MYSQLADMIN ] && die "File $MYSQLADMIN does not exists. Make sure correct path is set in $0."
        [ ! -x $GREP ] && die "File $GREP does not exists. Make sure correct path is set in $0."
}

### Make sure we can connect to server ... else die
verify_mysql_connection(){
        $MYSQLADMIN  -u $MUSER -h $MHOST -p$MPASS ping | $GREP 'alive'>/dev/null
        [ $? -eq 0 ] || die "Error: Cannot connect to MySQL Server. Make sure username and password are set correctly in $0"
}

### main ####
verify_bins
verify_mysql_connection
backup_mysql_rsnapshot
5
This is usually happens when the remote is down/unavailable; or the remote machine doesn’t have ssh installed; or a firewall doesn’t allow a connection to be established to the remote host.
ssh returns 255 when an error occurred or 255 is returned by the remote script:
 EXIT STATUS

     ssh exits with the exit status of the remote command or
     with 255 if an error occurred.
Usually you would an error message something similar to:
ssh: connect to host host.domain.com port 22: No route to host
Or
ssh: connect to host HOSTNAME port 22: Connection refused
Check-list:
-
What happens if you run the ssh command directly from the command line?
-
Are you able to
pingthat machine? -
Does the remote has ssh installed?
-
If installed, then is the ssh service running?
answered Feb 14, 2013 at 23:30
![]()
6
This error will also occur when using pdsh to hosts which are not contained in your «known_hosts» file.
I was able to correct this by SSH’ing into each host manually and accepting the question «Do you want to add this to known hosts».
1
If there’s a problem with authentication or connection, such as not being able to read a password from the terminal, ssh will exit with 255 without being able to run your actual script. Verify to make sure you can run ‘true’ instead, to see if the ssh connection is established successfully.
answered Feb 14, 2013 at 23:28
![]()
that other guythat other guy
114k11 gold badges167 silver badges192 bronze badges
Isn’t the problem in the lines:
### Die on demand with message ###
die(){
  echo "$@"
  exit 999
}
Correct me if I’m wrong but I believe exit 999 is out of range for an exit code and results in a exit status of 255.
1
I was stumped by this. Once I got passed the 255 problem… I ended up with a mysterious error code 1. This is the foo to get that resolved:
pssh -x '-tt' -h HOSTFILELIST -P "sudo yum -y install glibc"
-P means write the output out as you go and is optional. But the -x ‘-tt’ trick is what forces a psuedo tty to be allocated.
You can get a clue what the error code 1 means this if you try:
ssh AHOST "sudo yum -y install glibc"
You may see:
[slc@bastion-ci ~]$ ssh MYHOST "sudo yum -y install glibc"
sudo: sorry, you must have a tty to run sudo
[slc@bastion-ci ~]$ echo $?
1
Notice the return code for this is 1, which is what pssh is reporting to you.
I found this -x -tt trick here. Also note that turning on verbose mode (pssh —verbose) for these cases does nothing to help you.
It can very much be an ssh-agent issue.
Check whether there is an ssh-agent PID currently running with eval "$(ssh-agent -s)"
Check whether your identity is added with ssh-add -l and if not, add it with ssh-add <pathToYourRSAKey>.
Then try again your ssh command (or any other command that spawns ssh daemons, like autossh for example) that returned 255.
### Die on demand with message ###
die(){
        echo "$@"
        exit 999
}
I don’t have the rep to comment on Alex’s answer but the exit 999 line returns code 231 on my WSL Ubuntu 20.04.4 box. Not quite sure why that is returned but I understand that it’s out of range.
1
This document (7018701) is provided subject to the disclaimer at the end of this document.
Environment
SUSE Linux Enterprise Server 11 Service Pack 4 (SLES 11 SP4)
Situation
Upon right-clicking a folder in Gnome’s Nautilus file manager, choosing «Sharing Options,» selecting the «Share this folder» box and clicking the «Create Share» button in the open dialog, the following error is returned:
‘net usershare’ returned error 255: net usershare add: cannot convert name «Everyone» to a SID. Access denied.
Resolution
Since samba-client version 3.6.3-76.1, a new global option is required in smb.conf.
hostname:~ # vi /etc/samba/smb.conf
Add this option under the [global] section:
client ipc signing = auto
After the change is written, restart the samba service:
hostname:~ # rcsmb restart
Cause
Several CVEs were addressed for this samba-client package with the update to version 3.6.3-76.1. As a result of these changes, this new client ipc signing configuration option is required when creating usershares through Nautilus.
Disclaimer
This Support Knowledgebase provides a valuable tool for SUSE customers and parties interested in our products and solutions to acquire information, ideas and learn from one another. Materials are provided for informational, personal or non-commercial use within your organization and are presented «AS IS» WITHOUT WARRANTY OF ANY KIND.
- Document ID:7018701
- Creation Date:
09-Mar-2017 - Modified Date:28-Sep-2022
-
- SUSE Linux Enterprise Server
< Back to Support Search
For questions or concerns with the SUSE Knowledgebase please contact: tidfeedback[at]suse.com
- Forum
- The Ubuntu Forum Community
- Ubuntu Official Flavours Support
- Networking & Wireless
- [ubuntu] net usershare’ returned error 255: net usershare: cannot open usershare directory /va

-
net usershare’ returned error 255: net usershare: cannot open usershare directory /va
I try to share a folder by right clicking on it, then going to share. I get this error.
‘net usershare’ returned error 255: net usershare: cannot open usershare directory /var/lib/samba/usershares. Error Permission denied
You do not have permission to create a usershare. Ask your administrator to grant you permissions to create a share.What do I do?
-
Re: net usershare’ returned error 255: net usershare: cannot open usershare directory
This is a known bug when you first install Samba on Hardy. Restart and you should be able to share folders.
More details are available in this thread:
Simple File Sharing over a Home Network
-
Re: net usershare’ returned error 255: net usershare: cannot open usershare directory
Ok. I did that. Now I need to configure samba. I managed to find the config file, but it won’t let me save it. Nor does it poke me for my password. Also, do you know where I can set this? Now I can’t share my folder because of this.
‘net usershare’ returned error 255: net usershare add: cannot share path /opt/foldingathome as we are restricted to only sharing directories we own.
Ask the administrator to add the line «usershare owner only = False»
to the [global] section of the smb.conf to allow this.I tried finding it in smb.cof. But I don’t see anything interesting when I do a ctrl f for usershare.
Here is my smb.conf:
Code:
#
# Sample configuration file for the Samba suite for Debian GNU/Linux.
#
#
# This is the main Samba configuration file. You should read the
# smb.conf(5) manual page in order to understand the options listed
# here. Samba has a huge number of configurable options most of which
# are not shown in this example
#
# Any line which starts with a ; (semi-colon) or a # (hash)
# is a comment and is ignored. In this example we will use a #
# for commentary and a ; for parts of the config file that you
# may wish to enable
#
# NOTE: Whenever you modify this file you should run the command
# "testparm" to check that you have not made any basic syntactic
# errors.
#

#======================= Global Settings =======================

[global]

## Browsing/Identification ###

# Change this to the workgroup/NT-domain name your Samba server will part of
   workgroup = MSHOME

# server string is the equivalent of the NT Description field
   server string = %h server (Samba, Ubuntu)

# Windows Internet Name Serving Support Section:
# WINS Support - Tells the NMBD component of Samba to enable its WINS Server
;   wins support = no

# WINS Server - Tells the NMBD components of Samba to be a WINS Client
# Note: Samba can be either a WINS Server, or a WINS Client, but NOT both
;   wins server = w.x.y.z

# This will prevent nmbd to search for NetBIOS names through DNS.
   dns proxy = no

# What naming service and in what order should we use to resolve host names
# to IP addresses
;   name resolve order = lmhosts host wins bcast

#### Networking ####

# The specific set of interfaces / networks to bind to
# This can be either the interface name or an IP address/netmask;
# interface names are normally preferred
;   interfaces = 127.0.0.0/8 eth0

# Only bind to the named interfaces and/or networks; you must use the
# 'interfaces' option above to use this.
# It is recommended that you enable this feature if your Samba machine is
# not protected by a firewall or is a firewall itself.  However, this
# option cannot handle dynamic or non-broadcast interfaces correctly.
;   bind interfaces only = true


#### Debugging/Accounting ####

# This tells Samba to use a separate log file for each machine
# that connects
   log file = /var/log/samba/log.%m

# Cap the size of the individual log files (in KiB).
   max log size = 1000

# If you want Samba to only log through syslog then set the following
# parameter to 'yes'.
;   syslog only = no

# We want Samba to log a minimum amount of information to syslog. Everything
# should go to /var/log/samba/log.{smbd,nmbd} instead. If you want to log
# through syslog you should set the following parameter to something higher.
   syslog = 0

# Do something sensible when Samba crashes: mail the admin a backtrace
   panic action = /usr/share/samba/panic-action %d


####### Authentication #######

# "security = user" is always a good idea. This will require a Unix account
# in this server for every user accessing the server. See
# /usr/share/doc/samba-doc/htmldocs/Samba3-HOWTO/ServerType.html
# in the samba-doc package for details.
;   security = share

# You may wish to use password encryption.  See the section on
# 'encrypt passwords' in the smb.conf(5) manpage before enabling.
   encrypt passwords = true

# If you are using encrypted passwords, Samba will need to know what
# password database type you are using.
   passdb backend = tdbsam

   obey pam restrictions = yes

;   guest account = nobody
   invalid users = root

# This boolean parameter controls whether Samba attempts to sync the Unix
# password with the SMB password when the encrypted SMB password in the
# passdb is changed.
   unix password sync = yes

# For Unix password sync to work on a Debian GNU/Linux system, the following
# parameters must be set (thanks to Ian Kahan <<kahan@informatik.tu-muenchen.de> for
# sending the correct chat script for the passwd program in Debian Sarge).
   passwd program = /usr/bin/passwd %u
   passwd chat = *Entersnews*spassword:* %nn *Retypesnews*spassword:* %nn *passwordsupdatedssuccessfully* .

# This boolean controls whether PAM will be used for password changes
# when requested by an SMB client instead of the program listed in
# 'passwd program'. The default is 'no'.
   pam password change = yes

# This option controls how nsuccessful authentication attempts are mapped
# to anonymous connections
map to guest = bad user

########## Domains ###########

# Is this machine able to authenticate users. Both PDC and BDC
# must have this setting enabled. If you are the BDC you must
# change the 'domain master' setting to no
#
;   domain logons = yes
#
# The following setting only takes effect if 'domain logons' is set
# It specifies the location of the user's profile directory
# from the client point of view)
# The following required a [profiles] share to be setup on the
# samba server (see below)
;   logon path = \%Nprofiles%U
# Another common choice is storing the profile in the user's home directory
;   logon path = \%N%Uprofile

# The following setting only takes effect if 'domain logons' is set
# It specifies the location of a user's home directory (from the client
# point of view)
;   logon drive = H:
;   logon home = \%N%U

# The following setting only takes effect if 'domain logons' is set
# It specifies the script to run during logon. The script must be stored
# in the [netlogon] share
# NOTE: Must be store in 'DOS' file format convention
;   logon script = logon.cmd

# This allows Unix users to be created on the domain controller via the SAMR
# RPC pipe.  The example command creates a user account with a disabled Unix
# password; please adapt to your needs
; add user script = /usr/sbin/adduser --quiet --disabled-password --gecos "" %u

########## Printing ##########

# If you want to automatically load your printer list rather
# than setting them up individually then you'll need this
;   load printers = yes

# lpr(ng) printing. You may wish to override the location of the
# printcap file
;   printing = bsd
;   printcap name = /etc/printcap

# CUPS printing.  See also the cupsaddsmb(8) manpage in the
# cupsys-client package.
;   printing = cups
;   printcap name = cups

############ Misc ############

# Using the following line enables you to customise your configuration
# on a per machine basis. The %m gets replaced with the netbios name
# of the machine that is connecting
;   include = /home/samba/etc/smb.conf.%m

# Most people will find that this option gives better performance.
# See smb.conf(5) and /usr/share/doc/samba-doc/htmldocs/Samba3-HOWTO/speed.html
# for details
# You may want to add the following on a Linux system:
#         SO_RCVBUF=8192 SO_SNDBUF=8192
   socket options = TCP_NODELAY

# The following parameter is useful only if you have the linpopup package
# installed. The samba maintainer and the linpopup maintainer are
# working to ease installation and configuration of linpopup and samba.
;   message command = /bin/sh -c '/usr/bin/linpopup "%f" "%m" %s; rm %s' &

# Domain Master specifies Samba to be the Domain Master Browser. If this
# machine will be configured as a BDC (a secondary logon server), you
# must set this to 'no'; otherwise, the default behavior is recommended.
;   domain master = auto

# Some defaults for winbind (make sure you're not using the ranges
# for something else.)
;   idmap uid = 10000-20000
;   idmap gid = 10000-20000
;   template shell = /bin/bash

# The following was the default behaviour in sarge,
# but samba upstream reverted the default because it might induce
# performance issues in large organizations.
# See Debian bug #368251 for some of the consequences of *not*
# having this setting and smb.conf(5) for details.
;   winbind enum groups = yes
;   winbind enum users = yes

# Setup usershare options to enable non-root users to share folders
# with the net usershare command.

# Maximum number of usershare. 0 (default) means that usershare is disabled.
;   usershare max shares = 100

# Allow users who've been granted usershare privileges to create
# public shares, not just authenticated ones
   usershare allow guests = yes

#======================= Share Definitions =======================

# Un-comment the following (and tweak the other settings below to suit)
# to enable the default home directory shares.  This will share each
# user's home directory as \serverusername
;[homes]
;   comment = Home Directories
;   browseable = no

# By default, the home directories are exported read-only. Change the
# next parameter to 'no' if you want to be able to write to them.
;   read only = yes

# File creation mask is set to 0700 for security reasons. If you want to
# create files with group=rw permissions, set next parameter to 0775.
;   create mask = 0700

# Directory creation mask is set to 0700 for security reasons. If you want to
# create dirs. with group=rw permissions, set next parameter to 0775.
;   directory mask = 0700

# By default, \serverusername shares can be connected to by anyone
# with access to the samba server.  Un-comment the following parameter
# to make sure that only "username" can connect to \serverusername
# This might need tweaking when using external authentication schemes
;   valid users = %S

# Un-comment the following and create the netlogon directory for Domain Logons
# (you need to configure Samba to act as a domain controller too.)
;[netlogon]
;   comment = Network Logon Service
;   path = /home/samba/netlogon
;   guest ok = yes
;   read only = yes
;   share modes = no

# Un-comment the following and create the profiles directory to store
# users profiles (see the "logon path" option above)
# (you need to configure Samba to act as a domain controller too.)
# The path below should be writable by all users so that their
# profile directory may be created the first time they log on
;[profiles]
;   comment = Users profiles
;   path = /home/samba/profiles
;   guest ok = no
;   browseable = no
;   create mask = 0600
;   directory mask = 0700

[printers]
   comment = All Printers
   browseable = no
   path = /var/spool/samba
   printable = yes
   guest ok = no
   read only = yes
   create mask = 0700

# Windows clients look for this share name as a source of downloadable
# printer drivers
[print$]
   comment = Printer Drivers
   path = /var/lib/samba/printers
   browseable = yes
   read only = yes
   guest ok = no
# Uncomment to allow remote administration of Windows print drivers.
# Replace 'ntadmin' with the name of the group your admin users are
# members of.
;   write list = root, @ntadmin

# A sample share for sharing your CD-ROM with others.
;[cdrom]
;   comment = Samba server's CD-ROM
;   read only = yes
;   locking = no
;   path = /cdrom
;   guest ok = yes

# The next two parameters show how to auto-mount a CD-ROM when the
#	cdrom share is accesed. For this to work /etc/fstab must contain
#	an entry like this:
#
#       /dev/scd0   /cdrom  iso9660 defaults,noauto,ro,user   0 0
#
# The CD-ROM gets unmounted automatically after the connection to the
#
# If you don't want to use auto-mounting/unmounting make sure the CD
#	is mounted on /cdrom
#
;   preexec = /bin/mount /cdrom
;   postexec = /bin/umount /cdrom
Or should I make a new thread about this?
Edit:
I managed to save my file by using the command «gksu gedit /etc/samba/smb.conf». I still, however, need to do this.
‘net usershare’ returned error 255: net usershare add: cannot share path /opt/foldingathome as we are restricted to only sharing directories we own.
Ask the administrator to add the line «usershare owner only = False»
to the [global] section of the smb.conf to allow this.Last edited by Shoek; June 11th, 2008 at 09:18 PM.
-
Re: net usershare’ returned error 255: net usershare: cannot open usershare directory
I don’t think you need to mess with the usershare settings in the smb.conf. If you’ve restarted, the error message should no longer happen when you right click and try to share a folder. The problem is a group membership issue, and should be fixed by the restart alone.
Unless you run into further trouble, the only change I recommend you make to the smb.conf is to set your workgroup name correctly. Change the workgoup in the line workgroup = MSHOME to your correct workgroup name.
Probably the reason you can’t save the smb.conf is because you’re not editing with gksu or sudo.
Open a terminal and type:
Code:
gksu gedit /etc/samba/smb.conf
You might want to backup the file before you make changes. Again, from a terminal, you can do this with:
Code:
sudo cp /etc/samba/smb.conf /etc/samba/smb.conf.orig
-
Re: net usershare’ returned error 255: net usershare: cannot open usershare directory
I have tried restarting (twice), after I edited the config file. But I still get the error. I tried doing what the error said litterally, so here’s how my global looks like:
Code:
#======================= Global Settings =======================

[global]

## Browsing/Identification ###

# Change this to the workgroup/NT-domain name your Samba server will part of
   workgroup = MSHOME

# server string is the equivalent of the NT Description field
   server string = %h server (Samba, Ubuntu)

# Windows Internet Name Serving Support Section:
# WINS Support - Tells the NMBD component of Samba to enable its WINS Server
;   wins support = no

# WINS Server - Tells the NMBD components of Samba to be a WINS Client
# Note: Samba can be either a WINS Server, or a WINS Client, but NOT both
;   wins server = w.x.y.z

# This will prevent nmbd to search for NetBIOS names through DNS.
   dns proxy = no

# What naming service and in what order should we use to resolve host names
# to IP addresses
;   name resolve order = lmhosts host wins bcast

; "usershare owner only = False

#### Networking ####
That didn’t solve it. The folder I’m trying to share is in /opt by the way.
-
Re: net usershare’ returned error 255: net usershare: cannot open usershare directory
OK. /opt/ is owned by root and should be, so I guess you need to do what you’re doing if you really want to share it.
The problem now I think is you still have a ; in the line ; «usershare owner only = False. This makes it a comment. Try taking the ; and the « out and saving, then restarting Samba with:
Code:
sudo /etc/init.d/samba restart
Is there any particular reason you want to share /opt/? It’s a pretty obscure part of the directory structure.
What is the folder you want to share? Did you create it yourself? Another, possibly better approach would be to change the ownership of the directory you are sharing.
Last edited by jetsam; June 11th, 2008 at 10:01 PM.
-
Re: net usershare’ returned error 255: net usershare: cannot open usershare directory
Ok now it worked. Brilliant!
The only thing was that I’d already set «security = share», but it still prompted me for a password the first time. That’s ok, I solved it by allowing guest access for that particular folder. The reason I wanted to share a folder in opt is because fah_install set a program called Folding@Home there. As this is a server I wanted to share the results in my network so that I can monitor Folding@Home’s progress from my XP machine. Thanks for the help, I really didn’t expect to get an answer around here. Edit: by the way I am Shoek, I don’t know why I have two accounts here. But I changed my web browser now and the passwords didn’t come with it so I searched for Ubuntu in my e-mail and this is what came up.
Last edited by Giak; June 12th, 2008 at 02:11 PM.
-
Re: net usershare’ returned error 255: net usershare: cannot open usershare directory
Cool. That’s an interesting use for Samba. Glad you got it working.
Not all questions find answers on the forums, but it’s amazing to me how many of them do.
-
Re: net usershare’ returned error 255: net usershare: cannot open usershare directory
Originally Posted by Giak
Ok now it worked. Brilliant!
The only thing was that I’d already set «security = share», but it still prompted me for a password the first time. That’s ok, I solved it by allowing guest access for that particular folder. The reason I wanted to share a folder in opt is because fah_install set a program called Folding@Home there. As this is a server I wanted to share the results in my network so that I can monitor Folding@Home’s progress from my XP machine. Thanks for the help, I really didn’t expect to get an answer around here. Edit: by the way I am Shoek, I don’t know why I have two accounts here. But I changed my web browser now and the passwords didn’t come with it so I searched for Ubuntu in my e-mail and this is what came up.
You can also install and try the following package
Code:
sudo apt-get install system-config-samba
a.k.a. Samba Server Configuration Tool 1.2.50
its a nice gui tool (repository present in hardy universe) for configuring and setting share in samba similar to editing samba.conf file.
GNOME menu listing: System>Administration>Samba
Enjoy!
Last edited by pravinbravi; August 1st, 2008 at 02:41 AM.
—
The Wickerman
Ubuntu = sudo apt-get install freedom
-
Re: net usershare’ returned error 255: net usershare: cannot open usershare directory
Originally Posted by pravinbravi
You can also install and try the following package
Code:
sudo apt-get install system-config-samba
a.k.a. Samba Server Configuration Tool 1.2.50
its a nice gui tool (repository present in hardy universe) for configuring and setting share in samba similar to editing samba.conf file.
GNOME menu listing: System>Administration>Samba
Enjoy!
Omg, that was a brilliant tool. Glad I found this thread!

Bookmarks
Bookmarks
Posting Permissions

Want to share a folder over local network and allow access with create and delete files permission? Here’s the step by step picture guide shows how to do the trick in Ubuntu 22.10 Kinetic Kudu.
It’s quite easy to share your files over LAN or even outside home network either via a temporary http / ftp server, or third party file transfer tool (such as Dukto).
If you however need to setup a share folder for long time use, then samba file and print service can be a good choice.
In previous Ubuntu 22.04 and earlier, there’s a ‘Local Network Share‘ option when you right-clicking on a folder. With it, user can easily install and setup a shared folder via a few mouse clicks.
The option is on longer available in Ubuntu 22.10. However, it’s still easy to setup network share via an extension for Nautilus (the default file manager).
- First, press Ctrl+Alt+T key combination on keyboard to open a terminal window.
- When terminal opens, paste the command below and hit run to install the nautilus-share package, which install the samba service and setup file browser integration.
sudo apt install nautilus-share

After installation, you may also run nautilus -q command to quit Nautilus to apply the extension.
2. Start sharing a folder
Now, right-click on any folder that you want to share over local network. There should be a “Sharing Options” option in pop-up menu.

Just click on this option will open the dialog, which is just the similar one in the previous Ubuntu releases. Then, do:
- Enable the checkbox for ‘Share this folder’.
- Set the folder name to whatever that you want, or just leave it with default.
- Enable write permission for choice (create and delete files).
- Enable guest access so anyone can access without authentication, or leave it disabled so user need to type username & password when trying to open this folder.

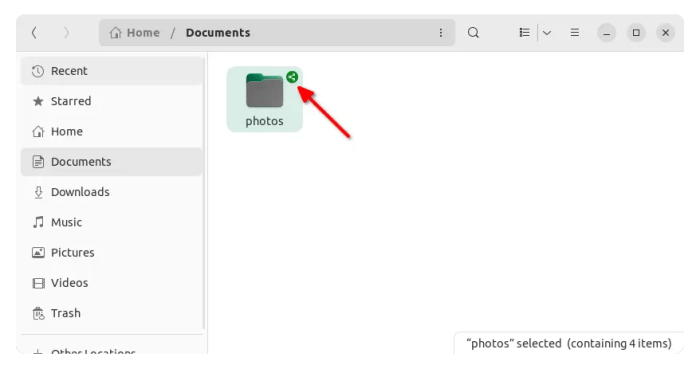
Once you clicked “Create Share” button, it will ask to confirm in next pop-up dialog for adding create and delete files permission.

Just click ‘Add Permission Automatically’ to confirm, then your folder icon will change with a little symbol in up-right.
3. Setup a password for authentication
If you didn’t enable ‘Guest access’, then you also need to set a password for access.
- First, press Ctrl+Alt+T on keyboard to open terminal.
- Then, run command to set a smb password:
sudo smbpasswd -a $USER

Finally, you can access this shared folder remotely via the username for login this Ubuntu system, but another password you just set specially for network share.
- Account: user-name you use to login the Ubuntu system (run
whoamito tell). - Password: the password you just set.
Firstly, you need to get either the hostname of local IP address for the Ubuntu machine. To do so, either go to Wifi/Network Settings, or run command in terminal:
- To get hostname, run:
hostname
- To get the IP address, run:
ip address

To access the shared folder in different system:
replace host_name_here with the hostname, and replace ip_here with the IP address. They are hirsute and 192.168.0.108 in the previous picture.
- For Windows, go to “Start Menu -> Run” (or press Windows logo key + R) and then type either
\host_name_hereor\ip_hereand hit Enter. - For Linux, it depends on your system. For Gnome Desktop, open file manager and go to “Other Locations”, under bottom “Connect to Server” box type
smb://host_name_hereorsmb://ip_hereand hit Enter. - For Mac OS, press “command + K” on keyboard to open Connect to Server dialog, type in
smb://host_name_hereorsmb://ip_hereand hit Enter.