Модуль ngx_http_auth_request_module (1.5.4+) предоставляет
возможность авторизации клиента, основанной на результате подзапроса.
Если подзапрос возвращает код ответа 2xx, доступ разрешается.
Если 401 или 403 — доступ запрещается с соответствующим кодом ошибки.
Любой другой код ответа, возвращаемый подзапросом, считается ошибкой.
При ошибке 401 клиенту также передаётся заголовок
“WWW-Authenticate” из ответа подзапроса.
По умолчанию этот модуль не собирается, его сборку необходимо
разрешить с помощью конфигурационного параметра
--with-http_auth_request_module.
Модуль может быть
скомбинирован с другими модулями доступа, такими как
ngx_http_access_module,
ngx_http_auth_basic_module
и
ngx_http_auth_jwt_module,
с помощью директивы satisfy.
До версии 1.7.3 ответы на авторизационные подзапросы не могли быть закэшированы
(с использованием директив
proxy_cache,
proxy_store и т.п.).
Пример конфигурации
location /private/ {
    auth_request /auth;
    ...
}

location = /auth {
    proxy_pass ...
    proxy_pass_request_body off;
    proxy_set_header Content-Length "";
    proxy_set_header X-Original-URI $request_uri;
}
Директивы
| Синтаксис: |
auth_request
|
|---|---|
| Умолчание: |
auth_request off; |
| Контекст: |
http, server, location
|
Включает авторизацию, основанную на результате выполнения подзапроса,
и задаёт URI, на который будет отправлен подзапрос.
| Синтаксис: |
auth_request_set
|
|---|---|
| Умолчание: |
— |
| Контекст: |
http, server, location
|
Устанавливает переменную в запросе в заданное
значение после завершения запроса авторизации.
Значение может содержать переменные из запроса авторизации,
например, $upstream_http_*.
I’ve a really strange issue mostly with images and sometimes with URLs, too. (on my NGINX setup)
Sometimes I find following message in the console of Firebug the message:
"NetworkError: 401 Unauthorized - http://myproject.mydomain.com/images/20150812/sample1.png"
or
"NetworkError: 401 Unauthorized - http://myproject.mydomain.com/appliaction/item/18/#"
But the strange thing is, these things are loaded! There aren’t anything missing. So I’m a little bit confused about this error message.
Configuration:
myproject-file in «sites-available» and «sites-enabled»
server {
    listen 80;
    #listen 443 ssl;

    server_name myproject.mydomain.com;
    root /srv/www/myproject;

    access_log /var/log/nginx/myproject-access.log;
    error_log /var/log/nginx/myproject-error.log;

        include global/dev.conf;


}
dev.conf
## Disable Access
    auth_basic "Restricted";
    auth_basic_user_file /etc/nginx/.htpasswd;

## Open instead listing (start)
    index index.php index.html index.htm;

## Redirect Default Pages
    # error_page 404 /404.html;

## favicon.ico should not be logged
location = /favicon.ico {
    log_not_found off;
    access_log off;
}

## Deny all attempts to access hidden files such as .htaccess, .htpasswd, .DS_Store (Mac).
location ~ /. {
    deny all;
    access_log off;
    log_not_found off;
}

## Deny all attems to access possible configuration files
location ~ .(tpl|yml|ini|log)$ {
    deny all;
}

## XML Sitemap support.
location = /sitemap.xml {
    log_not_found off;
    access_log off;
}

## robots.txt support.
location = /robots.txt {
    log_not_found off;
    access_log off;
}

location ~ .php$ {
#    try_files $uri $uri/ =404;

    ## NOTE: You should have "cgi.fix_pathinfo = 0;" in php.ini
    fastcgi_split_path_info ^(.+.php)(/.+)$;

    ## required for upstream keepalive
    # disabled due to failed connections
    #fastcgi_keep_conn on;

    include fastcgi_params;
    fastcgi_buffers 8 16k;
    fastcgi_buffer_size 32k;

    client_max_body_size 24M;
    client_body_buffer_size 128k;

    ## Timeout for Nginx to 5 min
    fastcgi_read_timeout 300;

    ## upstream "php-fpm" must be configured in http context
    fastcgi_pass php-fpm;
}

#URL Rewrite
location / {
    try_files $uri $uri/ /index.php?$args;
}
Any idea?
2 января, 2015 12:50 пп
15 315 views
| Комментариев нет
Cloud Server
При обращении к веб-серверу или приложению каждый поступивший HTTP-запрос получает в качестве ответа код состояния HTTP (англ. HTTP status code). Коды состояния HTTP – это трехзначные коды, сгруппированные в пять различных классов. Класс кода состояния можно определить по первой цифре:
- 1хх – информационные коды;
- 2хх – успех;
- 3хх – перенаправление;
- 4хх – ошибка клиента;
- 5хх – ошибка сервера.
Это руководство фокусируется на выявлении и устранении наиболее часто встречающихся кодов ошибок HTTP (то есть кодов состояния 4xx и 5xx) с точки зрения системного администратора. В некоторых ситуациях веб-сервер отвечает на запрос определенным кодом ошибки; рассмотрим общие возможные причины и решения.
Краткий обзор ошибок клиента и сервера
Ошибки клиента (коды состояния HTTP 400-499) возникают из-за HTTP-запросов, отправленных клиентом (веб-браузером или другим клиентом HTTP). Хотя данные типы ошибок связаны непосредственно с клиентом, системному администратору полезно знать, с какими кодами ошибок может столкнуться пользователь, чтобы определить, можно ли решить эту проблему в конфигурациях сервера.
Ошибки сервера (коды состояния HTTP 500-599) возникают тогда, когда веб-сервер не в состоянии обработать запрос из-за какой-либо ошибки или сбоя.
Общие советы по устранению ошибок HTTP
- При использовании веб-браузера для тестирования веб-сервера не забудьте обновить браузер после внесения изменений в настройки сервера.
- Проверяйте логи сервера, чтобы получить подробные сведения о том, как сервер обрабатывает запросы. Например, веб-серверы Apache и Nginx создают два файла по имени access.log и error.log, в которых можно найти соответствующую информацию.
- Запомните: определения кодов состояния HTTP являются частью стандарта, который реализуется обслуживающим запросы приложением. Это означает, что фактический код состояния, который возвращается в результате, зависит от того, как программное обеспечение сервера обрабатывает конкретную ошибку.
Ознакомившись с основными понятиями кодов состояния HTTP, приступим к обзору наиболее часто встречающихся ошибок.
Ошибка 400 Bad Request
Код статуса 400, или ошибка Bad Request («неверный запрос») означает, что синтаксис запроса HTTP, отправленного на сервер, неверен.
Как правило, причины возникновения ошибки 400 Bad Request таковы:
- Куки пользователя, связанные с сайтом, повреждены. Чтобы решить эту проблему,, попробуйте очистить кэш браузера и файлы cookie.
- Искаженный запрос из-за неисправного браузера.
- Искаженный запрос из-за ошибки пользователя при формировании HTTP-запроса вручную (например, неправильное использование curl).
Ошибка 401 Unauthorized
Код статуса 401, или ошибка Unauthorized («неавторизован») значит, что пользователь, пытающийся получить доступ к ресурсу, не прошел авторизацию (или не смог пройти ее, указав неверные учетные данные). Чтобы иметь возможность просматривать защищенный ресурс, пользователь должен предоставить корректные учетные данные.
Например, ошибка 401 Unauthorized может возникнуть, если пользователь пытается получить доступ к ресурсу, который защищен HTTP-авторизацией (как в этом руководстве по Nginx). В подобной ситуации ошибка 401 будет появляться снова и снова до тех пор, пока пользователь не предоставит корректный логин и пароль (который внесен в файл .htpasswd).
Ошибка 403 Forbidden
Код состояния 403, или ошибка Forbidden («запрещено») значит, что запрос пользователя был отправлен верно, но сервер отказывается обслуживать его в связи с отсутствием разрешения на доступ к запрашиваемому ресурсу. В этом разделе описаны наиболее распространенные причины возникновения ошибки 403.
Права на файл
Как правило, ошибка 403 случается, если пользователь, который запускает процесс веб-сервера, не имеет прав на чтение запрашиваемого файла.
Чтобы привести пример устранения ошибки 403, предположим, что:
- пользователь пытается получить доступ к индексному файлу (http://example.com/index.html);
- рабочий процесс веб-сервера принадлежит пользователю www-data;
- индексный файл на сервере находится в /usr/share/nginx/html/index.html.
Итак, если пользователь получает ошибку 403 Forbidden, убедитесь, что пользователь www-data имеет права на чтение файла. Как правило, в подобной ситуации нужно просто изменить права на файл. Это можно сделать несколькими способами, но в данном случае подойдет вот эта команда:
sudo chmod o=r /usr/share/nginx/html/index.html
Файл .htaccess
Еще одна потенциальная причина возникновения ошибки 403 (часто это делается намеренно) – использование файла .htaccess. При помощи файла .htaccess можно запретить конкретным IP-адресам (или диапазонам адресов) доступ к определенным ресурсам.
Если пользователи неожиданно получают ошибку 403 Forbidden, убедитесь, что она не была вызвана настройками файла .htaccess.
Несуществующий индексный файл
Если пользователь пытается получить доступ к каталогу, который не имеет стандартного индексного файла, а листинг каталога (directory listing) отключен, веб-сервер будет возвращать ошибку 403 Forbidden. Такое случится, если, например, пользователь попытается получить доступ к каталогу http://example.com/emptydir/, а в каталоге emptydir на сервере нет индексного файла. Листинг каталога можно включить в конфигурациях сервера.
Ошибка 404 Not Found
Код статуса 404, или ошибка Not Found («не найдено») значит, что пользователь может взаимодействовать с сервером, но требуемый файл или ресурс отсутствует.
Ошибки 404 могут возникнуть в самых различных ситуациях. Ниже приведен список советов, которые помогут устранить проблему в случае, если пользователь неожиданно получил 404 Not Found:
- Проверьте ссылку, которая направляет пользователя на сервер, на наличие ошибок или опечаток.
- Возможно, пользователь ввел неверный URL.
- Может быть, нужного файла не существует в указанном месте на сервере; убедитесь, что запрашиваемый ресурс не был перемещен или удален с сервера.
- Проверьте, правильно ли указано местонахождение корневого каталога (document root) в конфигурации сервера.
- Возможно, пользователь, которому принадлежит рабочий процесс веб-сервера, не имеет соответствующих прав, чтобы открыть каталог, в котором находится запрашиваемый файл. Для доступа к каталогу нужны права на чтение и выполнение.
- Если пользователь переходит к ресурсу по символической ссылке, убедитесь, что веб-сервер настроен для поддержки символических ссылок.
Ошибка 500 Internal Server Error
Код состояния 500, или ошибка Internal Server Error («внутренняя ошибка сервера») означает, что сервер не может обработать запрос по неизвестной причине. Иногда этот код появляется в ситуациях, когда более подходящими являются другие сообщения об ошибках 5xx.
Как правило, причиной данной ошибки является неправильная настройка сервера (например, искаженный файл .htaccess) или нехватка некоторых пакетов (к примеру, запуск файла PHP без предварительно установленного PHP).
Ошибка 502 Bad Gateway
Код состояния 502, или ошибка Bad Gateway («ошибочный шлюз») значит, что запрашиваемый сервер является шлюзом или прокси-сервером, и он не получает валидных ответов от серверов бэкэнда, которые на самом деле выполнили запрос.
Если речь идет об обратном прокси-сервере (например, о балансировщике нагрузки), убедитесь, что:
- с серверами бэкэнда (на которые пересылаются HTTP-запросы) все в порядке;
- обратный прокси настроен правильно, в его настройках указаны корректные бэкэнды;
- сетевое соединение между серверами бэкэнда и обратным прокси-сервером в порядке. Если серверы могут взаимодействовать на других портах, убедитесь, что эти порты не заблокированы брандмауэром;
- нужные сокеты существуют в корректном местонахождении и имеют соответствующие разрешения (если веб-приложение настроено слушать сокеты).
Ошибка 503 Service Unavailable
Код состояния 503, или ошибка Service Unavailable («сервис недоступен») означает, что сервер перегружен или находится на обслуживании; такой сервис должен стать доступным в течение некоторого времени.
Если сервер не находится на обслуживании, эта ошибка может указывать на то, что серверу не хватает ресурсов процессора или памяти для обработки всех входящих запросов, или что нужно настроить веб-сервер для обслуживания большего количества пользователей или процессов.
Ошибка 504 Gateway Timeout
Код состояния 504, или ошибка Gateway Timeout («шлюз не отвечает») значит, что данный сервер является шлюзом или прокси-сервером, и он не получает ответа от бэкэнда в пределах допустимого периода времени.
Как правило, это происходит по следующим причинам:
- Плохое сетевое соединение между серверами;
- Внутренний сервер, который выполняет запрос, работает слишком медленно;
- В настройках сервера задано слишком короткое время ожидания шлюза или прокси-сервера.
Заключение
Теперь вы знакомы с основными кодами ошибок HTTP и знаете некоторые пути решения этих проблем.
Если же вы столкнулись с ошибкой, которая не была охвачена данной статьей, или знаете другие удобные способы устранения ошибок HTTP, пожалуйста, опишите их в комментариях ниже.
Tags: Cloud Server, HTTP, HTTP status code, VPS
Ever found yourself wanting to put an application behind a login form, but dreading writing all that code to deal with OAuth 2.0 or passwords? In this tutorial, I’ll show you how to use the nginx auth_request module to protect any application running behind your nginx server with OAuth 2.0, without writing any code! Vouch, a microservice written in Go, handles the OAuth dance to any number of different auth providers so you don’t have to.
Tip: If you want to add login (and URL based authorization) to more apps via a UI, integrate with more complex apps like Oracle or SAP, or replace legacy Single Sign-On on-prem, check the Okta Access Gateway.
Why Authenticate at the Web Server?
Imagine you use nginx to run a small private wiki for your team. At first, you probably start out with adding a wiki user account for each person. It’s not too bad, adding new accounts for new hires, and removing them when they leave.
A few months later, as your team and company start growing, you add some server monitoring software, and you want to put that behind a login so only your company can view it. Since it’s not very sophisticated software, the easiest way to do that is to create a single password for everyone in an .htpasswd file, and share that user with the office.
Another month goes by, and you add a continuous integration system, and that comes with GitHub authentication as an option, which seems reasonable since most of your team has GitHub accounts already.
At this point, when someone new joins, you have to create a wiki account for them, add them to the GitHub organization, and give them the shared password for the other system. When someone leaves, you can delete their wiki account and remove them from GitHub, but let’s face it, you probably won’t change the shared password for a while since it’s annoying having to distribute that to everyone again.
Surely there must be a better way to integrate all these systems to use a common shared login system! The problem is the wiki is written in PHP, the server monitoring system just ends up publishing a folder of static HTML, and the CI system is written in Ruby which only one person on your team feels comfortable writing.
If the web server could handle authenticating users, then each backend system wouldn’t need to worry about it, since the only requests that could make it through would already be authenticated!
Using the nginx auth_request Module
Enter the nginx auth_request module.
This module is shipped with nginx, but requires enabling when you compile nginx. When you download the nginx source and compile, just include the --with-http_auth_request_module flag along with any others that you use.
The auth_request module sits between the internet and your backend server that nginx passes requests onto, and any time a request comes in, it first forwards the request to a separate server to check whether the user is authenticated, and uses the HTTP response to decide whether to allow the request to continue to the backend.
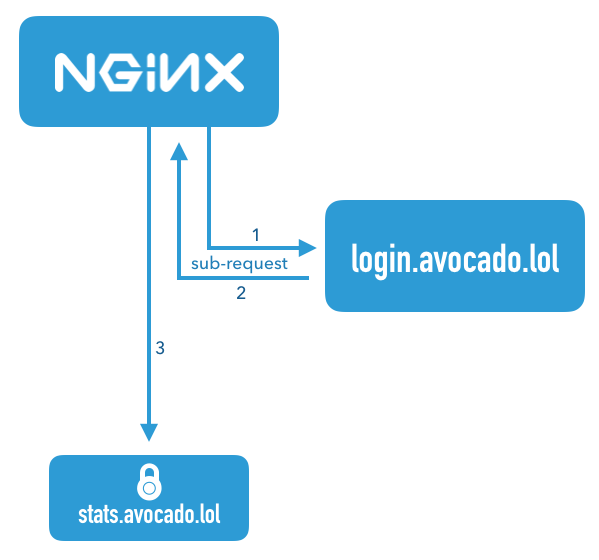
This diagram illustrates a request that comes in for the server name stats.avocado.lol. First, nginx fires off a sub-request to login.avocado.lol (1), and if the response (2) to that request returns HTTP 200, it then continues forwarding the request on to the backend stats.avocado.lol.
Choosing an Auth Proxy
Since the nginx auth_request module has no concept of users or how to authenticate anyone, we need something else in the mix that can actually handle logging users in. In the diagram above, this is illustrated by the server name login.avocado.lol.
This server needs to handle an HTTP request and return HTTP 200 or 401 depending on whether the user is logged in. If the user is not logged in, it needs to know how to get them to log in and set a session cookie.
To accomplish this, we’ll use the open source project “Vouch”. Vouch is written in Go, so it’s super easy to deploy. Everything can be configured via a single YAML file. Vouch can be configured to authenticate users via a variety of OAuth and OpenID Connect backends such as GitHub, Google, Okta or any other custom servers.
We’ll come back to configuring Vouch in a few minutes, but for now, let’s continue on to set up your protected server in nginx.
Configure Your Protected nginx Host
Starting with a typical nginx server block, you just need to add a couple lines to enable the auth_request module. Here is an example server block that should look similar to your own config. This example just serves a folder of static HTML files, but the same idea applies whether you’re passing the request on to a fastcgi backend or using proxy_pass.
server {
  listen 443 ssl http2;
  server_name stats.avocado.lol;

  ssl_certificate /etc/letsencrypt/live/avocado.lol/fullchain.pem;
  ssl_certificate_key /etc/letsencrypt/live/avocado.lol/privkey.pem;

  root /web/sites/stats.avocado.lol;

  index index.html;
}
Add the following to your existing server block:
# Any request to this server will first be sent to this URL
auth_request /vouch-validate;

location = /vouch-validate {
  # This address is where Vouch will be listening on
  proxy_pass http://127.0.0.1:9090/validate;
  proxy_pass_request_body off; # no need to send the POST body

  proxy_set_header Content-Length "";
  proxy_set_header X-Real-IP $remote_addr;
  proxy_set_header X-Forwarded-For $proxy_add_x_forwarded_for;
  proxy_set_header X-Forwarded-Proto $scheme;

  # these return values are passed to the @error401 call
  auth_request_set $auth_resp_jwt $upstream_http_x_vouch_jwt;
  auth_request_set $auth_resp_err $upstream_http_x_vouch_err;
  auth_request_set $auth_resp_failcount $upstream_http_x_vouch_failcount;
}

error_page 401 = @error401;

# If the user is not logged in, redirect them to Vouch's login URL
location @error401 {
  return 302 https://login.avocado.lol/login?url=https://$http_host$request_uri&vouch-failcount=$auth_resp_failcount&X-Vouch-Token=$auth_resp_jwt&error=$auth_resp_err;
}
Let’s look at what’s going on here. The first line, auth_request /vouch-validate; is what enables this flow. This tells the auth_request module to first send any request to this URL before deciding whether it’s allowed to continue to the backend server.
The block location = /vouch-validate captures that URL, and proxies it to the Vouch server that will be listening on port 9090. We don’t need to send the POST body to Vouch, since all we really care about is the cookie.
The line error_page 401 = @error401; tells nginx what to do if Vouch returns an HTTP 401 response, which is to pass it to the block defined by location @error401. That block will redirect the user’s browser to Vouch’s login URL which will kick off the flow to the real authentication backend.
Configure a Server Block for Vouch
Next, configure a new server block for Vouch so that it has a publicly accessible URL like https://login.avocado.lol. All this needs to do is proxy the request to the backend Vouch server.
server {
  listen 443 ssl;
  server_name login.avocado.lol;

  ssl_certificate /etc/letsencrypt/live/login.avocado.lol/fullchain.pem;
  ssl_certificate_key /etc/letsencrypt/live/login.avocado.lol/privkey.pem;

  # Proxy to your Vouch instance
  location / {
    proxy_set_header  Host  login.avocado.lol;
    proxy_set_header  X-Forwarded-Proto https;
    proxy_pass        http://127.0.0.1:9090;
  }
}
Configure and Deploy Vouch
You’ll need to download Vouch and compile the Go binary for your platform. You can follow the instructions in the project’s README file.
Once you’ve got a binary, you’ll need to create the config file to define the way you want Vouch to authenticate users.
Copy config/config.yml_example to config/config.yml and read through the settings there. Most of the defaults will be fine, but you’ll want to create your own JWT secret string and replace the placeholder value of your_random_string.
The easiest way to configure Vouch is to have it allow any user that can authenticate at the OAuth server be allowed to access the backend. This works great if you’re using a private OAuth server like Okta to manage your users. Go ahead and set allowAllUsers: true to enable this behavior, and comment out the domains: chunk.
You’ll need to choose an OAuth 2.0 provider to use to actually authenticate users. In this example we’ll use Okta, since that’s the easiest way to have a full OAuth/OpenID Connect server and be able to manage all your user accounts from a single dashboard.
Before you begin, you’ll need a free Okta developer account. Install the Okta CLI and run okta register to sign up for a new account. If you already have an account, run okta login.
Then, run okta apps create. Select the default app name, or change it as you see fit.
Choose Web and press Enter.
Select Other.
Then, change the Redirect URI to https://login.avocado.lol/auth and use https://login.avocado.lol for the Logout Redirect URI.
What does the Okta CLI do?
The Okta CLI will create an OIDC Web App in your Okta Org. It will add the redirect URIs you specified and grant access to the Everyone group. You will see output like the following when it’s finished:
Okta application configuration has been written to: /path/to/app/.okta.env
Run cat .okta.env (or type .okta.env on Windows) to see the issuer and credentials for your app.
export OKTA_OAUTH2_ISSUER="https://dev-133337.okta.com/oauth2/default"
export OKTA_OAUTH2_CLIENT_ID="0oab8eb55Kb9jdMIr5d6"
export OKTA_OAUTH2_CLIENT_SECRET="NEVER-SHOW-SECRETS"
Your Okta domain is the first part of your issuer, before /oauth2/default.
NOTE: You can also use the Okta Admin Console to create your app. See Create a Web App for more information.
Now that you’ve registered the application in Okta, you’ll have a client ID and secret which you’ll need to include in the config file. You’ll also need to set the URLs for your authorization endpoint, token endpoint and userinfo endpoint. These will most likely look like the below using your Okta domain.
config.yml
oauth:
  provider: oidc
  client_id: {yourClientID}
  client_secret: {yourClientSecret}
  auth_url: https://{yourOktaDomain}/oauth2/default/v1/authorize
  token_url: https://{yourOktaDomain}/oauth2/default/v1/token
  user_info_url: https://{yourOktaDomain}/oauth2/default/v1/userinfo
  scopes:
    - openid
    - email
  # Set the callback URL to the domain that Vouch is running on
  callback_url: https://login.avocado.lol/auth
Now you can run Vouch! It will listen on port 9090, which is where you’ve configured nginx to send the auth_request verifications as well as serve traffic from login.avocado.lol.
When you reload the nginx config, all requests to stats.avocado.lol will require that you log in via Okta first!
Bonus: Who Logged In?
If you’re putting a dynamic web app behind nginx and you care not only about whether someone was able to log in, but also who they are, there is one more trick we can use.
By default, Vouch will extract a user ID via OpenID Connect (or GitHub or Google if you’ve configured those as your auth providers), and will include that user ID in an HTTP header that gets passed back up to the main server.
In your main server block, just below the line auth_request /vouch-validate; which enables the auth_request module, add the following:
auth_request_set $auth_user $upstream_http_x_vouch_user;
This will take the HTTP header that Vouch sets, X-Vouch-User, and assign it to the nginx variable $auth_user. Then, depending on whether you use fastcgi or proxy_pass, include one of the two lines below in your server block:
fastcgi_param REMOTE_USER $auth_user;
proxy_set_header Remote-User $auth_user;
These will set an HTTP header with the value of $auth_user that your backend server can read in order to know who logged in. For example, in PHP you can access this data using:
<?php
echo 'Hello, ' . $_SERVER['REMOTE_USER'] . '!';
Now you can be sure that your internal app can only be accessed by authenticated users!
Learn More About OAuth 2.0 and Secure User Management with Okta
For more information and tutorials about OAuth 2.0, check out some of our other blog posts!
- Add Authentication to your PHP App in 5 Minutes
- What is the OAuth 2.0 Authorization Code Grant Type?
- What is the OAuth 2.0 Implicit Grant Type?
As always, we’d love to hear from you about this post, or really anything else! Hit us up in the comments, or on Twitter @oktadev!