Looks like no one’s replied in a while. To start the conversation again, simply
ask a new question.
Could not mount “Seagate”. (com.apple.DiskManagement.disenter error 49223.) message
Im new with MacBooks so thank you for any help. Im trying to mount my hard drive but I’m getting this message- Could not mount “Seagate”. (com.apple.DiskManagement.disenter error 49223.)
I ran the first aid in the disk utilities and it runs and says operation successful. But it still won’t mount.
MacBook Air 13″,
macOS 10.15
Posted on Oct 27, 2019 11:49 AM
Similar questions
-
Could not mount Seagate4 : ( com.apple.DiskManagement.disenter error 0. )
I too am getting the window: Could not mount
«Seagate 4 Drive»
( com.apple.DiskManagement.disenter error 0. )Anyone find out a solution ? Thanks !!
[Email Edited by Moderator]
184
3
-
can’t mount external hard disk or usb drive
This is the error message when I clicked ‘mount’ in the disk utility, hope someone could help.
Could not mount “Ted_16”. (com.apple.DiskManagement.disenter error -119930872.)On another macbook, the same disk works, so i am sure it’s not the disk itself that has the issue.
I have tried run first aid, still cannot mount. then, I erased it, still got the same error message.389
4
-
External hard drive won’t mount after power blip
After a momentary power interruption this morning, my external hard drive (on which I have a Time Machine backup) does not mount and does not appear in Finder. (It is a LaCie 2TB USB drive.) The device is recognized in System Information and Disk Utility, but an attempt to mount it in Disk Utility returns this error message:Could not mount “disk2s2”. (com.apple.DiskManagement.disenter error -119930868.)
I have tried First Aid in Disk Utility but it fails. Restarting the computer did not help either.
I have a Mac Mini (Late 2014) running MacOS Big Sur Ver. 11.6.2.
Any suggestions would be appreciated. Thank you!
602
4
1 reply
Question marked as
★
Helpful
Dec 29, 2019 12:09 PM in response to Krakalaka
My 5 TB external harddrive is powered via external power supply and the Mac can’t use it, so I assume Mac and harddvie are just not working together for an unknown reason.
30 replies
Dec 21, 2019 11:45 AM in response to unnsteinngardars
unnsteinngardars wrote:
It is not a Catalina thing, I have a Seagate Backup Plus Hub drive that was formatted as exFAT on a windows computer and will not mount on a mac and gives me the exact same error as this thread. And it started to happen on my mac before Catalina and also was an issue on another mac with a mac os Sierra.
Windows can format the drive using different block sizes some of which macOS does not recognize. Backup any files on this drive and use the Mac’s Disk Utility to erase the drive as GUID partition and ExFAT. You need to erase the physical drive so you may need to click on «View» within Disk Utility and select «Show all devices» before the physical drive appears in the left pane of Disk Utility. This should allow the drive to be used on both Windows & Mac.
When you say Seagate Software, are you referring to the Paragon or something else?
I’ve never used the Seagate external drives or their proprietary software, so I am not sure what is included. Did you run a Seagate app which was included on or with the drive? If so uninstall it using the included uninstaller or by following Seagate’s instructions. I know Paragon software is sometimes included with the Seagate software to allow writing to NTFS volumes.
If you downloaded the Paragon software separately, then yes uninstall it according to the developer’s instructions since it is not needed on a Mac unless you need to write to an NTFS volume or access a Linux file system.
Dec 23, 2019 8:59 AM in response to HWTech
Yes I was referring to paragon software. Here’s what I know:
- I have a seagate drive I’ve used for a few years now. When I bought it, it would only mount as read-only on my Mac. I installed the Paragon software and it worked fine after that.
- I have backed up 100+ GB of data to that drive over those years
- I updated to Catalina. The seagate drive would no longer work, mounting as read-only. I updated the Paragon software and the drive worked fine. Just as before, I don’t have to do anything, as it mounts automatically when I plug it into my mac.
It continues to work fine now. I understand from other posts that this won’t work for everyone, but I can’t comment on those posts. I’m just passing on what I did. I don’t worry about disk formats or Mac vs. PC, I’m just a guy using a disk drive for backups.
-dave
Dec 23, 2019 1:42 PM in response to dchura7734
dchura7734 wrote:
1. Yes I was referring to paragon software. Here’s what I know:
I have a seagate drive I’ve used for a few years now. When I bought it, it would only mount as read-only on my Mac. I installed the Paragon software and it worked fine after that.
2. I have backed up 100+ GB of data to that drive over those years
3. I updated to Catalina. The seagate drive would no longer work, mounting as read-only. I updated the Paragon software and the drive worked fine. Just as before, I don’t have to do anything, as it mounts automatically when I plug it into my mac.
It continues to work fine now. I understand from other posts that this won’t work for everyone, but I can’t comment on those posts. I’m just passing on what I did. I don’t worry about disk formats or Mac vs. PC, I’m just a guy using a disk drive for backups.
-dave
Unless you are using an external drive for access with both Mac & Windows you should always use macOS Disk Utility to erase the drive as GUID partition and MacOS Extended (Journaled) so that only macOS is managing the drive using a native macOS file system. If a drive needs to be shared between Mac & Windows, then erasing the drive as ExFAT on a Mac using Disk Utility is an acceptable alternative since both macOS & Windows support read+write ExFAT file system (it must be erased on a Mac since Windows may format ExFAT with options currently incompatible with macOS).
Third party software is not needed to use an external drive on a Mac unless you want to use the built-in hardware encryption feature found on some external SSD drives. Third party software usually ends up causing issues at some point, but especially during system updates or upgrades. Plus access to the drive may become lost if the proprietary third party software is no longer supported.
Unfortunately this is a Windows only world when it comes to third party hardware so hardware manufacturers default everything to work with a Windows system which means many external drives are shipped using the Windows NTFS file system. It is always best to use the operating system’s built-in native file systems whenever possible to reduce the risk of problems and compatibility issues.
Just something to consider and I hope this information may help others.
Dec 26, 2019 9:39 AM in response to HWTech
Yep I agree its lousy advice. I guess some people should think before offering any advice and consider whether their advice is actually helpful.
Dec 28, 2019 12:26 PM in response to Krakalaka
I have read the whole thread and now concluded this is on Apple, not Seagate.
I bought the Seagate drive before Catalina. After installing the Paragon driver, from Seagate, everything worked. When I upgraded to Catalina, I needed to install a newer version (64-bit). Then it continued to work. A week ago, it stopped working on one of my computers. But it continued to work on the other. Before I triage, the other computer auto-upgraded itself to a newer Catalina. Now both computers stopped working for the drive.
I uninstalled Seagate’s paragon driver, the disk mounts but read-only. I reinstalled the previously working driver (same version) and the problem reproduced.
I guess Apple may claim the Paragon driver is now incompatible with one of the later Catalina patches and I will accept that. The point is still that Apple’s patch broke the driver, not the other way around.
I now have a 5TB drive that is basically useless.
Guess Seagate, Paragon, or Apple need to do something.
[Edited by Moderator]
Dec 28, 2019 8:13 PM in response to sin-yaw
sin-yaw wrote:
I have read the whole thread and now concluded this is on Apple, not Seagate.
I bought the Seagate drive before Catalina. After installing the Paragon driver, from Seagate, everything worked. When I upgraded to Catalina, I needed to install a newer version (64-bit). Then it continued to work. A week ago, it stopped working on one of my computers. But it continued to work on the other. Before I triage, the other computer auto-upgraded itself to a newer Catalina. Now both computers stopped working for the drive.
I uninstalled Seagate’s paragon driver, the disk mounts but read-only. I reinstalled the previously working driver (same version) and the problem reproduced.
I guess Apple may claim the Paragon driver is now incompatible with one of the later Catalina patches and I will accept that. The point is still that Apple’s patch broke the driver, not the other way around.
I now have a 5TB drive that is basically useless.
Guess Seagate, Paragon, or Apple need to do something.
[Edited by Moderator]
And so many other users in this thread have blasted me for recommending people not to use the proprietary software which ships with external drives! Seems I might know what I’m talking about!
You cannot expect Apple to make sure every piece of third party software works in macOS. It is up to the hardware manufacturers to update their third party software. It is the way it has ALWAYS been. It is the same for Windows & Linux systems as well. If you have an issue with a third party app provided by the drive manufacturer, then contact the manufacturer of your external drive for support and to complain about not having a timely software update to the app.
You do have options here. You can report the issue to Seagate and wait for an update to their app. Or you can transfer everything from the now read-only external drive to another drive or computer. Then erase the external drive using Disk Utility. Erase the drive as GUID partition and MacOS Extended (Journaled) if you will only be using it on Macs. Or if you will be using the drive with Windows as well, then erase it as GUID partition and exFAT using Disk Utility. If you erase it as exFAT on Windows, then macOS may not be able to read the drive. Once the external drive has been erased using Disk Utility, then you can transfer all the files back to the external drive.
Dec 28, 2019 8:36 PM in response to HWTech
stay friendly, be happy. we are not in the 1980’s anymore where any manufacturer made his own thing and almost nothing did fit well together. I personally refuse to use third party tools only to access well known, simple devices. to buy any harddrive in the next shop and use it without trouble should be no magic anymore today. not even when using an apple computer …
Dec 28, 2019 10:12 PM in response to HWTech
I have been an OS developers for decades and, in general, agree with you that the manufacturer must ultimately bear the responsibility to make things work.
In this case, however, it was working and got broken by a minor OS patch. Therefore, the patch failed the regression tests against the vendors.
Nearly all OS vendors maintain a large lab and developed a comprehensive regression test suite to prevent things like this from happening. Simply, what was working should continue so. Either Apple did not find such failure, didn’t warn Seagate on this failure, or expect a different relationship than what us customers expect. Probably Apple expects Seagate to test against all patches on its own and remedy any issue. From what I read from Seagate’s website, they appeared completely oblivious to this failure.
Apple must manage its ecosystem as a platform vendor. Your reply basically stated that Apple bears no responsibility. It’s either Seagate’s or customer’s problem. That attitude is really disappointing.
The industry is saying that «Apple is becoming Microsoft faster than Microsoft becoming Apple.» Remember that consumers have choices. Being arrogant will hurt you.
Dec 28, 2019 10:18 PM in response to HWTech
Just search this error message on the internet and count how many customers encountered the same problem. This is not isolated to Seagate. Catalina is not reliable. Fix it.
Dec 29, 2019 4:49 AM in response to HWTech
Thank you for all of your replies to my question. Here is a bit more updated information on my situation.
I have 2 external hard drives that are formatted the same. They both work when connected to my windows computer. The Samsung 1tb hd works when I connect to my Mac and it is powered by a wall plug. The seagate 6tb hd shows up but won’t mount, I can verify it using paragon software and is powered by the usb cable. I’ve tried using paragon software(old version/updated version), it still didn’t work.
I have both hard drives full so I can’t just reformat the seagate. Is there any chance that it could be because the hard drive isn’t getting enough power from the Mac book? Or does the seagate hd and Mac just not play nice together?
Question marked as
★
Helpful
Dec 29, 2019 12:09 PM in response to Krakalaka
My 5 TB external harddrive is powered via external power supply and the Mac can’t use it, so I assume Mac and harddvie are just not working together for an unknown reason.
Dec 29, 2019 4:19 PM in response to Krakalaka
Krakalaka wrote:
I have 2 external hard drives that are formatted the same. They both work when connected to my windows computer. The Samsung 1tb hd works when I connect to my Mac and it is powered by a wall plug. The seagate 6tb hd shows up but won’t mount, I can verify it using paragon software and is powered by the usb cable. I’ve tried using paragon software(old version/updated version), it still didn’t work.
That is one of the dangers of using a non-native macOS file system and relying on third party software to manage the drive. You may need to contact Seagate for support.
What file system is used on your 6TB drive? macOS should be able to mount an NTFS file system in read-only mode. If the drive is formatted as exFAT, then the exFAT format may be using block sizes which macOS cannot understand. To use an exFAT drive with both Mac & Windows you need to format the drive on the Mac using Disk Utility.
I have both hard drives full so I can’t just reformat the seagate. Is there any chance that it could be because the hard drive isn’t getting enough power from the Mac book? Or does the seagate hd and Mac just not play nice together?
Try using a powered USB3 hub with UASP support to connect the hard drive. This may help provide any extra power plus it will act as a buffer between the devices. Does the 6TB drive come with its own power supply or special double USB cable/dongle? Years ago I did encounter a drive enclosure which would not work on a Mac, so there is always a possibility of hardware incompatibility, but by using third party software the situation becomes more complicated. I think a 6TB drive will need extra power to work either with a double USB connector or its own power adapter.
Have you disconnected all other external devices from your Mac when trying to access the 6TB drive? Is your laptop using its power adapter?
Have you tried booting into Safe Mode to see if the 6TB drive can be mounted as read-only if it is formatted as NTFS?
Has this 6TB drive ever worked on this Mac? Do you see the drive (or the drive’s controller) show up under the USB section of the Apple System Profiler? You can access this by Option-clicking on the Apple menu and selecting the first option (System Information?).
Maybe your drive is physically failing. You may be able to check the health of the external hard drive on Windows by using GSmartControl (portable app available requiring no installation). GSmartControl also has a method to run a drive’s internal self diagnostics. There is no guarantee this information can be accessed since some external drive’s USB controllers block the necessary communication. Maybe your Seagate software on Windows can access this information or even test the physical drive. Feel free to post the GSmartControl report for the drive here using the «Additional Text» icon which looks like a piece of paper.
If the external drives are not backup drives, then I hope you have backup copies of all the data stored on your external drives.
Dec 29, 2019 4:26 PM in response to HWTech
I think we have already clarified that this issue is not related to third party tools and also appears when you are not using them. I haven’t expected there to be that much guys defending Apple at all cost by lacking any helpful information why in nearly 2020 a harddrive bought in the next store should not be able to be used without any hassle with any modern operating system.
Dec 29, 2019 5:33 PM in response to Imobisac
Imobisac wrote:
I think we have already clarified that this issue is not related to third party tools and also appears when you are not using them. I haven’t expected there to be that much guys defending Apple at all cost by lacking any helpful information why in nearly 2020 a harddrive bought in the next store should not be able to be used without any hassle with any modern operating system.
I am far from an Apple fan. I’ve been strongly opposed to the direction Apple has been going for years now and yes Apple does make some pretty stupid decisions. I personally do not purchase Apple’s computers, but am forced to use them for work. Apple is really a closed system where you do it Apple’s way or you will experience difficulties. Same thing if you do something which Apple did expect.
If you search these forums you will see so many threads where updating or removing third party drive management software solved so many of the users’ external hard drive problems.
Yes there can be hardware incompatibilities, but it is hard to identify the hardware issues when some people are unable to erase the drive to test without the third party software being involved. Some of the users posting here with problems may need to contact a local Apple hardware expert to physically examine their computer & drives to see what the source of their individual problem is. You also never get the complete story or system setup from people posting here so we are always working with incomplete information and many unknowns so there could be other factors involved such as security or AV software, etc. Like I said in my last post a 5TB+ drive may require extra power.
Many hardware vendors only pay lip service to macOS compatibility because unfortunately we live in a Windows centric world which is why most of these drives come pre-formatted for Windows with NTFS. Like Linux users Mac users need to research products and carefully choose & configure those products. Mac users do need to understand the hardware more than their Windows counterparts because a Mac user usually needs to do more to make hardware work properly. Mac users do have an option of purchasing guaranteed & tested products from an Apple friendly vendor such as OWC. If Mac users purchase off the shelf items at a regular store, then the Mac user will need to deal with possible incompatibilities. You know nothing of compatibility issues until you try to find Linux compatible hardware or Linux compatible firmware updaters. While Mac users are second class citizens in the tech world, Linux users are treated like the plague by hardware manufacturers. I agree it would be so nice if everyone would agree to standards and then properly implement those standards, but everyone including Apple takes shortcuts.
Dec 29, 2019 5:39 PM in response to HWTech
I was lucky and able to store my backup somewehre else so I connected my 5 TB harddrive with the Mac and made it ExFAT GUID. The harddrive itself is brand new and working okay on both Windows and Mac this way. Nethertheless I remember «strange» things like going into the next shop and find «special» hardware like harddrives with a MacOS compatible sign attached to. For those who are not too familar with re-formatting/partitioning that thing themself. ^^
Could not mount “Seagate”. (com.apple.DiskManagement.disenter error 49223.) message
Содержание
- Вставленный Вами диск не может быть прочитан на этом компьютере — как действовать в этом случае
- Дисковая утилита для macOS 10.11 и более поздних версий: ошибки и вопросы
- How to Fix com.apple.DiskManagement.disenter Error -119930868
- What is Com.apple.DiskManagement.disenter Error -119930868?
- What Causes Com.apple.DiskManagement.disenter Error -119930868?
- How to Solve com.apple.DiskManagement.disenter Error -119930868
- Fix #1: Change macOS Settings.
- Fix #2: Reset Mac Firmware Settings.
- Fix #3: Repair Disk with Disk Utility.
- Fix #4: Fix Macintosh HD via Terminal.
- Fix #5: Restore from a Time Machine Backup.
Вставленный Вами диск не может быть прочитан на этом компьютере — как действовать в этом случае
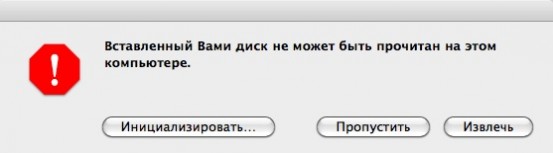
Окно выше — пожалуй, самое неприятное сообщение об ошибке, которое только может увидеть пользователь Mac OS X. Как правило, оно появляется при монтировании флешки или внешнего диска и означает, что носитель приказал долго жить. Но ещё хуже, если вы увидите это сообщение без подключённых флешек. Тогда оно будет означать, что вы лишились одного из жёстких дисков.
Впрочем, в панике восстанавливать информацию из Time Machine (конечно, если у вас есть бэкап) не стоит. У сообщения «Вставленный Вами диск не может быть прочитан на этом компьютере» может быть как минимум две категории причин:
- диск физически неисправен или находится на грани умирания
- диск исправен, но испорчена таблица разделов, поэтому система не может с ним взаимодействовать
В первом случае мало что поможет (разве что специализированные утилиты восстановления данных типа R-Studio). Но во втором случае сдаваться категорически не стоит.
Во-первых, надо проверить, в каком состоянии находится диск. Нажмите в окошке с ошибкой кнопку «Инициализировать», а потом запустите на Маке Дисковую утилиту. Слева посмотрите, как отображается ваш диск:
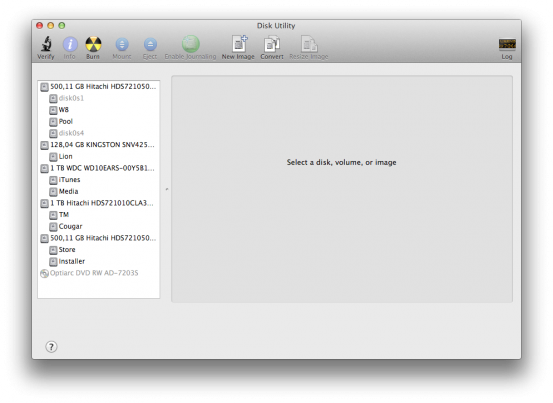
Возможны следующие варианты:
- видно только название раздела, но не видны разделы. Это хуже всего, в этом случае шансов на благополучный исход мало
- видны разделы, но все они показаны серым и не хотят монтироваться при их выборе и нажатии на кнопку «Монтировать» (Mount) на панели инструментов. Это уже лучше
- видны разделы, и некоторые из них монтируются, а некоторые — нет
Второй и третий варианты означают, что испорчена таблица разделов диска. Способов её испортить — масса. Например, это может произойти при неудачном завершении Дисковой утилиты или Ассистента Boot Camp при разбиении диска, изменении разделов, их добавлении и удалении. Ещё одна возможная причина — неудачное отключение питания при загрузке или завершении работы компьютера. Ну а на хакинтошах самая частая причина — неудачные попытки поставить Windows на GPT-диск через утилиту gptsync.
Важно: не нажимайте в Дисковой утилите на кнопку «Исправить диск»! Она может вам так его поправить, что потом не помогут даже специализированные программы!
Что делать? Всё зависит от того, в какой схеме разделов размечен диск. Не путайте разметку диска с файловой системой диска! Файловая система — это способ размещения файлов на разделе диска. А разметка — это способ размещения самих разделов на диске. На Маке чаще всего встречаются:
- разметка GPT (GUID Partition Table) — используется по умолчанию
- разметка MBR (Master Boot Record) — является стандартом на PC-компьютерах, но совместима и с Маком
Разметка GPT хороша тем, что в ней драгоценная информация о состоянии разделов диска прописывается дважды — в начале и в конце диска. Если запись в начале будет повреждена, у вас будет шанс восстановить таблицу разделов с конца диска.
Для этого запустите Терминал и вводите команды:
Затем введите пароль от аккаунта вслепую и нажмите Enter.
Вы увидите список всех дисков компьютера:
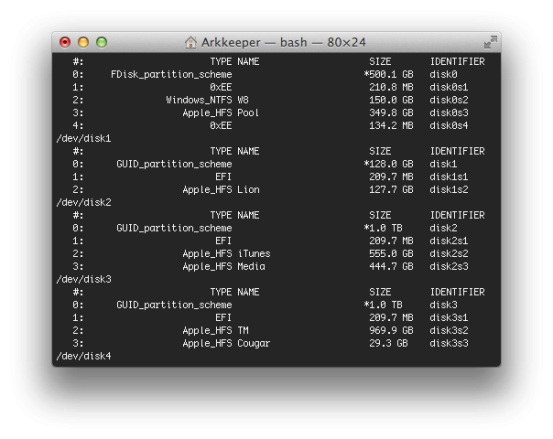
Найдите здесь номер нужного диска (например, disk2). Трижды проверьте, что это именно тот диск, иначе может стать ещё хуже. Если на исправляемом диске есть подключённые разделы, их нужно отключить (тоже через Дисковую утилиту, кнопкой «Размонтировать» / Unmount).
[php]gpt recover disk2[/php]
disk2 замените на верный идентификатор диска. Если вам повезёт, то диск вернётся в работоспособное состояние.
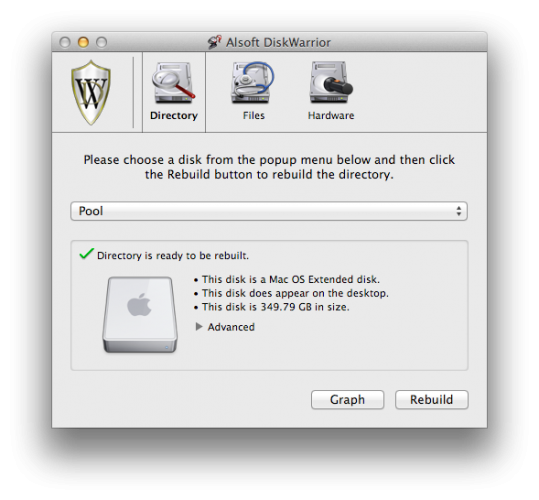
Если восстановление GPT не помогло или если у вас MBR-диск, вся надежда на сторонние инструменты восстановления. Мы бы посоветовали вам воспользоваться DiskWarrior. В списке разделов выберите нужный (если нет названия, опознайте его по размеру), а потом нажмите Rebuild.
И два совета напоследок:
- всегда пользуйтесь Time Machine
- всегда следуйте первому совету
Любому маководу желаем, чтобы описанные в этой статье действия ему никогда не пришлось бы выполнять 😉
Источник
Дисковая утилита для macOS 10.11 и более поздних версий: ошибки и вопросы
В этой статье рассматриваются распространенные вопросы и сообщения об ошибках, связанные с использованием приложения «Дисковая утилита». Данный список сообщений не является исчерпывающим, поэтому вашей ошибки здесь может не быть.
Эта статья предназначена для пользователей следующих версий macOS:
- macOS 10.15 (Catalina);
- macOS 10.14 (Mojave);
- macOS 10.13 (High Sierra);
- macOS 10.12 (Sierra);
- macOS 10.11 (El Capitan).
Не знаете, какая у вас версия? Проверьте.
Примечание. При переформатировании все данные с накопителя удаляются, поэтому нужную информацию следует предварительно скопировать на другой диск.
Если у вас macOS 10.13 (High Sierra) или более поздней версии, обязательно смените режим просмотра в Дисковой утилите. Нажмите «Вид» и выберите вместо стандартного режима «Показывать только тома» опцию Показывать все устройства. В версиях 10.11 и 10.12 эта опция недоступна.

Вашему накопителю в Дисковой утилите будут соответствовать две или три записи. Это зависит от того, как он отформатирован. Запись верхнего уровня (без отступа) обозначает физический накопитель. Как правило, его название содержит слово «Носитель» или Media. Прямо под ней находятся дочерние записи с отступами — они соответствуют томам (разделам).
Это нужно знать на случай, если вам понадобится стереть с накопителя данные. Доступные варианты будут зависеть от того, какую запись вы выберете — для всего накопителя или для отдельного тома. Поэтому при форматировании важно выбирать запись верхнего уровня (без отступа).
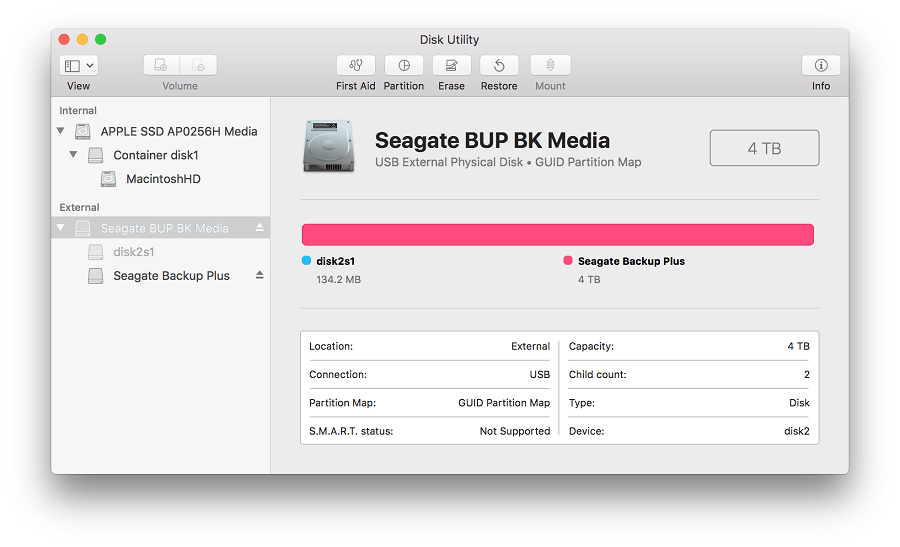
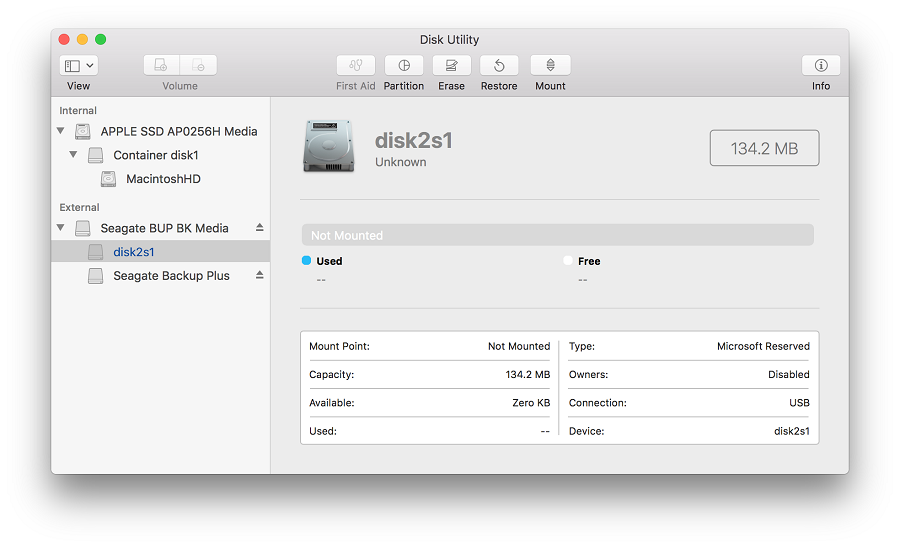
Откуда на накопителе взялся том размером 134,2 МБ?
Он отображается, потому что ваш накопитель настроен для ОС Windows с использованием схемы разделов GUID и файловой системы NTFS. В Дисковой утилите тип этого тома обозначается как Зарезервировано Microsoft. Это нормально для накопителей, отформатированных в NTFS. Технические подробности см. в документации Microsoft. Если вы собираетесь использовать накопитель только с Mac, рекомендуем его переформатировать. Если же вы планируете подключать его и к компьютерам с ОС Windows, ничего делать не нужно.
Почему кнопка «Разбить на разделы» неактивна?
Эта проблема появилась в macOS 10.11 (El Capitan) и свойственна всем более поздним версиям macOS. Кнопка неактивна, потому что на накопителе используется главная загрузочная запись (MBR), которая обычно применяется на дисках емкостью до 3 ТБ. Если навести курсор мыши на кнопку «Разбить на разделы», появится подсказка от Apple с соответствующей информацией.
Чтобы решить проблему, отформатируйте накопитель с использованием схемы разделов GUID. Если накопитель планируется использовать только с компьютерами Mac, выберите специализированный формат для macOS — например, Mac OS Extended (журналируемая) или APFS. Если же вы планируете подключать накопитель и к компьютерам с ОС Windows, задайте формат exFAT.
Если накопитель будет использоваться и с macOS, и с Windows, сделайте резервную копию всех важных данных с него и отформатируйте его в exFAT под macOS. Как отформатировать накопитель в exFAT…
Если вы планируете использовать накопитель только в macOS, отформатируйте его в Mac OS Extended (журналируемая). Этот формат оптимизирован специально для устройств Apple. По-другому он называется HFS+. Как отформатировать накопитель в HFS+…
Ошибка: MediaKit сообщает, что на устройстве недостаточно свободного места
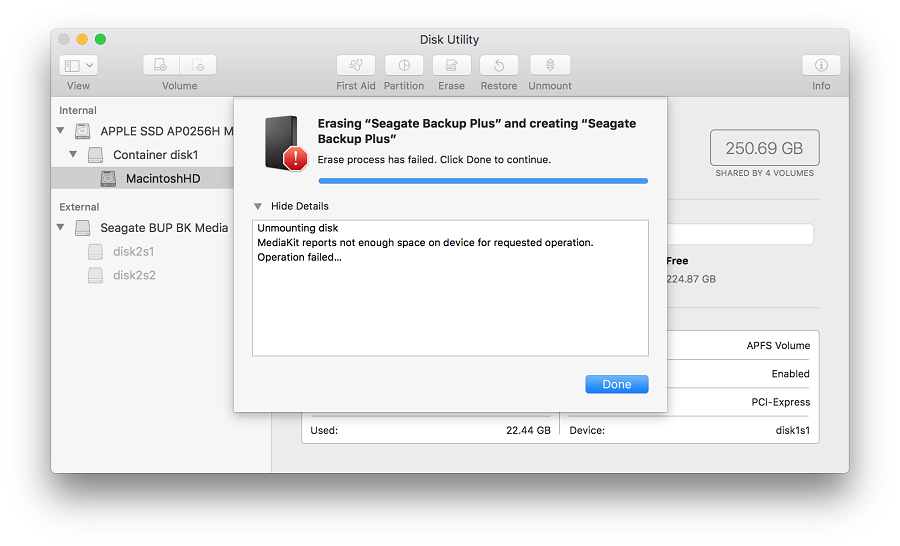
Такая ошибка может возникать при стирании данных и разбиении на разделы. Это происходит, потому что ОС пытается использовать том «Зарезервировано Microsoft» емкостью 134,2 МБ для тома EFI, минимальный размер которого — 200 МБ. Технические подробности см. в документации Apple.
Эту проблему можно решить разными способами, но проще всего отформатировать накопитель с использованием схемы разделов GUID. Тогда Дисковая утилита сможет создать на нем собственные тома. Если этот вариант недоступен, включите режим просмотра Показывать все устройства вверху слева (см. начало этой статьи).
Если накопитель будет использоваться и с macOS, и с Windows, сделайте резервную копию всех важных данных с него и отформатируйте его в exFAT под macOS. Как отформатировать накопитель в exFAT…
Если вы планируете использовать накопитель только в macOS, отформатируйте его в Mac OS Extended (журналируемая). Этот формат оптимизирован специально для устройств Apple. По-другому он называется HFS+. Как отформатировать накопитель в HFS+…
Ошибка: не удалось отключить диск
Такая ошибка может возникать по ряду причин. Это происходит, если накопитель занят — например, когда на нем открыт образ диска. В таком случае извлеките образ и еще раз попробуйте отформатировать диск.
Если вы считаете, что диск не занят никаким процессом, просто запустите форматирование еще раз. Если это не поможет, выделите том и нажмите «Отключить». После этого мешающий процесс должен завершиться.
Если и это не поможет, выключите компьютер, отключите накопитель и перезагрузите компьютер. Когда ОС загрузится, подключите накопитель и вновь попробуйте его отформатировать.
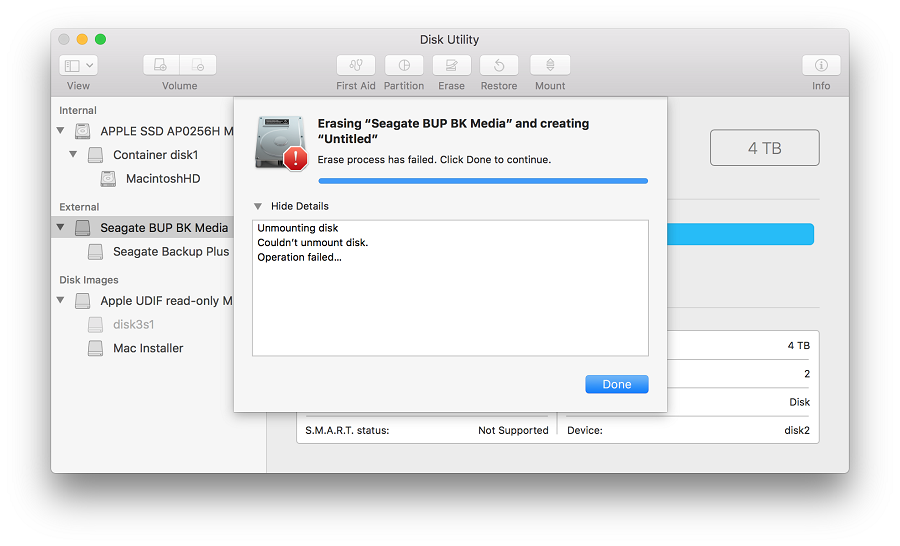
Ошибка: ошибка com.apple.DiskManagement.disenter 49223
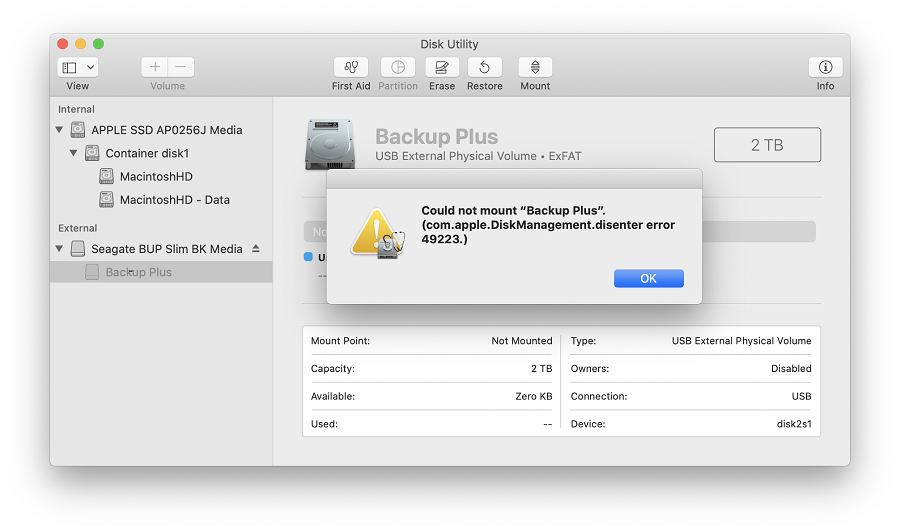
Такая ошибка случается с накопителями, отформатированными в exFAT. Если накопитель используется и с macOS, и с ОС Windows, его нужно форматировать только на компьютере с macOS. Дело в том, что она не поддерживает некоторые размеры кластеров (блоков), создаваемые при форматировании в ОС Windows. Из-за этого накопитель может не подключаться. Это сообщение об ошибке выводится, если попытаться вручную подключить накопитель в Дисковой утилите.
Если накопитель будет использоваться и с macOS, и с Windows, сделайте резервную копию всех важных данных с него и отформатируйте его в exFAT под macOS. Как отформатировать накопитель в exFAT…
Если вы планируете использовать накопитель только в macOS, отформатируйте его в Mac OS Extended (журналируемая). Этот формат оптимизирован специально для устройств Apple. По-другому он называется HFS+. Как отформатировать накопитель в HFS+…
Ошибка: ошибка com.apple.DiskManagement.disenter 49153
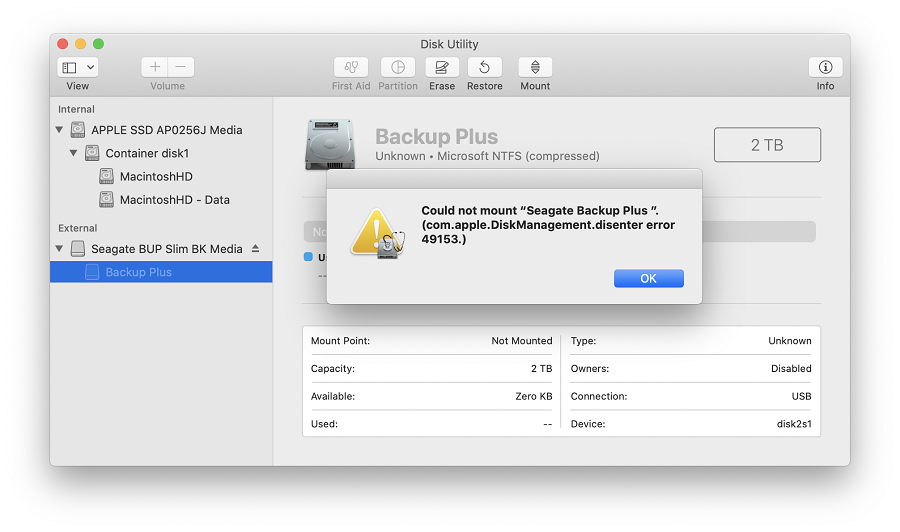
Такая ошибка характерна для внешних жестких дисков и некоторых других накопителей. Она возникает, если диск отформатирован в NTFS и для него используется драйвер Paragon. Обычно причина проблемы заключается именно в драйвере.
Чтобы решить проблему, удалите и заново установите драйвер Paragon. Как удалить драйвер Paragon… Если у вас macOS 10.13 (High Sierra) или более поздней версии, при установке обязательно выберите для расширения ядра опцию «Разрешить». Если кнопка «Разрешить» отсутствует, попробуйте смонтировать накопитель с помощью программного обеспечения Paragon и проверить, не выдается ли сообщение об ошибке. После этого кнопка «Разрешить» может появиться на панели «Защита и безопасность».
ПРИМЕЧАНИЕ. Версия Paragon для дисков Seagate несовместима с накопителями LaCie. Если вы используете полную версию Paragon, удалите и вновь установите ее, следуя инструкциям в Paragon.
Что делать, если решить проблему не удалось?
Если у вас есть доступ к другому компьютеру Mac, попробуйте подключить накопитель к нему и вновь запустить стирание данных.
Если у вас есть возможность воспользоваться другим компьютером с ОС Windows, подключите накопитель к этому компьютеру и отформатируйте его с помощью утилиты diskpart. Как пользоваться diskpart… Затем вновь подключите накопитель к компьютеру Mac и попробуйте стереть данные.
Источник
Download and try Outbyte MacAries right now to see what it can do for your Mac.
Developed for macOS
When your Macintosh HD (disk0s2) cannot be mounted in Disk Utility, it means that there is something wrong somewhere and your Mac won’t turn on. Several Mac users who have upgraded to macOS Big Sur have complained of getting the com.apple.DiskManagement.disenter error -119930868 when mounting their hard drives. Not being able to mount their drives means not being able to access that drive. This poses a huge issue especially for those who decided to install macOS on that drive.
com.apple.DiskManagement.disenter error -119930868 is not a new error because Mac users have also encountered this in earlier versions of macOS. However, the occurrence of this error this time means that it is related to the recent upgrade to macOS Big Sur.
What causes the com.apple.DiskManagement.disenter error -119930868 and how do you successfully mount your drive without getting this error? If you’re wondering about these questions, then read on to find out more.
When you connect an external hard drive on your Mac, it usually shows up on the Desktop, Finder, and Disk Utility. But there are times when the external drive doesn’t appear on any of these places and the data inside the unmounted external hard drive becomes inaccessible. When users encounter this issue, the easiest way to resolve this is by mounting the drive manually. Unfortunately, several users have reported getting the com.apple.DiskManagement.disenter error -119930868 whenever they try to mount the external drive using Disk Utility or the Terminal.
Pro Tip: Scan your Mac for performance issues, junk files, harmful apps, and security threats
that can cause system issues or slow performance.
In some cases, the drive is already mounted but not visible. In other instances, the disk error appears no matter what action the user is trying to perform on the drive — whether it’s formatting, mounting, or erasing.
The complete error message reads:
Could not mount “disk name”.
(com.apple.DiskManagement.disenter error -119930868)
If you can’t mount your hard drive and the com.apple.DiskManagement.disenter error -119930868 appears, it could be due to any of the following reasons:
- File system damage. File system is responsible for how data is organized and stored in a drive. If the file system of the Macintosh HD is corrupted, the master file table will be impacted in a direct manner so the Mac won’t mount the drive.
- Virus attacks. Perhaps, your Mac system or the Macintosh HD is attacked by virus or malware, resulting in data corruption. Then your Mac won’t mount the Macintosh HD, either.
- Catalog file corruption. Catalog files contain the record files of partitioned volumes. So if any catalog file becomes corrupt, the Mac won’t be able to get volume size location, description of volume content and other volume information, let alone mount the drive.
- Disk Utility failures The Macintosh HD not mounted issue may be caused by Disk Utility faults, too.
- System malfunctions. System malfunctions include machine malfunctions and operating system errors. If the Mac operating system crashes, it cannot mount any drive.
Before you proceed with fixing this error, here is a checklist you need to consider when connecting your hard drive:
- Reconnect the USB connector or adapter to fit the hard drive snugly.
- Connect the hard drive to a different USB port or a different Mac.
- Replace the USB cable or adapter in case you suspect it to be damaged.
- Connect to an external power source if the hard drive requires one.
- Check the LED light to ensure the storage device is powered on and working.
- Swap the hard drive with a different case if you presume it to be faulty.
It is also recommended that you run a scan of your computer using a reliable antivirus program to make sure that the error is not being caused by a malware infection.
Once you’ve gone through the checklist and the error still appears, then proceed with the steps below.
Fix #1: Change macOS Settings.
Ensure Finder’s preference to show external disks on Desktop or Finder is enabled. To do this:
- Open Finder from Dock. From the top Menu Bar, go to Finder > Preferences.
- On the Finder Preferences window, click the General tab.
- Under the Show these items on the Desktop section, select the External disks checkbox. Your Desktop will now show the external hard drive icon.
- Click the Sidebar tab. Under the Locations section, select the External disks checkbox. Your Finder sidebar will now show the external hard drive.
You also need to ensure Disk Utility’s View menu has the “Show All Devices” option selected.
- Press Command + Space Bar keys to open Spotlight.
- Type disk utility and hit Return to open Disk Utility.
- Click the View menu located at the top left corner of Disk Utility and select Show All Devices. Your Disk Utility’s sidebar should now show the external hard drive.
Fix #2: Reset Mac Firmware Settings.
To reset NVRAM (Non-volatile RAM) & PRAM (Parameter RAM):
- Restart Mac then immediately press and hold Option + Command + P + R keys until you hear a second chime.
- Reset SMC (System Management Controller) on your Mac by using the instructions below:
- For iMac, Mac Pro/mini, or laptop with a removable battery—detach the power cable or take out the battery then press and hold the Power button for 5 seconds.
- For MacBook Air, MacBook Pro, or MacBook with non-removable battery—press and hold Shift + Control + Option + Power Button for 10 seconds.
Fix #3: Repair Disk with Disk Utility.
If your Mac computer won’t boot, you can boot your Mac into macOS Recovery mode and then repair unmounted Macintosh HD (disk0s2).
Follow these steps to repair unmounted Macintosh with Disk Utility:
- Turn on your Mac by pressing the Power button.
- Press and hold down Command+R keys immediately upon hearing the startup chime. Hold down the keys until you see the Apple logo, a spinning globe or other startup screen. Startup is complete when you see the macOS Utilities window.
- Select Disk Utility and click Continue.
- Select the unmounted Macintosh HD (disk0s2) from the left sidebar of Disk Utility window.
- Click First Aid in the toolbar of the Disk Utility window.
- Click Run to check and repair file system errors.
- Wait until the procedure is completed. If you get a message saying success, restart your Mac and see if your Mac can be booted.
If a message says that the disk utility cannot repair the disk, go to the next solution.
Fix #4: Fix Macintosh HD via Terminal.
If Disk Utility stopped repairing Macintosh HD in macOS, you can then try to fix it with Terminal.
- Boot your Mac into Recovery Mode.
- Click Utilities from the menu bar and select Terminal from the drop-down list.
- Enter diskutil list. This will list out the available volumes.
- Check the volume identifier from the table that appears. (For example disk 2s1)
- Enter diskutil repairVolume/disk 2s1. (Replace disk 2s1 with the volume identifier of your Macintosh HD)
Fix #5: Restore from a Time Machine Backup.
If you have a Time Machine backup, you can restore the backup and fix unmounted Macintosh HD (disk0s2).
- Boot your Mac into macOS Recovery mode.
- Select Disk Utility and click Continue.
- Select Macintosh HD (disk0s2) and click Erase.
- Before erasing, make sure you don’t lose any data.
- Return to macOS Utilities window.
- Select Restore from Time Machine Backup and click Continue.
- Select your Time Machine backup disk as the restore source and then click Continue.
- Select a backup and then click Continue.
- Select the hard disk as the restore destination and then click Restore to continue.
- Restart your Mac computer when the restore is done.
Источник
-
#1
Here’s everything I’ve tried.
1) Since my Samsung T5 SSD is in Ex-fat format and seems to work properly. I backed up 3TB data and then formatted it to ex-Fat and moved the data back. It still doesn’t seem to work.
2) I’ve tried using WD discovery to mount. It just doesn’t work. Not even an error.
3) Tried Removing Password.
4) Tried Using WD Security for the same.
5) Tried mounting using the disk Utilities. Got this.
«Could not mount “My Passport”. (com.apple.DiskManagement.disenter error 49223.)»
6) Tried using commands in one similar thread that removes the fsck(whatever that is. I’m a first-time mac user. Been a windows user for years).
7) Tried mounting directly from the terminal.
Got
«
Volume on disk4s1 failed to mount
«
8)Tried mounting in read-only mode. Still Doesn’t work.
(A week ago, It worked in Readonly. Even when it was in NTFS. But suddenly disappeared.)
Disk checkup says the drive is OK.
And it still works perfectly fine in Windows.
-
#2
Is there some compelling reason you’re formatting everything to exFAT? Are you using the T5 and the WD Passport with a Windows machine in addition to your M1 Air?
Also, WD usually includes their own software on their Passport drives and they’re pre-formatted to NTFS. It’s always best to wipe the drive with your M1 using Disk Utility and then format it to HFS+ or APFS.
What you’ve done (from your post) is confusing and could be why the Passport won’t mount.
-
#3
Never ever, ever use the third party software that comes bundled with the new drive if you intend the drive to go anywhere near a Mac. Apple’s Disk Utility is all you will need.
I have to ask: How did you backup data and then format to ex-fat without erasing the disk? I too am confused.
And please, don’t use all caps. Either in a heading or the body of the message. It’s just rude.
-
#4
Is there some compelling reason you’re formatting everything to exFAT? Are you using the T5 and the WD Passport with a Windows machine in addition to your M1 Air?
Also, WD usually includes their own software on their Passport drives and they’re pre-formatted to NTFS. It’s always best to wipe the drive with your M1 using Disk Utility and then format it to HFS+ or APFS.
What you’ve done (from your post) is confusing and could be why the Passport won’t mount.
I read that ex-Fat is now natively supported by macs.
Yes, I’m using it alongside a windows machine. That is my primary work machine.
WD’s software as I mentioned. Didn’t seem to work..
If I format it to HFS+ or APFS as you said. Will I be able to use it with my PC too??
-
#5
Never ever, ever use the third party software that comes bundled with the new drive if you intend the drive to go anywhere near a Mac. Apple’s Disk Utility is all you will need.
I have to ask: How did you backup data and then format to ex-fat without erasing the disk? I too am confused.
And please, don’t use all caps. Either in a heading or the body of the message. It’s just rude.
I have multiple WD HDDs. I just used WD’s software to back up my drive to another one. And then restored the data later on.
So I did erase the disk.
I apologize for the all-caps heading.
Kindly tell me what should I do now to make this work.
I have a Windows 10 PC.
If that helps..Here are the specs.
(MSI 370 PC PRO MB, 16GB ToughRam 3200MHz, 1Tb Xpg SSD and 1TB WD HDD, Intel i7 8700).
-
#6
I have multiple WD HDDs. I just used WD’s software to back up my drive to another one. And then restored the data later on.
So I did erase the disk.
I apologize for the all-caps heading.
Kindly tell me what should I do now to make this work.
I have a Windows 10 PC.
If that helps..Here are the specs.
(MSI 370 PC PRO MB, 16GB ToughRam 3200MHz, 1Tb Xpg SSD and 1TB WD HDD, Intel i7 8700).
To help you we need more details about the WD drive. How is it partitioned? Are you using some sort of WD utility software on the drive that could be incompatible with your M1 / Big Sur? etc.
As a general point, as @Longkeg suggested you don’t need to use any drive manufacturers utilities to use your drive under MacOS. If anything, such software can cause issues like you’re getting now. A drive is just a drive, and it needs no special utilities etc to work under MacOS. So let us know if you are using any such s/w on the drive.
With that out of the way;
— plug in the WD drive
— press the Command and Space keys together, and start typing ‘disk utility’. Hit return to open the MacOS Disk Utility app.
— in Disk Utility menu, select View | Show All Devices
— can you see your WD Drive in the left hand pane? There should be a section headed ‘Internal’ which is your Macbook internal SSD, and a section headed ‘External’ which should have details of your WD drive in it.
— Click on the topmost entry (ie your WD drive) in the ‘External’ section of the left hand pane to select it. The main right hand pane should now show the partition layout of the WD drive. Make a screen grab of the Disk Utility app and post it here for others to interpret.
If there’s no entry for your WD drive in Disk Utility, then there’s a basic connectivity problem with your drive. Try things like another cable, another port on your Macbook.
-
#7
Kindly tell me what should I do now to make this work.
I wish we could but there are so many variables to this issue since the WD software is involved. Was the disk encrypted? Are you using the same cables when going from PC to Mac? I’m no ex-fat expert but isn’t there a limit on the file size in ex-fat?
Macs can decipher ex-fat disks out of the box but since it can’t boot from an ex-fat volume I wouldn’t say it does it “natively.”
When using Disk Utility on the Mac is “show all disks” checked? Make sure you’re selecting the icon for the whole disk and not just the formatted volume. Now try DU again. Trash the WD software.
Edit: Totally agree with Mick2. We must have been typing our replies at the same time.
Last edited: Apr 6, 2021
-
#8
While using ex-fat is a free solution for cross platform use, it has its limitations. I’ve been using NTFS for Mac by Paragon for years and for $20, it is the most trouble free solution IMHO. Once installed, it is nearly transparent and gives you full R/W access to NTFS drives on your Mac. There is a 10 day free trial period. Give it a try, you won’t be disappointed.
-
#9
Are you using some sort of WD utility software on the drive that could be incompatible with your M1 / Big Sur? etc.
No Such Utility.
With that out of the way;
— plug in the WD drive
— press the Command and Space keys together, and start typing ‘disk utility’. Hit return to open the MacOS Disk Utility app.
— in Disk Utility menu, select View | Show All Devices
— can you see your WD Drive in the left hand pane? There should be a section headed ‘Internal’ which is your Macbook internal SSD, and a section headed ‘External’ which should have details of your WD drive in it.
— Click on the topmost entry (ie your WD drive) in the ‘External’ section of the left hand pane to select it. The main right hand pane should now show the partition layout of the WD drive. Make a screen grab of the Disk Utility app and post it here for others to interpret.
As I’ve mentioned in my original post. The Drive does show up. But I’m unable to mount it. It’s weirdly Grayed out. And clicking the Mount Option gives this error.
-
#10
Was the disk encrypted? Are you using the same cables when going from PC to Mac?
I’m using the same cables. The disk had a password, yes. But I removed it later since I thought that might be what’s causing this.
When using Disk Utility on the Mac is “show all disks” checked? Make sure you’re selecting the icon for the whole disk and not just the formatted volume. Now try DU again. Trash the WD software.
The Disk shows up. It’s just grayed out. I’ve uploaded images in the reply above this.
-
#11
What happens when you click on “View”? Do you get the “Show all disks” option? If so click it. What do you see? Show us.
-
#12
What happens when you click on “View”? Do you get the “Show all disks” option? If so click it. What do you see? Show us.
This Shows Up.
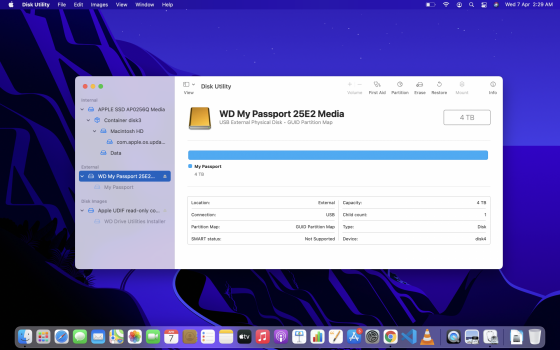
I Clicked info and it had this
Volume type : Physical Device
BSD device node : disk4
Connection : USB
Device tree path : IODeviceTree:/arm-io@10F00000/usb-drd1@2280000/usb-drd1-port-ss@01200000
Writable : No
Is case-sensitive : No
Volume capacity : 40,00,75,25,99,040
Available space (Purgeable + Free) : 0
Purgeable space : 0
Free space : 0
Used space : 40,00,75,25,99,040
Owners enabled : No
Is encrypted : No
Can be verified : No
Can be repaired : No
Bootable : No
Journaled : No
Disk number : 4
Media name : WD My Passport 25E2 Media
Media type : Generic
Ejectable : Yes
Solid state : No
SMART status : Not Supported
-

Screenshot 2021-04-07 at 2.29.13 AM.png
1.5 MB · Views: 121
-
#13
Click on the “My Passport” under the “WD My Passport…” and try to format. What happens?
-
#14
No Such Utility.
As I’ve mentioned in my original post. The Drive does show up. But I’m unable to mount it. It’s weirdly Grayed out. And clicking the Mount Option gives this error.
View attachment 1754518
View attachment 1754519
View attachment 1754520
You’ve not followed the 3rd instruction in my post, namely:
— in Disk Utility menu, select View | Show All Devices
The reason I wrote those steps as I did is you need to get to view the actual partition thats causing the problem, as well as the drive that contains it. And you do this by selecting ‘Show All Devices’.
Once you can see the partition, you can then select it and try to erase it by reformatting. Doesnt matter what format for now — exFat, HFS, APFS will all work for testing purposes. THIS WILL ERASE ALL DATA YOU MAY HAVE ON THIS DRIVE…so back it up before doing this erase if the drive contains data.
This erase will also remove any WD specific utilities / crapware that may be on the drive.
If erasing doesnt work, post what error you’re getting.
Edit: Just seen that @Longkeg has already asked you to do this. He’s right
Last edited: Apr 6, 2021
-
#15
Once you can see the partition, you can then select it and try to erase it by reformatting. Doesnt matter what format for now — exFat, HFS, APFS will all work for testing purposes. THIS WILL ERASE ALL DATA YOU MAY HAVE ON THIS DRIVE…so back it up before doing this erase if the drive contains data.
I tried this. But then I wasn’t able to use the drive on any Windows PC. (Obviously).
So I reformatted it to ex-Fat using a Windows Pc but this time I used the disk allocation size of 1024 bytes instead of the previous 4096. It turns out Macs have a problem working with drives with a cluster size of more than that.
ThankYou all for all the recommendations and Help.
-
#16
Click on the “My Passport” under the “WD My Passport…” and try to format. What happens?
Works like a charm. Thanks.
Transfer speeds are down to about 60MBPS but that’s still workable.